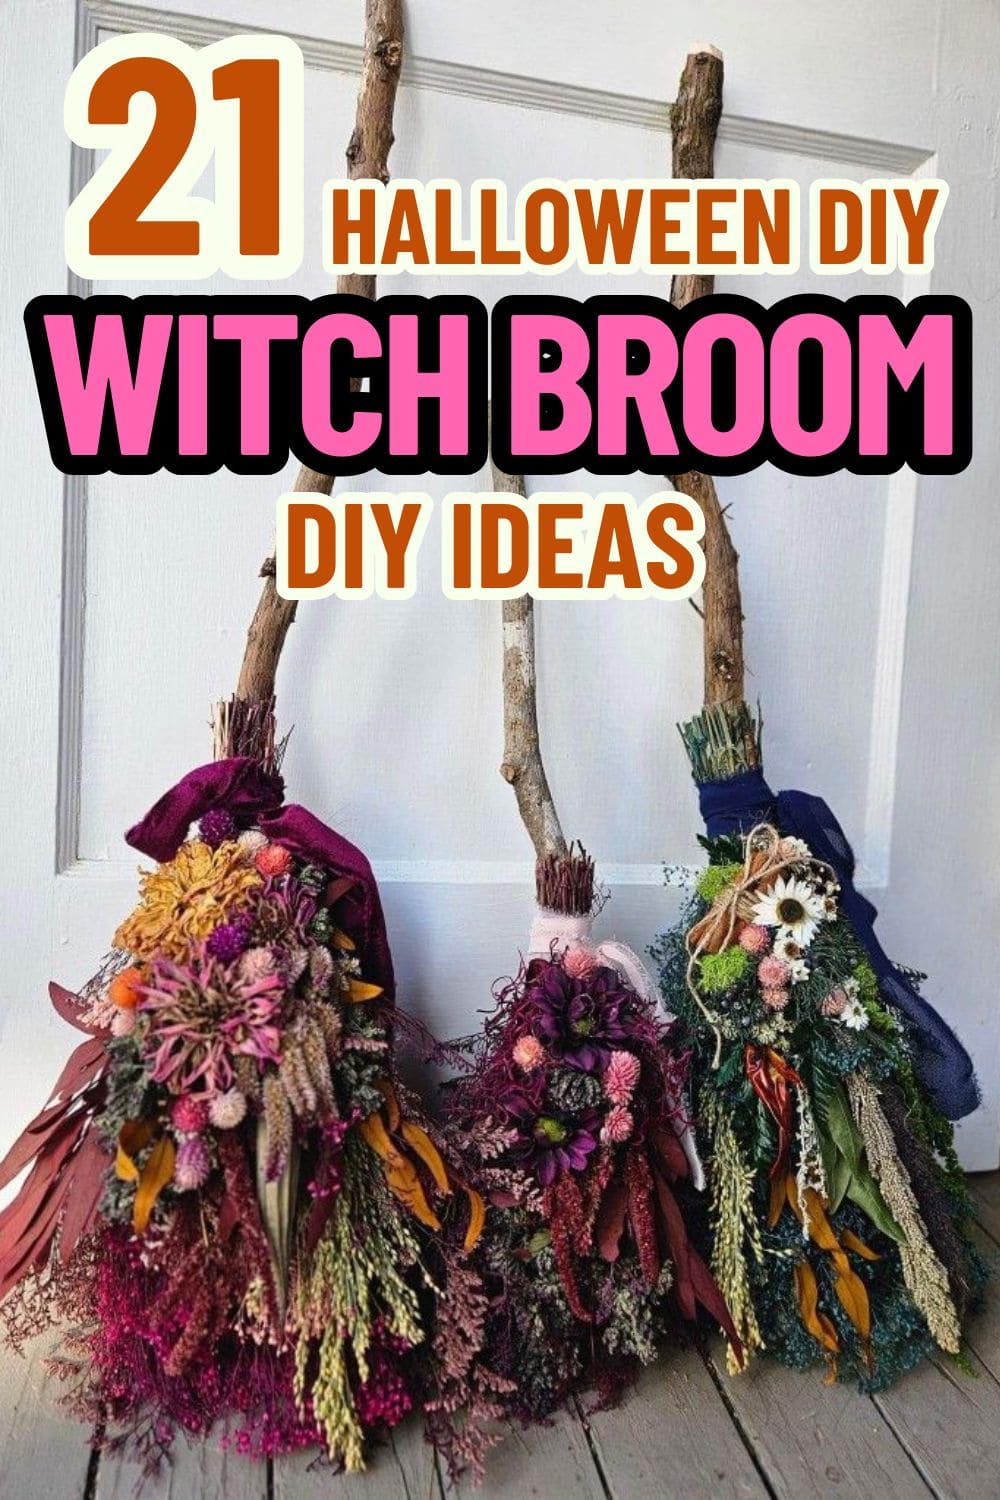
Looking to add a dash of witchy flair to your Halloween decor this year? A DIY witch broom might be just the charm you need.
These magical creations aren’t just for flying through the night sky, they make incredible porch props, party decorations, and spooky statement pieces.
With just a few natural sticks, dried florals, fabric, or even mop heads, you can craft something that feels playful, eerie, or downright enchanting.
This collection of over 20 unique DIY witch broom ideas will inspire you to get creative, embrace your inner spellcaster, and turn simple materials into something wickedly beautiful.
#1. Botanical Witch Brooms Made from Dried Florals

Each of these brooms looks like it was gathered straight from an enchanted meadow at twilight. Their handles are gnarled, rustic sticks, each with its own wild story to tell.
Plus, the bristles are not your ordinary sweepers, but vibrant bouquets of dried flowers, grasses, and seed heads, cascading in layers of burgundy, blush, ochre, and sage.
Placed by your front door or mounted on the wall, they speak of folklore and forest paths, of witches who work with flowers and spells whispered into petals.
Materials Needed
- 3 wooden sticks (approx. 24″-36″, naturally curved)
- Assorted dried florals (strawflowers, millet, statice, amaranth, etc.)
- Velvet or satin ribbon (deep purple, navy, blush – 1.5” wide)
- Floral wire or twine
- Hot glue gun (optional)
Step-by-step Guide
Step 1: Bundle dried florals together by color groupings and fan them out into a lush arrangement.
Step 2: Attach the bundles securely to each stick using floral wire, layering until the broom has a full, cascading shape.
Step 3: Wrap the top of the bouquet with ribbon, tying into a bow or knot depending on your style.
Step 4: Fluff and trim any stray stems for balance, then display where it can be admired up close.
Tip: For a longer-lasting display, you should keep it away from humidity or direct sun to preserve the color of the flowers.
#2. Mini Altar Brooms With Sparkly Witchy Charms
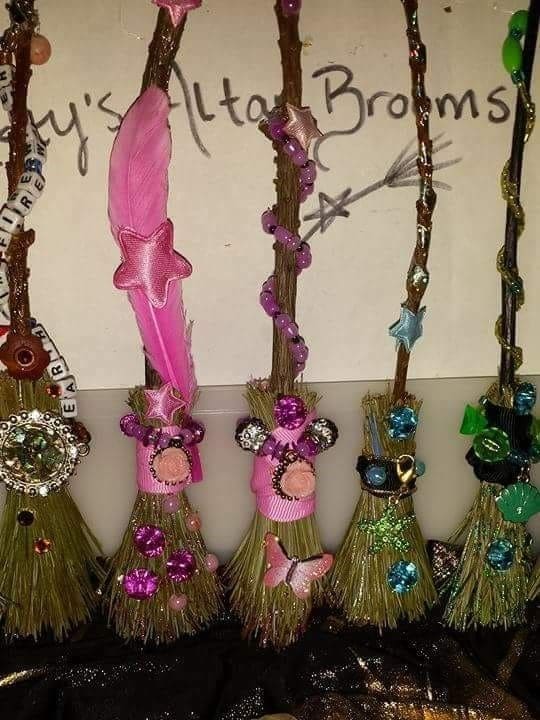
Whimsical and glittering with personality, these mini altar brooms look like something a faerie would stash in her satchel. Each one is uniquely decked out with rhinestones, feathers, tiny beads, and pastel wrappings.
Additionally, some sparkle with stars, others flaunt gemstone buttons or charms that represent the four elements.
Perfect for spiritual decor, spellwork altars, or simply to add a touch of mystical flair to your shelf. They may be tiny, but their detail is magical.
Materials Needed
- Mini broom brushes (approx. 4-6” tall)
- Twigs or skewers
- Colorful thread, yarn, or faux leather cord
- Rhinestones, beads, charms, and feathers
- Hot glue gun or strong craft glue
Step-by-step Guide
Step 1: Attach twigs to mini brooms using glue and wrap the top with cord or fabric for a secure hold.
Step 2: Decorate each broom with chosen beads, stars, feathers, or crystals to match your theme or element.
Step 3: Personalize further with letter beads, symbolic charms, or a touch of glitter for extra sparkle.
Step 4: Let them dry fully, then place them on your altar, hang on the wall, or gift as magical tokens.
#3. Handcrafted Boho Brooms Bursting with Color
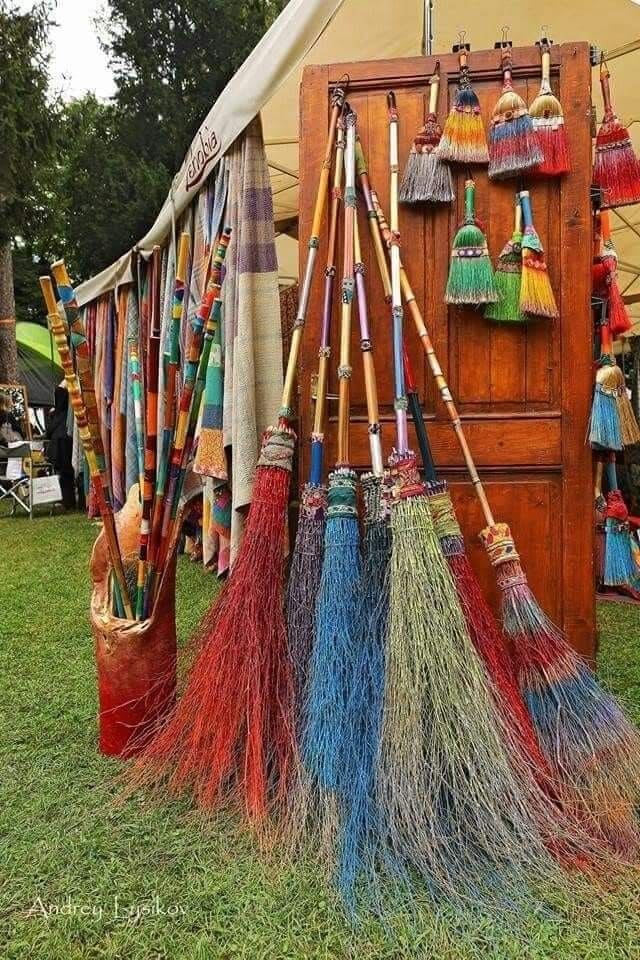 Every one of these brooms is a celebration in itself. Made from natural twigs and bursting with vivid dyes like turquoise, crimson, sunflower yellow, and grass green, they feel like a joyful parade frozen in time.
The broomsticks aren’t an afterthought either; they’re wrapped in vibrant textile bands and painted in patchworks, turning practical tools into functional folk art.
Plus, this is the kind of piece you’d proudly display in a cozy cabin, on a front porch, or even indoors as wall decor.
Materials Needed
- Dried broomcorn or twig bundles (approx. 36” long)
- Wooden sticks or poles (3-4 ft length)
- Fabric strips or yarn
- Bright-colored wood-safe paint or dyes
- Strong twine
- Optional: beads, leather, charms
Step-by-step Guide
Step 1: Paint or wrap the handle with colorful patterns using fabric, thread, or dyes.
Step 2: Dye the broomcorn bristles in separate batches for varied colors and let them dry fully.
Step 3: Attach the broomcorn to the stick using tight twine or wire, layering for fullness and durability.
Step 4: Finally, add decorative touches like beads, ribbons, or charms if desired.
#4. Googly-Eyed Witch Broom Character
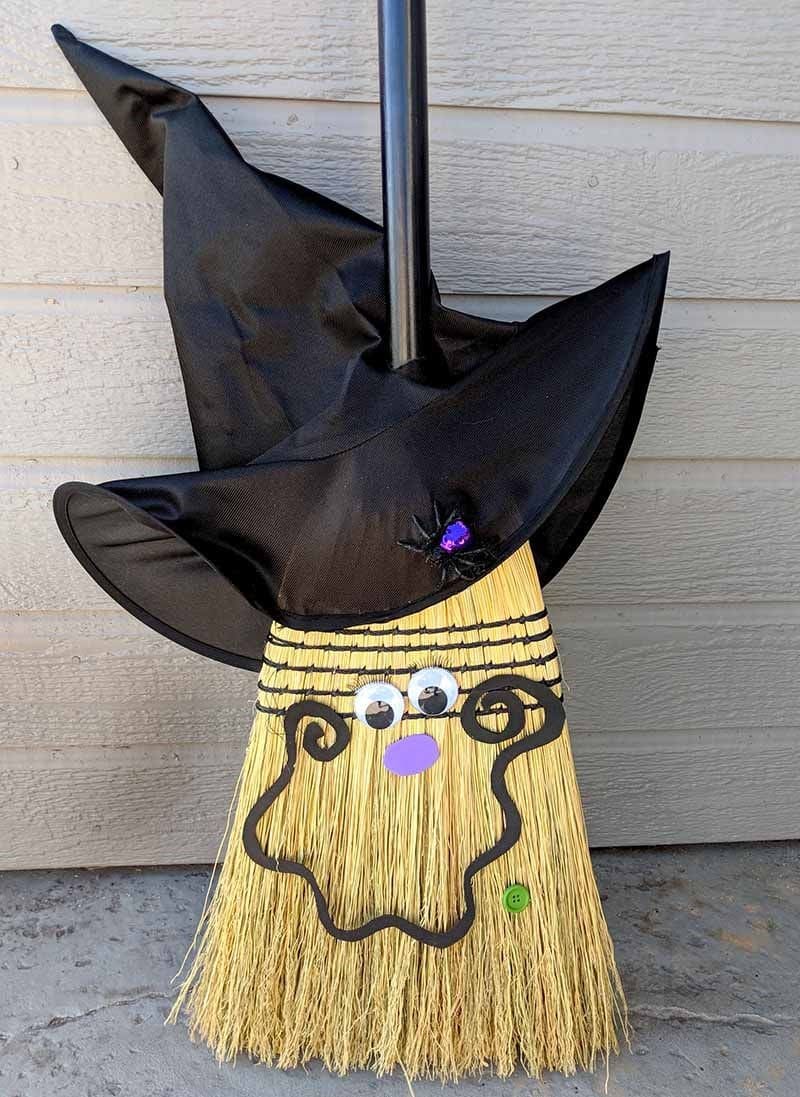
Ever wonder what happens when a broom gets bewitched? This adorable character is proof that even cleaning tools can come to life during Halloween!
With oversized googly eyes, a curly painted mouth, and a purple nose that’s more sweet than spooky, this broom is full of personality.
Also, the wide-brimmed witch hat perched on top adds dramatic flair, and don’t miss the tiny sequin spider tucked into the brim, it’s clearly her mischievous little friend.
Materials Needed
- Straight broom (standard size)
- Large black witch hat
- Googly eyes (1-inch diameter)
- Craft foam
- Black paint or permanent marker
- Glue gun, buttons, small spider embellishment
Step-by-step Guide
Step 1: Draw or paint a whimsical mouth and swirl cheeks on the broom’s bristles using black marker or foam cutouts.
Step 2: Glue on the googly eyes and a colorful nose right in the center of the face.
Step 3: Place the witch hat snugly over the handle and secure it with hot glue if needed.
Step 4: Add final touches like a button, a glittery spider, or any little spooky accessories you like.
#5. Autumn Witch Brooms with Dried Flowers and Citrus
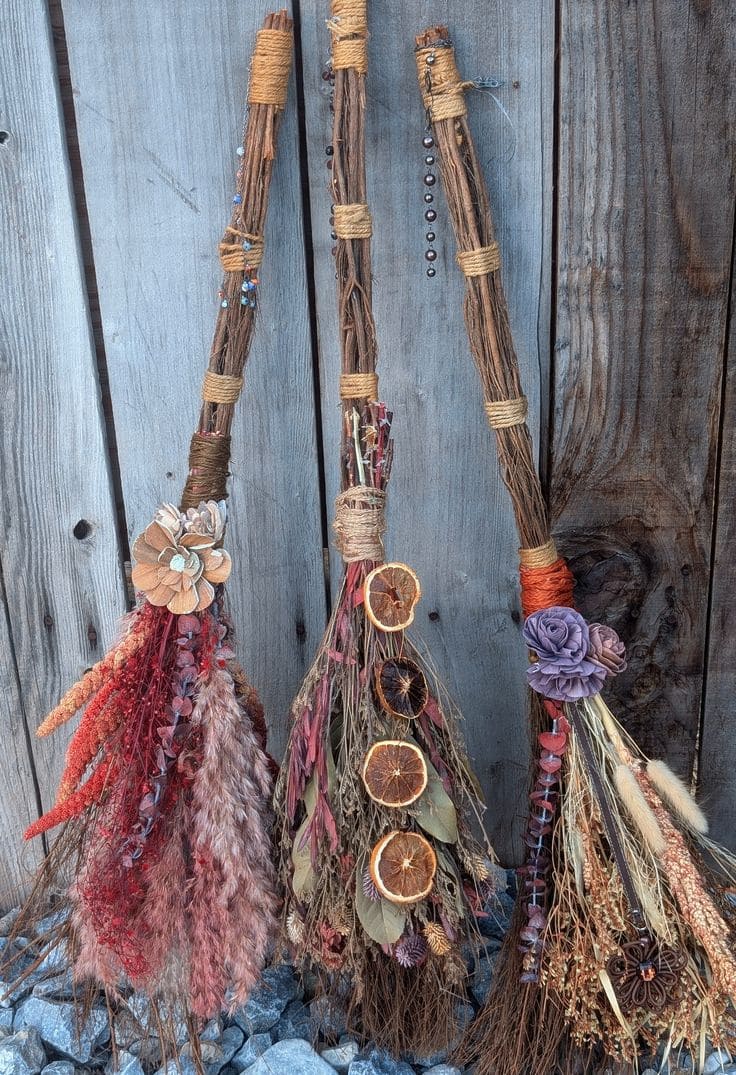
You can see these brooms look like they were gathered straight out of an enchanted forest at dusk.
Woven with grapevine branches, their rustic form becomes a canvas for nature’s treasures like fuzzy pampas plumes, sprigs of dried wildflowers, curled eucalyptus leaves, and even wheels of sun-dried oranges.
Some are adorned with handmade paper blooms or strands of wooden beads, giving off a warmth that feels like candlelight.
You can set one near your doorway or fireplace and let it whisper stories of harvests, hearths, and ancient magic. This craft honors nature’s quieter beauty.
Materials Needed
- Grapevine branches (3-4 ft long)
- Dried florals: pampas grass, eucalyptus, wheat stalks, wildflowers
- Dried orange slices (approx. 6-8 pieces per broom)
- Twine, jute, or raffia (1-2 yards)
- Hot glue gun and floral wire
- Optional: paper or fabric flowers, beads, charms
Step-by-step Guide
Step 1: Bundle together grapevine or twig branches for the broom base and secure tightly with twine.
Step 2: Tuck in dried florals, starting with the largest pieces and layering in texture and color.
Step 3: Glue or wire in dried orange slices and accents like beads or handmade flowers.
Step 4: Finally, wrap the handle area with rustic twine or raffia for added charm and support.
#6. Twinkle Light Witch Broom for a Magical Hearth Accent
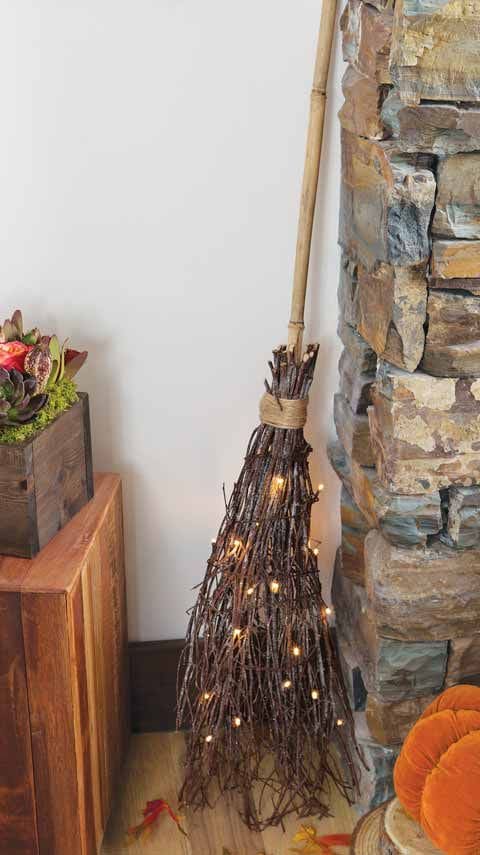
Perfect for adding a gentle flicker to your fireplace corner or entryway, this rustic creation is wrapped with tiny string lights that twinkle like fireflies on an autumn night.
Specially, the mix of natural twigs and warm LEDs creates an inviting contrast between forest texture and soft sparkle.
You can also pair it with pumpkins, a wooden crate, or a succulent arrangement for a scene that feels both earthy and magical. It’s subtle, charming, and oh so easy to fall in love with.
Materials Needed
- 1 wooden broomstick or thick branch (approx. 36″)
- 20-30 small dry twigs (12-18″ each)
- Warm white LED fairy lights (battery-operated, 6 ft)
- Jute rope or twine (2-3 ft)
- Hot glue or floral wire
Step-by-step Guide
Step 1: Bundle the twigs together tightly and attach them securely to the broomstick using jute rope or wire.
Step 2: Wrap the LED fairy lights gently around the twig section, tucking the battery pack out of sight behind the broom.
Step 3: Now, you just add glue to secure any loose twigs or light wires, and turn it on to enjoy the cozy ambiance.
#7. Color-Pop Witch Brooms for a Kid-Friendly Halloween Corner
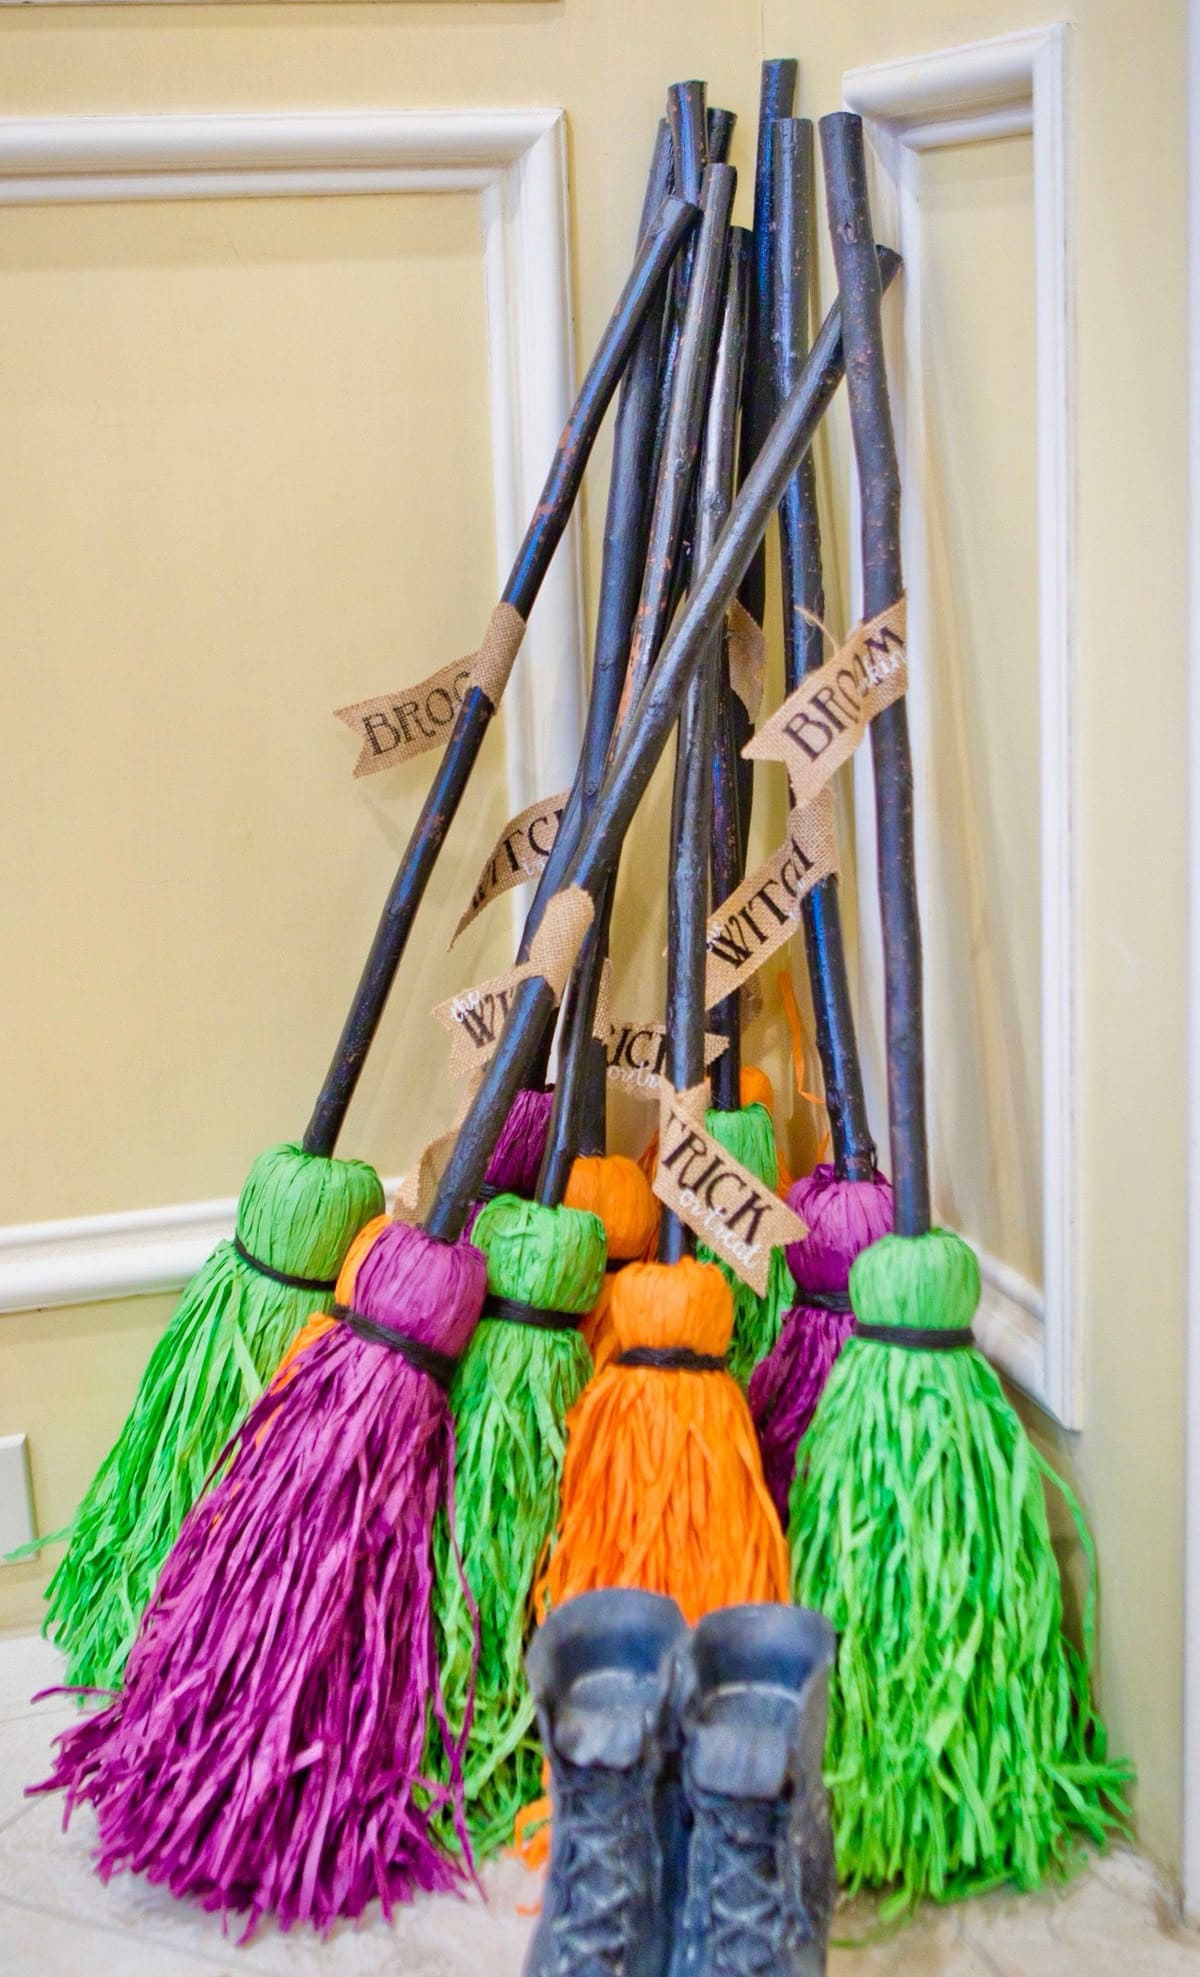
Who says spooky can’t be fun? These bright, candy-colored witch brooms add a splash of joyful chaos to any Halloween setup.
You lean them by your entryway or prop them in a corner, either way, they’ll spark smiles and curiosity. With vibrant green, orange, and purple paper bristles and dark painted handles, these playful props are perfect for kid zones, classrooms, or whimsical parties.
Materials Needed
- 6-8 wooden sticks (approx. 32″ long, 1″ thick)
- Colored raffia or crinkle-cut paper in green, purple, and orange (2-3 oz per broom)
- Black acrylic paint (4 oz)
- Burlap ribbon (2” wide, 2-3 ft)
- Black ribbon or twine (1 yard per broom)
- Hot glue gun & scissors
Step-by-step Guide
Step 1: Paint each stick with black acrylic paint and let dry completely.
Step 2: Bundle your raffia or paper tightly at one end of the stick, then wrap with black ribbon and secure with hot glue.
Step 3: Cut small triangles from the burlap ribbon and write fun words using a black marker. Then glue or tie them to the handles.
Step 4: Arrange them together leaning against a wall with added accessories for more flair.
Tip: If you’re crafting with kids, use washable glue and let them pick their own broom color for extra Halloween magic.
#8. Wall-Hanging Witch Broom Collection for a Magical Entryway
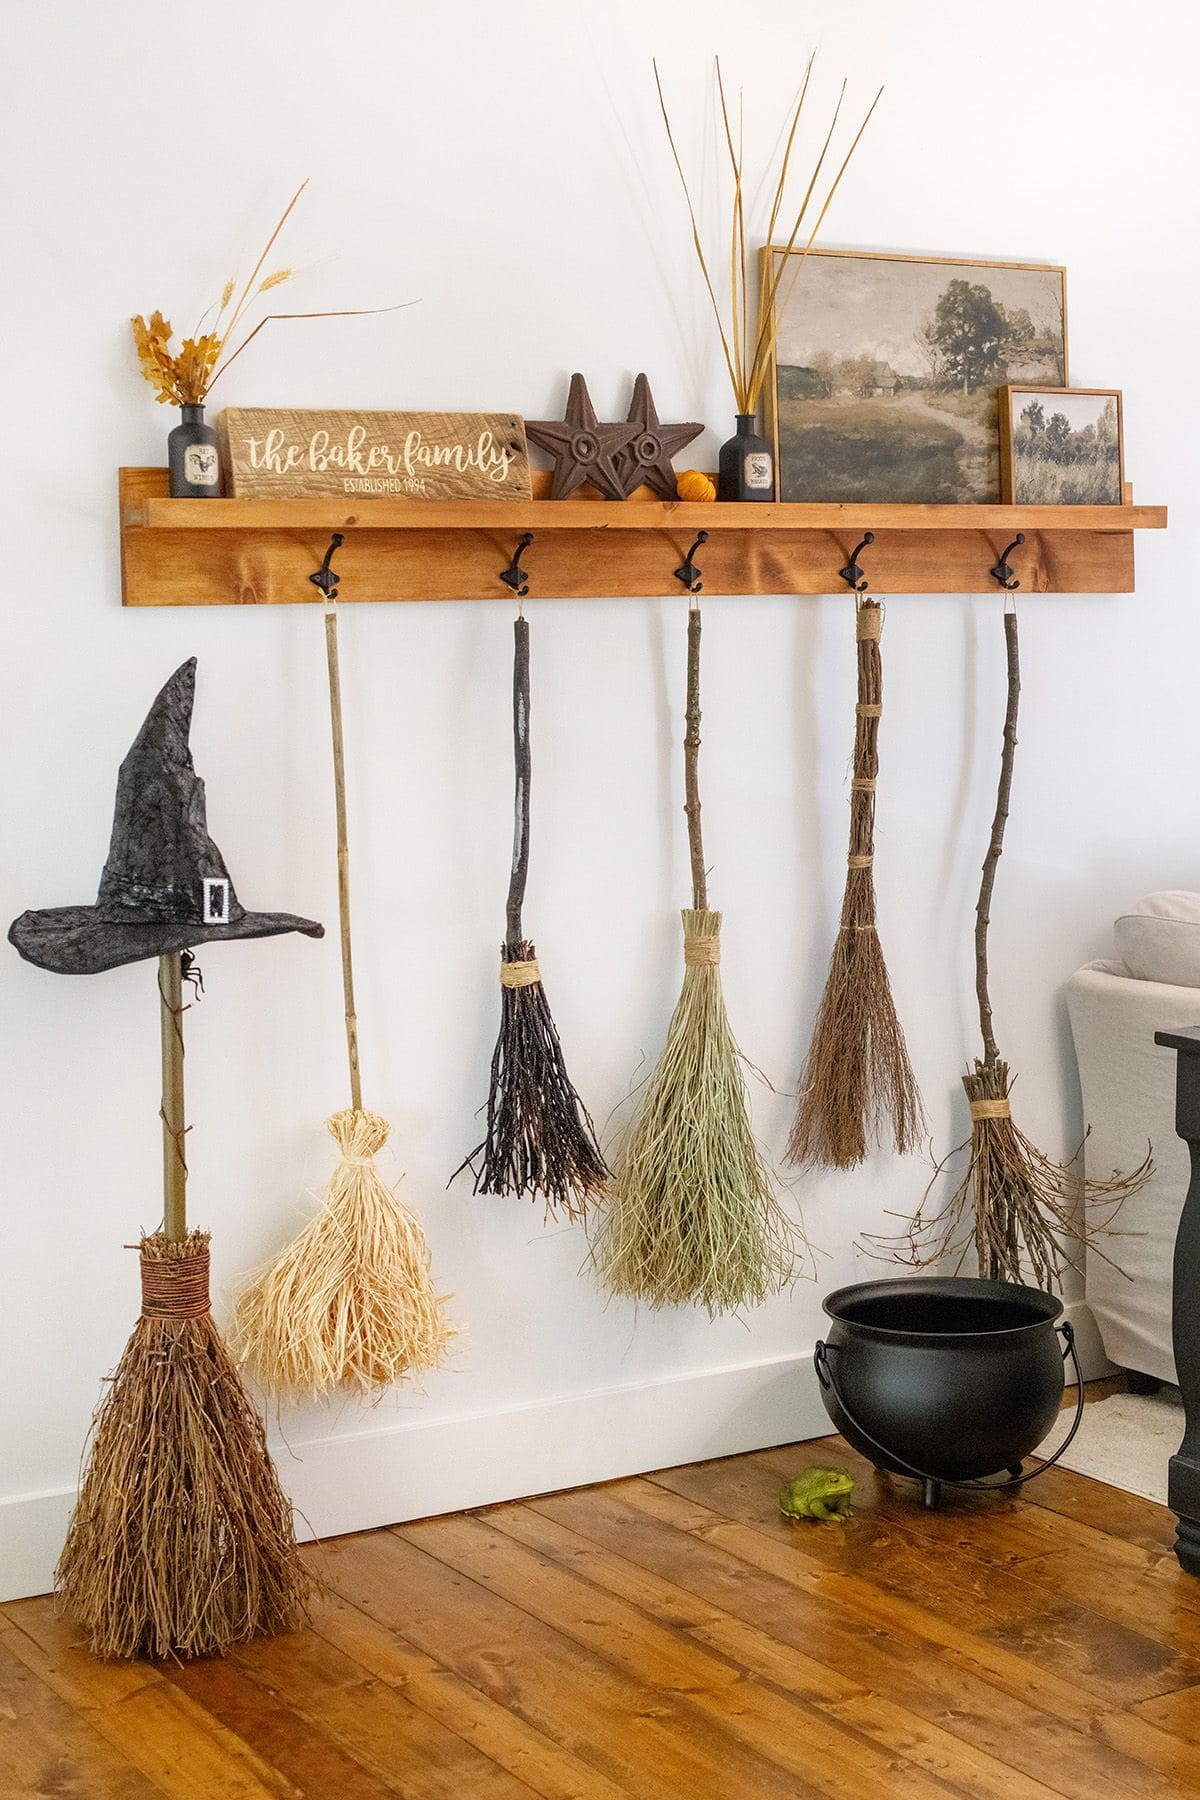
If you’ve ever wanted to charm your entryway with a whisper of Halloween whimsy, this display nails it. Each broom, handmade with rustic branches and natural fibers, feels like it holds its own story.
Hanging them in a tidy row beneath a wooden shelf gives the look of an enchanted mudroom, where every witch parks her ride.
Paired with artwork, potion bottles, and a lone cauldron, this setup feels straight out of a friendly witch’s cottage. It’s simple, seasonal, and full of character you can craft in an afternoon.
Materials Needed
- 5-6 wooden sticks (approx. 30-36″ long, 1″ thick)
- Natural broom bristles: straw, twigs, or raffia (6-8 oz per broom)
- Jute twine or hemp rope (approx. 40″ per broom)
- Wall-mounted wooden rack with hooks (approx. 36-48” long)
- Optional: witch hat, vintage art, cauldron, faux frog
Step-by-step Guide
Step 1: Tie your chosen bristles tightly around each broom handle using twine. Then adjust and trim to balance the look.
Step 2: Attach a loop of twine or fishing line to the top of each handle for hanging purposes.
Step 3: Mount the wooden rack securely to your wall, then space your brooms across the hooks.
Step 4: Add decorative accents like a floppy witch hat, fall stems, and small art to elevate the mood.
#9. Broom Parking Station for Witches Only
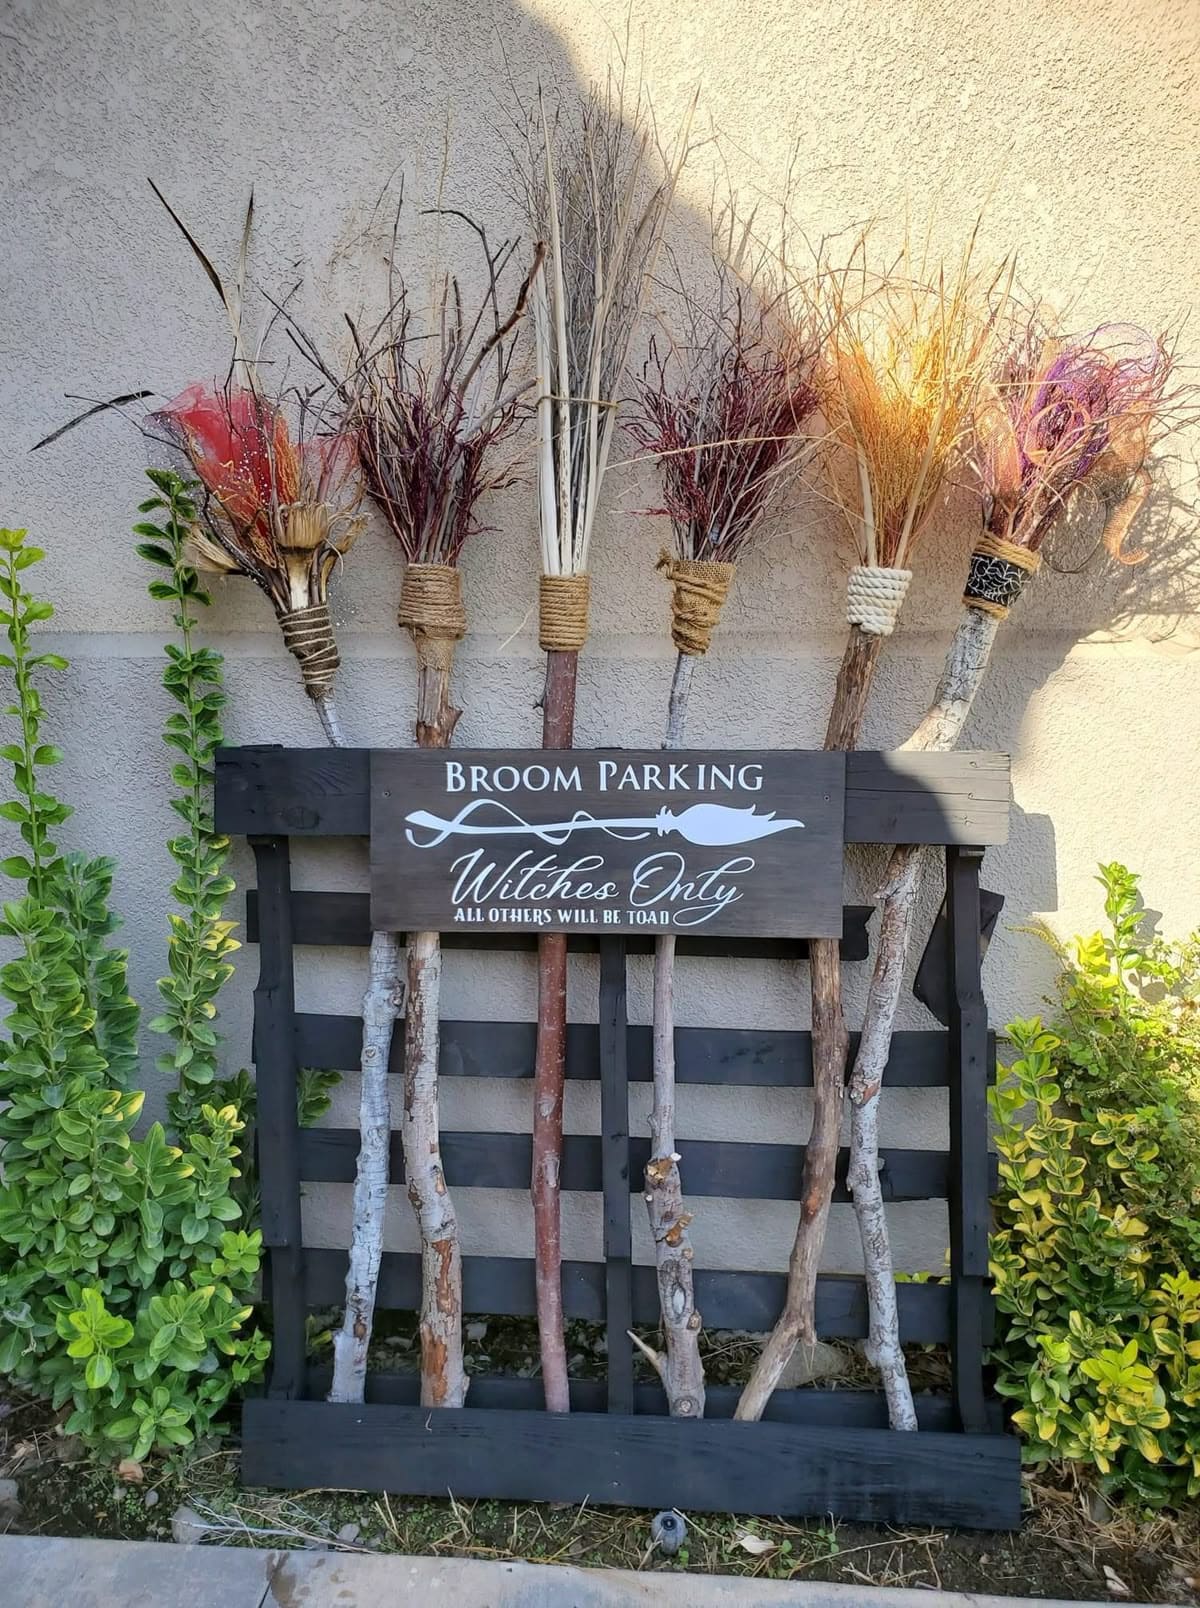
Who says witches can’t have a sense of humor and style? This outdoor broom parking station is both spooky and smart, a playful nod to Halloween that turns simple branches and dried grass into a functional art piece.
Each broom is uniquely crafted, from wispy birch and bundled corn stalks to tufts of vibrant straw dyed in sunset tones. T
he “Witches Only” sign sets the tone with just the right touch of sass. Perfect for porches or front yard displays, it adds character, laughs, and seasonal charm that neighbors won’t forget.
Materials Needed
- 6-8 sturdy sticks (36-40” long)
- Dried grasses, colorful raffia, or faux Halloween stems
- Twine, jute rope, or thick string
- Black wooden pallet or crate as stand
- Decorative signboard (vinyl lettering or stencil)
Step-by-step Guide
Step 1: Gather or purchase broom handles (branches or sticks) and attach bunches of raffia, straw, or dried floral stems using hot glue and twine wrapping.
Step 2: Prepare a wooden pallet by painting it black and attaching a hand-lettered or stenciled sign that reads “Broom Parking – Witches Only.”
Step 3: Stand the pallet securely against a wall or fence, then slide the broomsticks into the slats or secure with brackets if needed.
Step 4: Optional: You can add lights, cobwebs, or faux crows to enhance the witchy vibe.
See also: 20 Magical Witch-Inspired Crafts to Enchant Your Next Project
#10. Herbal Mini Witch Brooms with Eucalyptus and Lavender
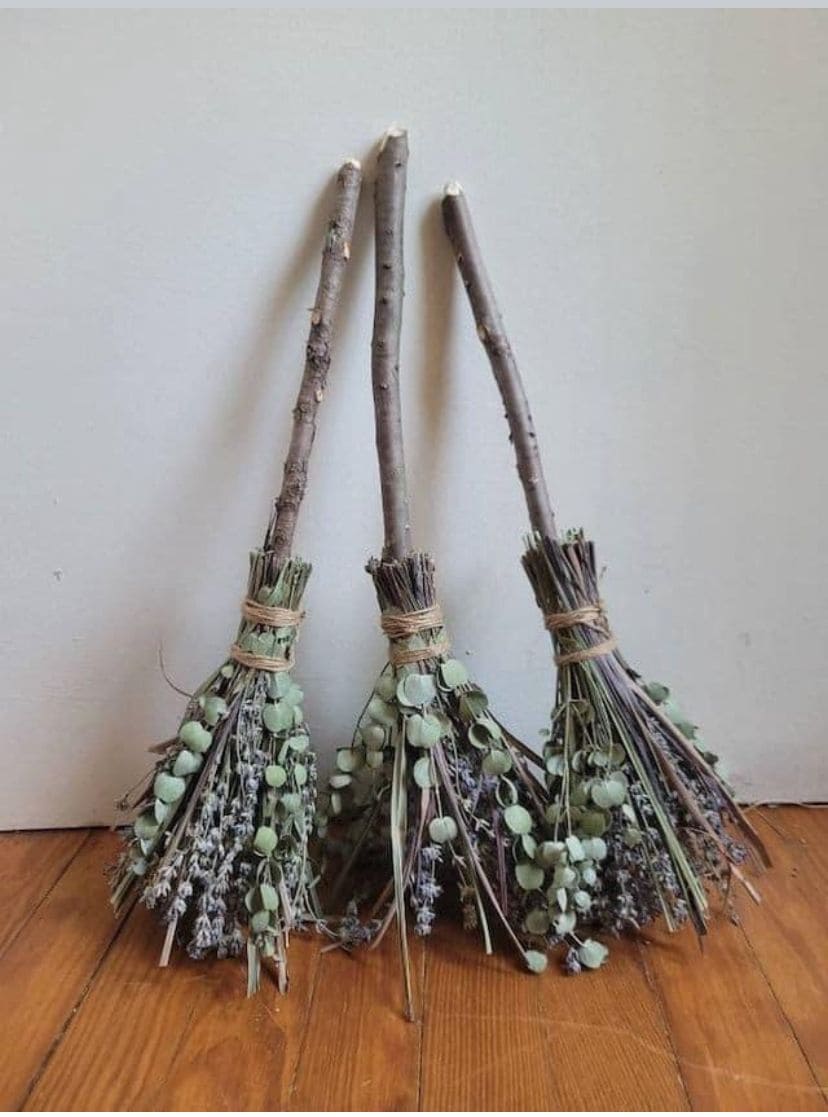
Instead of straw or raffia, you’re bundling fresh eucalyptus, dried lavender, and soft twigs to create something that’s both magical and healing. Their subtle scent fills the air with comfort and clarity, like a whisper from the woods.
You hang them by a window, place one by your entryway, or tuck one onto a shelf, each one radiates a quiet kind of power.
Best of all, this is a lovely project for herbalists or nature lovers who prefer natural textures and botanical beauty over bold spookiness.
Materials Needed
- 3 small sticks or branches (each 12-14″ long, approx. 0.75″ thick)
- Dried eucalyptus stems (approx. 8-10 per broom)
- Dried lavender bundles (approx. 10 stems per broom)
- Natural twine or raffia cord (24″ per broom)
- Scissors or garden snips
Step-by-step Guide
Step 1: Trim the lavender and eucalyptus to even lengths, about 8–10 inches long.
Step 2: Create a small bundle by layering lavender and eucalyptus together in a fan shape.
Step 3: Place your bundle against the base of the stick and wrap the twine tightly around it several times, tying off with a secure knot.
Step 4: Trim any loose stems or twine, and fluff the base to give it fullness.
Step 5: Finally, set them out to dry fully if the herbs are still fresh. Once dry, enjoy their scent and soft look all season long.
#11. Halloween Tulle Brooms Wrapped in Ribbon and Spider Accents
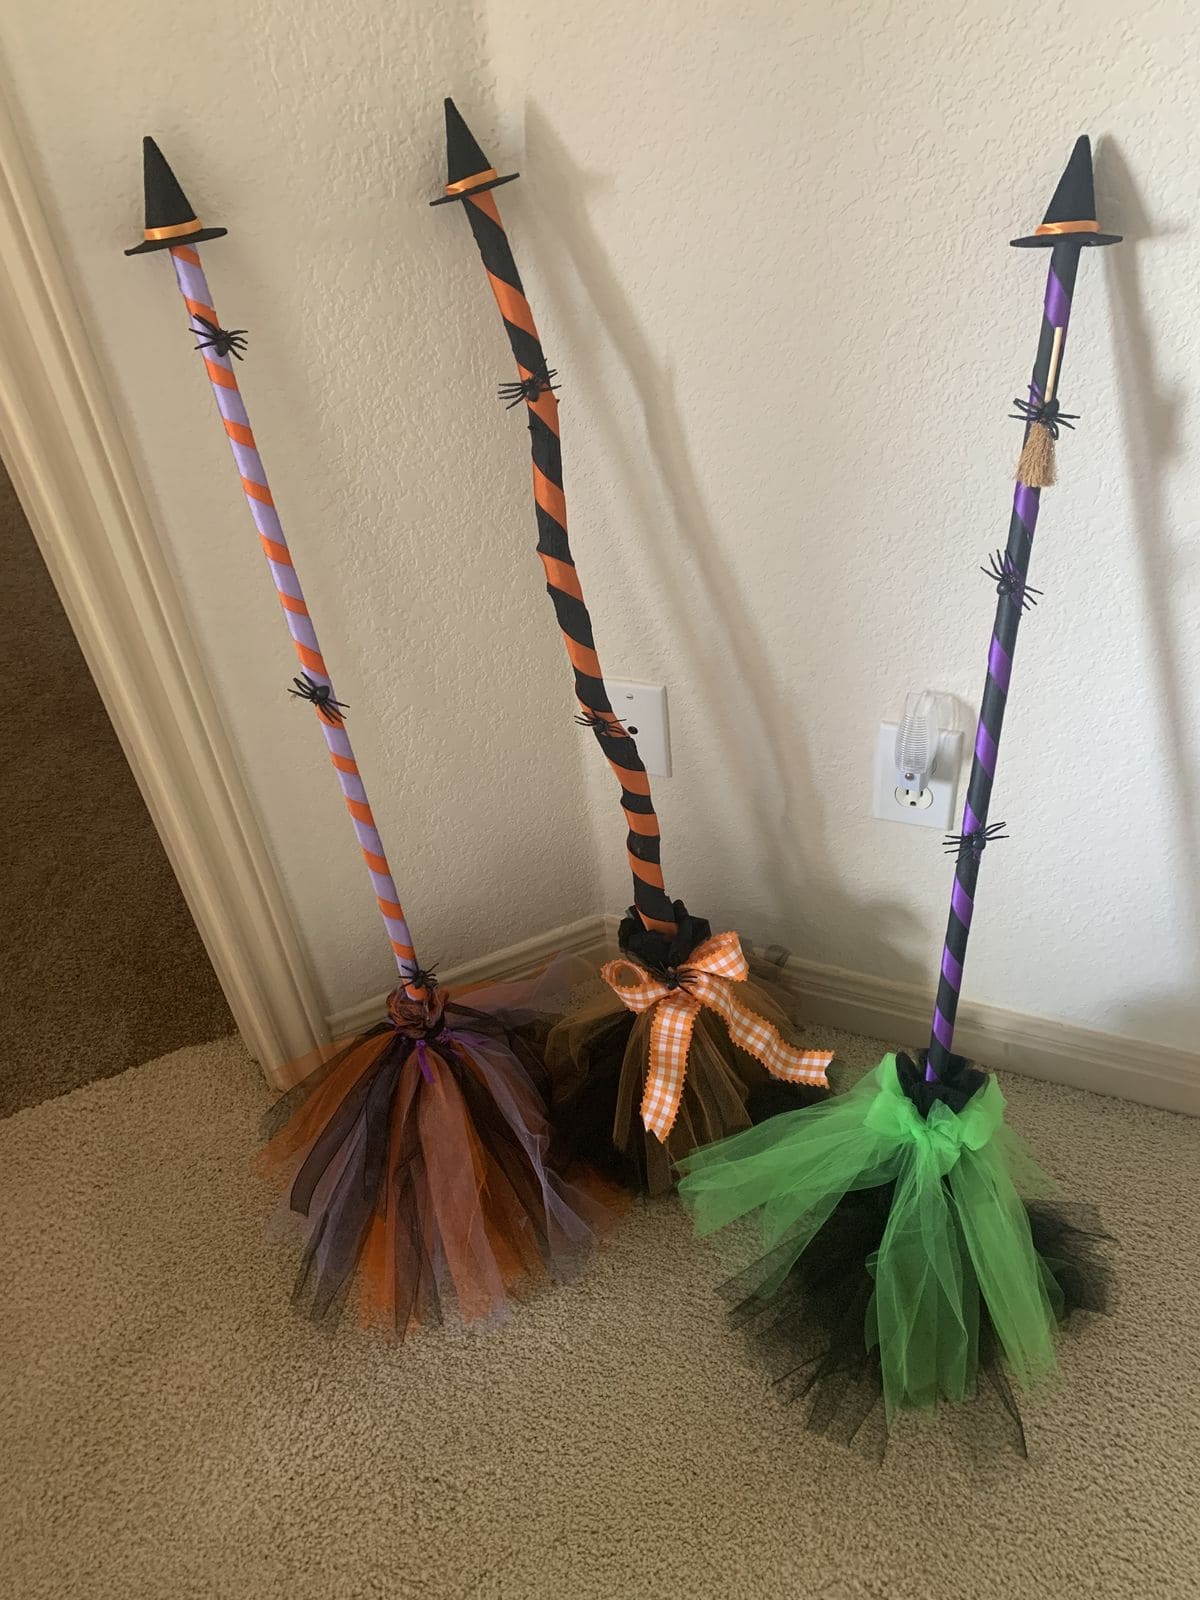
Interestingly, these Halloween brooms are bursting with personality, thanks to bold swirls of ribbon, fluffy layers of tulle, and mini spider embellishments.
Each handle is wrapped in diagonal stripes, classic black and orange, or fun purple and pink and finished with a witch hat topper that gives them extra flair.
The tulle bristles create a soft, whimsical texture that makes these brooms ideal for indoor decor or photo booth props. Line them up in a hallway or near your front door to greet guests with festive flair.
Materials Needed
- Wooden dowels or PVC pipes (3-4 ft long)
- Colored ribbons (1″ wide, about 3-4 ft per broom)
- Tulle in Halloween colors (about 3 yards per broom)
- Mini witch hats (felt or craft foam, approx. 5″)
- Plastic spiders and hot glue
- Optional: decorative bows or glitter ribbon
Step-by-step Guide
Step 1: Wrap each broomstick with colorful ribbon, securing both ends with glue or tape.
Step 2: Cut tulle into long strips and tie them around the base of the stick to create a full, tutu-like bristle.
Step 3: Top each broom with a mini witch hat and decorate the handle with plastic spiders or bows for added fun.
#12. Witch Hat Mop Brooms with Glittery Spiders
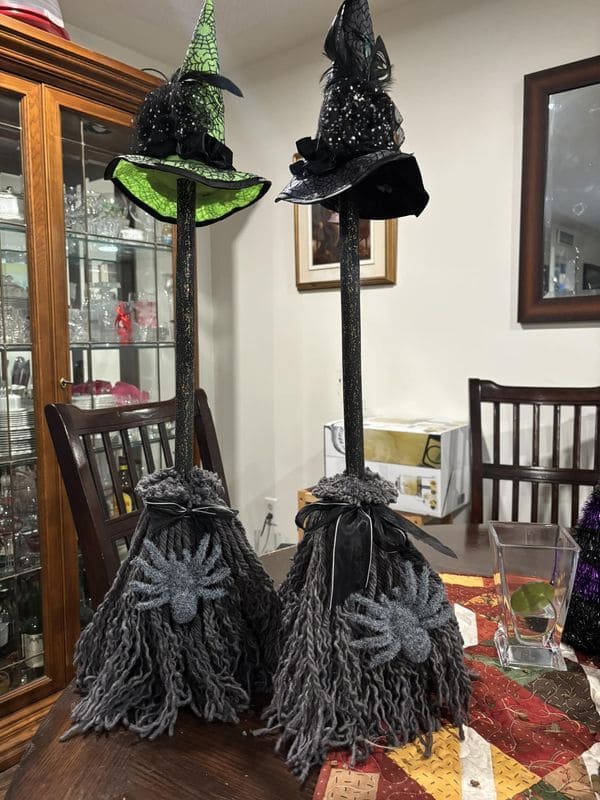
These fabulous mop brooms look like your favorite sassy witches turned themselves into décor for the season! Topped with bold statement hats, they’re all dressed up for Halloween mischief.
Bonus, the broom bristles are made from chunky gray yarn, giving them a cozy texture, while sparkly spiders sit front and center like spooky brooches.
You display them in your entryway, dining nook, or even the kitchen to add personality and whimsy that guests won’t forget.
Materials Needed
- Wooden sticks or dowels (approx. 2.5 ft)
- Gray yarn (1-2 skeins)
- Witch hats (2 medium-size, fabric or foam)
- Black ribbon (1 yard per broom)
- 2 glittery spider ornaments
- Glue gun, scissors
Step-by-step Guide
Step 1: Wrap gray yarn around your hand 25-30 times, then slide off and tie at one end. You need to repeat to create a full skirt of “bristles.”
Step 2: Hot glue yarn bundles around the base of the stick, layering to create fullness.
Step 3: Add the witch hat on top of the stick and secure with glue if needed.
Step 4: Finish by tying a black ribbon bow at the neck and attaching a sparkly spider to the yarn front.
#13. Glowing Witch Broom with Rustic Charm
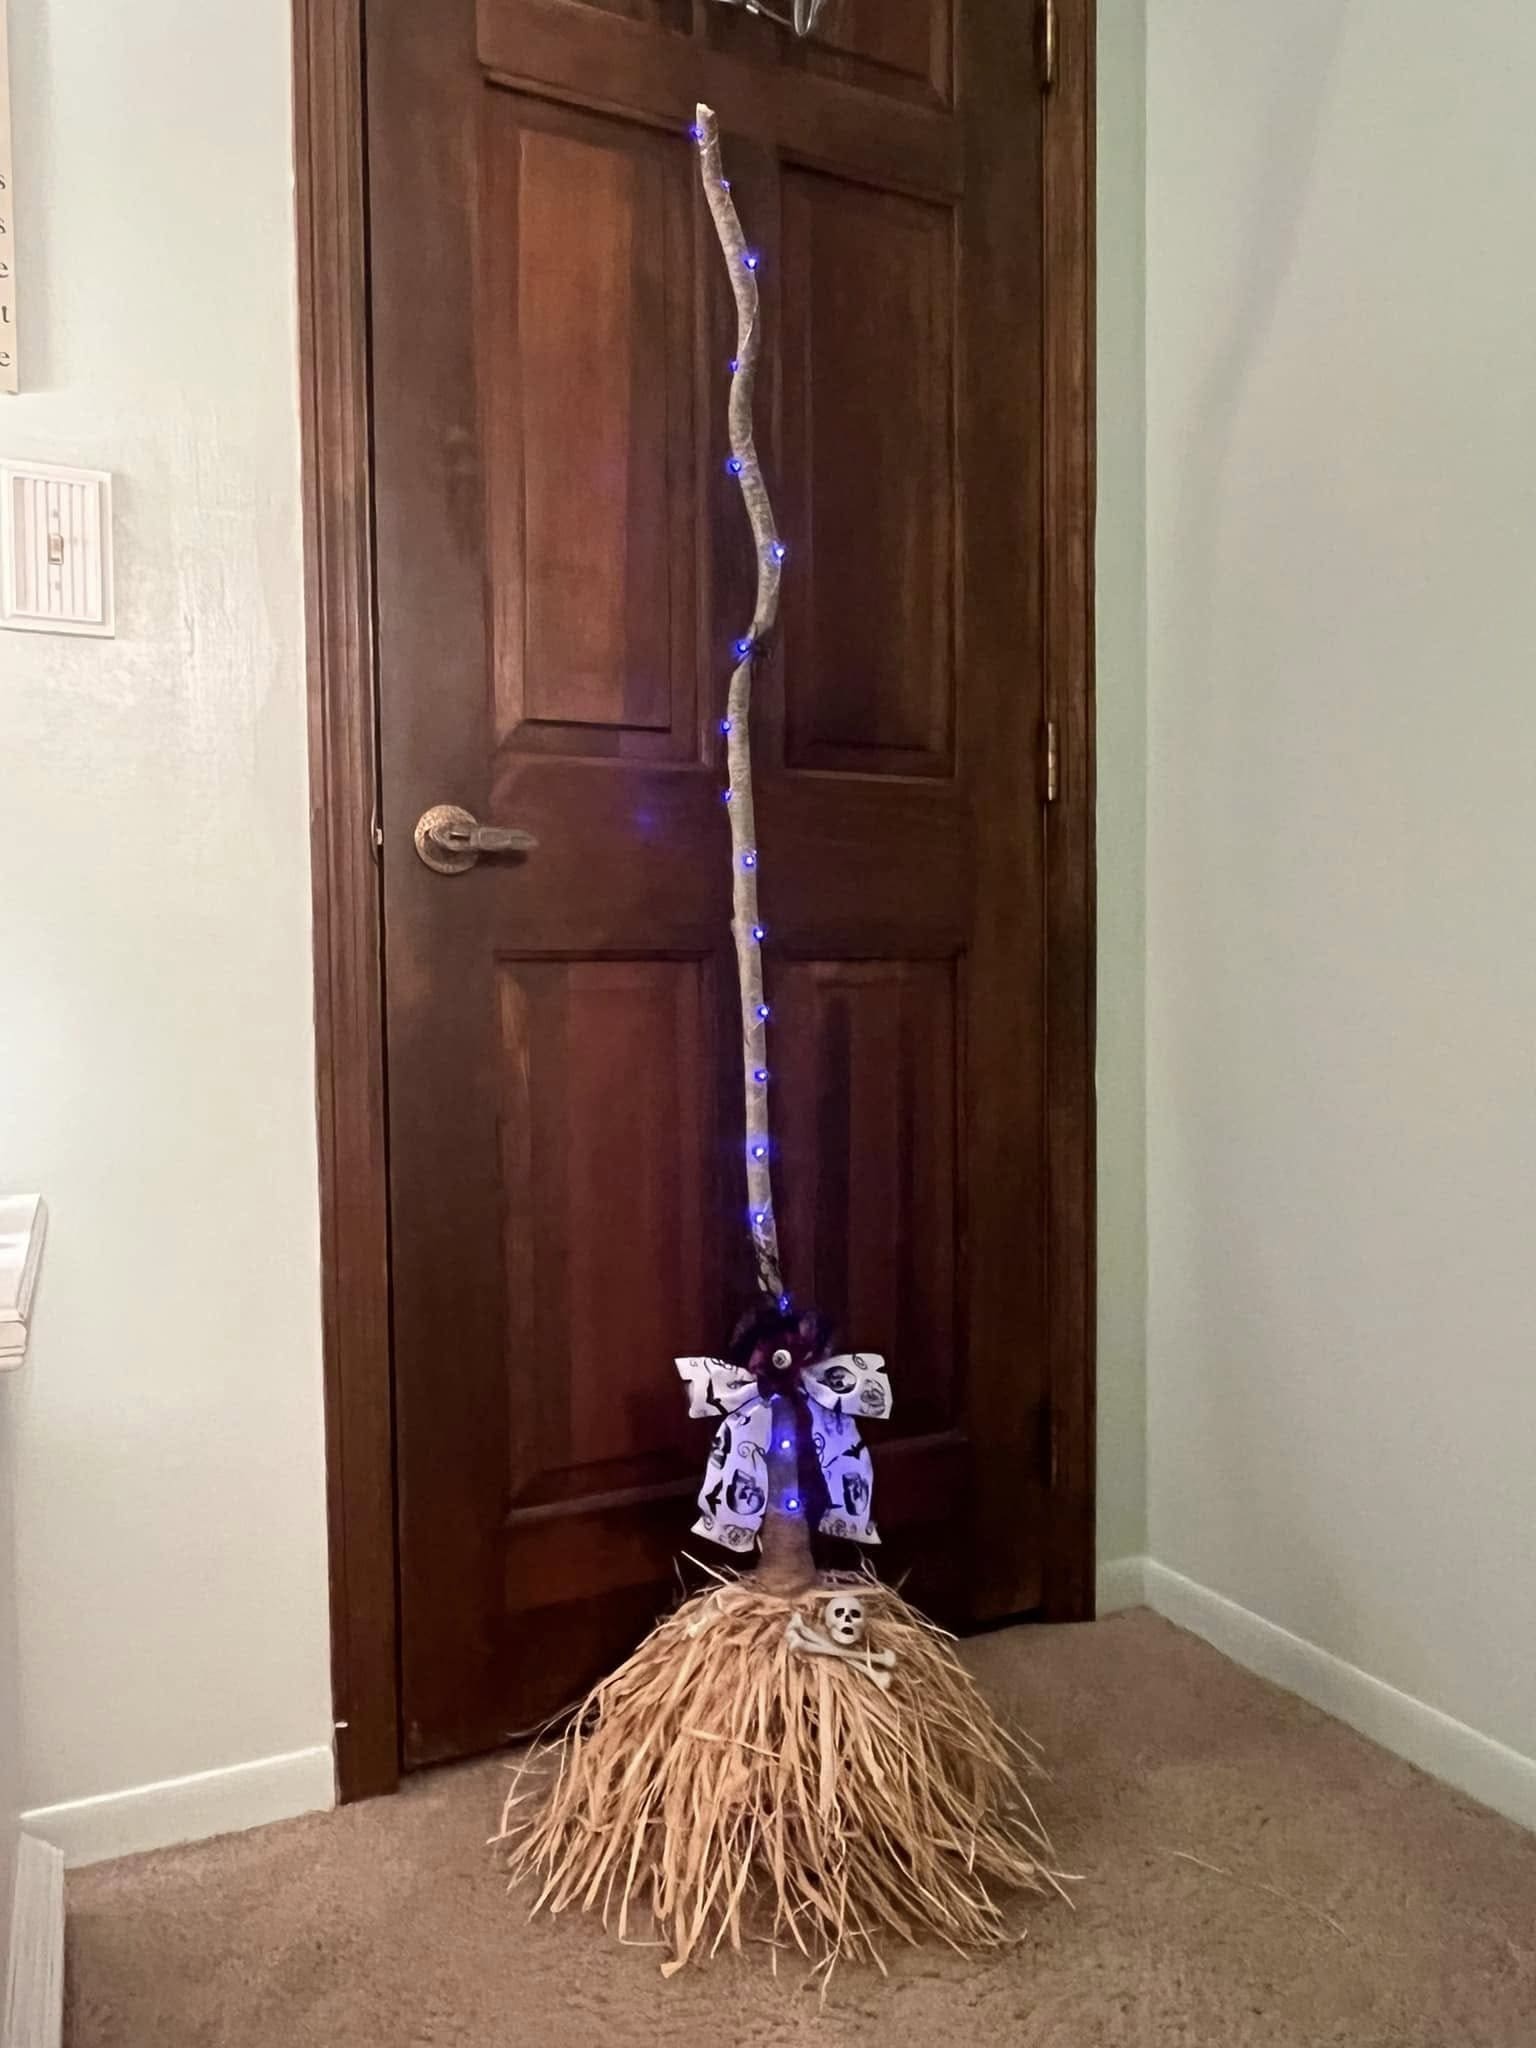
Wow, this handcrafted witch’s broom glows with spooky elegance, making it a bewitching accent for your hallway or front porch.
You start with a natural wooden stick, twisted just right by nature, then wrap it with purple LED lights to give it that midnight incantation glow.
What makes it even more eye-catching is the skull embellishment and Halloween-themed bow, which add personality and a whisper of haunted history to the display.
Materials Needed
- 1 wooden branch (around 3.5-4 ft long, gnarled if possible)
- 1 bundle of raffia or straw (approx. 18-20 inches long)
- 3 ft Halloween ribbon (any theme: bats, ghosts, pumpkins)
- Battery-operated mini LED lights (purple or orange, 5-6 ft strand)
- Small skull or Halloween trinket
- Hot glue gun or strong craft adhesive
- Twine
Step-by-step Guide
Step 1: Begin by bundling the raffia tightly and fluffing out the ends to form the broom’s base. Then secure the center with twine.
Step 2: Attach the raffia to one end of the branch using floral wire or hot glue. You need to wrap more twine around the joining point for stability.
Step 3: Wrap the LED lights spirally from bottom to top of the branch. Then tuck or glue the battery pack out of sight near the broom head.
Step 4: Tie a Halloween-themed bow just above the straw section and add your skull embellishment in the center or base for extra spookiness.
Step 5: Turn on the lights, and admire your handmade magical broom glowing softly in the shadows.
#14. Corn Husk Witch Broom Trio with Purple Hat
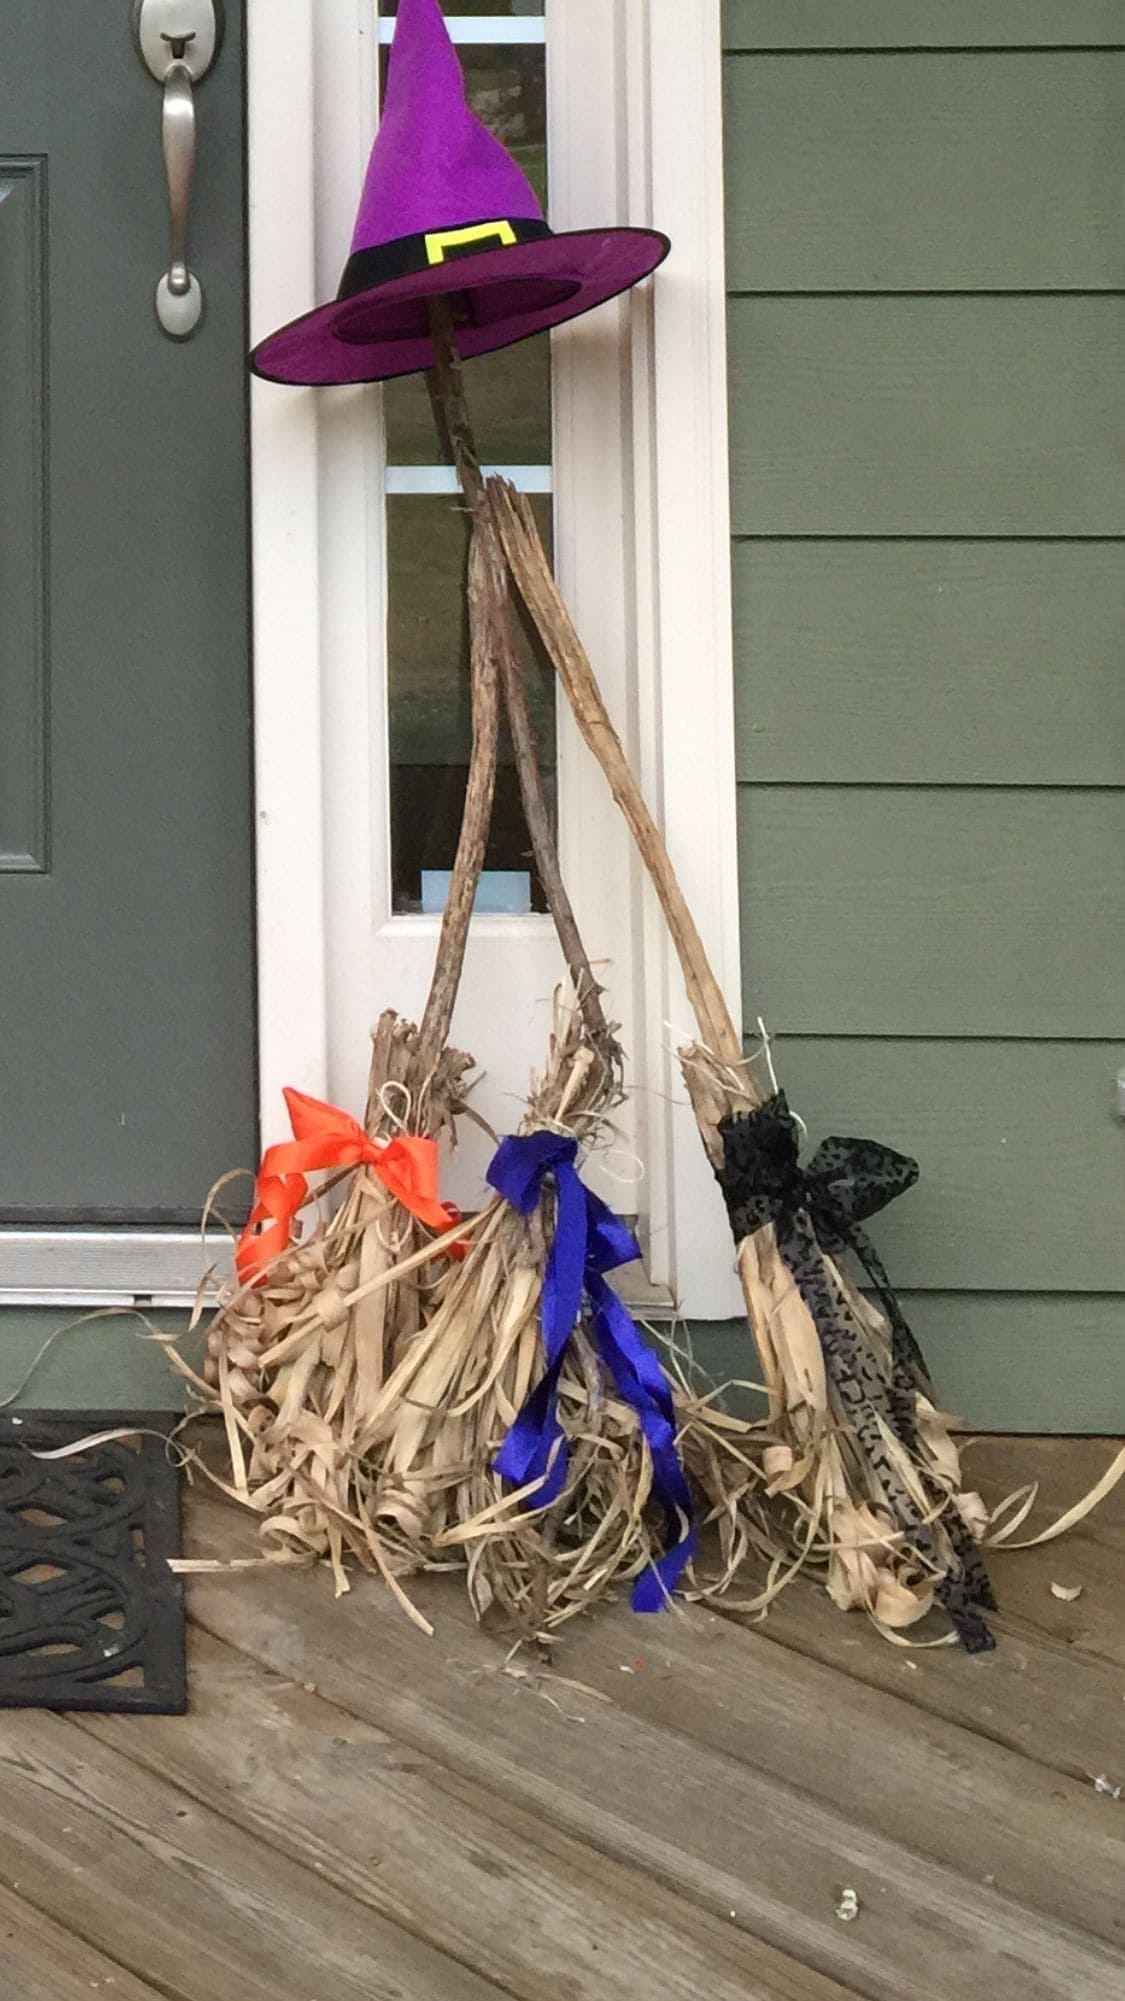
This rustic broom trio leans perfectly into the season with a cozy, handmade feel. Each broom is crafted from dried corn husks and tied to curved wooden branches, giving them an earthy, enchanted-forest vibe.
Their colorful bows with bold orange, deep blue, and black lace add just the right touch of Halloween flair without overpowering the simplicity.
And that oversized purple witch hat resting casually on one handle steals the show with just one glance.
Materials Needed
- 3 rustic sticks (around 36″ long)
- Bundles of dried corn husks or raffia
- Halloween ribbon (orange, blue, black – 1.5” wide)
- Purple witch hat with buckle
- Twine or floral wire
- Hot glue gun (optional)
Step-by-step Guide
Step 1: Gather your dried husks and bunch them together tightly around the bottom of each stick to form the broom bristles.
Step 2: Secure each bunch with twine or wire, then tie a decorative Halloween ribbon over the top.
Step 3: Rest or lightly attach a witch hat to one of the broom handles for a playful accent.
Step 4: Arrange the trio leaning against your porch or wall, it’s spooky simplicity at its best.
#15. Enchanted Porch Witch Broom Collection
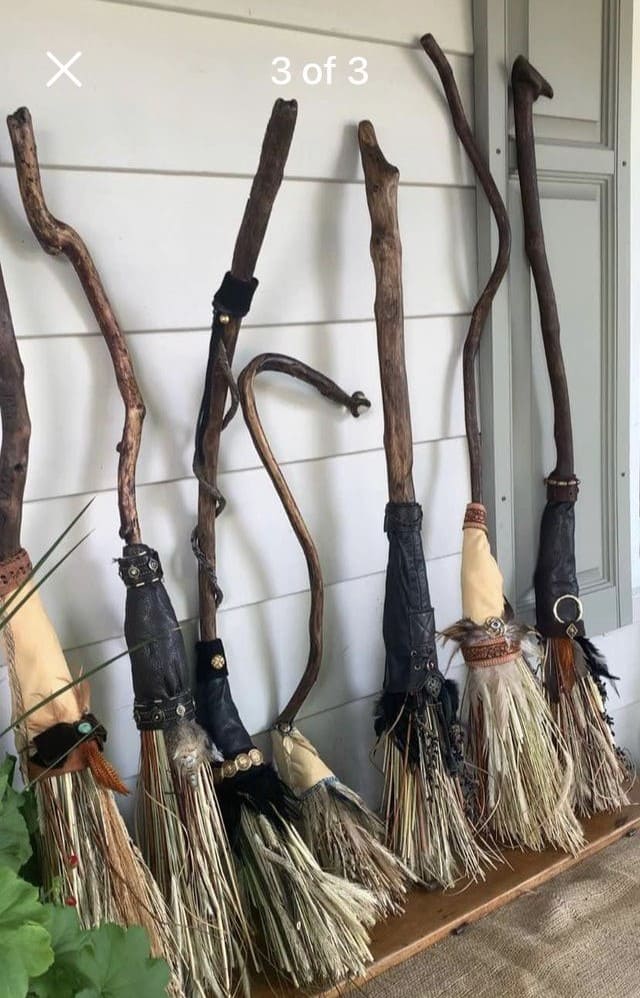
If these brooms could talk, they’d whisper tales of midnight flights and full-moon gatherings. This collection transforms your porch into something out of a fairytale.
Draped in leather and cloth wraps with rustic adornments like vintage buttons, feathers, and rings, every detail adds personality.
You’re not just making Halloween decor, you’re curating charm, mystery, and magic. Set them outside to greet guests, or line them up in your hallway for a dramatic entrance.
Materials Needed
- 6–8 wooden branches (curved or gnarled, 36-48″ long)
- Raffia or straw bundles (approx. 12-15″ per broom base)
- Scrap leather or thick fabric strips (approx. 8″×10″)
- Buttons, feathers, charms, and small trinkets
- Hot glue gun
- Scissors and optional wood sealant
Step-by-step Guide
Step 1: Select branches with character, knotty and naturally bent ones work best. Then sand or seal the wood if needed.
Step 2: Gather your raffia or straw and form it into a thick bunch. You need to hold it against one end of your branch handle.
Step 3: Wrap the broom base tightly with fabric or leather, securing the bristles and concealing the joint.
Step 4: Add embellishments: wrap in twine, glue on buttons or feathers, or even stitch on metal charms.
Step 5: Lean your brooms together or stand them in a pot by the door, they’ll enchant visitors before they even knock.
#16. Mini Witch Brooms with Paper Fringe and Playful Hats
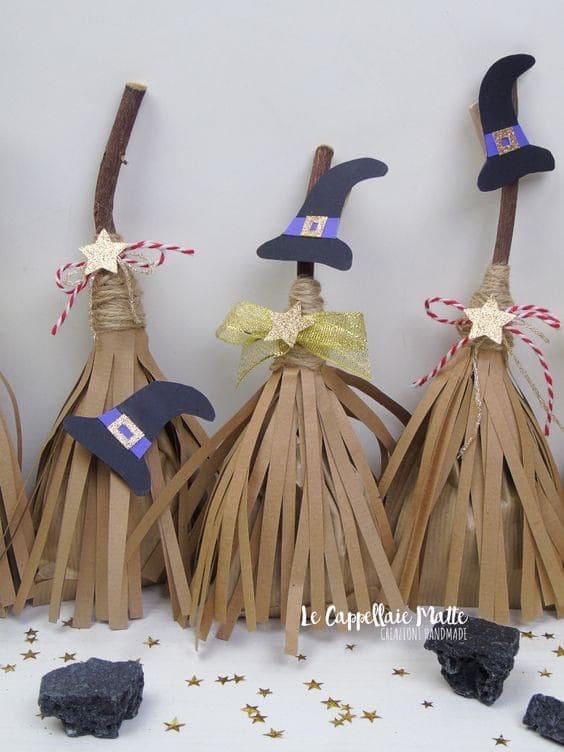
These little brooms are bursting with charm! Crafted with strips of brown kraft paper, a sturdy twig handle, and topped with a paper witch hat, they’re pure Halloween magic in miniature form.
Besides, add a gold ribbon or baker’s twine bow, and suddenly they’re perfect as party favors, place settings, or a sweet handmade gift for a teacher. Each one has its own quirky tilt and personality.
The best part is that they’re super affordable and easy enough for older kids to help create. Sprinkle a few gold stars around and you’ve got a scene that feels straight out of a spellbook.
Materials Needed
- Brown kraft paper (cut into ½” x 10″ strips, approx. 25-30 pieces per broom)
- Small tree twigs (5-6″ long)
- Black cardstock for hats (3″ tall)
- Gold ribbon or baker’s twine (12-18″)
- Glue, twine, and small paper stars
Step-by-step Guide
Step 1: Gather and glue the kraft paper strips together, wrapping them around the base of a twig to form the broom’s bristles.
Step 2: Secure the paper strips tightly using twine or hot glue, then tie a ribbon or twine bow on top for extra flair.
Step 3: Finally, cut and glue a black cardstock hat to the top or side of the twig, adding a glittery star for sparkle.
#17. Enchanted Harvest Moon Brooms with Dried Florals
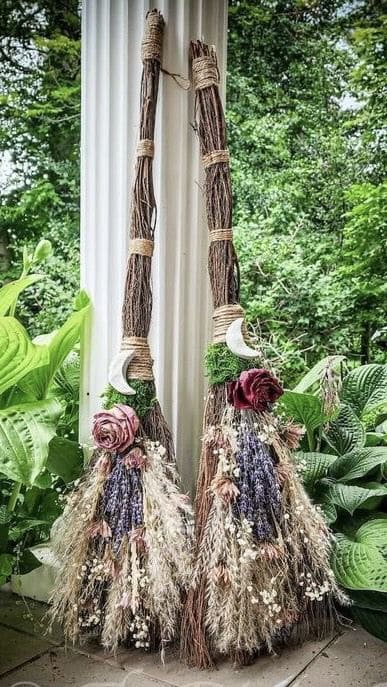
Adorned with lavender sprigs, wheat grass, preserved roses, and crescent moons, these breathtaking brooms whisper stories of twilight rituals and autumnal blessings.
Their delicate detailing and tall, commanding stature make them perfect for front porch decor or sacred space corners. Each stem seems carefully chosen for more than just beauty, it’s an offering.
Displaying one is like casting a charm of protection, abundance, and serenity in your home, grounded in seasonal rhythm and wildflower elegance.
Materials Needed
- 2 tall broomsticks or grapevine branches (approx. 36-40″ long)
- Dried lavender, wheat stalks, and baby’s breath (1 bundle each)
- 2 faux roses or dried roses (2-3” diameter)
- Floral wire or twine (48″ total)
- Decorative crescent moon charms (2-3″ wide)
- Hot glue gun (optional)
Step-by-step Guide
Step 1: Bundle your dried flowers and grasses together, layering for fullness and visual texture.
Step 2: Attach the floral bundle to the base of the branch using twine or floral wire, wrapping firmly but neatly.
Step 3: Add your faux or dried rose off-center near the top of the floral cluster using hot glue or tucked-in wire.
Step 4: Secure the crescent moon charm just above the floral base, wrapping the string or gluing in place.
Step 5: Finish with extra twine around the broom handle for detail and rustic elegance and you are done!
#18. Traditional Besom Brooms Made from Nature
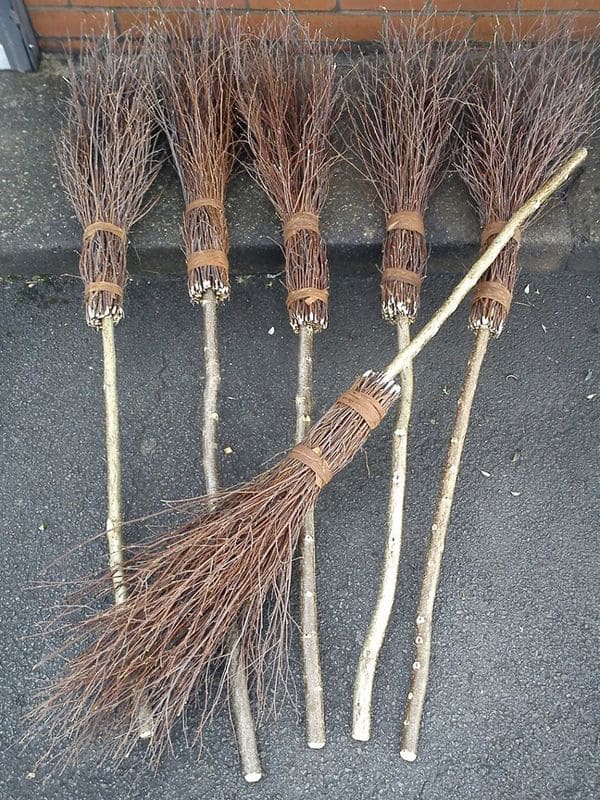
There’s something deeply grounding about crafting with what the forest gives you. These traditional besom-style witch brooms are a celebration of earth’s untamed beauty.
If you’ve ever wandered a woodland trail and admired the twisted elegance of fallen limbs and bramble, this project is your calling.
These brooms aren’t just Halloween props, they carry folklore, seasonal spirit, and a nod to ancestral craftsmanship. You can lean them beside your door, hang one above your fireplace, or give them as gifts to fellow lovers of the old ways.
Materials Needed
- 1 sturdy hardwood branch (approx. 36″ long, 1-1.5″ diameter)
- 20-30 small, flexible twigs (each around 24″ long)
- 2 lengths of natural jute twine or bark strips (24″ each)
- Hand pruners or garden scissors
- Optional: hand saw
Step-by-step Guide
Step 1: Gather dry twigs and a solid stick with a natural bend or character. Trim the ends for consistency.
Step 2: Bundle the twigs tightly around the base of your broomstick. Make sure the ends fan out evenly.
Step 3: Use jute twine or bark strips to wrap around the base securely. Then wrap twice, once tight near the bottom of the bundle and again a few inches higher for strength.
Step 4: Press and roll the broom against the ground to shape the bristles naturally.
Step 5: Display it upright, or hang it using a loop of extra twine at the handle end.
#19. Cozy Mop Witch Broom With Lights
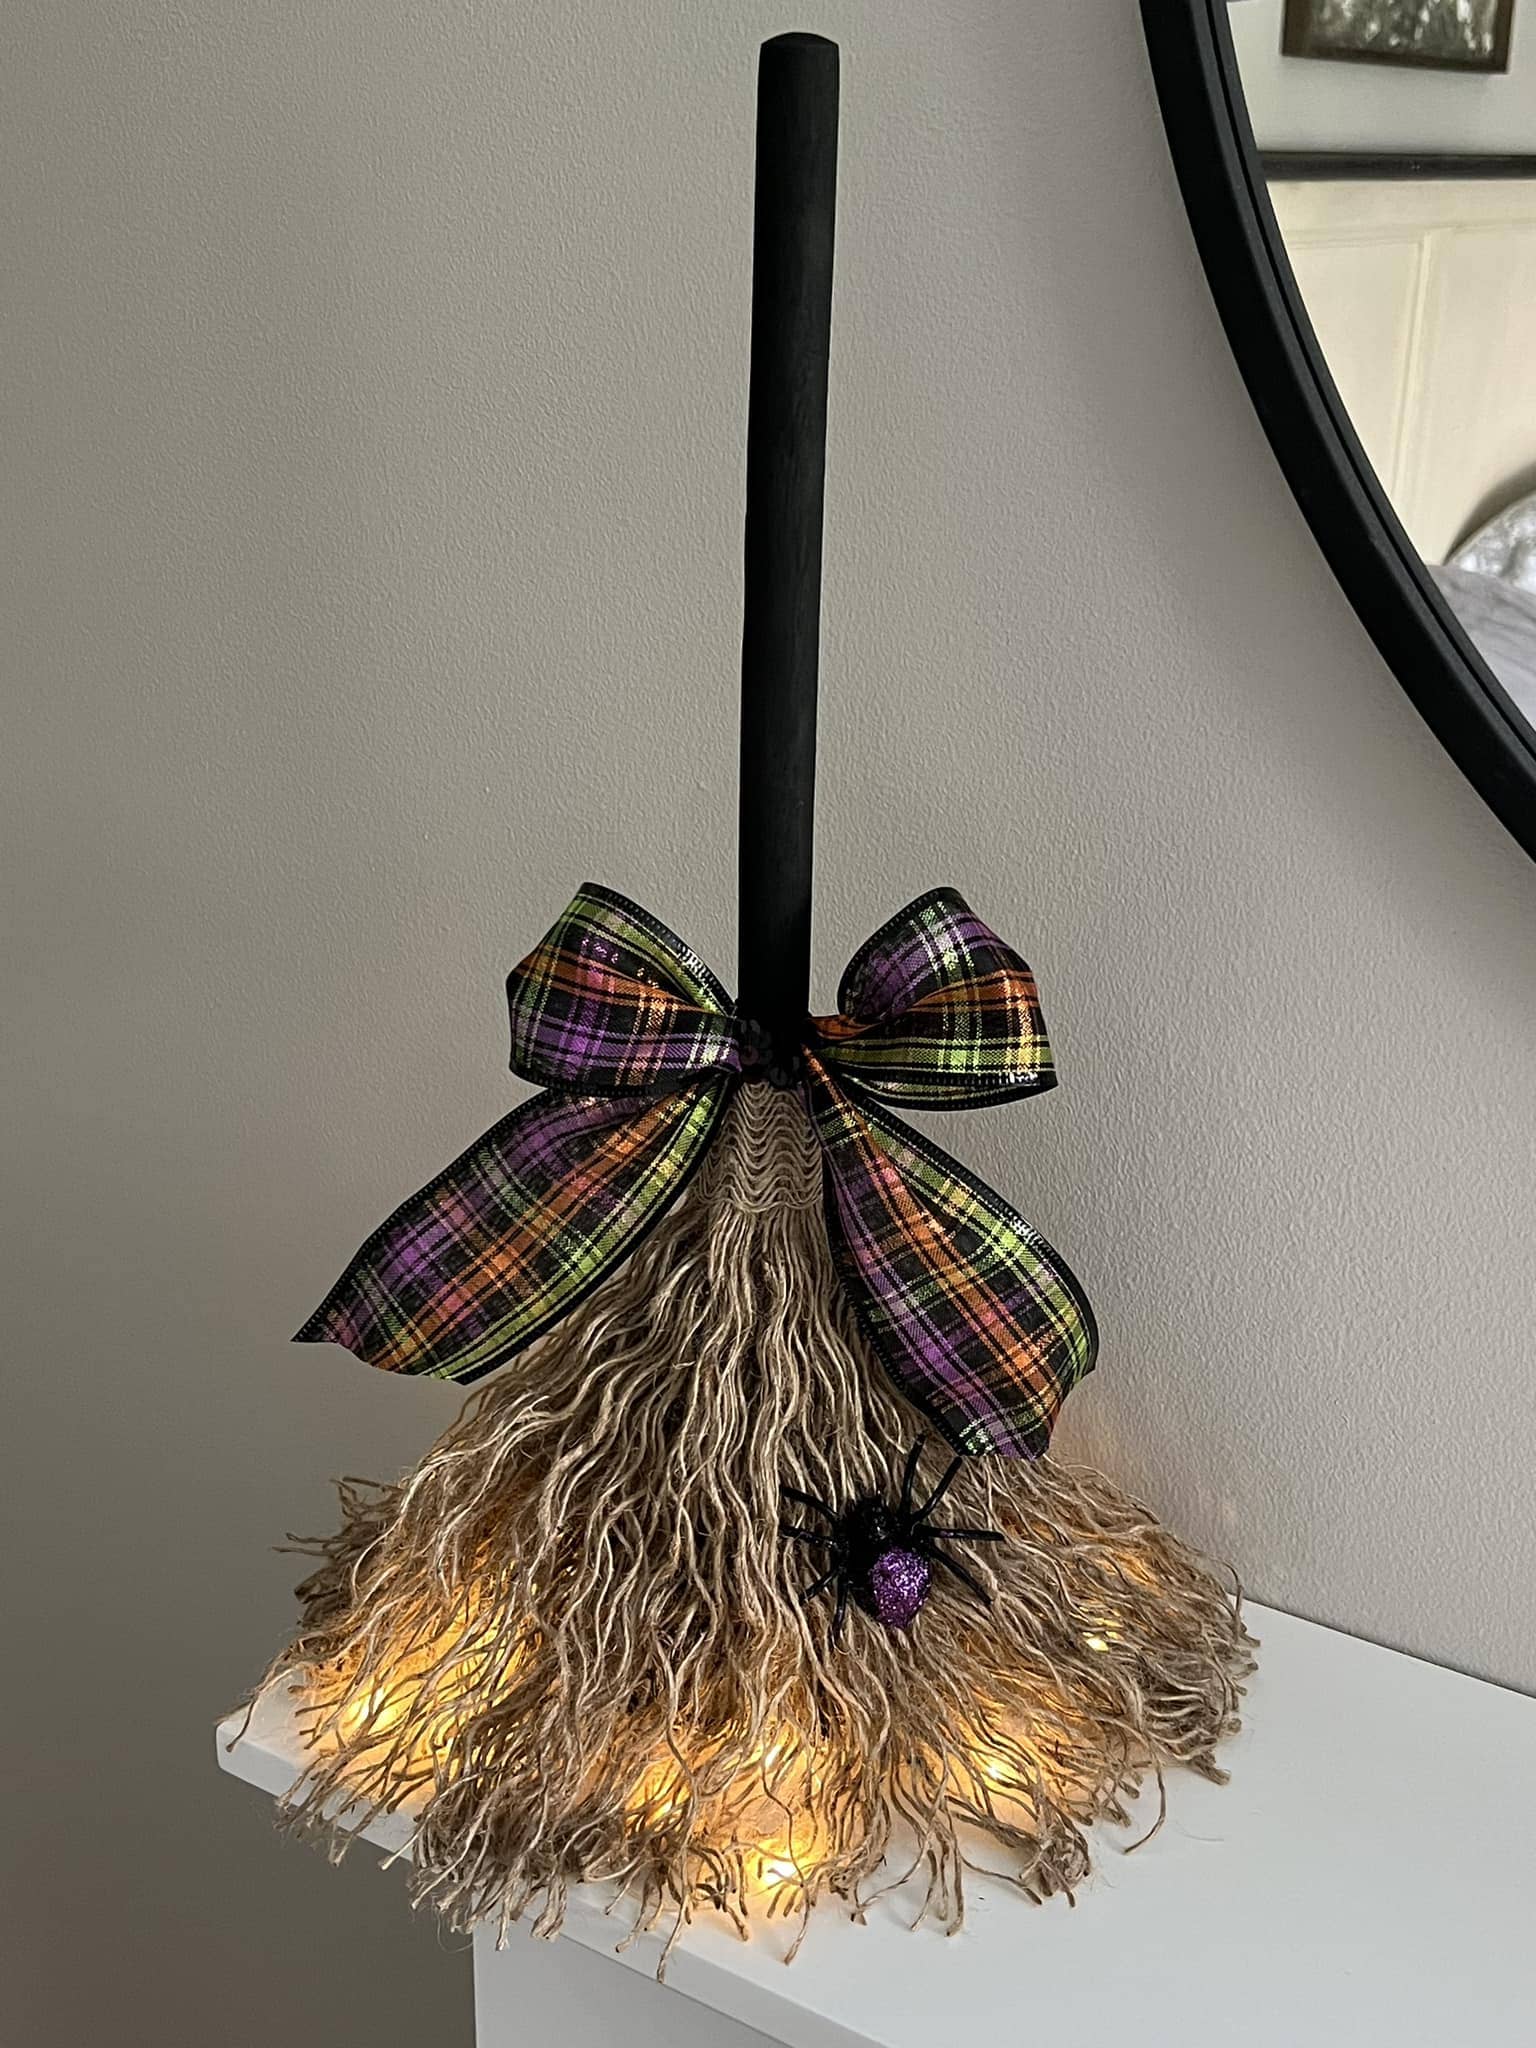
Who knew a humble mop head could feel this enchanting? This DIY witch’s broom leans into softness and glow, offering a friendlier side to your spooky setup.
The plaid bow adds a festive punch of color while the little glittery spider gives it that hint of Halloween mischief. The string lights underneath turn the frayed mop strands into something that sparkles, casting a cozy, bewitching glow.
Place it on a mantle, hallway shelf, or entryway for a subtle nod to Halloween magic without going overboard. You don’t have to craft like a pro to pull this off.
Materials Needed
- 1 clean cotton mop head (about 12″-14″)
- Wooden broomstick (18″-24″ long)
- Battery-operated LED fairy lights (1 strand, warm white)
- Wide plaid Halloween ribbon (2.5″ width, 24″ long)
- Plastic spider or Halloween embellishment
- Hot glue gun and glue sticks
- Black acrylic paint (for the handle)
Step-by-step Guide
Step 1: Paint the wooden handle black and let it dry fully before assembly.
Step 2: Attach the mop head to the bottom of the handle using hot glue, wrapping tightly for security.
Step 3: Tuck the fairy lights into the mop strands, weaving through them loosely so the glow spreads evenly.
Step 4: Tie your plaid ribbon into a large bow and hot glue it where the handle meets the mop.
Step 5: Finish with a glittery spider or creepy charm to bring in some spooky personality.
#20. Elegant Black Brooms with Dried Floral Touch
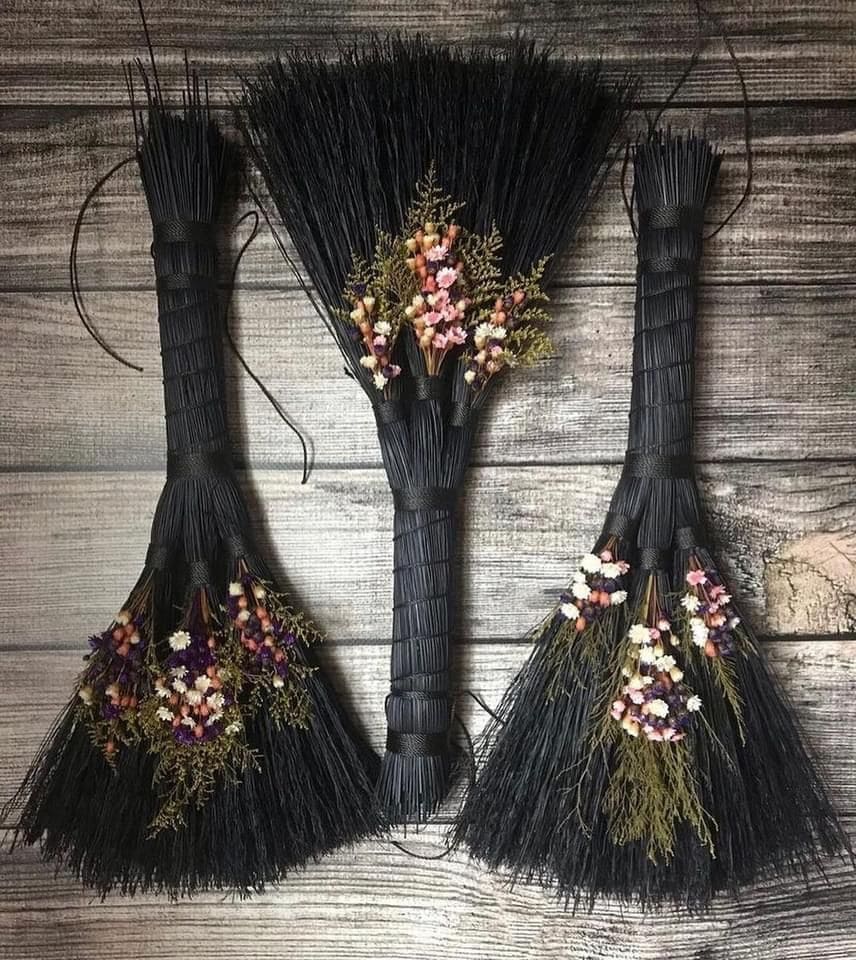
Crafted entirely from dyed black broomcorn, these brooms give off that moody elegance with just enough whimsy to make you smile.
Each one is dressed with petite dried flower clusters such as lavender, pink, orange, and cream nestled perfectly in their bristles like magic blooming from shadows.
Hung on a rustic wall, they double as enchanting fall decor and protective symbols. Minimalist yet mystical, they’re a lovely way to blend Halloween vibes with year-round witchy aesthetics.
Materials Needed
- Black broomcorn stalks or natural whisk brooms (approx. 16–18” long)
- Black floral wire or ribbon for binding
- Mini dried flower bundles (assorted textures and colors)
- Hot glue gun or floral tape
- Twine or leather cord for hanging
Step-by-step Guide
Step 1: Bundle black broomcorn into your desired broom shape and secure tightly with floral wire or black ribbon at the handle.
Step 2: Tuck in small arrangements of dried flowers between the bristles, using hot glue sparingly if needed for support.
Step 3: Finish with a loop of twine at the top for wall hanging or use them as tabletop decor laid across a vintage cloth runner.
Step 4: Optional: Lightly mist with lavender oil for a subtle scent and spiritual charm.
#21. Whimsical Broom Rides Halloween Mop Decor
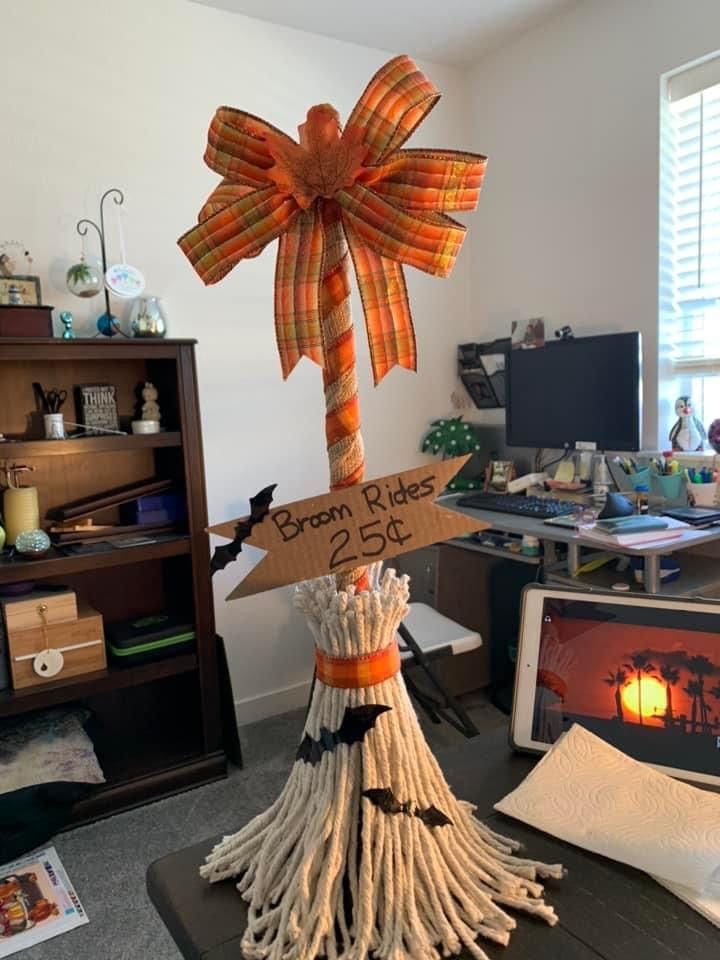
Made from a simple mop head, this quirky little broom turns into a playful Halloween decoration with a big plaid bow, a hand-lettered sign, and tiny flying bats that seem ready for takeoff
It’s lighthearted and fun, perfect for desks, entryway tables, or even teacher gifts. That rustic wooden arrow sign reading “Broom Rides 25¢” adds just the right dose of witchy charm.
You don’t need real broom-making skills, just a clever imagination and some festive ribbon.
Materials Needed
- 1 cotton mop head (approx. 12-14″ strands)
- Wooden stick or dowel rod (18-24” tall)
- Orange plaid ribbon (2.5” wide, approx. 2 ft)
- Small wood arrow sign (5-6”) and permanent marker
- Mini plastic bats or Halloween stickers
- Hot glue gun, twine, or craft tape
Step-by-step Guide
Step 1: Attach your mop head to the wooden stick securely using hot glue or wrapping it tightly with twine.
Step 2: Wrap the ribbon around the stick and finish with a full, fluffy bow on top. Then secure with glue.
Step 3: Write “Broom Rides 25¢” on the sign and glue it onto the broomstick at an angle.
Step 4: Add mini bats to the mop bristles and stick for a little spooky flair.
Read more: 26 DIY Witch Hat Ideas with Tutorials That’ll Instantly Elevate Your Halloween Costume
