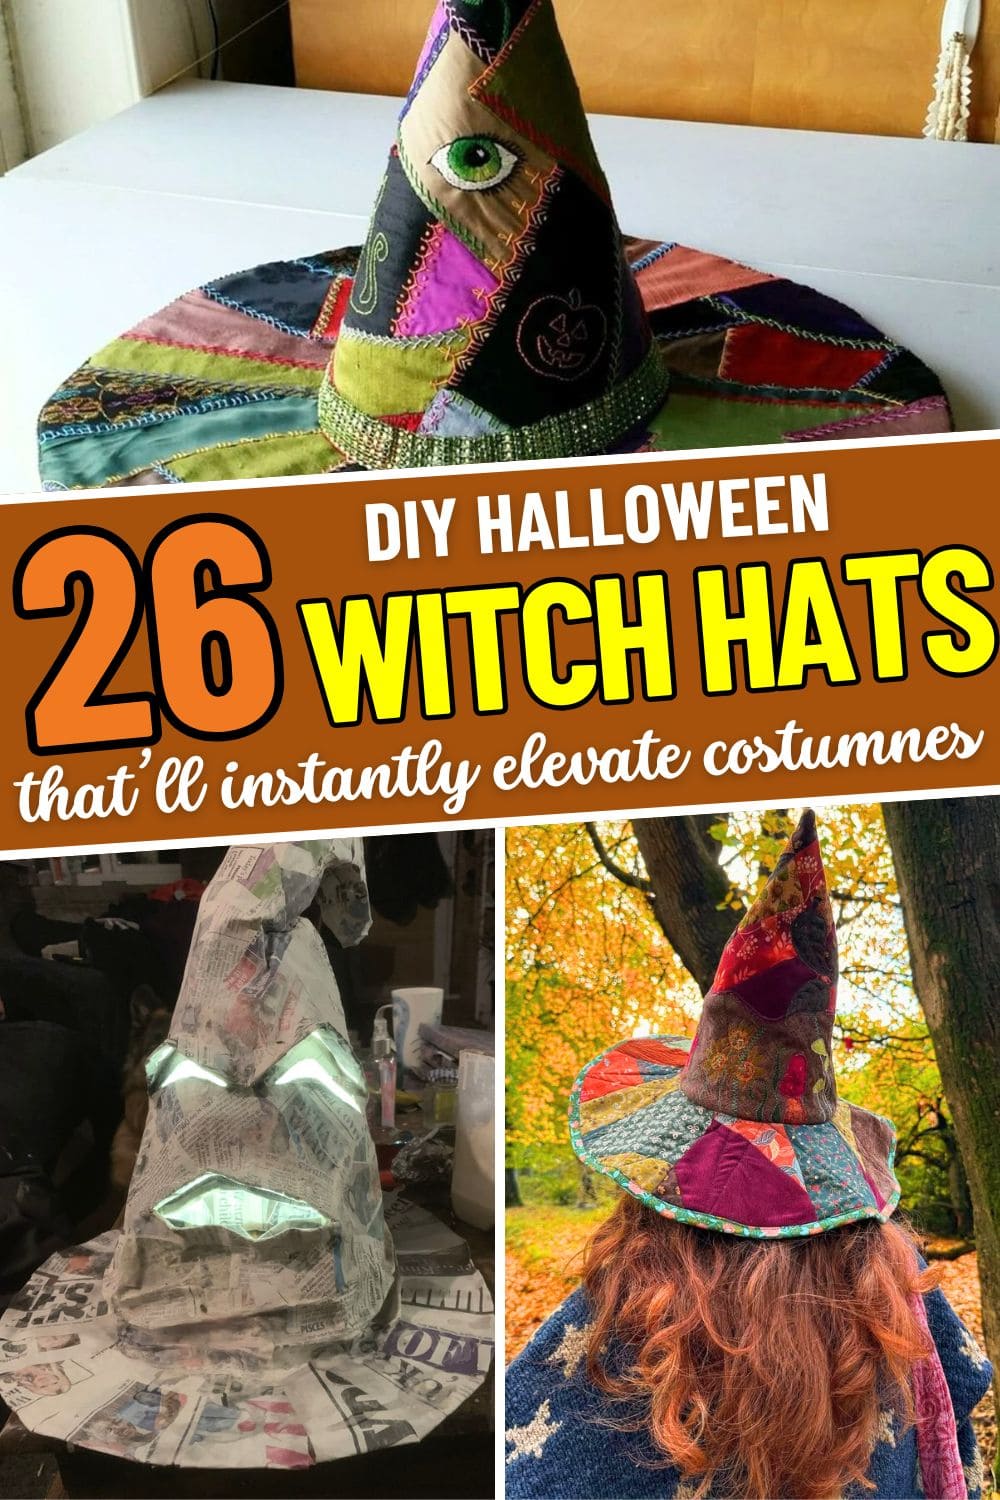
There’s something magical about slipping on a witch hat that instantly transforms you.
I still remember the year I made my first one, stitched together with scraps, sequins, and way too much hot glue. It wasn’t perfect, but the sparkle in my niece’s eyes when she wore it made it unforgettable.
That’s the charm of handmade. These 26 DIY witch hat ideas bring that same thrill, hats with crooked tips, glowing eyes, patchwork velvet, and woodland whimsy.
Each project comes with a step-by-step tutorial, making it easy to create a head-turning accessory that feels uniquely yours.
Get ready to conjure up something wickedly fun and fabulously festive for your Halloween look.
#1. Enchanted Woodland Patchwork Witch Hat
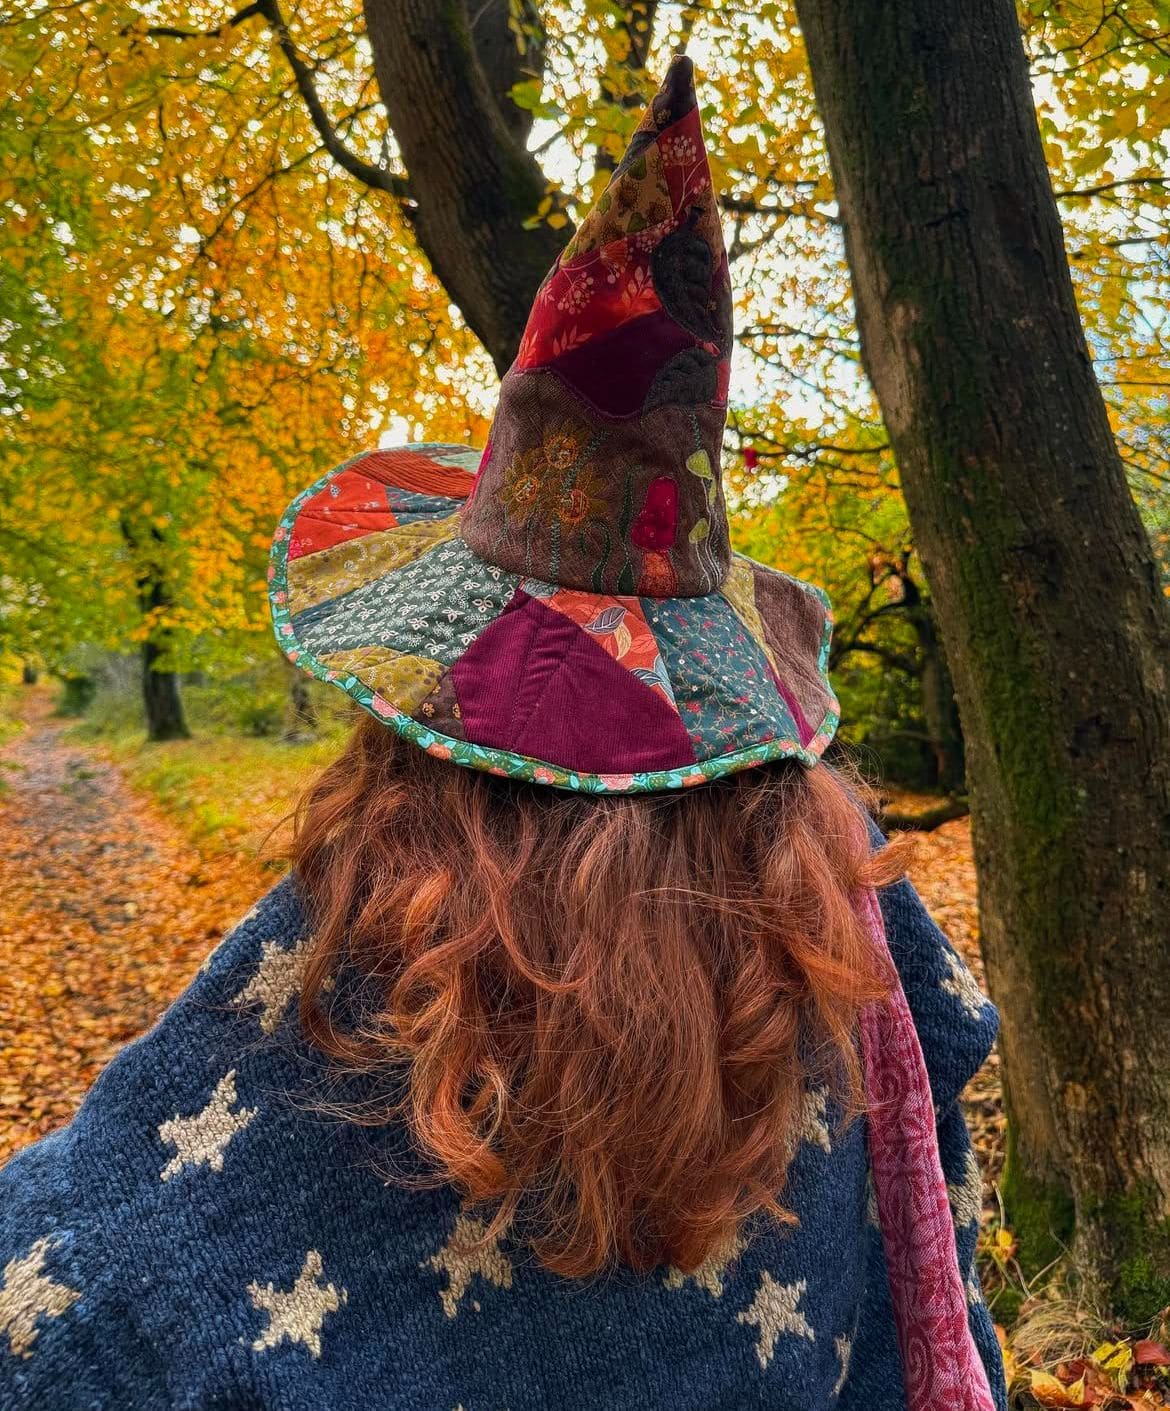
With its warm, earthy colors and intricate patchwork, this witch hat looks like it walked straight out of an autumn fairytale.
The fabric choices evoke the feeling of fallen leaves underfoot. Some patches are even embroidered with mushrooms, florals, and whimsical shapes, adding to the hat’s storybook charm.
Moreover, the leafy green bias trim around the brim gives a final, forest-inspired touch. It’s the kind of hat you’d wear for a quiet walk through golden woods.
Materials Needed
- Patchwork fabric scraps (5″x5″) in warm fall tones
- Medium-weight interfacing – 1/2 yard
- Matching embroidery thread or floss
- Bias tape or ribbon trim – 1 yard
- Witch hat pattern template
- Sewing machine, needle, and fabric scissors
Step-by-step Guide
Step 1: Sew fabric scraps into a panel using a patchwork or crazy quilt technique. Then cut cone and brim shapes from this panel.
Step 2: Add embroidery motifs like mushrooms or falling leaves. Now you can use simple backstitch or satin stitch for detailing.
Step 3: Stitch cone and brim together. Finish by attaching a bias tape around the brim for a polished look.
#2. Elegant Witch Hat With Oversized Satin Bow
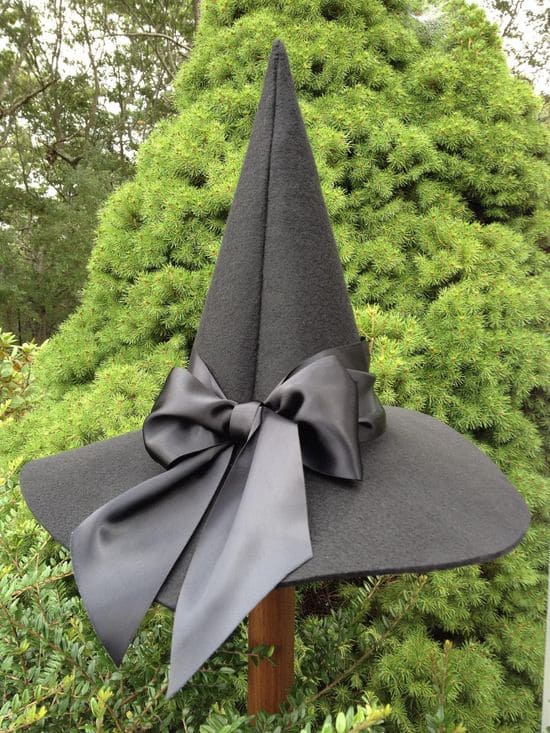
Wow, this black witch hat stands tall and proud, with a flawless conical shape and wide structured brim.
What sets it apart is the luxurious oversized satin bow, tied perfectly at the base like a couture statement. It gives the piece an aura of elegance and power, reminiscent of a mysterious Victorian enchantress who casts spells in silence and walks with poise.
Materials Needed
- Thick black felt – 1 yard (36″x36″)
- Black satin ribbon – 3 inches wide, 40 inches long
- Heavy-duty fabric glue or sewing kit
- Cardstock or interfacing (optional)
- Wire (optional)
Step-by-step Guide
Step 1: Cut and assemble the hat pieces, using interfacing inside the cone if needed for height support. Then join the cone to the brim securely with fabric glue or stitching.
Step 2: Wrap the satin ribbon around the base of the cone and tie it into a dramatic bow. You should adjust the tails so they drape evenly along the brim.
Step 3: Press the ribbon lightly with a cool iron to keep its shape, and add wire around the brim if you want extra structure.
Tip: For a romantic twist, you can swap the satin with velvet ribbon or layer lace beneath for a dimensional look.
#3. Elegant Woodland Witch Hat With Glam Buckle
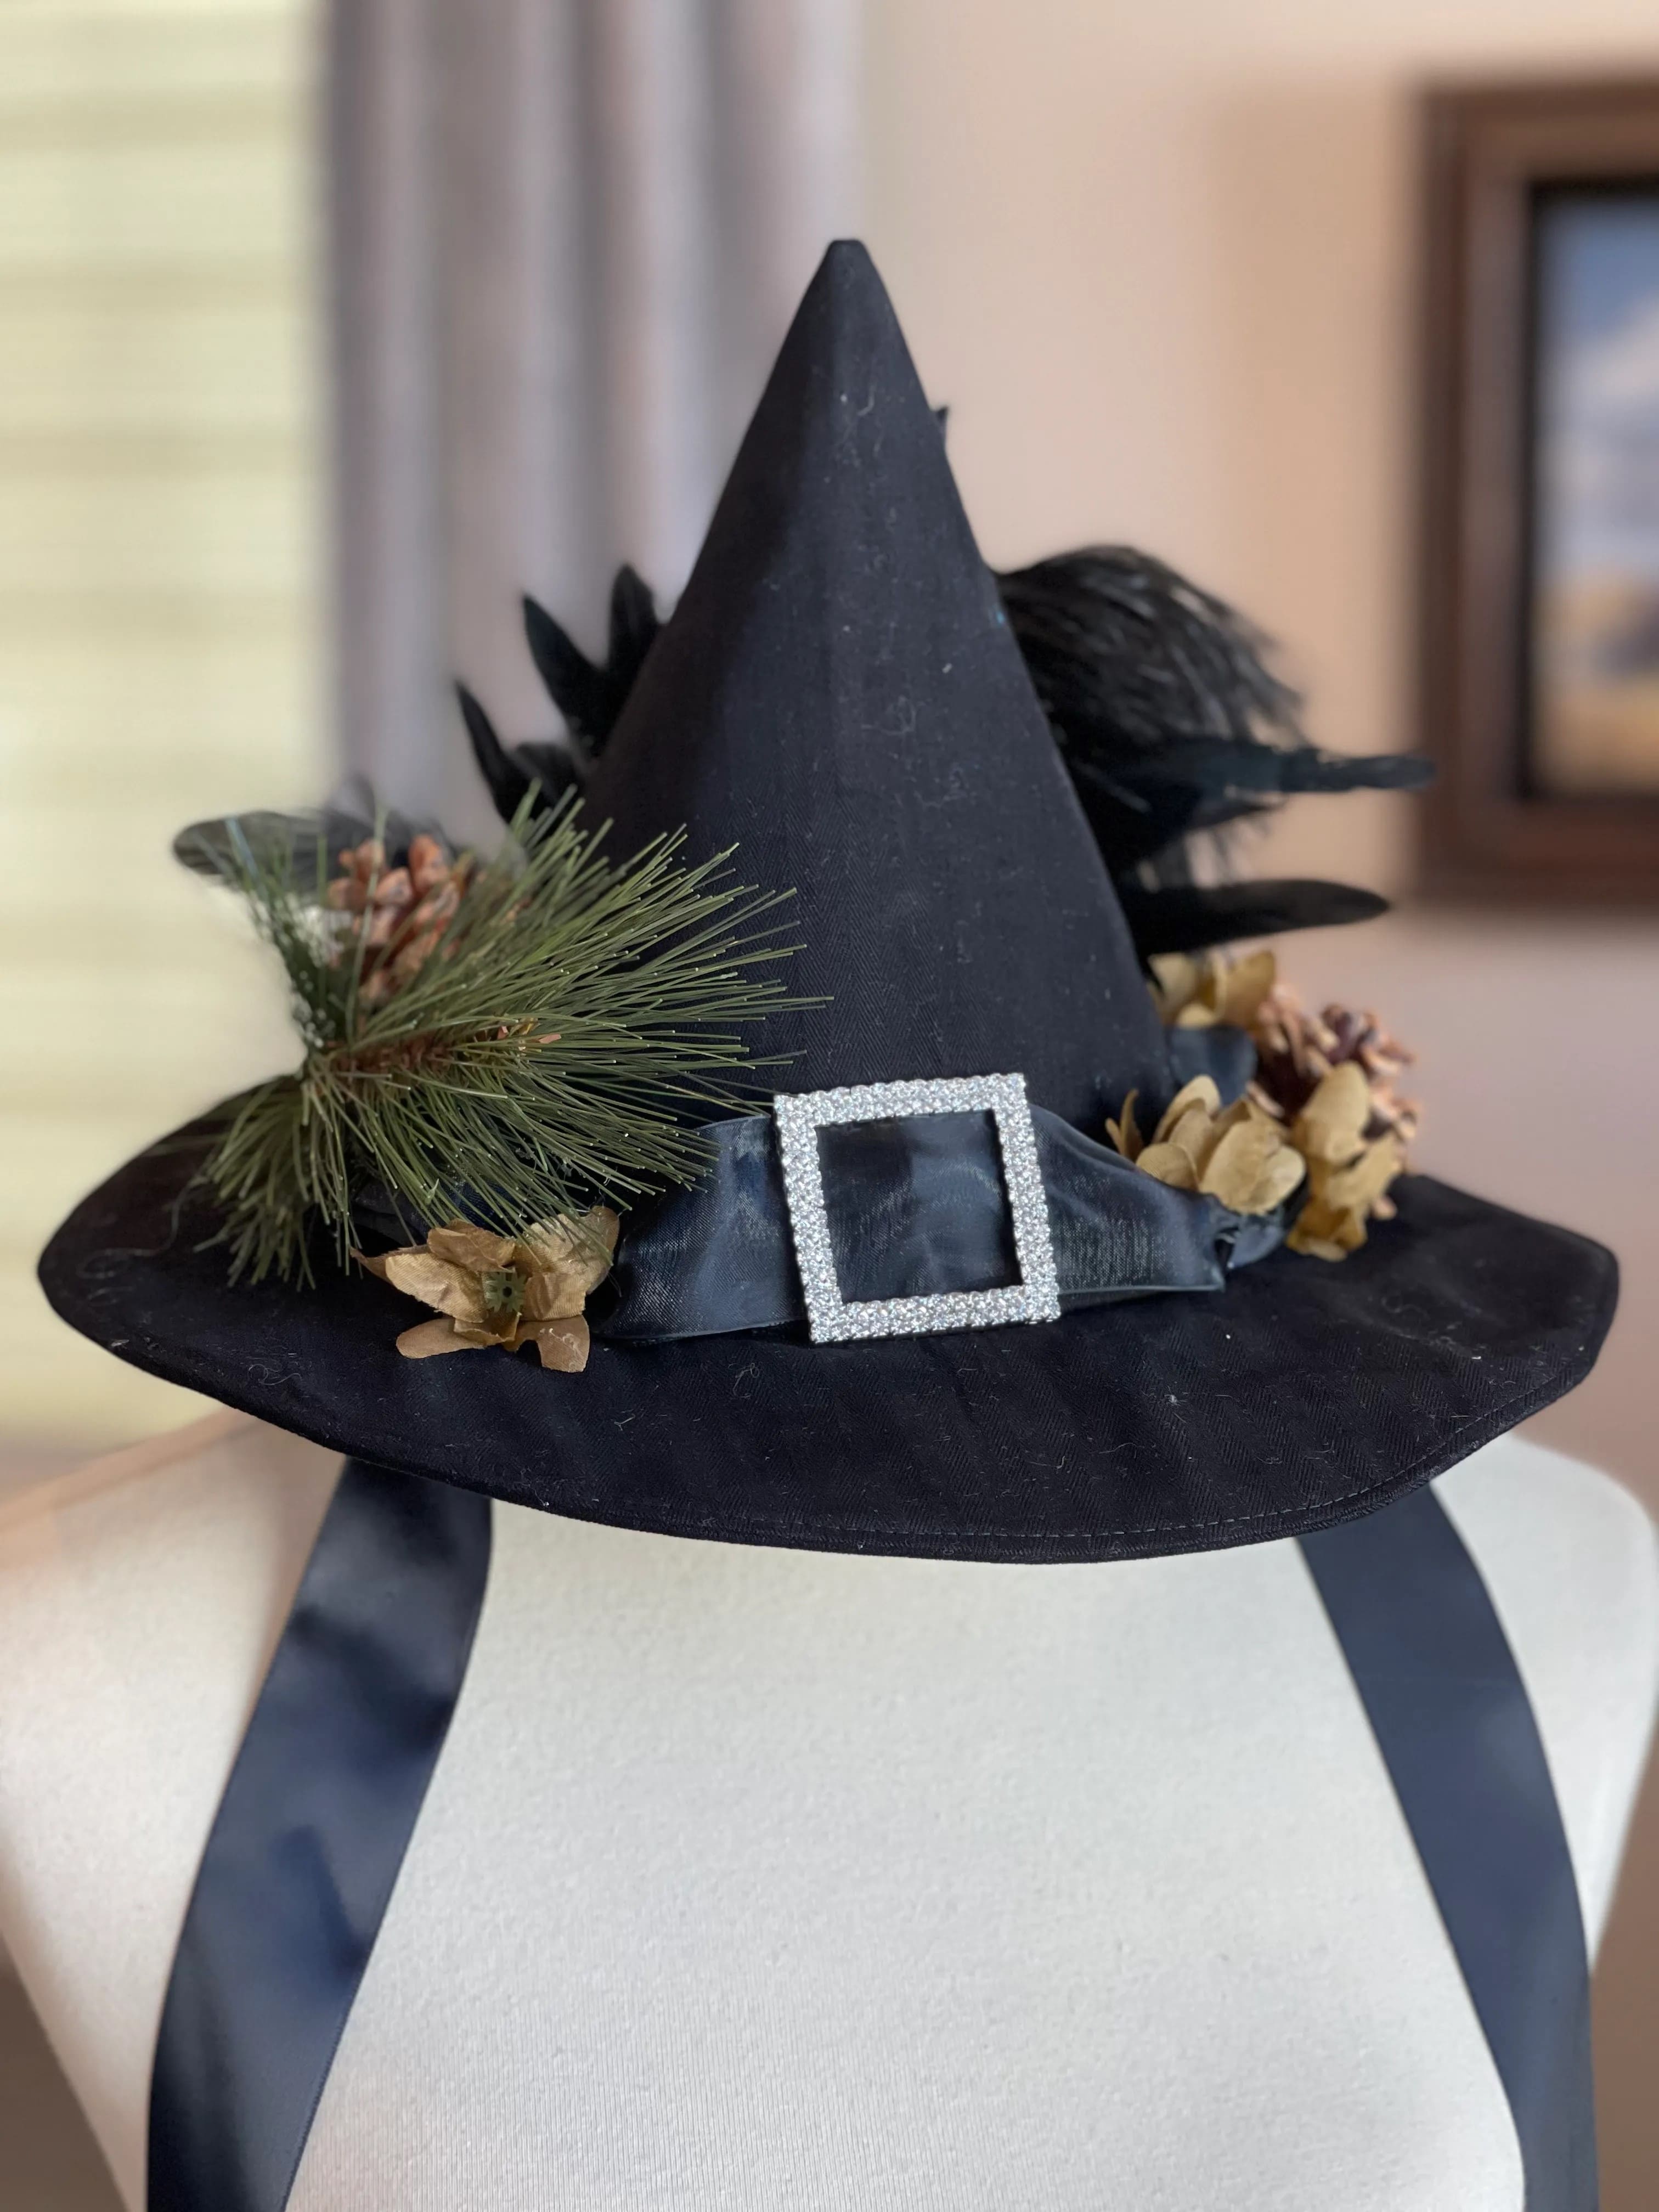
This refined black witch hat merges natural forest charm with subtle glam.
Its clean, structured shape is accented by a luxe faux leather band wrapped around the crown, secured by a glittering rhinestone buckle that adds just the right amount of sparkle.
But what makes it unique are the nature-inspired touches including sprigs of pine, dried hydrangeas, and tiny pinecones, nestled among black feathers for texture and contrast.
Materials Needed
- Stiff black felt or buckram – 1/2 yard
- Black faux leather ribbon – 1 inch wide, 1 yard
- Rhinestone buckle (2″x2″)
- Floral picks: pine needles, dried flowers, mini pinecones
- 4-6 black feathers
- Hot glue gun, thread, and needle
Step-by-step Guide
Step 1: Cut and sew the felt into a classic witch hat shape using a stiffened cone and a wide brim.
Step 2: Wrap the faux leather band around the base of the cone and secure with hot glue or a few stitches. You now attach the rhinestone buckle at the center.
Step 3: Arrange natural elements and feathers on one or both sides of the hatband. Then glue in layers for a balanced look.
Tip: Spray your pine and dried flowers with a matte sealer to help preserve them longer without crumbling.
#4. Quilted Fabric Witch Hat with Potion Print
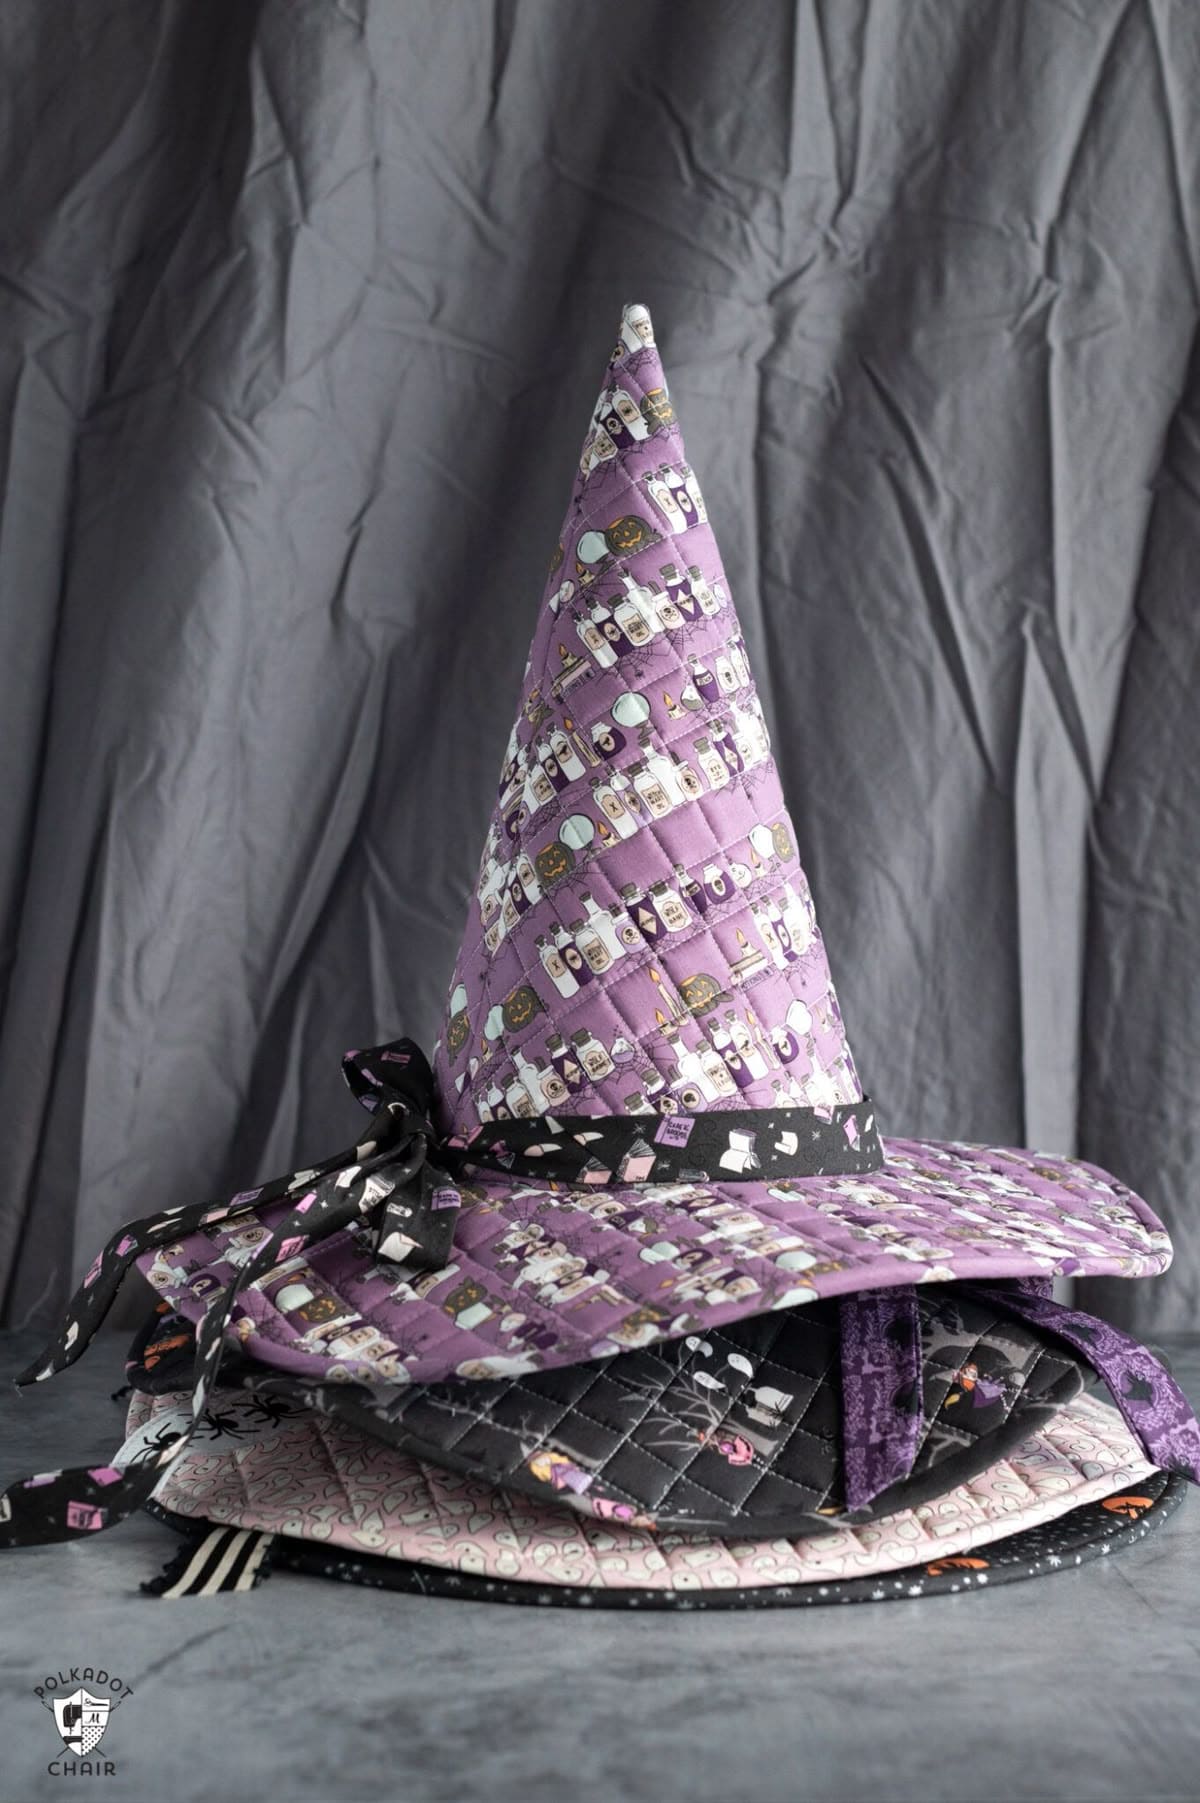
If you’re a cozy Halloween crafter at heart, this quilted witch hat will cast a spell on your sewing table. The structured design combines soft cotton layers with batting for that plush, sculpted form.
Plus, the potion bottle print gives it a vintage apothecary flair, while the black bow-tied band adds the perfect pop of contrast.
Even more enchanting, this one’s actually wearable and giftable. Stackable, padded, and full of character, it’s a witch hat that feels as comforting as your favorite handmade quilt.
Materials Needed
- 1/2 yard Halloween-themed cotton fabric
- 1/2 yard coordinating cotton fabric
- 1/2 yard lightweight quilt batting
- Black fabric (12″x20″)
- Sewing machine, thread, scissors, pins
- Printable witch hat pattern template
Step-by-step Guide
Step 1: Cut fabric and batting using a witch hat template (cone and brim pieces).
Step 2: Quilt each fabric + batting layer by stitching diagonal lines, then sew the cone and brim.
Step 3: Attach the brim to the cone, sew the lining, and add the black fabric band with a bow for a polished look.
#5. Primitive Blue Quilted Witch Hat
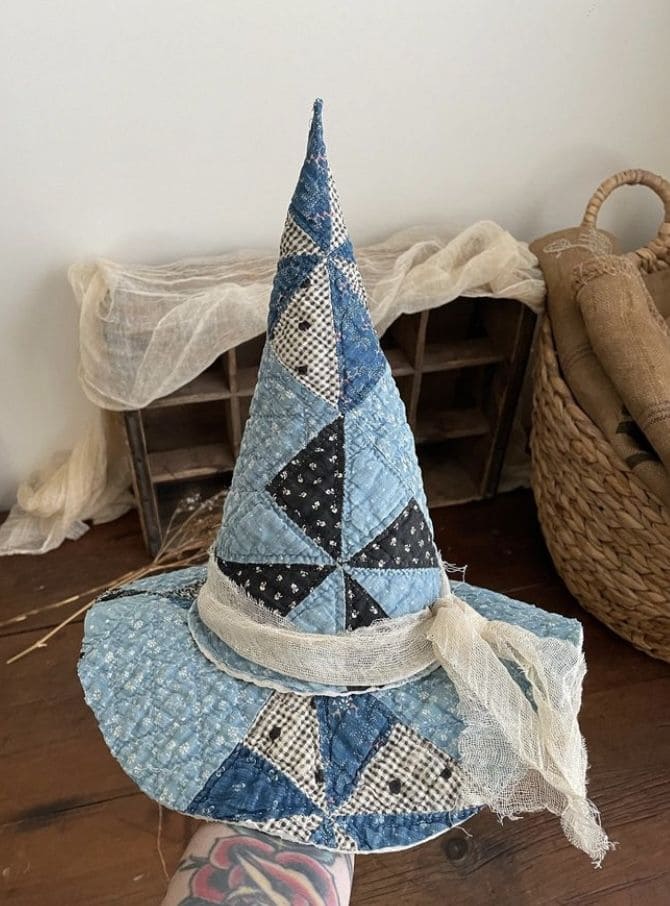
Made from faded blue quilt pieces, vintage gingham, and tiny floral prints, this witch hat carries a homespun beauty.
If you love rustic decor or farmhouse Halloween themes, this is a perfect match. It looks lovely on a mantel, nestled in a wreath, or even hanging on a peg near dried herbs and lanterns.
Materials Needed
- Quilted fabric scraps or vintage quilt (½ yard total)
- Cardstock or stiff interfacing for shape
- Needle, thread, and hot glue gun
- Cheesecloth or gauze (18″ strip)
- Paper pattern or pre-made cone base
- Optional: tea or coffee stain
Step-by-step Guide
Step 1: Cut triangular patchwork sections from old quilt scraps or stitch together pieces to create a patchwork sheet.
Step 2: Use a stiff backing or pre-cut cone base to wrap and shape the fabric into a tall hat form. Then glue or stitch in place.
Step 3: Cut a circular brim, adding a hole in the center for the cone. Next, you just attach securely using glue or hidden stitches.
Step 4: Tie a strip of cheesecloth around the base of the cone and let the ends hang loose for a haunting, antique touch.
#6. Purple Glam Spiderweb Witch Hat
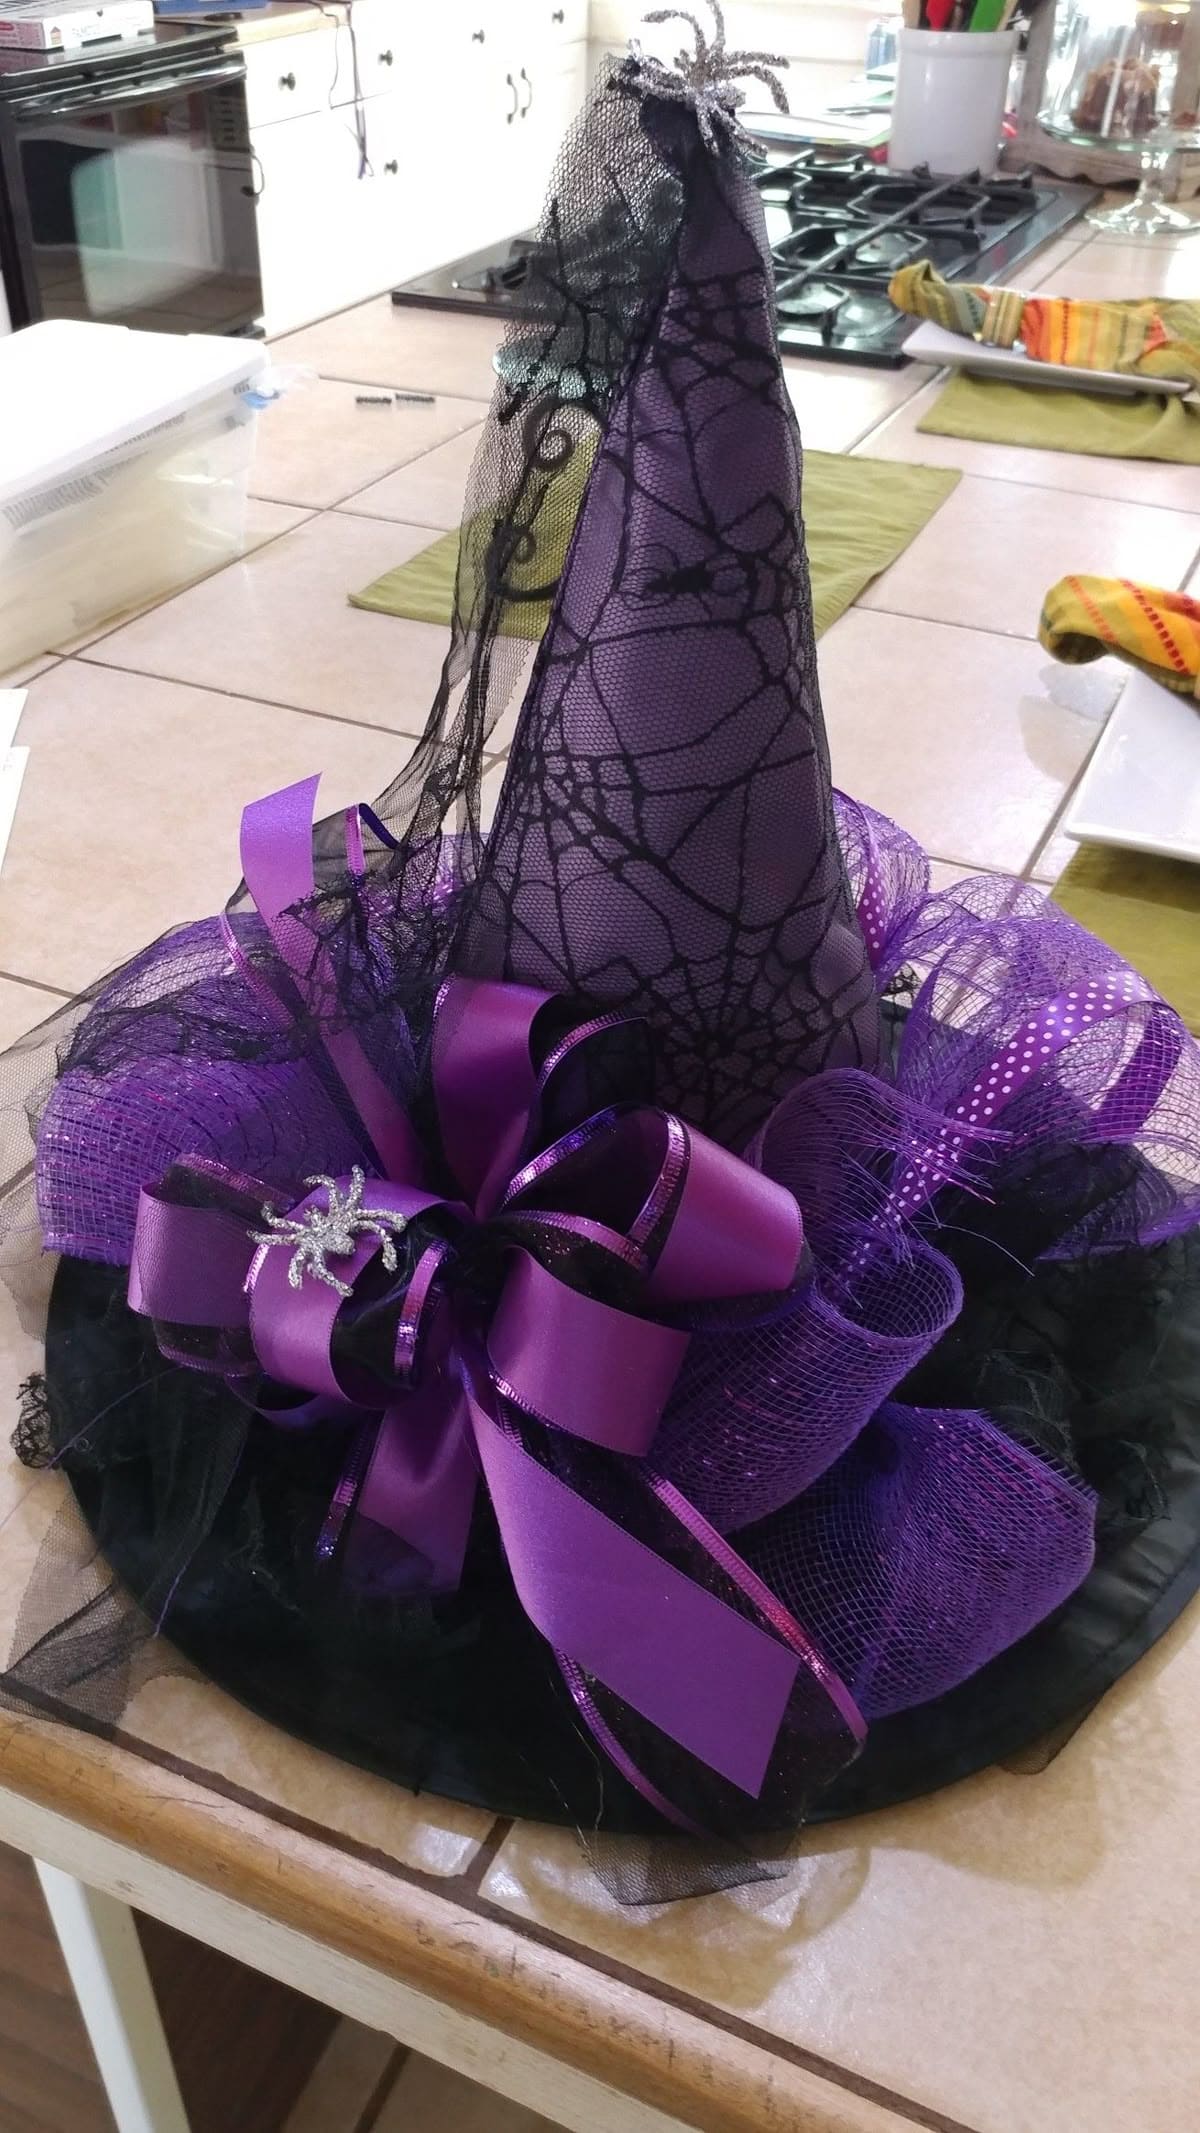
Draped in black mesh patterned with elegant spiderwebs, the hat stands tall in rich purple, catching the eye instantly.
But the real showstopper is that extravagant bow, glossy purple ribbons layered with sparkly black trim, a silver glitter spider tucked in like a brooch.
This piece isn’t just a hat, it’s Halloween couture. Perfect for a table centerpiece, door accent, or costume upgrade, it delivers charm and drama in equal measure.
Materials Needed
- Plain witch hat (black or purple, 12-14 inches tall)
- Black spiderweb mesh fabric (1 yard)
- Purple deco mesh ribbon (2 yards)
- Wide satin ribbon (2 inches thick, 1.5 yards)
- Polka dot ribbon and glittery accents (optional)
- Decorative spider or Halloween brooch
- Hot glue gun and floral wire
Step-by-step Guide
Step 1: Wrap the cone of the hat with black mesh, securing with glue or small stitches.
Step 2: Layer the deco mesh and ribbons around the brim, fluffing them outward for volume.
Step 3: Tie the satin ribbon into a full bow and place it front and center, adding the spider detail last.
Step 4: Adjust the layers to create a balanced, full silhouette. Use floral wire if you need to shape the loops.
#7. Soft Pink Witch Hat for Little Spellcasters
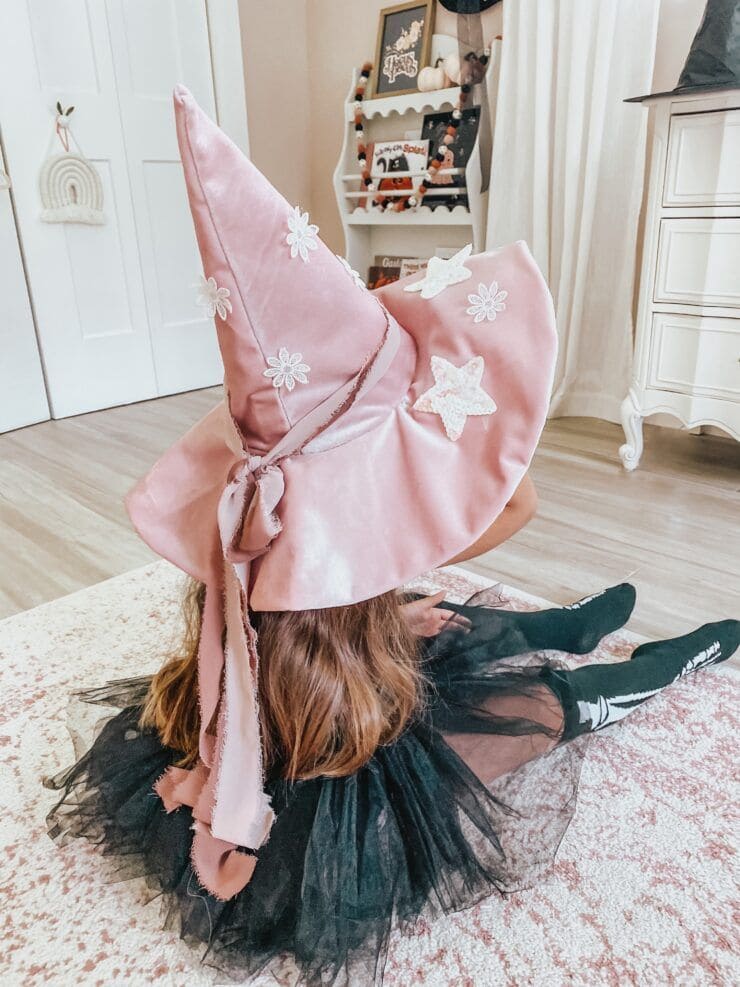 So cute, this dreamy witch hat feels like it wandered out of a fairy tale. Sewn in blush pink velvet with delicate floral and star appliqués, it swaps spooky for sweet with a hint of enchantment.
Specially, the wide, floppy brim and flowing fabric tie in the back make it perfect for little witches who love twirling through their own magical world.
Whether worn as part of a costume or simply for fun dress-up days, it adds softness and sparkle to any spooky season moment.
Materials Needed
- Velvet fabric in dusty pink (1 yard, 45″ wide)
- Interfacing or felt (½ yard)
- 6-8 floral and star iron-on appliqués
- Thread
- Scissors and sewing machine
- Needle
Step-by-step Guide
Step 1: Cut two cone-shaped pieces and two wide circle brims from your velvet and interfacing. Then fuse them together for stability.
Step 2: Sew the cone, then attach it to the brim with a wide, soft seam. You should leave a gap if needed to flip the hat right-side out.
Step 3: Add a long velvet sash and hand-stitch it at the back, allowing it to trail down elegantly.
Step 4: Finally, iron or sew on the floral and star patches, spacing them to look whimsical but balanced.
#8. Talking Sorting Witch Hat Made from Newspaper
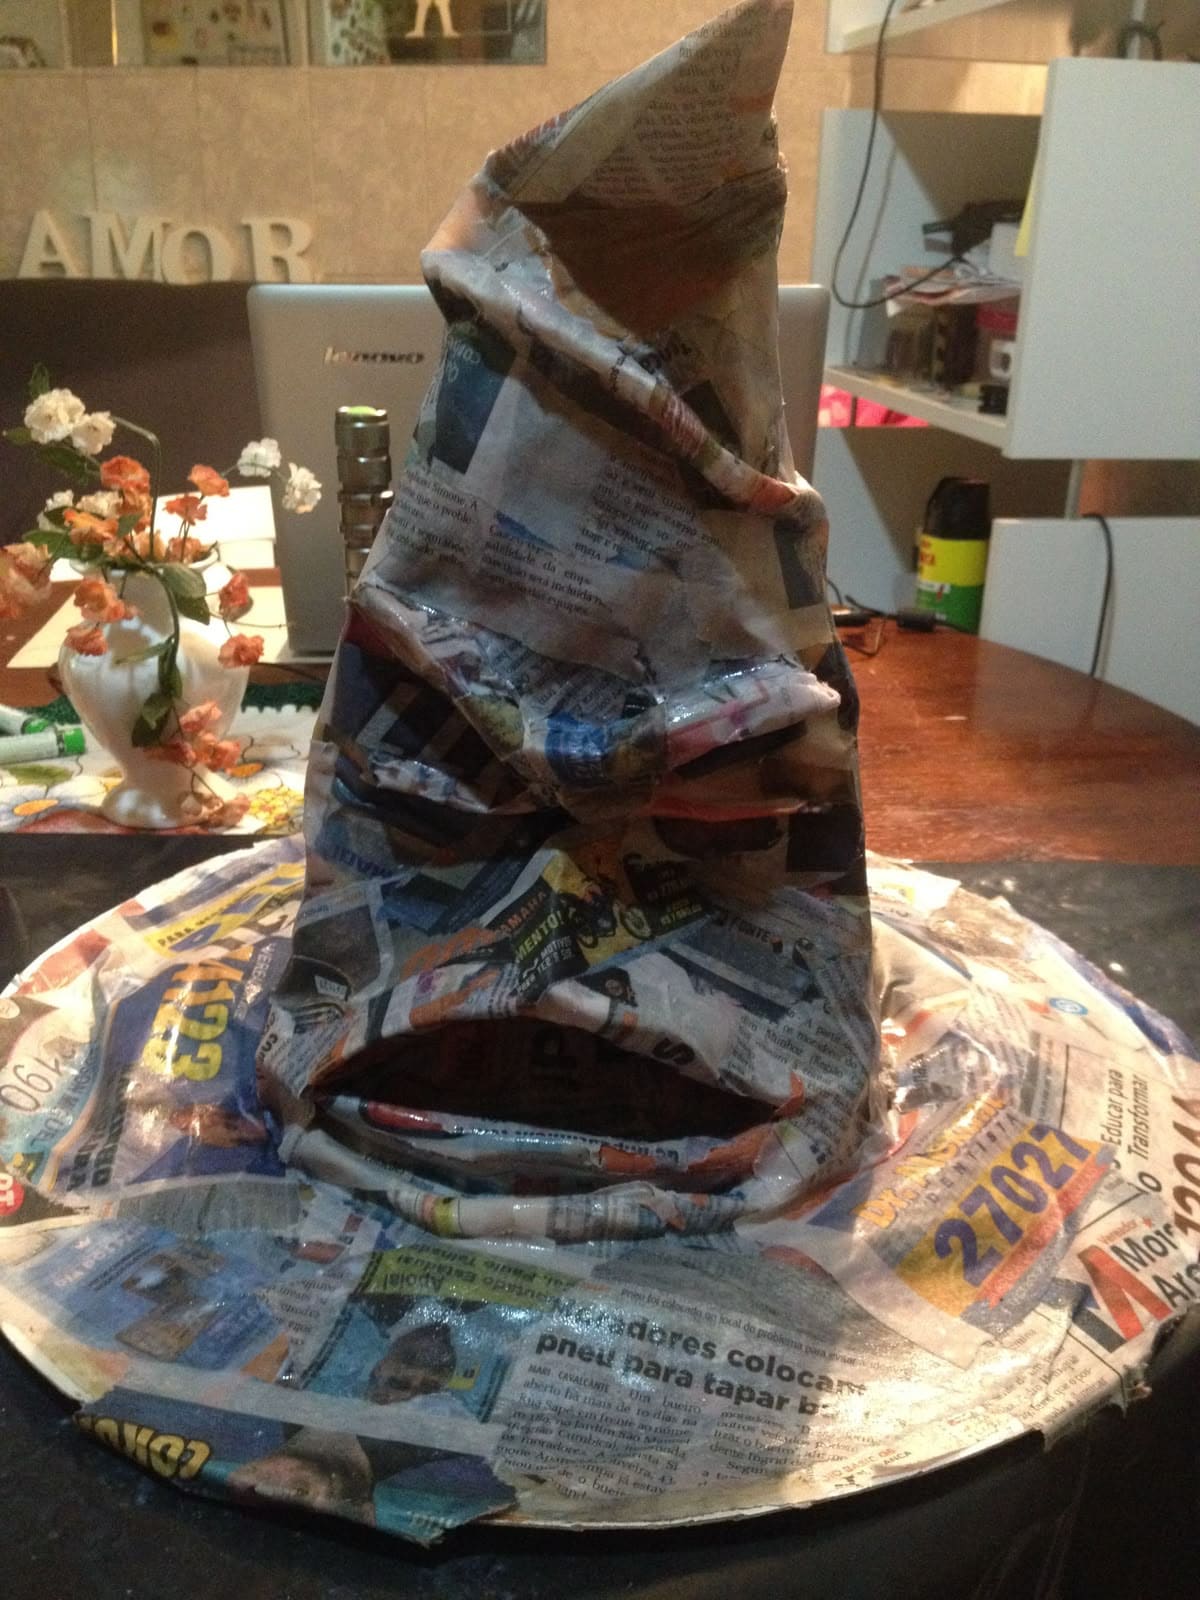
If your Halloween needs a little Hogwarts flair, this DIY sorting hat is perfect for casting a spell of wonder.
Made entirely from newspaper and shaped with dramatic creases and folds, the sculpted mouth and furrowed brow give this hat a personality all its own.
No matter how placed on a table or worn for theatrical fun, this creation stands out as a true handmade marvel. It’s a project that invites patience but rewards you with a centerpiece full of character.
Materials Needed
- 10-12 sheets of newspaper
- 1 balloon (12″ diameter)
- Cardboard circle (12″-14″ diameter)
- Masking tape (1 roll)
- Flour and water
- Acrylic paint (brown or black)
- Paintbrushes (medium and detail sizes)
- Clear varnish or Mod Podge (optional)
- Scissors or X-Acto knife
Step-by-step Guide
Step 1: Inflate the balloon and use it as a base to wrap and shape newspaper strips into a tall, crinkled cone. You need to layer with papier-mâché paste as you go.
Step 2: Let the cone dry fully (overnight recommended). Once hardened, use masking tape to form facial features like eyebrows, mouth, eye sockets, then papier-mâché over them.
Step 3: Cut and attach a large circular brim from cardboard, securing it under the cone with tape and papier-mâché. Let dry again.
Step 4: Paint the entire hat in dark tones, using lighter strokes to accent shadows and contours of the face.
Step 5: Optional: Seal the hat with a layer of clear varnish or Mod Podge for a glossy finish and added durability.
#9. Sparkling Tinsel Witch Hat
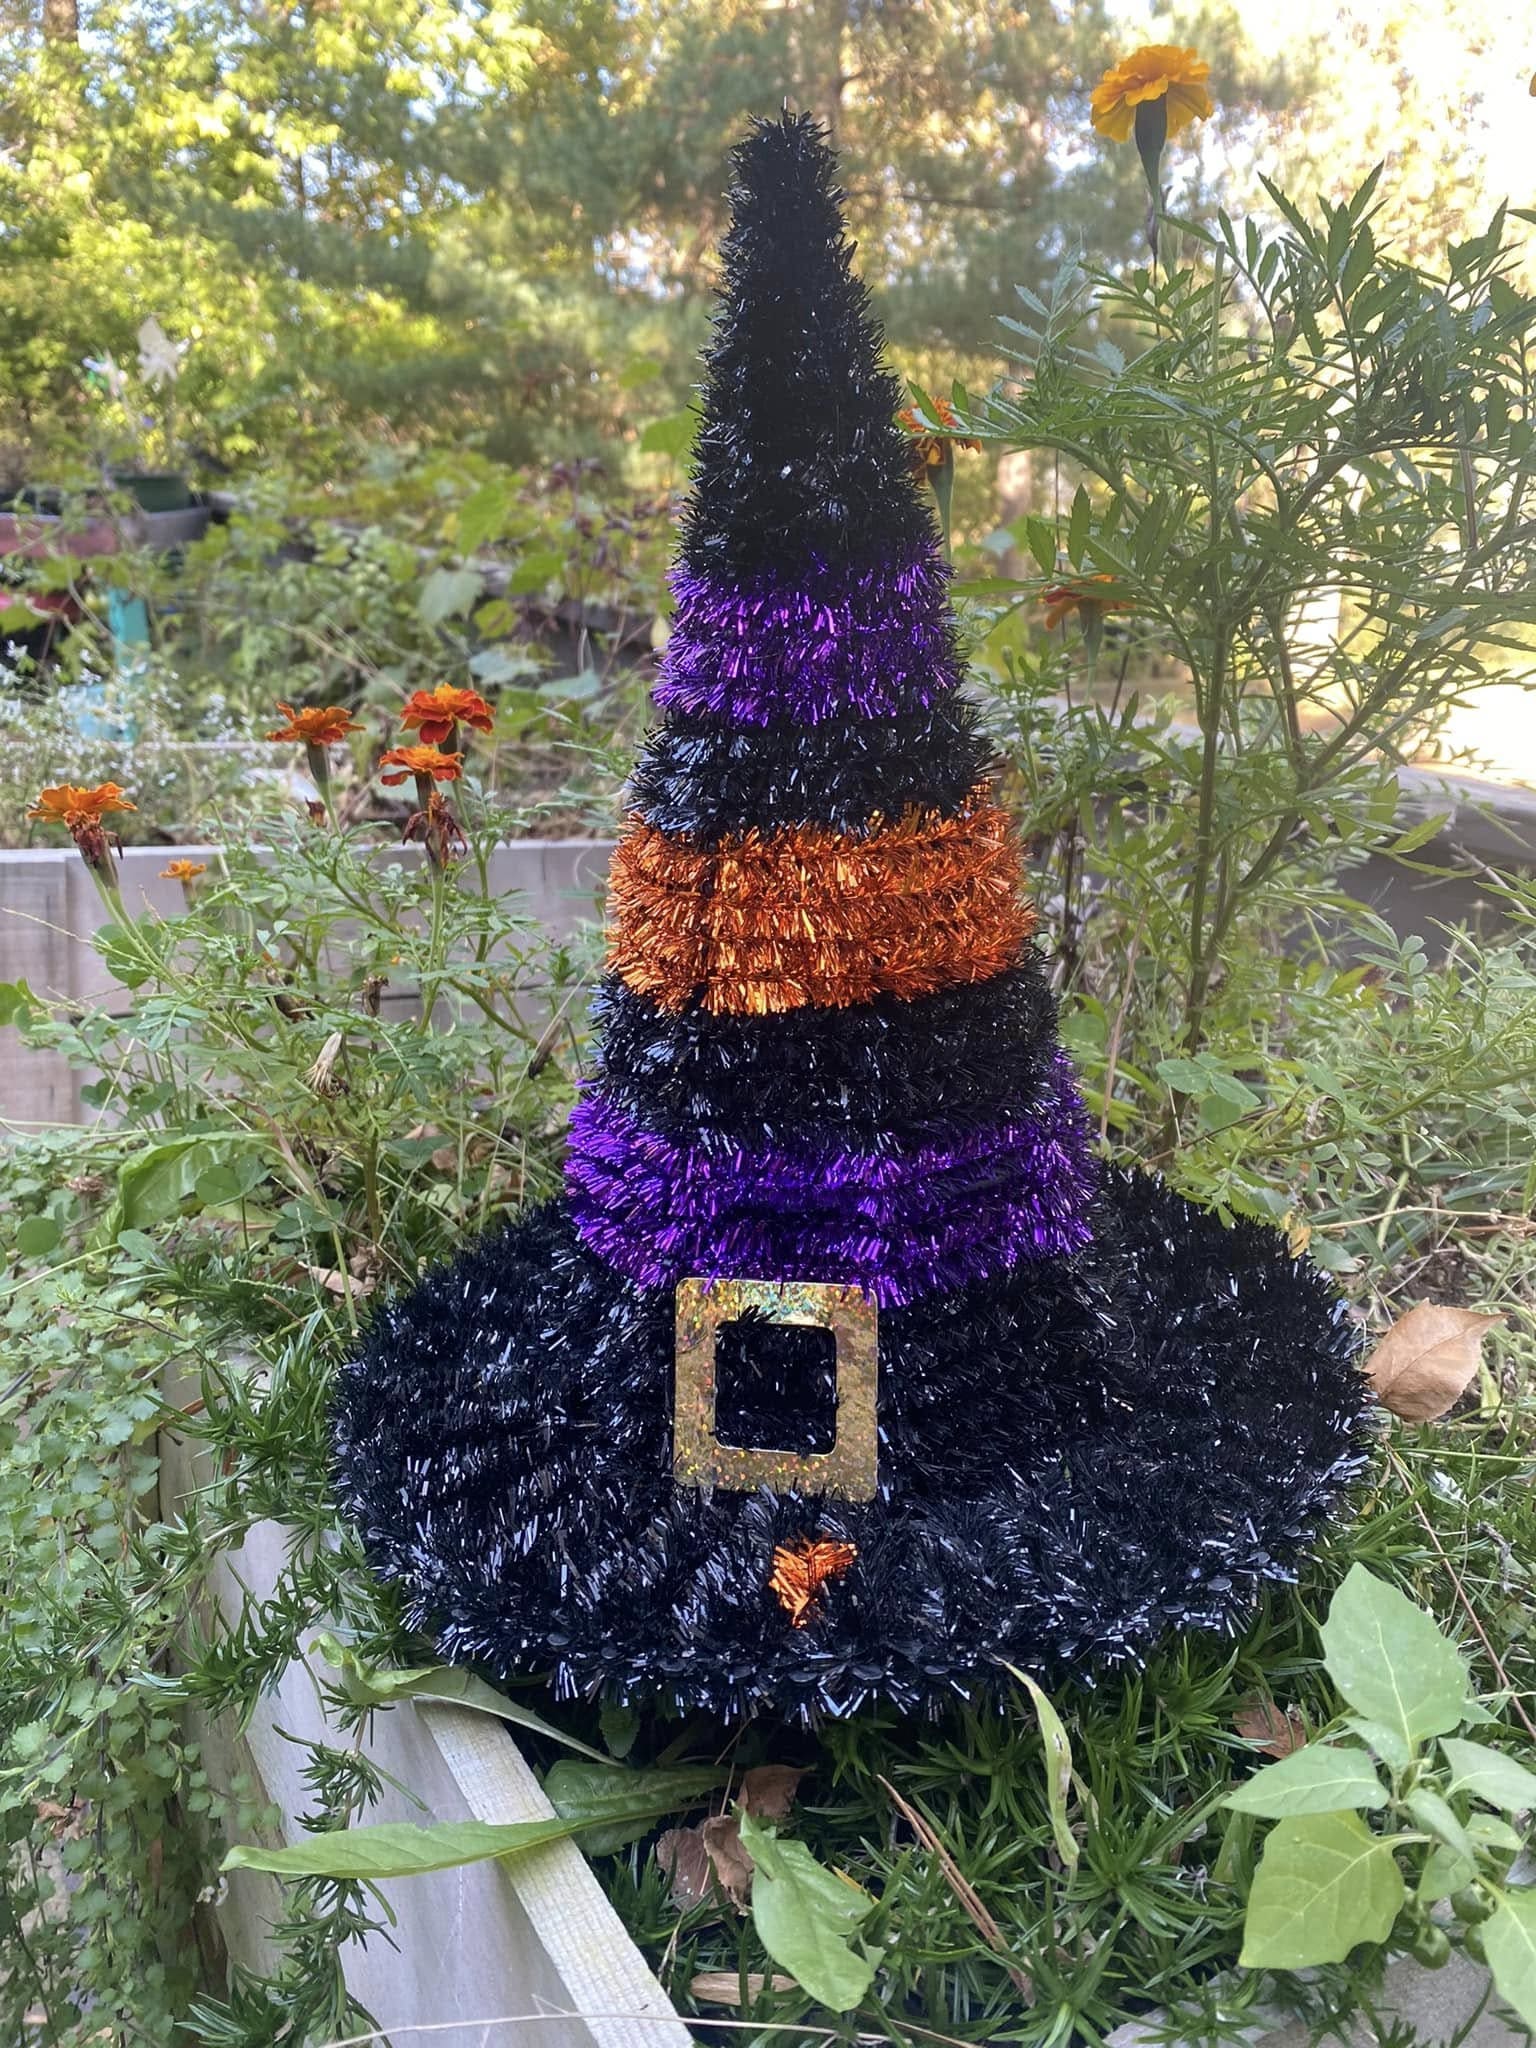
Wrapped in shimmering tinsel garland such as black, orange, and purple, this witch hat instantly catches the eye and bounces light like a disco ball in a haunted house. T
You can place it on a garden post, entry table, or porch to add sparkle to your spooky setup. It’s fun, festive, and low-effort drama for Halloween decor.
Materials Needed
- Cardboard witch hat cone (12-14 inches tall)
- Tinsel garland (6 ft each of black, orange, and purple)
- Hot glue gun + glue sticks
- Gold glitter paper (1 sheet, 8×10 inch)
- Scissors
Step-by-step Guide
Step 1: Begin by wrapping the black tinsel around the brim of your cardboard hat base and hot gluing it in place.
Step 2: Continue upward with orange and purple garland, alternating colors to create bold stripes.
Step 3: Cut a square buckle from glitter paper and attach it to the front using hot glue.
Step 4: Fluff the tinsel gently to fill in any gaps and make the hat look full and even.
#10. Witch Hat with Crow Nest Door
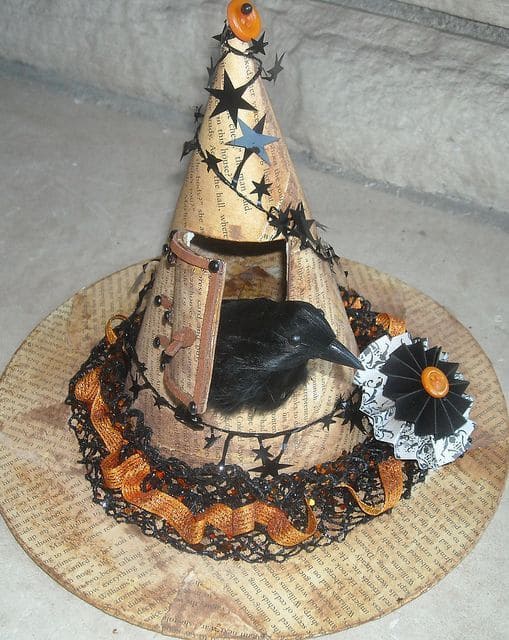
With vintage-style paper and a crow peeking from a cut-out doorway, the hat transforms into a gothic cottage of sorts, perfect for Halloween magic.
Plus, the star garland twining up the cone creates a whimsical, celestial effect, while the orange-and-black lace trim wraps around the brim like a protective enchantment.
That little rosette with a pumpkin button adds charm to the spooky vibe. So you can place this on a shelf or tabletop where curious eyes will want to take a second look.
Materials Needed
- 1 witch hat (10-12″ diameter brim)
- Vintage book pages or scrapbook paper (10+ sheets)
- Black plastic crow (approx. 4″)
- Miniature door and hinges (about 2.5” tall)
- Black star garland (4-5 ft)
- Orange rickrack ribbon (2 ft)
- Black lace trim (2 ft)
- Rosette embellishment or pinwheel (2″)
- Orange button (¾”)
- Hot glue gun and glue sticks
- Scissors
Step-by-step Guide
Step 1: Cover the hat with vintage paper using hot glue, overlapping pieces for a rustic look. Let the seams show as it adds to the charm.
Step 2: Carefully cut out a door-shaped hole in the cone, sized to fit the crow peeking out. Then attach a miniature door to one edge using glue or real hinges if desired.
Step 3: Place and secure the crow inside the cone, facing outward. You can also use extra glue to hold it steady from the inside.
Step 4: Wrap the brim with the black lace and orange ribbon, creating ruffles or waves as you go.
Step 5: Wrap the star garland around the cone, spiraling upward. Then top it with a glued-on orange button for a quirky finish.
Step 6: Add a paper rosette to the brim as a final flourish. And position it off-center for a more artistic flair.
#11. Woven Grapevine Witch Hat
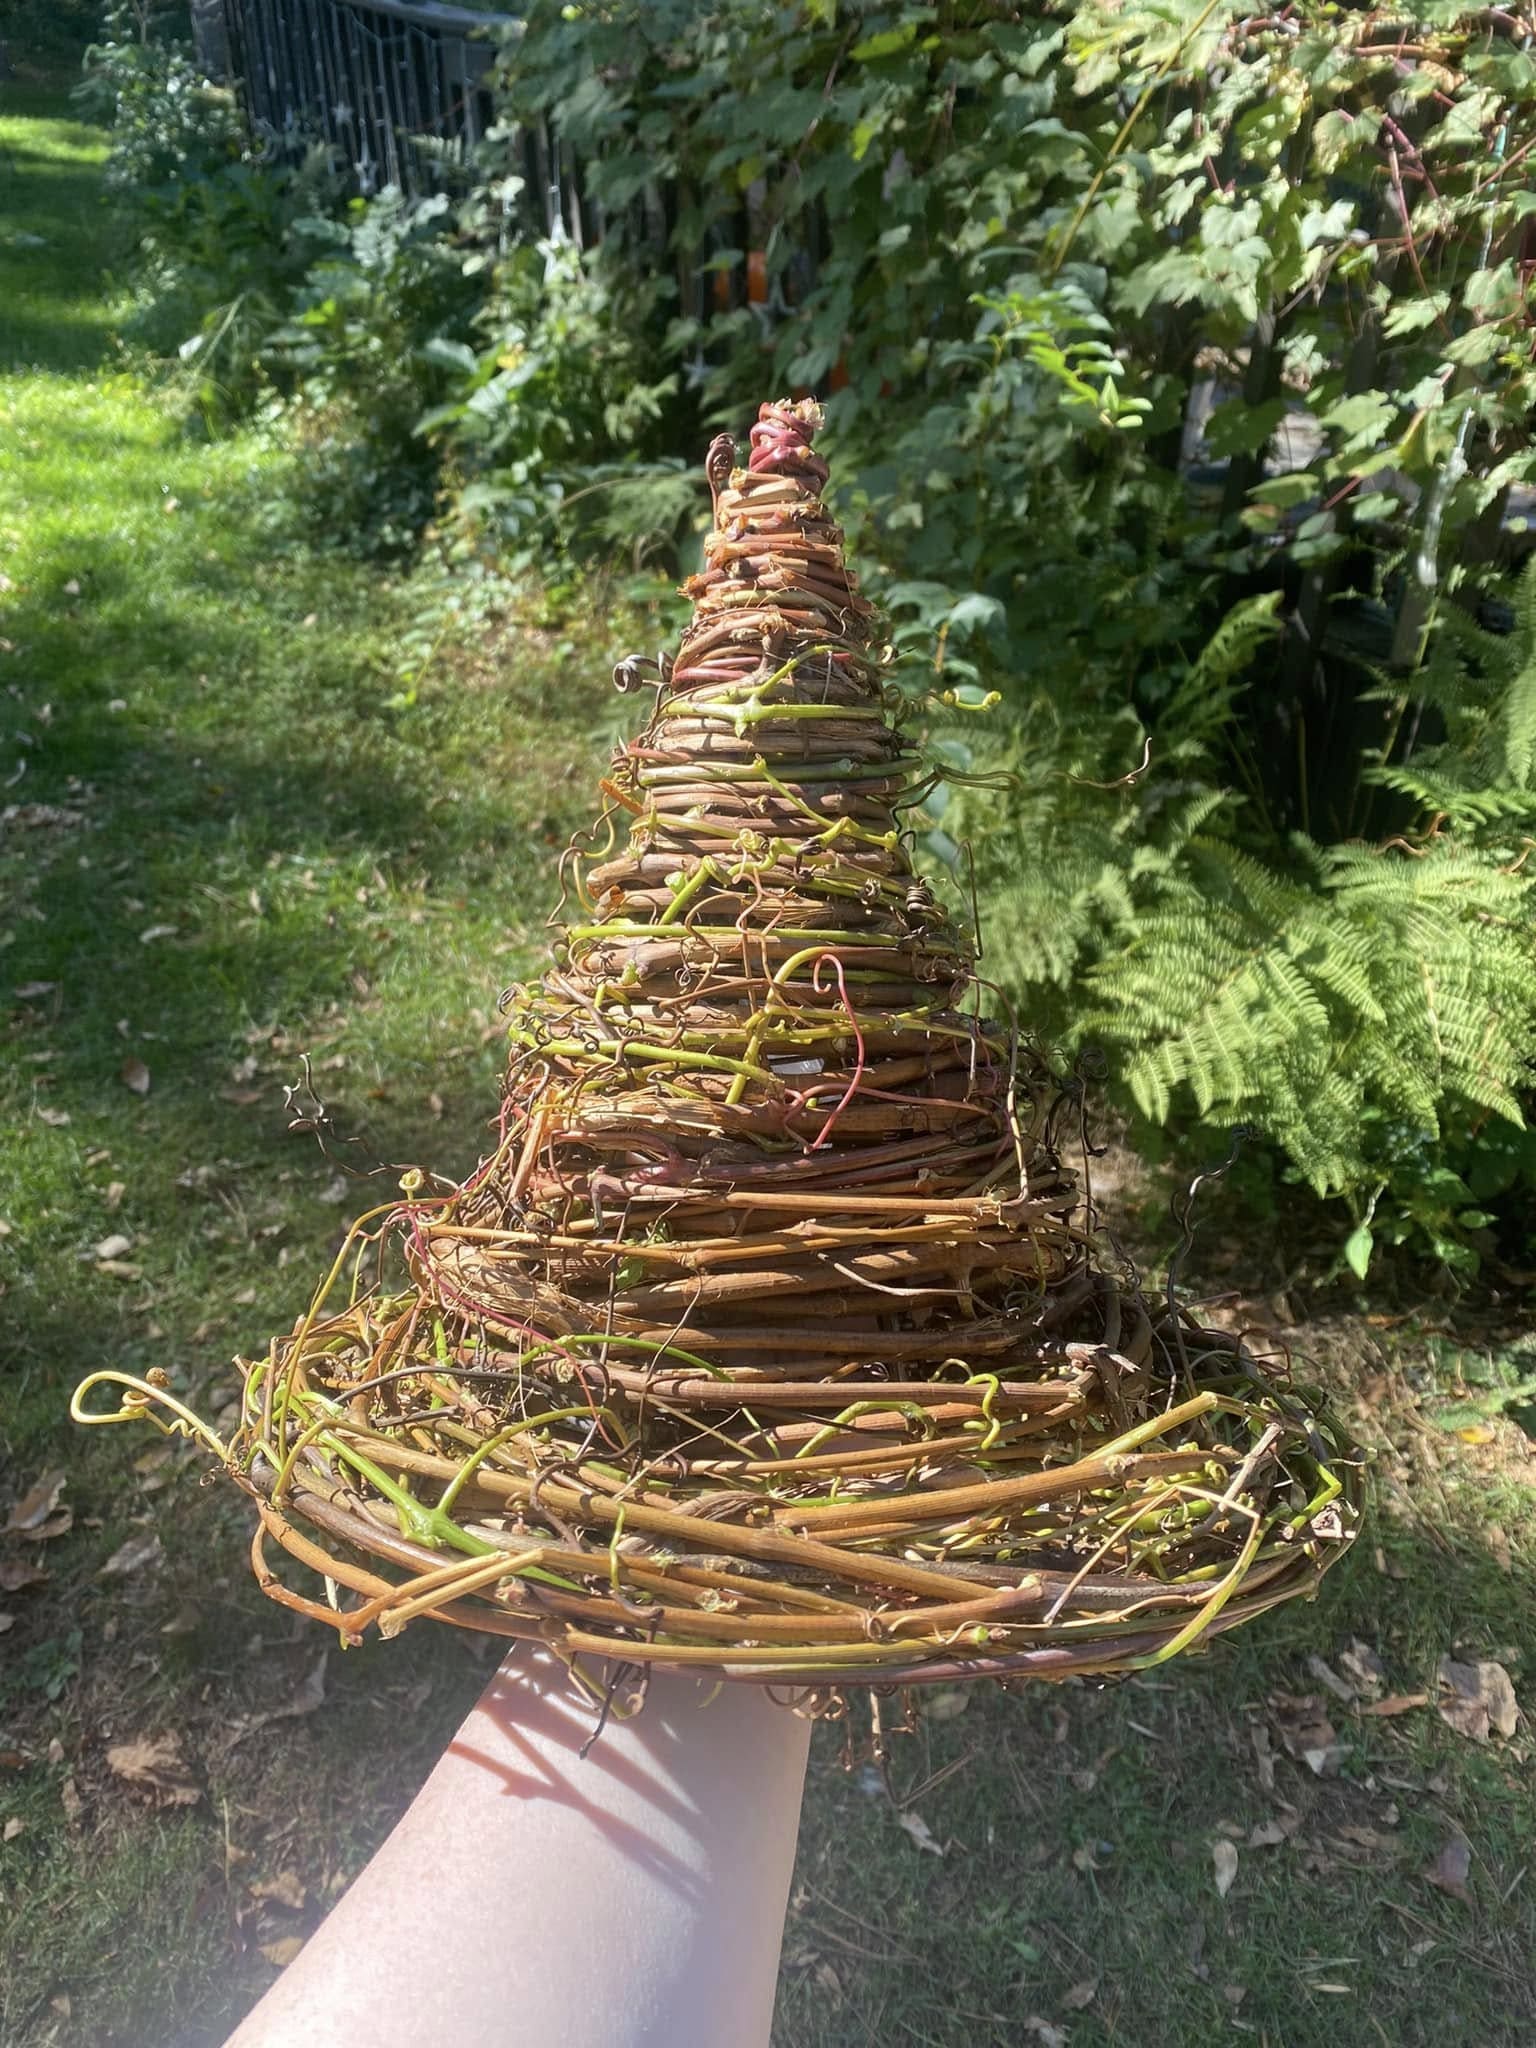
This rustic witch hat brings the forest right to your fingertips. Twisted from real grapevines, it channels woodland magic with every loop and curl.
Furthermore, the wild tendrils give it a naturally spooky silhouette, like it was conjured straight from a haunted thicket. It’s perfect for fall porch decor or a nature-themed Halloween costume.
Materials Needed
- Fresh grapevine (10-15 feet, pliable)
- Wire (thin gauge)
- Floral wire or twine (optional)
- Gloves
- Hat cone form or traffic cone (as a base mold)
Step-by-step Guide
Step 1: Soak grapevines in water overnight to soften them. This helps prevent breakage while bending.
Step 2: Use a cone-shaped form as your base and begin wrapping the vine tightly around the tip, working downward.
Step 3: Keep the cone tight at the top and slightly looser toward the brim. Now you shape a flat spiral for the base, securing with wire as needed.
Step 4: Once shaped, remove from the mold and adjust any wild ends for balance or flair.
#12. Starry DIY Witch Hats for Group Spells
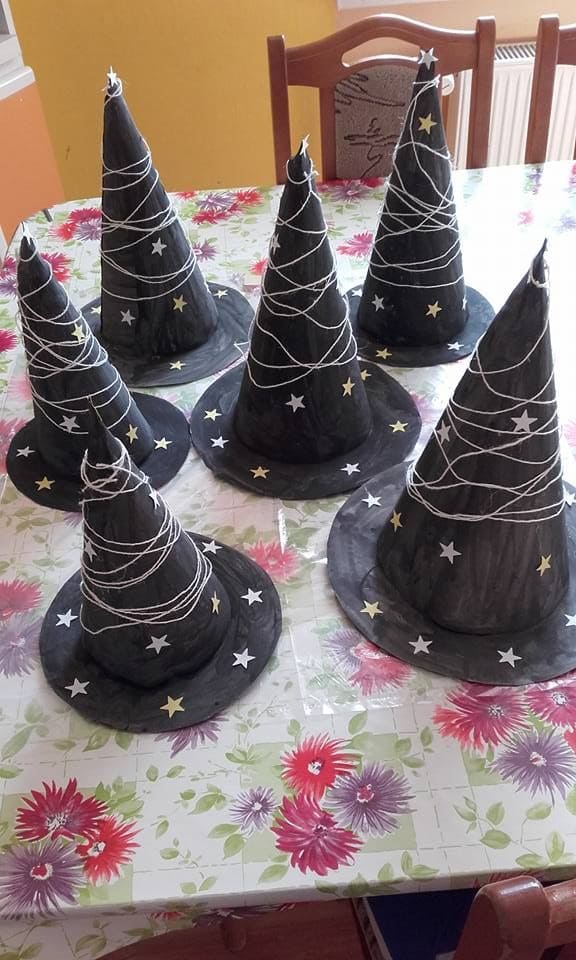
These charming handmade witch hats are perfect for classroom parties, Halloween sleepovers, or coven-style crafting sessions with friends.
Crafted from painted paper and dressed in twine webs and metallic star stickers, they’re simple enough for kids to help make, yet magical enough to steal the spotlight.
Plus, each one has its own little imperfections, which adds to the charm, they look like they’ve been conjured up straight from a spellbook.
Materials Needed
- Black craft paper or cardboard (12×18 inches per hat)
- White yarn or string (approx. 2 feet per hat)
- Gold and silver star stickers (20+ per batch)
- Glue stick or hot glue gun
- Scissors and tape
- Black paint (optional)
Step-by-step Guide
Step 1: Roll a sheet of black paper into a cone and tape or glue the edge to secure. Then you just trim the bottom flat.
Step 2: Cut a wide ring from another piece of paper and glue it under the cone to form the brim.
Step 3: Wrap yarn randomly around the cone to mimic a spiderweb or magical thread.
Step 4: Finally, stick on metallic stars in a scattered, magical pattern.
#13. Whimsical Black Cat and Moon Witch Hat
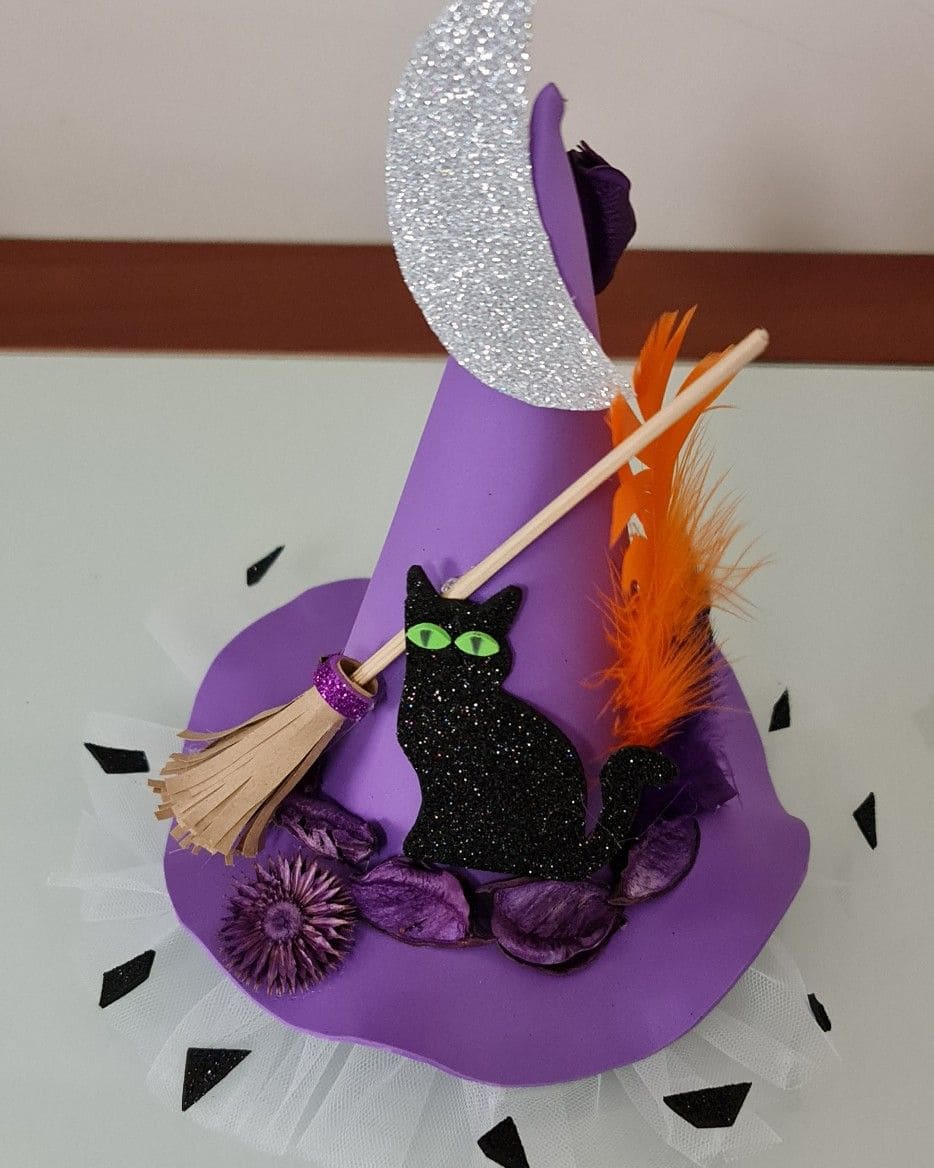
This playful witch hat captures the magical mischief of Halloween night. Cloaked in bright violet with a charming curve, it’s topped with a shimmering silver crescent moon that glitters with mystery.
Bonus, the details keep coming like orange feathers, dried petals, and a splash of purple florals create a magical meadow-like trim. Bits of black confetti and white mesh peek beneath the brim, giving it a tutu-like flair.
Materials Needed
- Foam witch hat (approx. 12 inches tall)
- Silver glitter foam sheet
- Black glitter cat cutout (approx. 3-4 inches tall)
- Mini craft broomstick (about 6 inches long)
- 2-3 orange feathers
- Dried petals and faux florals
- White mesh or tulle (1 yard)
- Hot glue gun, scissors
Step-by-step Guide
Step 1: Cut and glue the silver moon to the upper front of the hat’s point.
Step 2: Attach the black cat cutout near the brim and position the broomstick diagonally for dynamic flair.
Step 3: Glue dried petals, feathers, and florals around the base to form a magical border.
Step 4: Finally, add white mesh underneath the brim and scatter a few glittery cutouts to complete the look.
#14. Glowing-Eyes Paper Mâché Witch Hat
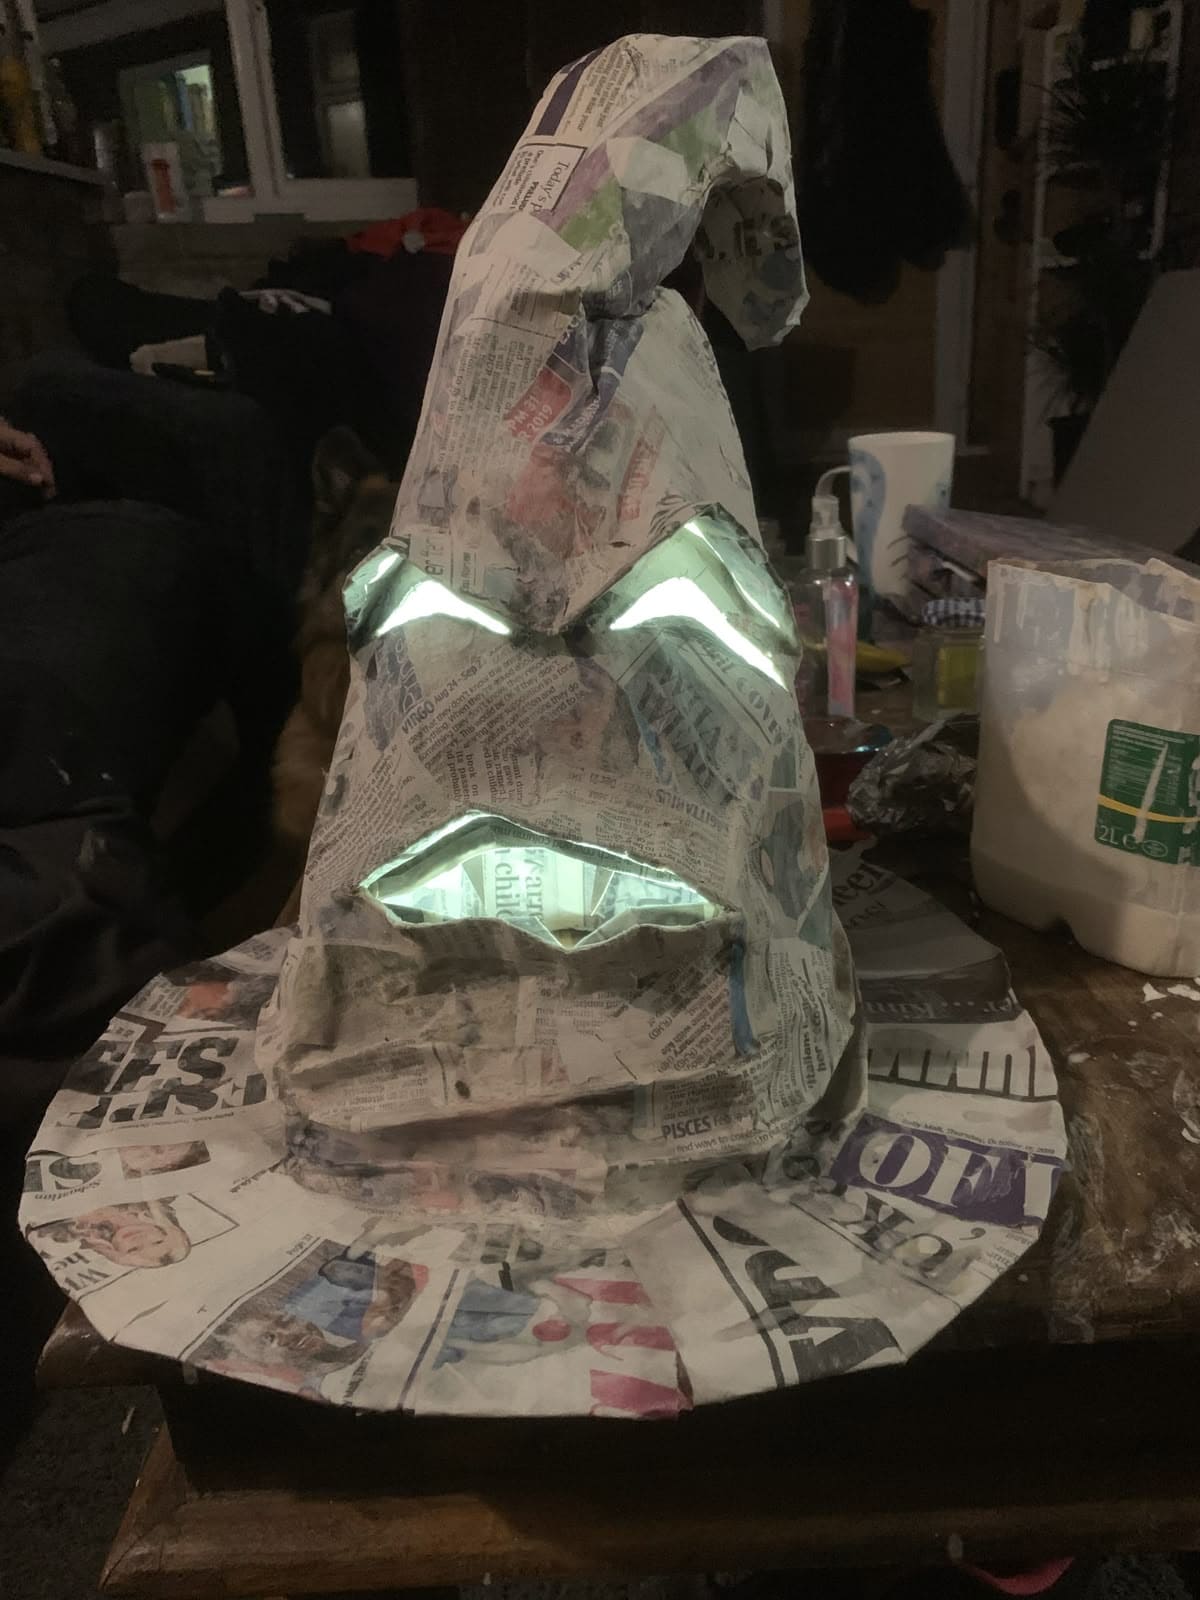
Why not give your Halloween a glowing edge with this animated paper mâché witch hat?
With slanted eyes and a jagged mouth that light up from within, this hat feels like it belongs on the shelf of a mischievous spellcaster.
The uneven curl of the cone adds character, and the visible newspaper print gives it a gritty, handmade charm. It’s eerie but playful, perfect for dimly lit corners, porches, or even as a party prop.
Materials Needed
- Old newspaper (10-15 full pages)
- Flour and water paste (or Mod Podge)
- LED string lights or battery-operated tea lights
- Craft knife or X-Acto blade
- Plastic bowl or balloon
- Black or gray paint (optional)
Step-by-step Guide
Step 1: Build a cone shape using a balloon or mold, then layer newspaper strips dipped in paste to form the base hat shape.
Step 2: Let dry completely, this can take up to 24 hours depending on humidity.
Step 3: Use a craft knife to carefully cut angry eye slits and a mouth. Then insert lights behind these cutouts.
Step 4: Optionally, paint over the paper with dark tones for a more sinister look, or leave the print visible for a fun newspaper texture.
Tip: For extra glow, you can line the inside of the face holes with reflective tape or foil to amplify the light.
#15. Enchanted Forest Witch Hat With Mushroom Accents
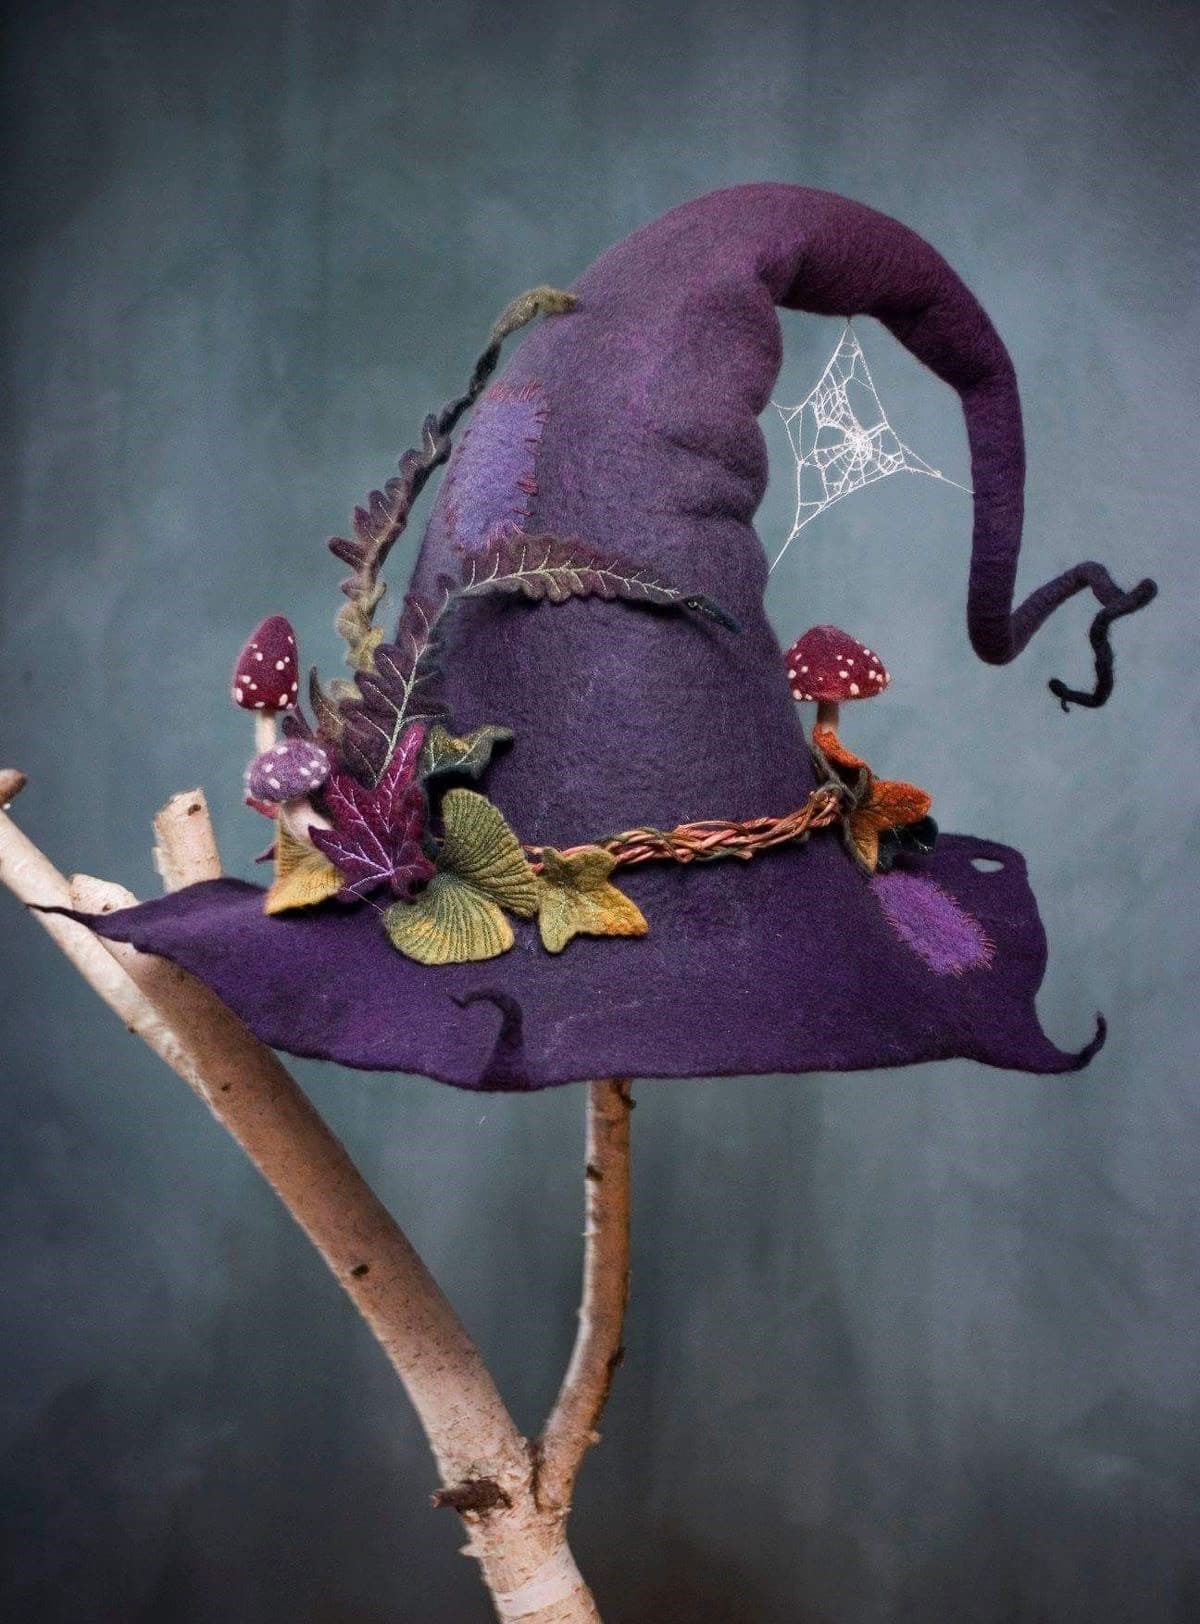
This deep plum witch hat looks like it walked straight out of a woodland fairytale. Its tall, twisted peak is charmingly crooked, giving it that perfect enchanted vibe.
Plus, felted foliage in mossy green, burgundy, and gold wraps around the base, paired with handcrafted mushrooms that peek playfully from the brim.
You can see the stitched leaf appliqués, vine crown, and delicate faux spiderweb add layers of texture and story.
Materials Needed
- Plum wool felt – 1/2 yard (20″x36″)
- Felt scraps in green, brown, mustard, burgundy (6″ each)
- 3-4 mini faux mushrooms or needle-felted mushrooms
- Brown twine or flexible grapevine wire (20 inches)
- Embroidery floss and sewing needle
- Hot glue gun or felt-safe fabric glue
- Optional: cobweb thread or lace to mimic spider silk
Step-by-step Guide
Step 1: Cut out a wide brim and tall cone from the wool felt. Then sew together and gently curl the tip into a whimsical bend using steam and shaping tools.
Step 2: Stitch or glue leaf-shaped felt pieces and tiny mushrooms around the crown. You now wrap twine or grapevine loosely around the base as a nature-inspired band.
Step 3: Add extra details like stitched patches, spiderweb lace, or spiraling felt tendrils for character.
#16. Upcycled Denim Witch Hat Wreath

If you’ve got old jeans lying around, you’ve already got the makings of a quirky, homespun witch hat wreath.
This denim delight turns repurposed fabric into a fun and festive front-door accent. The frayed blue edges, orange ribbons, and little flower embellishment add a charmingly rustic vibe that leans more country cottage witch than spooky sorceress.
You’ll love how this piece blends fall colors with recycled creativity, plus, that side pocket detail makes it extra playful.
Materials Needed
- 2-3 pairs of old denim jeans
- Cardboard or foam board (14″ diameter)
- Hot glue gun and glue sticks
- Orange plaid ribbon (1″ wide, 2 yards)
- Scissors or rotary cutter
- Artificial flower
- Wire or string
Step-by-step Guide
Step 1: Cut a witch hat shape from cardboard or foam board as your base.
Step 2: Use hot glue to wrap strips of denim around the hat’s form, layering them for a pieced-together look.
Step 3: Create the brim fringe by tying short denim strips (about 1″ x 6″) around the base, mixing in orange ribbon pieces for pop.
Step 4: Glue on a small denim pocket and tuck a faux flower or accent inside for flair.
Step 5: Finally, attach a string or wire to the back for easy hanging on hooks or nails.
#17. Witch Hat Pumpkin Lampstand
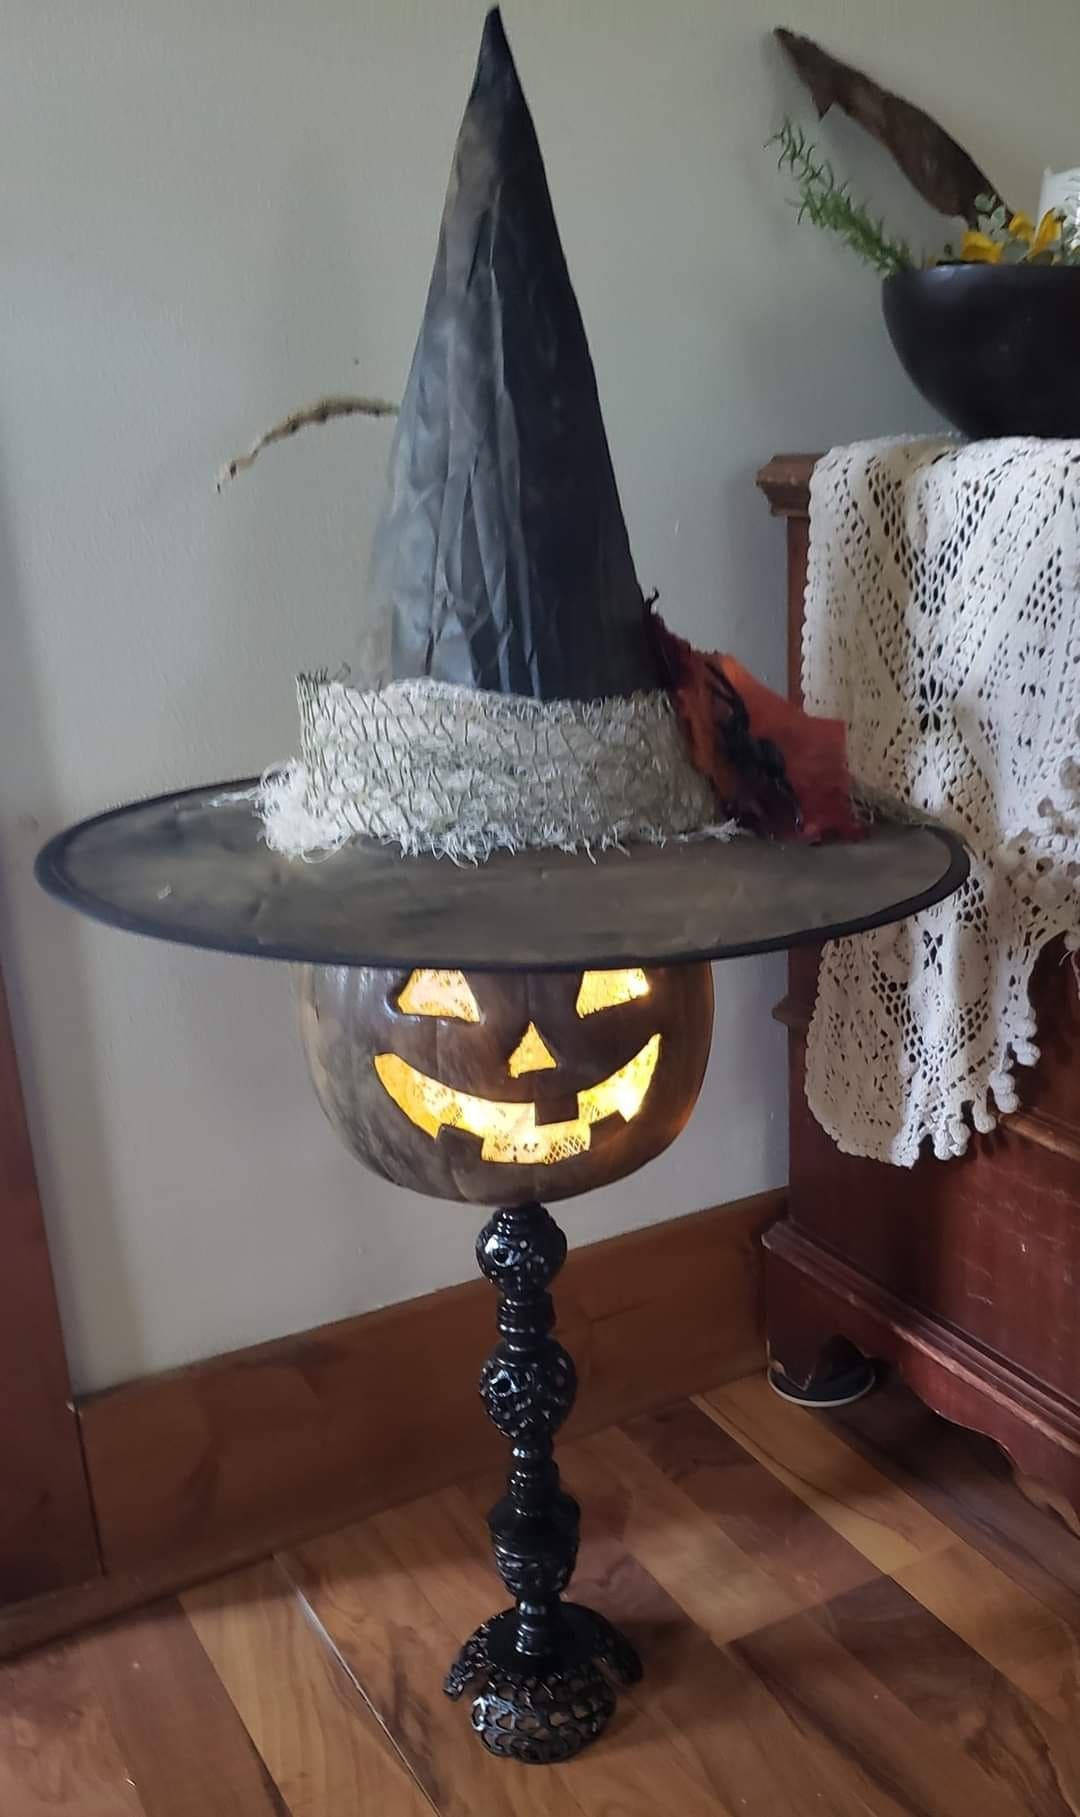
This one’s pure Halloween magic. A glowing jack-o’-lantern head wears a tattered witch hat, perched high on a sculpted black candlestick stand.
Specially, the rustic hat, with its worn brim and gauzy band, adds a storybook witch vibe like something conjured up in an enchanted attic. Its eerie light casts shadows that dance off the walls, making it more than just a decoration.
Not only that, you can place it by the door or in a dim hallway for maximum impact. The combination of soft lighting, vintage texture, and spooky charm is simply irresistible.
Materials Needed
- Plastic or foam pumpkin with carved face (8-10 inches wide)
- Battery-operated LED lights (warm white)
- Old black witch hat with brim
- Distressed gauze (approx. 24 inches)
- Decorative black candlestick (18-24 inches tall)
- Hot glue gun and scissors
Step-by-step Guide
Step 1: Insert the LED lights inside the pumpkin and secure the lid or base.
Step 2: Position the pumpkin securely on top of the candlestick. You can use hot glue or padding to stabilize if needed.
Step 3: Add the witch hat on top of the pumpkin. Then tuck the gauze around the base of the hat for a worn, ghostly effect.
Step 4: Place it in a shadowy corner and turn on the lights to let the eerie glow bring the hat and face to life.
#18. Rustic Witch Hat with Fall Skeleton Charm
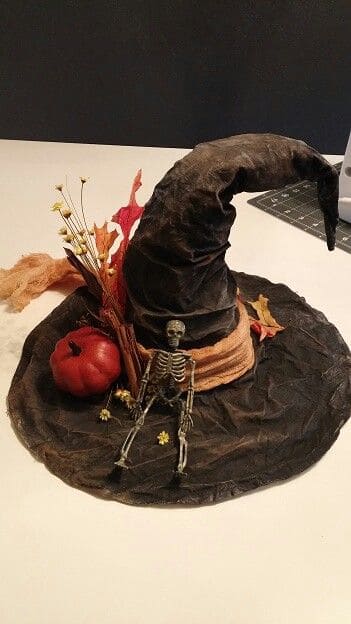
You can almost hear the crunch of autumn leaves with this rustic witch hat centerpiece. Its gently slouched form and textured black paper make it feel like it was just plucked from a forest cottage.
Wrapped in aged cheesecloth and decorated with faux leaves, dried sprigs, and a tiny skeleton friend, this piece blends Halloween charm with cozy fall vibes.
Plus, each element feels thoughtfully placed, creating a story without words with one of magic, harvest, and quiet spells under full moons.
Materials Needed
- Black tissue paper or crepe paper (4-5 large sheets)
- Cardboard base (12″-14″ round)
- Cheesecloth (about 1 yard, tea-stained if possible)
- Mini plastic skeleton (4″-6″)
- Faux mini pumpkin, leaves, and dried florals
- Hot glue gun and glue sticks
- Craft wire or tape
Step-by-step Guide
Step 1: Shape the cone using black tissue paper over a wire or taped frame. Then secure the cone to the round cardboard base with glue.
Step 2: Wrap the base with additional tissue to give it fullness. Then loosely drape the cheesecloth around the base and tuck in spots for a weathered look.
Step 3: Arrange and glue your faux pumpkin, skeleton, and autumn leaves on one side of the brim. Let them lean naturally to add a relaxed woodland touch.
Step 4: Adjust the tip of the hat to give it a bent, storybook character. Use a bit of glue if needed to keep it in place.
#19. Patchwork Witch Hat with Embroidered Eye
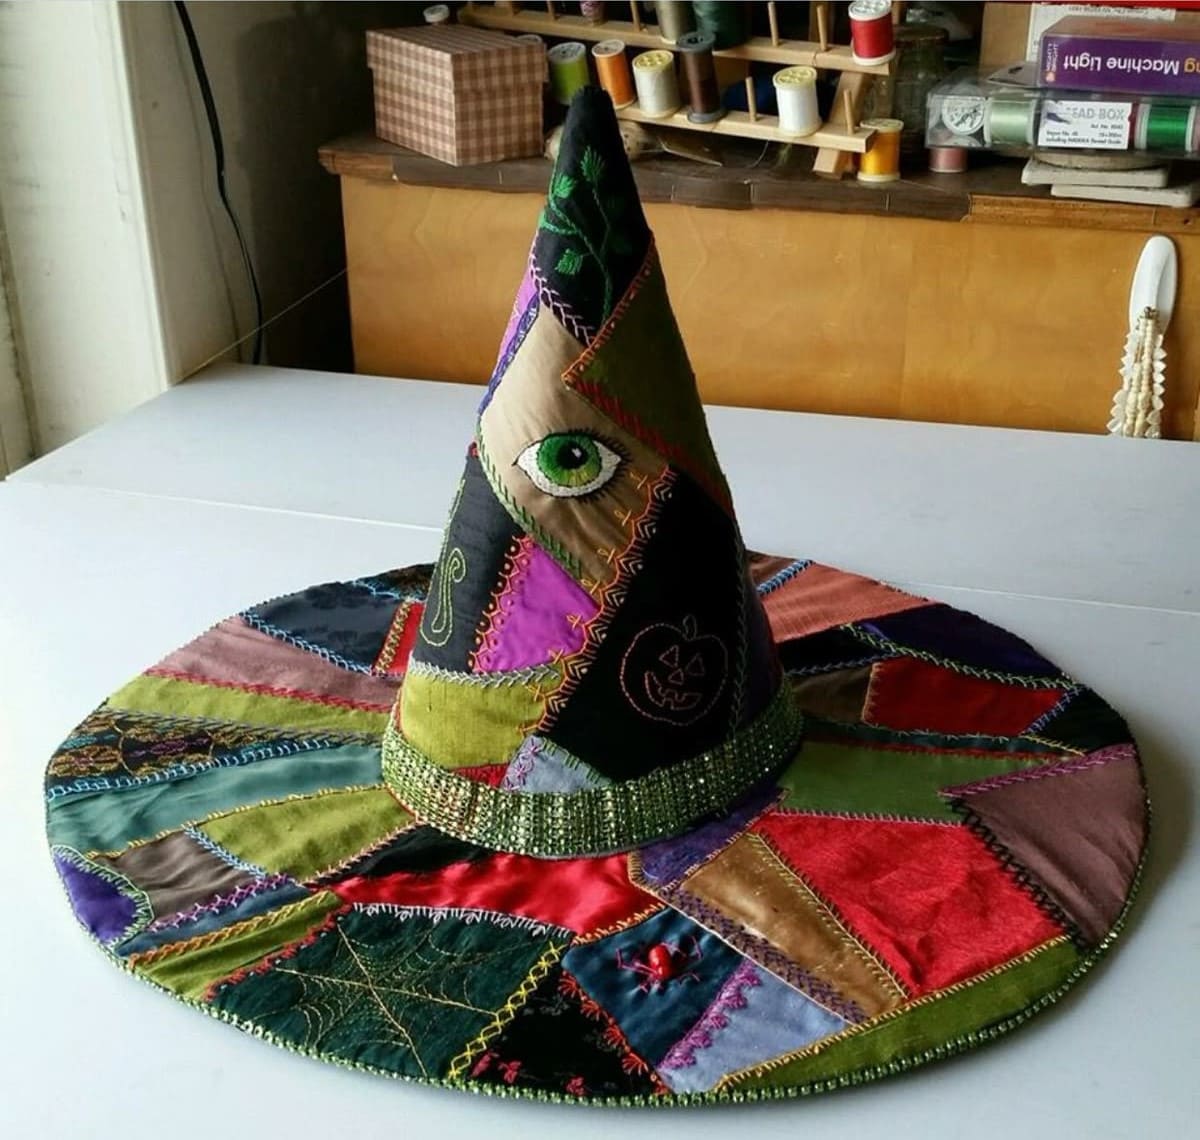
Amazingly, this handcrafted patchwork witch hat is a one-of-a-kind textile masterpiece. Made for a quilt show raffle, it blends bold colors, hand embroidery, and spooky charm with fine craftsmanship.
Also, each fabric scrap, whether velvet, satin, or brocade, is stitched with colorful thread, forming decorative zigzags, leafy vines, and Halloween motifs like a Jack-o’-lantern and spider.
The green embroidered eye gives it a slightly magical, all-seeing aura that feels both playful and mystical.
Materials Needed
- Assorted fabric scraps (each ~5″x5″) in rich Halloween colors
- Quilt batting – 1/2 yard
- Embroidery floss in assorted colors
- Needle, sewing machine, thread, scissors
- Fusible interfacing (optional)
- Printable witch hat template
Step-by-step Guide
Step 1: Cut cone and brim shapes using a template. Now piece together fabric scraps to form patchwork panels.
Step 2: Quilt panels onto batting, then embroider designs, such as leaves, stars, or an eye, across seams.
Step 3: Assemble cone and brim, then finish with a decorative trim or ribbon around the base.
#20. Transparent Autumn Leaf Witch Hat
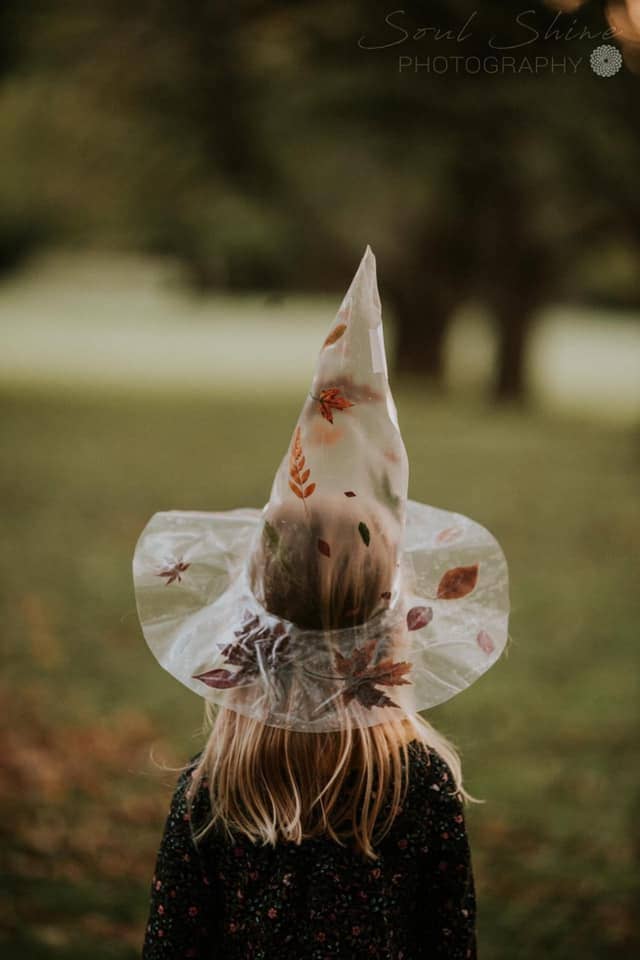
Made from sheer, translucent material and decorated with delicate fall foliage, this ethereal witch hat captures the spirit of October with a light, magical touch.
The soft colors of the leaves seem to glow against the gentle fabric, making it perfect for an autumn photo shoot or fairy-inspired costume.
Materials Needed
- Clear vinyl sheet or transparent fabric (1 yard)
- 20-30 artificial fall leaves (small to medium)
- Fabric glue or hot glue
- Scissors
- Needle and thread or strong adhesive tape
Step-by-step Guide
Step 1: Cut and shape the transparent fabric into a cone for the top of the hat and a wide ring for the brim.
Step 2: Stitch or glue the cone and brim together, securing the seam carefully.
Step 3: Arrange and glue fall leaves onto the hat, spacing them out to create a floating effect.
#21. Whimsical Crochet Witch Hat
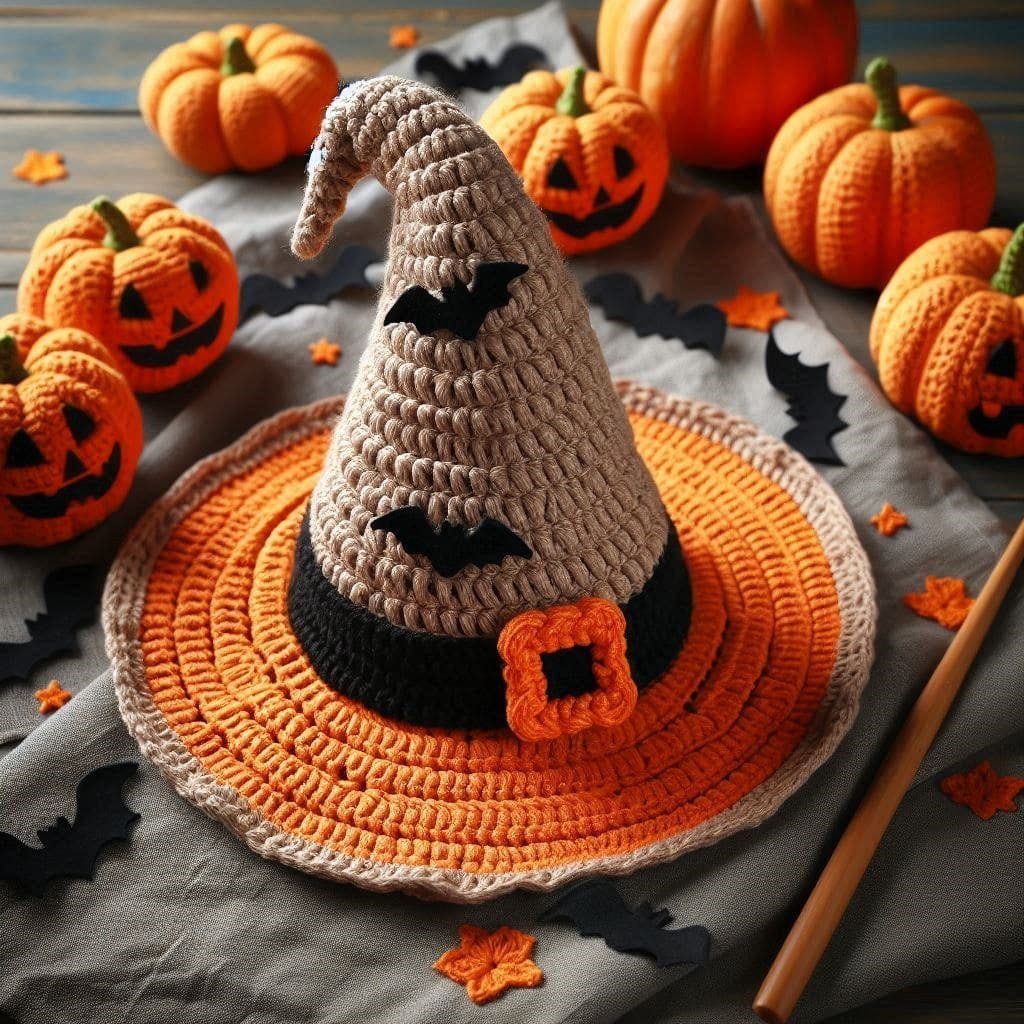
There’s something undeniably heartwarming about this crochet witch hat. With its playful curl at the top and festive orange brim, it feels like it was made for a Halloween storybook.
Plus, the textured yarn gives it cozy charm, while the felt bats and chunky buckle add just the right amount of spook. It’s great for anyone who wants a handmade look without being too serious or spooky.
Ideal for little ones, seasonal decor, or even autumn-themed photo sessions. This piece adds personality to any Halloween scene.
Materials Needed
- Worsted weight yarn in tan, orange, and black (approximately 200g total)
- Crochet hook (size H/5.0mm)
- Black felt sheet (1 sheet for bats)
- Yarn needle
- Hot glue or fabric glue
- Scissors
Step-by-step Guide
Step 1: Begin with the hat cone. Use tan yarn to crochet in the round, increasing slowly to form a pointed shape. Then curve the tip slightly by shaping as you go.
Step 2: Switch to orange and work outward to form the brim. You now add a round of tan for a finished edge.
Step 3: Crochet a black band and orange buckle separately, then stitch them onto the base of the cone.
Step 4: Finally, cut small bats from black felt and glue them onto the hat.
#22. DIY Sorting Hat-Inspired Witch Hat
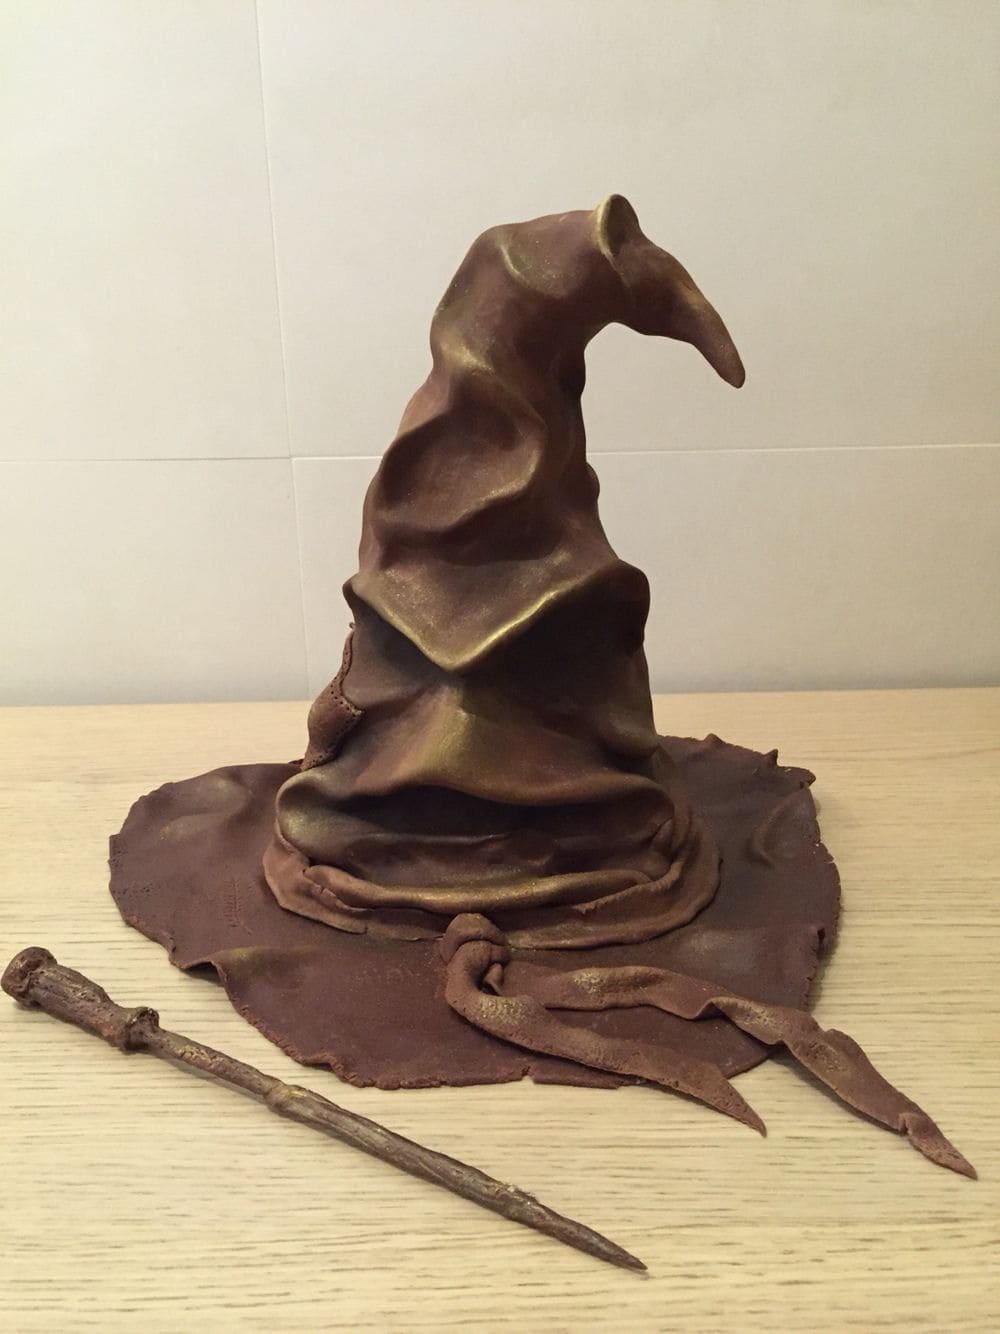
For Harry Potter fans or lovers of all things whimsical, this Sorting Hat-inspired DIY is pure magic.
Sculpted with deep folds, a pointed curve, and a mischievous face, it instantly stirs up sorting ceremony nostalgia. The earthy tones and metallic gold highlights give it a timeworn wizard’s charm.
Plus, paired with a wand and placed on a shelf or table, this piece feels like it came straight out of Hogwarts. You’ll enjoy how the crinkles and dips in the hat create natural shadows.
Materials Needed
- Brown air-dry clay or paper clay (about 1-1.5 lbs)
- Gold paint or metallic wax (1 small jar)
- Baseboard (round, 12″ diameter)
- Rolling pin and sculpting tools
- Hot glue or craft glue
- Optional: wand prop
Step-by-step Guide
Step 1: Roll out a clay sheet wide enough for the brim and cut into a wide circle. Then form the conical top with a separate piece and attach it to the center.
Step 2: Use your fingers or tools to sculpt the face, a pointed brow, eye folds, and a puckered mouth shape, then blend into the cone.
Step 3: Once dry, add shadows and character by dry brushing gold paint over the surface, focusing on raised edges and folds.
Step 4: Attach a faux tie or clay strip around the base for extra flair. Set it beside a wand for the full magical effect.
Tip: If working with kids, use air-dry modeling foam for a lighter version that’s easier to shape and safe for all ages.
#23. Oversized Foam Witch Hat with Spiral Tip
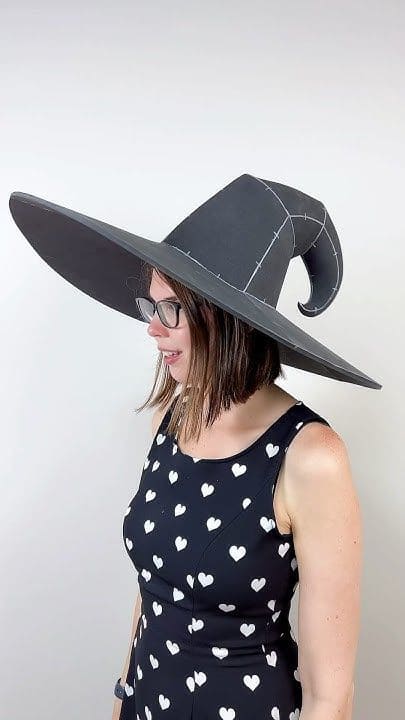
If you’re going bold this Halloween, this dramatic oversized witch hat is a total show-stealer. Made from black craft foam and featuring a sharp spiral tip, it adds a cartoonish flair that feels straight out of a fantasy world.
Despite its size, it’s lightweight and easy to wear, perfect for photo ops, costume parties, or themed events.
The faux stitching detail adds character without needing actual sewing. I believe this is one of those hats that makes everyone ask, “Did you make that?”
Materials Needed
- Black craft foam sheets (2-3 large sheets, 5mm thick)
- Hot glue gun with glue sticks
- Craft knife and scissors
- White paint pen or silver gel pen
- Headband or elastic
- Paper
Step-by-step Guide
Step 1: Draw and cut out a large cone pattern and circular brim from your foam sheets. Then test size by wrapping the cone to fit your head or headband base.
Step 2: Use a hot glue gun to seal the cone, then cut a slit in the brim center and slide the cone through. Next, glue in place from underneath for a clean look.
Step 3: Curl the tip into a spiral while the foam is still warm and flexible, hold until it sets. You can reinforce with glue if needed.
Step 4: Add faux stitch lines using a white paint pen, then attach a headband or elastic inside for stability when wearing.
#24. Paper Mâché Witch Hat Base
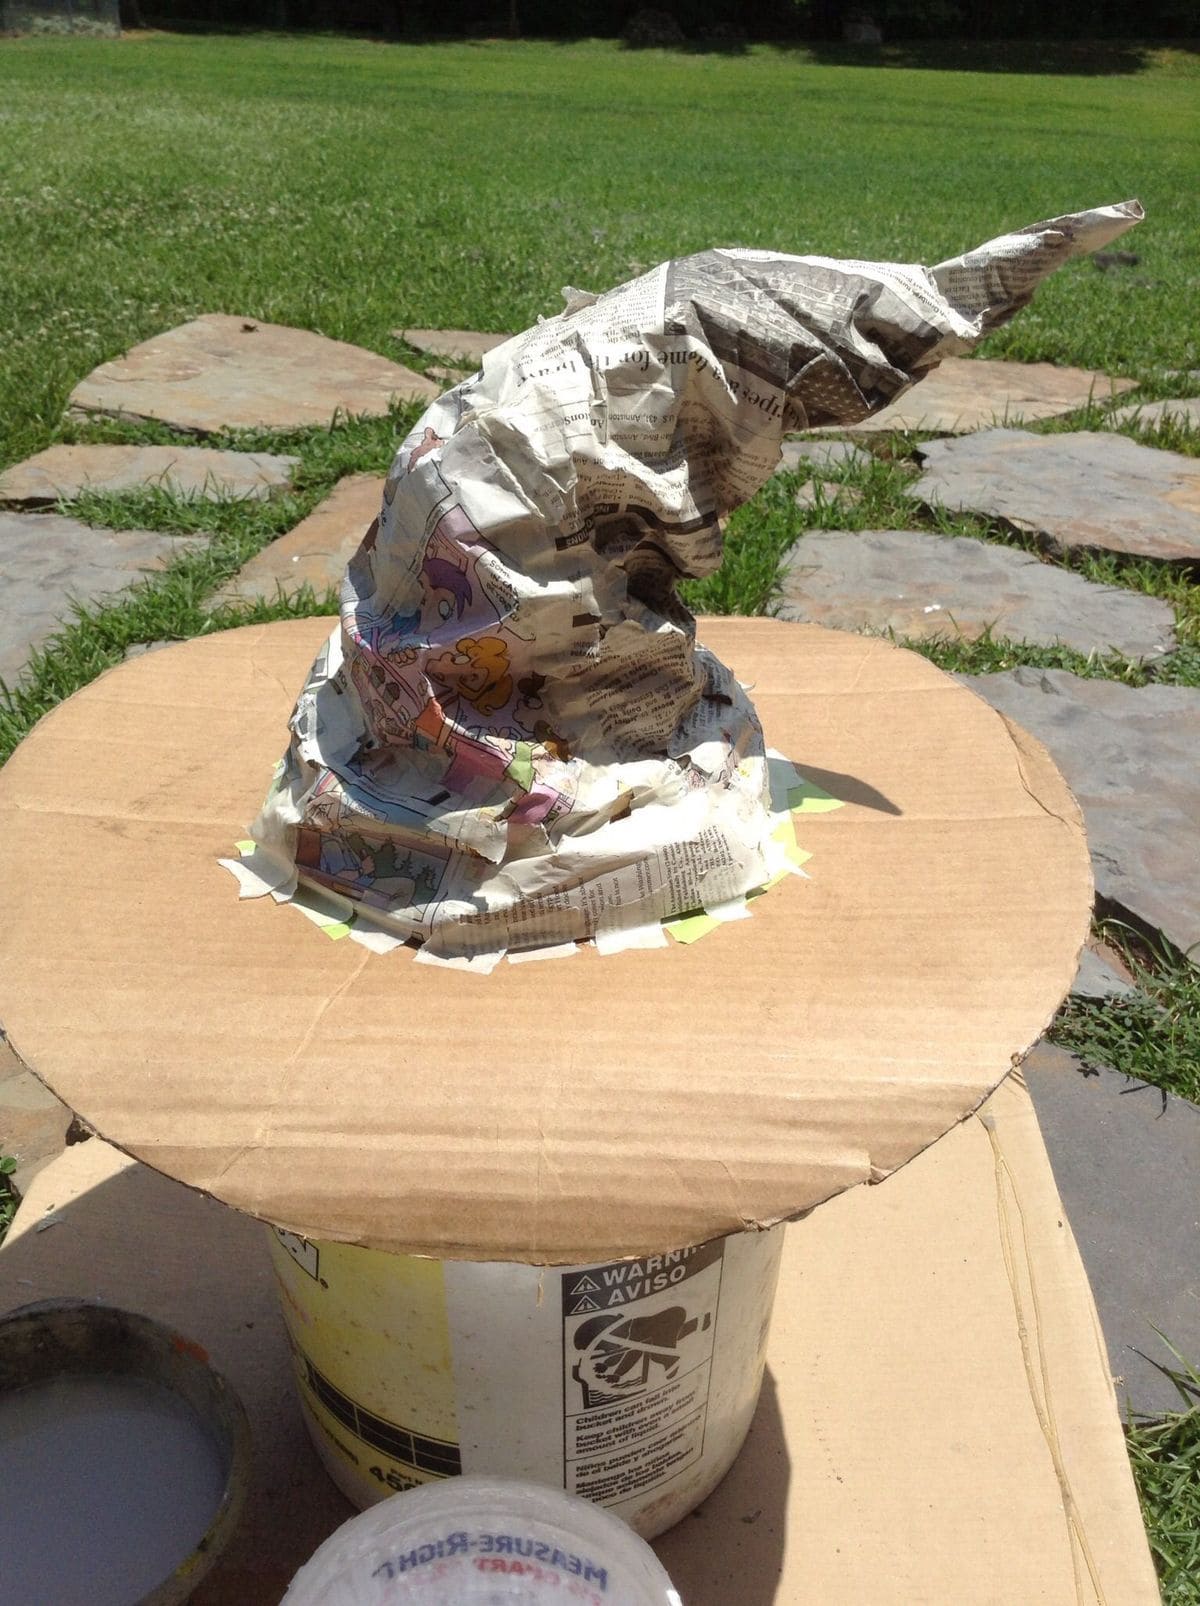
You don’t have to wait for a full moon to start crafting something magical. This in-progress witch hat, made from humble newspaper and a cardboard brim, is a glimpse into the spellbinding process of paper mâché creativity.
It’s all about patience and shaping with your hands, wrinkled paper here, a twist there, and suddenly you’ve got a hat brimming with attitude.
Specially, this raw stage offers you total control over the final look: jagged and rustic or smooth and elegant. It’s like sculpting your own magic.
Materials Needed
- Old newspaper (about 12 full sheets)
- Flour and water paste or craft glue mix
- Cardboard circle (12-14 inch diameter)
- Painters or masking tape
- Bowl or bucket
Step-by-step Guide
Step 1: Shape a cone using crumpled newspaper and secure it with tape. You can adjust the tilt and curve to add character.
Step 2: Cut a large circle from cardboard for the brim, then cut a center hole that fits your cone.
Step 3: Fit the cone into the brim and tape it securely underneath. Then layer the entire hat with newspaper strips dipped in paste.
Step 4: Let dry completely in the sun or a warm room before painting or decorating.
#25. Quilted Patchwork Witch Hats
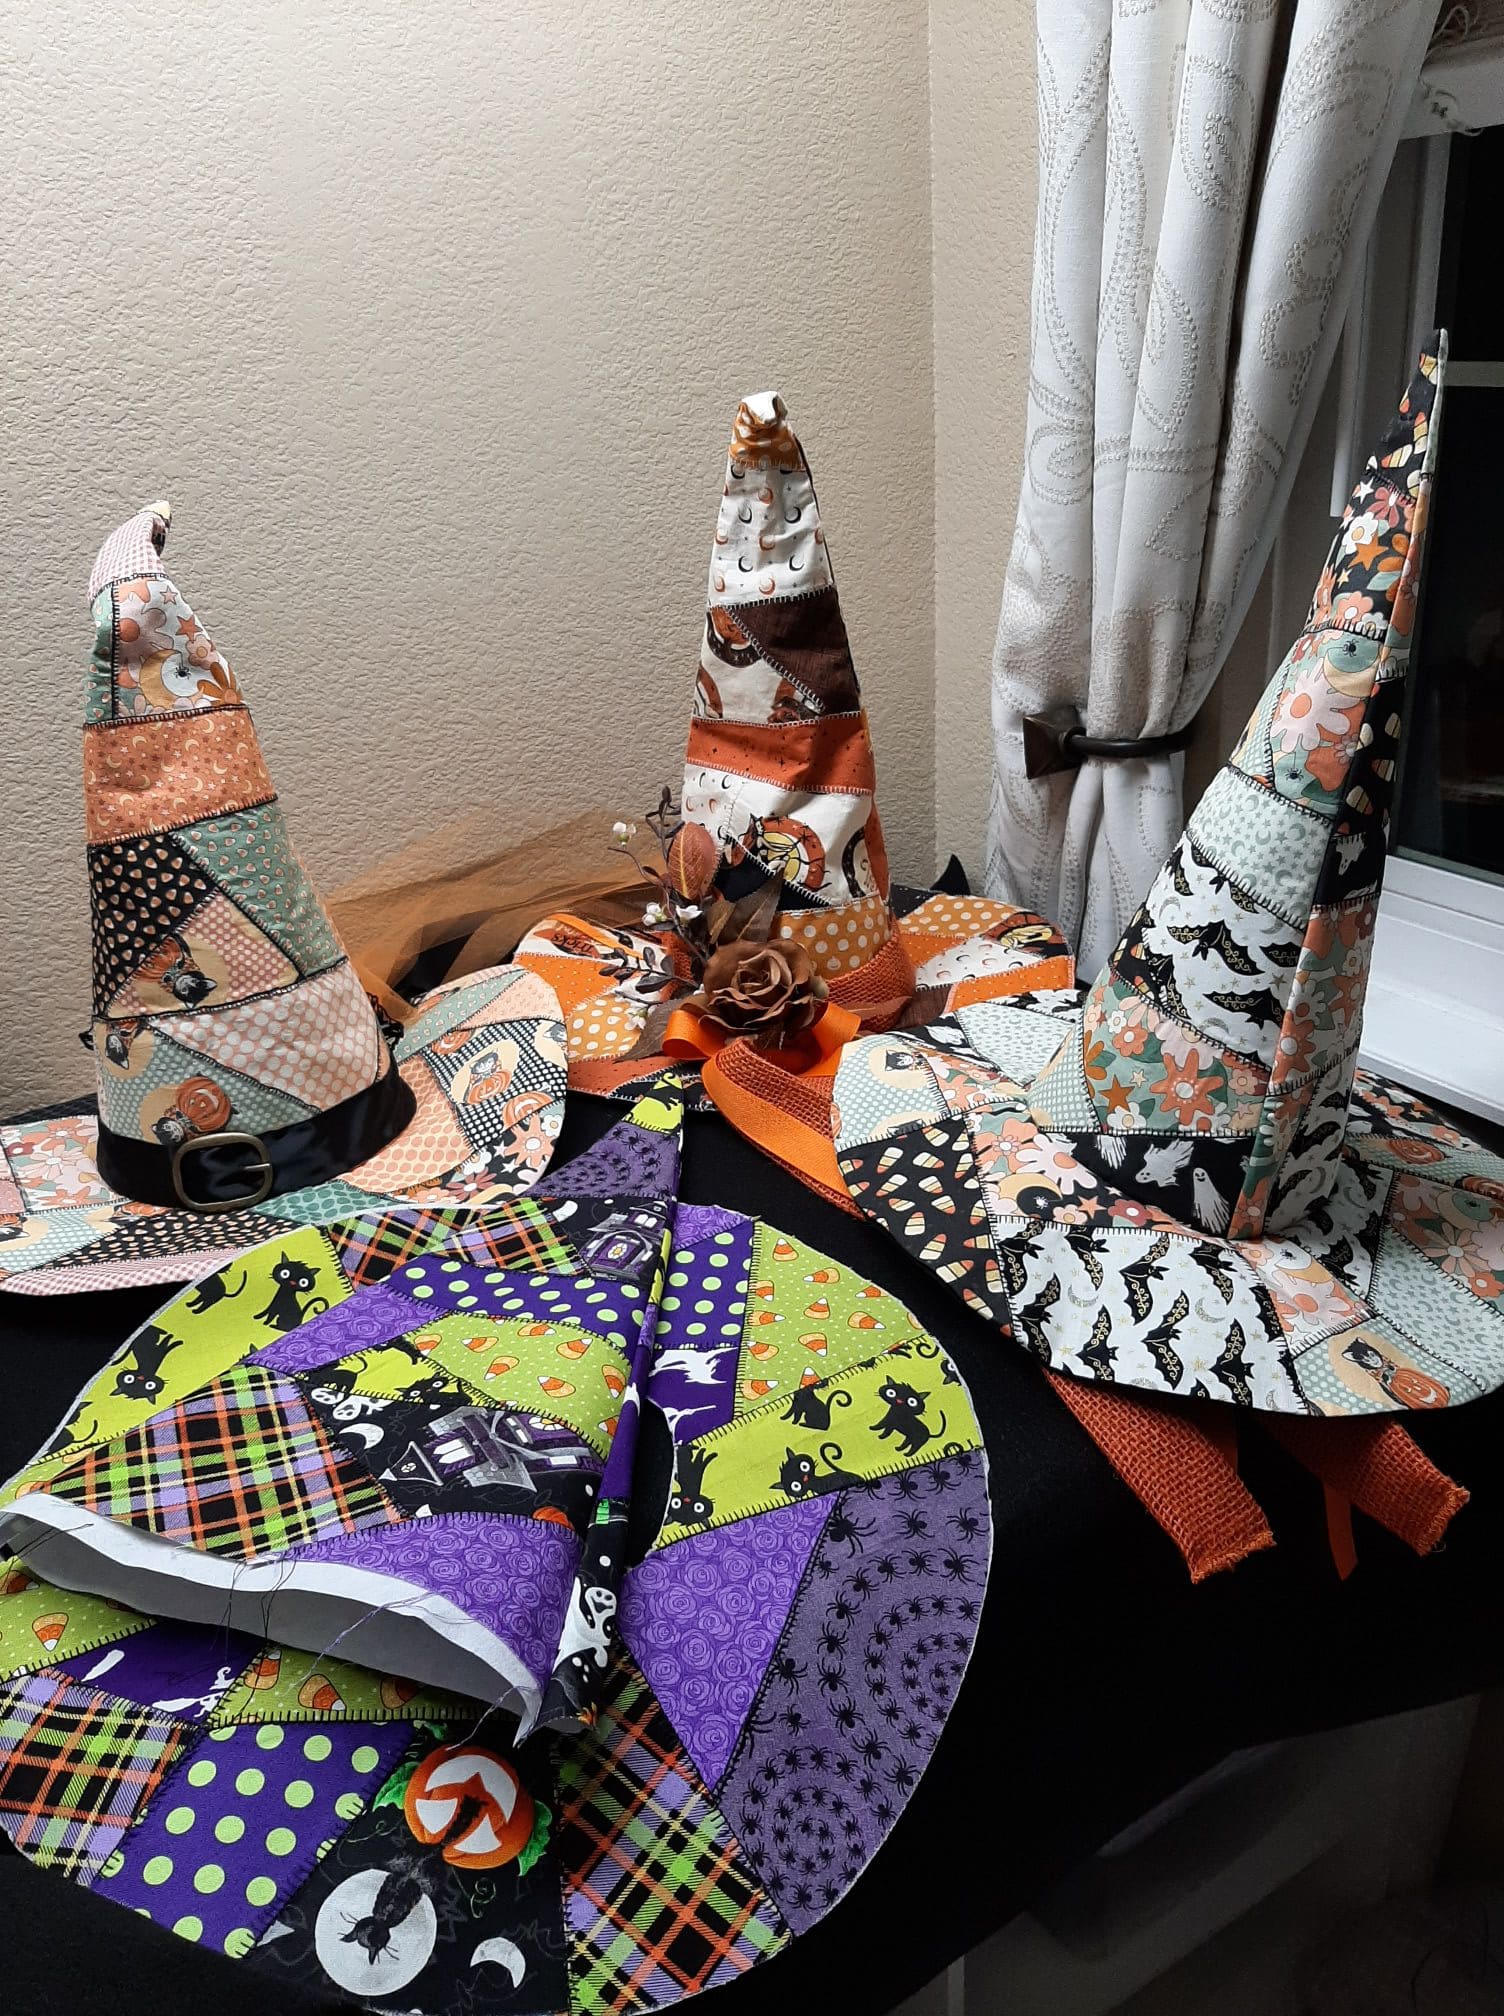
These colorful quilted witch hats bring the charm of handmade Halloween magic to life. With their playful mix of prints like bats, pumpkins, cats, and candy corn, each one tells its own whimsical story.
If you love sewing or hoard Halloween fabric scraps, this project is the perfect excuse to use every last bit.
Bonus, the vibrant colors and tidy stitching make them lovely for centerpieces, costume props, or even wall accents.
Materials Needed
- Halloween fabric scraps (each piece about 4-6″)
- Interfacing or stabilizer (½ yard)
- Thread, sewing machine, and scissors
- Hot glue gun (optional)
- Orange or black tulle (½ yard)
- Paper pattern or template
- Decorative extras: faux flowers, ribbon, buckle
Step-by-step Guide
Step 1: Create a pattern for the cone and brim. Use cardstock or stiff paper to draft a witch hat shape scaled to your desired size.
Step 2: Cut and arrange fabric scraps into a patchwork panel large enough for the cone. Then sew them together using a zigzag or topstitch to keep it secure.
Step 3: Use your template to cut the patchwork into the cone shape and interfacing to give it support. You do the same for the brim.
Step 4: Sew the cone seam closed and attach it to the brim. Next, add a ring of tulle or ribbon around the base for extra personality.
Step 5: Embellish with faux flowers, buttons, or even a glittery spider if you’re feeling spooky!
#26. Starry Night Witch Hat With Pipe Cleaner Twists
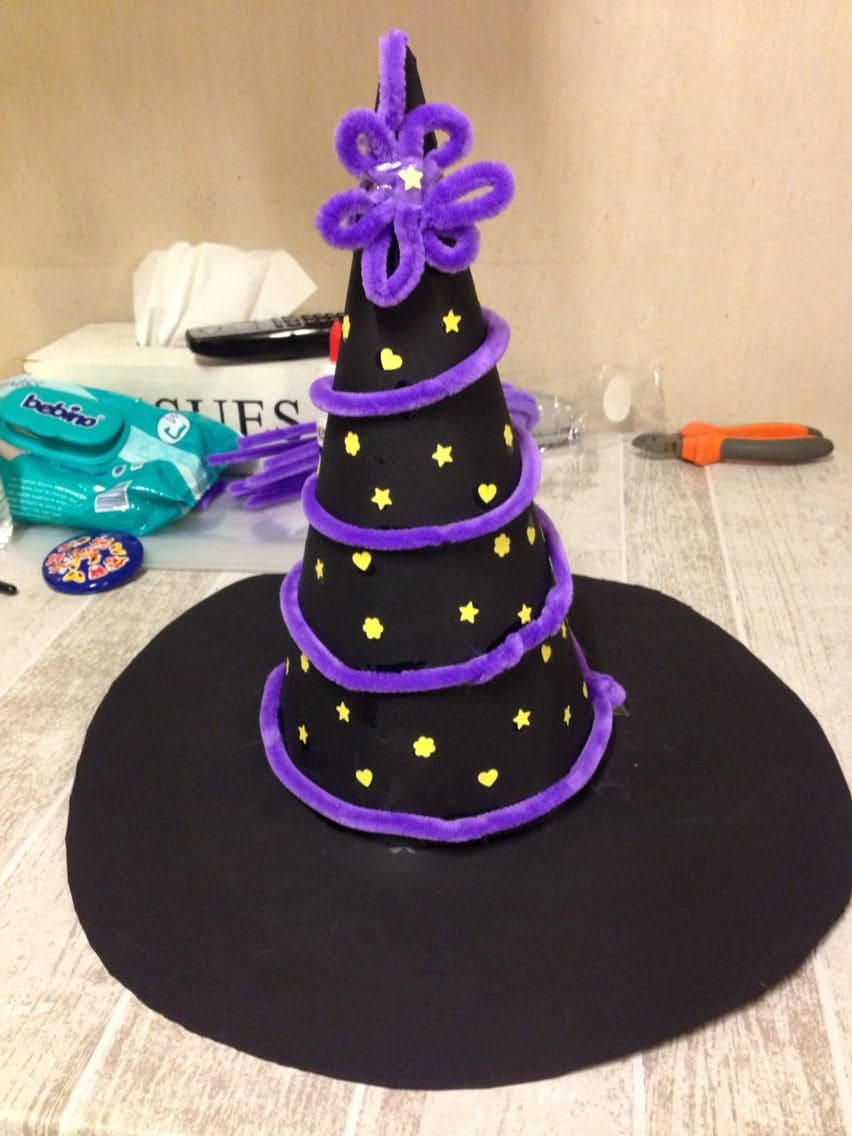
Fun, bold, and brimming with charm, this DIY witch hat is pure Halloween magic! The classic black cone shape is wrapped in loops of fuzzy purple pipe cleaners, forming spiral rings that pop with texture and color.
Also, a pipe cleaner flower tops the hat like a whimsical starburst, while the body is dotted with cheerful yellow stars and hearts for a stargazer vibe.
Despite its simple construction, this hat captures a joyful, cartoon-like Halloween spirit that instantly draws a smile.
Materials Needed
- Black craft foam or cardstock (approx. 12×18 inches)
- 6-8 purple pipe cleaners
- 30 yellow foam star and heart stickers
- Hot glue or craft glue
- Scissors
Step-by-step Guide
Step 1: Form a cone from black craft foam and secure with glue. Then attach it to a wide black foam brim.
Step 2: Wrap and glue purple pipe cleaners in rings around the cone. You shape one into a flower and place it on top.
Step 3: Decorate the cone with yellow foam star and heart stickers, spacing them evenly for a night-sky effect.
Read more: 22 Wickedly Fun DIY Witch Crafts to Enchant Your Halloween
