There’s something undeniably magical about counting down to Christmas, and advent calendars make it even more special.
Each tiny surprise, each opened door or pocket, adds a moment of joy in the middle of all the seasonal chaos. I’ve always loved the anticipation it builds, the quiet excitement that grows with each passing day.
If you’re someone who enjoys crafting and making the holidays feel a little warmer, these DIY advent calendar ideas are for you. They’re not just about candy or small gifts. They’re little daily acts of celebration, handmade with love.
These 22 creative and cozy ideas will help turn your Christmas countdown into a heartfelt tradition worth repeating every year.
#1. Hanging Garland Advent Calendar with Paper Bags
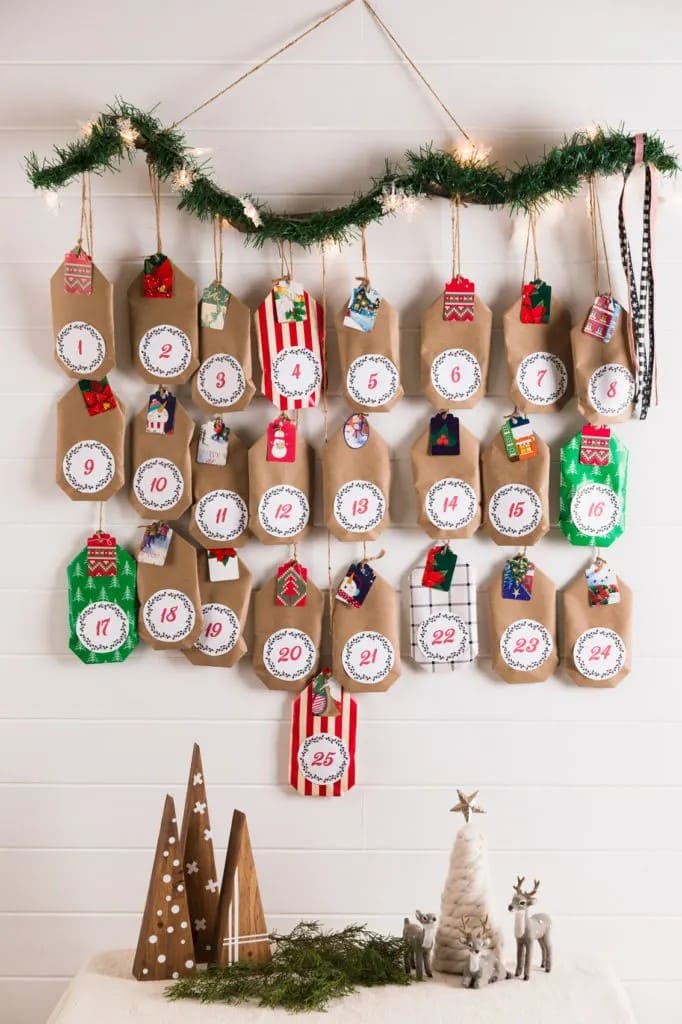
This cozy Advent setup is the perfect blend of rustic charm and festive cheer. Kraft paper bags, each labeled with a simple wreath-style number sticker, dangle sweetly from a faux evergreen garland.
The addition of colorful tags, mini clothespins, and bold patterns adds a playful twist. Hung neatly on the wall, it creates the feel of an old-fashioned countdown with modern flair.
Each day feels like opening a tiny gift, thoughtfully packaged and ready to delight. It’s festive, it’s personal, and it brings a sense of homemade warmth to your holiday decorating.
Materials Needed
- 25 kraft paper bags (approx. 5″ x 7″)
- Printable or pre-made number stickers
- Mini gift tags and ribbon scraps
- Jute twine
- Faux garland with lights (optional)
- Mini clothespins
- Hooks or nails
Step-by-step Guide
Step 1: Fill each paper bag with a small treat, note, or gift and seal it.
Step 2: Attach number labels and a colorful tag to each bag for decoration. Then string the garland across a wall or wooden dowel and secure it with hooks.
Step 3: Use clothespins or twine to hang each bag beneath the garland in rows.
Step 4: Adjust spacing and straighten bags as needed for a clean, festive look.
#2. Rustic Wood Slat Advent Calendar with Clothespin Pouches
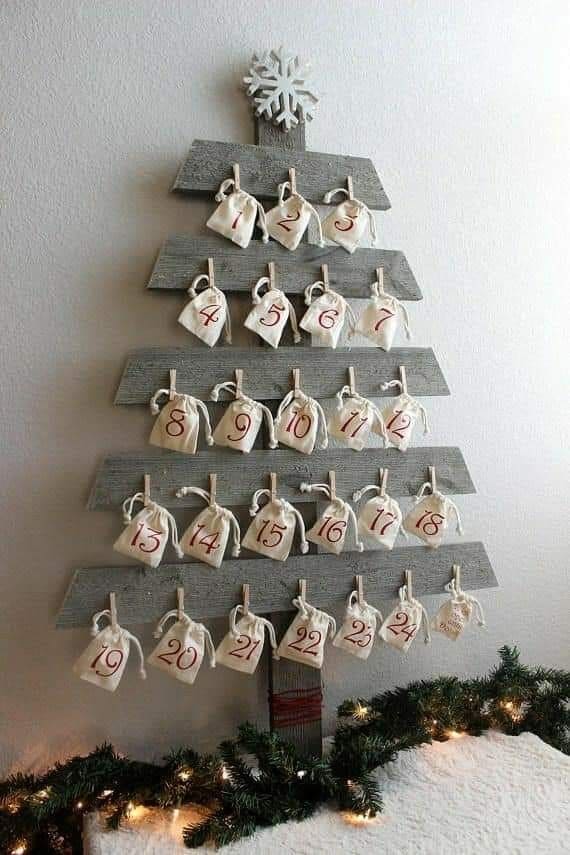
This DIY Advent calendar turns simplicity into pure charm. Crafted from staggered wood slats shaped like a Christmas tree, it becomes a perfect backdrop for 24 drawstring pouches, each numbered in classic red.
Moreover, the soft, neutral-colored bags hang neatly from mini clothespins, offering a soft, cozy contrast to the rustic texture of the wood.
Plus, you can fill the pouches with little surprises or notes of love, and let each day bring a new smile. It’s quietly elegant and deeply personal.
Materials Needed
- 6–7 wood slats (varying lengths, roughly 1.5 ft to 4 ft)
- 24 small fabric drawstring pouches (approx. 3” x 4”)
- 24 clothespins (mini size preferred)
- Red paint or numbered stickers
- Hot glue or small nails
- Wall hook or hanging hardware
- Treats or messages
Step-by-step Guide
Step 1: Arrange and secure the wooden slats into a tree shape using a vertical wood support down the center.
Step 2: Paint or number the pouches from 1 to 24 using red craft paint or ready-made stickers.
Step 3: Fill each bag with a treat or a heartfelt note.
Step 4: Clip the bags onto the wood slats using clothespins, evenly spacing them across the rows.
Step 5: Finally, add a tree topper or bow if desired, then hang the calendar on your wall with sturdy hooks.
#3. Wall-Hanging Pillow Box Advent Calendar
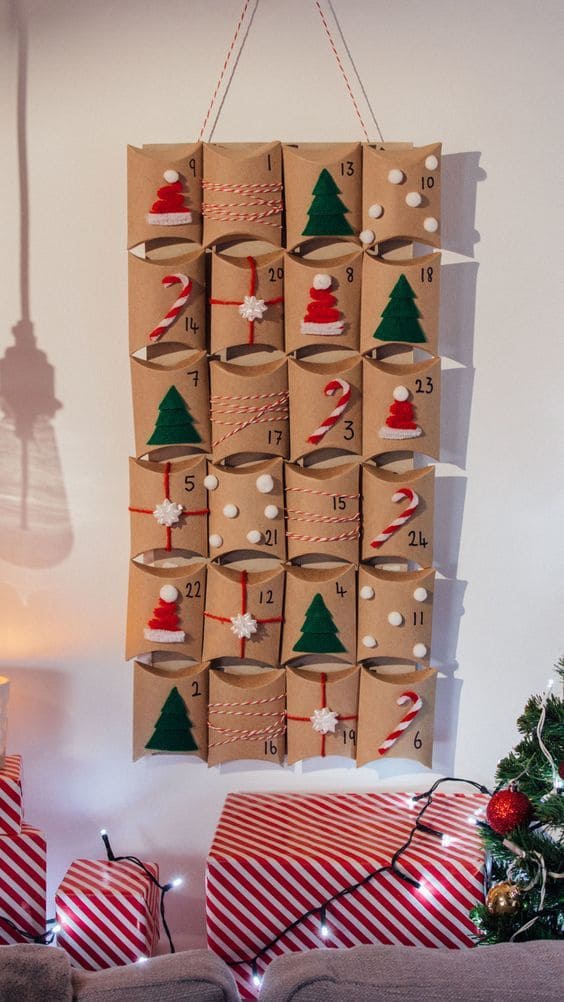
Wow, this charming Advent calendar turns simple pillow boxes into a festive holiday wall piece. Each kraft box is folded at both ends to form a soft, rounded shape and then decorated with felt trees, mini pom-poms, candy canes, and Santa hats.
What makes this design special is how each pocket becomes a mini artwork while holding a small surprise inside.
Ideal for small spaces, this setup brings warmth, texture, and excitement to any blank wall.
Materials Needed
- 24 kraft pillow boxes (approx. 4″ x 2.5″)
- Felt sheets (green, red, white)
- Mini pom-poms and yarn
- Baker’s twine or ribbon
- Hot glue gun and glue sticks
- Scissors and black marker
- Strong string or ribbon
- Double-sided tape or adhesive hooks
Step-by-step Guide
Step 1: Fill each pillow box with small treats or notes, then seal the ends.
Step 2: Decorate the fronts using cut felt shapes, twine, and mini pom-poms to mimic holiday motifs.
Step 3: Write numbers (1-24) clearly on each box with a black marker.
Step 4: Attach the boxes to a sturdy backing or string them in rows for hanging.
Step 5: Hang your Advent display using hooks, nails, or tape and enjoy counting down in style.
#4. Magical Christmas Village Tree Advent Calendar
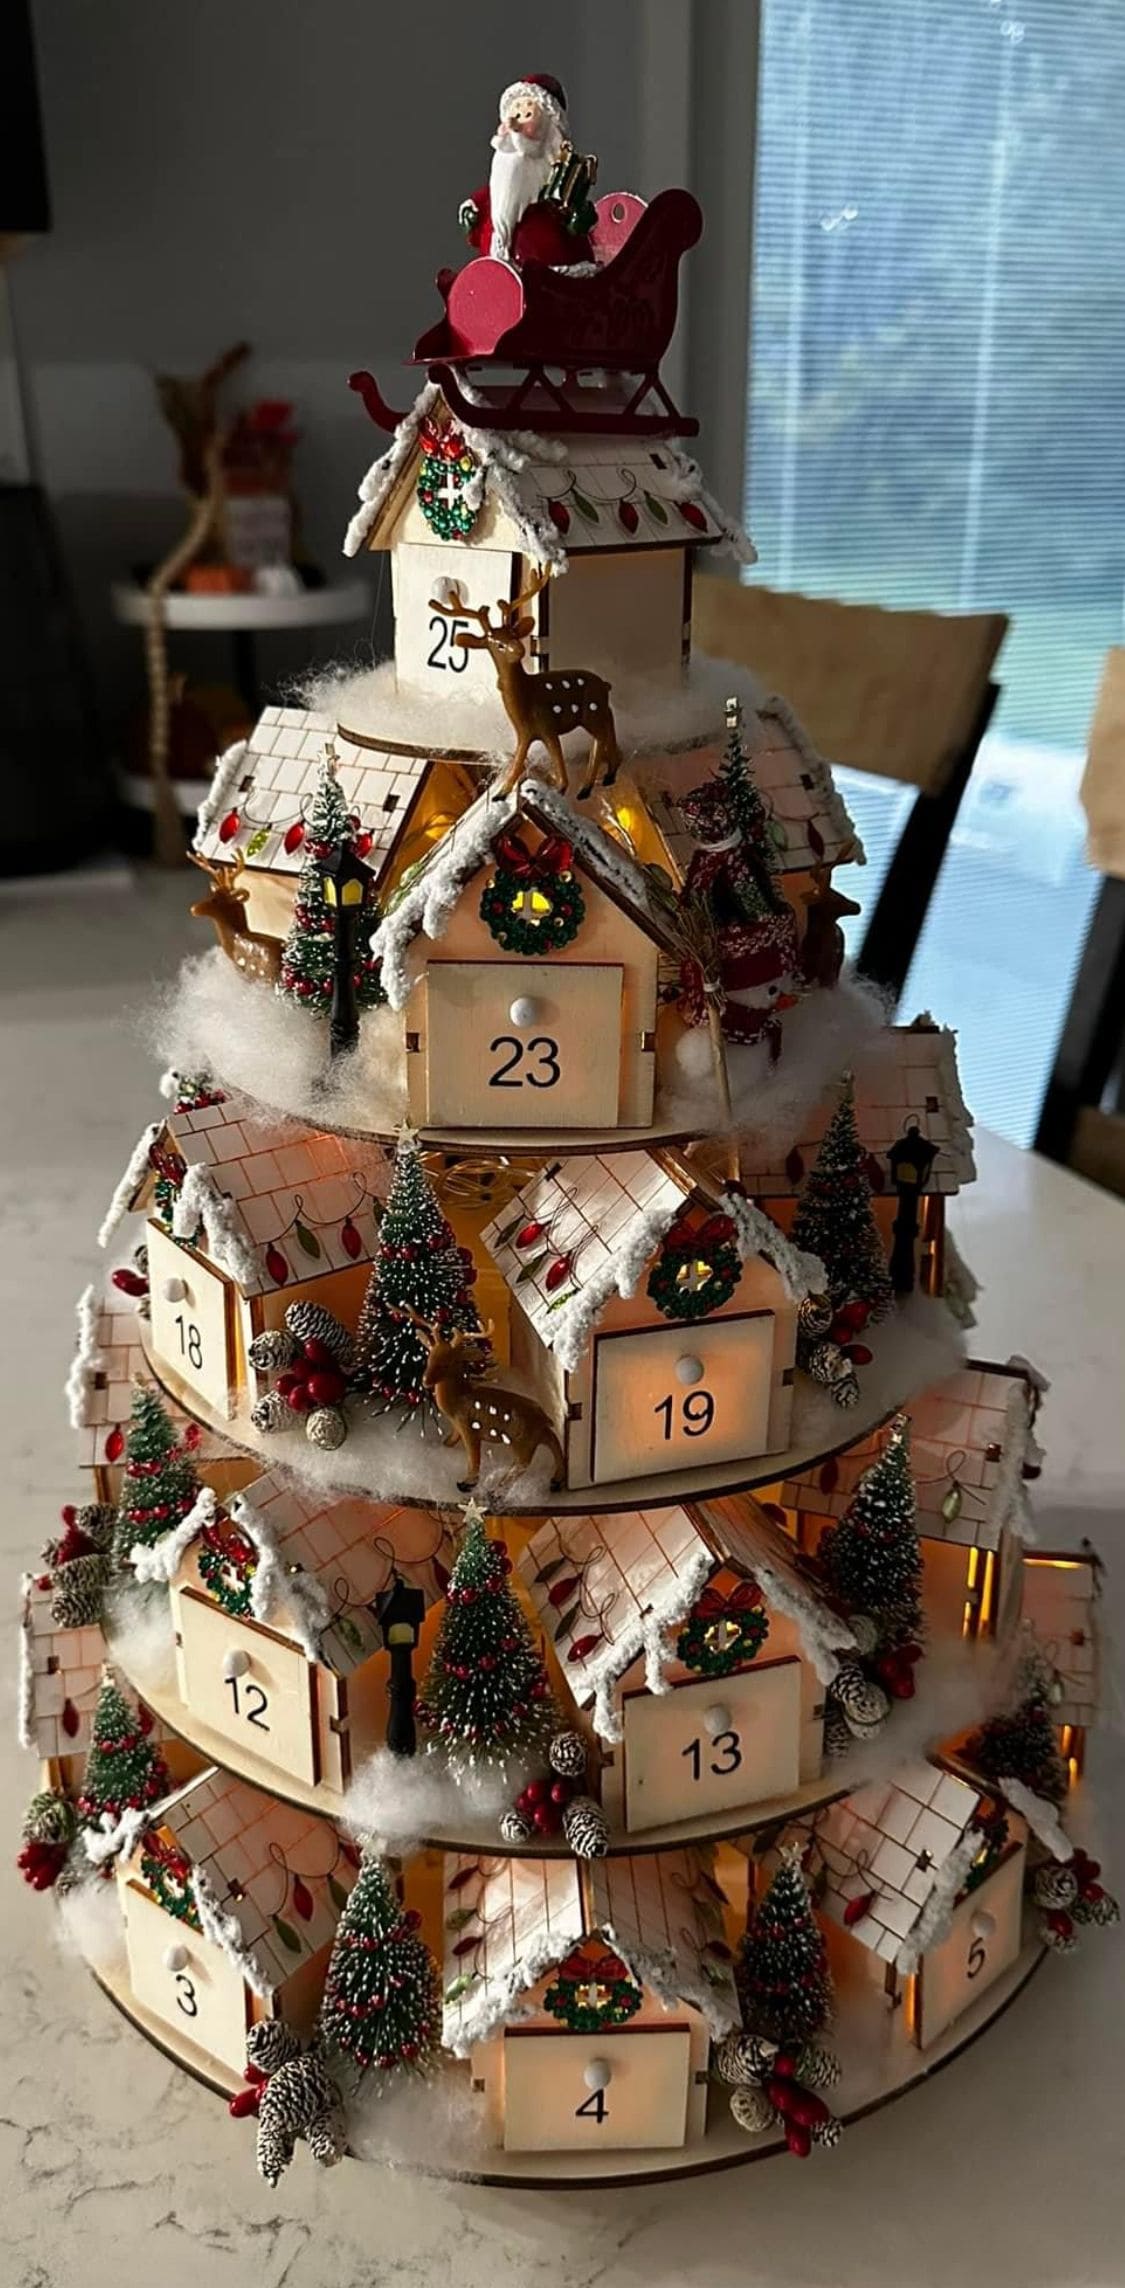
Wow, this breathtaking Advent calendar transforms your tabletop into a glowing, layered Christmas village.
Each level of the wooden tree holds tiny house drawers, adorned with snow-dusted rooftops, wreaths, garlands, and soft lights that flicker like a winter evening.
A cheerful Santa in his sleigh sits atop, ready to deliver joy on the 25th. Little drawers numbered 1 through 25 can hide sweets, trinkets, or notes of holiday cheer.
If you love holiday magic in miniature form, this one’s a showstopper worth displaying all season long.
Materials Needed
- 1 wooden tiered Advent tree (approx. 18-24 inches tall)
- 25 small house-shaped drawers (1.5”-2” wide)
- Miniature wreaths, trees, pinecones, reindeer figurines
- Battery-operated string lights
- Cotton stuffing
- Glue gun, white paint (optional)
Step-by-step Guide
Step 1: Assemble the wooden tiers and attach the numbered house drawers securely on each level.
Step 2: Decorate the roofs with faux snow and white paint to mimic a frosted village look.
Step 3: Glue wreaths, garlands, and mini embellishments onto the houses for festive charm.
Step 4: Tuck tiny lights between the layers to create a warm inner glow.
Step 5: Now you can fill each drawer with small surprises and top the tree with Santa and his sleigh to finish.
#5. Hidden Treats Box Advent Calendar
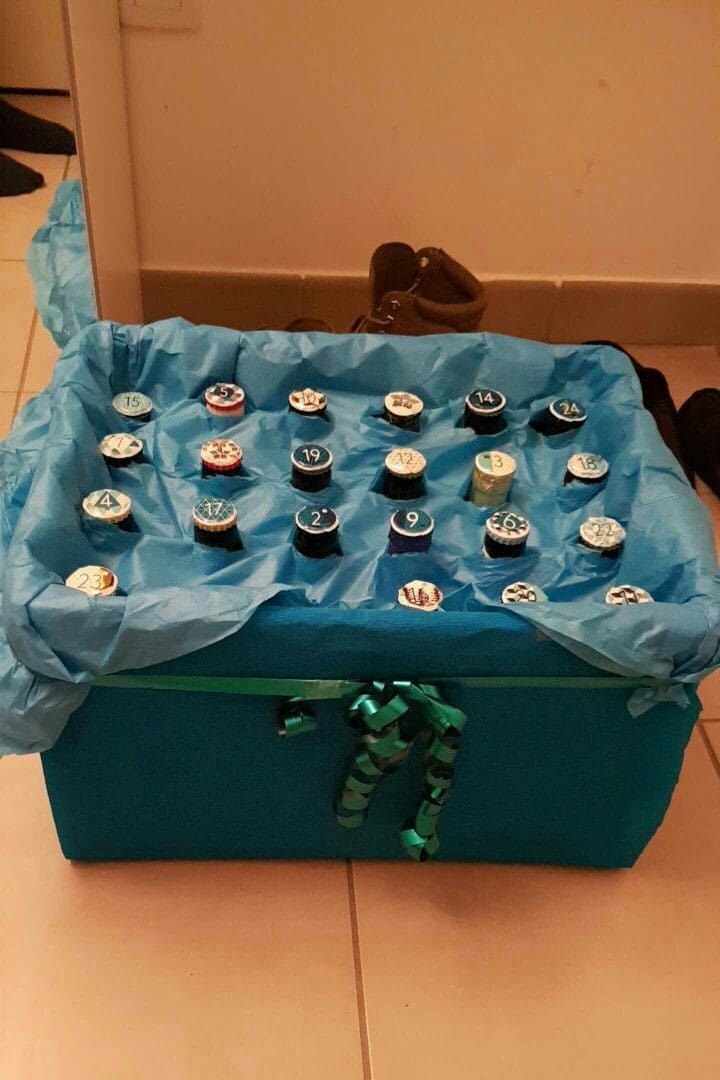
This playful twist on the Advent calendar invites a little mystery each day. Crafted from a large box wrapped in vibrant blue tissue, it features 24 bottle caps or similar lids glued in a scattered layout on top.
Each cap conceals a small treat, and all are numbered with festive stickers or hand lettering. Also, the crinkled tissue adds texture and makes the whole presentation feel like a whimsical treasure chest.
This idea is great for kids or grown-ups who love surprises and it’s a clever way to reuse bottle caps or tiny jars that usually go to waste.
Materials Needed
- 1 large cardboard box (approx. 16″ x 12″)
- 24 bottle caps, jar lids, or small containers
- 4-5 blue tissue paper sheets
- Small candies or trinkets
- Glue or hot glue gun
- Number stickers or printed labels (1-24)
- Ribbon and bows
Step-by-step Guide
Step 1: Wrap the box in tissue paper and tape or glue the edges underneath.
Step 2: Cut or poke 24 small holes spaced across the top, just wide enough to fit a cap or container.
Step 3: Insert small treats inside each cap and secure them into the holes with glue.
Step 4: Add numbered labels to each cap, then embellish the front with ribbon curls or a bow. Let it dry completely before displaying or gifting.
#6. Punch-Out Christmas Tree Advent Calendar
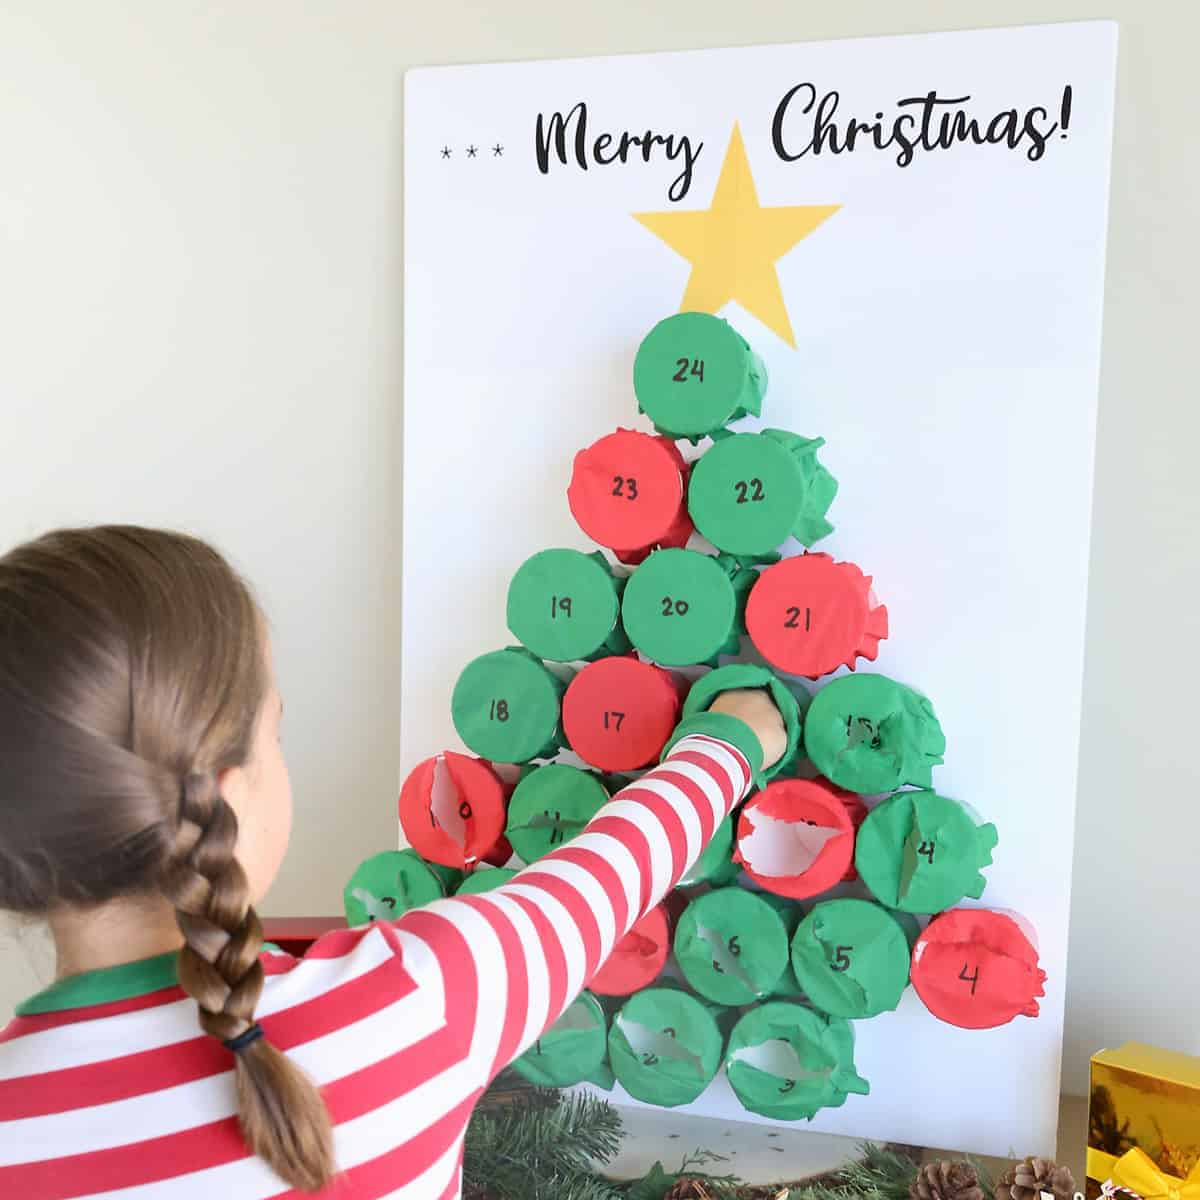
You can see each day leading to Christmas becomes an exciting game with this punch-out Advent calendar.
Shaped like a Christmas tree, the structure holds 24 paper-covered holes filled with surprises. Kids love the thrill of punching through the tissue to reveal the daily treat tucked inside.
With alternating red and green colors and a bold yellow star on top, it doubles as cheerful wall decor. The anticipation builds each day as more of the tree gets punched, making it both interactive and festive.
Materials Needed
- Large foam board or cardboard sheet (24″ x 36″)
- 24 plastic cups (9 oz or similar size)
- Green and red tissue paper (cut into 5″ x 5″ squares)
- Rubber bands
- Small treats, toys, or notes
- Marker for numbers, star cutout, hot glue
Step-by-step Guide
Step 1: Arrange the cups on the board in a pyramid shape (tree form) and glue them down securely. Then fill each cup with a surprise item.
Step 2: Cover each cup with a square of tissue paper and secure it with a rubber band or glue around the rim.
Step 3: Number each cup, add a star to the top of the tree, and write “Merry Christmas” above.
#7. Bicycle Wheel Advent Calendar with Mini Boxes
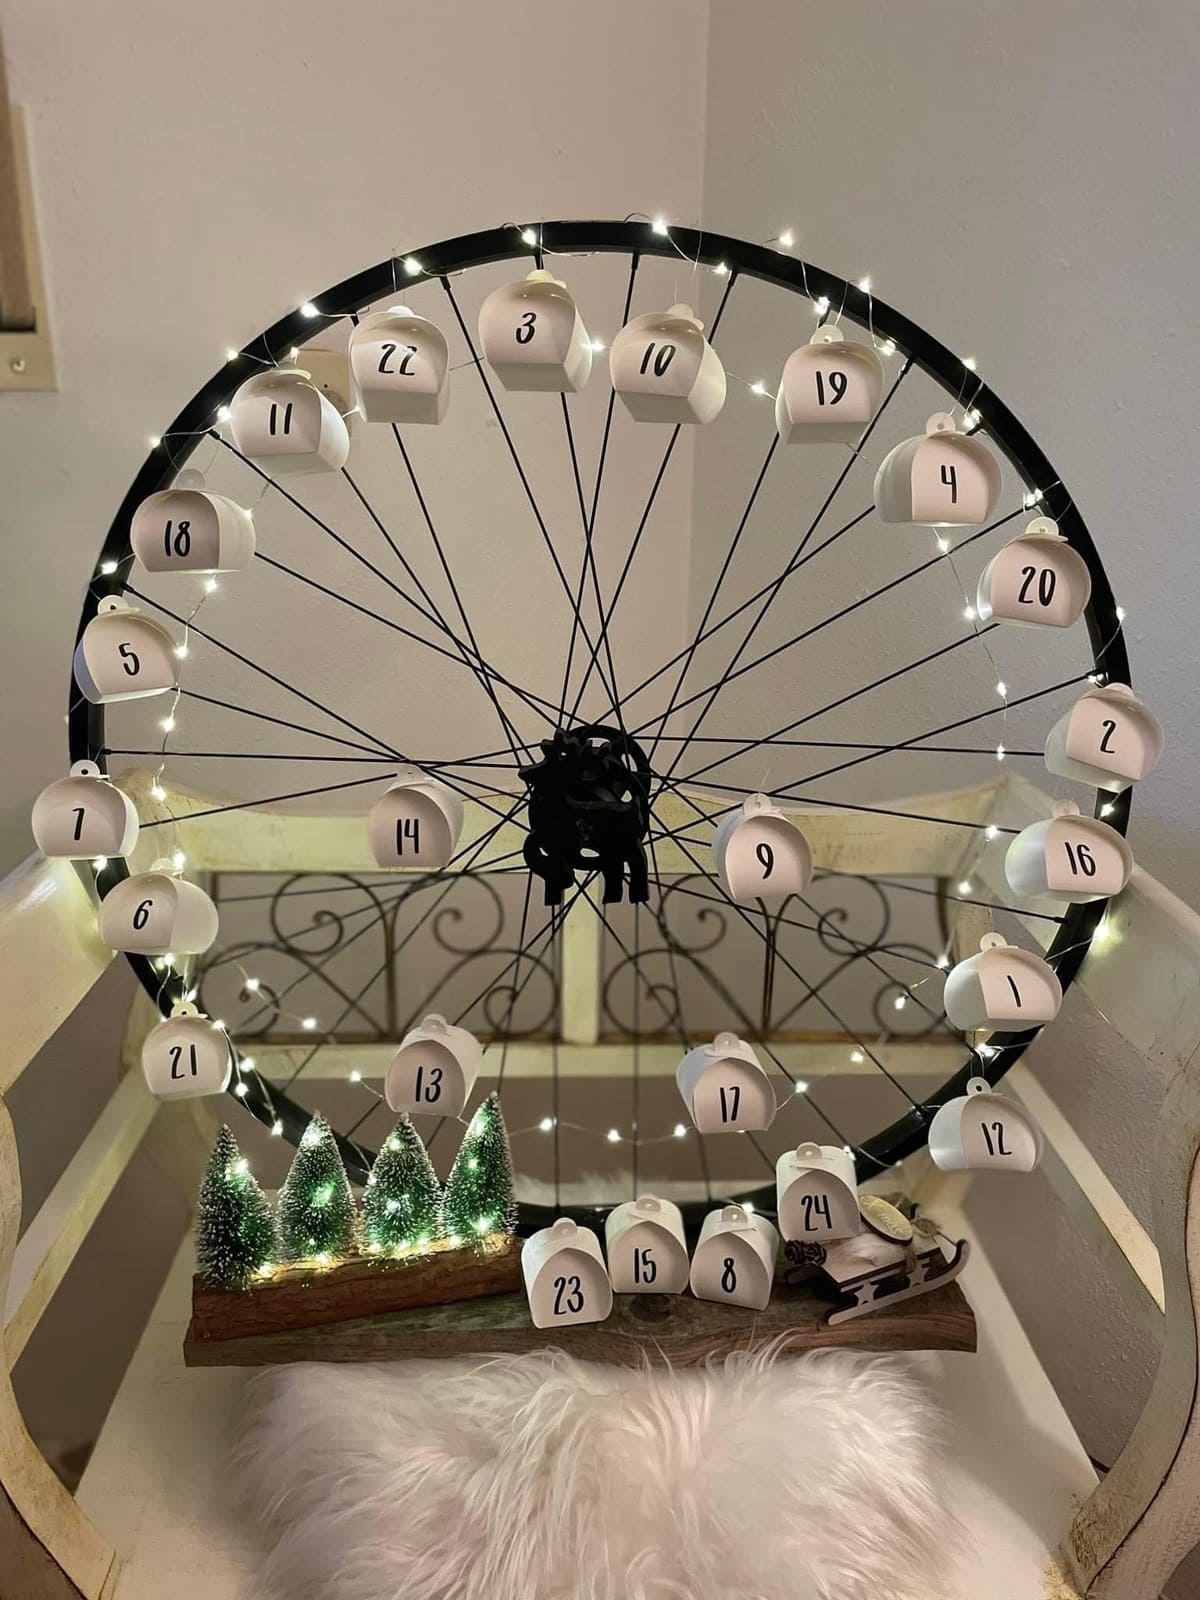
What about repurposing a bicycle wheel into a magical countdown?
The wheel becomes a festive frame for 24 numbered mini gift boxes, strung along with fairy lights to create a glowing halo of holiday cheer. It feels a bit like a modern Christmas ferris wheel, and each day brings the excitement of opening a new surprise.
Nestled below, a wooden base holds the bottom boxes, accented by tiny lit trees and a playful faux fur rug.
Materials Needed
- 1 old bicycle wheel (24-28″ diameter)
- 24 small paper boxes with hanging loops (approx. 2″ each)
- Black marker or number stickers (1-24)
- String lights (battery operated, 1 set)
- Clear thread or twine
- Hot glue gun (optional)
- Miniature trees and base decor (optional)
Step-by-step Guide
Step 1: Clean the bicycle wheel and check spokes for stability. Then spray paint black or leave natural for a rustic look.
Step 2: Number each mini box from 1 to 24 using a marker or stickers. You can add small trinkets, notes, or chocolates inside.
Step 3: Use thread or twine to hang the boxes from the wheel spokes, spacing them evenly in a circular layout.
Step 4: Wrap fairy lights around the wheel for a warm, twinkling glow. You need to secure battery pack at the back with tape or a clip.
Step 5: Decorate the base with a wood slab, faux snow, mini trees, or even a sled for an extra festive scene.
#8. Pyramid Beer Advent Calendar Tree
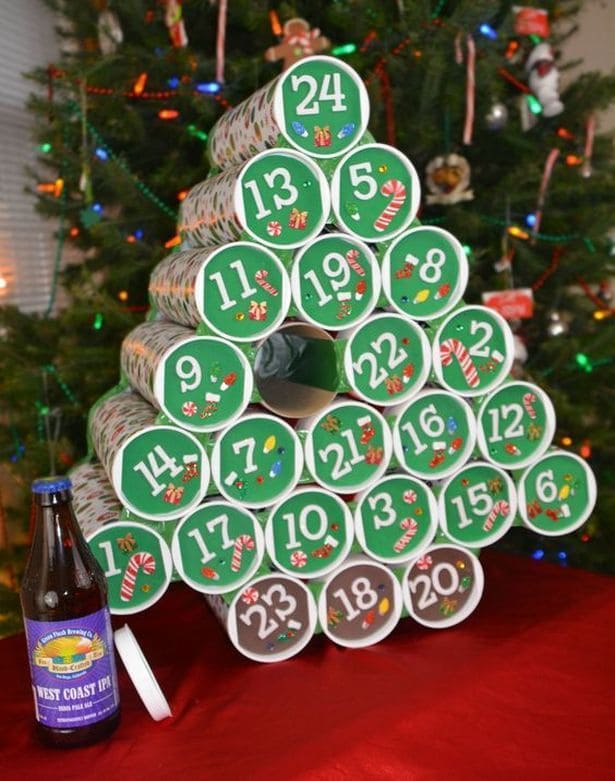
Here’s a cheeky twist on the classic countdown, it’s not just festive, it’s flavorful. This Advent calendar uses 24 wrapped cardboard tubes, each snug enough to hide a surprise bottle or can, stacked in a pyramid to mimic a Christmas tree.
The numbered green lids are playful and clean, adorned with candy canes and holly stickers for a nostalgic holiday feel.
It’s a brilliant adult version of the traditional calendar, ideal for craft beer lovers, soda enthusiasts, or anyone who enjoys a daily treat with a pop of personality.
Materials Needed
- 24 cardboard mailing tubes (3″-4″ diameter, 6″-8″ long)
- Festive wrapping paper (enough to cover each tube)
- Green cardstock and number stickers (1-24)
- Holiday-themed stickers or clipart (optional)
- Strong tape or hot glue
- Surprise gifts (bottles, cans, or small toys)
Step-by-step Guide
Step 1: Wrap each tube with holiday paper and secure it tightly with tape or glue.
Step 2: Cut green cardstock circles to cover one end of each tube. Then add numbers 1 through 24 and decorate with holiday stickers.
Step 3: Arrange the tubes into a pyramid shape, base of 6 tubes wide, and hot glue them together for stability.
Step 4: Fill each tube with your desired treat, and seal the numbered lid with light tape so it’s easy to pop open each day.
#9. Rustic Paper Bag Advent Calendar Crate
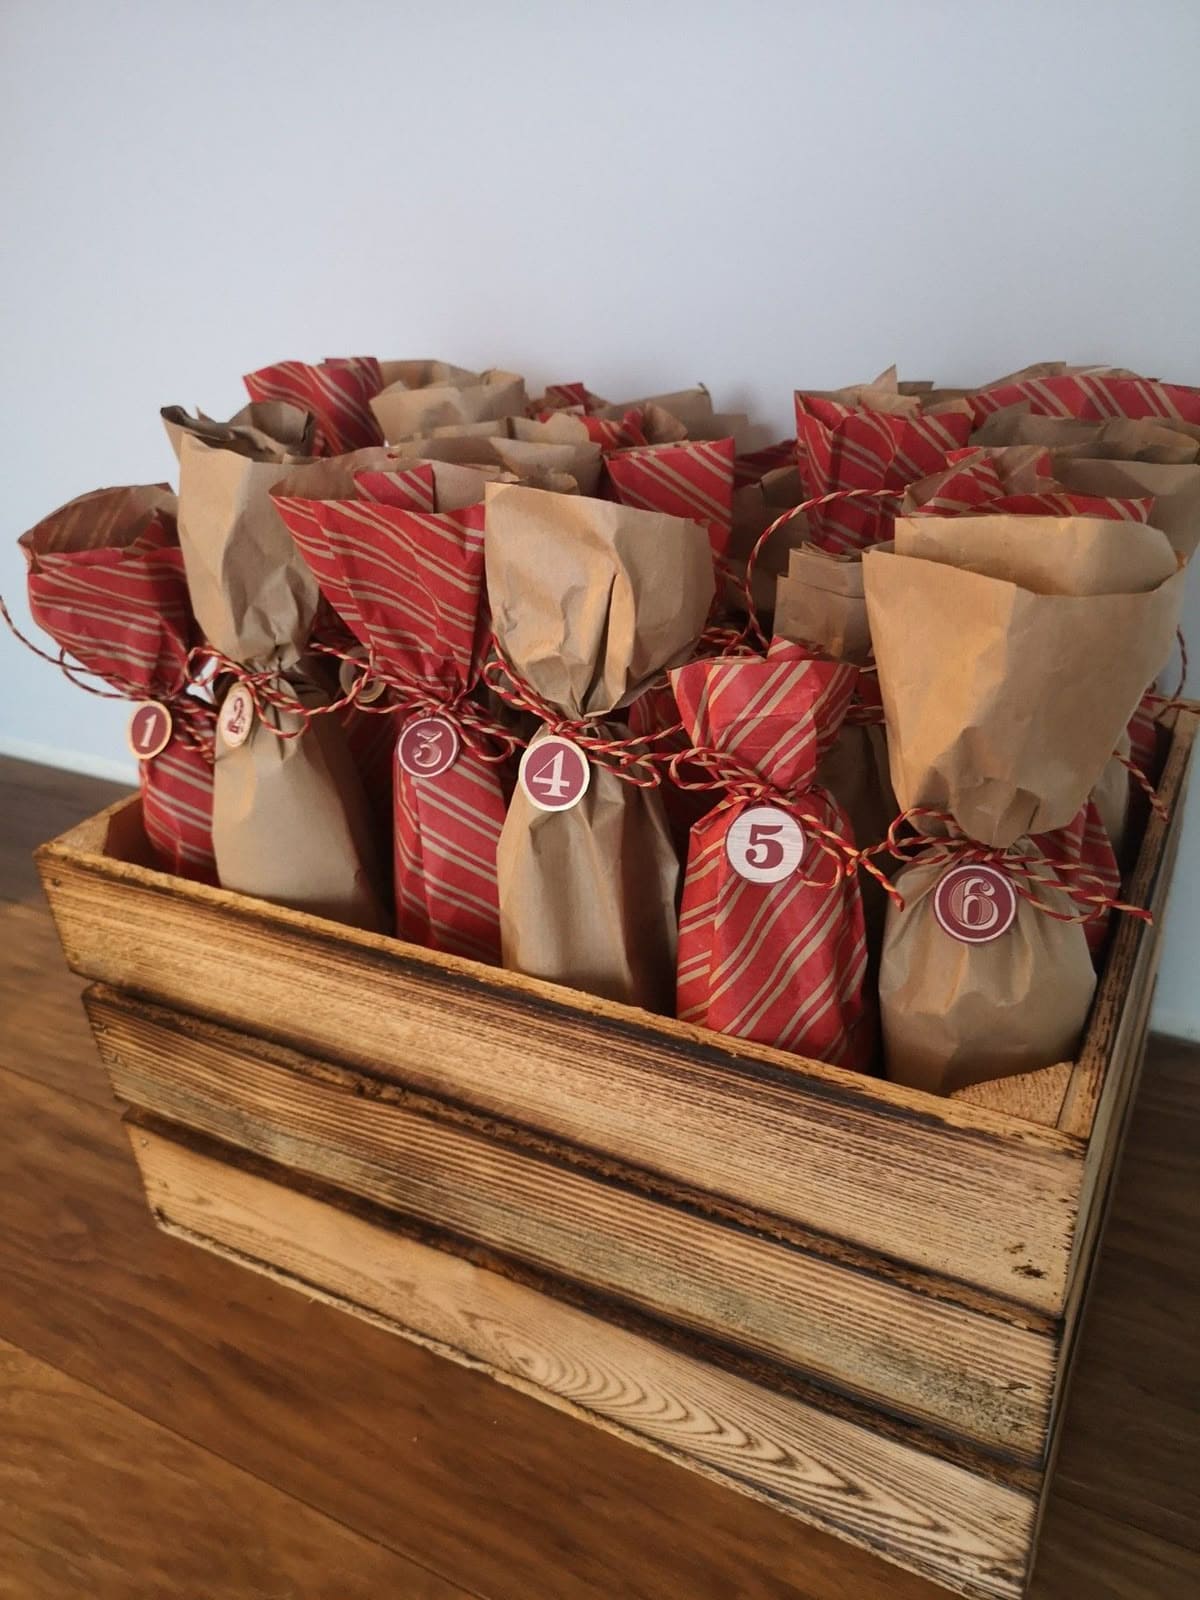
This Advent calendar proves that simple materials can create warm, nostalgic magic. Brown paper lunch bags and red-striped wrapping are filled with sweet surprises, then gathered and tied off with rustic twine.
Numbered tags in a charming vintage font mark each day leading up to Christmas. All the bags are neatly arranged in a weathered wooden crate, bringing a cozy, farmhouse vibe to any corner of your home.
Specially, the charm is in the contrast, plain kraft paper and soft red hues paired with natural textures.
Materials Needed
- 24 paper lunch bags (brown and/or patterned red)
- Twine or baker’s string (approx. 2 ft per bag)
- Numbered gift tags
- Wooden crate or box (at least 12″ x 18″)
- Treats or small gifts
Step-by-step Guide
Step 1: Place a small gift or treat inside each bag. Then fold the top of each bag and tie with twine, leaving a bit of flair for texture.
Step 2: Attach a numbered tag to each bag using tape or thread.
Step 3: Arrange all 24 bags in a rustic wooden crate, alternating colors and textures for visual balance.
Step 4: Place the crate on a side table or near the tree for an inviting seasonal touch.
#10. Faux Book Box Advent Calendar
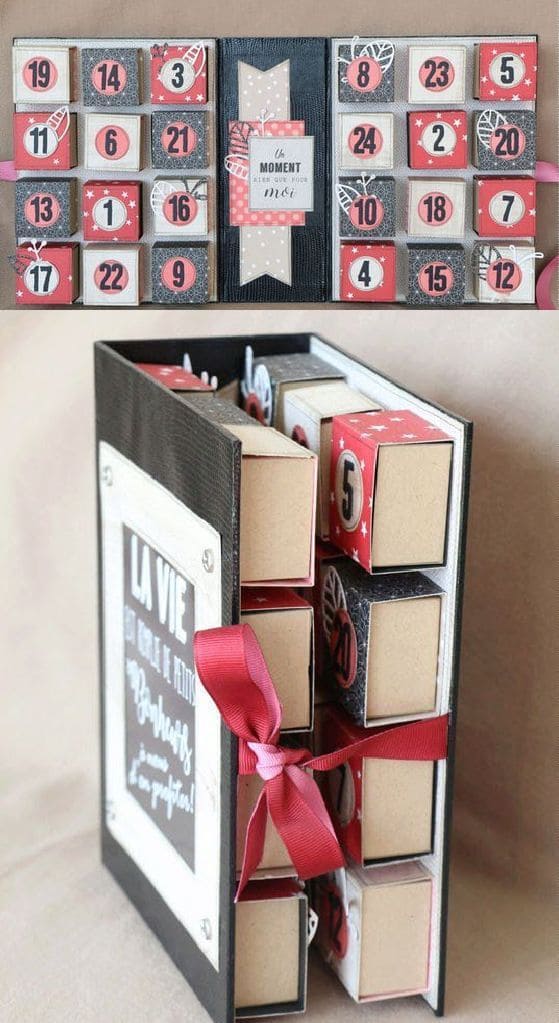
This clever Advent calendar hides a festive secret behind the cover of what looks like a vintage-style book.
Once opened, it reveals a charming grid of tiny numbered drawers, each ready to be filled with candy, affirmations, or tiny keepsakes.
The color palette is soft and chic giving it a modern yet cozy appeal. A bright red ribbon ties everything shut like a precious holiday journal.
Materials Needed
- 1 large cardboard book box (approx. 9” x 12”)
- 24 mini matchbox-style drawers (1.5” x 2”)
- Patterned scrapbook paper (red, black, and kraft tones)
- Number stickers or stamps (1-24)
- Double-sided tape or glue
- Ribbon (24” length)
Step-by-step Guide
Step 1: Decorate each drawer’s front using scrapbook paper and number them from 1 to 24.
Step 2: Attach the drawers into the book box using glue or tape, forming three equal rows.
Step 3: Add decorative labels or a festive quote to the front and inside of the box.
Step 4: Tie the box shut with a ribbon to create that “storybook” feel and keep contents secure.
Step 5: Finally, place on display and enjoy opening a tiny surprise each day!
Read more: 25 DIY Nativity Scene Ideas That Add Heart and Warmth to Christmas
#11. Paper Tube Advent Wreath Calendar
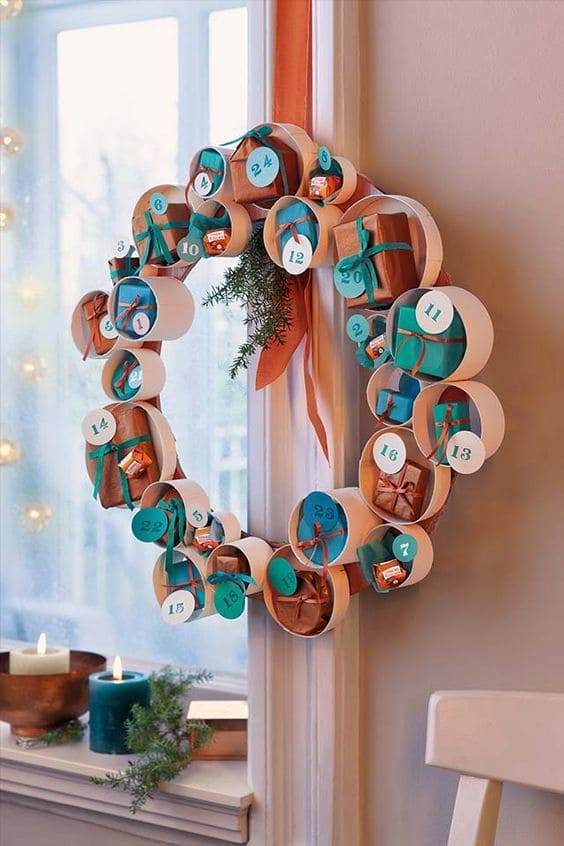
If you’ve ever wanted to blend holiday magic with minimalism, this paper tube wreath calendar does it beautifully.
Each day leading up to Christmas is tucked inside a neat little circle, some with tiny wrapped gifts, others hiding candies or personal notes.
Bonus, the soft mix of turquoise and kraft paper gives it a modern twist while the warm ribbon tie and greenery keep things cozy.
Materials Needed
- 24 cardboard tubes (toilet paper or mailing tubes, cut to 2″ lengths)
- Thick cardboard or wooden hoop base (approx. 16-18″ diameter)
- Kraft wrapping paper and turquoise gift wrap
- Ribbon (orange or seasonal color) – 1.5 yards
- Number stickers (1-24)
- Glue gun + glue sticks
- Small gifts, notes, or candy
- Greenery or mini decorative sprigs
Step-by-step Guide
Step 1: Wrap tiny gifts or treats in kraft and turquoise paper, tying them with string or ribbon. Then add a numbered tag to each one.
Step 2: Cut cardboard tubes into 2-inch rings. You can place one wrapped item inside each tube and glue it so it sits snugly.
Step 3: Arrange the tubes in a circular wreath shape on your base, mixing sizes and tilts for visual interest.
Step 4: Hot glue each tube in place. Next, add a touch of greenery or festive decoration for extra flair.
Step 5: Attach a ribbon to the top for hanging, and enjoy the countdown!
#12. Toilet Paper Roll Candle Countdown
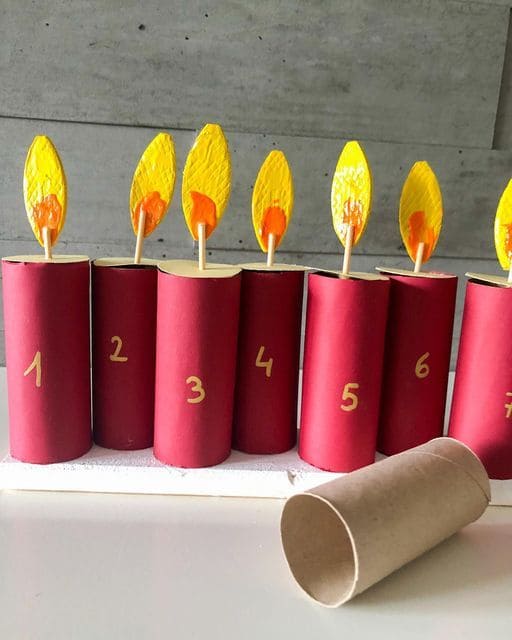
Interestingly, this Advent calendar idea brings a touch of warmth and symbolism using the simplest materials.
Each candle represents a day of the countdown, fashioned from a toilet paper roll wrapped in red paper with a golden number and topped with a hand-cut flame.
As the days pass, your child gets to light a candle by removing the tube and revealing the treat inside. It’s a beautiful blend of craft and tradition, especially meaningful for young children learning about anticipation and reflection.
Materials Needed
- 7 toilet paper rolls (4″ height standard)
- Red craft paper (approx. 8.5″ x 4″ per roll)
- Yellow and orange cardstock for flames
- 7 toothpicks or small sticks (7 pieces)
- Hot glue gun
- Scissors, gold marker, and small treats
- White cardboard base (12″ x 3″)
Step-by-step Guide
Step 1: Wrap each tube with red paper and glue it in place. Write the numbers 1-7 on them using a gold marker.
Step 2: Cut flame shapes from yellow cardstock and color the centers with orange.
Step 3: Glue each flame to a toothpick, then attach to the inside top of each roll to mimic a burning candle.
Step 4: Finally, glue the finished tubes onto a white cardboard base, placing a treat or message inside each one.
#13. Enchanted Village Envelope Advent Calendar
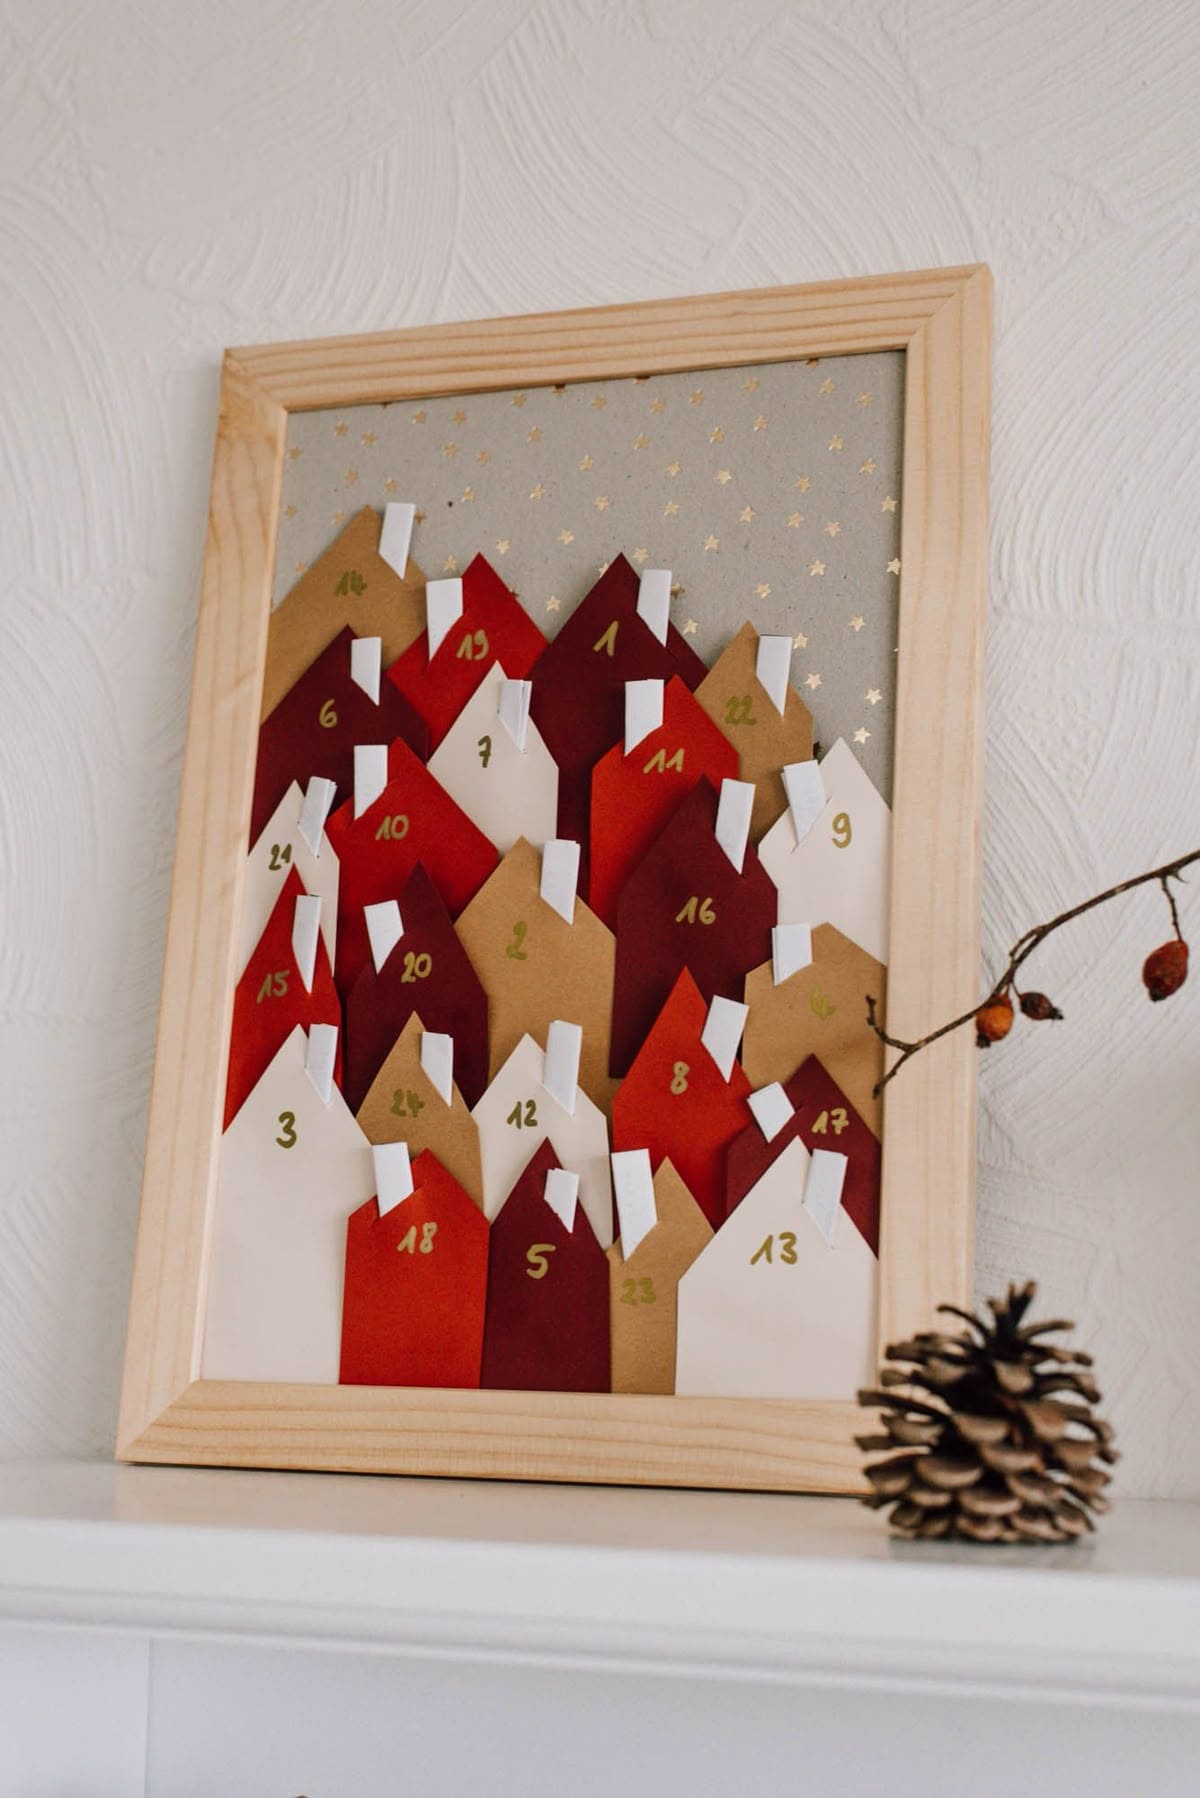
This charming little village turns a picture frame into a countdown filled with color and wonder.
Each house-shaped envelope, in cozy reds, kraft browns, and wintry whites, holds a surprise note or treat. The gold stars scattered behind them feel like a snowy night sky.
I love how each envelope overlaps like a hillside neighborhood, it makes it feel layered and lived-in. Whether you tuck in handwritten jokes, prayers, or chocolates, this project feels heartfelt and personal.
Materials Needed
- 1 picture frame (approx. 11”x14”)
- Stiff cardboard or fabric backing with star print (or gold paint)
- 24 sheets of cardstock in red, kraft, white
- Glue or double-sided tape
- Gold paint pen or marker
- 24 paper strips
- Scissors and ruler
Step-by-step Guide
Step 1: Cut out 24 house-shaped envelopes in different colors and sizes. Then fold the bottom to create pockets.
Step 2: Use a gold pen to write numbers 1-24 on the front of each house.
Step 3: Attach the houses to the backing board in a layered, staggered design like rooftops climbing a hillside.
Step 4: Tuck a tiny note, act of kindness, or treat into each pocket and seal with a white paper strip.
Step 5: Finally, fit the board into the frame and prop it on your mantel or hang it like festive wall art.
#14. Toilet Paper Roll Chimney Advent Calendar
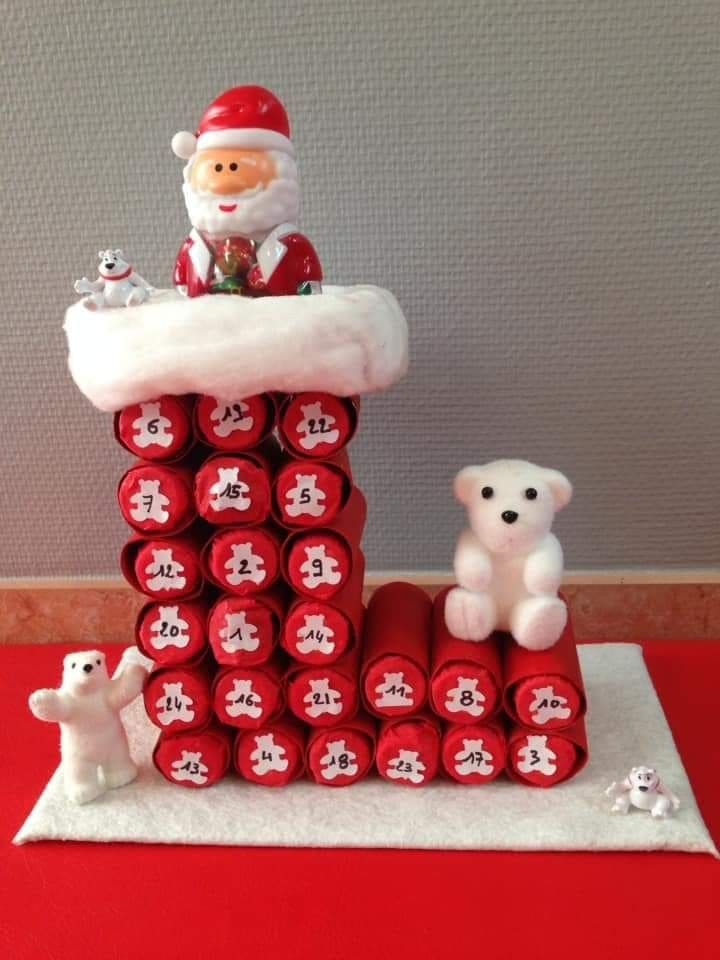
This adorable Advent calendar brings a playful chimney scene to life using something as simple as toilet paper rolls! Each roll is neatly wrapped in red paper, stacked into a chimney shape, and topped with Santa and his polar bear pals.
The numbered rolls count down to Christmas, hiding little treats or notes inside. The snowy cotton at the top adds a whimsical flair, and the felt base completes the cozy scene.
This project is the perfect mix of creative reuse and holiday charm. It’s fun to build and even more fun to watch little hands excitedly poke into each day’s roll.
Materials Needed
- 24 empty toilet paper rolls
- Red wrapping paper or cardstock (enough to cover 24 rolls)
- White cotton or faux snow
- Number stickers or printed labels (1-24)
- Small toys, candies, or notes
- Glue gun and glue sticks
- Stiff felt or foam board base (approx. 10″x14″)
- Mini Santa and polar bear figurines
Step-by-step Guide
Step 1: Wrap each toilet paper roll with red paper and secure the ends with glue or tape. Then add a numbered label to one side of each roll.
Step 2: Arrange and glue the rolls into a pyramid shape including five rows of varying lengths to create a stepped chimney effect.
Step 3: Glue cotton or faux snow on top for a soft, snowy finish. You can ad a Santa figurine peeking out if you like!
Step 4: Place the whole chimney on a felt base and decorate with polar bear figures or extra festive touches.
#15. Festive Cracker Wreath Advent Calendar
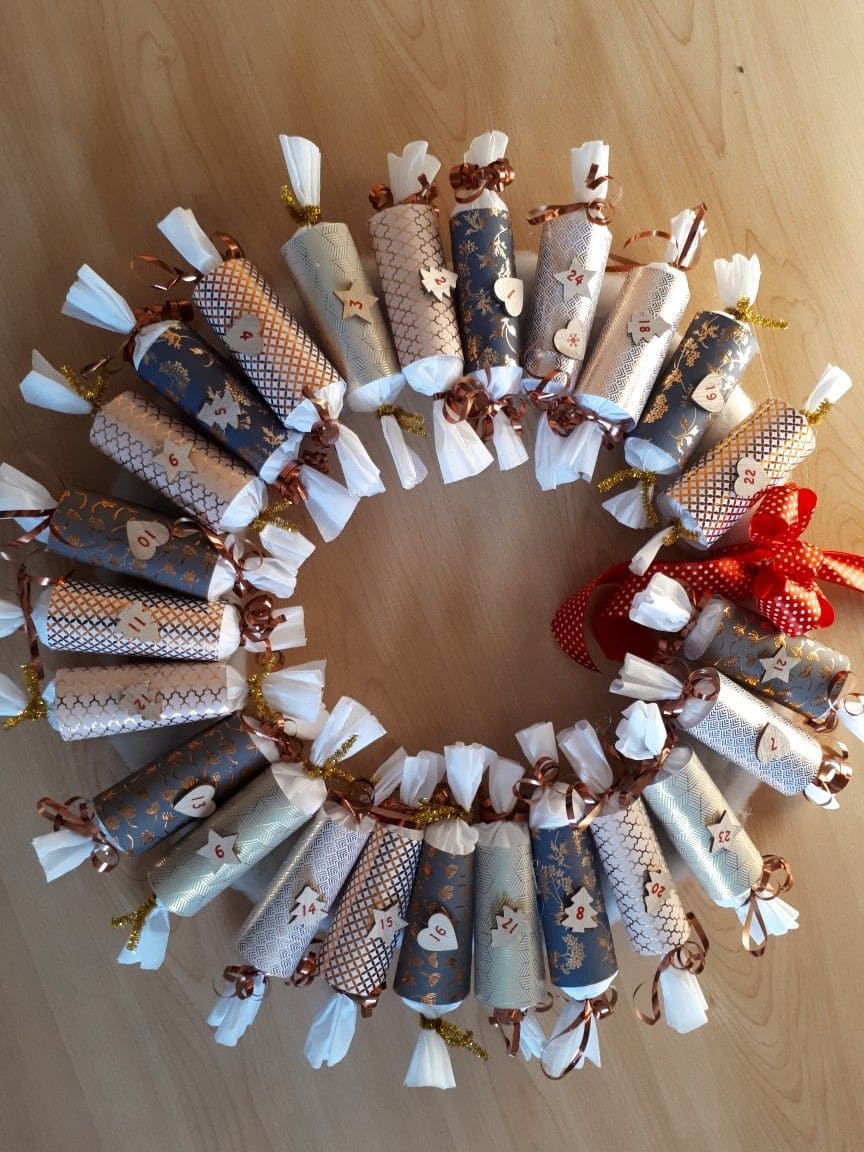
Whimsical and wonderfully handmade, this cracker-style Advent calendar doubles as a decorative wreath that adds a festive touch to any door or wall.
Each cracker is a rolled paper tube wrapped in elegant metallic paper and tied with curly ribbon at both ends, resembling classic Christmas poppers.
Moreover, the numbers are sweetly handwritten on little paper hearts and stars, giving it a cozy, personal feel. A red bow seals the wreath’s circle, making this DIY calendar as charming to look at as it is fun to use.
Materials Needed
- 24 toilet paper rolls or cardboard tubes (approx. 4” length)
- Assorted decorative paper (metallic, patterned, holiday-themed)
- Tissue paper or white napkins for ends
- Ribbon (curling and twist ties in gold or brown)
- Twine or wire wreath base
- Numbered tags or small cut-out shapes
Step-by-step Guide
Step 1: Fill each tube with treats, notes, or small gifts. Then wrap the tube in decorative paper, securing ends with tissue and ribbon to resemble crackers.
Step 2: Attach numbered tags to each tube using glue or tape.
Step 3: Tie or hot glue the crackers around a wire or twine wreath base in a circular arrangement.
Step 4: Add a ribbon bow to finish the look and hang your wreath proudly!
#16. Paper Bag Sticker Advent Calendar
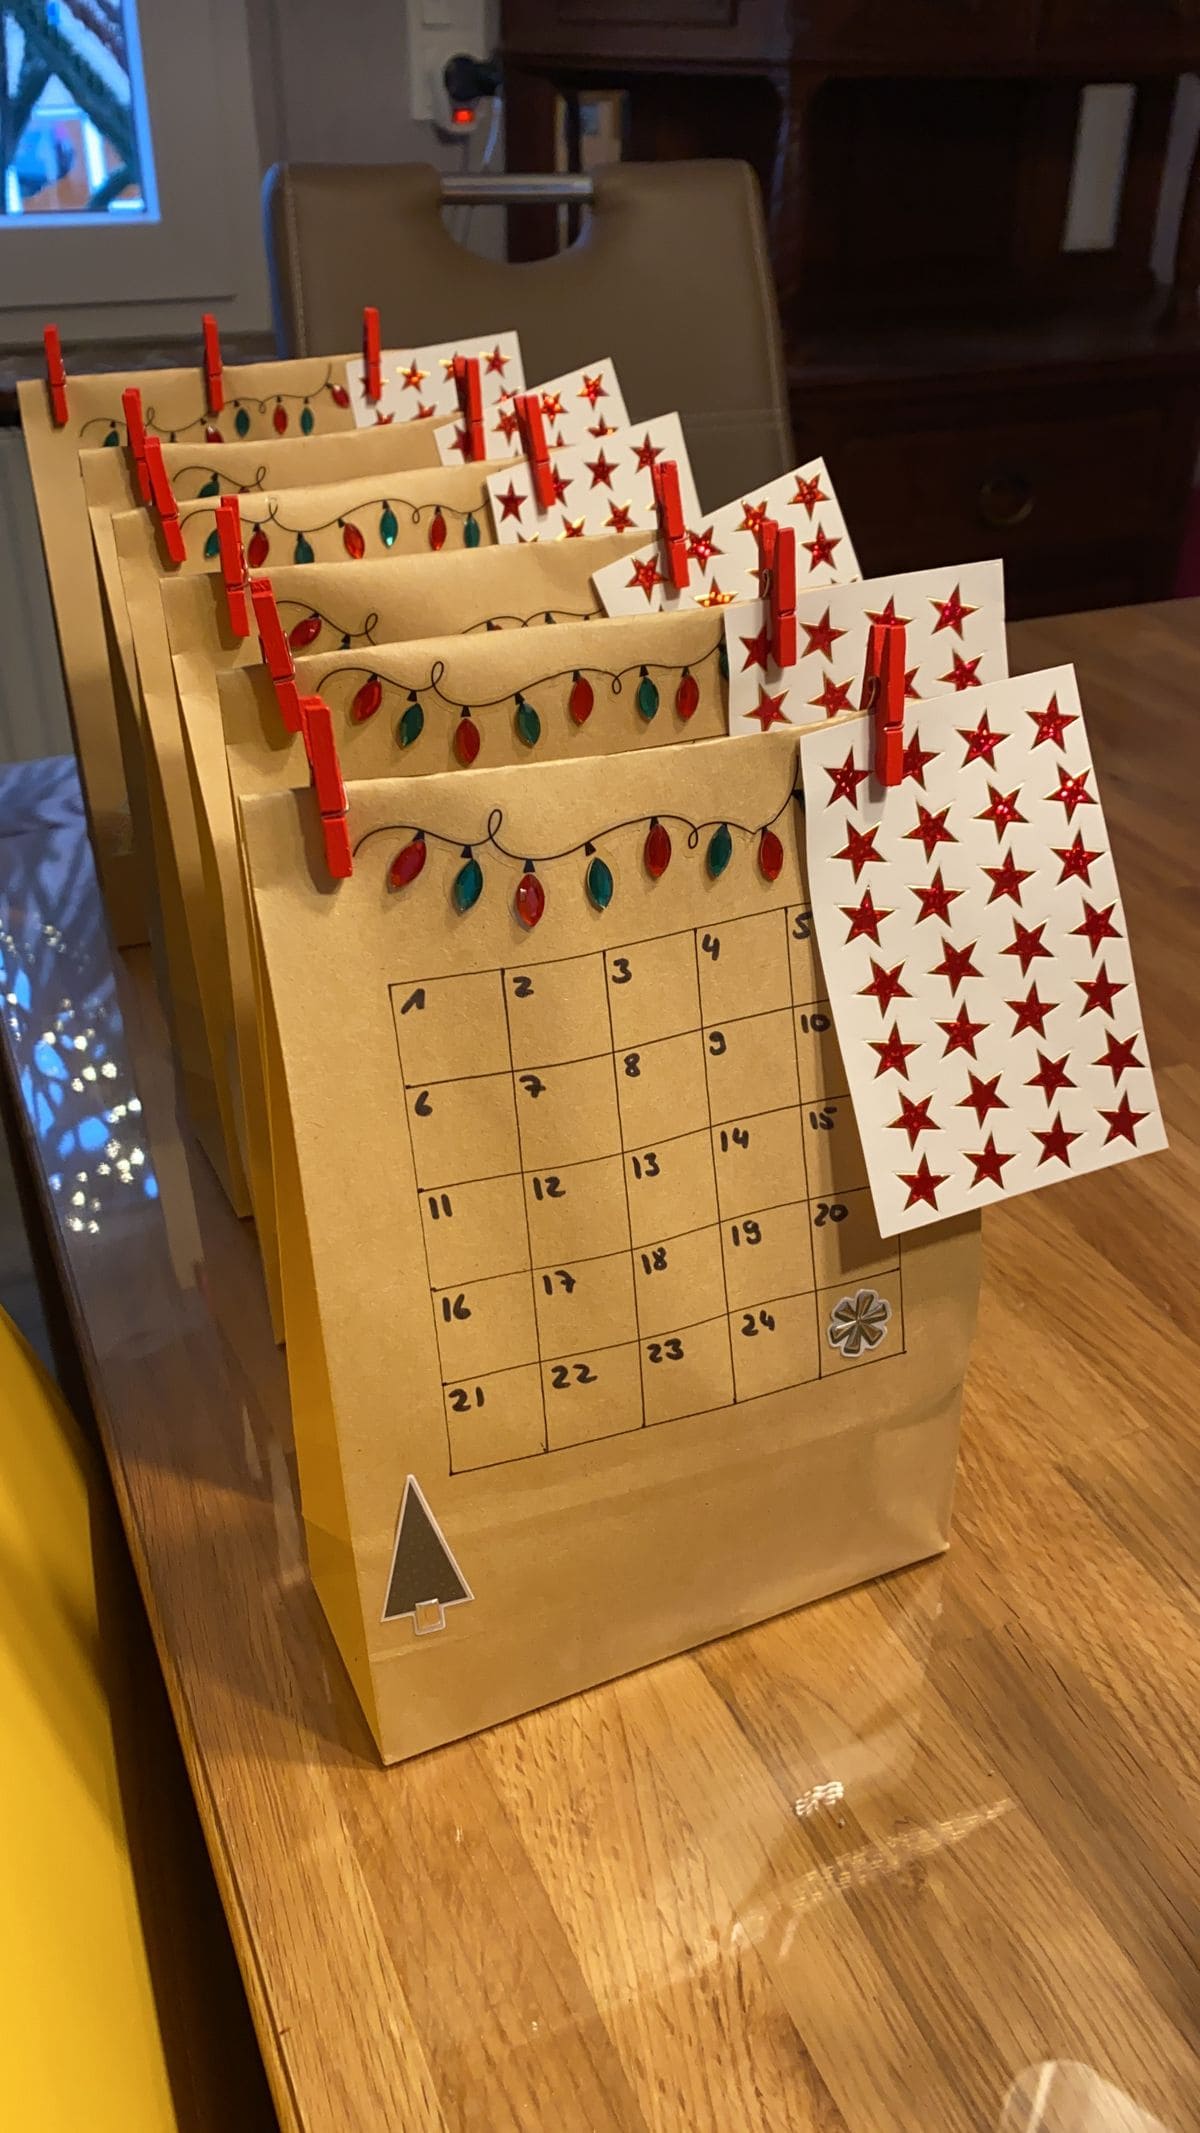
Sometimes the simplest ideas are the most delightful. This paper bag advent calendar turns everyday materials into something heartwarmingly nostalgic.
You’re not just counting down the days, you’re creating a hands-on experience for your little one. Each morning, they add a shiny red star to the calendar grid, watching December fill with sparkle and anticipation.
You can tuck a small treat, message, or activity slip inside each bag to build excitement.
Materials Needed
- 24 brown kraft paper lunch bags (5″x10″)
- Red mini clothespins (approx. 1.5″)
- Printable or hand-drawn grid calendars (approx. 4″x4″)
- Red star stickers (at least 24 per bag)
- Christmas-themed stickers
- Scissors and glue stick
- Small gifts, treats, or notes
Step-by-step Guide
Step 1: Print or draw a 1–24 calendar grid onto square paper sheets. Then add colorful string lights or borders for a festive feel.
Step 2: Glue each calendar sheet onto the front of a kraft paper bag. Next, add stickers like trees or snowflakes for extra charm.
Step 3: Clip a small sheet of star stickers to each bag using a mini clothespin.
Step 4: Fill the bags with daily goodies, then set them up in a row or basket for easy access.
Step 5: Let your child add a star to the matching calendar day each morning, it’s like unwrapping joy with every sticker.
#17. Ornament Countdown Tree Calendar
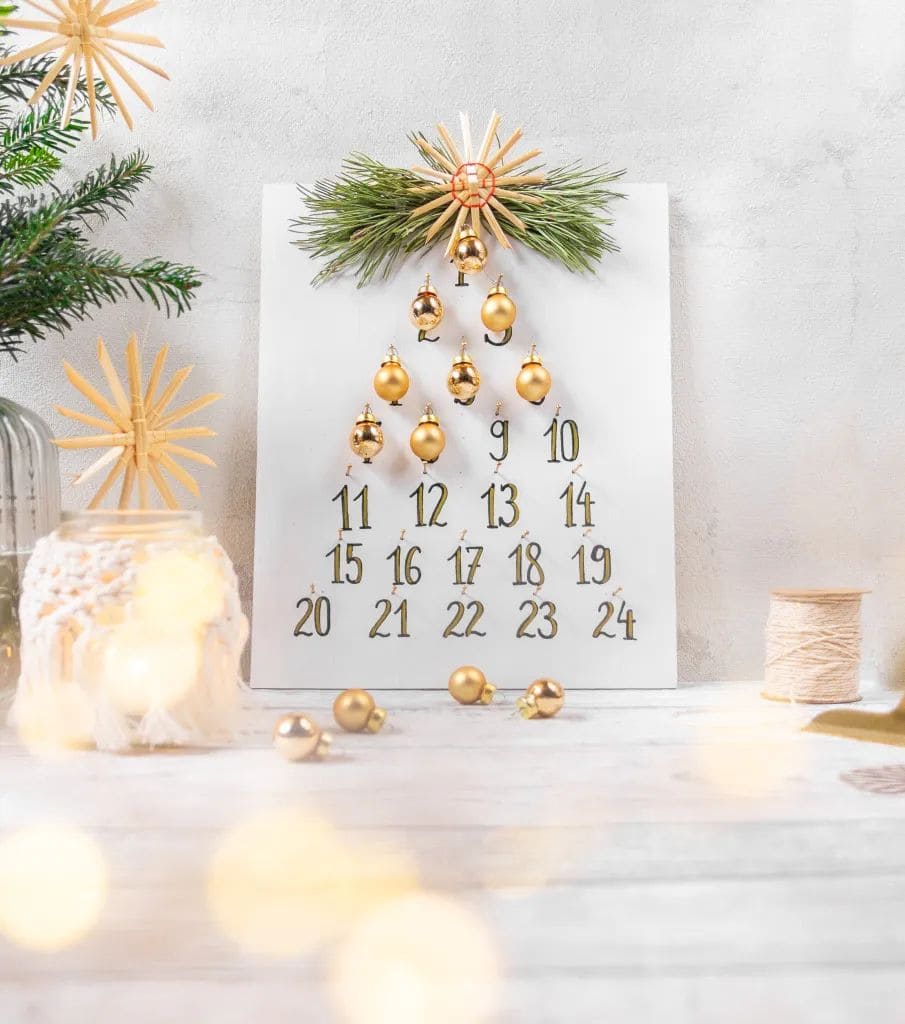
Here’s a fresh twist on the countdown tradition. Instead of chocolates or gifts, this DIY turns each day into a decorating ritual.
Every morning, you get to hang a shimmering ornament on the board’s tiny hooks, slowly revealing a sparkling Christmas tree shape.
If you’re someone who loves a touch of minimalism mixed with meaningful moments, this project might become your new holiday favorite. Bonus, it doubles as wall art throughout December.
Materials Needed
- 1 wood board (approx. 18”x24” or larger)
- 24 small cup hooks or screw-in hooks
- 24 gold or mixed mini ornaments (1.5″-2″)
- Brass number stickers or metallic marker
- Pine sprigs and star topper (real or faux)
- Hot glue
- Drill (optional)
Step-by-step Guide
Step 1: Lay out your board and decide where each hook will go to form a Christmas tree shape. You can mark each spot lightly with a pencil.
Step 2: Screw in the cup hooks by hand or with a drill if needed. Then space them evenly to create that classic triangular form.
Step 3: Label each hook with numbers 1 to 24 using brass stickers or hand-drawn numerals for a rustic finish.
Step 4: Attach a few sprigs of greenery and a star or straw ornament at the top to give it a festive flair.
Step 5: Store the ornaments in a jar or box nearby and hang one each day until Christmas Eve. It’s a countdown that grows more magical with time.
#18. Hanging Gift Box Advent Calendar
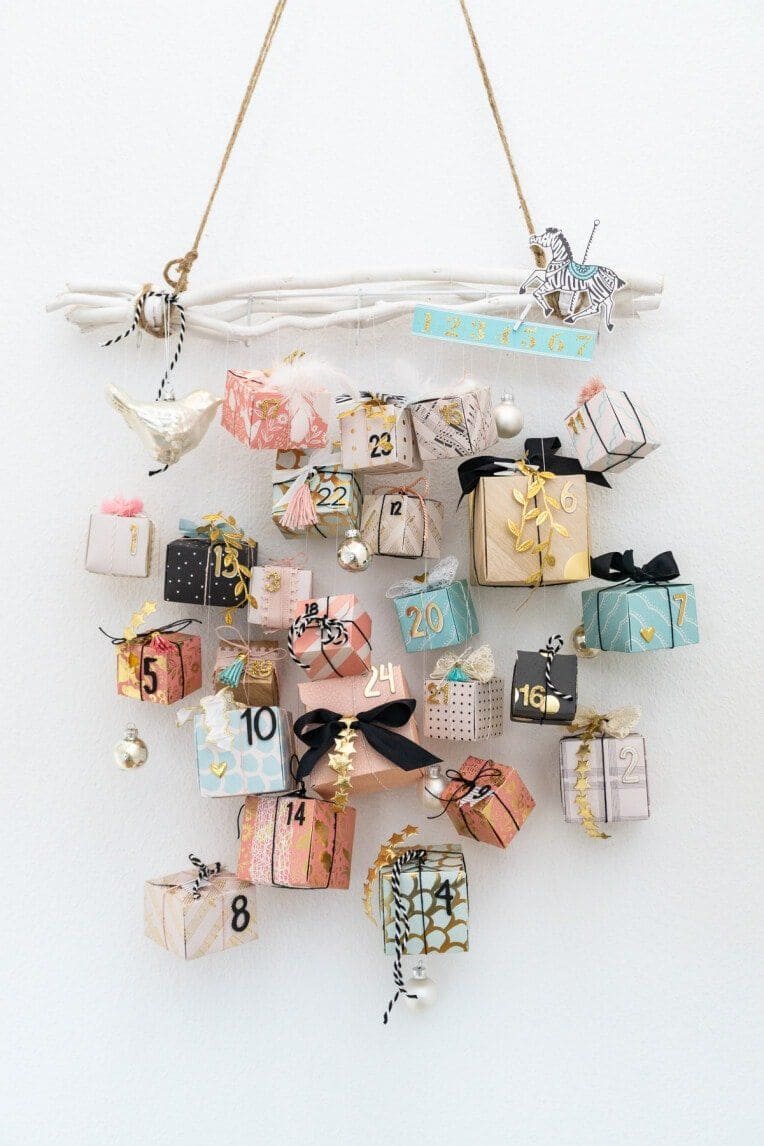
This whimsical advent calendar looks like something plucked from a dreamy holiday boutique. Suspended from a painted branch, 24 mini gift boxes dance in mid-air, each one wrapped like a tiny treasure.
You can choose soft pastels, metallic golds, or even your leftover gift wrap scraps to give it personality. It’s playful, creative, and doubles as seasonal wall art.
Kids love the surprise of tugging down a mystery box each day, and you’ll love how it brightens the room like a festive mobile.
Materials Needed
- 24 small cardboard boxes (2″-3″ wide)
- Assorted wrapping paper or scrapbook paper
- Ribbons, string, and mini bows
- Gold number stickers
- 1 sturdy stick or driftwood (about 18″-24″)
- Twine
- Hot glue
Step-by-step Guide
Step 1: Wrap each box in a different paper or pattern. Then secure neatly using double-sided tape or glue for clean edges.
Step 2: Label each box with a number sticker or handwrite the countdown using a metallic pen.
Step 3: Fill each box with a treat, ornament, or folded note with a fun activity for the day.
Step 4: Tie clear string or thread to each box and suspend them from the stick, spacing them out at varying heights.
Step 5: Hang the branch on the wall using twine. Add decorations like ornaments, paper animals, or garlands to finish it off.
#19. Vertical Hanging Star Pocket Advent Calendar
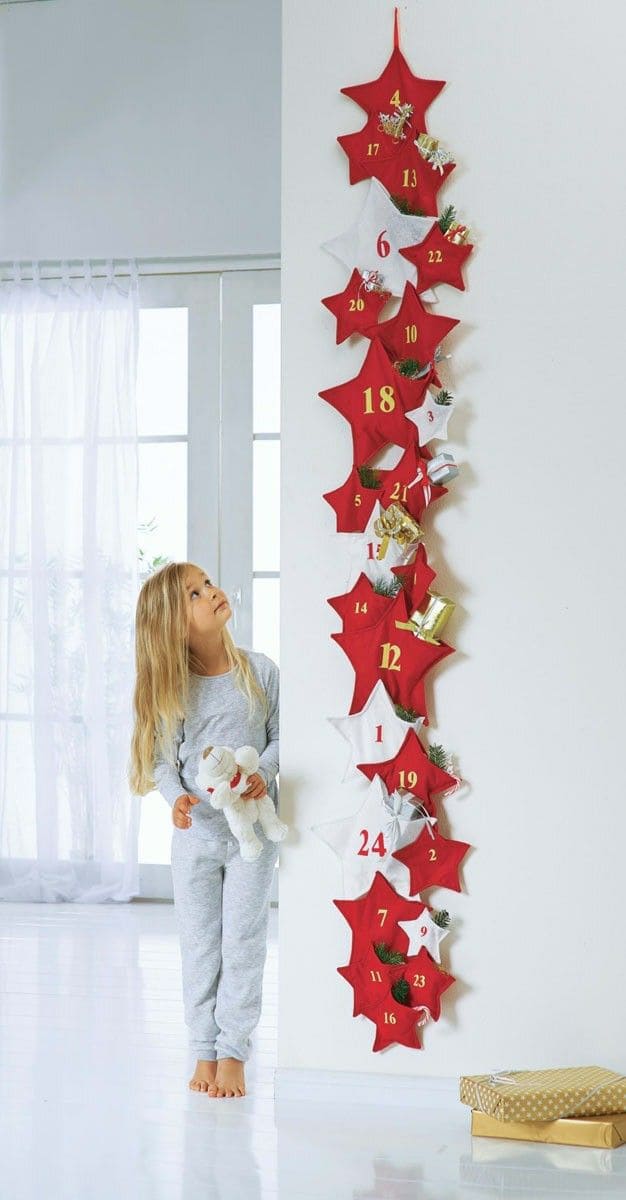
Crafted from red and white felt stars, each pocket holds a tiny gift, treat, or note waiting to be discovered. It hangs vertically, making it ideal for narrow spaces or cozy apartments.
What makes this version shine is how it feels like a festive garland, but each star has a secret.
If you’ve got little ones, watching them wake up each morning to check the next star becomes its own holiday ritual.
Materials Needed
- Red and white felt sheets (at least 12 sheets, 9″×12″)
- Gold iron-on or vinyl numbers (1-24)
- Matching thread and needle or hot glue gun
- Small craft gifts
- Twine or ribbon (about 50″)
- Optional: greenery sprigs, mini bells, ribbon bows
Step-by-step Guide
Step 1: Cut out 48 identical star shapes (about 6″ wide) from your felt, two per pocket. You can use a cardboard stencil to stay consistent.
Step 2: Sew or glue each pair of stars together around the edge, leaving the top open to create a pocket. Repeat for all 24 pockets.
Step 3: Add your numbers using iron-on vinyl or gold fabric paint. You make sure each one is clearly visible near the top edge.
Step 4: Attach the stars vertically to a length of ribbon or twine using glue, stitches, or small clothespins.
Step 5: Fill each pocket with tiny gifts, handwritten notes, or rolled-up scrolls, and hang it on a hook, door, or narrow wall.
#20. Muffin Tin Magnetic Advent Calendar
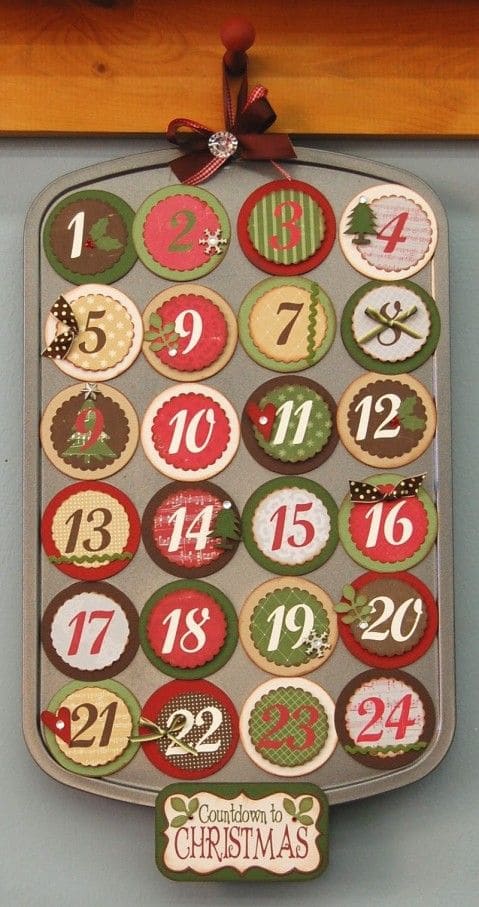
Amazingly, this charming DIY transforms a humble muffin tin into a festive countdown that’s as cute as it is clever. Each numbered circle is a little magnetic door, hiding a surprise inside every cup.
The layered cardstock circles add texture and whimsy, while the red, green, and kraft tones create a cozy, homespun look.
Besides, you can hang it by a ribbon, prop it on a shelf, or gift it to a teacher as it’s fun, functional, and full of heart.
Materials Needed
- 24-cup standard muffin tin
- 24 round magnets (1.5″-2″)
- Scrapbook paper in festive colors and patterns
- Number stickers or stencils (1-24)
- Double-sided tape
- Small items or treats
- Ribbon or bow (optional)
Step-by-step Guide
Step 1: Cut 24 circles from patterned paper to fit over the muffin tin cups, layering with scalloped or textured cardstock if desired.
Step 2: Add numbers to each circle using stickers or stencils. Then embellish with ribbon, washi tape, or tiny cutouts like trees or snowflakes.
Step 3: Attach magnets to the backs of each circle with glue or adhesive dots.
Step 4: Fill each muffin cup with tiny treats or fun holiday messages before sealing them with the magnetic covers.
Step 5: Finally, add a festive ribbon or label to the top and bottom, then hang or display for a delightful countdown.
#21. Chalkboard Wall Countdown with Wreath Marker
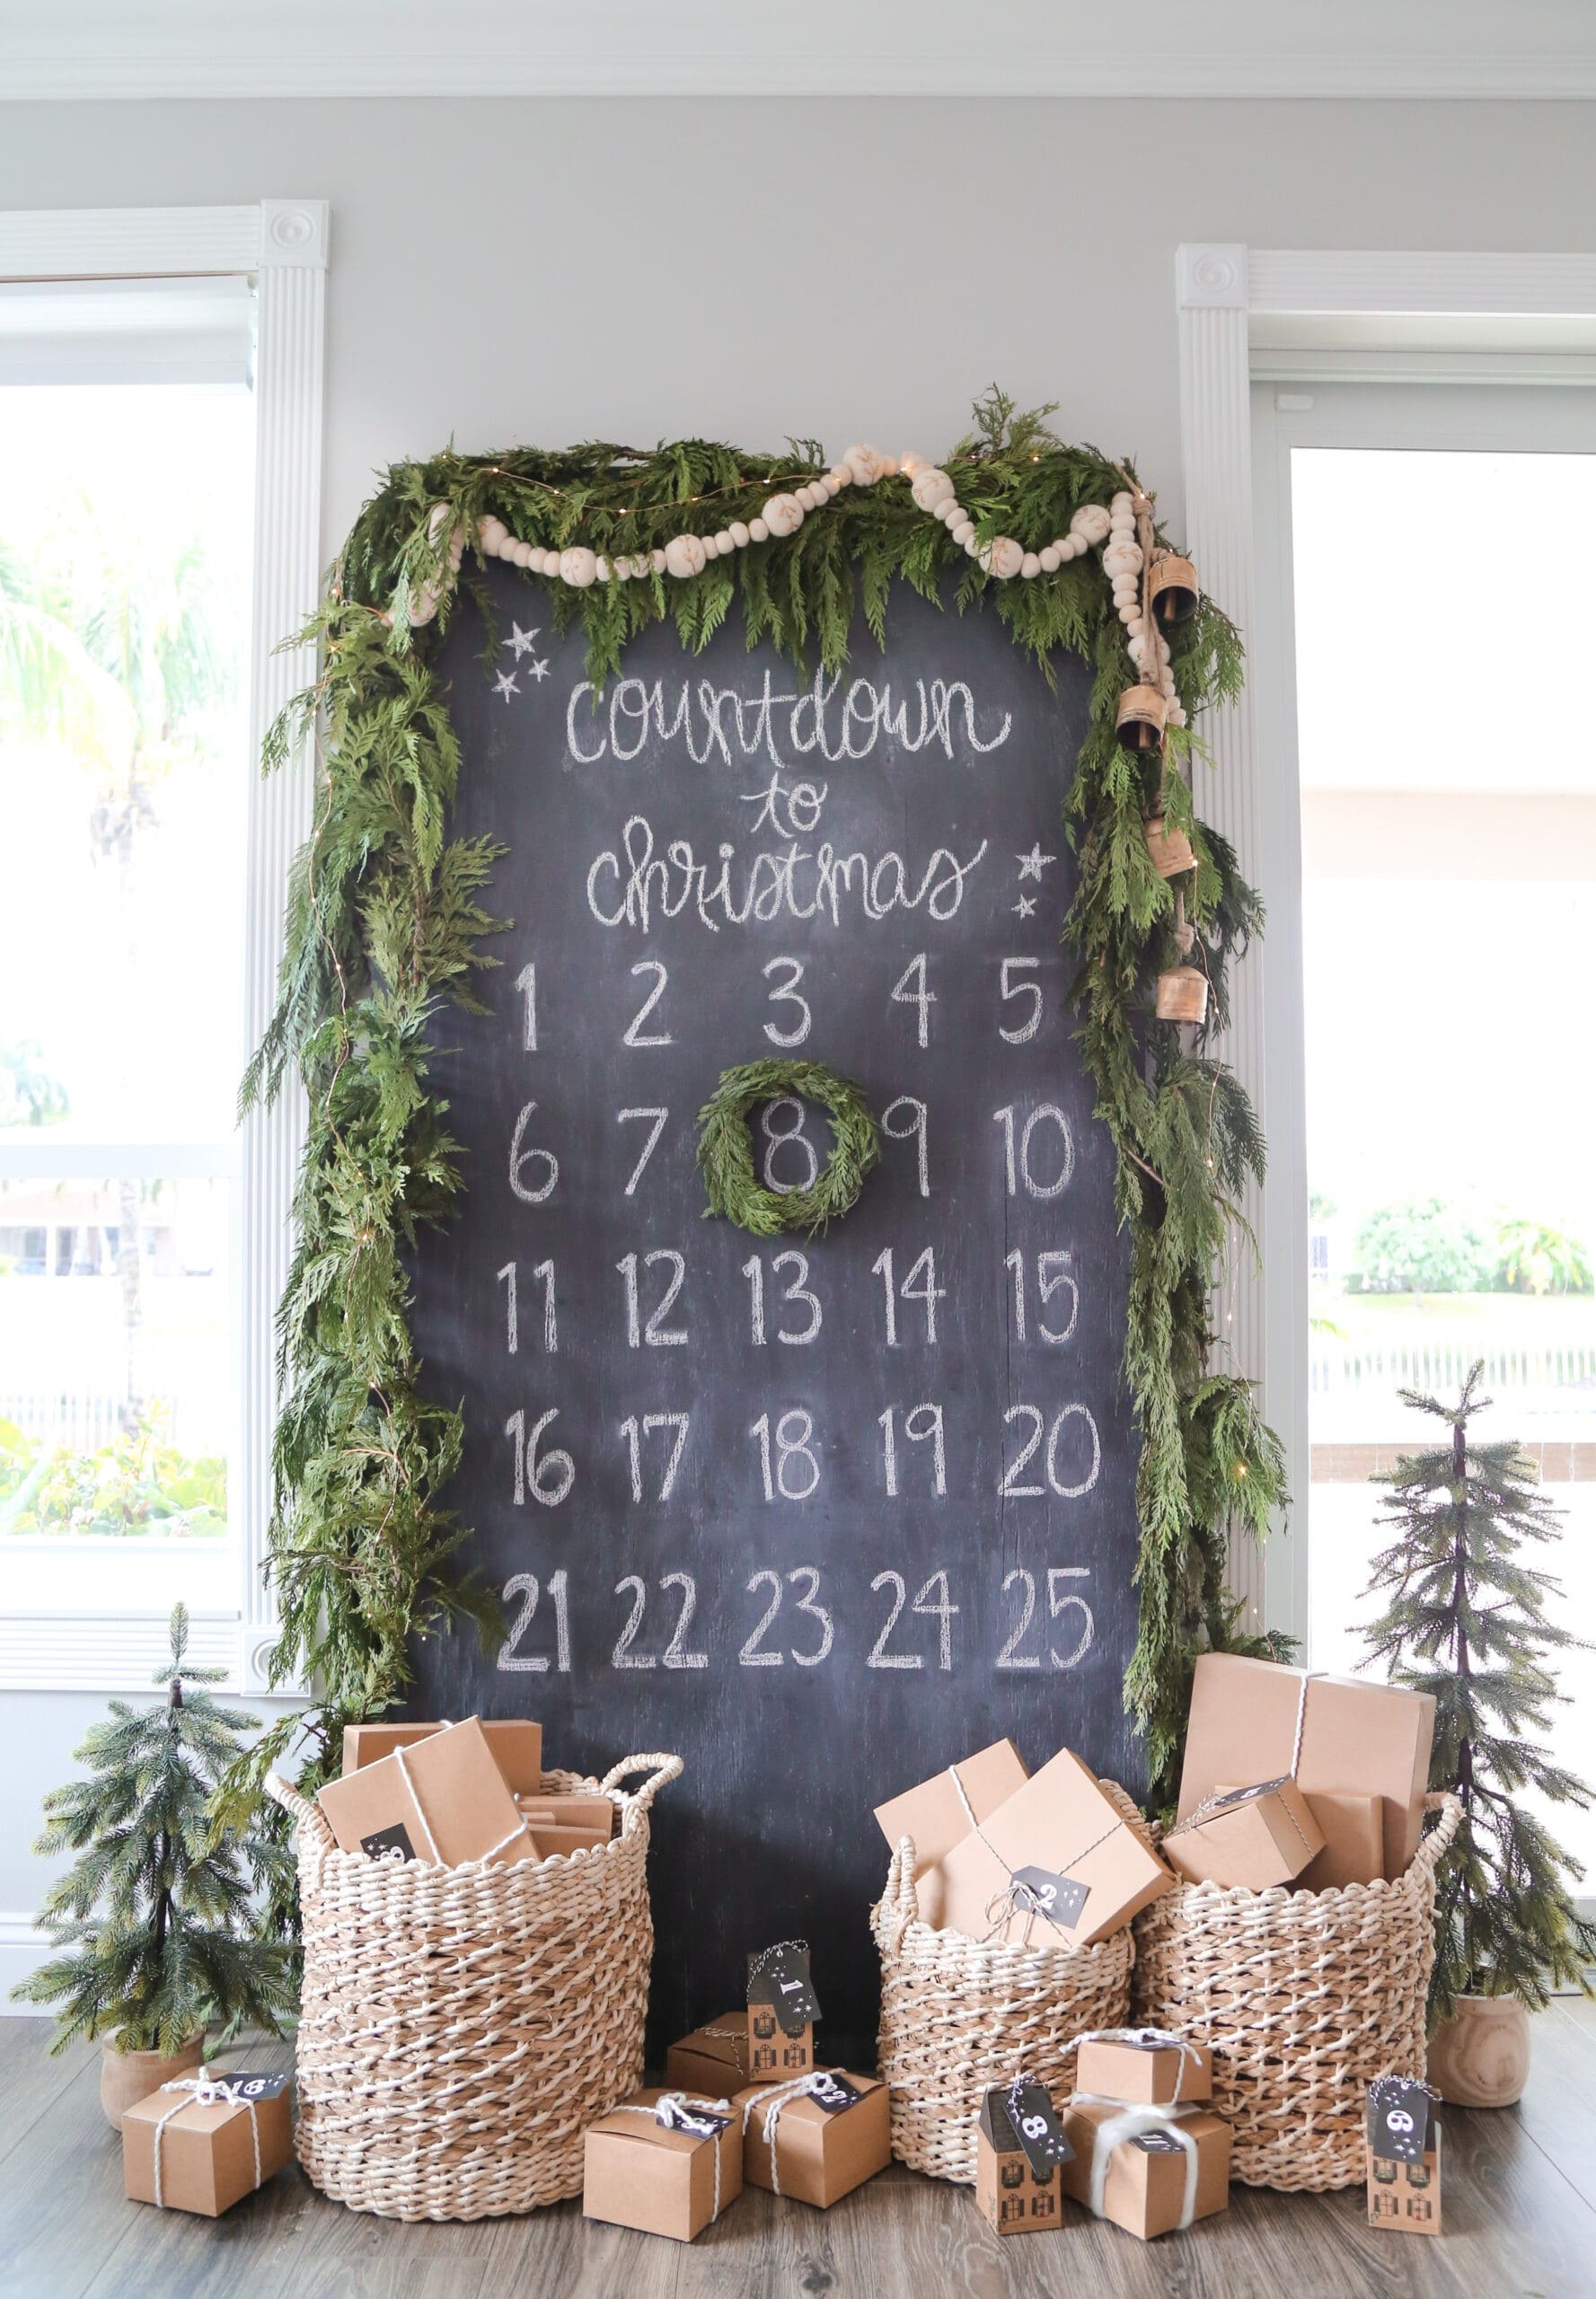
There’s something timeless about chalk and greenery. This large chalkboard Advent calendar brings a peaceful, old-world charm to your Christmas countdown.
Each number is hand-drawn in soft white chalk, spaced neatly across the board like a grid of possibility. A mini wreath becomes your daily marker, moving with intention as Christmas draws near.
Draped with fresh evergreen garland and wooden bead strands, the frame feels earthy and elegant. Below, wicker baskets brimming with simple brown-paper packages wait quietly, each one a hidden joy, ready to be opened.
Materials Needed
- Large chalkboard or blackboard-painted wall
- White chalk
- Mini faux wreath (approx. 6″ diameter)
- Fresh or faux evergreen garland
- Wood bead garland and small bells (optional)
- Hooks or tacks
- 25 small gift boxes
Step-by-step Guide
Step 1: Draw a 5×5 number grid on your chalkboard, spacing evenly.
Step 2: Hang the mini wreath around the number for the current day. Then drape your garland and wood beads along the top and sides of the board.
Step 3: Place labeled or numbered gifts in baskets below, ready for each day.
Step 4: Move the wreath each morning to mark the countdown visually.
#22. Mini Bucket Wall Advent Calendar
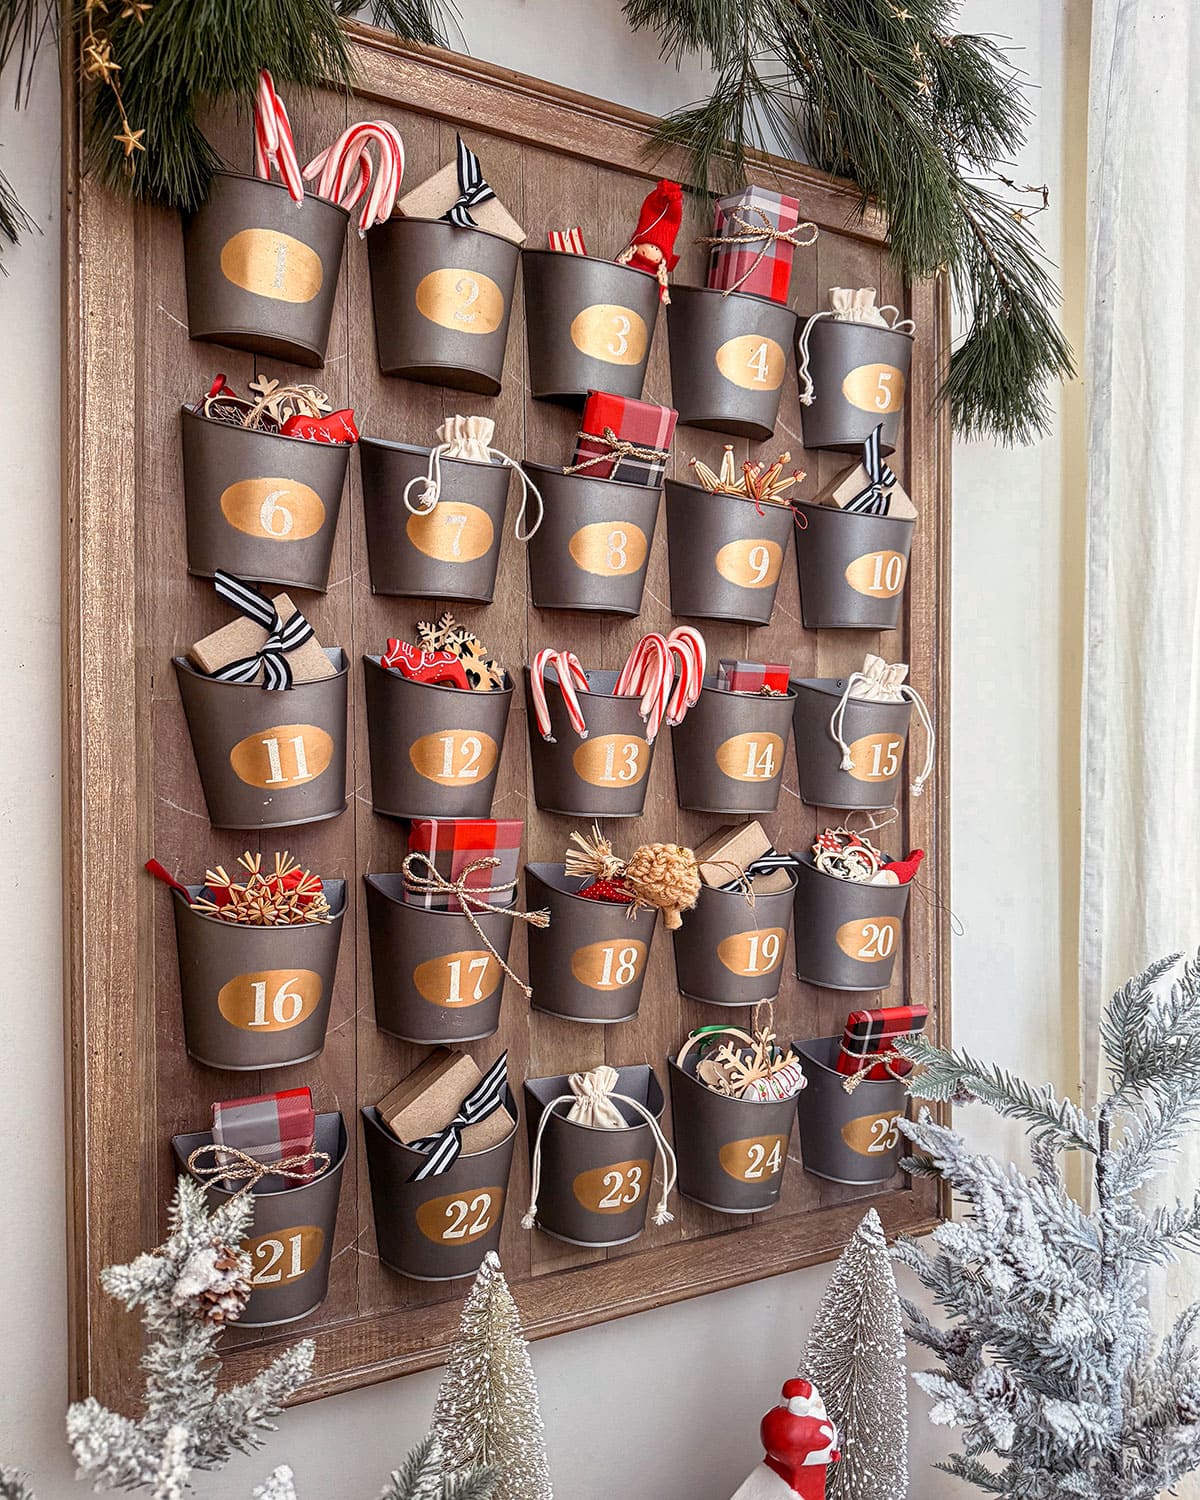
This Advent calendar brings a polished, boutique-style charm right into your home. A rustic wood frame holds 25 sleek, matte-black mini buckets, each marked with a golden number that glows softly against the deep tone.
The little buckets are brimming with wrapped goodies, striped candies, cozy ribbons, and tiny burlap pouches, each one begging to be opened.
Plus, the consistent layout gives it a clean, curated look, but the varied treats inside keep the excitement alive every single day.
Materials Needed
- 25 mini black buckets (approx. 3″ wide x 3″ tall)
- Wooden board or large frame (at least 24″ x 36″)
- Gold vinyl numbers or metallic number stickers (1-25)
- Small gifts, candy canes, craft items, fabric ribbon
- Hooks or screws
- Pine or garland (optional)
Step-by-step Guide
Step 1: Space and mount the 25 mini buckets evenly across the wooden board using screws or sturdy hooks.
Step 2: Apply gold numbers to the front of each bucket.
Step 3: Fill each bucket with a mix of small wrapped items, candy, or notes tied with ribbon or twine.
Step 4: Now, hang or display the entire board on a wall or tabletop with added greenery for a festive finish.
See also: 20+ Cute Christmas Crafts from Egg Cartons for All Ages
