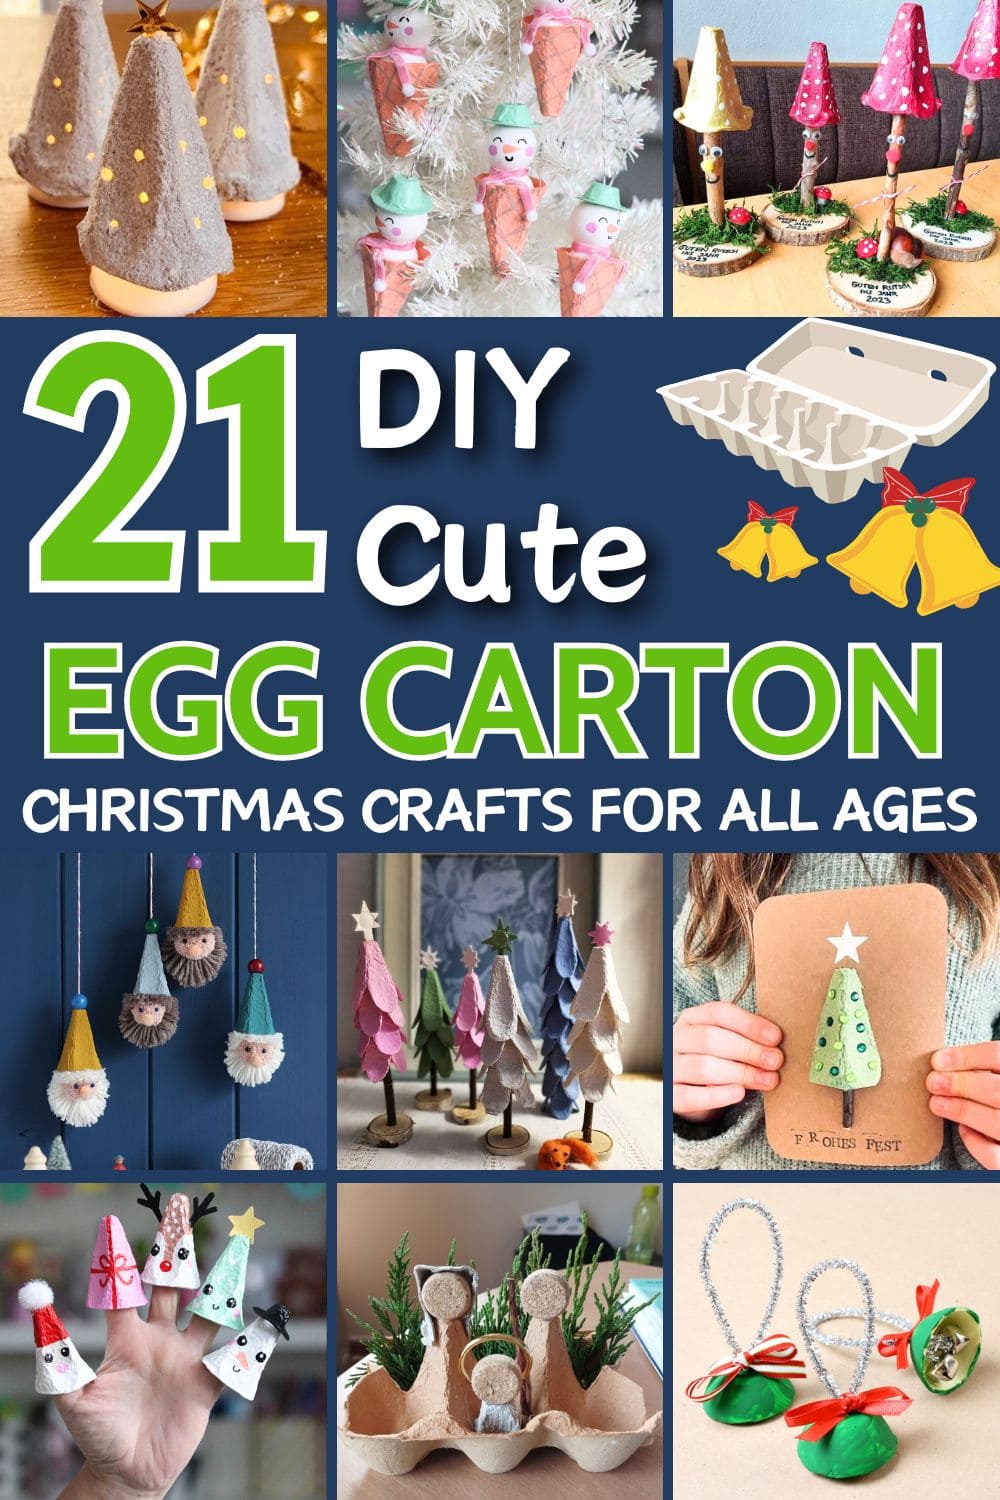
Who knew something as simple as an egg carton could turn into holiday magic? This season, repurposing egg cartons into charming Christmas crafts has become a trend loved by crafters of all ages and for good reason.
These humble trays are popping up everywhere, from Pinterest boards to classroom projects, transformed into everything from reindeer to twinkling trees. They’re easy to work with, budget-friendly, and perfect for reducing waste during the holidays.
Whether you’re crafting with kids or making handmade décor for your home, these egg carton ideas are a fun way to get creative without spending much.
#1. Glowing Egg Carton Christmas Trees

Softly glowing like magic forest lanterns, these minimalist Christmas trees are made by inverting cone-shaped sections of an egg carton over LED tealights.
Small holes are carefully poked throughout to mimic tiny twinkle lights, creating a starry effect when the warm light glows through.
Finished with a golden star on top, they blend rustic charm with cozy ambiance. They give off a handmade Scandinavian feel without requiring any special materials.
Materials Needed
- 1 egg carton (pointy cone shapes)
- Battery-operated LED tealights
- Craft knife or pin tool
- Gold star stickers or 3D embellishments
- White or gray paint
- Hot glue or tacky glue
Step-by-step Guide
Step 1: Cut out cone shapes from the egg carton and paint them white or pale gray.
Step 2: After drying, use a pin or craft knife to make tiny holes all around the cones. Then glue a gold star on top of each cone.
Step 3: Finally, place the cones over LED tealights and switch them on for a glowing tree effect.
#2. Peppermint Stripe Egg Carton Garland
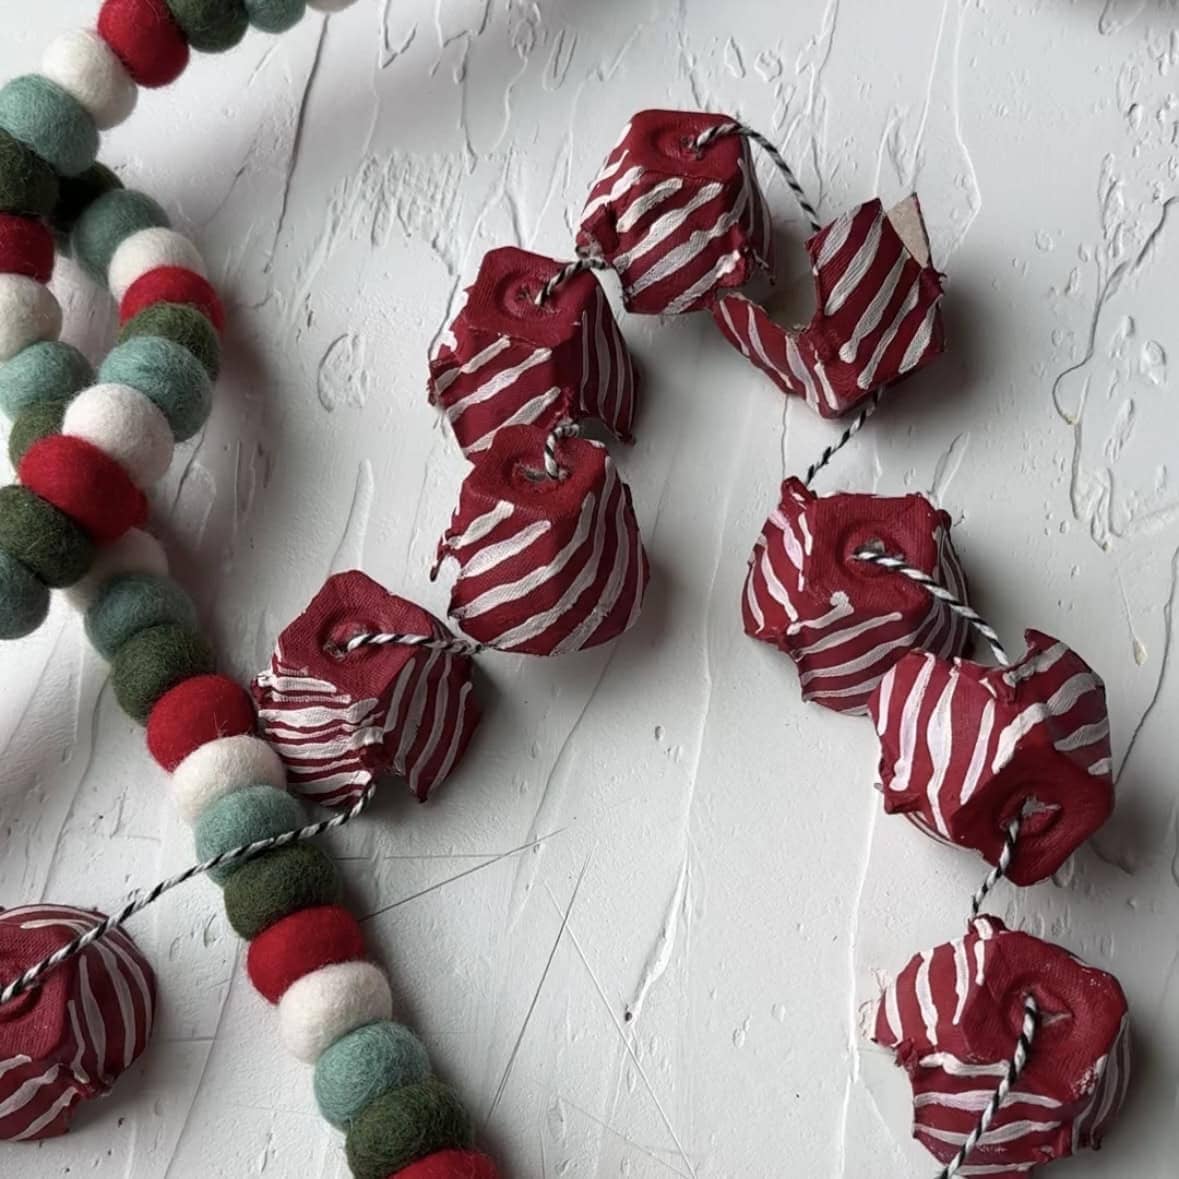
Interestingly, this whimsical garland captures the sweet spirit of peppermint candies without the sugar rush. Each candy is made by cutting and painting egg carton cups in bold red and hand-painted white stripes to mimic wrapped peppermints.
Strung together with baker’s twine, they make a playful and eco-friendly decoration for your mantle, windows, or tree.
You can also pair it with felt ball garlands for a layered, textured holiday look that feels both handmade and festive. This is a fun way to reuse materials while making your home look like it belongs on a vintage candy shop postcard.
Materials Needed
- 12-15 egg carton cups
- Red and white acrylic paint (1 oz each)
- Fine-tip brush
- Baker’s twine or yarn (about 6-8 ft)
- Hole punch or sharp tool
- Scissors
Step-by-step Guide
Step 1: Cut out individual egg carton cups and trim them into rough peppermint shapes. Then paint each cup red and let them dry fully.
Step 2: Add curved white stripes with a detail brush for a candy-like effect.
Step 3: Punch a hole in each side of every cup and thread them onto baker’s twine.
Step 4: Space them evenly and knot between cups if you want fixed gaps.
#3. Egg Carton Christmas Finger Puppets
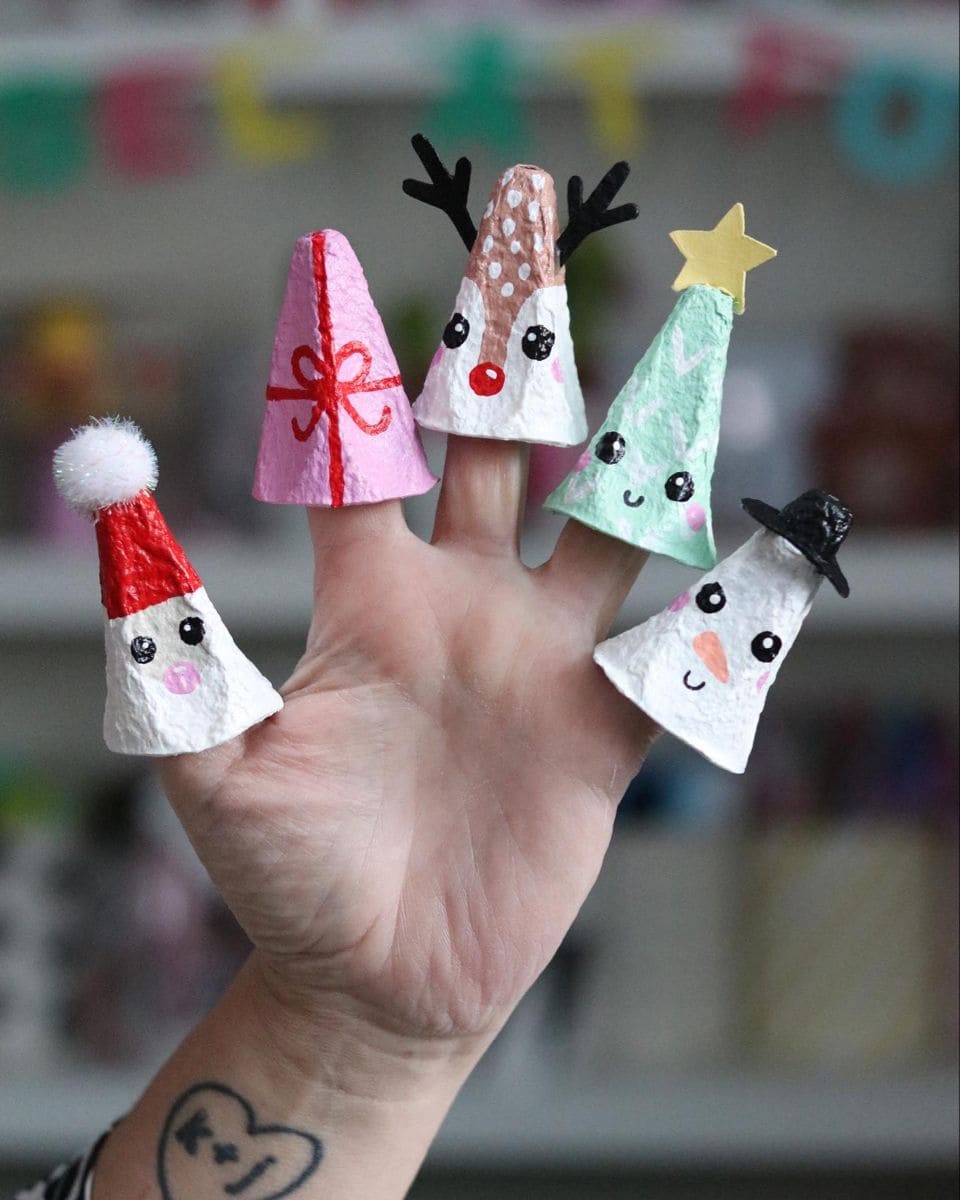
What about bringing holiday magic to life right at your fingertips? These playful finger puppets are made from the pointed tips of egg cartons and painted into a festive cast of characters.
Santa, Rudolph, a snowman, a Christmas tree, and a gift box, each one is full of personality. They’re perfect for storytelling time, school plays, or just hours of giggling puppet shows with your little one.
Additionally, the charm lies in the simplicity, but you’ll be surprised how expressive a tiny cone of cardboard can be.
Materials Needed
- 5 egg carton cones (approx. 1.5-2” tall)
- Acrylic paints in red, white, brown, green, black, pink, and more
- Paintbrushes (fine tip)
- Black marker or paint pen for faces
- Pom-poms, foam stars, mini felt, and paper scraps
- Scissors and hot glue gun
Step-by-step Guide
Step 1: Cut out the pointed sections of your egg carton, trimming the edges to make a clean cone shape that fits a child’s finger comfortably.
Step 2: Paint each cone a base color like red for Santa or green for the tree and let them dry completely.
Step 3: Add facial features and details with a fine brush or paint pen. Then give them rosy cheeks, sparkly eyes, or dotted reindeer fur.
Step 4: Decorate with pom-poms (Santa’s hat), stars (tree topper), or felt hats for your snowman. You secure these with hot glue.
Step 5: Let your puppets dry fully, then slide them onto your fingers and bring your holiday story to life!
#4. Minimalist Egg Carton Nativity Scene
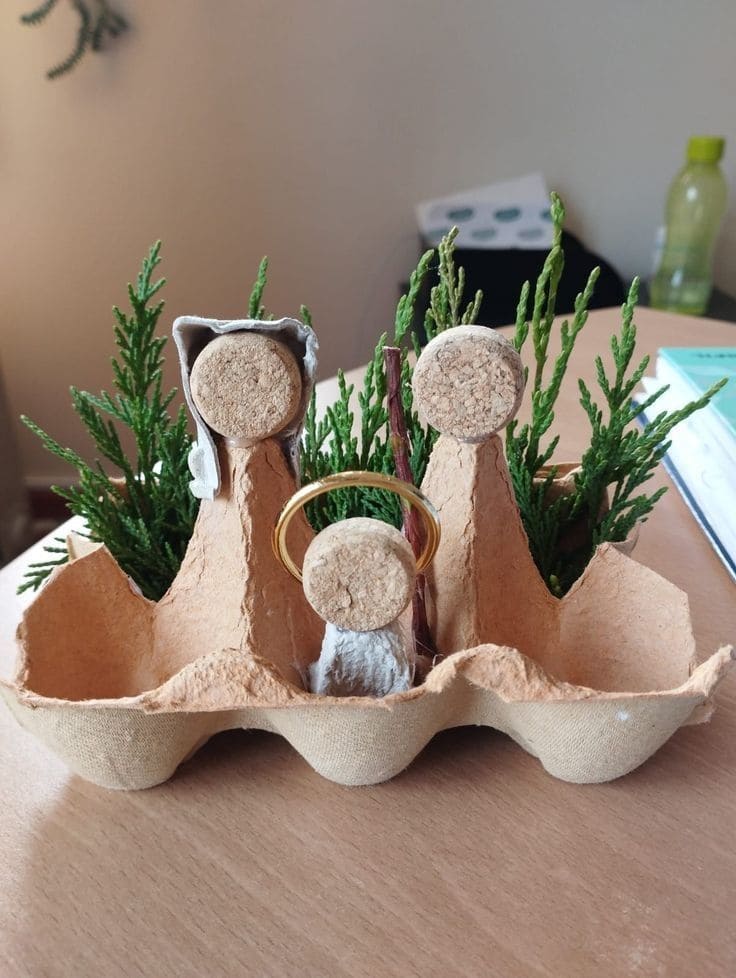
This serene and symbolic nativity scene captures the essence of Christmas with simplicity and warmth.
Using the upright cones from an egg carton and a few corks for heads, this DIY crèche represents Mary, Joseph, and baby Jesus. Small branches stand in for the manger’s frame, while fresh greenery tucked behind adds a natural backdrop.
Moreover, a golden ring encircling baby Jesus gives the piece a gentle, sacred touch. It’s a heartfelt reminder that meaningful décor doesn’t have to be complex, just made with care.
Materials Needed
- 1 egg carton base (with 3 upright cones intact)
- 3 wine corks
- Small twigs or sticks
- Gold wire ring (approx. 2″)
- Hot glue gun
- Greenery cuttings (real or faux)
- Scissors or craft knife
Step-by-step Guide
Step 1: Cut your egg carton to create a base with three standing cones for the Holy Family. Then glue a cork to the top of each cone to form heads.
Step 3: Place a small gold ring around the baby figure for a halo or angelic effect. You next add twigs behind the center figure to mimic a manger or stable post.
Step 4: Tuck in sprigs of greenery around the sides to complete the rustic nativity scene.
See more: 25 Magical Christmas Popsicle Stick Crafts to Delight Kids and Parents Alike
#5. Santa’s Egg Carton Sleigh and Reindeer Team
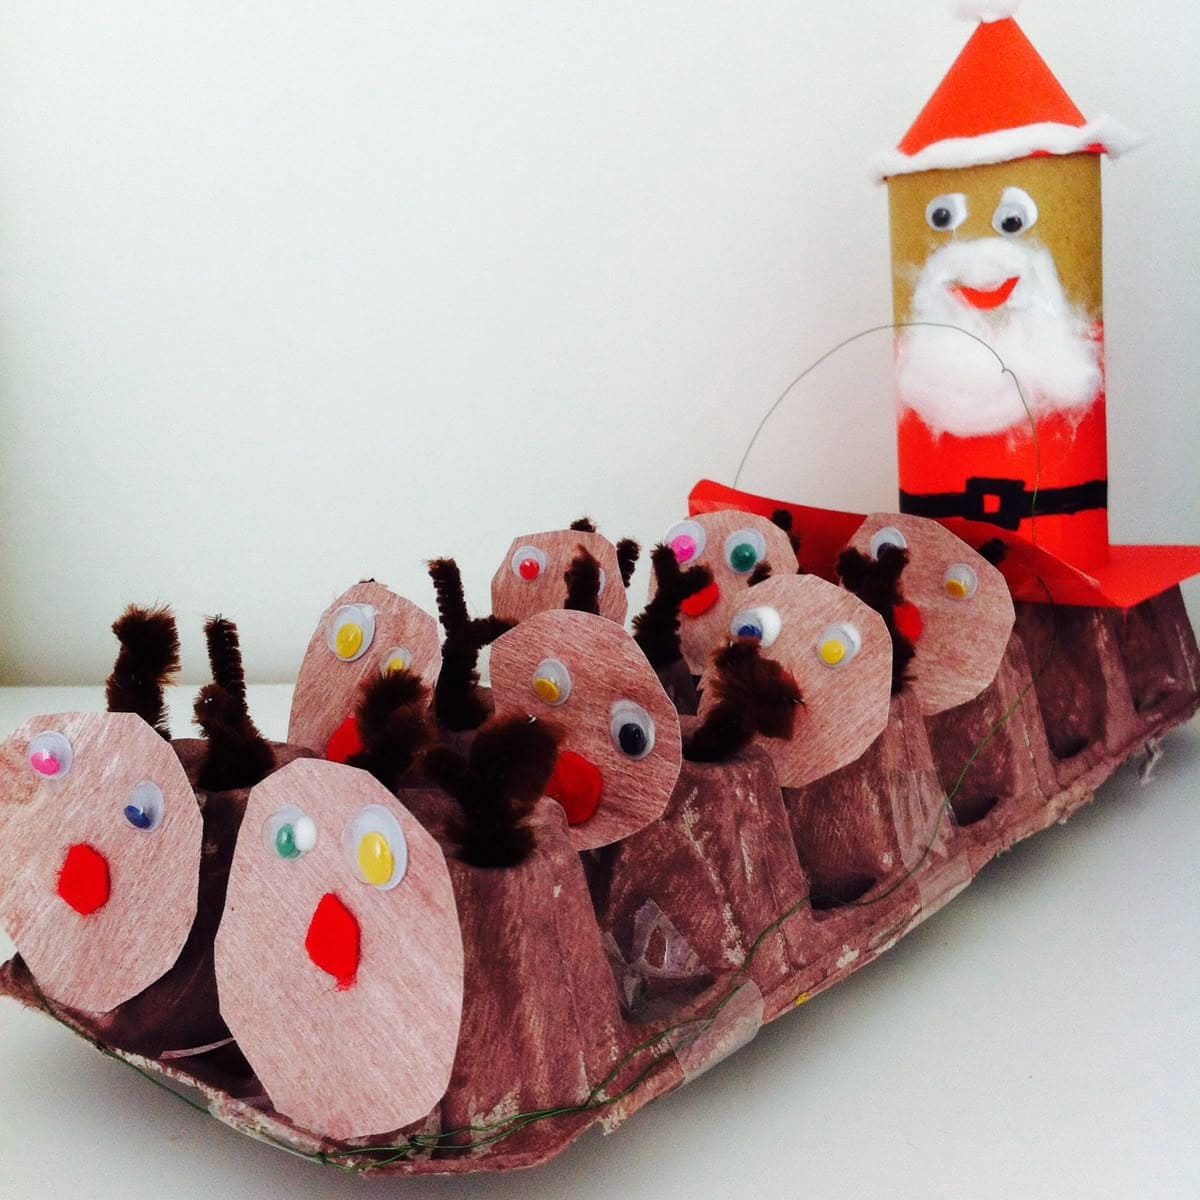
This adorable sleigh scene captures the full magic of Santa’s Christmas Eve ride using an old egg carton.
With a cardboard tube Santa leading the way and a line of reindeer made from brown-colored egg cups, this craft is bursting with holiday spirit. Each reindeer has a googly-eyed face, red pom-pom nose, and pipe cleaner antlers.
Plus, the sleigh is cleverly crafted from the base of the carton, while Santa stands cheerfully at the helm in his red suit and cotton beard.
Materials Needed
- 1 large egg carton (12-count)
- Toilet paper roll
- Brown paint and red construction paper
- Brown pipe cleaners
- 14 googly eyes
- Small pom-poms (red, assorted colors)
- White cotton or fiberfill
- Glue, scissors, markers
Step-by-step Guide
Step 1: Paint the egg carton brown and let dry.
Step 2: Cut out brown circles for reindeer faces, glue on eyes, pom-pom noses, and bend pipe cleaners into antlers.
Step 3: Glue each reindeer face to a section of the carton top.
Step 4: Create Santa using a toilet paper roll, adding paper clothing, a beard, and hat with cotton.
Step 5: Attach Santa to the back of the carton as if he’s riding the sleigh.
#6. Pom-Pom Beard Gnome Ornaments
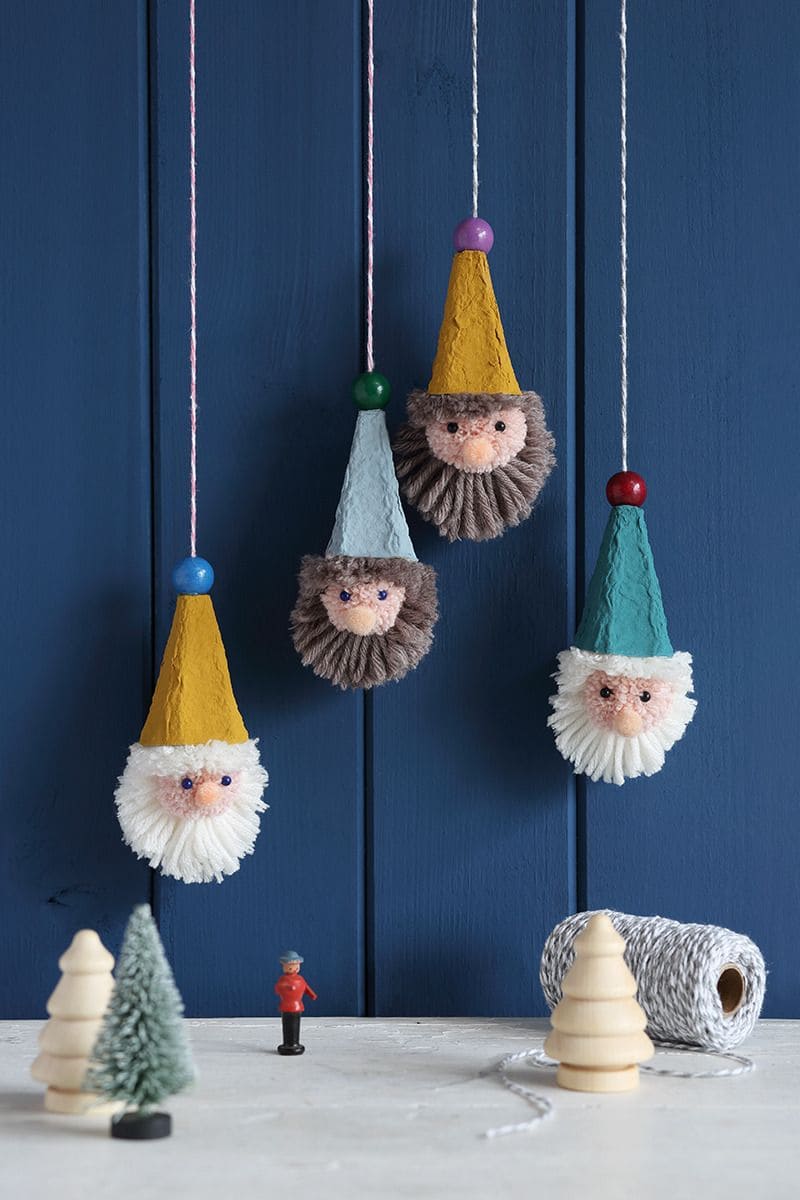
These dapper little gnomes bring a touch of personality and handmade warmth to your holiday décor. Each one features a colorful egg carton hat perched atop a fluffy yarn pom-pom beard, giving them an irresistibly playful charm.
Besides, you can hang them on the tree, gift them as party favors, or turn them into a cheerful garland.
Mixing different yarn colors for beards and alternating hat shades adds a delightful, folksy feel that feels right at home during the season of cozy gatherings.
Materials Needed
- 1 cone section of an egg carton (trimmed)
- Acrylic paint (various colors)
- Yarn (white, gray, brown – about 3 ft per gnome)
- Pom-pom maker or fork
- 1 small bead (0.5”)
- Twine or string
- Craft glue or hot glue
- Optional: small wooden bead
Step-by-step Guide
Step 1: Paint your egg carton cone and let it dry. This will serve as the gnome’s hat.
Step 2: Use yarn to create a full pom-pom using a fork or pom-pom tool. Then trim to shape it into a rounded beard.
Step 3: Glue the pom-pom under the painted cone so it becomes the gnome’s beard.
Step 4: Add a small bead to the center of the pom-pom for the nose.
Step 5: Finally, attach a loop of twine through the top of the hat or glue a bead on top for hanging.
#7. Egg Carton Santa Advent Calendar
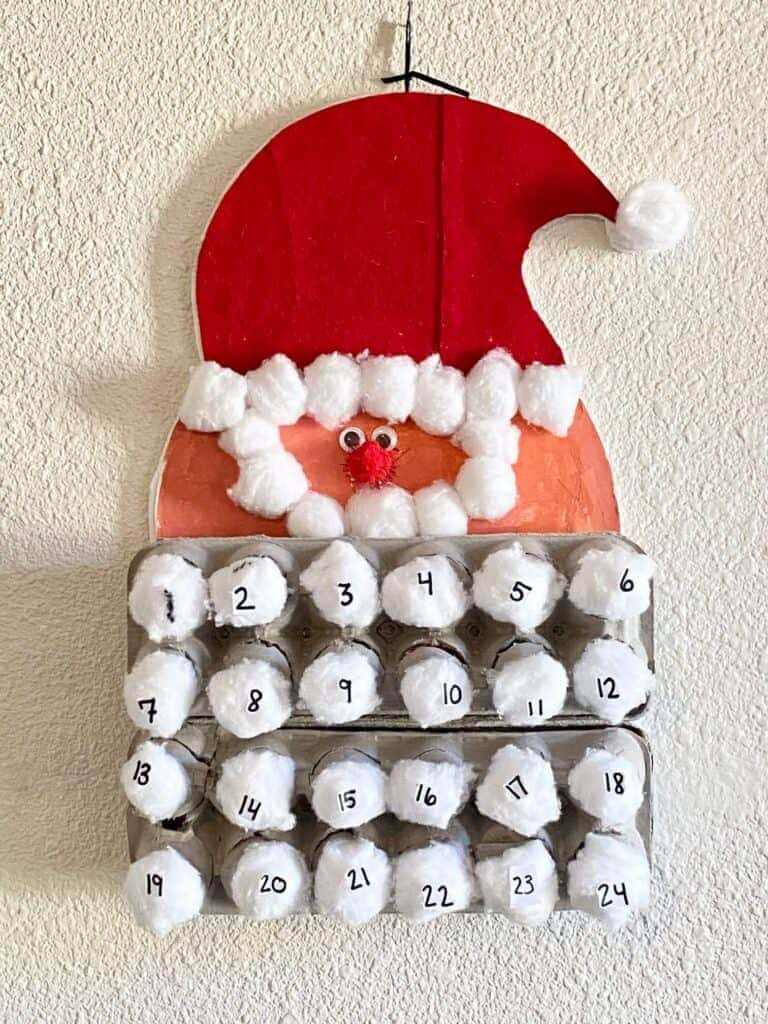
This adorable Santa-themed advent calendar brings the countdown to Christmas to life with charm and creativity.
Using two egg cartons for the beard, each cup is filled with treats and topped with a numbered cotton-covered flap. The top half forms Santa’s face and hat, complete with googly eyes, a red pom-pom nose, and cotton balls for the trim.
You can see it’s a delightful mix of art and anticipation that kids will love poking through day by day. Hang it on the wall and watch the holiday excitement build with every cotton-ball-covered surprise!
Materials Needed
- 2 egg cartons (24 cups total)
- Red felt or construction paper (approx. 8″ x 8″)
- 24 cotton balls
- Red pom-pom (1 inch)
- Googly eyes (0.5 inch, 2 pieces)
- Black marker
- Hot glue gun
- Small treats or paper notes (optional)
- Twine or hanger
Step-by-step Guide
Step 1: Paint or color the upper part of a cardboard backing to form Santa’s face and glue a red felt hat on top. Then add googly eyes and a red pom-pom nose.
Step 2: Attach cotton balls as the hat trim and beard around the face.
Step 3: Glue the egg cartons below Santa’s face in two rows of 12 cups each.
Step 4: Place small surprises in each cup, then cover each opening with a cotton ball and number them 1-24 using a marker.
Step 5: Add a string or hook at the top for hanging your advent calendar on the wall.
#8. Elegant Angel Ornament with Egg Carton Gown
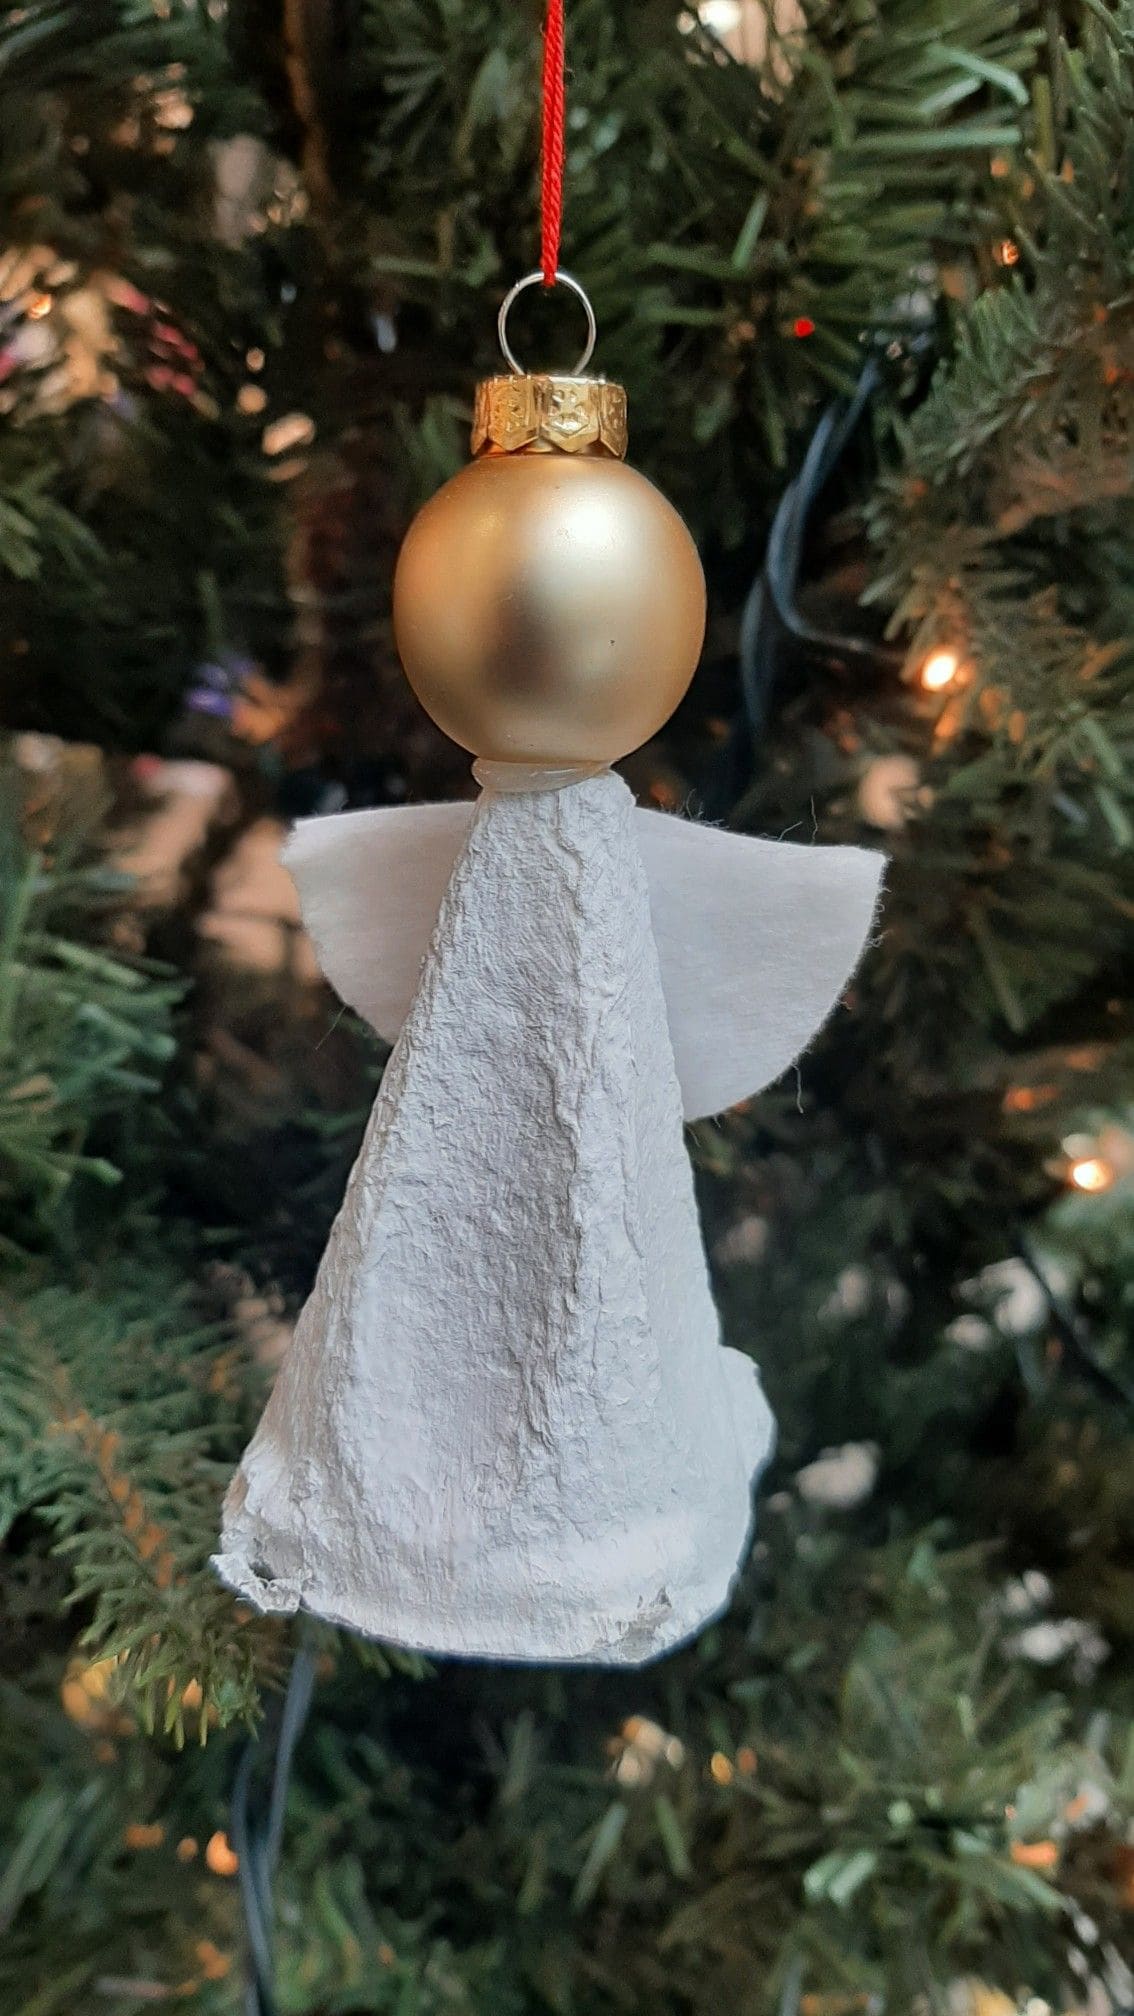
Using the tapered cone from an egg carton as the flowing gown and a simple gold ornament as the head, this project blends elegance and upcycling effortlessly.
This angel ornament brings a soft, peaceful glow to your tree with its delicate handmade charm. Its minimal design carries quiet beauty.
Also, you don’t need glitter or sparkle, just the symbolism of grace watching over your holiday celebrations. It’s a touching craft for both memory-making and gift-giving during the season of light and love.
Materials Needed
- 1 egg carton cone section (2”-2.5” tall)
- 1 small round ornament (1.5” diameter, gold or white)
- White or cream paint
- Thick white cardstock or felt (for wings)
- Hot glue gun
- Red string or ornament hook
- Scissors
Step-by-step Guide
Step 1: Cut the cone-shaped section from an egg carton and smooth out any rough edges. Then paint it with a coat of white or soft cream and let it dry completely.
Step 2: Draw and cut out a pair of wings from thick cardstock or stiff felt, about 3″ wide. You round the edges gently for a soft angelic shape.
Step 3: Use hot glue to attach the wings to the back of the cone near the top edge. Then hold in place until secure.
Step 4: Glue the ornament on top of the cone to form the angel’s head. If using a hanging ornament, make sure the loop is positioned straight up.
Step 5: Thread red string through the ornament loop to hang it on your Christmas tree or as a sweet handmade gift tag.
#9. Rustic Reindeer Figurines with Twig Legs
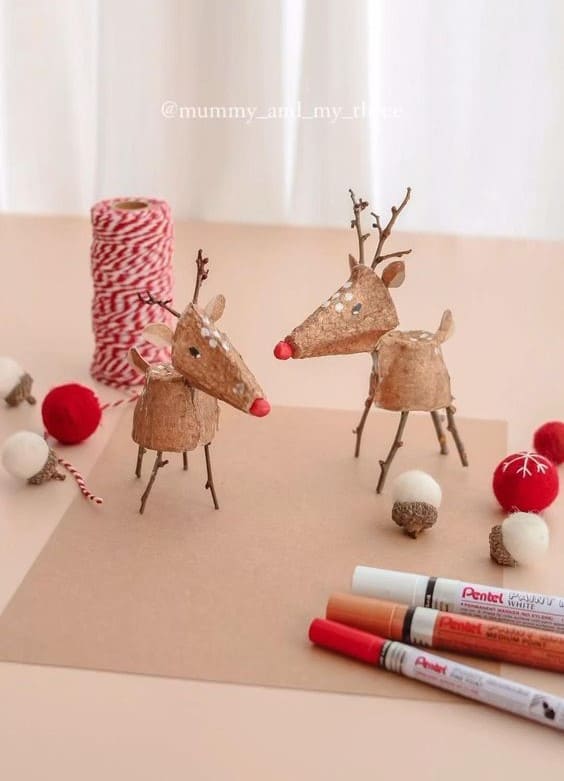
These charming little reindeer bring a rustic, woodland vibe to your holiday decor. Made using upside-down egg carton cups for the bodies and pointy cone sections for the heads, they come to life with tiny twigs as legs and antlers.
Their long noses, complete with a tiny red bead or painted tip, give off major Rudolph energy. Each detail, from their stick-thin limbs to the dot eyes and ears, is minimal yet delightful.
These handmade creatures look beautiful placed on a mantle, used as table toppers, or arranged into a Christmas woodland scene.
Materials Needed
- 1 egg carton
- Twigs (thin, 8-12 pieces)
- Red beads or paint pens
- Brown paint
- Glue gun and scissors
- White paint pen
Step-by-step Guide
Step 1: Cut two types of shapes from the egg carton: round cup bases for bodies and pointy cups for snouts.
Step 2: Paint the pieces brown and let them dry thoroughly. Then use a glue gun to attach the head to the body and insert twig legs and antlers into small holes.
Step 3: Add tiny red noses and dot the eyes using a white marker or paint pen.
#10. Stacked Egg Carton Snowmen With Pom-Pom Earmuffs
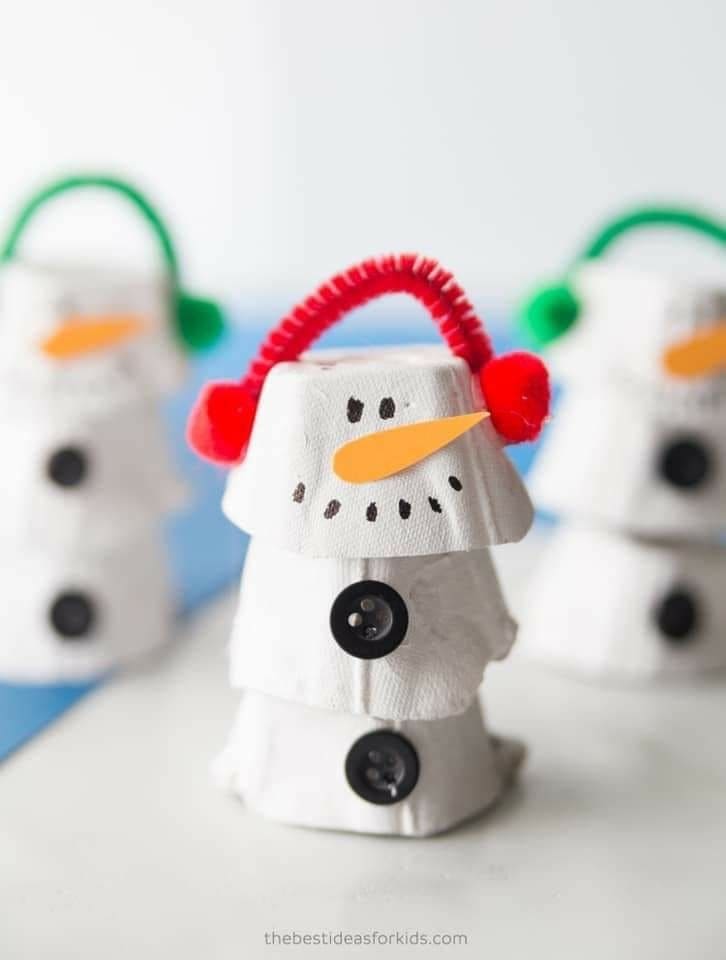
Made entirely from stacked egg carton cups, this little snowmen is full of personality with hand-drawn smiles, bright carrot noses, and colorful earmuffs.
You can make a whole snow-family in no time. They’re the kind of craft that sparks joy on a windowsill or becomes a cheerful table centerpiece during your holiday brunch.
Materials Needed
- 3 egg carton cups per snowman (1.75”-2” wide)
- White acrylic paint
- Orange foam sheet (1” for carrot nose)
- Black permanent marker
- 2 black buttons (0.5”-0.75” diameter)
- 1 pipe cleaner (6” length)
- 2 mini pom-poms (0.75” diameter)
- Hot glue gun or tacky craft glue
- Scissors
Step-by-step Guide
Step 1: Cut and paint three egg carton cups white. Let them dry completely. These will be the head and body parts of your snowman.
Step 2: Glue the three cups together in a stacked tower, open sides facing down. You make sure they’re aligned so the snowman stays upright.
Step 3: Cut a small carrot shape from orange foam and glue it onto the top cup as a nose. Then use a black marker to draw eyes and a dotted smile around it.
Step 4: Attach two black buttons to the front of the lower cups with glue.
Step 5: Curve a pipe cleaner over the top cup to form earmuffs and glue a pom-pom on each side. Let everything set before displaying.
#11. Ice Cream Cone Snowman Ornaments
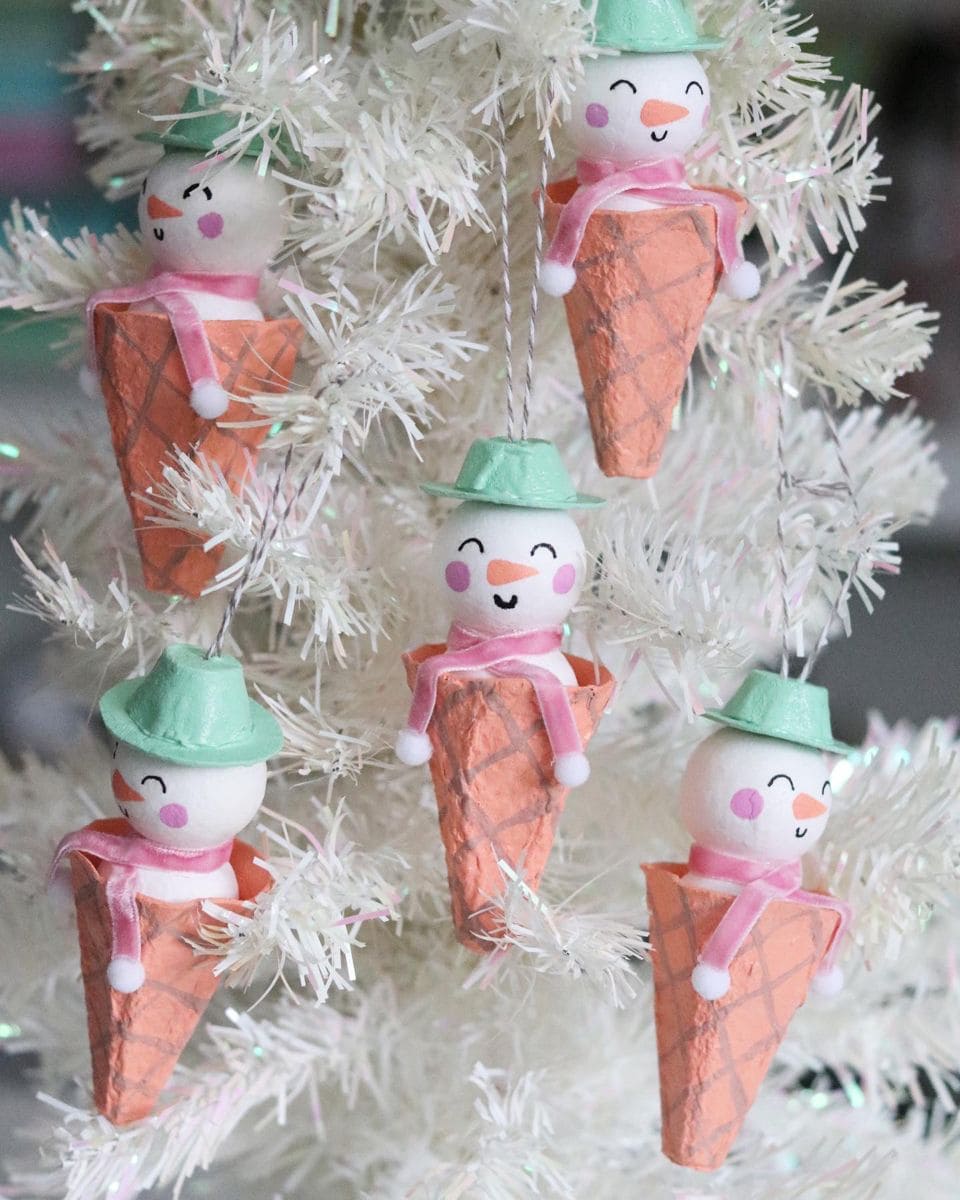
Crafted using egg carton cones as the base, each piece is transformed into a waffle cone painted in warm orange tones with crisscross details.
A foam ball forms the jolly snowman’s head, complete with blushing cheeks, tiny smiles, and sweet carrot noses. And a mint green mini hat and pink ribbon scarf give these ornaments a cheerful, pastel twist, perfect for a white Christmas tree or candy-themed décor.
Materials Needed
- Egg carton cones (cut and trimmed)
- Small foam balls (1.5″ diameter)
- Acrylic paint (orange, mint green, white, black, pink)
- Mini pom-poms (white)
- Pink ribbon (6″ length per snowman)
- Twine or thread
- Glue gun and craft knife
Step-by-step Guide
Step 1: Paint the egg carton cones orange and draw diagonal lines to mimic waffle cone texture.
Step 2: Paint foam balls with cute snowman faces including eyes, cheeks, and a carrot nose.
Step 3: Attach the foam heads to the cones using hot glue. Then add pink ribbon scarves and secure mini pom-poms at each end.
Step 4: Paint and glue egg carton caps as hats, then attach string loops for hanging.
#12. Whimsical Elf Girls Made from Egg Cartons

Wow, these adorable Christmas elf girl ornaments feel like they’ve stepped straight out of a storybook.
You’d never guess that their bodies are shaped from humble egg carton cups! With their rosy red dresses, leafy green hats, and striped legs, they bring charm and warmth to any tree branch or festive garland.
Specially, their candy cane embellishments and long flowing hair add personality and cheer, each one looks like it could come alive and start dancing to jingle bells.
Materials Needed
- 3 egg carton cups (standard size, 2.5” diameter)
- 3 small wooden beads (0.75”)
- Red felt (6” × 6”)
- Green felt (6” × 6”)
- 3 miniature candy cane decorations (1.5” each)
- Yarn or doll hair (about 18” total length, any color)
- Pom-poms (0.5” white, 3 pieces)
- Paint: red, white, black
- Twine or clear string (12” total, cut into 3 loops)
- Hot glue gun and scissors
Step-by-step Guide
Step 1: Trim each egg carton cup into a smooth bell shape. These will serve as the elf girls’ dresses.
Step 2: Paint the dresses red and let them dry completely before adding details like glitter or snow spray if desired.
Step 3: Attach a wooden bead to the top of each dress using hot glue.
Step 4: Cut yarn strands into 3” pieces and glue them around the top of the head as hair. You can braid them, curl them, or leave them loose.
Step 5: Cut triangle shapes from green felt and roll them into cones to form hats. Then add a white pom-pom to the tip of each.
Step 6: Wrap a thin scarf cut from green felt around each neck and secure with a dab of glue. Then use small candy cane decorations and glue one onto each dress as a final detail.
Step 7: To hang, glue a loop of clear string or twine to the top of each hat. Your little elves are ready to decorate!
#13. Rudolph the Red-Nosed Reindeer
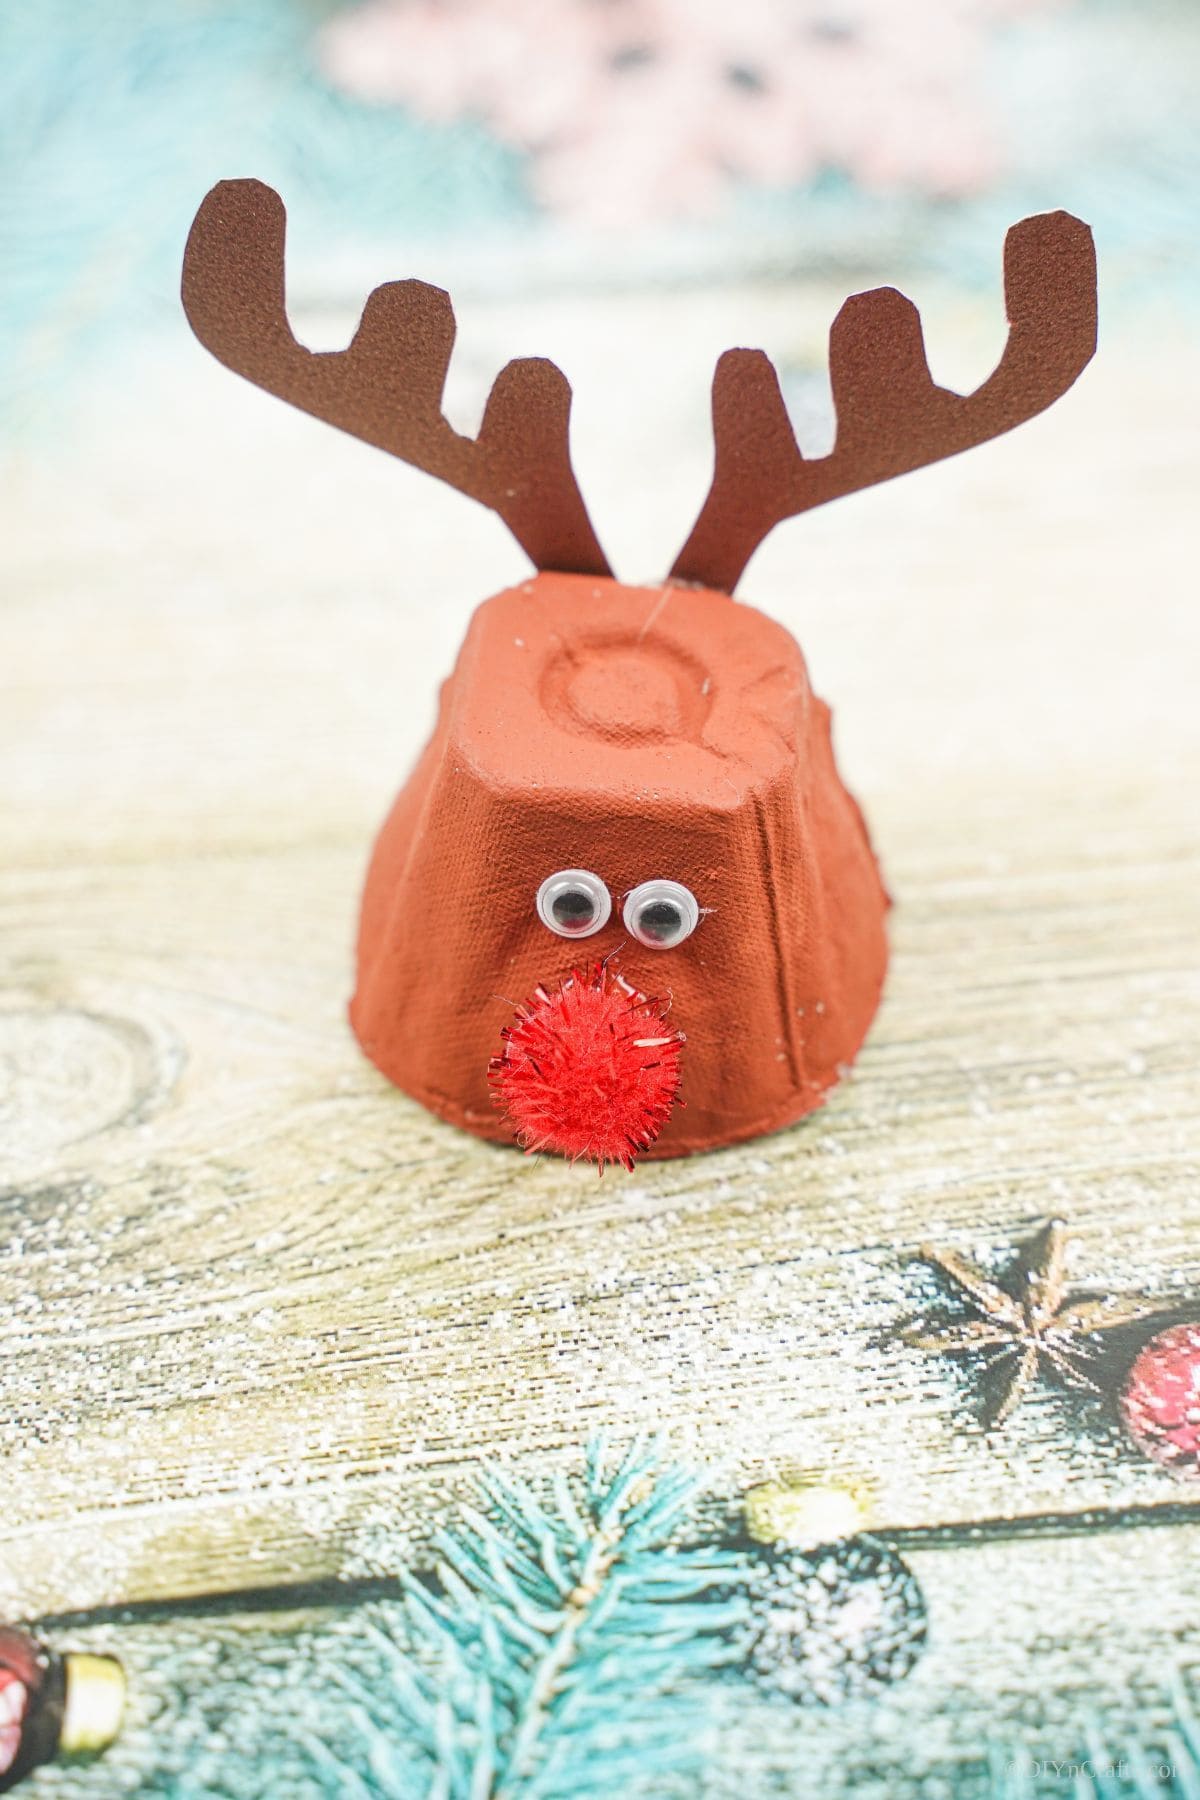
Created from a single egg carton cup, this cheerful Rudolph craft is painted in a warm, reindeer brown and brought to life with googly eyes, a fluffy red pom-pom nose, and antlers made from sturdy brown cardstock.
This little guy makes a perfect centerpiece for a kid’s craft table, tree ornament, or classroom holiday project.
It’s quick, inexpensive, and full of personality, a little nod to everyone’s favorite reindeer with the glowing red nose.
Materials Needed
- 1 egg carton cup
- Brown acrylic paint
- 1 red pom-pom (approx. 1/2″ diameter)
- 2 googly eyes (10mm)
- Brown cardstock or foam sheet for antlers
- Hot glue or craft glue
- Scissors and paintbrush
Step-by-step Guide
Step 1: Trim a single egg cup and paint it completely brown; let it dry fully.
Step 2: Glue on googly eyes and a red pom-pom nose to form the face.
Step 3: Cut out antler shapes from brown cardstock and glue to the back of the cup.
#14. Egg Carton Christmas Tree Garland
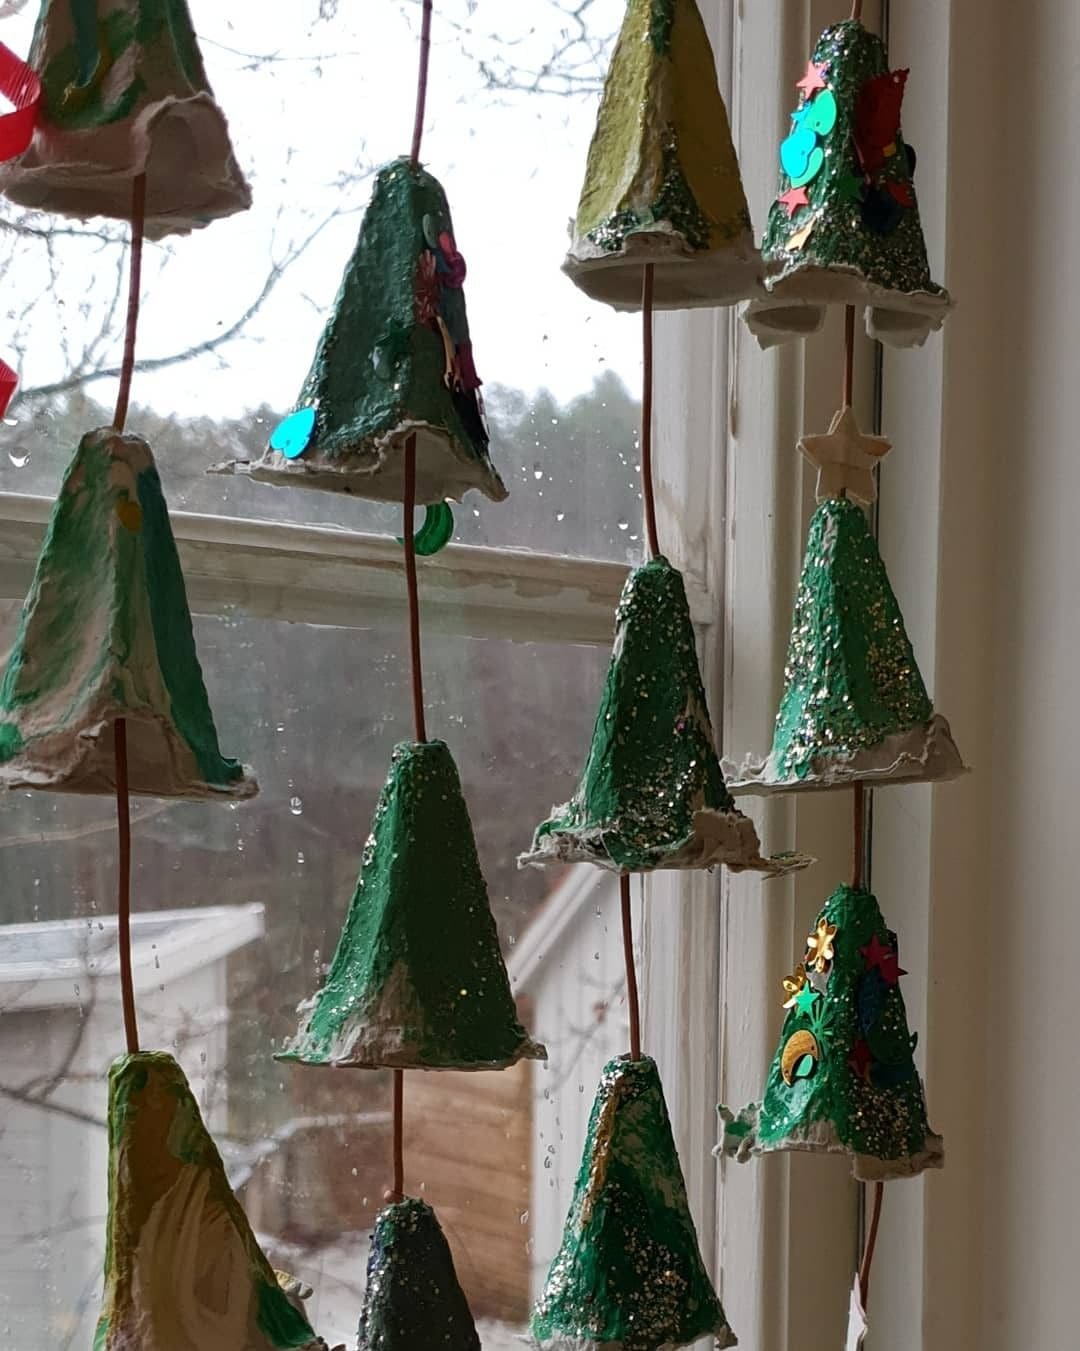
Why not turn a dull window or doorway into a whimsical woodland scene with this festive Christmas tree garland made from egg carton cones?
Each cone is painted in shades of green, then sprinkled with glitter and topped with star stickers or tiny sequins. Strung together vertically with rustic string or twine, they mimic the look of tiered evergreens swaying in the breeze.
I believe it’s a fun holiday project for kids and adds homespun charm to any cozy nook or classroom window.
Materials Needed
- Egg carton cones (6-10 per garland strand)
- Green acrylic paint
- Glitter (gold, green, silver)
- Craft glue
- Sequins, foam stars, or sticker shapes
- Twine or strong thread (approx. 3–5 ft)
- Needle or sharp skewer
Step-by-step Guide
Step 1: Paint each cone green and allow them to dry completely. Then apply glue to the edges or tips of the cones, then dust with glitter.
Step 2: Decorate the cones with stickers, sequins, or mini stars for added sparkle.
Step 3: Poke a hole through the top and bottom of each cone and thread them onto twine, spacing evenly.
Step 4: Tie knots under each cone to hold them in place, then hang your garland proudly.
#15. Pom-Pom Ornament Egg Carton Tree
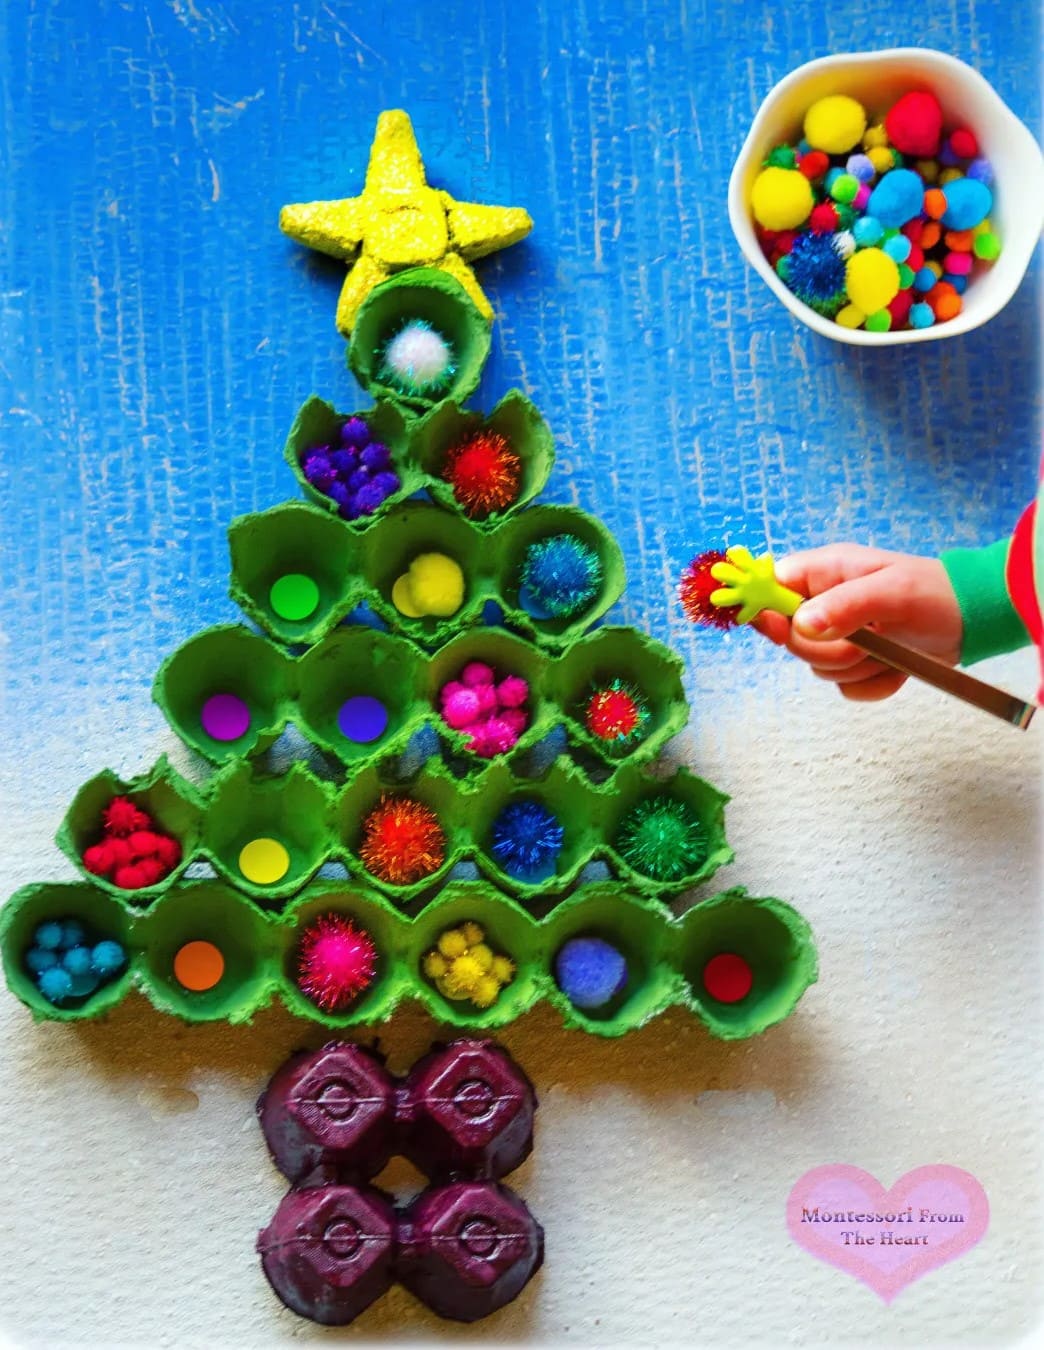
Look at this craft! It turns a simple egg carton into a vibrant Christmas tree bursting with color and texture.
Each section of the carton is painted green and arranged into a tree shape, while the trunk is cleverly crafted from the purple base of another carton.
Pom-poms in all sizes act as ornaments, placed neatly inside the cups, giving little ones a fun and engaging way to decorate. It’s hands-on, sensory-friendly, and encourages fine motor skill development too.
Moreover, the glittery yellow star on top completes this cheerful project that looks just as festive as it feels.
Materials Needed
- 1 egg carton (12-cup size or cut to shape)
- Green and brown acrylic paint (1 oz each)
- Pom-poms (25+ assorted sizes/colors)
- 1 yellow star topper (foam or cardboard, approx. 2″)
- Paintbrush
- Glue gun or craft glue
- Scissors
- Cardboard or foam board (optional)
Step-by-step Guide
Step 1: Cut the egg carton into individual cups and arrange them in a tree shape (1-2-3-4-5-6-2-2 row format).
Step 2: Paint the cups green and let them dry. You continue to paint 2-4 bottom cups brown to represent the tree trunk.
Step 3: Glue the cups onto a backing board if desired or directly on a flat surface.
Step 4: Decorate each cup with colorful pom-poms as ornaments. Then use glue to secure them if needed.
Step 5: Attach a yellow star to the top of the tree using glue or tape.
#16. Whimsical Layered Christmas Trees
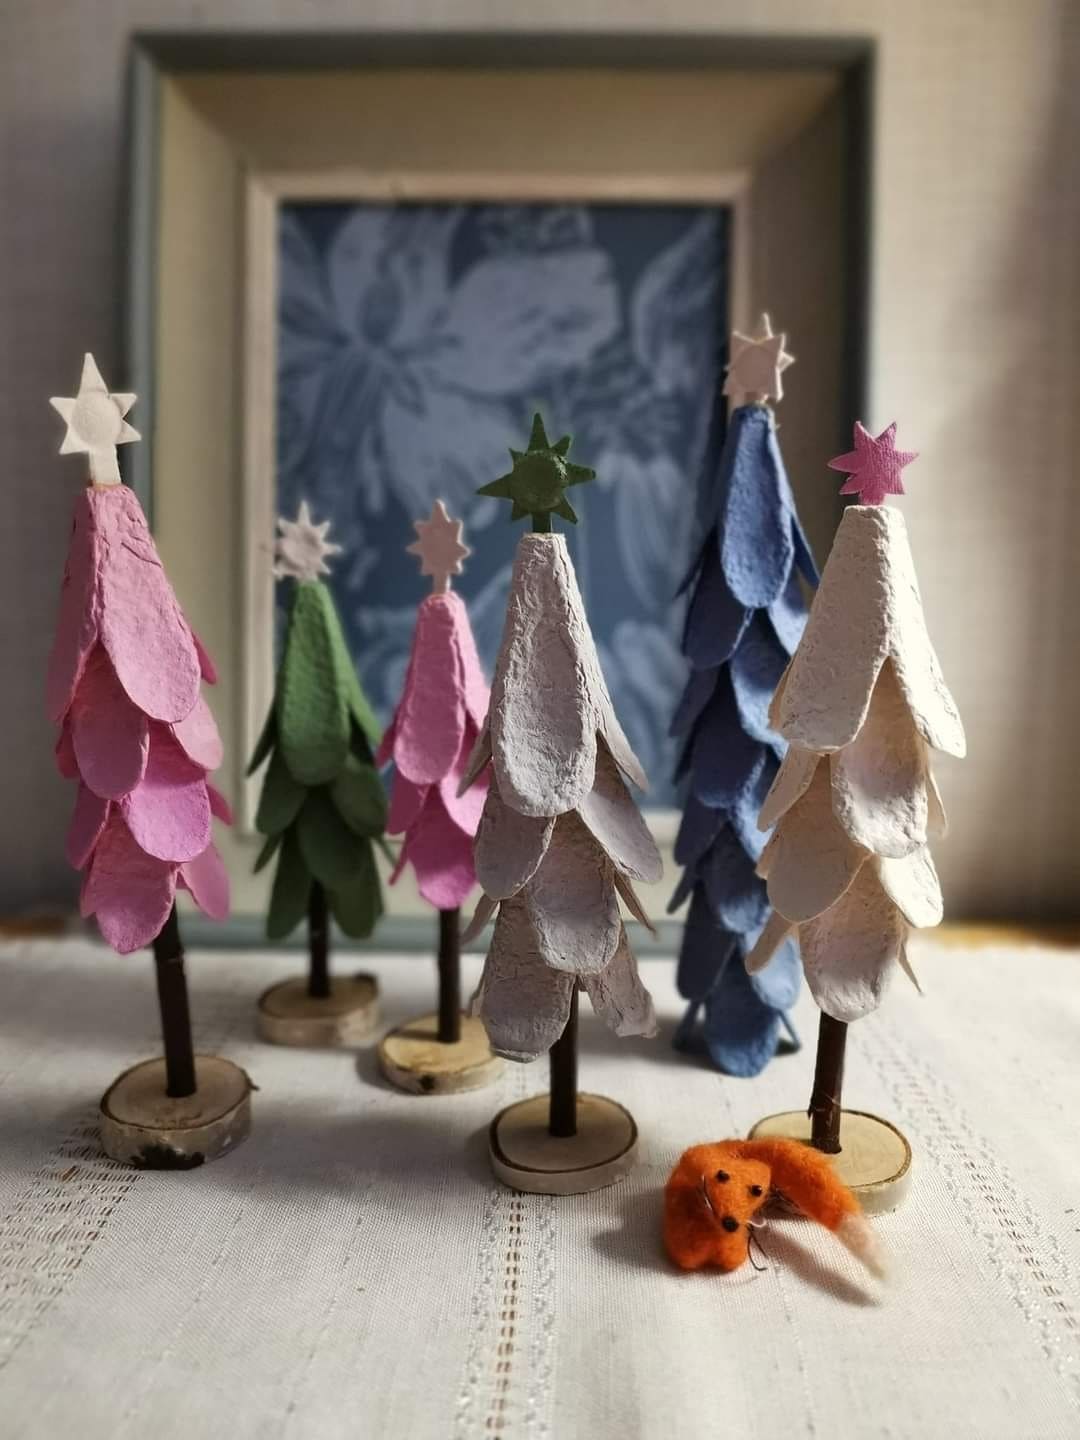
Amazingly, these delicate, hand-layered egg carton trees look like they stepped right out of a fairy tale woodland.
With pastel tones and dainty star toppers, they make the perfect table centerpiece or mantle display for a cozy, whimsical Christmas vibe. Each branch is a petal-shaped piece from an egg carton, giving the trees a soft, cascading texture.
Plus, add wood slices as bases and slender twigs as trunks, and suddenly, you’ve created an entire enchanted forest using simple recycled materials.
Materials Needed
- 8-10 egg cartons
- Acrylic paint (soft pastels or traditional colors)
- Small twigs or sticks (5-6 inches long)
- Wood slices or corks for bases (2-3 inches wide)
- Small paper or foam stars
- Hot glue gun
Step-by-step Guide
Step 1: Cut petal or scale shapes from egg cartons and paint each in your desired color. Let dry fully.
Step 2: Starting from the bottom, glue each petal layer around the twig to form the tree’s silhouette, overlapping slightly as you go upward.
Step 3: Insert and glue the twig into a small wood slice or cork base to hold it upright.
Step 4: Top it off with a little paper or foam star, and your charming tree is ready to display.
#17. Egg Carton Toadstool Gnomes
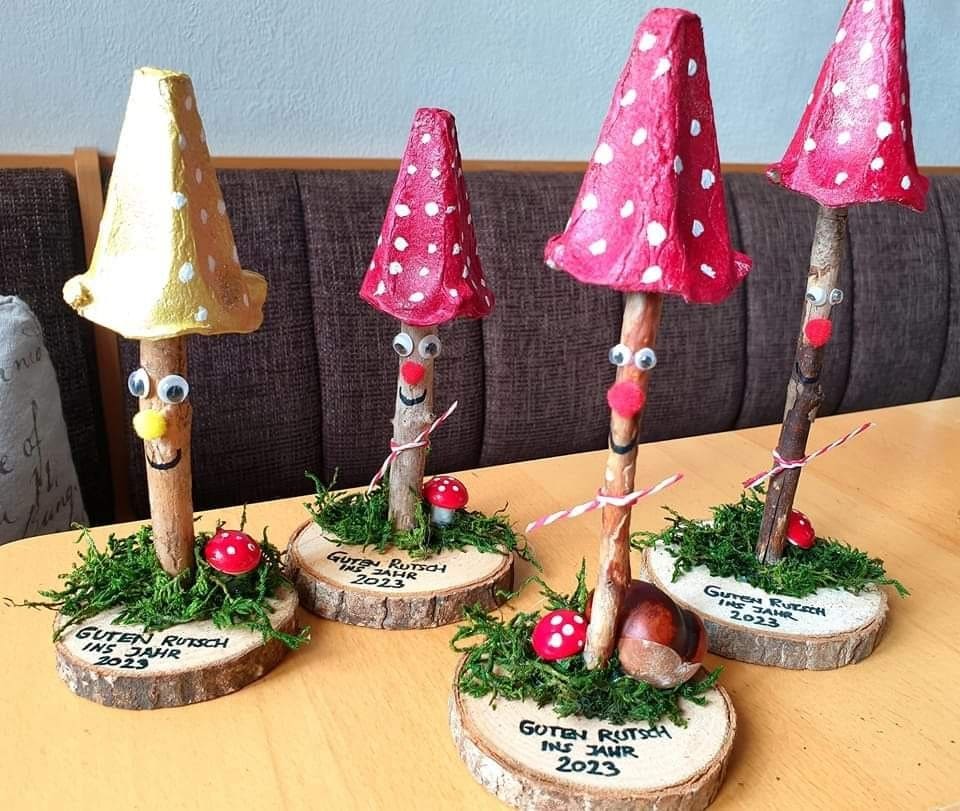
Whimsy meets woodland charm with these cheerful little toadstool gnomes! Their pointy, polka-dotted hats are actually made from inverted egg carton cones, giving them a delightfully quirky shape.
Moreover, each one stands tall on a rustic stick body, rooted into a slice of wood and surrounded by moss and tiny mushroom accents.
They’re full of personality with googly eyes, red pom-pom noses, and warm smiles bring them to life. These forest friends look right at home on a mantel, table centerpiece, or even tucked into a Christmas village.
Materials Needed
- 3-4 egg carton cones (approx. 2.5″ tall)
- 4 wooden sticks (6-8” long, 0.5″ thick)
- 3 wooden discs (3-4” diameter)
- Acrylic paint (red, white, yellow, gold)
- 3 pom-poms (0.5”, red or yellow)
- 6 googly eyes (1 pair per gnome)
- Green moss (small handful)
- Mini plastic mushrooms or red beads
- Twine or red-and-white string (12″)
- Hot glue gun, craft knife, and paintbrush
Step-by-step Guide
Step 1: Cut out cone shapes from egg cartons and paint them in bright colors like red or gold. Once dry, dab white dots to mimic a toadstool cap.
Step 2: Glue the painted hat on top of each stick to form the gnome’s head.
Step 3: Add googly eyes and glue a pom-pom just below for the nose. Then draw a smile with permanent marker or paint.
Step 4: Secure the stick vertically into the center of a wooden disc base using hot glue. You surround the base with moss and small decorative mushrooms for a forest-floor feel.
Step 5: Wrap a bit of twine around the stick “waist” as a finishing touch. You can even write a sweet holiday greeting on the wood slice!
#18. Classic Egg Carton Santa Gnomes
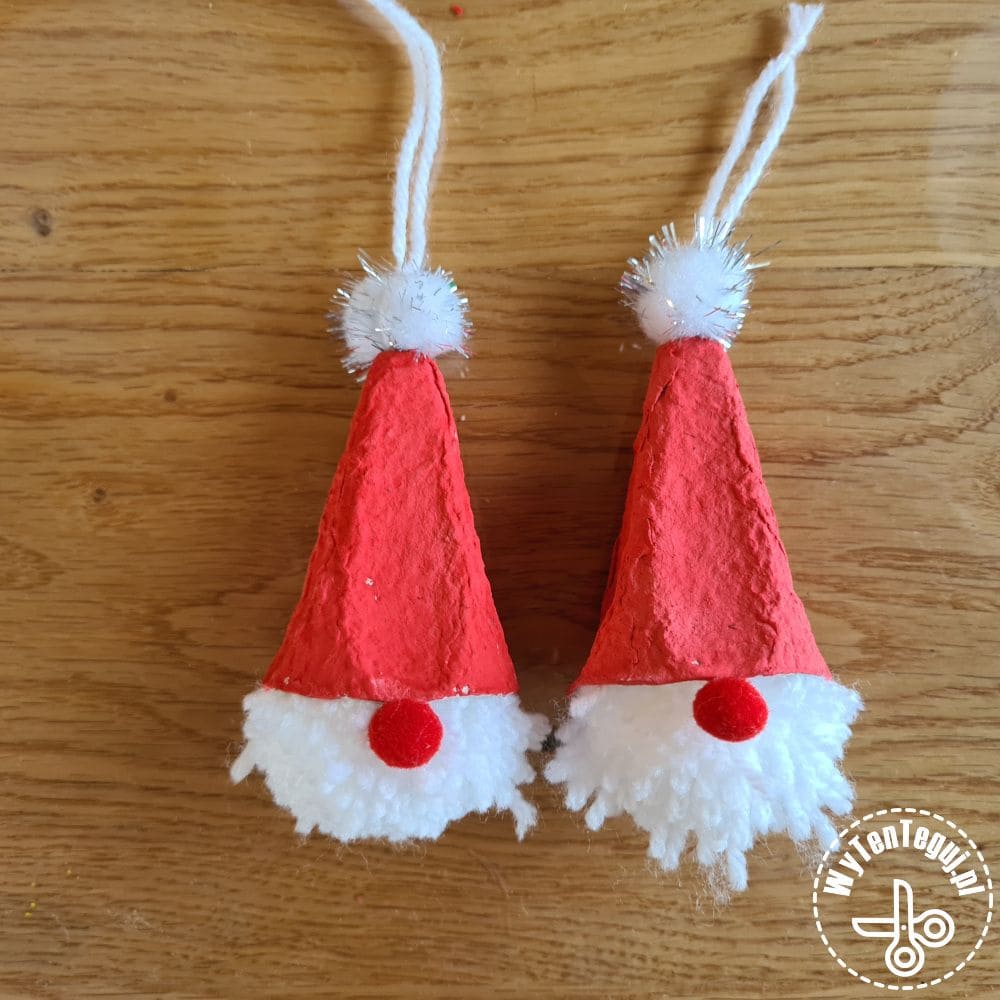
How about bringing cheerful charm to your Christmas tree with these adorable egg carton Santa gnomes?
With pointy red hats made from carton cones and fluffy white yarn beards, these little guys are a nostalgic nod to Scandinavian holiday décor.
A small red pom-pom nose peeks out from under the hat brim, creating a playful and heartwarming look. Lightweight and easy to hang, they make for perfect ornaments or handmade gifts from kids to grandparents.
Materials Needed
- Egg carton cones (cut from the pointy ends)
- Red acrylic paint
- White yarn
- Red mini pom-poms (0.5-1 cm)
- White sparkly pom-poms (1 cm)
- Glue gun or craft glue
- String or twine (6-8 inches per ornament)
Step-by-step Guide
Step 1: Paint each cone red and let them dry completely.
Step 2: Tie and trim white yarn strands to make a full beard, then glue them to the bottom rim of each cone.
Step 3: Attach a red pom-pom where the nose would peek out from under the hat.
Step 4: Finally,add a white pom-pom to the top of the cone and glue on a loop of string for hanging.
#19. Pinecone Gnomes with Egg Carton Hats
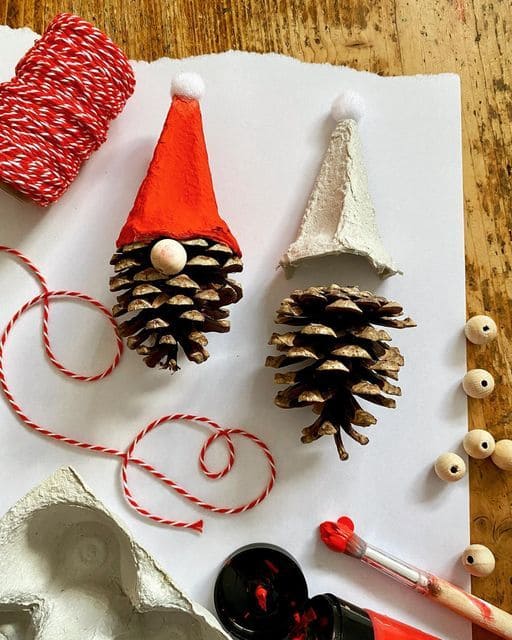
There’s something heartwarming about these tiny gnomes like woodland visitors ready to spread cheer beneath your Christmas tree. Their pinecone bodies bring rustic charm, while the pointed hats made from painted egg carton cones add a whimsical twist.
Plus, the simplicity of their design makes them perfect for crafting with kids or turning into festive ornaments for gift wrapping.
All it takes is a few natural elements and some imagination to bring these little fellows to life.
Materials Needed
- 1 large pinecone (about 3”-4” tall)
- 1 egg carton cone (cut from a corner)
- Red or white acrylic paint
- 1 wooden bead (0.5”-0.75” diameter)
- 1 mini pom-pom (0.5” diameter)
- Hot glue gun or tacky craft glue
- Optional: red-and-white baker’s twine
Step-by-step Guide
Step 1: Paint the egg carton cone in your chosen color and allow it to dry fully. This will serve as the gnome’s hat.
Step 2: Attach a small wooden bead under the brim of the hat with glue, it’ll look like the gnome’s nose peeking out.
Step 3: Glue the finished hat on top of the pinecone. Then angle it slightly forward for a cozy, tilted look.
Step 4: Glue a mini pom-pom to the tip of the hat for a classic gnome touch.
Step 5: If you’d like to hang it, attach a loop of twine to the back of the hat using glue.
Tip: You can dust the pinecones with a little white paint or glitter to give them a snowy finish.
#20. Egg Carton Christmas Tree Card
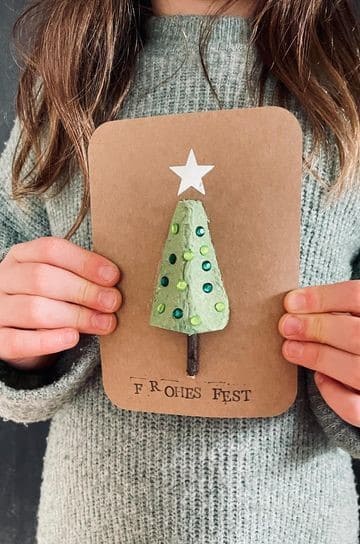
Using just a scrap of egg carton, you can turn a simple greeting into a tiny 3D celebration. The little green tree, dotted with sequins and crowned with a white star, pops up like a forest surprise.
Specially, it’s perfect for kids’ crafting sessions, and the result feels heartfelt and festive. Tuck this into a gift bag or leave it on a neighbor’s doorstep, it’s a quiet way to say you care during the holidays.
Materials Needed
- 1 egg carton cone (approx. 2.5” tall)
- Brown kraft cardstock (5”×7” folded)
- Small twig (1” long, 0.25” thick)
- Green acrylic paint and brush
- 12-15 mini sequins or flat gems
- 1 white paper star (about 1”)
- Hot glue or tacky craft glue
- Black pen
Step-by-step Guide
Step 1: Paint the egg carton cone green and let it dry fully. This will be your tree.
Step 2: Glue the small twig to the bottom of the cone to serve as the tree trunk.
Step 3: Attach the tree to the front center of your folded cardstock using hot glue for a sturdy hold. Then you can decorate the tree with sequins or gems, placing them like ornaments around the cone.
Step 4: Add a white star to the top and write your holiday message below, “Frohes Fest” means “Happy Holidays” in German, but feel free to personalize!
#21. Festive Egg Carton Bell Ornaments
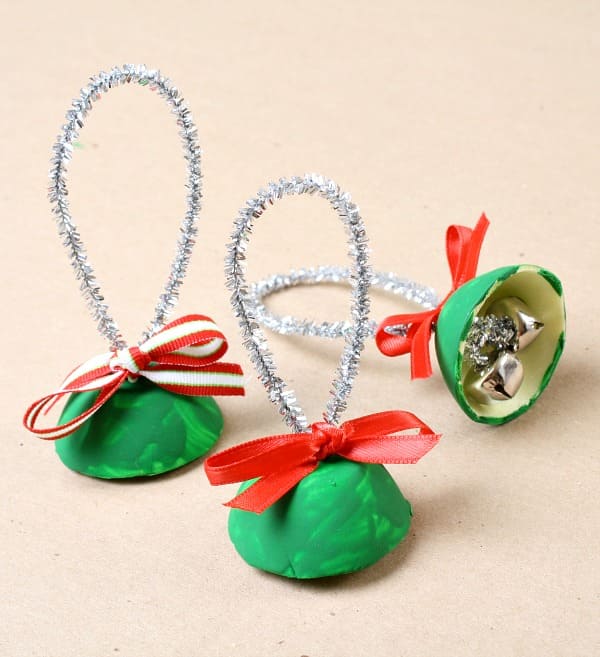
These charming bell-shaped ornaments bring a nostalgic ring to your Christmas decor. Crafted from the base cups of an egg carton and painted festive green, each bell is strung with a shiny silver pipe cleaner loop for hanging.
Inside, jingle bells add that joyful sound of the season. A red bow at the base brings the perfect finishing touch.
These make wonderful classroom crafts, DIY tree decorations, or even heartfelt gift toppers. Lightweight yet sturdy, they capture the handmade holiday spirit beautifully.
Materials Needed
- Egg carton cups
- Green acrylic paint (1 oz)
- Silver pipe cleaners
- 2 mini jingle bells per bell
- Small red ribbon bows
- Glue gun
- Paintbrush
- Needle or skewer
Step-by-step Guide
Step 1: Cut out an egg carton cup and paint it green. Let it dry completely.
Step 2: Use a skewer to poke a small hole at the top of the cup. Then thread two jingle bells onto a short length of pipe cleaner and pull it through the hole from the inside.
Step 3: Twist the pipe cleaner ends into a loop above the bell for hanging.
Step 4: Add a red ribbon bow to the base of the loop using glue for a festive touch.
Read more: 26 Creative & Fun Egg Carton Craft Projects for Kids and Parents
