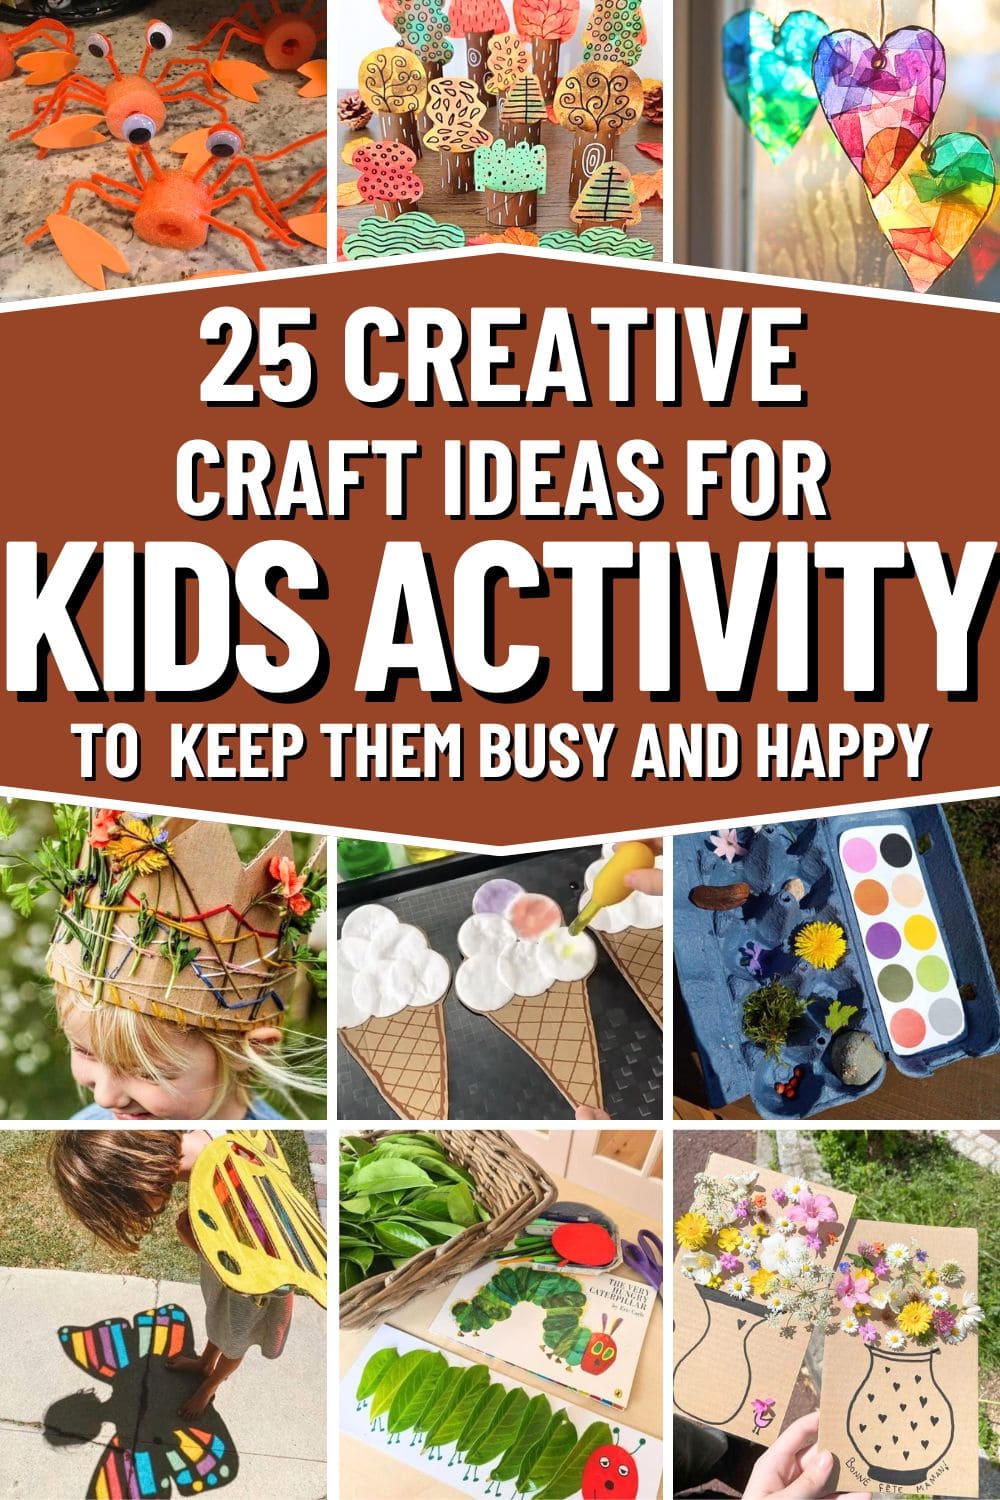
School’s out, the kids are bouncing off the walls, and you’ve already heard their complaint more times than you can count. Sound familiar? For many moms, keeping little ones entertained during school breaks feels like a full-time job without any coffee breaks.
Screens quickly become the default babysitter, but you know they deserve more enriching play. That’s where simple, hands-on crafts come in. You don’t need fancy supplies or Pinterest perfection, just a few household materials and a willingness to get a little messy.
These 25 fun and creative craft ideas are designed to spark imagination, encourage independent play, and most importantly, give you a moment to breathe while the kids stay happily engaged.
#1. Mini Forest Craft With Toilet Paper Rolls
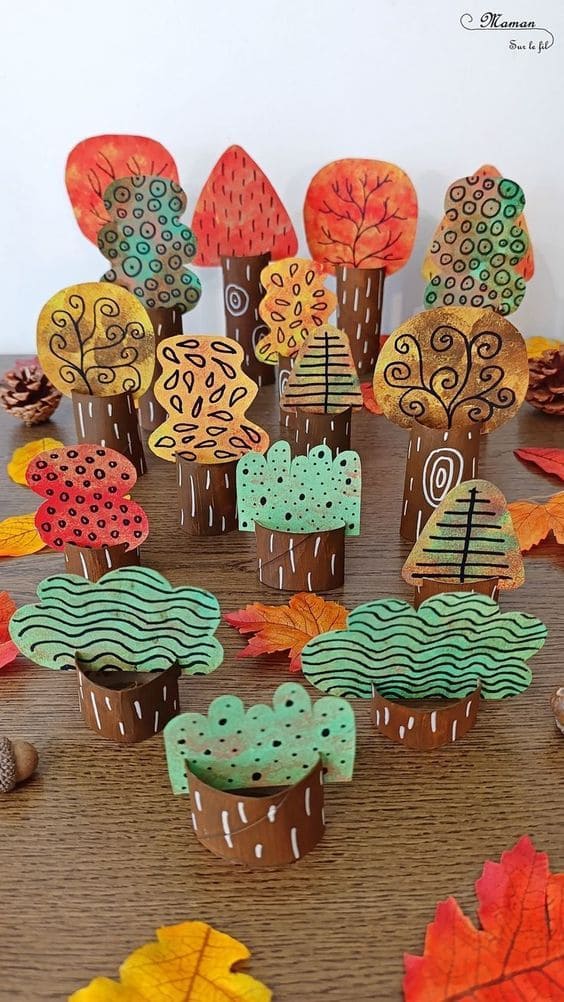
This enchanting little cardboard forest brings autumn indoors with just a few supplies and a whole lot of creativity. My niece called it her pocket-sized park, and honestly, I couldn’t have named it better.
Materials Needed
- 5-10 empty toilet paper rolls
- Brown paint
- Watercolor paper
- Watercolors (in green, yellow, orange, red tones)
- Black pen or marker
- Scissors
- Glue or double-sided tape
Step-by-Step Guide
Step 1: First, paint your toilet paper rolls with brown paint. Let them dry completely. These will be your tree trunks.
Step 2: Meanwhile, cut out simple tree top shapes from watercolor paper like ovals, clouds, and funky rounded blobs work best.
Step 3: Next, color or paint each tree top in rich autumn tones. Use watercolor for a beautiful gradient effect or markers for bold coverage. Once dry, you draw whimsical patterns using a black pen like swirls, dots, zigzags, or tree rings.
Step 4: Then, glue each tree top onto its roll trunk. For short trees, cut the roll in half.
#2. Rainbow Shadow Wings
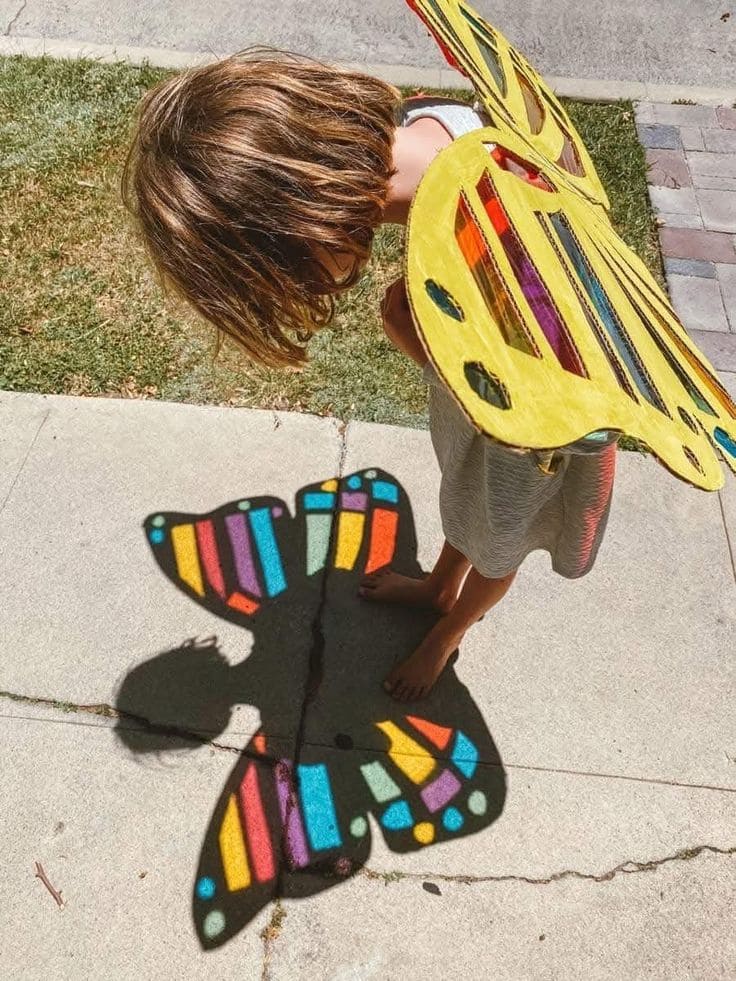
Wow, these stained-glass-style butterfly wings not only look gorgeous on your child but also cast radiant, colorful shadows on the ground. It’s perfect for outdoor play, imagination-fueled afternoons, or whimsical photo sessions.
Materials Needed
- 1 large piece of cardboard or a recycled box
- Scissors or a craft knife
- Clear colored plastic sheets or cellophane (various colors)
- Black marker or paint (for outlining)
- Glue or double-sided tape
- String or elastic straps
Step-by-Step Guide
Step 1: Start by drawing butterfly wing shapes on your cardboard. Keep the design bold and open with large windows for the light to shine through.
Step 2: Cut out the wings and the window sections carefully. Then, glue colored cellophane behind each opening from the back side.
Step 3: Moreover, outline the wing segments with black marker or paint to give it that stained-glass effect.
Step 4: Next, attach straps to wear it like a backpack. Now, step outside and let the sun hit the wings.
#3. Leaf Mane Lion
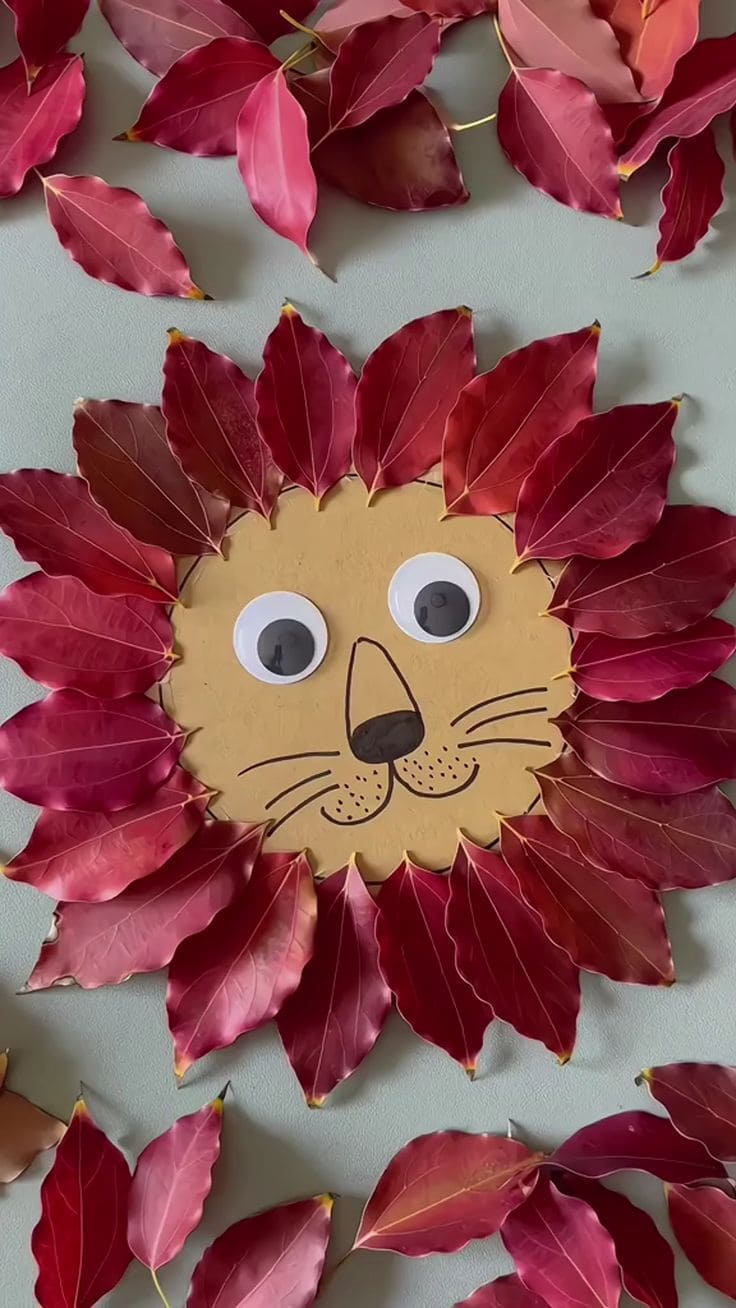
This adorable lion project is an easy and imaginative way to introduce kids to seasonal textures while encouraging fine motor skills and creativity.
Materials Needed
- 1 sheet of cardboard (approx. 8×8 inches)
- About 30 red or brown leaves
- 1 black marker
- 2 googly eyes (about 1 inch wide)
- Glue stick or tacky glue
- Scissors
Step-by-Step Guide
Step 1: Cut your cardboard into a circle, this will be the lion’s face.
Step 2: Next, glue down the googly eyes. Then, use a marker to draw a nose, whiskers, and a big friendly smile.
Step 3: Now, flip your leaf pile into action! Glue leaves all around the edge of the circle, layering slightly so it looks full and mane-like.
#4. Bottle Cap Flowers
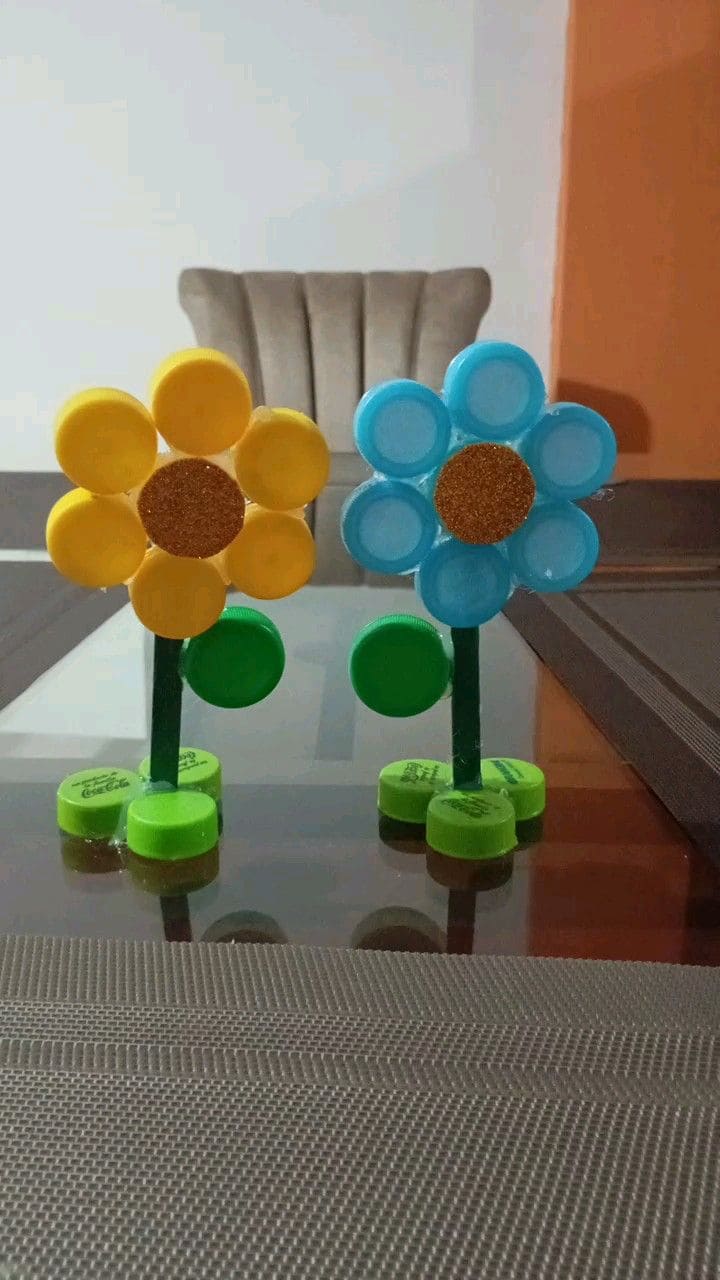
If you’re looking for a quick afternoon activity that blends creativity and sustainability, this one’s a winner. Kids will love arranging their petals, choosing color combos, and seeing something trash bloom into something fun.
Materials Needed
- 7 plastic bottle caps per flower (6 for petals + 1 center)
- 2 green caps for leaves
- 3 green caps for the base
- 1 green straw
- Glitter paper
- Strong glue (adult supervision recommended)
Step-by-Step Guide
Step 1: Begin by arranging 6 bottle caps in a circle to form your flower petals, then place a contrasting cap in the center for the flower’s core.
Step 2: Next, glue all the petals together by attaching each to the center cap. You need to make sure they’re evenly spaced for a symmetrical bloom.
Step 3: Then, attach a small straw to the back of your flower and glue two green bottle caps along the stem to act as leaves.
Step4: Finally, create a sturdy base using 3 caps glued together. Now, attach the bottom of the stem to the middle cap for balance.
#5. Seed Mosaic Nature Art
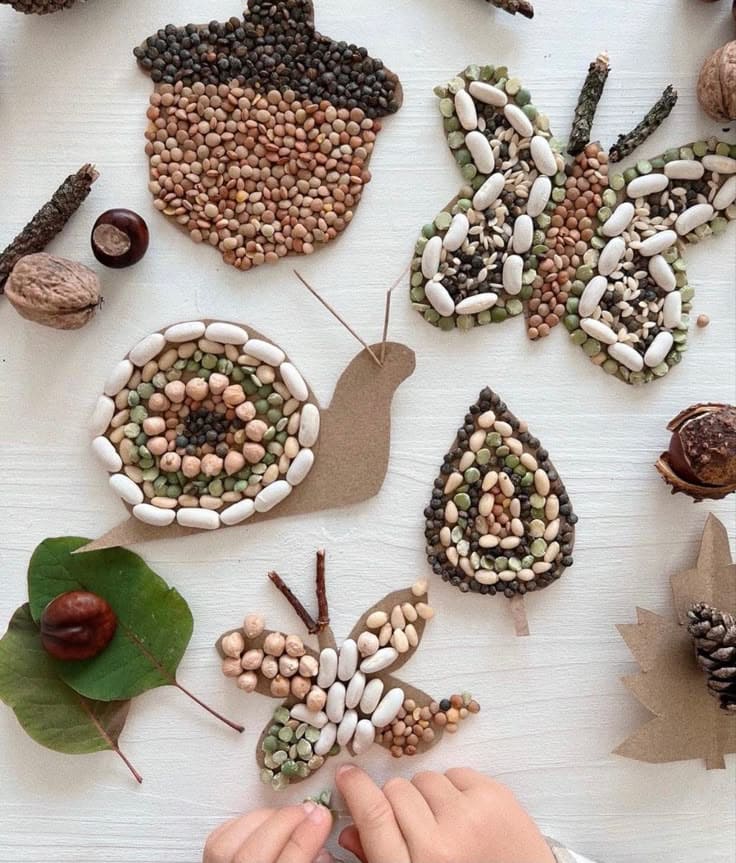
This seed mosaic activity combines the quiet rhythm of nature with creative play. It’s budget-friendly, mess-friendly, and surprisingly beautiful when finished.
Plus, it’s a brilliant way to practice fine motor skills and color sorting. You’ll find joy in how focused kids get and how proud they are to display their work afterward.
Materials Needed
- Thick cardboards
- Mixed dried beans, lentils, and seeds (e.g., white beans, split peas, black sesame, millet)
- School glue
- Small paintbrush (optional)
- Pencil or printed templates
Step-by-Step Guide
Step 1: Start by drawing or tracing simple nature-inspired shapes onto cardboard like acorns, butterflies, leaves, or snails .
Step 2: Next, cut out the shapes carefully. Pre-cut shapes can be helpful for younger kids.
Step 3: Then, apply glue to one section at a time, either using a brush or directly from the bottle.
Step 4: Now, begin placing the seeds and beans, grouping by color or type if you’d like to make patterns. Let kids use their fingers or tweezers for extra dexterity practice.
#6. Painted Food Rocks
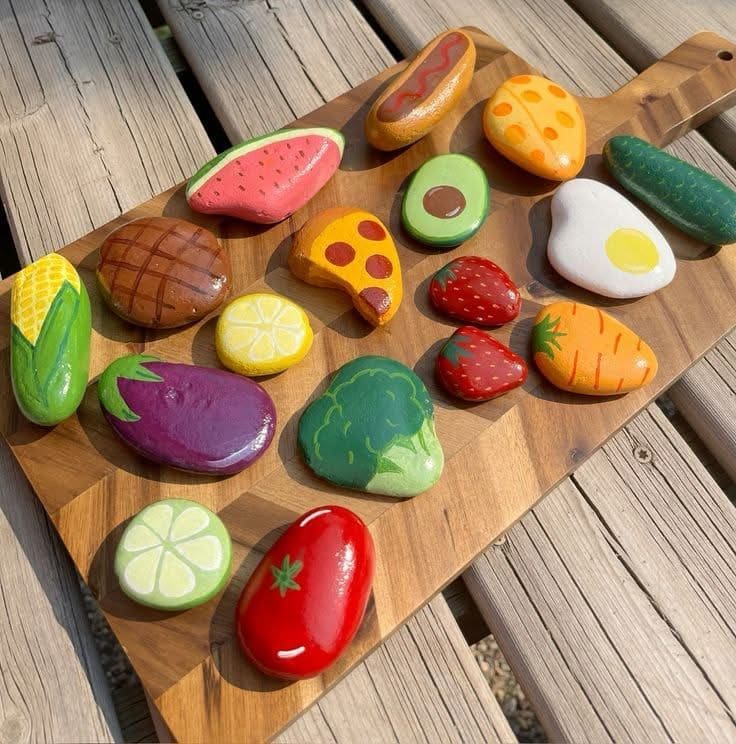
This colorful activity is an absolute treat for curious little minds. Painting rocks to look like food not only sparks creativity but also encourages imaginative play.
Materials Needed
- 15-20 smooth flat rocks (around 2-3 inches wide)
- Acrylic paints in various colors (red, green, yellow, etc.) and paintbrushes
- Water container and paper towels
- Pencil (optional)
- Non-toxic sealant spray
Step-by-Step Guide
Step 1: Begin by washing and drying your rocks to remove any dirt to help the paint stick better.
Step 2: Then, let your child pick their favorite foods like pizza, avocado, eggplant, strawberries, and more. Then lightly sketch outlines onto the rocks using a pencil if needed.
Step 3: Use bold base colors first and allow them to dry before adding details like seeds, grill marks, or icing. Don’t forget highlights and shadows to bring them to life.
Step 4: Finally, once all rocks are fully dry, spray them with a non-toxic sealant.
#7. Wildflower Crown
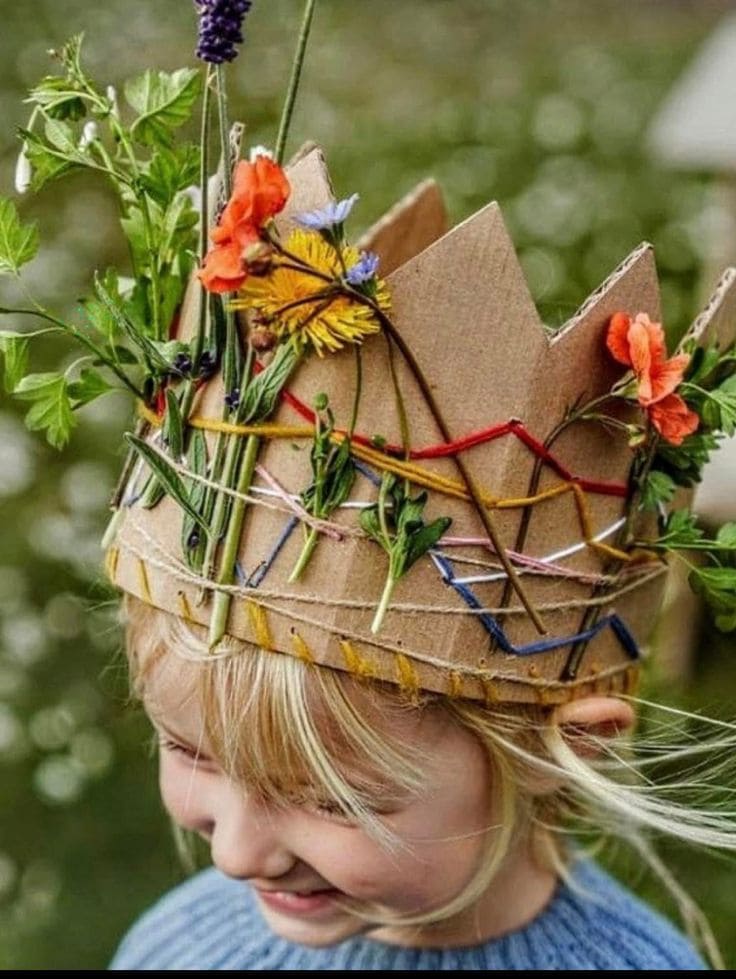
This charming DIY flower crown is as earthy and whimsical as it gets. Kids get to forage in the garden or park, then weave their finds into a crown made from recycled cardboard and twine.
Materials Needed
- A strip of sturdy cardboard (about 6-7 cm wide and long enough to wrap around the head)
- Scissors
- Hole punch
- Colorful yarn (approx. 2 meters total)
- Fresh flowers, leaves, and small twigs
Step-by-Step Guide
Step 1: Cut the cardboard into a strip that fits your child’s head, then trim one side into a crown shape with points.
Step 2: Punch holes evenly along the strip’s top and bottom edges. Next, thread the yarn through the holes in any pattern you like.
Step 3: Collect small flowers, herbs, and leaves, then carefully weave them behind the strings or tie them in place.
Step 4: Finally, tape or staple the ends of the crown together and let your nature prince or princess rule the garden!
#8. Nature Color Hunt Box
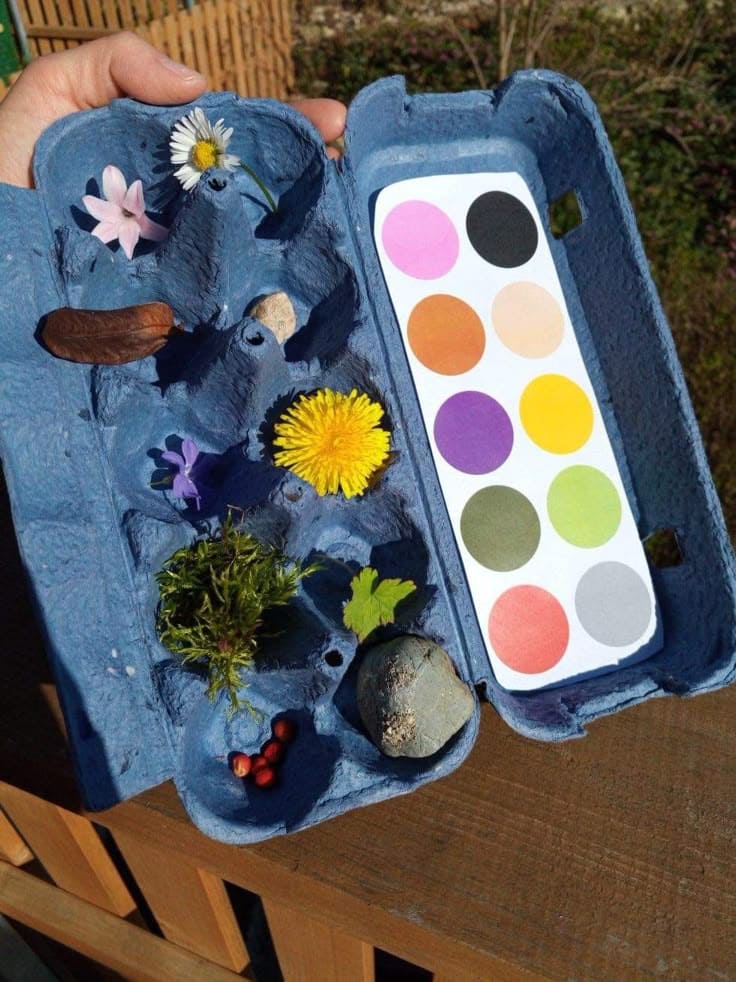
You can turn a simple walk around the backyard or park into a vibrant adventure. All it takes is an old egg carton, some paint or paper swatches, and curious little hands ready to connect with nature.
Additionally, each colored circle becomes a mission, encouraging your child to observe more deeply and appreciate the tiny treasures hiding in plain sight.
Materials Needed:
- 1 empty egg carton (12-count)
- 1 small sheet of paper with 6-12 colored circles (approx. 1-2 inches in diameter)
- Glue stick
- Crayons or printed color dots (optional)
Step-by-Step Guide
Step 1: Take your egg carton and remove any leftover pieces or labels. If you’d like, paint the outside a bright to make it feel more special.
Step 2: Prepare your color chart by drawing or printing 6-12 color dots (around 1–2 inches wide) on a small piece of paper. You can use crayons or even paint samples. Then, glue the chart to the inside of the lid.
Step 3: Head outside with your child and encourage them to find natural objects that match each color on the chart. This could be anything from petals, leaves, and moss to tiny stones or seed pods.
Step 4: Finally, place each item into a matching compartment in the carton.
#9. Leafy Caterpillar
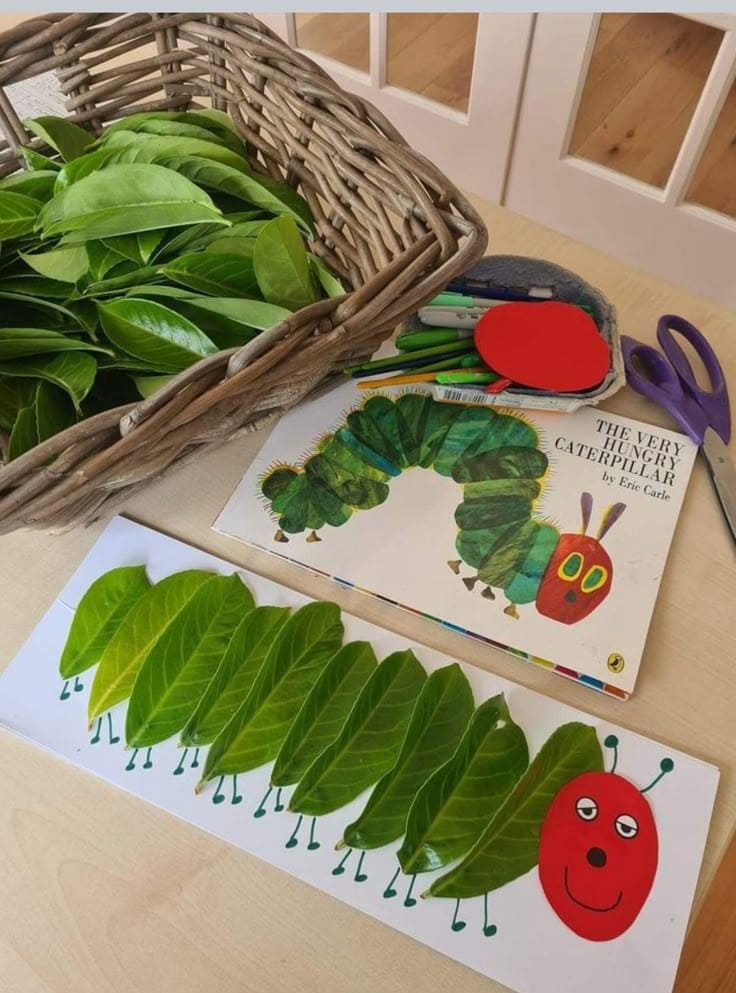
If you’re already a fan of The Very Hungry Caterpillar by Eric Carle, this craft brings the book to life. I’ve done this project with toddlers and kindergartners, and they lit up as they turned ordinary leaves into a wiggly caterpillar buddy.
Materials Needed
- 1 white sheet of cardstock (A4 size)
- 10 green leaves
- Red construction paper
- Googly eyes
- Non-toxic glue
- Green and black markers
- Scissors (child-safe)
Step-by-Step Guide
Step 1: Start by collecting about 10 fresh green leaves. Next, glue them onto the cardstock in a curved or straight row to form the caterpillar’s body.
Step 2: Cut a red circle for the caterpillar’s head. Then, glue it to the front of the leaf row. You also wany to add googly eyes or draw them on, plus a big smile.
Step 3: Lastly, use green or black markers to draw tiny feet and curvy antennae.
#10. Handprint Flower Bouquet
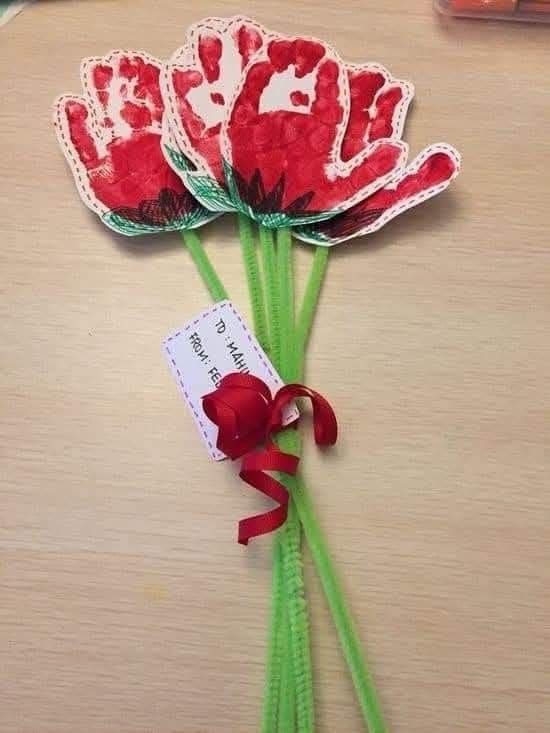
This adorable bouquet turns your child’s hand into a blooming flower. Of course, it’s a sweet and simple gift perfect for Mother’s Day, Teacher Appreciation, or just because.
Materials Needed
- Red and green paint
- 3 white cardstock
- 3 green pipe cleaners
- Scissors
- Red ribbon (about 30 cm)
- Hole punch
- Small gift tag or homemade label
- Glue or hot glue gun
Step-by-Step Guide
Step 1: Paint your child’s hand with red paint and press it onto the white cardstock to make three handprints.
Step 2: Once flowers dry, you need to cut out each handprint carefully along the outline.
Step 3: Glue a green pipe cleaner to the back of each handprint to serve as a flower stem.
Step 4: Punch a hole in a gift tag and write a short message. Moreover, gather all the stems together and tie them using a red ribbon, adding the tag as you go.
#11. Paper Plate Purses
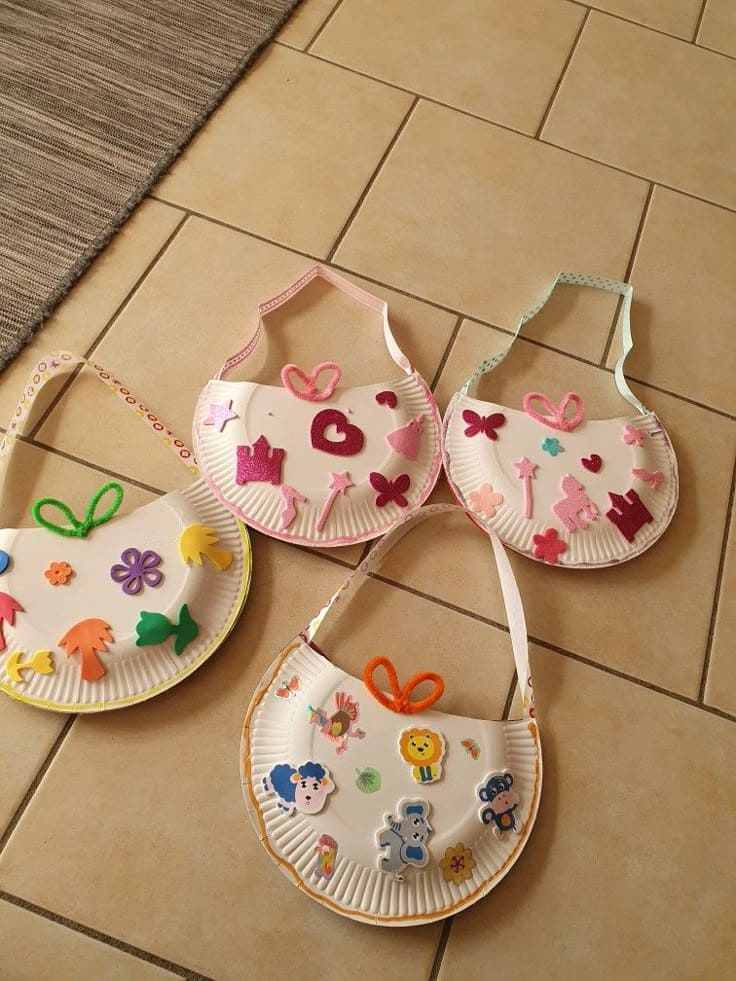
The first time I made these paper plate purses with my nieces, we ended up surrounded by stickers, giggles, and a sense of accomplishment that only a kid-made accessory can bring.
Besides, what I love most is how each child’s version turns out entirely unique as some go for fairy themes, others choose ocean creatures or glitter galore. Plus, they’re budget-friendly and require just a few easy-to-find supplies.
Materials Needed
- 1 white paper plate per purse
- Stickers, foam shapes, or felt cutouts (any theme)
- Glue stick
- Hole punch
- Ribbon (approx. 30-40 cm per handle)
- Pipe cleaners or pom-poms (optional)
- Safety scissors
Step-by-Step Guide
Step 1: Begin by folding your paper plate in half to create a purse shape. Then press firmly to crease the fold.
Step 2: Next, punch two holes near the top fold, one on each side. This is where your handle will go.
Step 3: Now it’s time to use stickers, foam shapes, or anything you have on hand. Moreover, let kids design the purse to match their personality or favorite theme.
Step 4: After the decorations are dry, thread a ribbon through the holes and knot them to secure. You can also add a pipe cleaner twist to dress it up.
#12. Upcycled Tulip Garden
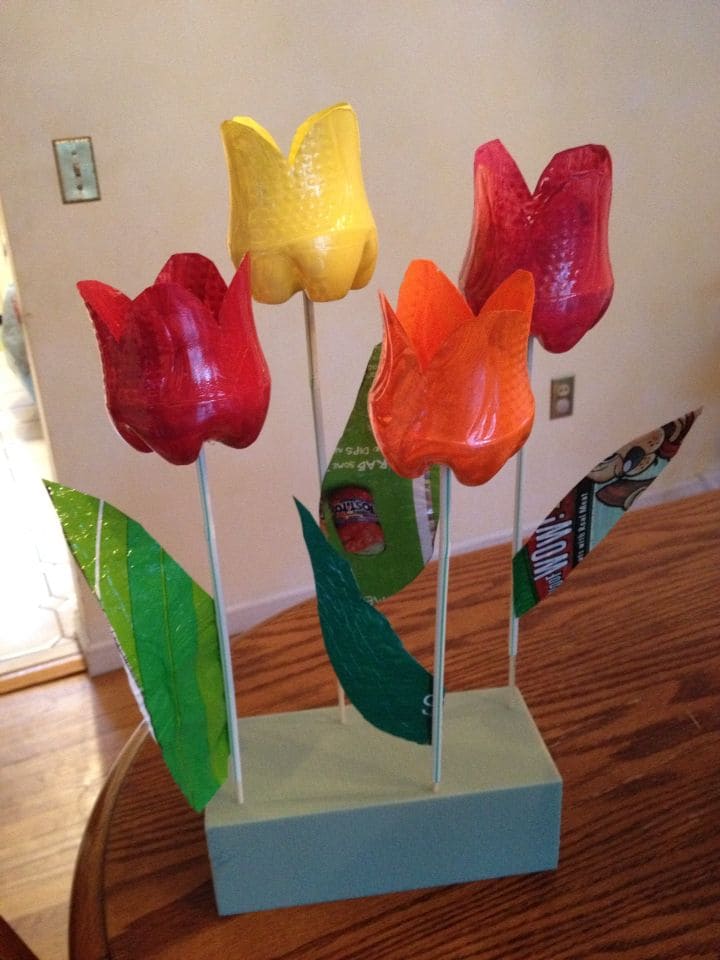
Who knew empty soda bottles could become a spring garden centerpiece? These upcycled tulips are a burst of color, perfect for a sunny windowsill or a homemade gift.
Specially, this craft invites kids to experiment with cutting, painting, and assembling, plus, it makes a lovely conversation starter.
Materials Needed
- 4 empty plastic bottles (2-liter works best)
- Acrylic paint (assorted bright colors)
- 5 wooden skewers (12-inch length)
- Green plastic from packaging
- Scissors and hot glue gun
- A block of floral foam
Step-by-Step Guide
Step 1: Begin by cutting off the bottom halves of your plastic bottles, these will be the tulip heads. Then, trim the edges into soft petal shapes.
Step 2: Paint the insides or outsides of the tulip heads in bold colors. Let them dry fully before moving on.
Step 3: Glue each tulip head onto a wooden skewer or dowel to create a sturdy stem.
Step 4: Moreover, cut out simple leaf shapes from green plastic and attach them to the skewers with glue or tape.
Step 5: Finally, insert each skewer into a block of floral foam or a base box so your tulips stand upright.
#13. Cardboard Binoculars
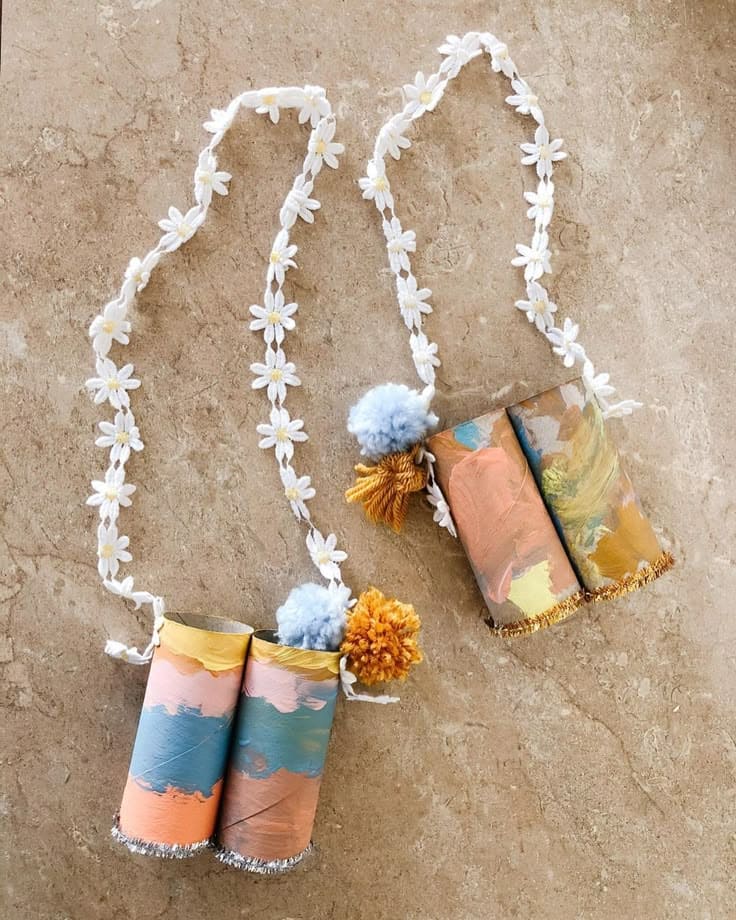
Whether your little one is bird-watching, bug-hunting, or pretending to be an adventurer in a faraway land, these decorated toilet roll binoculars are easy to make and endlessly fun.
Materials Needed
- 2 empty toilet paper rolls
- Flower lace (approx. 60-80 cm)
- Paints
- Hot glue
- 2 pom-poms (optional)
- Hole punch or scissors
- Glitter (optional)
Step-by-Step Guide
Step 1: Begin by painting the two toilet rolls in any color or pattern your child loves, then let them dry completely.
Step 2: Then, glue the rolls side by side to form a pair of binoculars.
Step 3: Punch a hole on each outer side of the rolls. Now, tie your daisy string through both sides to create a wearable strap.
Step 4: Finally, add finishing touches like pom-poms or glitter trim to make it extra cute.
#14. Wood Slice Birds
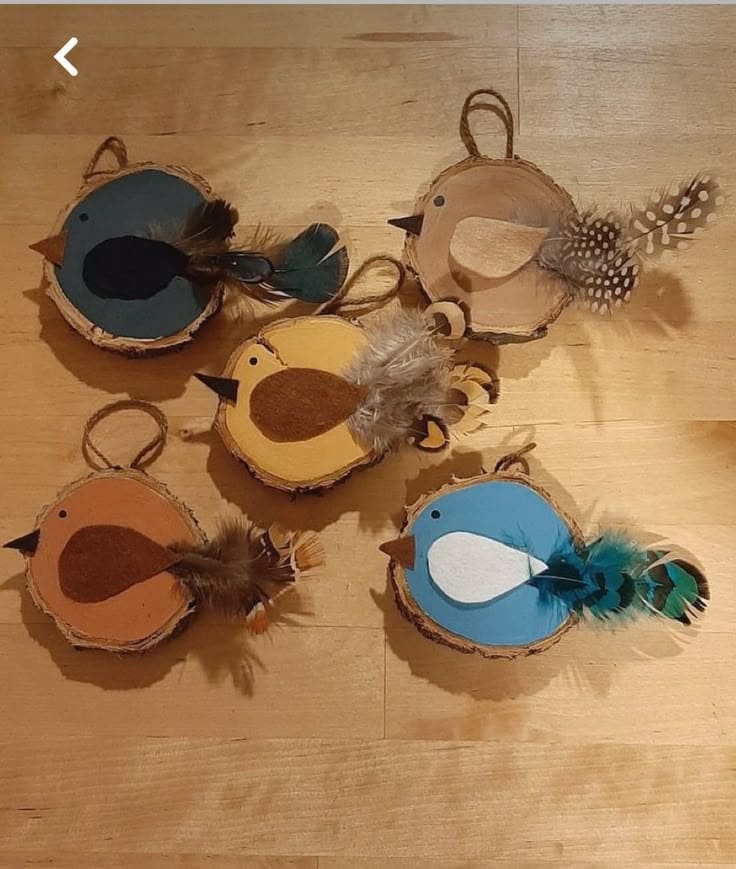
These wood slice birds are the kind of project that feels like a cozy day in the forest. Each bird has its own personality thanks to colorful feathers, soft felt details, and the rustic charm of a natural wood base.
I bet your kids will immerse in and they double as adorable decorations or keepsakes your kids will love showing off.
Materials Needed
- Natural wood slices (approx. 3-4 inches wide)
- Acrylic paints (various colors)
- Small felt scraps
- Feathers
- Black marker for eyes
- Glue
- Twine
Step-by-Step Guide
Step 1: First, paint the surface of the wood slice in your chosen base color and let it dry completely.
Step 2: Next, cut out a wing and beak from felt, then glue them onto the bird’s body using craft glue or a hot glue gun.
Step 3: Then, you can draw an eye with a black pen to bring your bird to life and glue a fluffy feather at the back for the tail.
Step 5 (optional): Finally, tie a piece of twine through a small hole or glue it on the back if you’d like to hang your bird.
#15. Color Hunt Nature Walk
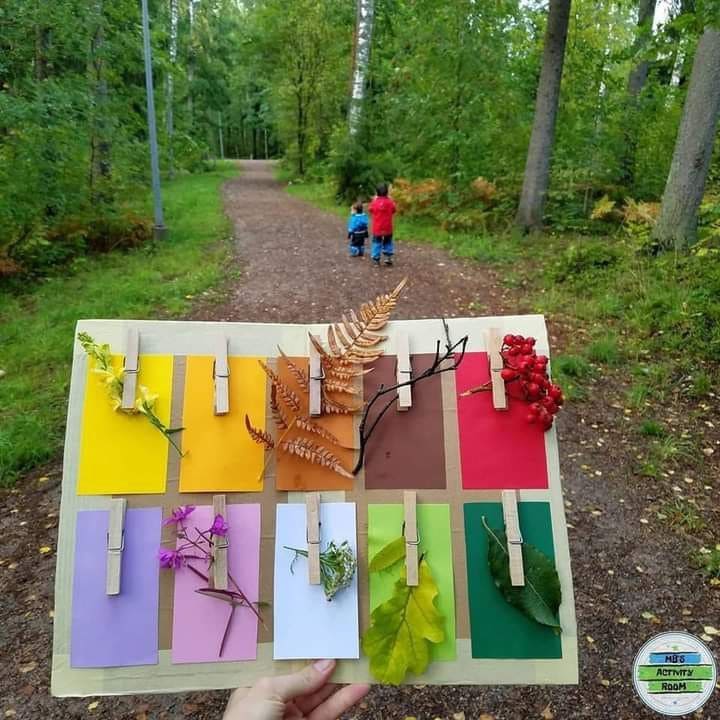
This nature color hunt is a simple but enriching way to blend art, observation, and outdoor play. It turns a regular walk into a vibrant scavenger hunt where nature becomes the palette.
Whether you’re in a forest, park, or your own backyard, kids get to interact with the world while sharpening their attention to detail.
Materials Needed
- A piece of sturdy cardboard (around 9×12 inches)
- 10 color swatches from construction paper (cut into 2”x4” pieces)
- 10 wooden clothespins
- Double-sided tape
- A marker (optional)
Step-by-Step Guide
Step 1: Cut out small rectangles of colored paper, try to include a wide range like red, yellow, purple, green, brown, and gray.
Step 2: Attach each color swatch to the cardboard using glue or double-sided tape. Leave enough space between them so each can hold a pin and item.
Step 3: Then, clip a clothespin onto each color card. This will allow your child to attach their nature finds as they go.
Step 4: Finally, head outside and begin your walk. Encourage kids to stop, observe, and see which items around them resemble the colors.
#16. Texture Explorer Sticks
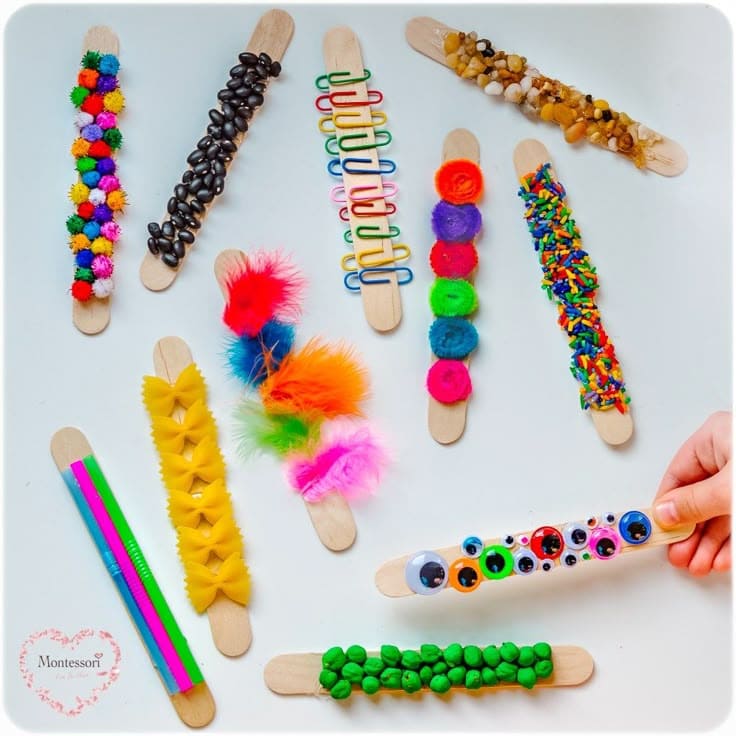
On a rainy afternoon if you are looking for some projects to keep kids busy, you can try this which is super easy and fun.
Materials Needed
- 10-12 jumbo craft sticks
- Assorted craft glue or hot glue (with adult help)
- Items with varied textures: googly eyes, mini pom-poms, colorful feathers, dry pasta, pipe cleaners, paper clips, dried beans and lentils, colored rice or even playdough balls
Step-by-Step Guide
Step 1: Begin by laying out all your materials. Let your child explore the textures first, you can ask them what feels soft, hard, rough, or squishy.
Step 2: Take a wooden craft stick and apply glue along the top. You can either let kids design by theme (e.g., “feathers only”) or mix it all together.
Step 3: Press objects into the glue firmly. Then let the sticks dry completely.
#17. Cardboard Butterfly Wand
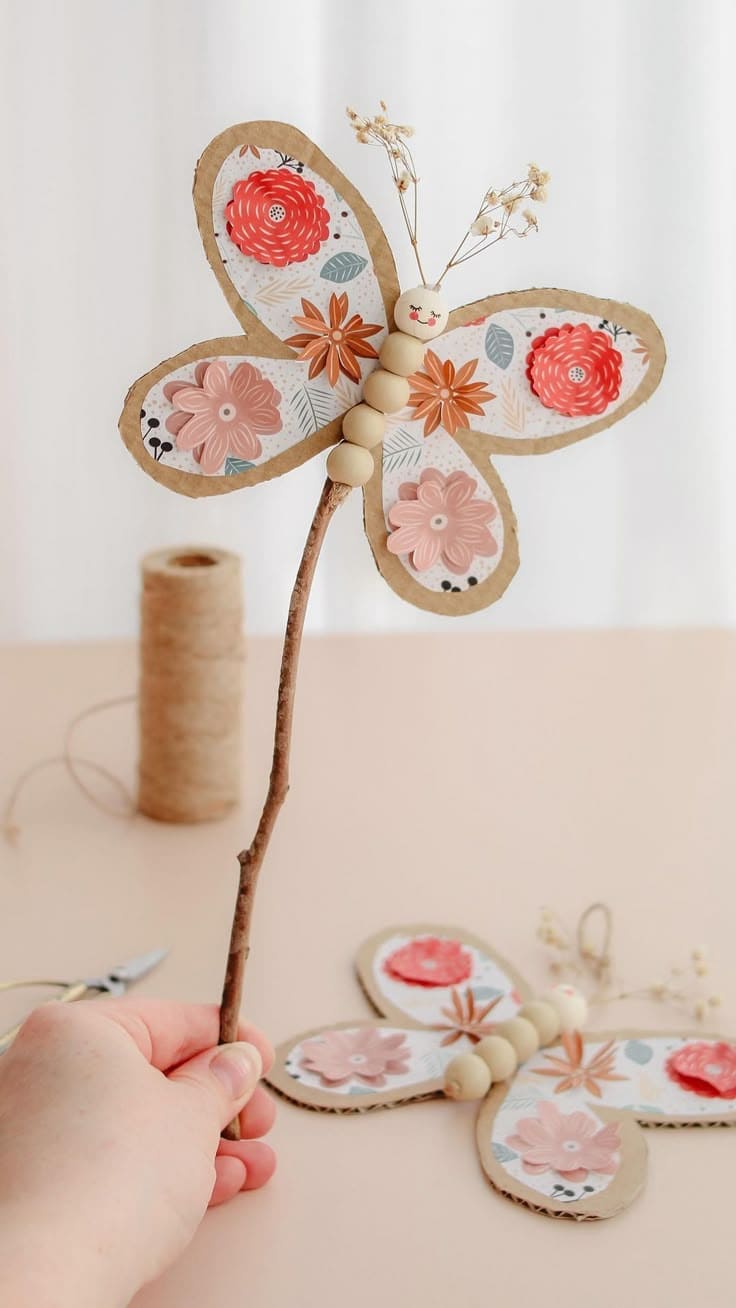
Crafting this butterfly wand feels like capturing a soft breeze and turning it into art. Bonus, the mix of cardboard, pressed flowers, and wooden beads makes each butterfly unique, fluttering with personal charm.
Whether you’re spending a cozy afternoon indoors or collecting twigs in the garden, this project is simple enough for young hands, yet lovely enough to become a keepsake.
Materials Needed
- 1 small stick or twig (6-10 inches)
- Cardboard (approx. 6–8 inches wide)
- Decorative paper
- 5 wooden beads (1–1.5 cm size)
- Craft glue or hot glue gun (with supervision)
- String
- Markers or paint
Step-by-Step Guide
Step 1: Draw and cut out a butterfly shape from a piece of cardboard.
Step 2: Decorate the wings using floral paper, dried flowers, or colorful scraps. Let kids get creative as there’s no wrong way to make it beautiful!
Step 3: Next, glue the twig vertically down the center of the butterfly, so it becomes the wand handle.
Step 4: Now, slide wooden beads onto the twig or glue them on top, stacking them like the butterfly’s body. Kids can add a bead with a face drawn on it if they’d like.
Step 5: Finally, tie a piece of twine through the top bead or stick on a tiny flower sprig for whimsical antennae.
#18. Coffee Filter Daisies
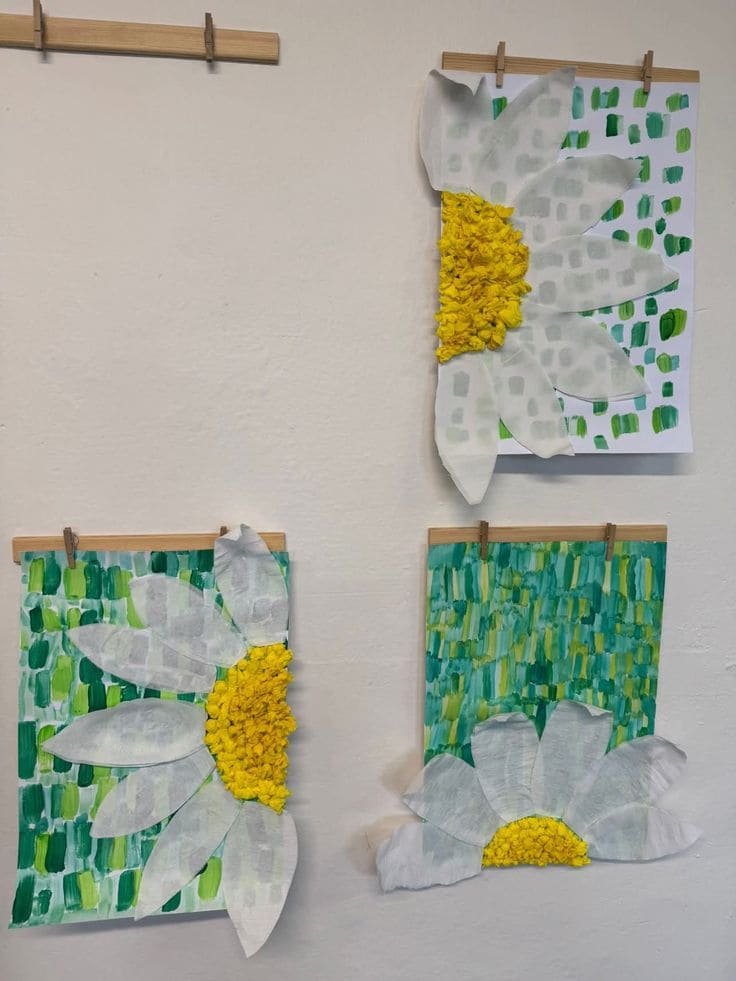
This cheerful wall-worthy artwork is a lovely way to help kids explore textures and colors. With simple materials and a splash of imagination, you can transform everyday coffee filters and scrap tissue into blooming daisies.
Materials Needed
- 1 coffee filter per flower (standard size)
- Yellow tissue paper (cut into 1” squares or smaller)
- Green and blue paint
- White paper
- Glue stick
- Scissors and a paintbrush
Step-by-Step Guide
Step 1: Paint your background using vertical strokes of green, blue, and teal. Let kids mix hues for a grass-like effect.
Step 2: While the background dries, cut petals from white coffee filters. Each flower usually needs 6-8 petals.
Step 3: Then, crumple small yellow tissue paper squares and glue them onto the center area of your paper to form the daisy’s textured core.
Step 4: Now, glue the petals around the yellow center, layering slightly to create fullness.
#19. Candy Bridle Horses
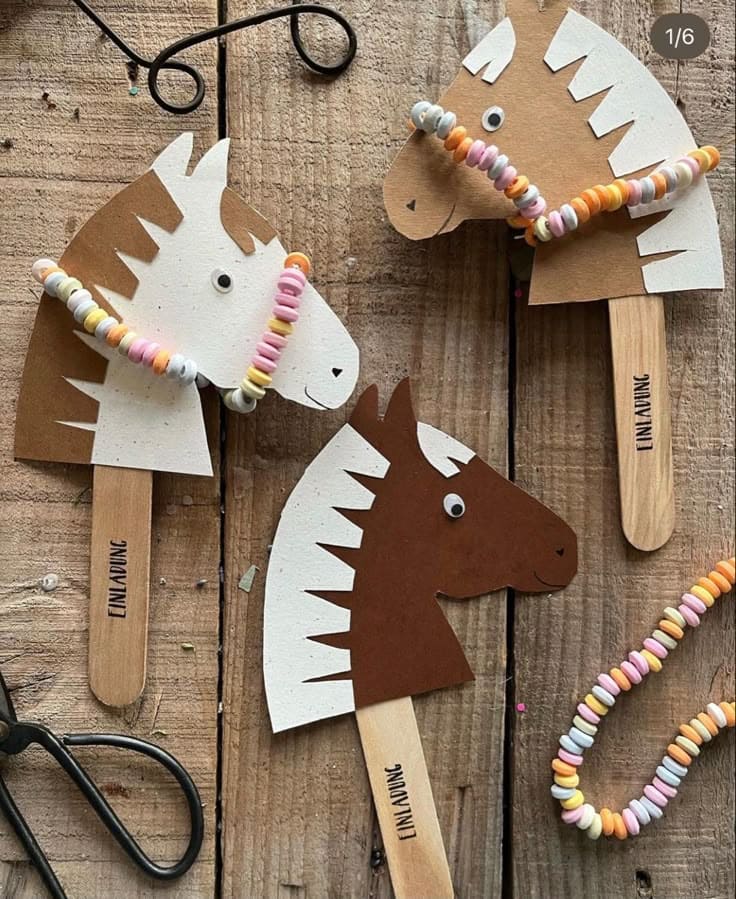
If you’re looking for a charming activity that kids will adore (and sneak a nibble from), these candy bridle horse puppets are a definite win.
With a mix of cardstock and sweet candy beads, each horse gets its own personality and a sugary snack if you allow it! Ideal for rainy afternoons, themed birthdays, or a cozy crafting day at home.
Materials Needed
- Cardstock paper (brown, beige, white)
- Popsicle sticks
- Candy bracelets
- Googly eyes
- Glue stick or craft glue
- Scissors
- Black pen or marker
Step-by-Step Guide
Step 1: Cut out a horse head shape from brown or beige cardstock, then cut a matching mane from white cardstock with jagged edges for a stylized look.
Step 2: Next, glue the mane onto the back of the head, then attach a googly eye and draw on a sweet little smile or nostril dot.
Step 3: Flip the horse head over and glue a popsicle stick to the bottom as a handle.
Step 4: Now, take a candy bracelet or necklace and loop it around the muzzle like a bridle, it should sit snugly without glue.
Step 5 (optional): Moreover, you can write each child’s name on the stick and turn it into a party invitation or personal puppet.
#20. Magnetic Fishing Game with Pipe Cleaner Fish
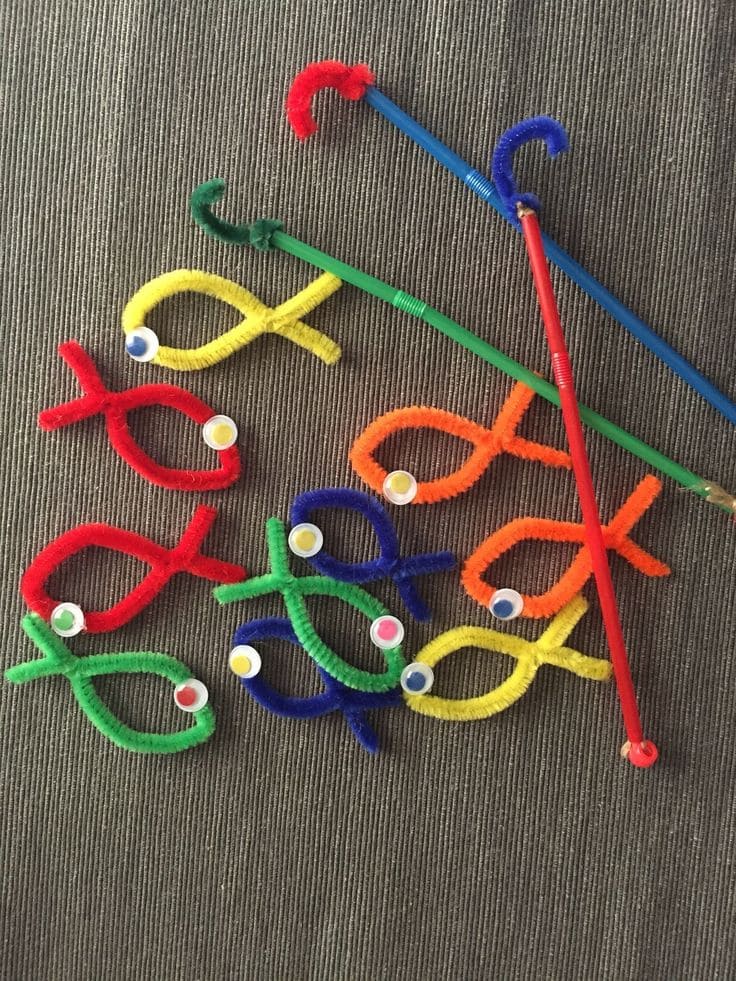
This colorful fishing game is a perfect blend of creativity and fun, and it’s easy to whip up with supplies you likely already have at home.
Plus, kids will love crafting their own little rainbow fish and then catching them with their handmade fishing rods.
Materials Needed
- 2 pipe cleaners per fish
- Googly eyes
- Small metal paper clips
- Hot glue or strong craft glue
- Wooden dowels
- String (about 12-18 inches per rod)
- Small round magnets
Step-by-Step Guide
Step 1: Take two pipe cleaners and twist them into a fish shape, you want to loop one end to form the body and use the tail ends to make a little cross for the tail.
Step 2: Attach a paper clip to the middle of the fish, then glue on a googly eye to bring your fish to life!
Step 3: For the rod, tie or glue one end of the string to the dowel or stick. On the other end, securely attach a magnet. You can use hot glue, or wrap it tightly with thread and knot it.
#21. Autumn Forest Diorama
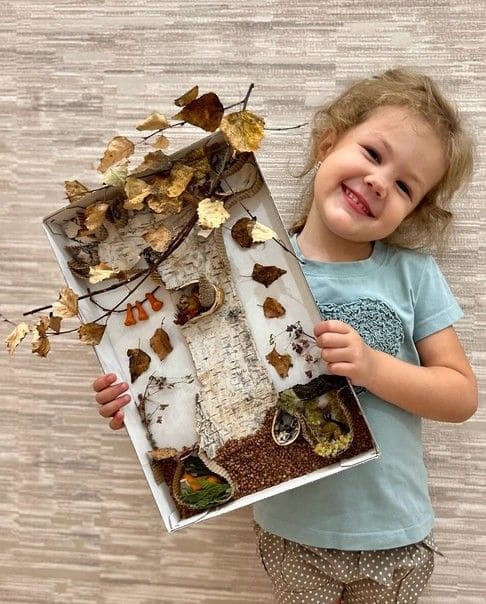
With a simple cardboard lid as your canvas, your child can recreate a cozy woodland scene that’s rich in texture, color, and imagination.
My little cousin beamed just like the girl in the photo when we finished ours. She even gave the tree a name “Mrs. Birch.” That’s the kind of joy you can’t plan, you just build the space for it.
Materials Needed
- 1 cardboard box lid (approx. A3 size)
- A handful of dried leaves, bark, twigs, moss, and acorns
- Brown buckwheat or grains (optional)
- White paint
- Glue
- Scissors
- Optional: small toy animals, felt mushrooms, mini pinecones
Step-by-Step Guide
Step 1: Start by painting the base of the tray white or covering it with white paper to highlight all the natural elements later.
Step 2: Next, glue a large piece of birch bark or a thick branch vertically in the center to represent the tree trunk. You can use twigs to create branches that extend outward.
Step 3: Glue leaves at different angles to create the illusion of depth and natural fall. Don’t forget to tuck in some moss at the base for added realism.
Step 4: After that, sprinkle some buckwheat or brown rice for a forest floor effect. You can also add any extra decorations like mini mushrooms, small animal toys, or acorns for woodland details.
Step 5: Finally, let your child point out what’s happening in the scene.
#22. Wildflower Card Bouquet
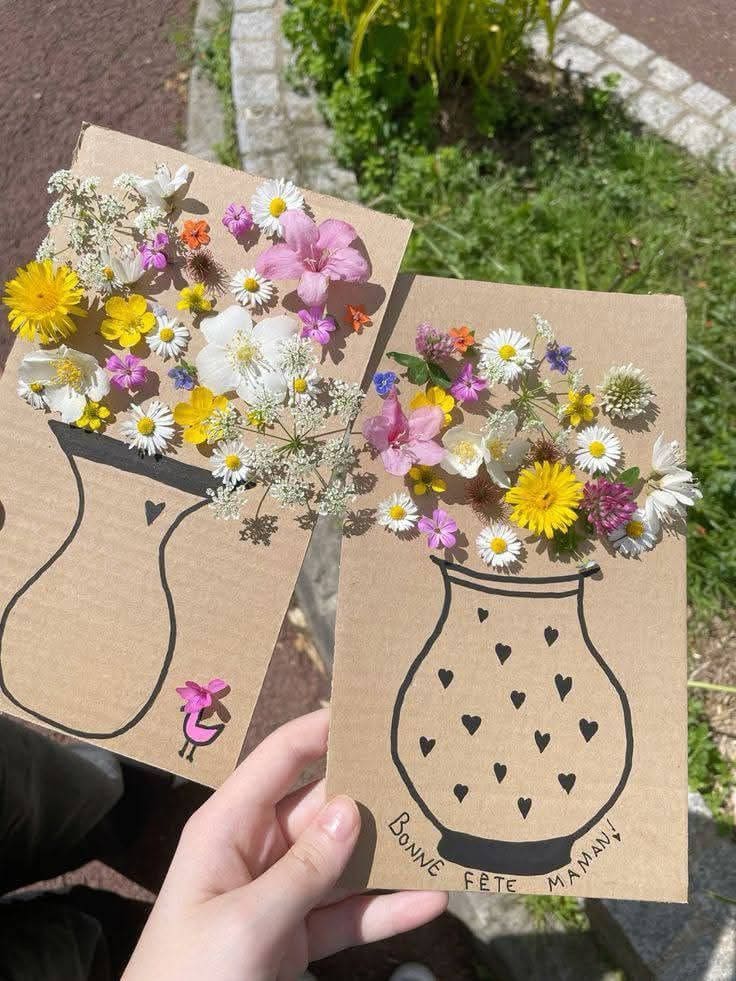
These handmade wildflower cards are a lovely mix of creativity and nature’s charm and perfect for Mother’s Day, birthdays, or just a note.
Even better, you can personalize each card with doodles, stickers, or a heartfelt message scribbled in crooked letters.
Materials Needed
- Kraft paper (A5 size works well)
- Black marker or pen
- Wildflowers
- Glue dots
- Optional: washi tape, stickers
Step-by-Step Guide
Step 1: Fold your kraft paper in half to form a sturdy card base then use your marker to sketch a simple vase shape on the front.
Step 2: Next, head outside and pick small, colorful flowers. Daisies, clovers, and tiny blossoms all work beautifully.
Step 3: Now, arrange your flowers so the stems look like they’re inside the vase, letting the blossoms burst above the rim.
Step4: After that, secure each flower gently using glue dots or tape. You can also press them flat first for a neater look.
#23. Pool Noodle Crabs
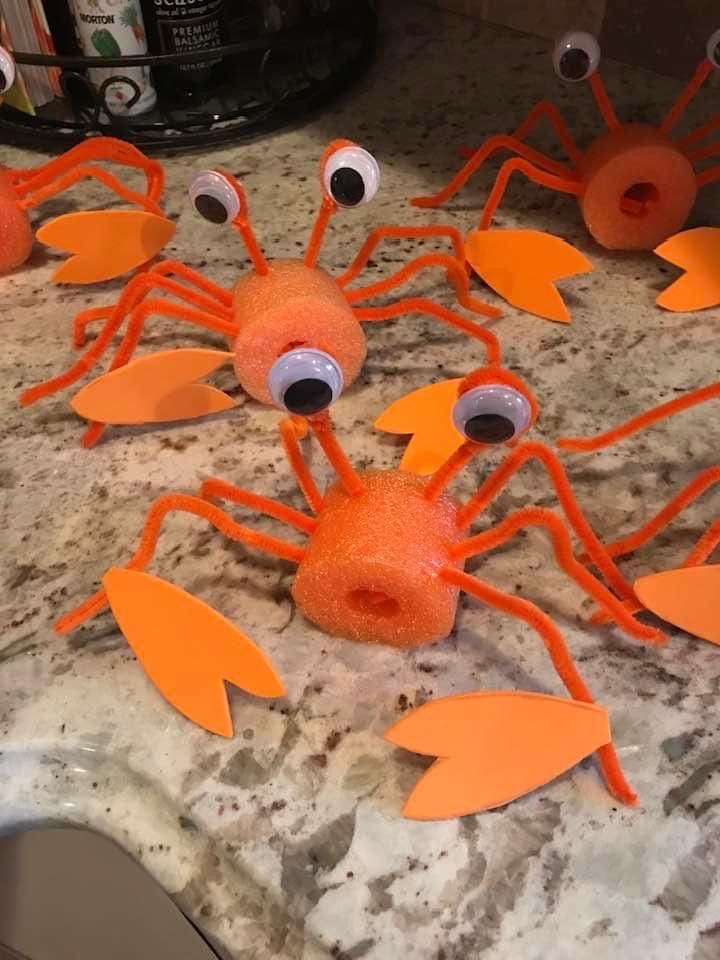
These adorable crabs made from pool noodles are just the kind of quirky, hands-on project kids love during summer break or beach-themed craft days.
Materials Needed
- Orange pool noodles
- 8 orange pipe cleaners
- 2 large googly eyes per crab
- Orange craft foam
- Hot glue or strong tacky glue
- Scissors
Step-by-Step Guide
Step 1: Start by cutting the pool noodle into sections, each around 2 to 3 inches thick to form the crab’s body.
Step 2: Use the pencil to poke small holes into the sides of the noodle where the legs and eye stalks will go.
Step 3: Next, bend six pipe cleaners and insert three on each side for legs. Use a little glue if needed to secure them in place.
Step 4: After that, cut small claw shapes from the orange foam and glue them to the ends of two pipe cleaners. You need to attach one to each side of the crab as its pinchers.
Step 5: Finally, for the eyes, glue googly eyes onto the top ends of two pipe cleaners and insert them into the top of the noodle.
#24. Rainbow Heart Sun Catchers
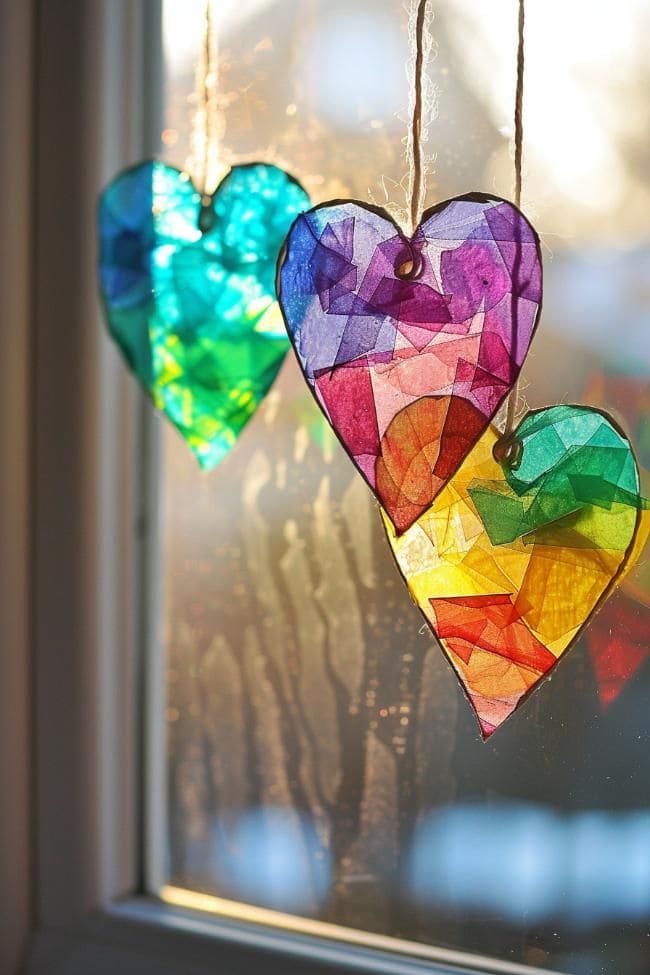
Whether it’s a rainy afternoon or a bright morning, these little paper hearts transform any window into a kaleidoscope of joy.
Moreover. they’re easy to make, budget-friendly, and so rewarding, perfect for keeping little hands busy while encouraging a sense of color and symmetry.
Materials Needed
- Colored tissue paper
- Clear contact paper (1 per sun catcher)
- Black construction paper
- Scissors
- Pencil
- Hole punch
- String or yarn
Step-by-Step Guide
Step 1: Cut a heart shape out of black construction paper. Then, cut out a smaller heart from inside to form a frame like a heart-shaped window.
Step 2: Place a sheet of clear contact paper sticky side up, then fill the inside of the heart with small tissue paper pieces. Let your child layer colors to create a stained-glass effect.
Step 3: Once the space is covered, place another piece of contact paper sticky side down on top to seal it.
Step 4: Now, cut around the heart, leaving a thin border of contact paper so it stays sealed.
Step 5: Finally, punch a hole at the top and tie a loop of string.
#25. Drip-Dye Ice Cream Cones
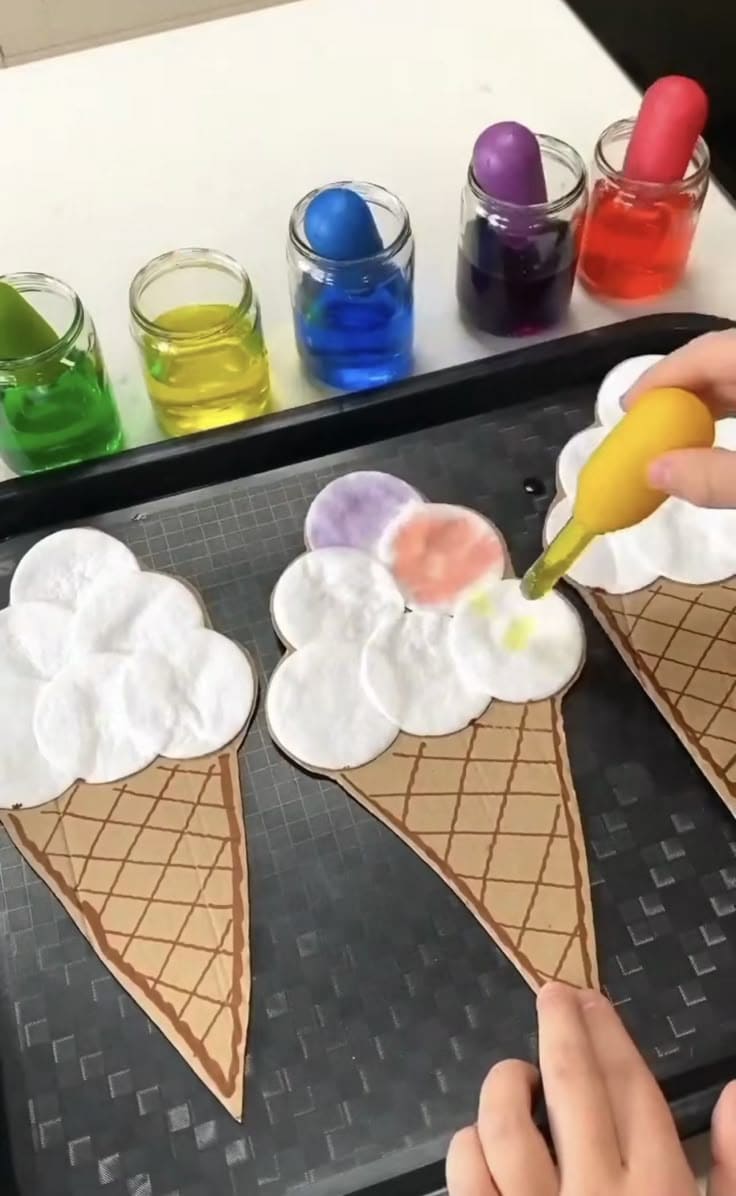
This ice cream-themed dropper activity is pure sensory delight. Kids absolutely love watching bright droplets bloom across the cotton pads like watercolor scoops.
Materials Needed
- 6 white cotton pads per cone
- Cardboard or brown paper
- Liquid watercolor with 6 different colors
- Pipettes, droppers, or plastic spoons
- Glue stick or school glue
- Tray or mat to catch spills
Step-by-Step Guide
Step 1: Cut a few cone shapes from brown paper or cardboard. You can add lines with a marker to give it that waffle-cone texture.
Step 2: Next, glue 6 cotton pads at the top of each cone to form the ice cream scoops.
Step 3: Meanwhile, fill small jars or cups with diluted food coloring. Choose bright, contrasting colors for best effect. Then, you can add a dropper in each jar.
Step 4: Have your child use droppers to gently add colored water to the cotton pads. Watch the colors blend and spread like melting ice cream.
