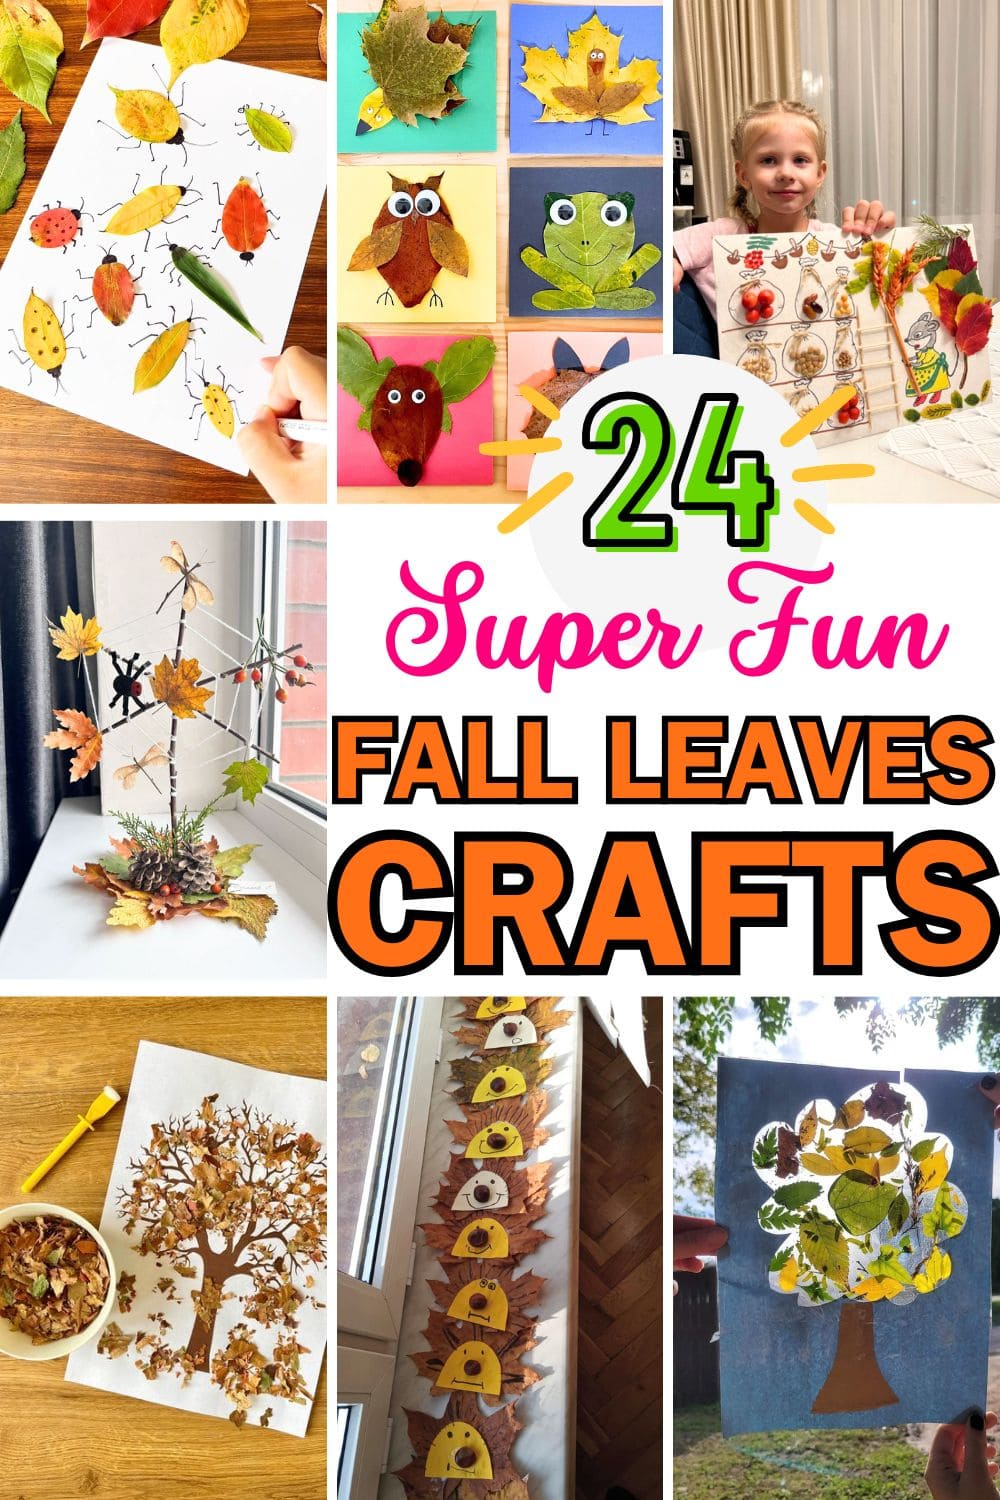
What’s the first thing that comes to mind when you think of fall crafts with kids?
Probably leaves and for good reason! Colorful, crisp, and scattered everywhere, fall leaves are the ultimate free art supply.
Whether you’re planning a classroom activity, a cozy afternoon project at home, or something fun to do after a nature walk, leaf crafts are a go-to for preschoolers and kids alike.
They help little hands explore textures, shapes, and creativity, all while celebrating the beauty of the season. Get inspired and let the leaf fun begin!
#1. Vibrant Autumn Leaf Mask
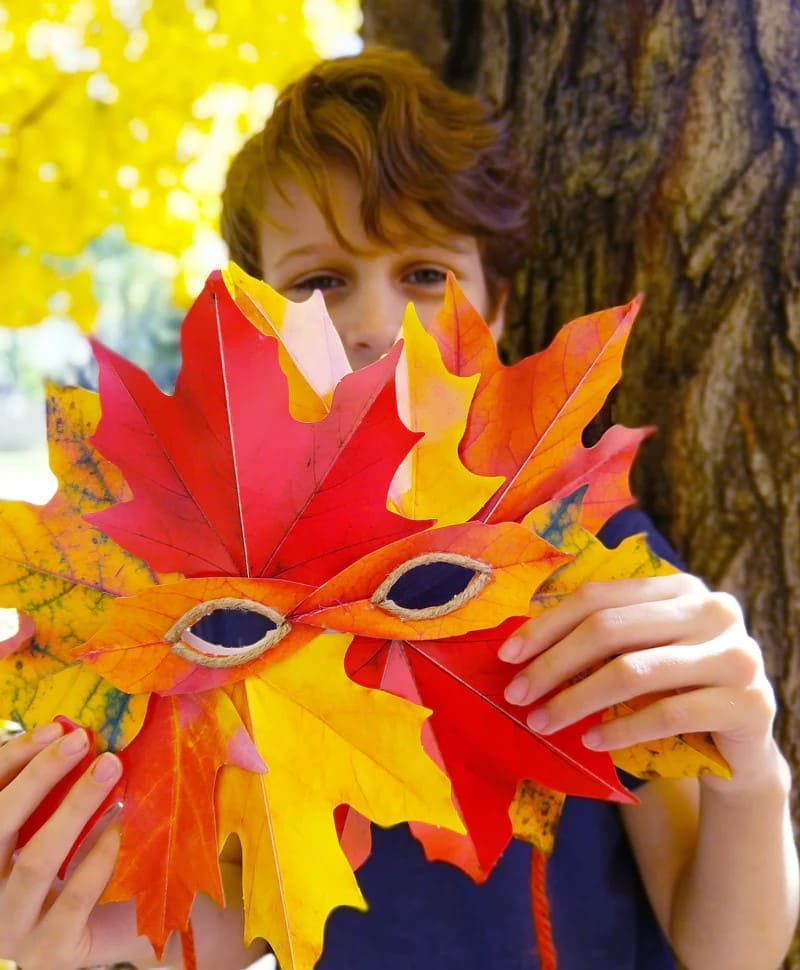
Crafted from vibrant maple and oak leaves in fiery shades of red, gold, and orange, this stunning fall leaf mask transforms your child into a magical woodland creature.
It’s a showstopper for school fall festivals, imaginative play, or even a DIY Halloween costume with a natural twist. The layered leaves create texture and movement, making the mask feel alive with autumn spirit.
Materials Needed
- Colorful fall leaves (fresh or pressed)
- Sturdy cardboard or cardstock base
- Scissors
- Glue or hot glue gun
- Twine
- Hole punch (optional)
Step-by-step Guide
Step 1: Cut a basic mask shape out of thick paper, adding eye holes.
Step 2: Layer and glue fall leaves across the front, fanning out for a dramatic effect.
Step 3: Punch holes on the sides and tie twine or attach elastic to secure it around the head.
#2. Torn Leaf Fall Tree Collage
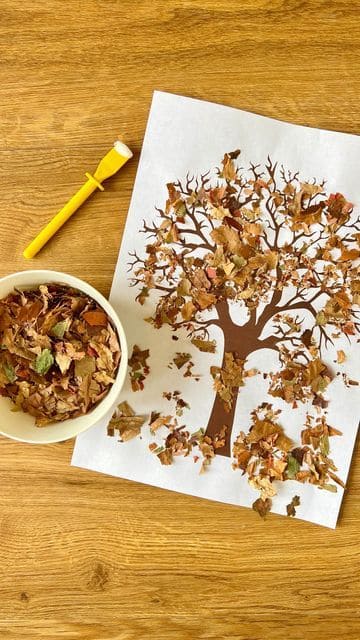
Wow, this simple yet charming autumn craft brings the beauty of falling leaves indoors.
A printed tree silhouette becomes the backdrop for layers of real, crumbled leaves glued on to mimic the look of a colorful canopy. It’s a relaxing activity for kids and adults alike.
Plus, it’s a lovely way to repurpose dried foliage from a backyard stroll.
Materials Needed
- Tree outline printed on white paper
- Dried leaves in various colors
- Glue stick
- Small bowl
Step-by-step Guide
Step 1: Gather dried leaves and crumble them into small pieces or tear them by hand.
Step 2: Apply glue onto the tree branches and around the base of the printed tree silhouette.
Step 3: Next, gently press leaf bits onto the glued areas to create the effect of foliage and fallen leaves.
Step 4: Shake off loose bits and let the project dry before displaying it on a fridge or window.
#3. Autumn Nature Spider Web Display
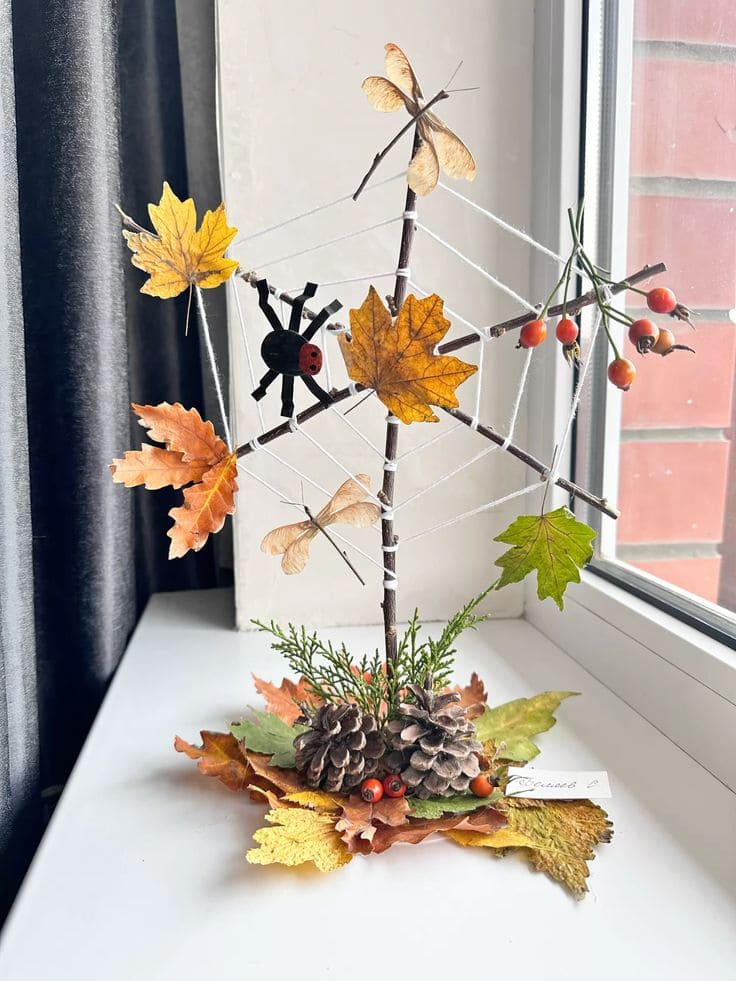
You can see a spider web strung between crossed branches becomes home to pinecone critters, leaf-dressed dragonflies, and a painted spider that looks straight from a storybook.
Balanced beautifully with berries, pine sprigs, and golden leaves at the base, it’s both sculpture and celebration of autumn textures.
Materials Needed
- Twigs or small branches (3-5 sturdy pieces)
- White string or yarn
- Assorted leaves, pinecones, and seed pods
- Hot glue gun
- Black paint and red marker
- Small craft paper
Step-by-step Guide
Step 1: Arrange and glue sticks into a star or spider web frame. You now wrap string around intersections to create the web pattern.
Step 2: Paint a spider on a seed or pebble and glue it to the web. Then, add dragonflies, leaves, and berries to the branches.
Step 3: Build a natural base using pinecones, greenery, and layered leaves to support the structure upright.
Step 4: Let everything dry and proudly display it near a window for sunlight to catch the web.
Read more: Top 20 Easy DIY Spiderweb Ideas for Stylish Fall Decor
#4. Leaf Animal Collage Cards
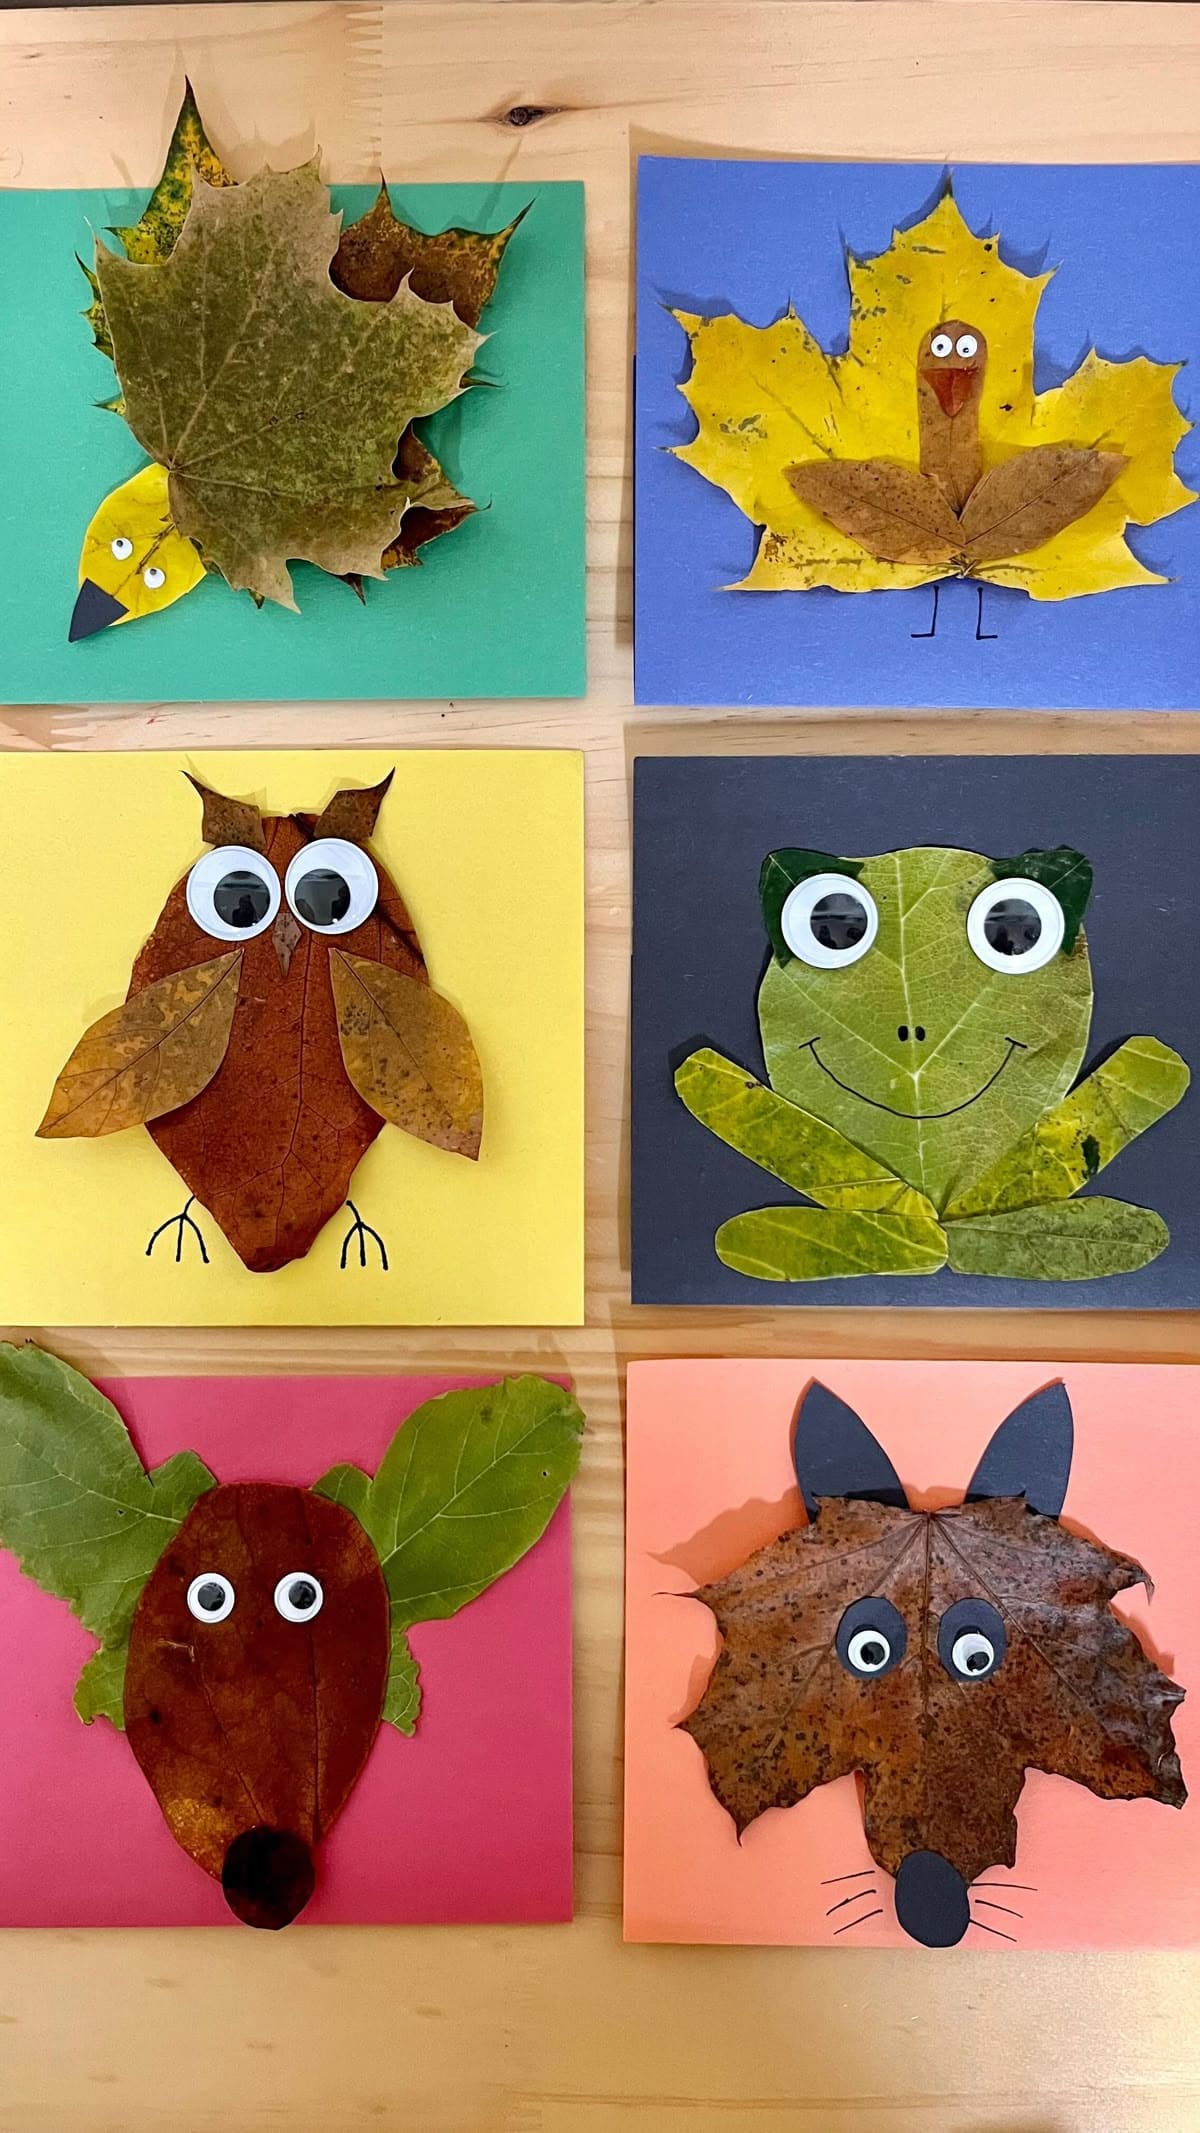
Each card is a burst of charm and imagination, where dried leaves become owls, frogs, turkeys, foxes, and more!
This project blends nature with creativity, letting kids bring animals to life using only a few leaves, googly eyes, and construction paper.
The best part is that every critter ends up with its own quirky personality. Great for preschool classrooms, rainy day crafting, or even handmade greeting cards for fall holidays.
Materials Needed
- Assorted dried leaves (various colors, shapes, and sizes)
- Colored cardstock or construction paper
- Googly eyes (medium size)
- Black marker or pen
- Glue stick
- Scissors (optional)
Step-by-step Guide
Step 1: Choose a background color and lay it flat. Then arrange leaves to create an animal shape, you try layering different sizes for wings, legs, or ears.
Step 2: Glue the leaves in place, then add googly eyes and use markers to draw feet, smiles, or whiskers.
Step 3: Let your creation dry and proudly display or gift it!
#5. Autumn Leaf Dress-Up Dolls
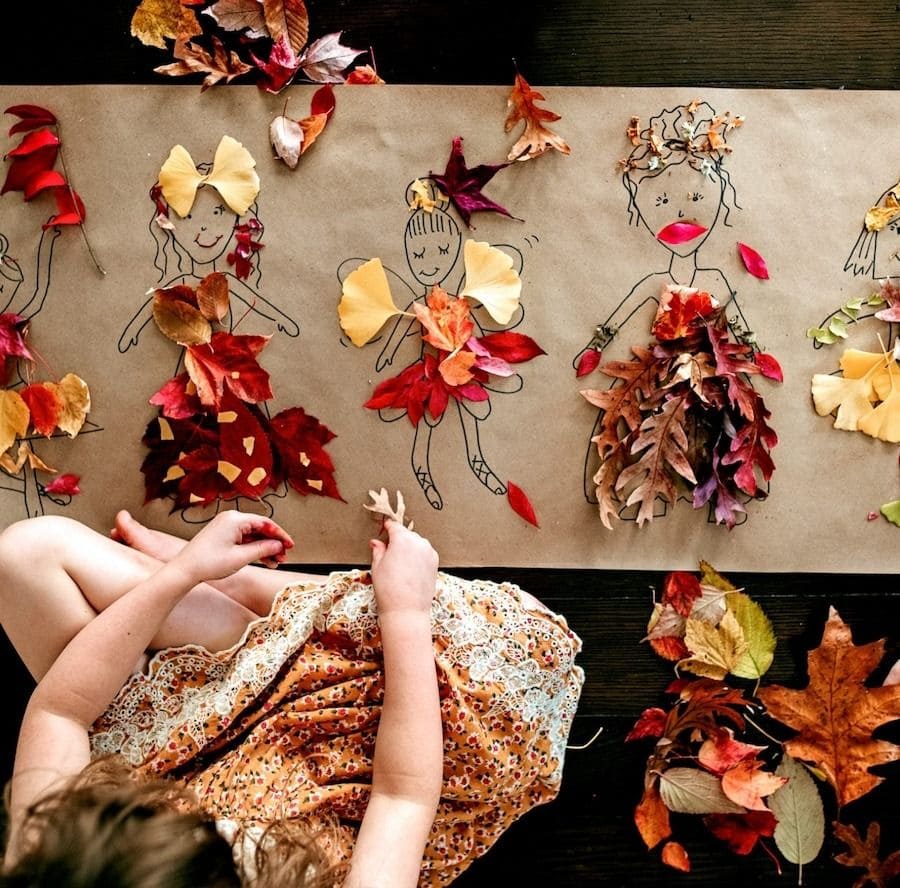
This charming craft turns simple line drawings into leafy fashion statements.
Kids will love designing their own autumn “outfits” using real leaves as skirts, wings, bows, and hairstyles.
Whether it’s a ballerina, fairy, or princess, every leafy creation is unique and magical. It’s a beautiful blend of drawing, storytelling, and sensory play that inspires creativity and fine motor skills.
Materials Needed
- Kraft or butcher paper roll
- Black marker or pen
- Assorted dried leaves in various colors and sizes
- Glue stick or liquid glue
- Optional: crayons or colored pencils
Step-by-step Guide
Step 1: Unroll your kraft paper and draw doll or fairy outlines spaced out along the sheet.
Step 2: Sort through leaves and decide which ones will be used for skirts, wings, or accessories.
Step 3: Glue the leaves directly onto the paper to “dress” each character.
Step 4: Let the glue dry and proudly hang up your autumn fashion parade!
#6. Leaf Mosaic Pumpkin Art
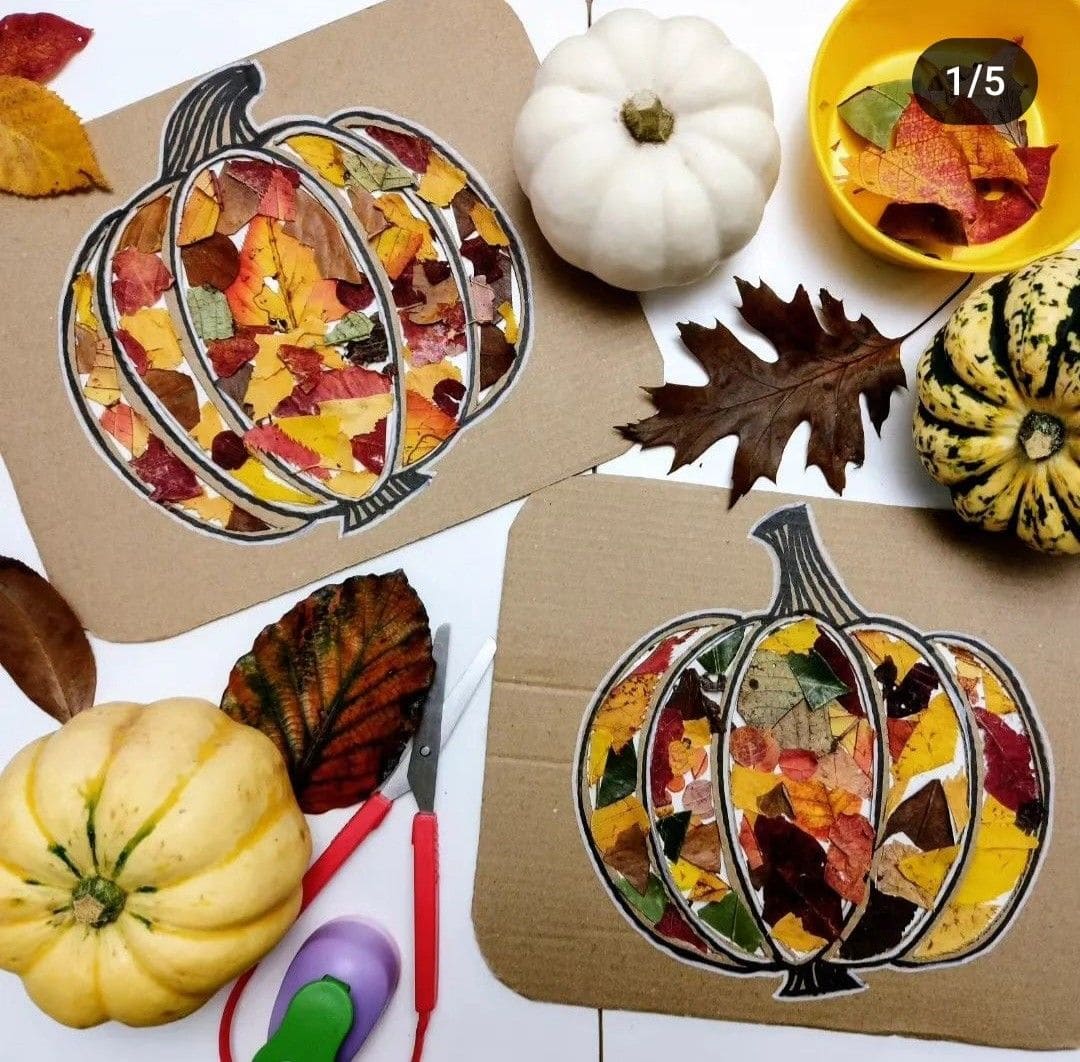
This autumn craft turns fallen leaves into a pumpkin masterpiece.
Using a cardboard cutout and a simple black outline, your little ones can fill each section with bits of colorful leaves like red, amber, gold, and even green.
You’ll end up with a display-worthy piece that captures the warmth of fall in the most hands-on way. Plus, it’s mess-free and relaxing for all ages.
Materials Needed
- Cardboard sheet or recycled box
- Black marker or printed pumpkin outline
- Dried autumn leaves in mixed colors
- Scissors (for trimming leaf pieces)
- Glue stick or craft glue
Step-by-step Guide
Step 1: Draw or print a pumpkin outline onto cardboard and cut around the edges.
Step 2: Collect colorful leaves and tear them into small mosaic-like pieces.
Step 3: Fill each pumpkin section with glue, then stick on the leaf pieces like a puzzle.
Step 4: Let it dry and display your leaf pumpkin proudly!
#7. Woodland Fox Leaf Puppets
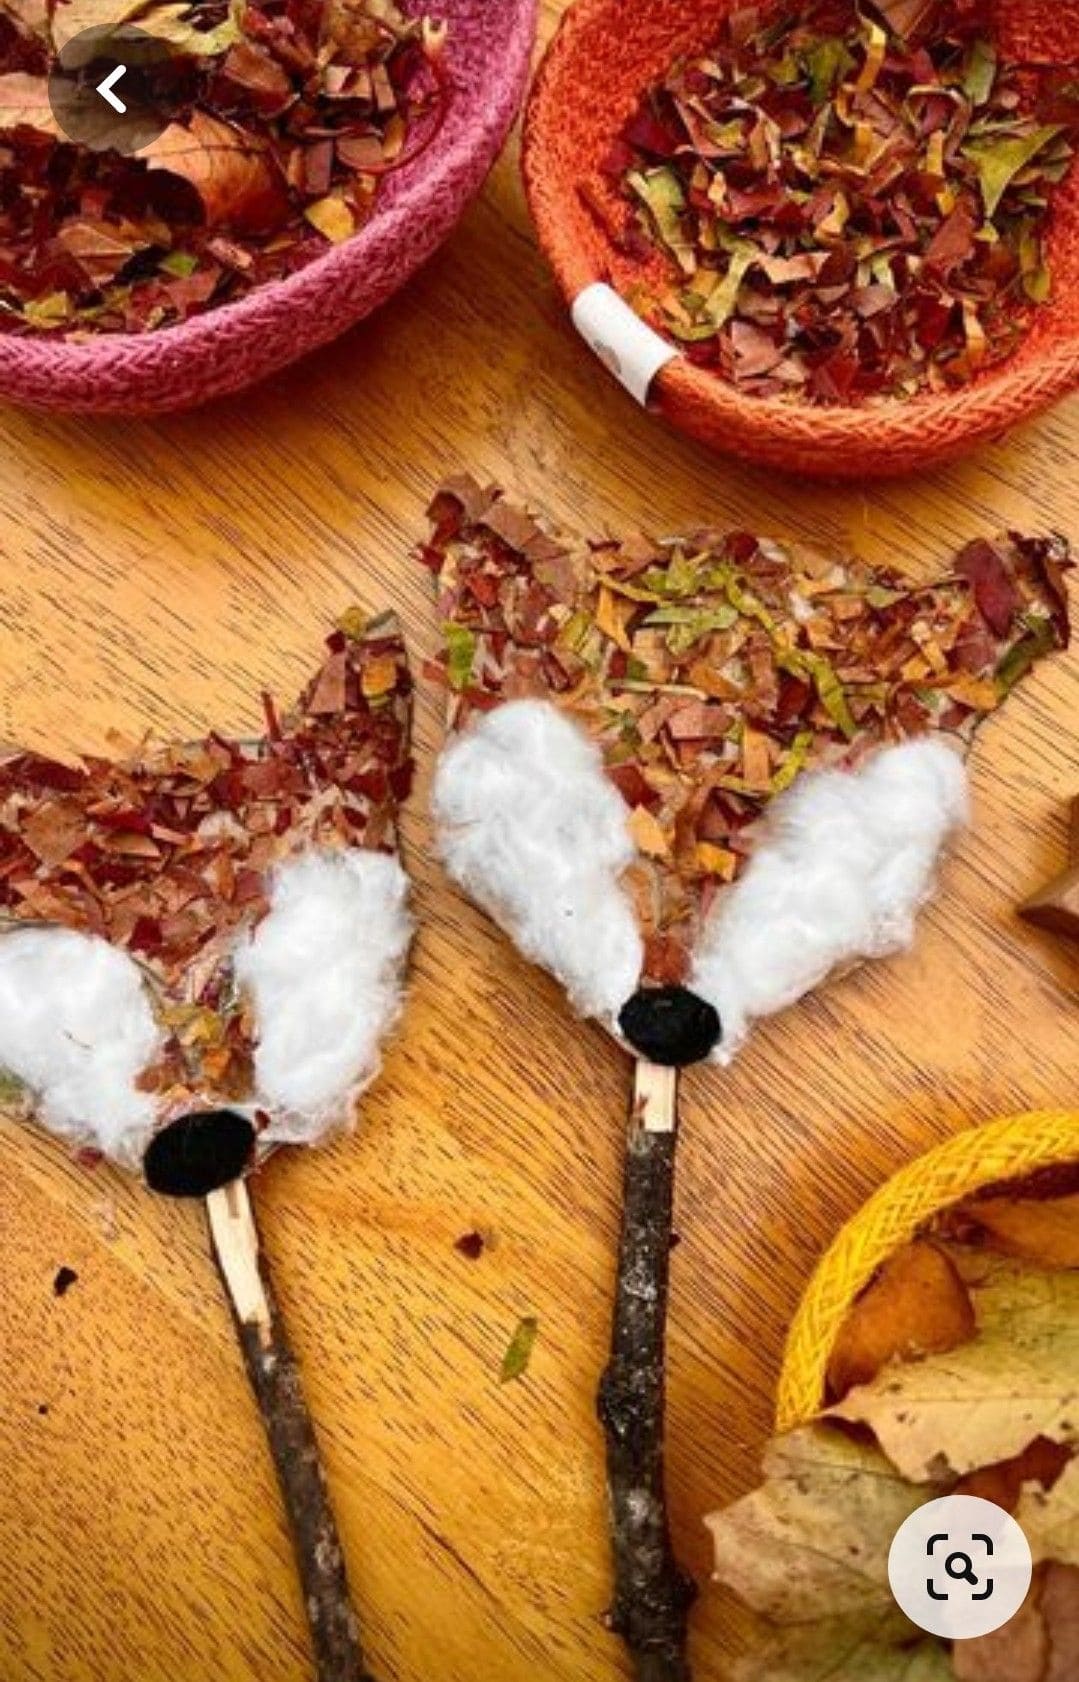
These adorable fox puppets bring a forest friend to life using only fallen leaves, a stick, and a little imagination.
Specially, kids get to explore texture and shape while layering shredded autumn leaves into that signature fox-red coat.
The cotton adds softness and a fluffy white contrast, while the stick handle makes it perfect for play. Each one turns out slightly different, full of charm and character.
Materials Needed
- Cardboard triangles
- Shredded dried leaves (in orange, red, and green tones)
- White cotton balls or stuffing
- Small black pom-poms
- Twigs or sticks (around 6-8″ long)
- Glue and scissors
Step-by-step Guide
Step 1: Cut cardboard into triangles for each fox head. Then glue shredded leaves across the top part of each triangle to form the fur.
Step 2: Add fluffy cotton to each side of the triangle to form cheeks.
Step 3: Glue a black pom-pom where the nose should be.
Step 4: Attach a twig handle to the bottom using strong glue or tape.
#8. Fall Forest Cabin Landscape
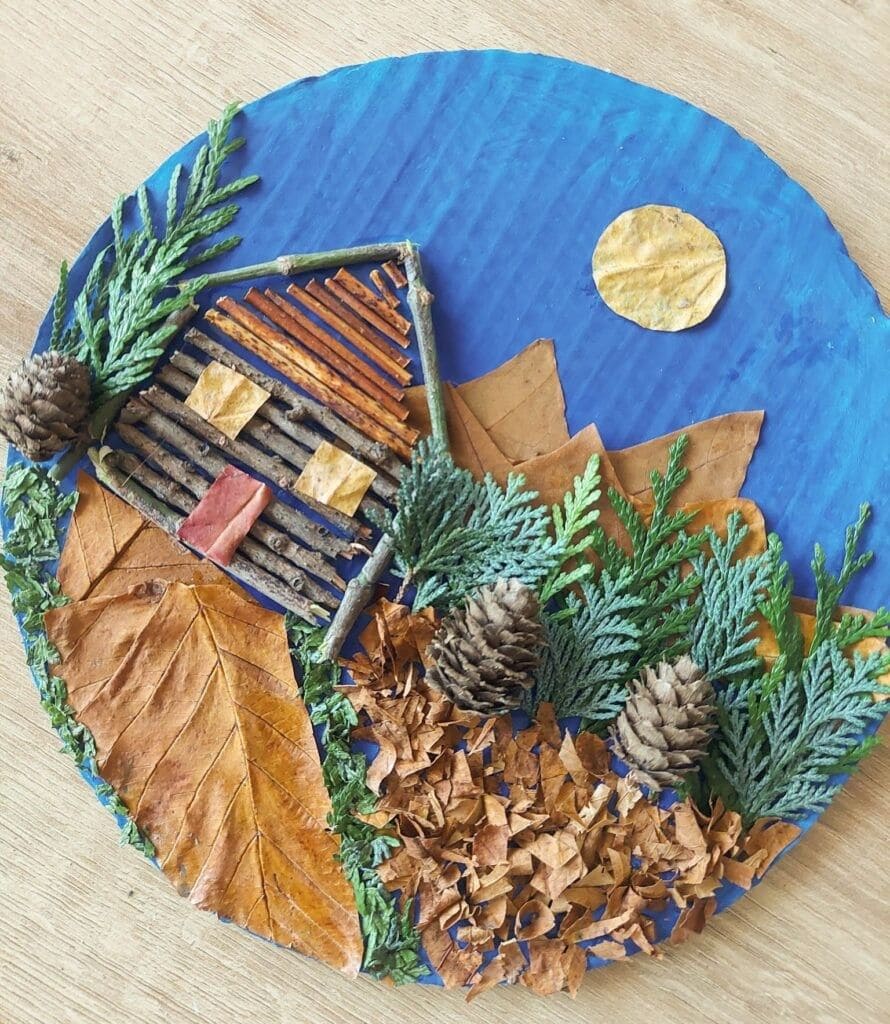
With a mix of pinecones, pressed leaves, twigs, and evergreen sprigs, you and your child can create a rustic woodland cabin that feels like it belongs in a storybook.
Plus, the rich contrast between the bold blue sky and earthy textures gives this project visual depth and charm.
Each piece of natural material adds a different brushstroke to the landscape, allowing kids to explore how shapes and textures come together to tell a story.
Materials Needed
- Round cardboard base (8-12″ diameter)
- Assorted dried fall leaves
- Twigs (cut to various lengths)
- Small pinecones
- Green sprigs or faux greenery
- Blue acrylic paint
- Glue
- Scissors
Step-by-step Guide
Step 1: Paint the cardboard base in your chosen sky color and let it dry completely.
Step 2: Arrange and glue twigs to form the house frame and roof. Fill the roof and walls with smaller sticks or bark.
Step 3: Use pressed leaves for the ground, mountain, and sky elements like the sun or clouds.
Step 4: Add pinecones and greenery for trees and bushes. Now you fill in any gaps with smaller leaf pieces or moss.
#9. Leaf-Stuffed Plastic Bag Owls
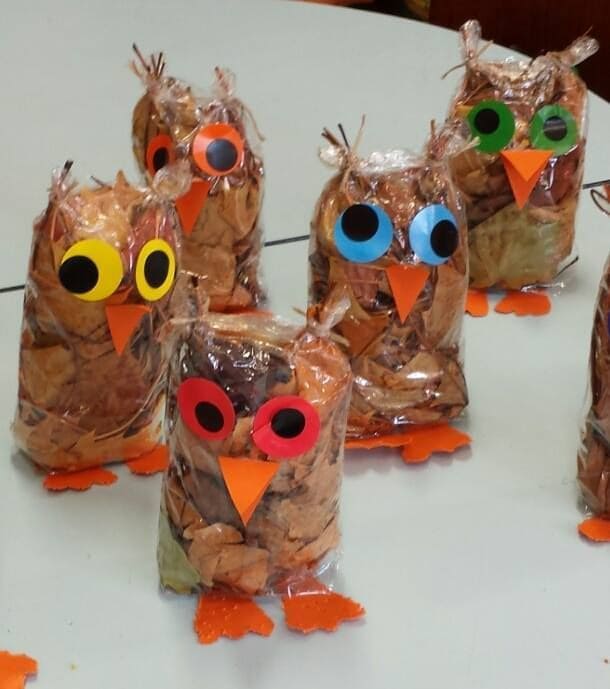
These wide-eyed woodland owls are as cute as they are eco-friendly. Made from clear plastic bags stuffed with crisp autumn leaves, each owl comes to life with colorful paper eyes, a bright orange beak, and matching feet.
Plus, a twist-tie on top forms the ears, giving them their signature owl silhouette. It’s the perfect craft for little hands and classroom fun, letting kids explore textures while celebrating fall.
Materials Needed
- Clear plastic sandwich or storage bags
- Dried autumn leaves
- Colored paper
- Glue or double-sided tape
- Twist ties or string
- Scissors
Step-by-step Guide
Step 1: Fill each plastic bag with a generous handful of dry leaves until plump.
Step 2: Tie the top tightly with a twist tie to form the owl’s ears.
Step 3: Cut out two round eyes, a triangle beak, and two feet from colorful paper.
Step 4: Now you just attach the features to the bag using glue or tape.
#10. Harvest Storage Board With Leafy Mouse Friend
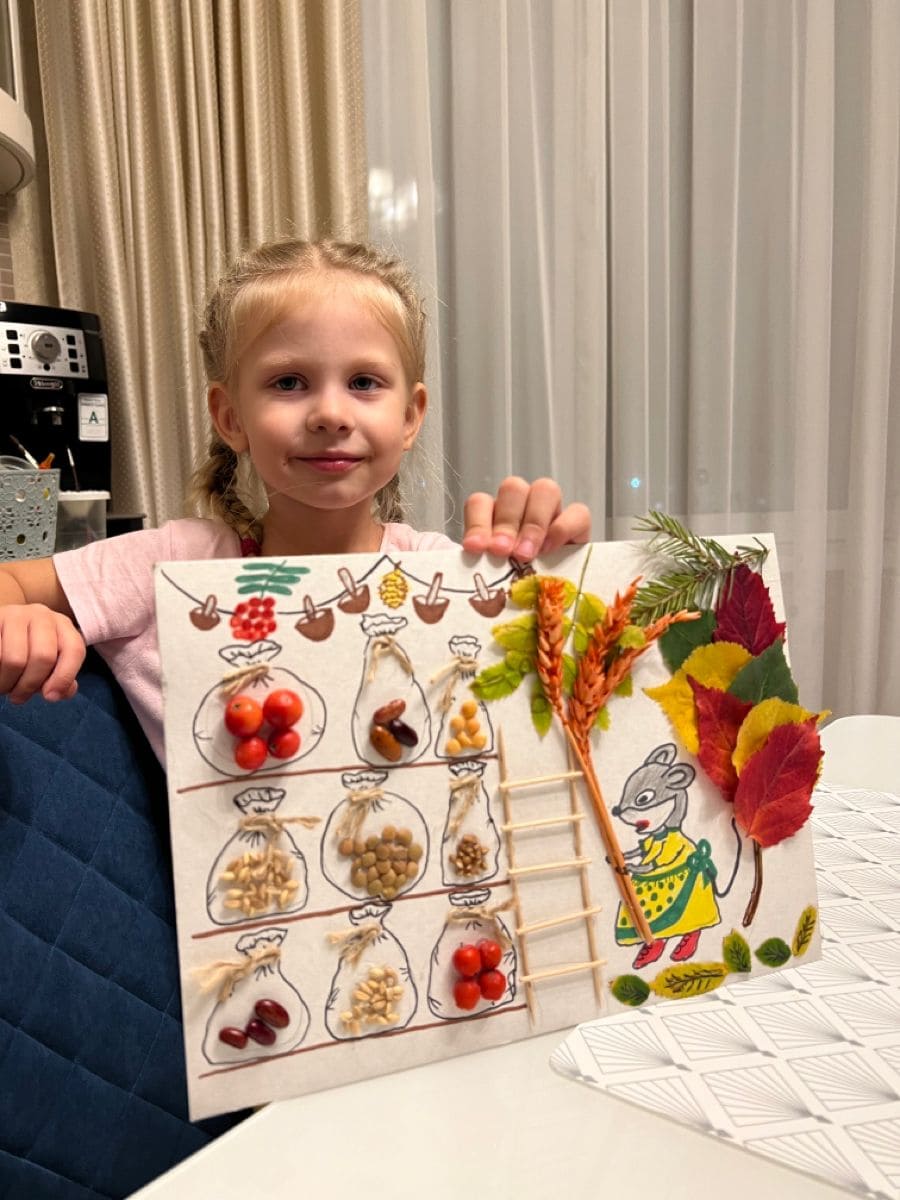
This charming fall project turns a simple board into a cozy harvest pantry, perfect for sparking creativity and storytelling.
Bonus, your child will love gluing real grains, seeds, and dried beans into hand-drawn sacks, creating a colorful, textural experience that’s both tactile and educational.
The friendly mouse in her dress adds a playful narrative. Topped off with collected fall leaves and ears of wheat, this scene celebrates nature’s bounty in a way kids can grasp and enjoy.
Materials Needed
- Thick cardstock or cardboard sheet
- Dried beans, lentils, grains, chickpeas, etc.
- Fall leaves and mini wheat stalks
- Markers or crayons
- Glue stick or white craft glue
- Craft sticks
- Optional: printed or hand-drawn animal characters
Step-by-step Guide
Step 1: Draw sack shapes across the board, then fill each one with different seeds or beans. Let your child glue them in place.
Step 2: Draw or paste a cute animal helper like this harvest mouse beside the pantry setup.
Step 3: Build a small ladder from toothpicks or craft sticks to lead up to the storage area.
Step 4: Finally, decorate the upper corners and sides with colorful autumn leaves and dried wheat.
#11. Leaf Stack Forest Creatures
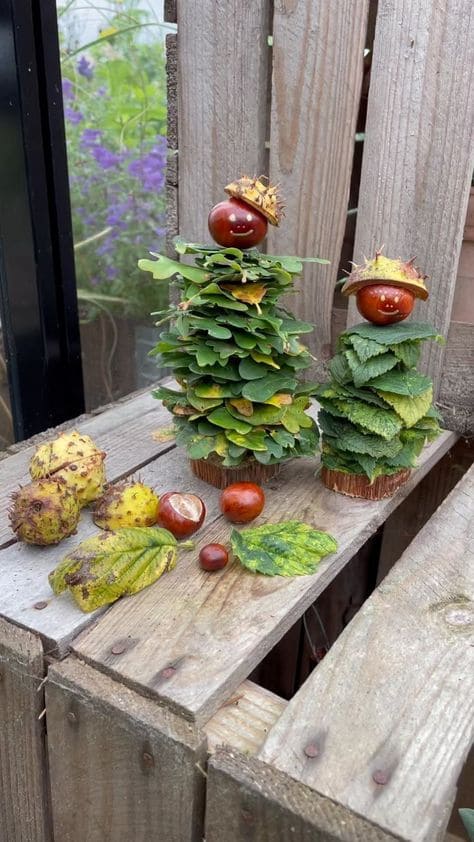
These whimsical woodland figures are made entirely from stacked leaves, chestnuts, and a sprinkle of imagination. Each layer of leaves forms the creature’s body, growing smaller as they rise to mimic a pine tree shape.
Topped with a shiny conker head and spiky chestnut shell hat, they look like tiny forest guardians standing proud on a wooden fence.
Materials Needed
- Various leaves in different sizes and colors
- Chestnuts (conkers)
- Chestnut shells or acorn caps for hats
- Small wood rounds or bottle caps as base
- Wooden skewers
Step-by-step Guide
Step 1: Push a skewer through the center of each leaf, starting from largest to smallest, to build the body.
Step 2: Attach a chestnut to the top as the creature’s head. Then place a chestnut shell or acorn cap as a whimsical hat.
Step 3: Fix the skewer into a wooden round or bottle cap to stand upright.
#12. Leaf Hair Portraits
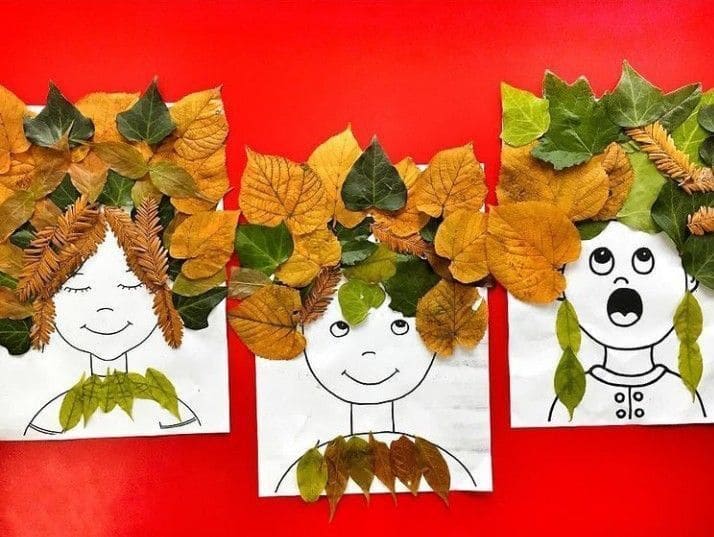
This fun and quirky project brings autumn to life with just a few printable faces and a big pile of leaves.
Each portrait becomes a unique personality, with real leaves turned into wild hairstyles, leafy collars, and natural accessories. It’s a perfect activity to spark creativity while learning about leaf shapes and textures.
Materials Needed
- Printed face templates or hand-drawn faces
- A variety of dried fall leaves (different shapes and colors)
- Glue or glue sticks
- Scissors (optional)
Step-by-step Guide
Step 1: Collect an assortment of autumn leaves, some flat, some curly, and all colorful.
Step 2: Print or draw simple cartoon-style face outlines on paper.
Step 3: Arrange leaves like hair, beards, necklaces, or even earrings.
Step 4: Once happy with the design, glue each piece into place and let it dry completely.
#13. Hanging Autumn Leaf Mobile
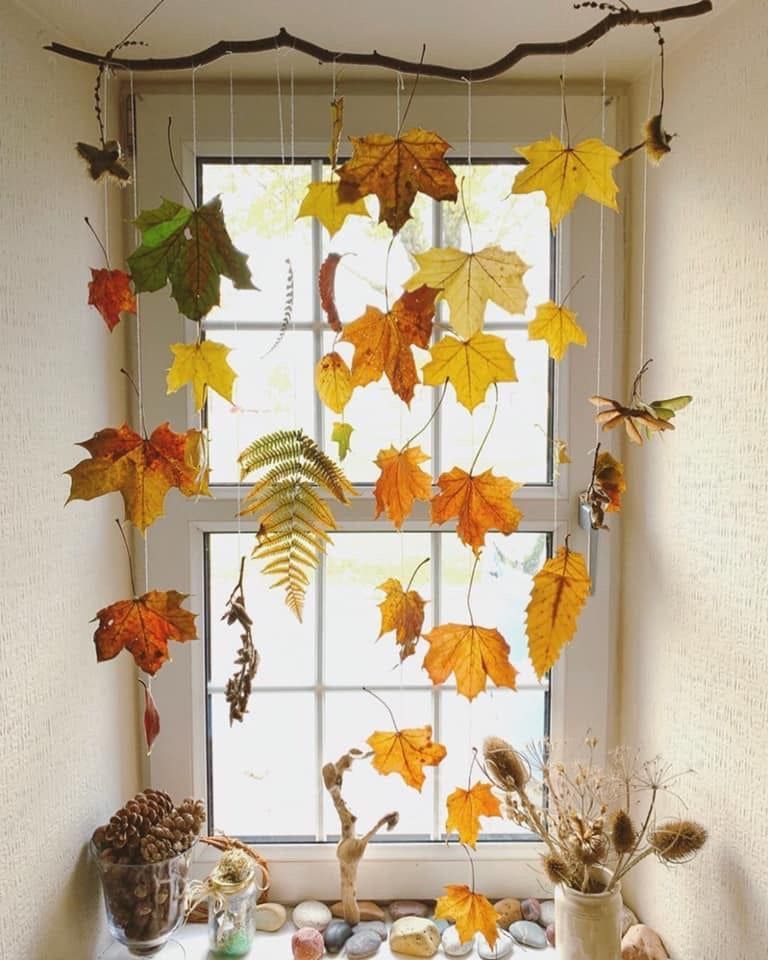
This airy autumn leaf mobile brings the rhythm of nature indoors. Every flutter and sway echoes the falling leaves outside your window.
Using real leaves in warm golden, crimson, and russet tones, this project becomes both a sensory craft and a seasonal display.
The natural twig anchor adds a rustic feel, making it perfect for classrooms, bedrooms, or that little nook by the window. I bet kids will love watching their creations gently dance in the breeze, and it’s a subtle way to teach about changing seasons, textures, and color patterns.
Materials Needed
- A sturdy branch or thick stick (12-18 inches long)
- Twine, clear thread, or string
- Freshly fallen autumn leaves (dry but not brittle)
- Scissors
- Optional: small pinecones, seed pods, or feathers
Step-by-step Guide
Step 1: Collect leaves in a variety of colors and shapes. Try to pick ones that are dry but still flexible.
Step 2: Tie pieces of string to each leaf stem. You should vary the lengths for a layered effect.
Step 3: Secure each string to your branch, spacing them evenly across its length.
Step 4: Add a hanging loop at both ends of the stick for balance, and suspend your mobile near a window where light filters through.
Step 5: For a little extra charm, attach pinecones, feathers, or dried herbs along the string.
Tip: If you want to preserve the leaves longer, press them in a book for a day or two or apply Mod Podge to prevent curling.
#14. Fox Face Painted Leaf
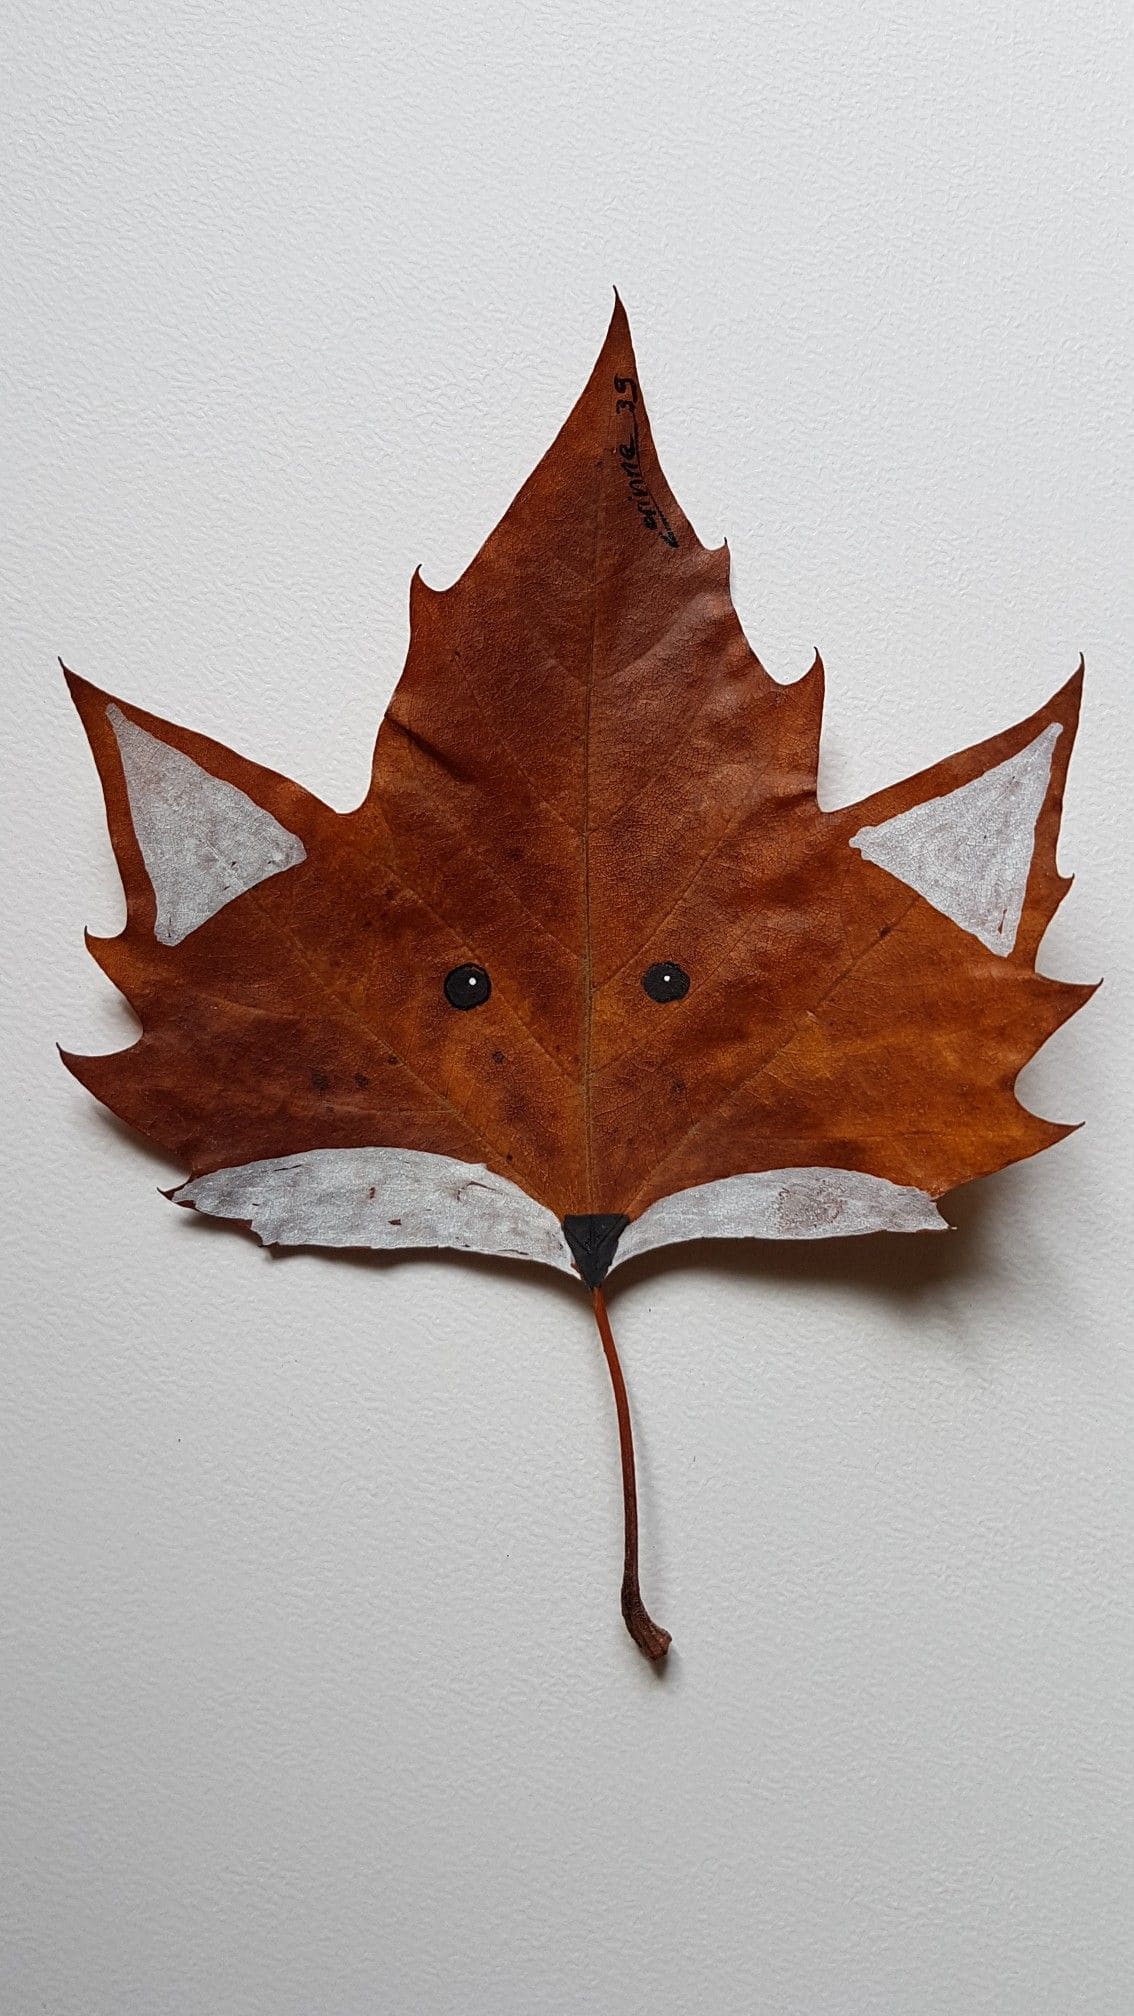
Interestingly, this adorable fox face made from a single autumn leaf is a perfect way to add woodland charm to your fall crafts.
Its natural shape already hints at little ears and a pointed snout, making it ideal for turning into a sweet forest creature.
Kids can turn their nature walk finds into fun art with just a few strokes of paint. It’s minimal, quick, and absolutely heartwarming, great for a classroom wall or fridge display.
Materials Needed
- One large maple leaf or any wide, pointy-edged leaf
- White acrylic paint or paint pen
- Black paint or permanent marker
- Small paintbrush
Step-by-step Guide
Step 1: Choose a flat, clean leaf and let it dry completely if fresh.
Step 2: Paint white areas on the lower part for cheeks and near the pointed ends for ears.
Step 3: Add black dots for eyes and a small triangle nose at the bottom center.
Step 4: Let dry completely and display your woodland friend on cardstock or a wall!
#15. Leafy Hedgehog Faces with Chestnut Noses
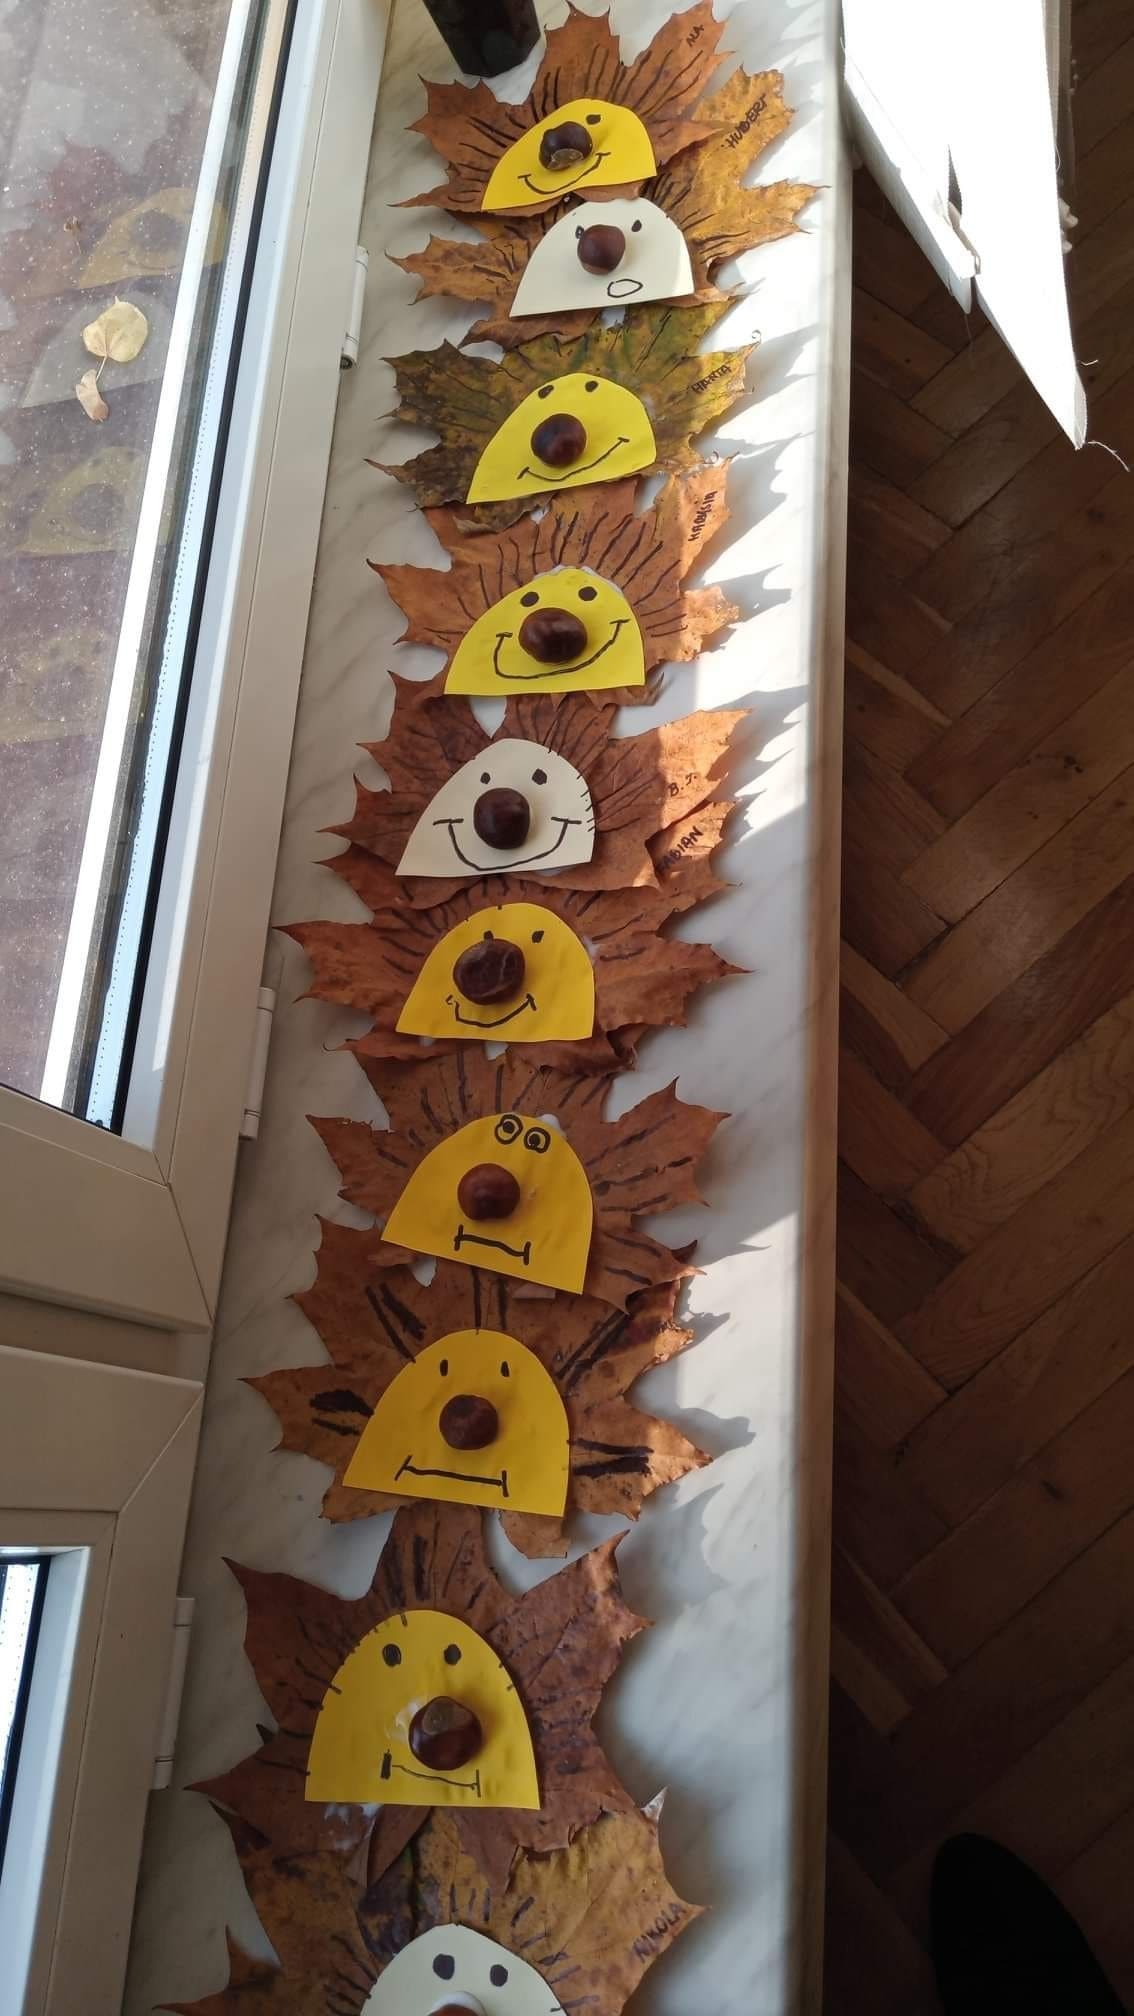
This whimsical hedgehog craft will have little ones giggling as they bring a parade of forest friends to life. Each hedgehog face is made from a simple semicircle of paper and backed with a burst of crunchy autumn leaves for quills.
Moreover, the real magic happens when you glue on a glossy chestnut for the nose, suddenly, each creature has personality.
Let your child draw a face on each one: silly, shy, surprised no two are the same! It’s a charming mix of nature, imagination, and pure fun.
Materials Needed
- Large dried leaves (like maple or sycamore)
- Yellow or cream-colored paper (cut into half circles)
- Brown chestnuts (one for each hedgehog nose)
- Markers or crayons
- Glue stick or craft glue
Step-by-step Guide
Step 1: Cut paper into semicircles to form hedgehog faces.
Step 2: Glue the paper faces onto the center of each large leaf. Then attach a chestnut near the bottom center as a cute little nose.
Step 3: Use markers to draw fun expressions and hedgehog fur lines.
#16. Painted Leaf Portraits on Cardboard Canvas
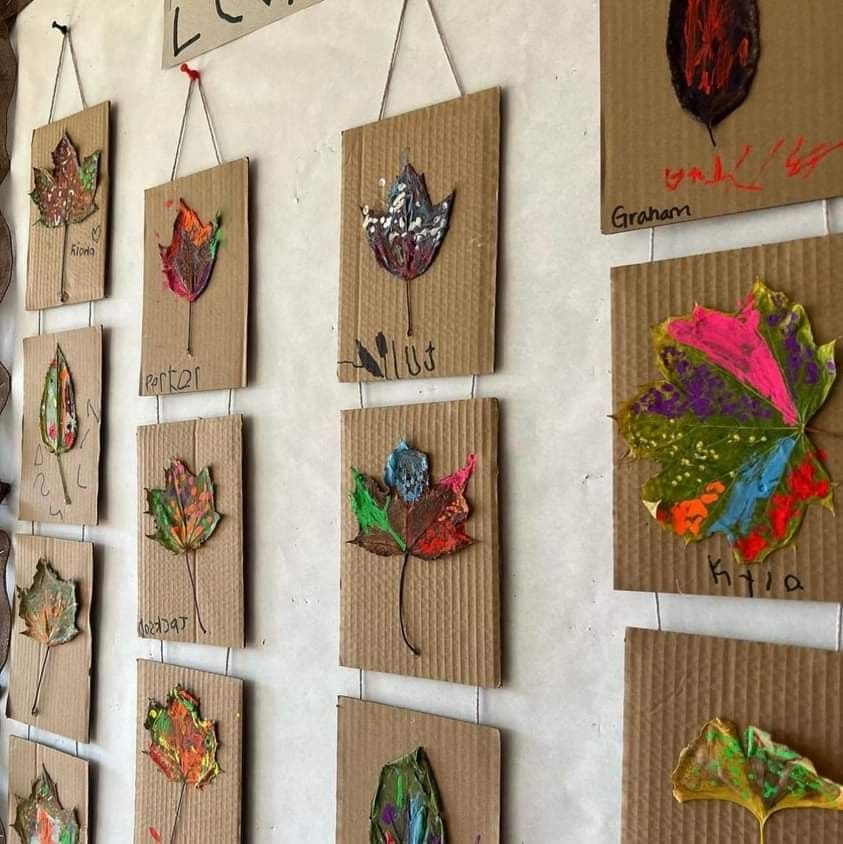
Let kids turn real leaves into miniature masterpieces with this easy wall-worthy art display. Each leaf becomes its own unique brushstroke canvas, just press it flat, glue it down, and paint it in bright, joyful colors.
The beauty of this project is in the imperfections: no two are the same. The cardboard backing makes everything feel earthy and tactile, while the addition of names personalizes the experience.
Materials Needed
- Flat pieces of cardboard (8″x10″ or smaller)
- Freshly picked or pressed fall leaves
- Acrylic or tempera paints in various colors
- Paintbrushes
- Glue or Mod Podge
- String or yarn (optional)
- Markers or pens
Step-by-step Guide
Step 1: Glue one leaf to the center of each cardboard panel, gently pressing it flat.
Step 2: Paint directly on top of the leaf or use it as a stencil to highlight its shape and texture.
Step 3: Let the paint dry, then add your name or a title underneath the design for a personal touch.
Step 4: If you’d like to hang them, punch two holes and tie yarn across the top.
#17. Bejeweled Leaf Dragonflies
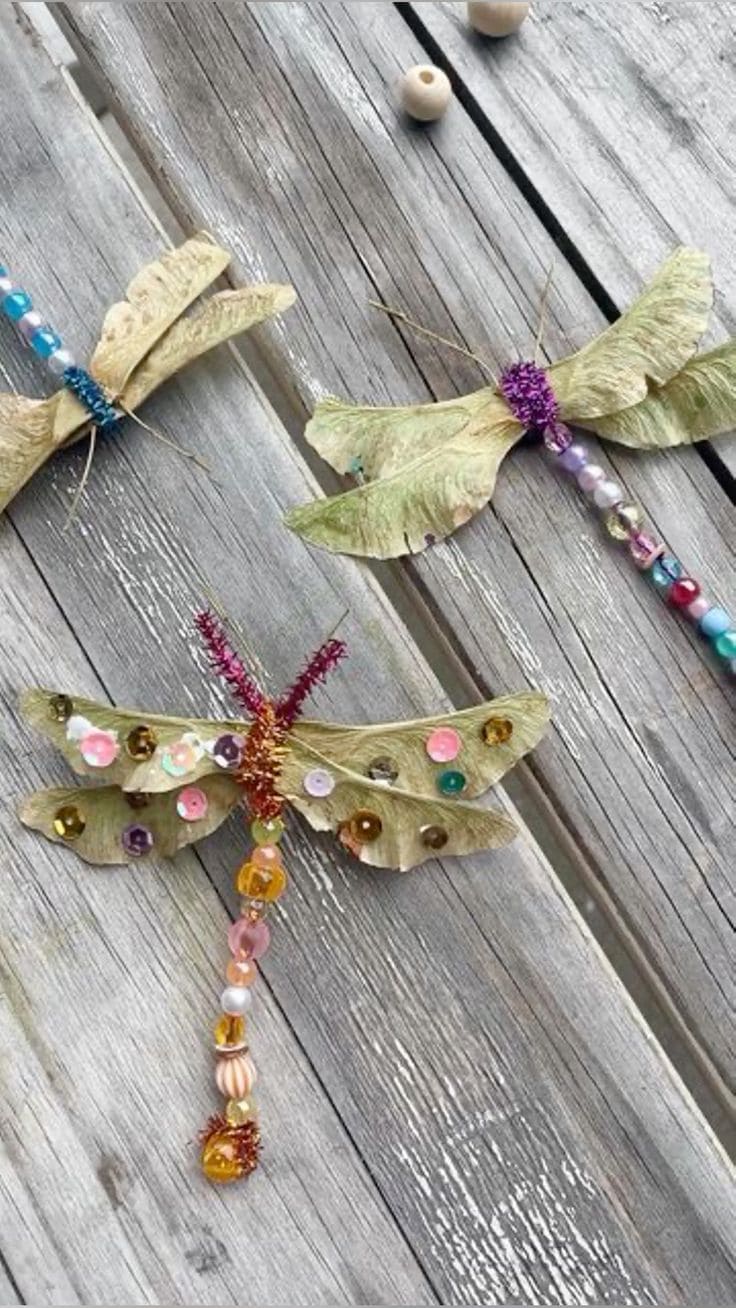
These shimmering dragonflies bring a splash of magic to your fall crafting.
Using dried maple seeds for wings and beaded pipe cleaners for the body, you can create woodland creatures that feel like they’ve flown straight out of a fairytale.
Whether you hang them by a window or add them to a mobile, they’ll catch the light—and everyone’s attention.
Materials Needed
- Dried maple seed pods (helicopter seeds)
- Colorful pipe cleaners
- Assorted beads and sequins
- Craft glue (with adult help)
- Fishing line or string (optional)
Step-by-step Guide
Step 1: Twist pipe cleaners to form the dragonfly’s body and antennae.
Step 2: Glue two maple seeds on each side to create the wings.
Step 3: Decorate the wings with sequins and jewels using glue.
Step 4: Finally, add beads to the body or tail for sparkle and texture.
#18. Leaf Mane Lion Face
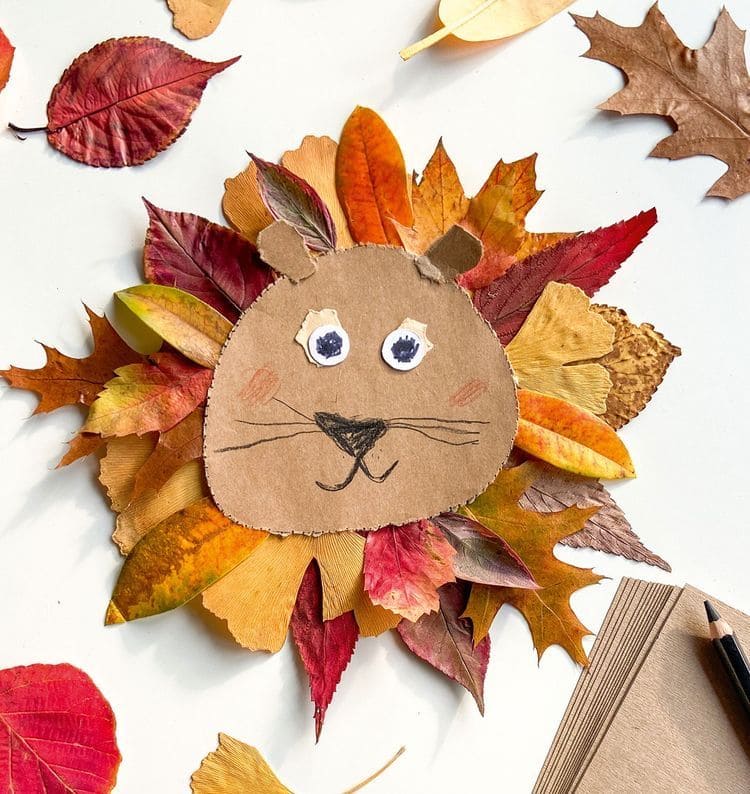
This project brings the magic of autumn colors to life, right around a cardboard lion’s face that’s as sweet as it is expressive.
I believe kids will love arranging the leaves like a mane, picking their favorite shades and shapes to frame the lion’s head. It’s a great way to introduce ideas of texture, symmetry, and wildlife while giggling through art time.
Materials Needed
- Cardboard or kraft paper
- Assorted fall leaves in various colors and sizes
- Scissors and glue
- Black marker
- White paper scraps
Step-by-step Guide
Step 1: Cut out a circle or oval from cardboard to make the lion’s face.
Step 2: Use paper and markers to draw on the eyes, nose, and smile. Then add ears with cut cardboard shapes.
Step 3: Arrange leaves around the edges like a mane and glue each one down securely.
Step 4: Let dry and admire your leafy king of the jungle!
#19. Leaf Bug Drawing Art
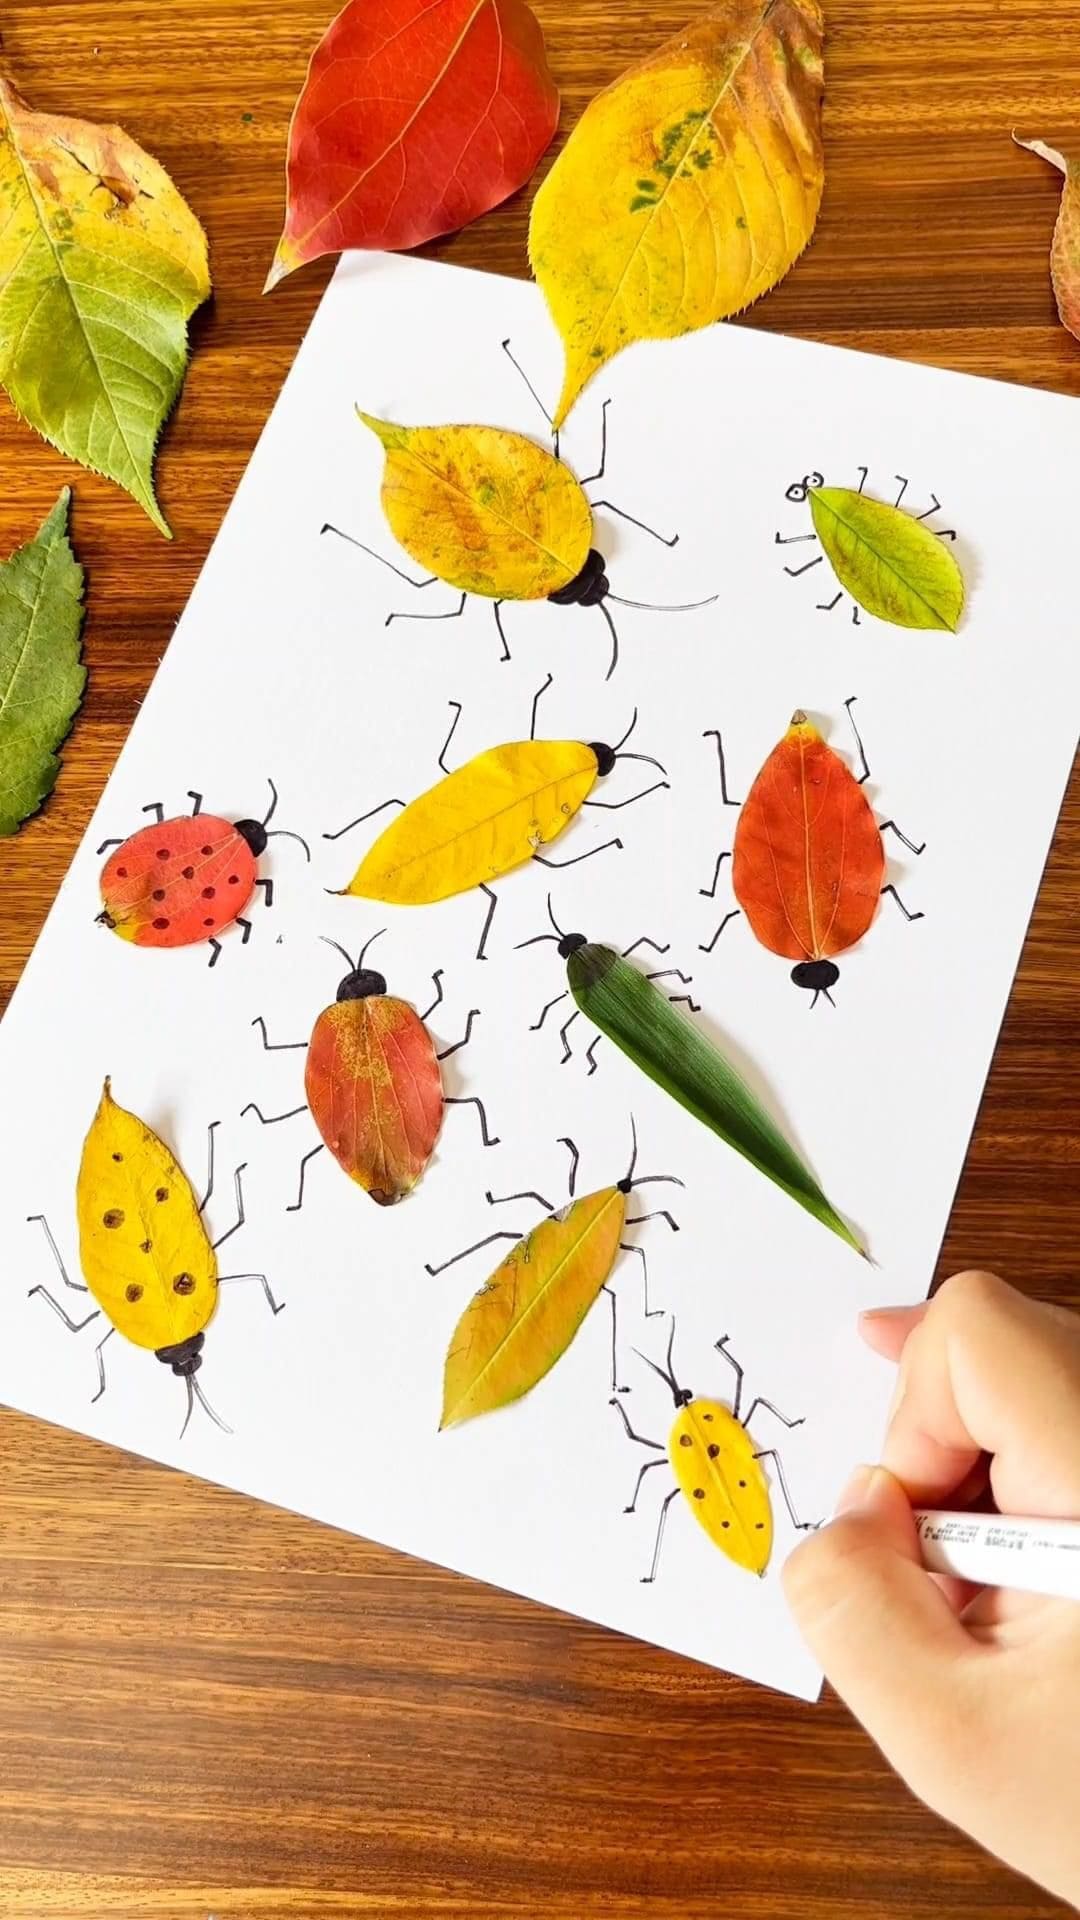
With just a bit of imagination, each leaf becomes a different bug, from beetles to ladybugs to walking sticks.
Kids will love watching their leafy bugs come to life with just a few strokes of a pen. It’s a great way to spark conversations about insects, symmetry, and the textures of different leaves.
You’ll be surprised how much personality a simple leaf can have once you add legs, eyes, and a curious antenna.
Materials Needed
- White cardstock or thick drawing paper
- Assorted fall leaves in different shapes and colors
- Black fine-tipped pen or marker
- Glue stick
- Optional: googly eyes or colored pens
Step-by-step Guide
Step 1: Select a mix of small and medium leaves. Then press them flat if needed.
Step 2: Glue each leaf onto the paper with the tip of the leaf pointing outward, it’ll become the insect’s body.
Step 3: Use the pen to draw heads, legs, and antennae. You add eyes or dots to mimic beetle patterns.
Step 4: Let kids name their bugs and create a mini insect world right on the page!
#20. Stitched Leaf Star Ornaments
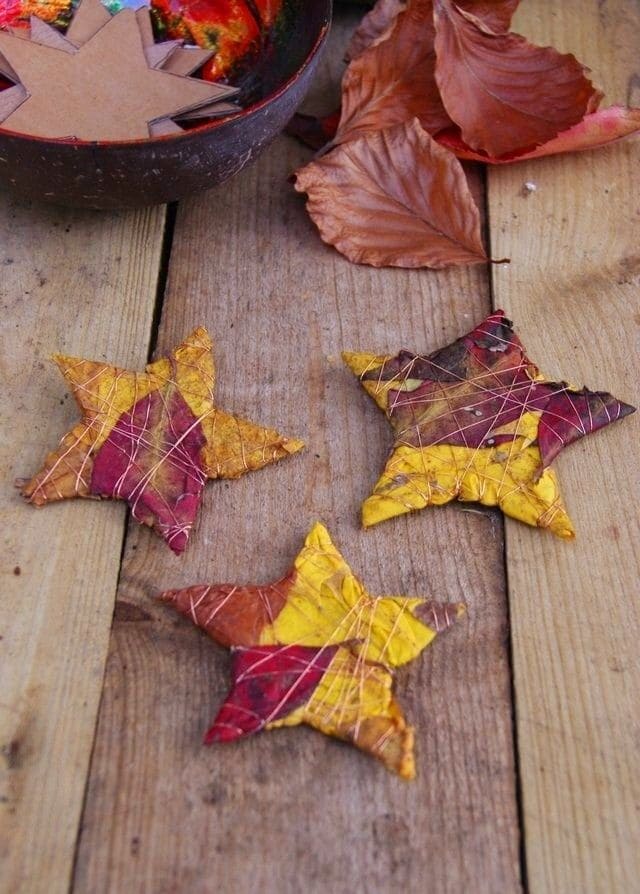
Crafted by layering colorful autumn leaves over star templates and binding them with thin twine, these delicate star-shaped ornaments bring a rustic charm that’s both earthy and elegant.
Each piece becomes a little patchwork of reds, yellows, and orange, woven together like a tiny story of the season.
Materials Needed
- Cardboard star templates (approx. 4-5 inches wide)
- Pressed autumn leaves in assorted colors
- Glue or mod podge
- Thin twine, thread, or embroidery floss
- Scissors
Step-by-step Guide
Step 1: Trace and cut star shapes out of sturdy cardboard.
Step 2: Glue layers of colorful leaves onto each star, slightly overlapping them.
Step 3: Wrap twine gently around each star several times to secure and add texture.
Step 4: Trim the edges and add a string if you want to hang them.
#21. Stained Glass Leaf Tree Art
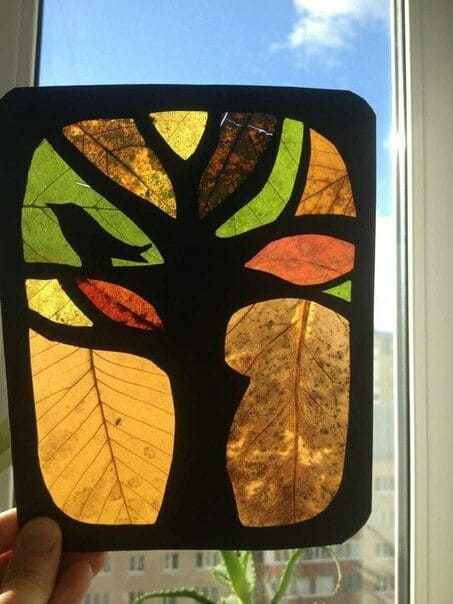
When sunlight meets fall’s finest colors, something magical happens and this leaf stained glass captures it perfectly.
Using real leaves as vibrant panels framed by a silhouette of a tree, this craft brings nature indoors in the most artistic way.
Hang it near a window, and you’ll watch it glow with shifting light throughout the day. It’s surprisingly easy to make, yet the result feels like a nature-inspired work of art.
Materials Needed
- Assorted fall leaves (various colors and sizes)
- Black cardstock or construction paper
- Scissors
- Clear contact paper or laminating sheets
- Pencil and ruler
Step-by-step Guide
Step 1: Draw and cut a tree silhouette onto black paper with branch windows.
Step 2: Press leaves between contact paper or laminate them flat.
Step 3: Attach the leaves behind the cut-out openings of the tree like stained glass panels.
Step 4: Finally, trim excess and tape your artwork to a window to catch the sunlight.
#22. Leaf Matching Wheel for Tree ID Fun
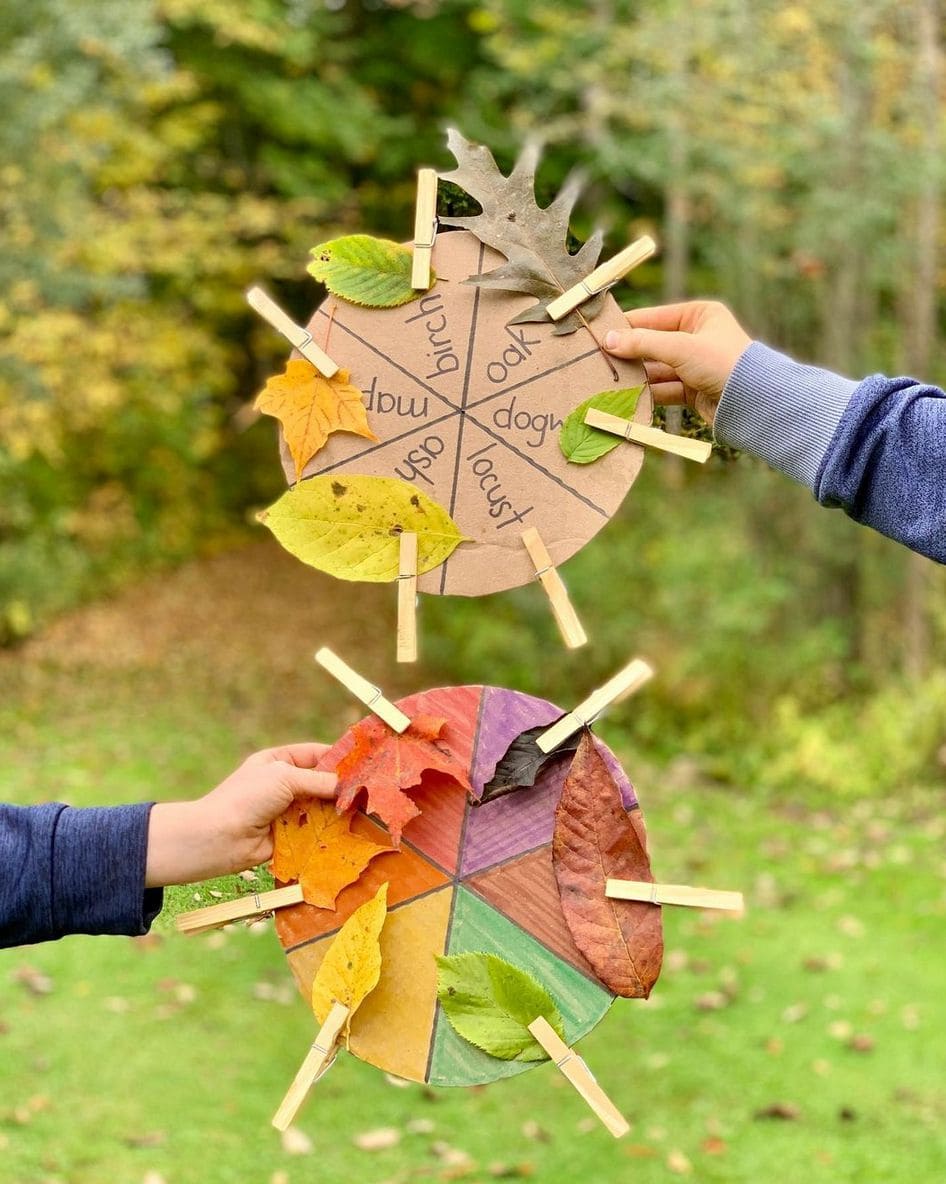
This clever DIY game transforms a nature walk into a hands-on science lesson and kids won’t even realize they’re learning.
Using a circle of cardboard and simple clothespins, this leaf matching wheel lets children identify and sort real leaves by tree type or color. It’s a beautiful mix of exploration, creativity, and botany, all rolled into one playful activity.
Materials Needed
- Cardboard circle (approx. 8-10 inches in diameter)
- Markers or crayons
- Clothespins (wooden)
- Collected leaves (different trees or colors)
- Scissors and glue (optional)
Step-by-step Guide
Step 1: Divide the cardboard into wedges using a ruler and label each section with a tree name or a color.
Step 2: Take a nature walk to collect matching leaves from around your neighborhood or park.
Step 3: Let kids clip each leaf onto the correct section using clothespins, either by tree species or color category.
Step 4: Reuse it again and again or keep it as a fun leaf scrapbook wheel.
#23. Stained Glass Leaf Tree Suncatcher
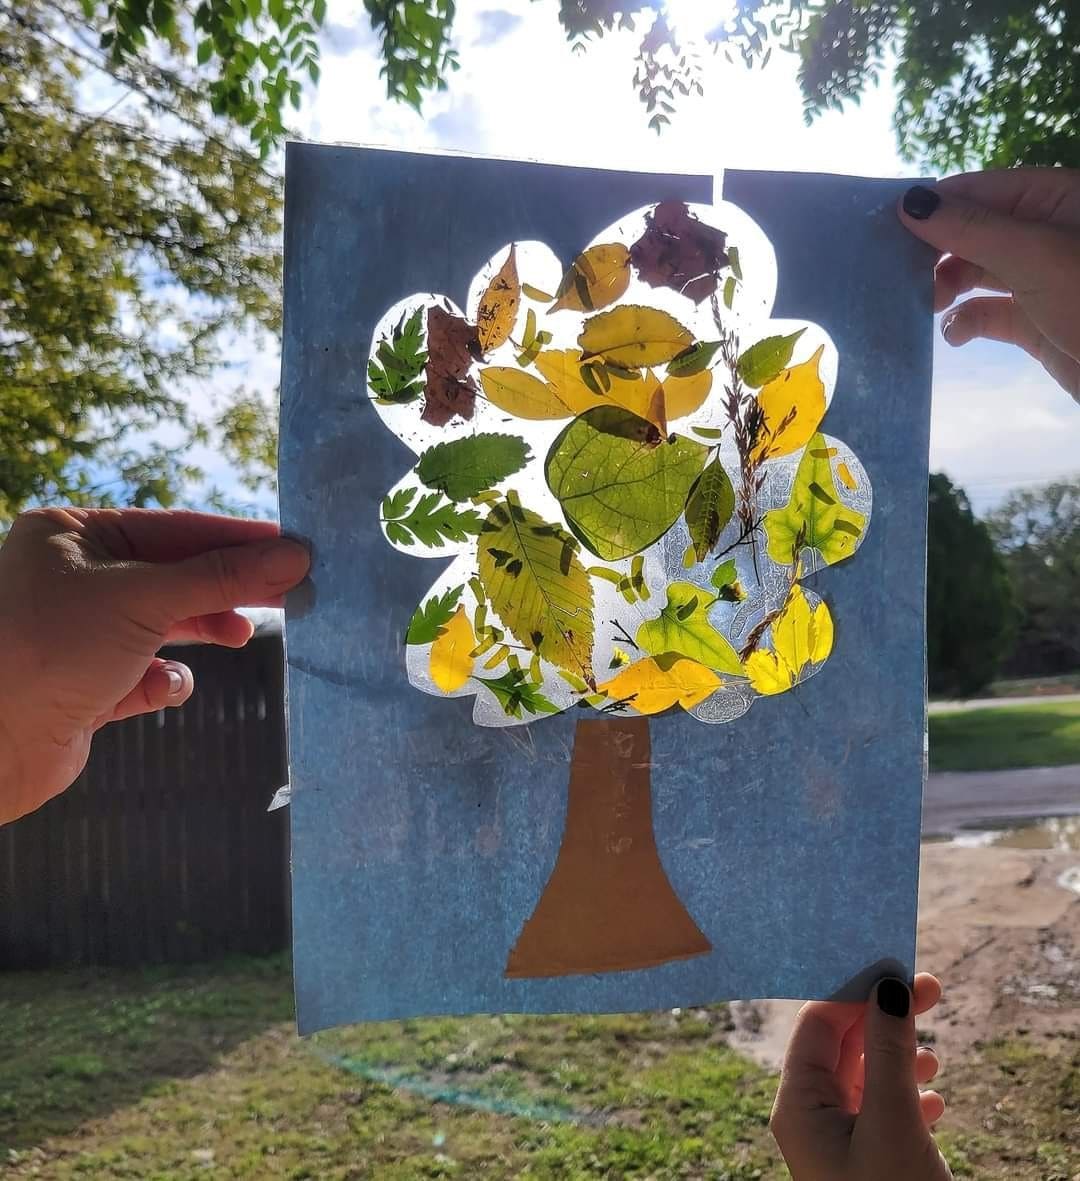
This beautiful leaf tree suncatcher turns any window into a piece of seasonal art. It combines fall foliage with a tree-shaped cutout and clear contact paper to let the sunlight shine through the leaves.
The result is a glowing patchwork of colors that shifts and sparkles as the light changes. It’s a peaceful craft to do on a crisp autumn afternoon and makes a lovely gift for parents or teachers.
Materials Needed
- Blue construction paper
- Brown paper (for the tree trunk)
- Clear contact paper or laminating sheets
- Scissors or craft knife
- Fresh or pressed leaves
- Glue or tape
Step-by-step Guide
Step 1: Cut a large tree shape out of blue paper, then cut out the canopy area to leave a window space.
Step 2: Stick a sheet of clear contact paper behind the tree frame, sticky side facing forward.
Step 3: Arrange colorful fall leaves onto the sticky surface, overlapping to create a stained-glass effect.
Step 4: Now, you just add another piece of contact paper on top to seal it.
#24. Hanging Leaf Bat Craft
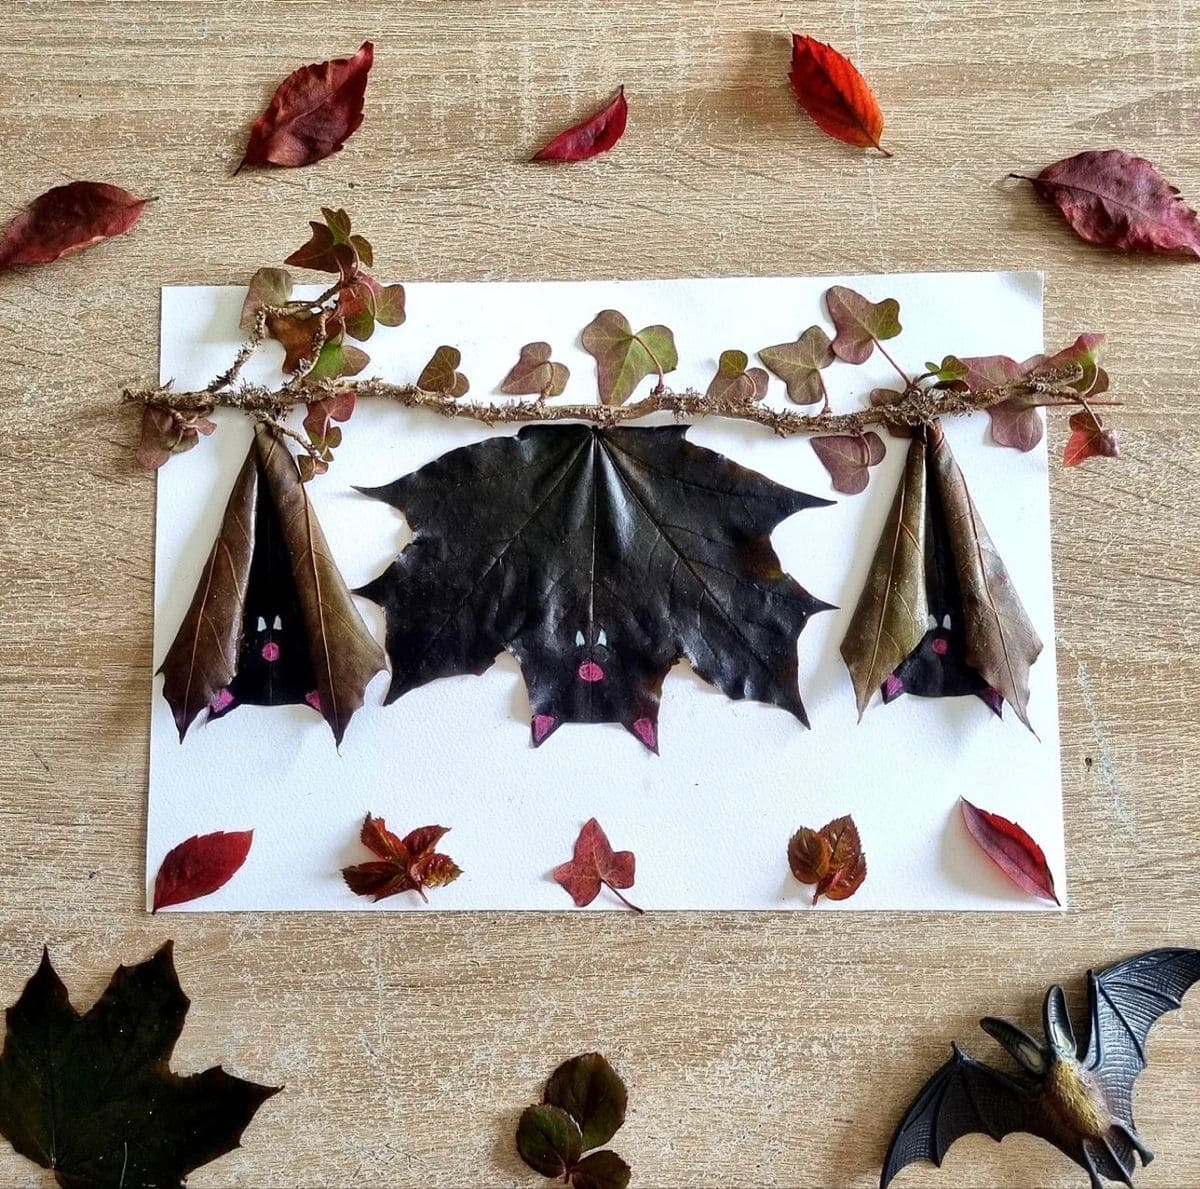
This whimsical bat scene made with real leaves brings a playful twist to Halloween or autumn nature crafts.
Using a mix of dark and curled leaves, the bats appear to hang upside-down from a twig like they would in a quiet cave.
Specially, the little drawn-on faces, complete with pink snouts and sleepy eyes, give them a cute personality that’s more charming than spooky.
Materials Needed
- 1 sheet white cardstock
- Dark brown or black leaves
- Curlable dried leaves
- Small twig with dried vines or leaves attached
- Glue or double-sided tape
- Black and pink marker
Step-by-step Guide
Step 1: Position and glue the twig across the top portion of the paper to create a perch.
Step 2: Fold two dried leaves to resemble bats wrapping themselves in their wings, and glue them upside-down beneath the branch.
Step 3: Use a full flat leaf for the open-wing bat and glue it in the center.
Step 4: Finally, draw tiny faces with eyes and pink noses to bring the bats to life.
See more: 28 Creative and Cozy DIY Fall Crafts to Elevate Your Seasonal Decor
