If you’ve got a growing pile of fabric scraps and a love for Christmas, this might be the perfect moment to turn leftovers into something magical.
Tiny pieces of plaid, lace, velvet, and cotton can all find new life as charming handmade decorations. These kinds of crafts don’t just save materials, they tell a story.
Specially, you don’t need fancy tools or sewing expertise, just a bit of imagination and that festive spark.
From cheerful garlands to mini tree ornaments, each of these 20 projects adds handmade magic to your holiday. Ready to turn your scraps into something truly joyful?
#1. Quilted Holiday House Ornaments
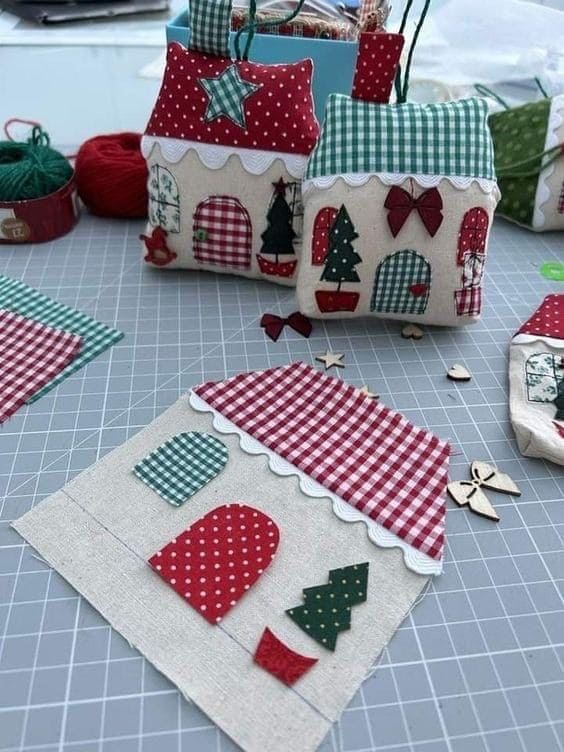
There’s a gentle kind of magic in these fabric Christmas cottages, they look like something out of a winter storybook. With their checkered roofs, whimsical doors, and patchwork trees, each one feels personal and delightfully homespun.
You get to play architect with scraps of gingham, felt, and linen, designing your own cozy village of soft ornaments. They’re perfect for hanging on the tree, topping gifts, or stringing into a sweet holiday garland.
If you enjoy slow, mindful crafting, this project will warm your heart as much as it does your home.
Materials Needed
- Natural-toned fabric (approx. 5″x5″)
- Red and green patterned scraps for roofs, doors, windows
- White ric-rac or lace trim
- Small felt cutouts: trees, bows, stars
- Polyfill stuffing
- Ribbon or twine
- Fabric glue
Step-by-step Guide
Step 1: Cut two square pieces for the house base and various shapes for windows, doors, trees, etc.
Step 2: Attach decorative details to the front panel using fabric glue or stitching.
Step 3: Sew the front and back panels together, leaving a small opening.
Step 4: Turn right side out, lightly stuff with polyfill, and close the opening. Then you just add a ribbon loop at the top so it’s ready to hang wherever joy is needed.
#2. Scrappy Christmas Fabric Wreath
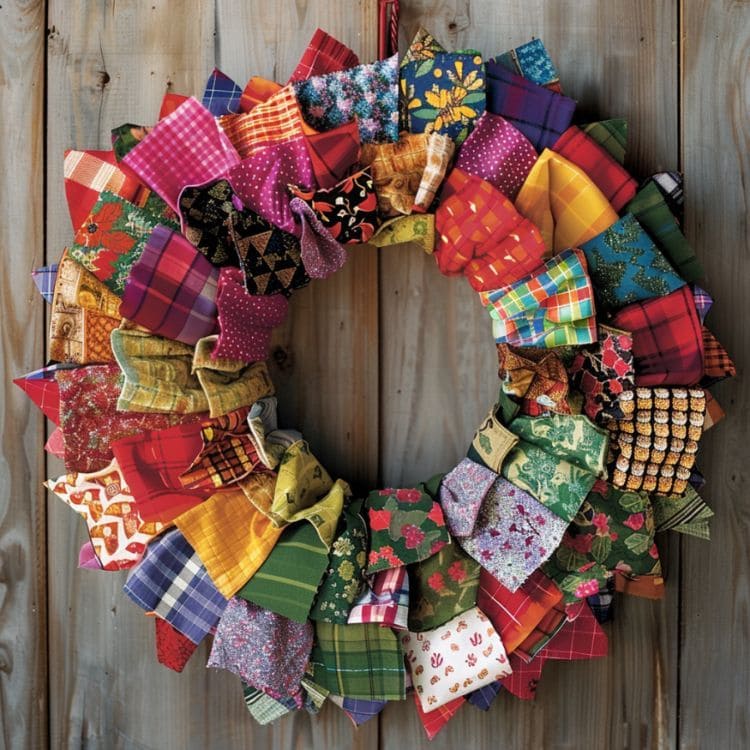
Made entirely from leftover fabric strips, each piece adds its own story, pattern, and texture, creating a beautifully mismatched harmony. It’s the kind of wreath that feels like a hug from Grandma’s quilt.
You can tailor the palette to fit any season, but the riot of reds, greens, golds, and tartans makes it feel especially warm for Christmas. Plus, no sewing is required.
Materials Needed
- Wire wreath frame (12-14″ diameter)
- Fabric scraps or quilting remnants (about 80-100 strips, 1.5″ x 8″)
- Scissors
- Ribbon
Step-by-step Guide
Step 1: Cut fabric into strips, roughly 1.5 inches wide and 8 inches long.
Step 2: Tie each strip onto the wire frame using a simple knot, pushing them close together as you go.
Step 3: Fluff and rotate colors for an even, full look, then add a ribbon loop for hanging.
See more: 25 DIY Christmas Wreath Ideas You Need to Try This Holiday Season
#3. Festive Fabric Gift Bags
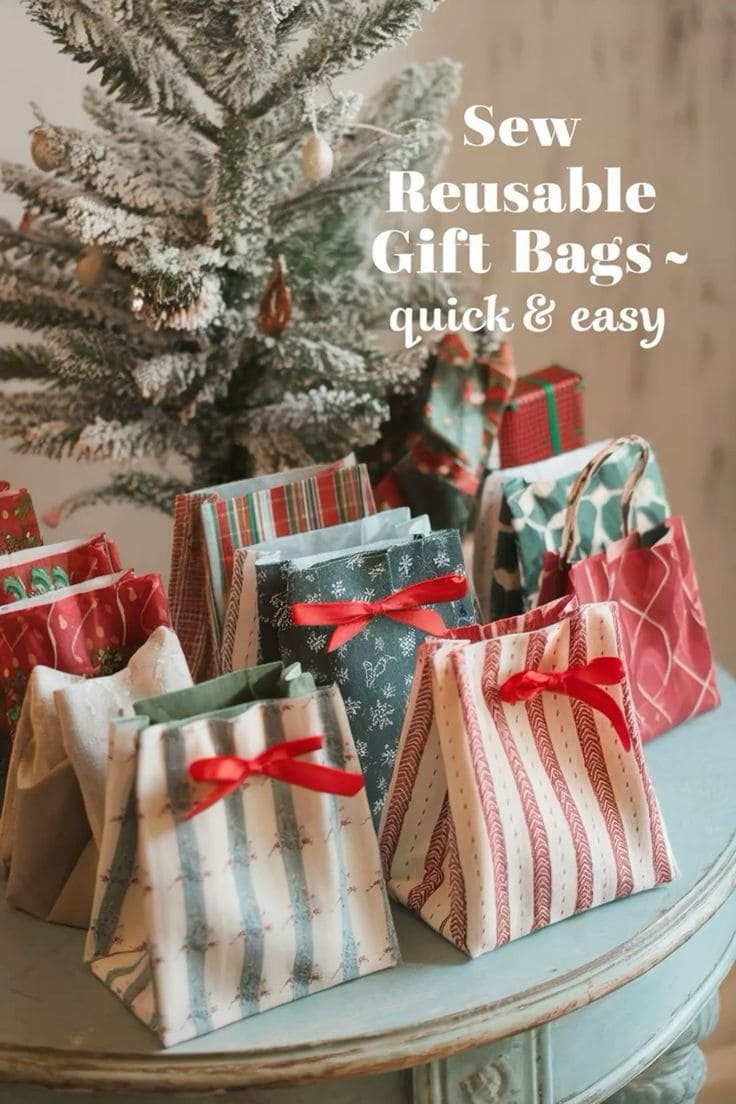
If wrapping paper always feels wasteful to you, these reusable fabric gift bags are a joyful solution.
Sewn in classic Christmas prints like plaid, pine, snowflakes, and candy-cane stripes, they add charm while cutting down on trash.
Even better, you can reuse them year after year or gift them as part of the present itself. It’s a simple project that turns scraps into something practical and beautiful and it adds a cozy, handmade touch to your holiday gifting ritual.
Materials Needed
- Festive cotton fabric (cut to approx. 10” x 14” per bag)
- Sewing machine or needle and thread
- Iron and scissors
- Ribbon (approx. 12” per bag)
- Optional: pinking shears, fusible interfacing
Step-by-step Guide
Step 1: Fold your fabric in half lengthwise, right sides together, and sew the two side seams.
Step 2: Turn it inside out, press the seams flat, and fold over the top edge twice to create a neat hem.
Step 3: Stitch the hem down and press again for a crisp finish.
Step 4: Finally, fill the bag with your gift and tie a ribbon tightly around the top to close it up.
#4. Fabric Christmas Light Garland
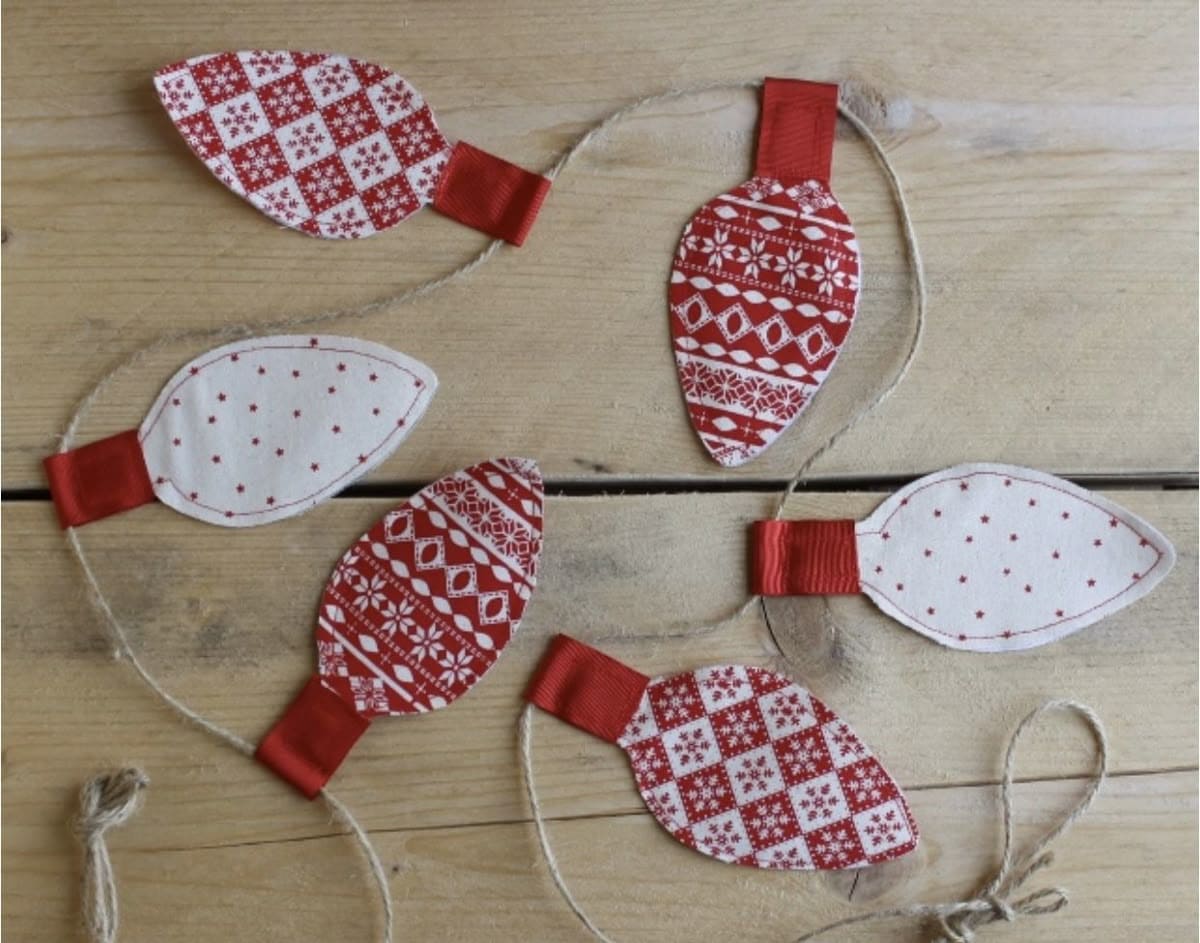 This whimsical garland transforms your favorite holiday fabric into vintage-inspired Christmas bulbs. It’s cheerful, soft, and completely unbreakable, perfect for a house with kids or pets.
Additionally, you can customize each light with different red-and-white prints, then string them onto twine for a farmhouse-style look that works on mantels, stair rails, or even windows.
Materials Needed
- Assorted red and white holiday fabric
- Red ribbon (about 1” wide)
- Fusible interfacing or felt
- Twine or string
- Scissors or rotary cutter
- Sewing machine or hot glue gun
Step-by-step Guide
Step 1: Cut out pairs of bulb shapes from your chosen fabrics and interfacing or felt for stiffness.
Step 2: Stitch or glue the bulb shapes together, sandwiching the interfacing between the fabric layers.
Step 3: Add a small piece of red ribbon at the top of each bulb to mimic the socket.
Step 4: Sew or glue the backs of the ribbons to a length of twine to complete your garland.
#5. Patchwork Fabric Ornament Balls
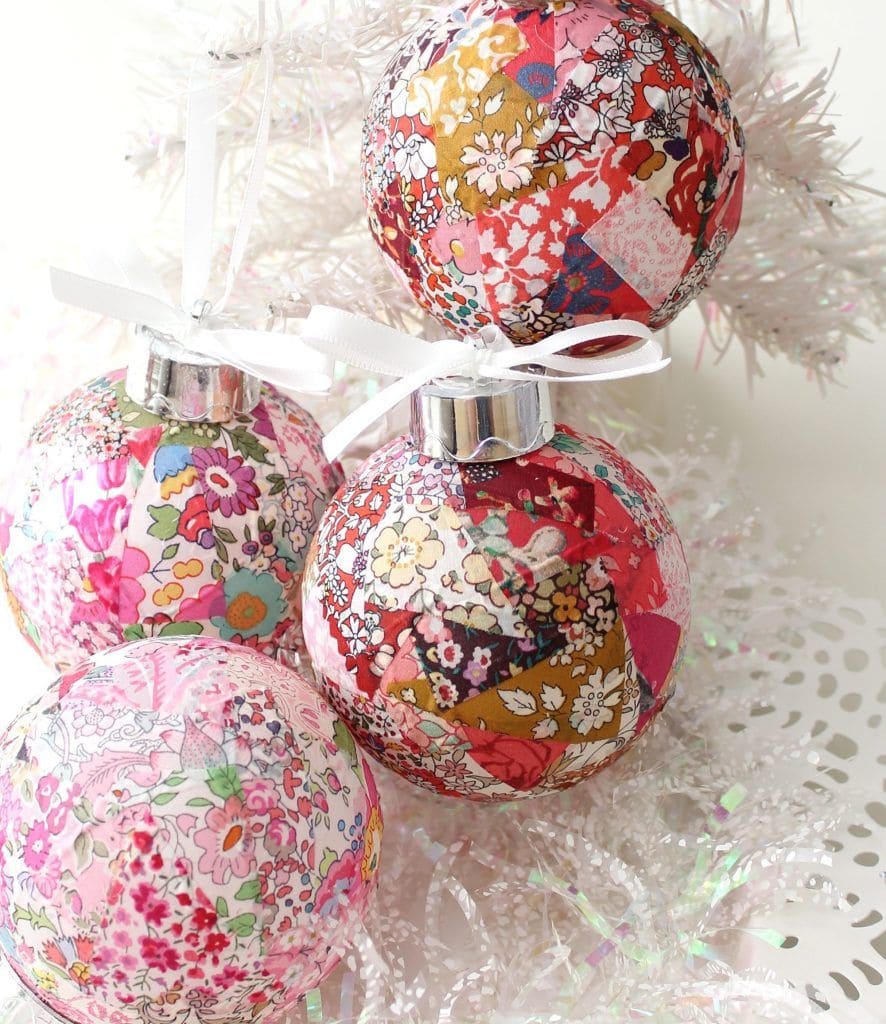
What about turning fabric scraps into magical little keepsakes with these patchwork ornament balls?
Each one tells its own story through color and pattern such as florals, plaids, or vintage prints stitched or glued together over a plain ornament base.
Topped with a satin ribbon, they sparkle with handmade charm and look stunning nestled in tree branches or arranged in bowls as a festive centerpiece.
Materials Needed
- Clear or foam ornament balls (plastic or glass)
- Fabric scraps in various patterns and colors
- Mod Podge or fabric glue
- Foam brush or paintbrush
- Ribbon for hanging
- Scissors
Step-by-step Guide
Step 1: Cut your fabric into small pieces like squares, triangles, or torn scraps for a more natural look.
Step 2: Brush a thin layer of Mod Podge onto the ornament surface and press fabric pieces down, overlapping slightly.
Step 3: Once the ball is covered, seal it with another layer of Mod Podge and let it dry fully.
Step 4: Tie a ribbon through the ornament top and hang it up or gift it in a homemade box.
#6. Scrappy Patchwork Tree Ornaments
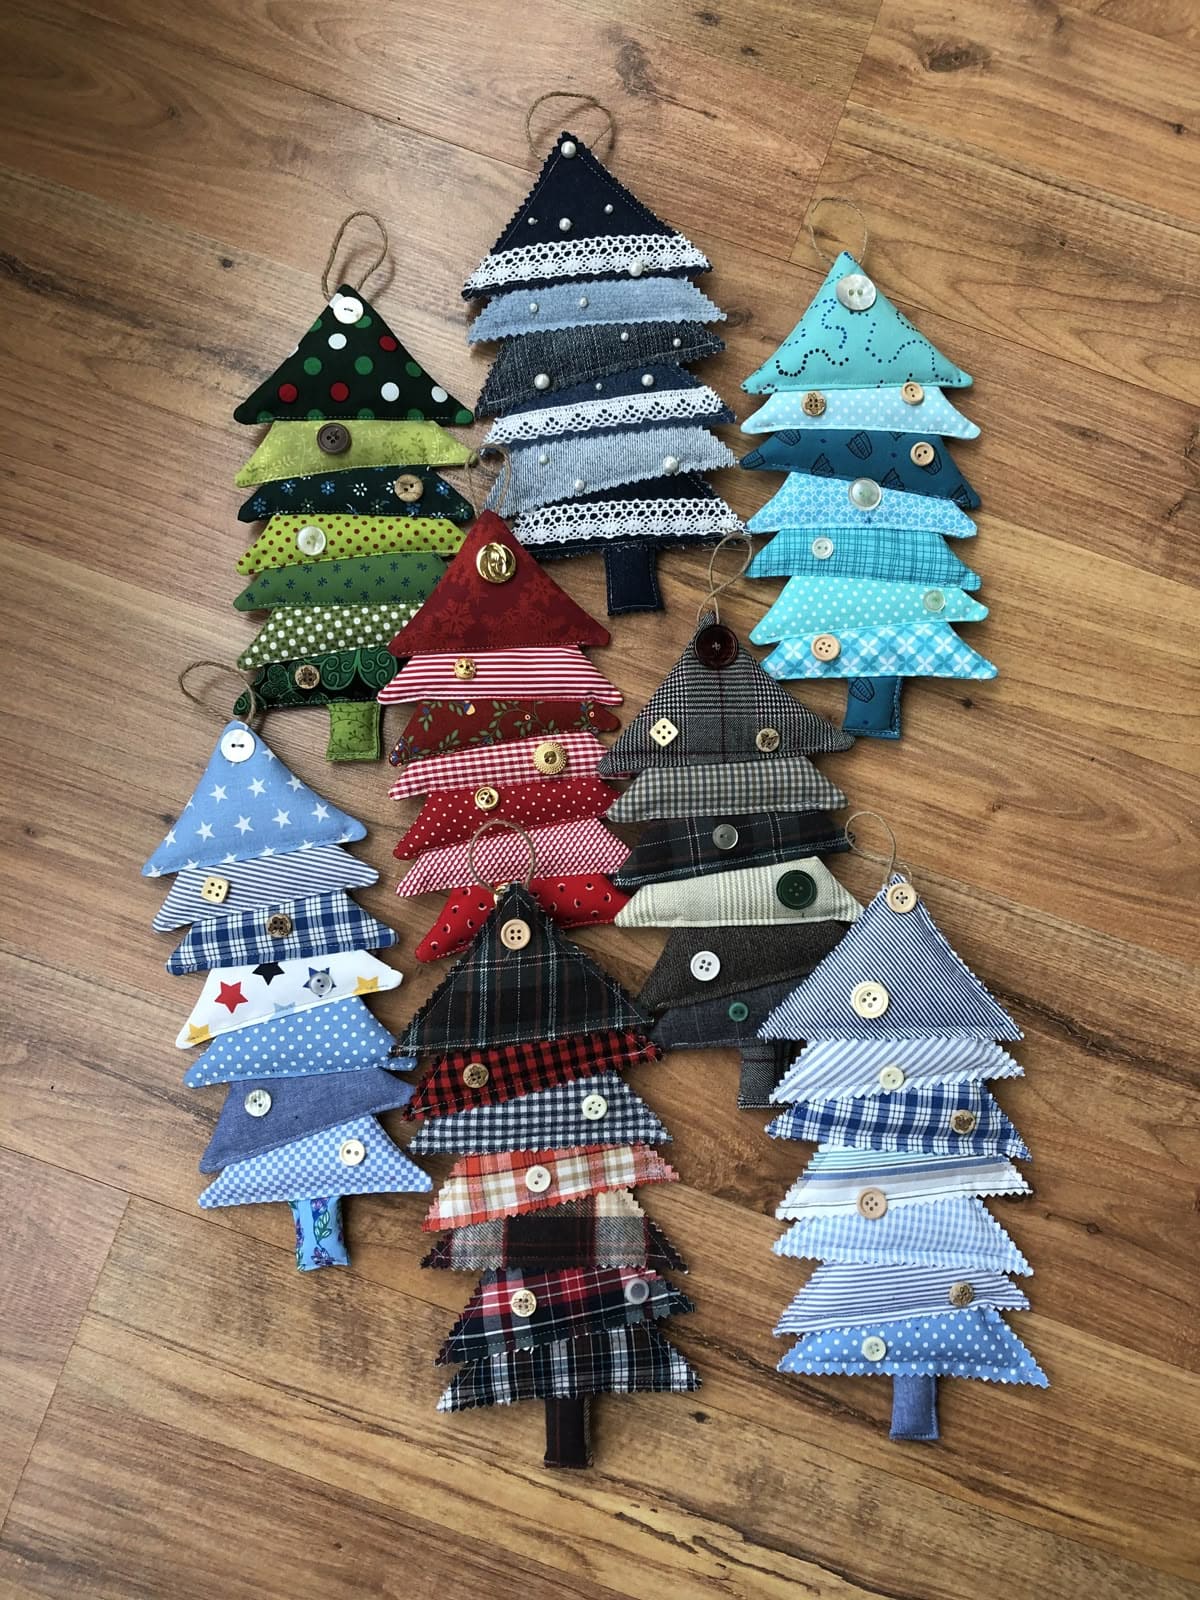
These triangle-stacked ornaments are pure joy to make, blending whimsy with handmade charm. Each one is a little different, ome wear gingham, others flaunt polka dots or lace.
Besides, buttons and pearls add personality, while rough pinked edges give them a rustic, heartfelt feel. The variety in textures and patterns brings warmth and life to any tree or garland display.
Whether you’re crafting for gifts or trimming your own tree, these tiny trees carry the kind of comfort only homemade can offer.
Materials Needed
- Scraps of cotton or flannel in various colors (each strip approx. 3-6″ wide)
- Felt or brown fabric for the trunks
- Small buttons, mini pom-poms, lace, or pearls
- Thread or hot glue
- Pinking shears (optional)
- Twine or string
- Polyfill or fabric scraps
Step-by-step Guide
Step 1: Cut three to four triangles in graduating sizes for each tree, along with a small trunk piece.
Step 2: Layer and attach the triangles together, starting from smallest at the top, slightly overlapping them as you go down.
Step 3: Add the trunk at the base and stitch around the tree, leaving a gap for stuffing.
Step 4: Lightly stuff the ornament, sew the opening closed, and trim edges with pinking shears if desired.
Step 5: Now you can decorate with buttons or lace and attach a loop of twine to hang.
#7. Primitive Fabric Star Ornament
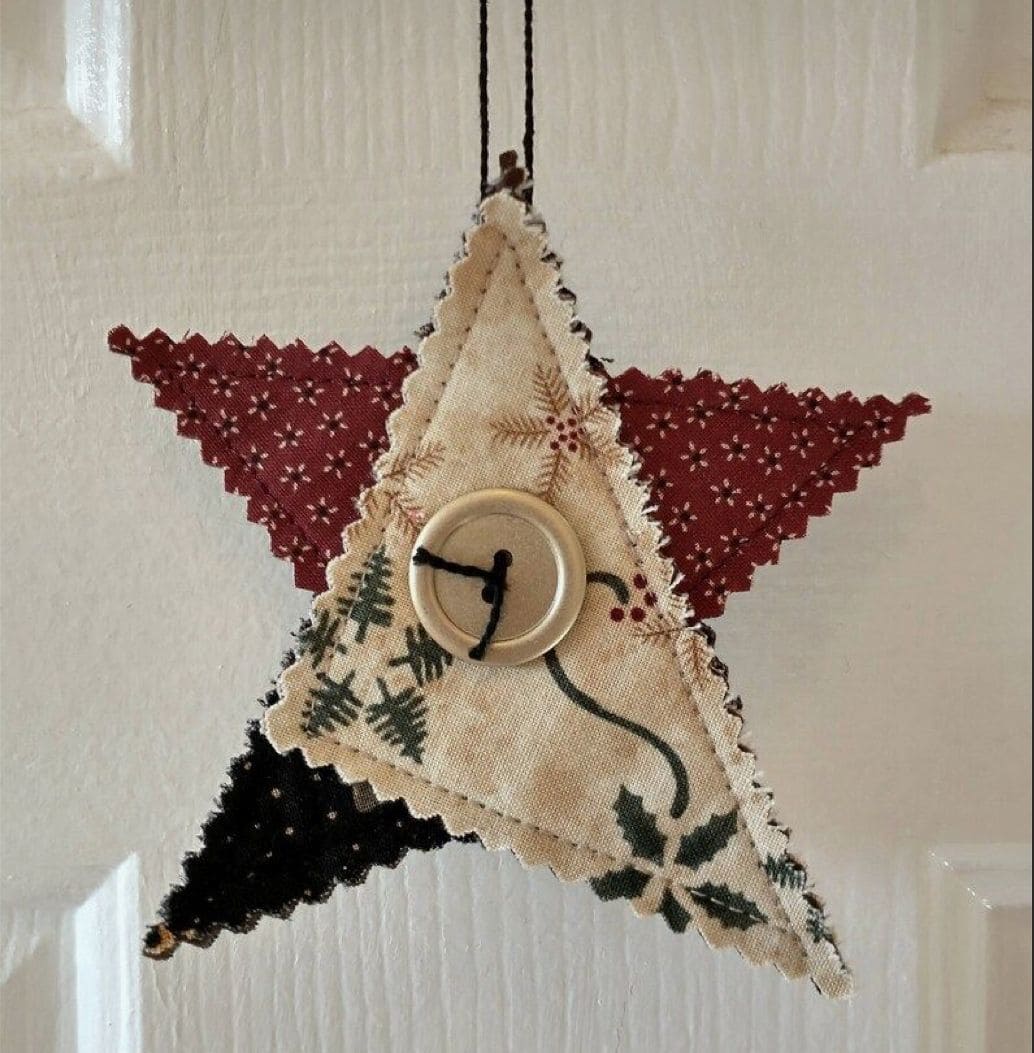
This homespun star ornament brings a vintage charm to your holiday tree with its cozy quilt-style textures and earthy tones.
Made from coordinating triangle scraps and stitched with love, it’s the kind of decoration that reminds you of warm holiday nights and handmade traditions. The big center button adds a sweet farmhouse touch while doubling as a focal point.
Materials Needed
- Fabric scraps in coordinating patterns (preferably muted or rustic tones)
- Pinking shears
- Needle and thread or fabric glue
- 1 large button (wooden or neutral color)
- Twine or string
Step-by-step Guide
Step 1: Cut five triangle shapes using pinking shears for textured edges. Then arrange the triangles to form a five-point star, overlapping slightly at the center.
Step 2: Stitch or glue them together at the overlap point, then sew a button in the middle.
Step 3: Attach a loop of twine to the top for hanging, and it’s ready to display.
Tip: You can use coordinating thread to make the stitching part of the design, it adds a rustic, handmade vibe.
#8. Upcycled Fabric Pocket Advent Calendar
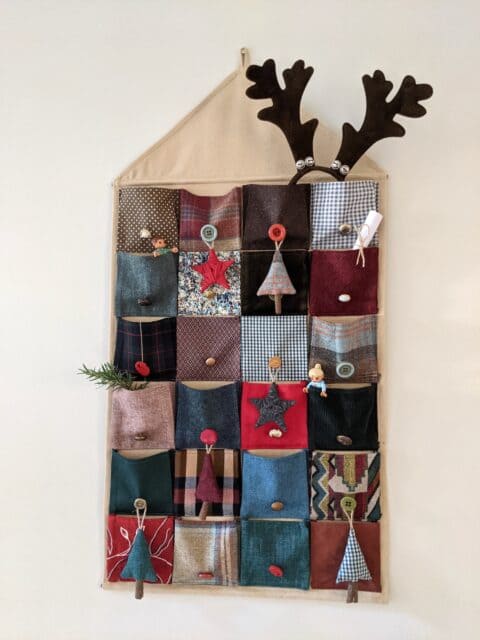
This charming advent calendar brings together warm textures, festive colors, and just the right amount of whimsy. Each pocket is crafted from recycled fabric stitched into a cheerful house shape, complete with playful reindeer antlers.
You can also tuck in tiny treats, notes, or ornaments to build anticipation throughout December.
The blend of rustic patterns and handcrafted elements makes it feel both nostalgic and one-of-a-kind.
Materials Needed
- Assorted scrap fabric (wool, flannel, corduroy)
- Canvas or linen backing (approx. 20×30 inches)
- Buttons and decorative trims
- Needle and thread or sewing machine
- Optional: felt antlers, small accessories
Step-by-step Guide
Step 1: Cut 24 small fabric squares or rectangles for pockets.
Step 2: Attach the pockets onto the backing fabric in neat rows using a sewing machine or hand stitching.
Step 3: Add buttons, decorative felt cutouts, or embroidery to personalize each pocket.
Step 4: Sew or glue on optional reindeer antlers at the top, and hang with a dowel or hook.
#9. Scandinavian Gnome Sachets
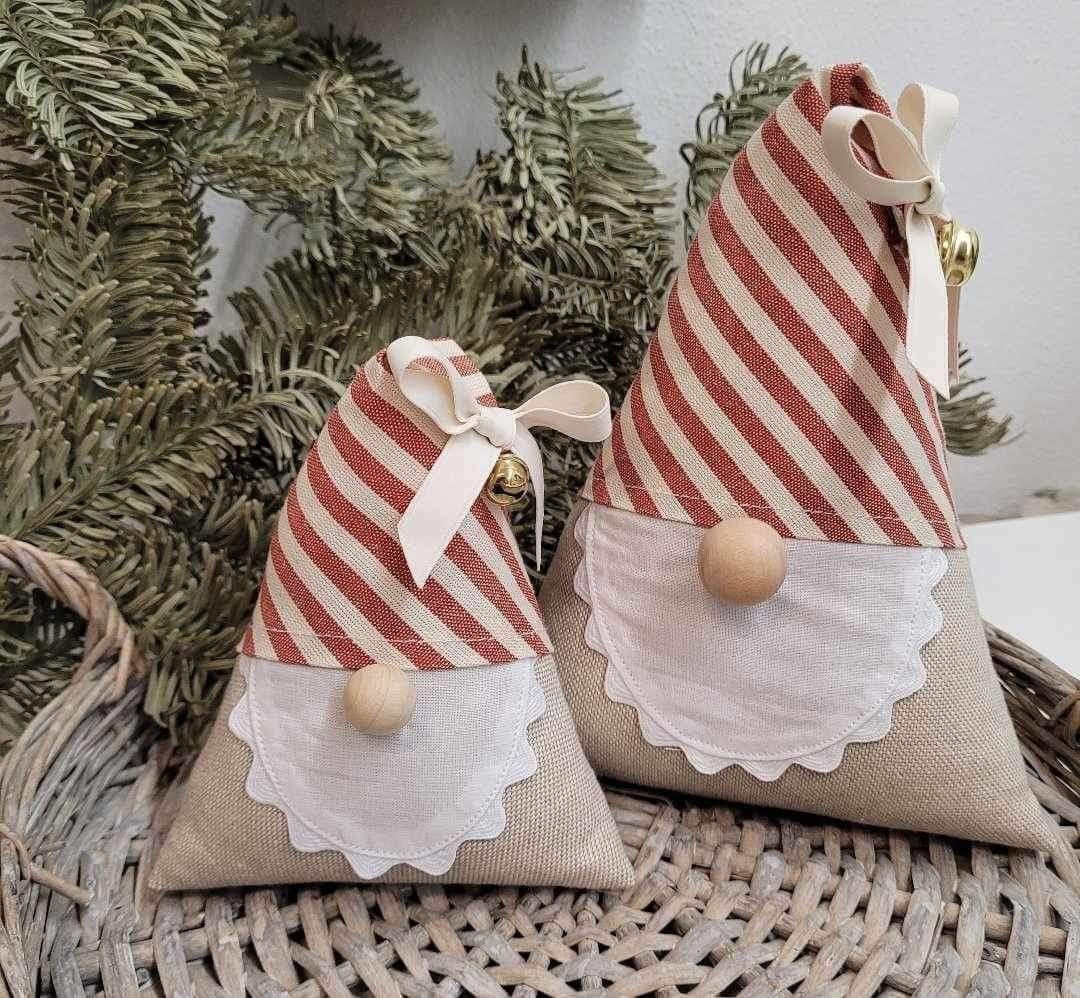
Charming and full of personality, these little gnomes are the kind of Christmas craft that brings a smile the moment you spot them.
With their striped hats, puffy beards, and round wooden noses, they capture the quiet joy of Nordic holiday traditions.
Made entirely from leftover fabric and a few simple additions, they work beautifully as tabletop decor, gift toppers, or even as lightly scented sachets filled with dried lavender or pine needles.
Materials Needed
- Red and white striped fabric (approx. 6″x6″)
- Plain beige or linen scrap (approx. 6″x6″)
- White cotton or lace trim
- Wooden beads (1” diameter)
- Ribbon and jingle bells
- Stuffing or dried potpourri (optional)
- Hot glue or needle and thread
Step-by-step Guide
Step 1: Cut two triangle shapes for each gnome including one from your base fabric, one for the hat. Then sew or glue the sides together, leaving the bottom open.
Step 2: Turn right side out, fill lightly with stuffing or dried herbs, and close the bottom with glue or stitching.
Step 3: Cut a scalloped white fabric beard and attach to the lower front.
Step 4: Glue a wooden bead just above the beard to create the nose.
Step 5: Tie a ribbon and bell to the tip of the hat for extra holiday cheer.
#10. No-Sew Christmas Fabric Garland
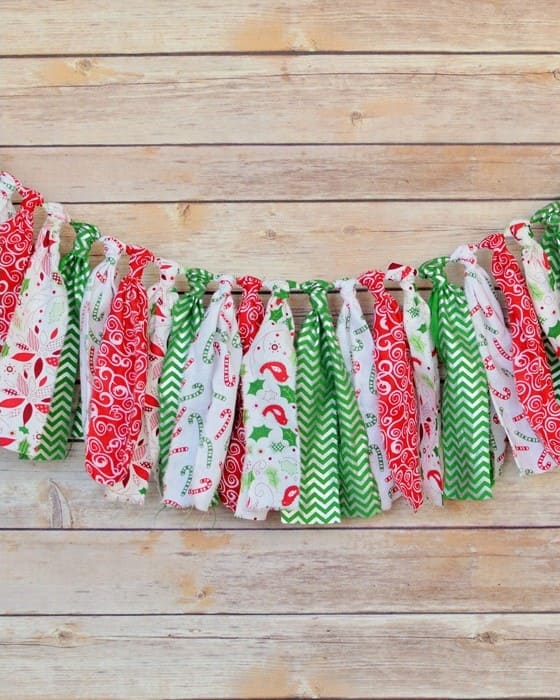
This festive fabric garland brings an instant pop of holiday cheer to any space! It’s playful, bold, and incredibly easy to make, even if you’re not handy with a needle.
Moreover, the bright mix of reds, greens, and whites in varying holiday prints creates a lovely, layered texture that’s perfect for mantels, doorways, or stair railings.
It feels whimsical and cozy at the same time, and the best part is that you can make it entirely with leftover fabric scraps.
Materials Needed
- Fabric strips in Christmas colors and prints (approx. 2″x18″ each)
- Twine, string, or ribbon (length based on where you’ll hang it)
- Scissors or pinking shears
Step-by-step Guide
Step 1: Cut multiple strips of fabric using scissors or pinking shears for a clean edge.
Step 2: Fold each strip in half and loop it over the twine using a lark’s head knot.
Step 3: Continue adding strips in your preferred color order until the garland reaches the desired fullness.
Step 4: Hang it across a mantel, wall, or shelf and fluff the fabric pieces as needed.
#11. Country Plaid Fabric Chain Garland
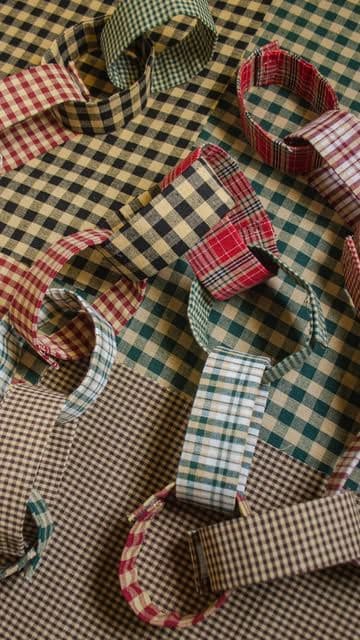
You can turn your leftover gingham or plaid fabric into this rustic chain garland that instantly brings an old-fashioned, homey vibe to your tree or mantel.
Each loop connects like a memory, creating a chain that stretches across generations of cozy Christmases.
This garland adds texture and warmth, perfect for farmhouse or vintage-style décor. And you don’t need to be a pro sewer to make it.
Materials Needed
- Fabric scraps in plaid or gingham (2” x 6” pieces work well)
- Needle and thread or sewing machine
- Hot glue gun (optional)
- Iron (optional)
Step-by-step Guide
Step 1: Cut your fabric into strips about 2 inches wide and 6 inches long.
Step 2: Fold the edges inward and press flat if desired, then stitch or glue each strip into a loop.
Step 3: Thread the next strip through the previous loop and repeat the process to build your chain.
Step 4: Continue until you reach the desired length, alternating colors or patterns for variety.
#12. Jewel-Toned Fabric and Sequin Ornaments
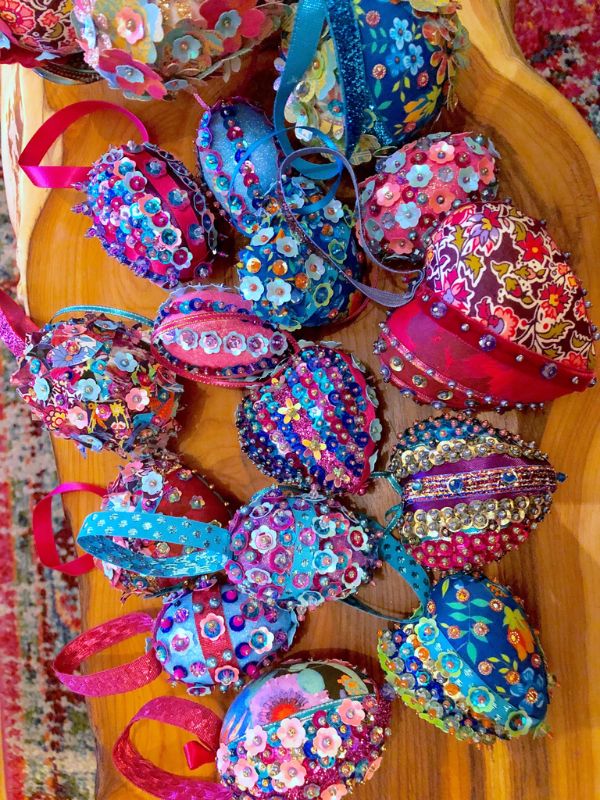
These vibrant handmade ornaments look like something pulled straight from a magical storybook. Each heart and oval shape bursts with personality, adorned in floral fabrics, shimmering sequins, and cheerful ribbon loops.
Specially, the richness of colors and textures turns these into tiny works of textile art that you’ll love hanging year after year.
Perfect for crafters who enjoy bold creativity, these ornaments also make heartfelt gifts or stocking stuffers.
Materials Needed
- Foam ornament shapes (heart or oval)
- Assorted fabric scraps in jewel tones
- Sequins, seed beads, or small gems
- Straight pins or hot glue gun
- Ribbon
Step-by-step Guide
Step 1: Cut fabric into small strips or panels and wrap them around the foam shapes, securing with pins or glue.
Step 2: Decorate each panel with sequins, beads, or flowers using pins or adhesive.
Step 3: Finally, attach a ribbon loop at the top to hang.
#13. Stacked Fabric Scrap Christmas Tree
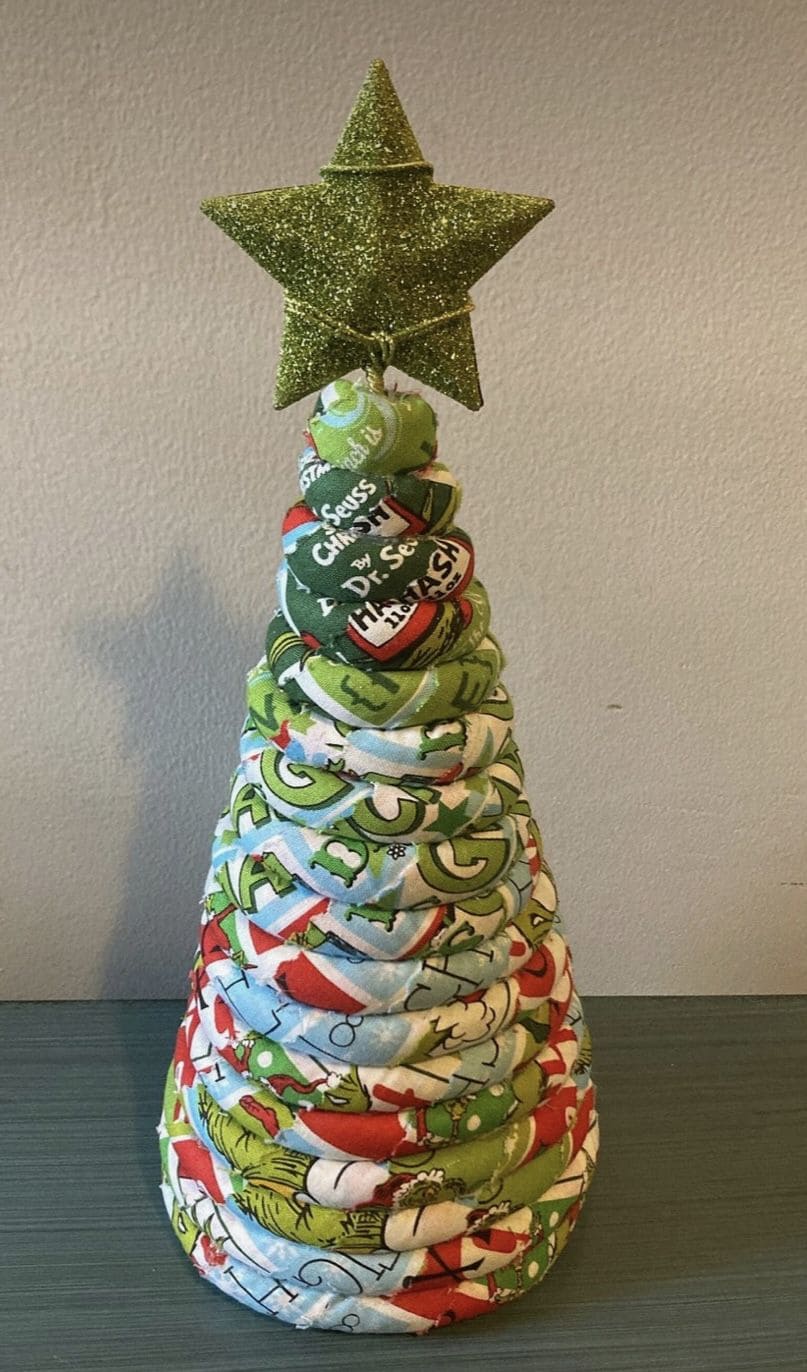
Why not give your leftover holiday fabrics a cheerful second life with this playful stacked Christmas tree?
The whimsical mix of colors and patterns from cartoonish reds to jolly greens brings the nostalgic charm of childhood Christmas books right into your living room.
Plus, each ring of fabric is rolled and stacked to create a soft, spiraling cone that builds upward with joy, topped off by a sparkly green star that instantly catches the eye.
Materials Needed
- 12-18 scraps of holiday fabric (various sizes
- Styrofoam or cardboard cone (10-12 inches tall)
- Hot glue gun & glue sticks
- Fabric scissors or rotary cutter
- Optional: glittered star topper
Step-by-step Guide
Step 1: Cut your fabric into strips (roughly 2″ x 18″). Then you roll or twist them into donut shapes or loops, securing the ends with glue.
Step 2: Starting from the base, glue each loop around the cone, layering upward like a stacked snowman hat tower.
Step 3: Choose smaller loops as you reach the top to maintain a tree shape.
Step 4: Once stacked, top with a mini star or ribbon bow to finish the look.
#14. Quilted Mitten Ornaments
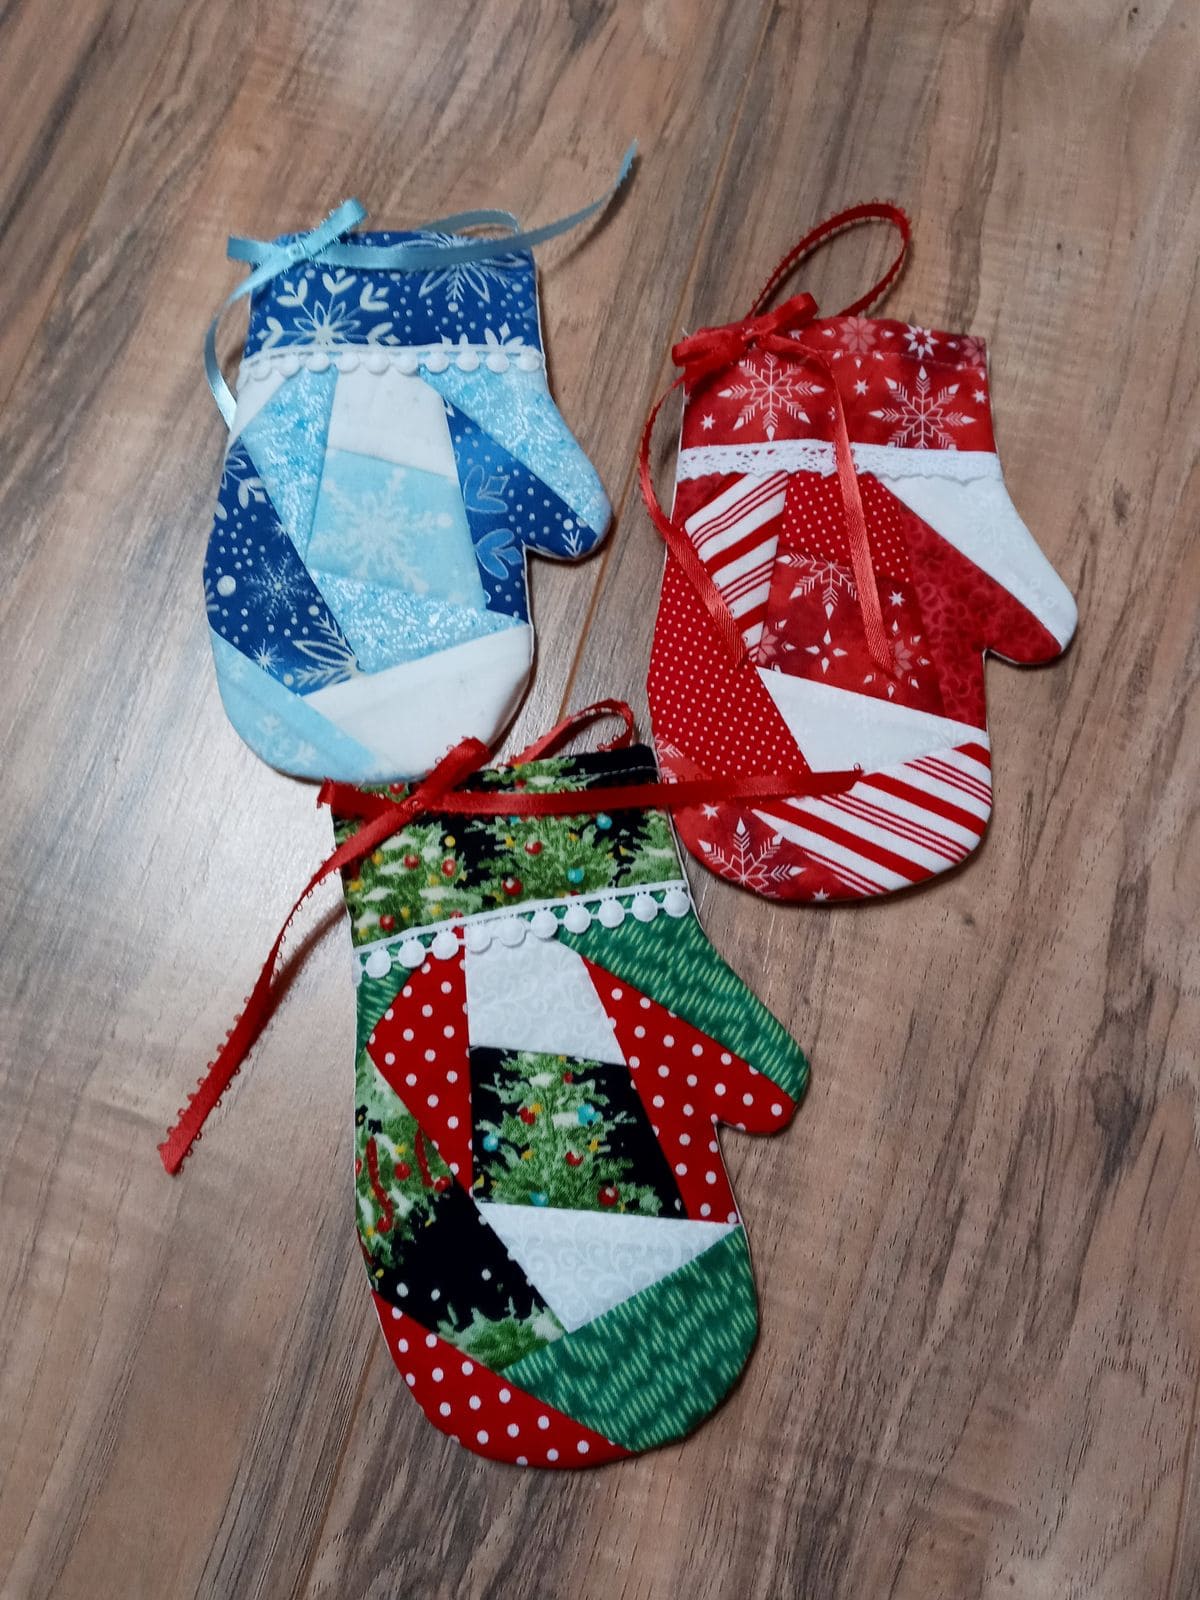
These cozy quilted mitten ornaments bring all the nostalgic feels of a handmade Christmas. Each one is crafted from vibrant fabric scraps stitched into festive patchwork patterns, mimicking classic quilting techniques.
If you go for icy blues, peppermint reds, or evergreen hues, these mittens look beautiful dangling from your tree or tied to a wrapped gift.
Specially, the details from the contrast trims to dainty ribbon loops make them feel like tiny heirlooms.
Materials Needed
- Holiday-themed fabric scraps
- Batting or felt
- Pom-pom or lace trim
- Coordinating ribbons
- Thread and sewing machine or hand needle
Step-by-step Guide
Step 1: Cut mitten shapes from fabric and batting using a template.
Step 2: Arrange and sew fabric scraps into a quilted pattern on the mitten front.
Step 3: Finally, stitch the front and back together, turn right side out, and add a hanging loop and trim.
#15. Scrap Fabric Christmas Tree Art
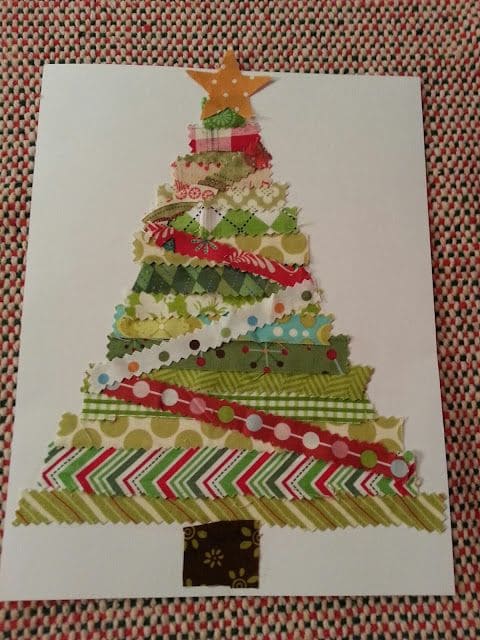
With zigzags, dots, florals, and plaids stacked in a festive taper, this cheerful little tree captures that nostalgic holiday spirit in a handmade, heartwarming way.
No matter how you frame it or send it as a card, it’s a lovely keepsake that feels personal and playful. So this project is also a sweet one to do with kids.
Materials Needed
- Scrap fabric strips in green, red, white, and patterned prints (2″ to 6″ lengths)
- White cardstock or canvas board (8×10 or larger)
- Glue stick or fabric glue
- Pinking shears (optional)
- Brown fabric and yellow/orange
Step-by-step Guide
Step 1: Cut your fabric scraps into strips, with the longest at the bottom and shortest at the top to form a triangle tree shape.
Step 2: Start gluing from the bottom up, layering the strips slightly as you go.
Step 3: Add a brown square at the bottom for the trunk and top it off with a fabric star.
Step 4: Let it dry completely and display your tree or frame it as wall art.
Read more: 21 Unique Christmas Tree Alternatives You Must Try This Season
#16. Scrap Fabric Bow Garland
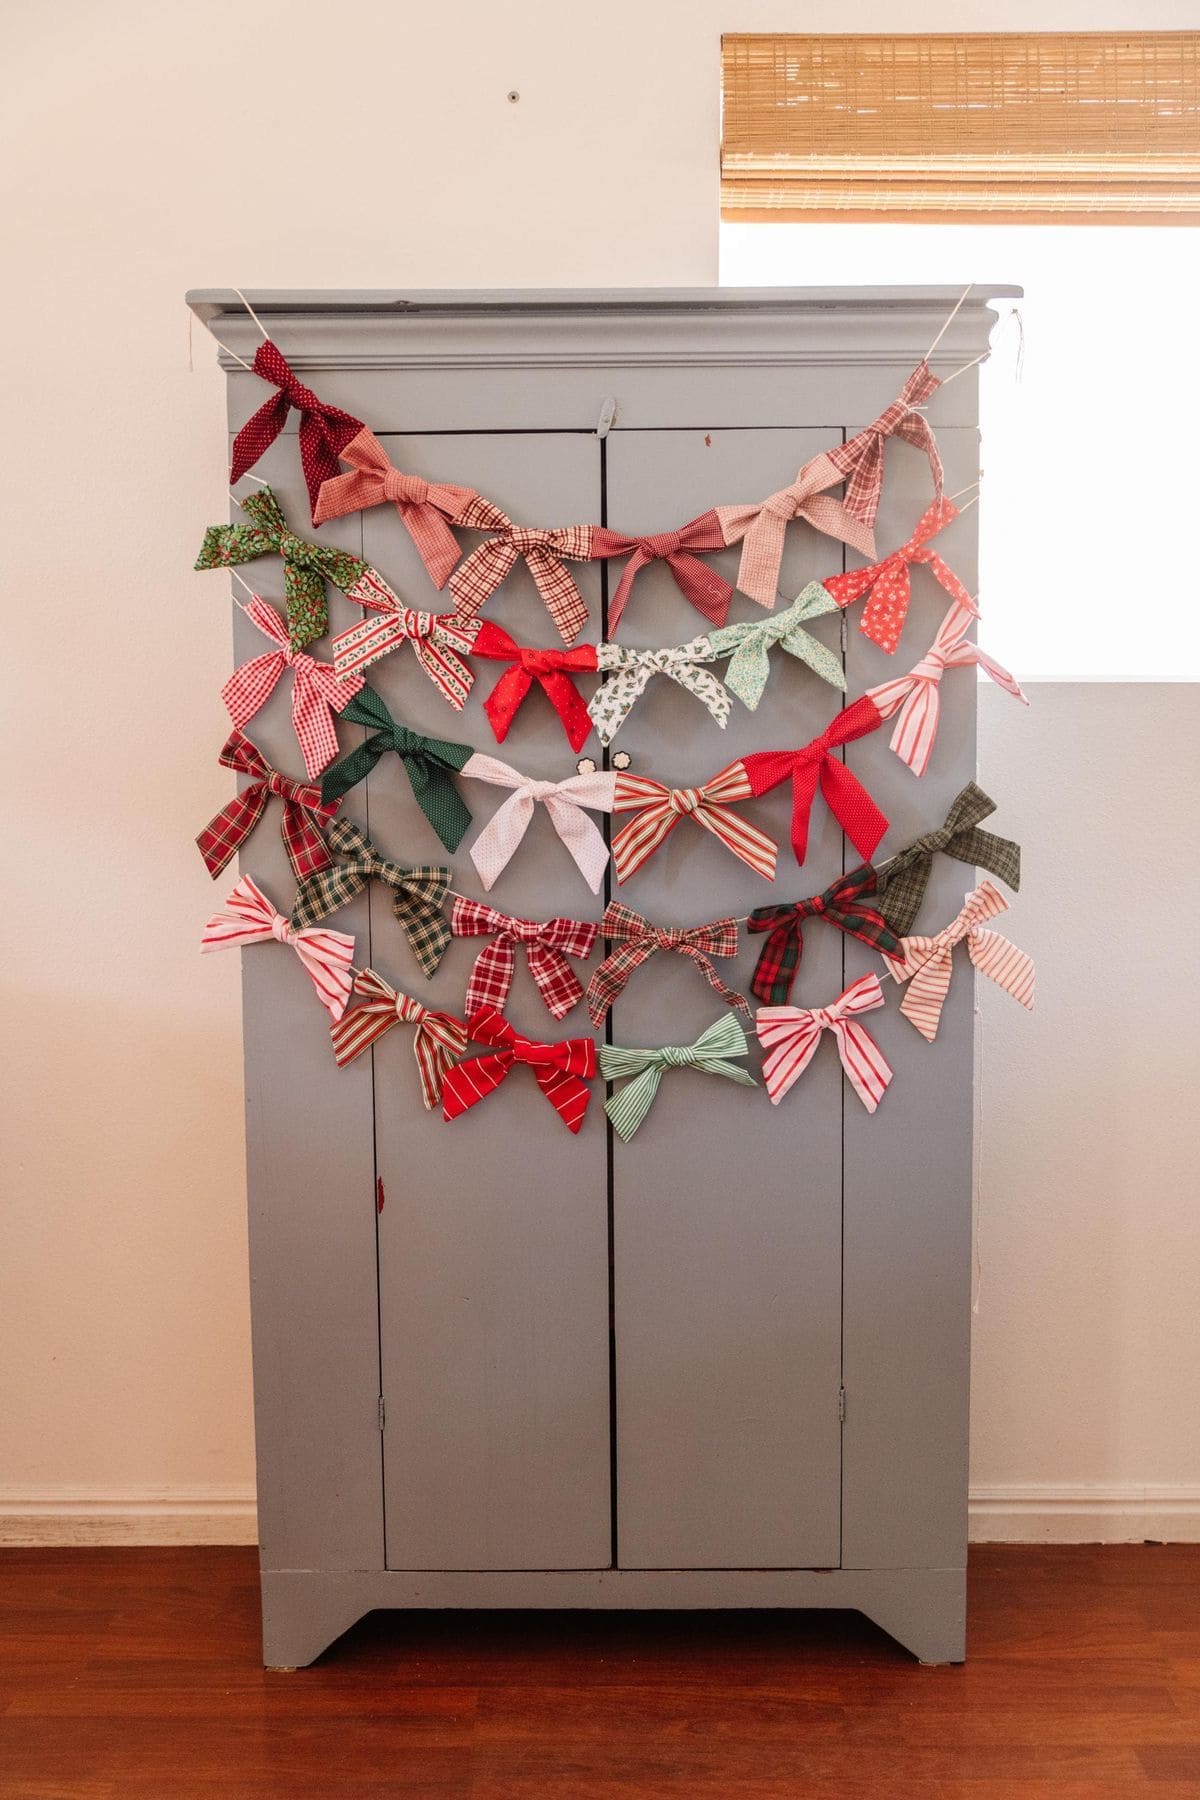
Wow, this bow garland turns your leftover holiday fabrics into a cheerful, ribbon-wrapped celebration. Each bow feels like a small gift, tied with memories and patterns that whisper of Christmas past.
Whether you hang it across a window, mantel, or cabinet, it adds playful color and old-school charm that never goes out of style.
You don’t need fancy tools or sewing skill, just a mix of red, green, and patterned fabrics and a little time to tie it all together.
Materials Needed
- Fabric scraps (cut into strips around 1.5″ x 14″)
- Twine, jute rope, or ribbon
- Scissors
- Optional: pinking shears
Step-by-step Guide
Step 1: Cut fabric scraps into even strips, about 14 inches long and 1.5 inches wide.
Step 2: Tie each strip into a bow and adjust the tails evenly.
Step 3: Attach the bows to the twine by tying or hot-gluing them in place.
Step 4: You keep spacing consistent or cluster them for a fuller garland effect.
#17. Festive Felt Tree Wall Hanging
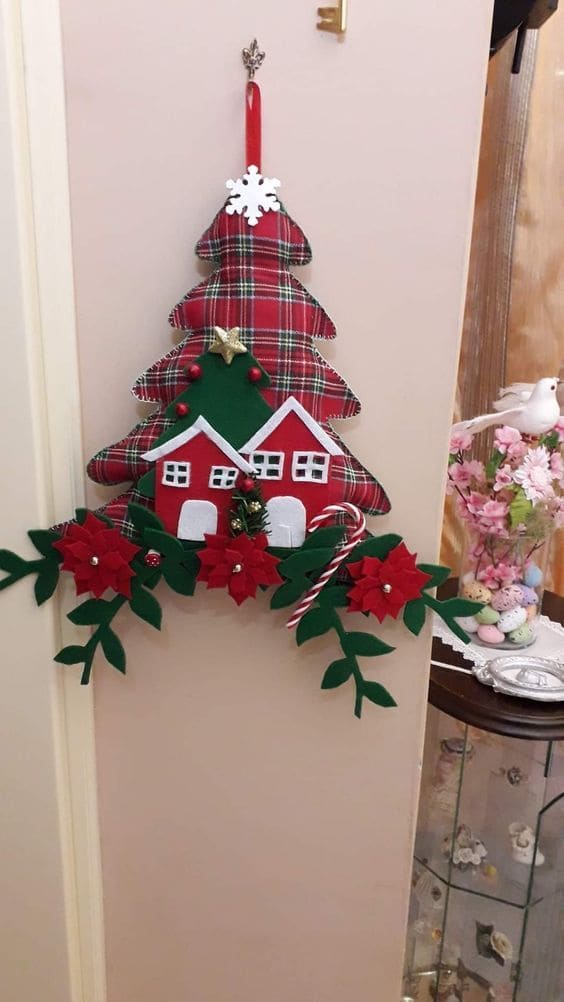
You can see a red plaid tree sets the backdrop for charming felt houses, complete with white rooftops and tiny green wreaths.
Below, poinsettia blooms and sprigs of green leaves add texture and warmth, making it feel like a wintery garden scene straight out of a storybook.
It’s the kind of handmade detail that makes your hallway or door feel instantly welcoming like Christmas carols might start playing the moment someone knocks.
Materials Needed
- Red plaid fabric (approx. 12″x18″)
- Felt scraps in red, white, green
- Stuffing or batting
- Hot glue or fabric glue
- Ribbon for hanging
- Optional: small ornaments, mini candy canes, or buttons
Step-by-step Guide
Step 1: Cut out a Christmas tree silhouette from plaid fabric and back it with a second layer. Then lightly stuff between layers and glue or stitch around the edge.
Step 2: Cut simple house shapes from felt and attach to the lower portion of the tree.
Step 3: Add poinsettia flowers and leafy stems along the bottom edge using red and green felt pieces.
Step 4: Glue on mini candy canes, stars, or other trimmings to add personality. Then attach a loop of ribbon at the top for easy hanging.
#18. Quilted Patchwork Christmas Ornaments
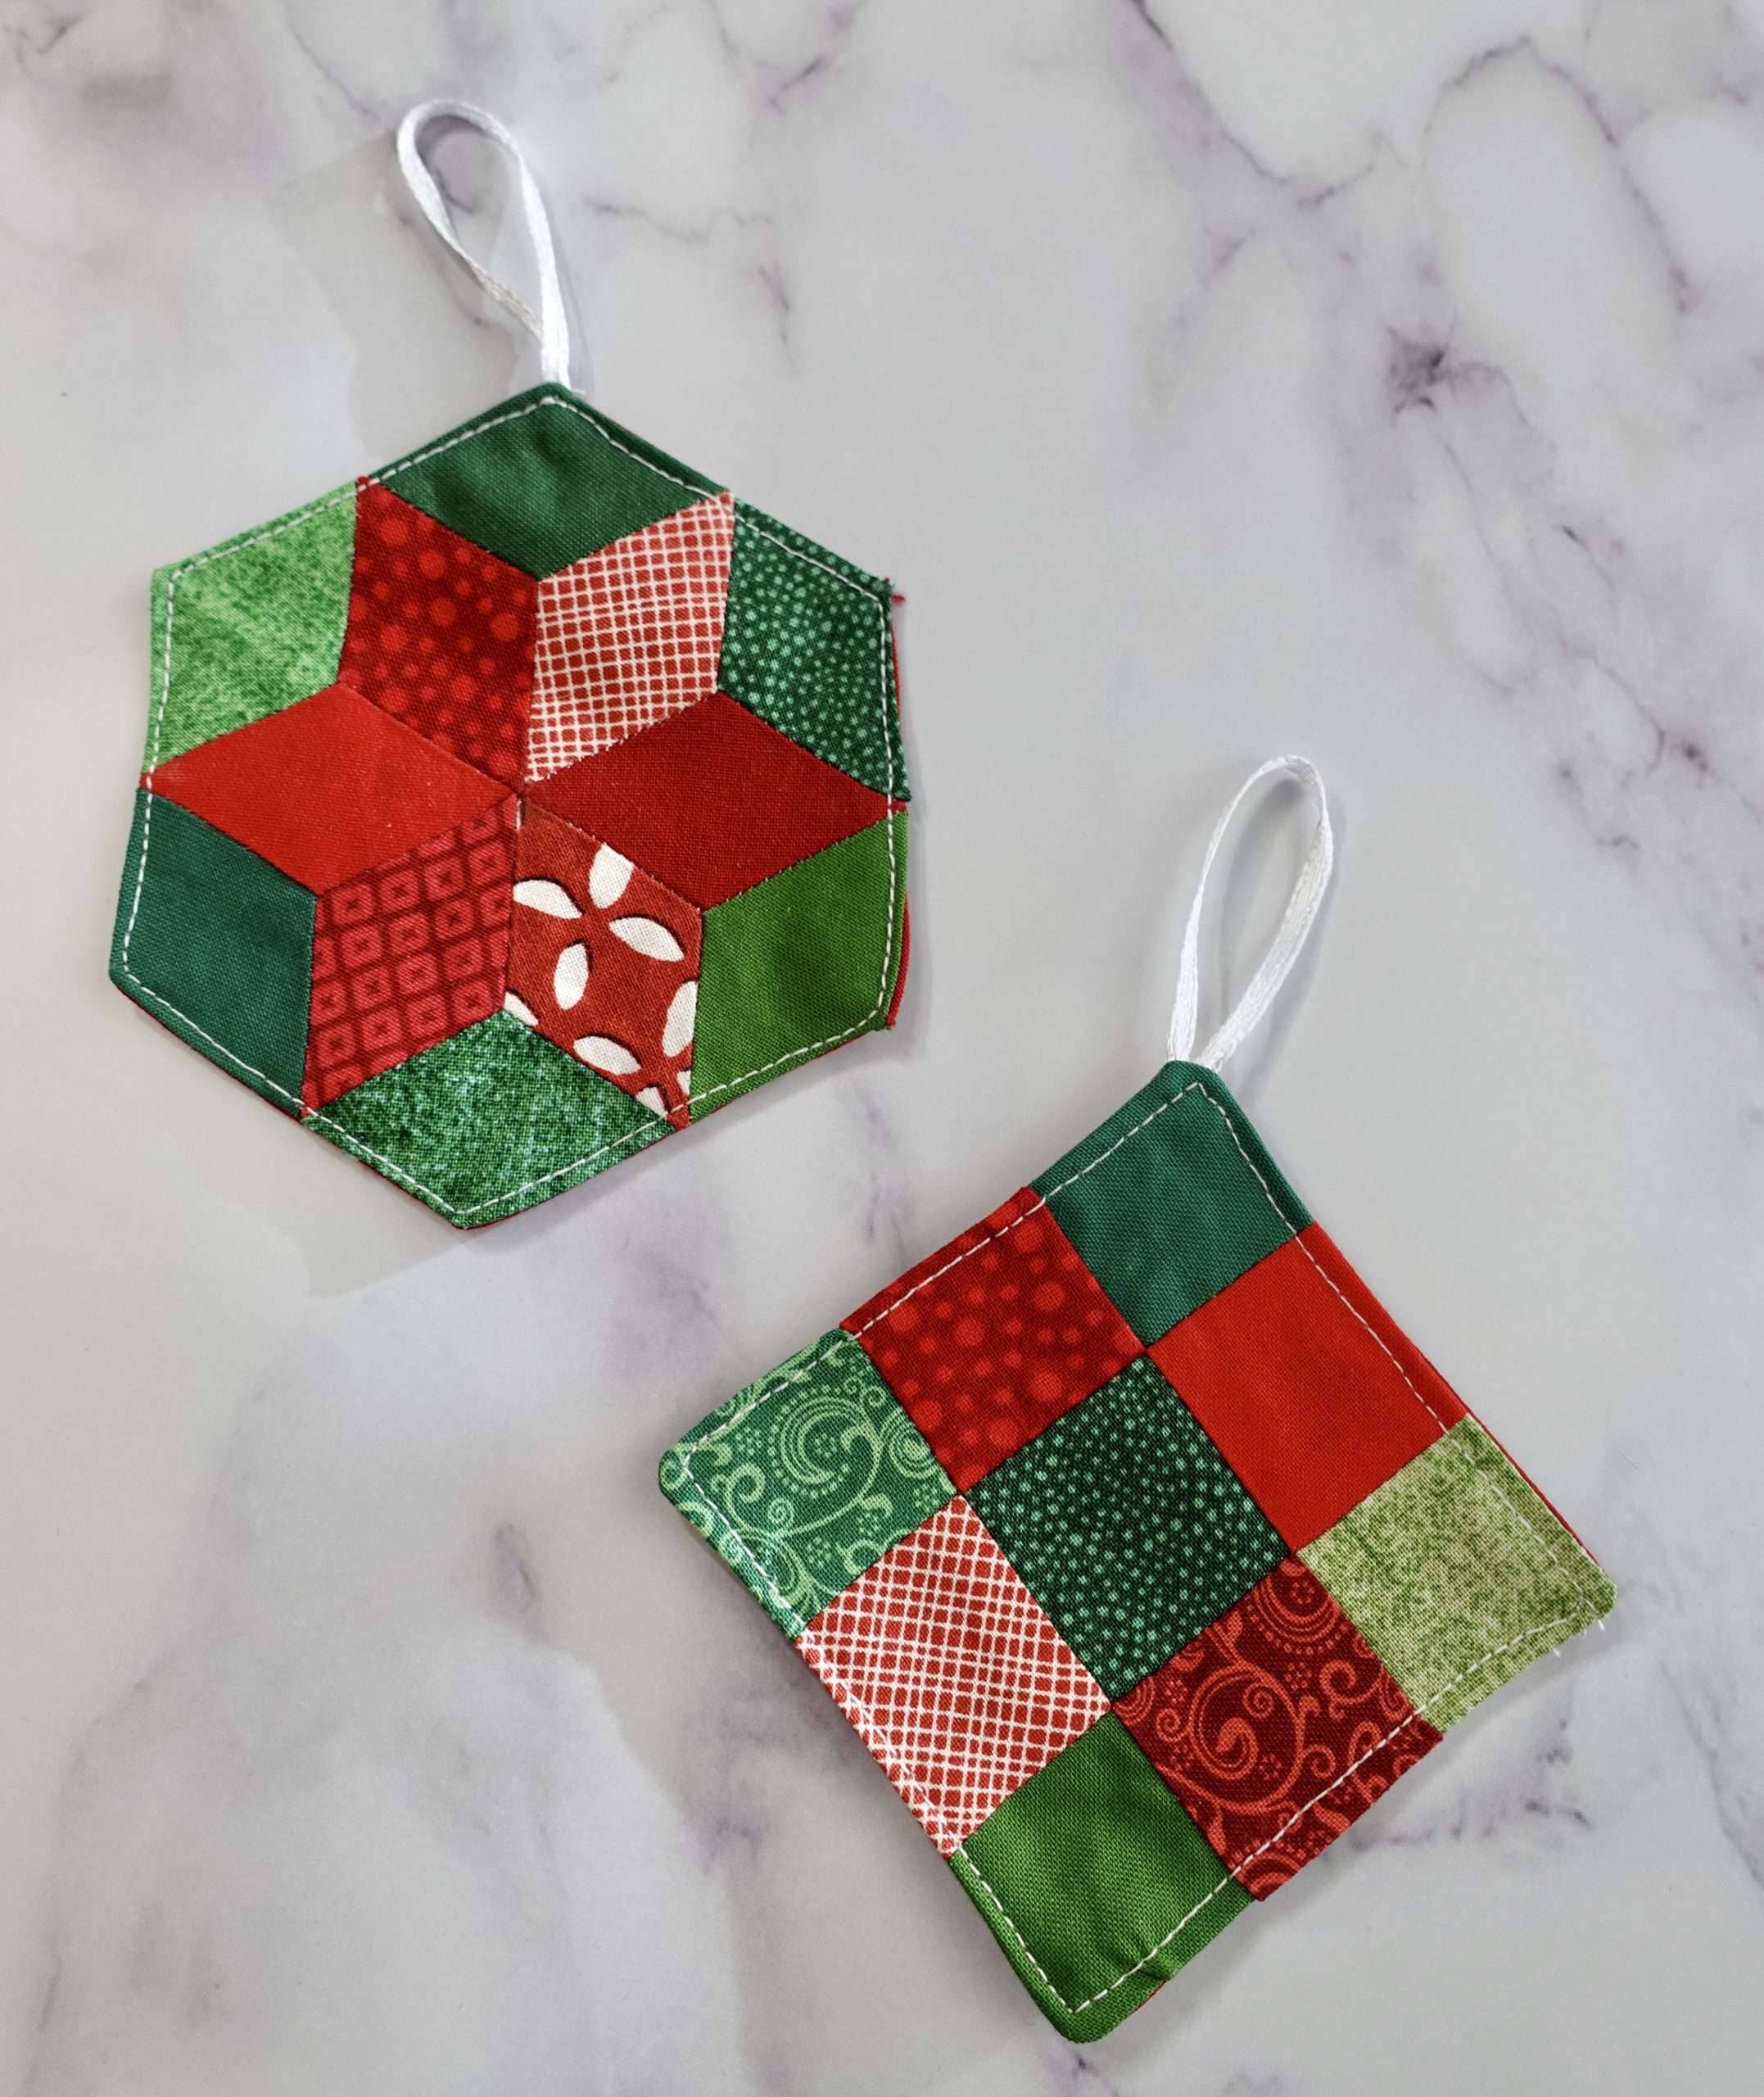
These handmade patchwork ornaments feel like little heirlooms in the making. Crafted from vibrant red, green, and holiday-print fabric squares, they give off that charming, old-fashioned Christmas vibe.
Whether you choose the hexagon star pattern or a traditional square grid, each piece adds a personal touch to your tree or gift wrapping.
Bonus, they’re sturdy enough to last for years and light enough to hang anywhere. If you’re into quilting or just love piecing things together, this is a satisfying project that blends creativity with coziness.
Materials Needed
- Assorted cotton fabric scraps (red, green, white)
- Lightweight batting or interfacing
- Needle and thread or sewing machine
- Ribbon
- Scissors or rotary cutter
Step-by-step Guide
Step 1: Cut your fabric scraps into uniform squares or diamond shapes depending on the pattern.
Step 2: Sew the pieces together to form your desired shape, then layer with batting and backing.
Step 3: Stitch all around the edge, leaving a gap to turn it right-side out.
Step 4: Now, just insert a ribbon loop before closing the opening with a topstitch.
#19. Folded Fabric Angel Ornament
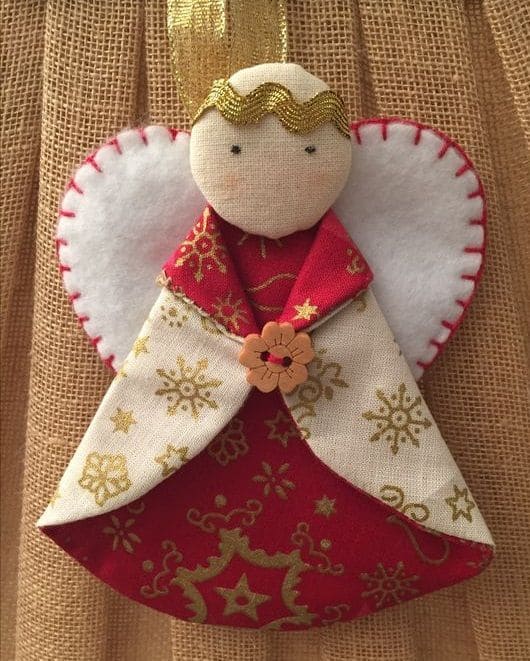
Made from beautifully folded festive fabric and topped with a serene linen face, this ornament feels like it stepped out of a nostalgic Christmas story.
Plus, the white felt wings edged in red stitches give it that soft, handcrafted look that instantly warms any space.
Whether you hang her on the tree, gift her to a friend, or use her as a keepsake for kids, she’s a gentle reminder of love and peace during the holidays.
Materials Needed
- 2 coordinating Christmas fabric squares (approx. 6×6 inches)
- Small wooden bead or stuffed fabric ball
- White felt
- Gold ribbon
- Button embellishment
- Needle and thread or hot glue
- Blush or marker
Step-by-step Guide
Step 1: Fold fabric into a robe shape by making accordion pleats or triangle folds.
Step 2: Stitch or glue the body together at the front, then add a button detail at the join.
Step 3: Attach a round fabric head and draw or stitch simple facial features.
Step 4: Cut wing shapes from felt, stitch the edges with thread, and attach to the back. Then loop gold ribbon on top as a halo and hanger.
#20. Scrappy Christmas Tree Gift Tags
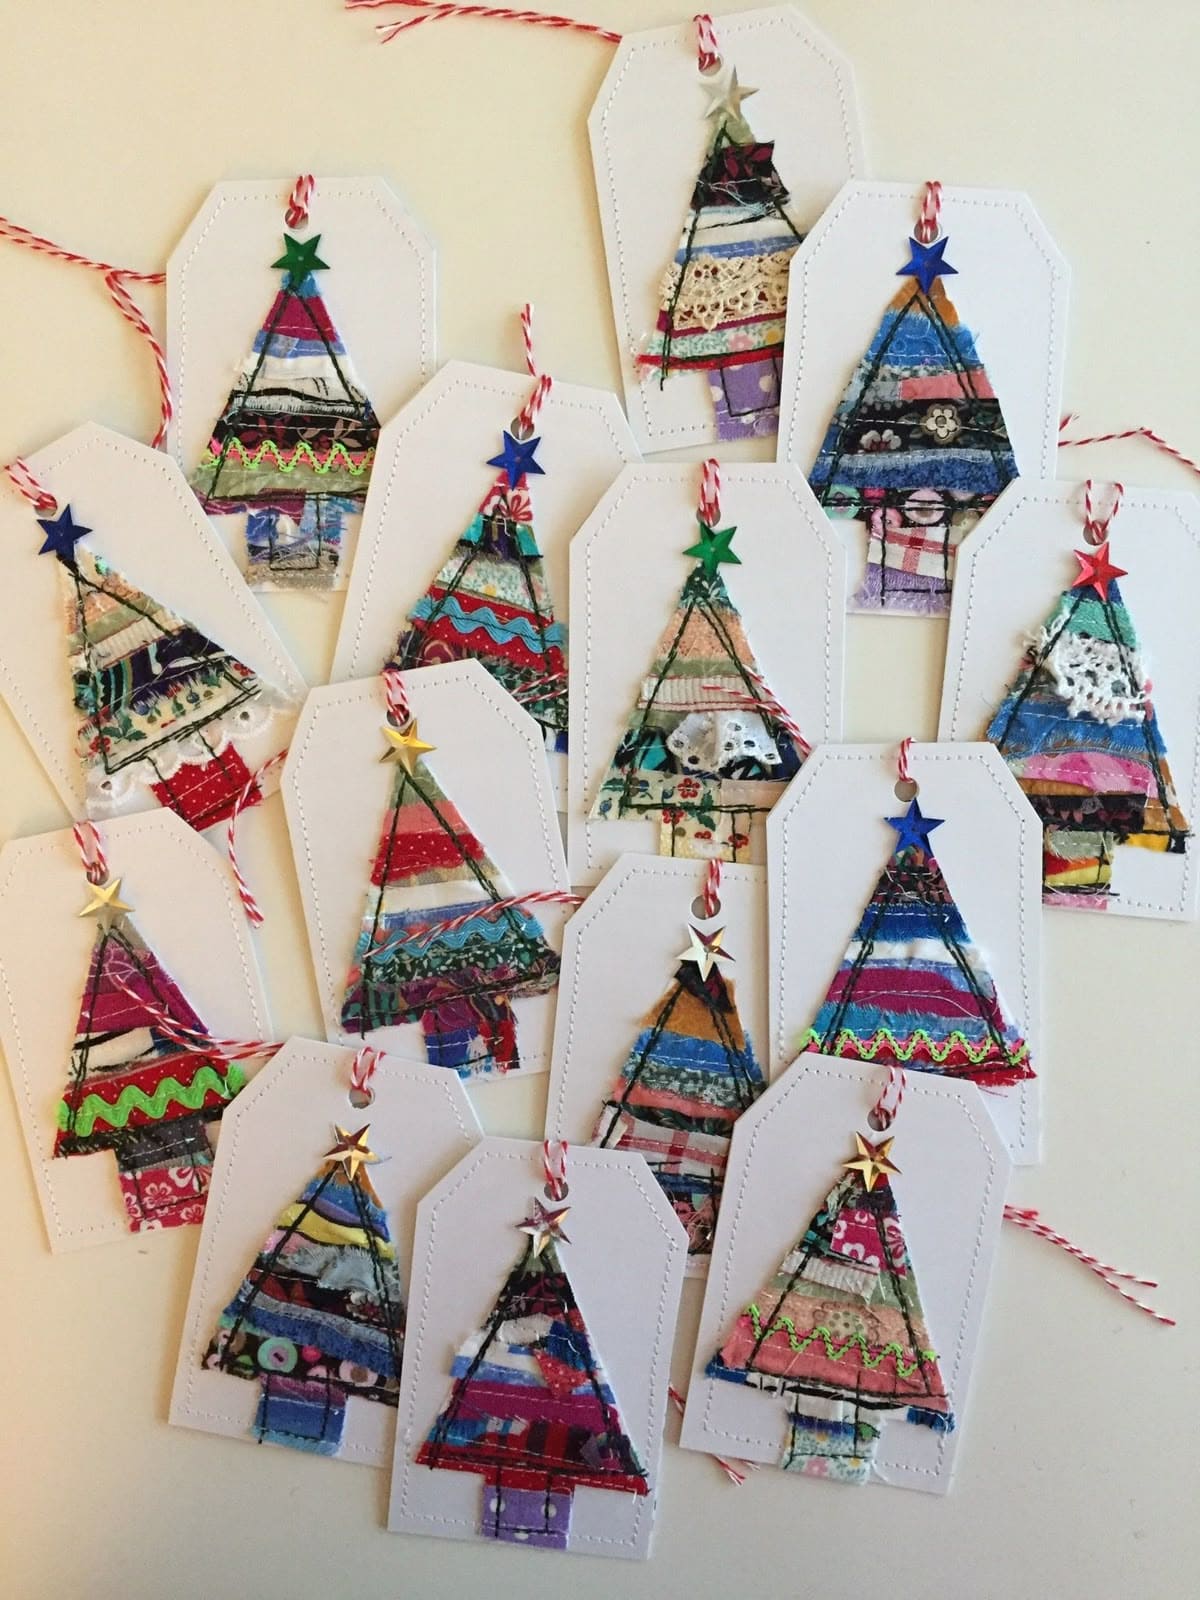
These charming handmade tags combine the simplicity of cardstock with the whimsical texture of fabric scraps. Each tag features a miniature Christmas tree built from layered textile strips, topped with a colorful star and stitched with rustic thread.
Every tree is unique, making them perfect for using up fabric odds and ends. These tags feel playful and heartfelt like a handwritten note in textile form.
Materials Needed
- White cardstock or blank tags (approx. 2.5″x4″)
- Fabric scraps in festive colors
- Embroidery floss or sewing machine
- Star embellishments
- Red baker’s twine
Step-by-step Guide
Step 1: Cut fabric scraps into small strips and layer them into a tree shape on each tag.
Step 2: Stitch through the fabric to secure it to the card, either by hand or machine.
Step 3: Finally, add a star to the top and punch a hole to thread twine through.
