Old lamp posts are surprisingly easy to come by in flea markets, salvage yards, even curbside cleanup days often turn them up. And while they might look like nothing more than bulky scrap at first glance, these pieces have incredible potential.
With their solid build, charming details, and vintage flair, lamp posts can be turned into everything from garden showstoppers to cozy home accents.
Whether you’ve already got one collecting dust in the garage or spot one on your next thrift run, don’t overlook it. This roundup will show you 20 creative, beautiful, and sometimes unexpected ways to breathe new life into an old lamp post.
#1. Upcycled Lamp Base Planters
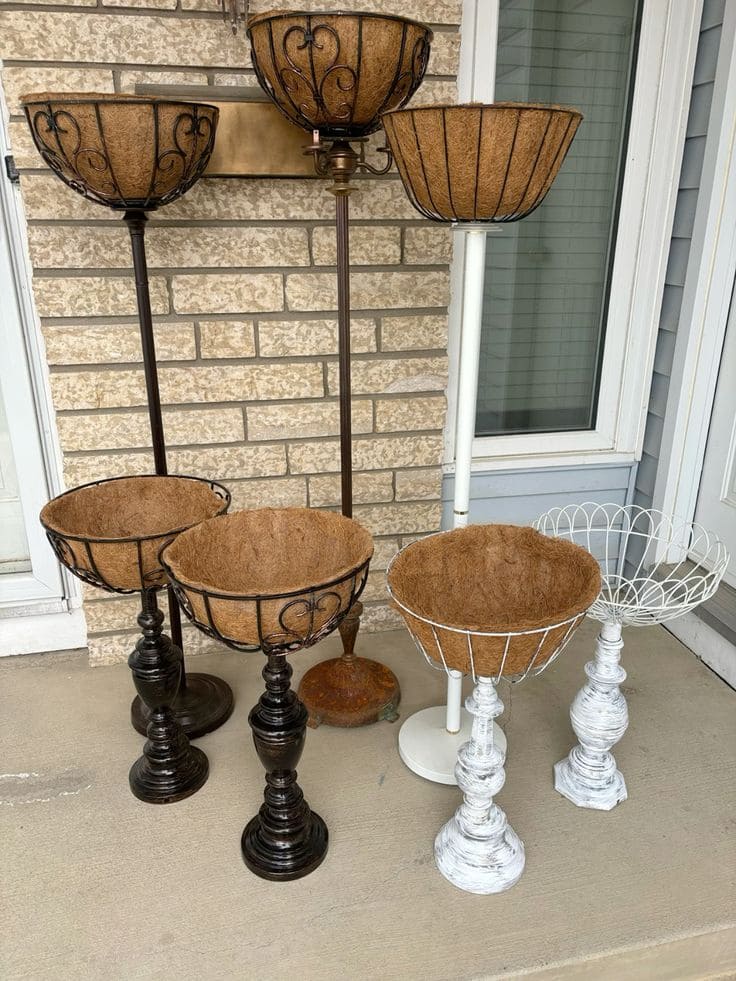
There’s something magical about giving forgotten things a second life. These charming planter stands were once floor lamps—dusty, outdated, maybe even destined for the curb. But with a little imagination (and some coconut liners), they’ve been transformed into elegant plant holders that elevate any porch or garden corner. Each piece is a one-of-a-kind blend of texture and shape, offering character no store-bought item can match. Whether you’re lining a walkway or styling your patio, these beauties bring vintage soul to your blooms.
Materials Needed:
Old floor lamp bases (as many as you’d like to create)
Metal hanging basket inserts (approx. 12–14 inches diameter)
Coconut fiber liners (sized to fit your baskets)
Strong epoxy or metal screws
Spray paint (optional: matte black, whitewash, bronze)
Drill with metal bit (optional)
Step-by-Step Guide:
Step 1: Disassemble the lamp by removing the wiring, bulb socket, and harp (if any). Clean the base thoroughly and sand any rust or rough spots.
Step 2: Position the hanging basket upside down on the top of the lamp base. Use screws or heavy-duty epoxy to secure the basket firmly in place.
Step 3: If desired, paint the entire piece using spray paint for a uniform or vintage finish. Let it dry completely.
Step 4: Line the basket with a coconut fiber liner and fill it with soil and your favorite seasonal plants or trailing greenery.
#2. Repurposed Spindle Coat Hook Stands
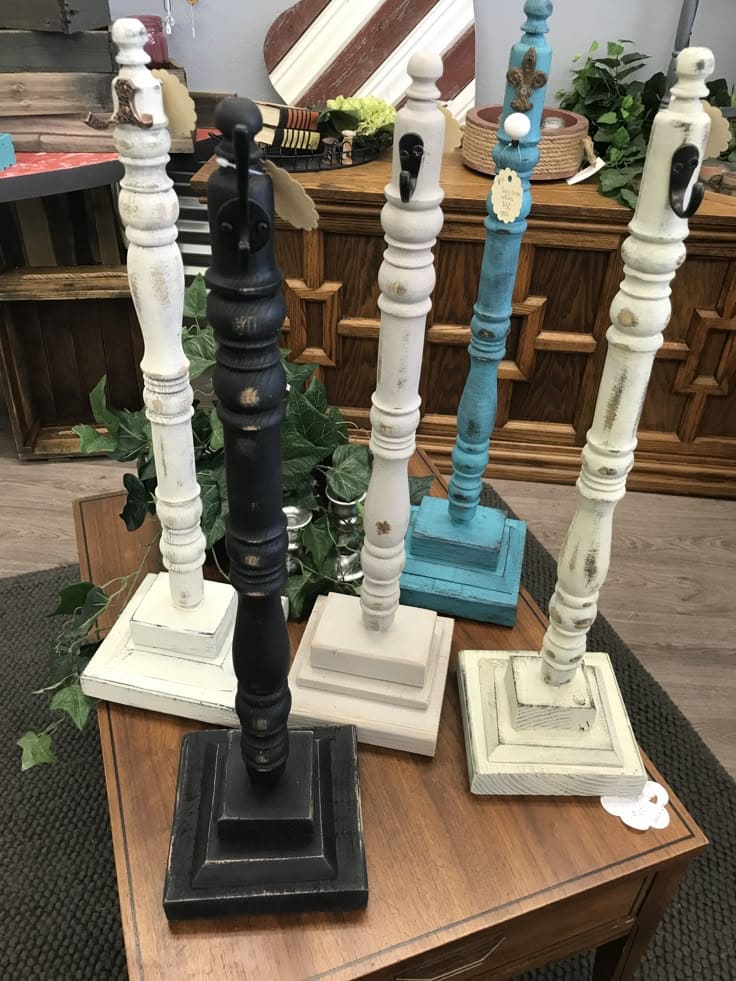
Sometimes, the most practical pieces come from the simplest scraps. These Repurposed Spindle Coat Hook Stands started as forgotten stair spindles gathering dust in the garage. With just a little creativity and a couple of sturdy hooks, they’ve been reborn as charming vertical organizers—perfect for entryways, craft rooms, or even next to your shower for towels. I made a few of these on a rainy weekend, and I’ve been surprised by how often we use them. They’re sturdy, stylish, and just quirky enough to start conversations. Plus, they make the perfect DIY gift for that friend who loves rustic décor.
Materials Needed
1 salvaged wooden spindle (about 24–30 inches tall)
1 square wood base (approx. 6×6 to 8×8 inches)
1–2 metal hooks
Paint or chalk paint (any color)
Sandpaper or sanding block
Wood glue or screws
Drill and screwdriver
Optional: distressing wax or clear sealant
Step-by-step Guide
Step 1: Clean the spindle thoroughly and lightly sand both it and the base. Wipe clean to remove dust.
Step 2: Paint your spindle and base using your chosen colors. You can go bold or stick to muted farmhouse tones—whatever suits your style.
Step 3: Once dry, use a sanding block to distress edges for a vintage look if desired. Apply wax or sealant for durability.
Step 4: Attach the spindle to the center of the wood base using wood glue or screws for extra strength. Let dry fully.
Step 5: Screw in your hook(s) at a comfortable height. You can use a single large hook or two staggered small ones.
#3. Elegant Statement Lamps
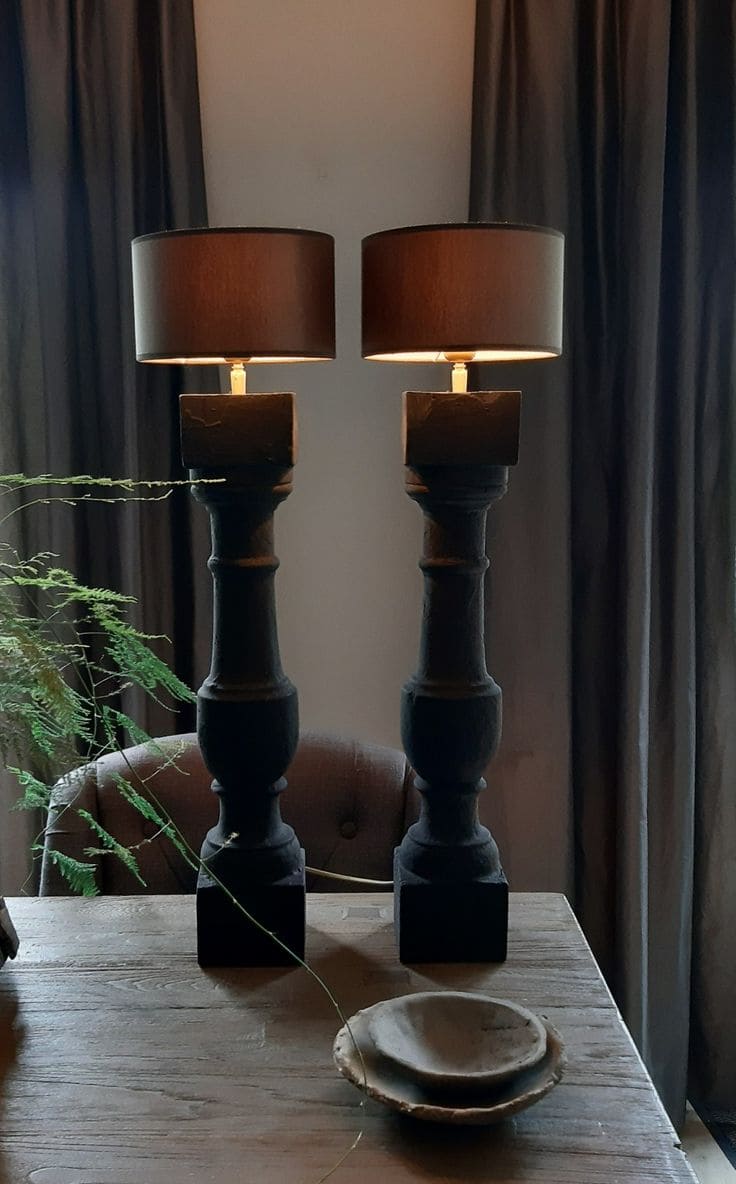
If you’ve ever stumbled across a pair of chunky vintage table legs and thought “they deserve better,” this project is proof you were right. These tall, dark beauties were born from raw, repurposed wood, sanded and finished to highlight every imperfect curve. The matte black paint brings depth, while the simple drum shades balance the drama with quiet sophistication. Set on a raw wooden table in front of long curtains, they cast a warm, calm glow—like two sentinels standing guard over a thoughtfully styled room. It’s a masterclass in contrast: aged wood turned artful, rough turned refined. You don’t just light a room with these—you transform the mood.
Materials Needed
2 salvaged table legs or balusters
2 lamp kits (socket, harp, cord, plug)
2 wooden bases (about 5×5 inches)
Drill with spade or Forstner bit
Sandpaper (medium grit)
Paint or stain (optional)
2 lamp shades
Wood glue or screws
Painter’s tape (optional)
Matte sealer or wax (optional)
Step-by-step Guide
Step 1: Clean the salvaged legs and bases using a damp cloth. Sand any rough or chipped areas.
Step 2: Attach each leg to its wooden base using wood glue or screws from underneath.
Step 3: Drill a hole down through the center of the leg for the lamp cord. Add a horizontal exit hole near the bottom of the leg.
Step 4: Paint or stain the legs and bases if desired. Let dry completely, then seal with wax or matte finish.
Step 5: Thread the cord through the holes. Follow the lamp kit instructions to wire the socket and attach the harp.
Step 6: Add your shade, plug it in, and admire the warm, handmade glow.
#4. Rustic Garden Arbor from Repurposed Lamp Posts
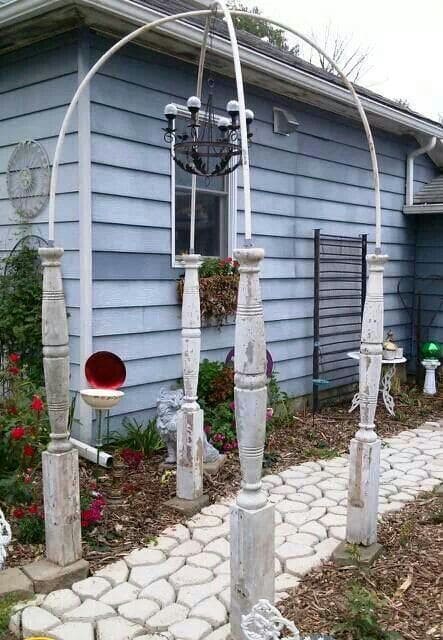
If you’re someone who appreciates charm layered with a touch of nostalgia, this DIY arbor will speak to your soul. Built from four vintage lamp posts and crowned with graceful arching conduit pipes, this structure feels like it belongs in a secret garden novel. It’s the perfect spot for hanging planters, a whimsical chandelier, or even a bird feeder. The timeworn paint adds just the right amount of romantic patina—no need for perfection here. It’s all about repurposed beauty.
Materials Needed:
4 old wooden lamp posts (approx. 5–6 feet tall each)
2 flexible metal conduit pipes or PVC (10–12 feet long)
Screws and L-brackets for securing arches
Outdoor paint or sealer (optional, for weather protection)
Hanging décor (small chandelier, bird feeder, or planter)
Concrete blocks or secure ground anchors (if needed for stability)
Step-by-Step Guide:
Step 1: Arrange the four lamp posts into a square or rectangular base, spacing them evenly. Anchor them securely into the ground using concrete or stakes.
Step 2: Bend the two conduit pipes gently and attach one to each pair of opposite posts to form arched supports. Use L-brackets and screws to fix them tightly in place.
Step 3: Add a center hook or crosspiece to hang your chosen ornament—an old chandelier adds elegance, but a quirky bird feeder works just as well.
Step 4: Optionally, repaint or seal the wood to preserve it outdoors. Let nature add the rest—climbing vines, wind chimes, or curious little birds.
#5. Vintage Wreath Stands from Repurposed Lamp Posts
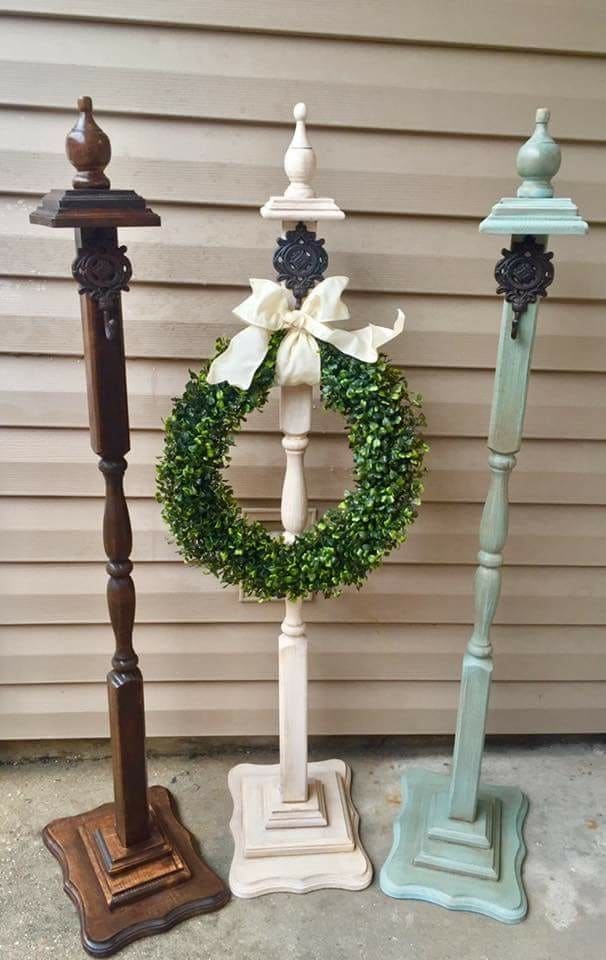
Sometimes a porch needs just a little something extra—something to say “welcome” with charm and character. These wreath stands are the answer. Crafted from repurposed lamp posts or stair spindles, they bring elegant height and a timeless cottage feel to your seasonal decor. Whether you choose a chippy white, soft sage, or rich espresso finish, each piece becomes a one-of-a-kind statement. Perfect for holding wreaths, hanging lanterns, or simply standing proud beside your front door.
Materials Needed:
3 old lamp posts or large stair spindles (about 36–48 inches tall)
3 decorative wood plaques or square bases (at least 8” wide)
3 finials (or salvage knobs for top detail)
3 metal wall hooks or vintage-style plaques with hooks
Screws and drill
Paint or wood stain (your choice of finish)
Wreath with bow (18–24 inches recommended)
Step-by-Step Guide:
Step 1: Attach each spindle to its wooden base using screws from the bottom up. Be sure to center it so the stand stays balanced.
Step 2: Add a decorative finial or knob to the top using wood glue or a screw, depending on your material.
Step 3: Screw a hook or ornate metal plaque with hook onto the front side at eye level for hanging the wreath.
Step 4: Paint or stain the entire piece in your chosen finish. Let it dry thoroughly before placing outside.
#6. Elegant Porch Planters
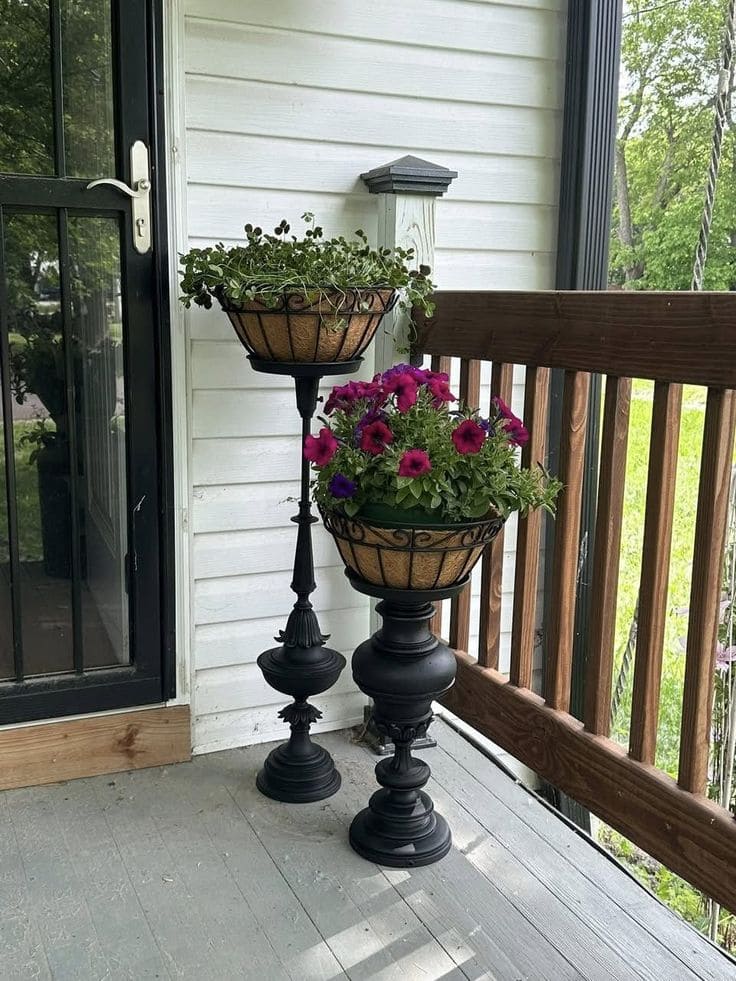
Who says porch décor needs to be expensive or store-bought? If you’ve ever stumbled upon a couple of old lamp post bases—those ornate, heavy-bottomed ones—you might be sitting on pure garden gold. With a little vision, they can become dramatic, vintage-style pedestal planters that elevate your porch (literally and aesthetically). These black beauties add a sense of history while lifting your blooms to eye level where they can truly shine.
Materials Needed:
2 salvaged lamp post bases (metal or resin)
2 wire hanging baskets (12–14 inch diameter)
2 coconut fiber liners
Black outdoor spray paint (satin or matte)
Strong adhesive (E6000 or outdoor epoxy)
Potting soil
Flowering plants (petunias, ivy, or any trailing annual)
Step-by-Step Guide:
Step 1: Clean your lamp bases thoroughly, removing dust or rust. Spray paint them black (or your desired color) and let dry completely.
Step 2: Attach each wire basket to the top of the lamp base using a heavy-duty adhesive. Hold or clamp in place until set—this is key for stability.
Step 3: Line the baskets with coco liners, trimming if needed to fit snugly.
Step 4: Fill with potting soil and tuck in your favorite flowers—trailing petunias, sweet potato vine, or even strawberries work well.
#7. Solar Garden Lamp with a Repurposed Twist
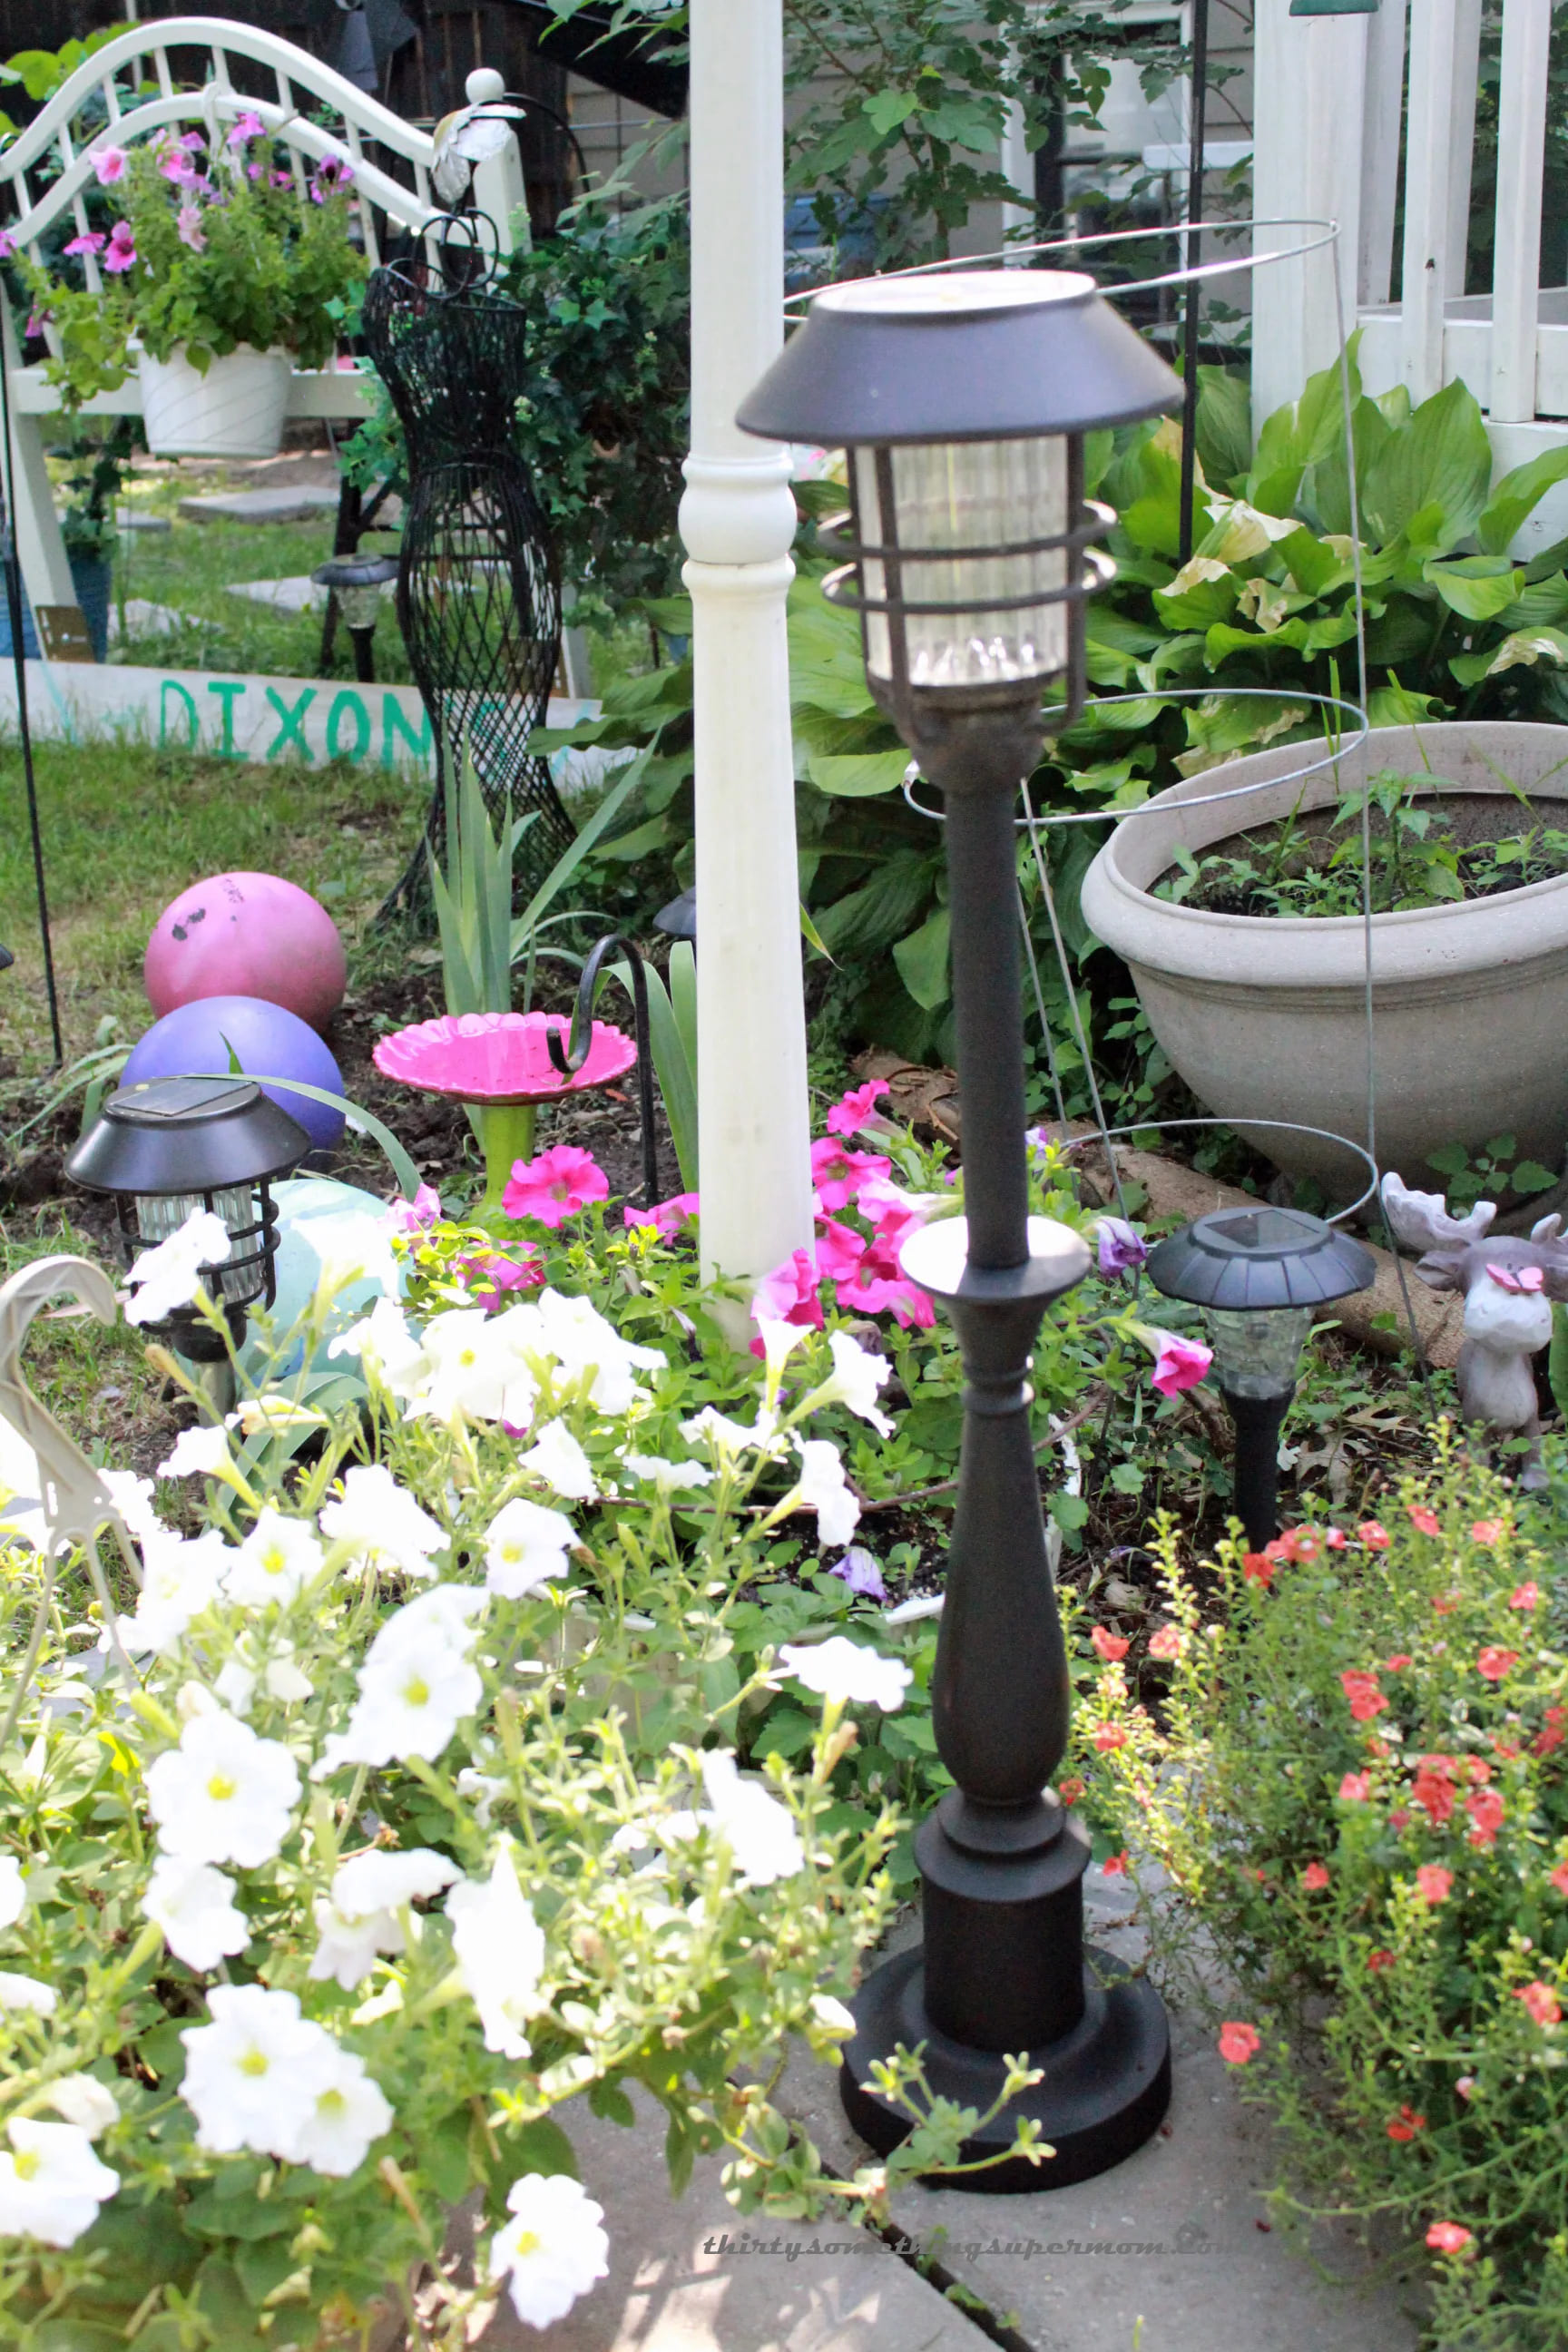
This solar lamp post blends practicality with personality. Instead of tossing an old table leg or stair spindle, you can give it a new lease on life as a garden accent. The base adds sculptural charm while the solar light softly illuminates the blooms at dusk. It’s the kind of project that quietly delights—you’ll catch yourself smiling every time it lights up your path. Whether you’re aiming for a cozy cottage vibe or simply want to reuse what you have, this is an easy win for your flower bed or walkway.
Materials Needed:
1 wooden spindle or table leg (around 24–30 inches tall)
1 solar garden lamp (detachable top with light)
Wood round or sturdy base (6–8 inches diameter)
Exterior black spray paint (matte or satin finish)
Heavy-duty construction adhesive or screws
Sandpaper or sanding sponge
Step-by-Step Guide:
Step 1: Lightly sand the spindle and wood base. This helps the paint adhere better.
Step 2: Spray-paint both pieces with outdoor-safe black paint. Let them dry completely before handling.
Step 3: Attach the spindle to the base using wood screws or strong adhesive. Make sure it’s level and secure.
Step 4: Insert or glue the solar lamp head into the top of the spindle. If the fit isn’t snug, use a bit of hot glue or caulking for stability.
#8. Vintage Lamp Stand Turned Elegant Indoor Planter
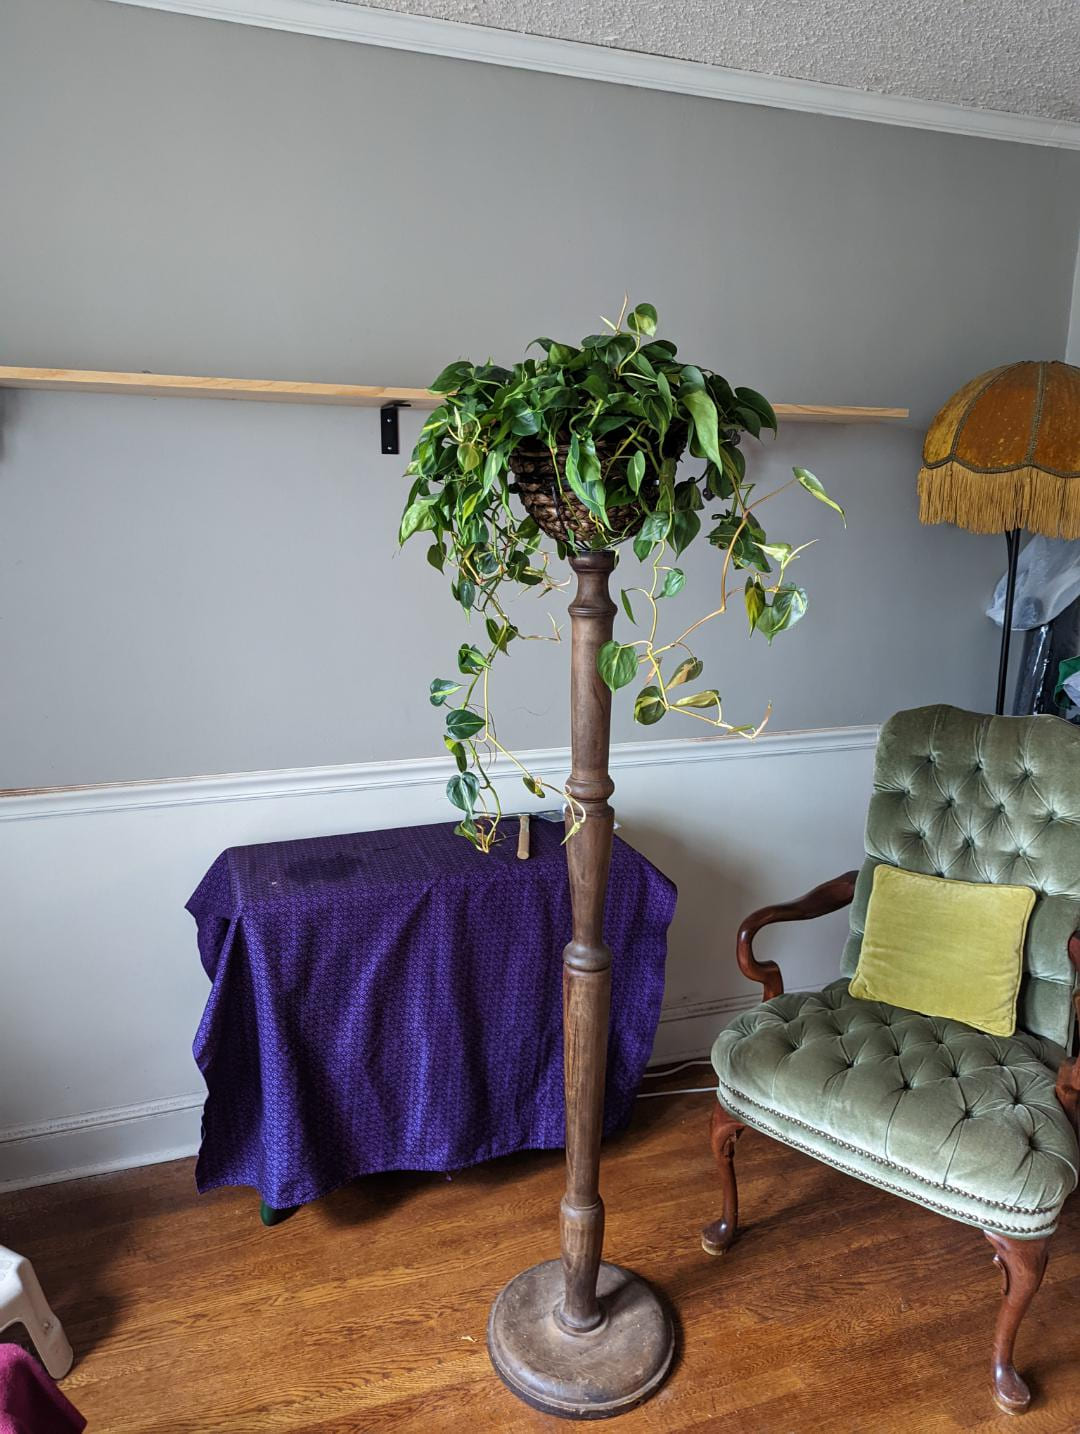
Who says your plants can’t have a throne? This tall indoor plant stand, made from an old wooden floor lamp, gives your trailing greens the royal treatment. It brings vertical interest to your space while making that once-forgotten lamp base feel fresh and dignified again. If you’ve got a room that needs a little greenery and character, this is your golden opportunity to blend both.
Materials Needed:
1 tall wooden lamp post or floor lamp (lamp removed)
Wood stain or furniture polish (optional, to refresh the base)
1 small to medium-sized planter basket
Screws or industrial glue
Trailing indoor plant (like pothos or ivy)
Step-by-Step Guide:
Step 1: Remove the old lamp parts and wiring completely, leaving only the base and stand.
Step 2: Clean the wood and optionally refinish it with polish or stain to restore its warm tones.
Step 3: Attach a decorative planter basket securely to the top using screws or a strong adhesive.
Step 4: Pot your plant and gently arrange the trailing vines so they cascade naturally.
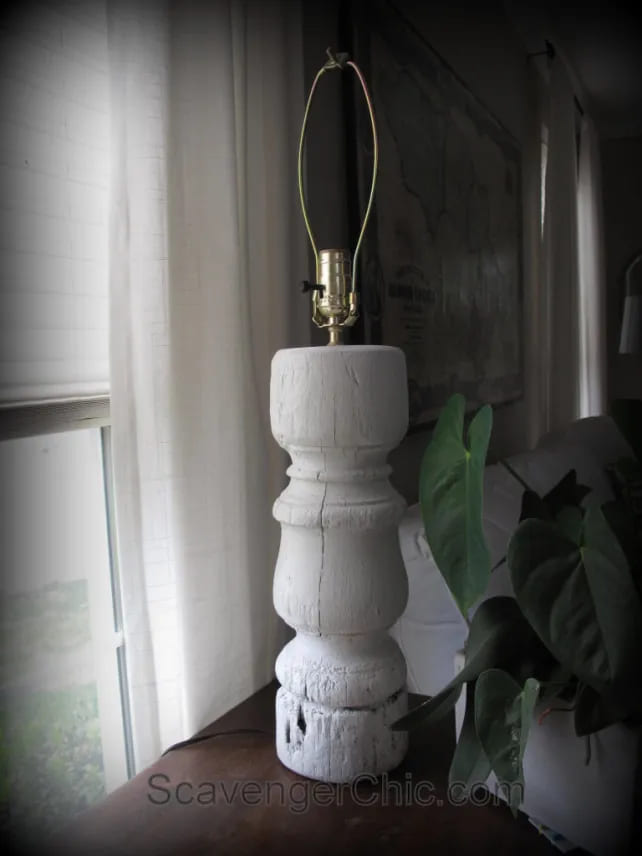
#9. From Table Leg to Timeless Lamp
Somewhere in a forgotten garage corner or under a flea market table, an old baluster or table leg waits patiently for a second chance. You pick it up, feel the weight of its solid wood, trace the cracks and curves, and imagine the stories it’s carried. With a bit of love and light—literally—you can give that weathered wood a new role: the glowing centerpiece of your room.
Materials Needed:
1 chunky wooden baluster or table leg (about 12–18 inches tall)
Sandpaper (medium and fine grit)
Drill with a long bit
Lamp kit (socket, harp, cord)
Paint or stain (optional)
Lamp shade
Wood sealer (optional for a matte finish)
Step-by-Step Guide:
Step 1: Sand the wood to remove dirt or flaking paint. Keep the cracks and chips—they add rustic charm.
Step 2: Drill a hole through the center of the baluster (top to bottom). If it’s solid, you may need to drill in sections from both ends and meet in the middle.
Step 3: Feed the lamp cord through the base and out the top. Attach the socket and secure it tightly per your lamp kit’s instructions.
Step 4: Add your preferred finish—whitewashed, matte black, or natural wood sealed with tung oil. Let it dry fully.
Step 5: Top it with a lamp harp and your favorite shade. Plug it in, flip the switch, and enjoy your cozy, handmade glow.
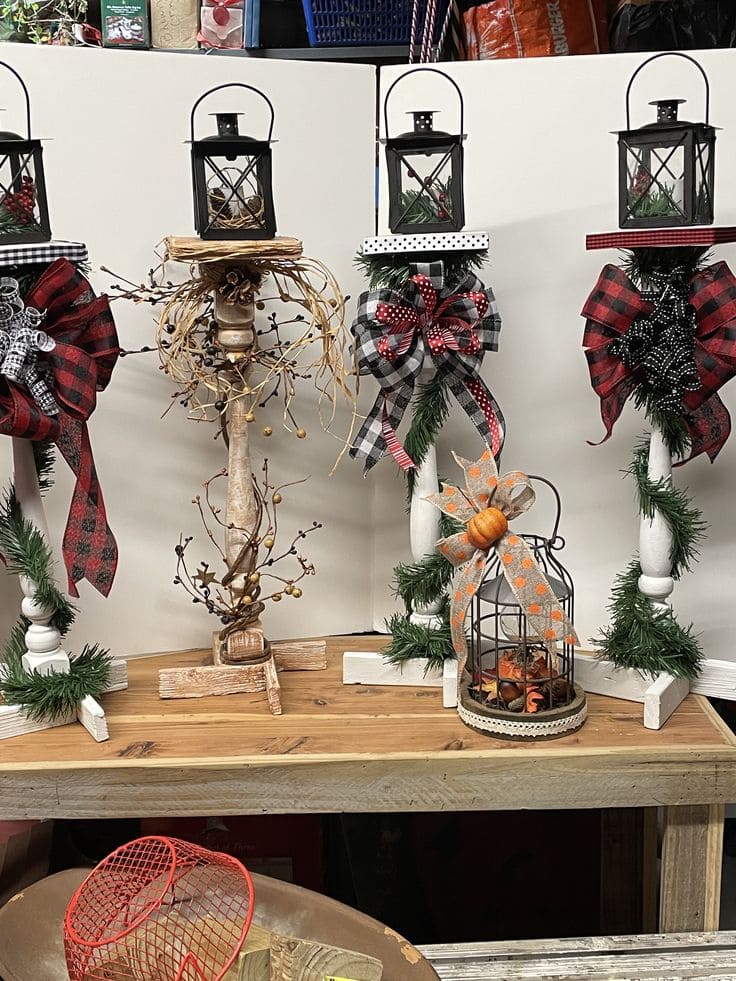
#10. Rustic Lantern Pedestals
If you’ve ever stumbled across an old stair spindle or broken table leg and wondered what to do with it—here’s your answer. These lantern pedestals are more than seasonal décor; they’re joyful little statements that blend rustic charm with holiday spirit. Adorned with greenery, plaid bows, and flickering lanterns, they bring a nostalgic glow to your entryway, mantel, or porch. You can tailor each one with your own ribbon flair, seasonal picks, or even painted finishes. They’re surprisingly affordable and addictive to make—you might not stop at one.
Materials Needed:
1 repurposed spindle or table leg (approx. 24–36 inches tall)
1 small lantern (battery-operated or tea-light style)
1 wooden block or flat wood topper (approx. 4×4 inches)
Decorative ribbon (2–3 feet per post)
Faux greenery garland or picks
Hot glue gun and glue sticks
Wood screws or wood glue
White paint or stain (optional for finish)
Drill and sanding block
Step-by-Step Guide:
Step 1: Lightly sand your spindle and paint or stain it in your desired tone. Let it dry thoroughly.
Step 2: Attach the wooden topper using strong wood glue or screws to create a flat platform for your lantern. Let it cure completely.
Step 3: Hot glue or tie faux greenery around the base and up the post, securing it as you go. Wrap your chosen ribbon around and finish with a big bow near the top or base.
Step 4: Place or secure the lantern on top. If your lantern is light, a dab of glue is enough; for heavier ones, use screws.
Optional: Add seasonal picks like pinecones, berries, or mini pumpkins depending on the occasion.
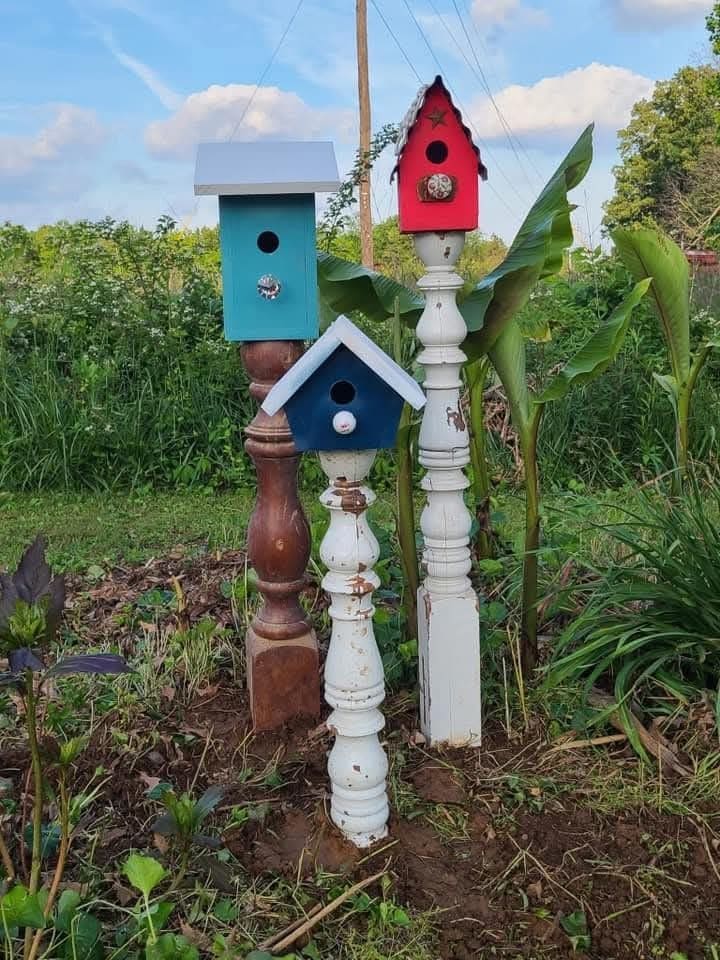
#11. DIY Garden Spindle Birdhouses
There’s a certain kind of magic that happens when you mix weathered wood, bold color, and a touch of whimsy. That’s exactly what you get with these DIY Garden Spindle Birdhouses. Each one tells its own story—maybe from an old staircase or salvaged table leg—and now, they stand proudly in the garden like quirky sentinels offering room and board to your local songbirds. I made a few of these last spring using leftover spindles I couldn’t bring myself to toss. A quick coat of paint, a birdhouse from the craft store, and suddenly the flower bed felt like a little neighborhood. The best part? You don’t need to be a woodworking pro. Just a drill, some paint, and a bit of imagination.
Materials Needed
3 salvaged wooden spindles or chunky table legs (about 30–40 inches tall)
3 unfinished wooden birdhouses
3 screws (1–1.5 inches long)
Small decorative knobs (optional)
Exterior paint (3–4 colors of your choice)
Wood glue (optional, for extra hold)
Clear outdoor sealer
Drill and screwdriver
Step-by-step Guide
Step 1: Clean the salvaged legs with a damp rag and let them dry. Lightly sand if needed, but keep the vintage character if you love that worn look.
Step 2: Paint the birdhouses with bold, cheerful colors. Mix and match hues for a playful, eye-catching look. Let dry fully.
Step 3: Attach decorative knobs or pulls beneath the birdhouse openings to act as perches (optional but adorable).
Step 4: Drill a pilot hole into the top of each spindle and the bottom of each birdhouse. Use a screw to attach the house to its base securely.
Step 5: Apply a clear sealer over the entire structure to protect it from the elements. Let dry overnight.
Step 6: Place your spindle birdhouses directly into the soil, about 4–6 inches deep, and press firmly to anchor. Use a rubber mallet if needed for stability.
#12. Candle Holders From Vintage Spindles
There’s something soulful about aged wood—each dent and curve whispers its own story. These rustic candle holders are crafted from old staircase spindles and salvaged furniture legs. Whether they once stood in a grand hallway or a creaky farmhouse, they now glow with quiet warmth beside the Christmas tree. This is a project where imperfection becomes charm. No two pieces are alike—and that’s the beauty of it. You don’t need to be a master carpenter to create them. Just a love for texture, history, and candlelight.
Materials Needed:
4–6 reclaimed wooden spindles or furniture legs (12–36 inches tall)
Wooden bases (salvaged or cut from 1” thick wood, at least 5” square or round)
Candle plates or metal discs (1 per spindle, 3–4” diameter)
Wood glue or screws
Sandpaper (medium and fine grit)
Wood stain or clear wax (optional)
Drill with bit matching screw size
Tapered or pillar candles
Step-by-Step Guide:
Step 1: Sand the spindles lightly to remove rough edges but keep their rustic patina. Clean any dust or residue with a damp cloth.
Step 2: Attach each spindle to a solid wood base using screws or strong wood glue. Make sure they stand evenly and securely.
Step 3: Affix a candle plate or small metal dish on top to safely hold your candle. You can screw it in or glue it, depending on the materials.
Step 4: Apply wood stain or a protective wax finish if you want to deepen the color or seal the wood, but leaving it raw works beautifully too.
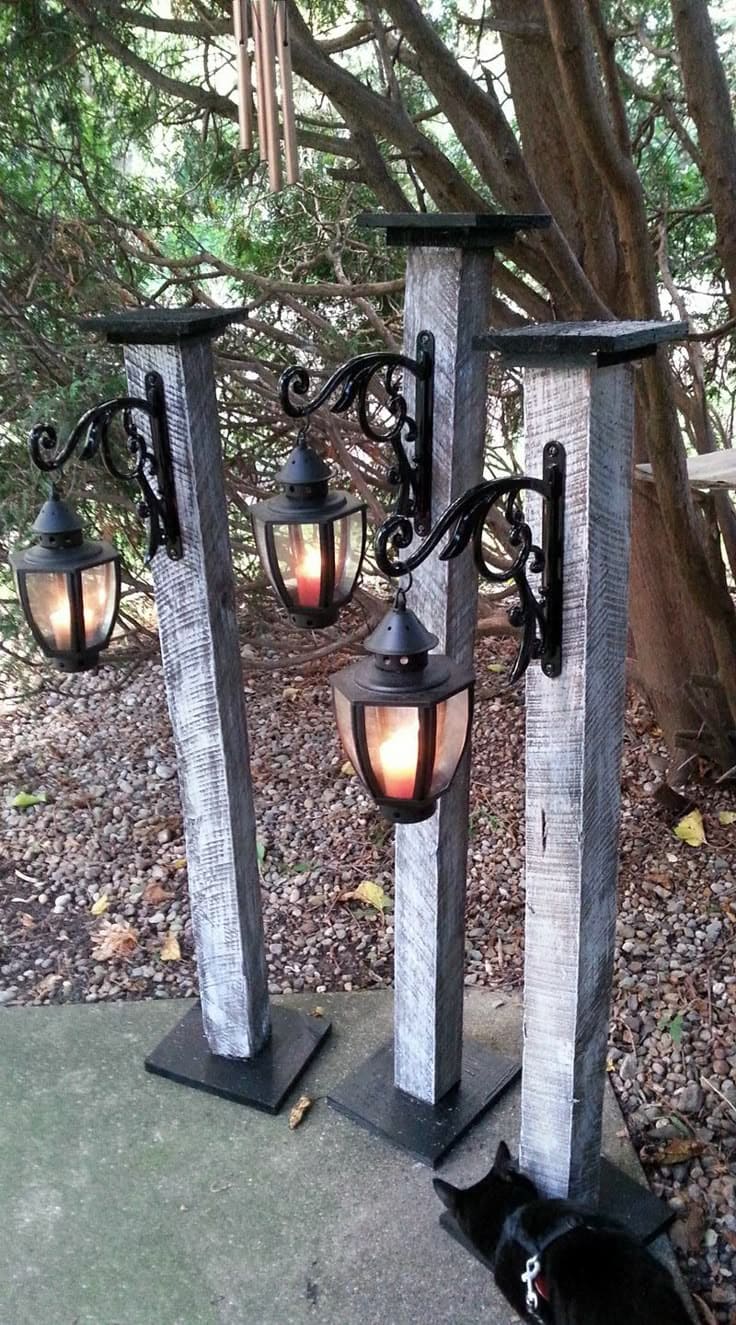
#13. Rustic Garden Lamp Posts
If you’ve got a few old lanterns lying around and some leftover wood from a fence project, you’re halfway to creating these charming garden lamp posts. They bring a soft, vintage glow to any outdoor space—like little sentinels of light tucked among the trees. I built mine one chilly afternoon using scrap materials and a touch of black spray paint. These posts look expensive, but they cost less than a dinner out. You’ll love the transformation they bring to a plain path or patio corner.
Materials Needed:
3 wooden posts (4″x4″, 4 ft, 5 ft, and 6 ft tall)
3 wooden bases (12″x12″ plywood or similar for stability)
3 decorative wall-mount lamp brackets
3 outdoor lanterns (repurposed or solar-powered)
12 screws (1½” wood screws)
Black matte spray paint (1 can)
Wood stain or whitewash (optional, for a weathered look)
Drill and screwdriver
Wood glue (optional)
Step-by-Step Guide:
Step 1: Cut your 4×4 posts into three heights: 4 feet, 5 feet, and 6 feet. Attach each to a plywood base using wood screws from underneath and a dab of wood glue for extra hold.
Step 2: Lightly sand the posts and apply a wood stain or whitewash if desired. Let them dry, then spray paint your lantern brackets matte black.
Step 3: Attach the brackets near the top of each post using screws. Make sure they’re secure enough to hold the lantern weight.
Step 4: Hang the lanterns on the brackets. If using solar or battery-powered lights, check their alignment to make sure they catch sunlight or are easy to turn on at night.
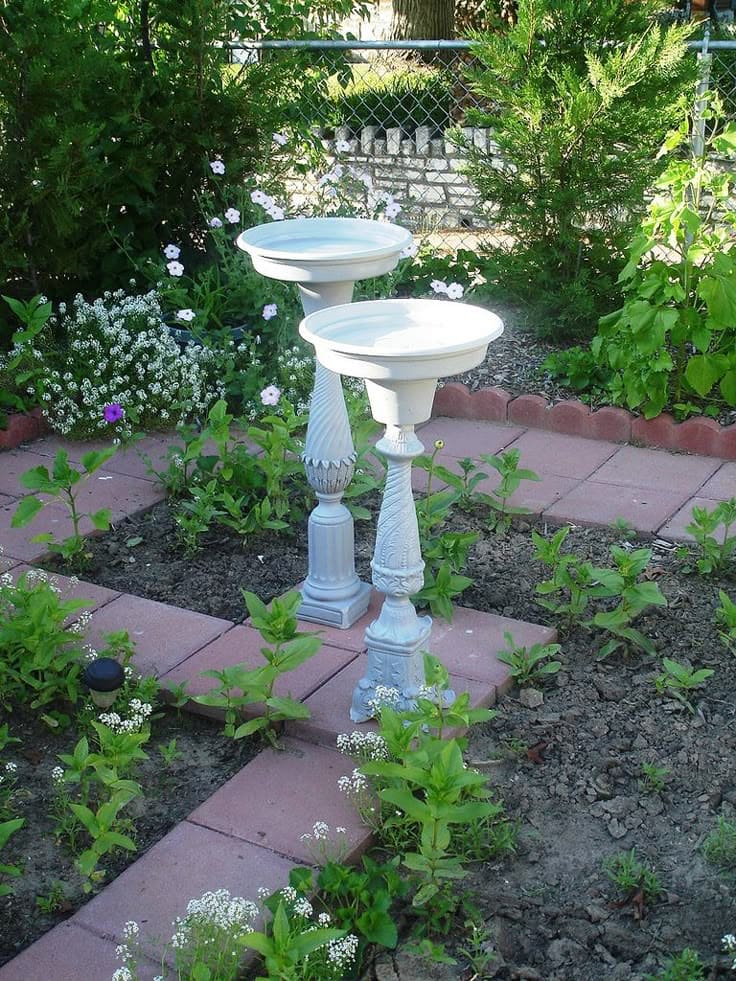
#14. Vintage Spindle Birdbaths
Every morning, I catch a few chickadees splashing around in these upcycled birdbaths, and it brings such a simple joy. They’re made from old stair spindles paired with thrifted bowls or metal pans—so easy to put together, yet they look like elegant garden accents you’d find in a fancy boutique. The best part? They’re budget-friendly and surprisingly sturdy. If you’ve got a couple of mismatched spindles and shallow bowls lying around, this is your sign to give them a second life under the sky.
Materials Needed
2 salvaged wooden spindles (18–24 inches tall)
2 shallow metal or ceramic bowls (about 8–10 inches wide)
2 square wood bases (around 6×6 inches)
Outdoor paint or spray paint
Strong adhesive (like E6000 or construction adhesive)
Sandpaper
Step-by-step Guide
Step 1: Clean and sand the spindles and bases to prep for painting. Make sure surfaces are smooth and dust-free.
Step 2: Paint the spindles, bowls, and bases with outdoor-rated paint. Let them dry completely between coats.
Step 3: Attach each spindle to a wood base using strong adhesive or screws from underneath for extra hold.
Step 4: Glue the bowls securely to the top of each spindle. Press down and let cure fully—follow adhesive instructions.
Step 5: Once dry, place your birdbaths in a sunny garden spot and fill the bowls with fresh water.
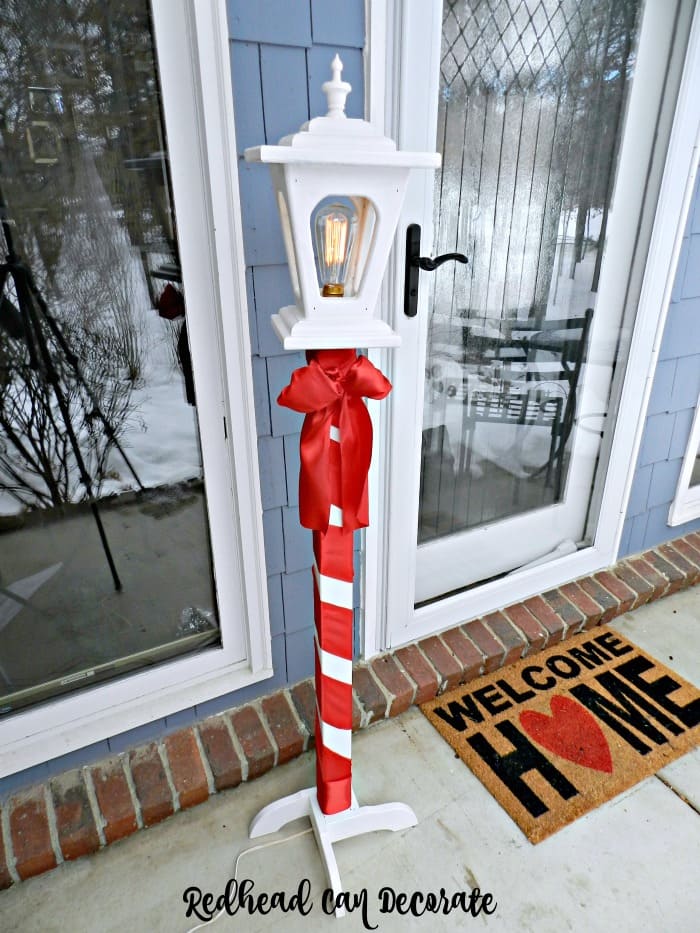
#15. DIY Candy Cane Porch Lamp
This project turns a forgotten spindle and a thrifted lamp into a show-stopping holiday porch piece. The white base and bold red ribbon give it that cheerful North Pole vibe, while the working light adds both charm and function. Set it near your door to welcome guests with warmth and whimsy—it’s like the spirit of Christmas wrapped in a bow. Whether you’re lighting up snowy evenings or just want a touch of classic flair, this creation brings nostalgic joy with a handmade heart.
Materials Needed:
1 wooden spindle (at least 3 feet tall)
1 porch lamp or lantern top (can be electric or solar)
1 wooden base or cross-shaped stand
White paint (spray or brush-on)
2–3 yards of red satin ribbon (or red paint for stripes)
Hot glue gun or adhesive
Optional: bulb and extension cord (if using electric)
Step-by-Step Guide:
Step 1: Paint the spindle and base white. Let dry completely.
Step 2: Wrap the red ribbon in a spiral up the spindle to mimic a candy cane. Secure with hot glue at both ends or paint the stripes if preferred.
Step 3: Attach the lamp top to the spindle using screws or industrial-strength glue.
Step 4: Add a large bow just beneath the lamp for a festive touch.
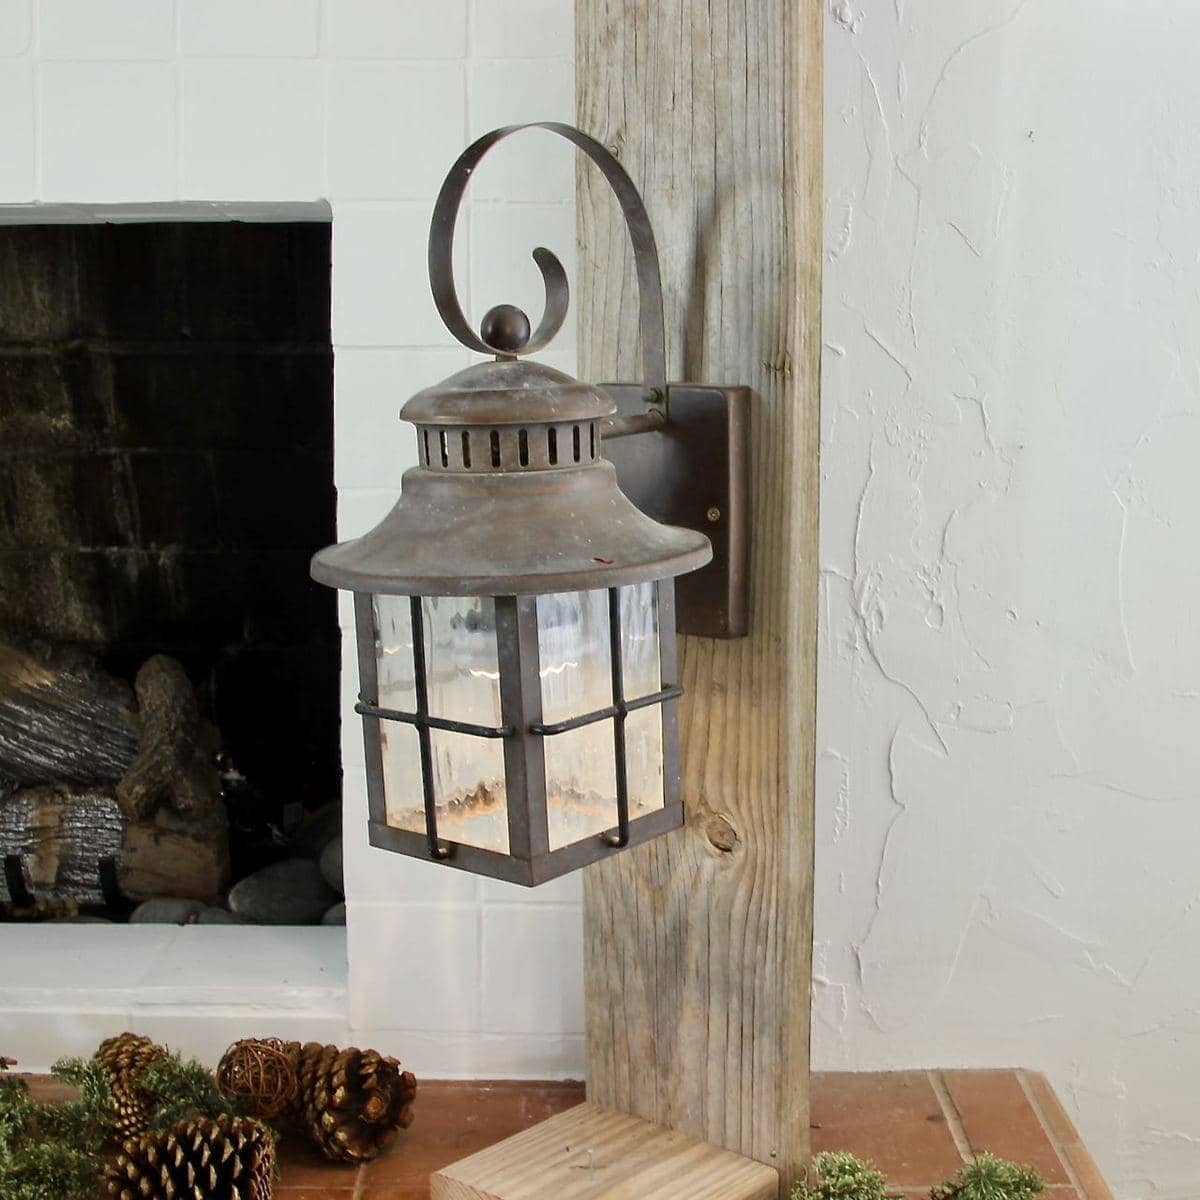
#16. Rustic Porch Lantern with Reclaimed Wood Charm
This cozy wall lantern looks like it was plucked right off a vintage cabin porch—and that’s exactly the point. Mounted on a thick, weathered post, it instantly adds a touch of rustic soul to any space. Whether it’s welcoming guests at your front door or casting a warm glow in a reading nook, this piece speaks quiet stories of old-time craftsmanship and woodsmoke evenings.
Materials Needed:
1 reclaimed wooden post (approx. 3ft tall, 4×4 thickness)
1 outdoor lantern (wall-mount style)
Wood screws or bolts
Mounting bracket or hook for lantern
Optional: clear coat or wood sealant for protection
Step-by-Step Guide:
Step 1: Cut your wooden post to the desired height and sand down rough edges while keeping the rustic texture intact.
Step 2: Attach a stable wooden base if the post needs to stand freely. Otherwise, mount directly to a wall or floor.
Step 3: Secure the lantern’s bracket to the post with heavy-duty screws or bolts. Make sure it’s level and snug.
Step 4: Hang the lantern and check wiring if it’s electric—or simply pop in a flameless candle for instant atmosphere.
#17. Adorable Holiday Characters
There’s something undeniably heartwarming about transforming scrap into smiles—especially when it involves a snowman, Santa, and a reindeer. These whimsical Christmas figures are actually upcycled spindles from an old staircase. With just a bit of paint and personality, they’ve become cheerful greeters by the fireplace. Kids love helping with the faces, and it’s a great way to give forgotten wood a new life. Bonus? No fancy tools needed—just a dash of festive spirit and a free afternoon.
Materials Needed:
3 wooden spindles (each about 24–36 inches tall)
Acrylic paint: white, red, brown, black, orange, pink, gold
Paintbrushes (1 fine tip, 1 medium)
Googly eyes (6 total)
Small felt or fabric scraps (red scarf, Santa hat)
Cotton batting or fiberfill (for Santa’s trim)
Small wood circles or scrap plywood (for bases, approx. 5–6” diameter)
Hot glue gun and glue sticks
Permanent marker (fine point)
Thin twigs or pipe cleaners (for reindeer antlers)
Step-by-Step Guide:
Step 1: Lightly sand your spindles if needed, then paint one white (snowman), one red (Santa), and one brown (reindeer). Let dry completely.
Step 2: Paint facial features and costume details. Add buttons, belts, or carrot noses. Use fine brushes or a permanent marker for small details.
Step 3: Attach googly eyes with glue. Hot glue on scarves, cotton trim, and any other fabric accents. You can also glue Santa’s “boots” with a bit of faux snow at the base.
Step 4: Drill or glue each spindle to its circular wood base for stability. Add twigs or pipe cleaners to the reindeer head for antlers.
#18. Retro Glass Lamp Collection Display
If you’ve ever stumbled upon one of these vintage glass lamps at a thrift store or estate sale, you know they’re not just lighting—they’re statement pieces. This particular collection feels like a time capsule from the ‘60s or ‘70s, glowing in vibrant hues of amber, avocado, and honey gold. Their sculpted glass shapes and ornate metal bases carry a drama that today’s minimalist lamps could never replicate. Whether you’re restoring them for your living room or setting up a cozy vintage corner, these retro lamps turn any space into something magical once lit.
Materials Needed
1 or more vintage glass lamp bases (thrifted or salvaged)
Lamp kits (socket, harp, and cord)
Vintage-style bulbs
Lampshades (drum or bell style, depending on vibe)
Brass cleaner or metal polish
Optional: Color-matched spray paint for base touch-ups
Step-by-step Guide
Step 1: Clean the glass bodies gently with warm water and a soft cloth. Avoid anything abrasive—vintage glass scratches easily.
Step 2: Polish the metal hardware using brass cleaner or mild vinegar solution if it’s tarnished.
Step 3: If you’re rewiring, install a new lamp kit by attaching the socket to the harp and threading the cord through the base. Follow manufacturer instructions carefully for safety.
Step 4: Secure your lampshade—drum styles give a more modern twist, while scalloped or fringed shades lean into the vintage vibe.
Step 5: Plug it in, add a warm-toned bulb, and step back. Your room just got a whole lot cozier.
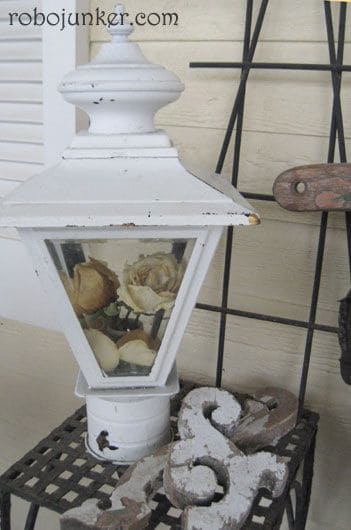
#19. Upcycled Lantern Flower Display
Who says old porch lanterns are only for lighting? This project turns a discarded outdoor lantern into a poetic little display case. Tucked inside are dried roses—delicate, nostalgic, and almost frozen in time. It’s the kind of project that brings soft charm to a garden corner, porch shelf, or rustic entryway. Whether you’re holding on to flowers from a special moment or just love the faded beauty of dried blooms, this lantern becomes a quiet tribute to the past.
Materials Needed
1 old outdoor lantern (any size, glass panels intact)
A handful of dried roses or flowers
White chalk paint (optional, for distressing)
Sandpaper or steel wool (to distress edges)
Floral foam or twine (to hold flowers inside)
Step-by-step Guide
Step 1: Clean the lantern thoroughly inside and out. Remove any leftover wiring or light socket if it’s still wired for electricity.
Step 2: If the lantern isn’t already painted, apply a coat or two of white chalk paint. Once dry, gently sand the edges and corners for a shabby-chic effect.
Step 3: Arrange your dried roses inside. You can either glue them to a base, secure them with floral foam, or tie them in a small bundle with twine.
Step 4: Carefully place or close the glass panels. If the top detaches, you can add or adjust flowers from above.
Step 5: Display your new lantern where it can catch the light or sit peacefully among your garden treasures.
#20. Rustic Porch Post Lantern Decor
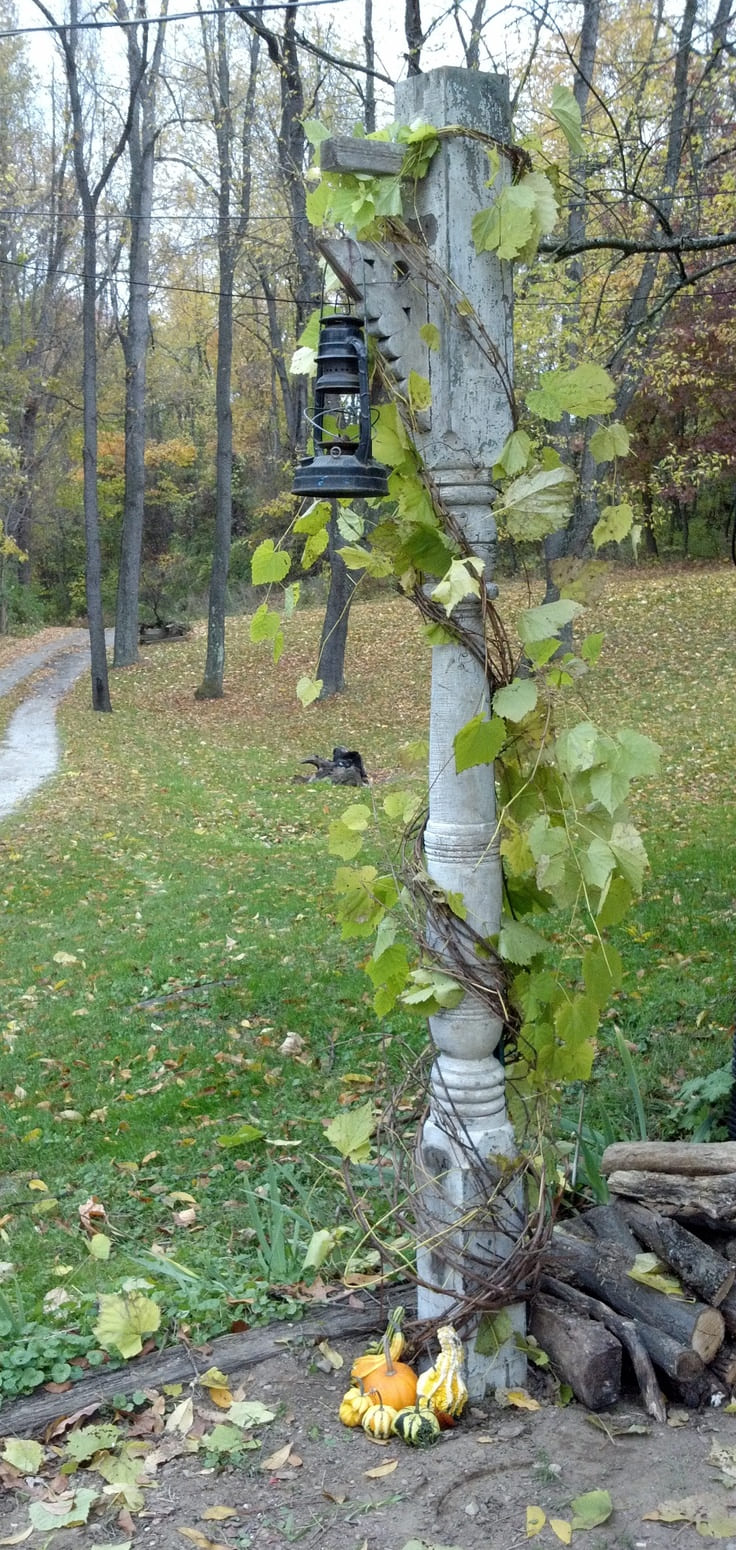
There’s a poetic calm in seeing something old stand tall among trees and fallen leaves. This project brings that magic to life using a salvaged porch post, an antique lantern, and nature’s own vines as finishing touches. It’s part sculpture, part light post, and fully charming in its rustic beauty. Whether marking the entrance to your garden or serving as a quiet autumn vignette, this piece invites you to slow down and savor the season.
Materials Needed
1 salvaged porch post or newel post (around 5–6 feet tall)
1 vintage-style lantern (battery or solar-powered)
1 wood bracket (to hold the lantern)
Outdoor screws or nails
White or gray outdoor paint (optional, for distressing)
Twine or garden vine (for wrapping)
Decorative gourds or pumpkins (for base accent)
Step-by-step Guide
Step 1: Clean the porch post and sand if needed. You can leave the natural patina or give it a light coat of chalky white paint for a worn, weathered look.
Step 2: Attach the wooden bracket to the top side of the post using outdoor screws. Make sure it’s secure enough to support the lantern.
Step 3: Hang your lantern from the bracket. Choose a battery or solar-powered lantern for easy lighting, or keep it purely decorative with a rustic oil lantern.
Step 4: Wind twine or natural vines around the post, letting them drape naturally. This softens the structure and ties it to its woodland surroundings.
Step 5: At the base, pile up a few miniature pumpkins, gourds, or seasonal items. This adds a festive, grounded touch to the whole display.

