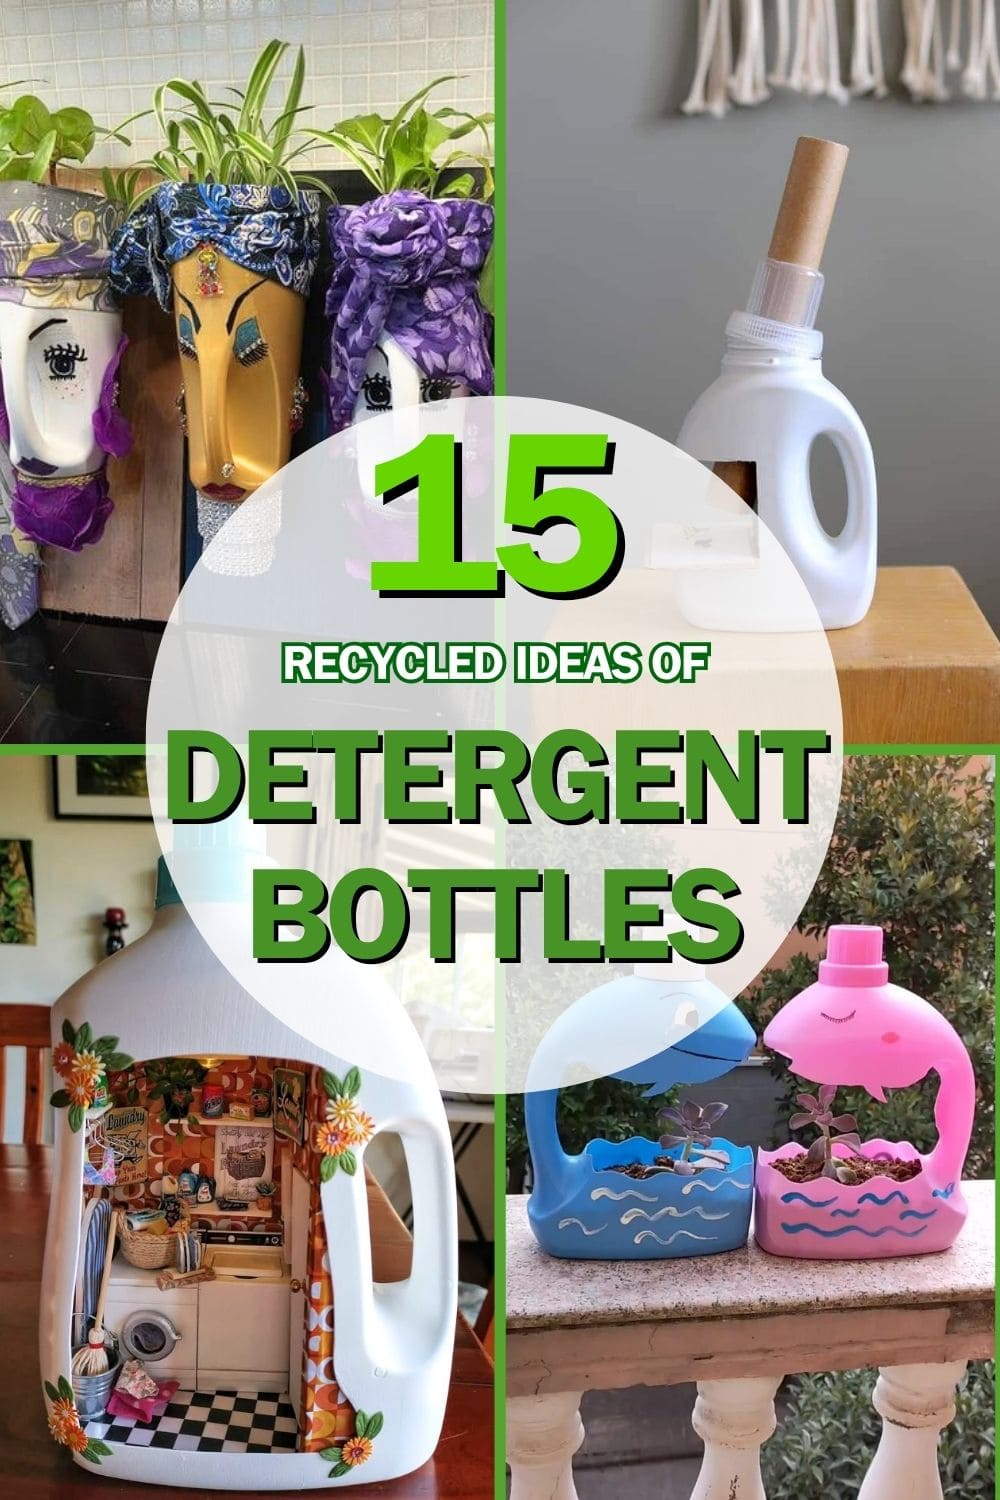
Over 1 billion detergent bottles are used every year and sadly, most of them end up as plastic waste scattered across landfills and oceans.
But what happen if I say those bulky, oddly-shaped bottles could be more than just trash? With a little creativity, they can become playful toys, quirky planters, charming lanterns, and even functional home tools.
This article is here to inspire you with 15 amazing craft ideas that give old detergent bottles a brand-new purpose. Whether you’re crafting with kids, decorating your garden, or just looking for a fun eco-project, these ideas prove that recycling can be colorful, clever, and full of joy.
#1. Miniature Laundry Room Diorama
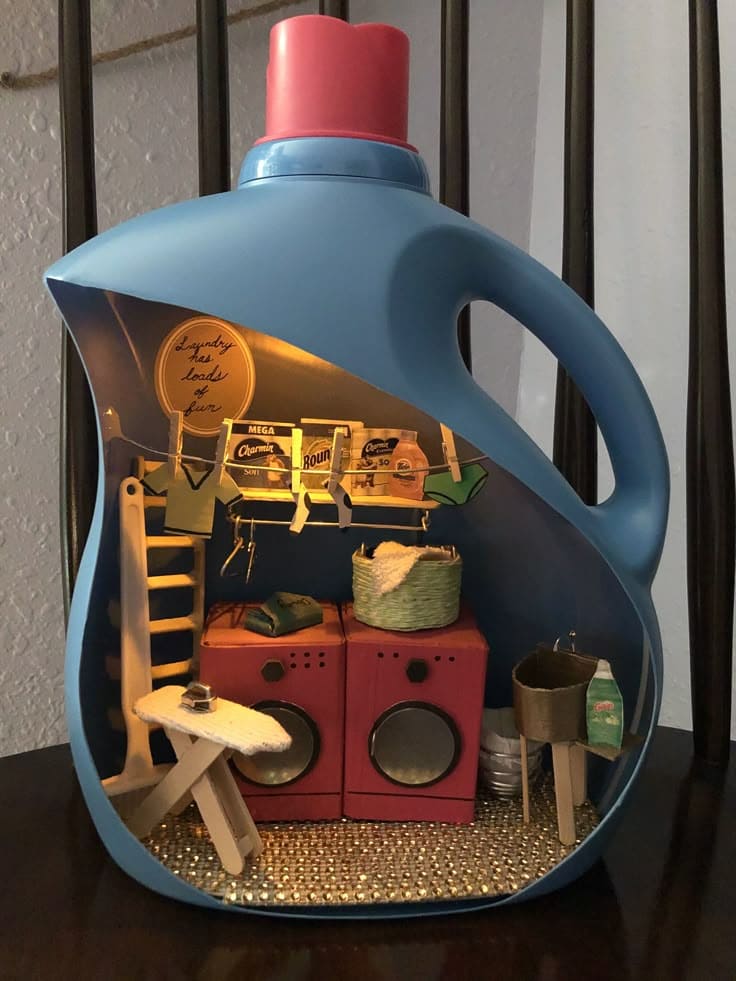
There’s something utterly magical about peeking into a tiny world, especially when it’s hidden inside something as ordinary as a used detergent bottle.
Moreover, this miniature laundry room diorama is a heartwarming little masterpiece. It reminds you that creativity can live in the most unexpected places.
Materials Needed:
- 1 large laundry detergent bottle (3-4L)
- Craft knife
- Cardboard or thick paperboard
- Acrylic paint
- Small pieces of fabric, cotton balls, or felt
- Toothpicks, clothespins, string
- Hot glue gun
- Beads, paper scraps, or printed mini labels
- Optional: mini LED light
Step-by-step Guide:
Step 1: Cut a large window out of the front side of the detergent bottle, leaving enough border to keep the structure strong but wide enough to display the diorama clearly.
Step 2: Paint the interior or line it with paper or fabric to create a warm wall color. Then lay a textured fabric, burlap, or beaded mat as your floor.
Step 3: Build your washer and dryer from small cardboard boxes and paint them red or gray. Now you can add circles for doors, buttons, and a bit of shine to mimic glass.
Step 4: Craft tiny laundry baskets using small cups, paper, or woven fabric. Then fill them with rolled felt or fabric scraps for the clothes. You continue to take an ironing board from two sticks and a padded piece of cardboard.
Step 5: Hang a miniature clothesline across the top with string and attach tiny paper shirts or socks using toothpick-sized clothespins. Next, add personal touches like a ladder, shelves, or labels for detergent boxes to make it feel alive.
#2. DIY Solar System Model Using a Recycled Detergent Bottle
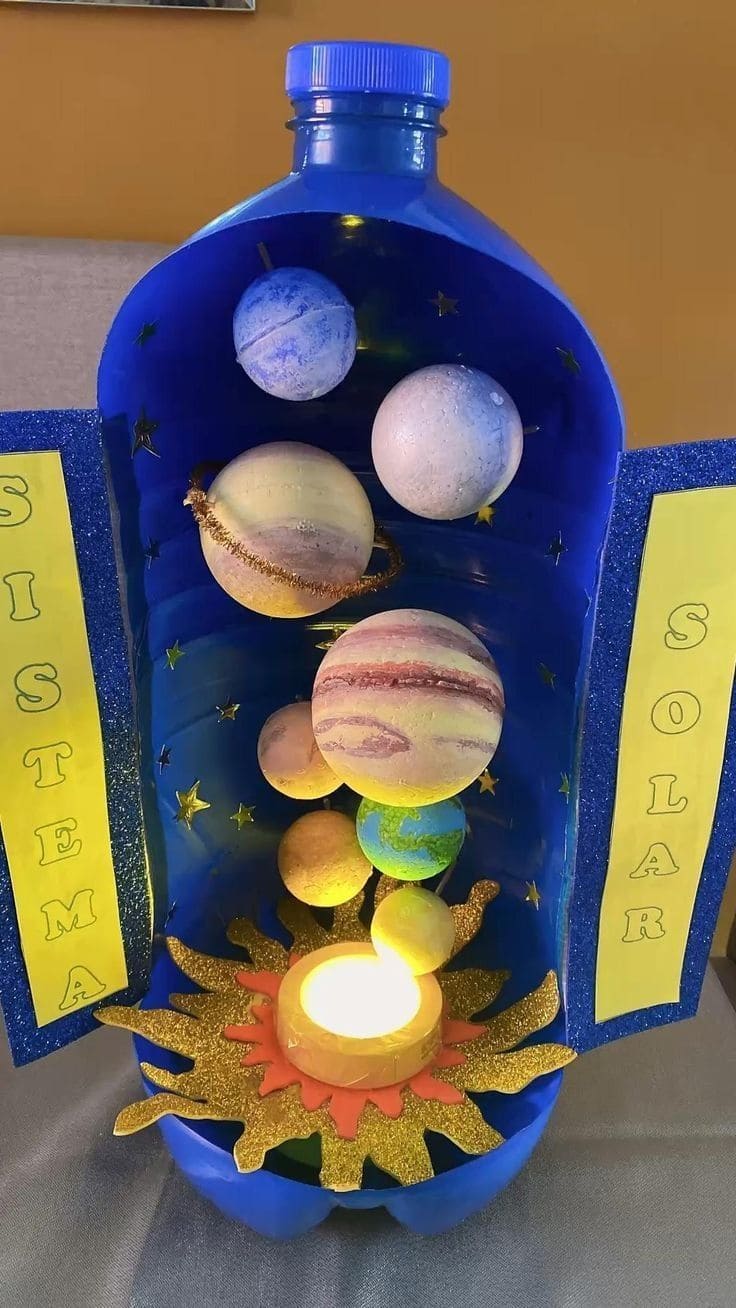
This project started with an empty laundry detergent bottle, just something you’d usually toss out and turned into a glowing, magical solar system that looked like it belonged in a kid’s dream.
And when we clicked on that tiny LED sun? The room lit up with wide eyes and quiet gasps. If you’ve ever wanted to teach the planets in a way that actually sticks, this little bottle of wonders is the way to go.
Materials Needed:
- 1 large plastic laundry detergent bottle (2-3L)
- 8-9 foam balls (1-3 inches in diameter)
- Acrylic paint in assorted colors
- 1 battery-powered LED tealight
- 1 sheet of gold glitter foam
- 1 gold pipe cleaner
- Toothpicks or wooden skewers
- Craft glue
- Star-shaped stickers or confetti
- Blue glitter foam and yellow paper strips
Step-by-step Guide:
Step 1: Cut the front panel of the detergent bottle using a craft knife or strong scissors, leaving a deep U-shaped opening that shows the interior space clearly.
Step 2: Paint the foam balls to represent each of the planets including Earth, Mars, Saturn, and the rest and let them dry completely. Don’t worry about perfection; swirling colors and hand-painted details give each planet its own character.
Step 3: Glue the LED tealight to the base inside the bottle and surround it with gold glitter foam cut into pointed sun rays, it becomes your glowing center of the solar system.
Step 4: Insert toothpicks or skewers into the planets, then glue or tape them at varying heights and depths inside the bottle to mimic the orbital order. Saturn’s ring can be made by wrapping a gold pipe cleaner around the middle of its foam ball.
Step 5: Add star stickers inside the bottle walls, then attach the blue glitter foam and yellow paper strips labeled “SISTEMA” and “SOLAR” on each flap for a vibrant educational touch.
#3. Recycled Detergent Bottle Cat Sculpture
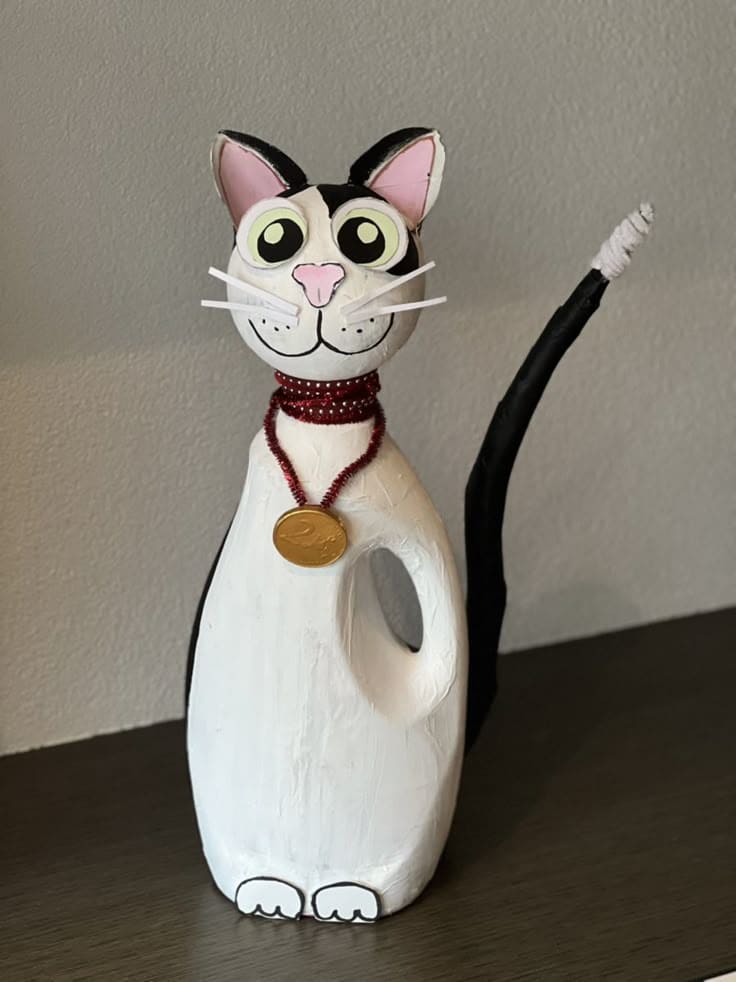
Some crafts just make you smile the moment you finish them and this dapper little cat is exactly that.
Crafted from an old detergent bottle, this whimsical feline feels like it stepped out of a children’s book and into your home. Its expressive face, upright tail, and painted-on charm give it real personality.
Materials Needed:
- 1 empty plastic laundry detergent bottle (2-3L)
- Acrylic paint (white, black, pink)
- 1 plastic or foam ball (2-3 inches diameter)
- 1 black pipe cleaner
- 1 small coin
- 1 red pipe cleaner
- Cardstock or foam
- Hot glue gun
- Scissors
Step-by-step Guide:
Step 1: Cut the spout off the detergent bottle and thoroughly clean the surface, removing any labels. Let it dry completely.
Step 2: Glue a foam or plastic ball to the top of the bottle as the cat’s head. Now paint the entire body white and let dry, then add black patches and pink details like ears and nose.
Step 3: Use black and white cardstock to cut out the ears, eyes, whiskers, and paw shapes. Then glue them carefully onto the head and base.
Step 4: Bend and glue a black pipe cleaner to the back for the tail. You can wrap a red pipe cleaner around the neck to form a collar, then attach a small gold coin as a tag.
#4. DIY Recycled Bottle Microscope for Kids
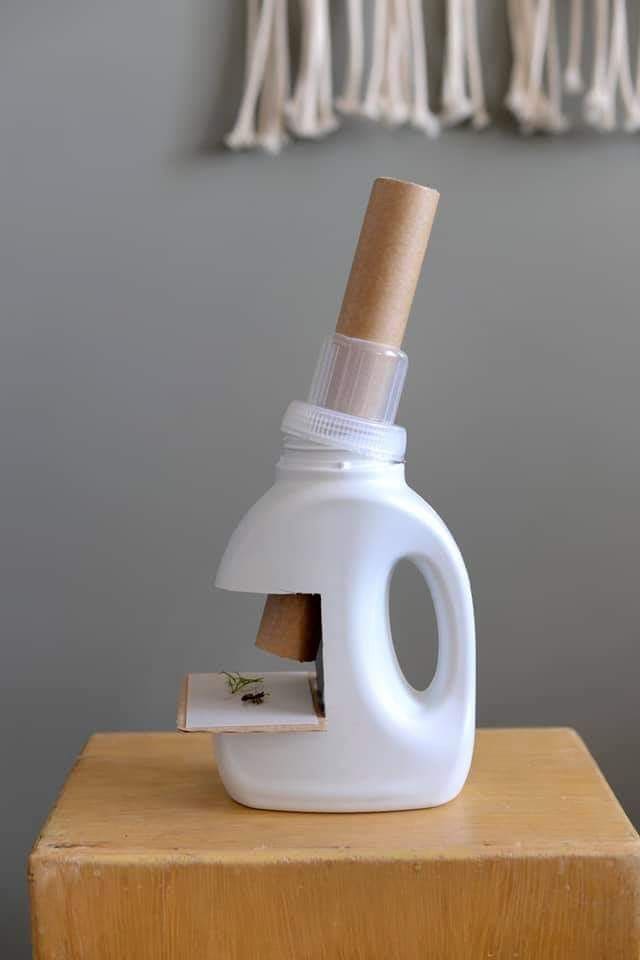
This is the kind of project that sparks curiosity in an instant. You don’t need high-end gadgets or expensive kits, just a used detergent bottle, some cardboard, and a bit of wonder.
Specially, this homemade microscope doesn’t actually magnify, but it gives kids the feeling of observing something up close. It opens the door to exploration: leaves, twigs, bugs, or treasures from the yard.
Materials Needed:
- 1 small empty laundry detergent bottle (1-2L size)
- 1 cardboard tube
- 1 clear plastic cup or lid
- Scrap cardboard
- Craft knife
- Hot glue gun
- Small items to observe (e.g., leaves, seeds, bugs, dried flowers)
Step-by-step Guide:
Step 1: Cut an opening in the front of the detergent bottle to create a viewing window, you should leave space below for inserting a cardboard slide tray.
Step 2: Glue a small piece of cardboard inside at an angle just below the window to help reflect light upward, like a simple stage.
Step 3: Insert the clear plastic cup into the bottle’s spout, then glue the cardboard tube into the cup at a downward tilt.
Step 4: Cut a thin cardboard tray that can slide in and out of the bottom opening. Now, place a few tiny objects on the tray to explore like seeds, insects, or petals work great.
#5. Whale Planters Made from Laundry Bottles
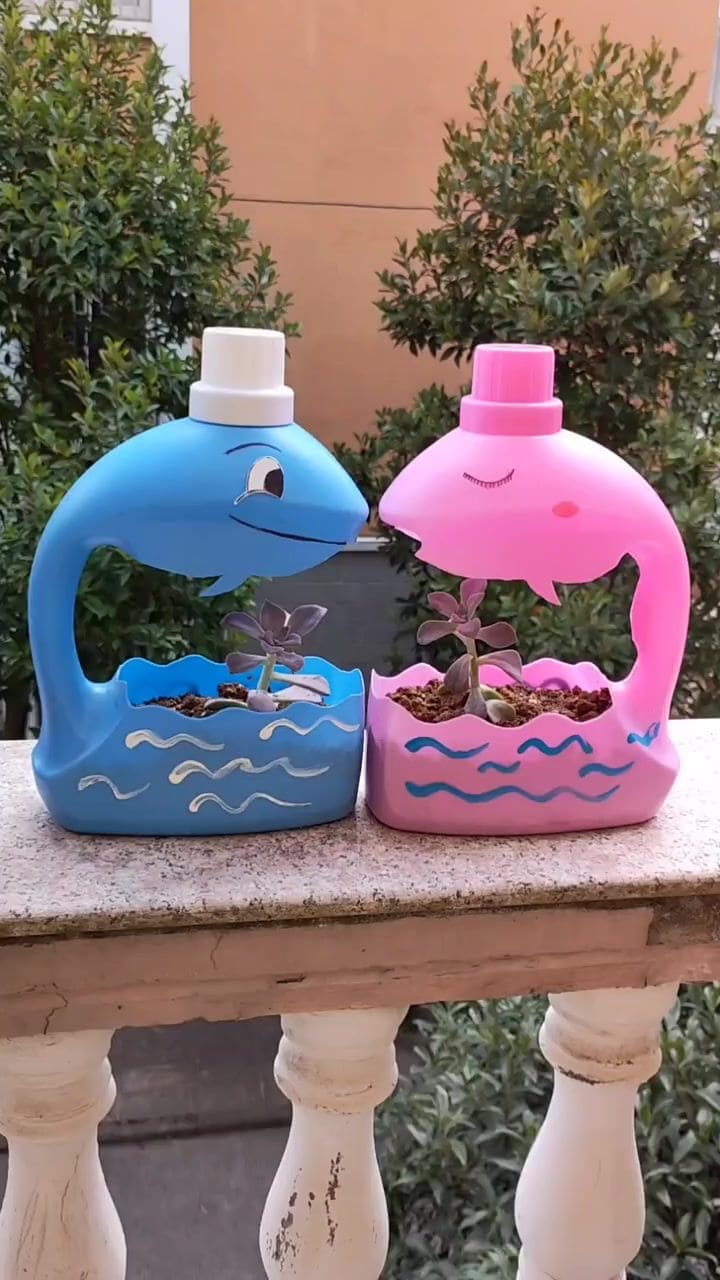
These two love-struck whales might just be the cutest planters on the block. They sit side by side, shaped from old laundry bottles, each holding a tiny succulent like it’s a treasure from the sea.
In addition, this project is perfect for kids or anyone who wants to turn their trash into something that smiles back.
Materials Needed:
- 2 empty laundry detergent bottles
- Acrylic paint (blue, pink, white, black) and paintbrushes (fine and medium sizes)
- Craft knife
- Potting soil
- 2 small succulents or other low-maintenance plants
- Optional: clear sealant spray
Step-by-step Guide:
Step 1: Cut a large smile shape into the front side of the bottle, leaving the top curved like a whale’s head and the tail-like handle intact.
Step 2: Paint the entire bottle, one in blue, the other in pink. Then let them dry, then add simple face features including an eye, a gentle smile, and painted waves around the base.
Step 3: Fill each bottle planter with potting soil. Now you can plant one succulent in each, nestling them down gently.
Step 4: (Optional) Spray with a clear sealant if your planters will be outdoors to protect the paint from fading.
#6. Colorful Elephant Wall Art from Recycled Plastic
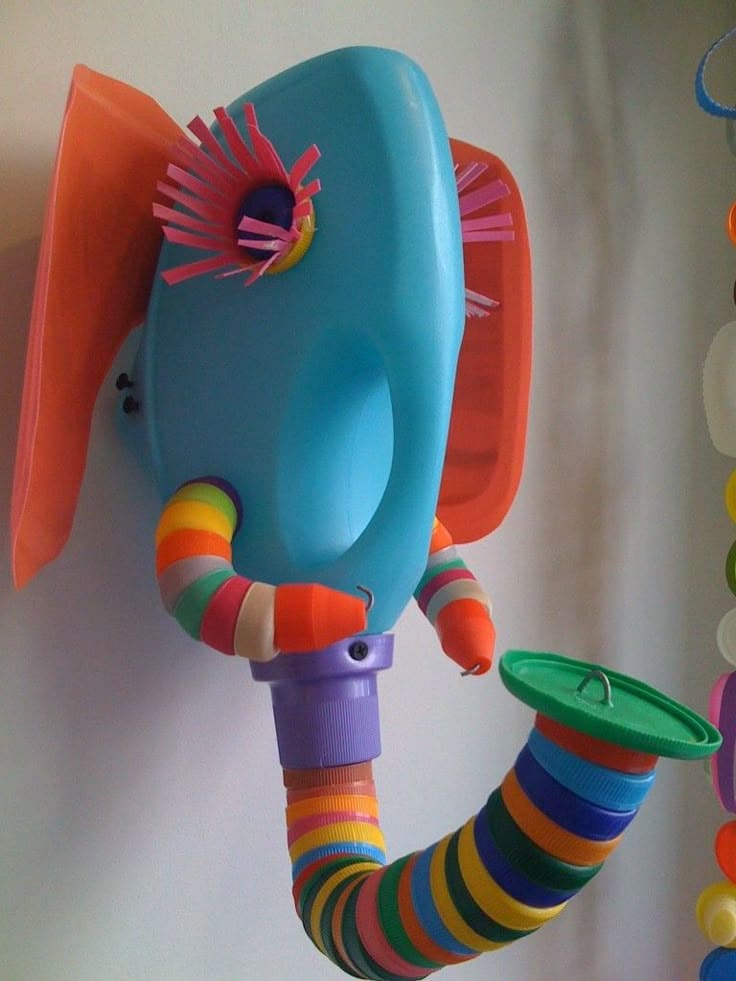
Your kids are sure to be into this his joyful, rainbow-striped elephant. With wide floppy ears, fluttery eyelashes, and a flexible trunk made of stacked caps, it’s like something straight out of a children’s storybook.
Materials Needed:
- 1 large blue laundry detergent bottle (2-3L)
- 2 plastic bowl lids
- Dozens of colorful plastic bottle caps
- Rainbow-colored plastic or fabric tubing
- Scissors
- Hot glue gun
- Black permanent marker
- Optional: cut plastic rings
Step-by-step Guide:
Step 1: Cut the front side of the detergent bottle to create a flat base, then turn the bottle sideways. The handle becomes the cheek and the cap becomes the mouth or trunk base.
Step 2: Attach the ears using large, soft plastic sheets or lid pieces. Then glue them to each side of the bottle to form oversized, floppy elephant ears.
Step 3: Build the trunk by gluing bottle caps or stacked plastic rings in a curved line, starting from the bottle cap spout and moving downward. You can cap the end with a lid for a finished look.
Step 4: Create arms from coiled tubes, old toys, or flexible piping.
Step 5: Use paper strips or curled plastic to create long, whimsical eyelashes. Now you can add eyes, a painted smile, and any other facial features you like.
#7. Vintage Comic-Inspired Paint Brush Holder
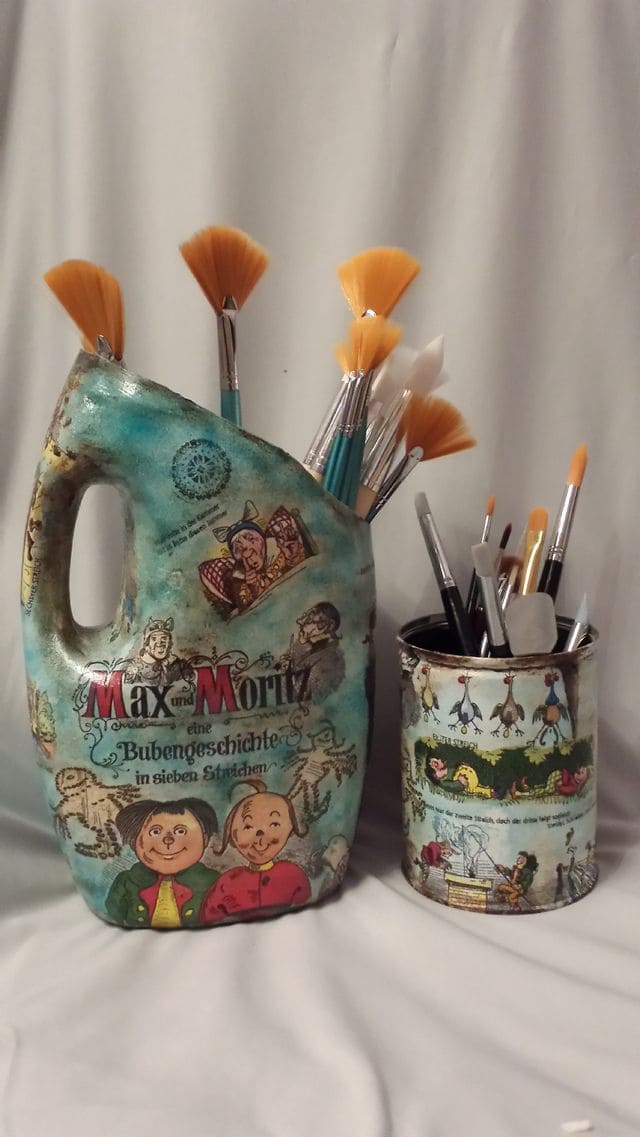
This upcycled brush holder started life as a humble detergent jug, but with a bit of clever cutting and a layer of vintage comic decoupage, it’s now a one-of-a-kind treasure for any creative space.
Materials Needed:
- 1 empty laundry detergent bottle (2-3L, preferably with a large handle)
- Sharp scissors
- Mod Podge
- Vintage comic book pages
- Acrylic paint (optional)
- Soft brush
Step-by-step Guide:
Step 1: Cut the top off the detergent bottle at an angle, leaving the handle intact for easy gripping.
Step 2: Paint the surface with a base color or leave it plain, depending on your desired finish. Let it dry completely.
Step 3: Tear or cut your comic or into smaller sections. You can use Mod Podge to adhere them to the bottle’s surface, overlapping slightly to cover it entirely.
Step 4: Once all images are in place, brush a full coat of Mod Podge over everything to seal and protect it.
#8. Recycled Detergent Bottle Toy Car
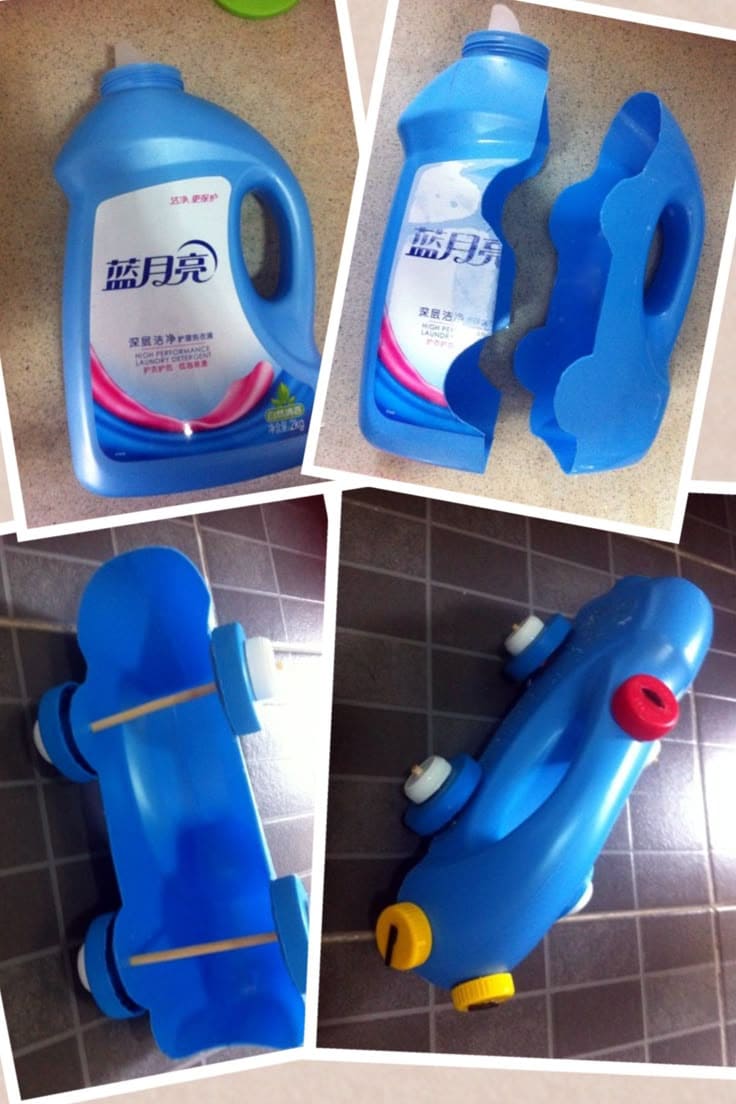
This little racer, built from a laundry detergent jug, rolls smoothly on repurposed caps and is a fun project for both kids and adults who love making toys from scratch.
What I love most is watching it zip across the floor and thinking! It’s a perfect rainy day craft that teaches problem-solving, reusing materials, and sparks hours of pretend play.
Materials Needed:
- 1 large empty laundry detergent bottle (2-3L size)
- 4 plastic bottle caps
- 2 wooden skewers (approx. 10-12″ each)
- Small nail or skewer
- Craft knife
- Hot glue gun
- Optional: extra caps
Step-by-step Guide:
Step 1: Cut the bottle in half vertically using a craft knife. You’ll use the flatter half for the car’s base, then trim the shape to resemble a racer, leaving smooth, rounded edges.
Step 2: Poke small holes on both ends (front and back, left and right) near the base, these will hold the axles for your wheels.
Step 3: Slide the skewers or dowels through the holes. Then attach a plastic bottle cap to each end with glue, ensuring they spin freely. Let dry.
Step 4: Now, add smaller caps as headlights or steering knobs, or even paint racing stripes for flair.
#9. DIY Recycled Detergent Bottle Guitar
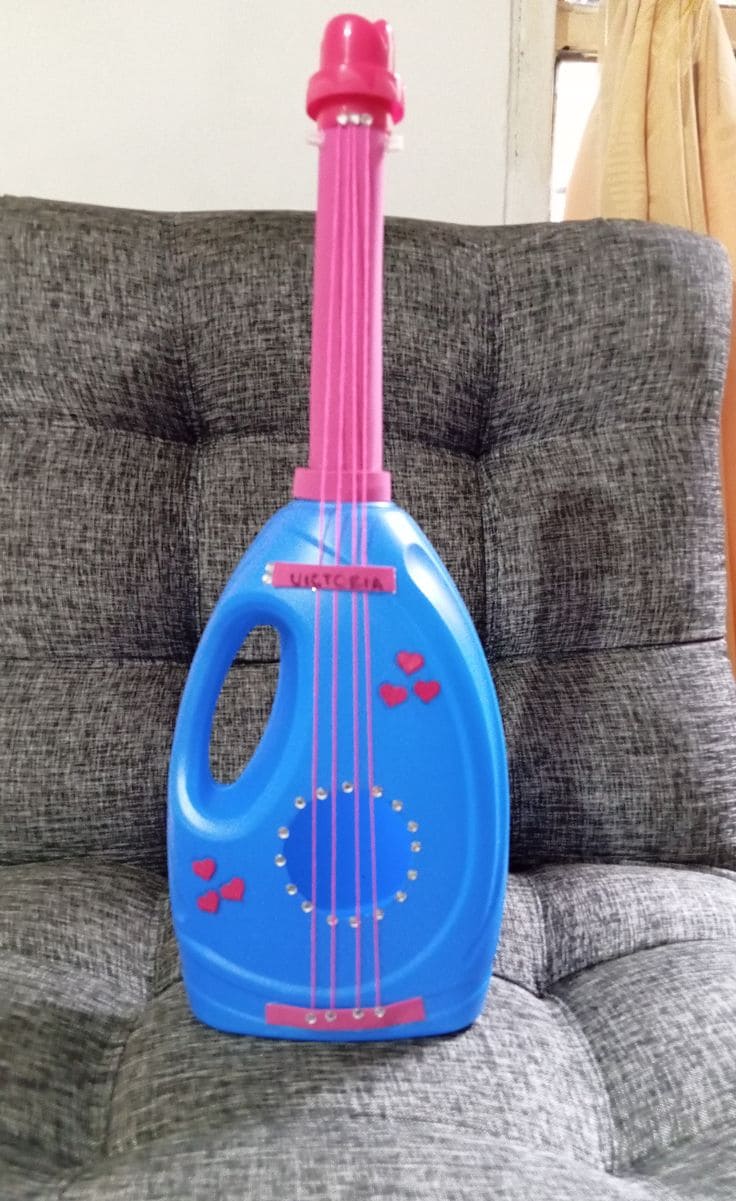
Crafted from a detergent bottle and a few simple supplies, it’s a playful nod to music and creativity, perfect for kids who love to pretend, perform, or just tinker.
Materials Needed:
- 1 empty plastic detergent bottle (2-3L)
- 5-6 rubber bands
- 1 paper towel tube
- Colored paper, paint, or tape
- Beads, rhinestones
- Scissors or craft knife
- Hot glue gun
Step-by-step Guide:
Step 1: Cut a circular or oval-shaped sound hole on the front of the detergent bottle.
Step 2: Paint or decorate the bottle and tube in your favorite colors. Then add details like hearts, dots, or faux frets using stickers or markers.
Step 3: Glue the cardboard tube to the top of the bottle to create the neck of the guitar.
Step 4: Stretch rubber bands vertically across the bottle front, over the sound hole, and secure them at the top and bottom with glued paper strips or slits.
Step 5: Add finishing touches like faux tuning pegs (beads or bottle caps) and a name tag for your instrument.
#10. Elephant Night Light from a Detergent Bottle
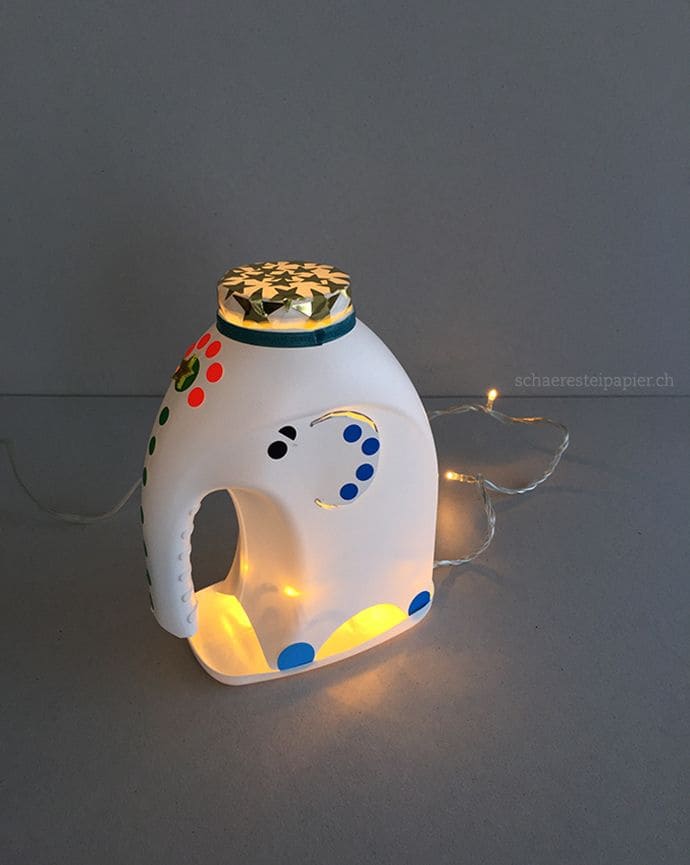
This glowing little elephant might be one of the most heartwarming projects you’ll ever make from a laundry detergent bottle.
With its curved trunk, soft silhouette, and inner twinkle lights, it brings a touch of magic to any room, especially a child’s nightstand.
Materials Needed:
- 1 empty white plastic detergent bottle (preferably 2-3L)
- String lights or LED tealights
- Craft knife
- Acrylic paint
- 1 bottle cap or round decorative lid
- Tape or glue
- Optional: black permanent marker
Step-by-step Guide:
Step 1: Cut the bottle in half vertically, using the handle side to form the elephant body. Then carve out a curved trunk shape from the handle, and trim the bottom edge to help it stand flat and stable.
Step 2: Cut small holes or slits in the back and bottom to allow soft light to glow through. You can add a few cutouts near the legs or ears if desired.
Step 3: Paint or decorate the elephant with dots, patterns, or traditional motifs. Now, use a black marker to draw on the eyes, tail, or decorative accents.
Step 4: Insert a string of LED lights or place a battery-operated tealight inside.
Step 5: Glue or place a fun bottle cap on top as a decorative headpiece or hat.
#11. Recycled Bottle Piggy Decoration
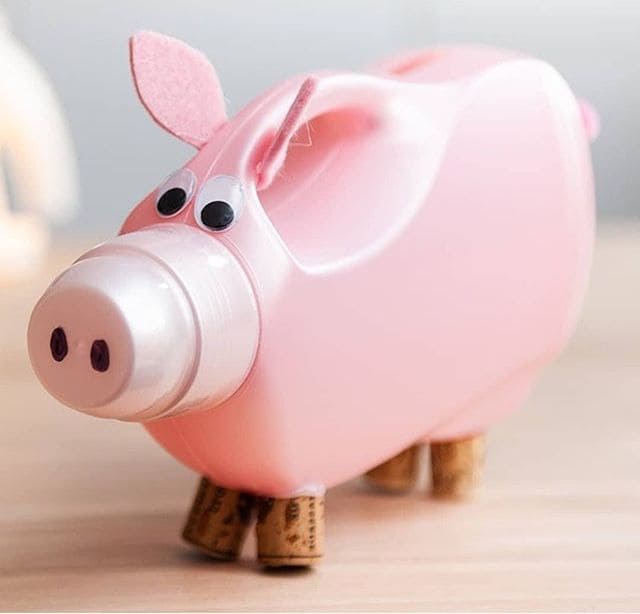
This sweet little piglet is made almost entirely from scraps yet somehow steals the spotlight on any shelf or craft table.
Whether you make it with kids or just for fun, this pig project is bound to bring smiles. It could be a bank, a decoration, or even a whimsical gift.
Materials Needed:
- 1 small pink plastic bottle (1-2L, rounded works best)
- 1 bottle cap with a second cap on top
- 4 wine corks
- 2 small googly eyes
- Pink felt
- Black marker
- Hot glue gun
Step-by-step Guide:
Step 1: First, screw the cap on tightly, and glue a second cap or rounded lid on top of it to form the snout. Then use a black marker to draw two oval nostrils.
Step 2: Glue two googly eyes above the snout. Now, you can cut two ear shapes from pink felt, bend them slightly, and glue them on top near the eyes.
Step 3: Glue four wine corks to the bottom of the bottle as legs and make sure the pig stands steady.
Step 4: (Optional) Add a twisty tail using a pipe cleaner glued to the back.
#12. Recycled Laundry Bottle Bird Feeder
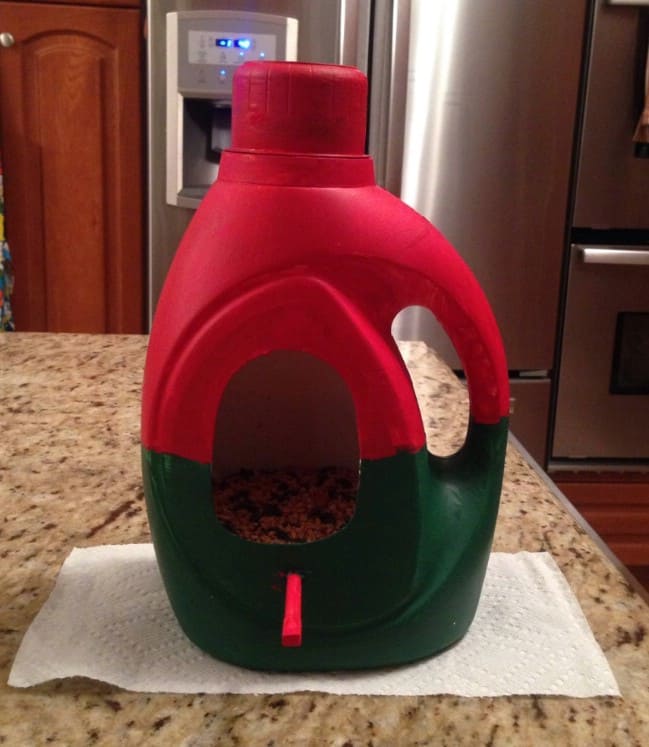
This cozy little feeder started out as an empty detergent jug and now it’s a snug diner for neighborhood birds.
What I love most about this project is how easy it is to make. You don’t need power tools or fancy supplies, just a clean bottle, a bit of patience, and a warm heart for your feathered visitors.
Materials Needed:
- 1 empty laundry detergent bottle (1.5-3L size)
- Acrylic paint (red, green, or any preferred color) and paintbrushes
- Craft knife
- 1 small wooden dowel (approx. 3-4 inches long)
- Hot glue gun
- Birdseed
Step-by-step Guide:
Step 1: Cut a large arched window into the front of the detergent bottle using a sharp craft knife. Make sure the opening is big enough for small birds to enter comfortably but still protects the seed inside from rain.
Step 2: Use a heated nail or sharp tool to poke a small hole beneath the opening. Then insert the dowel to act as a perch and secure it with hot glue.
Step 3: Paint the bottle with your chosen colors. Two-tone works great with red on top, green on bottom, or any combination that stands out in your garden.
Step 4: Fill the bottom with birdseed, replace the cap, and place or hang your feeder where birds can easily access it.
#13. Recycled Kitty Lantern from a Plastic Jug
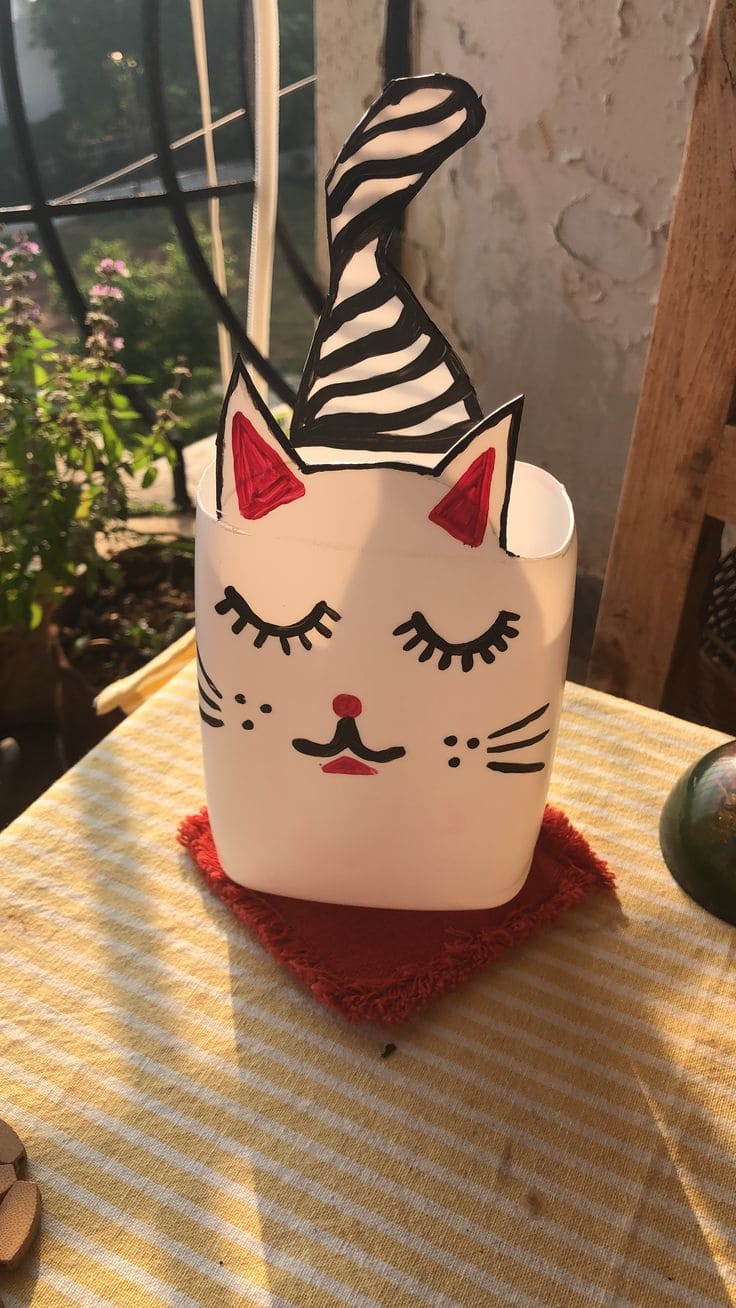
Made from a simple plastic jug, this sleepy little kitty lantern has been lovingly transformed with a hand-drawn face, soft curves, and a curled tail that almost makes you want to whisper so you don’t wake her up.
Materials Needed:
- 1 plastic jug (milk or detergent, 1-2L size)
- Permanent markers or acrylic paint (black, red, pink)
- Scissors
- Optional: extra plastic or cardboard
- Hot glue gun
Step-by-step Guide:
Step 1: Cut the top portion off the jug to create a clean, open container, leaving the handle side for added stability.
Step 2: Cut ear shapes and a curvy tail from leftover plastic or sturdy paperboard. You can paint or outline them, then glue them to the inside rim of the jug.
Step 3: Draw on the cat’s sleepy face with permanent markers or paint. Now, add long lashes, a sweet nose, gentle whiskers, and any extra touches like stripes or blush dots.
Step 4: Place a small LED light inside if you want it to glow or use it as a pencil holder, mini vase, or decorative piece.
#14. Upcycled Laundry Bottle Watering Can
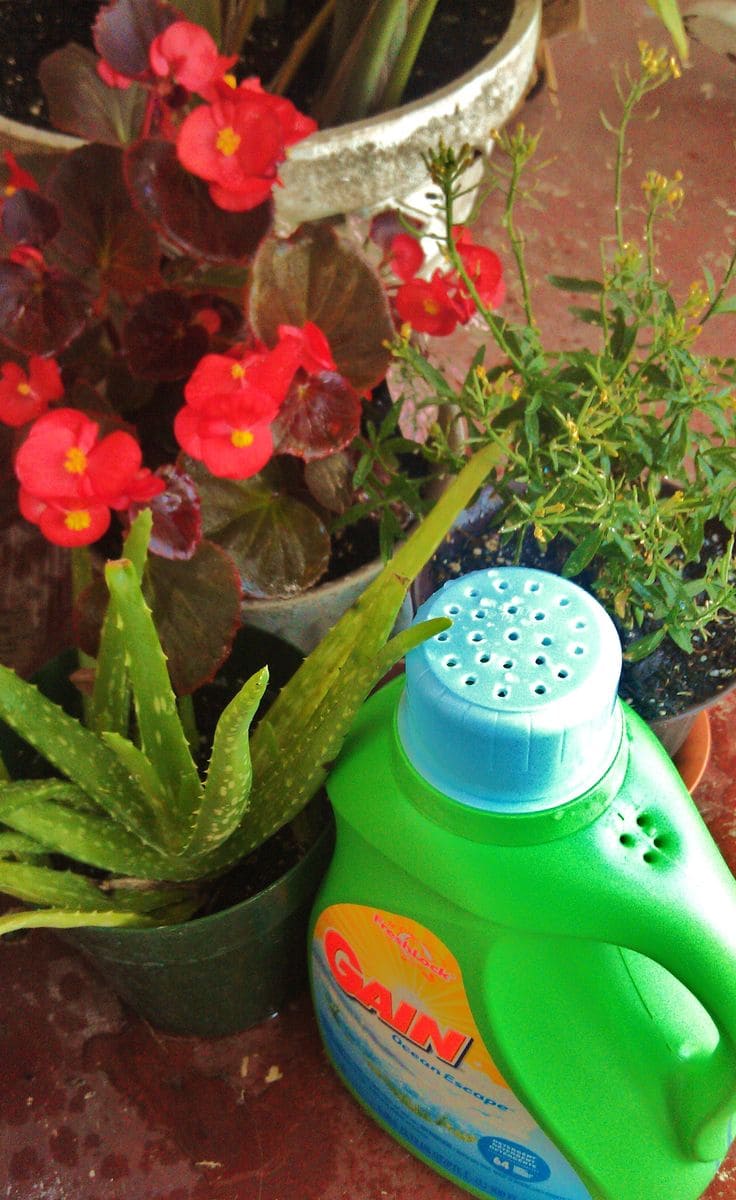
Sometimes the best gardening tools are the ones you make yourself. This simple yet brilliant watering can is made from a used laundry detergent bottle and it works so well, especially for gentle watering of potted flowers or delicate herbs.
Materials Needed:
- 1 empty laundry detergent bottle (1.5-3L size)
- Clean water
- Small nail or drill
- Optional: paint or labels
Step-by-step Guide:
Step 1: Rinse the detergent bottle thoroughly several times with warm water to remove all residue. This is especially important if you’ll be watering edible plants.
Step 2: Use a heated nail or a small drill bit to carefully poke 10-15 small holes into the cap. Remember to space them evenly to create a gentle shower-like effect.
Step 3: Fill the bottle with water, screw on the cap, and give it a test over a plant. You should adjust the hole size or number if the water flow is too strong.
#15. Laundry Bottle Lady Face Planters
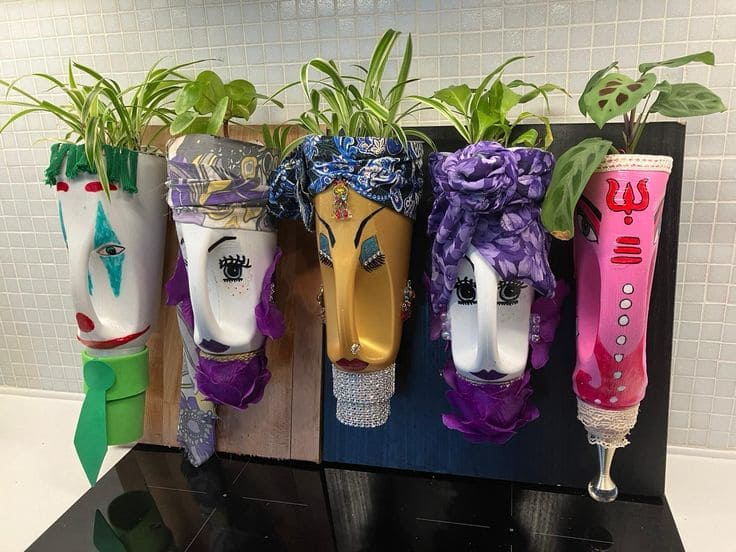
If houseplants could have personalities, these ladies would be the queens of your countertop. Each planter is not just functional but full of flair.
You can almost hear them whispering gossip from the kitchen wall. This project lets you play with color, style, and upcycling in one go.
Materials Needed:
- 5 empty laundry detergent bottles (2-3L size)
- Acrylic paints in assorted colors
- Scarves, scrap fabric, or ribbons
- Googly eyes, fake eyelashes, rhinestones, earrings, or jewelry bits
- Hot glue gun and glue sticks
- Small plants (like spider plants, pothos, or prayer plants)
- Scissors
- Wooden boards (optional)
- Potting mix + drainage holes
Step-by-step Guide:
Step 1: Cut the bottom portion of each detergent bottle, keeping the handle upright.
Step 2: Paint each bottle with a base color and let it dry. Then, add facial features like eyes, nose lines, lips, and cheek details. You should make them dramatic, soft, or whimsical as there’s no wrong way.
Step 3: Wrap the top rim with a scarf or fabric to mimic a head wrap. You can tuck and tie it for volume. Glue in place as needed.
Step 4: Add embellishments like lashes, stick-on jewels, painted dots, or earrings made from spare beads.
Step 5: Fill with potting soil and your plant of choice or insert a plastic cup liner if you prefer not to plant directly.
