Curtains do more than filter light, they set the tone for your entire space. But while most people focus on the fabric and length, there’s one detail that often gets overlooked: the tieback.
It’s the subtle accent that can completely transform the mood of a room, yet many don’t realize just how much beauty hides in that simple cinch. A thoughtful tieback draws the eye, shapes the drape, and turns plain panels into soft sculpture.
Whether you’re into rustic charm, playful pops, or handcrafted elegance, these DIY curtain tieback ideas reveal just how artistic and expressive this small detail can be.
#1. Whimsical Trinket Garland Curtain Tieback
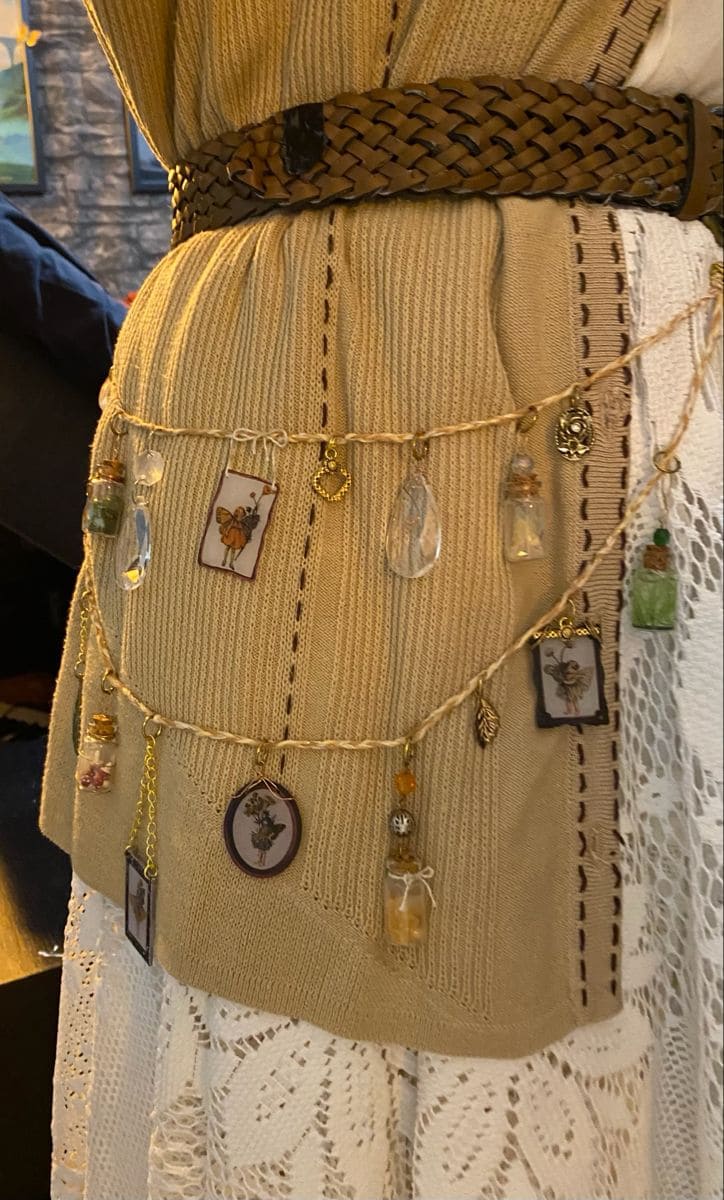
If your heart leans toward cottagecore or vintage-inspired treasures, this DIY curtain tieback will feel like something out of your favorite storybook.
Specially, miniature glass bottles filled with dried petals, dangling crystals, and delicate vintage charms tell tiny tales every time sunlight hits them.
Materials Needed
- 1 thick natural fiber rope (approximately 36-40 inches)
- 10-14 small charms (keys, leaves, frames, lockets, etc.)
- 3-5 mini glass vials (approx. 1 inch)
- 2-4 teardrop
- Small printed vintage photos (1-2 inch)
- Twine
- Hot glue gun (optional)
- 2 small hooks or safety pins
Step-by-Step Guide
Step 1: Start by measuring your curtain’s width and cutting your rope to fit loosely around it.
Step 2: Prepare your vials by adding tiny dried flowers, glitter, or even tiny scrolls. Then seal them with their corks, and tie twine for hanging.
Step 3: Attach your decorative elements (vials, charms, framed images, crystals) evenly along the rope using jump rings.
Step 4: Loop the garland around your curtain, letting it fall naturally.
#2. Crochet Lily of the Valley Curtain Tieback
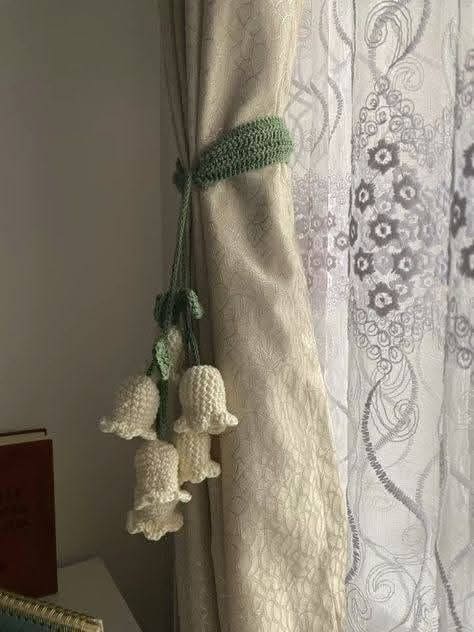
Oh my god, this tieback feels like something straight out of a vintage cottage, the kind where lace curtains sway in the breeze and the kettle’s always warm.
I believe you’ll feel like a quiet gesture of care, perfect for nurseries, reading nooks, or just about any space that needs a breath of kindness.
Materials Needed
- Light green yarn
- Cream or white yarn
- Crochet hook (3.5mm-4mm)
- Yarn needle
- Scissors
- Optional: button or snap
Step-by-Step Guide
Step 1: Start by measuring your curtain’s width when gathered.
Step 2: Crochet 4-6 small bell-shaped flowers. Each is worked in the round and slightly flared at the end for a natural petal-like edge.
Step 3: Use green yarn to crochet slender chains as stems and attach them to one end of the tieback. You can vary the lengths for a more natural, cascading effect.
Step 4: Wrap the band around your curtain and fasten it using a button, snap, or simply by tying it.
#3. Coastal Rope and Starfish Curtain Tieback
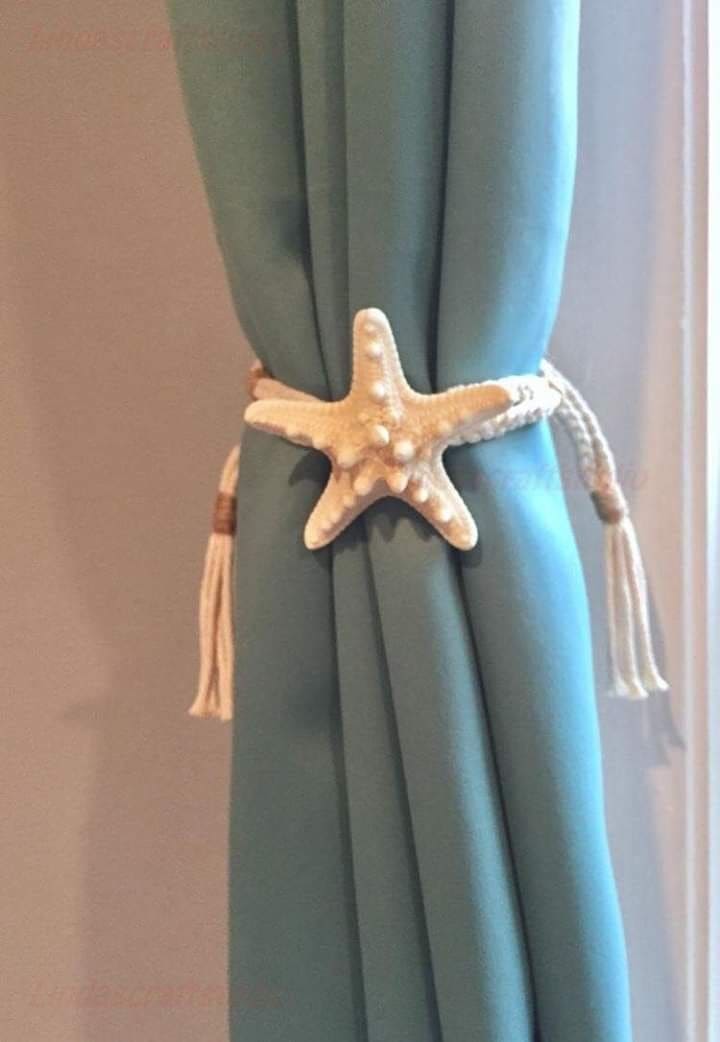
This tieback takes me back to a little seaside cottage I once stayed in, the kind with sandy floors, salty air, and open windows that flutter all day long.
I made this starfish tieback for a friend’s sunroom last summer and she told me it felt like having a bit of the ocean holding her curtains back every morning. If you’re craving a piece of the sea in your home, this project wraps that feeling right into your space.
Materials Needed
- 1 small decorative starfish (3-4 inches across)
- Cotton rope (approx. 24-30 inches)
- Hot glue gun
- Scissors
- Optional: two tassels
- 2 small hooks
Step-by-Step Guide
Step 1: Start by measuring your curtain’s width when drawn to the side. Then cut your rope long enough to wrap comfortably with some room for tying or draping.
Step 2: Attach the starfish to the center of the rope using hot glue.
Step 3: Add tassels or tie small knots at each end of the rope for decorative flair and to prevent fraying.
Step 4: Wrap the rope around your curtain and tie at the back or side. You can also secure the ends with discreet hooks or pins for a cleaner look.
#4. Boho Gemstone Chain Curtain Tieback
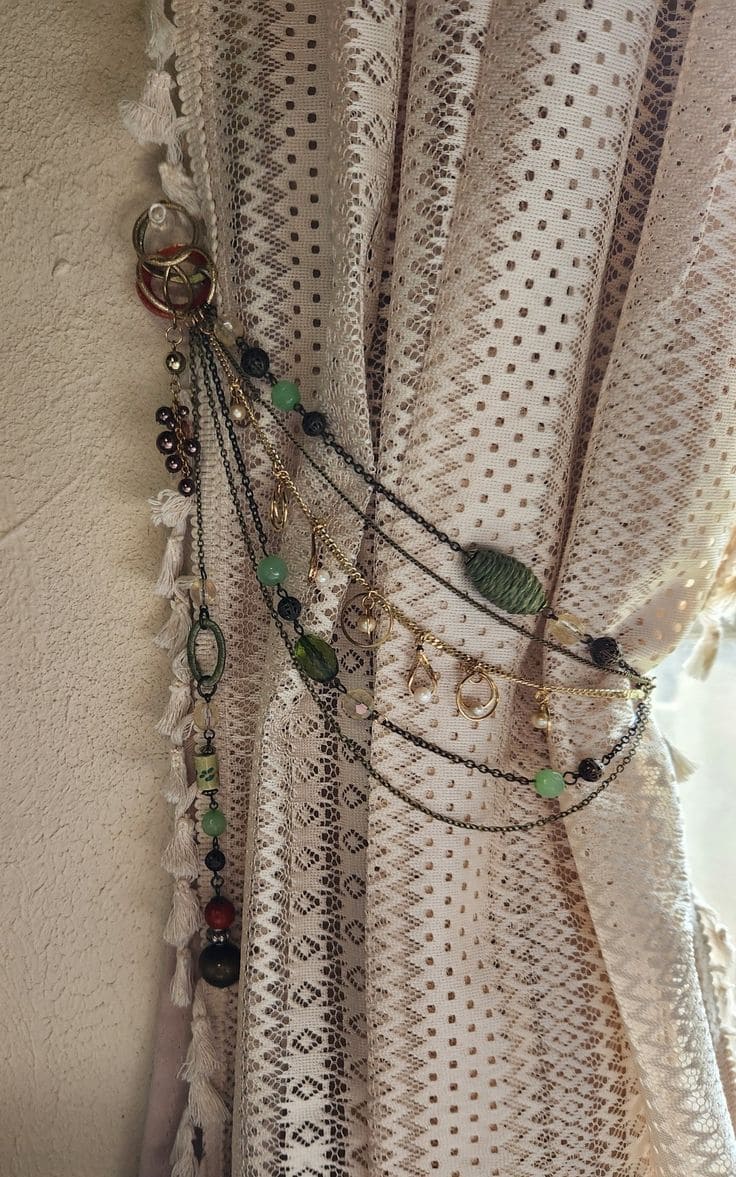
If your home leans toward vintage romance or slow-living calm, this piece becomes jewelry for your window.
In addition, the blend of earthy greens, dusky purples, and golden shimmer brings an effortless boho elegance. And the best part is that you can make it from bits of broken jewelry, beads, or lucky charms you already cherish.
Materials Needed
- 4-6 fine metal chains (12-24 inches length)
- Assorted beads and charms (green stones, pearls, glass or brass)
- 2 metal rings (1 inch diameter)
- Jewelry wire
- 2 small hooks
- Optional: embroidery thread
- Jewelry pliers and scissors
Step-by-Step Guide
Step 1: Start by measuring your curtain’s width when pulled to one side. Decide how far you want each chain to drape across the fabric.
Step 2: Layer and attach each chain to one of the metal rings. Now, you use jewelry wire to add beads, small pendants, and dangling charms at varied intervals.
Step 3: Add visual interest by mixing materials like combine shiny chain with thread-wrapped wire, or cluster three beads in one section.
Step 4: Secure the first ring to a hook or safety pin on the wall. You can also drape the strands across the curtain and hook the second ring to the other side.
#5. Polka-Dot Burlap Button Tieback
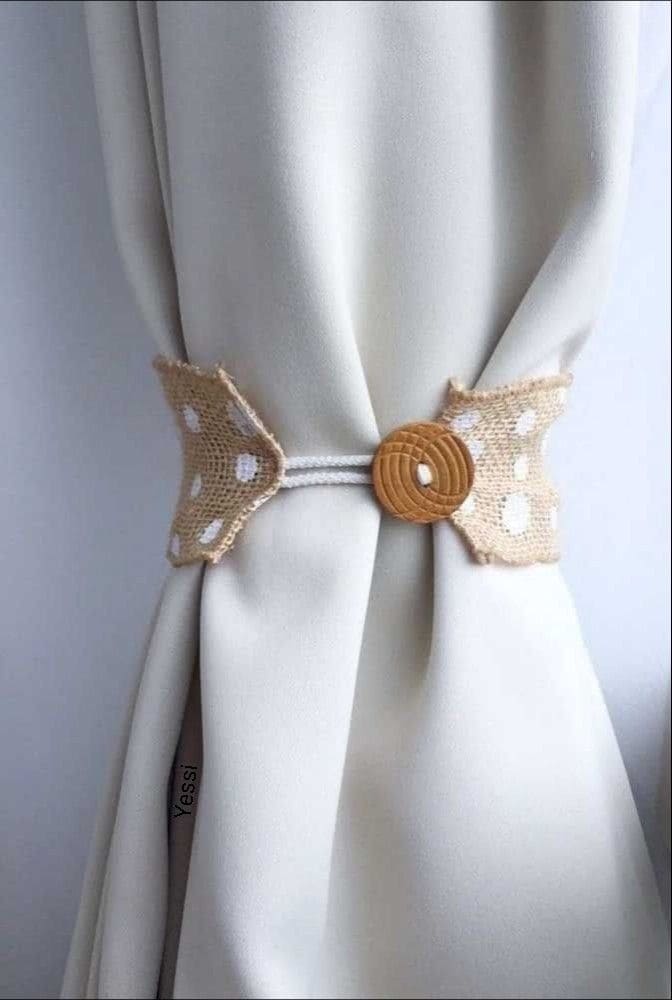
This was the first curtain tieback I ever made that actually made me smile every time I passed the window.
I remember sitting at the dining table on a rainy afternoon, scraps of burlap and thread scattered between my coffee cup and my phone playing an old podcast.
To be honest, I wasn’t aiming for perfection and I just wanted something sweet and simple to dress up my plain white curtains. And this button tieback did exactly that.
Materials Needed
- 2 pieces of burlap fabric (approx. 4 x 3 inches each)
- White marker
- 1 large wooden button (about 1 inch diameter)
- Cotton cord (12-14 inches)
- Needle and thread
- Scissors
Step-by-Step Guide
Step 1: Start by measuring your curtain’s width when pulled aside. Then cut a piece of cotton cord that fits snugly around it.
Step 2: Cut the burlap pieces into arrowhead shapes and decorate them with white polka dots using a fabric marker.
Step 3: Fold the cord ends and attach one piece of burlap to each side using glue or a few stitches. Then, securely sew the wooden button in the center to join both ends.
Step 4: Wrap the cord around the curtain and fasten by sliding the loop over the button.
#6. Hand-Embroidered Floral Fabric Tieback
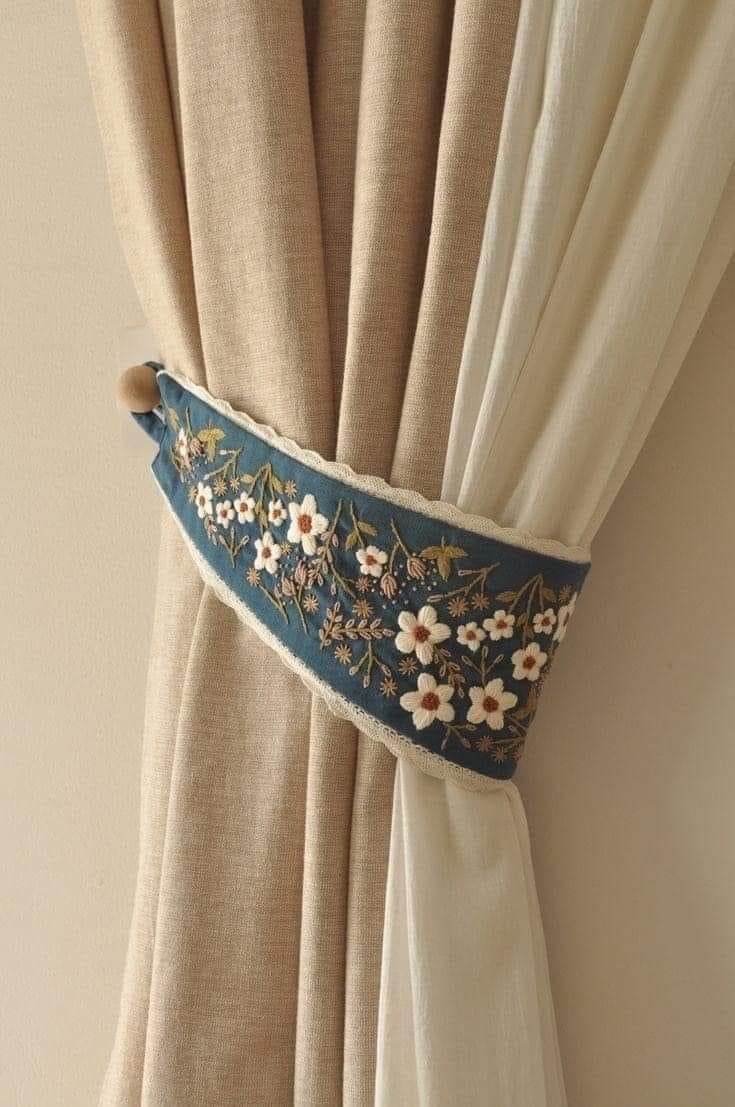
I still remember the first time I saw my grandmother embroider a flower, it was on the hem of a pillowcase, and I thought it was actual magic.
This tieback brings that same old-world warmth into the room. Also, the dainty flowers and wild stems stitched across a rich fabric band add such poetry to the everyday act of opening your curtains.
Materials Needed
- 1 fabric band (approx. 4 inches wide × 18-20 inches long)
- Embroidery floss in assorted colors (green, white, yellow, brown, etc.)
- Embroidery needle
- Pencil
- Lining fabric and lace trim (optional)
- Button or velcro
- Scissors and thread
Step-by-Step Guide
Step 1: Start by cutting your main fabric, you should sew lace trim along the top and bottom.
Step 2: Lightly sketch your floral design onto the fabric. You can use wildflowers, vines, or any nature-inspired motifs that feel personal to you.
Step 3: Using simple stitches like backstitch, satin stitch, and French knots, embroider the flowers and leaves.
Step 4: Attach a button or velcro to the ends of the band for an easy wrap-around closure.
#7. Pom-Pom Yarn Curtain Tieback
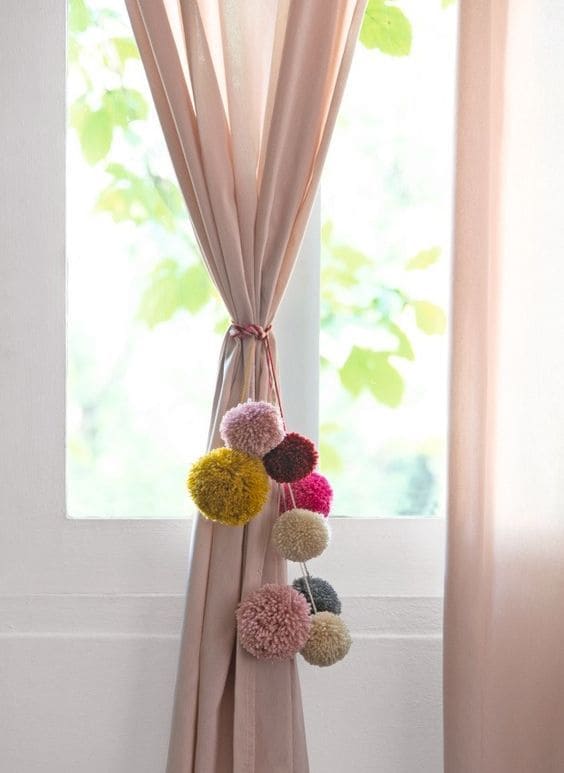
This tieback is a celebration of color, texture, and whimsy. I made a version of this for my craft room, and I swear it instantly lifted the whole space.
If you are also where it is perfect for, I’d say they are for boho spaces, creative corners, or kids’ rooms that need a little extra spark.
Materials Needed
- Yarn in assorted colors
- Pom-pom maker
- Sharp scissors
- Braided yarn (approx. 24-30 inches)
- Large-eyed needle
- Optional: hot glue gun
Step-by-Step Guide
Step 1: Wrap yarn around a pom-pom maker. The fuller you wrap, the fluffier they’ll be.
Step 2: Make 6-10 pom-poms in varying sizes and colors. You should aim for a good mix like brights, neutrals, and maybe one oddball color to keep things playful.
Step 3: Thread your pom-poms onto the twine or cord, spacing them unevenly for a casual drape.
Step 4: Wrap the twine around your curtain and tie a soft knot at the back.
#8. Macrame Feather Curtain Tieback
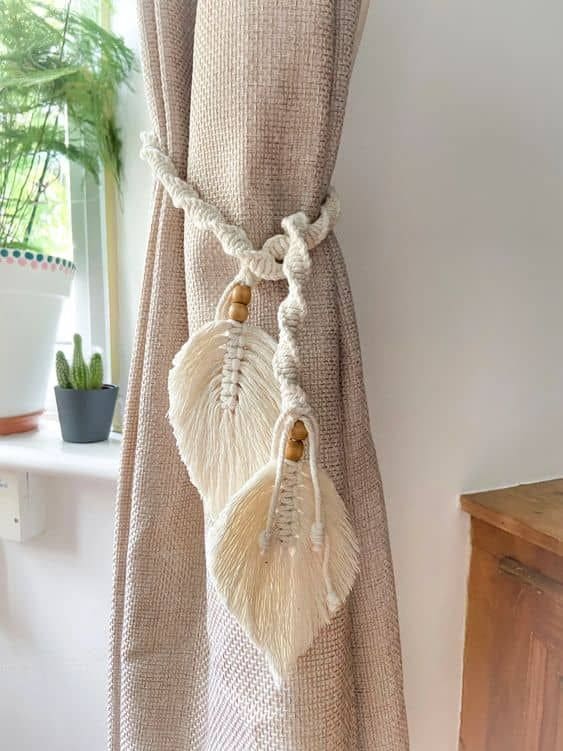
This piece is like a deep breath in your home. I remember making my first one at a slow Sunday market workshop. The instructor said, “Macramé is just knots and patience,” and she was right. What I didn’t expect was how meditative it would feel—and how satisfying it would be to step back and see those feather-like forms take shape. This tieback feels rooted and breezy all at once. The twisted rope, natural cotton, and wood beads give it warmth, while the feather shapes add flow and movement. It’s a perfect match for cozy corners, boho nooks, or nature-inspired rooms.
Materials Needed
- 3mm or 4mm macramé cord (2 pieces, each about 30-36 inches)
- 10-12 extra cords (each 5-6 inches)
- 4 wood beads with large holes
- Brush or comb
- Scissors
- Optional: stiffening spray
Step-by-Step Guide
Step 1: Start by braiding or knotting the two long cords to create your tieback base.
Step 2: To make each feather, cut several short strands and attach them along a vertical center string using lark’s head knots. You need to trim into a leaf shape.
Step 3: Gently comb out the strands to create a soft feathered effect.
Step 4: Slide a wood bead onto each feather’s stem, then attach the feathers to your main tieback cord.
#9. Metallic Bow Curtain Tieback
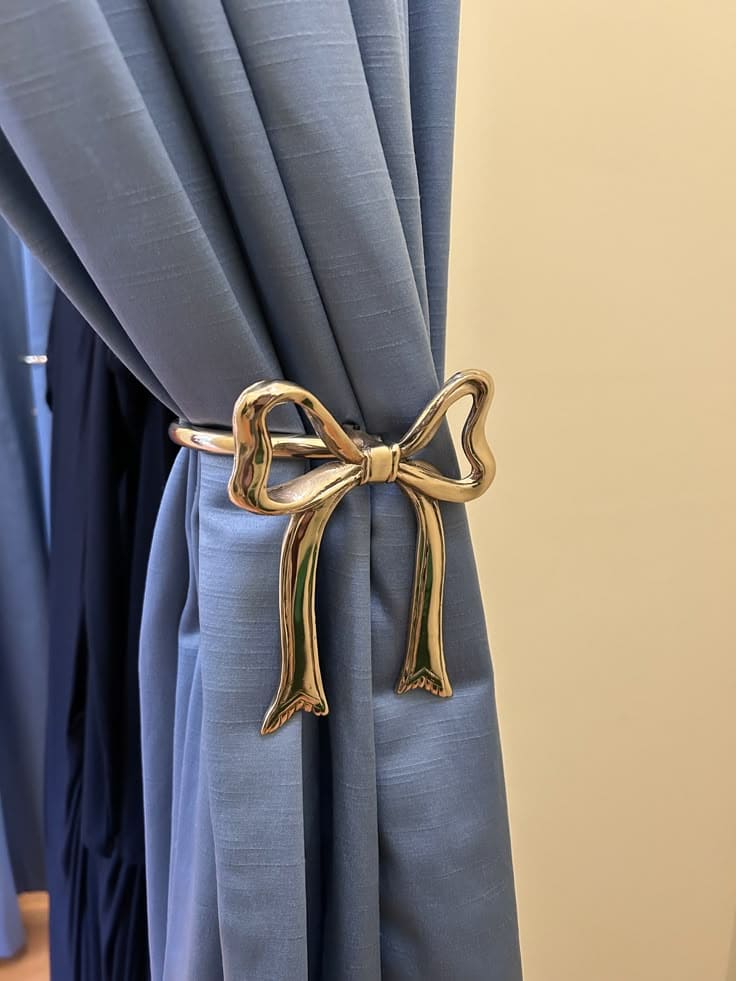
This project is effortless as it can be bought easily online. Bonus, the glossy metallic bow curves like a ribbon in mid-air and instantly elevates even the most neutral drapes.
Materials Needed
- 1 decorative metallic bow (approx. 5–6 inches wide)
- 1 curtain hook with screw base
- Wall anchors
- Power drill or screwdriver
Step-by-Step Guide
Step 1: Start by measuring the gathered width of your curtain and decide the height at which you want the tieback to sit.
Step 2: Drill a small hole into the wall where you’ll attach the mounting hook or bracket. Use a wall anchor for added support if the wall isn’t solid wood or stud-backed.
Step 3: Mount the bow via the hook depending on its design.
Step 4: Pull the curtain back and gently tuck it behind the bow.
#10. Linked Wooden Rings Curtain Tieback
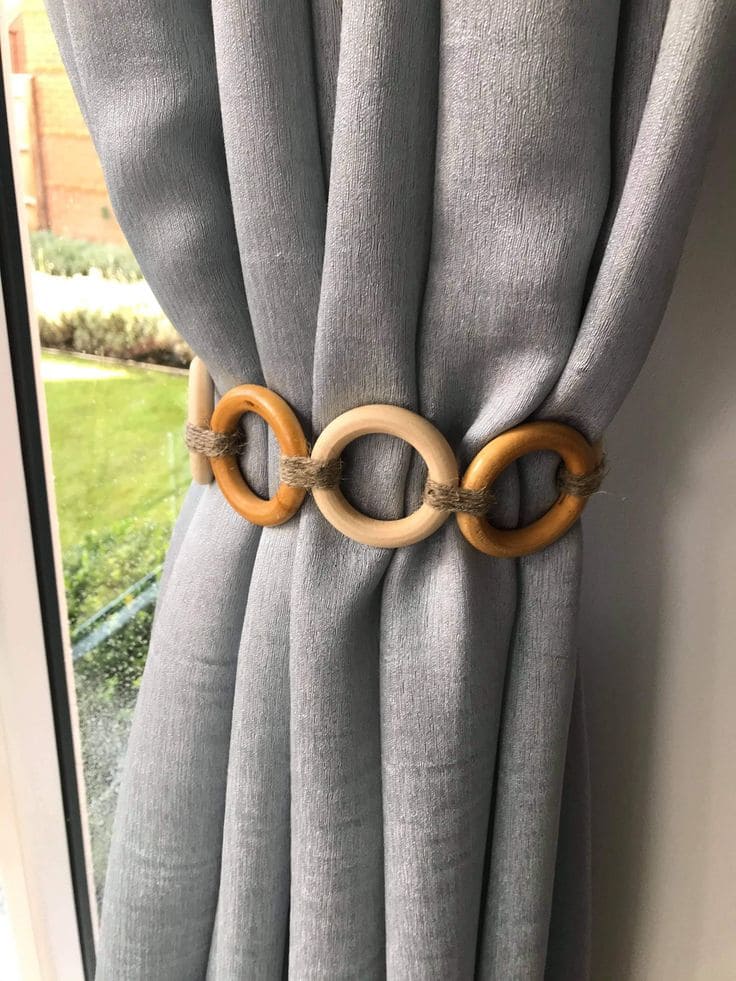
This one feels satisfyingly simple and clever, like a weekend project you finish in an hour but appreciate every single day.
I made something similar after finding a stash of mismatched curtain rings at a thrift store and once they were looped together and tied with twine, it suddenly felt like I’d uncovered a hidden design secret.
Materials Needed
- 6-8 wooden curtain rings (2-3 inches diameter)
- Jute twine
- Scissors
- Hot glue (optional)
- Optional: magnetic clasp or velcro
Step-by-Step Guide
Step 1: Start by linking your wooden rings one through the other, forming a flexible chain.
Step 2: Wrap a small length of twine tightly around the spot where each ring joins the next. Then, knot securely or glue in place at the back.
Step 3: Continue until you’ve created a chain long enough to wrap around your curtain with a small gap or overlap.
Step 4: Wrap the finished chain around the curtain and secure by tying the ends together with more twine.
#11. Burlap Bow and Rope Curtain Tieback
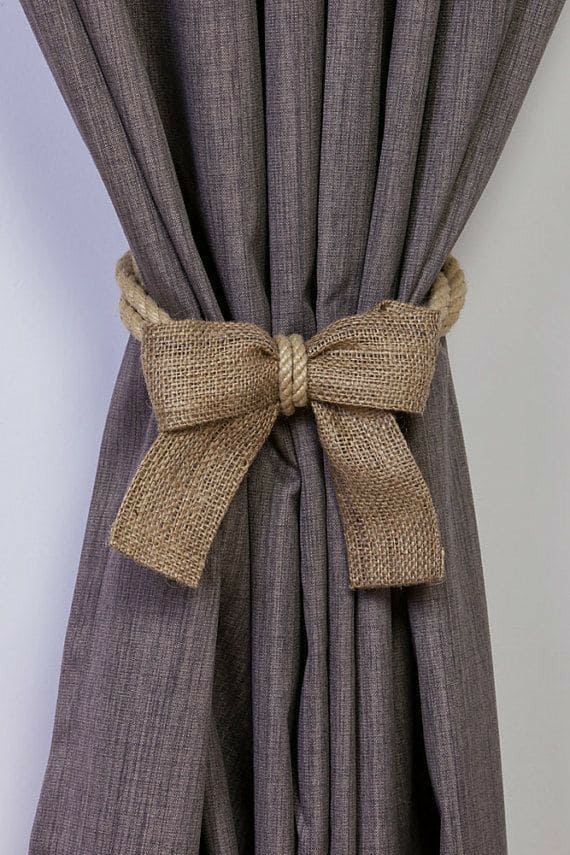
If you are looking for something to add your neutral-toned rooms or farmhouse style room, here is your answer.
You can easily make this tieback on a Sunday morning, coffee in one hand, burlap ribbon in the other. Specially, the bow brings softness, while the rope gives it structure and a timeless, slightly nautical twist.
Materials Needed
- 1 strip of burlap ribbon (at least 2.5″ wide × 20″ long)
- 1 piece of thick jute rope (about 24-28″ long)
- Hot glue gun or needle and thread
- Scissors
- Optional: hook
Step-by-Step Guide
Step 1: Start by measuring your curtain’s width when pulled aside. Then cut the jute rope to wrap comfortably around the gathered fabric.
Step 2: Cut the burlap strip and tie it into a neat bow. You can adjust the loops and tails until they look balanced.
Step 3: Position the bow at the front center of the jute rope. Now, you can wrap the rope around your curtain and tie it gently at the back.
#12. Vintage Button and Charm Curtain Tieback
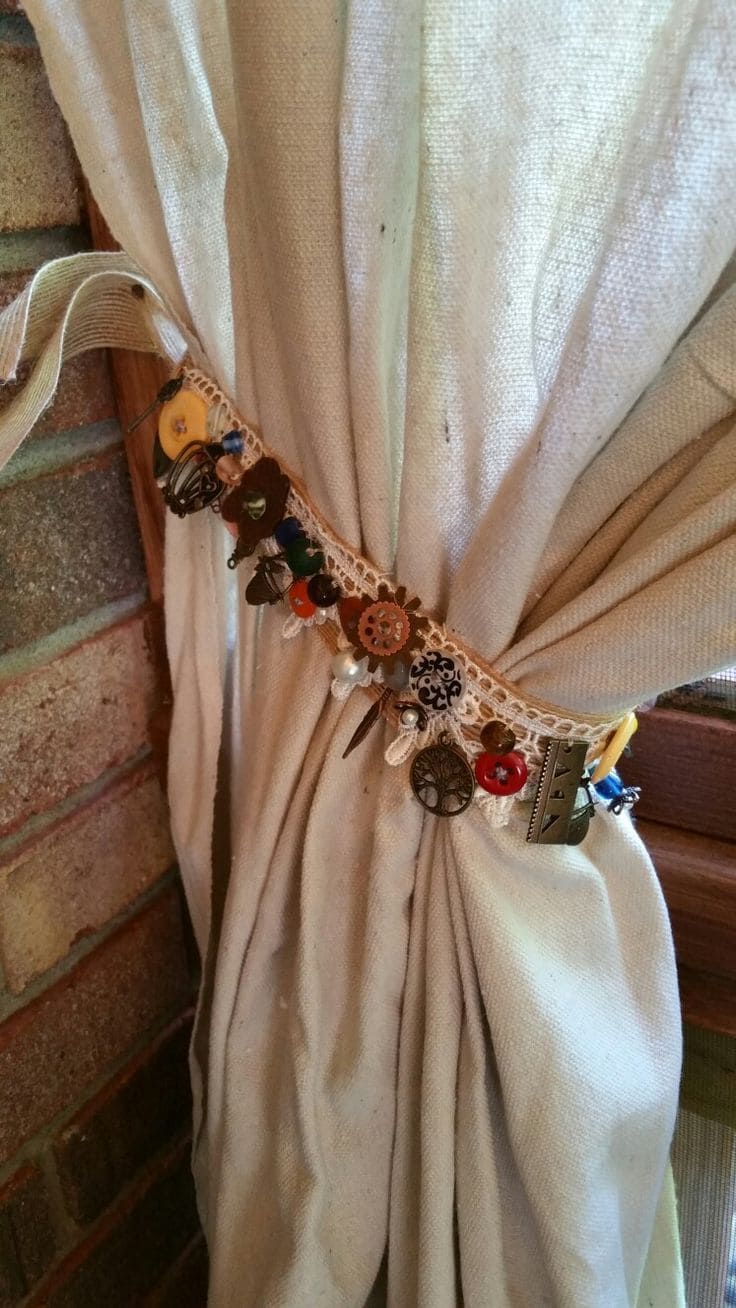
This one’s for the memory collectors, the people who can’t throw away a single mismatched button, lone earring, or tiny trinket with meaning.
Materials Needed
- 1 strip of linen ribbon (approx. 1.5″ wide, 24″ long)
- Crochet lace
- 15-20 assorted buttons, charms, beads, or tiny trinkets
- Needle and thread
- 2 small hooks
- Scissors
Step-by-Step Guide
Step 1: Start by measuring your curtain’s width when pulled back. You should cut your ribbon to fit around it with a little slack for overlap.
Step 2: Sew the crochet lace over the center of the ribbon to create a delicate base for attaching your decorations.
Step 3: Stitch buttons, beads, and charms across the lace. You can even add tiny keepsakes like shells or tiny metal tokens.
Step 4: Wrap the tieback around your curtain and secure it with safety pins or hooks at the back or sides.
#13. Felt Bird and Floral Curtain Tieback
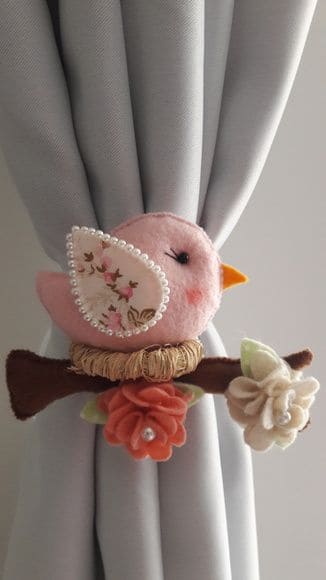
This tieback reminds me of crafting with my niece one sunny afternoon, she was obsessed with birds and glued little rhinestones to everything, including the cat.
But this soft, plushy bird, nestled on a felt branch with blooming flowers, turned out so sweet we made three more for different windows. It’s whimsical, warm, and full of delicate detail.
Materials Needed
- Felt sheets (pink, brown, cream, green, orange, floral print)
- Fiberfill stuffing
- Small pearls
- Embroidery thread and needle
- Hot glue gun
- Scissors
- Ribbon or elastic
Step-by-Step Guide
Step 1: Cut two bird shapes out of pink felt, then you can sew or glue them together, leaving a small gap to stuff with fiberfill.
Step 2: Cut out a wing shape from floral fabric and stitch it onto one side. Now, you want to embellish the edge with tiny beads or pearl trim.
Step 3: Make a small beak from orange felt and stitch or glue it in place, then add a black bead for the eye.
Step 4: Cut and glue brown felt into a small branch shape, then attach the bird to it. You can also add a few felt flowers and leaves for decoration.
Step 5: Attach the whole piece to a ribbon or elastic band long enough to wrap around the curtain.
#14. Hand-Sewn Fabric Flower Curtain Tieback
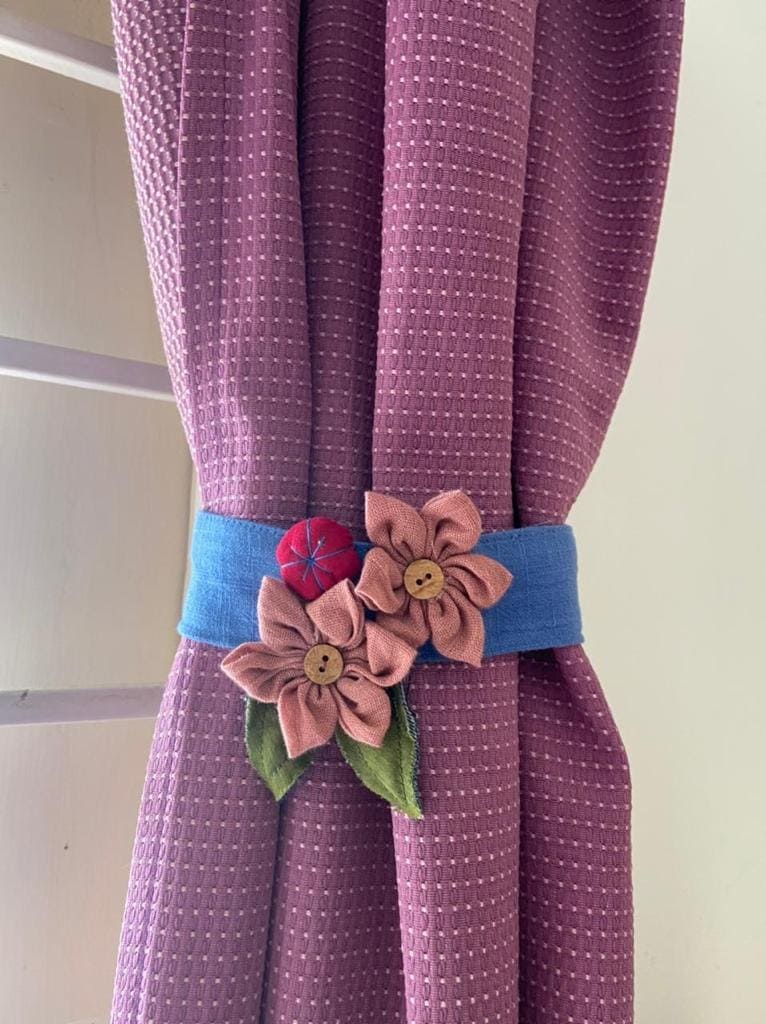
With soft, hand-stitched flowers, button centers, and leaf details, this project brings a garden-like joy into your home, one that feels lovingly crafted, not mass-produced.
Moreover, this tieback is perfect for kids’ rooms, craft corners, or any space that could use a bit of warmth and whimsy. Best of all, it’s beginner-friendly and makes great use of scrap fabric and old buttons.
Materials Needed
- 1 strip of fabric (2.5-3 inches wide × 18-20 inches long)
- 2-3 pieces of colored fabric
- 2 green felt pieces
- 3 buttons (small to medium)
- Needle and thread
- Velcro strips or snap buttons
- Scissors and fabric chalk
Step-by-Step Guide
Step 1: Start by measuring your curtain’s gathered width, then cut the main fabric strip accordingly, allowing overlap for fastening.
Step 2: Create the fabric flowers by cutting petal shapes and stitching them into layered blossoms. After that, secure a button at the center of each flower.
Step 3: Cut simple leaf shapes from green felt and stitch them behind the flower arrangements for a dimensional touch.
Step 4: Attach the flowers and leaves to one end of the fabric strip. You can also add velcro or a snap button to the back ends of the strip.
#15. Wood Bead and Yarn Tassel Curtain Tieback
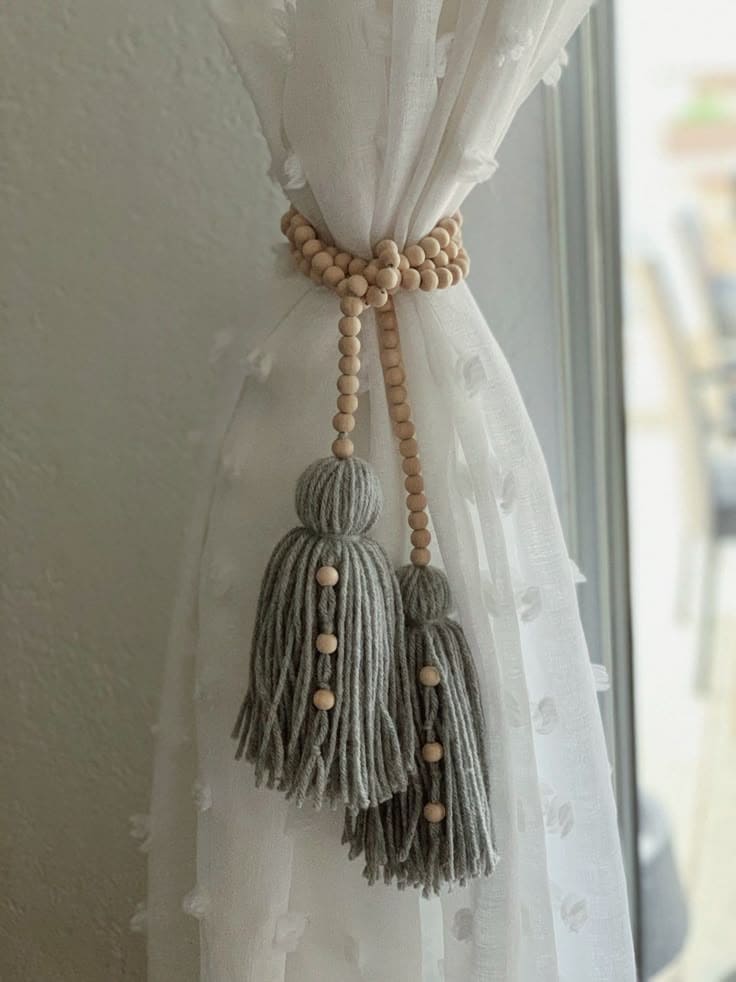
You can see the combination of smooth wooden beads and thick yarn tassels makes this craft soothing to look at and touch. It balances minimalism with softness, perfect for neutral palettes, hygge-inspired spaces, or Scandi-style interiors.
Materials Needed
- 30-40 natural wood beads (1/2 inch size)
- Strong twine (about 30-36 inches)
- Yarn (neutral tones like gray, cream, or sage)
- Scissors
- Large-eyed needle
- Optional: glue gun
Step-by-Step Guide
Step 1: Start by threading your wood beads onto the twine until it’s long enough to wrap comfortably around your curtain with a little overlap.
Step 2: Make two large tassels using thick yarn. You need to wrap yarn around your hand 20-30 times, tie at the top, then cut the loops at the bottom.
Step 3: Thread a few wood beads along the length of each tassel strand for added detail and texture. You can glue them in place if they slide.
Step 4: Tie the beaded strand around your curtain and let the tassels hang freely.
#16. Vintage Spoon and Fork Curtain Tieback
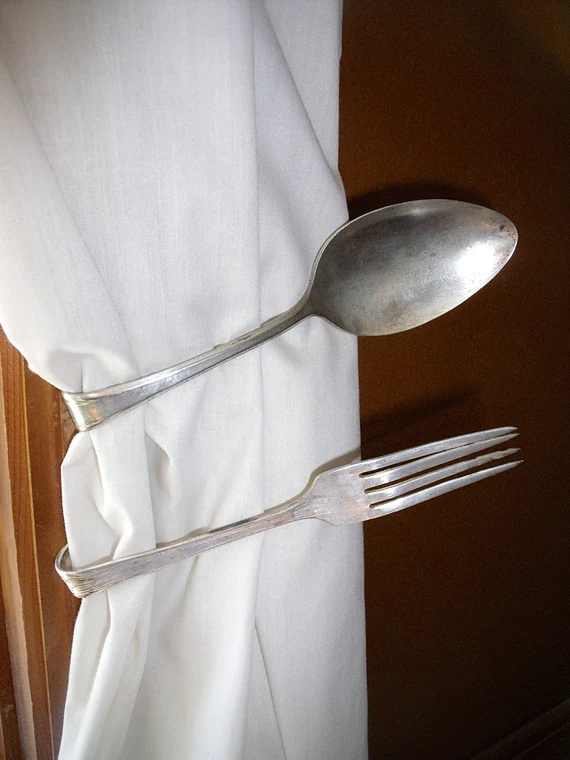
Haha, even everyday objects can be turned into your curtain tieback and the best part is that it feels like a conversation piece that somehow also hugs your curtains.
Bonus, this project is perfect for kitchens, dining nooks, or any cozy corner where nostalgia and creativity meet. If you’ve got a mismatched drawer of vintage cutlery, you’re halfway there already.
Materials Needed
- 1 vintage spoon
- 1 vintage fork
- 2 strong adhesive hooks
- Pliers or bench vise
- Soft cloth
Step-by-Step Guide
Step 1: Using pliers or a bench vise, carefully bend the spoon and fork into curved shapes. You’ll want the handle ends to form a loose loop, allowing the pieces to wrap around the curtain like an embrace.
Step 2: Once shaped, position the spoon and fork on opposite sides of the curtain and mark where you’ll place your hooks. Then mount the hooks securely into the wall or window frame.
Step 3: Hook the bent cutlery into place so it cups the curtain.
#17. Dragonfly Beaded Curtain Tieback
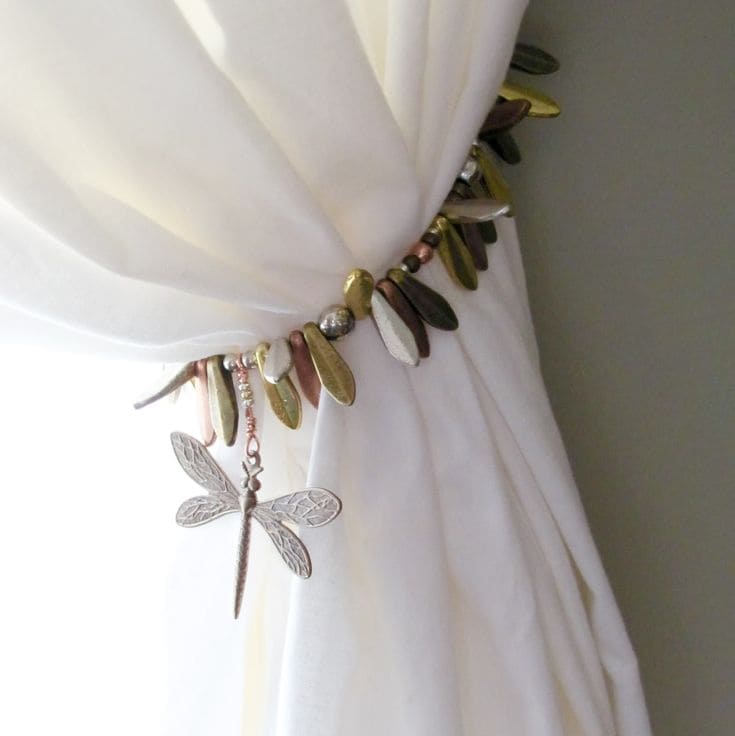
This tieback looks like it fluttered out of a fairy garden as it is covered by metallic leaf-shaped beads, earthy tones, and a single dragonfly pendant.
Therefore, this project is a lovely way to bring nature indoors. and of course your room will become more peaceful thanks to it.
Materials Needed
- 1 elastic cord (about 24 inches long)
- 20-30 assorted metallic beads and leaf-shaped charms
- 1 dragonfly pendant
- Crimp beads
- Jewelry pliers
- 2 small hooks
Step-by-Step Guide
Step 1: Start by measuring your curtain’s gathered width and cut your cord accordingly, leaving a bit extra for fastening.
Step 2: Thread your leaf beads and accent charms onto the cord, alternating colors and finishes to create texture and balance. Then, add the dragonfly pendant as a central charm.
Step 3: Once all beads are in place, secure the ends using crimp beads or small jewelry clasps.
Step 4: Wrap the beaded tieback gently around your curtain and fasten the ends with hooks or discreet pins.
#18. Braided Cotton Rope Curtain Tieback
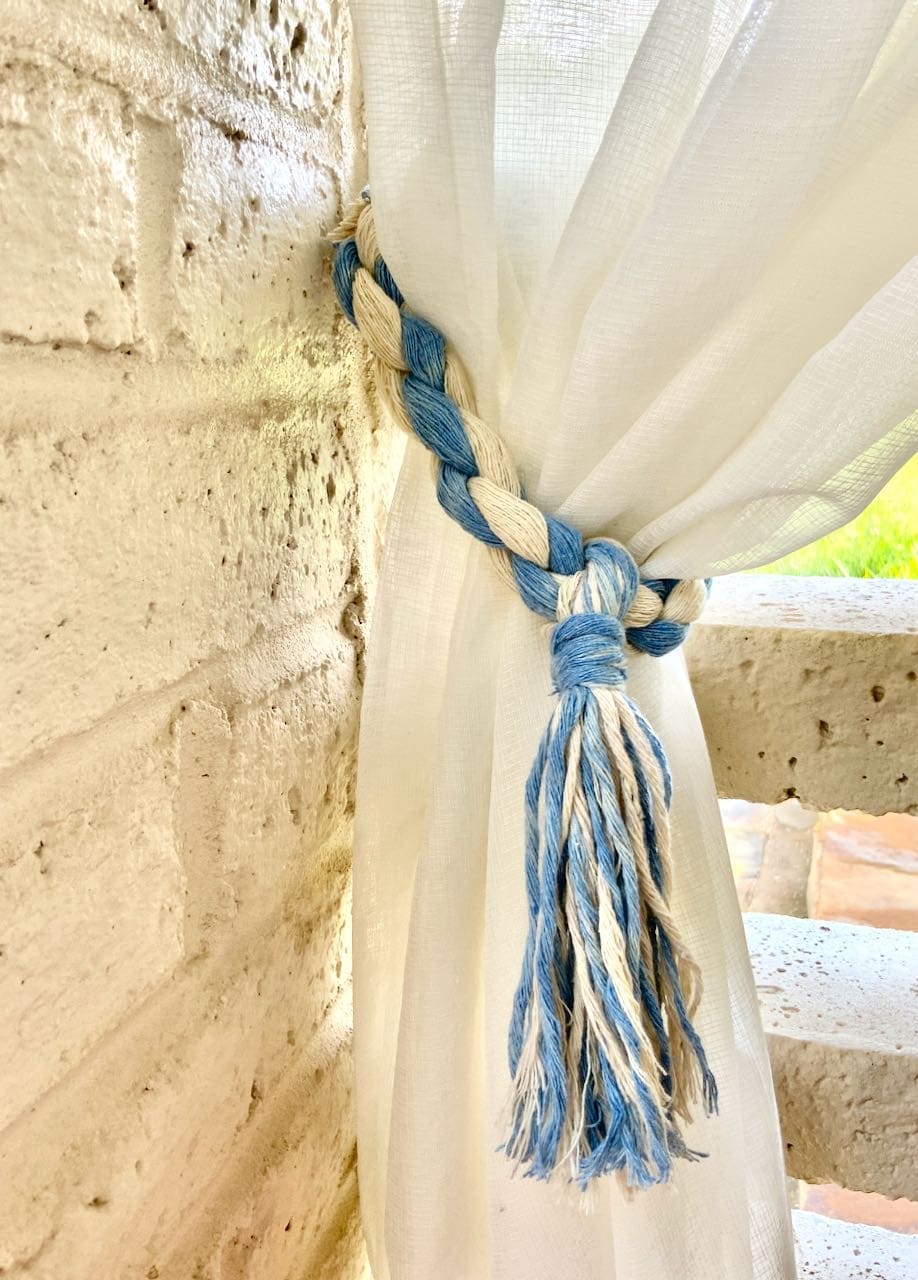
This soft cotton rope tieback, braided in blue and cream and finished with a rustic tassel, brings a light, coastal charm to any room.
It’s casual but thoughtful, handmade but neat. You can almost hear waves rolling in when the sunlight hits your curtain.
Materials Needed
- Cotton rope in 2 colors (3 strands, each 3 feet long)
- 1 additional piece of rope (12 inches)
- Scissors
- Tape
- Optional: fabric glue
Step-by-Step Guide
Step 1: Start by measuring your curtain’s girth when pulled aside. Cut three equal lengths of rope (about 3 feet each) to allow for braiding and a little drape.
Step 2: Tape the ends of the ropes to a table and braid them evenly. Try to keep a relaxed tension so the braid stays soft and flexible.
Step 3: Once braided, knot the end securely and gather the loose ends to form a tassel. Wrap the smaller rope piece tightly around the top of the tassel, about 1–2 inches down, and tie it off or glue it to hold.
Step 4: Wrap the braid around the curtain and tie it gently at the front or back, letting the tassel hang freely for a charming finish.
#19. Glamorous Beaded Necklace Curtain Tieback
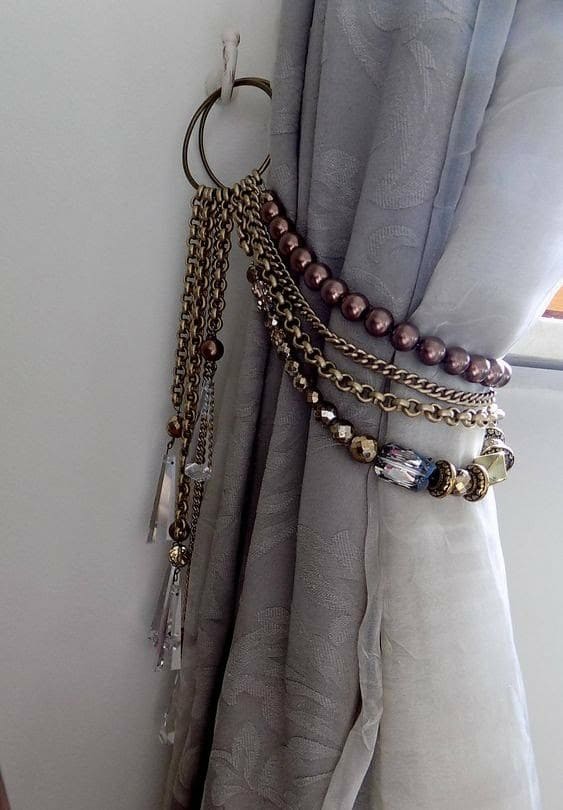
Do you know chunky beaded necklaces and gold-toned chains can bring a touch of luxe to your all room?
By doing this project, you’ll create a little moment of sparkle even on cloudy days. Also, anyone seeing this all want to try.
Materials Needed
- 3-5 old necklaces (mix of beads, chains, faux gems)
- 2 sturdy metal rings (1.5–2 inches diameter)
- 2 small hooks
- Optional: crystal drops
- Jewelry pliers
Step-by-Step Guide
Step 1: Start by measuring your curtain’s gathered width. This helps you gauge how many necklaces to layer and how much slack to leave for the draped effect.
Step 2: Choose necklaces with different textures like pearls, chains, rhinestones and loop them through one of the metal rings.
Step 3: Add optional crystal pendants or charms to the end of some chains to give it an elegant, chandelier-like finish.
Step 4: Secure the metal ring to a small hook or safety pin on the wall.
#20. Teacup Curtain Tieback
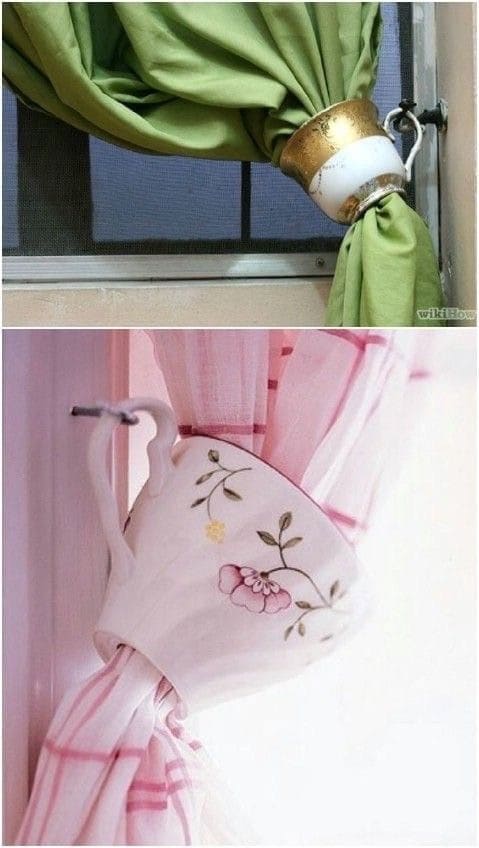
Repurposing teacups as curtain tiebacks transforms a simple window into a storybook scene.
Whether you use a chipped heirloom or a thrift store treasure, this project adds personality that guests can’t help but smile at.
Materials Needed
- 1 ceramic teacups (with handles)
- 1 cup hook
- Wall anchors
- Power drill or screwdriver
- Optional: epoxy or glue
Step-by-Step Guide
Step 1: Start by measuring your curtain’s width when pulled to the side. Determine where the cup should sit so the curtain can be gently pulled through without drooping too much.
Step 2: Drill a small pilot hole in the wall, then screw in the hook. Use a wall anchor if you’re not drilling into a stud, especially if the teacup is thick or heavy.
Step 3: Hook the teacup handle onto the installed hook.
Step 4: Gather the curtain and slide it carefully through the cup.
#21. Fairy Doll Curtain Tieback
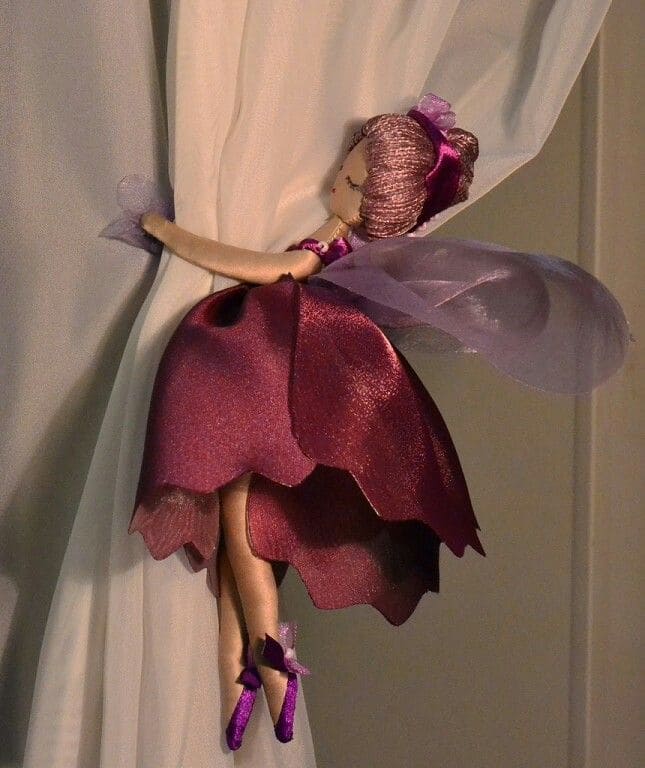
With her wings poised mid-flight and her delicate arms wrapped gently around the fabric, this little fairy feels like a guardian of the window, ready to sprinkle just a little extra whimsy into your everyday life.
You can make this project for your niece’s bedroom, and to this day, I’m sure she’ll insist her fairy flies a little every night.
Materials Needed
- 1 soft fabric doll (approx. 8–10 inches)
- Satin fabric and organza
- Ribbon and trims
- Needle and thread
- Wire
- Optional: velcro or snap buttons
Step-by-Step Guide
Step 1: Start by selecting a small cloth doll with bendable limbs or attachable arms. You can use floral wire inside the arms to allow them to wrap gently around the curtain.
Step 2: Dress the doll in a fairy-style outfit using shiny or sheer fabric. Then create a petal-style skirt and add tulle or organza wings to the back.
Step 3: Add small details like hair bows, ballet-style ribbons for shoes, or glitter on the wings to enhance the whimsical look.
Step 4: Position the fairy on the curtain and gently wrap her arms around the gathered fabric.
#22. Wall-Clip Modern Curtain Tieback
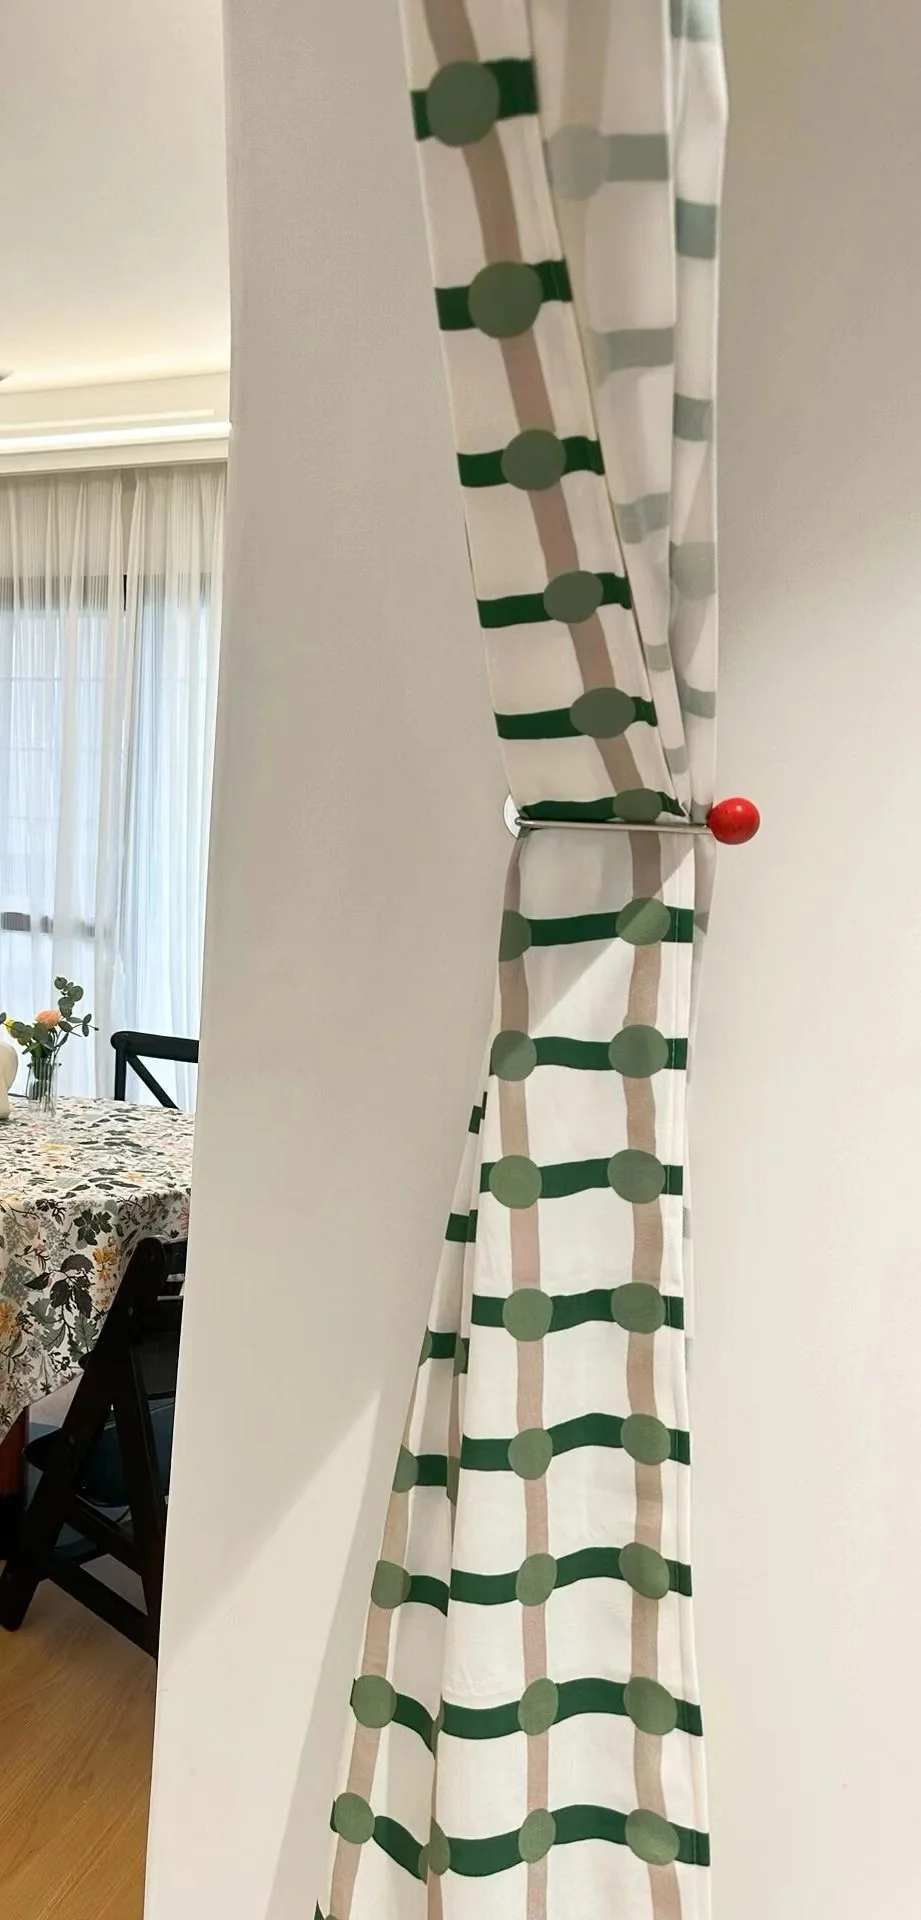
This clever design strips things back to the essentials. A single wall-mounted hook with a rounded red knob transforms a curtain into a clean, sculptural shape.
Ideal for modern or Scandinavian-inspired spaces, this DIY project relies on geometry, color contrast, and that satisfying “why didn’t I think of that?” practicality. If you love sleek lines and playful details, this tieback proves you don’t need frills to make a statement.
Materials Needed
- 1 strong metal hook (2-3 inches long)
- 1 wooden or plastic knob
- 1 screw and wall anchor
- Power drill
- Optional: matching paint
Step-by-Step Guide
Step 1: Start by measuring your curtain’s resting width when pulled to the side. Then mark the spot on the wall where the tieback will pinch the fabric.
Step 2: Attach the bracket to the wall using a power drill and wall anchor.
Step 3: Screw the painted knob into the end of the bracket, creating a bold and functional end cap.
Step 4: Gently wrap the curtain around the bracket, tucking it snugly so that the knob holds it in place.


