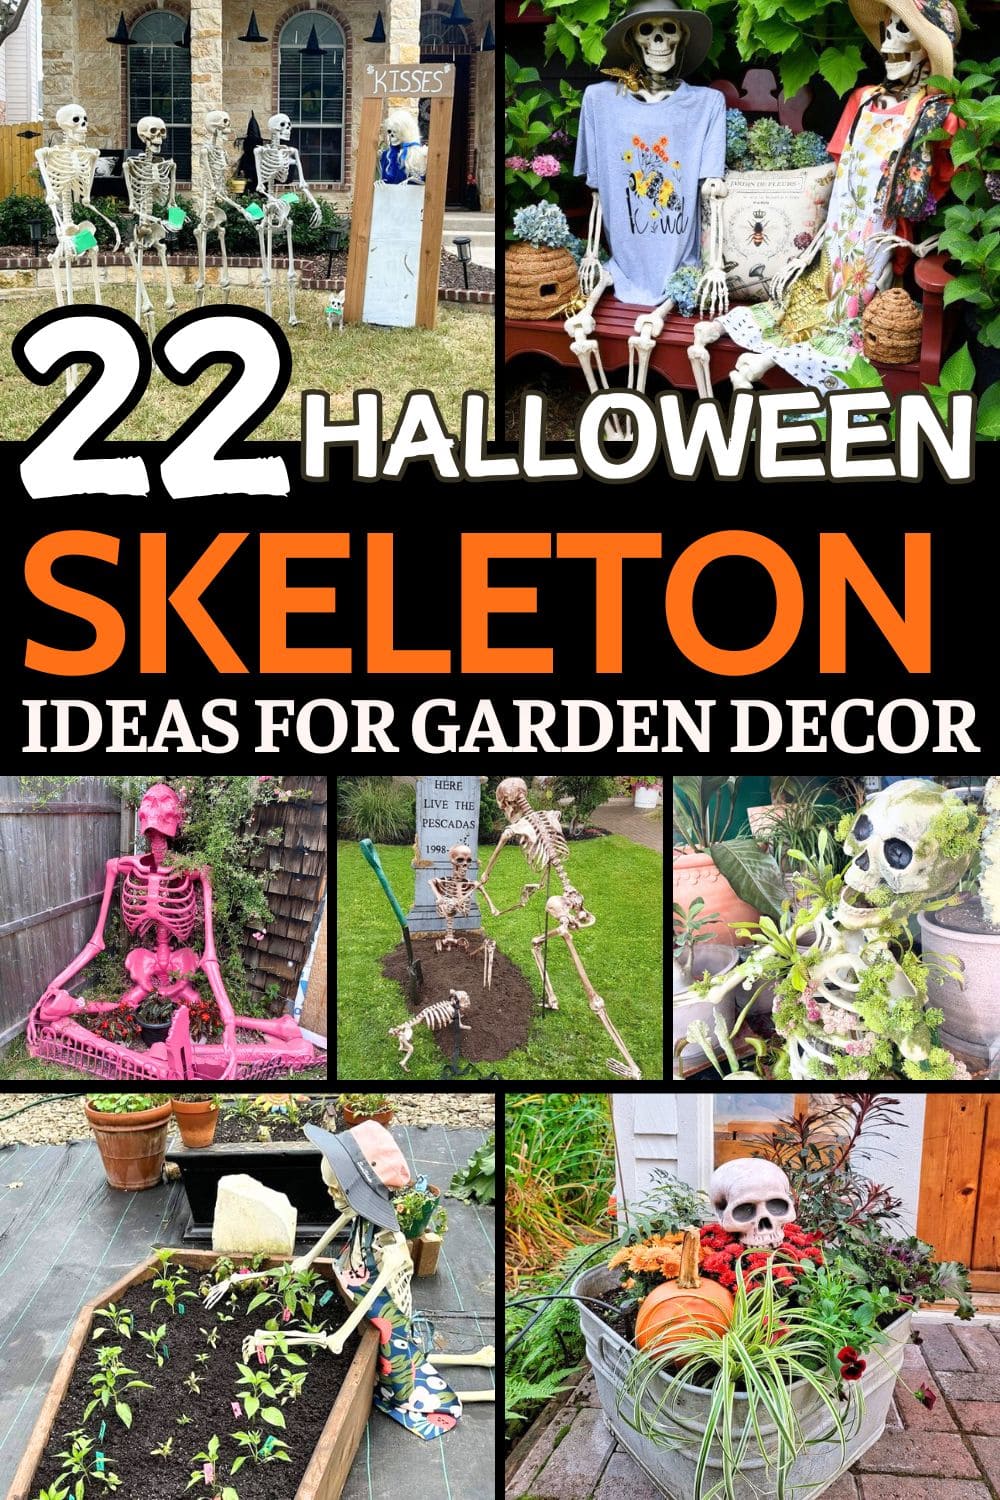
Halloween doesn’t stop at the front door, your garden deserves a spooky makeover too!
If you’re ready to take your outdoor decorations to the next level, these 22 skeleton ideas will do the trick.
From bony gardeners tending ghostly blooms to croquet champions who haven’t let death stop their swing, this collection brings a perfect blend of humor and just the right amount of creep.
I bet for spine-chilling or side-splitting, these setups will have your neighbors snapping pics and your trick-or-treaters howling with delight.
#1. Skeleton Zen Garden Planter
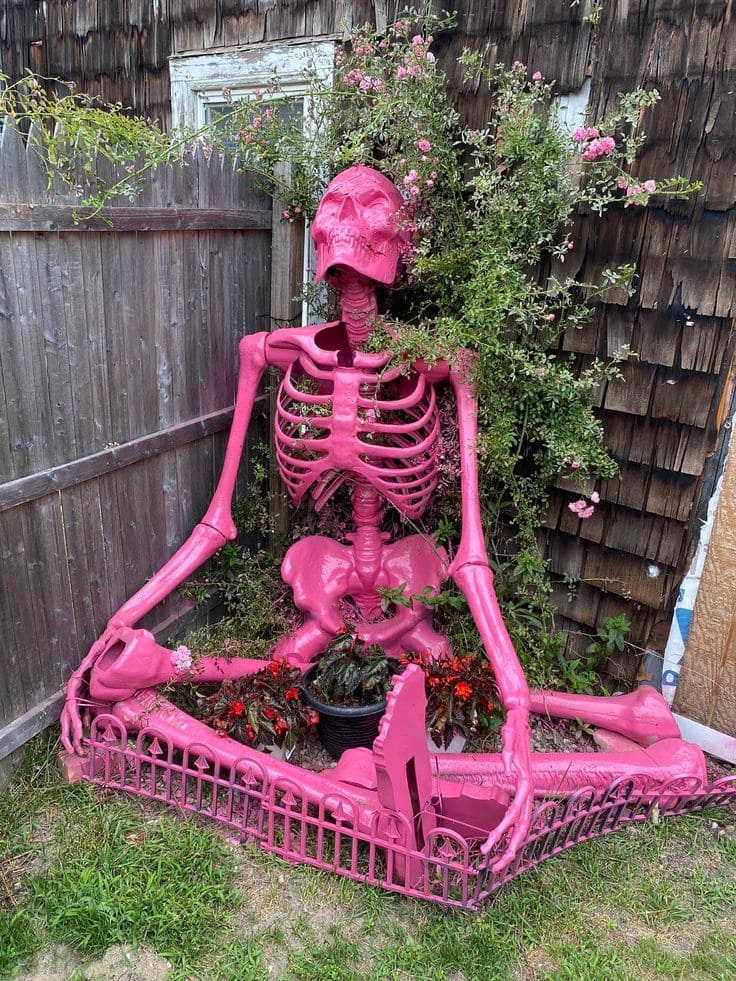
Who says Halloween has to be all black and spooky? This fabulous pink skeleton breaks the mold, literally and creatively.
Tucked into a garden corner like a meditating guardian of blooms, it brings a vibrant, cheeky energy that’s equal parts macabre and magical.
It’s the perfect statement piece for someone who loves spooky season but doesn’t take themselves too seriously. Plus, it doubles as a planter!
Materials Needed:
- 1 life-size plastic skeleton
- Pink outdoor spray paint (2-3 cans depending on size)
- Potted flowers or garden soil + bedding plants
- Mini garden fence (spray-painted pink)
- Zip ties
- Optional: vines or faux ivy
Step-by-step Guide:
Step 1: Choose a shady garden corner and set your skeleton in a seated pose with legs crossed or extended. Then secure joints if needed using wire.
Step 2: Spray paint the entire skeleton and fence with pink paint.
Step 3: Position flower pots between the skeleton’s legs and around the ribs, almost like the blooms are being lovingly cradled.
Step 4: Drape vines through the ribcage and around the neck, letting them climb up a fence or wall for that overgrown look.
Step 5: Finally, add the mini fence around the setup for a playful graveyard-chic touch.
#2. The Dead Celebs Hall of Fame

You can see this hysterically bone-chilling display turns pop culture legends into pun-loving skeleton stars.
Center stage is Marrow-lyn Monroe, complete with her iconic white dress and windswept pose, looking absolutely drop dead gorgeous.
The addition of signs like great bone structure and deadline makes this setup more than a Halloween display, it’s a skeleton satire masterpiece.
Materials Needed:
- 4-6 poseable skeletons (life-size)
- Wigs and costume pieces (e.g., white halter dress, sunglasses, jackets, hats)
- Foam boards
- Yard stakes
- Spotlights
- Optional: fake microphones, guitars, or themed props
Step-by-step Guide:
Step 1: Dress your skeletons in iconic celebrity looks. For Marrow-lyn, recreate the famous white dress moment. For Pelvis Presley, don’t forget the shades and scarf.
Step 2: Make pun signs using foam board or poster board. Then stick them on with zip ties or fishing line for easy removal later.
Step 3: Use yard stakes or rebar behind the skeletons to keep them standing, especially if you’re placing them on grass.
Step 4: Add themed props like a movie poster, mic stand, or guitar. These little details bring the whole setup to life or afterlife.
Step 5: Place outdoor lights to highlight each character once the sun sets. If you want to go even further, add a small speaker playing faint celebrity voice clips or retro music.
#3. The Bone Yard Croquet Club
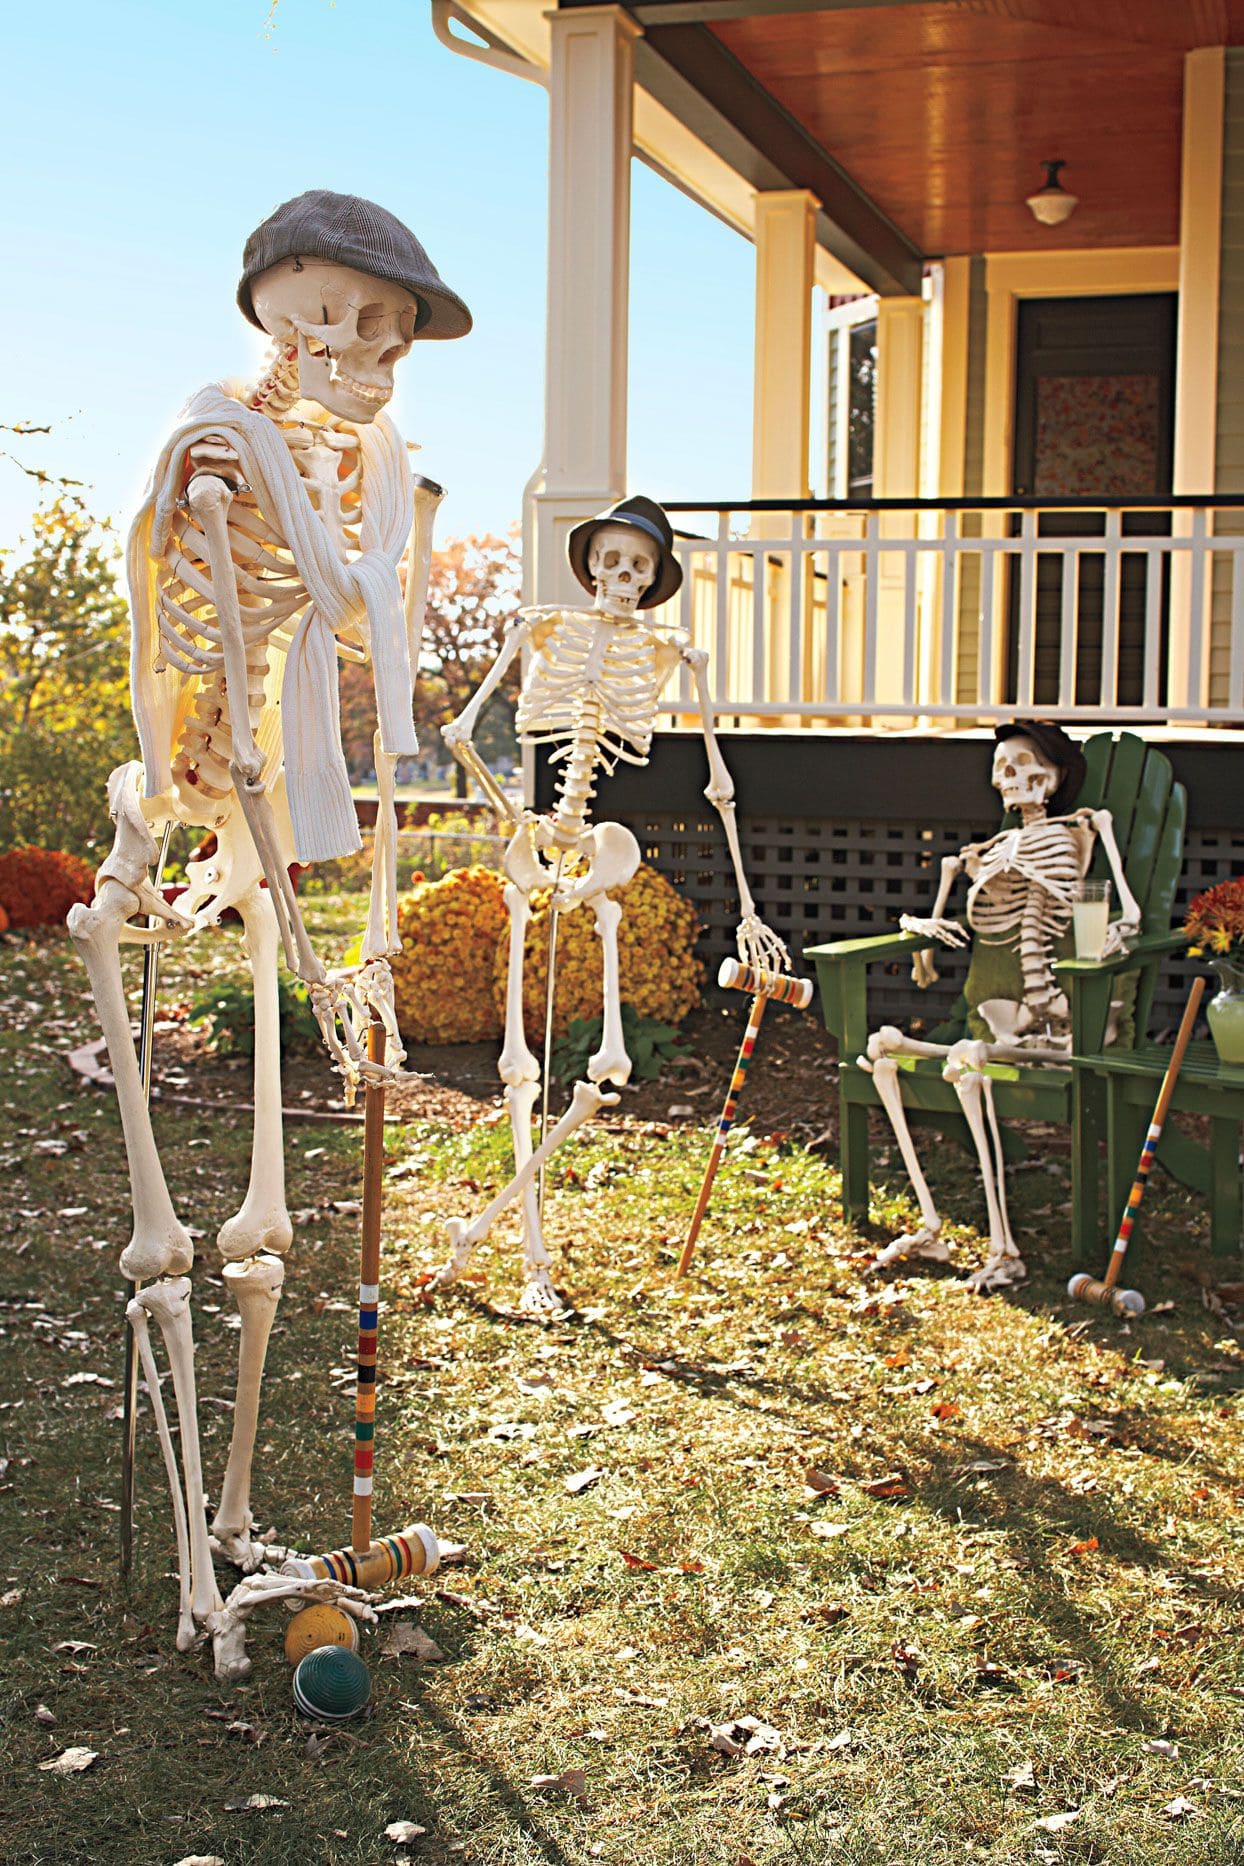
Who says you can’t enjoy retirement even after you’ve kicked the bucket? This hilarious croquet scene features three dapper skeletons decked out in caps, scarves, and relaxed vibes.
One lounges in a garden chair with a drink in hand, clearly more interested in the refreshments than the game.
The other two are mid-match, mallets poised and competition brewing or whatever the bony version of brewing is.
Materials Needed:
- 3 full-size plastic skeletons
- Croquet set (mallets, balls, and wickets)
- Assorted hats (newsboy, fedora, sunhat)
- Light scarf, vest, or shawl for flair
- Green Adirondack chair
- Props: drink glass, fall flowers, or a garden side table
Step-by-step Guide:
Step 1: Position your chair and set up your seated skeleton first. Then tilt the head back slightly and add a cup or mason jar for a humorous, relaxed look.
Step 2: Set up your croquet field using the mallets and balls. Next, pose one skeleton mid-swing and another one reacting, arms crossed or leaning on the mallet can create playful interaction.
Step 3: Add hats and accessories to each skeleton to give them distinct personalities. Little details like a draped scarf or tilted cap add charm.
Step 4: Scatter fall leaves or place some potted mums around to bring warmth and seasonal color to your spooky lawn match.
#4. Skeleton Garden Gag Inspired by The Three Stooges
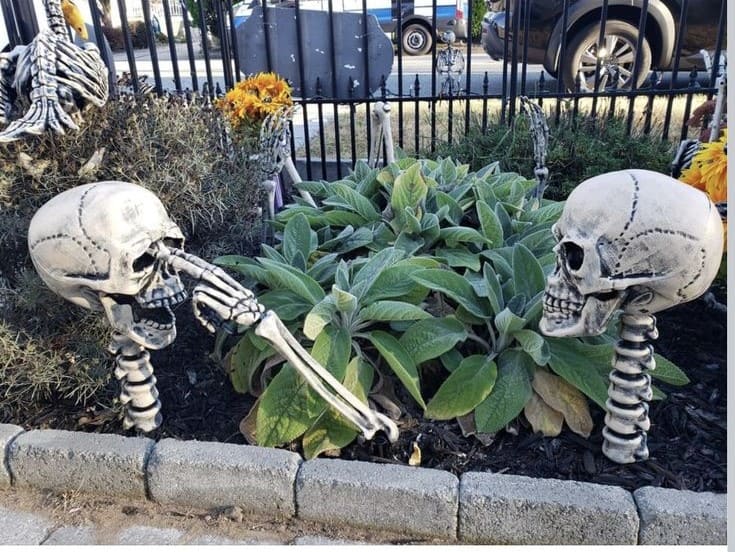
This cheeky garden display pays tribute to classic slapstick comedy in the most bone-headed way.
If you grew up chuckling at the antics of Larry, Curly, and Moe, this setup will hit you right in the funny bone.
Perfect for Halloween with a hint of nostalgia, these skeletons are posed mid-squabble, complete with a two-finger eye poke.
Materials Needed:
- 3 plastic skulls with detachable jawlines
- 3 spine or neck bone stakes (about 18-24 inches each)
- 2 skeleton arms
- Garden soil
- Optional: fake flowers, cemetery fencing, or foam signs
Step-by-step Guide:
Step 1: Insert each skull onto a plastic or metal stake, adjusting the height slightly for variation. Then space them evenly in your flower bed or garden patch.
Step 2: Attach one hand to a stake or bury the arm in mulch so it appears to be reaching up. You carefully pose it to poke the eye sockets of the neighboring skull.
Step 3: Use additional skeleton arms or spare parts for a more animated feel.
Step 4: For added effect, you place a “RIP Comedy” or “Stooges Forever” tombstone in the background to complete the homage.
#5. Screaming Sunflowers
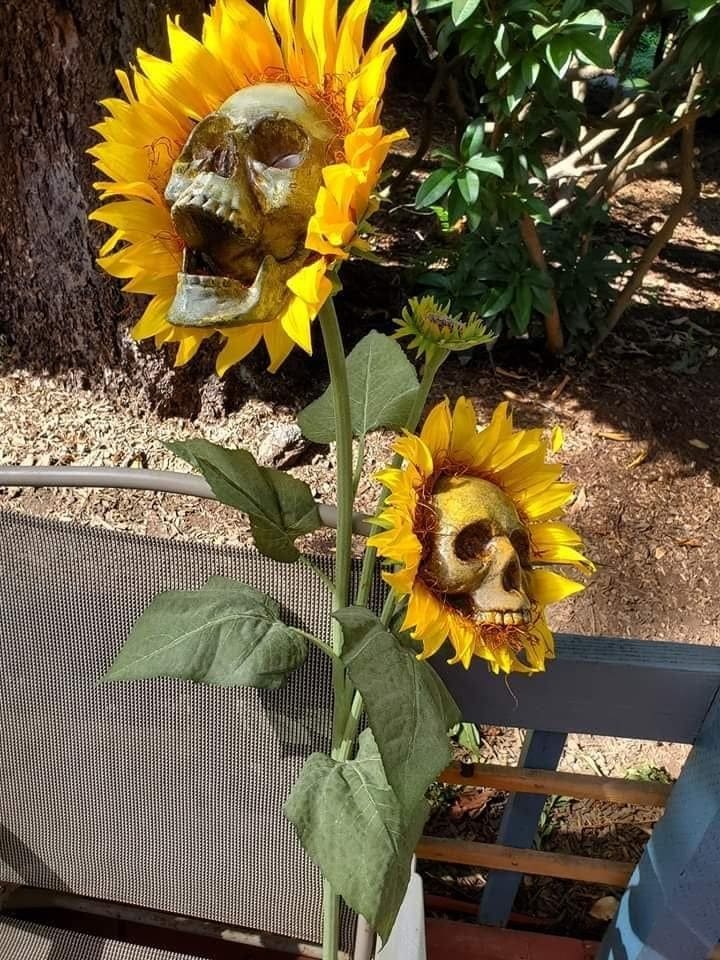
Who knew sunflowers could scream? These twisted blooms turn the classic cheer of summer into full-on Halloween horror.
Moreover, each face is a plastic skull surrounded by sunny yellow petals, like nature had a nightmare and bloomed it anyway.
They’re eye-catching, campy, and brilliant for anyone looking to add a dark twist to their flower beds or porch planters.
Materials Needed:
- 2-3 faux sunflower stems
- 2 mini plastic skulls
- Yellow artificial sunflower petals
- Hot glue gun and glue sticks
- Brown moss or dried coconut fiber (optional)
Step-by-step Guide:
Step 1: Remove the center of each faux sunflower and hollow out a space big enough for the skull. If using standalone petals, build your flower base using cardboard or thick floral wire.
Step 2: Secure each skull in the flower’s center with hot glue. Then tilt at slight angles for that creepy “alive” expression.
Step 3: Add moss or coconut fiber around the edges of the skull to hide glue seams and give a weathered, organic look.
Step 4: Finally, arrange the flowers in a pot or garden bed, or attach them to a trellis or railing.
#6. Skeleton Gardener Raised Bed Display
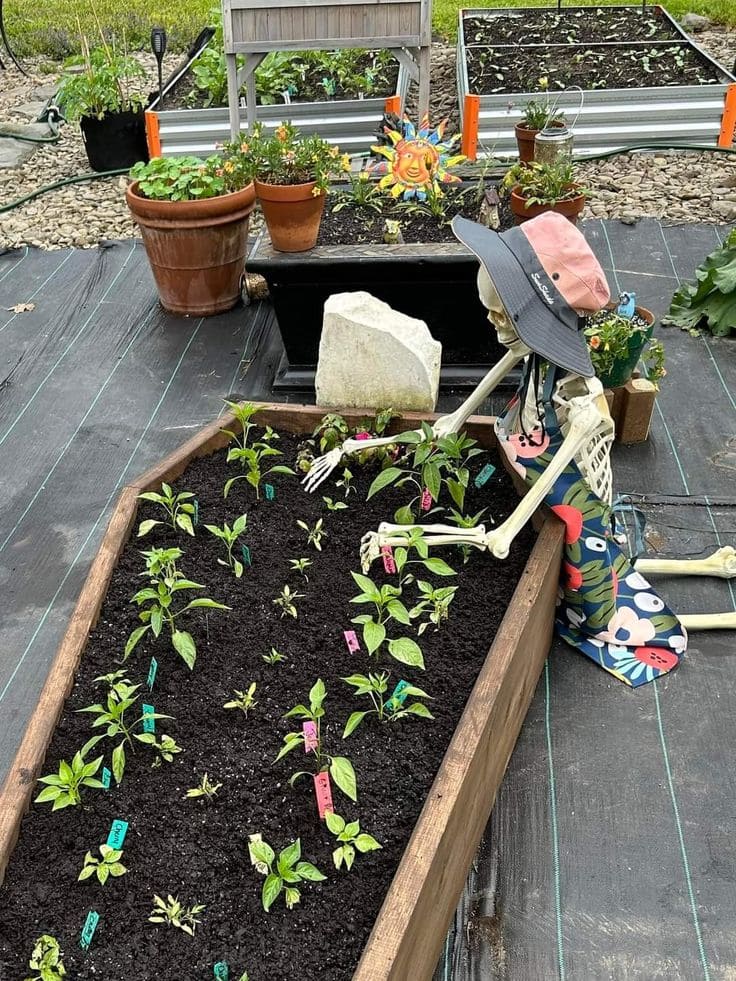
This Halloween garden idea is equal parts clever and charming. The skeleton gardener is a playful twist that blends spooky fun with garden pride.
Plus, it’s incredibly simple to build using what you may already have on hand. You’ll get smiles from visitors and bonus points for creativity from fellow plant lovers.
Materials Needed:
- 1 posable skeleton (4 ft)
- Wide-brim hat and garden gloves
- Raised garden bed
- Small tombstone prop (foam or stone-look)
- Mini rake
- Garden labels
- Optional: Apron or cloth
Step-by-step Guide:
Step 1: Place your skeleton next to the garden bed. Then adjust the arms so they reach naturally toward the plants.
Step 2: Dress your skeleton with a hat and gloves, then tuck in a child’s apron or colorful fabric to mimic gardening clothes.
Step 3: Add a mini rake or tool to the skeleton’s hand, and insert a tombstone prop behind the skeleton for spooky flair.
Step 4: Scatter a few plant markers or labels to complete the look.
#7. Undying Gardener Skeleton Decor
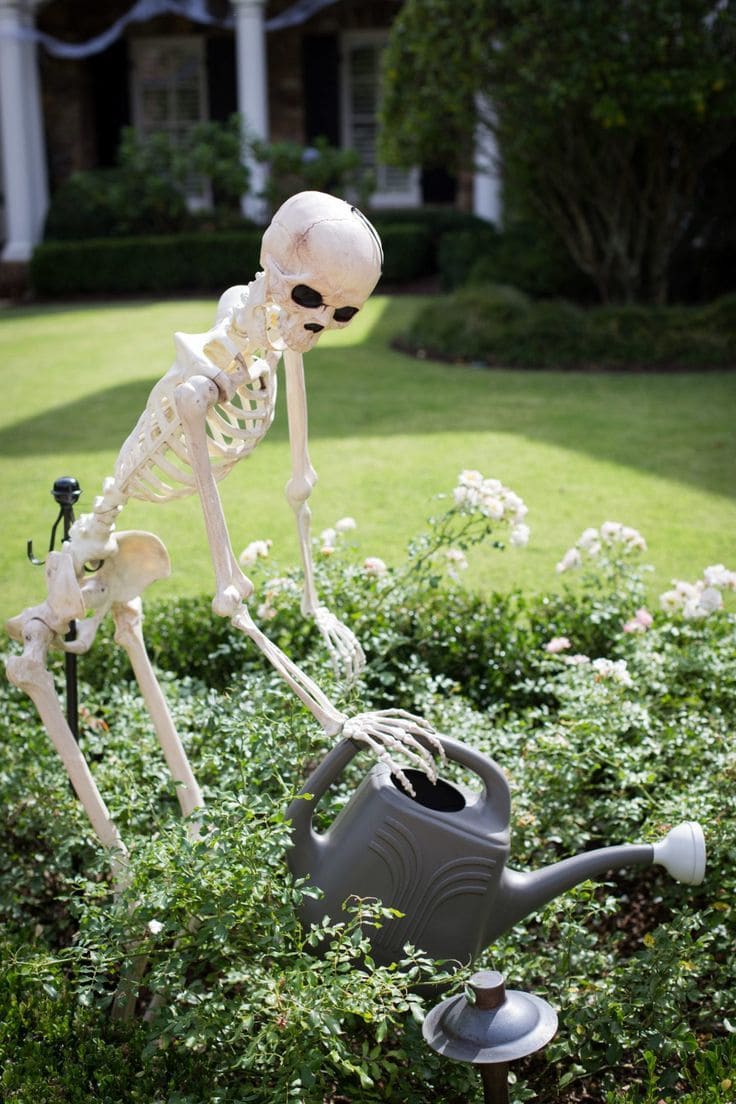
Who says gardening has to end after death? This hilarious Halloween yard setup features a lanky skeleton tending lovingly to the bushes, complete with a watering can in hand and an eerily determined expression.
The pose is everything here. The skeleton’s hands are perfectly clasped on the watering can, creating a scene that’s oddly touching and unexpectedly funny.
No matter how you place this figure in a rose garden, herb patch, or even a potted corner, it’s guaranteed to make guests do a double take.
Materials Needed:
- 1 life-size plastic skeleton
- 1 large plastic watering can
- Garden stakes
- Outdoor shrubbery
- Optional: garden gloves, hat, or apron
Step-by-step Guide:
Step 1: Find the perfect spot in your garden or flower bed where the skeleton can lean over plants naturally.
Step 2: Position the skeleton in a slightly hunched stance and use garden stakes to secure its legs and arms. You can even gently bury the feet for realism.
Step 3: Place the watering can between the hands, adjusting the grip so it looks like the skeleton is mid-task.
Step 4 (Optional): Add personality with a gardening hat, scarf, or funny signage. You can even glue a few fake flowers to the bones to show off their green thumb.
#8. Skeleton Kissing Booth
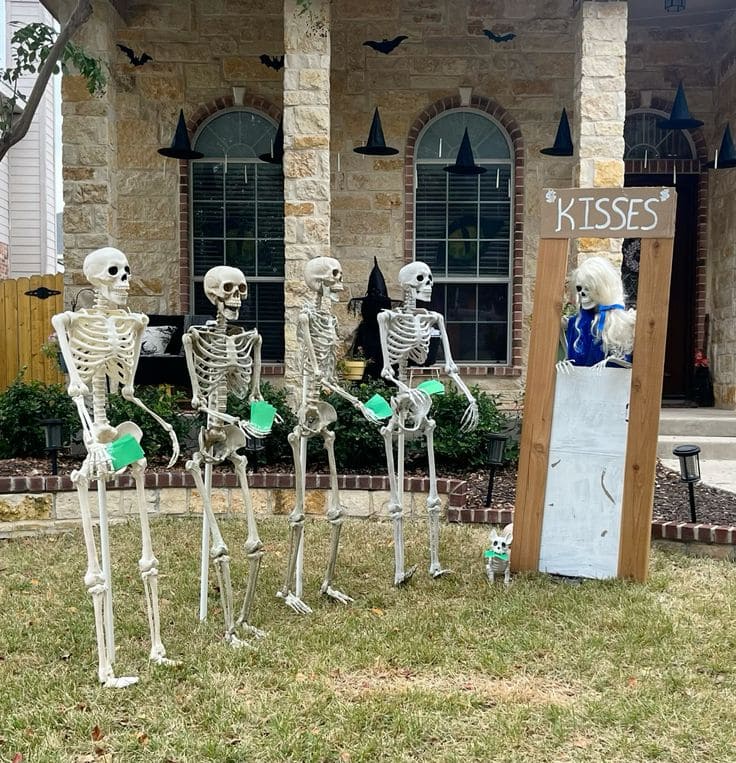
This hilarious Halloween setup takes the phrase dying for a kiss to a whole new level.
You don’t need animatronics or fog machines to get attention; just humor, timing, and a few well-placed bony lovers.
It’s ideal for anyone who wants their Halloween décor to be funny with a playful storyline.
Materials Needed:
- 4-5 posable skeletons (4 ft or taller)
- 1 Halloween mannequin
- 1 wooden booth frame (approx. 6 ft tall, 2.5 ft wide)
- White fabric or board
- Cardboard sign
- Fake money
- Hot glue, tape, zip ties
- Optional: dog skeleton + green bow
Step-by-step Guide:
Step 1: Set up your wooden frame as the kissing booth using scrap wood, pallets, or even a door frame. Then drape a white fabric or attach whiteboard to form the counter surface.
Step 2: Dress up the booth operator like wig, costume, and spooky charm go a long way. You should prop them behind the booth securely.
Step 3: Arrange the skeletons in a queue. Then angle their bodies to face the booth, giving them slightly bent elbows to hold the money.
Step 4: Add little accessories like green slips of paper as wallets or dollar bills. Then hot glue them to the skeletons’ hands if needed.
Step 5 (optional): You can add a dog skeleton to the scene with a matching green bow or tag to bring the whole tableau to life.
#9. The Skeleton Garden Club
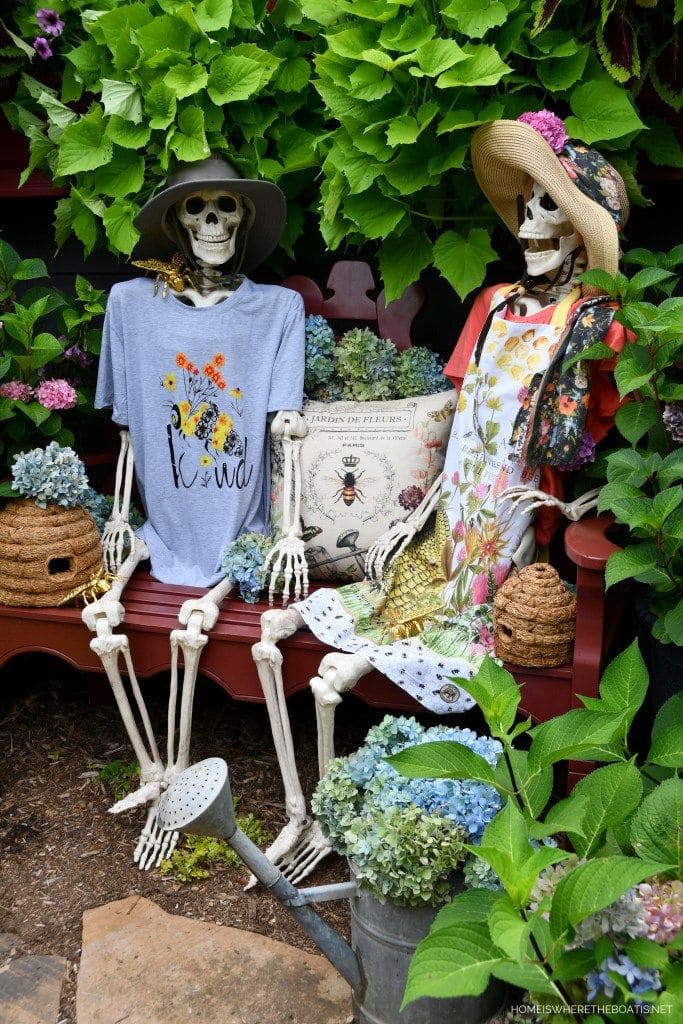
This adorable garden duo is out here proving that green thumbs don’t stop at the grave.
Dressed in florals, sunhats, and cheerful tees, these two skeletons are living their best afterlives on a cozy garden bench.
Surrounded by lush hydrangeas, bee-themed décor, and a stylish watering can, they look like they’ve been swapping plant tips and gossiping about the neighbor’s begonias for the last century.
Materials Needed:
- 2 full-size plastic skeletons
- Garden bench
- 2 sunhats with fake flowers or ribbon
- 1 apron, 1 printed t-shirt
- Decorative pillows (floral or bee-themed)
- Faux or real hydrangeas and greenery
- Garden props: watering can, bee skeps, gloves, apron, garden tools
- Floral scarf or scrap fabric
Step-by-step Guide:
Step 1: Dress each skeleton with a garden-appropriate outfit including one in a t-shirt and the other in a cheerful apron. Then add sunhats and optional accessories like scarves or necklaces.
Step 2: Pose the skeletons in a relaxed sitting position on the bench. Let one hold a small garden tool or watering can, while the other rests a hand on a pillow or their gardening buddy.
Step 3: Surround the scene with floral pots or faux arrangements. Nestle pillows behind their backs and tuck in extra details like a folded tea towel or labeled herb markers.
Step 4: For a charming finishing touch, place a watering can in front, filled with blooms or trailing vines, and scatter a few seed packets or gloves nearby.
#10. Skeleton Cleanup Crew Scene
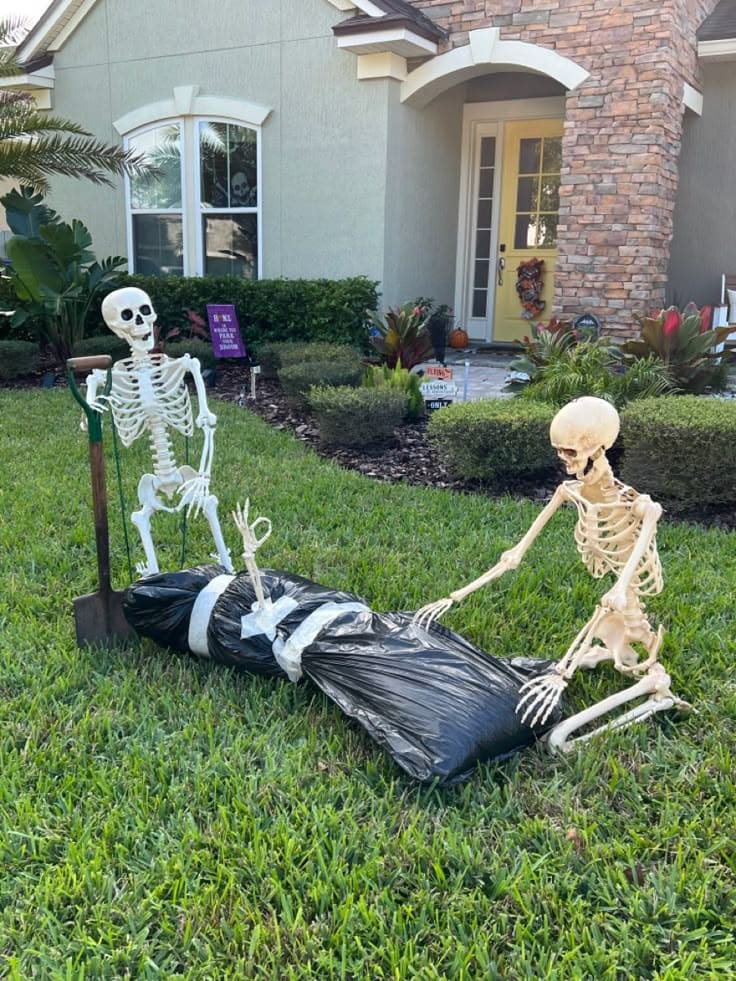
Sometimes your Halloween display needs a dash of dark comedy and this one brings it in spades.
Two bony pranksters caught mid-clean-up duty with a duct-taped body bag and a shovel make for a scene that stops people in their tracks.
Plus, it gives your lawn a narrative twist like something straight out of a campy horror film.
Materials Needed:
- 2 posable skeletons (4 ft+ recommended)
- 1 large black trash bag
- White duct tape (about 2-3 yards)
- Stuffing (newspapers, pool noodles, old clothes)
- A plastic or metal shovel
- Optional: a fake hand/foot
Step-by-step Guide:
Step 1: Fill the black trash bag with crumpled newspaper, old rags, or anything soft but shapeable. Then use pool noodles or rolled towels to form limbs.
Step 2: Seal the bag tightly and use white duct tape to wrap it at three points including top, middle, and bottom to mimic a body bag.
Step 3: Position the skeletons on each side of the bag. One should appear to drag it, while the other leans casually on the shovel as if supervising.
Step 4: Place the shovel in the grass or prop it with extra support. You can also add a fake hand out of the bag for extra drama.
#11. Skull and Petal Planter
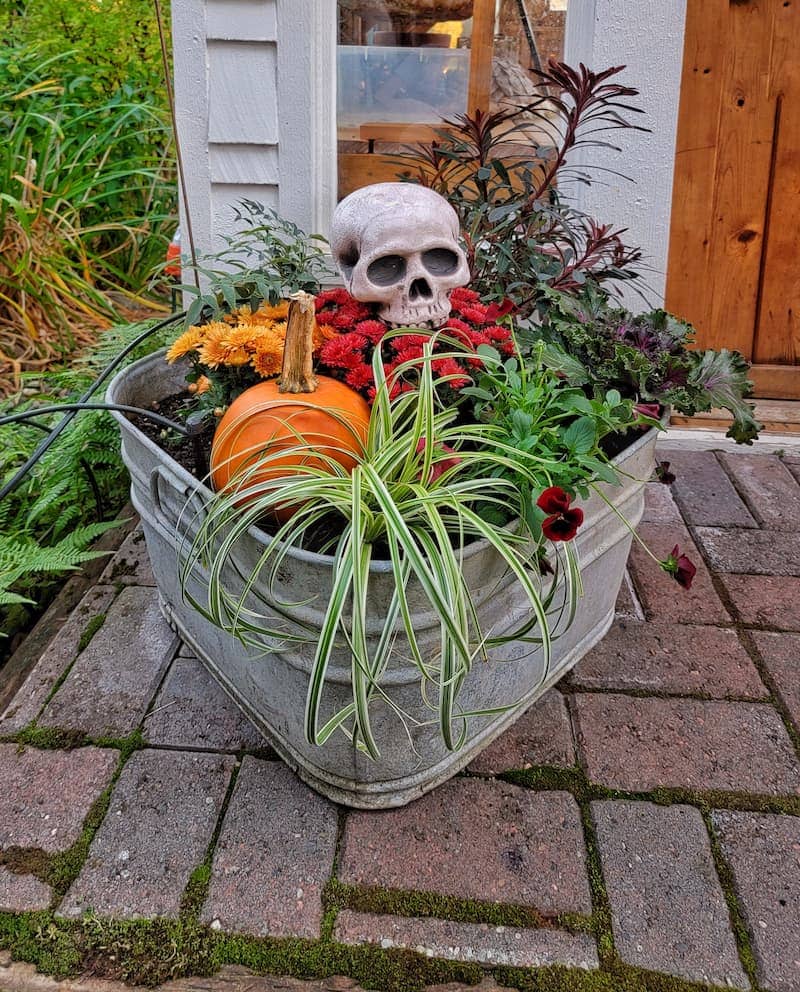
Who says spooky can’t be stylish? This garden container turns a humble galvanized tub into a seasonal showstopper.
Nestled among vibrant chrysanthemums, ornamental kale, and a cheerful pumpkin, the faux skull adds a hauntingly playful twist.
#12. Lost and Found Skeleton Station
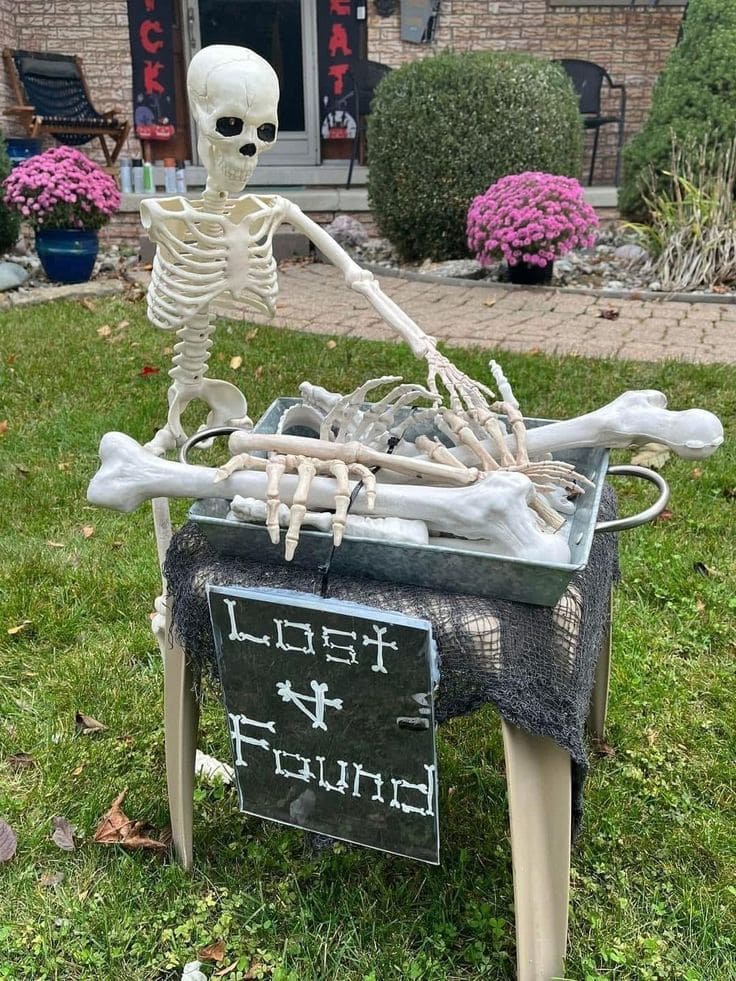
Imagine strolling past a garden and seeing this skeleton casually sifting through a bin of spare bones like it’s sorting laundry.
Plus, the “Lost & Found” sign adds humor while tying everything together, perfect for families who want spooky fun without the gore.
You can place it right on the lawn near the entrance to surprise your trick-or-treaters with a giggle.
Materials Needed:
- 1 posable plastic skeleton (approx. 3 ft)
- 1 plastic bin (around 18″ x 12″)
- 1 mix of extra bones/skull parts
- 1 plastic stool
- 1 black mesh cloth (24” x 24”)
- Cardboard (for sign, 12″ x 12″)
- White paint marker
- Hot glue or zip ties
Step-by-step Guide:
Step 1: Drape the mesh cloth over the stool or small table to give it a haunted, worn-out look. Let it hang slightly uneven for a natural effect.
Step 2: Place the bin or tray in the center and fill it with mismatched bones, hands, ribs, or even a skull. Then lean a few bones over the edge like they’re being sorted.
Step 3: Position the main skeleton behind or beside the table. Now, you bend one arm to reach into the bin for a fun, animated feel.
Step 4: Create the “Lost & Found” sign using cardboard or foam board. You can also write with a white marker or glue on bone-styled letters.
#13. Overgrown Guardian Skeleton
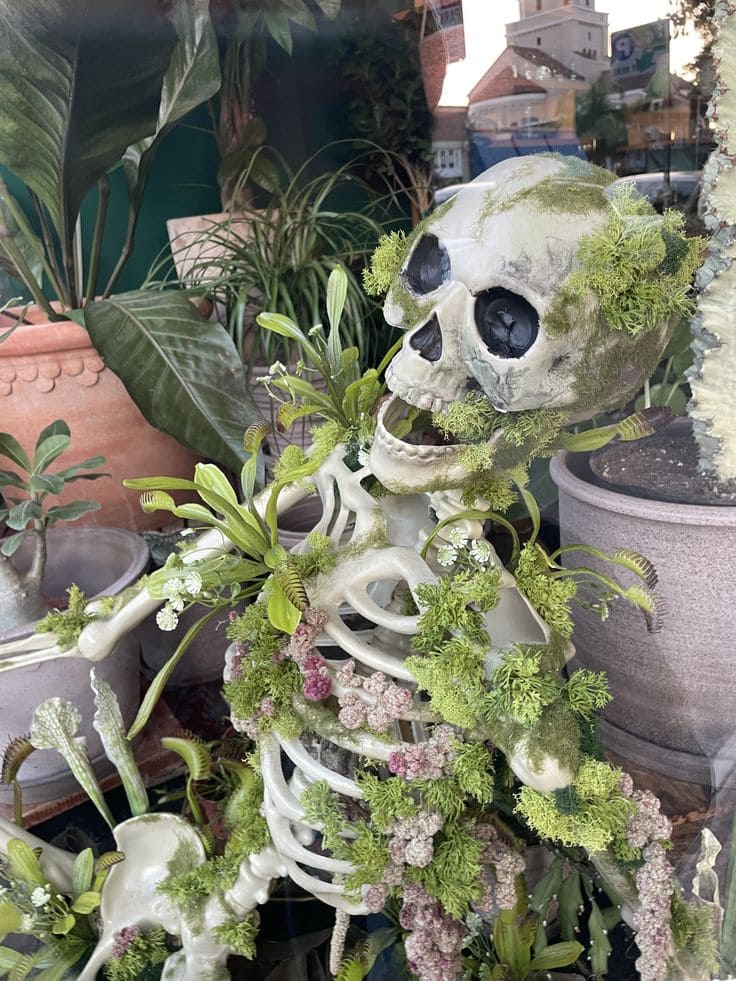
Interestingly, this skeletal centerpiece looks like it’s been chilling in a greenhouse for a few decades and it’s never looked better.
Covered in moss, delicate vines, and sprigs of faux flowers, it’s like a garden spirit that forgot to move on.
Materials Needed:
- 1 full-size plastic skeleton
- Faux moss sheets
- Assorted faux greenery (ferns, vines, air plants)
- Mini artificial flowers in muted or pastel tones
- Hot glue gun and glue sticks
- Scissors and optional floral wire
Step-by-step Guide:
Step 1: Lay the skeleton flat and map out your greenery placement, focus on joints, the rib cage, and head for maximum visual interest.
Step 2: Hot glue moss around key areas first, then layer in vines and flowers. Then weave stems through ribs and around arms to make it look naturally overgrown.
Step 3: Tuck in flower buds near the jawline, clavicles, and chest for a soft touch. You want to add some over the skull like a wild crown.
Step 4: Finally, position your garden skeleton among potted plants or in a shady garden corner.
#14. Skeleton Family Reunion
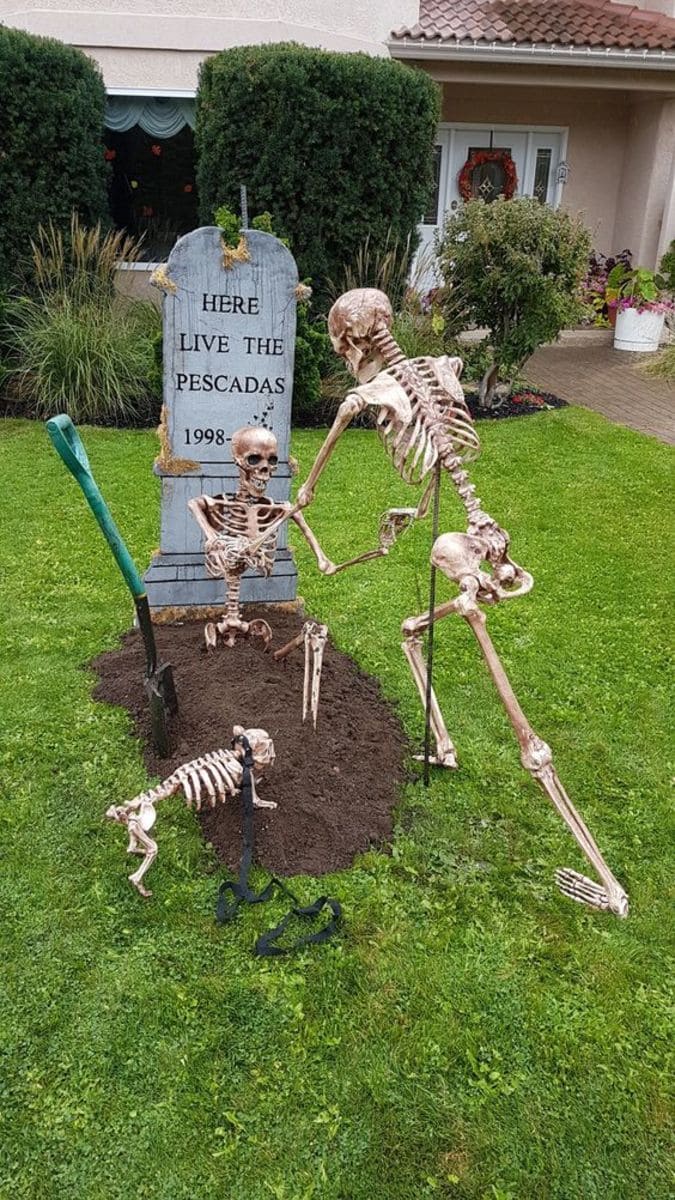
This Halloween setup is a full-blown undead family affair! You’ve got Dad mid-dig, a little skeleton crawling out of the dirt with baby arms raised, and even the family dog lending a paw.
Bonus, the tombstone in the background seals the narrative: “Here live the Pescadas.”
Materials Needed:
- 2 adult-size skeletons
- 1 child-size skeleton
- 1 small dog skeleton
- 1 faux tombstone (custom text optional)
- 1 garden shovel
- Fresh soil or mulch
- Yard stakes or wire
Step-by-step Guide:
Step 1: Choose a grassy front yard spot and lay down a generous mound of soil to simulate a freshly dug grave. Then pack the center so it holds figures well.
Step 2: Position one adult skeleton bent over with a shovel, as if digging. You want to use a stake to secure it upright.
Step 3: Half-bury the child skeleton in the soil with arms outstretched like it’s just emerged from its nap in the afterlife.
Step 4: Add the dog skeleton near the front, playfully watching or barking. Finish by placing the tombstone behind them all and adding final pose touches with stakes or zip ties.
#15. Skull Stack Topiary
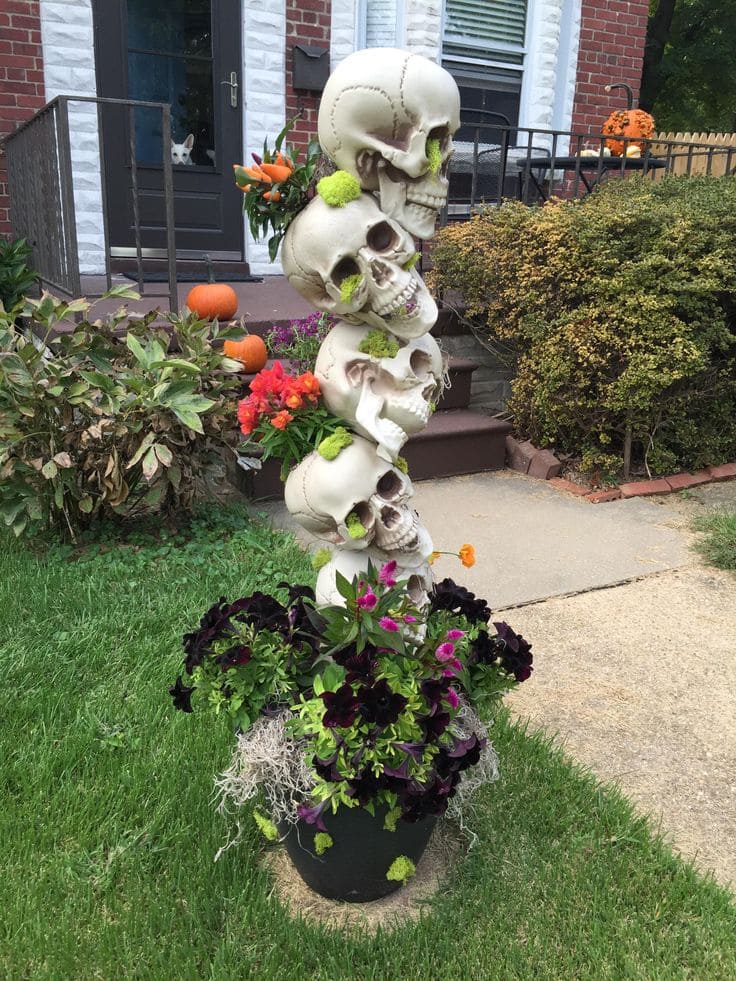
Wow, this eye-catching Halloween planter mixes spooky and stylish with a playful twist. A stack of plastic skulls climbs straight out of a lush arrangement of petunias, celosia, moss, and seasonal blooms.
It’s macabre, sure but the fresh pops of color and carefully placed greenery soften the scare just enough to make it delightfully cheeky.
This is the kind of decoration that makes passersby stop, laugh, and then immediately wonder how you made it.
Materials Needed:
- 5-6 plastic skulls (lightweight and hollow)
- 1 sturdy wooden dowel or PVC pipe (approx. 3-4 feet tall)
- Large planter
- Potting soil and a mix of flowers (black petunias, moss, celosia, pansies)
- Floral foam or hot glue
- Green moss and mini faux florals
Step-by-step Guide:
Step 1: Fill your planter with potting soil and arrange your flowers around the base. Dark-colored blooms create a bold contrast against the bone-white skulls.
Step 2: Insert your dowel or pipe into the soil at the center of the pot. Make sure it’s secure.
Step 3: Carefully drill holes in the bottom and top of each skull to slide them down onto the pole. Then rotate each one slightly so they tilt in different directions.
Step 4: Tuck bits of moss, faux flowers, or Halloween-themed greenery into the eye sockets and mouths for a playful, overgrown effect.
#16. Skeleton in a Cauldron Display
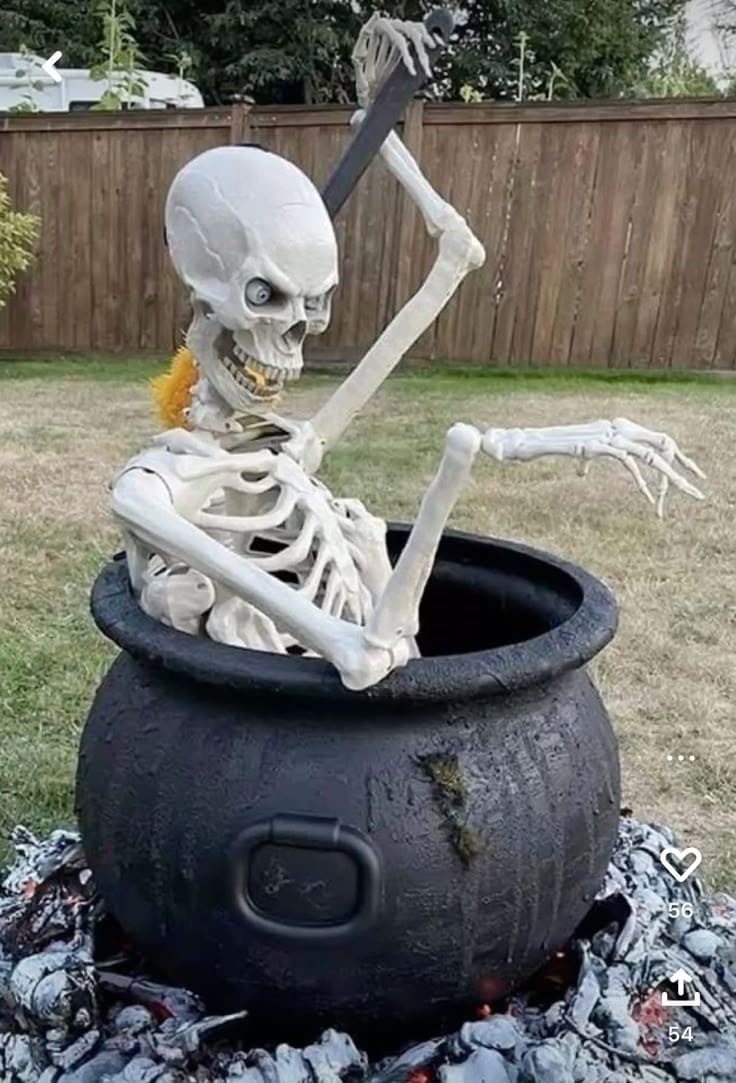
Who’s cooking in the backyard? Apparently, this skeleton has decided to stir up some mischief.
This Halloween garden decor idea is wildly fun and gives your setup a cheeky, haunted-witch vibe.
Placing a skeleton inside a bubbling cauldron over glowing faux embers instantly adds theatrical flair to your lawn.
Materials Needed:
- 1 large plastic cauldron (approx. 24-30 inches wide)
- 1 posable skeleton (4 ft or taller)
- 1 plastic or foam stirring stick (sword, oar, or branch)
- Faux bones
- Black base
- Spray paint: black, gray, and red/orange
- Optional: LED lights
Step-by-step Guide:
Step 1: Place the large cauldron on a black tray or platform. This helps contain the fire ring design and gives a grounded look.
Step 2: Arrange faux bones or broken skeleton parts in a ring around the cauldron base. Then spray lightly with gray, black, and red/orange to mimic scorched embers.
Step 3: Position the skeleton inside the cauldron. You should adjust arms to grip the cauldron edge and the stirring stick.
Step 4: For extra flair, add flickering LED lights among the faux coals to create a glowing fire effect after dark.
#17. Finally Graduated After 100 Years
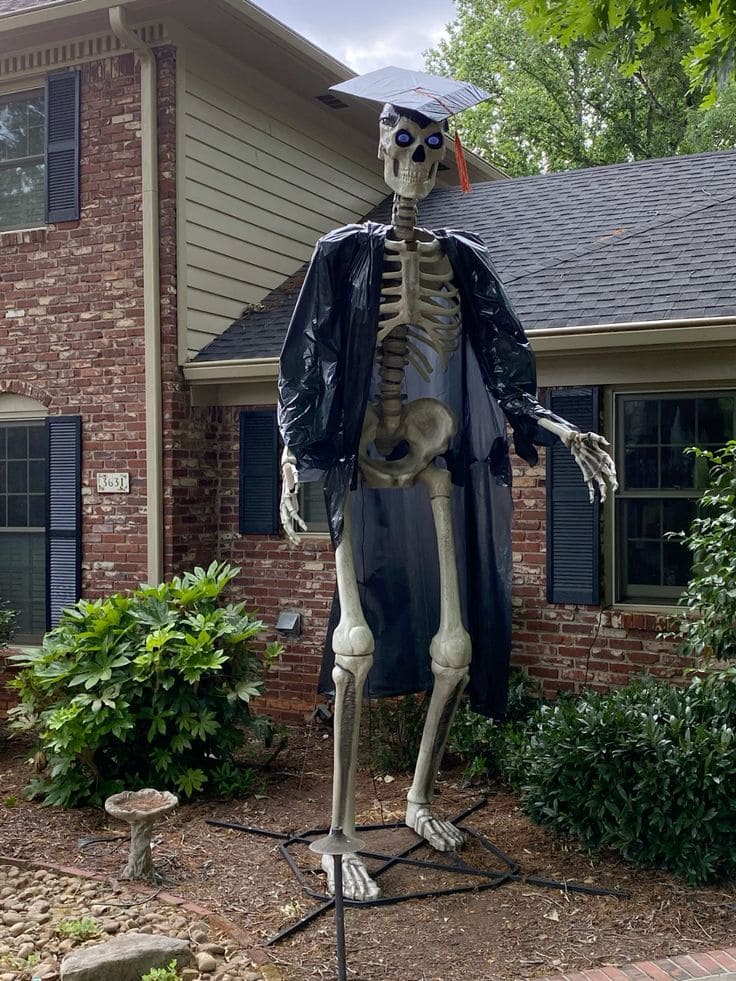
This towering skeleton has achieved what few dare to dream: he finally graduated, even if it took a few extra decades.
Plus, the googly eyes are pure comic gold. He looks both proud and slightly overwhelmed, which, let’s be honest, is how most grads feel anyway.
This is the ultimate yard display for anyone celebrating a graduation with humor.
Materials Needed:
- 1 oversized skeleton (at least 6 ft tall or taller)
- 1 black plastic tablecloth or trash bag (for gown)
- 1 DIY graduation cap (cardboard square, small bowl base, tassel made from yarn or string)
- 2 large googly eyes (adhesive or taped)
- Optional: Diploma scroll, banner, or “Class of Never” sign
Step-by-step Guide:
Step 1: Secure the skeleton using a sturdy frame or yard stand so it doesn’t tip over in the wind. Make sure it’s positioned upright and facing forward.
Step 2: Drape the plastic tablecloth or trash bag over the skeleton’s shoulders like a graduation gown. Then use tape to shape it around the arms.
Step 3: Place the handmade graduation cap on the skull and attach googly eyes for an extra dose of personality.
Step 4: Add props like a rolled diploma or a cheeky sign, “Took So Long I’m Bare Bones” or “Class of 1923 Finally Made It” works great.
#18. Skeleton Tree Chase Halloween Decor
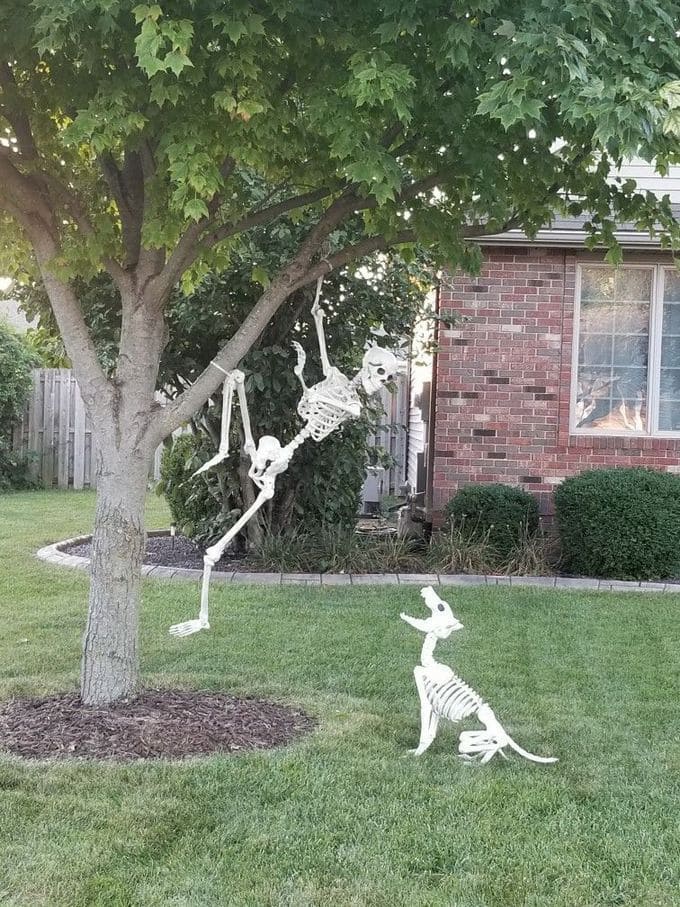
This hilarious Halloween setup captures a timeless scene, except this time, the skeleton’s doing the running and the undead pup is calling the shots!
Perfect for a front yard tree, this display brings a sense of motion and mischief that instantly grabs attention.
Moreover, you can practically hear the bone-rattling panic.
Materials Needed:
- 1 full-size posable skeleton
- 1 skeleton dog figure
- Nylon rope
- 4-6 zip ties or garden wire
- Optional: LED lights
Step-by-step Guide:
Step 1: Choose a sturdy tree branch about 6–8 feet off the ground and hang your human skeleton using rope or fishing line. Then loop around arms and torso for secure placement.
Step 2: Adjust the skeleton’s pose to look like it’s clinging or climbing up, legs dangling for a comical effect.
Step 3: Position the skeleton dog at the base of the tree, facing upward, and secure with lawn stakes or hidden wire.
Step 4 (Optional): For nighttime laughs, place a small spotlight under the tree or wrap the skeleton in dim fairy lights.
#19. Rest in Peace Literally
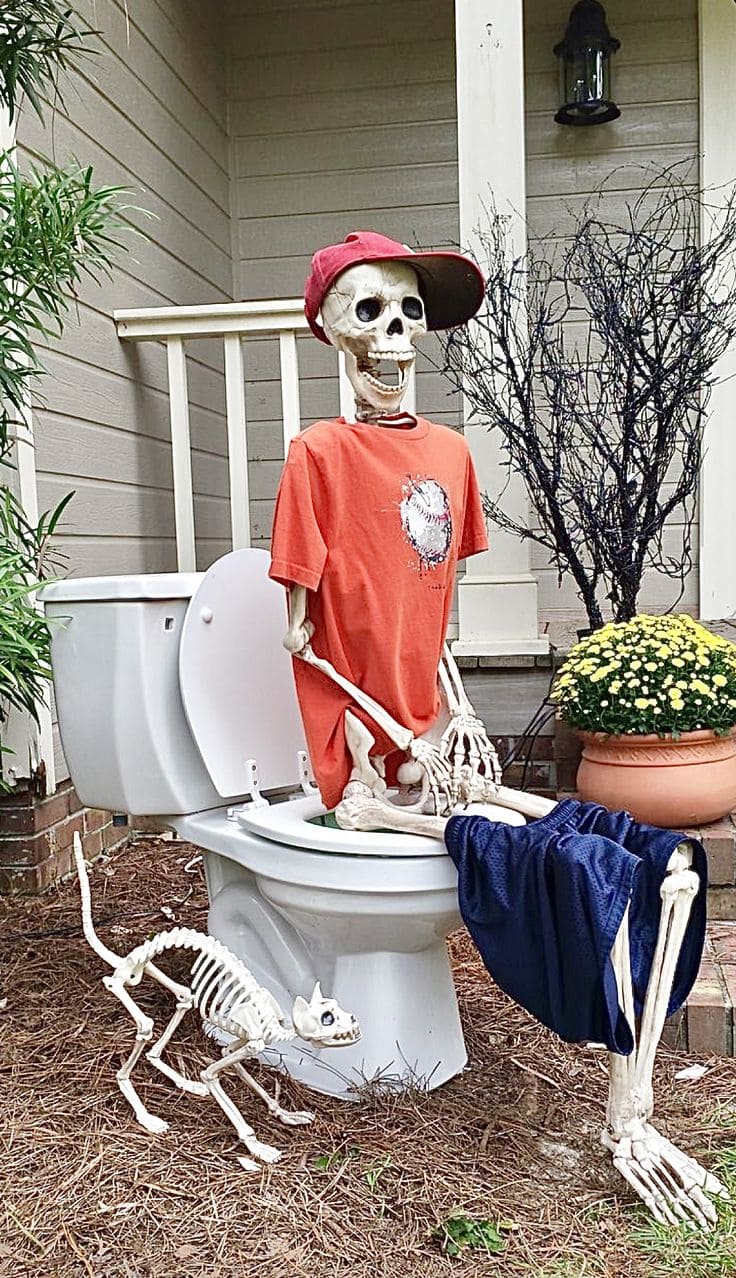
Perched confidently on a fully-installed outdoor toilet, this skeleton seems to be in no rush at all.
With a baseball cap turned sideways, a loose tee, and his shorts around his ankles, he’s clearly committed to taking his sweet time for eternity.
Specially, the bony cat circling nearby adds just the right amount of extra chaos, like it’s waiting to use the toilet next.
Materials Needed:
- 1 life-size poseable skeleton
- 1 standard toilet
- 1 child-size t-shirt and shorts
- 1 red baseball cap
- 1 skeleton cat figure
- Optional: Toilet paper, fake phone, mini Halloween sign
Step-by-step Guide:
Step 1: Place the toilet securely in your chosen outdoor spot. Make sure it’s stable and won’t tip over, especially on uneven ground.
Step 2: Dress the skeleton with a T-shirt and loosely hang the shorts around its legs, positioned as if they’re down at the knees.
Step 3: Sit the skeleton on the toilet, bending the arms to rest on the thighs or belly. Then angle the head slightly for a content or cheeky look.
Step 4: Add the cat skeleton nearby to keep the scene playful. For extra laughs, you toss in a plunger, roll of TP, or spooky sign.
#20. The Afterlife Influencer Photoshoot
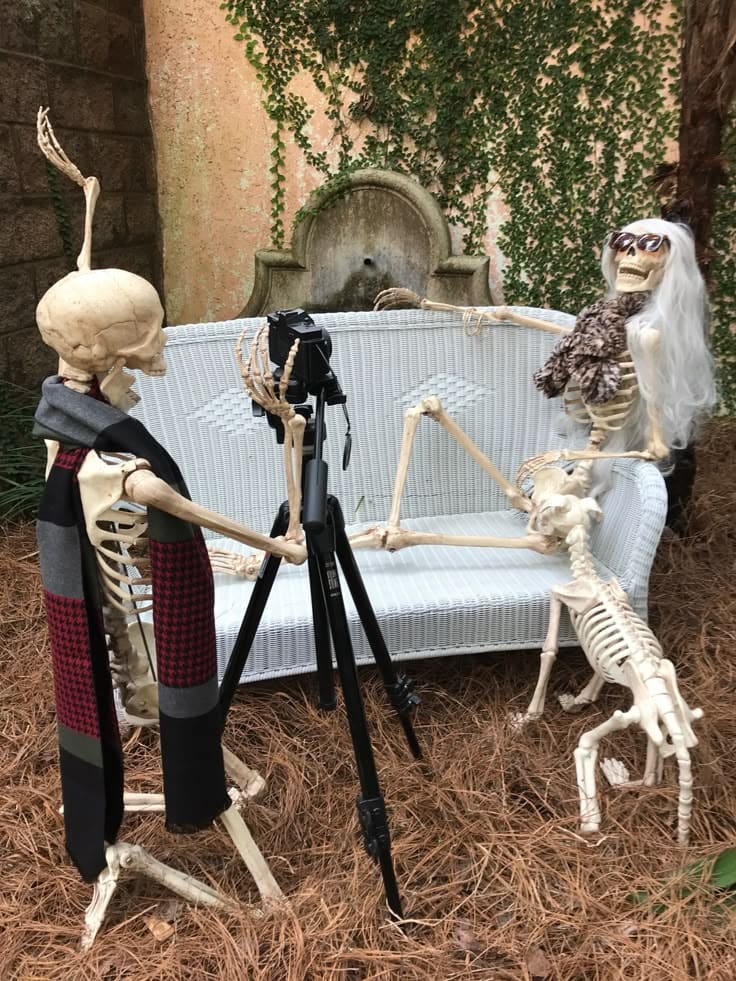
Someone call the undead paparazzi and this glamorous skeleton is clearly ready for her close-up.
Rocking big sunglasses, flowing silver hair, and a fuzzy scarf, she’s lounging on a white bench like she just walked out of a Vogue cover shoot in 1843.
Meanwhile, her skeletal photographer, decked out with a bold scarf and a tripod, is totally focused on getting the perfect angle.
Materials Needed:
- 2 human skeleton props (poseable)
- 1 skeleton dog
- 1 bench
- 1 camera tripod + fake camera
- Accessories: scarf, sunglasses, wig, faux fur stole
- Optional: ivy wall, garden setting, or neutral backdrop
Step-by-step Guide:
Step 1: Pose one skeleton sitting cross-legged or leaned-back on the bench, with a wig and accessories styled to give glam model energy. Then add glasses and scarf for drama.
Step 2: Set up the second skeleton behind the camera on a tripod. You adjust the arms to look like it’s mid-photo session.
Step 3: Place the skeleton dog or pet near the model, reaching up or barking to add movement to the scene.
Step 4: Use surrounding elements like vines, trees, or an old wall to frame the setup and create an enchanted garden photoshoot vibe.
#21. Skeleton Mulch Mystery in a Wheelbarrow
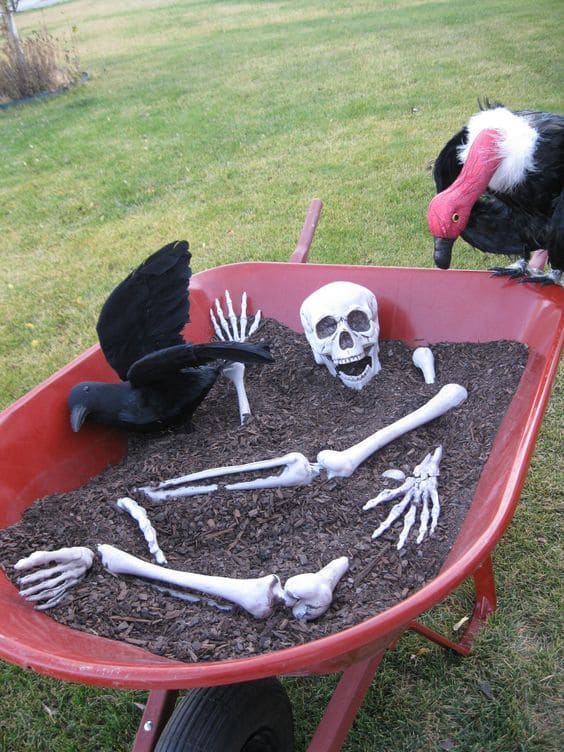
Here’s a scene that looks like a gardening project gone delightfully wrong.
Someone left the mulch out too long, and guess who decided to move in? A full skeleton, scattered just enough to raise eyebrows and chuckles.
Specially, this display mixes yard humor with just the right amount of dark storytelling.
Materials Needed:
- 1 wheelbarrow (any color, though red adds flair)
- 1 full plastic skeleton (poseable or separated parts)
- 2 decorative birds (vulture + crow)
- 1-2 bags of dark mulch
- Optional: fake worms, gardening gloves, mini shovel
Step-by-step Guide:
Step 1: Fill your wheelbarrow about halfway with mulch to give a dug-up look.
Step 2: Bury most of the skeleton under the mulch, but strategically place the skull, hands, and legs to peek through. You need to keep it random, as if time or birds did the digging.
Step 3: Position the crow sitting on the mulch and the vulture on the edge of the wheelbarrow, facing the bones.
Step 4 (Optional): You add a few accessories like a tiny shovel nearby, a trail of mulch leading away, or even a skeleton hand holding a plant tag for extra humor.
#22. The Haunted Pouring Poison Illusion
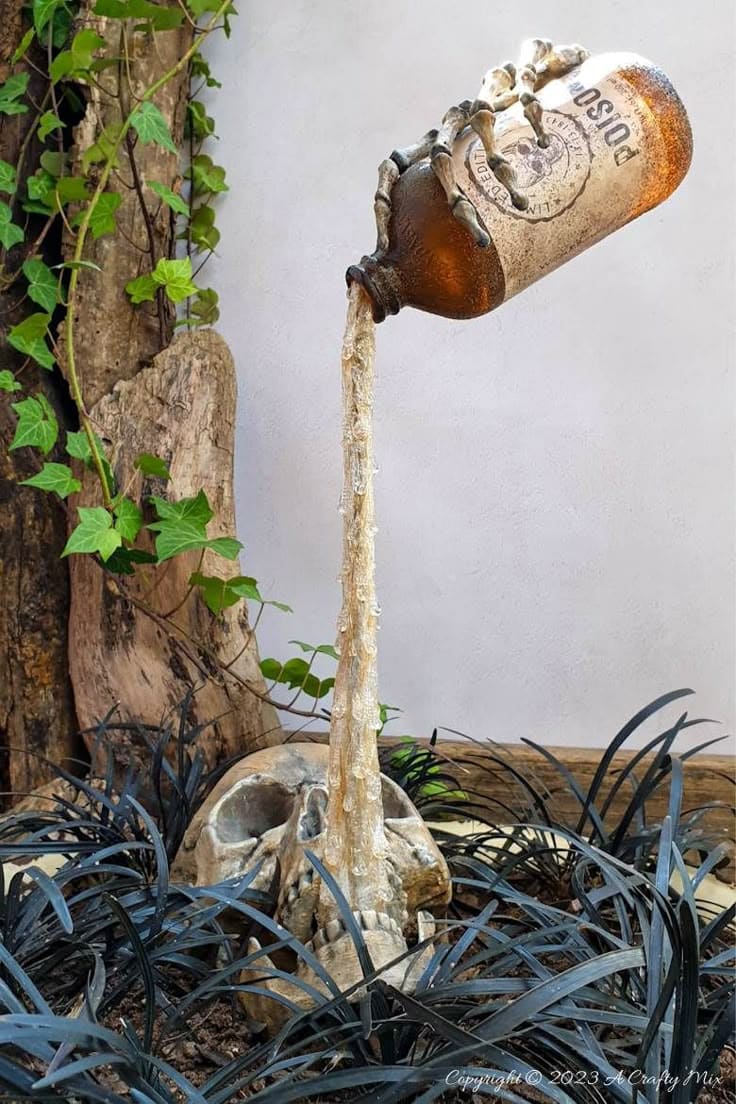
At first glance, it looks like a skeleton hand is eerily pouring poison into a skull from midair and yet there’s no visible support holding anything up.
But the trick is a clever use of resin or hot glue, stiff tubing, and illusion magic that makes the liquid stream appear to hold everything in place.
Plus, this macabre little sculpture is perfect for a garden bed or tucked into a shaded corner, where curious guests will do a double take.
Materials Needed:
- Empty amber or brown bottle labeled “Poison”
- Skeleton hand (plastic or resin)
- Clear plastic tubing or metal rod
- Hot glue
- Foam skull
- Spray paint
- Epoxy or silicone adhesive
Step-by-step Guide:
Step 1: Secure the skeleton hand around the bottle using glue or wire. You want it to look like the hand is gripping the bottle naturally.
Step 2: Insert a strong piece of clear plastic tubing or a sturdy rod into the skull’s mouth area.
Step 3: Use hot glue or pourable resin down the outside of the tube to create the illusion of liquid flowing. Let it dry completely before handling.
Step 4: Attach the top of the tube to the inside of the bottle opening, angling it as if the liquid is pouring straight down.
Step 5: Age the bottle and bones using black and brown paint for a vintage, creepy look. You now nestle it into a garden bed or spooky vignette.
