Garden & Crafty - Garden, DIY, Home
No Result
View All Result
  • GARDEN
    • Garden Tips
    • Garden Guide
    • Garden Care
    • Garden Ideas
  • DIY
    • Diy Project
    • Crafty Ideas
  • HOME
    • Decoration
    • Cleaning
    • Tips & Hacks
  • About Us
  • GARDEN
    • Garden Tips
    • Garden Guide
    • Garden Care
    • Garden Ideas
  • DIY
    • Diy Project
    • Crafty Ideas
  • HOME
    • Decoration
    • Cleaning
    • Tips & Hacks
  • About Us
No Result
View All Result
Garden & Crafty - Garden, DIY, Home
Home Guide

How to Transform Oyster Shells into Stunning Keepsake Ornaments

Lois Capone by Lois Capone
September 16, 2025
in Guide
Reading Time: 2 mins read

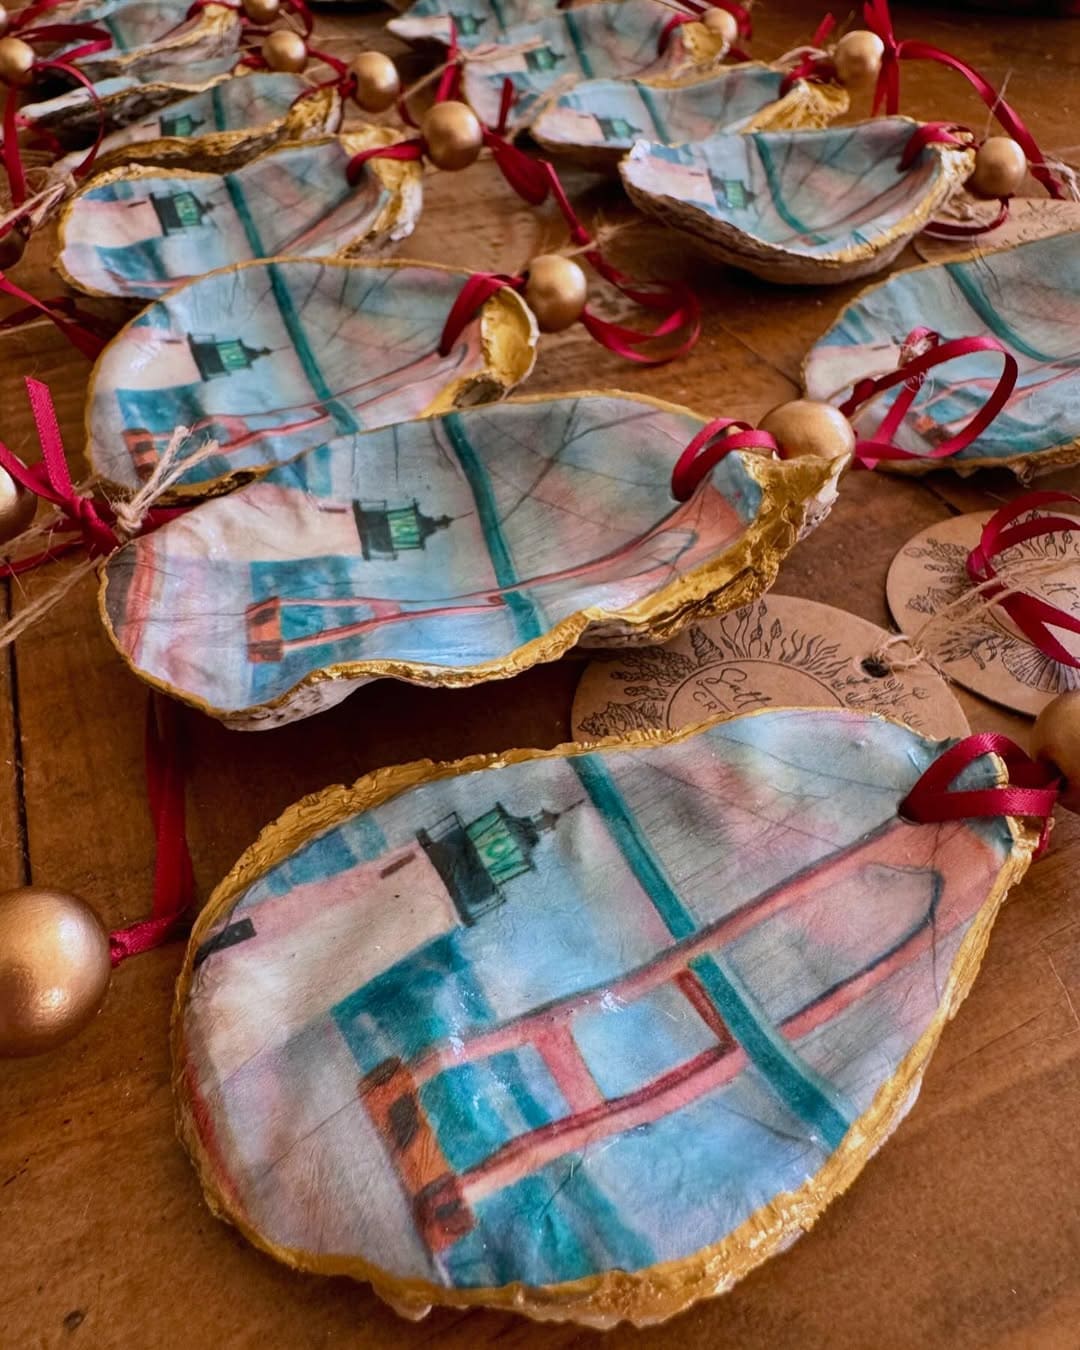
How to Transform Oyster Shells into Stunning Keepsake OrnamentsImagine hanging a piece of the sea on your Christmas tree but with your family’s story painted inside.

These oyster shell ornaments blend nature and memory in a way that feels timeless.

The texture of the shell cradles an image, while shimmering gold paint turns its edge into jewelry for your tree.

Whether you gift them to loved ones or keep them as heirlooms, these ornaments are treasures born of both ocean and heart.

Materials Needed

  • 10-12 oyster shells (3-4” size, cleaned and dried)
  • Printed images or photos (trimmed to fit shell shape, 2.5”-3” max)
  • Mod Podge or decoupage glue (8 oz jar)
  • Small paintbrushes (flat 1” and fine tip)
  • Gold acrylic paint or liquid gold leaf (1 bottle, 2 oz)
  • Hot glue gun and glue sticks
  • Ribbon (¼” wide, 8-10” per ornament)
  • Optional: small wooden beads or charms
  • Scissors
  • Clear acrylic sealer spray (matte or gloss finish, 6-8 oz can)

Step-by-step Guide

Step 1: Clean your oyster shells with warm water and mild soap, then let them dry fully. Make sure there’s no residue or grit.

Step 2: Cut your chosen images to fit inside each shell. Then trim carefully so the photo sits snugly within the curve.

Step 3: Apply a thin layer of Mod Podge to the inside of the shell using a flat brush.

Then gently press the image into place, smoothing out wrinkles with your fingertips or a clean brush.

You can also add another coat of Mod Podge over the top for sealing. Let dry for 30-40 minutes.

Step 4: Once dry, paint the outer edge of the shell with gold acrylic paint or liquid gold leaf.

This step transforms the ornament into something luxurious. Allow paint to dry for at least 20 minutes before handling.

Step 5: Spray the entire ornament lightly with clear acrylic sealer for extra protection and shine. Let it dry completely.

Step 6: Cut an 8-10” piece of ribbon, fold it into a loop, and hot-glue it to the back of the shell for hanging.

You can also thread a wooden bead onto the ribbon before gluing for a decorative touch.

Step 7: Repeat with each shell, varying your images so no two are the same.

Step 8: Hang them on your Christmas tree or tie them onto gifts for a coastal-inspired, handmade flourish.

Tip:

These ornaments make beautiful keepsakes if you use wedding photos, children’s artwork, or even vintage postcards.

They’re lightweight but feel like little jewels when finished.

SharePin
Lois Capone

Lois Capone

Lois Capone is a wife and mom in her 50s who enjoys sharing gardening, DIY tips, and home decor ideas. She believes that with some inspiration, anyone can create a special feel in their home and garden.

Related Posts

Guide

Create Colorful Mini Weavings on Wooden Squares

There’s something meditative about weaving on a tiny scale. As you loop yarn over and under each strand, you start...

by Lois Capone
October 7, 2025
Guide

Craft Mini Driftwood Weavings to Add a Cozy Boho Touch

If you’ve ever admired woven wall art in cozy studios or boutique cafés, this is your chance to make your...

by Lois Capone
October 7, 2025
Guide

Create a Radiant Woven Circle from Scrap Yarn and Cardboard

This circular weaving craft brings together simplicity and joy. With just a piece of cardboard and a few strands of...

by Lois Capone
October 7, 2025
Guide

Create Adorable Pet Art with Mini Woven Blankets

Imagine your pet tucked under a handmade blanket, dreaming away after a long day of play. You’ll weave a small,...

by Lois Capone
October 7, 2025
Guide

Craft Colorful Beaded Bracelets with a DIY Cardboard Loom

This project transforms cardboard into a mini bead loom, turning small glass or plastic beads into wearable art. You’ll find...

by Lois Capone
October 7, 2025
Guide

Make a Whimsical Yarn Doll Through Simple Weaving

Creating this woven yarn doll feels like crafting a childhood memory. There’s something delightful about giving her shape and color...

by Lois Capone
October 7, 2025
Load More

Categories

  • Cleaning (6)
  • Crafty Ideas (158)
  • Decoration (160)
  • DIY (8)
  • Diy Project (222)
  • GARDEN (39)
  • Garden Care (60)
  • Garden Guide (133)
  • Garden Ideas (347)
  • Garden Tips (126)
  • Guide (687)
  • HOME (90)
  • Tips & Hacks (20)


Garden & Crafty - Garden, DIY, Home

© 2024 gardenandcrafty.com

Navigate Site

  • About Us
  • Privacy Policy
  • Terms Of Service
  • Disclaimer
  • Cookie Policy
  • Webstories
  • Sitemap

Follow Us

No Result
View All Result
  • GARDEN
    • Garden Tips
    • Garden Guide
    • Garden Care
    • Garden Ideas
  • DIY
    • Diy Project
    • Crafty Ideas
  • HOME
    • Decoration
    • Cleaning
    • Tips & Hacks
  • About Us