Garden & Crafty - Garden, DIY, Home
No Result
View All Result
  • GARDEN
    • Garden Tips
    • Garden Guide
    • Garden Care
    • Garden Ideas
  • DIY
    • Diy Project
    • Crafty Ideas
  • HOME
    • Decoration
    • Cleaning
    • Tips & Hacks
  • About Us
  • GARDEN
    • Garden Tips
    • Garden Guide
    • Garden Care
    • Garden Ideas
  • DIY
    • Diy Project
    • Crafty Ideas
  • HOME
    • Decoration
    • Cleaning
    • Tips & Hacks
  • About Us
No Result
View All Result
Garden & Crafty - Garden, DIY, Home
Home Guide

How to Make Elegant Wreaths from Dried Orange Slices and Ribbon

Lois Capone by Lois Capone
September 15, 2025
in Guide
Reading Time: 2 mins read

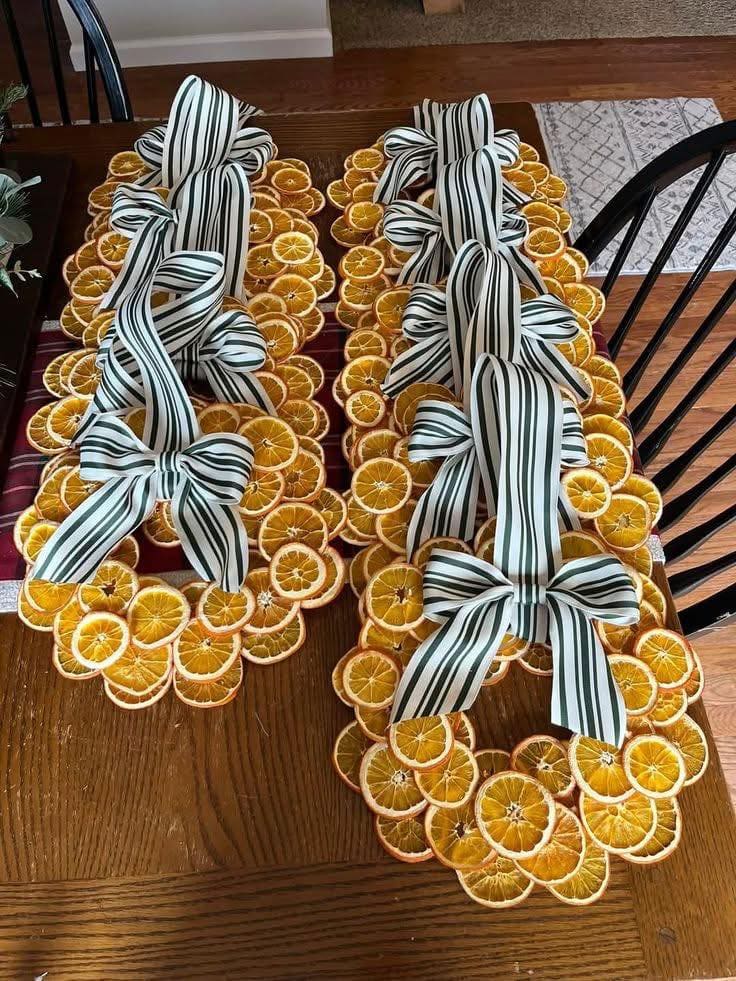
How to Make Elegant Wreaths from Dried Orange Slices and RibbonPicture sunlight captured in a circle, that’s the magic of these dried orange wreaths.

Each slice becomes a petal, radiating outward in vibrant shades of amber and gold.

Plus, the striped bow ties everything together, giving it both modern style and vintage charm.

When hung on your door, the wreath feels like a warm welcome, inviting everyone inside to share in the glow of the season.

Materials Needed

  • 40-50 dried orange slices (2-3 inches each)
  • 1 flat wreath form (wooden, cardboard, or wire, 14-16 inches wide)
  • 1 spool of wide striped ribbon (2.5-3 inches wide, about 2-3 yards)
  • Hot glue gun and glue sticks
  • Floral wire (optional)
  • Scissors
  • Clear acrylic spray (optional, to preserve citrus color)

Step-by-step Guide

Step 1: Prepare your wreath base.

If using cardboard or wood, paint it a neutral color (brown or white) so it blends with the oranges. Then allow to dry completely.

Step 2: Begin arranging your dried orange slices around the wreath form.

Start by laying them out in a single layer, slightly overlapping edges like flower petals. You can adjust until the circle looks even.

Step 3: Once satisfied with the layout, glue each slice in place with hot glue. Also, press firmly for a few seconds to ensure they stick flat.

Step 4: Add a second layer of orange slices on top of the first, overlapping them in between the gaps.

This creates depth and fullness, making the wreath look rich and complete.

Step 5: Cut a length of striped ribbon and tie it into a large bow.

If you want extra volume, make two bows and layer them. Secure the bow with floral wire or hot glue at the top or bottom of your wreath.

Step 6: Trim the ribbon tails neatly, letting them cascade down for elegance.

Step 7: Spray lightly with clear acrylic sealer to preserve the oranges and keep them vibrant. Allow to dry fully before hanging.

Step 8: Attach a loop of ribbon or twine to the back of the wreath for hanging. Then place it on your front door, wall, or even as a window decoration.

Tips:

For variation, tuck in sprigs of evergreen, star anise, or cinnamon sticks between orange slices. It adds fragrance and layers of texture without losing the citrus glow.

SharePin2
Lois Capone

Lois Capone

Lois Capone is a wife and mom in her 50s who enjoys sharing gardening, DIY tips, and home decor ideas. She believes that with some inspiration, anyone can create a special feel in their home and garden.

Related Posts

Guide

How to Create Elegant Framed Paw Prints as Lasting Memories

Imagine sitting in your living room and seeing your pet’s paw print framed on the wall, almost like a portrait....

by Lois Capone
October 5, 2025
Guide

Create Keepsake Paw Print Ornaments That Last for Years

If you’re looking for a keepsake that feels both rustic and heartfelt, clay paw print ornaments are a perfect choice....

by Lois Capone
October 5, 2025
Guide

How to Make Lasting Clay Paw Print Keepsakes of Your Pet

Think of this project as bottling up a moment in time. With just a bit of clay, you can create...

by Lois Capone
October 5, 2025
Guide

How to Stitch a Floral Paw Print Keepsake

You can see a paw print tells a story, but here, it blooms with petals and vines. With a little...

by Lois Capone
October 5, 2025
Guide

How to Carve a Paw Print Pumpkin for Halloween

Instead of the usual spooky faces, why not let your pet’s paws light up Halloween? A pumpkin carved with paw...

by Lois Capone
October 5, 2025
Guide

How to Create a Heartfelt Paw Print Keepsake

Some projects aren’t just crafts, they’re healing. This paw print memory shadow box is a gentle way to honor your...

by Lois Capone
October 5, 2025
Load More

Categories

  • Cleaning (6)
  • Crafty Ideas (157)
  • Decoration (158)
  • DIY (8)
  • Diy Project (220)
  • GARDEN (39)
  • Garden Care (60)
  • Garden Guide (132)
  • Garden Ideas (346)
  • Garden Tips (125)
  • Guide (667)
  • HOME (90)
  • Tips & Hacks (20)


Garden & Crafty - Garden, DIY, Home

© 2024 gardenandcrafty.com

Navigate Site

  • About Us
  • Privacy Policy
  • Terms Of Service
  • Disclaimer
  • Cookie Policy
  • Webstories
  • Sitemap

Follow Us

No Result
View All Result
  • GARDEN
    • Garden Tips
    • Garden Guide
    • Garden Care
    • Garden Ideas
  • DIY
    • Diy Project
    • Crafty Ideas
  • HOME
    • Decoration
    • Cleaning
    • Tips & Hacks
  • About Us