Garden & Crafty - Garden, DIY, Home
No Result
View All Result
  • GARDEN
    • Garden Tips
    • Garden Guide
    • Garden Care
    • Garden Ideas
  • DIY
    • Diy Project
    • Crafty Ideas
  • HOME
    • Decoration
    • Cleaning
    • Tips & Hacks
  • About Us
  • GARDEN
    • Garden Tips
    • Garden Guide
    • Garden Care
    • Garden Ideas
  • DIY
    • Diy Project
    • Crafty Ideas
  • HOME
    • Decoration
    • Cleaning
    • Tips & Hacks
  • About Us
No Result
View All Result
Garden & Crafty - Garden, DIY, Home
Home Guide

How to Make A Skeleton Bride and Groom Embroidery Hoop

Lois Capone by Lois Capone
August 16, 2025
in Guide
Reading Time: 2 mins read

How to Make A Skeleton Bride and Groom Embroidery Hoop

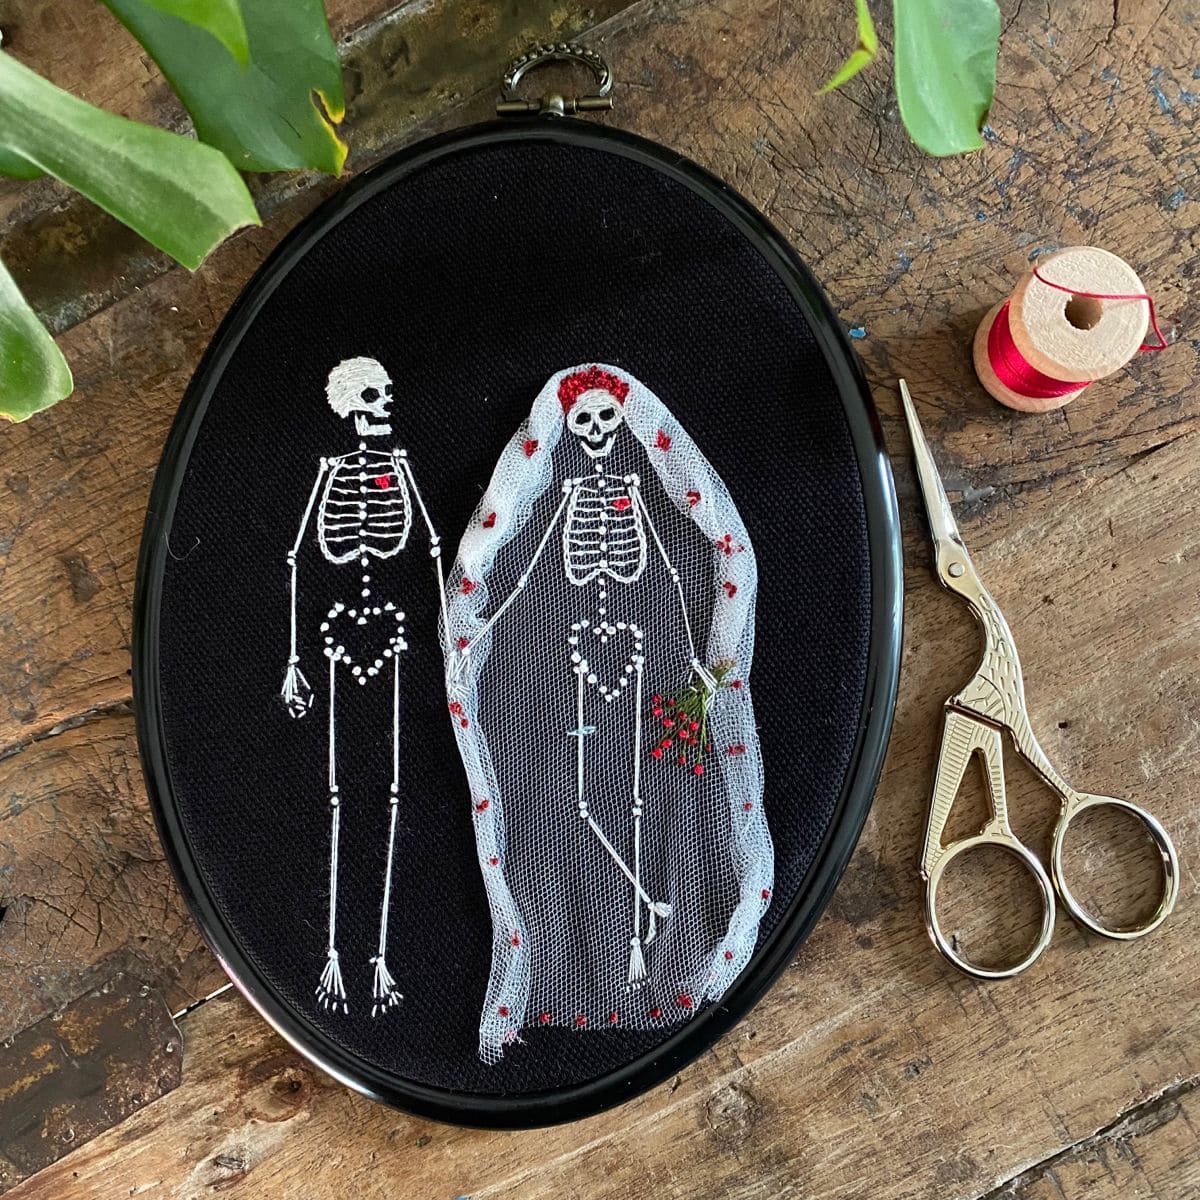
This hoop design blends embroidery with mixed-media creativity, telling the story of a skeletal bride and groom standing side by side.

The skeletons themselves are stitched with clean, simple lines, while the details like the lace veil, the red floral accents, the bouquet bring the piece to life.

Specially, using lace fabric for the veil gives the design depth without requiring advanced embroidery skills. The black fabric backdrop makes the white stitches pop beautifully, while the touches of red add warmth and symbolism.

Materials Needed

  • 1 embroidery hoop (8″-10″)
  • Black cotton or canvas fabric (cut 3″ larger than the hoop)
  • White embroidery floss (2-3 skeins)
  • Red embroidery floss
  • Green embroidery floss
  • Embroidery needle and scissors
  • Small piece of white lace
  • Optional: beads or sequins
  • Felt backing

Step-by-step Guide

Step 1: Stretch your black fabric tightly into the embroidery hoop. The dark base will help all the stitches and lace details stand out clearly.

Step 2: Lightly sketch two skeleton figures side by side with chalk or a fabric pencil.

You should keep the bones simple including straight lines for limbs, small circles for joints, and a heart-shaped ribcage for charm.

Step 3: Use white embroidery floss with a backstitch to outline the skeletons.

Start with the skulls, then move down to ribs, arms, and legs. Also, keep your stitches small and steady so the lines look clean.

Step 4: Add red French knots around the bride’s head to create a flower crown.

For the bouquet, you can stitch small red knots clustered together, with green stitches as stems. You can even attach a few beads for sparkle.

Step 5: Cut a piece of lace or tulle slightly larger than the bride’s outline. Then stitch or glue it gently across her head and shoulders to form a veil.

Step 6: Once all elements are in place, check the back of your hoop and secure any loose threads with knots. Add a felt backing if you want a polished finish before hanging.

Tip: Don’t worry about perfectly symmetrical bones as slight unevenness adds character. If you want a personal touch, stitch initials or a small date under the skeletons to make it a true keepsake.

SharePin
Lois Capone

Lois Capone

Lois Capone is a wife and mom in her 50s who enjoys sharing gardening, DIY tips, and home decor ideas. She believes that with some inspiration, anyone can create a special feel in their home and garden.

Related Posts

Guide

How to Craft Elegant Twine Christmas Trees with Simple Materials

Think of these trees as little spirals of holiday joy. As you wind the rope around each cone, it feels...

by Lois Capone
September 16, 2025
Guide

Embroidered Holiday Card with Tree Design

If you love slow crafts, this stitched Christmas tree card is perfect for you. Each needle pull through the card...

by Lois Capone
September 16, 2025
Guide

How to Make a Rustic Christmas Tree Craft with Kids

A handful of twigs becomes a forest, and a few soft pom-poms turn into ornaments when arranged with care. This...

by Lois Capone
September 16, 2025
Guide

How to Craft a Rolled Paper Christmas Tree Wall Art

If you’re looking for an eye-catching holiday décor piece, this rolled paper Christmas tree canvas is the answer. The varied...

by Lois Capone
September 16, 2025
Guide

How to Build a Christmas Tree Sculpture with Nuts and Marbles

This project is proof that holiday magic can spring from the simplest materials. Bolts, nuts, and marbles become a modern...

by Lois Capone
September 16, 2025
Guide

Quick DIY Rustic Twine Trees You Can Make in Minutes

Sometimes the best decorations come together with the simplest materials. Imagine sitting with your kids at the table, winding twine...

by Lois Capone
September 16, 2025
Load More

Categories

  • Cleaning (6)
  • Crafty Ideas (149)
  • Decoration (150)
  • DIY (8)
  • Diy Project (209)
  • GARDEN (39)
  • Garden Care (54)
  • Garden Guide (125)
  • Garden Ideas (330)
  • Garden Tips (110)
  • Guide (470)
  • HOME (90)
  • Tips & Hacks (20)


Garden & Crafty - Garden, DIY, Home

© 2024 gardenandcrafty.com

Navigate Site

  • About Us
  • Privacy Policy
  • Terms Of Service
  • Disclaimer
  • Cookie Policy
  • Webstories
  • Sitemap

Follow Us

No Result
View All Result
  • GARDEN
    • Garden Tips
    • Garden Guide
    • Garden Care
    • Garden Ideas
  • DIY
    • Diy Project
    • Crafty Ideas
  • HOME
    • Decoration
    • Cleaning
    • Tips & Hacks
  • About Us