Garden & Crafty - Garden, DIY, Home
No Result
View All Result
  • GARDEN
    • Garden Tips
    • Garden Guide
    • Garden Care
    • Garden Ideas
  • DIY
    • Diy Project
    • Crafty Ideas
  • HOME
    • Decoration
    • Cleaning
    • Tips & Hacks
  • About Us
  • GARDEN
    • Garden Tips
    • Garden Guide
    • Garden Care
    • Garden Ideas
  • DIY
    • Diy Project
    • Crafty Ideas
  • HOME
    • Decoration
    • Cleaning
    • Tips & Hacks
  • About Us
No Result
View All Result
Garden & Crafty - Garden, DIY, Home
Home Guide

How to Make a Pillow from Old Ties

Lois Capone by Lois Capone
August 19, 2025
in Guide
Reading Time: 2 mins read

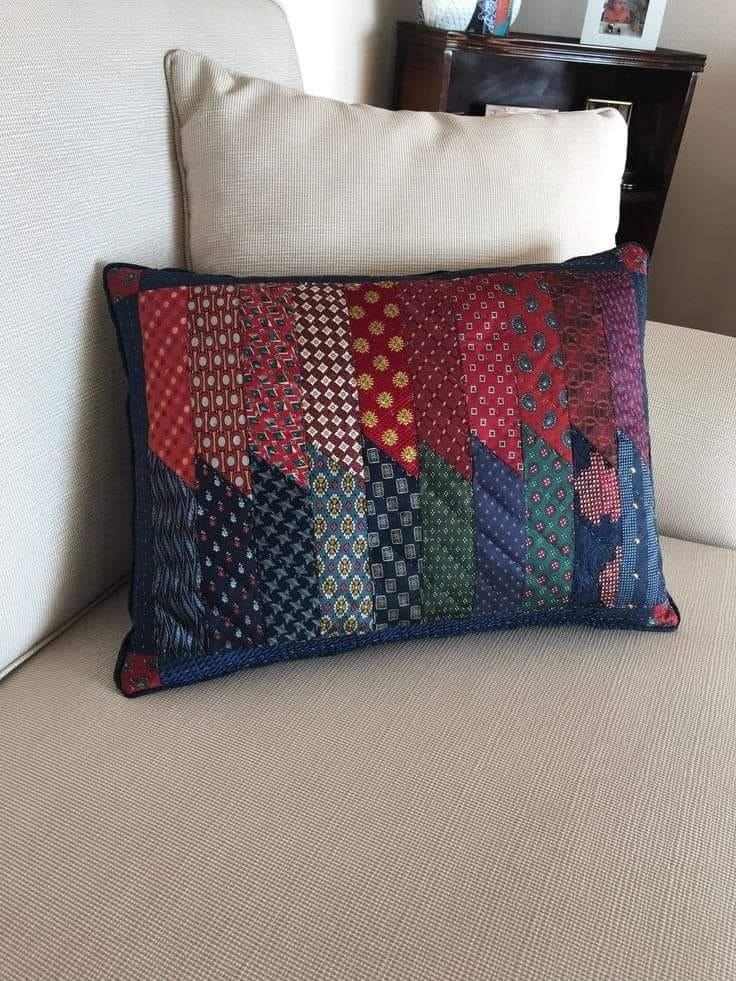
How to Make a Pillow from Old Ties

Sometimes fabric isn’t just fabric. It’s a memory of your father’s favorite work tie, a gift from a loved one, or a pattern that instantly reminds you of a time in your life.

By sewing ties together into a pillow, you create more than just décor, you stitch together stories.

The silky textures, the geometric designs, the vibrant colors all come together in harmony. It’s like holding onto the past while making it part of your everyday comfort.

Materials Needed

  • 10-15 old neckties (silk or polyester, preferably in coordinating or contrasting colors)
  • Backing fabric (sturdy cotton or canvas)
  • Pillow insert (rectangular or square, depending on your design)
  • Sewing machine (or hand-sewing kit with strong thread)
  • Iron and ironing board
  • Scissors or rotary cutter
  • Pins or fabric clips
  • Lining fabric (optional)

Step-by-step Guide

Step 1: Choose ties in a variety of colors and patterns. You cut each tie open along the back seam, remove any inner lining, and press flat with an iron.

If the fabric feels too flimsy, you can sew or fuse it onto a thin cotton lining for stability.

Step 2: Measure and cut each tie into uniform strips or angled shapes that will fit together in a patchwork design.

From my experiences, a chevron, diagonal stripe, or herringbone pattern works beautifully with ties.

Step 3: Lay out the tie pieces on a flat surface, moving them around until you’re happy with the balance of colors and patterns.

Now you can mix bold and subtle designs to keep the look dynamic but not overwhelming.

Step 4: Pin and sew the tie pieces together, one seam at a time, pressing each seam flat as you go.

Continue until you have a complete patchwork front panel large enough to cover your pillow insert.

Step 5: Cut a piece of sturdy fabric for the back of the pillow.

If you want the cover to be removable, cut it into two overlapping pieces for an envelope closure, or install a zipper along one side.

Step 6: Place the patchwork front and backing fabric right sides together, pin along the edges, and sew all around, leaving an opening if you’re not using a zipper. Then turn it right side out after sewing.

Step 7: Insert your cushion and close the seam (or zip it up). You now have a pillow that’s elegant, full of personality, and sustainably made.

Tips:

If you’re making this pillow as a keepsake, use ties from a loved one as it makes the pillow deeply personal.

Plus, I’ve seen people make these as gifts for Father’s Day or in memory of a family member, it’s a beautiful way to preserve a part of someone’s wardrobe in your home décor.

SharePin
Lois Capone

Lois Capone

Lois Capone is a wife and mom in her 50s who enjoys sharing gardening, DIY tips, and home decor ideas. She believes that with some inspiration, anyone can create a special feel in their home and garden.

Related Posts

Guide

How to Turn Old Sweaters into Adorable Christmas Hoop Ornaments

Sometimes, it’s the simplest materials that turn into the most charming decorations. An embroidery hoop, a sweater scrap, and a...

by Lois Capone
September 16, 2025
Guide

How to Make Charming Acorn Ornaments for a Nature-Inspired Christmas

Imagine walking through the woods on a crisp December morning, pockets filling with acorns as you go. Later, at home,...

by Lois Capone
September 16, 2025
Guide

How to Sew a Nutcracker Felt Ornament That Steals the Spotlight

The Nutcracker has marched across stages for centuries, guarding sugarplum dreams and holiday stories. Now, imagine him guarding your tree....

by Lois Capone
September 16, 2025
Guide

Magic Christmas Keys Upcycled into Ornaments

Every key holds a secret, and during the holidays, they can unlock Christmas magic! By painting your spare keys in...

by Lois Capone
September 16, 2025
Guide

How to Make Rustic String Art Ornaments with Wood Slices

There’s something special about sitting at the table with a ball of yarn and a slice of wood. One by...

by Lois Capone
September 16, 2025
Guide

Fun Salt Dough Ornaments with Santa, Candy Canes, and Trees

These ornaments aren’t just decorations, they’re snapshots in time. You can see a handprint Santa captures your child’s tiny fingers...

by Lois Capone
September 16, 2025
Load More

Categories

  • Cleaning (7)
  • Crafty Ideas (151)
  • Decoration (150)
  • DIY (8)
  • Diy Project (211)
  • GARDEN (39)
  • Garden Care (54)
  • Garden Guide (125)
  • Garden Ideas (330)
  • Garden Tips (110)
  • Guide (513)
  • HOME (90)
  • Tips & Hacks (20)


Garden & Crafty - Garden, DIY, Home

© 2024 gardenandcrafty.com

Navigate Site

  • About Us
  • Privacy Policy
  • Terms Of Service
  • Disclaimer
  • Cookie Policy
  • Webstories
  • Sitemap

Follow Us

No Result
View All Result
  • GARDEN
    • Garden Tips
    • Garden Guide
    • Garden Care
    • Garden Ideas
  • DIY
    • Diy Project
    • Crafty Ideas
  • HOME
    • Decoration
    • Cleaning
    • Tips & Hacks
  • About Us