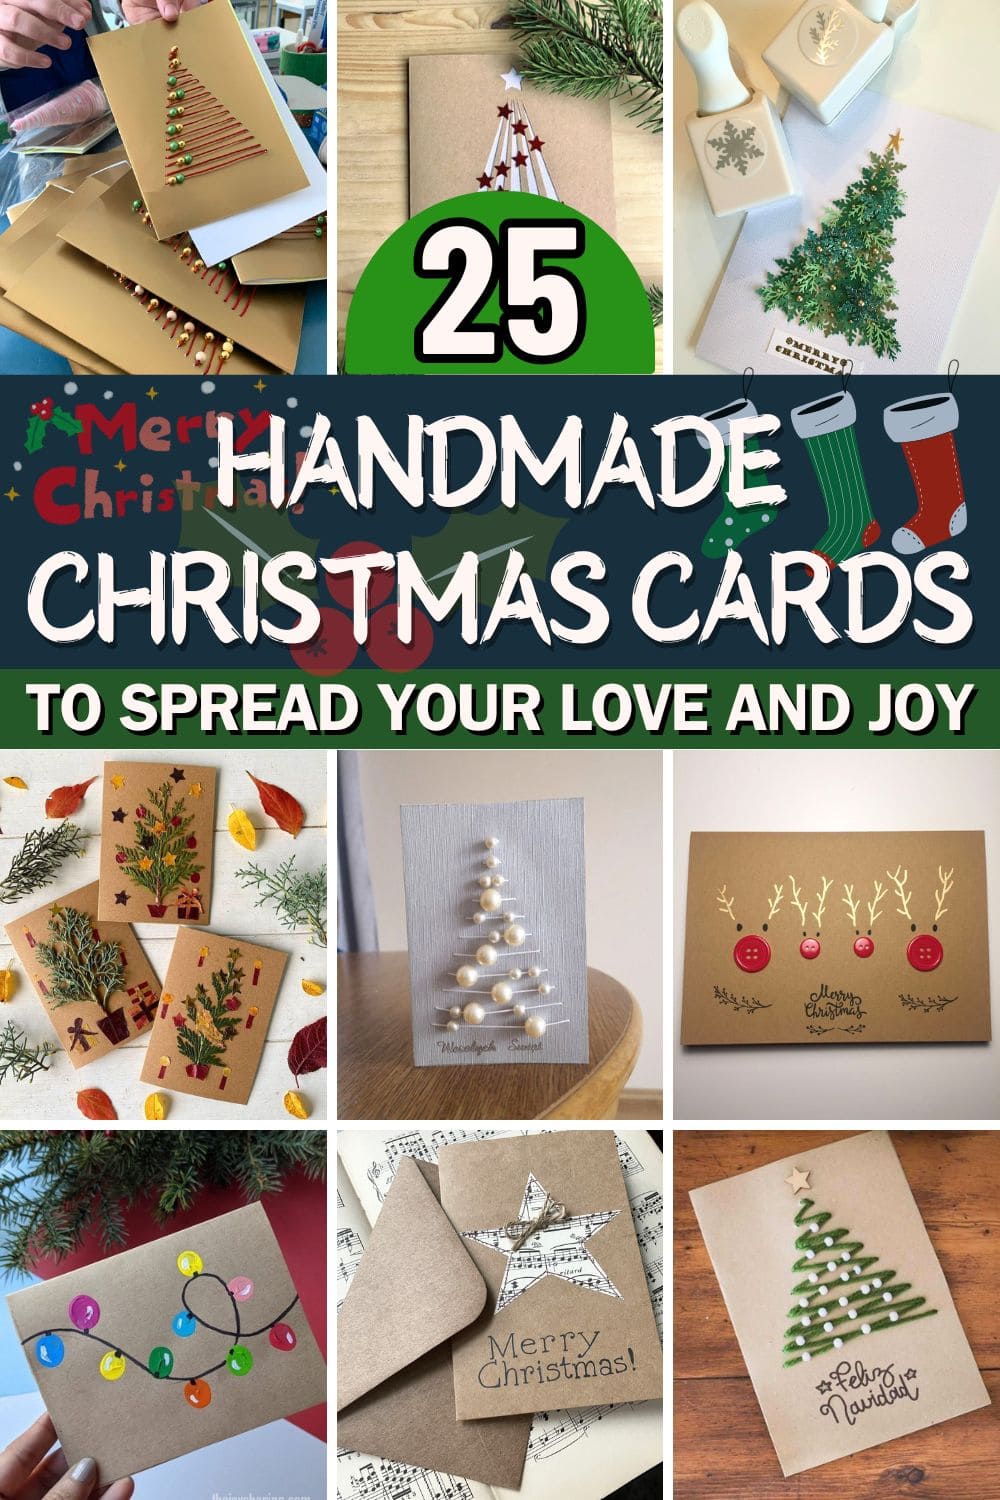
Looking for a more heartfelt way to say Merry Christmas this year?
Skip the store-bought cards and try making your own as it’s easier than you think and way more personal. Handmade Christmas cards have a certain magic to them.
In this list, you’ll find 25 charming ideas to inspire your holiday crafting.
From rustic and cozy to fun and whimsical, there’s something here for every style and skill level.
#1. Patchwork Heart Garland Card
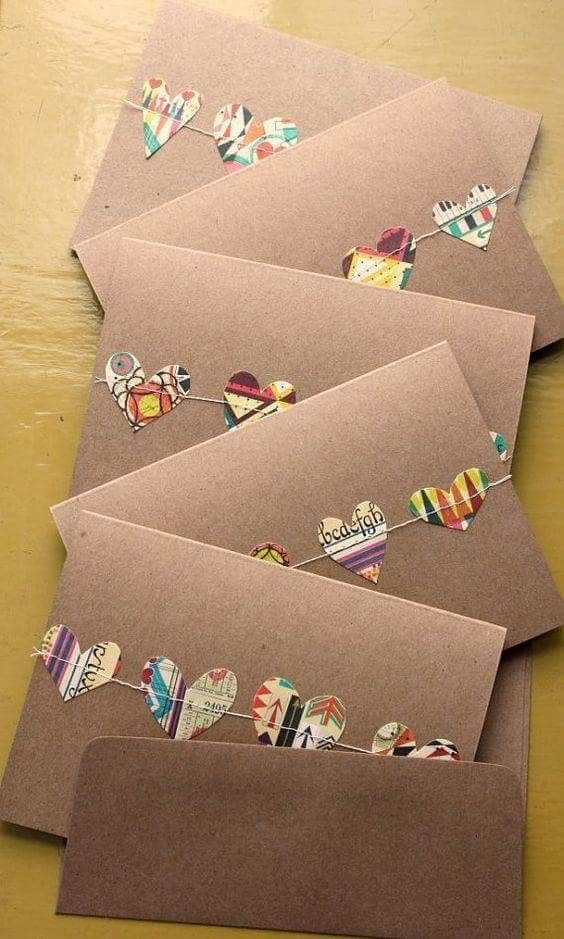
These heartfelt cards are stitched with joy. Each one features a sweet paper garland of colorful, mismatched hearts, strung across simple kraft paper like a string of love notes.
Moreover, the mix of prints, text scraps, and geometric colors gives it a charming, collage-like effect that feels both vintage and personal.
Materials Needed
- Kraft paper envelopes (A6 or 4.5″x6″)
- Scrap patterned paper, magazine clippings, or old book pages
- Heart-shaped paper punch
- Embroidery thread
- Needle
- Optional: sewing machine
Step-by-step Guide
Step 1: Cut or punch out 5-7 mini hearts from your chosen paper scraps.
Step 2: Thread a needle and carefully sew each heart onto the card in a curved or straight line.
Step 3: Leave some thread loose on either end for a garland feel, then tie or tape behind the card’s edges to secure.
#2. Minimalist Pearl Tree Card
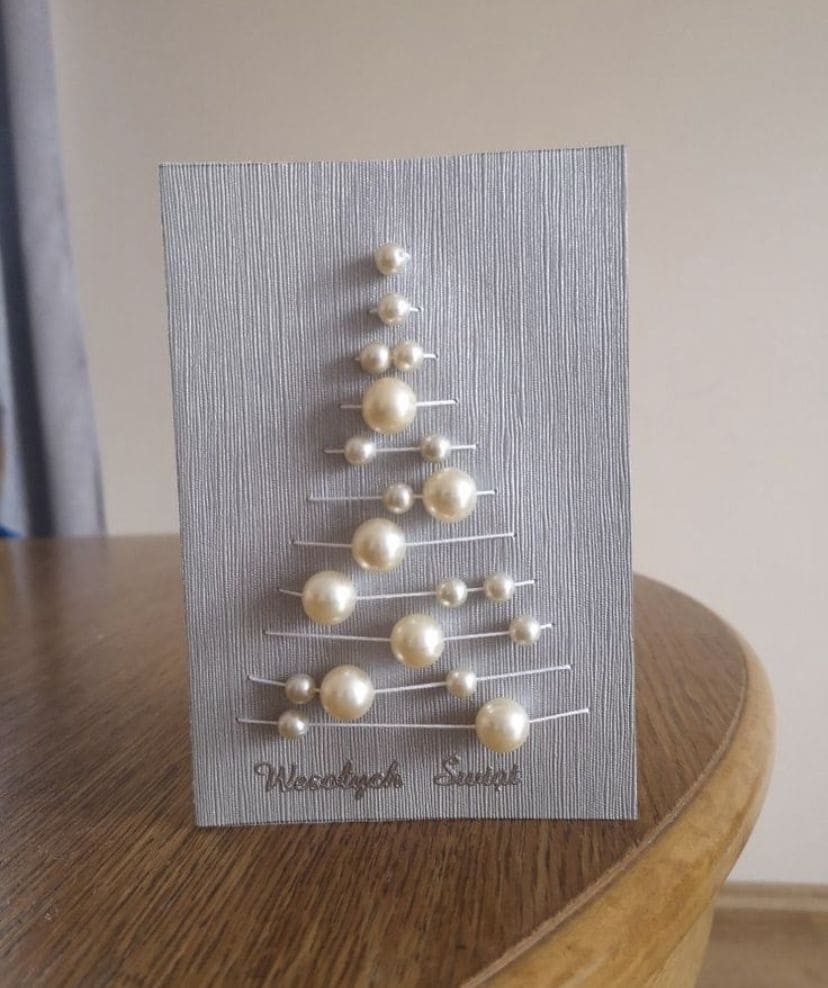
Using a mix of pearl beads arranged in a soft triangle shape, this craft forms the silhouette of a Christmas tree with a striking sculptural presence.
Specially, the silver-toned textured card base adds depth and subtle shimmer without needing extra embellishments. It’s a refined design that feels luxe yet approachable.
Materials Needed
- 1 sheet of silver or metallic cardstock (5×7 inches folded)
- 12-15 flat-back pearl beads (various sizes, from 4mm to 12mm)
- Thin silver wire (approx. 12 inches)
- Hot glue gun
- Needle
- Optional: sticker or stamp sentiment
Step-by-step Guide
Step 1: Fold your silver cardstock into a 5×7-inch card. Then lightly sketch a triangle as your guide for the tree shape.
Step 2: Pierce small holes horizontally along the triangle lines where your wire strands will sit. You should space them evenly, starting narrow at the top and widening downward.
Step 3: Thread silver wire through the holes and secure the ends on the inside with tape or glue.
Step 4: Arrange your pearl beads along each wire strand, gluing them directly on top. You can mix bead sizes for visual balance, placing larger pearls near the base.
Step 5: Finish by adding a sentiment sticker or hand-lettered message at the bottom for a personal touch.
#3. Rustic Egg Carton Tree Cards
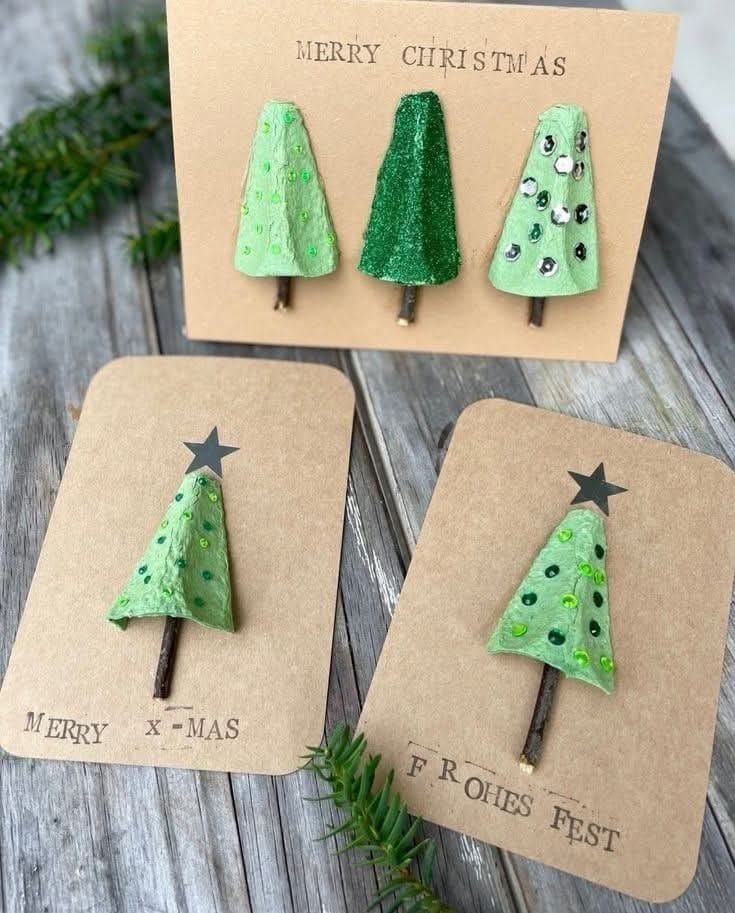
Wow, these eco-chic Christmas cards turn humble egg cartons into something unexpectedly magical.
With each little tree cut, shaped, and painted by hand, they have a sweet, rustic quality that feels personal and refreshingly different.
Moreover, mounted on kraft paper and accented with sequins and glitter, each card carries its own quirky charm. Whether you say “Merry Christmas,” “Frohes Fest,” or “Merry X-Mas,” the warmth shines through in every handmade detail.
Materials Needed
- Kraft cardstock (A6 or 4″ x 6″)
- Clean egg carton cups (3-4 sections per card)
- Acrylic paints in green, white, and glitter finishes
- Mini sequins
- Small twigs (1-2″ per card)
- Black marker
- Hot glue gun and scissors
Step-by-step Guide
Step 1: Cut cone shapes from egg carton cups and trim the bottoms flat so they stand. Then paint them in various green tones.
Step 2: Once dry, decorate the trees with sequins, paint dots, or mini rhinestones.
Step 3: Break twigs into 1-2 inch pieces and glue them to the base of each tree as the trunk.
Step 4: Glue the finished trees onto kraft cardstock, spacing them out if you’re doing a set.
Step 5: Finally, add a star on top or keep it simple. You can stamp or write your chosen greeting at the bottom.
Creative Tip:
You can use metallic paint for a more festive twist or create snowy tips with a dab of white acrylic or puffy paint.
#4. Pressed Leaf and Cedar Christmas Tree Cards
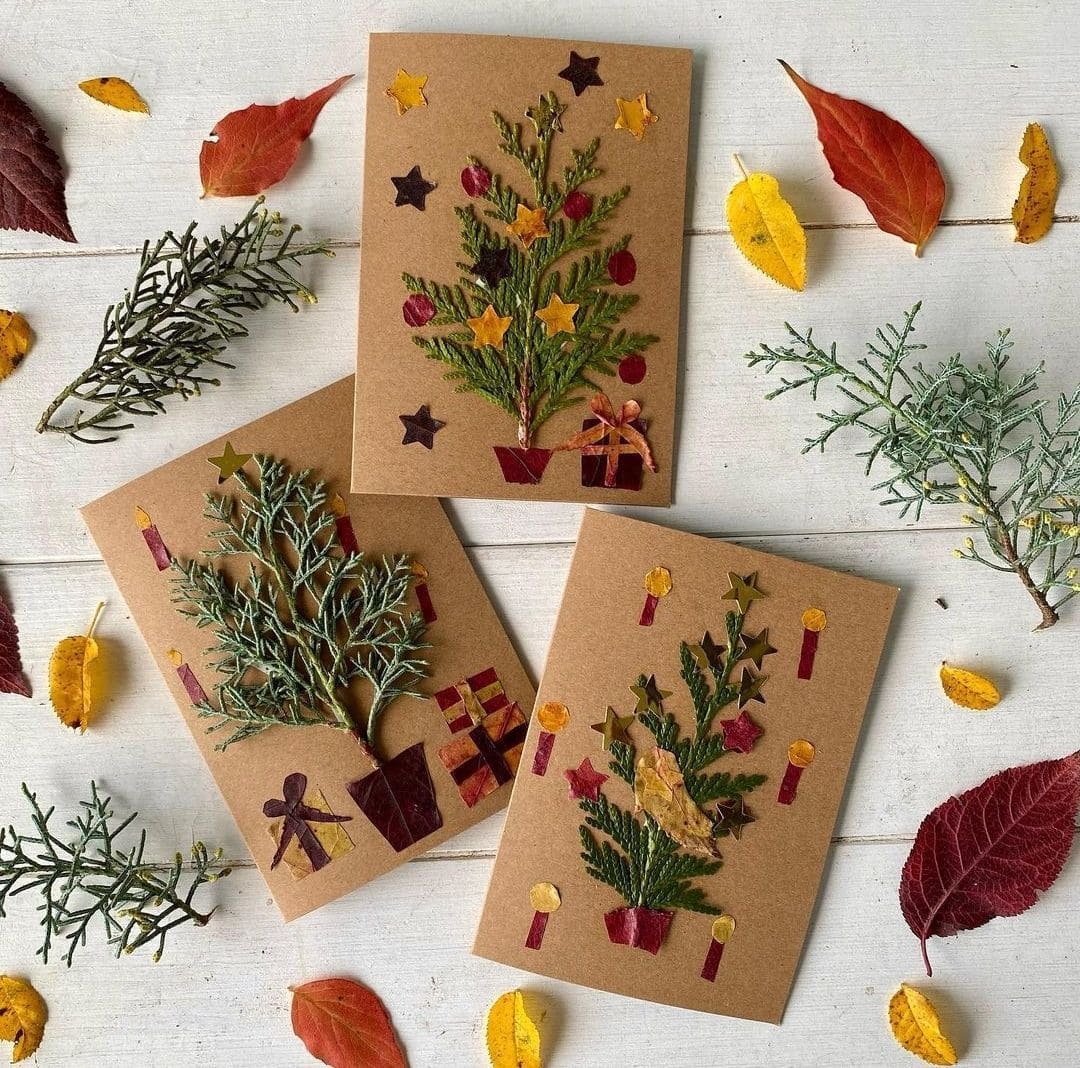
How about adding real forest into handmade cards? These earthy, handmade cards bring a breath of the forest right into your holiday greetings.
Built from real cedar or evergreen clippings and pressed leaves, each tree feels one-of-a-kind, like a memory captured on paper.
The rustic kraft cardstock and handmade paper cutout sadd a natural charm that feels cozy, personal, and refreshingly simple.
Materials Needed
- Blank kraft paper cards (4×6 inches)
- Fresh or dried evergreen sprigs (cedar, juniper, or pine), trimmed to 4-5 inches
- Pressed leaves in various colors (around 5-6 small leaves per card)
- Scissors
- Craft glue
- Optional: ribbon, twine, or gold ink
Step-by-step Guide
Step 1: Choose a trimmed evergreen piece for your tree and lightly press it between books for a few hours if it’s fresh and damp.
Step 2: Cut or punch stars, candle flames, presents, and bows from pressed autumn leaves. Deep reds, oranges, and yellows add rich contrast.
Step 3: Glue the evergreen sprig down the center of the card. Then press firmly for 30 seconds and let dry for 10–15 minutes.
Step 4: Arrange and glue your leaf shapes around the tree like ornaments, gifts, or stars. Vary placement slightly between cards for a natural, handmade vibe.
Step 5: Optional: You can add a small ribbon at the tree base or outline details with a gold pen for a hint of sparkle.
#5. Glam Santa Hat Gem Card
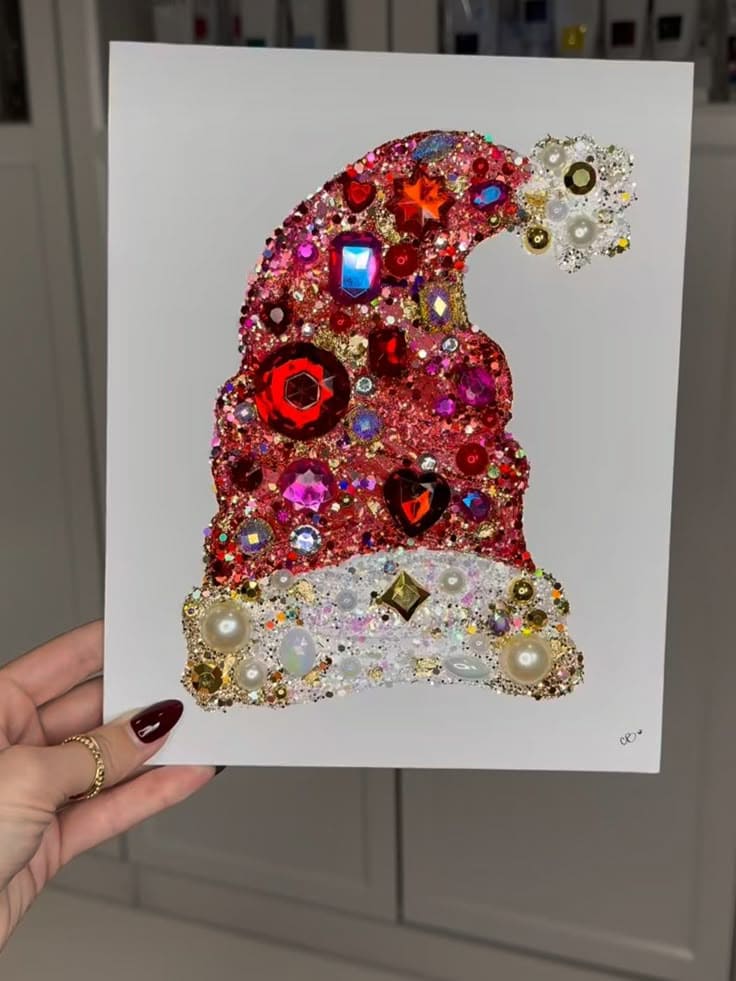
If you’re someone who believes sparkle is a holiday essential, this glamorous Santa hat card will speak to your soul.
Covered in a glimmering array of rhinestones, pearls, sequins, and beads, the card turns a simple silhouette into a showstopping piece of art. Plus, the mix of jewel tones creates dimension and instant festive energy.
Materials Needed
- White cardstock (8″x10″)
- 200 rhinestones, flat-back pearls, sequins (assorted sizes/colors)
- Craft glue
- Pencil
- Optional: glitter
Step-by-step Guide
Step 1: Lightly draw the outline of a Santa hat on the card front.
Step 2: Separate your embellishments into red (hat), white/gold (brim), and pearl accents (pompom).
Step 3: Finally, fill in the shape with glue and start pressing on the gems section by section. Let dry completely before handling.
Tip:
You’d better use tweezers for easier placement of tiny gems. And if gifting, place it in a padded envelope to keep all the sparkle safe and secure.
#6. Button-Nose Reindeer Card
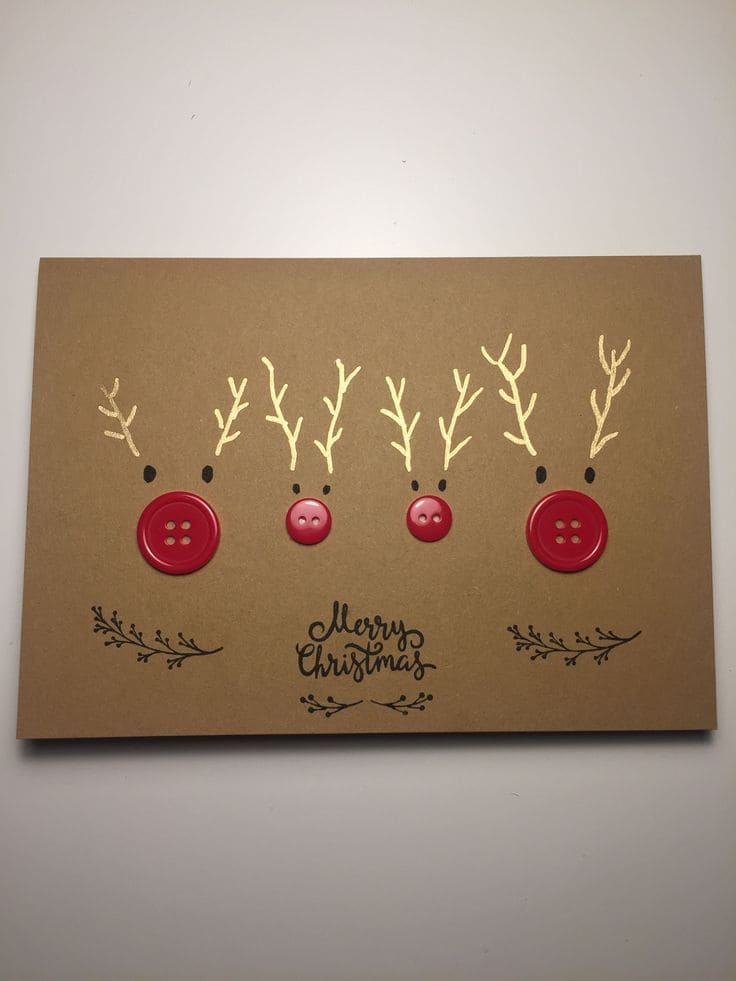
Simple yet heart-stealing, this charming reindeer card turns everyday buttons into the cutest noses ever. With just a few drawn antlers and dots for eyes, each red button transforms into a playful reindeer face on kraft cardstock.
Bonus, the handmade flair is subtle but adorable, perfect for kids’ crafting or last-minute gifts with personality.
You can personalize it by varying button sizes or adding names underneath for a family-style lineup.
Materials Needed
- Kraft cardstock (cut to 4×6 or 5×7 inches)
- 4 red buttons in assorted sizes
- Black fine-tip pen
- Gold or metallic gel pen
- Glue dots
- Optional: “Merry Christmas” stamp or handwritten message
Step-by-step Guide
Step 1: Fold your kraft cardstock into a card shape. Then arrange your buttons evenly across the front in a horizontal line.
Step 2: Glue each button down securely with glue dots or a dab of hot glue. You can use the largest ones on the ends for “Rudolph” and smaller ones in the middle for variation.
Step 3: Draw a tiny pair of eyes above each button using a black pen. Then add antlers branching out with a gold or metallic pen.
Step 4: Stamp or write “Merry Christmas” below the reindeer with decorative branches, dots, or hand lettering to enhance the festive vibe.
#7. Golden Star Lace Tree Card
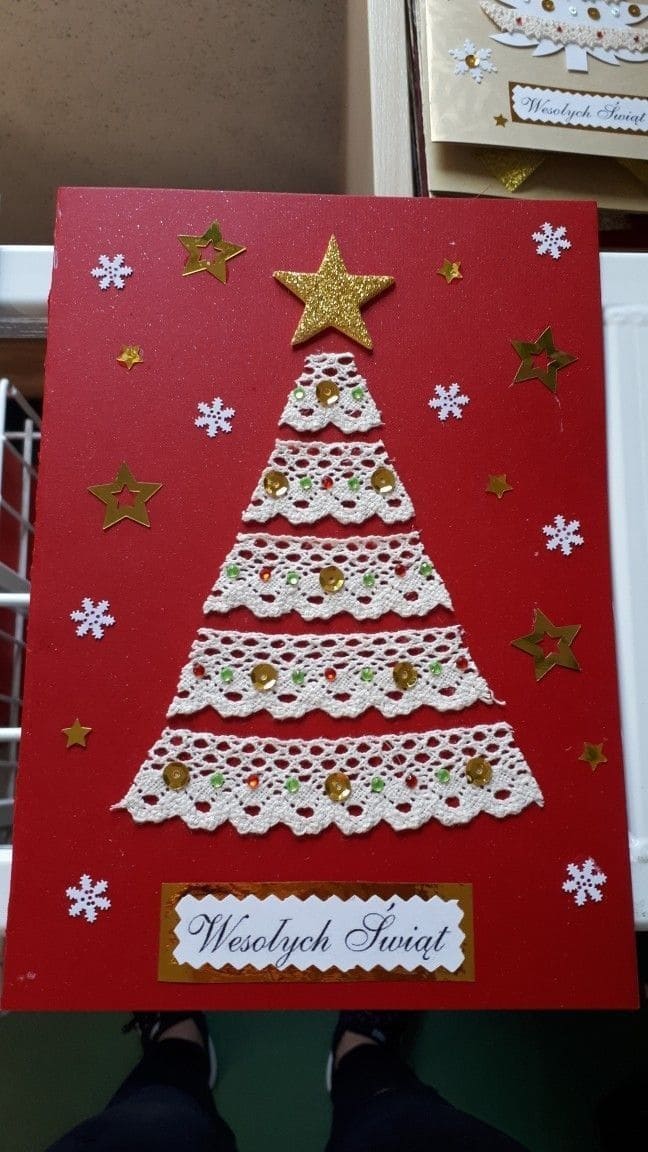
You can see strips of delicate white lace are layered in a Christmas tree shape, creating a soft and graceful silhouette against the bold red background.
Specially, gold sequins glimmer like ornaments, while a glittery star topper and shimmering accents add just the right amount of festive glam.
Materials Needed
- A6 red cardstock card
- 1-inch wide crochet lace trim (approx. 20 inches total)
- Gold sequins and mini rhinestones
- Gold glitter paper
- White paper
- Snowflake stickers
- Scissors and hot glue gun
Step-by-step Guide
Step 1: Cut lace strips in decreasing lengths to form a tiered tree. (Tip: You should start with 5.5″ wide at the bottom and reduce by 0.75″ for each row above.)
Step 2: Glue the lace strips in descending order onto the center of your card, spacing them slightly to mimic tree layers.
Step 3: Adorn each layer with gold sequins and rhinestones for a touch of shimmer.
Step 4: Add a glitter star at the top and embellish with punched snowflakes or sticker stars.
Step 5: Now, print or handwrite a holiday greeting on white paper, mount it on a gold rectangle, and glue it at the bottom.
#8. 3D Polka Dot Ornament Christmas Card
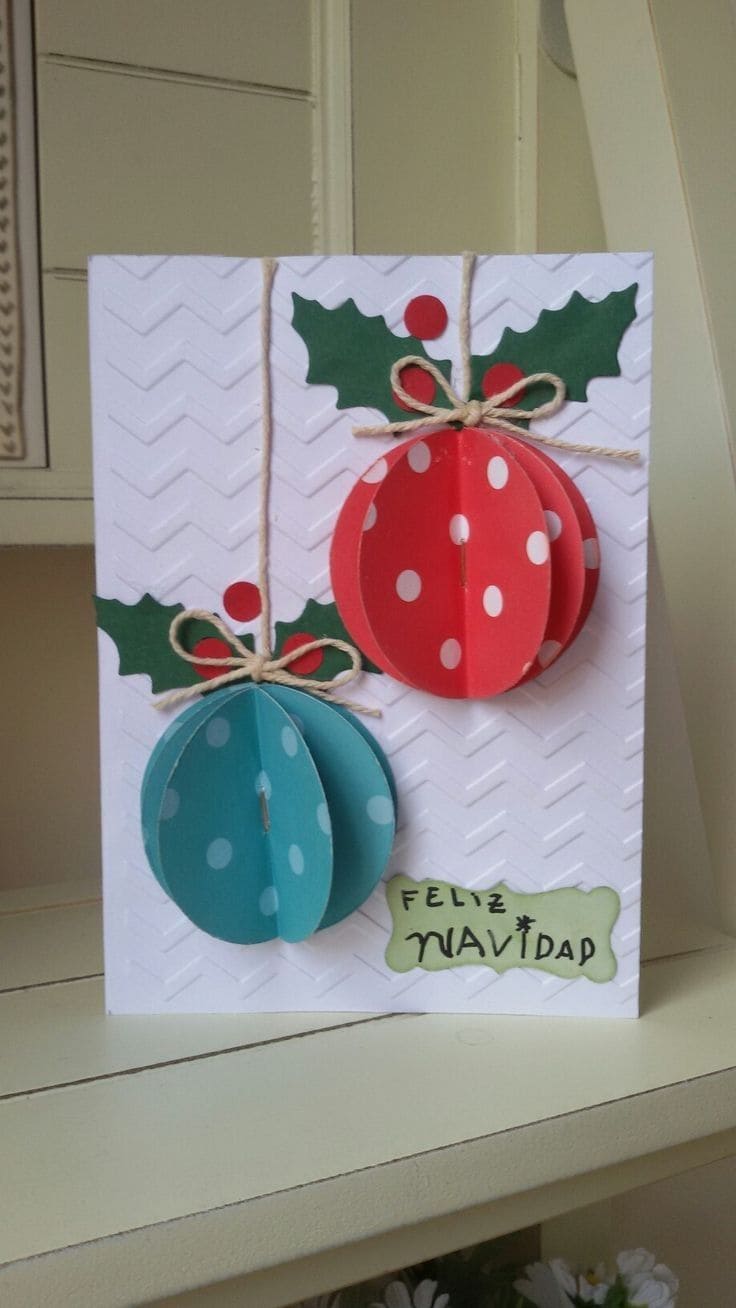
Cheerful and dimensional, this handmade card features playful 3D paper ornaments that practically pop off the page.
Red and teal spheres crafted from folded polka dot paper bring a joyful burst of color, accented with string bows and holly leaves.
Also, the raised background texture gives the whole card extra polish, while the tag adds a sweet cultural flair. It’s a fun design with movement and personality, perfect for gifting to friends or teachers.
Materials Needed
- White embossed card base (5×7 inches)
- Polka dot cardstock in red and teal
- Green and red cardstock
- Twine
- Glue stick
- Scissors and round paper punch (optional)
Step-by-step Guide
Step 1: Punch or cut 6-8 circles (approx. 2 inches wide) for each ornament. Then fold each circle in half and glue the halves back-to-back to form a 3D shape.
Step 2: Attach the two finished ornaments onto the card, leaving room above for twine and holly details.
Step 3: Cut holly leaves and red berries from cardstock and glue them behind the ornaments for a festive backdrop.
Step 4: Add bows made of twine at the tops of the ornaments and run a string up to the card edge for a hanging look.
Step 5: Finish with a cheerful greeting on a soft green label near the bottom.
#9. Minimalist Ribbon Tree Card
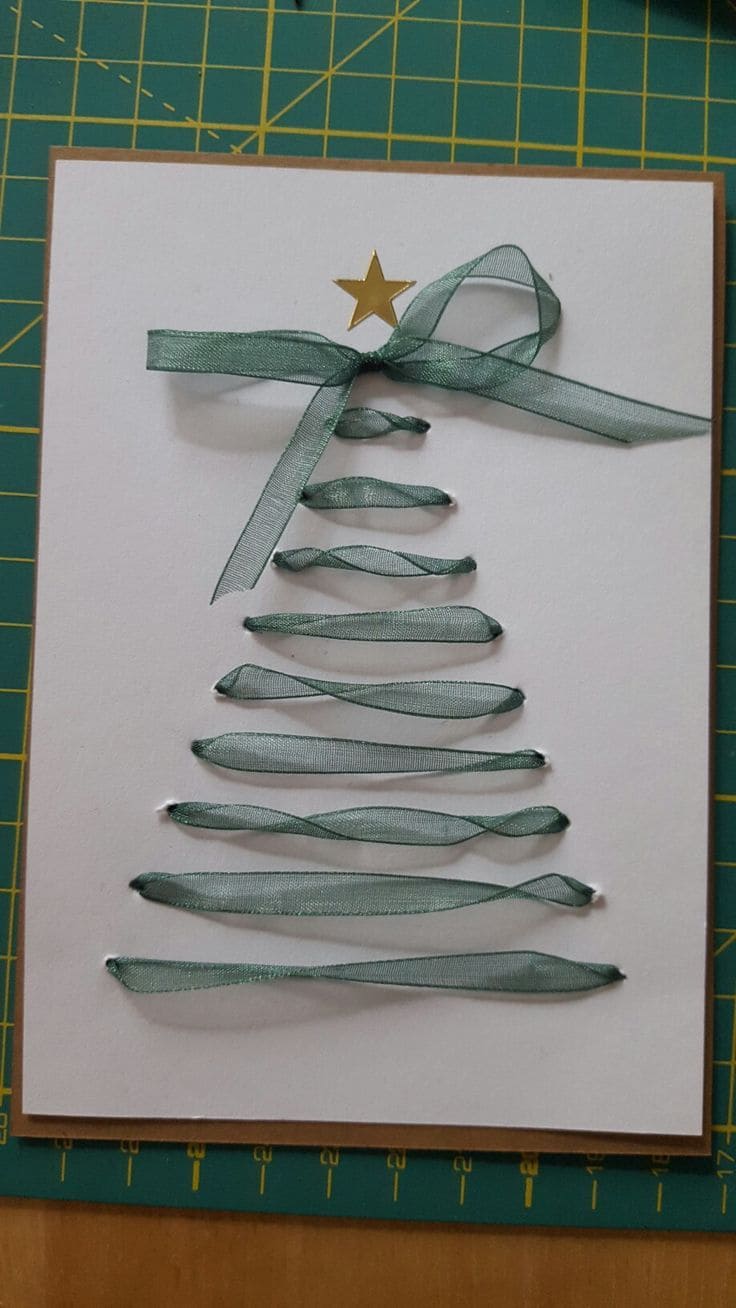
You can see this simple yet stunning design proves that less can be so much more.
Strips of green ribbon looped through cardstock create the gentle outline of a Christmas tree, topped with a golden star and finished with a graceful bow.
Also, the spacing, symmetry, and soft sheen of the ribbon give this card a refined handmade feel.
Materials Needed
- White cardstock (5×7″) mounted on kraft blank card
- 1/4 inch satin ribbon (approx. 24-30 inches)
- Gold foil star sticker or die-cut
- Needle or craft awl
- Glue dots or double-sided tape
- Scissors
Step-by-step Guide
Step 1: Cut your cardstock slightly smaller than your card base and punch even pairs of small holes in a tree-shaped tapering pattern (start wide at the bottom, narrowing toward the top).
Step 2: Thread your ribbon through the holes to form soft loops, each layer representing a tree branch. Gently twist if needed for shape.
Step 3: Secure the ends on the back using tape or glue dots. Add a tied ribbon bow at the top to finish the tree.
Step 4: Place a gold star above the bow, and glue the decorated panel onto your card base.
#10. Layered Evergreen Tree Christmas Card
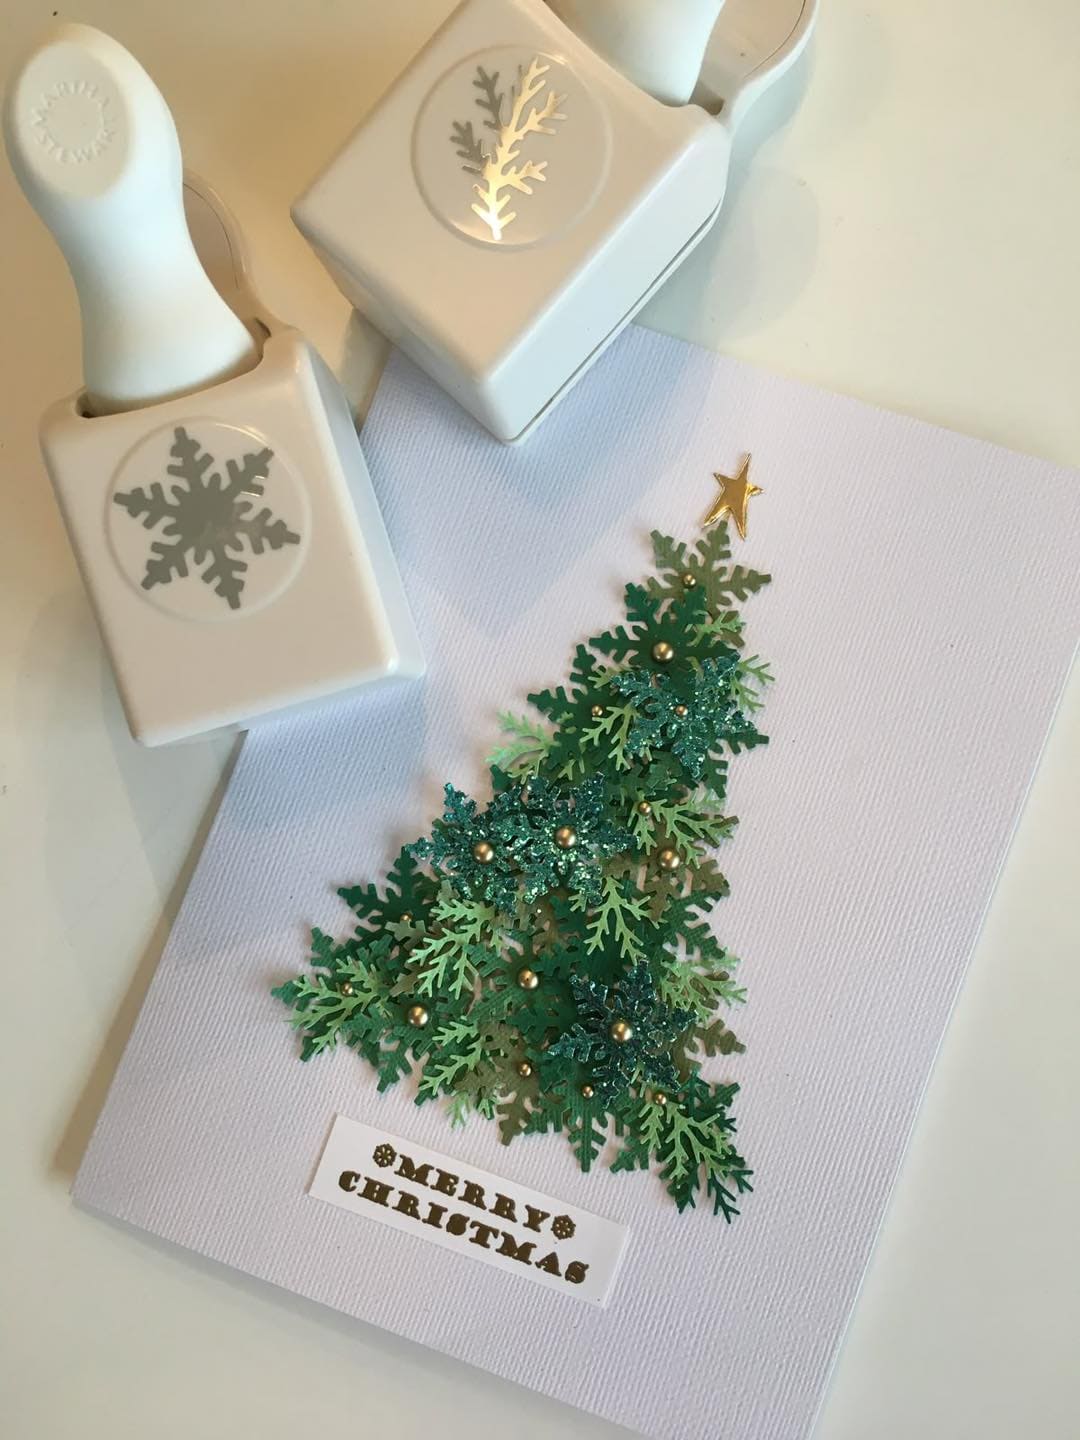
This charming card design brings a textured Christmas tree to life using punched greenery in layered tones.
Each tiny branch adds fullness and depth, forming a 3D shape that pops beautifully off the card base.
Also, a gold star tops the tree with a little sparkle, while pearl-like ornaments nestle into the layers, catching light just right.
Materials Needed
- 1 sheet of white textured cardstock (5×7 inches when folded)
- Scraps of green cardstock in 2-3 shades (about 6×6 inches total)
- Branch or fern-shaped paper punch (snowflake punches also work)
- 10-12 small gold adhesive pearls or metallic beads
- 1 gold star sticker (½ inch)
- “Merry Christmas” printed sentiment (about 2x½ inch)
- Craft glue or mini glue dots
Step-by-step Guide
Step 1: Use the punch to cut out 30–40 tiny greenery shapes from your green cardstock. You can mix shades for a more natural, layered look.
Step 2: Start at the bottom center of your card and work upward, gluing the pieces in slightly staggered rows to form a full triangle shape.
Step 3: Place the gold star at the top of the tree. Then add the adhesive pearls as ornaments, spacing them evenly between layers.
Step 4: Glue your holiday greeting beneath the tree and let the whole piece dry flat for at least 20 minutes.
Step 5: Optional: Lightly bend some of the punched pieces forward once dry to give the tree added dimension and a fluttery, lifelike feel.
Tip:
If you don’t have a punch, try hand-cutting small fern shapes from scrapbook paper. Or punch a few snowflakes and trim them into leafy sprigs.
#11. Patchwork Gift Stack Fabric Card
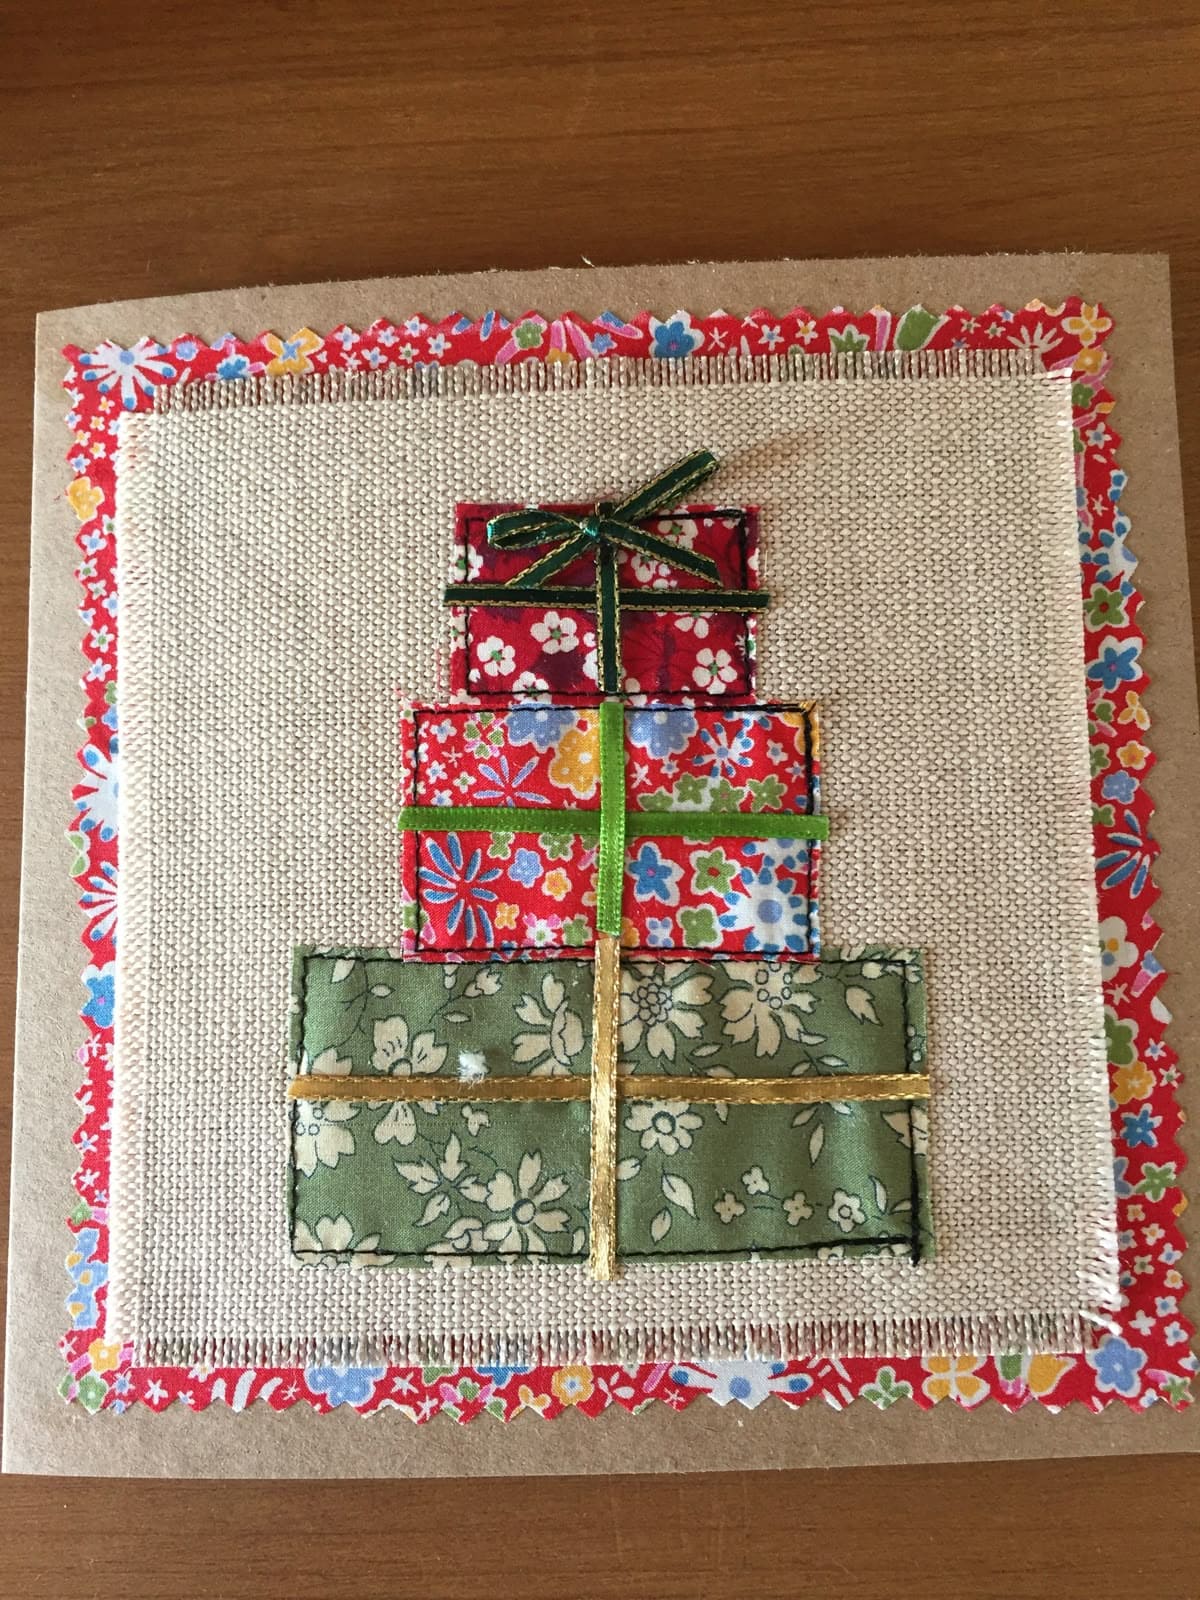
This card feels like a cozy quilt wrapped around a warm hug. Made from colorful fabric scraps arranged like stacked holiday presents, it’s the perfect blend of cheerful and handmade.
Each patterned square adds a playful pop of color, and the satin ribbons tie it all together.
Materials Needed
- Blank kraft card (6″x6″ or larger)
- Assorted fabric scraps with floral or festive prints
- Canvas or burlap backing square (approx. 5″x5″)
- Embroidery thread or fabric glue
- Thin ribbon (gold, green, or red)
- Scissors and fabric adhesive or double-sided tape
Step-by-step Guide
Step 1: Cut your fabric scraps into small rectangles in varying sizes and stack them to form a gift tower shape.
Step 2: Arrange them on your canvas or burlap square and secure with glue or hand-stitching for extra charm.
Step 3: Add ribbon accents to mimic gift wrapping, tying a bow on top if you’d like an extra flourish.
Step 4: Attach the entire fabric square onto your card base and let it dry flat under a book for clean adhesion.
Tip:
Raid your old fabric stash for unexpected gems, even tiny pieces make a big impact here.
For a softer feel, you can try fraying the fabric edges slightly for a more homey, rustic look.
#12. Popsicle Stick Reindeer Card
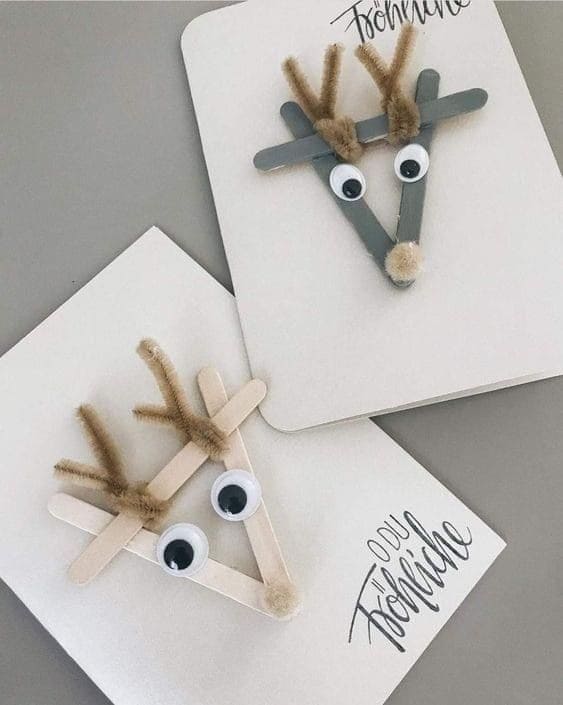
Made from just three popsicle sticks, a pair of googly eyes, and some fuzzy pipe cleaner antlers, this adorable little reindeer is a charming craft that’s both rustic and playful.
The simplicity of the materials gives it a warm, homemade feel, while the 3D design makes it pop right off the card.
Whether you go for neutral tones or bright reds, this one’s ideal for kids or craft nights with friends.
Materials Needed
- 3 mini craft sticks (about 4″ long)
- 2 small googly eyes
- 1 small pom-pom or felt circle for the nose
- 2 brown pipe cleaners
- Card base (5″ x 7″)
- Craft glue and scissors
Step-by-step Guide
Step 1: Glue the sticks into a triangle “V” shape with a horizontal stick across the top.
Step 2: Twist pipe cleaners into antlers and glue them behind the top stick.
Step 3: Add googly eyes below the cross stick and attach a pom-pom at the triangle’s point.
Step 4: Secure your reindeer onto the card front and let dry fully before writing inside.
#13. Rustic Fabric Tree Christmas Card
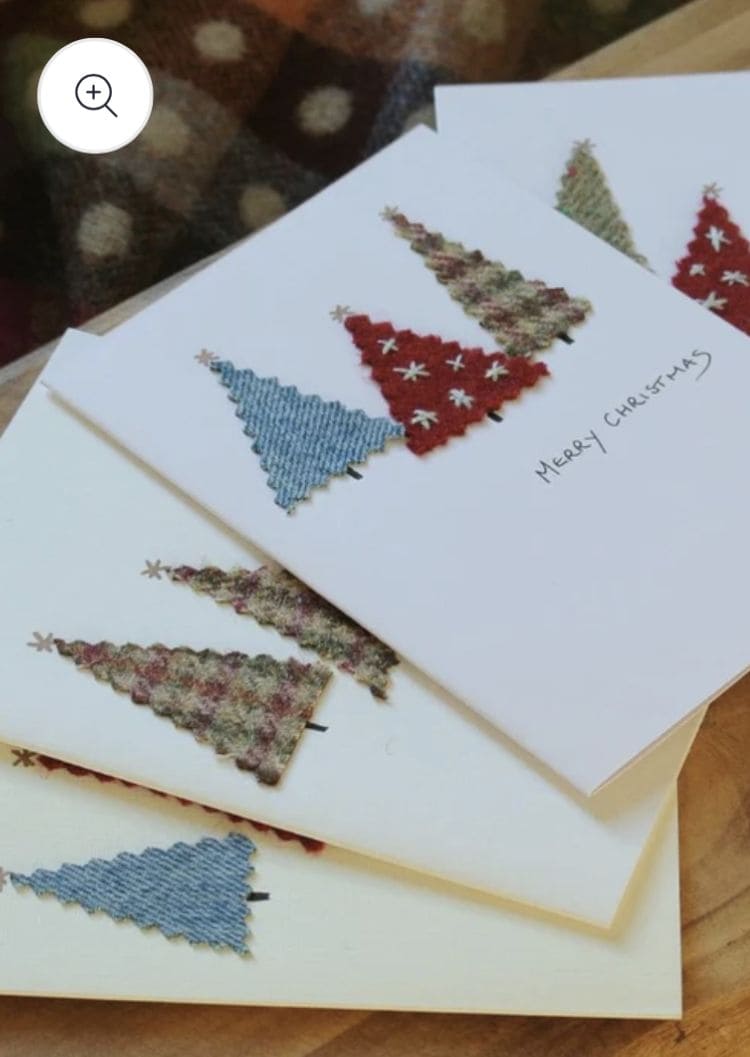
Cozy and textured, this handmade card design turns leftover fabric scraps into charming Christmas trees with a homespun feel.
Each tree is cut in a triangle shape and arranged on a clean white card base, showing off the varied colors and weaves.
Bonus, tiny stitched or glued stars add a hint of festive sparkle. It’s simple, tactile, and feels like a winter cabin hug.
Materials Needed
- White card blanks (4×6 inches or larger)
- Scrap fabric pieces in holiday colors or cozy patterns
- Fabric scissors or pinking shears
- Fabric glue or hot glue gun
- Mini star embellishments or felt cutouts
- Black marker
Step-by-step Guide
Step 1: Cut triangles from the fabric scraps, about 3 inches tall and 2 inches wide at the base for tree shapes. Use pinking shears for a zigzag edge.
Step 2: Arrange 2-3 trees on each card and glue them down in a row, leaving space underneath for a greeting.
Step 3: Draw simple tree trunks using a black pen or fine-tip marker.
Step 4: Glue a small star or sequin to the top of each tree for a festive finish.
Step 5: Write a simple holiday message like “Merry Christmas” underneath or along the side.
#14. Gem Ornament Christmas Card
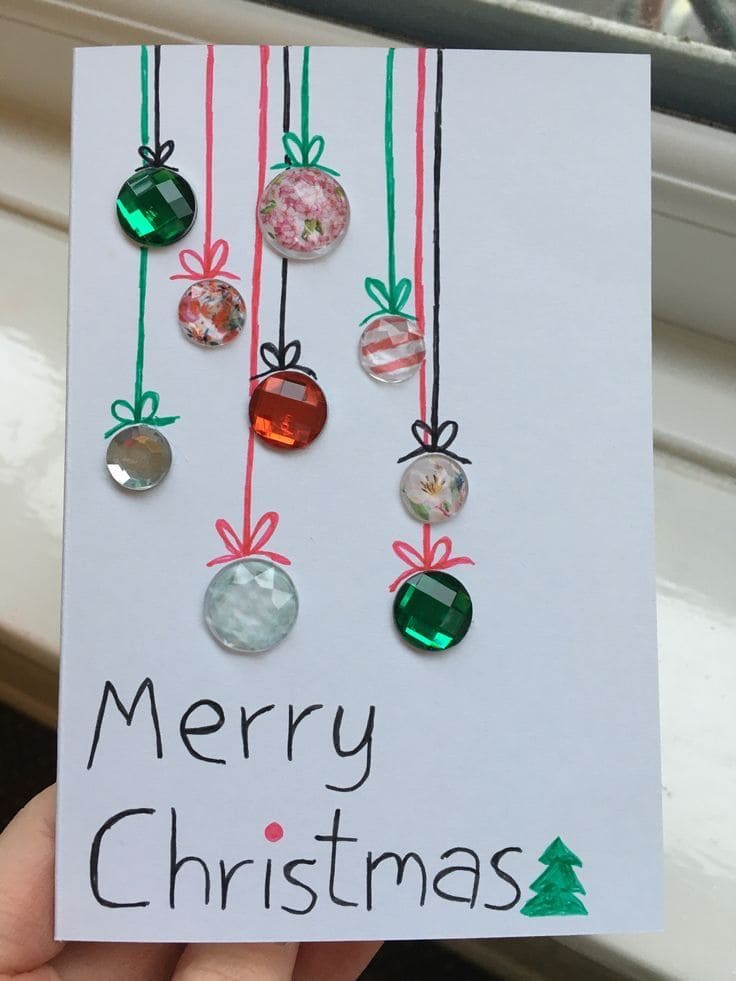
Bright, cheerful, and delightfully sparkly,
this handmade card turns flat rhinestones and pretty stickers into dangling ornaments full of charm. Each bauble is topped with a little bow, giving the illusion of them hanging from festive ribbons.
With hand-drawn accents and the classic “Merry Christmas” message at the bottom, it blends fun with elegance. G
reat for kids and adults alike, this card pops with just the right amount of shimmer and personality.
Materials Needed
- Blank white cardstock or pre-folded white card (4×6 inches)
- 10 flat gem stickers or decorative scrapbook embellishments
- Fine-tip markers in red, green, and black
- Ruler (optional)
Step-by-step Guide
Step 1: Lay your card flat and plan where you want each gem ornament to hang. Try clustering some high, some low for a dynamic layout.
Step 2: Use a fine-tip marker to draw thin lines downward, each ending with a hand-drawn bow. Alternate colors for a lively feel.
Step 3: Stick one gem at the base of each line, pressing firmly so it adheres well. Try using gems with texture or patterns to mix things up.
Step 4: Write “Merry Christmas” at the bottom with playful lettering, and add little embellishments like a tiny tree or dot for the “i”.
Tip:
Use clear-drying glue to add a dab of glitter or microbeads in the center of each gem for extra sparkle that won’t fall off during mailing.
#15. Swirled Quilling Christmas Tree Card
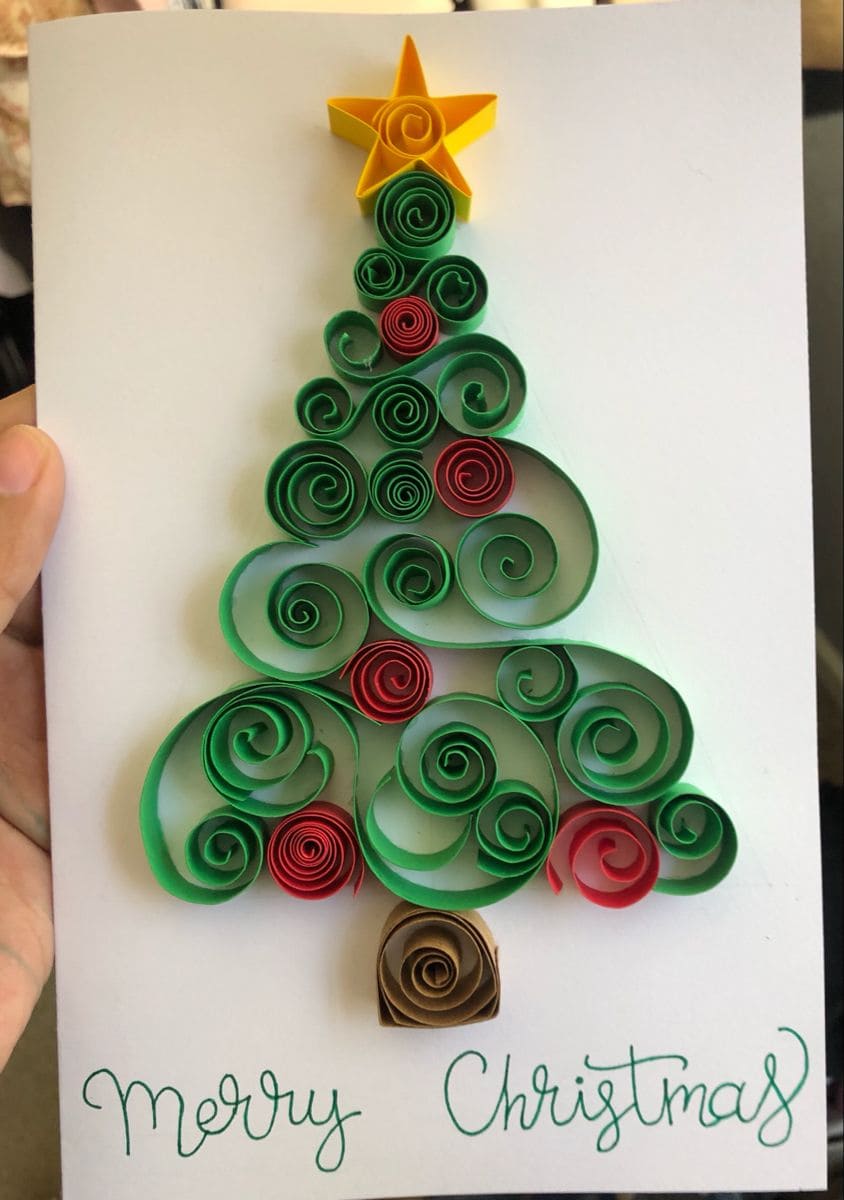
Wow, this card showcases a charming Christmas tree made entirely of colorful paper quills. Each swirl adds dimension and movement, building a festive tree that feels sculptural and full of life.
Topped with a bright yellow star and grounded by a sweet little quilled trunk, it’s a design that stands out.
This one makes a beautiful keepsake and a fun introduction to quilling for beginners. Finished size is about 5×7 inches, with layers popping about 0.25 inches off the card for a 3D look.
Materials Needed
- Blank white cardstock (5×7 inches)
- Quilling paper strips in green, red, yellow, and brown (1/4 inch wide)
- Slotted quilling tool or thin paintbrush handle
- Craft glue and tweezers
- Pencil and ruler (optional)
Step-by-step Guide
Step 1: Roll green and red quilling strips into tight or loose coils using your tool. Pinch some into teardrops for variation.
You need to make 20-25 shapes for the tree and a few extras to swap out as needed.
Step 2: Arrange the coils in a triangle formation on the card to resemble a tree. Also, leave a bit of space between each shape for breathing room.
Step 3: Create a yellow star using five short strips curled into loose teardrops, and glue them at the top. Make a small brown coil for the trunk.
Step 4: Once happy with placement, glue everything down carefully using tweezers for precision.
Step 5: Write “Merry Christmas” underneath the tree in your prettiest script or add a printed message for a clean finish.
#16. Rustic Yarn Christmas Tree Card
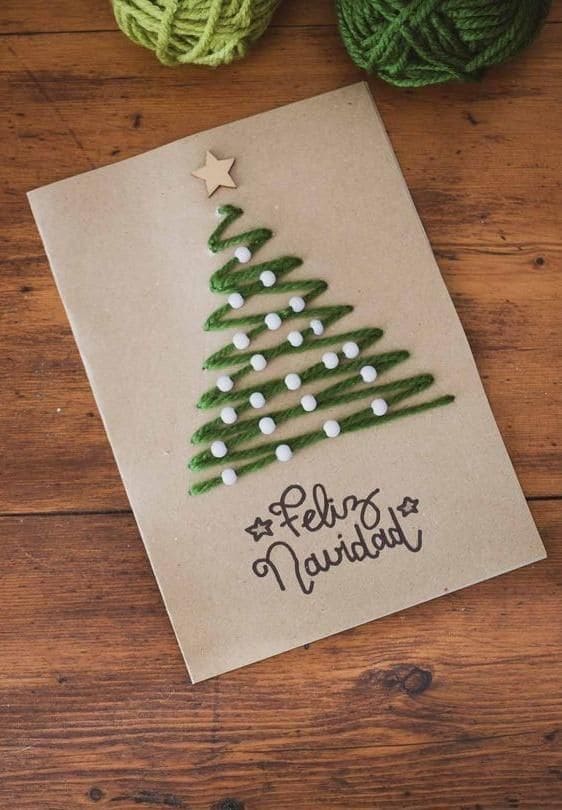
This sweet and earthy design uses cozy green yarn to form a zigzag tree, accented with white beads and topped with a wooden star.
It’s delightfully simple but full of personality like something straight from a warm cabin in the woods.
Moreover, the hand-lettered “Feliz Navidad” at the bottom adds a heartfelt, international touch, making this card feel extra personal and joyful.
Materials Needed
- Kraft cardstock (5″x7″)
- Green yarn or twine
- Mini white beads or pom-poms
- Wooden star embellishment
- Hot glue gun or tacky glue
- Black marker or calligraphy pen
Step-by-step Guide
Step 1: Cut lengths of green yarn, each slightly longer than the last, to create the tree layers.
Step 2: Glue each piece diagonally across the front of the card to form a stylized Christmas tree shape.
Step 3: Add small beads as ornaments and glue the wooden star at the very top.
Step 4: Use a pen to write “Feliz Navidad” or any holiday greeting in a playful script beneath the tree.
#17. Rustic Sheet Music Star Card

Elegant and earthy, this handmade card combines natural tones with vintage charm. A star cut from old sheet music adds character, while kraft paper creates a warm, organic backdrop.
Also, a tiny twine bow ties it all together. This design feels personal, like something you’d tuck into a handmade gift box or slide into a piano teacher’s mailbox
. It works beautifully with A6 (4.5×6.25″) card blanks and pairs well with matching kraft envelopes.
Materials Needed
- Kraft paper card blanks (A6 size or similar)
- Old sheet music or printable music paper
- Twine or jute string (thin)
- Glue stick or tacky glue
- Scissors or craft knife
- Black pen or stamp
Step-by-step Guide
Step 1: Cut a star shape from sheet music, roughly 3 to 3.5 inches across.
Step 2: Center the star on the front of your kraft card and glue it down firmly.
Step 3: Tie a small bow with twine and glue it at the center of the star.
Step 4: Write or stamp your “Merry Christmas” message below the star in a neat, bold font.
Step 5: Let everything dry completely before placing it in an envelope or stacking with others.
Tip:
If you don’t have old sheet music, print a faded music sheet on recycled paper to recreate the same nostalgic effect.
#18. String and Bead Tree on Gold Card
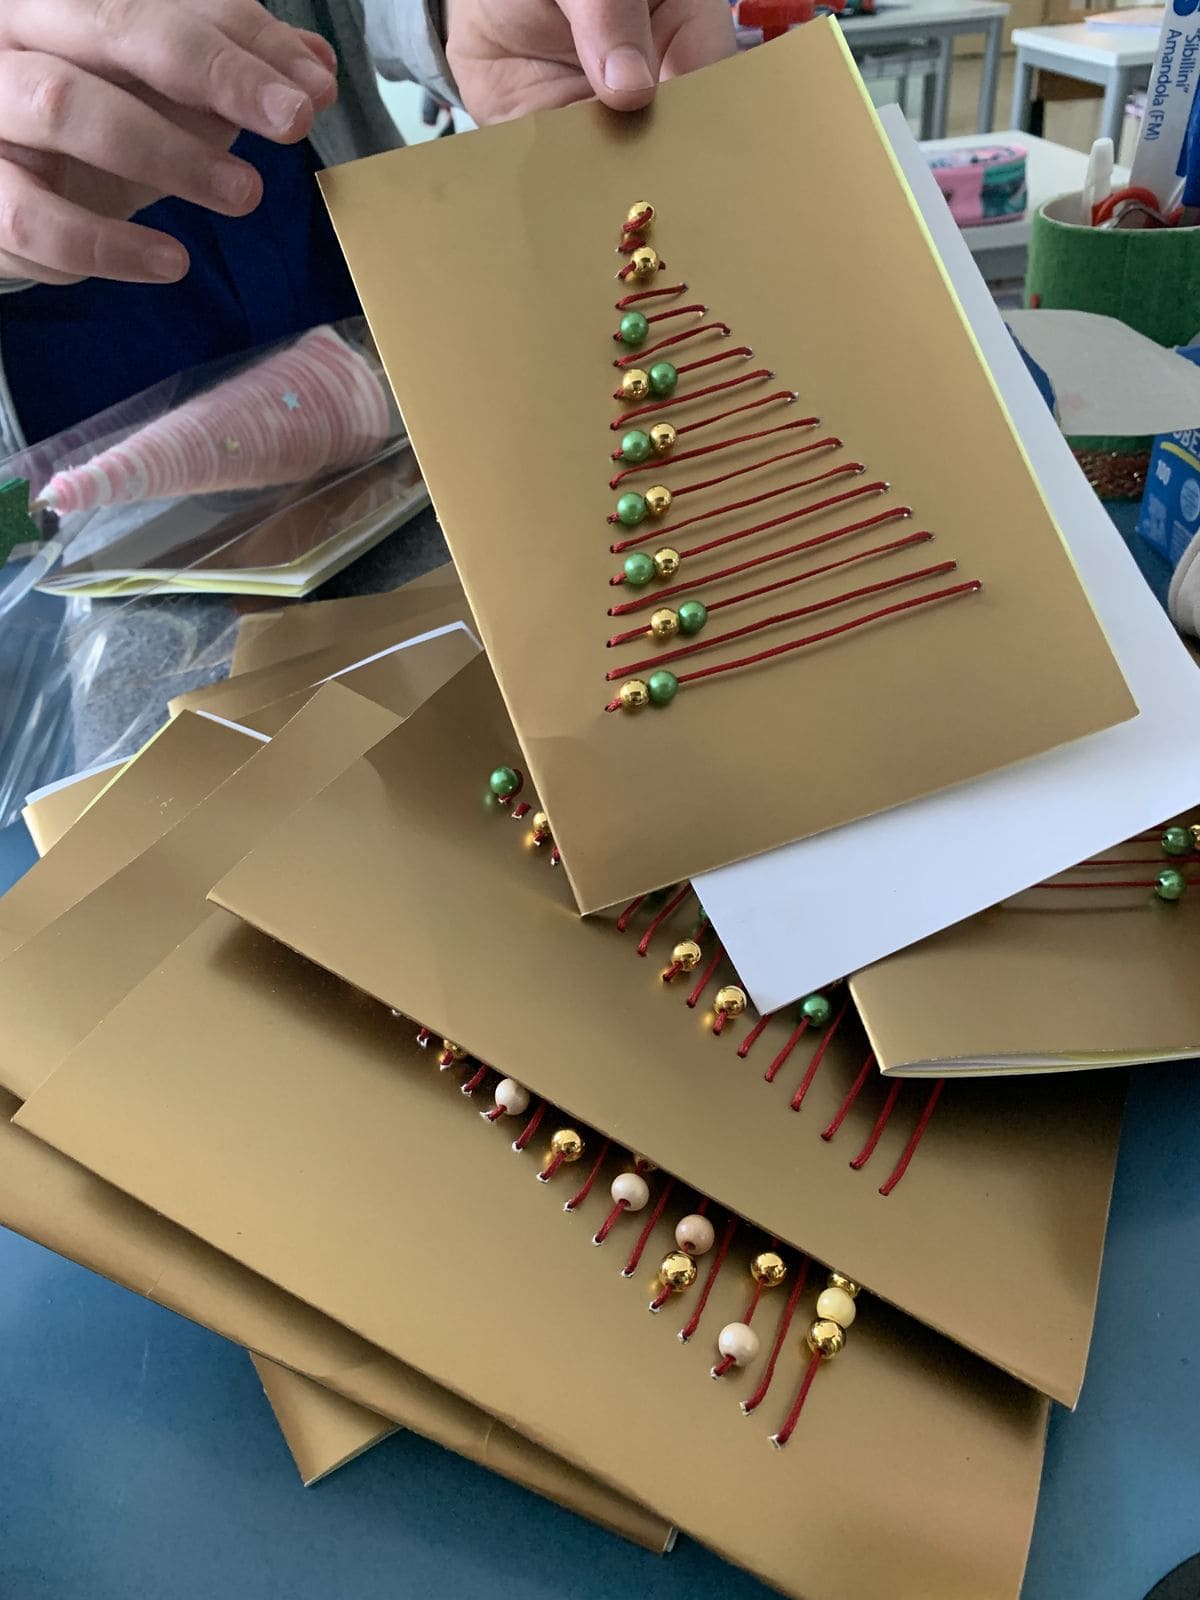
Modern and cheerful, this card brings a touch of festive glamour with its metallic gold backdrop and sleek string art.
Red cord is looped across the card to form the shape of a Christmas tree, while small beads with gold, green, ivory act as ornaments along the strands.
Specially, the clean lines create a striking graphic feel, and the dimensional beads add delightful texture.
Each card measures approximately 5×7 inches, perfect for gifting or display. It’s one of those deceptively simple projects that turns out beautifully eye-catching.
Materials Needed
- Metallic gold cardstock (cut and folded to 5×7 inches)
- Red string or embroidery floss (around 20 inches per card)
- Mini round beads in red, green, gold, or pearl (about 15 per card)
- Needle or paper piercer
- Scotch tape or glue dots
- Ruler and pencil
Step-by-step Guide
Step 1: Fold your gold cardstock into a 5×7 card. Lightly sketch two vertical dots about 1 inch apart from top to bottom to form the tree height.
Step 2: Mark and pierce evenly spaced holes along each side (getting wider as you go down) using a needle or awl. There should be about 10-12 rows.
Step 3: Thread the red string in a zigzag pattern between opposite holes to create the triangular tree form. Secure the string inside the card with tape.
Step 4: Slide beads onto the string and glue them into place. Mix colors and alternate sizes for a lively, ornament-like effect.
Step 5: Add a small star sticker or sequin at the top for a polished finish, or leave it minimalist for modern charm.
Tip:
To save time, prep a batch by piercing all the holes first, then do the stringing and beading assembly-line style. This makes it a fun family craft or a school-friendly holiday card project.
#19. Shooting Star Tree Card
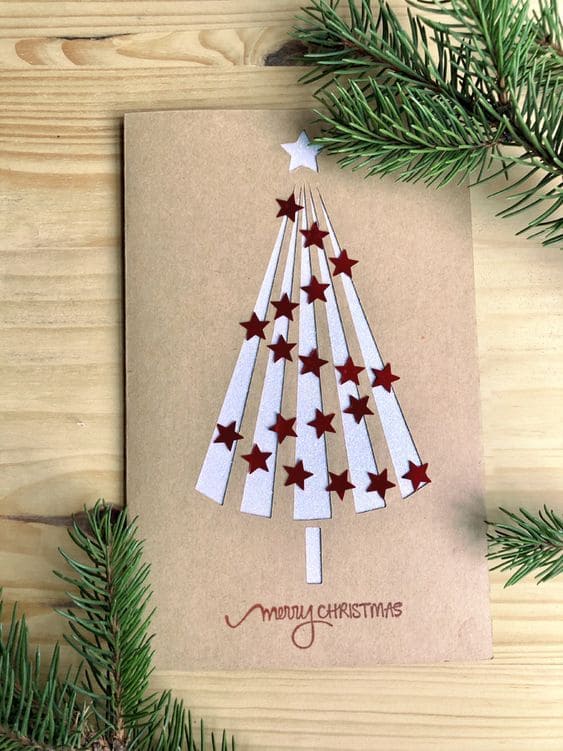
Amazingly, this card brings holiday magic to life with its star-streaked Christmas tree.
Slim white rays fan out from the top star, forming the tree’s shape in a sleek, modern burst.
Scattered across are tiny red foil stars that twinkle just like lights, adding just the right touch of whimsy.
With its bold simplicity and radiant details, this card is perfect for someone who loves clean lines with a dash of sparkle.
Materials Needed
- Kraft cardstock (5″x7″)
- White glitter paper or shimmer cardstock
- 20-25 red star confetti or sequin stickers
- Glue stick or craft glue
- Scissors or paper trimmer
- Optional: red pen or stamp
Step-by-step Guide
Step 1: Cut long, narrow white strips to create the radiating tree effect. Vary the length and width slightly for a natural spread.
Step 2: Arrange and glue the strips in a fan shape from a central top point, trimming the bottoms if needed for alignment.
Step 3: Glue red stars randomly over the tree shape. Add one large star at the very top as a finishing touch.
Tip:
If you’re using loose star confetti, a pair of tweezers makes placement way easier. Try mixing matte and shiny stars for an extra pop.
#20. Layered Triangle Tree Card
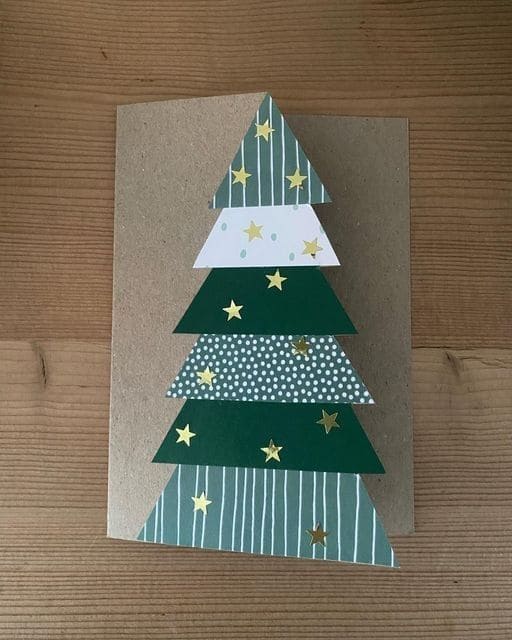
Simple shapes, big charm. This card transforms classic triangle cutouts into a layered Christmas tree full of texture and cheer.
Each patterned paper slice including some dotted, others striped or solid adds dimension while keeping the design crisp and balanced.
Plus, gold star stickers give it a touch of sparkle without overpowering the earthy kraft background. It’s a great design for kids or beginners, and a wonderful way to use leftover scrapbooking paper.
Materials Needed
- Kraft cardstock base (5″ x 7″)
- Patterned scrapbook paper in green, white, or blue hues
- Gold star stickers
- Scissors and glue stick
- Pencil and ruler (optional)
Step-by-step Guide
Step 1: Cut six to seven triangle shapes in descending size. Then use different paper styles to keep it playful and layered.
Step 2: Arrange the triangles vertically, slightly overlapping the edges for a stacked tree effect.
Step 3: Glue each triangle in place, starting from the bottom to top, and press to secure.
Step 4: Finally, add gold stars for a festive shimmer and finish with a short greeting inside the card.
Creative Tip:
If you want more 3D depth, fold each triangle slightly at the middle before gluing down just the crease, this makes the edges pop outward slightly.
#21. Layered Paper Tree Card
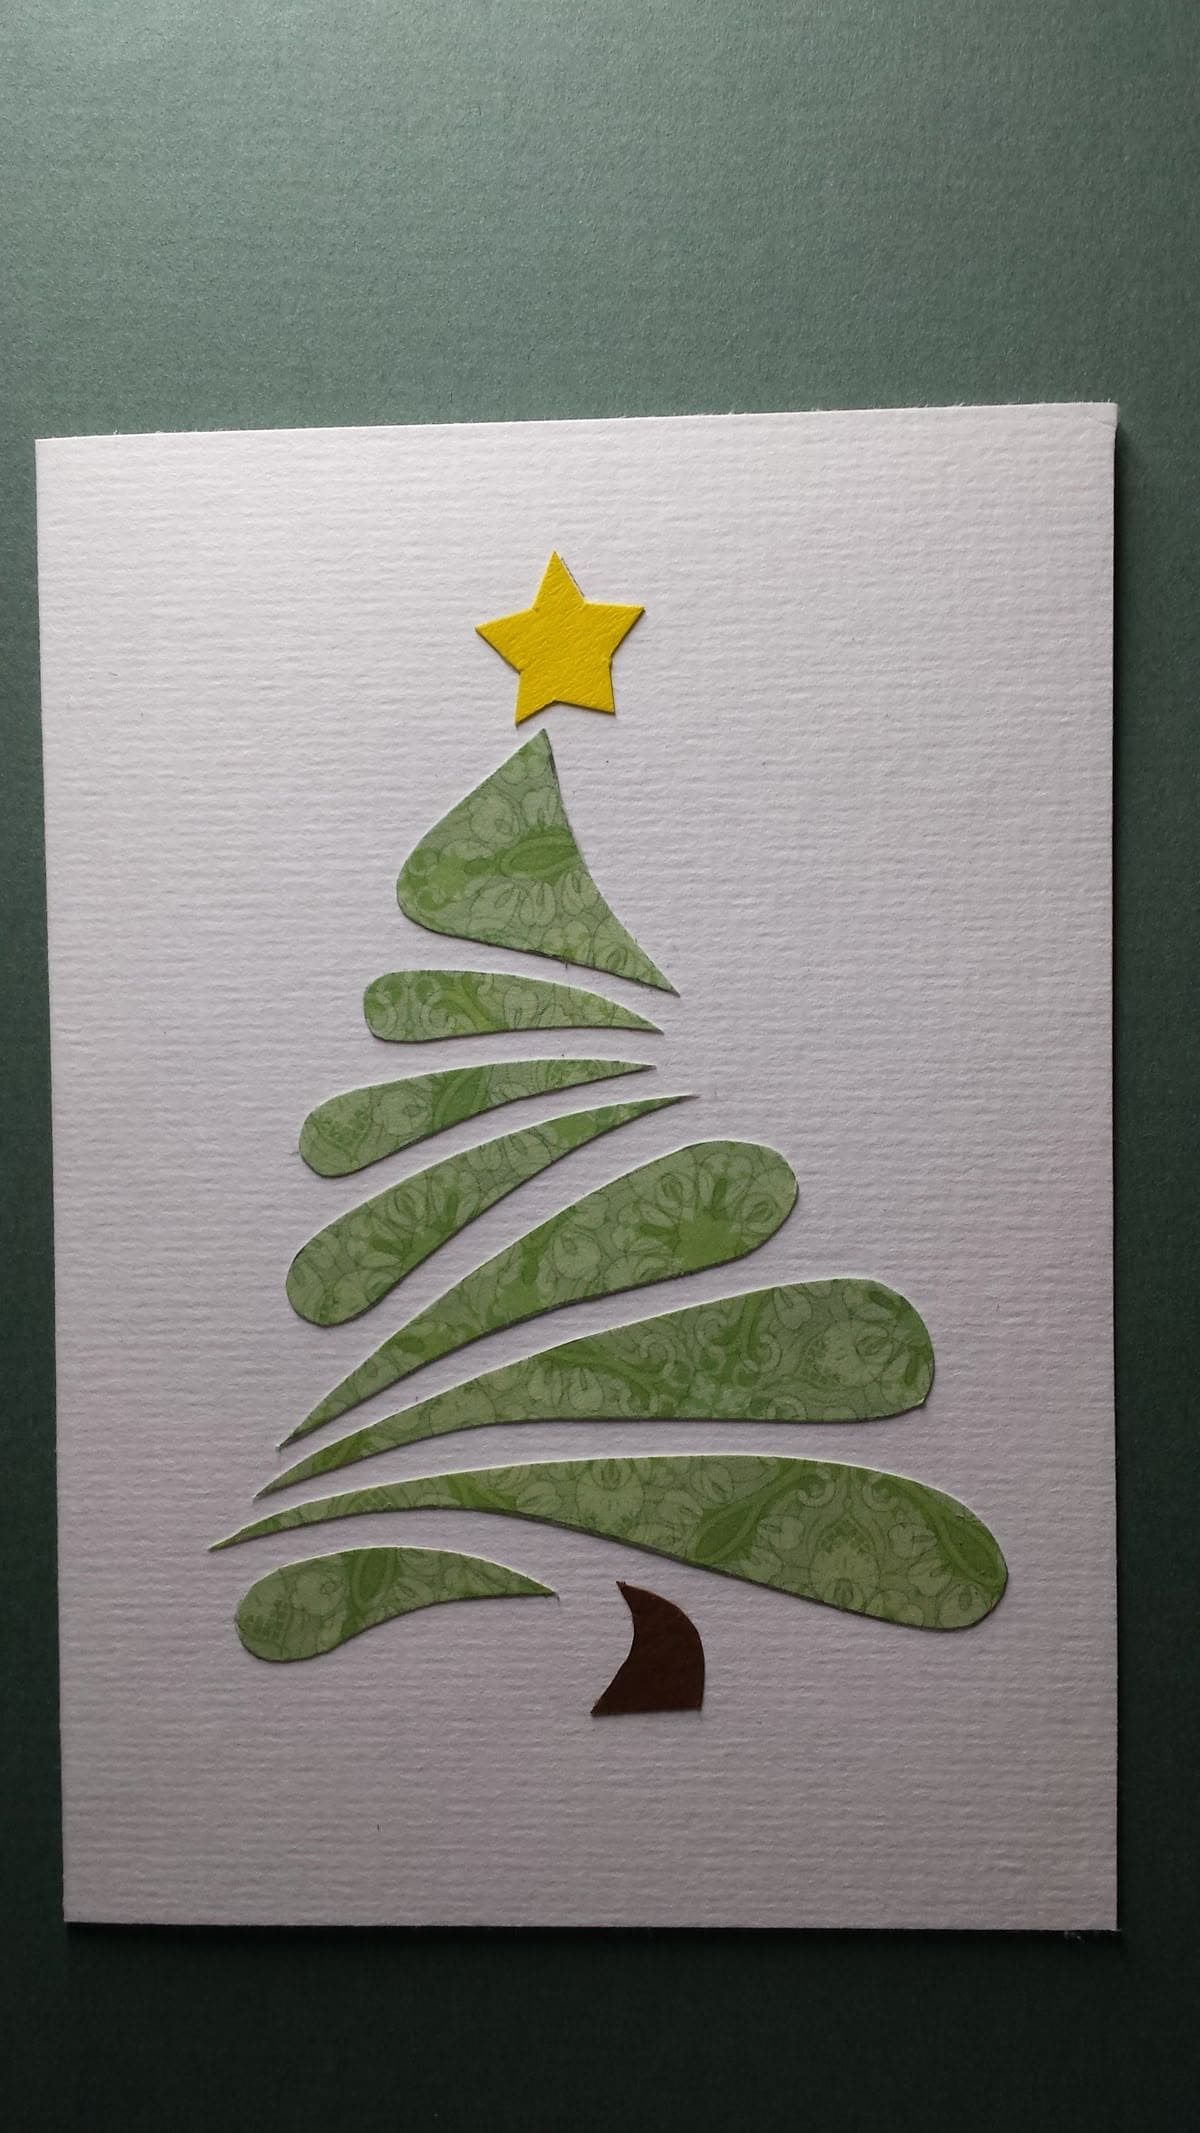
Have you ever thought of this clean, modern, and effortlessly stylish? Each piece of patterned green paper forms part of a stylized Christmas tree, gently stacked from top to bottom.
The yellow star on top and the tiny brown trunk add just enough charm without clutter.
It’s a design-forward card that feels artsy yet approachable, perfect for minimalists or anyone who loves paper crafting with flair.
Materials Needed
- White textured cardstock (5″x7″)
- Patterned green scrapbook paper
- Small scraps of yellow and brown paper
- Scissors
- Glue stick
- Pencil
Step-by-step Guide
Step 1: Sketch and cut out soft teardrop or swoop-shaped segments from the green paper to mimic tree branches, ranging in size from small to large.
Step 2: Glue each branch segment in layered order, leaving small gaps to create visual movement.
Step 3: Finally, add a yellow star at the top and a curved brown trunk at the bottom.
Tip:
If you’re making several cards, use one tree set as a template for easy replication. Swap paper prints for a more whimsical or classic look depending on the recipient.
#22. Crochet Holiday Cards
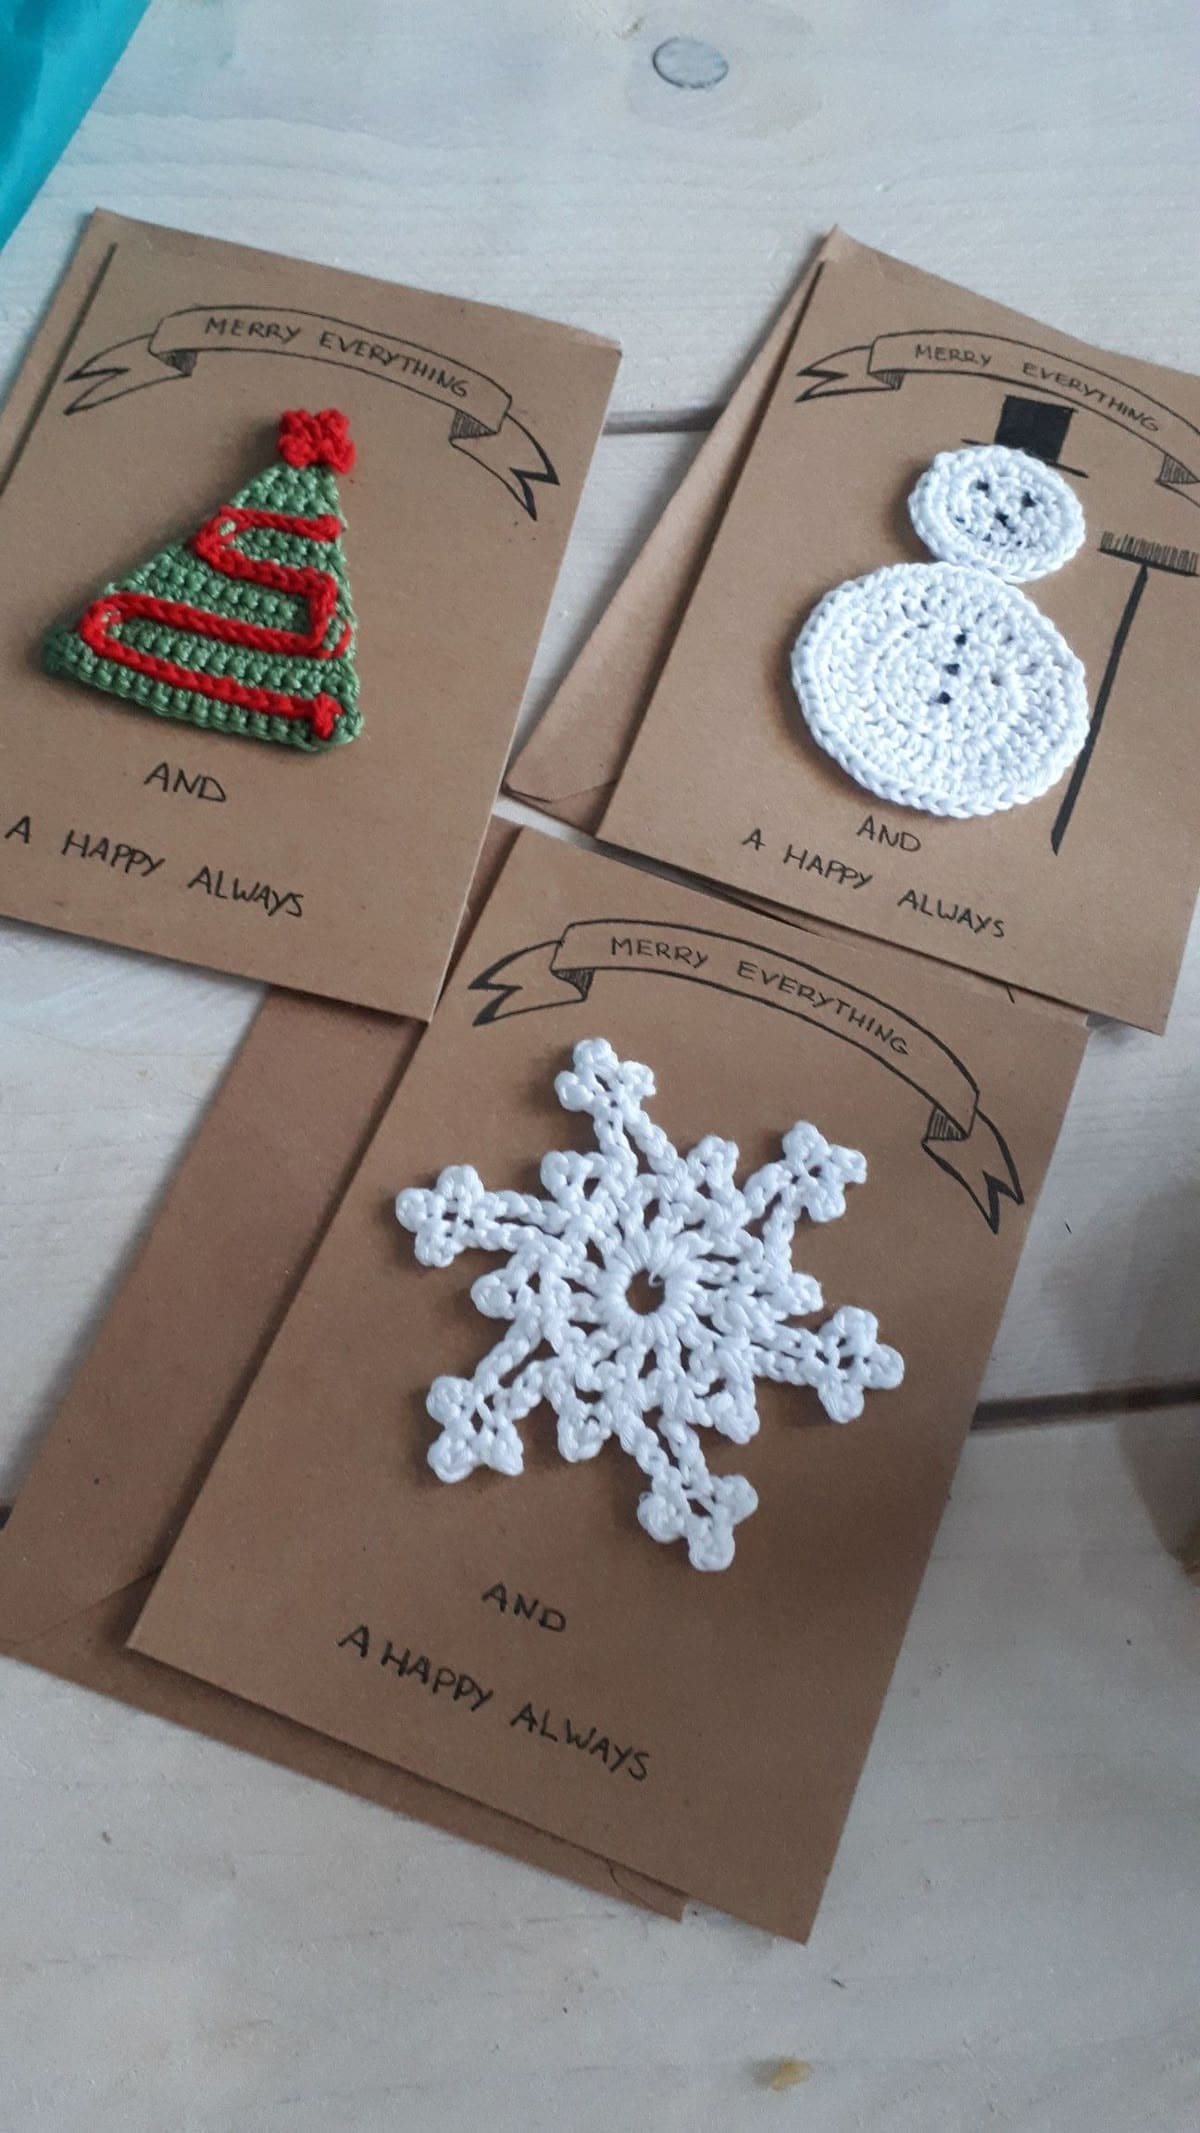
There’s something timeless and heartfelt about yarn-crafted cards, and this trio absolutely captures that spirit. Featuring miniature crocheted motifs, each one feels like a keepsake in itself.
Besides, the kraft cardstock provides a perfect rustic backdrop, letting the textured yarn pop with warmth and charm.
These are wonderful for crafters who love working with fiber and want their greetings to feel handmade down to the last stitch.
Materials Needed
- Kraft paper card bases (5″x7″)
- Crochet thread or cotton yarn in white, green, and red
- Crochet hook (1.5mm-2mm)
- Fabric glue
- Black pen
Step-by-step Guide
Step 1: Choose or create mini crochet appliqués like a star, tree, snowflake, or snowman keeping them under 3.5″ tall.
Step 2: Center each motif on the card and attach with strong glue.
Step 3: Handwrite a warm holiday message like “Merry Everything” or “And a Happy Always” to give it that personal touch.
#23. Colorful String Lights Card
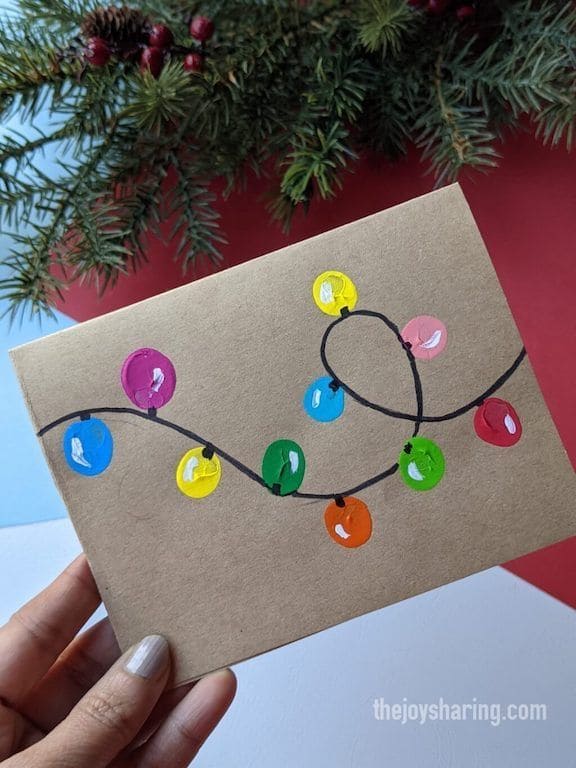
This card is bursting with holiday cheer, a hand-painted strand of bright, glossy Christmas lights dances across kraft paper like twinkling joy.
The mix of vivid colors (pink, green, yellow, blue, red, and more) pops against the rustic background, giving it a playful, modern look.
Also, it’s simple, festive, and feels like a little celebration in every brushstroke. Perfect for kids to make or for anyone who wants to add a pop of color to their greetings.
Materials Needed
- Kraft cardstock
- Acrylic paint (variety of bright colors)
- Black permanent marker
- White gel pen
- Paintbrushes
Step-by-step Guide
Step 1: Lightly sketch the curving light string with pencil if needed, then go over it with black marker or paint.
Step 2: Use round paintbrushes to add colored bulb shapes along the line, alternate the colors randomly for a fun effect.
Step 3: Once dry, add a tiny white highlight to each bulb for shine.
#24. Striped Straw Christmas Tree Card
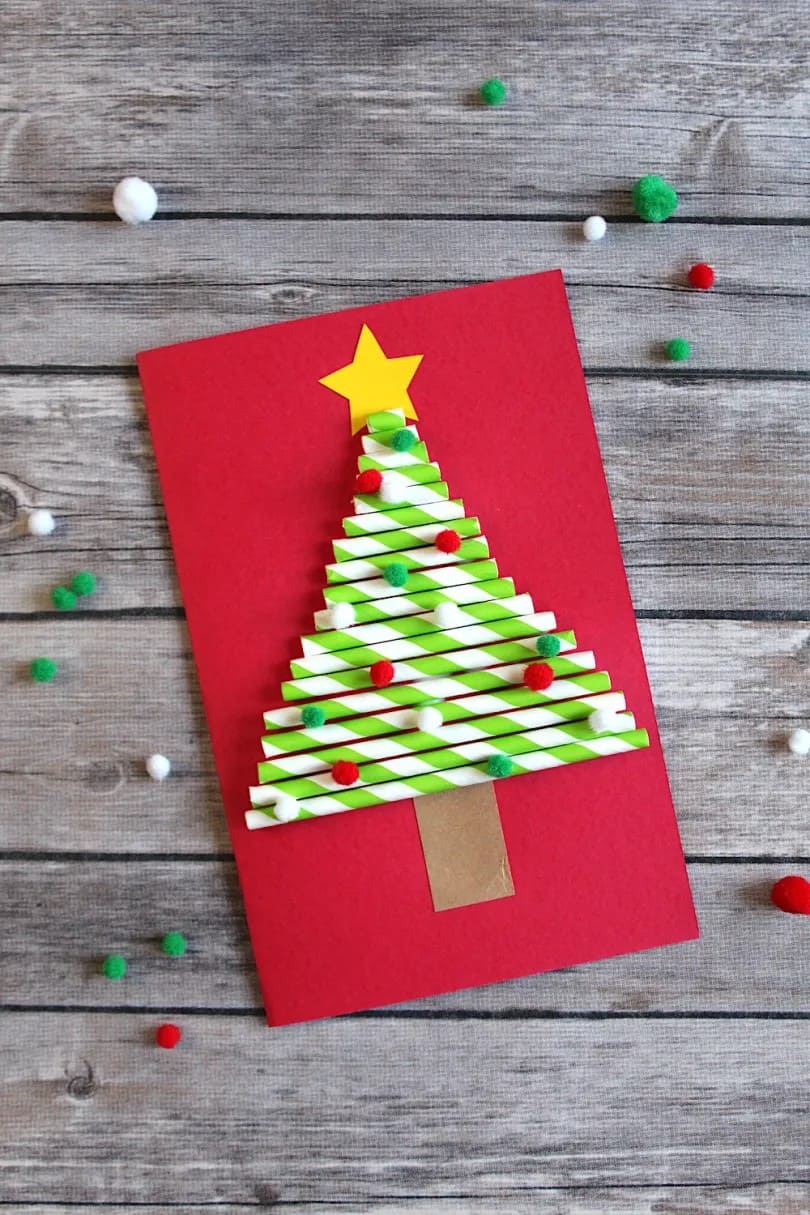
You can see striped green-and-white paper straws are trimmed into neat, descending lengths to form a quirky Christmas tree.
Also, bright pom-poms dot the tree like ornaments, and a big yellow star tops it all off with a classic holiday feel. It’s a fun craft project for all ages, especially perfect for kids who love 3D texture and color.
Materials Needed
- Red cardstock (5″x7″)
- 6-8 green-and-white striped paper straws
- Mini craft pom-poms (red, green, white)
- Yellow construction paper
- Brown paper
- Scissors and glue
Step-by-step Guide
Step 1: Cut straws into strips that gradually shorten in length (about ½” difference per level) to form a triangular tree shape.
Step 2: Glue the longest piece at the bottom center of the card and stack upward with smaller pieces to create the tree.
Step 3: Add a brown paper trunk and top the tree with a yellow star cutout.
Step 4: Finally, glue on colorful pom-poms like ornaments for a whimsical finish.
#25. Pompom Wreath Christmas Card
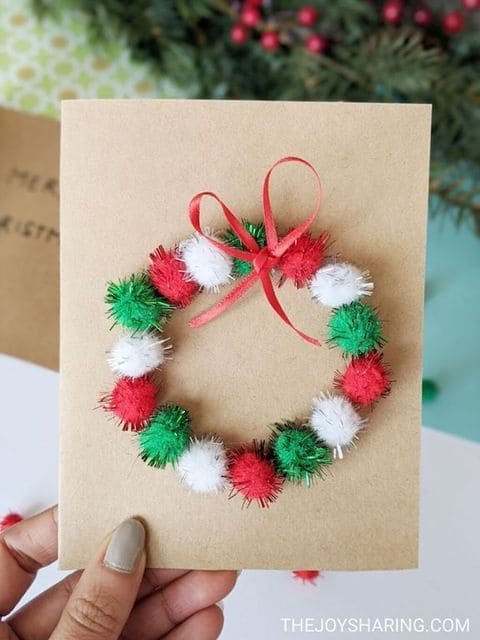
This cheerful little card brings all the cozy holiday vibes with a playful wreath made of mini pom-poms.
Specially, bright red, snowy white, and festive green textures pop right off the kraft paper background, making it look like something out of a holiday bakery window.
Materials Needed
- Kraft cardstock
- Mini pom-poms (red, white, green)
- Red ribbon (1/8 inch width)
- Craft glue
- Small round object
Step-by-step Guide
Step 1: Lightly trace a circle onto the front of the card to guide your wreath shape.
Step 2: Start gluing pom-poms along the traced line, alternating colors evenly around the circle.
Step 3: Tie a small red bow and glue it at the top or bottom of the wreath for a sweet finishing touch.
See also: 22 Creative and Cozy DIY Advent Calendars for a Heartfelt Christmas Countdown
