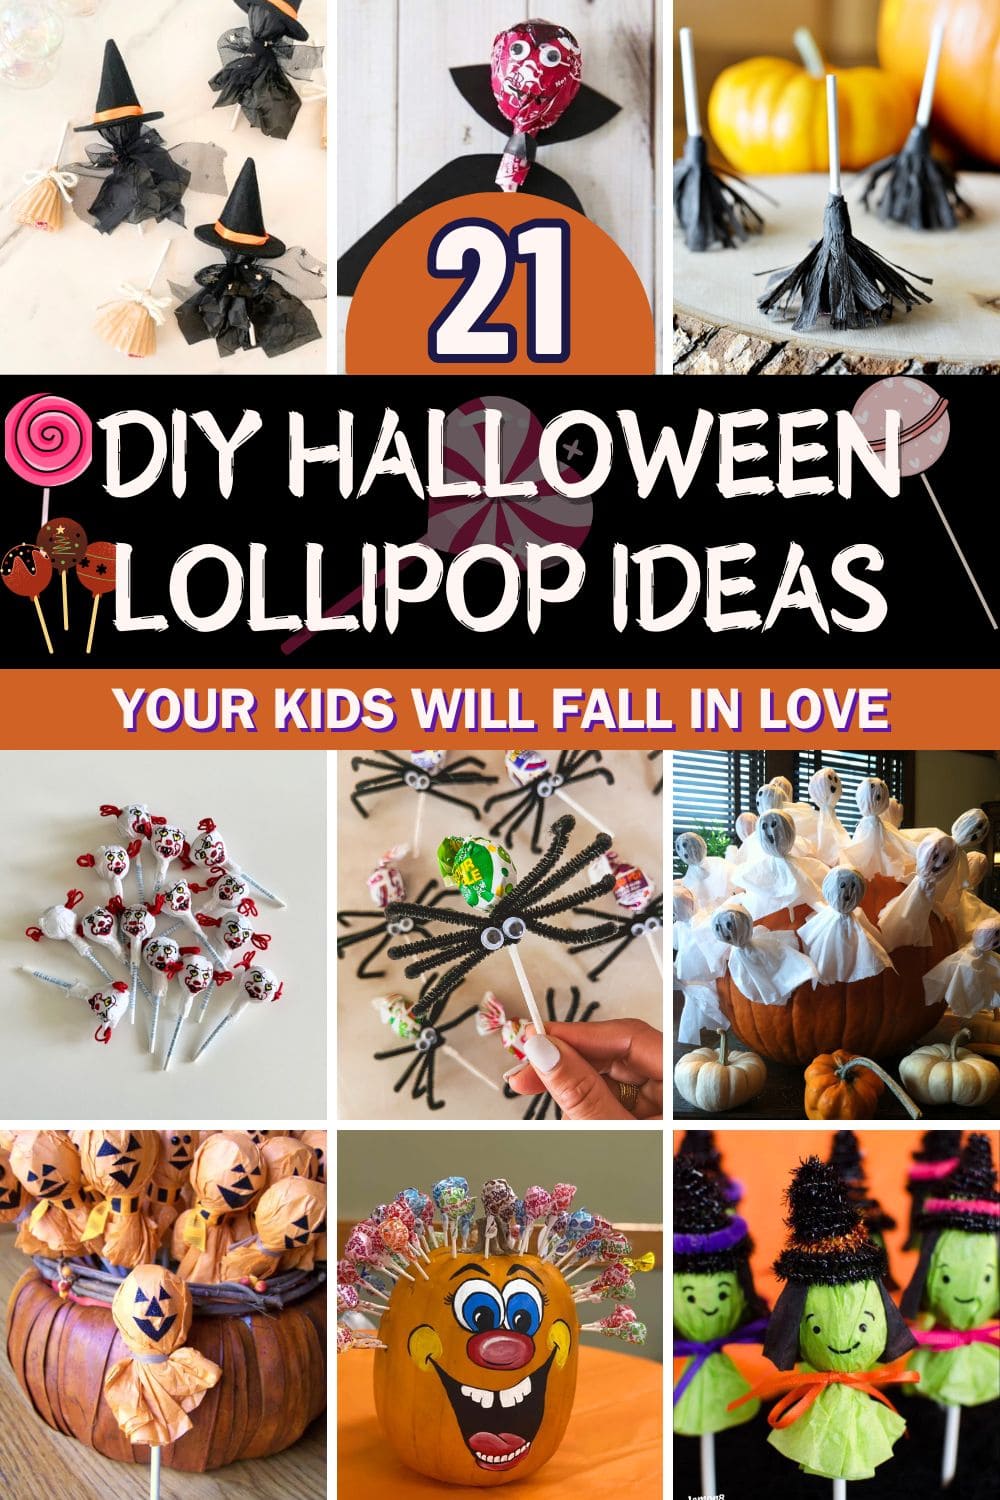
Lollipops have bright colors, shiny wrappers, and instant rush of sweetness the moment it touches your tongue. So why don’t we make these simple candies become little works of art?
With just a few playful touches, a plain pop can transform into a googly-eyed monster, a grinning jack-o’-lantern, or even a spooky ghost. They’re the kind of treats that make trick-or-treat bags extra special and dessert tables impossible to resist.
Whether you’re planning a classroom party, handing out candy to eager trick-or-treaters, or simply looking for a fun weekend project, these creative Halloween lollipop ideas will make every bite delightful.
#1. Goofy Pumpkin Lollipop Holder
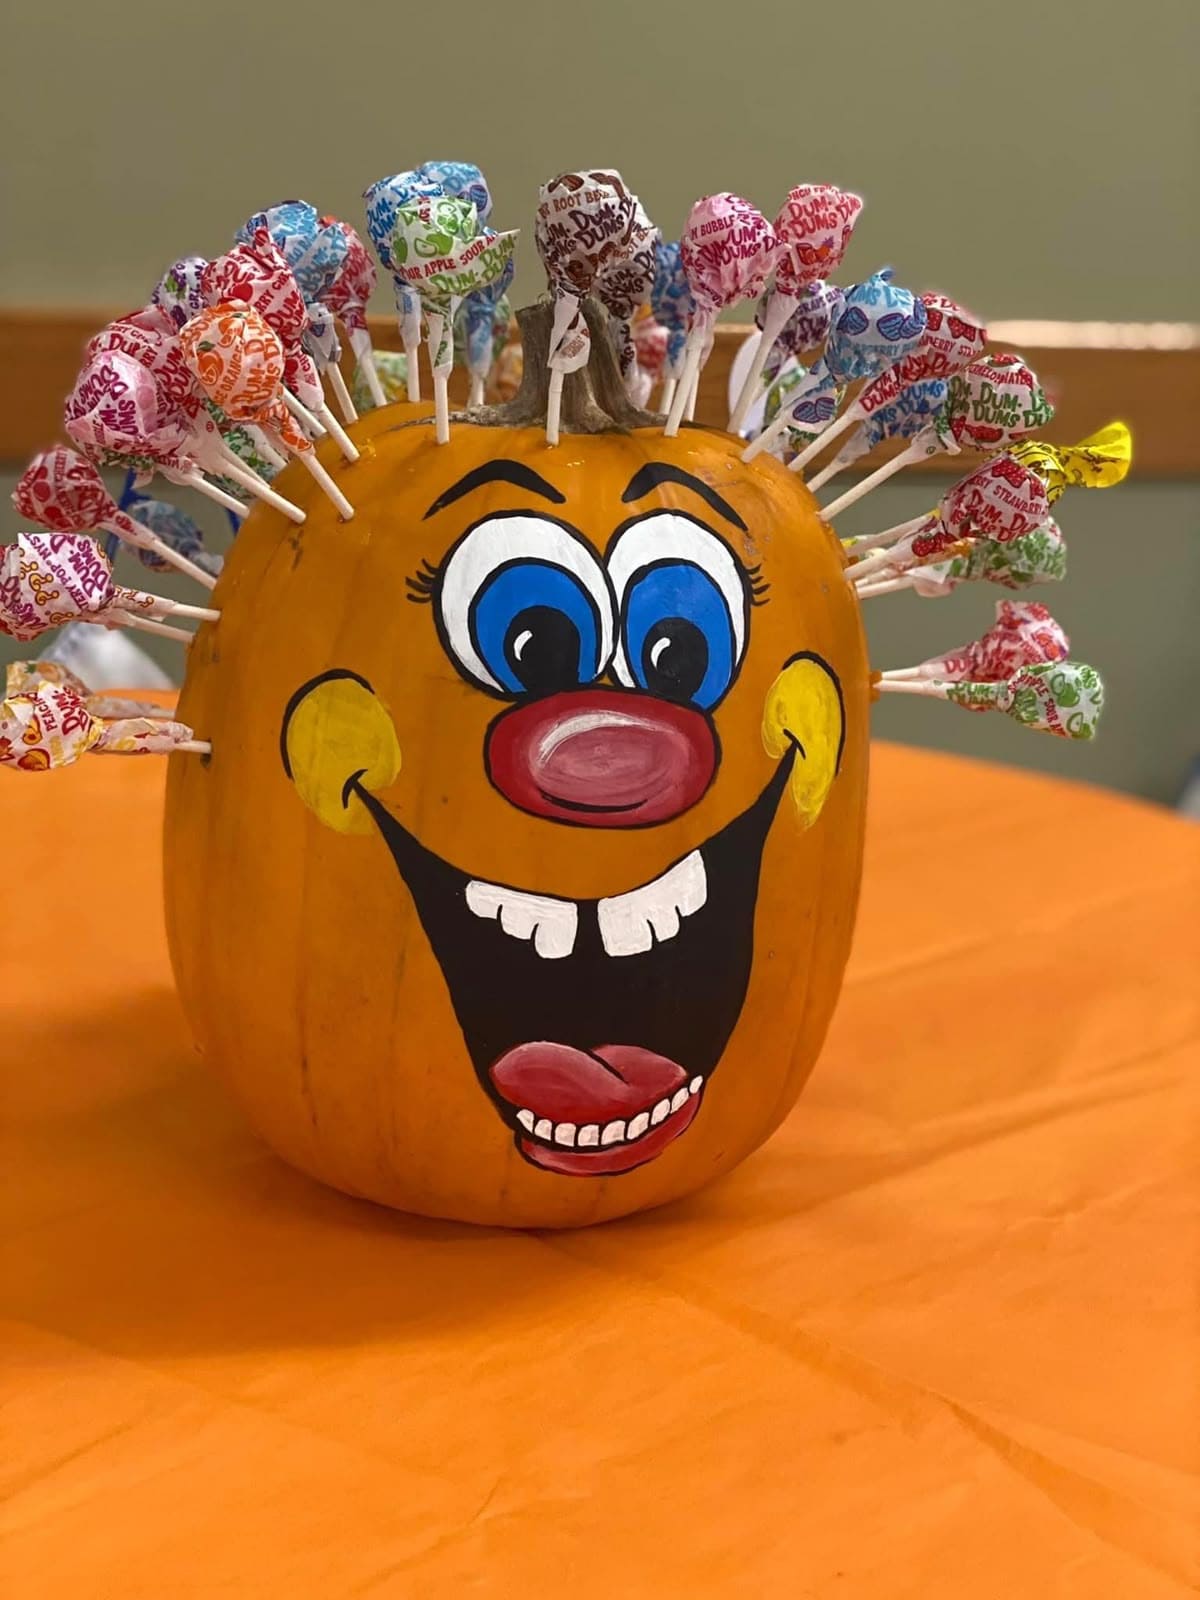
Wow, this cheerful pumpkin is here to make candy time even more fun. Imagine a goofy grin painted across its face, with a wild hairdo made entirely from colorful lollipops.
Every guest who spots it will want to grab a treat, and you’ll secretly love watching them smile.
Moreover, you can whip this up in less than an hour, so even last-minute party planners can pull it off without stress.
Materials Needed
- 1 medium pumpkin (about 10-12 inches tall)
- 25-30 lollipops (standard size)
- Acrylic paint set (white, black, blue, red, yellow)
- Paintbrushes (fine tip and medium)
- Marker or pencil
- Craft knife or awl
Step-by-step Guide
Step 1: Give the pumpkin a quick wipe so paint sticks nicely. Then with a pencil or marker, sketch a big, silly grin and wide cartoon eyes.
Step 2: Start painting the bigger areas first (think orange cheeks, white eyes), then add details like black outlines, teeth, or even a cheeky tongue.
Step 3: Let the paint dry. Using a craft knife or awl, make small holes around the pumpkin’s top and sides.
Step 4: Push each lollipop stick into the holes. And now you can set it out where guests will see it first.
#2. Jack-O’-Lantern Lollipop Treats
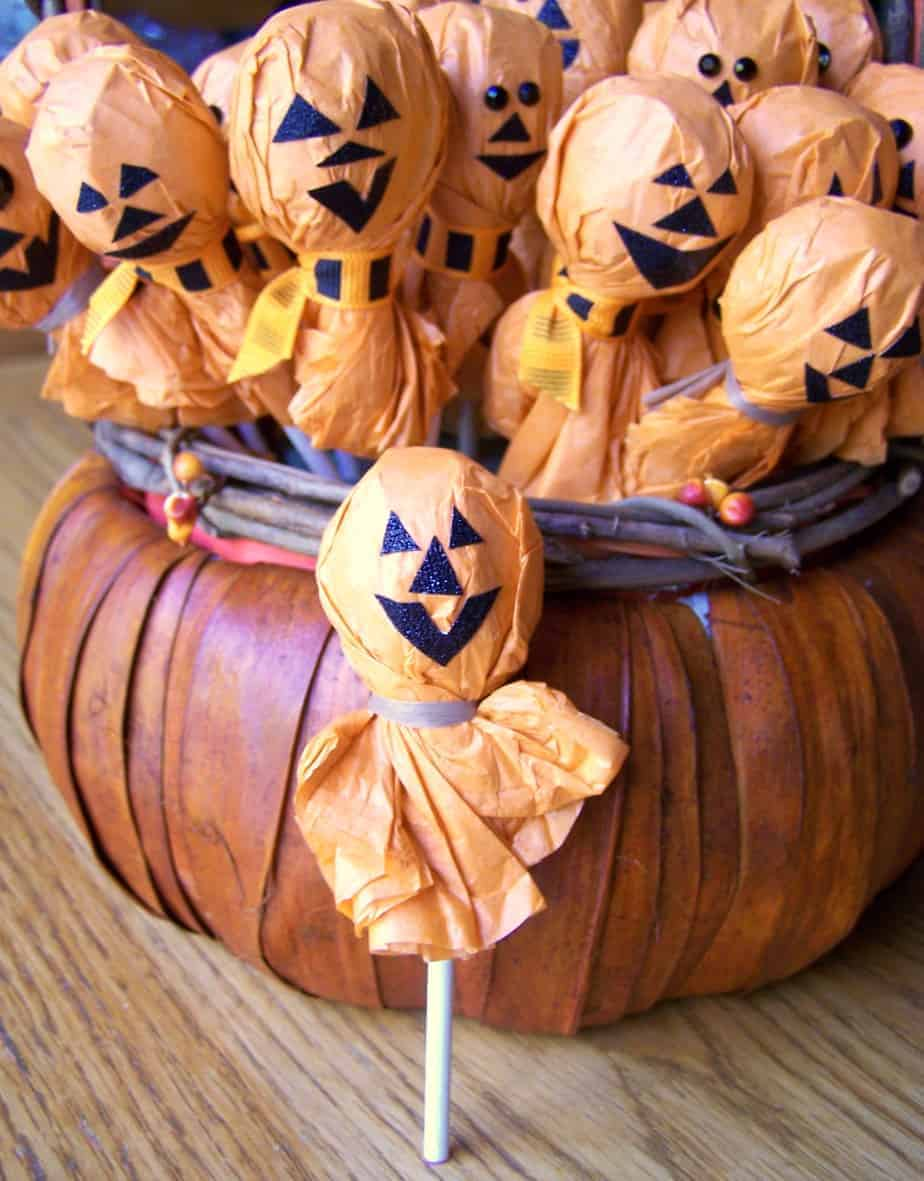
These little Jack-O’-Lantern lollipops are the kind of Halloween craft that makes you smile while you make them. They’re sweet, silly, and almost too cute to eat.
Bonus, the charm lies in how simple they are to create, yet how festive they look gathered in a bunch, ready for trick-or-treaters or as a centerpiece for your candy table.
With a bit of tissue paper, some glue, and your favorite lollipops, you can whip up a whole pumpkin patch in less than an hour.
Materials Needed
- 12-15 round lollipops
- 12-15 squares of orange tissue paper (15 cm x 15 cm each)
- Black adhesive foam or paper (A5 sheet)
- Scissors
- Glue stick or craft glue
- Small rubber bands (12-15 pieces)
- Thin black ribbon (about 60 cm, cut into 12-15 short lengths)
Step-by-step Guide
Step 1: Lay an orange tissue square flat and place a lollipop in the center with the candy part facing down.
Step 2: Wrap the tissue gently around the candy, gathering it at the base. Then smooth out wrinkles with your fingers, it doesn’t need to be perfect; a little crinkle gives character.
Step 3: Secure the gathered tissue at the stick’s base with a small rubber band. Next, tug it snug so the pumpkin shape holds.
Step 4: Cut out small triangles and a smiling mouth from your black foam or paper. You can think goofy, spooky, or classic.
Step 5: Glue the face pieces onto the tissue. Let them set for a minute so nothing slides.
Step 6: Tie a short length of black ribbon over the rubber band for a polished finish. Then arrange them in a bowl, basket, or foam block to create your mini pumpkin patch.
#3. Creepy-Cute Spider Lollipops
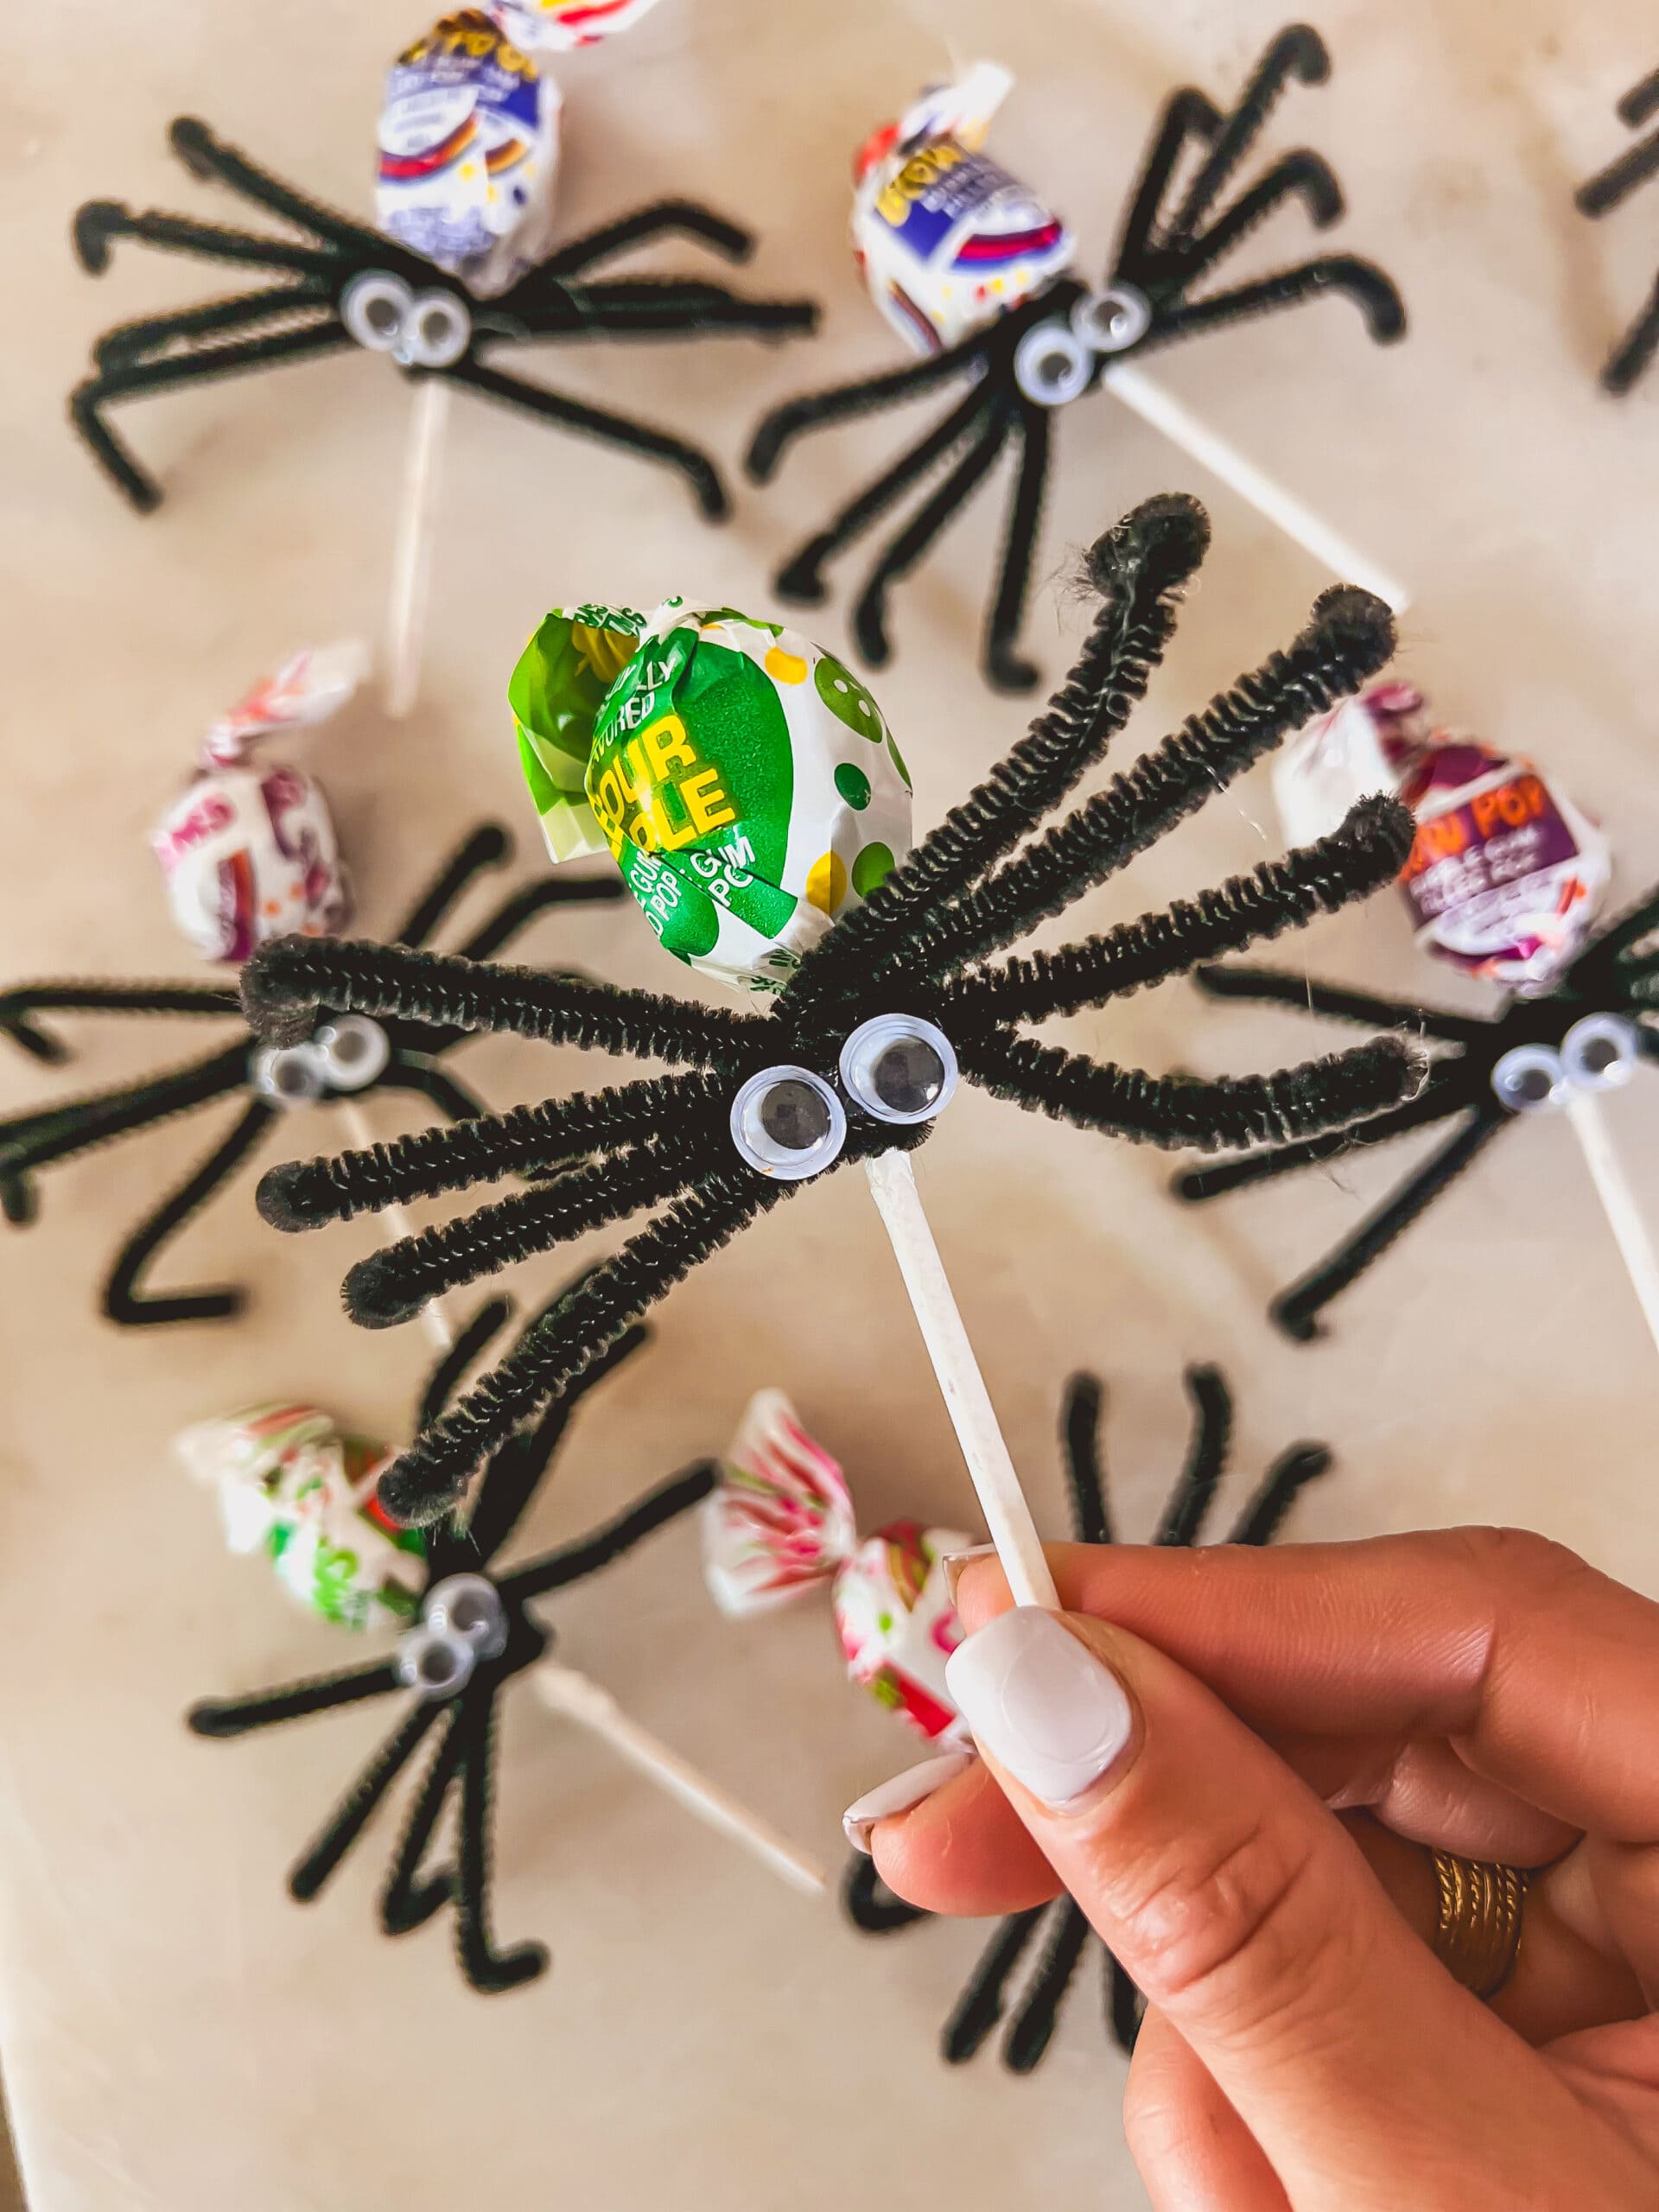
It’s almost impossible not to smile when you see these eight-legged treats scuttling across the table. They look spooky enough to thrill the kids, yet charming enough to win over the grown-ups.
The magic lies in transforming a simple lollipop into a playful Halloween character with just a few craft supplies.
I bet you’ll love how quickly they come together, making them perfect for last-minute party favors or trick-or-treat surprises.
Materials Needed
- 1 lollipop (standard size, about 1″ candy head)
- 4 black pipe cleaners (12″ each)
- 2 small googly eyes (0.4″ diameter)
- Hot glue gun with glue sticks
- Scissors
Step-by-step Guide
Step 1: Place your lollipop face-up on a flat surface. Take one pipe cleaner and wrap it tightly around the stick just below the candy head, centering it so both ends are equal.
Step 2: Repeat with the remaining pipe cleaners, spacing them evenly so you have eight legs.
Step 3: Bend each leg outward, then create small upward curves at the ends for a spider-like shape.
Step 4: Use a small dab of hot glue to attach two googly eyes to the front, just under the candy head.
Step 5: Let the glue cool before handling. Then arrange your spiders on a platter or pop them into treat bags.
#4. Boo-tiful Ghost Lollipops
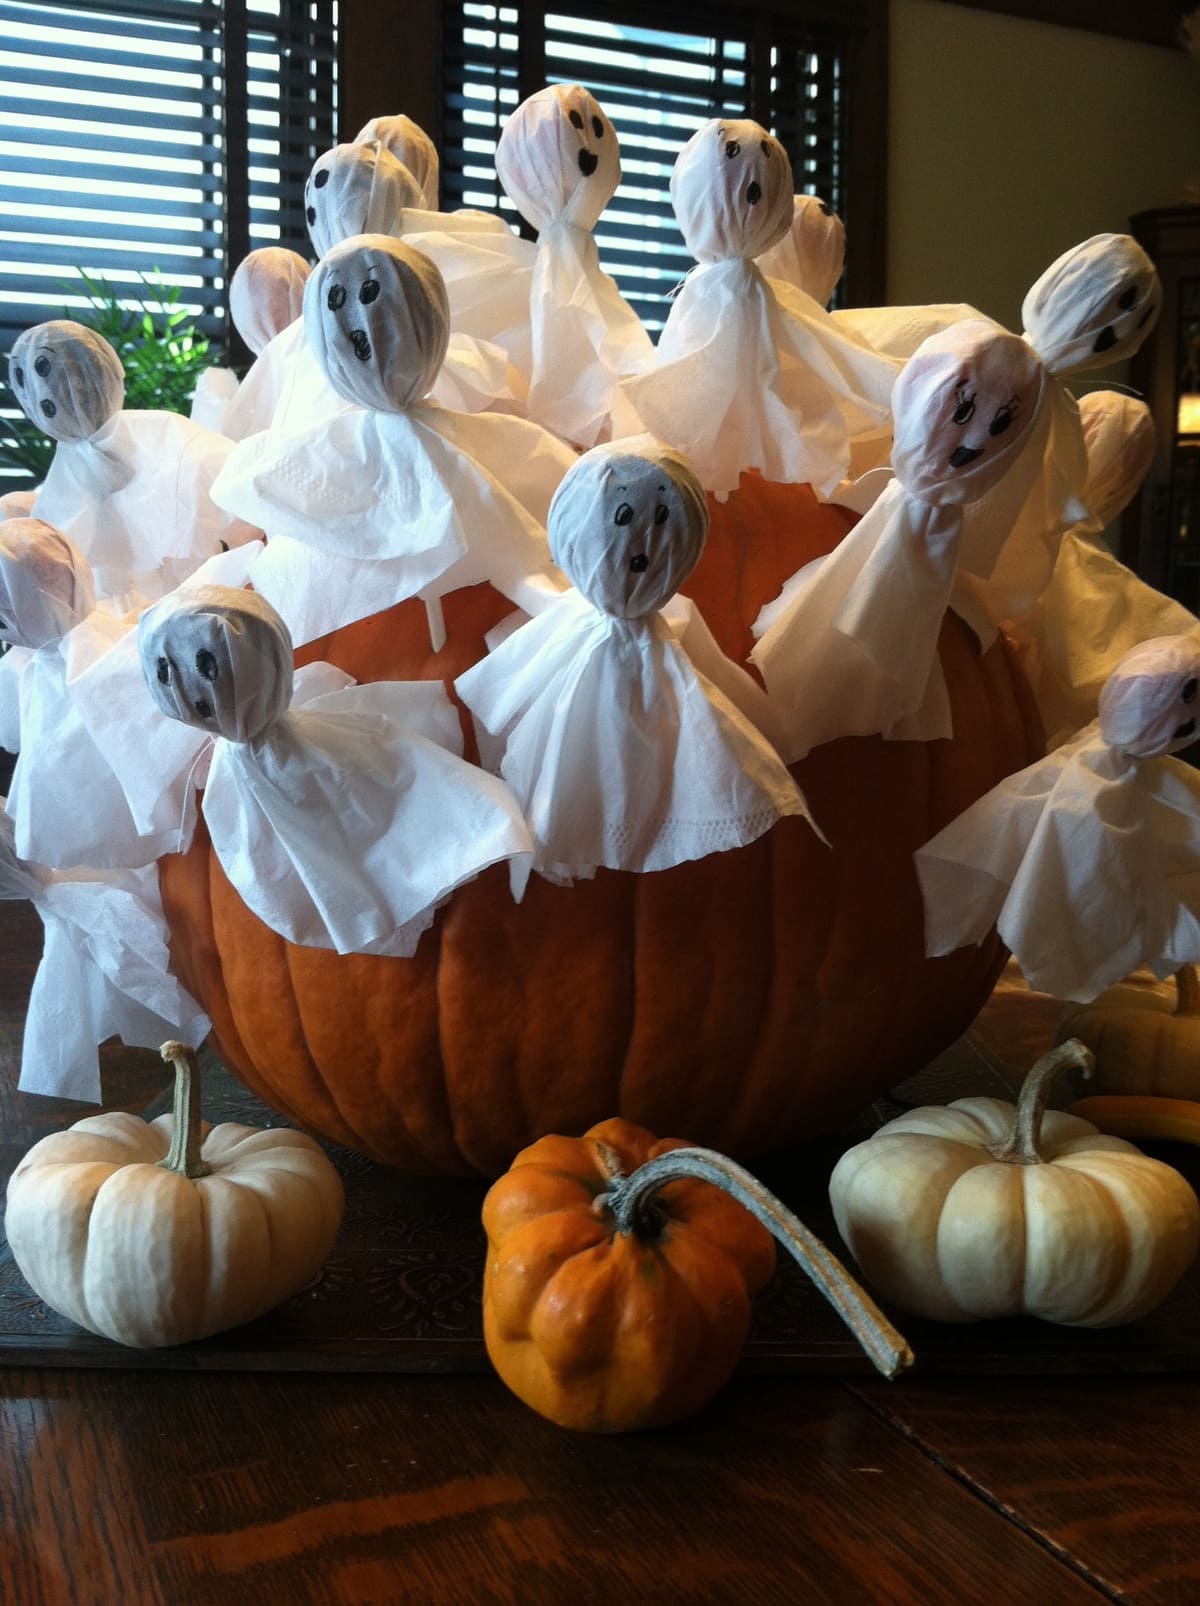
You can see these little spirits are all treat and no trick! Draped in flowing white robes, they float charmingly above a pumpkin patch or candy bowl.
Making them is as simple as wrapping, tying, and adding a spooky face but the effect is pure Halloween magic. They’re perfect for handing out to trick-or-treaters, decorating a party table, or surprising friends at school.
With each one, you’re creating a tiny character that’s part sweet, part spooky, and completely adorable.
Materials Needed
- 1 lollipop (1″ candy head)
- 1 white tissue or napkin (10″×10″)
- 1 small rubber band or twist tie
- Black marker (fine tip)
- Optional: orange ribbon (12″ length, 0.25″ wide)
Step-by-step Guide
Step 1: Lay the tissue flat, placing the lollipop in the center so the candy head is under the middle of the sheet.
Step 2: Wrap the tissue down over the lollipop head, smoothing it gently to form a flowing ghost body.
Step 3: Secure the tissue at the base of the candy head with a rubber band or twist tie.
Step 4: Use a black marker to draw round eyes and a small open mouth for that classic ghost look.
Step 5: Optional, you can tie an orange ribbon over the rubber band for a festive touch.
#5. Friendly Witch Lollipops
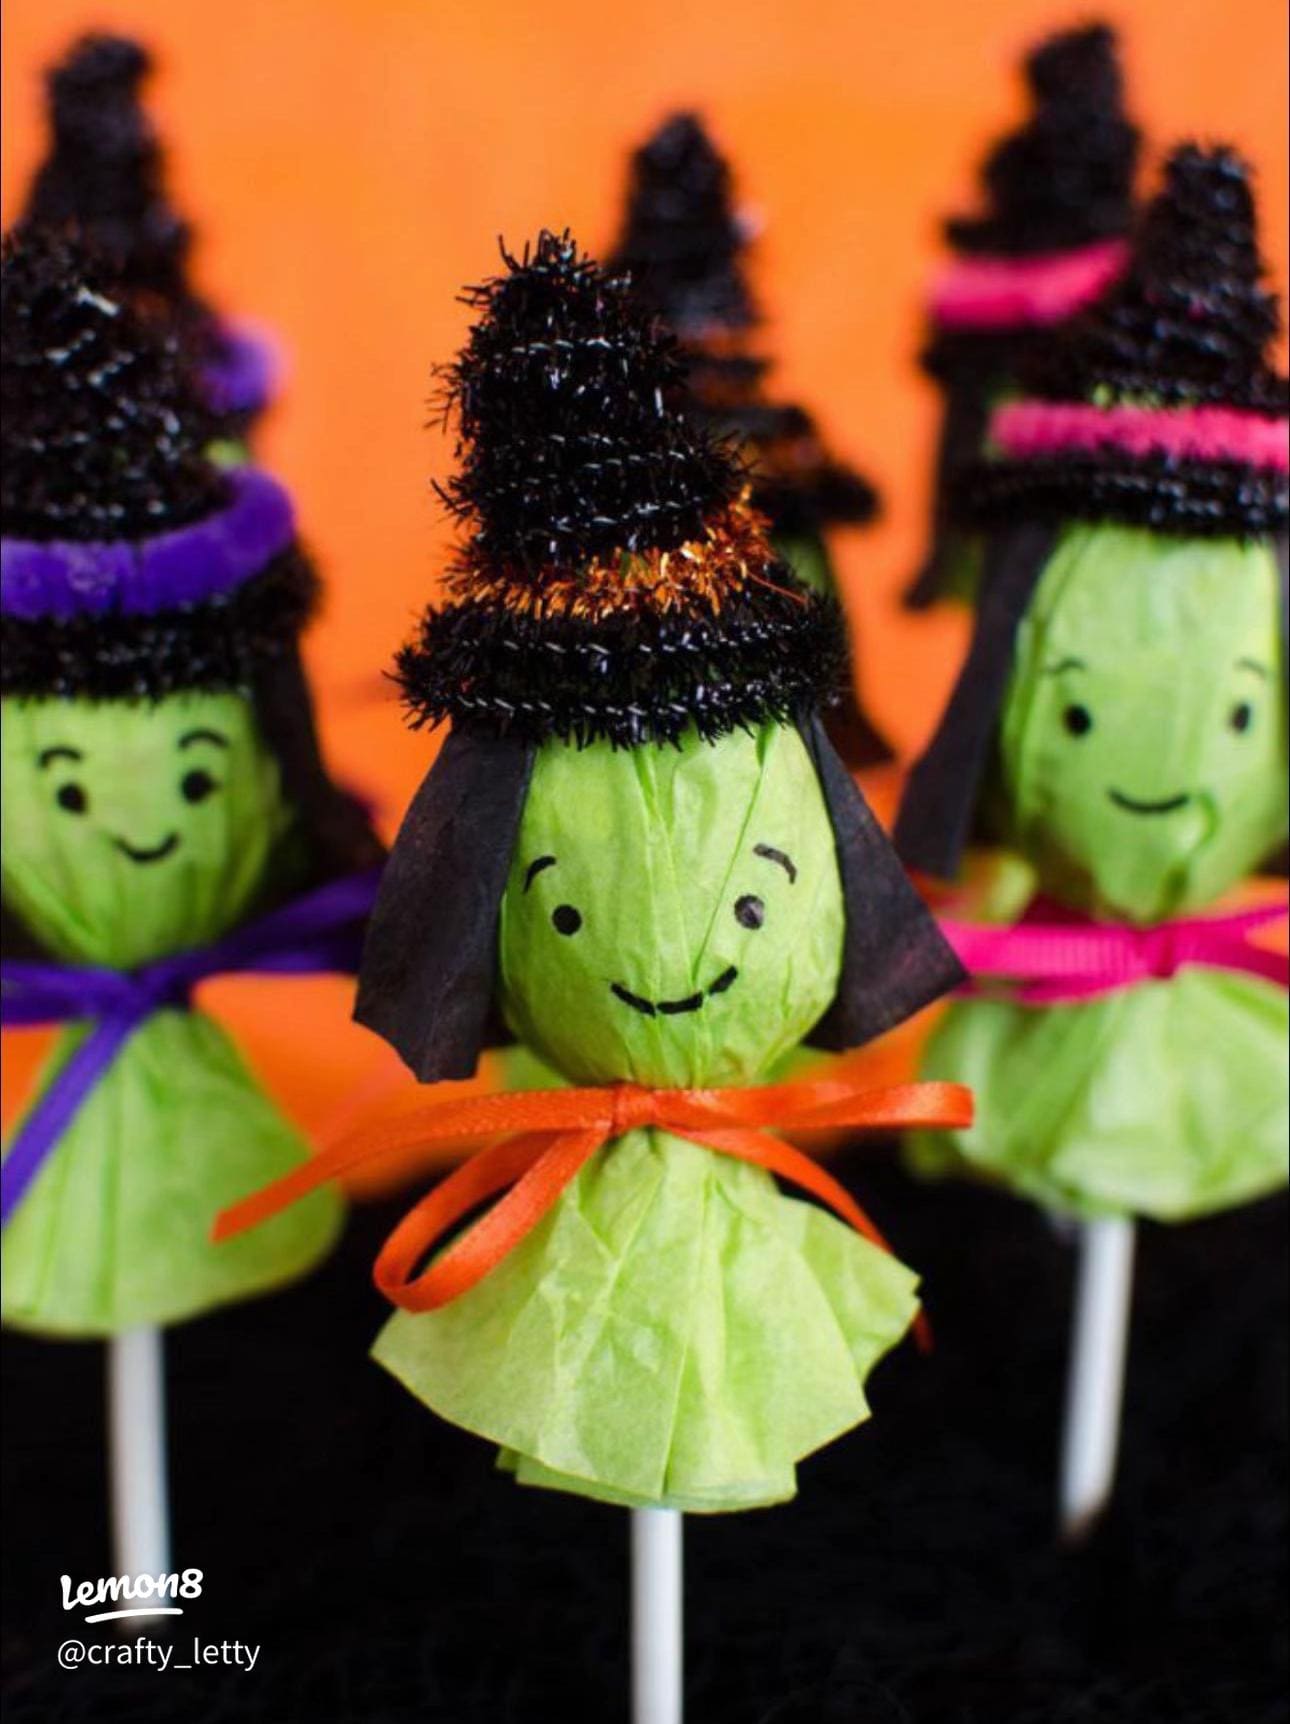
Not all witches are wicked as some are downright sweet! These charming green-faced lollipops bring a burst of color and a sprinkle of whimsy to your Halloween candy table.
With their sparkly hats, ribbon bows, and cheerful smiles, they’re guaranteed to win hearts instead of casting spells.
This is a craft you can enjoy making with kids, as each witch can have her own personality, from a sassy smirk to a mischievous grin.
Materials Needed
- 1 lollipop (1″ candy head)
- 1 sheet green tissue paper (10″×10″)
- 2 small black paper rectangles (1.5″×3″ for hair)
- 1 mini witch hat (store-bought or DIY, about 2″ tall)
- 1 colored ribbon (12″ length, 0.25″ wide)
- Black marker
- Scissors
- Glue stick or craft glue
Step-by-step Guide
Step 1: Wrap the lollipop candy head with green tissue paper, letting the paper fall smoothly down to form the “robe.”
Step 2: Tie the ribbon around the stick just under the candy head, creating a neat bow.
Step 3: Glue the black paper rectangles to the sides of the head for hair.
Step 4: Place the mini witch hat on top and secure with glue if needed. Then draw two eyes, a nose, and a friendly smile with the black marker.
#6. Witch’s Broom Lollipops
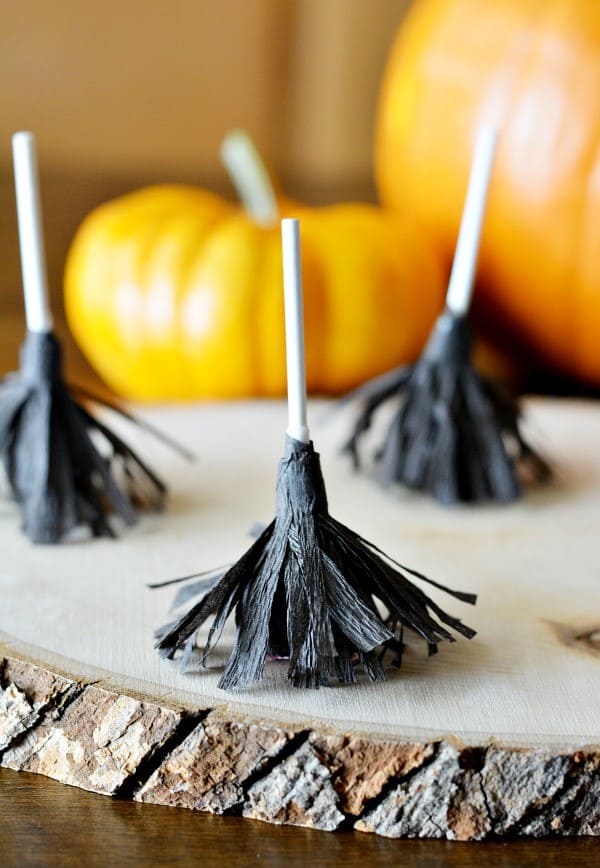
Every witch needs her broom and now your Halloween candy table can have them too! These mini broomstick lollipops are simple to make but look like they came straight out of a magical potion shop.
The shredded paper fringe gives them that perfect swept through the midnight sky look, while the hidden candy makes them a sweet surprise for anyone who picks one up.
Materials Needed
- 1 lollipop (1″ candy head)
- 1 strip black crepe paper (3″×12″)
- 1 small piece of tape
- Scissors
Step-by-step Guide
Step 1: Lay your strip of crepe paper flat, then cut tiny fringe slits along one long edge, stopping about 1 inch from the top so it stays connected.
Step 2: Place the candy head of the lollipop at one end of the paper strip and start wrapping, keeping the fringed edge pointing downward.
Step 3: Secure the top with tape or a glue dot so the paper stays in place.
Step 4: Gently fluff out the fringe with your fingers to make the broom look full and worn-in like it’s ready for a Halloween flight.
#7. Red Vampire Lollipops
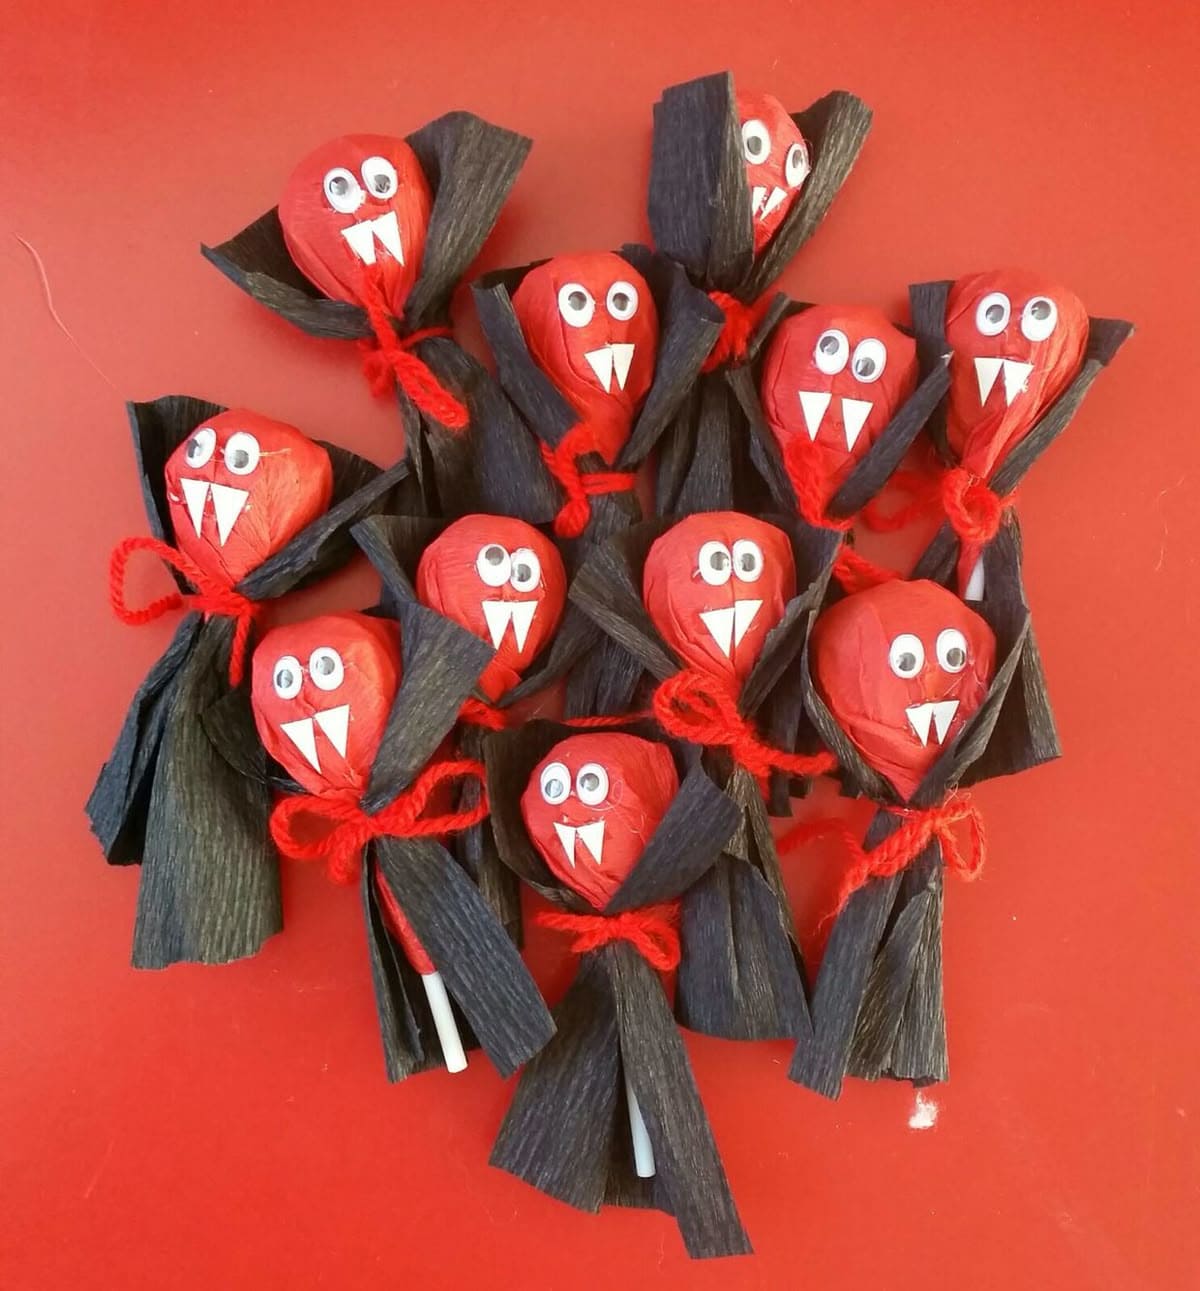
Look at these red-wrapped vampire lollipops! They are just the right mix of spooky and playful. Their sharp paper fangs and flowing black capes make them look like they’ve flown straight out of a Halloween story.
They’re perfect for handing out at school parties, Halloween night, or even using as a creepy-cute table centerpiece.
Materials Needed
- 1 lollipop (red wrapper, 1″ candy head)
- 1 strip black crepe paper (3″×12″)
- 1 piece red yarn or ribbon (12″ length)
- 2 small googly eyes (0.4″ diameter)
- 1 small piece of white cardstock
- Scissors
- Glue stick or craft glue
Step-by-step Guide
Step 1: Wrap the black crepe paper around the lollipop stick just under the candy head, letting it fan out like a cape.
Step 2: Tie the red yarn snugly at the neck and make a small bow for extra detail.
Step 3: Cut two small triangles from white cardstock to create fangs, then glue them onto the red wrapper.
Step 4: Add two googly eyes above the fangs, pressing gently so they stick well.
Step 5: Let the glue dry fully before arranging them together, these vampires look best in a group, ready for a Halloween night hunt!
#8. Pennywise Clown Lollipops
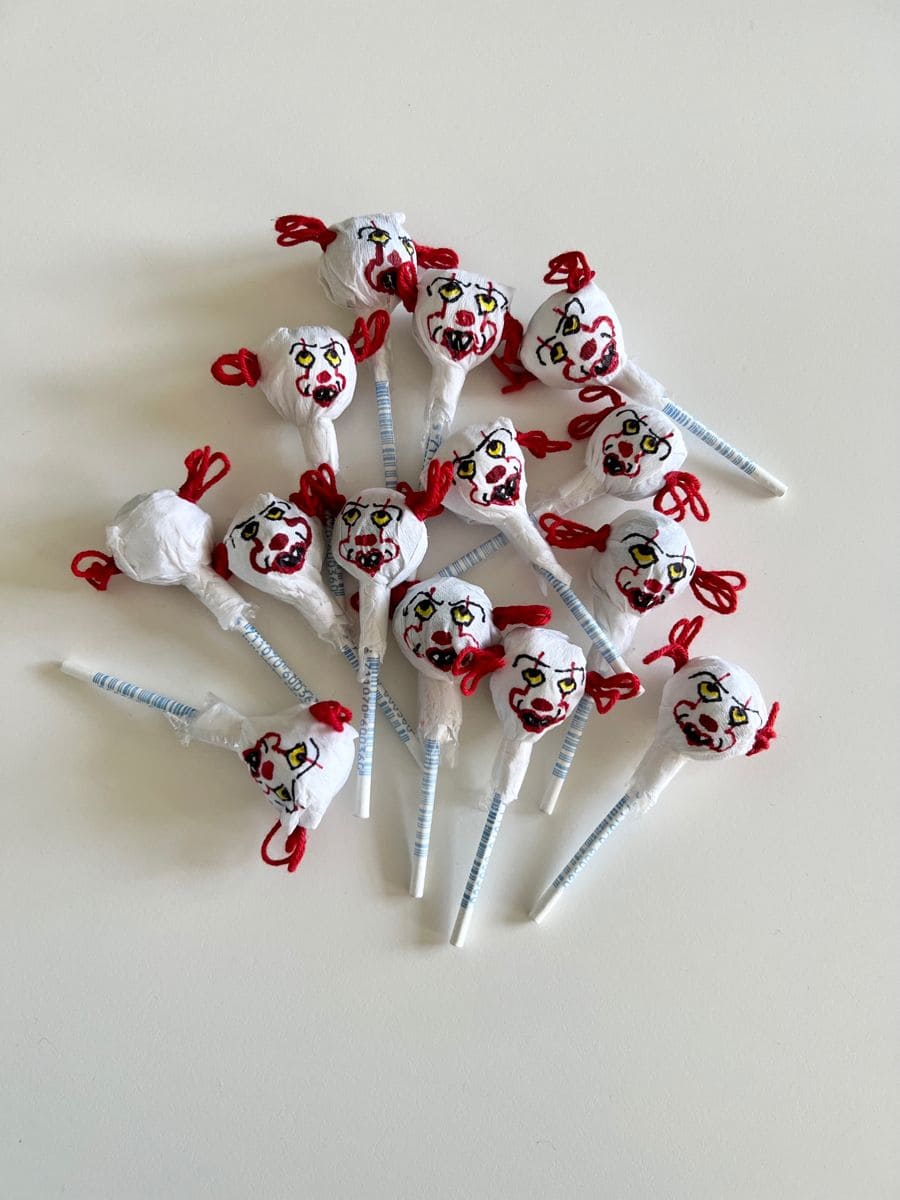
For a Halloween treat with a little fright factor, these Pennywise clown lollipops hit the mark.
Wrapped in white with hand-drawn creepy faces and fiery red yarn hair, they’re perfect for horror-themed parties or for scaring (and delighting) trick-or-treaters.
The best part is that each one turns out a bit different, giving you a whole crew of unsettling little clowns.
Materials Needed
- 1 lollipop (1″ candy head)
- 1 piece white tissue or fabric (10″×10″)
- Red yarn (two 2″ pieces)
- Black and red permanent markers
- Small rubber band or twist tie
- Scissors
Step-by-step Guide
Step 1: Place the lollipop in the center of the white tissue and wrap it down over the candy head so it’s smooth.
Step 2: Secure the tissue at the base of the candy head with a rubber band or twist tie.
Step 3: Tie a piece of red yarn on each side of the head to make Pennywise’s signature tufts of hair.
Step 4: Use the black and red markers to carefully draw the clown’s face, don’t forget the arched eyebrows, sharp smile, and red lines that run through the eyes.
Step 5: Let the ink dry before handling. Arrange your creepy clowns in a bowl for maximum impact.
#9. Frankenstein & Bride Lollipops
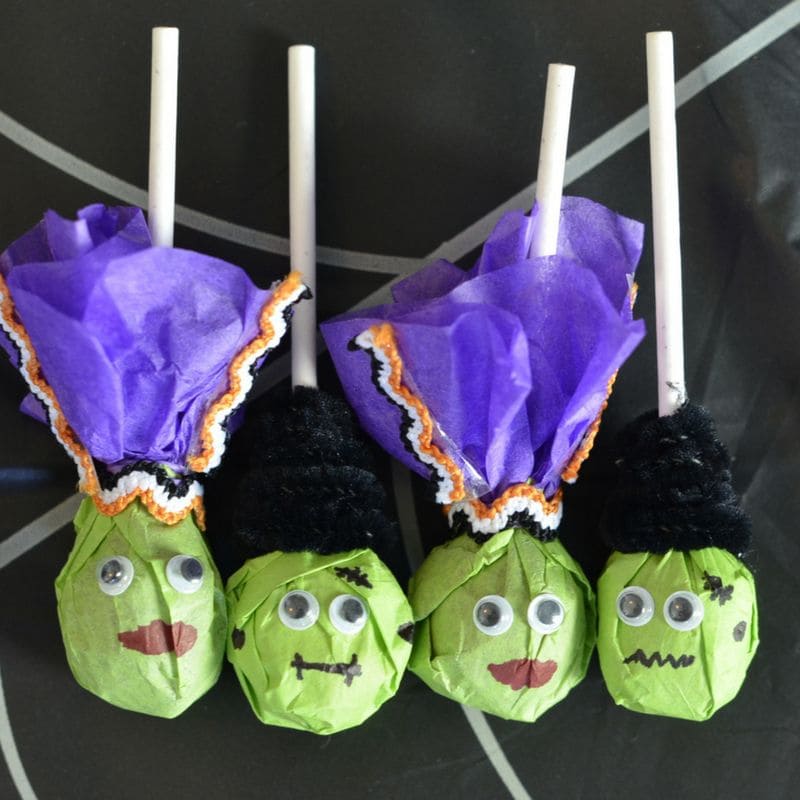
These adorable Frankenstein and Bride lollipops are a cute twist on classic Halloween monsters.
With green skin, googly eyes, and little stitched details, they’re instantly recognizable but not too scary, perfect for kids’ parties or classroom treats.
Also, the purple veil for the bride and fuzzy black hair for Frankenstein make them even more fun to create.
Materials Needed
- 1 lollipop (1″ candy head)
- 1 piece green tissue paper (10″×10″)
- 1 small piece black pipe cleaner (6″ for hair)
- 1 square purple tissue (6″×6″)
- 2 small googly eyes (0.4″ diameter)
- Black and red permanent markers
- Small rubber band
- Scissors
Step-by-step Guide
Step 1: Wrap the green tissue around the candy head of the lollipop and secure it underneath with a rubber band.
Step 2: For Frankenstein’s hair, twist the black pipe cleaner around the base of the candy head so it sits like thick, messy hair. For the bride, attach the purple tissue veil under the rubber band, letting it drape down the back.
Step 3: Glue on the googly eyes and let them set.
Step 4: Use the black marker to draw stitches, scars, and mouths. Then add a little red for the bride’s lips if desired.
Step 5: Let everything dry, then line them up as a spooky but sweet couple for your Halloween display.
#10. Hey Boo Ghost Lollipops
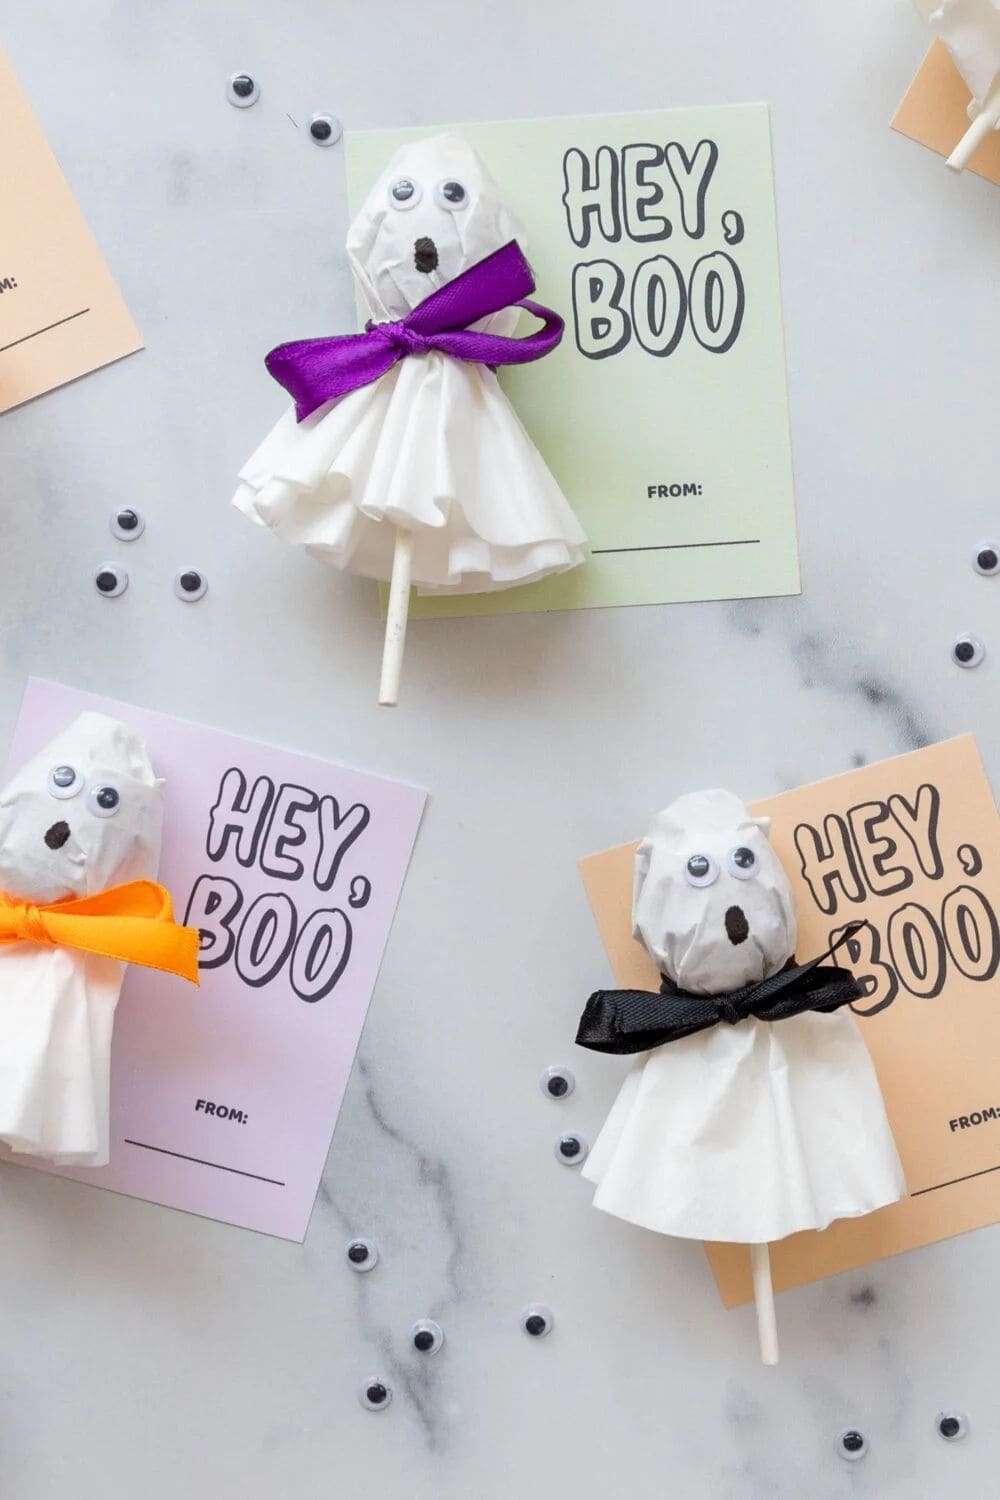
With their bright bows and wide-eyed expressions, these ghost lollipops are perfect for handing out at school, tucking into party favor bags, or pairing with a Halloween greeting card.
They’re simple enough for kids to help make, and you can personalize them with different ribbon colors.
Materials Needed
- 1 lollipop (1″ candy head)
- 1 white tissue or coffee filter (10″×10″)
- 1 small rubber band
- 2 small googly eyes (0.4″ diameter)
- Ribbon (12″ length, assorted colors)
- Black marker
- Halloween card or tag (optional)
- Glue stick or craft glue
Step-by-step Guide
Step 1: Wrap the white tissue around the candy head so it drapes like a ghost’s cloak.
Step 2: Secure the tissue just under the candy head with a rubber band.
Step 3: Tie a ribbon over the rubber band, making a bow in your chosen color.
Step 4: Glue on the googly eyes, then use a black marker to draw a small open mouth.
Step 5: If you’re using cards, tape or slot the stick into place so the ghost sits perfectly on display.
#11. Monster Eyeball Lollipop Bouquets
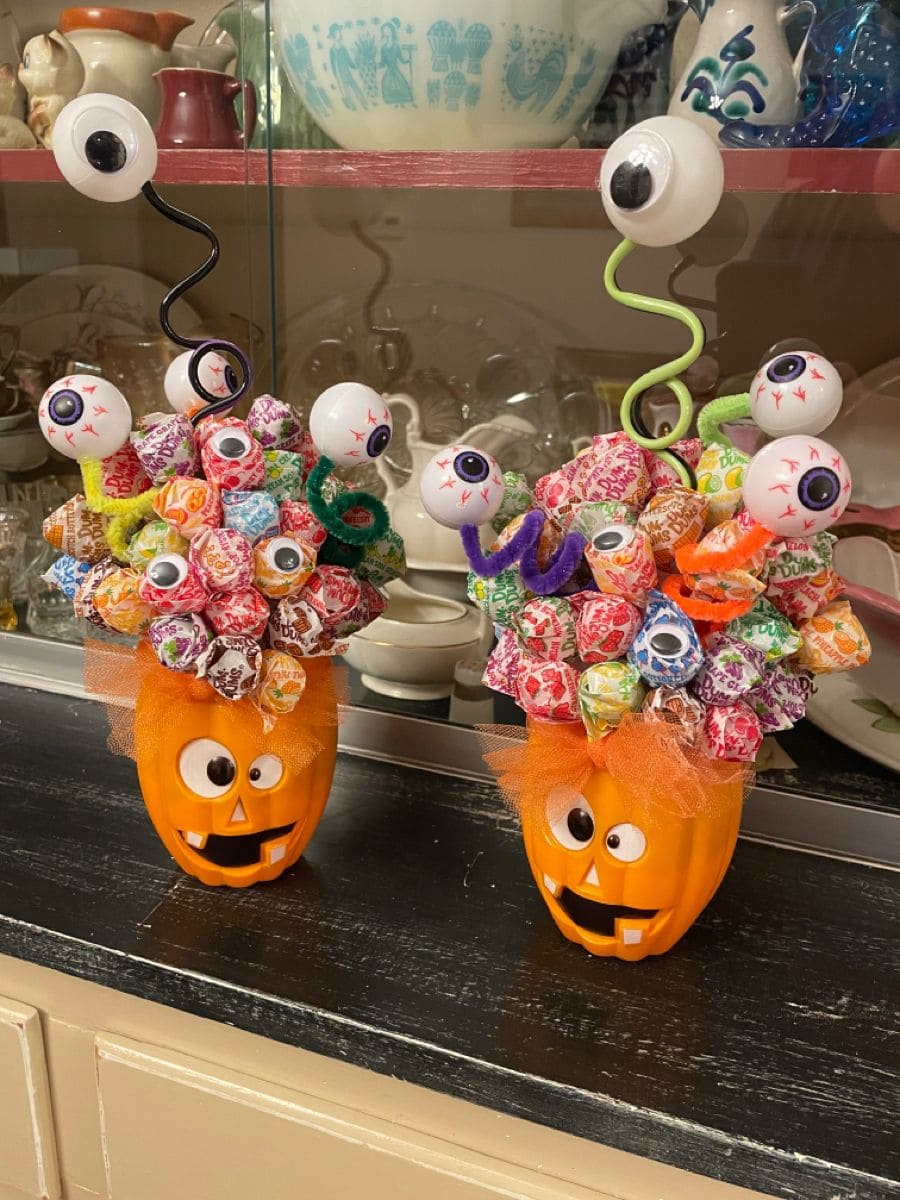
If you want a Halloween candy display that makes everyone stop and stare, these monster eyeball lollipop bouquets are a winner.
Packed with colorful lollipops, wiggly monster eyes, and a goofy pumpkin base, they’re as fun to look at as they are to eat. Perfect for parties, entryway decorations, or even a Halloween dessert table centerpiece.
Materials Needed
- 1 small plastic pumpkin container (about 6″ tall)
- 40-50 assorted lollipops
- Styrofoam ball or foam block
- Assorted plastic eyeballs or ping-pong balls (painted)
- Googly eyes (various sizes)
- Pipe cleaners (assorted colors)
- Hot glue gun and glue sticks
- Orange tulle or tissue
Step-by-step Guide
Step 1: Place the Styrofoam ball or block snugly inside the pumpkin container.
Step 2: Wrap orange tulle around the top edge of the pumpkin so it peeks out like a festive collar.
Step 3: Insert the lollipops one by one into the foam, starting from the center and working outward until the top is full.
Step 4: Add plastic eyeballs by hot-gluing them to the ends of pipe cleaners, then stick them into the foam so they peek over the lollipops.
Step 5: Finish by gluing googly eyes randomly on some lollipops for extra monster charm.
#12. Halloween Lollipop Tree
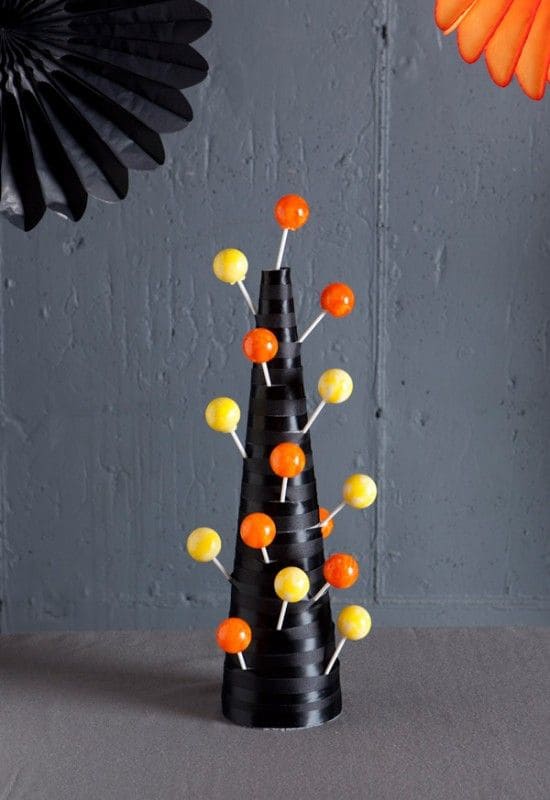
This sleek and modern Halloween lollipop tree is a fun way to serve candy and double as table décor.
The black cone base makes the orange and yellow lollipops pop, giving it a candy-corn color vibe that feels festive yet classy. It’s perfect for a buffet table, entryway display, or even as a party centerpiece guests can pick treats from.
Materials Needed
- 1 foam cone (about 12″ tall)
- Black satin ribbon (about 1″ wide, enough to wrap the cone)
- Hot glue gun and glue sticks
- 20-25 lollipops (orange and yellow)
- Scissors
Step-by-step Guide
Step 1: Wrap the black satin ribbon around the foam cone, starting from the base and spiraling upward. Then secure with hot glue every few inches so it stays snug.
Step 2: Once the cone is fully wrapped, decide where you want your lollipops to go. You space them evenly for a balanced look.
Step 3: Insert each lollipop stick into the foam at an angle so they branch out like ornaments on a tree.
Step 4: Adjust the spacing if needed to keep the colors alternating and the display looking full.
Step 5: Place the finished lollipop tree in the center of your table, and watch guests happily pluck their treats.
Tip: You can swap the candy colors to match different party themes or holidays such as purple and green for a witchy look, or black and silver for a gothic vibe.
#13. Googly-Eyed Monster Lollipops
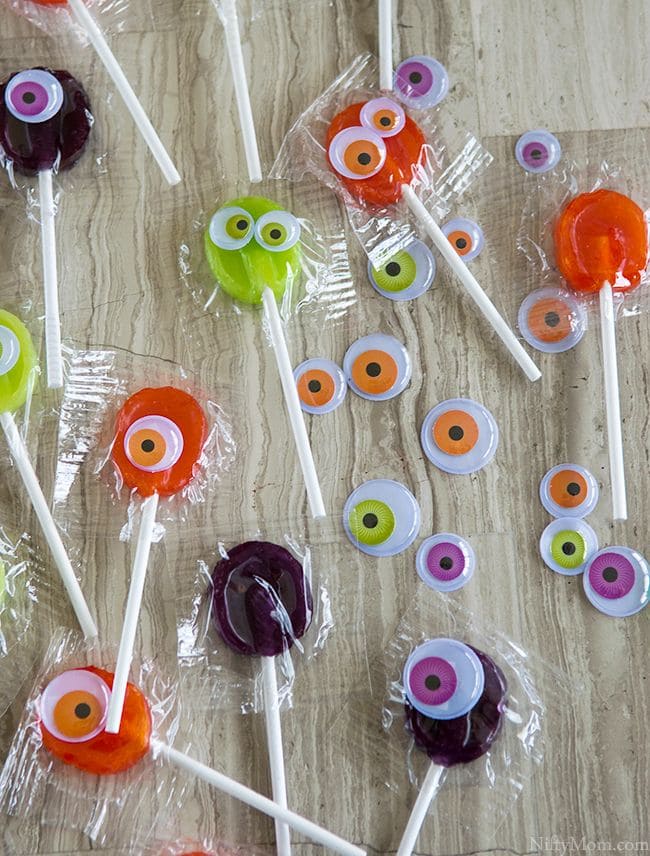
These googly-eyed lollipops are a playful way to give your Halloween treats a silly twist. Each colorful candy gets spooky eyes instantly turning them into cheeky little monsters.
They’re fun to hand out at parties, drop into trick-or-treat bags, or use as table decorations. Kids will love picking their favorite character, and you can mix and match eye sizes to make them look even goofier.
This quick project adds instant personality to plain lollipops without any mess.
Materials Needed
- Wrapped lollipops (any flavor or color, about 12-20 pieces)
- Googly eyes in assorted sizes and colors (2-3 packs)
- Glue dots or double-sided tape
Step-by-step Guide
Step 1: Spread your lollipops out on a flat surface so you can see all the colors and shapes.
Step 2: Pick two googly eyes for each lollipop, you can choose sizes and colors that make them look quirky.
Step 3: Attach the eyes directly onto the wrapper using glue dots or double-sided tape.
Step 4: Let them sit for a few minutes to secure, then display in a jar, basket, or on a treat table.
#14. Flying Witch Lollipops
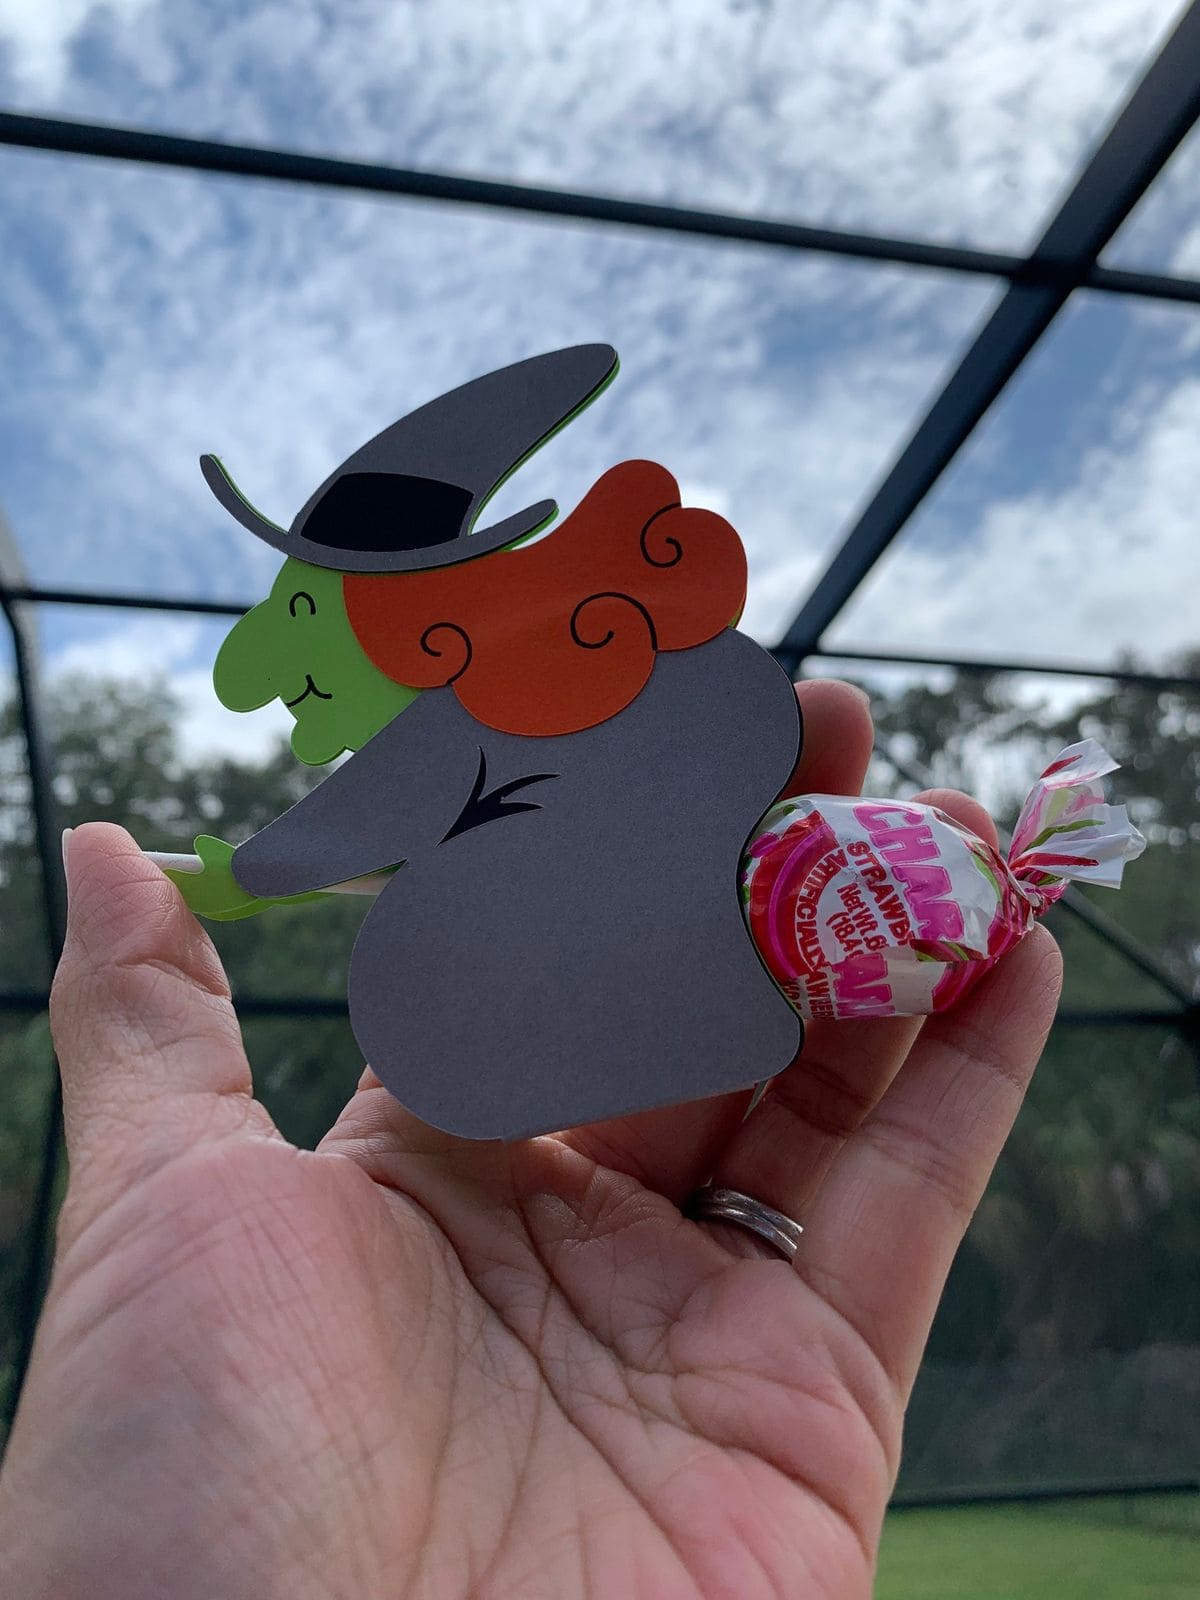
This clever flying witch lollipop will have everyone giggling. The lollipop becomes part of the design, doubling as the “broom” that the witch is riding.
With a simple paper cutout and a bit of candy magic, you can create a fun and interactive Halloween treat that’s perfect for handing out or adding to party favors.
Materials Needed
- 1 lollipop (about 1″ candy head)
- Printed or hand-cut witch silhouette (about 5″ long)
- Colored cardstock (black, green, orange)
- Scissors
- Glue stick or double-sided tape
- Craft knife
Step-by-step Guide
Step 1: Print or cut out a witch silhouette from black cardstock. You can add details like a green face and orange hair using colored cardstock for a playful look.
Step 2: Use a craft knife to cut two small slits in the design where the broom handle would be, one near the front and one near the back.
Step 3: Slide the lollipop stick through the slits so the candy head sits at the back, becoming the “broom bristles.”
Step 4: Secure the stick in place with a dab of glue or tape if needed.
Step 5: Let the glue dry and your witch is ready to fly right into the hands of your party guests.
#15. Witch and Broom Lollipops
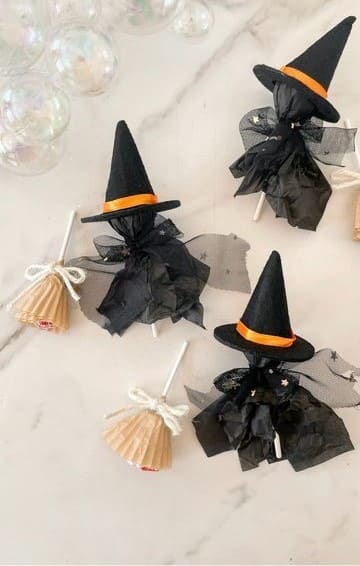
This set is double the fun including one lollipop becomes a charming little witch, and another turns into her trusty broom.
Together, they make a magical party favor or table decoration. The witch’s flowing black robes and pointed hat bring the Halloween spirit to life, while the rustic broom adds a whimsical touch.
Of course, kids will be delighted to take home both as a matching pair.
Materials Needed
- 2 lollipops (1″ candy head each)
- 1 piece black tissue or tulle (10″×10″)
- 1 small brown cupcake liner
- 1 mini witch hat (about 2″ tall)
- 1 small ribbon (12″ length, 0.25″ wide, orange or white)
- Black and white string
- Scissors
- Glue stick
Step-by-step Guide
Step 1: For the witch: Wrap the black tissue around the candy head and tie it under the neck with ribbon. You can also place the witch hat on top and secure with a dab of glue.
Step 2: For the broom: Flatten the cupcake liner, cut thin fringes around the edge, then wrap it around the lollipop stick just below the candy head.
Step 3: Tie the fringed liner in place with string so it flares out like broom bristles.
Step 4: Adjust the witch’s robe and the broom bristles for a neat, full look.
Step 5: Pair them together in treat bags or set them out on the table, they’ll be ready to fly away in style.
#16. Pink Ghost Lollipops
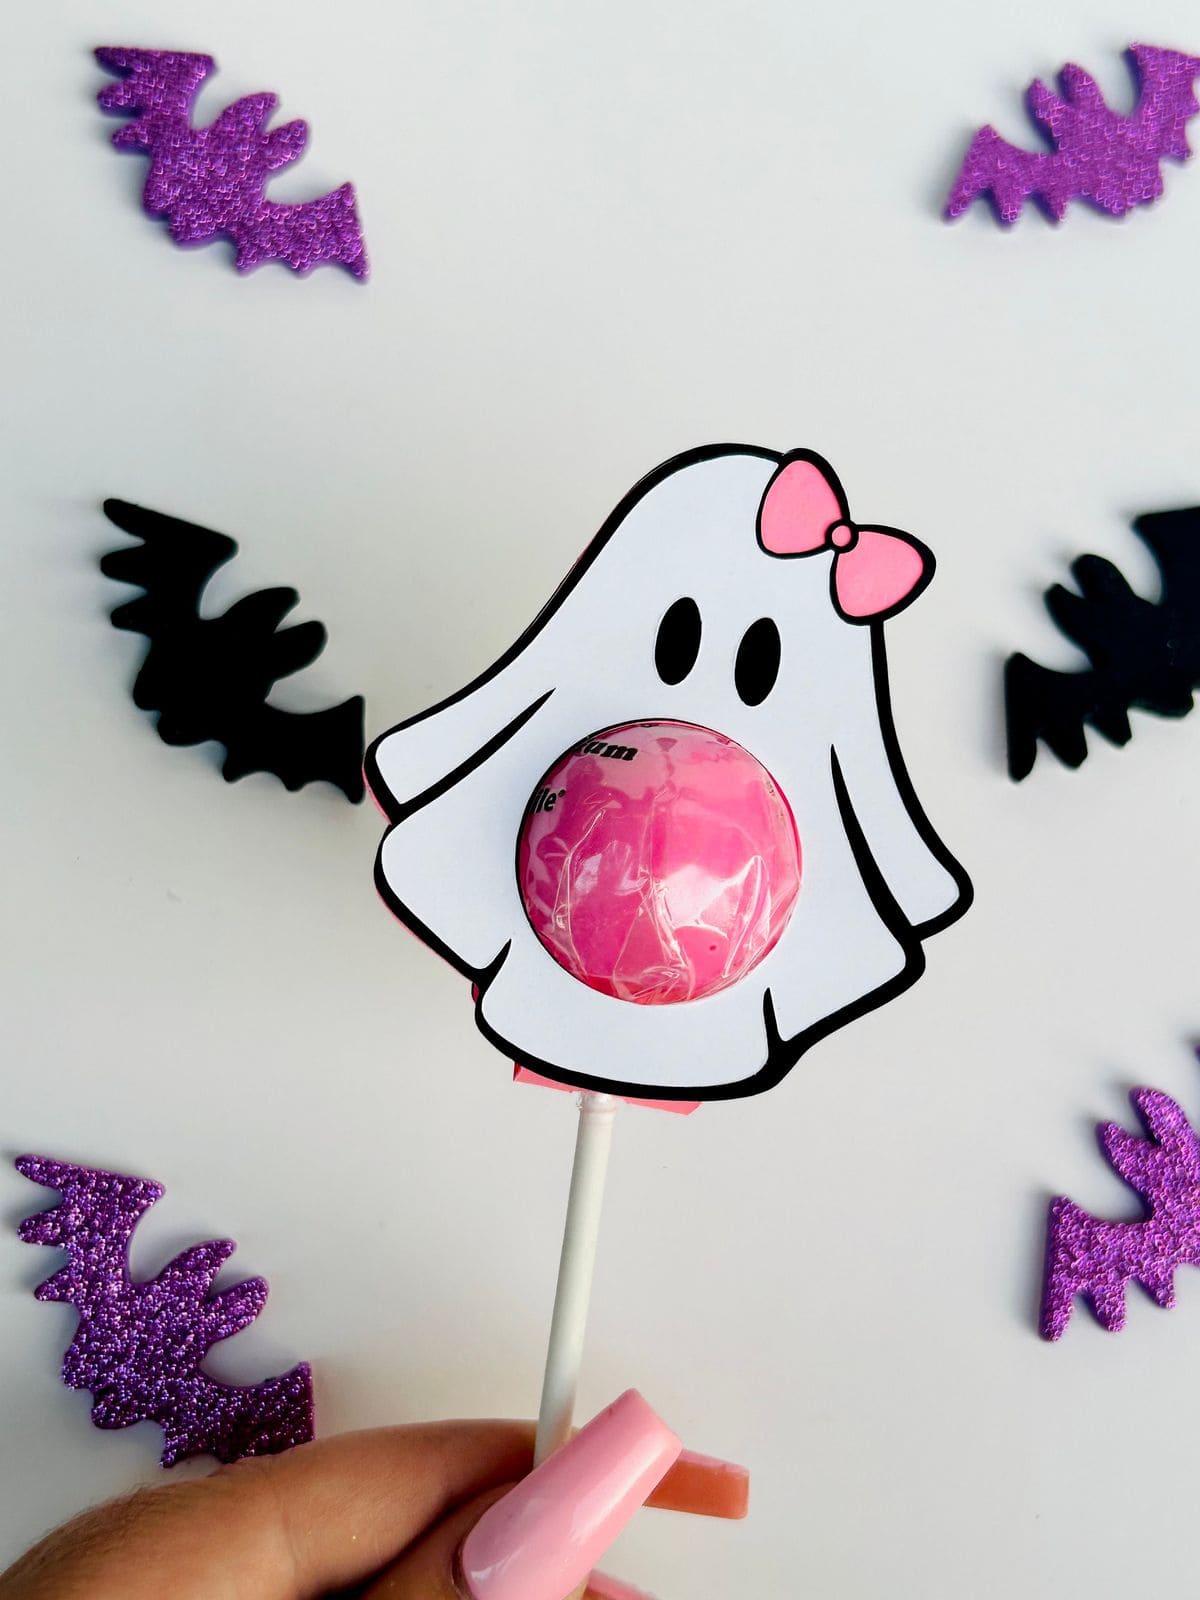
Who says ghosts can’t be adorable? This pink ghost lollipop is proof that Halloween treats can be sweet, spooky, and stylish all at once.
The pastel colors and bow detail make it perfect for kids’ parties, classroom treats, or anyone who prefers their Halloween with a softer touch. Plus, it’s super quick to put together, making it an easy last-minute idea.
Materials Needed
- 1 lollipop (pink wrapper, 1″ candy head)
- 1 printed ghost template (about 3″ tall)
- 1 small pink paper bow or sticker
- Scissors
- Craft knife
- Glue stick or double-sided tape
Step-by-step Guide
Step 1: Print and cut out your ghost template, making sure it’s large enough to cover the lollipop wrapper.
Step 2: Use a craft knife to carefully cut a round hole in the center where the ghost’s tummy will be, this is where the lollipop will peek through.
Step 3: Slip the lollipop through the hole so the candy head sits snugly in place.
Step 4: Attach the paper bow above one eye with a dab of glue or tape.
Step 5: Smooth everything down, and your pink ghost is ready to haunt your candy display in the cutest way possible.
#17. Vampire Lollipops
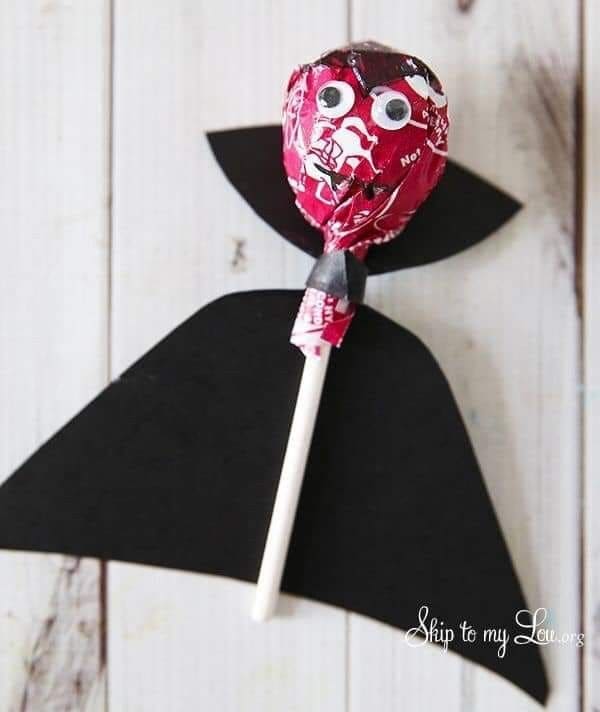
These little candy vampires are ready to swoop in and sink their teeth into your Halloween spread!
With their dramatic black capes, googly eyes, and bold red wrappers, they’re as fun to make as they are to give away. Perfect for party favors or trick-or-treat bags, they’ll add a touch of playful fright to any candy stash.
Materials Needed
- 1 lollipop (wrapped in red or dark-colored paper, 1″ candy head)
- 1 piece of black cardstock (4″×4″)
- 2 small googly eyes (0.4″ diameter)
- Glue stick or craft glue
- Scissors
- Black marker (optional)
Step-by-step Guide
Step 1: Cut a cape shape from the black cardstock, wide at the bottom with a curved top so it wraps neatly around the lollipop.
Step 2: Place the lollipop stick in the center of the cape’s top edge and glue it in place, letting the paper drape like flowing vampire robes.
Step 3: Glue two googly eyes onto the lollipop wrapper, just above the collar area.
Step 4: If you’d like, use a marker to draw tiny fangs or a mischievous grin directly onto the wrapper.
Step 5: Let the glue set completely before handling, then line up your vampire army for a deliciously spooky presentation.
#18. Bat Ghost Lollipops
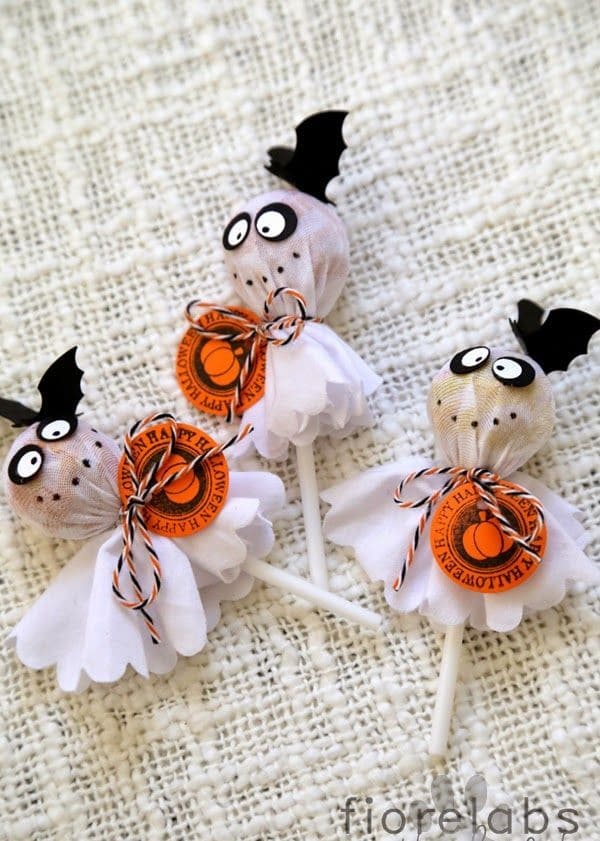
Why settle for just ghosts or bats when you can have both? These bat ghost lollipops are the perfect mash-up of spooky and cute.
With fluttering bat wings and wide-eyed ghostly faces, they make delightful party favors or trick-or-treat handouts.
Bonus, the little Halloween tag and twine bow tie everything together, making them look as if they came straight from a haunted candy shop.
Materials Needed
- 1 lollipop (1″ candy head)
- 1 piece white fabric or tissue (10″×10″)
- 1 Halloween tag (about 2″ diameter)
- 1 small piece of black cardstock (3″×2″)
- 2 small googly eyes (0.4″ diameter)
- Black and orange twine (12″ length)
- Glue stick
- Scissors
- Black marker
Step-by-step Guide
Step 1: Place the lollipop in the center of the white fabric or tissue and wrap it down over the candy head to form the ghost’s body.
Step 2: Tie the fabric securely with the black and orange twine, adding the Halloween tag in the knot.
Step 3: Cut bat wings from the black cardstock and glue them to the back of the ghost’s head.
Step 4: Attach the googly eyes to the front, then use the black marker to draw a small mouth.
Step 5: Let the glue dry completely before handing them out, they’ll be ready to spook and delight!
#19. Pumpkin Lollipop Hair Display
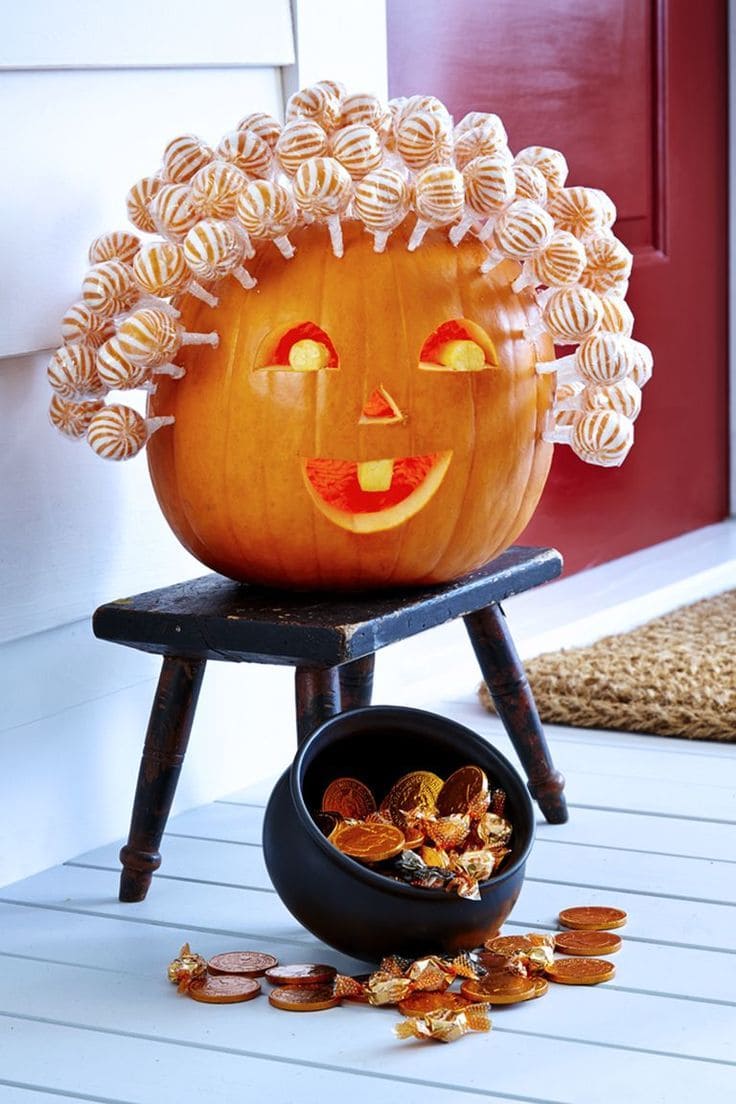
Sometimes the best Halloween ideas are the ones that make everyone laugh the moment they see them.
This cheerful pumpkin isn’t just carved as it’s sporting a full head of candy curls made from lollipops. It’s part decoration, part candy station, and it works brilliantly for parties or porch displays.
The more lollipops you add, the more dramatic and silly the hair becomes. Guests won’t be able to resist pulling one out for a sweet treat!
Materials Needed
- 1 large pumpkin (about 12–14″ tall)
- 50-60 lollipops (1″ candy head, wrapped)
- Carving knife and scoop
- Marker
- Small drill bit or skewer
- LED tea light
Step-by-step Guide
Step 1: Start by hollowing out your pumpkin and wiping the inside clean.
Step 2: Sketch a happy, silly, or spooky face on the front, then carve it out carefully with a knife.
Step 3: Use a small drill bit or skewer to make evenly spaced holes around the top and sides of the pumpkin, these will hold the lollipops.
Step 4: Insert each lollipop stick into a hole until the pumpkin’s head is full of candy curls.
Step 5: Finally, place an LED tea light inside so the face glows, making the display even more eye-catching at night.
See more: 30 Halloween Pumpkin Decorating Ideas That Are Easy And Affordable
#20. Elegant Tulle Ghost Lollipops
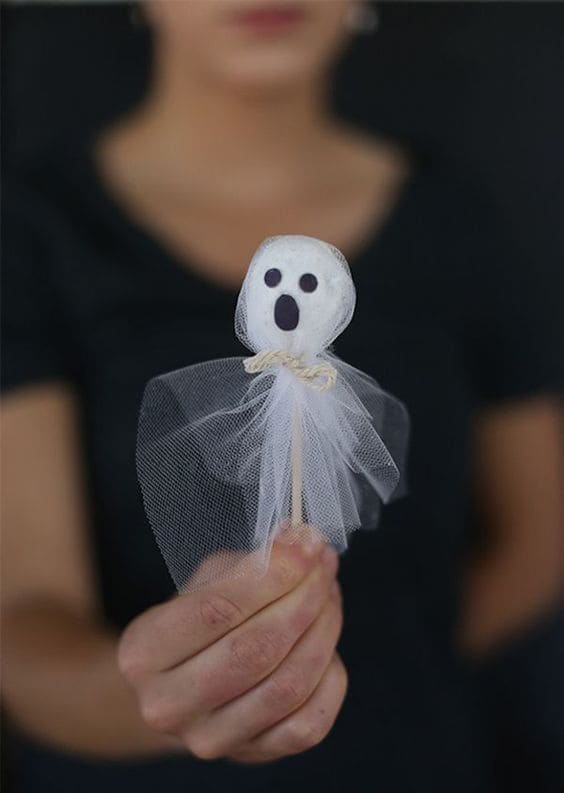
If you’re after a ghost treat that’s more chic than creepy, these tulle-wrapped lollipops are your go-to.
The sheer fabric gives them a dreamy, floating look, almost like they’re drifting through the air on a moonlit Halloween night.
Plus, they’re simple enough to whip up in batches, but the delicate details make them stand out at any party or candy display. This is the kind of DIY that feels magical the moment you finish tying the bow.
Materials Needed
- 1 lollipop (about 1″ candy head)
- 1 square of white tulle (10″×10″)
- 1 small piece of twine (10″ length)
- Black felt-tip marker
- Scissors
Step-by-step Guide
Step 1: Lay the tulle flat and place the lollipop in the center. Then gently gather the tulle around the candy head, letting the fabric fall naturally for a wispy effect.
Step 2: Tie the twine securely just under the candy head, creating a small “neck” for your ghost.
Step 3: Draw two eyes and an oval mouth with the marker or paint, keeping the features simple for elegance.
Step 4: Trim the tulle ends if you prefer a shorter, neater look or leave them long for more drama.
#21. Flying Bat Lollipops
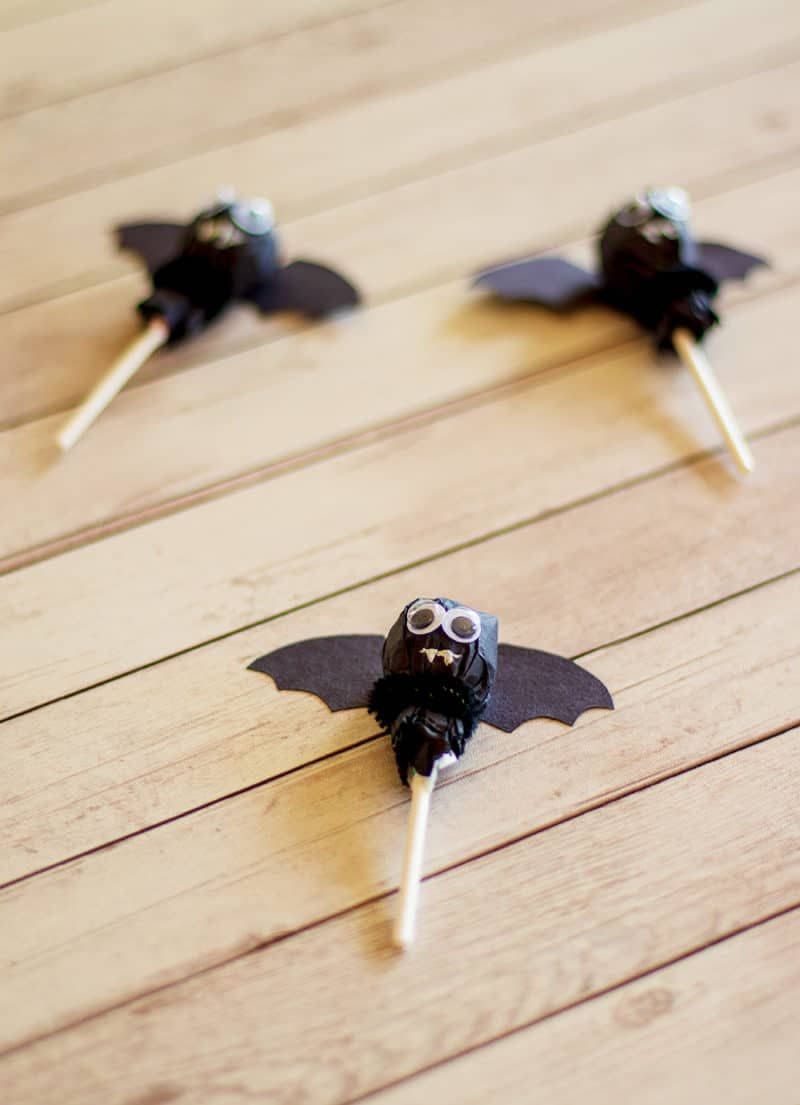
These flying bat lollipops are the perfect blend of spooky and cute. With paper wings, big googly eyes, and tiny fangs, they look ready to swoop down and snatch some Halloween candy
They make great party favors and are fun for kids to help create, plus, they’re quick enough to make in batches for trick-or-treat night.
Materials Needed
- 1 lollipop (1″ candy head)
- 1 piece black tissue paper (10″×10″)
- 1 piece black cardstock (4″×2″)
- 2 small googly eyes (0.4″ diameter)
- 1 small piece of white cardstock
- Black pipe cleaner (6″)
- Glue stick
- Scissors
Step-by-step Guide
Step 1: Wrap the black tissue paper around the candy head, letting it drape slightly down the stick.
Step 2: Twist a black pipe cleaner around the neck to create a fluffy bat collar.
Step 3: Cut bat wings from black cardstock and glue them to the back of the lollipop head.
Step 4: Glue on the googly eyes and tiny white fangs cut from cardstock.
Step 5: Let everything dry, then arrange your bats in a group so they look like they’re ready to take flight.
Refer to: 23 Hilariously Fun Halloween Party Games That’ll Keep Everyone Entertained
