Garden & Crafty - Garden, DIY, Home
No Result
View All Result
  • GARDEN
    • Garden Tips
    • Garden Guide
    • Garden Care
    • Garden Ideas
  • DIY
    • Diy Project
    • Crafty Ideas
  • HOME
    • Decoration
    • Cleaning
    • Tips & Hacks
  • About Us
  • GARDEN
    • Garden Tips
    • Garden Guide
    • Garden Care
    • Garden Ideas
  • DIY
    • Diy Project
    • Crafty Ideas
  • HOME
    • Decoration
    • Cleaning
    • Tips & Hacks
  • About Us
No Result
View All Result
Garden & Crafty - Garden, DIY, Home
Home Guide

Step-by-step Guide to Make Propane Tank Pendant Lights

Lois Capone by Lois Capone
August 17, 2025
in Guide
Reading Time: 2 mins read

Step-by-step Guide to Make Propane Tank Pendant Lights

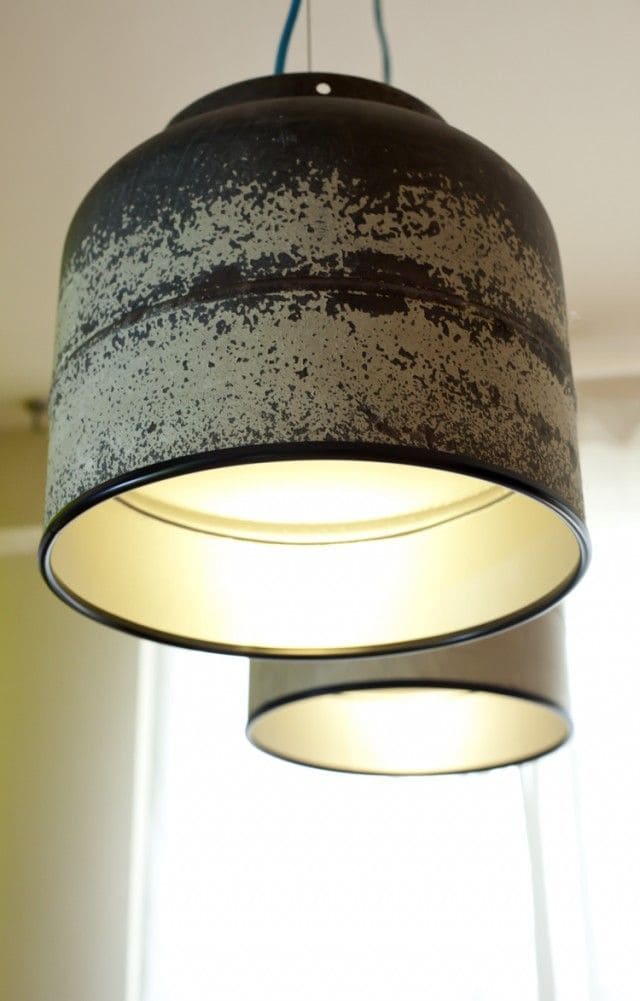
If you’ve been searching for a unique way to brighten your space, this propane tank pendant lamp is a brilliant option.

By cutting and cleaning an old tank, then fitting it with a simple light kit, you get a sturdy, durable, and eco-friendly light fixture.

Plus, the tank’s natural curve makes a perfect shade, focusing light downward while adding a rustic-industrial edge to any room.

Materials Needed

  • 1 empty propane tank (20 lb or smaller, thoroughly cleaned)
  • Angle grinder with cutting disc
  • Drill with metal drill bits
  • Sandpaper or wire brush
  • Light kit (cord, socket, and bulb holder)
  • LED bulb (warm or cool tone, depending on your style)
  • Hanging chain
  • Spray paint or clear sealant (optional, if you want a polished or protected finish)
  • Safety gear (gloves, goggles, respirator)

Step-by-step Guide

Step 1: Start by ensuring the propane tank is completely purged and safe to cut. You remove the valve, rinse it out with soapy water, and let it air dry for several days.

Step 2: Using the grinder, carefully cut the tank around the base to create an open end.

This opening will become the lampshade’s mouth, allowing the light to shine downward. Smooth the cut edges with a grinder or sandpaper so they’re safe to touch.

Step 3: Drill a hole in the center of the tank’s top (the old valve end) large enough to pass the light kit cord through. If you’re using a chain mount, drill two smaller holes for added support.

Step 4: Clean the surface with a wire brush or sandpaper to remove rust and dirt. At this stage, you can leave the raw, industrial look or add a coat of spray paint for a modern finish.

Step 5: Feed the light kit cord through the hole and secure the socket in place. Make sure it sits straight and snug. Screw in your bulb.

Step 6: Hang the lamp from a ceiling hook or chain, adjusting the cord length so it fits your space perfectly.

Step 7: Test the lamp. When you switch it on, you’ll see the tank transformed from rugged steel to a warm and stylish lighting fixture.

Tips:

One trick I’ve learned that LED bulbs not only save energy but also stay cool, which is important when using a metal shade.

If you want a cozy atmosphere, go for a warm white bulb. For a more modern feel, try a daylight bulb. And don’t be afraid to let some of the original tank’s patina show, it adds authenticity and personality.

SharePin
Lois Capone

Lois Capone

Lois Capone is a wife and mom in her 50s who enjoys sharing gardening, DIY tips, and home decor ideas. She believes that with some inspiration, anyone can create a special feel in their home and garden.

Related Posts

Guide

Create Colorful Mini Weavings on Wooden Squares

There’s something meditative about weaving on a tiny scale. As you loop yarn over and under each strand, you start...

by Lois Capone
October 7, 2025
Guide

Craft Mini Driftwood Weavings to Add a Cozy Boho Touch

If you’ve ever admired woven wall art in cozy studios or boutique cafés, this is your chance to make your...

by Lois Capone
October 7, 2025
Guide

Create a Radiant Woven Circle from Scrap Yarn and Cardboard

This circular weaving craft brings together simplicity and joy. With just a piece of cardboard and a few strands of...

by Lois Capone
October 7, 2025
Guide

Create Adorable Pet Art with Mini Woven Blankets

Imagine your pet tucked under a handmade blanket, dreaming away after a long day of play. You’ll weave a small,...

by Lois Capone
October 7, 2025
Guide

Craft Colorful Beaded Bracelets with a DIY Cardboard Loom

This project transforms cardboard into a mini bead loom, turning small glass or plastic beads into wearable art. You’ll find...

by Lois Capone
October 7, 2025
Guide

Make a Whimsical Yarn Doll Through Simple Weaving

Creating this woven yarn doll feels like crafting a childhood memory. There’s something delightful about giving her shape and color...

by Lois Capone
October 7, 2025
Load More

Categories

  • Cleaning (7)
  • Crafty Ideas (179)
  • Decoration (167)
  • DIY (8)
  • Diy Project (258)
  • GARDEN (39)
  • Garden Care (64)
  • Garden Guide (141)
  • Garden Ideas (358)
  • Garden Tips (145)
  • Guide (687)
  • HOME (90)
  • Tips & Hacks (22)


Garden & Crafty - Garden, DIY, Home

© 2024 gardenandcrafty.com

Navigate Site

  • About Us
  • Privacy Policy
  • Terms Of Service
  • Disclaimer
  • Cookie Policy
  • Webstories
  • Sitemap

Follow Us

No Result
View All Result
  • GARDEN
    • Garden Tips
    • Garden Guide
    • Garden Care
    • Garden Ideas
  • DIY
    • Diy Project
    • Crafty Ideas
  • HOME
    • Decoration
    • Cleaning
    • Tips & Hacks
  • About Us