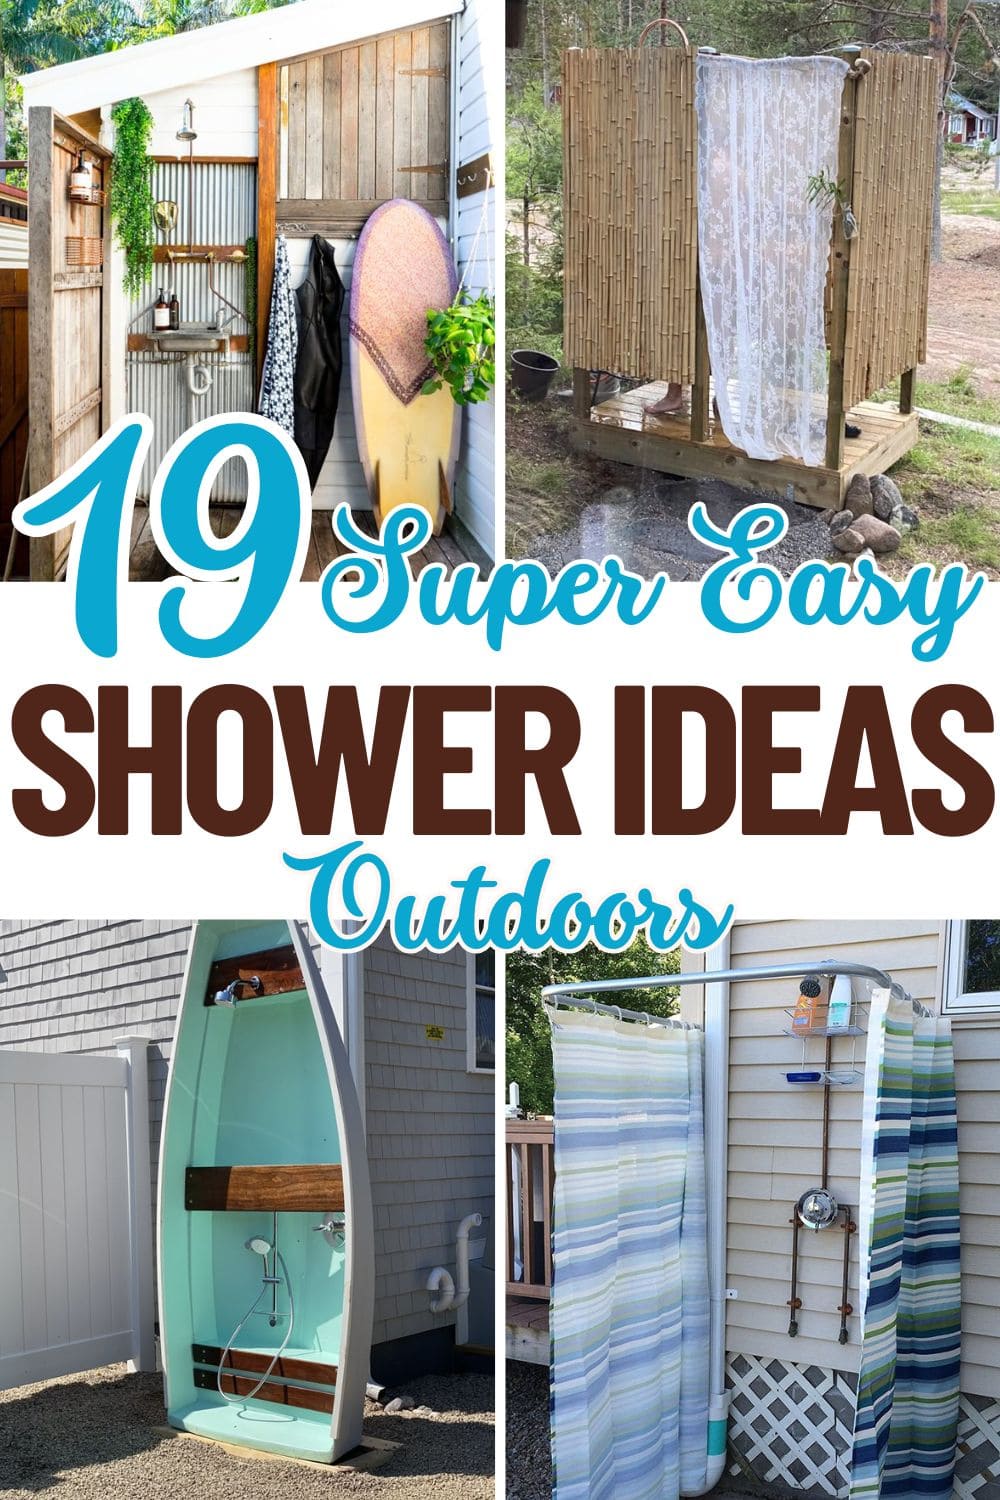
Ever come home from a beach day with sand in places you didn’t even know existed? Or found yourself covered in mud after an afternoon in the garden?
I’ve been there tracking grime through the house, clogging up the drains, and wishing there was a better way. That’s when I realized an outdoor shower isn’t just a luxury, it’s a lifesaver.
Whether you’ve got kids, pets, or just love being outside, having a spot to rinse off can make life cleaner, simpler, and surprisingly joyful. The best part is that you don’t need a big budget or fancy plumbing.
#1. Simple Wall-Mounted Outdoor Shower
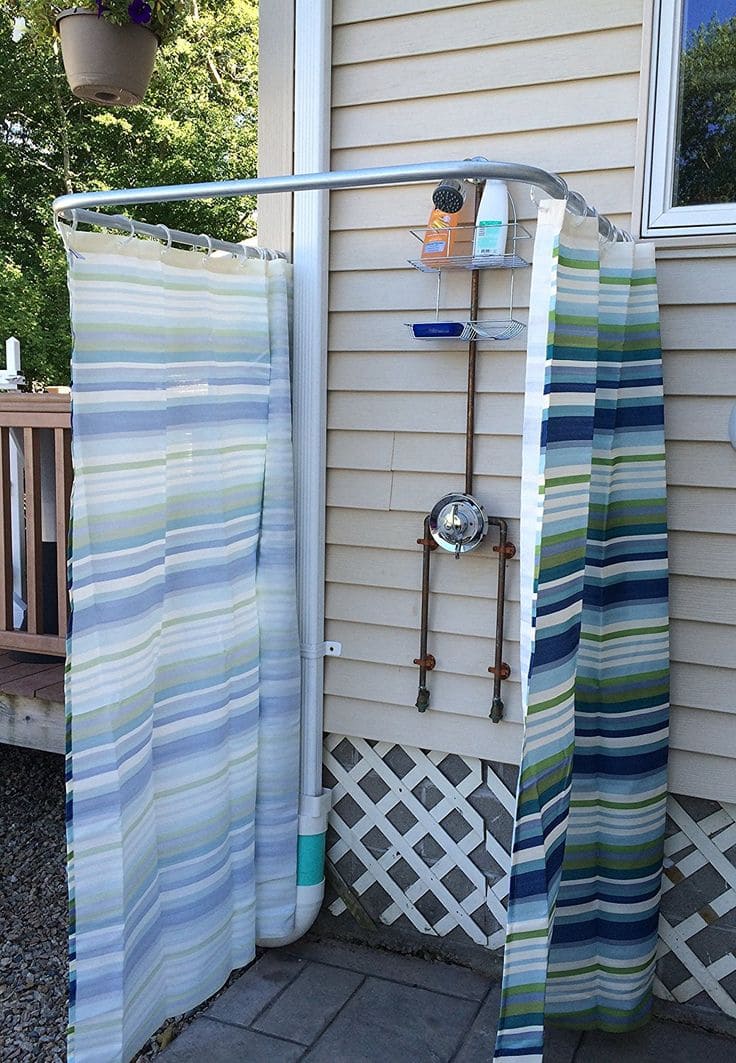
Here’s proof that you don’t need a big budget or sprawling yard to create a clean, practical outdoor shower. Attached to the house siding, this clever design makes the most of minimal space.
Materials Needed
- 1 outdoor shower fixture with hot/cold hookups
- 1 curved pipe or L-shaped curtain rod (approx. 48″ x 48″)
- 2 outdoor shower curtains (waterproof, mildew-resistant)
- 12–16 curtain rings
- Wall anchors and screws for mounting rod and fixture
- Optional: wall-mounted shelf or caddy
Step-by-Step Guide
Step 1: Mount the curtain rod directly to your house siding or exterior wall using heavy-duty anchors.
Step 2: Install the outdoor shower plumbing. You an use copper or PVC pipe with proper valves, and connect to an outdoor spigot or existing line.
Step 3: Attach your showerhead and handles securely, and seal with plumber’s tape to avoid leaks.
Step 4: Add curtains, secure with rings, and enjoy your new no-frills rinse station.
#2. Rowboat Turned Shower
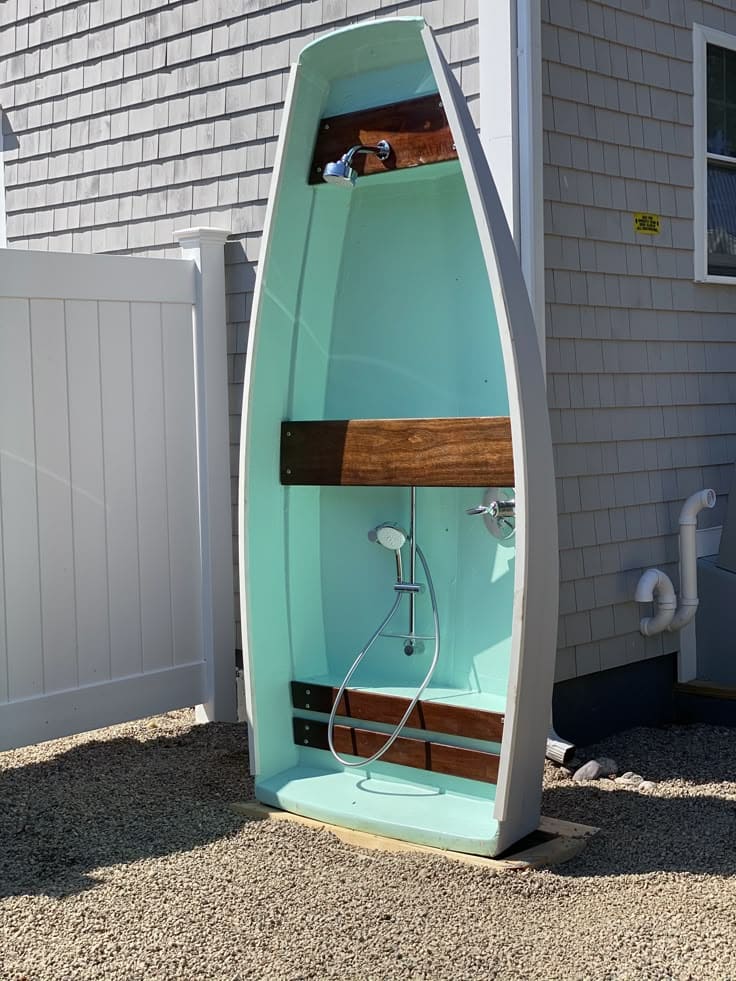
We found an old rowboat that had seen better days, and instead of letting it rot, we gave it a second life right next to our cottage wall.
With a splash of mint paint and a few hours of plumbing (plus a fair amount of trial and error), it became the kind of outdoor shower that guests keep talking about.
Materials Needed
- 1 old rowboat (approx. 5–6 ft tall)
- Exterior paint (1 quart)
- Waterproof sealant (marine-grade)
- Wood planks
- Basic outdoor shower kit (around $60–$90 online)
- Screws, brackets, drill, and plumbing connectors
Step-by-Step Guide
Step 1: Clean the inside of the rowboat thoroughly. Let it dry before applying two coats of exterior paint.
Step 2: Add wooden braces or shelving across the interior for storage and stability, then you should seal them with waterproof finish.
Step 3: Mount the showerhead, hose, and control handle. Drill clean holes and thread your plumbing through the bottom or back.
Step 4: Place the boat upright and secure it to a wall or brace base with anchor bolts or L-brackets.
#3. Industrial-Minimalist Outdoor Shower
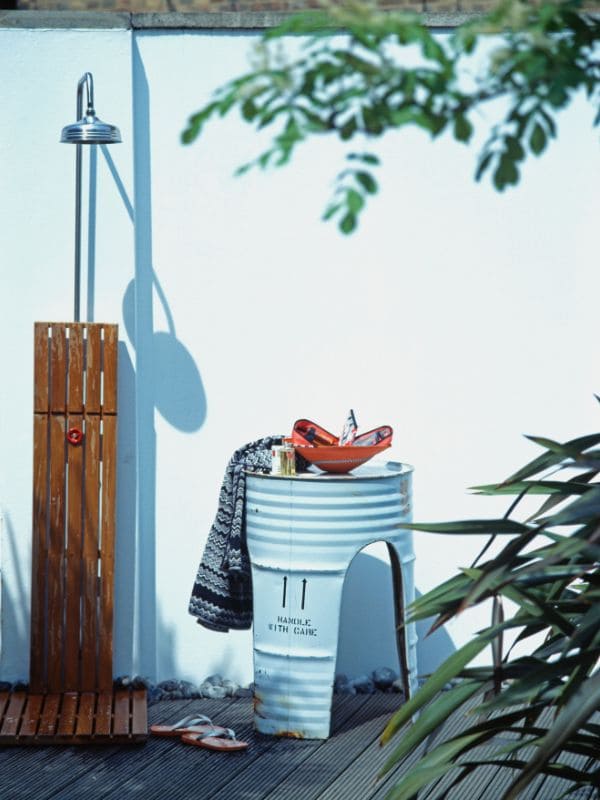
This pared-down outdoor shower has a bold, industrial spirit, perfect for smaller garden corners or even a sleek city patio.
Your backyard will become impressive because the upright wooden panel adds natural warmth against the clean white wall, while the galvanized barrel used as a table offers a cheeky nod to rustic charm.
Materials Needed
- 1 outdoor shower head with tall riser pipe
- 1 vertical wood panel (1×6” boards, 5 ft tall)
- 1 wooden slat mat (optional)
- 1 vintage barrel or drum
- Anchors or clamps
- Garden hose adapter
Step-by-Step Guide
Step 1: Secure the vertical wood panel directly to an outdoor wall or mount it free-standing with ground stakes.
Step 2: Attach the riser pipe and showerhead to the panel then connect to your water source.
Step 3: Add a wooden floor mat or raised platform for drainage and comfort underfoot.
Step 4: Place the barrel or drum beside the shower to hold towels, soaps, or fresh lemonade.
#4. Coastal Vibes Surfboard Shower
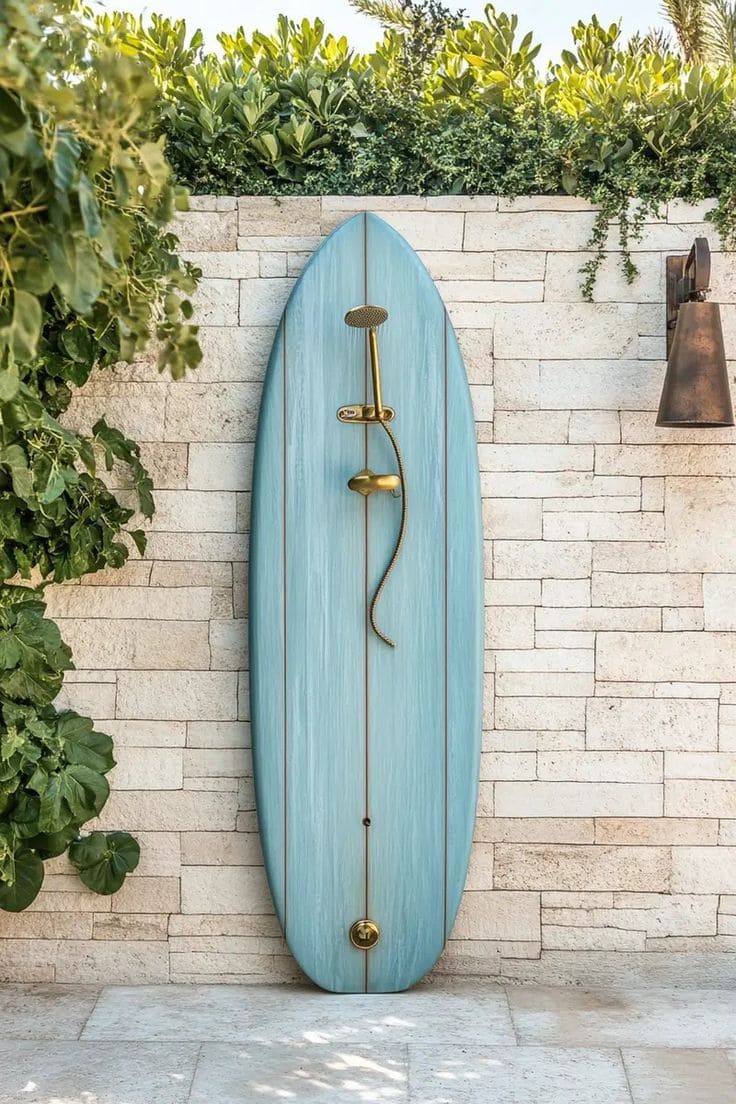
This one brings the ocean to your backyard even if you’re miles from the coast. A painted surfboard mounted on a light stone wall becomes a quirky, functional piece that instantly lifts your mood.
Materials Needed
- 1 wooden surfboard (approx. 5–6 ft tall)
- Outdoor brass shower fixture
- Wall-mounting hardware
- Exterior paint
- Drill and wall anchors
Step-by-Step Guide
Step 1: Paint or stain your surfboard and let it dry completely.
Step 2: Attach the shower fixture to the board using screws. Drill holes for plumbing to pass through if needed.
Step 3: Mount the board securely to a stone, brick, or wood wall using brackets or heavy-duty anchors.
Step 4: Connect your plumbing either to an existing line or a hose-fed system and test the water flow.
#5. Minimalist Tropical Outdoor Shower
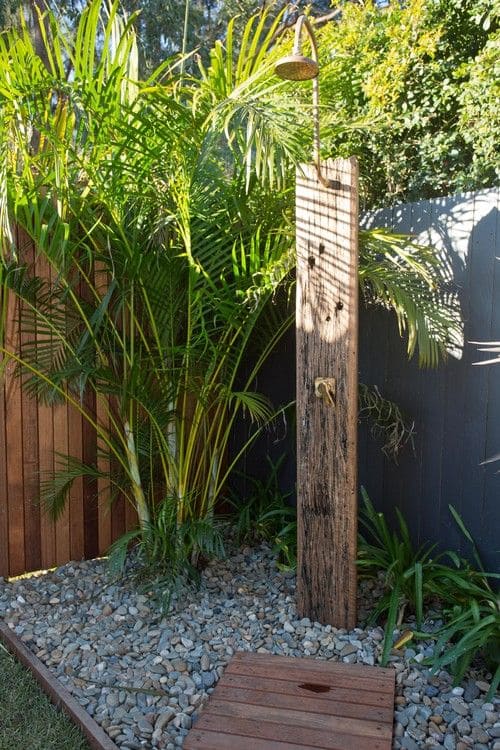
This simple setup feels like a quiet retreat tucked into the corner of your garden. One tall plank of weathered wood becomes both the support and statement.
Materials Needed
- 1 reclaimed wood post (approx. 8″ wide, 6–7 ft tall)
- 1 outdoor brass
- Basic plumbing fittings
- 1 small platform or pallet
- River rocks (2–3 bags)
- Optional: sealant
Step-by-Step Guide
Step 1: Choose a sunny garden spot with easy access to a hose , then dig a shallow area and fill with river rocks to help with drainage.
Step 2: Anchor the wood post into the ground or screw it into a buried concrete block for extra stability.
Step 3: Mount your shower head and attach plumbing using hose or copper pipe fittings.
Step 4: Add a small wood deck or pallet to stand on, and let the surrounding plants complete the look.
#6. Rustic-Coastal Outdoor Shower Nook
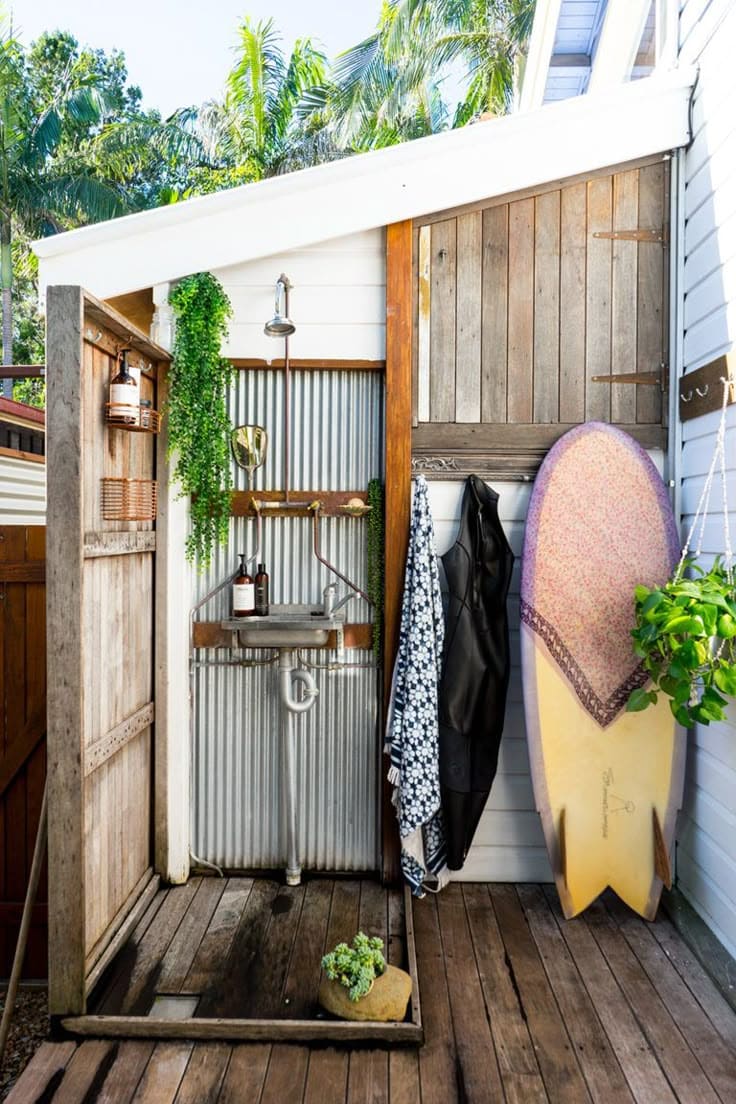
This charming corner shower might be the best thing I’ve added to our beach cottage. Tucked under the eaves, it mixes rugged textures with effortless style.
After morning surf or gardening, stepping into this sunlit space feels like a ritual. Therefore, if you’ve got a side yard or an empty nook near your backdoor, this setup is absolutely worth stealing.
Materials Needed
- Corrugated metal panel (approx. 3′ x 6′)
- 2 wood planks (1″ x 4″, for framing)
- 1 salvaged utility sink
- 1 basic shower fixture + garden hose connector
- Decking boards (6 pcs, 4’ long)
- Wall hooks, hanging plants, screws
Step-by-Step Guide
Step 1: Attach the corrugated metal panel to a wooden back frame or existing siding.
Step 2: Mount the sink securely below the fixture using angle brackets or support legs.
Step 3: Connect the shower fixture to your hose or water line, ensuring it has good drainage below.
Step 4: Lay down decking boards for a warm, barefoot-friendly base. Then you can add plants and hooks for towels or wetsuits.
#7. Simple and Smart Wall-Mounted Outdoor Shower
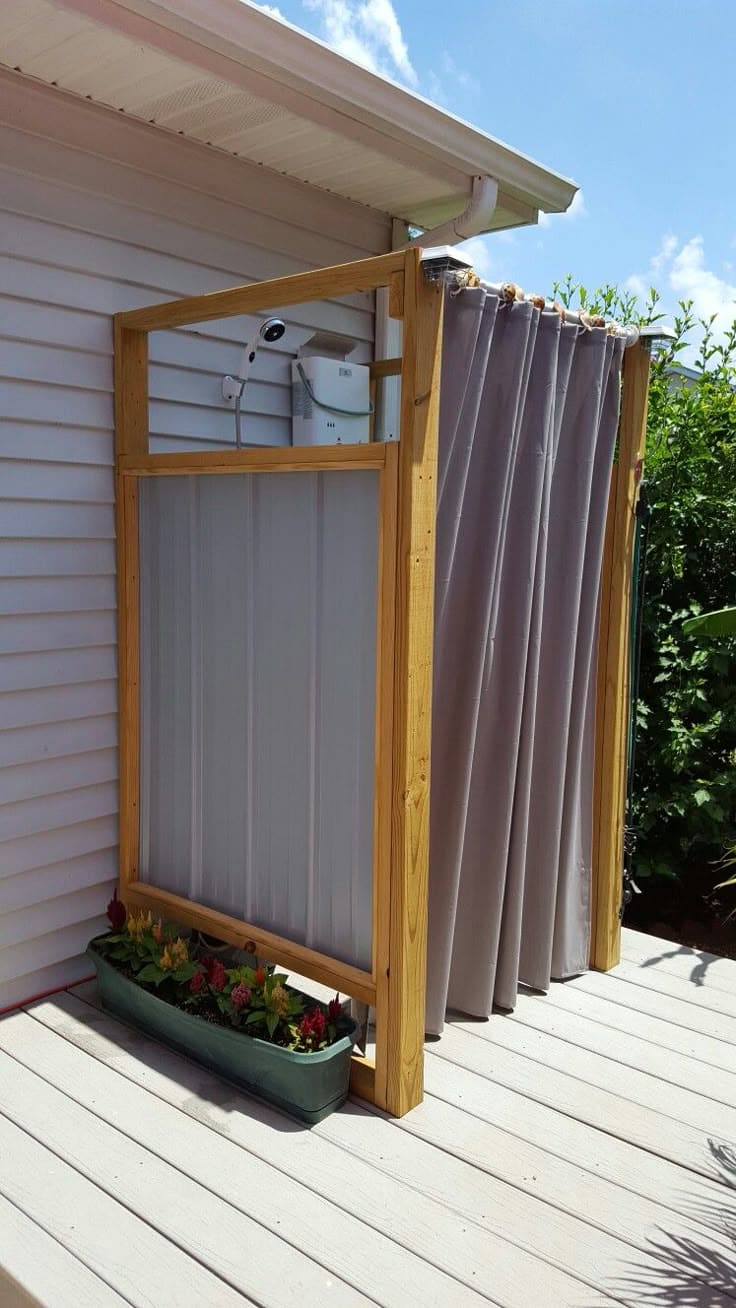
If you’ve ever rinsed off after a swim or a long day in the garden, you know just how satisfying it feels. This shower proves you don’t need a big backyard or a complex build to enjoy that luxury.
Materials Needed
- 4 wooden posts (4×4″, 7 ft tall)
- 4 wood beams (2×4″, 4 ft long)
- 1 corrugated metal panel (3×5 ft)
- 1 outdoor-safe shower curtain (6 ft wide) + hooks
- 1 wall-mounted outdoor water heater or shower kit
- Screws, brackets, anchors
- Optional: deck planter box and flowers for accent
Step-by-Step Guide
Step 1: Choose a flat, dry wall area close to your water supply, then mark and install the wooden frame using anchors and screws for a sturdy L-shape.
Step 2: Attach the corrugated panel to one section of the frame for splash protection and privacy.
Step 3: Mount your shower head on the wall, securing it according to the manufacturer’s instructions.
Step 4: Add the curtain rod across the open side and hang your outdoor curtain for easy coverage.
#8. Backyard Spa Vibes with a Simple Wooden Slat Shower
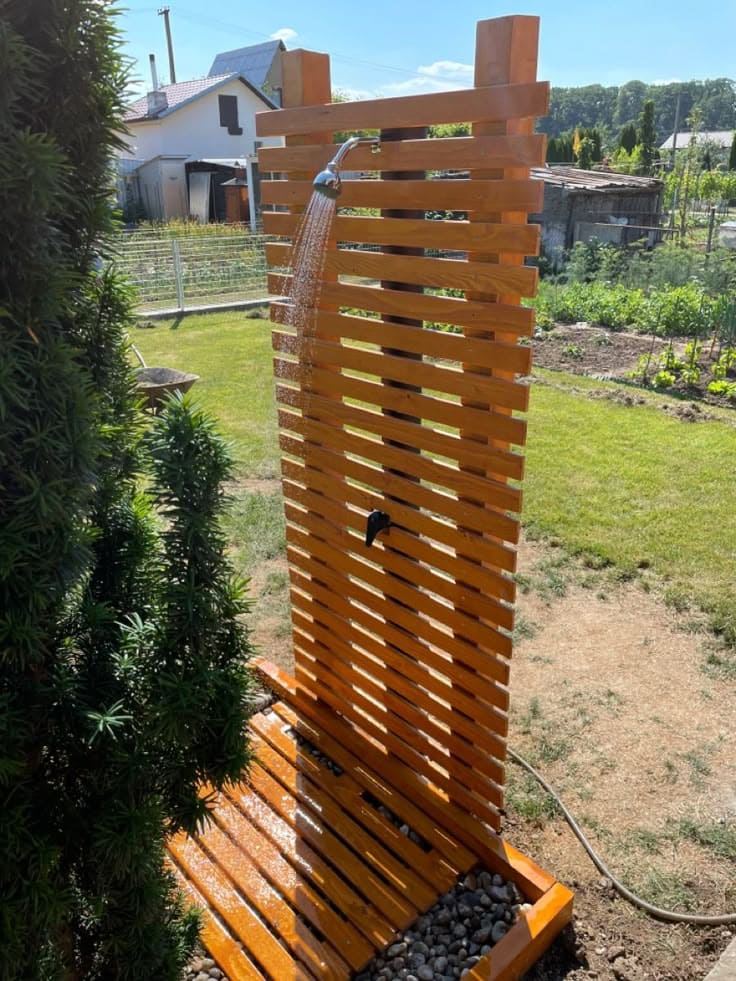
If you’ve got a sunny spot in your garden and a free afternoon, this outdoor shower idea might just become your new favorite weekend upgrade.
Built entirely from wooden slats and sealed to a warm, glossy finish, this setup creates a modern yet natural feel, perfect after a sweaty afternoon in the garden or a dip in the kiddie pool.
Materials Needed
- 10–12 pine or cedar slats (2″ x 1″, approx. 6 ft long)
- 4 upright posts (2″ x 2″, 6 ft tall)
- Outdoor water-resistant wood stain
- 1 showerhead with hose and garden tap adapter
- Screws, brackets, hose clamp, and basic drill
- Landscaping pebbles (1–2 bags)
Step-by-Step Guide
Step 1: Cut slats to equal length and pre-drill screw holes, then assemble two side posts with evenly spaced horizontal slats.
Step 2: Attach the vertical slat panel to two upright posts and brace them into the ground or concrete.
Step 3: Install the floor platform using a similar slat pattern over a base of pebbles to allow drainage.
Step 4: Connect the hose to a garden faucet or outdoor plumbing, and mount the showerhead securely.
#9. Bamboo and Lace Forest Shower
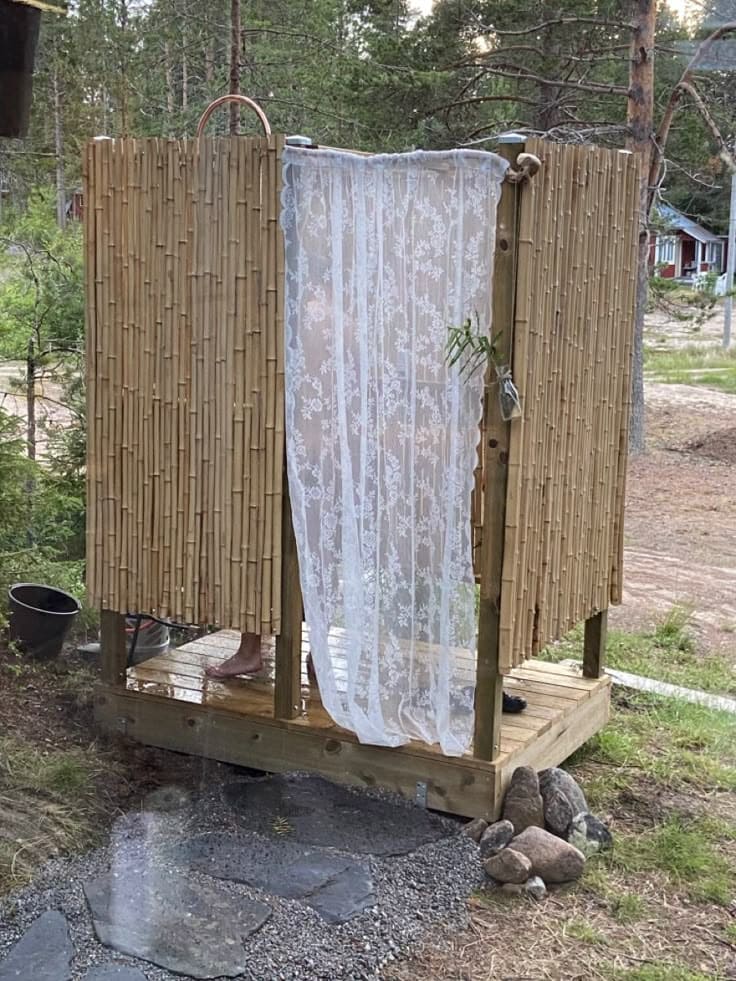
The bamboo of this dreamy little setup gives it structure and serenity, while the sheer lace curtain adds a romantic touch that sways gently in the breeze.
Besides, the raised platform keeps your feet dry, and the whole build is surprisingly affordable, especially if you already have leftover wood and fabric.
Materials Needed
- 8-10 bamboo fencing rolls (each approx. 6 ft tall)
- 1 shower curtain rod (4 ft long)
- 1 lace
- 4 wooden corner posts (4×4″, 7 ft tall)
- Pressure-treated deck boards (enough to cover approx. 4 ft x 4 ft base)
- Nails, screws, brackets, and L-hooks
- Optional: Small metal or copper shower head + hose attachment
Step-by-Step Guide
Step 1: Level your site and build a raised base frame using deck boards. Secure the platform with screws for strength.
Step 2: Anchor the four wooden posts at each corner of the platform, then attach the bamboo fencing to the frame using zip ties.
Step 3: Mount a curtain rod across the entrance. Hang your lace panel for a soft, breezy privacy touch.
Step 4: Add a simple shower head above or attach a camping solar shower bag if plumbing isn’t nearby.
#10. Crisp Cottage-Style Outdoor Shower
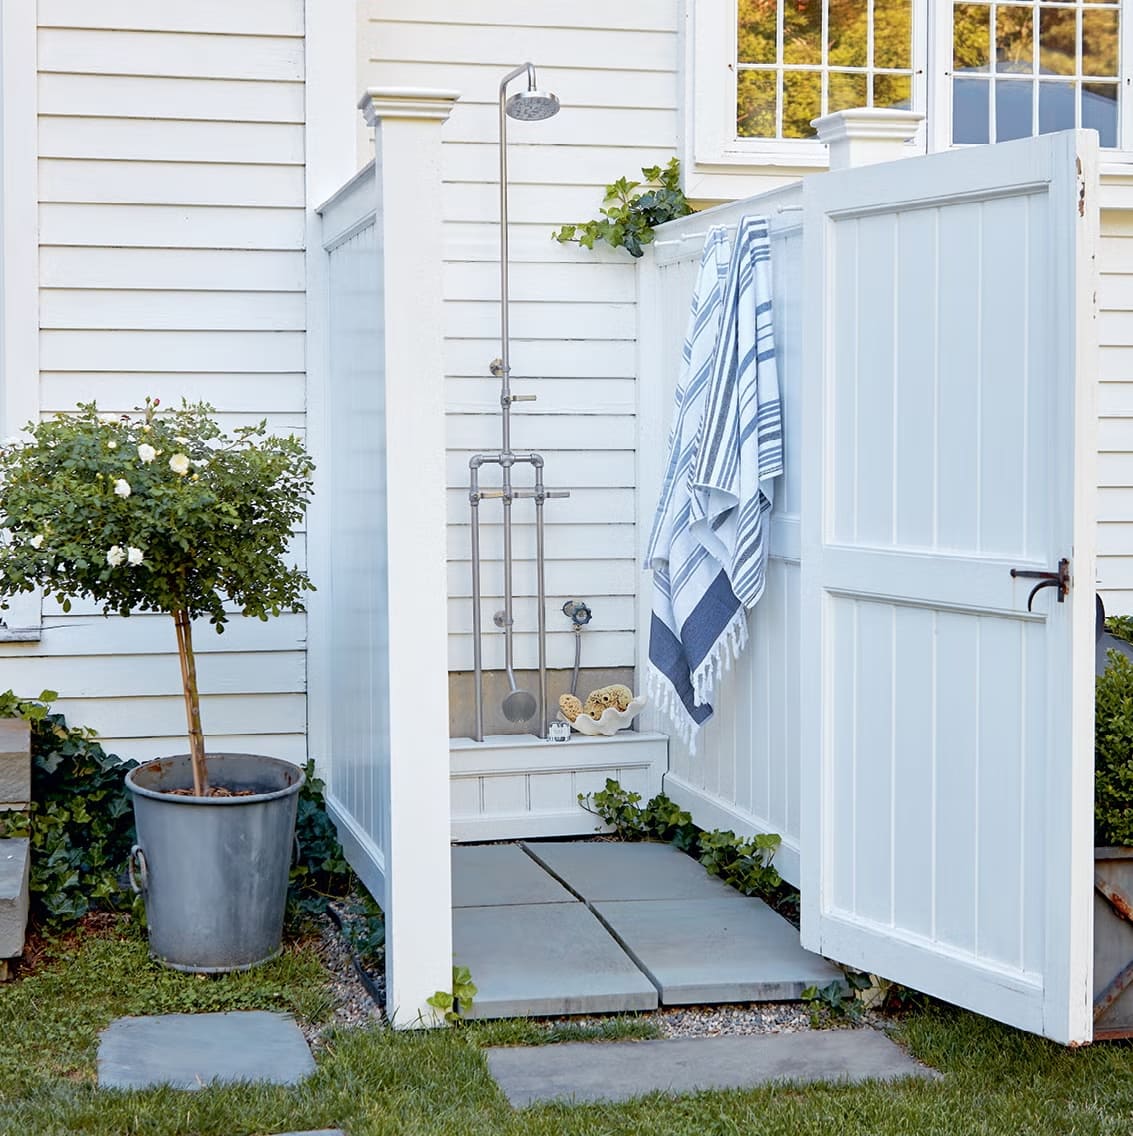
If you’ve ever longed to bring that breezy Cape Cod energy into your daily life, this outdoor shower does it with elegance and ease. The clean lines, soft whites, and traditional metal fixtures make it feel like a little slice of summer by the sea.
Materials Needed
- 3 white fence panels (72″ x 36″)
- 1 outdoor shower fixture with handheld and overhead spray
- 4 concrete pavers (24″ x 24″)
- 1 treated wood frame
- Towel hooks, curtain rod (optional)
- Exterior screws, plumbing fittings, hose or water hookup
Step-by-Step Guide
Step 1: Build a U-shaped frame using fence panels or slatted wood panels, and remember to attach securely to the house for stability.
Step 2: Lay down your concrete pavers over leveled gravel to create a clean, dry floor.
Step 3: Mount your shower fixture, connect to existing water supply or hose line.
Step 4: Add hooks for towels and a shelf for bath essentials.
#11. Rustic Corrugated Metal Outdoor Shower
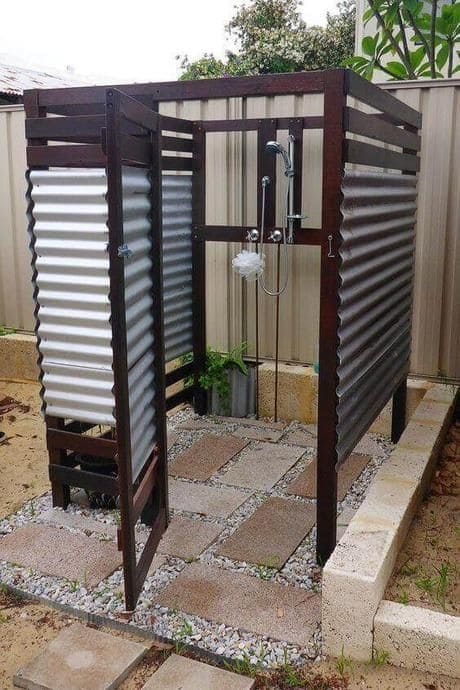
The dark wood frame and corrugated metal walls of this backyard shower create a private nook that feels both grounded and refreshingly open.
Bonus, this setup offers a calm sort of comfort that you can build with your own hands over a weekend.
Materials Needed
- 4 wooden posts (4″x4″, 7 ft tall)
- Corrugated metal panels (4 panels, 2′ x 6′)
- 12 concrete pavers (12″x12″)
- Gravel (3-4 bags)
- Outdoor shower kit with mixer and hose
- Galvanized screws and brackets
- Wood stain
- Concrete blocks
Step-by-Step Guide
Step 1: Level the ground and dig out a shallow rectangle for the base. Fill it with gravel and set your pavers in a pattern, leaving space between for more stone.
Step 2: Install the 4 corner posts using concrete or anchors for stability. Then treat the wood first to weatherproof it.
Step 3: Attach the corrugated panels to the posts using screws and brackets.
Step 4: Mount the outdoor shower unit onto the rear post and connect it to a garden hose.
#12. Recycled IBC Tank Outdoor Shower
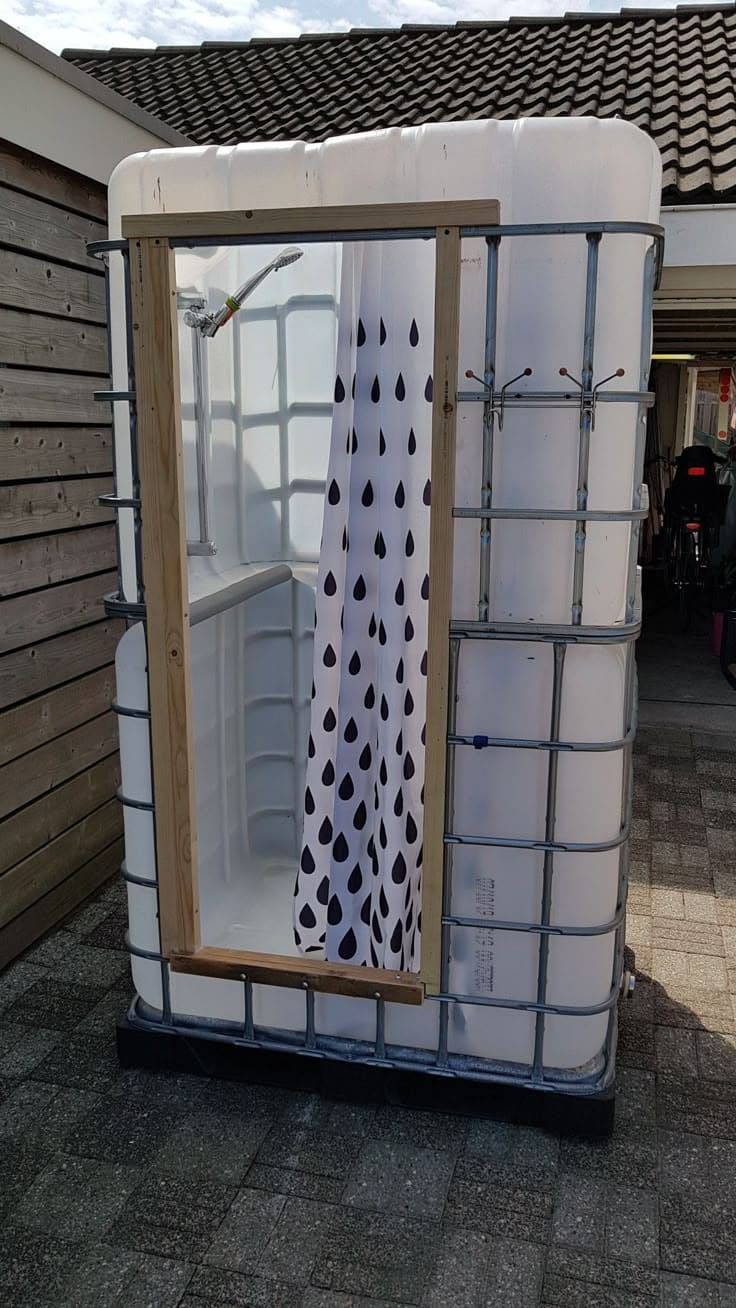
The inside of this DIY is surprisingly spacious and already water-resistant, and with a cutout door frame and a fun shower curtain, it instantly becomes a cozy, enclosed shower nook.
Specially, the best part is that you can often find used tanks for under $50.
Materials Needed
- 1 clean IBC tank (275–330 gallons)
- 4 wood planks (2″ x 3″)
- Shower curtain and rod
- Garden hose and handheld sprayer
- Screws, hand saw, sandpaper
Step-by-Step Guide
Step 1: Cut a door opening into one side of the IBC tank using a jigsaw, then sand the edges smooth.
Step 2: Build a simple wooden frame around the cutout to add structure and a place to mount your curtain.
Step 3: Install a shower curtain rod and hang a waterproof curtain for privacy.
Step 4: Attach a hose connector inside and fit with a shower sprayer.
#13. Solar Barrel Shower With Privacy Curtain
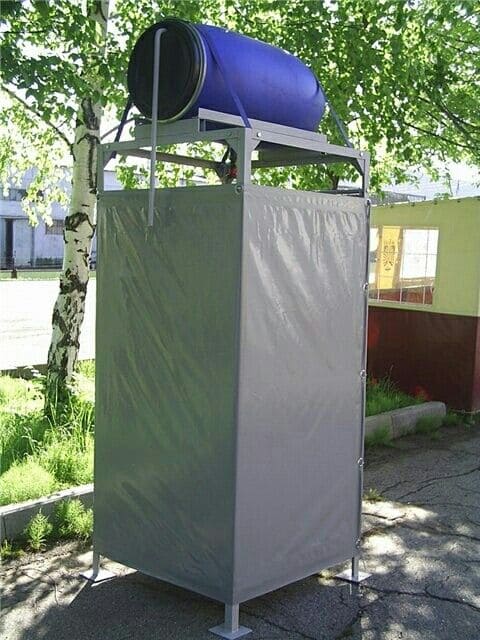
If you’ve got basic tools, a metal frame, and a little sun, this DIY outdoor shower could be your summer game-changer.
I helped a neighbor build one like this before a backyard wedding. The whole setup, including frame and curtain, came in under $100, especially if you can repurpose scrap metal or old tarps.
Materials Needed
- 1 water barrel (30–55 gallons)
- Metal tubing or angle iron (approx. 8 ft total)
- Waterproof tarp
- Basic shower head and hose attachment
- Welding machine
Step-by-Step Guide
Step 1: Build a square or rectangular metal frame, tall enough for someone to stand comfortably inside.
Step 2: Attach the curtain panels or tarp around the sides using grommets and hooks or zip ties.
Step 3: Place the water barrel securely on top of the frame. Make sure it’s tightly sealed but has an outlet for the shower hose.
Step 4: Connect the hose to the bottom of the barrel and mount the showerhead inside.
#14. Rustic Garden Bath and Shower Corner
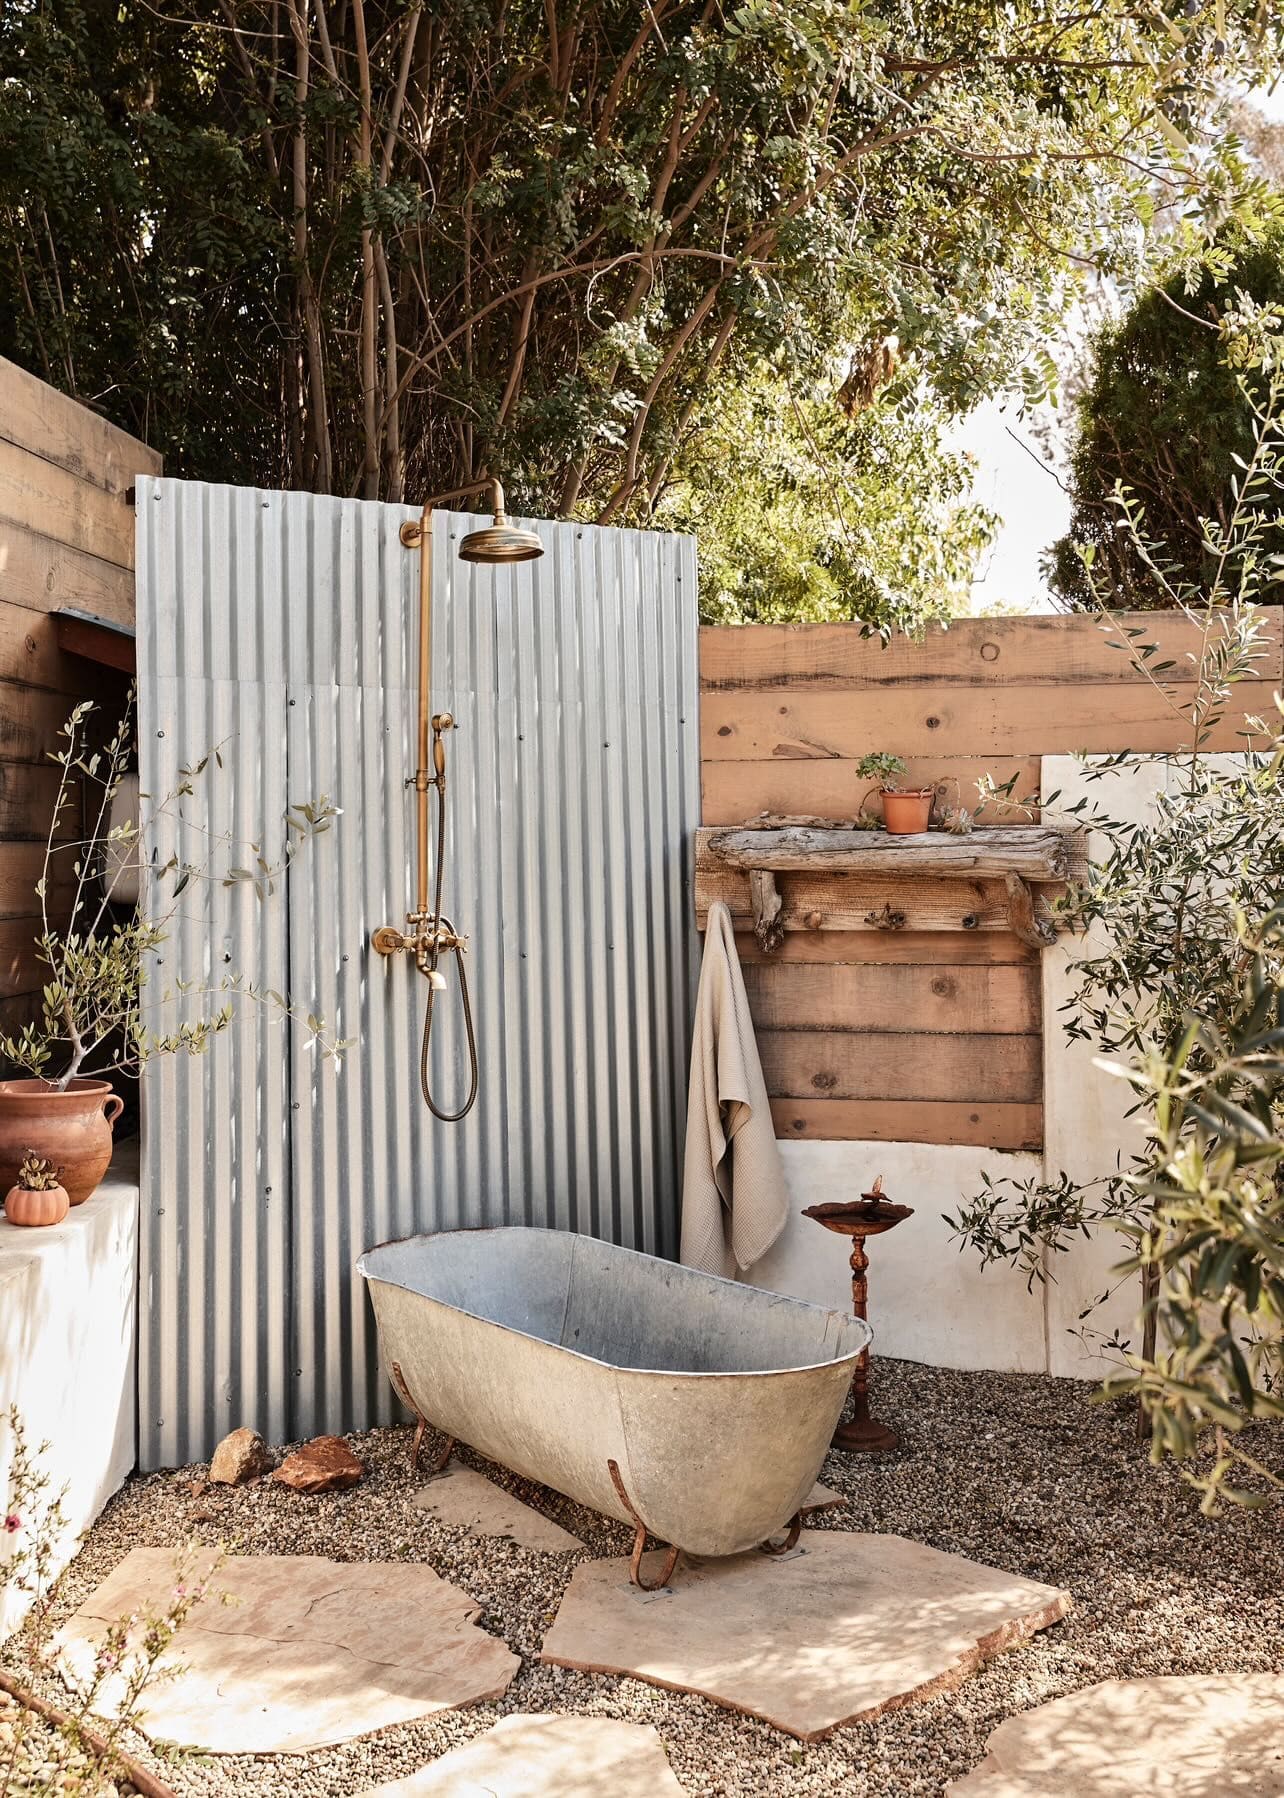
This setup feels like a hidden retreat carved out of time. I pieced mine together with what I already had in the garage – an old galvanized trough I picked up years ago at a flea market, some leftover wood planks, and a basic brass fixture I found online for under $70.
You can do the same project where you rinse off after a long garden session and sometimes just sit, soaking in the sunset and the scent of rosemary.
Materials Needed
- 1 galvanized steel tub (approx. 48″ long)
- Corrugated steel panel (1 sheet, 4′ x 6′)
- 3 wood planks (1″ x 6″)
- Brass shower fixture set
- Gravel and stepping stones (approx. 3 sq. ft. area)
- Hooks, shelf, towel
Step-by-Step Guide
Step 1: Set the steel panel against an existing fence or build a simple wood frame for support.
Step 2: Place gravel and large stone pavers on the ground to create a dry, mud-free zone.
Step 3: Position the tub and connect your shower fixture to a hose bib or outdoor plumbing line.
Step 4: Add finishing touches with a wooden shelf for bath oils, clay pots, and a hanging towel.
#15. Simple Freestanding Garden Shower
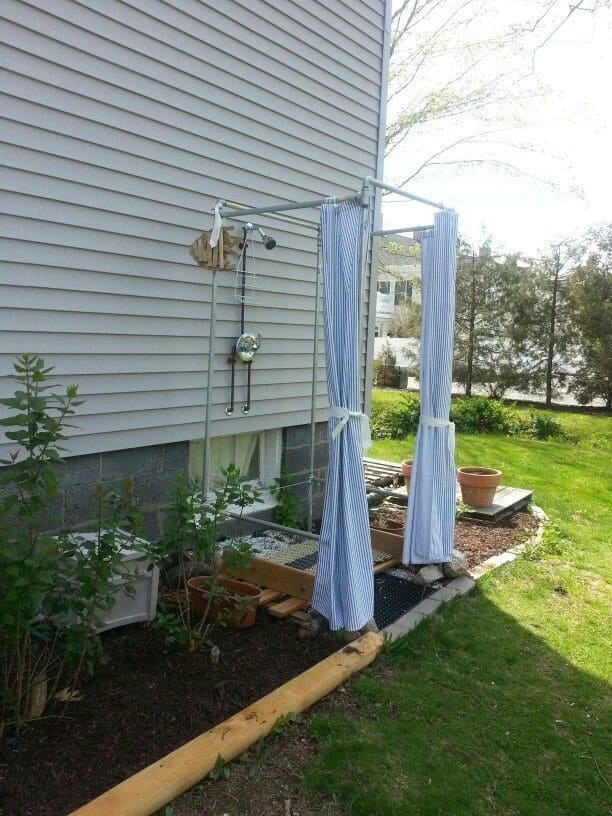
This DIY outdoor shower feels like something straight out of a summer cabin journal and of course, it’s convenient for any your outdoor activities.
Materials Needed
- PVC pipes (¾” or 1″, cut to fit 6′ height + 3′ width/depth)
- 4 elbow joints and 4 T-joints
- 1 outdoor shower fixture
- 2 waterproof shower curtain pieces and ties
- Optional: wood slats
Step-by-Step Guide
Step 1: Assemble the pipe frame by joining vertical and horizontal pipes with elbows and T-joints to create a rectangular structure. Secure ends by staking into the ground.
Step 2: Attach the outdoor shower fixture directly to the wall or to the pipe with brackets. Connect it to your garden hose.
Step 3: Hang the curtains using rings or ties, leaving the front open or loosely tied back.
Step 4: Place wood planks beneath your feet for drainage and comfort.
#16. Rustic Forest Shower Retreat
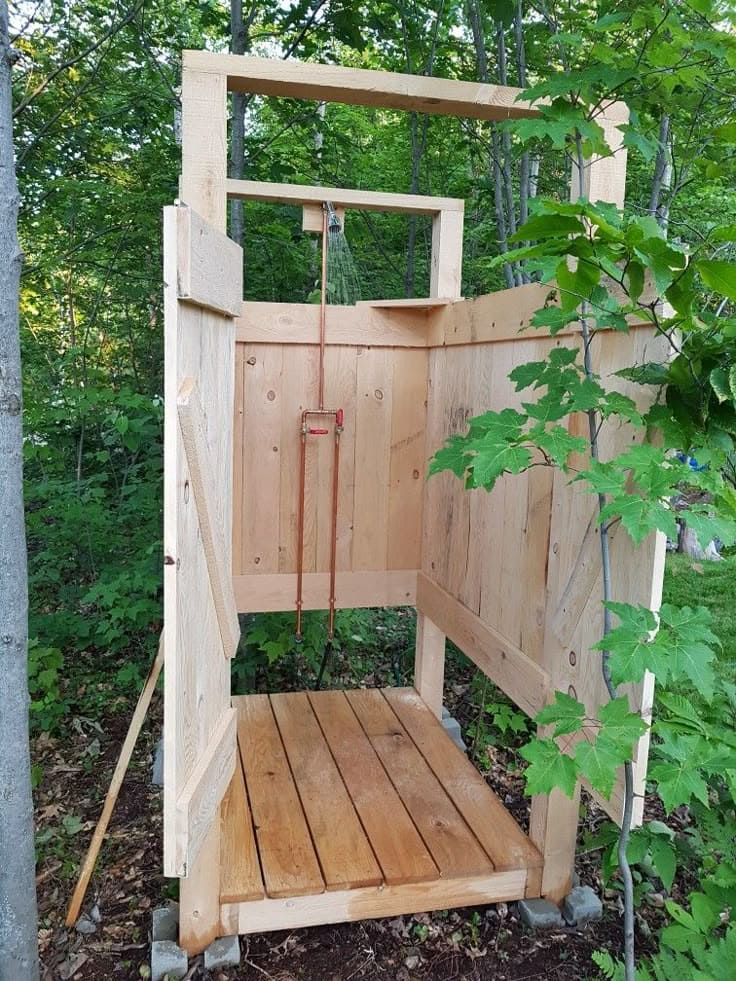
This DIY outdoor shower is built entirely from untreated pine planks and mounted on cinder blocks.
I built one just like it last summer with my uncle, using leftover lumber and a weekend of light work. It cost us around $150 total, including copper piping.
Materials Needed
- 8–10 pine planks (1×6″, 6–8 ft long)
- 4 posts (4×4″, 7 ft tall)
- 6 cinder blocks
- Copper piping (two lengths: one for cold, one for hot)
- Outdoor shower head and mixer
- Screws, wood sealer or stain (optional)
Step-by-Step Guide
Step 1: Level your ground and place cinder blocks as a foundation base.
Step 2: Build the floor platform using 2×4 joists and cover it with pine planks, then screw them down securely.
Step 3: Attach vertical posts to the platform corners, then fix wall panels (horizontal or vertical) using 1×6 boards.
Step 4: Install the copper pipes and mixer valve, attaching the shower head at the top.
#17. Nature-Lovers Log Shower Corner
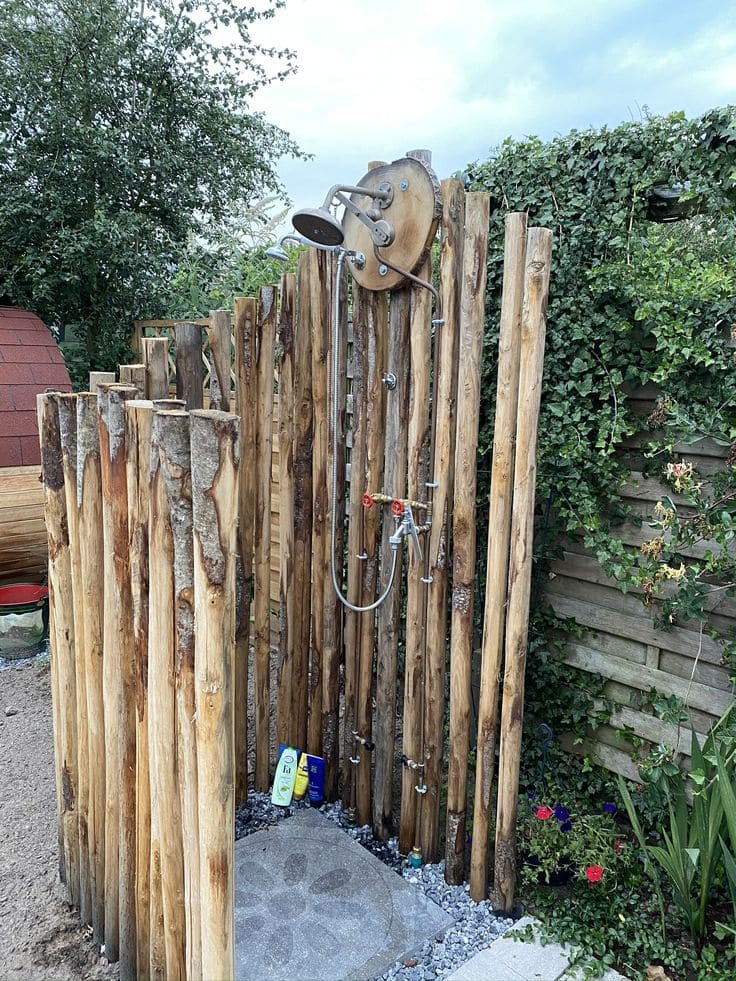
This outdoor shower feels like it was built right into the landscape like it simply grew there among the trees and ivy. The tall, uneven logs give a wonderfully imperfect, earthy feel.
In addition, you don’t need a high-end budget for this kind of soul-soothing experience, just a handful of stripped logs, a bit of time, and a love for things that age beautifully with weather.
Materials Needed
- 18–22 wooden poles (approx. 6 ft tall, 3–4 inches in diameter)
- 1 round wooden disc (12–16 inches wide)
- 1 flat stepping stone (2 ft x 2 ft)
- Gravel (2–3 bags)
- Outdoor shower kit with hose and valves
- Galvanized brackets and screws
- Optional: Wood sealer
Step-by-Step Guide
Step 1: Clear and level the shower area. Pour and spread the gravel for drainage, then set your large paver stone in the center.
Step 2: Sink your logs vertically into the ground (about 10–12 inches deep) in a rough semi-circle. Use brackets to secure them together if needed.
Step 3: Attach the wooden disc near the top of one log. Mount the showerhead and secure the plumbing to the disc, then connect your water supply.
Step 4: Finish with a coat of clear wood sealer if desired. Now you can add small stones or plants at the base to soften the edges.
#18. Rustic Brick Outdoor Shower
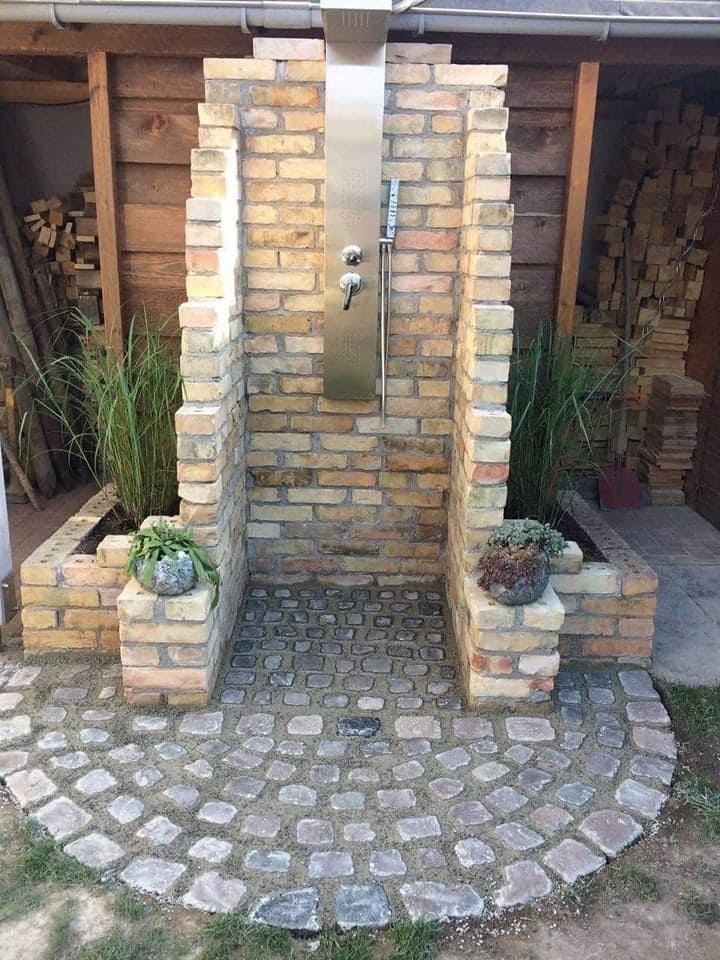
Here’s an outdoor shower that feels like it was plucked from a countryside villa. What stands out most is the cobblestone arc as it invites you in like a tiny courtyard.
Materials Needed
- About 150 vintage-style bricks
- 1 stainless steel or brushed metal shower panel
- Cement and sand mix (2–3 bags)
- Cobblestones or pavers (approx. 40 sq ft)
- 2 planters and ornamental grass or succulents
Step-by-Step Guide
Step 1: Clear and level the area, then lay the cobblestones in a half-circle pattern using sand or mortar.
Step 2: Build two short brick walls and a taller back wall, leaving a center cavity for the plumbing panel.
Step 3: Install the shower panel securely against the bricks, anchoring it with screws and sealing connections.
Step 4: Add decorative planters and tidy up the surrounding area with mulch or grass.
#19. Minimalist Solar Shower
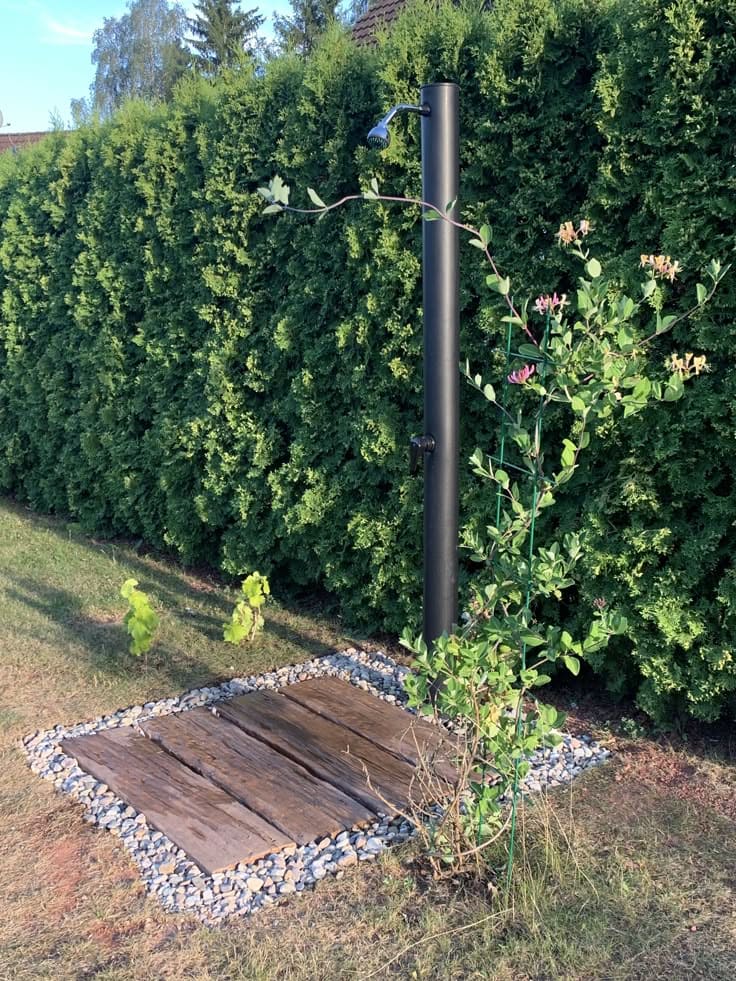
This outdoor solar shower setup is incredibly simple but it hits all the right notes. The tall black pipe soaks up the sun to warm your water, and the rough timber beneath your feet adds that barefoot in the forest feeling.
Materials Needed
- 1 black solar shower pipe (approx. 6 ft) with shower head and valve
- 3 reclaimed wooden planks (2 ft x 1 ft each)
- 2 bags of river stones
- Optional: climbing plant (honeysuckle or jasmine) + garden stake
Step-by-Step Guide
Step 1: Level a small patch of ground and create a square base using the river rocks.
Step 2: Lay the wood planks over the stone bed, spaced slightly apart for drainage.
Step 3: Secure the solar shower pipe upright using concrete footing or garden anchors.
Step 4: Add your climbing plant and let it weave its way up over time for a soft, natural enclosure.
