As October nights grow longer and cooler, the magic of Halloween takes over the air. Streets glow with eerie lights, leaves crunch underfoot, and the thrill of a spooky adventure calls out to every passerby.
A well-designed Halloween tunnel can turn an ordinary walkway into a spine-tingling journey filled with suspense, surprise, and a touch of fun.
From glowing arches and creepy crawlies to fog-filled passages and haunted wooden gateways, these creative tunnels spark curiosity before guests even step inside.
They set the tone for an unforgettable evening, inviting visitors to step into a world where every shadow has a story and every turn holds a new scare.
#1. Skull-Arch Halloween Entrance
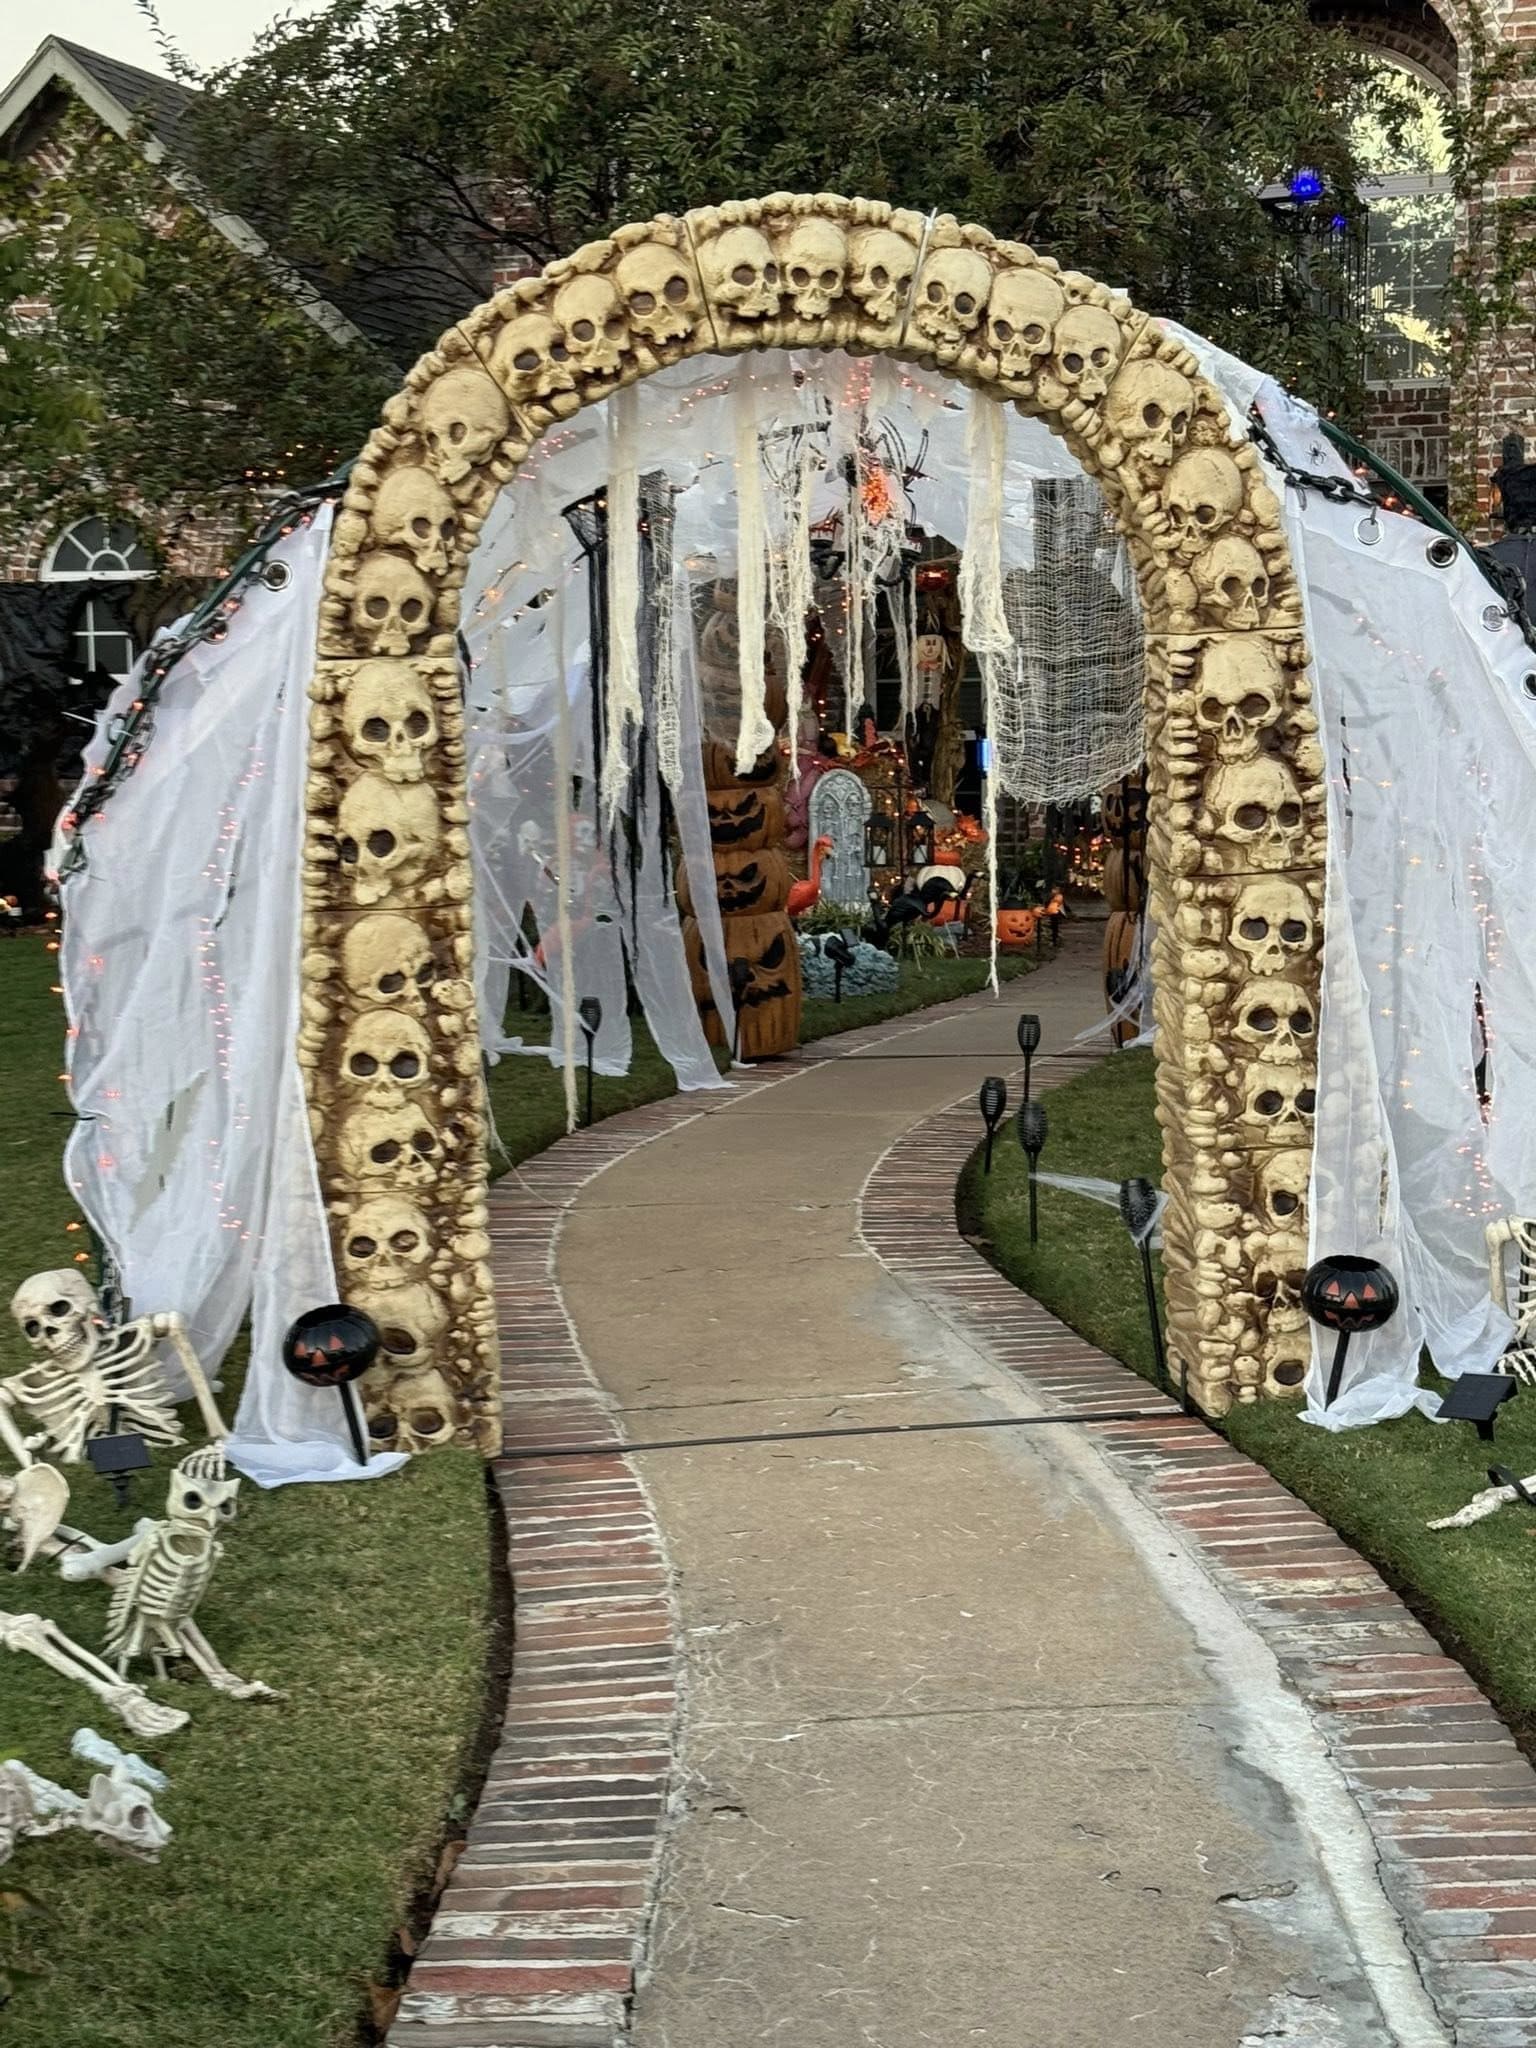
Nothing says “spooky welcome” like walking through a towering arch made entirely of skulls. This eerie yet impressive entrance sets the tone for a night of fright, drawing guests in with its grim charm.
Draped ghostly fabric and tattered gauze sway in the breeze, creating a haunting movement that pairs perfectly with the skulls’ hollow stares.
Whether for a haunted house, trick-or-treat night, or a Halloween party, this entrance makes a bold statement before anyone even steps inside.
Materials Needed
- Lightweight arch frame (PVC or metal)
- 40-50 foam or plastic skull props
- White or gray gauze fabric (3-4 yards)
- String lights (warm white or orange, 2-3 strands)
- Hot glue gun and glue sticks
- Zip ties or floral wire
- Optional: plastic bones or skeleton hands
Step-by-step Guide
Step 1: Assemble your arch frame and ensure it’s secured firmly into the ground. For outdoor setups, anchor with sandbags or stakes for stability.
Step 2: Arrange skulls along the frame, starting at the bottom and working upward. Then glue or zip-tie each in place, staggering angles for a more natural, chaotic look.
Step 3: Drape gauze fabric loosely over sections of the arch, letting some strips hang freely to move in the wind.
Step 4: Weave string lights through the skulls and behind the gauze, making sure they’re evenly spaced for a glowing, otherworldly effect.
Step 5: Add any optional accents, such as skeletal hands reaching out from the sides, to give guests a playful scare as they pass through.
#2. Creepy Pumpkin & Skeleton Tunnel
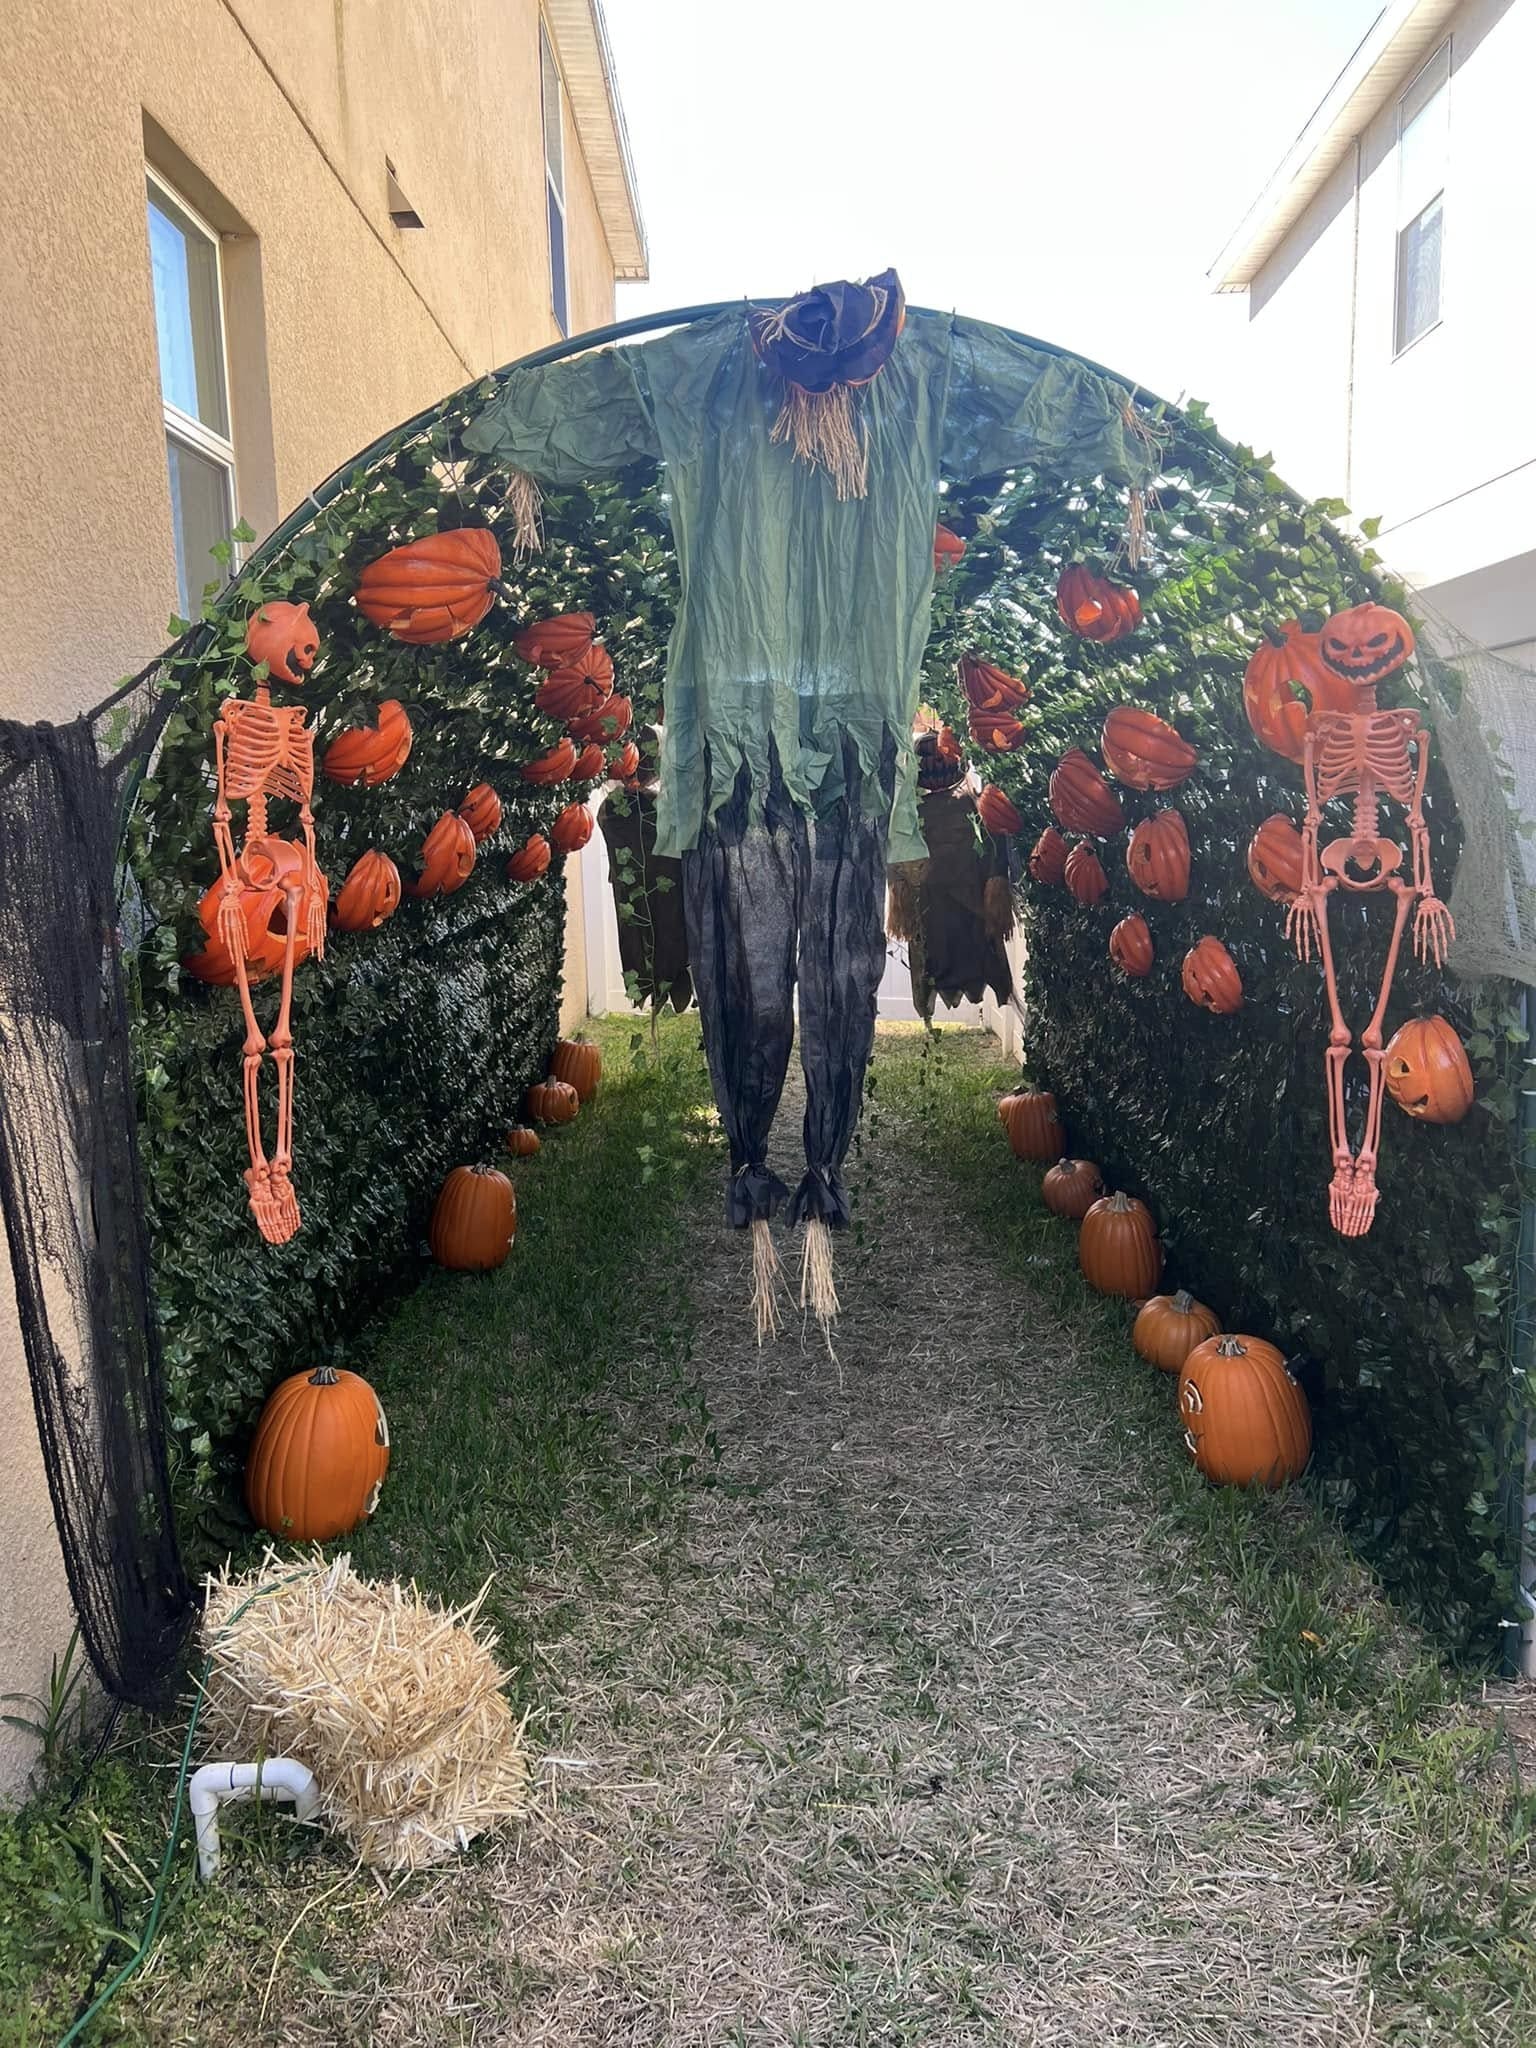
Wow, this pumpkin-lined tunnel brings the perfect mix of spooky fun and farmyard charm to your Halloween walkway.
Lush green vine panels create the backdrop, while bright orange pumpkins line both sides for a harvest-season feel.
Dangling from the arch, a ragged scarecrow shirt sways in the breeze, flanked by grinning skeletons painted pumpkin-orange for an extra eerie twist.
Materials Needed
- Metal or PVC tunnel frame (approx. 8-10 ft long)
- Artificial vine panels or green mesh
- 20-30 plastic pumpkins (mix of sizes)
- 2-4 hanging skeleton decorations
- 1 scarecrow shirt and hat with straw accents
- Black creepy cloth
- Zip ties and strong twine
Step-by-step Guide
Step 1: Set up your tunnel frame in the desired location, ensuring it’s stable and secure.
Step 2: Attach artificial vine panels or green mesh along the sides and top, making sure there are no gaps. Then secure with zip ties.
Step 3: Evenly space and attach the plastic pumpkins to the vine walls using zip ties or strong twine. You can mix in different sizes for a natural look.
Step 4: Hang the scarecrow shirt in the center of the arch and stuff the sleeves lightly for shape. Then top it with a straw-filled hat.
Step 5: Add orange-painted skeletons to both sides of the tunnel and drape black creepy cloth to give depth and a haunted feel.
Step 6: Finally, scatter extra pumpkins at the base and add a hay bale or two for a final harvest touch.
#3. Grim Reaper Tunnel Entrance
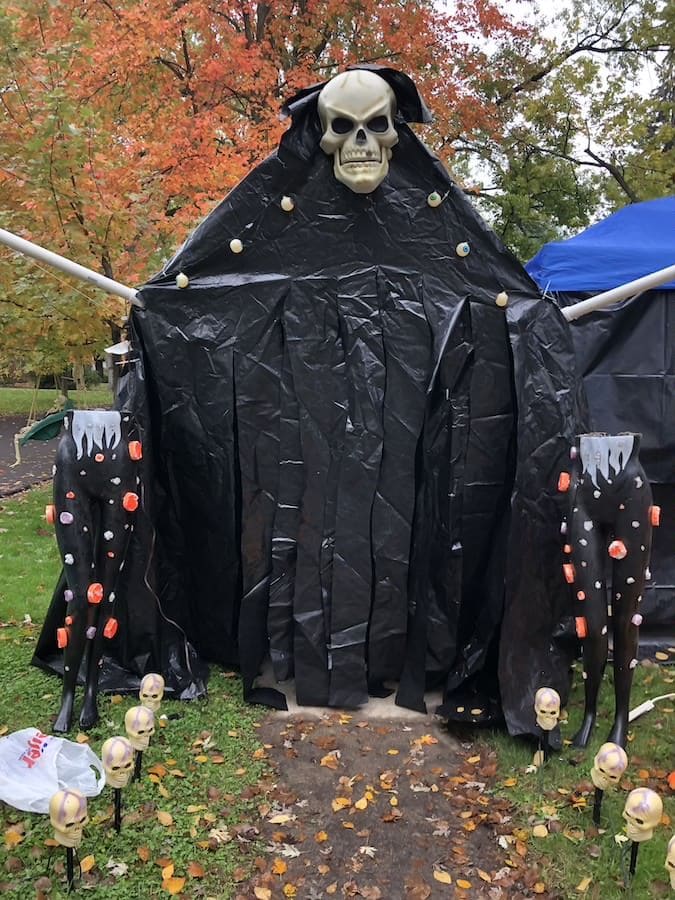
You can see this chilling Halloween tunnel uses black plastic sheeting to create a pitch-dark passage, framed by skeletal guards and eerie glowing eyes.
The oversized skull perched high above makes visitors feel like they’re stepping into another realm.
This setup is perfect if you want a simple structure with maximum fear factor. The way the entrance narrows with dangling strips adds to the unsettling, curtain-like reveal of what lies beyond.
Materials Needed
- 1 large plastic skull (12″–15″)
- Black plastic sheeting (10 ft × 20 ft)
- Sturdy frame or PVC pipe (8 ft height × 6 ft width)
- Black duct tape
- 6 plastic skull stakes
- Decorative props (eyeball lights, skeleton guards, etc.)
- Ground stakes or weights
Step-by-step Guide
Step 1: Build your frame using PVC pipes or a metal arch, ensuring it’s tall enough for guests to walk under comfortably.
Step 2: Drape the black plastic sheeting over the frame, letting it cover the sides fully. Then secure with duct tape or clips.
Step 3: Cut strips in the front sheet to create a curtain effect, so people push through to enter.
Step 4: Attach the large skull at the top center of the arch. You can secure it with heavy-duty zip ties.
Step 5: Add creepy details like eyeball lights along the hood area, skeleton guards on each side, and skull stakes leading up the path.
Step 6: Now you can anchor the base with ground stakes or heavy weights so wind doesn’t shift your tunnel.
#4. Spinning Tunnel of Terror
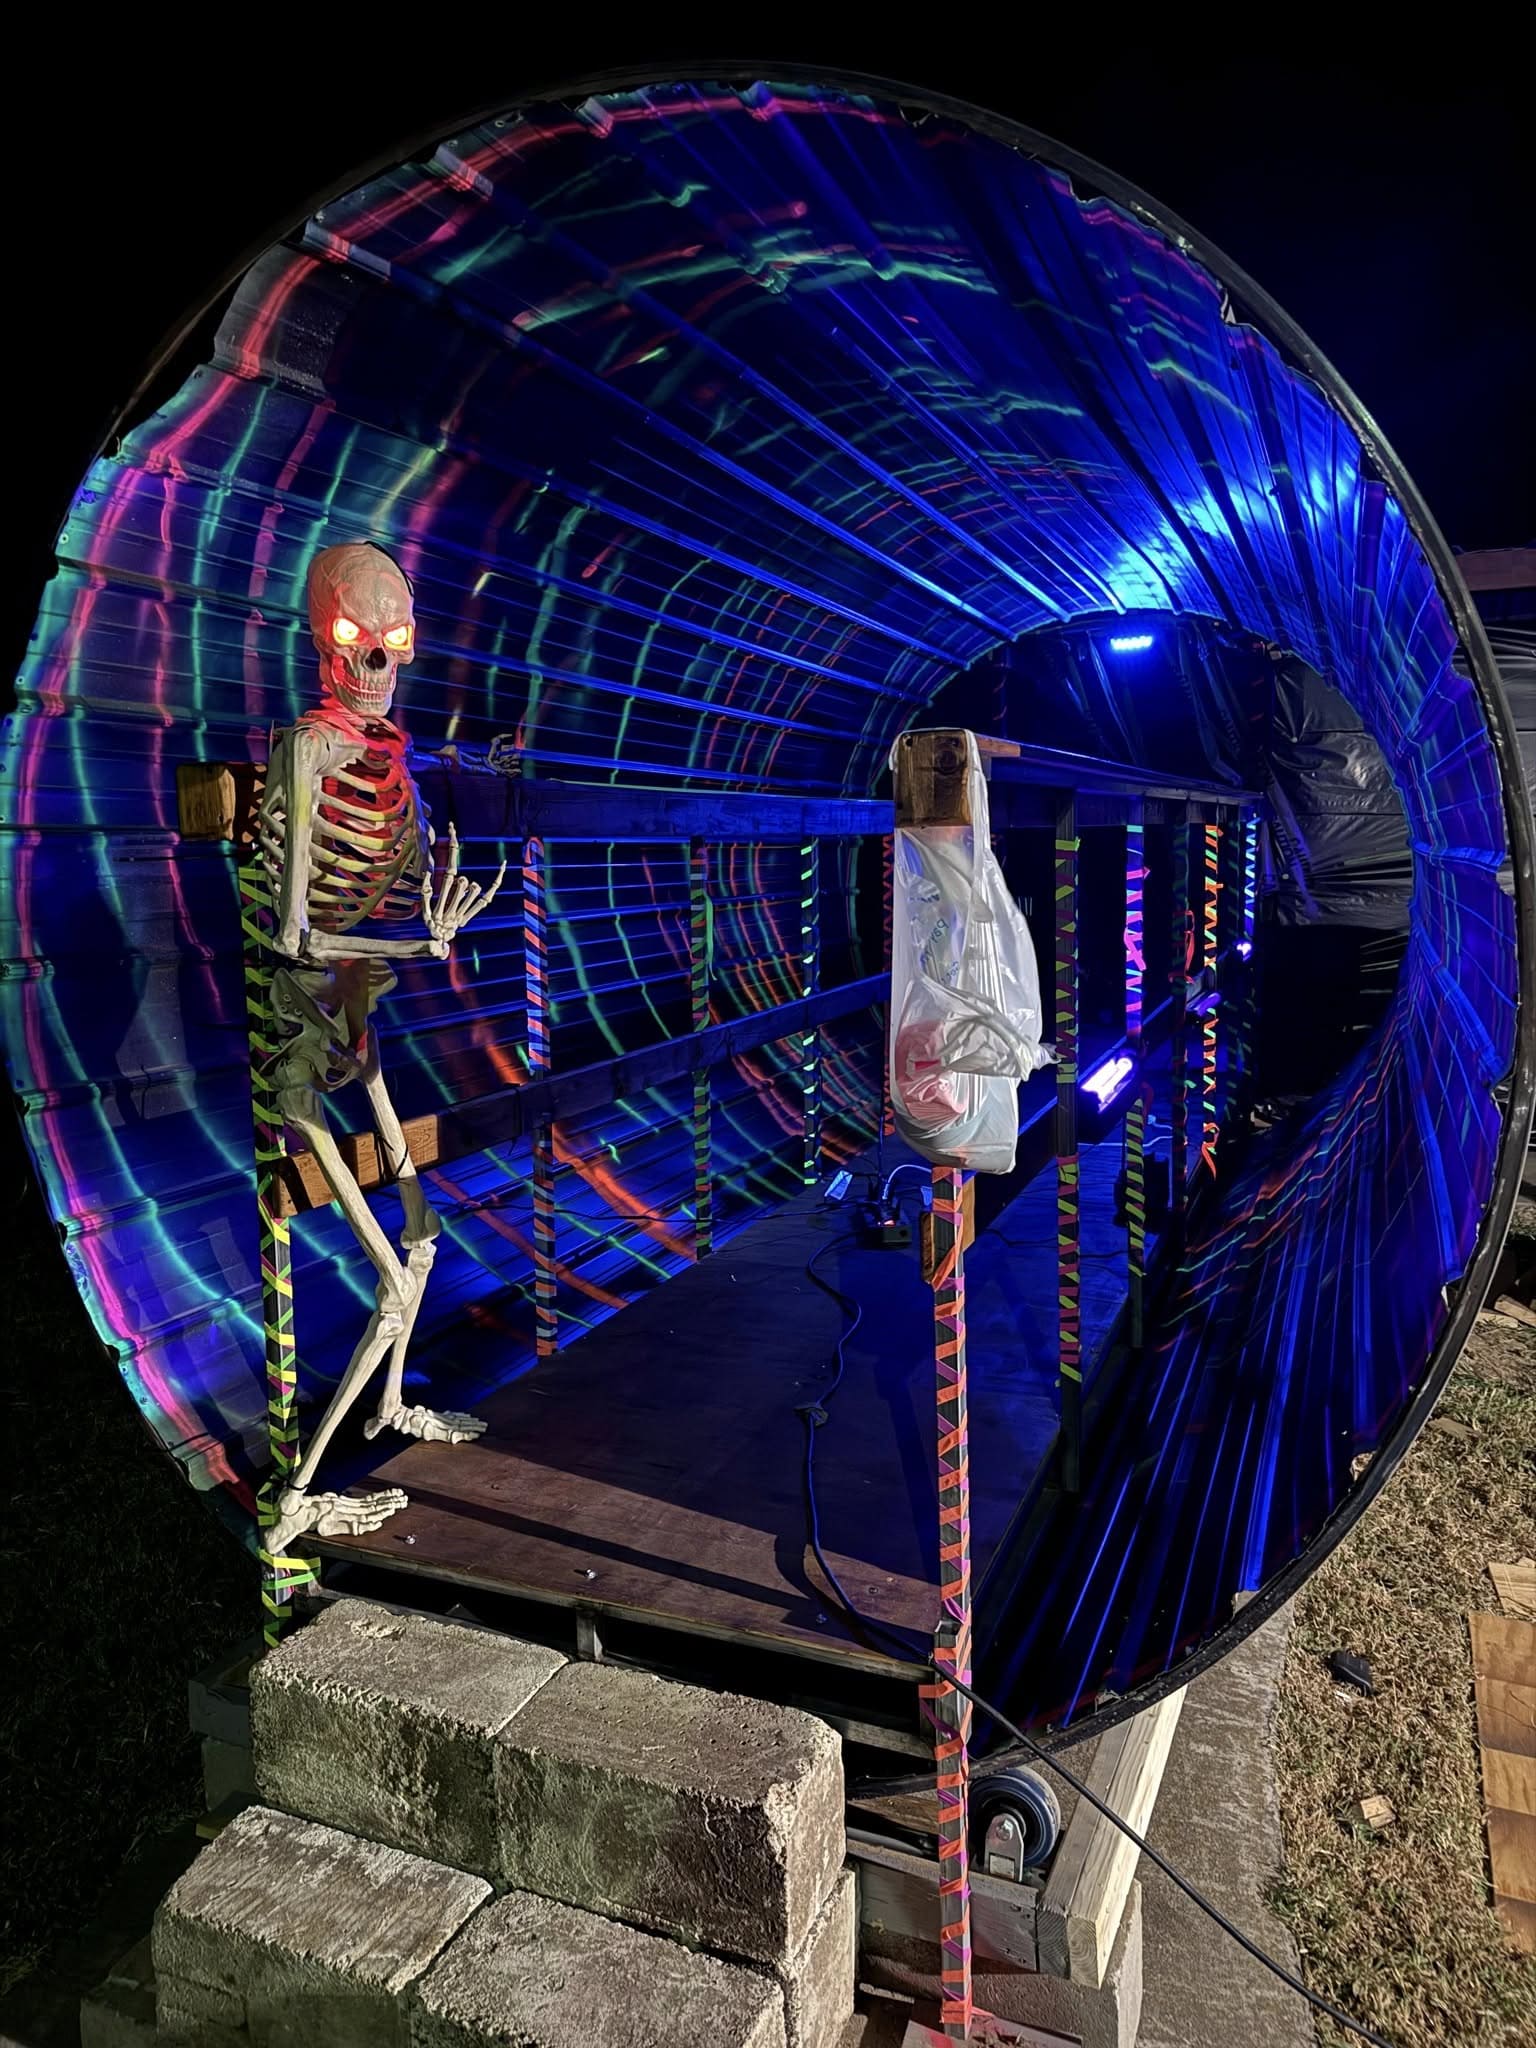
Step inside this eerie, spinning vortex and feel your senses swirl into another dimension. The glowing neon patterns create the illusion that the walls are moving, pulling you deeper into a haunted realm.
Plus, a skeleton guard with glowing red eyes watches your every step, making sure there’s no turning back.
This setup is perfect for haunted trails or yard walk-throughs, giving visitors a thrilling disorienting effect they won’t soon forget.
Materials Needed
- Large cylindrical tunnel frame (wood or metal)
- Black tarp or fabric
- Neon UV-reactive fabric or vinyl sheets with swirling designs
- Blacklight fixtures (4-6 units)
- Skeleton prop with LED eyes
- Motorized spinning mechanism (optional)
- Wooden walkway
- Safety railings and secure base (cinder blocks or wood frame)
Step-by-step Guide
Step 1: Build or secure a large cylindrical frame that can encase your walkway. Ensure it’s stable and anchored with heavy bases.
Step 2: Wrap the interior with UV-reactive neon patterned sheets, leaving enough space for blacklights to shine.
Step 3: Install the blacklight fixtures evenly along the inside of the tunnel to highlight the glowing designs.
Step 4: Place a wooden walkway through the center and secure handrails for safety. If you want extra thrill, use a motor to rotate the tunnel slowly.
Step 5: Position a skeleton prop at the entrance with LED eyes to create a chilling first impression.
#5. Haunted Woodland Archway
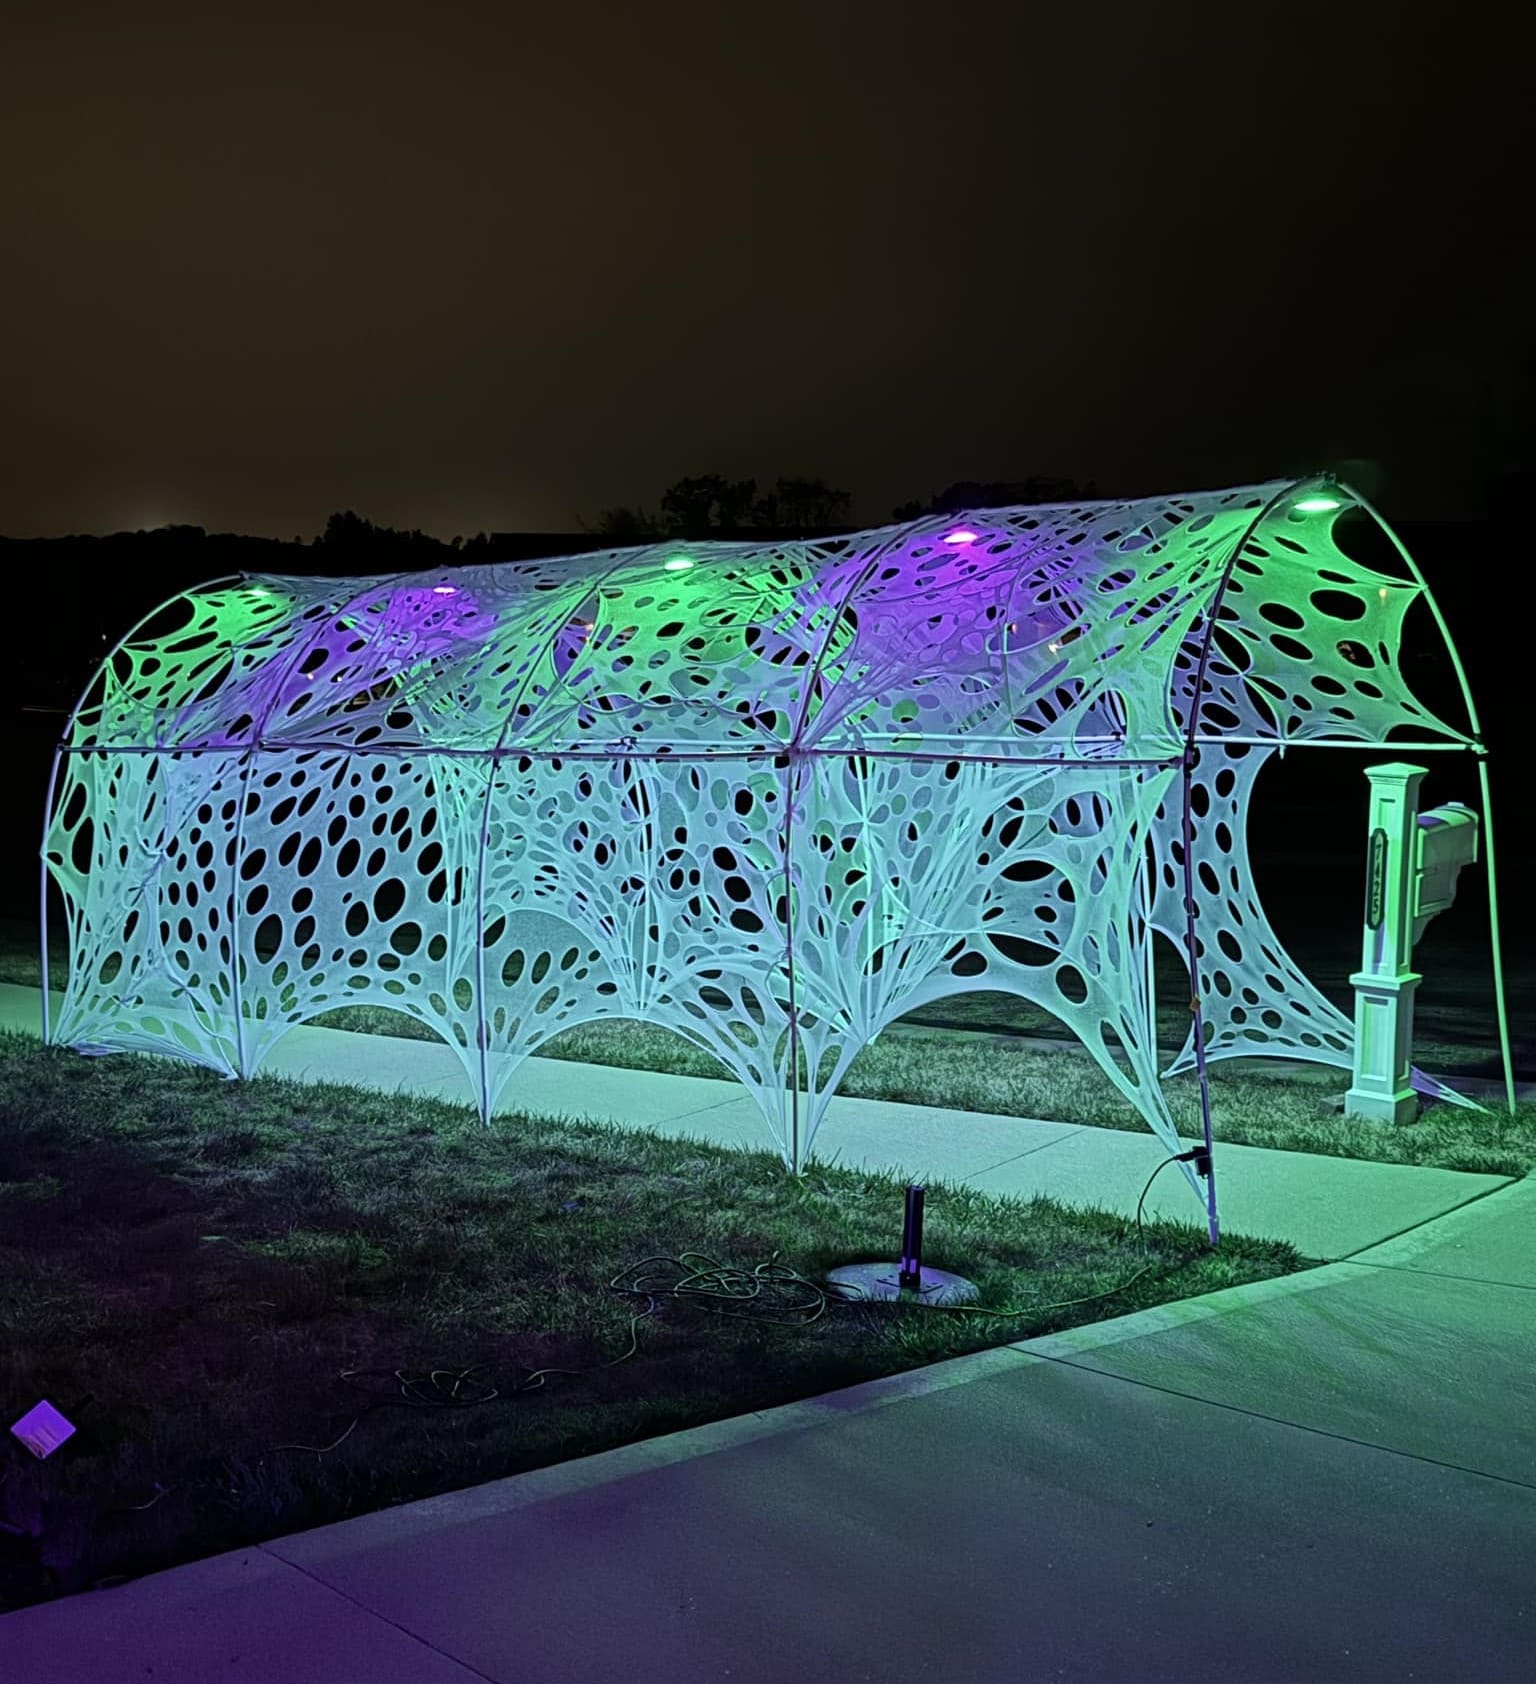
How about transforming your side yard into a chilling passage with this haunted woodland archway?
Using twisted branches, dried leaves, and eerie black netting, it feels like stepping into a cursed forest from a ghost story.
The natural textures make it look realistic in daylight, while the dangling fabric strips sway in the breeze to create an unsettling motion at night.
Materials Needed
- 4-6 large branches or driftwood pieces (6-8 ft tall)
- Black creepy cloth or netting (at least 12 ft)
- Assorted dried leaves
- Zip ties or floral wire
- Two sturdy base supports (buckets with cement or weighted stands)
- Optional: LED spotlights
Step-by-step Guide
Step 1: Place your base supports on each side of the pathway, ensuring they are sturdy enough to hold the branches upright.
Step 2: Attach the tallest branches vertically to the supports using zip ties or floral wire, then add horizontal branches across the top to form the arch shape.
Step 3: Layer the black creepy cloth over the arch, letting some strips hang loosely for a tattered effect.
Step 4: Weave in dried leaves or faux foliage along the frame to mimic an abandoned woodland look.
Step 5: For added drama at night, set up LED spotlights at the base to cast shadows through the branches and fabric.
#6. Giant Spider Web Tunnel
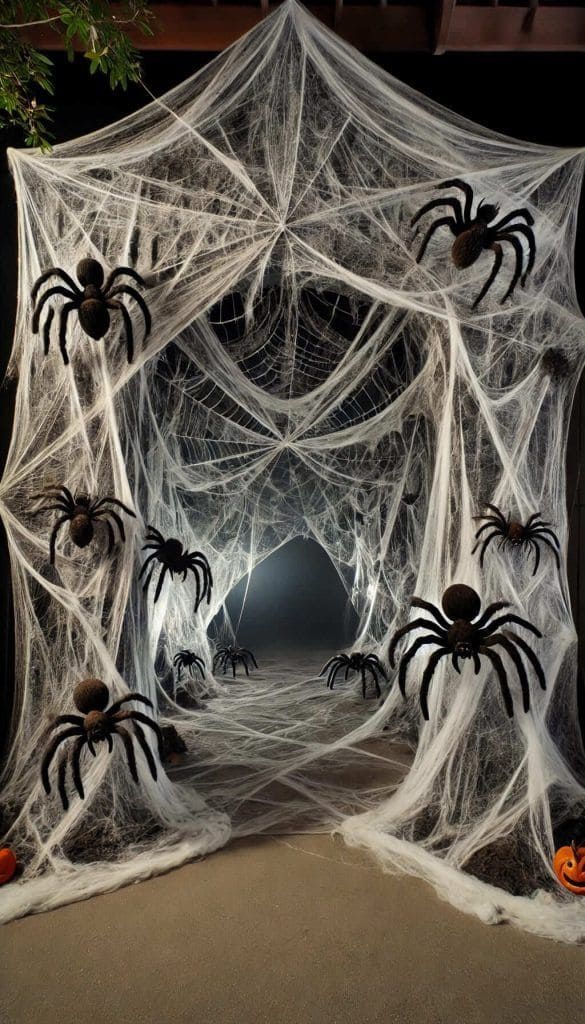
Draped with thick white webbing and guarded by two life-sized skeletons, this tunnel creates the illusion of stepping into a predator’s trap.
You can see a massive spider lurks at the top, clutching a “DANGER” sign, while smaller creepy crawlers cling to the webs for extra fright.
The skulls lining the path make every step feel like you’re entering forbidden territory. This setup is perfect for a haunted house entrance where you want guests to shiver before they even knock.
Materials Needed
- 2 life-sized skeleton props
- Large fake spider (18″-24″)
- 1 “DANGER” sign
- Thick white Halloween webbing (10-15 oz)
- 10-15 small plastic spiders
- Plastic skulls for pathway decor (8-10 pieces)
- Wire arch frame
- Zip ties or twist ties
Step-by-step Guide
Step 1: Place your wire arch frame or garden trellis over the path you want to transform. Then secure it firmly so it won’t wobble.
Step 2: Stretch the white webbing over the arch, pulling and tearing it slightly to create a realistic, tattered look. Let some strands hang loose for a creepier effect.
Step 3: Position the two skeleton props on either side of the tunnel entrance, attaching them to the frame with zip ties so they look like they’re holding the web.
Step 4: Fix the large spider at the top center of the arch with the “DANGER” sign hanging just below it. You can add smaller spiders randomly throughout the webbing.
Step 5: Line the walkway with skulls, spacing them evenly on both sides to guide guests through the terrifying tunnel. Then add a few hidden lights for nighttime drama.
#7. Snowy Spider Tunnel Entrance
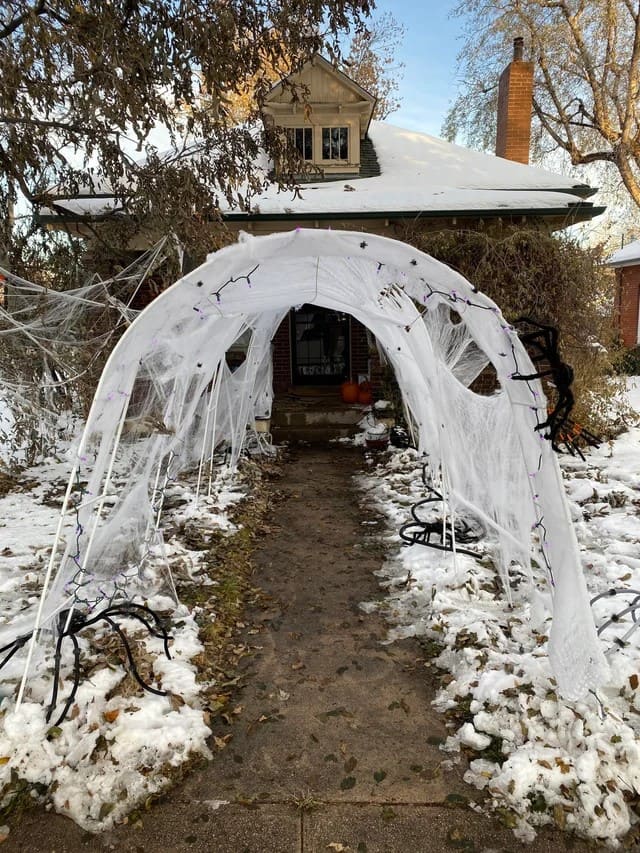
For those who love blending the eerie with the unexpected, this snowy spider tunnel turns a frosty front yard into a chilling Halloween welcome.
The white webbing naturally blends with the snow, creating a scene that feels like winter has collided with a haunted night.
Giant black spiders lurk along the path, their long legs stretching into the white drifts, making every step towards the door a thrill. Subtle purple string lights add a gentle, mysterious glow, guiding trick-or-treaters right into the web.
Materials Needed
- 1 garden arch tunnel frame (approx. 8-10 ft long × 6-7 ft tall)
- 6-8 bags of stretchable spider webbing
- 4-6 giant spider props (about 24″-36″)
- 1-2 sets of purple LED string lights (20-30 ft each)
- Clear fishing line or zip ties
- Optional: stakes
Step-by-step Guide
Step 1: Place the garden arch frame securely along your front path, ensuring it’s stable against snow or wind. If needed, anchor it with stakes or heavy bases.
Step 2: Begin stretching the spider webbing from one side of the frame to the other, layering it to create a dense, cocoon-like tunnel.
Step 3: Attach giant spiders at different heights, some on the frame and some low near the snow, to create the feeling of a live infestation.
Step 4: Wrap the purple LED lights around the arch, weaving them through the webbing so the glow appears soft and haunting.
Step 5: Step back, adjust any gaps, and fluff the web for maximum fullness. The contrast of black spiders on snowy white will make every visitor’s approach unforgettable.
#8. Glow-in-the-Dark Spider Tunnel
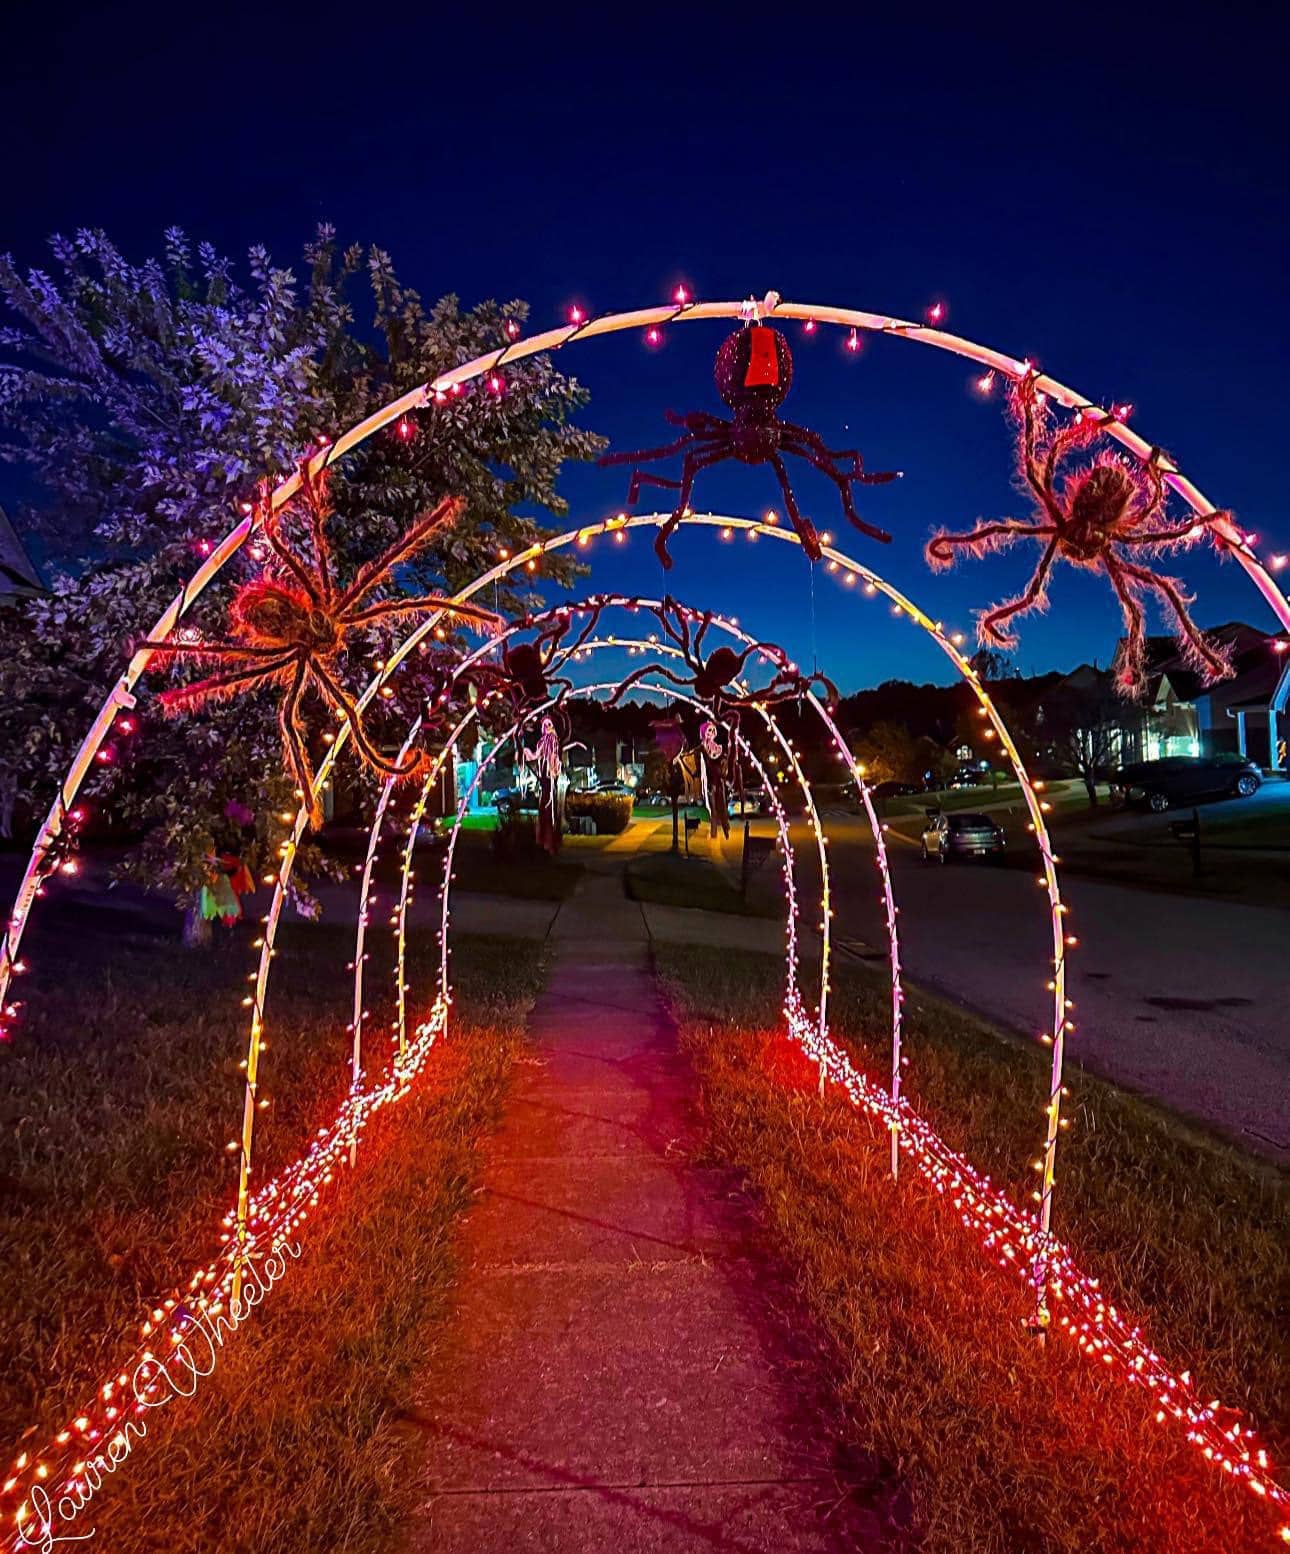
Picture the street is quiet, the sky is deep indigo, and your sidewalk shimmers with eerie neon light. Hanging above, giant glowing spiders loom overhead, their long legs stretching across illuminated arches.
As guests walk through, the combination of warm orange and purple string lights casts shifting shadows, making it feel like the spiders are alive and ready to crawl down.
This tunnel is a spectacular choice for anyone who wants to mix creepy crawly vibes with festive neighborhood cheer. The soft glow guides trick-or-treaters safely, while the playful scare factor keeps everyone buzzing with excitement.
Materials Needed
- 5-6 PVC pipes or metal conduit arches (8 ft each)
- 200-300 ft of orange and purple LED string lights
- 6-8 giant faux spiders (24-36 in leg span)
- Zip ties (at least 50)
- Outdoor extension cords
- Ground stakes or rebar
Step-by-step Guide
Step 1: Space your arches evenly along the pathway, securing them into the ground with stakes or rebar.
Step 2: Wrap each arch tightly with LED lights, alternating colors for a glowing gradient effect.
Step 3: Attach giant spiders to the top and sides of the arches using zip ties, ensuring they’re secure against wind.
Step 4: Plug in the lights, test for even coverage, and adjust positioning for maximum impact.
Step 5: Finally, add a few hanging cobweb strands or dangling plastic insects for extra creep factor.
#9. Webbed Walkway with Dangling Ghoul
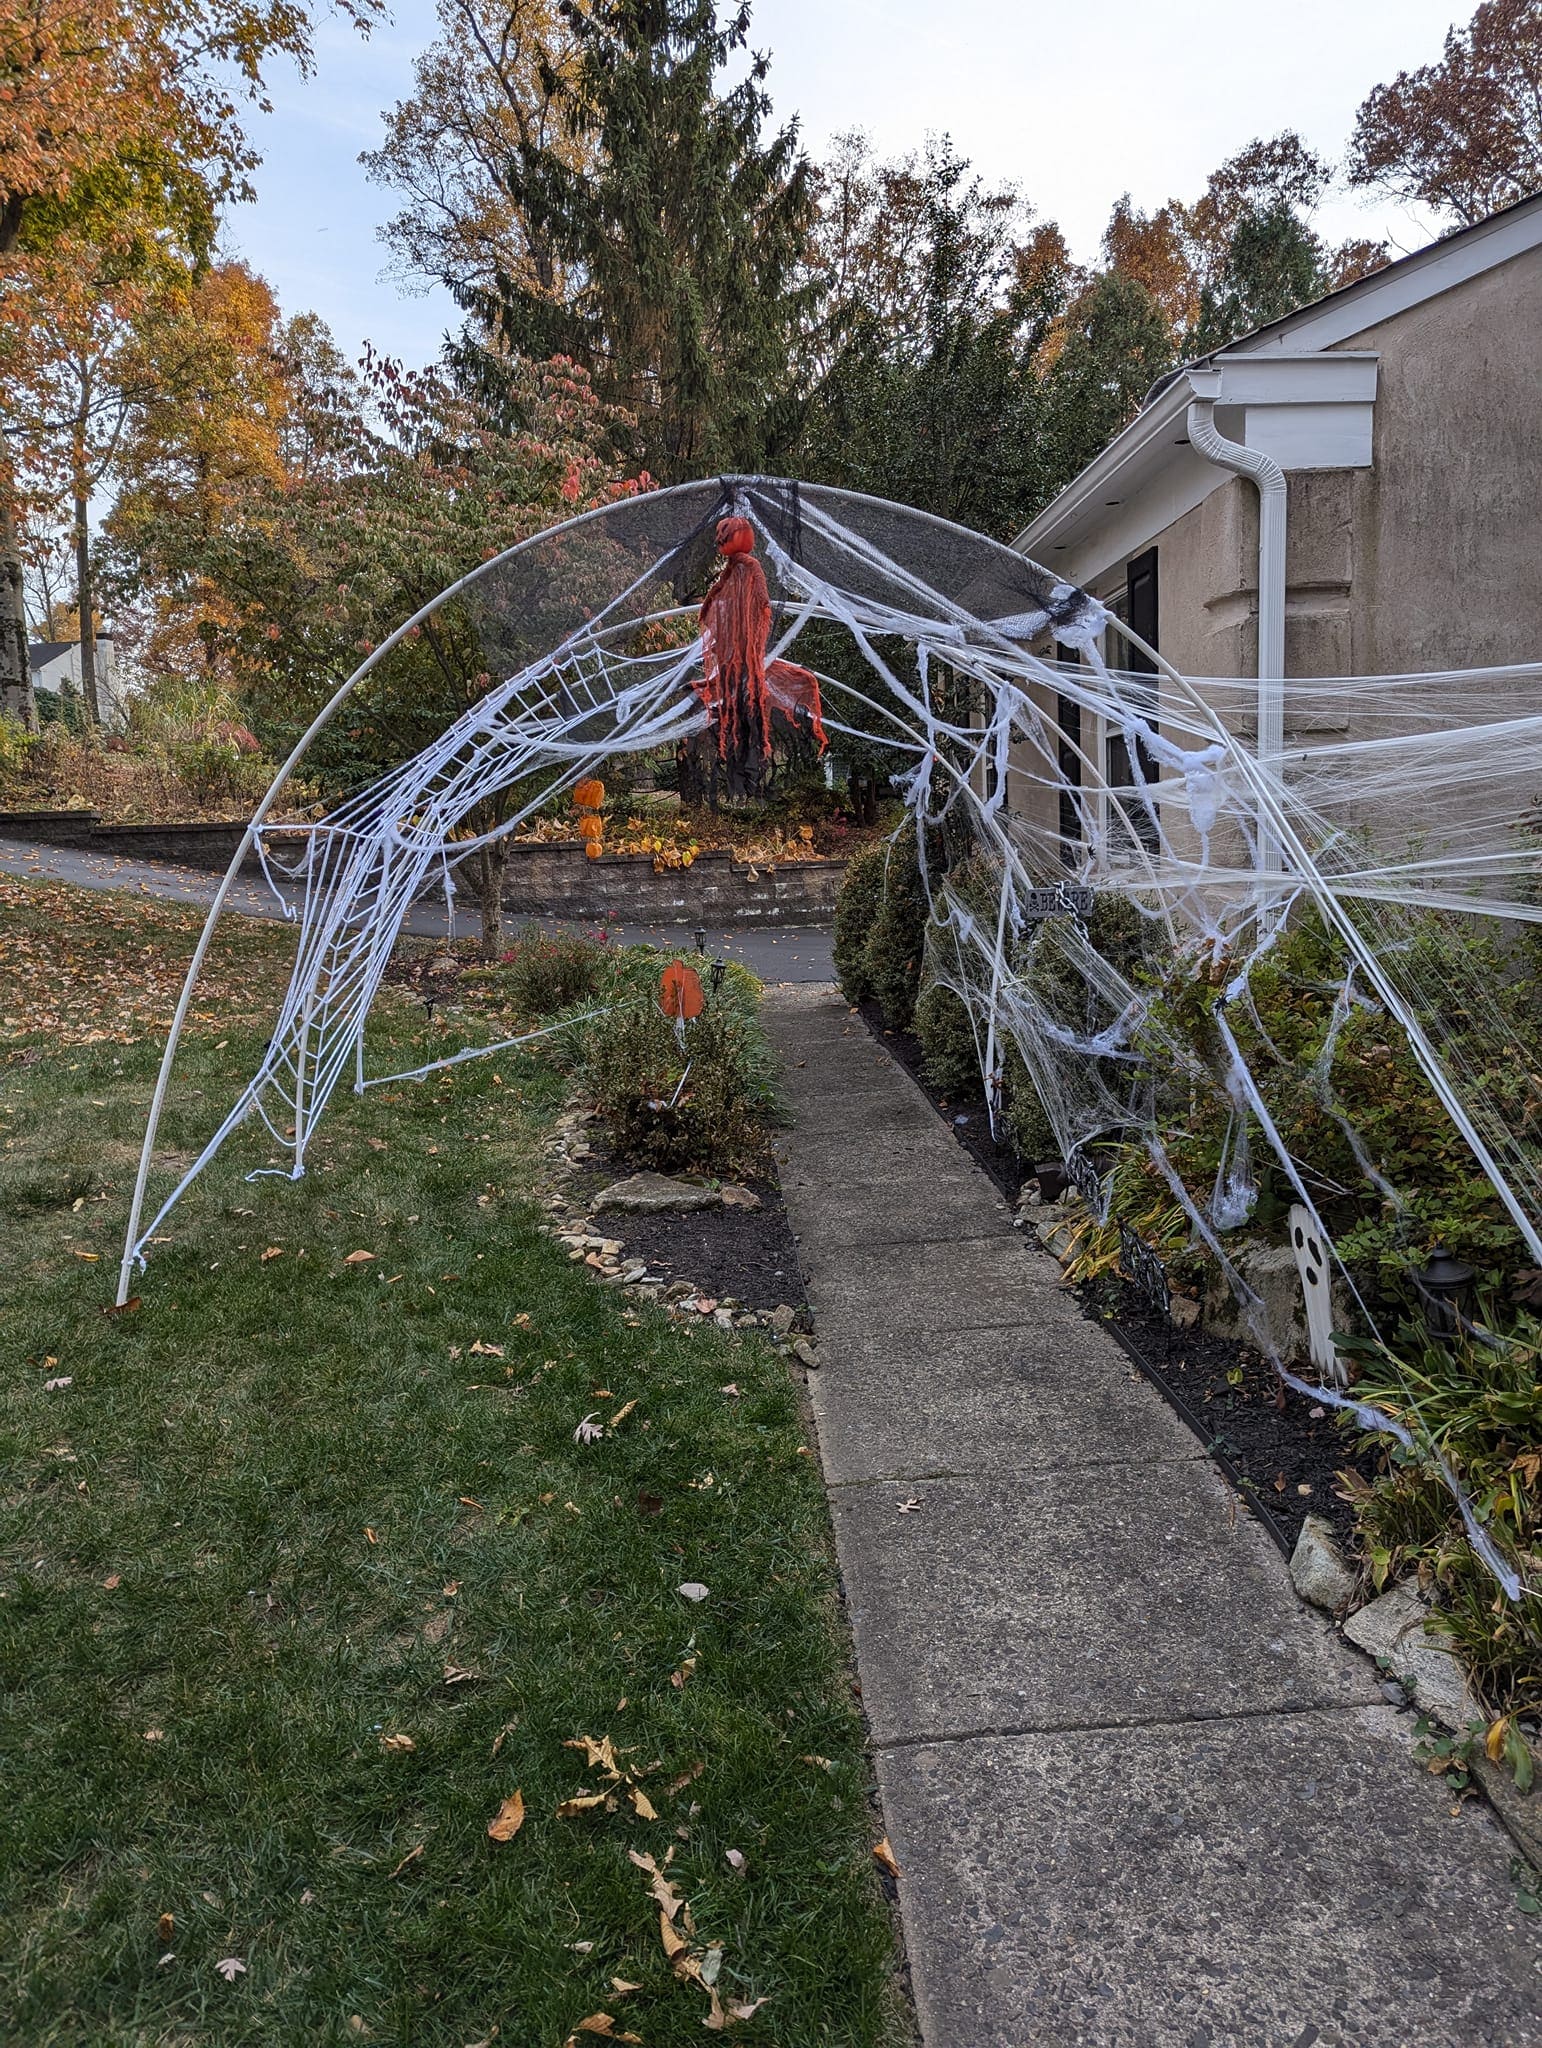
This Halloween tunnel idea creates a chilling welcome for guests the moment they step onto your path.
Built over a simple arched frame, the tunnel is covered in thick layers of stretchy spider webs, giving the illusion that you’re walking into a giant spider’s lair. At the top, a blood-red ghoul hangs ominously, swaying slightly with the breeze for an extra touch of unease.
As you walk through, the narrow path forces you closer to the eerie décor, making it an unforgettable entryway for trick-or-treaters and party guests.
Materials Needed
- 1 arched frame (PVC pipes or metal poles, approx. 7 ft tall × 8 ft long)
- 4-5 packs of stretchable spider webbing
- 1 hanging ghoul prop (around 3-4 ft tall)
- Plastic spiders (various sizes)
- String lights (optional)
- Ground stakes
- Zip ties or duct tape
Step-by-step Guide
Step 1: Assemble your arched frame over the pathway, ensuring it’s wide enough for comfortable walking space. Then secure the ends with ground stakes so it won’t wobble.
Step 2: Begin stretching the spider webbing over the top and sides of the arch, pulling it thin in some areas and leaving thicker clumps in others for a natural, tangled look.
Step 3: Attach the hanging ghoul prop at the highest point of the arch, using zip ties for stability.
Step 4: Add plastic spiders across the webbing, pressing them in so they appear to be crawling naturally.
Step 5: If desired, weave string lights through the top of the tunnel for an eerie nighttime glow.
#10. Haunted Pumpkin Archway
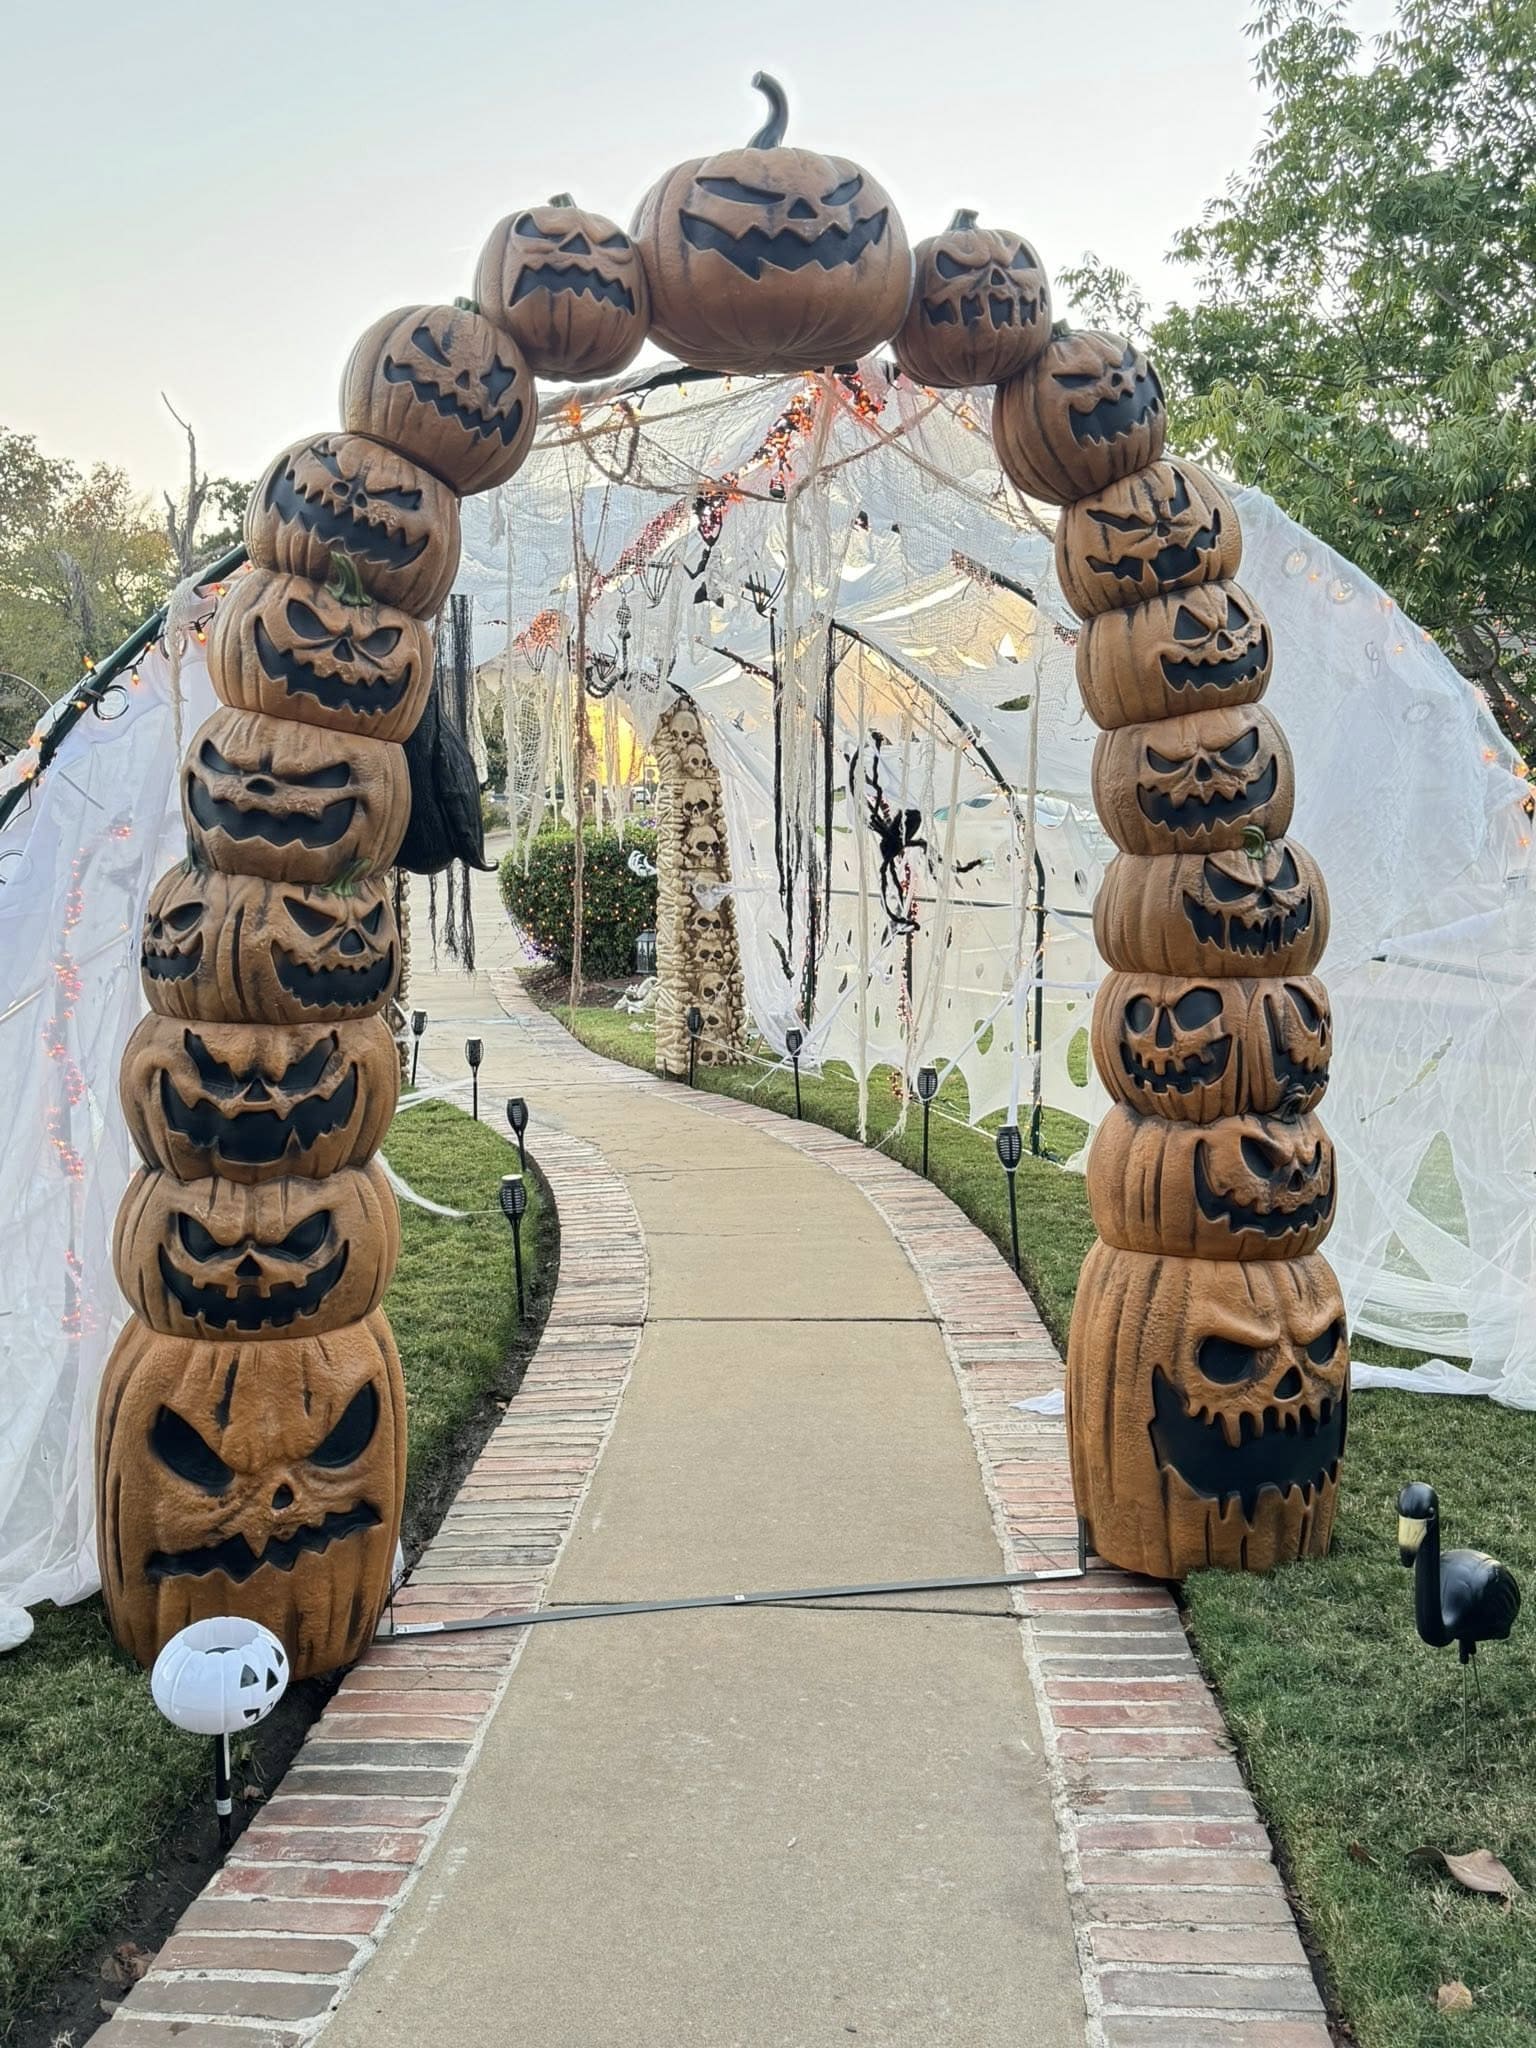
This towering arch of grinning jack-o’-lantern faces makes a bold and spooky statement at any Halloween gathering.
Each carved expression from mischievous smirks to menacing glares, watches over guests as they pass through, creating an unforgettable entryway.
Plus, the stacked pumpkins rise high on both sides, curving overhead for a complete, tunnel-like effect.
Materials Needed
- 14-18 foam pumpkins with carved jack-o’-lantern faces
- PVC pipes or lightweight metal arch frame (7-8 ft tall)
- Zip ties or strong adhesive glue
- Black spray paint
- Ground stakes
- Optional: LED string lights
Step-by-step Guide
Step 1: Assemble your PVC or metal frame into a sturdy arch, ensuring it’s tall enough for guests to comfortably walk through. Secure it with ground stakes.
Step 2: Prepare the foam pumpkins by carving or purchasing pre-carved designs. Then enhance the features with black spray paint to create depth and a weathered look.
Step 3: Attach the pumpkins to the frame starting from the bottom on both sides, using zip ties or strong adhesive.
Step 4: Place your largest pumpkin at the very top of the arch for a dramatic focal point.
Step 65: Finish by decorating the pathway with smaller pumpkins or themed lanterns to guide visitors toward the arch.
See more: 20 Hauntingly Cool DIY Halloween Archway Ideas for a Spine-Tingling Welcome
#11. Haunted Spider Web Tunnel
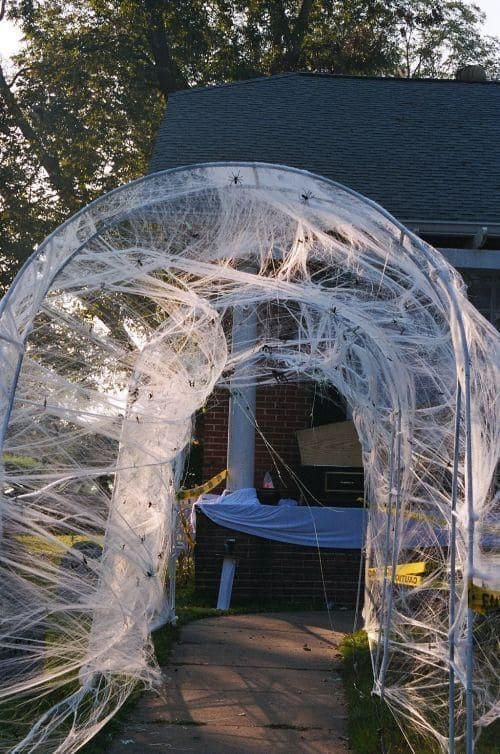
As guests step inside, they’ll feel wrapped in a creepy cocoon of shadows, shimmering webs, and watchful spiders.
The combination of black mesh, stretched webbing, and purple twinkle lights makes the whole arch feel alive.
You can add gravestones and skeleton critters on either side of the path, and you’ve created a spooky experience that’s perfect for trick-or-treaters or a Halloween block party.
Materials Needed
- 1 tunnel frame (8-10 ft long, 6-7 ft high)
- 3-4 rolls of stretchable spider web (about 200–300 sq ft coverage each)
- 2-3 packs of black mesh netting (3 × 15 ft)
- 1-2 strings of purple LED lights (20-30 ft each)
- 8-10 assorted plastic spiders (4-6 in, plus 1-2 large centerpiece spiders)
- 6-8 foam tombstones
- 20-30 zip ties or twist ties
Step-by-step Guide
Step 1: Place your tunnel frame so it covers a walkway or driveway, and check that it’s stable. If you’re using lightweight materials, anchor the legs with sandbags or bricks so wind won’t tip it over.
Step 2: Start by draping black mesh netting loosely over the top and sides. Overlap each strip to create shadowy layers without blocking too much light.
Step 3: Stretch the spider webs slowly. Pull small sections at a time until they look wispy and natural. Then wrap them over and under the frame, leaving gaps where visitors can peek through.
Step 4: Wind purple LED lights along the arch, starting from the entrance and weaving through the mesh.
Step 5: Attach your spiders, placing smaller ones along the sides and a giant one above the entrance to greet guests.
Step 6: Complete the look with tombstones, bones, or spooky yard signs lining the path.
#12. Bloody Plastic Sheet Haunted Tunnel
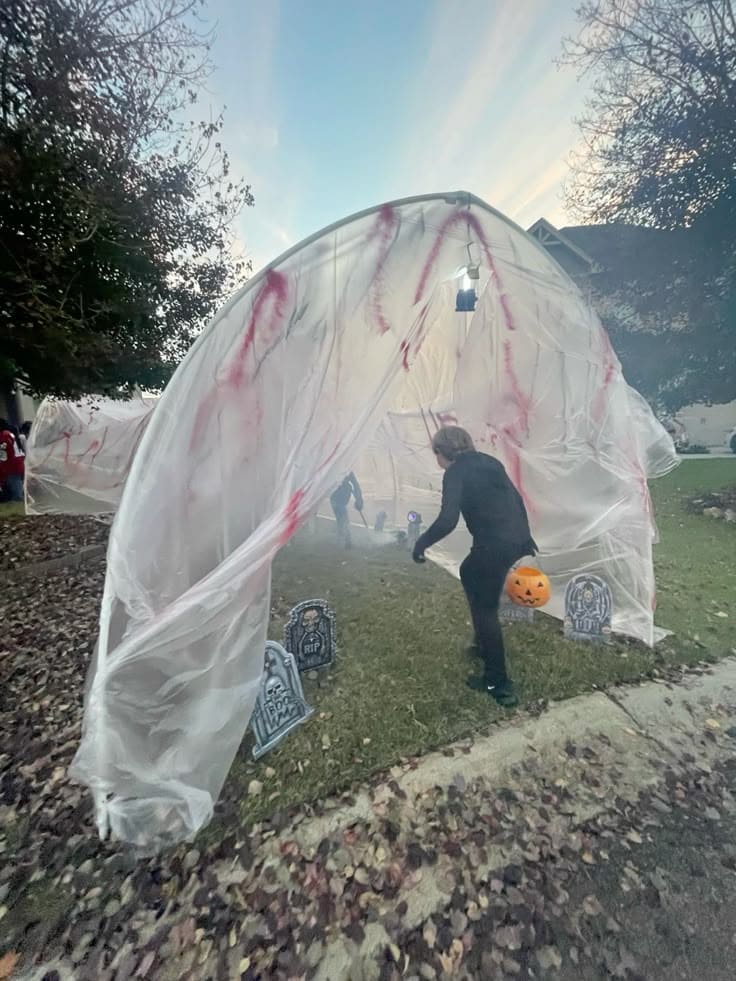
If you’re aiming for a low-cost yet high-impact scare, this bloody plastic sheet tunnel is your go-to. The translucent walls ripple in the wind, giving glimpses of shadowy figures moving inside.
Streaks of red mimic splattered blood, and a faint fog creeps along the ground, making each step feel like entering a crime scene.
With the right lighting and eerie sound effects, this simple setup can turn an ordinary yard into a chilling walkthrough that has guests hesitating before stepping in.
Materials Needed
- 6-8 PVC pipes or lightweight metal poles (7-8 ft each)
- 20-30 ft of clear plastic sheeting (3-4 mil thickness)
- Red spray paint or fabric dye
- Fog machine with fluid
- Outdoor spotlights or LED work lights
- Zip ties or duct tape
- Halloween tombstones or ground props
Step-by-step Guide
Step 1: Create a simple arch frame using PVC pipes or poles, securing them firmly into the ground.
Step 2: Drape the plastic sheeting over the frame, overlapping edges to block gaps.
Step 3: Lightly spray or splatter red paint along the sheets for a realistic blood effect.
Step 4: Place tombstones or props at the entrance to set the mood.
Step 5: Finally, position your fog machine at the far end so mist drifts through the tunnel.
#13. Glowing Cobweb Tunnel
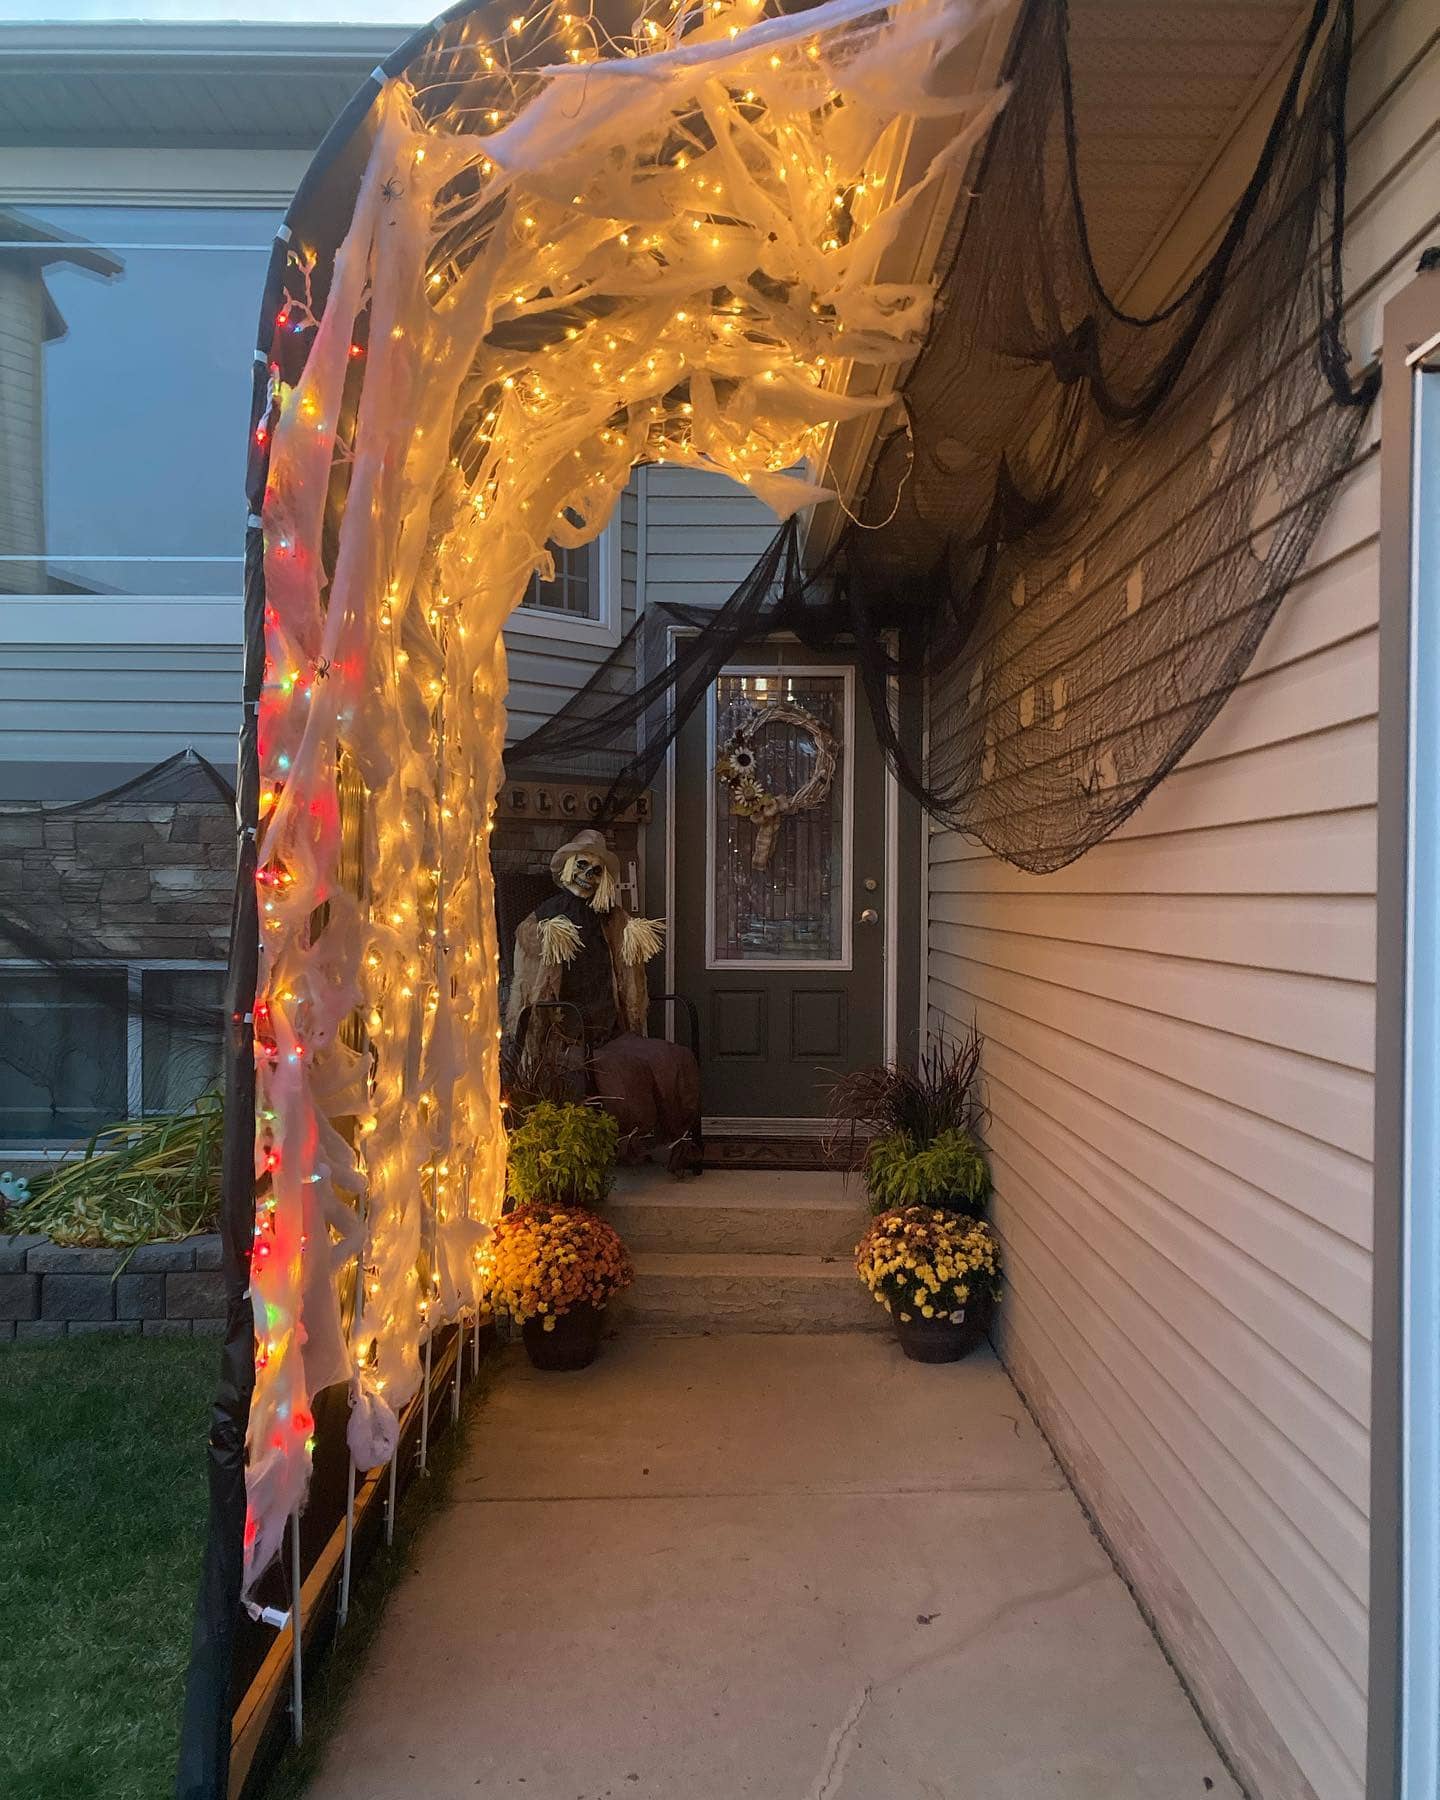
This cozy yet spooky tunnel greets guests with a warm golden glow, making it perfect for a Halloween night that blends fright with a touch of charm.
The arch is lined with fluffy cobwebs and draped in string lights that twinkle like captured fireflies.
Specially, the effect is both inviting and eerie, drawing trick-or-treaters down the path toward the decorated porch where scarecrows stand guard.
Materials Needed
- 1 lightweight tunnel frame (6-8 ft long, 6-7 ft high)
- 3-4 packs of synthetic cobwebs
- 2-3 sets of warm white and multicolor string lights (25-50 ft each)
- Black mesh fabric (optional)
- Zip ties or twist ties
- Extension cords and outdoor-safe power strips
- Optional: decorative scarecrows or potted mums
Step-by-step Guide
Step 1: Set up your tunnel frame along the path, ensuring it’s stable and well-secured for safety.
Step 2: Begin draping synthetic cobwebs over the arch, stretching them thin to create a realistic effect. Then tuck ends around the frame so they stay in place.
Step 3: Weave string lights through the cobwebs, mixing warm white and multicolor strands for a layered glow. Next, secure with zip ties every few feet.
Step 4: If desired, add black mesh fabric along the sides for depth and contrast.
Step 5: Place scarecrows or seasonal plants at the tunnel entrance to frame the view and enhance the autumn charm.
#14. Haunted Forest Tunnel
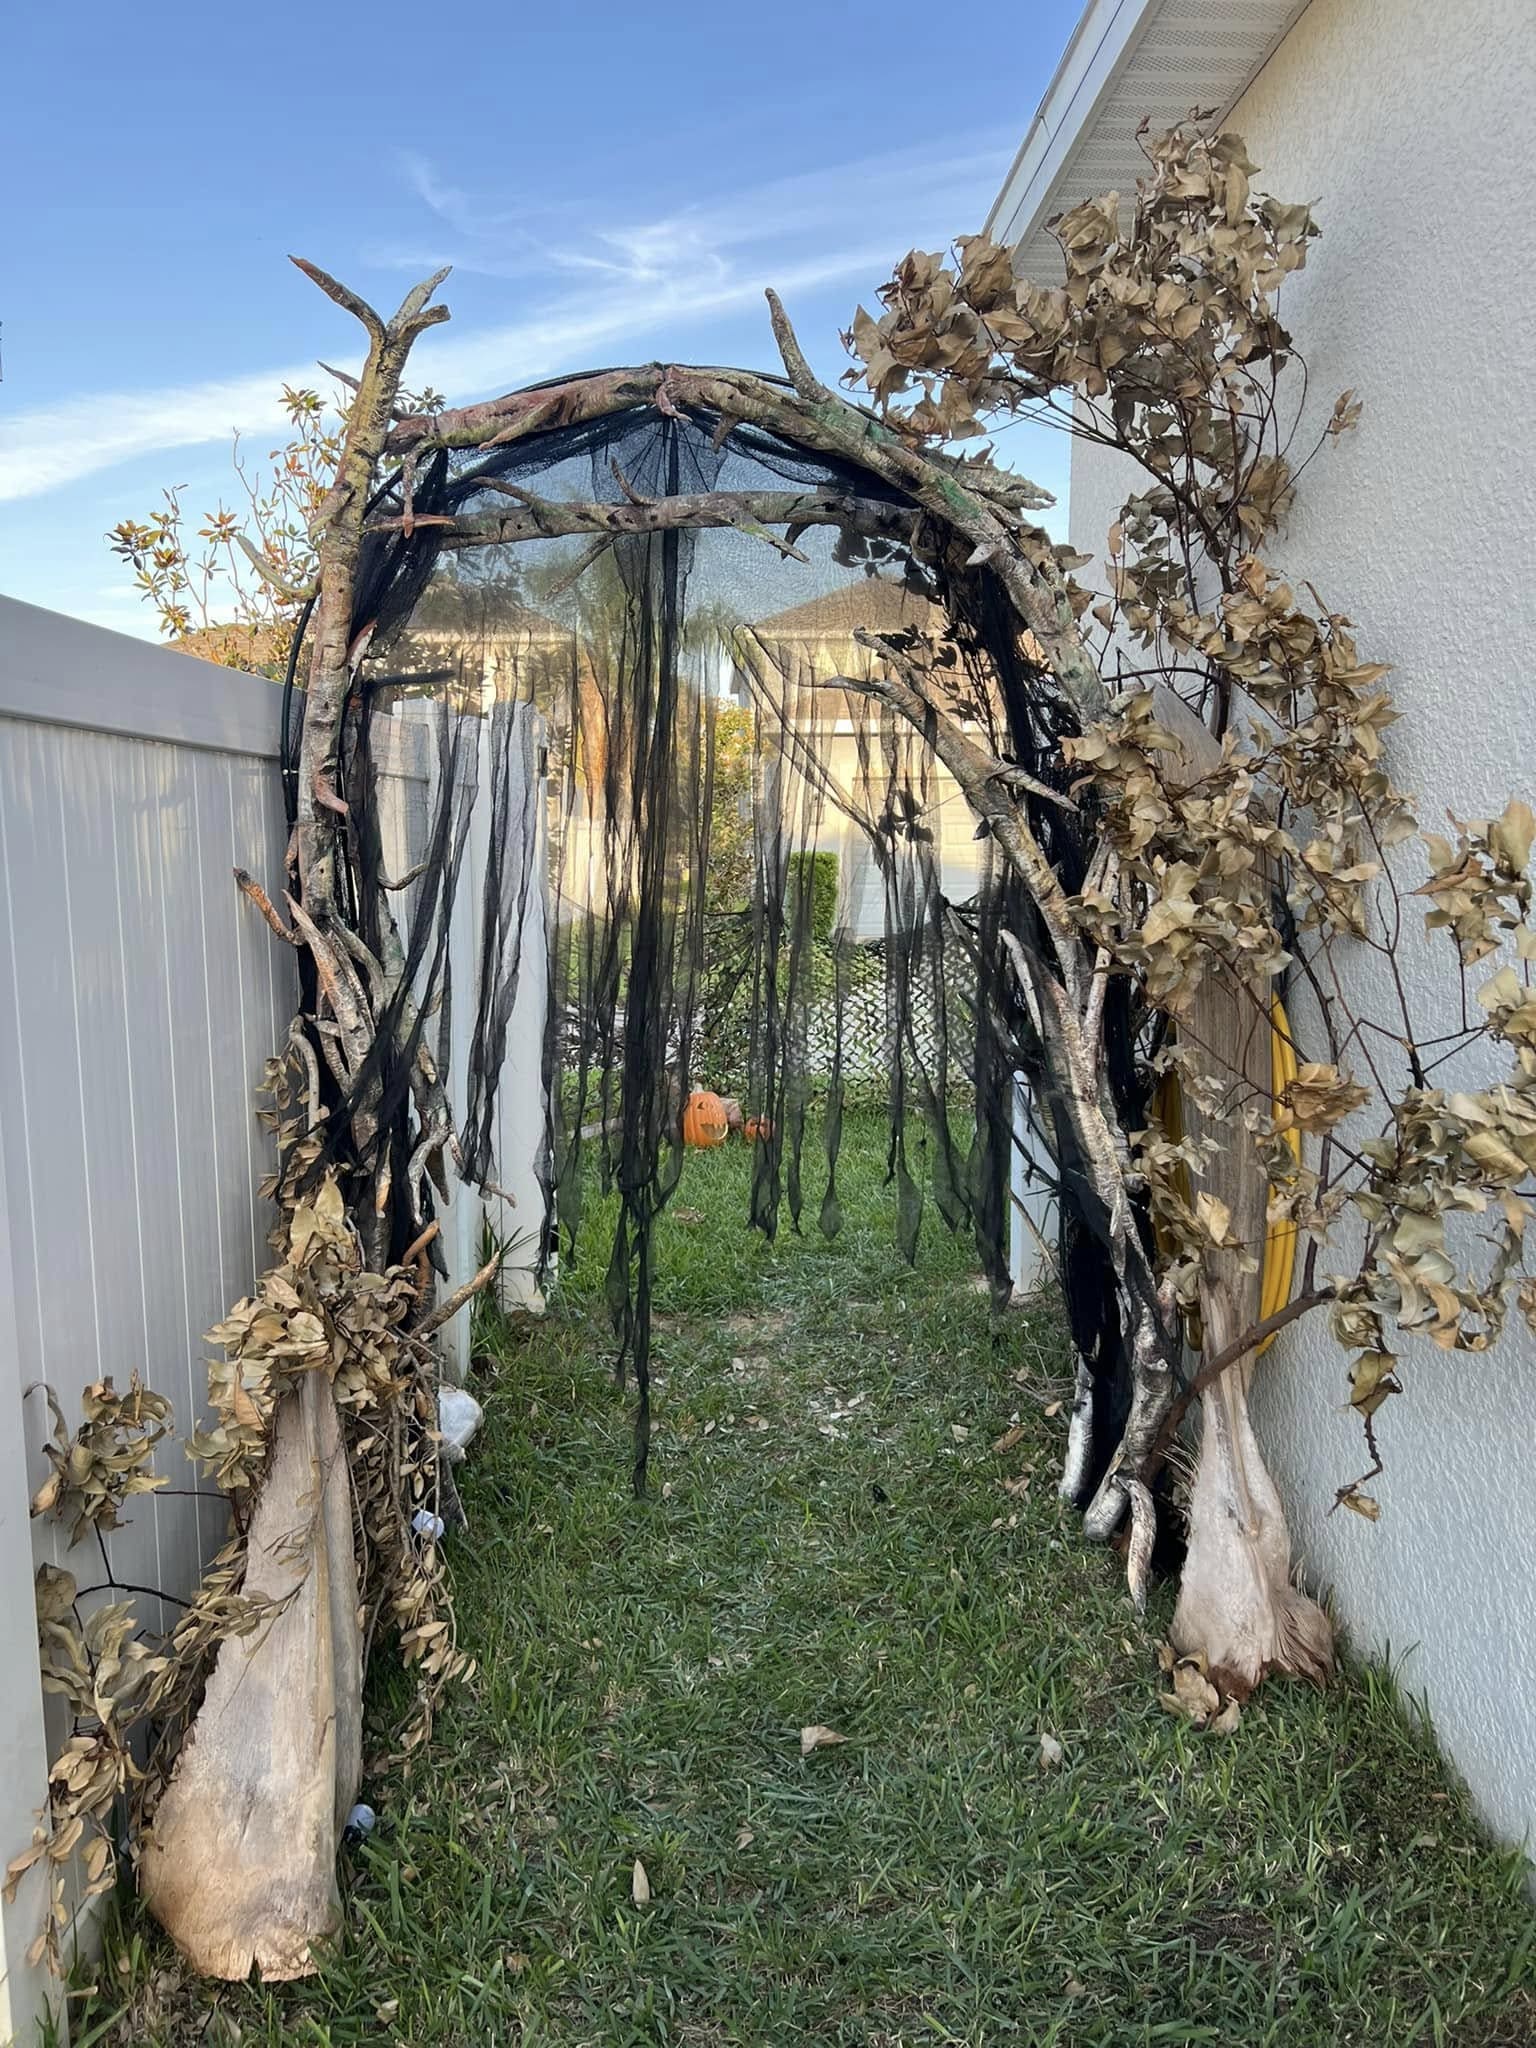
You can see the twisted branches, draped in tattered black fabric, make it feel like you’re stepping into an eerie woodland where shadows play tricks on your eyes.
The dried leaves rustle in the wind, adding a whispery soundtrack that heightens the suspense for anyone brave enough to pass through.
Materials Needed
- 6-8 large branches or driftwood pieces (5-7 ft tall)
- Black creepy cloth or mesh netting (approx. 15-20 ft)
- Dried leaves or faux autumn foliage
- Zip ties or garden wire
- Heavy-duty stakes or cement bases
- Optional: hanging props (small skeletons, bats, or ghosts)
Step-by-step Guide
Step 1: Start by selecting a narrow walkway or fence line where you want to set up your tunnel.
Step 2: Position two sturdy branches on each side of the entrance, angling them slightly inward at the top to form an arch. You can use stakes or cement bases to keep them steady.
Step 3: Continue placing branches along the pathway, spacing them 2-3 feet apart, and securing each pair together at the top with zip ties or wire.
Step 4: Drape black creepy cloth or netting loosely over the frame. Let some fabric hang down in strips for a tattered, haunted look.
Step 5: Tuck dried leaves or faux foliage into the structure to give it a more overgrown, abandoned feel. You can also attach hanging skeletons or ghost props for extra scares.
#15. PVC Pipe Haunted Archway
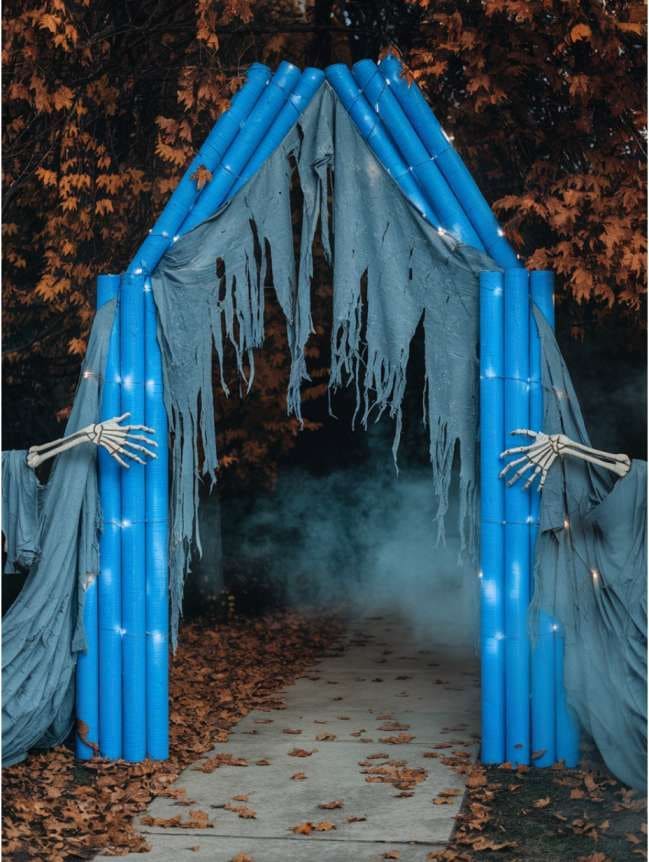
The striking blue pipes form a tall, peaked frame draped in tattered grey fabric that sways with the wind, instantly creating a sense of mystery.
Plus, skeleton arms seem to reach out from the sides, making guests wonder if they’ve entered the spirit world.
You can also add a fog machine behind the arch and the mist will roll through the opening, setting the perfect haunted scene for trick-or-treaters or party guests.
Materials Needed
- 8-10 blue PVC pipes (length: 6 ft each)
- 2 PVC corner connectors for top peak
- Grey distressed fabric or cheesecloth (about 12–15 ft)
- 2 plastic skeleton arms
- White or warm string lights (optional)
- Zip ties or strong tape
- Fog machine (optional but recommended)
Step-by-step Guide
Step 1: Assemble the PVC pipes into two upright columns with a peaked top, securing joints with connectors and zip ties.
Step 2: Attach the structure firmly to the ground using stakes or weighted bases for stability.
Step 3: Drape the grey fabric or cheesecloth over the arch, letting it hang loosely and tear some edges for a worn, spooky effect.
Step 4: Secure the skeleton arms to each side of the archway so they appear to be reaching out.
Step 5: Wrap lights around the frame for a glowing nighttime effect, then position a fog machine behind the arch to create a haunting entrance.
#16. Spooky Spiderweb Tunnel Entrance
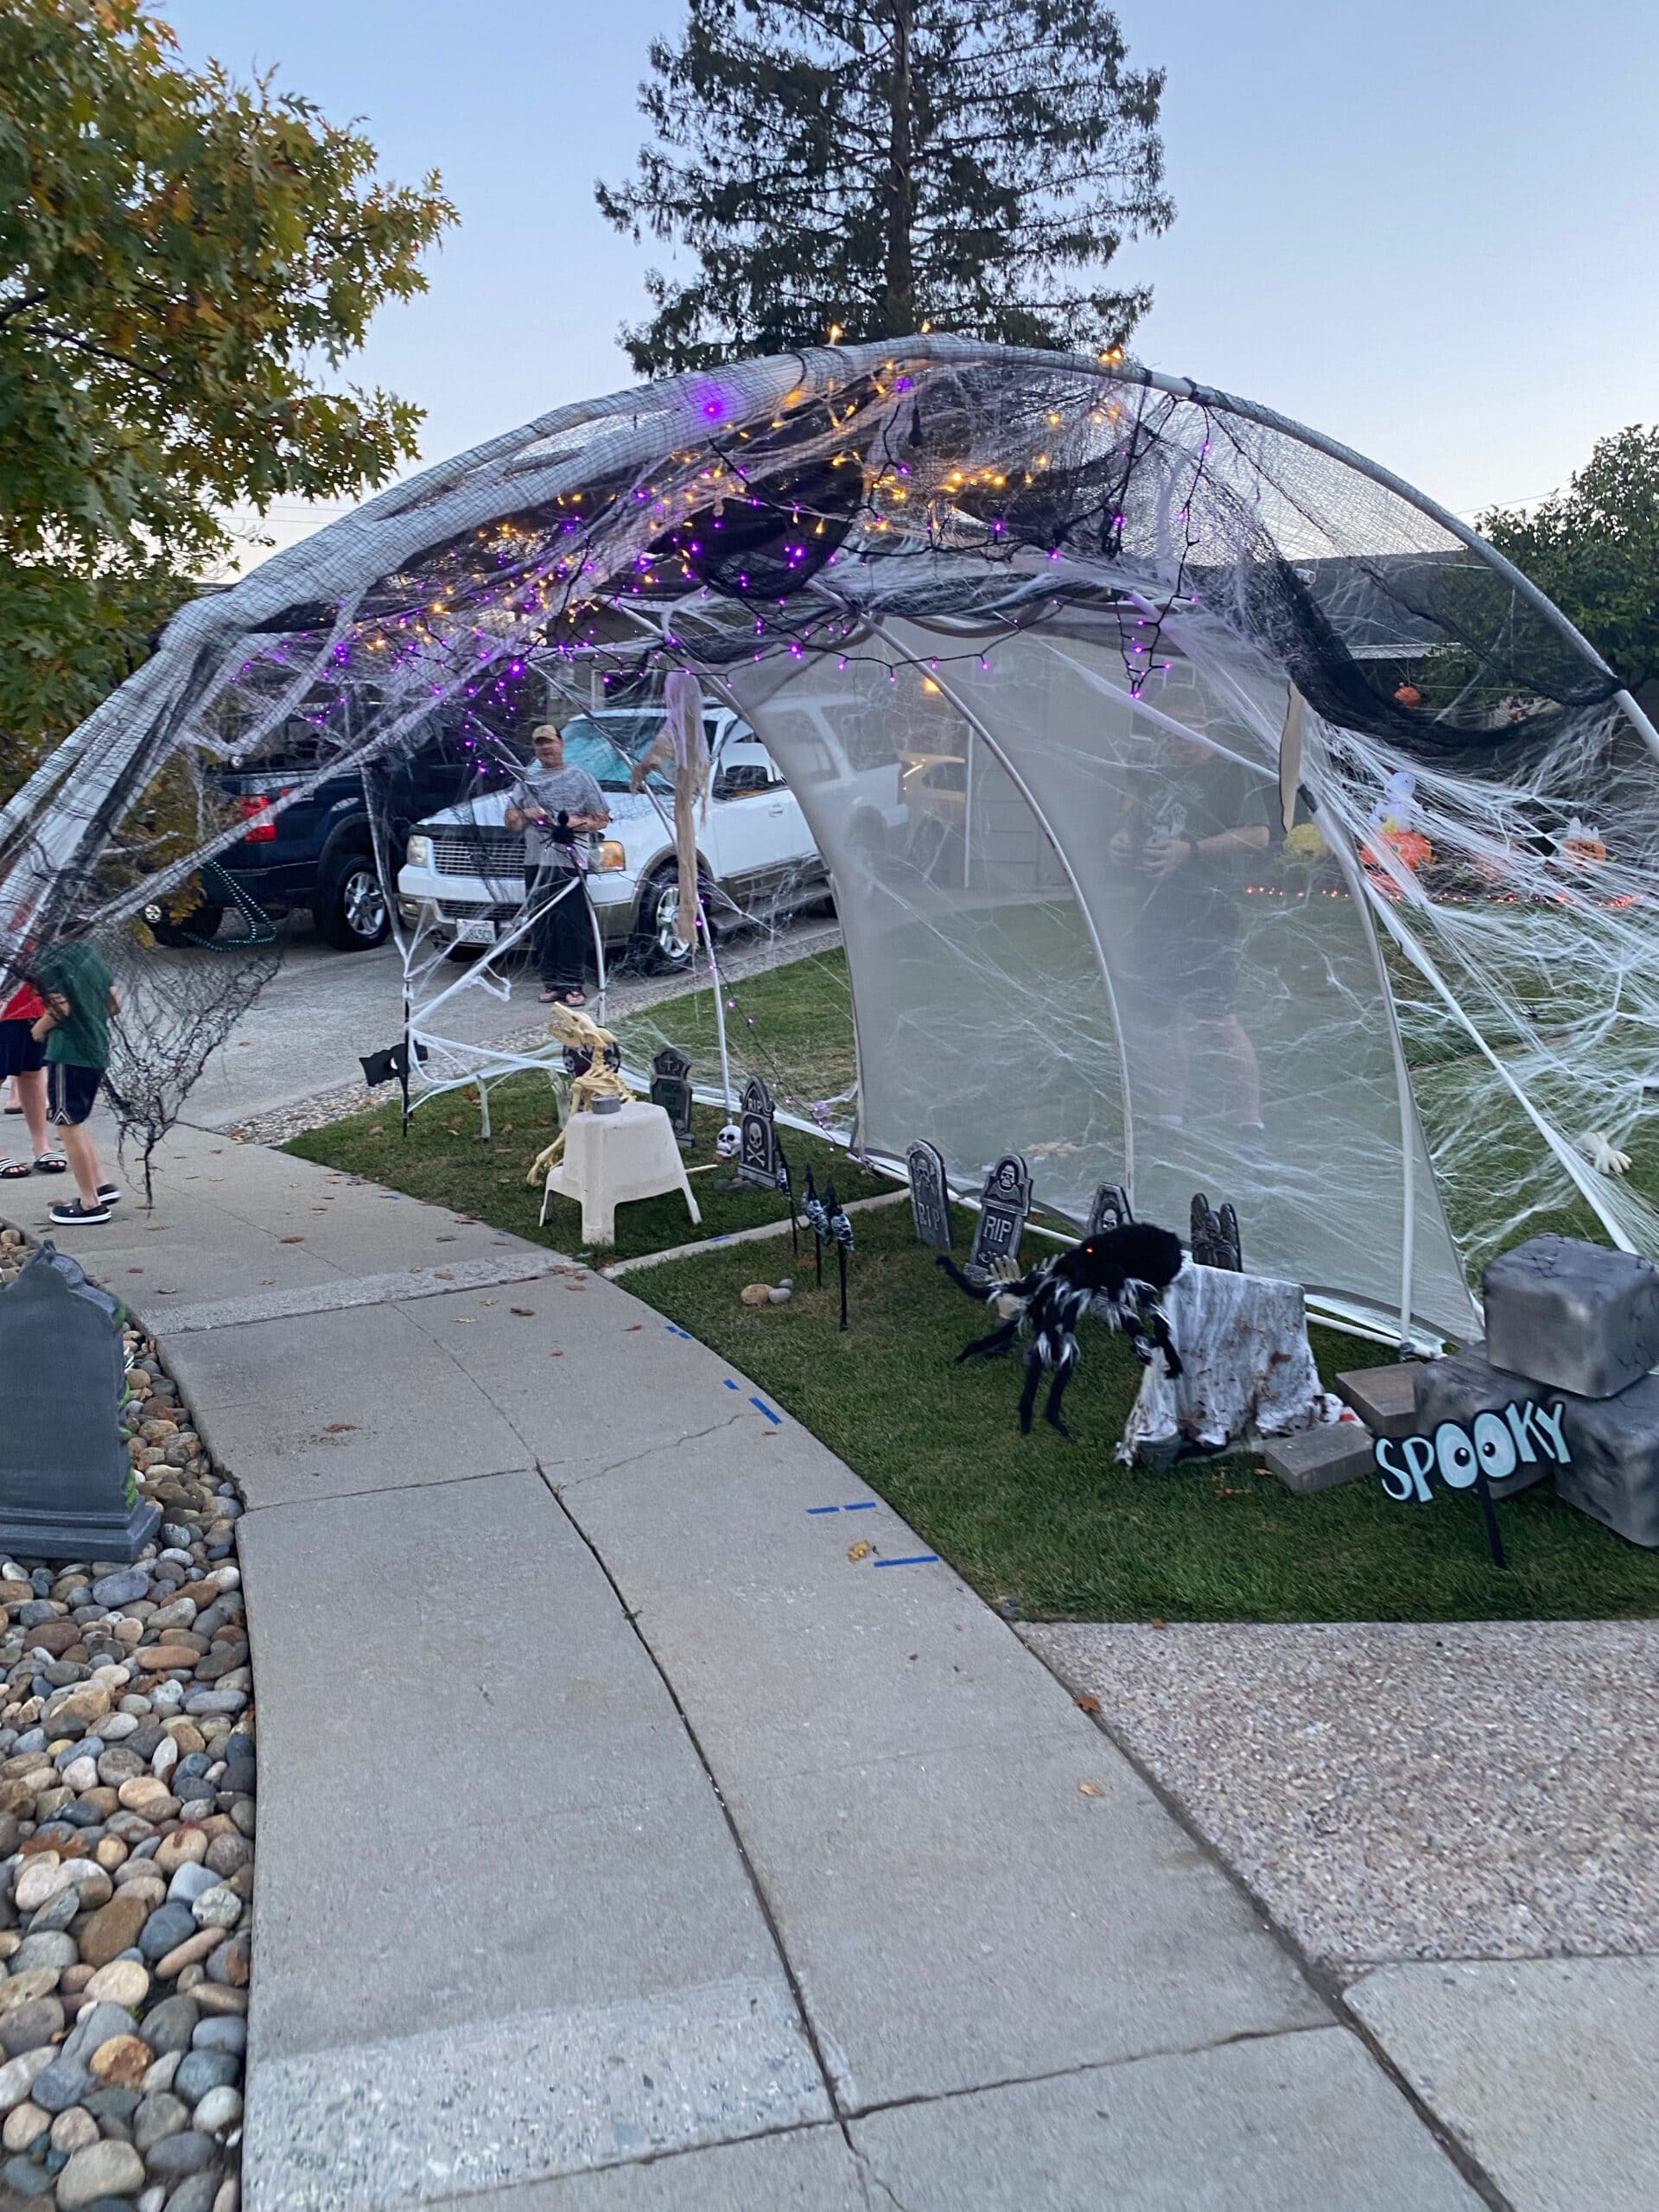
You can also turn your walkway into a thrilling gateway to the underworld with this giant spiderweb tunnel.
Imagine guests stepping under a canopy of black netting and shimmering purple lights while oversized spiders watch from above. Cobwebs stretch across the frame, creating an eerie, closed-in feel that makes each step a little more suspenseful.
Also, add gravestones and creepy critters along the path for extra drama.
Materials Needed
- 1 PVC or metal tunnel frame (approx. 8 ft length × 6 ft height)
- 20-30 ft black mesh netting
- 2-3 packs stretchable fake spiderwebs
- 3-4 large fake spiders (12-18″)
- 1-2 strings purple LED fairy lights (10-15 ft each)
- Outdoor extension cord
- Gravestone props, skeletons, or “Spooky” sign
Step-by-step Guide
Step 1: Assemble your tunnel frame at the start of your walkway.
Step 2: Drape the black mesh over the top, letting some edges hang for a ragged, aged effect.
Step 3: Pull and stretch the fake spiderwebs across the mesh, varying the density to create depth and texture.
Step 4: Attach large spiders in visible but slightly hidden spots so they surprise visitors as they pass.
Step 5: String purple LED lights along the top and sides of the tunnel, securing them with zip ties. Then plug into an outdoor-safe extension cord.
Step 6: Finally, arrange gravestones, skeletons, and creepy signs along the tunnel floor to complete the haunted graveyard vibe.
#17. Colorful Halloween Tunnel with Skeleton Friends
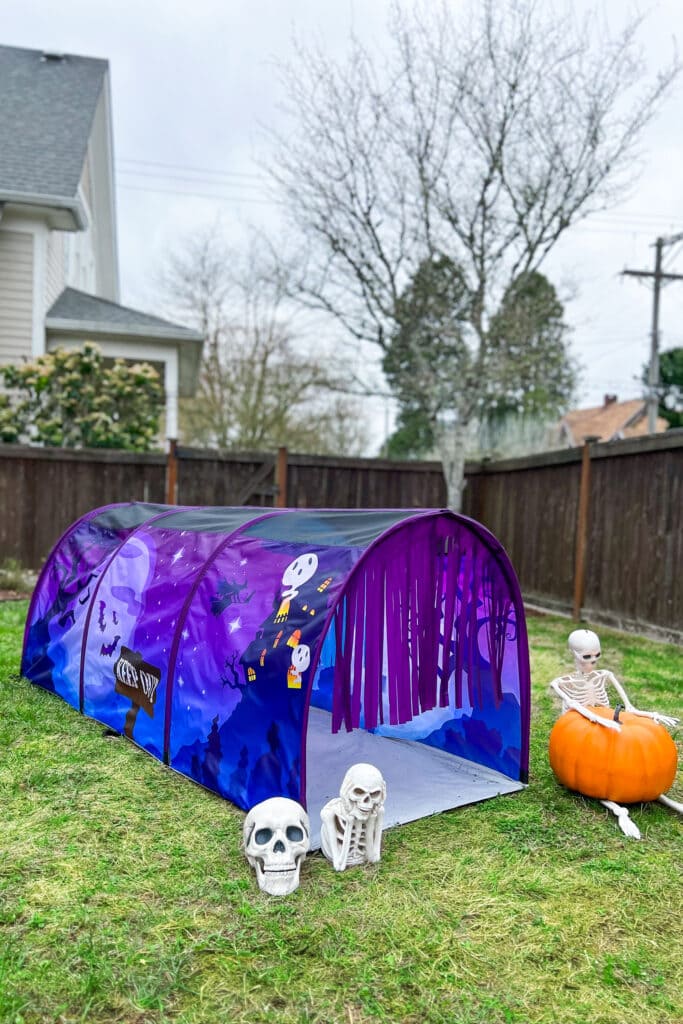
This whimsical Halloween tunnel is perfect for families who love a mix of spooky and playful.
The pre-printed purple panels are adorned with ghosts, bats, and haunted houses, creating a magical entrance for trick-or-treaters. The black roof adds contrast, while the fringe curtain at the end gives kids a fun, interactive entry.
Bonus, a couple of friendly skeletons, one sitting with a giant pumpkin, greet guests for an Instagram-worthy moment.
Materials Needed
- 1 pre-printed Halloween tunnel canopy (approx. 8-10 ft long × 4 ft wide × 4 ft high)
- Metal or PVC pipe frame (size to fit canopy)
- Fringe curtain (4 ft wide)
- 2-3 plastic skeletons (life-size or mini)
- 1-2 large foam pumpkins
- Ground stakes
Step-by-step Guide
Step 1: Assemble the tunnel frame using PVC or metal pipes, ensuring it’s stable and aligned straight for easy walking space.
Step 2: Slide the pre-printed canopy over the frame and secure it at the base with ground stakes.
Step 3: Attach the fringe curtain to the tunnel’s end opening, taping or tying it securely so it sways as people enter.
Step 4: Position skeleton props, place one leaning on a pumpkin and another sitting near the entrance to create a playful welcome.
Step 5: Add extra touches like faux spider webs or LED lights inside for an even more magical night effect.
#18. Pirate’s Curse Tunnel Entrance
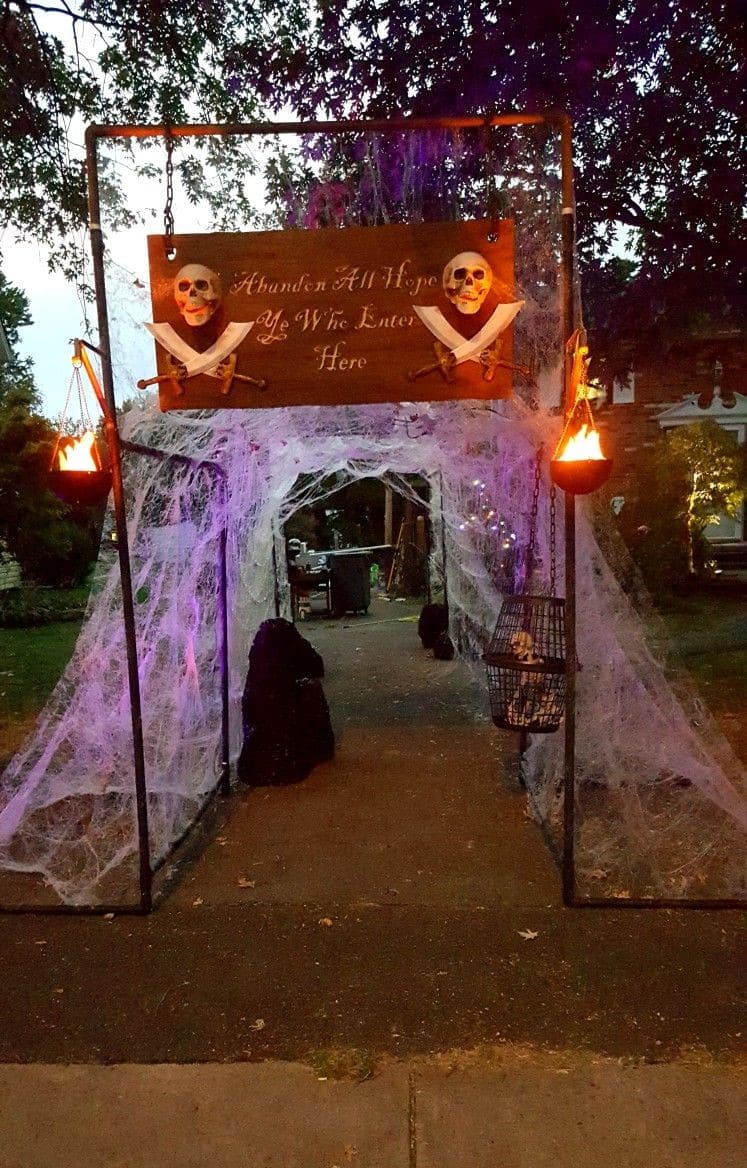
What about turning your walkway into a bone-chilling gateway to adventure?
The ominous wooden sign reading “Abandon All Hope Ye Who Enter Here,” paired with skulls, crossed swords, flickering faux torches, and cobweb-draped arches, instantly transports visitors into a cursed pirate realm.
Moreover, the warm glow of the fire lights adds just enough light to guide guests while keeping that spooky, shadowy feel alive.
Materials Needed
- 4 metal or PVC frame arches (7-8 ft tall, 3-4 ft wide)
- 10-12 packs of stretchable spider webs
- 6-8 large plastic spiders
- 1 wooden sign (approx. 3 ft × 1 ft)
- 2 plastic skull props
- 2 plastic sword props (18–24 inches)
- 2 hanging torch lights with flickering LED effect
- Black spray paint
- Zip ties or strong twine
- Battery-powered string lights (optional)
Step-by-step Guide
Step 1: Set up the frame arches along your walkway, spacing them evenly to form a tunnel.
Step 2: Spray paint the arches black for a more menacing, night-ready look. Let dry fully before decorating.
Step 3: Stretch spider webs over the entire frame, pulling thin for a realistic tattered effect. Then add large spiders throughout to give it a lived-in creepy feel.
Step 4: Create your pirate sign by painting or carving the warning message, then attach skulls and swords for dramatic flair.
Step 5: Hang faux torch lights on each side of the entrance, securing them with chain or rope for an authentic pirate touch.
#19. Inflatable Grim Reaper Tunnel
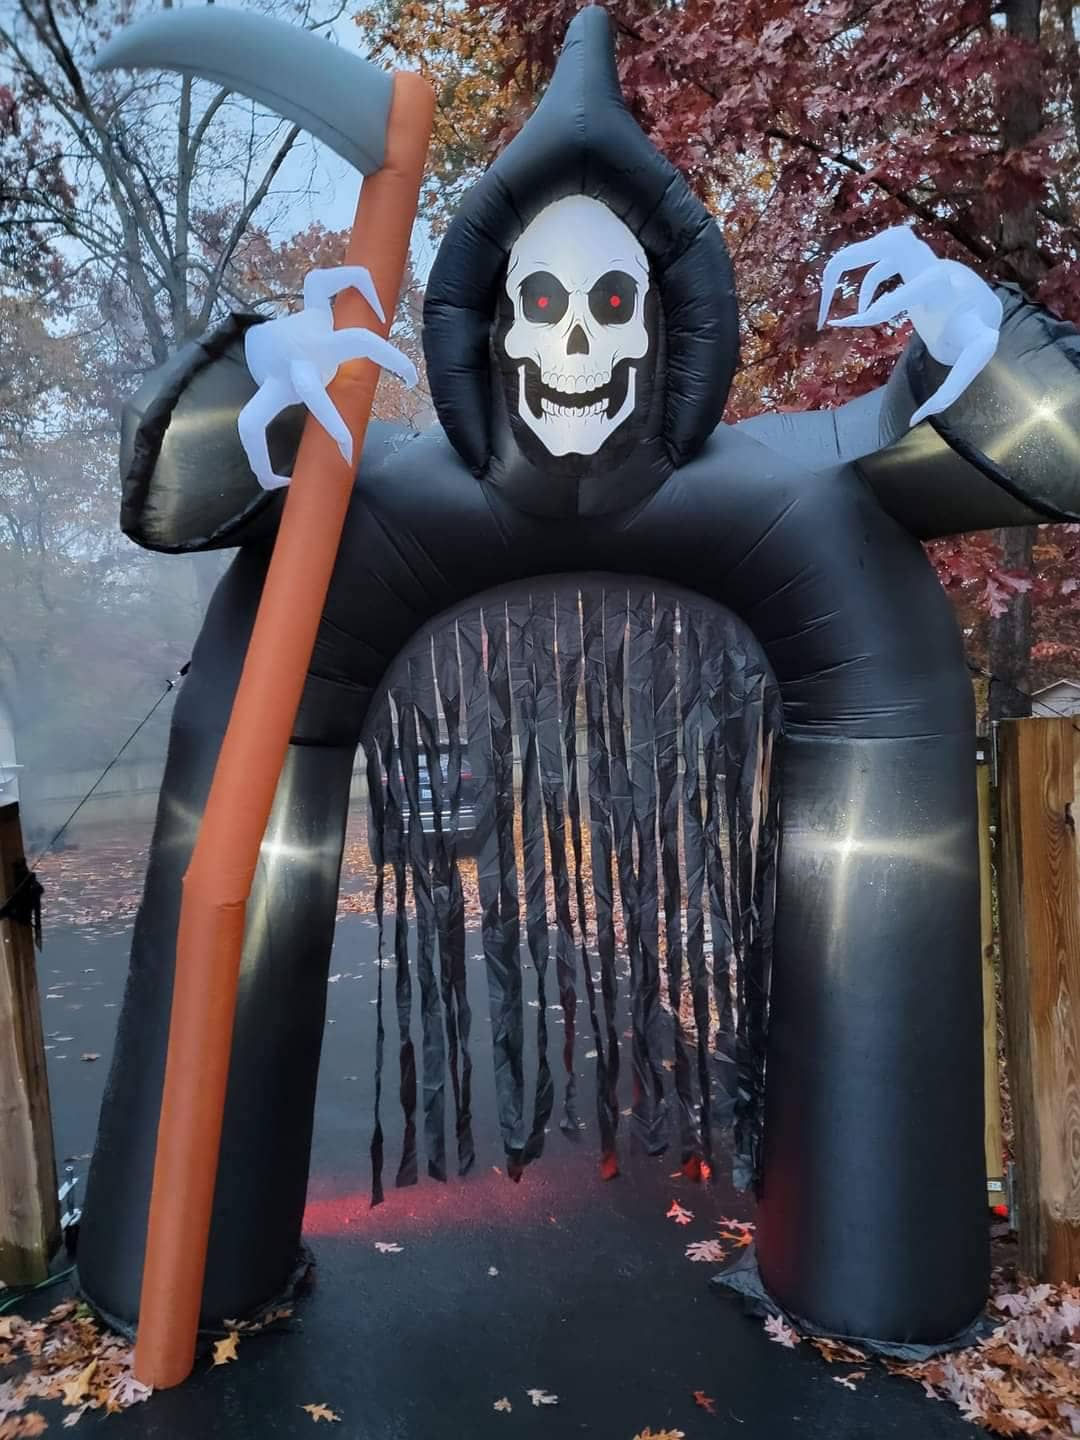
If you want instant impact with minimal effort, an inflatable Grim Reaper tunnel is your go-to showstopper.
Standing tall with eerie red eyes, skeletal hands, and a massive scythe, it creates a dramatic entrance that guests can’t resist walking through.
Bonus, the swaying black fringe strips at the base give an unsettling, curtain-like effect, making each step into the party feel like crossing into another realm.
Materials Needed
- 1 inflatable Grim Reaper archway (approx. 10-12 ft tall)
- Air blower (usually included with inflatable)
- 4-6 ground stakes or sandbags
- Extension cord (outdoor-rated)
- Optional: extra black plastic fringe
Step-by-step Guide
Step 1: Choose a visible location near your entryway or driveway where the inflatable will have maximum visual impact.
Step 2: Spread the inflatable out flat and connect the air blower, making sure it’s plugged into a secure, outdoor-rated extension cord.
Step 3: Once fully inflated, secure it to the ground with stakes or weigh it down with sandbags to prevent tipping.
Step 4: Fluff and straighten the black fringe strips at the entrance so they sway slightly when people pass through.
Step 5: For added drama, you can tuck in extra black fabric or spider webs into the arch frame, making it feel even more ominous.
#20. Haunted Wooden Jack-O’-Lantern Tunnel
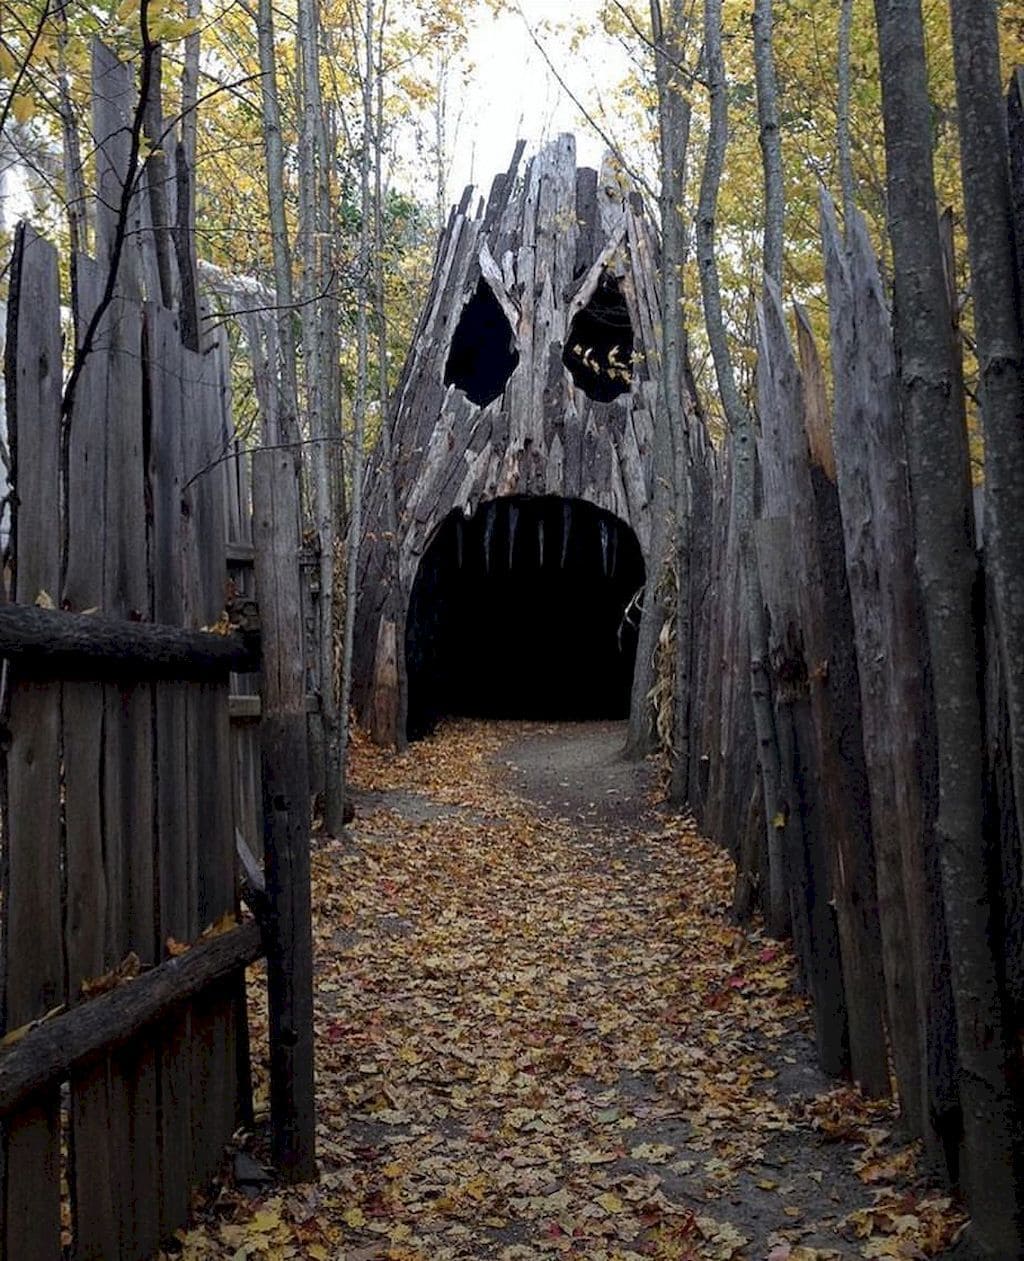
Imagine walking through the forest on a crisp autumn evening, leaves crunching beneath your feet, only to find yourself face-to-face with a towering jack-o’-lantern made entirely of weathered wood.
Its jagged eyes and gaping mouth invite you into a shadowy tunnel that feels both thrilling and mysterious.
This project blends the eerie charm of Halloween with the raw beauty of natural materials, making it perfect for a woodland or rustic-themed haunt.
You’ll love how the towering entrance captures attention from far away and builds anticipation before guests step inside.
Materials Needed
- 40-50 reclaimed wooden planks (various lengths 5-8 ft)
- 8-10 sturdy wooden stakes (6 ft)
- 1 sheet of black fabric or tarp (8 ft × 10 ft)
- Outdoor wood screws (2-3 in)
- Power drill
- Hand saw
- Black paint or weatherproof wood stain
- Optional: battery-operated lanterns or LED candles
Step-by-step Guide
Step 1: Select a pathway or garden entrance where the tunnel will stand. Then drive the stakes into the ground to form a sturdy frame.
Step 2: Attach wooden planks vertically, leaving uneven jagged edges at the top to mimic the carved pumpkin’s flames.
Step 3: Cut out large triangular eyes and a wide, jagged mouth in the front planks, making sure openings are safe for guests to walk through.
Step 4: Paint or stain the wood in dark, moody tones, leaving some natural weathering for a spooky texture.
Read more: 22 DIY Halloween Coffin Ideas That Will Send Shivers Down Your Spine
