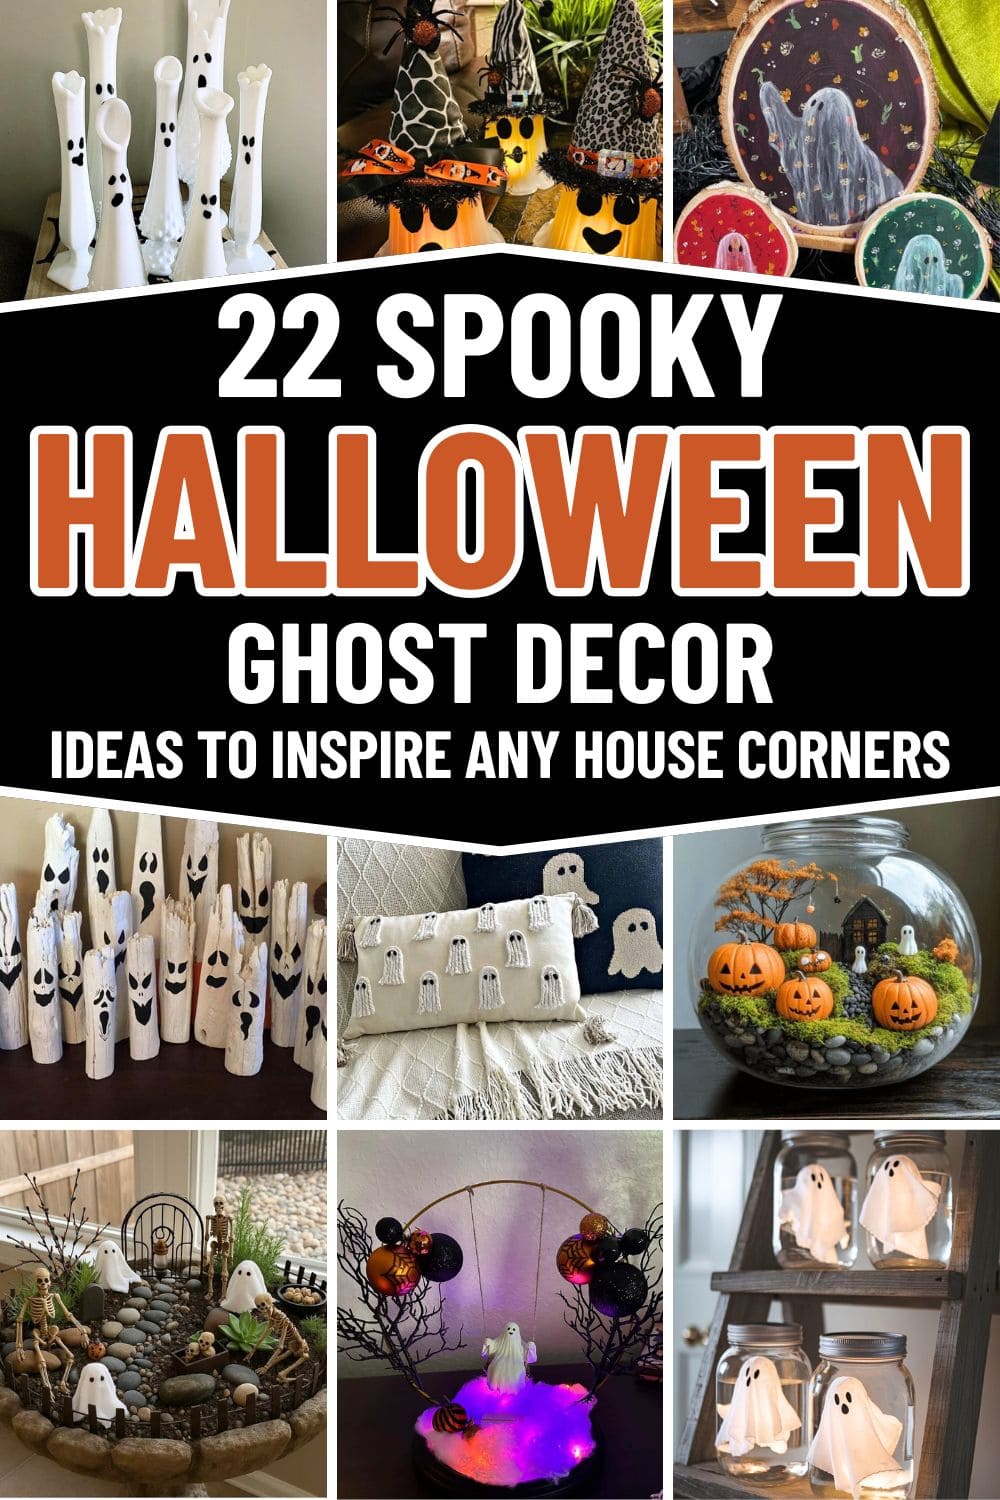
Last October, I walked into my living room one chilly evening and found it bathed in a warm orange glow.
In the corner, a small ghost I’d made out of an old sheet and fairy lights was swaying gently in the draft. It wasn’t scary more like a cozy little guardian of Halloween spirit.
That’s when I realized ghosts don’t have to be gloomy; they can be charming, funny, or even downright adorable.
This year, I’ve gathered a mix of DIY Halloween ghost decor ideas that can slip into any corner of your home, adding just the right balance of spook and whimsy to make your space feel magically haunted.
#1. Halloween Pumpkin and Ghost Terrarium
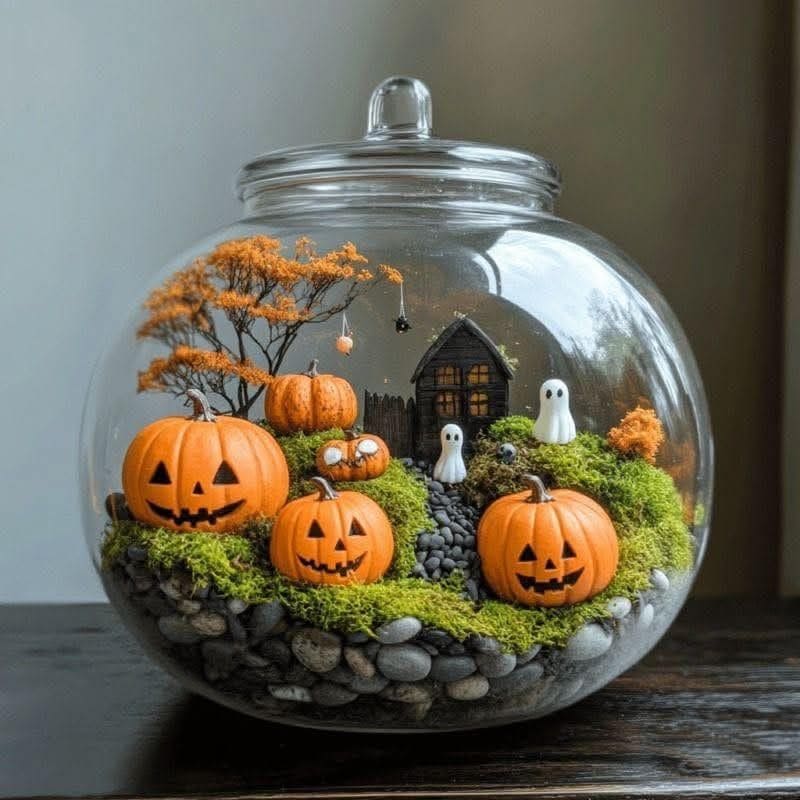
This Halloween terrarium is like a tiny world where pumpkins smile, ghosts hover, and autumn trees glow in warm orange tones.
Inside a round glass jar, layers of smooth pebbles, moss, and miniature figurines create a whimsical yet slightly eerie scene. A cobblestone path leads to a little haunted house, flanked by glowing jack-o’-lanterns and guarded by two friendly white ghosts.
I bet you’ll love how it captures the spirit of the season without taking up much space.
Materials Needed
- 1 round glass terrarium bowl with lid
- Small pebbles (approx. 2 cups)
- Preserved moss (about 2 cups)
- Miniature pumpkins and jack-o’-lantern figurines
- Mini ghost figurines
- Mini haunted house decoration
- Small artificial tree with orange foliage
- Tweezers
Step-by-step Guide
Step 1: Fill the bottom of the glass bowl with a layer of pebbles for drainage and stability.
Step 2: Arrange preserved moss over the pebbles, shaping it into little hills for added depth.
Step 3: Next, place the haunted house toward the back, then add the miniature pumpkins along the mossy mounds.
Step 4: Position ghost figurines along the path leading to the house. You can use tweezers for precise placement.
Step 5: Add the small orange tree for height and a touch of autumn magic, then secure the lid.
#2. Haunted Miniature Graveyard Scene
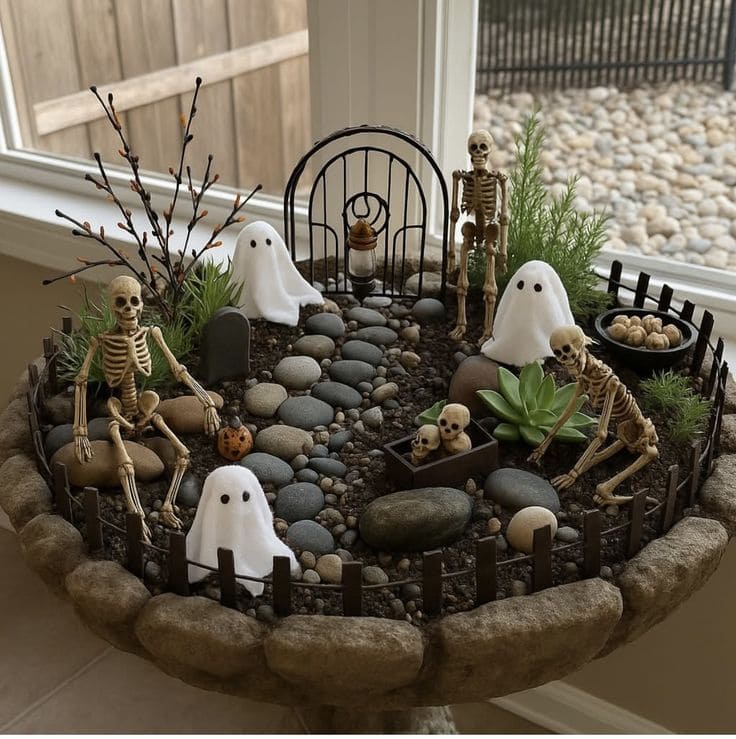
Nestled inside an old birdbath, this little haunted graveyard’s a whimsical mix of tiny skeletons, fabric ghosts, smooth river stones, and miniature succulents.
Also, the little gate, crooked gravestones, and scattered skulls make it look perfectly spooky yet still inviting.
You can almost imagine the ghosts floating around at night while the skeletons share bone-chilling tales.
Materials Needed
- 1 shallow round planter or birdbath (20″ diameter)
- 3 mini skeleton figures (4″-6″ tall)
- 3 mini fabric ghosts (about 3″ tall)
- 3 small faux succulents
- Miniature gate and fence set (about 12″ total length)
- Assorted river rocks and pebbles (3-5 lbs)
- Mini gravestones and skull accessories
- Potting soil (enough to fill planter)
Step-by-step Guide
Step 1: Fill the birdbath with potting soil, leaving a smooth surface for arranging your scene.
Step 2: Position the miniature gate and fence first, so you can work your layout around it.
Step 3: Place larger rocks to form a winding path through the graveyard. You also fill in gaps with smaller pebbles for a natural look.
Step 4: Add the skeletons in relaxed or quirky poses, and tuck in the little ghosts where they look like they’re floating.
Step 5: Finally, plant the faux succulents and place gravestones and skulls for extra detail.
#3. Swinging Ghost Light Display
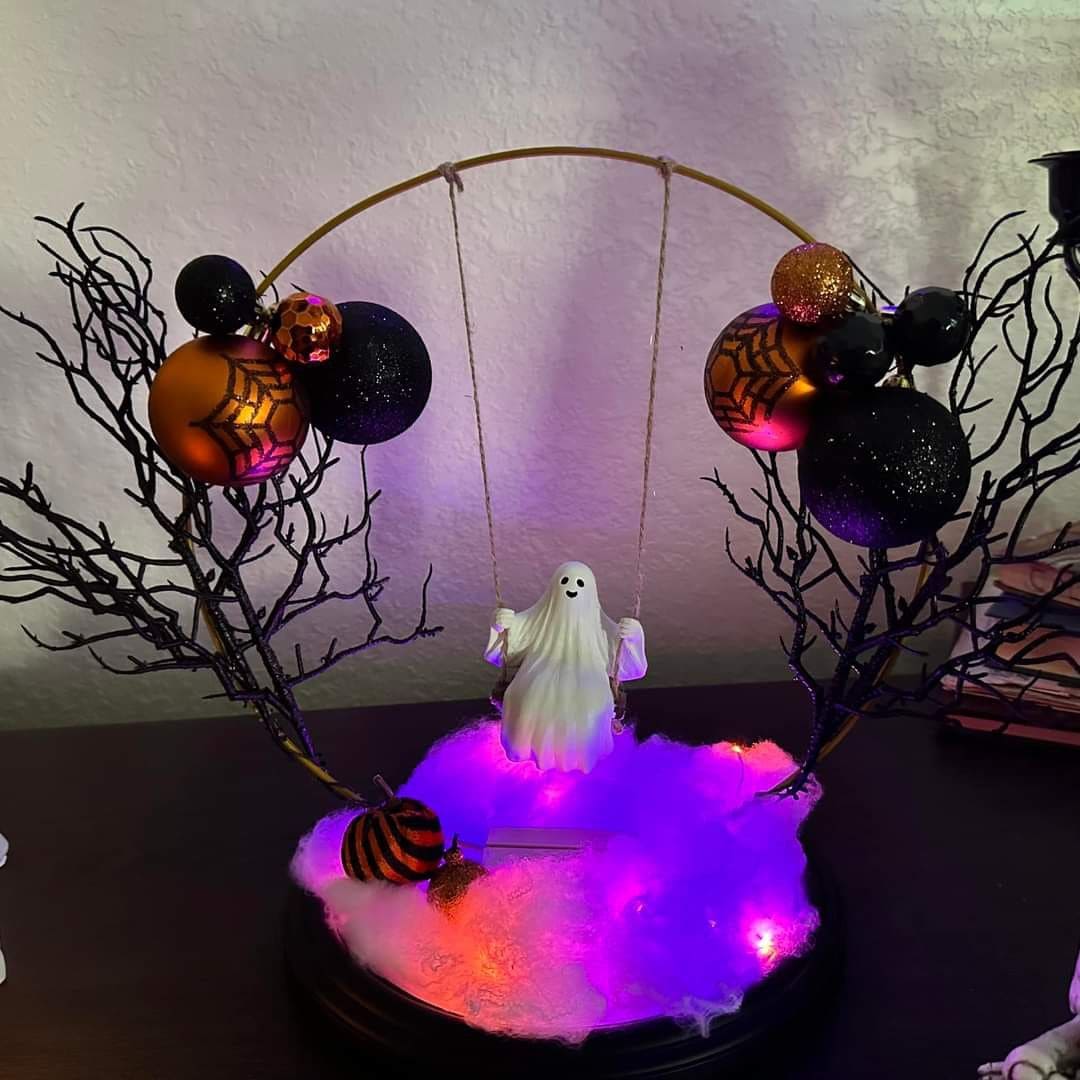
Wow, in this design, the glowing cotton fog beneath, dotted with orange and purple lights, feels like a tiny Halloween fairytale brought to life.
The black twig branches, adorned with glittery ornaments and spiderweb-patterned baubles, frame the ghost perfectly, giving the scene both charm and a hint of spookiness.
It’s one of those crafts that draws you in, you almost expect the ghost to wink as it swings.
Materials Needed
- 1 small white ghost figurine (about 4-5″)
- 2 faux black branch stems (12-15″ tall)
- 1 round wood or plastic base (8-10″ diameter)
- 8-10 mini Halloween ornaments (1-2″)
- 1 gold or black metal hoop (10-12″ diameter)
- 2 ft jute twine
- 1 pack LED string lights (purple and orange)
- 1 handful white polyester stuffing
- Hot glue gun & glue sticks
- Mini foam pumpkin (2-3″)
Step-by-step Guide
Step 1: Start by gluing the faux branches on opposite sides of the base so they slightly lean inward, creating a natural arch shape.
Step 2: Attach the metal hoop between the branches, securing it firmly with hot glue or floral wire.
Step 3: Cut two equal lengths of jute twine and tie them to the hoop. Then secure the ghost figurine to the bottom ends of the twine so it hangs like a swing.
Step 4: Wrap the LED string lights loosely around the base, tucking them into the polyester stuffing for a glowing fog effect.
Step 5: Now you can decorate the branches with Halloween ornaments and add the mini pumpkin at the base for extra charm.
#4. Glowing Ghost Wreath
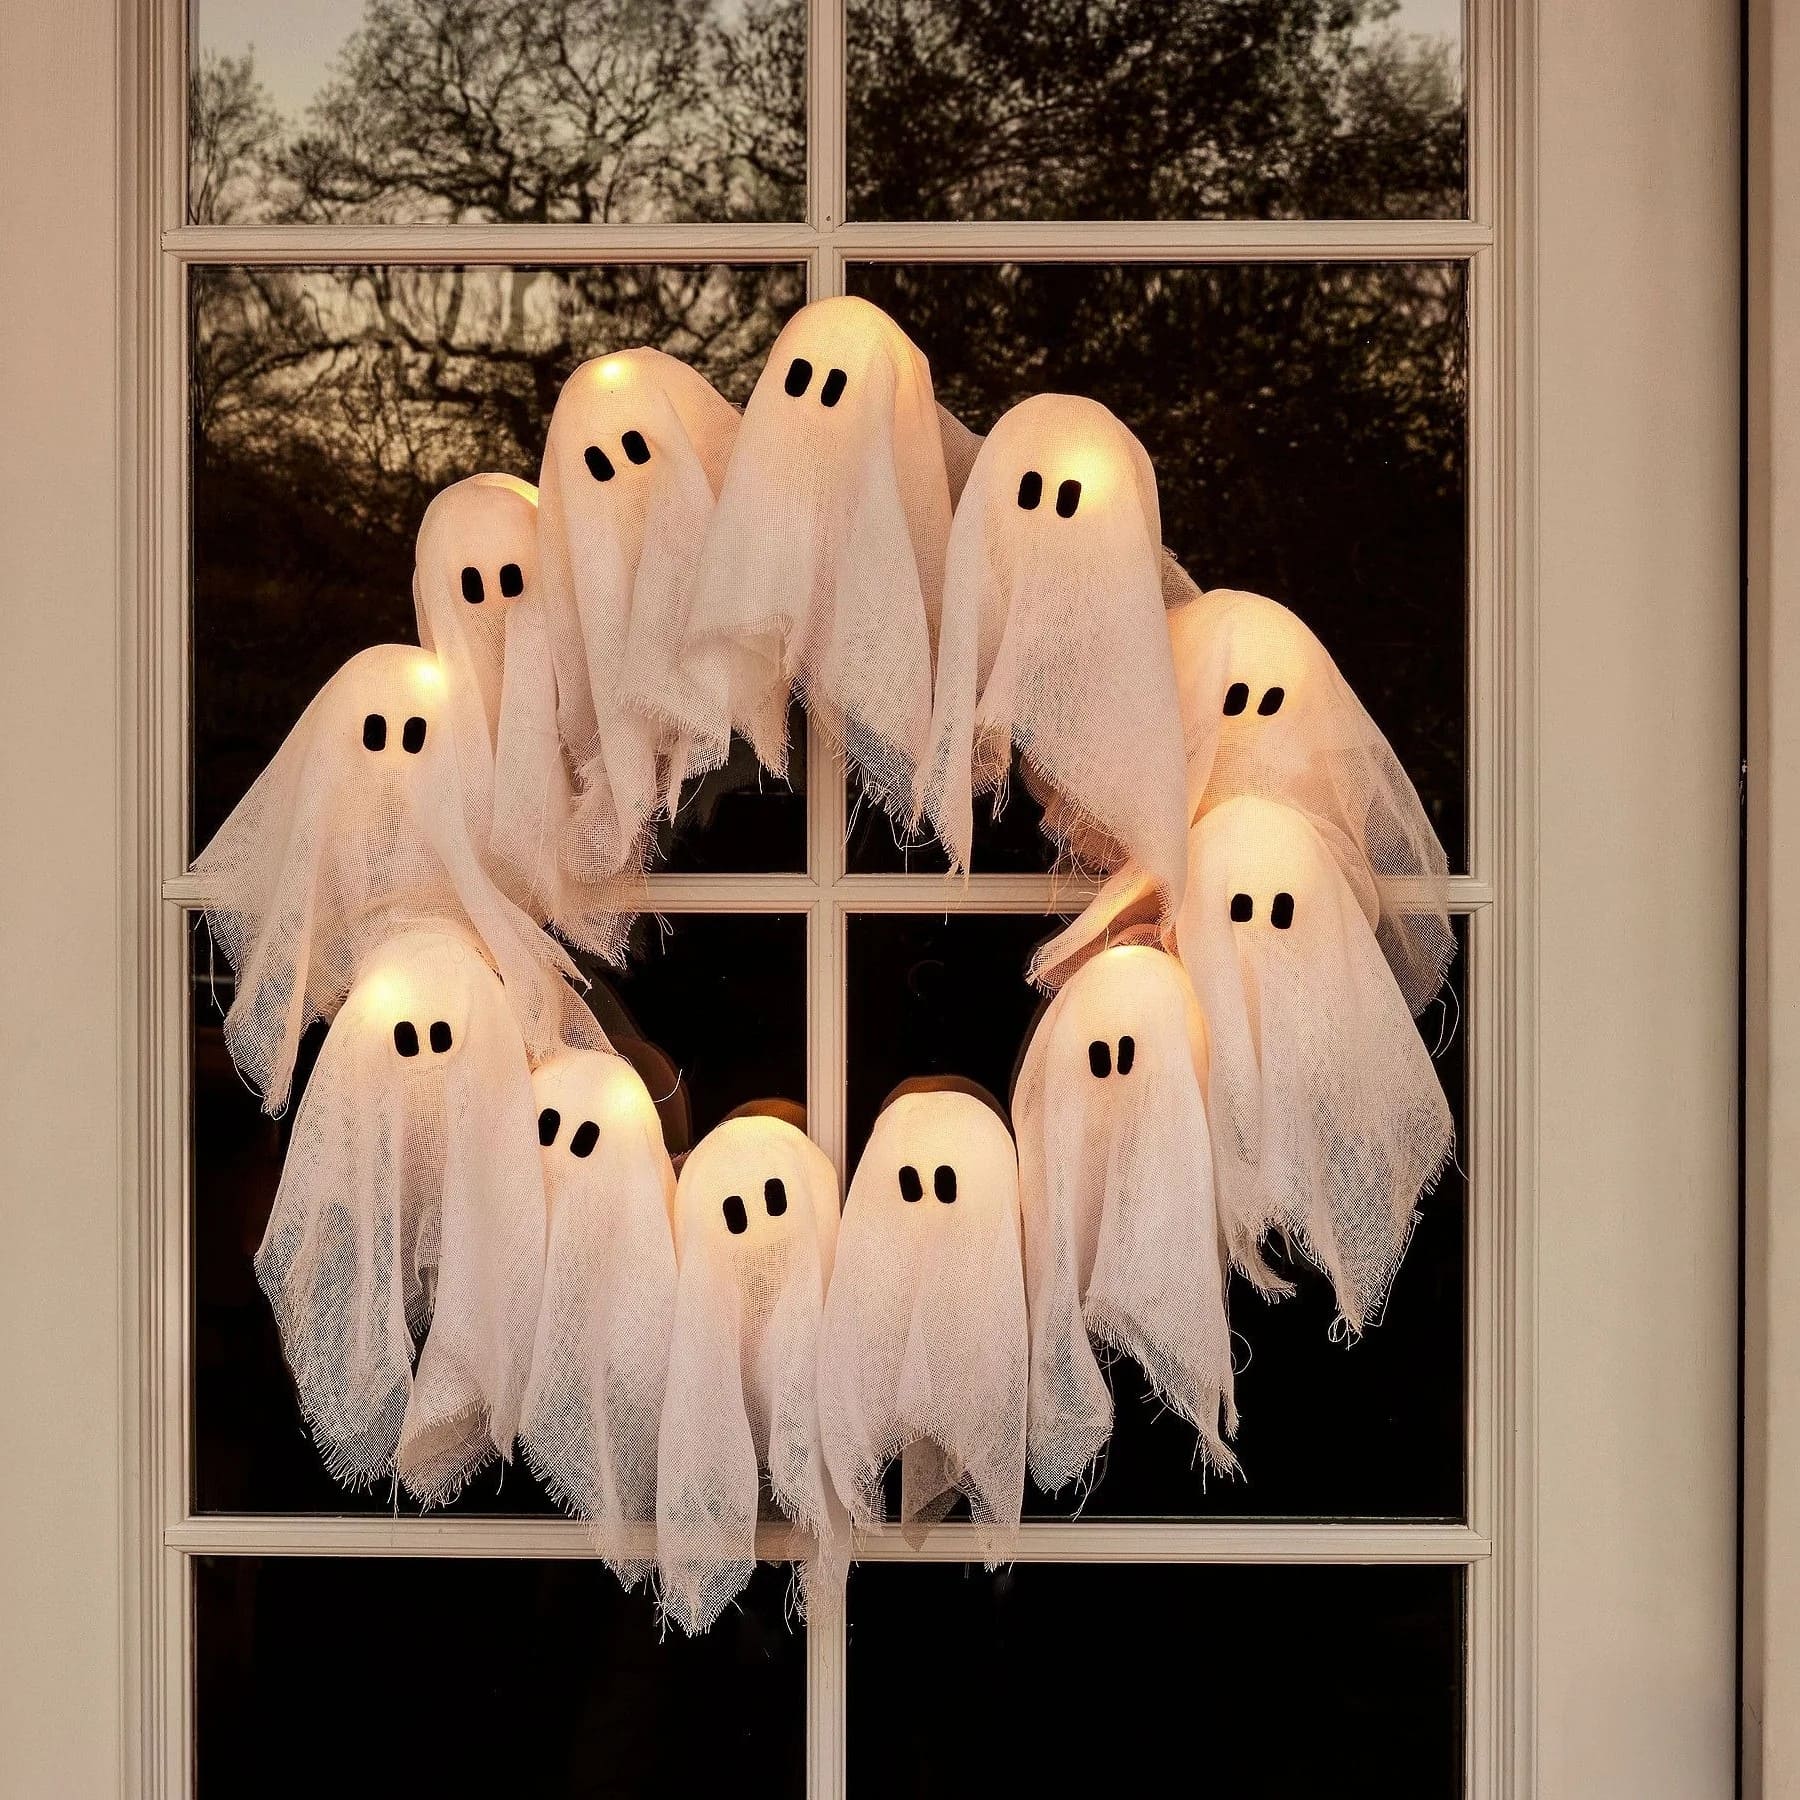
This wreath is pure Halloween joy, a glowing circle of friendly little phantoms ready to greet every trick-or-treater.
Each ghost is draped in tattered white cheesecloth, their soft light casting a warm and whimsical glow. The black felt eyes pop against the delicate fabric, giving them that perfect expression.
Hung on a front door or in a window, it’s the kind of decoration that makes neighbors smile and kids squeal in delight.
Materials Needed
- 1 wire wreath frame (14-16″)
- 12-14 plastic ping pong balls or small LED bulbs (1.5-2″)
- 1 strand of warm white LED string lights (20-25 bulbs)
- 1 yard of white cheesecloth
- Small black felt sheet (4″×6″)
- Hot glue gun and glue sticks
- Clear tape or twist ties
- Scissors
Step-by-step Guide
Step 1: Wrap your LED string lights evenly around the wire wreath frame, securing with tape or twist ties.
Step 2: Attach each ping pong ball or bulb to the light strand, ensuring they face outward.
Step 3: Cut cheesecloth into squares large enough to drape over each head, then glue or tape in place.
Step 4: Cut small oval eyes from black felt and glue them to each ghost’s face.
Step 5: Finally, hang your wreath and turn on the lights to watch your ghostly circle come alive.
#5. Curvy Ghost Face Candles
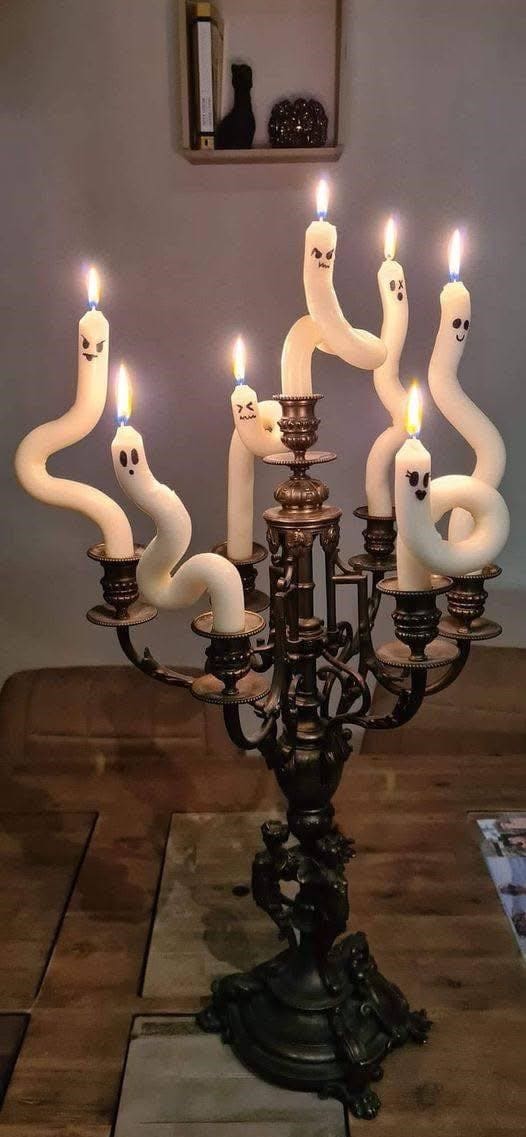
These twisted ghost face candles turn an ordinary candelabra into a playful haunted centerpiece.
Specially, the wavy shapes look like the candles are dancing or floating in midair, while each ghostly face adds a burst of personality.
The soft candlelight makes the expressions come alive, perfect for a Halloween dinner table or mantel display. It’s the kind of décor that sparks conversation and a few giggles.
Materials Needed
- 7 white taper candles (10-12″)
- Candelabra or candle holder with multiple arms
- Hair dryer or hot water
- Permanent black marker (fine tip)
Step-by-step Guide
Step 1: Soften the candles by gently heating them with a hair dryer or dipping them in hot water for a few seconds.
Step 2: Carefully bend each candle into curvy shapes while warm, then let them cool to set the form.
Step 3: Use the marker to draw fun ghost faces, you can mix expressions for extra character.
Step 4: Place them in the candelabra, light them up, and watch your ghostly guests hover in the glow.
#6. Mason Jar Ghost Lanterns
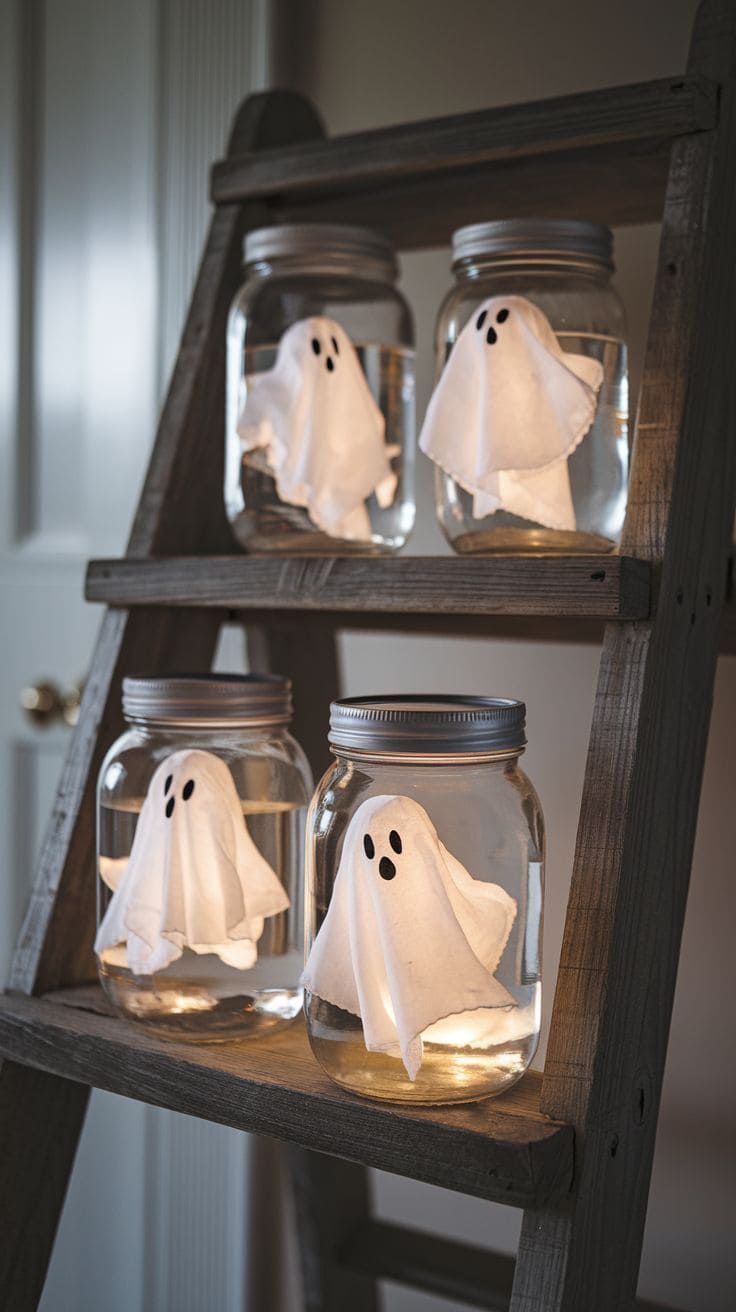
These mason jar ghost lanterns are a fun and cozy way to add a gentle Halloween glow to your home. Each jar holds a floating little ghost made from soft white fabric, lit from below to create a warm, flickering light.
When placed on shelves, mantels, or even an outdoor porch, they give off a whimsical haunted house vibe without being too spooky.
Bonus, you can cluster them together for impact or scatter them throughout your home to surprise guests with a glowing ghostly friend around each corner.
Materials Needed
- 4 clear mason jars with lids (quart size)
- White fabric squares (about 10 x 10 inches each)
- Black felt or craft foam
- Small LED tea lights
- Clear fishing line
- Hot glue gun and glue sticks
Step-by-step Guide
Step 1: Cut small oval or circular shapes from black felt to create eyes and mouths for your ghosts, then glue them onto the center of each white fabric square.
Step 2: Place an LED tea light in the bottom of each jar, making sure it’s turned on before you start arranging the ghost.
Step 3: Drape the white fabric over a small ball of tissue or foam to form the ghost’s head, then secure fishing line or wire to the top so it can float above the light.
Step 4: Lower the ghost into the jar, attaching the fishing line to the underside of the lid so the ghost hovers inside without touching the bottom.
Step 5: Screw the lids back on, making sure the ghost hangs neatly in the center. When lit, they’ll appear to be glowing from within.
#7. Ceiling Fan Glass Ghost Lanterns
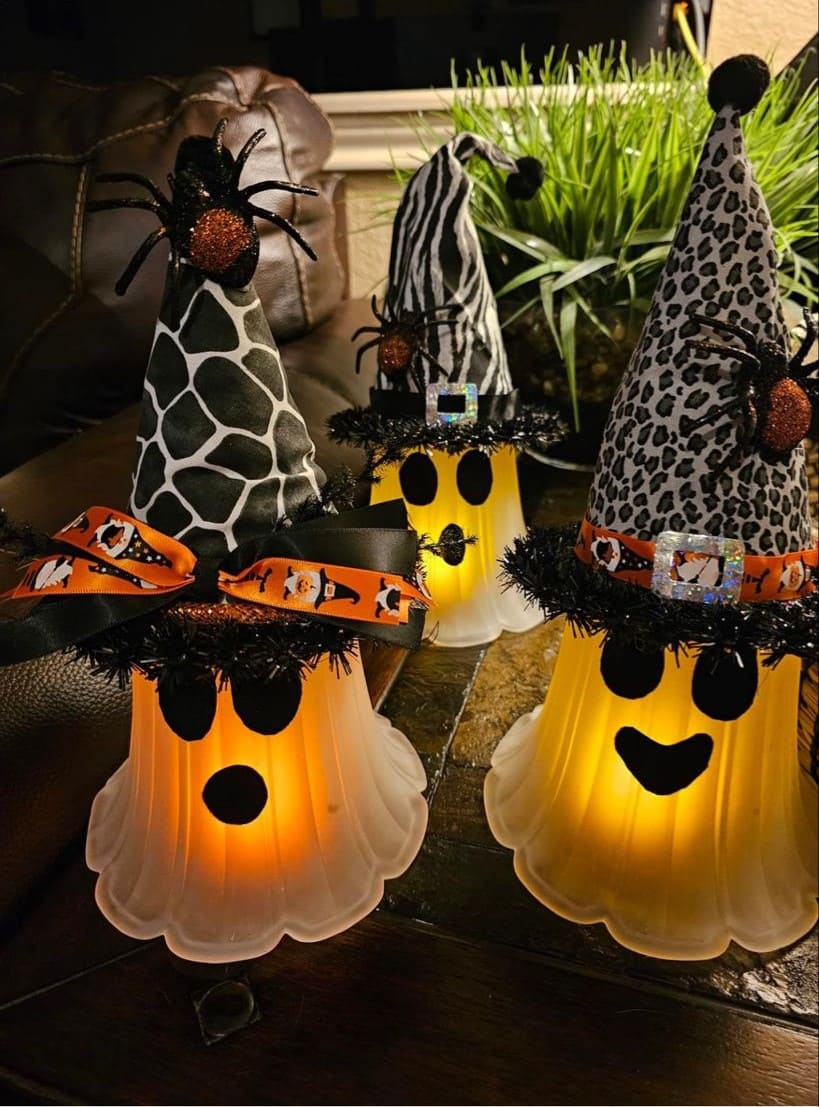
Wow, these adorable glowing ghosts are made by upcycling ceiling fan glass votives into charming Halloween lanterns.
Inside, a warm LED light gives the frosted glass an inviting orange glow, perfect for lighting up your mantel, entryway, or party table.
Moreover, the black felt eyes and mouths add just the right amount of spooky sweetness. It’s a creative way to transform thrifted or leftover home items into seasonal décor that will get plenty of compliments.
Materials Needed
- 3 ceiling fan glass votives (frosted or clear)
- Battery-operated LED tea lights
- Black felt (small sheet)
- Hot glue gun and glue sticks
- Decorative witch hats
- Halloween ribbon (1 inch wide, about 12 inches per ghost)
- Mini decorative spiders
- Scissors
Step-by-step Guide
Step 1: Clean the glass votives to remove dust or residue. Then cut out felt eyes and mouths, then glue them onto the glass.
Step 2: Place a battery-operated LED tea light inside each glass.
Step 3: Decorate witch hats with ribbon and embellishments, then secure them on top with hot glue.
Step 4: Display your glowing ghost lanterns where they can charm your Halloween guests.
#8. Snowman to Ghost Jack-O’-Lantern Tower
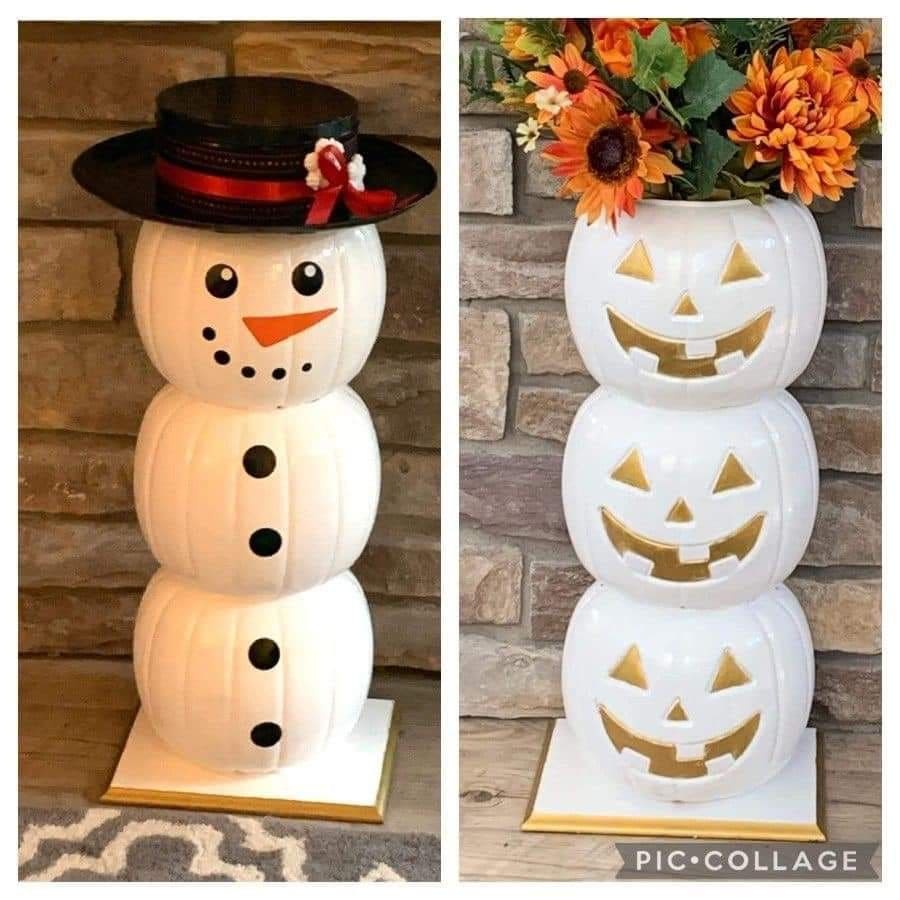
This fun reversible display lets you enjoy two holidays with one clever creation. For winter, three white plastic pumpkins are stacked into a charming snowman, complete with a black hat, carrot nose, and button details.
When Halloween rolls around, the same pumpkins transform into a spooky ghost-inspired jack-o’-lantern tower.
Specially, the carved faces glow with golden accents, giving a ghostly yet friendly vibe, and the top pumpkin can be adorned with fall blooms for extra flair.
Materials Needed
- 3 white plastic pumpkins (carved for ghost jack-o’-lantern look)
- White spray paint
- Gold paint for face accents
- Black hat and ribbon
- Black and orange craft foam
- Faux fall flowers
- Hot glue gun
- Wood base (12” x 12”)
Step-by-step Guide
Step 1: Spray paint pumpkins white and let them dry completely.
Step 2: For the ghost jack-o’-lantern, paint the inside of the carved faces gold and add fall flowers on top.
Step 3: For the snowman, cover face openings with foam, glue on eyes, a carrot nose, and buttons, then top with a hat.
Step 4: Stack pumpkins on a wood base, securing with hot glue.
Step 5: Now switch accessories between Halloween and winter for a quick seasonal makeover.
#9. Haunted Makeover of a Thrifted Painting
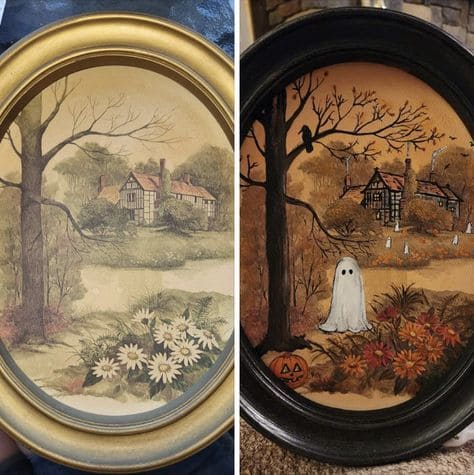
This clever transformation turns a serene vintage landscape into a charmingly eerie Halloween scene.
Starting with a thrifted framed print, a few artistic touches bring spooky life to the once-tranquil setting. The before image shows a soft countryside with flowers and a quaint house in the distance.
After the makeover, the scene shifts like trees darken, a ghost drifts among autumn foliage, tiny spirits float near the distant home, and a grinning jack-o’-lantern peeks from the corner.
Materials Needed
- Thrifted framed painting or print
- Acrylic paints (black, orange, white, autumn shades)
- Fine detail paintbrushes
- Painter’s palette or plate
- Sealant spray (matte finish)
Step-by-step Guide
Step 1: Lightly clean the painting’s surface and frame. You use acrylic paints to darken trees, grass, and sky to create a moody autumn look.
Step 2: Add Halloween elements such as ghosts, jack-o’-lantern, crow, and distant spirits.
Step 3: Once dry, seal your work with a matte spray to protect it.
Step 4: Hang your spooky art to give your home a haunted gallery feel.
#10. Tiered Ghost Halloween Display
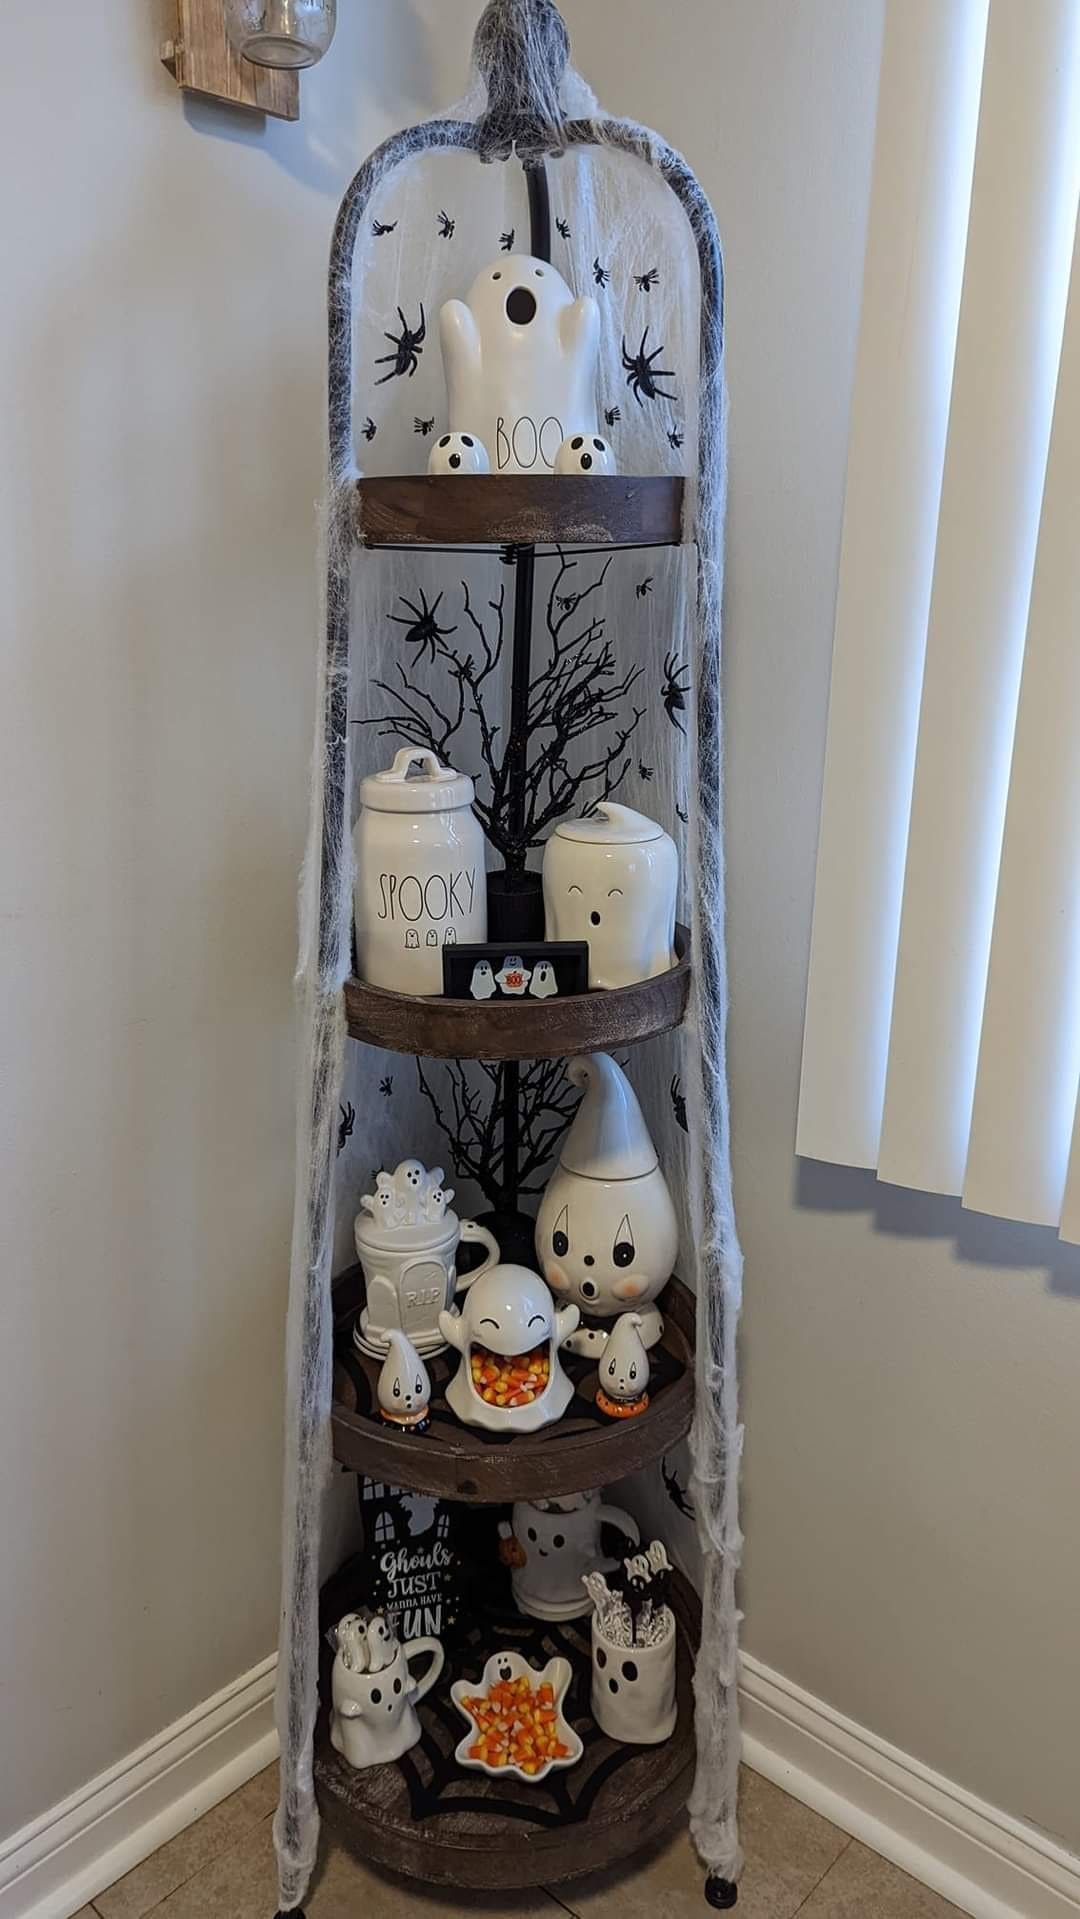
With a mix of ceramic ghosts, jars, mugs, and candy bowls, each shelf tells its own little Halloween story. Cobweb fabric and plastic spiders add a spooky frame, while a pop of candy color keeps it playful.
Materials Needed
- 1 tiered shelf (3-4 tiers, 45-55″ tall)
- 6-8 ceramic ghosts (4-12″ tall)
- 2 ghost jars (6-8″) and 2-3 mugs
- Spiderweb fabric (2-3 yards) + 10-15 plastic spiders
- 1- 2 lbs Halloween candy
Step-by-step Guide
Step 1: Position the stand in a visible corner and clean shelves. Then drape spiderweb fabric around the frame and tuck in spiders.
Step 2: Place the tallest ghost on the top tier, smaller ones around it.
Step 3: Add jars and mugs to middle tiers, angled for visibility.
Step 4: Finally, fill ghost bowls with candy on the bottom tier for a colorful finish.
#11. Ghost Tassel Pillow
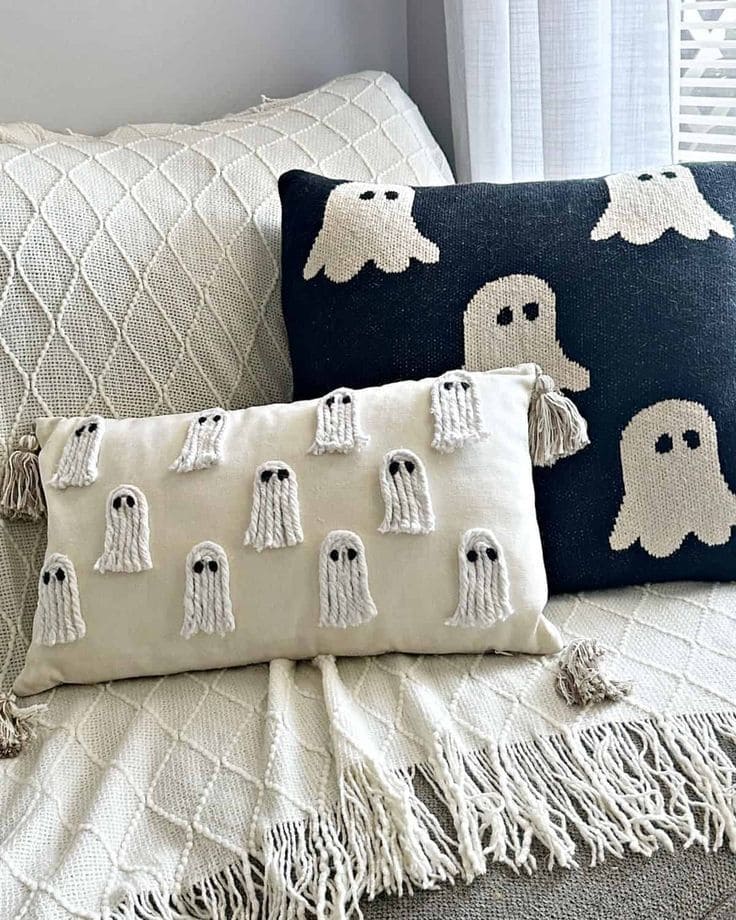
This sweet pillow brings a touch of Halloween charm without sacrificing your home’s cozy vibe.
The soft, neutral cover is dotted with adorable little ghost tassels, each one with tiny black eyes that peek out playfully.
Plus, these ghosts aren’t here to scare; they’re here to keep you comfy while adding a subtle seasonal touch. It’s a wonderful project if you enjoy crafting décor that you can cuddle up with afterward.
Materials Needed
- 1 rectangular pillow cover (12″×20″)
- 1 pillow insert (matching size)
- White yarn (about 60 yards)
- Black embroidery thread (2 yards)
- Yarn needle
- Scissors
- Cardboard piece for tassel-making (4″ tall)
Step-by-step Guide
Step 1: Wrap white yarn around the cardboard about 20 times for each ghost. Then slide it off carefully and tie one end to form the head.
Step 2: Snip the opposite end to create the ghost’s fringe. You should trim to your desired length so they look neat but still wispy.
Step 3: Stitch the ghosts onto the pillow cover in evenly spaced rows.
Step 4: Use black embroidery thread to make two tiny eyes on each ghost.
Step 5: Insert the pillow form, fluff it up, and set it out on your couch or bed.
#12. Painted Ghost Wood Slice Art
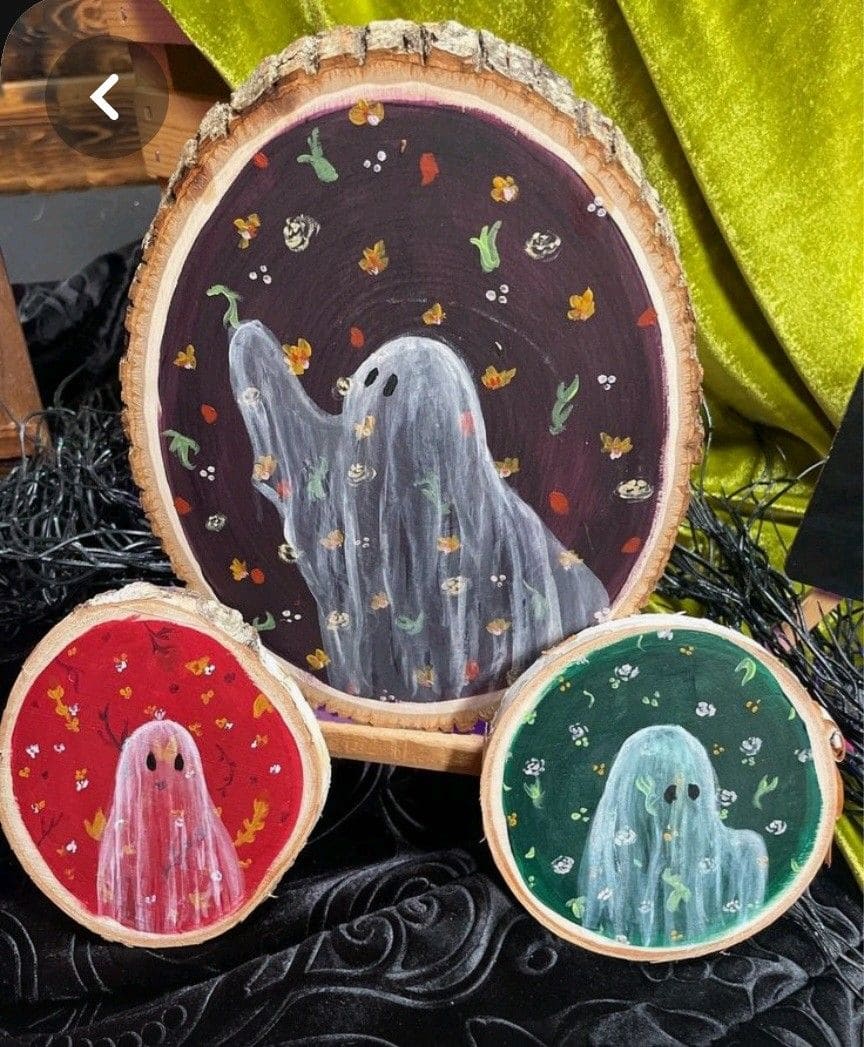
These painted wood slices bring a charmingly eerie twist to rustic décor. Each piece shows a ghost drifting across a colorful backdrop, with tiny flowers and leaves adding a soft, magical touch.
Materials Needed
- 3 wood slices (small: 4-5″, medium: 6-7″, large: 8-9″)
- Acrylic paints (background colors, white for ghost, accent colors)
- Fine detail brushes and a medium flat brush
- Paint palette and water cup
- Pencil
- Clear acrylic sealer spray
Step-by-step Guide
Step 1: Sand the wood slices lightly, then use a pencil to lightly sketch the ghost and any floral or leaf patterns you want to include.
Step 2: Paint the background first, blending colors if desired for a softer look.
Step 3: With white paint, fill in the ghost shape using light, feathery strokes to give it a translucent, floating appearance.
Step 4: Add small flowers, leaves, and decorative accents around the ghost, using fine brushes for detail work.
Step 5: Once the design is dry, spray the surface with a clear acrylic sealer to protect your art and enhance the colors.
See also: 24 Adorably Spooky Halloween Ghost Crafts to Try This Season
#13. Ghost Face Milk Glass Vases
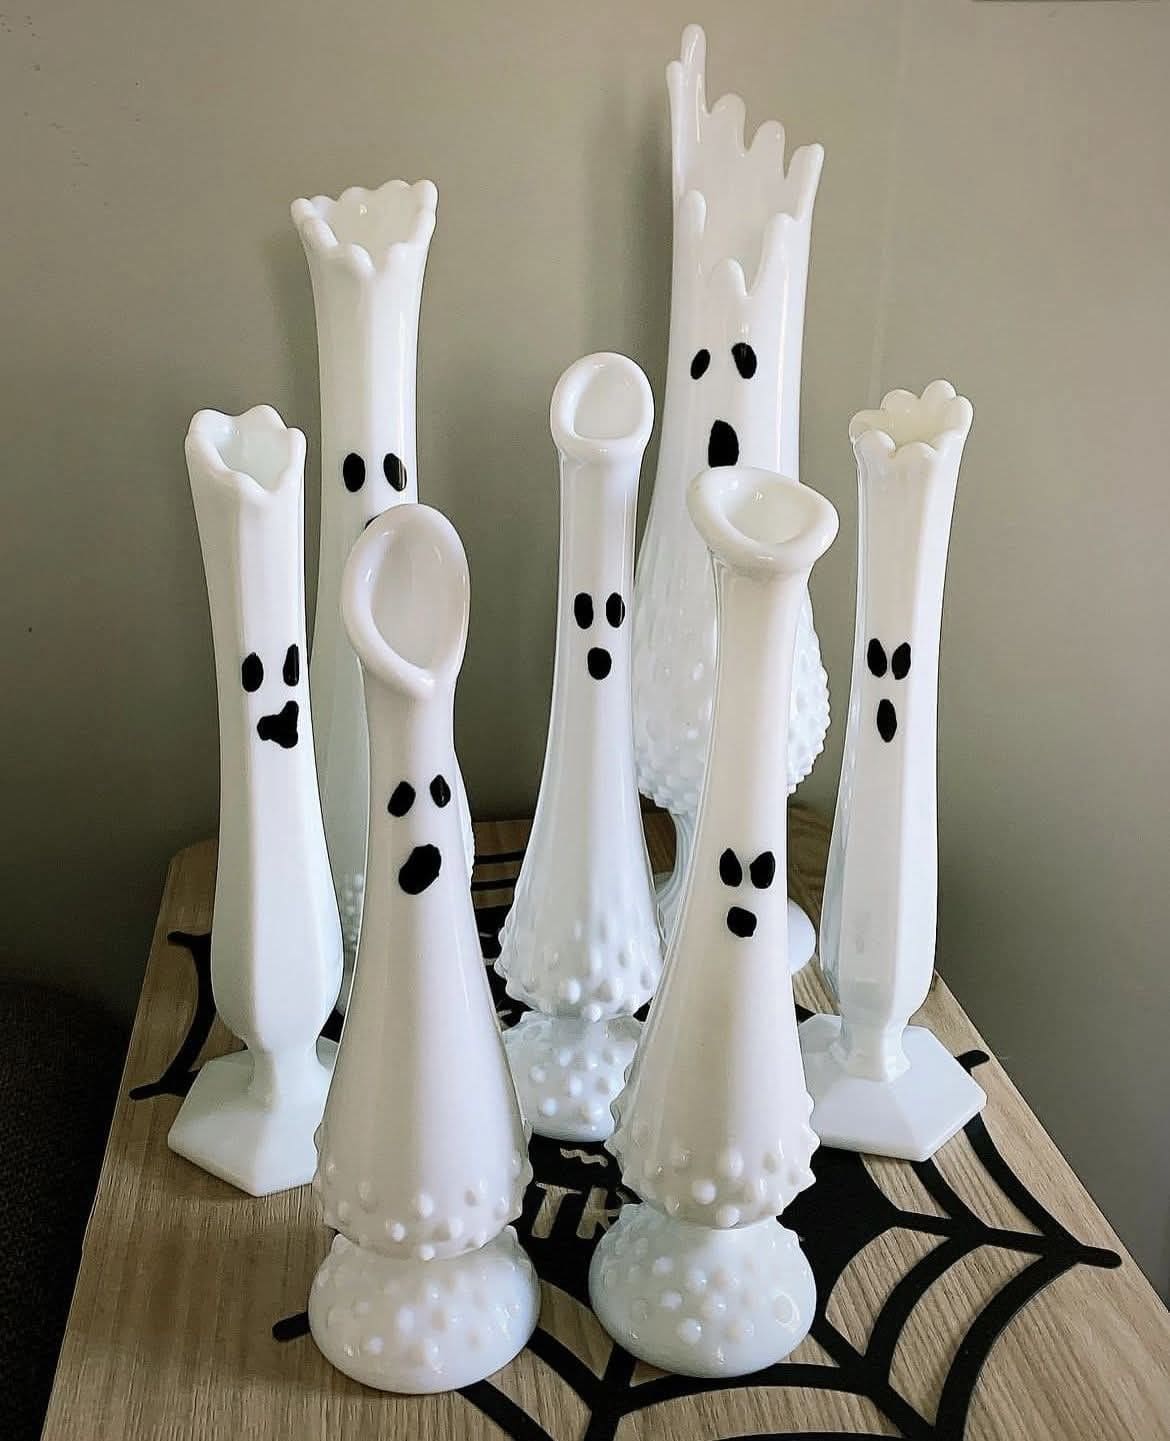
How about turning vintage milk glass vases into a hauntingly adorable ghost display? Their tall, elegant shapes and pure white color naturally lend themselves to ghostly figures.
With just a touch of paint, they transform into whimsical Halloween decorations that work beautifully for mantels, tabletops, or entryway displays.
Materials Needed
- Assorted milk glass vases (8-12 inches tall for variation)
- Black acrylic paint
- Small detail paintbrush
- Pencil (optional)
- Clear acrylic spray sealer
Step-by-step Guide
Step 1: Clean and dry the milk glass vases thoroughly to remove any dust or residue.
Step 2: If desired, lightly sketch different ghost face expressions onto each vase with a pencil.
Step 3: Using a fine detail brush, paint the eyes and mouth in black acrylic paint. You can create a variety of expressions like spooky, surprised, or playful to give personality to each ghost.
Step 4: Let the paint dry completely before handling.
Step 5: Lightly spray each vase with a clear acrylic sealer to protect the painted faces from chipping.
Step 6: Arrange them together in a cluster for maximum visual impact, placing taller ones at the back and shorter ones up front.
#14. Driftwood Ghosts
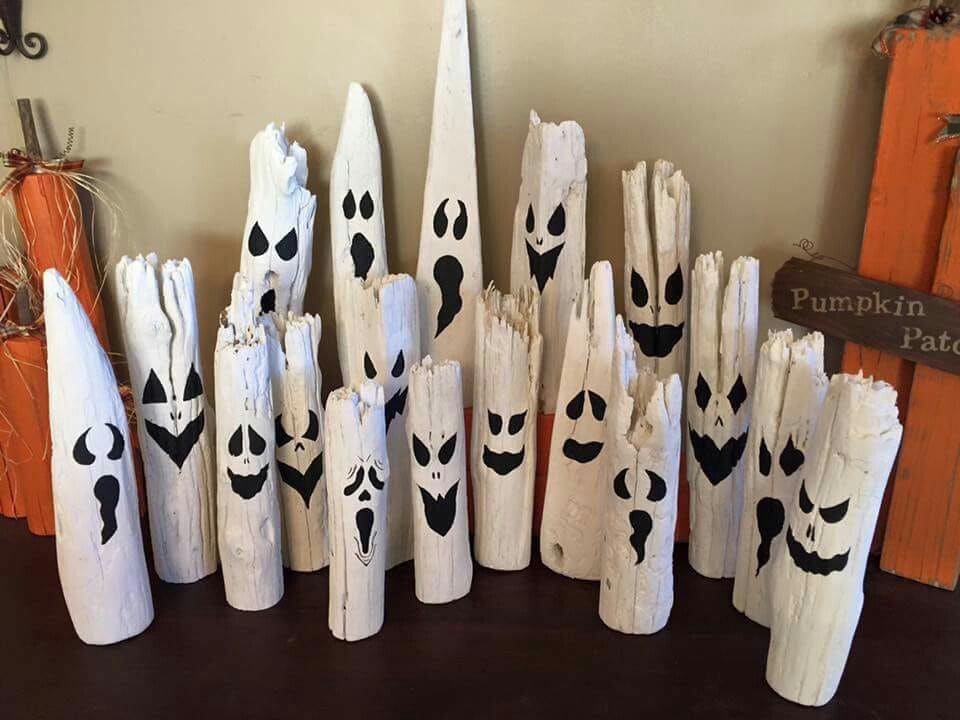
Made from weathered wood pieces painted white, each ghost has its own unique personality thanks to hand-painted black eyes and mouths in various spooky expressions.
The jagged tops of the driftwood create the illusion of tattered, floating spirits, making them perfect for a porch, mantel, or entryway display.
Grouped together, they look like a haunted gathering straight from a foggy shoreline.
Materials Needed
- Various sizes of driftwood or reclaimed wood (12-24 inches tall)
- White acrylic paint
- Black acrylic paint
- Paintbrushes (medium and fine tip)
- Sandpaper
- Protective sealant (optional)
Step-by-step Guide
Step 1: Lightly sand the driftwood to remove rough edges or splinters.
Step 2: Paint the entire surface white, letting the natural texture show through.
Step 3: Once dry, use black paint to create different ghost faces, mix happy, spooky, and surprised looks.
Step 4: Allow the paint to dry fully before sealing if you plan to display them outdoors. You can also arrange your ghost family together for the best haunting effect.
#15. Glam Sequin Ghost Trio
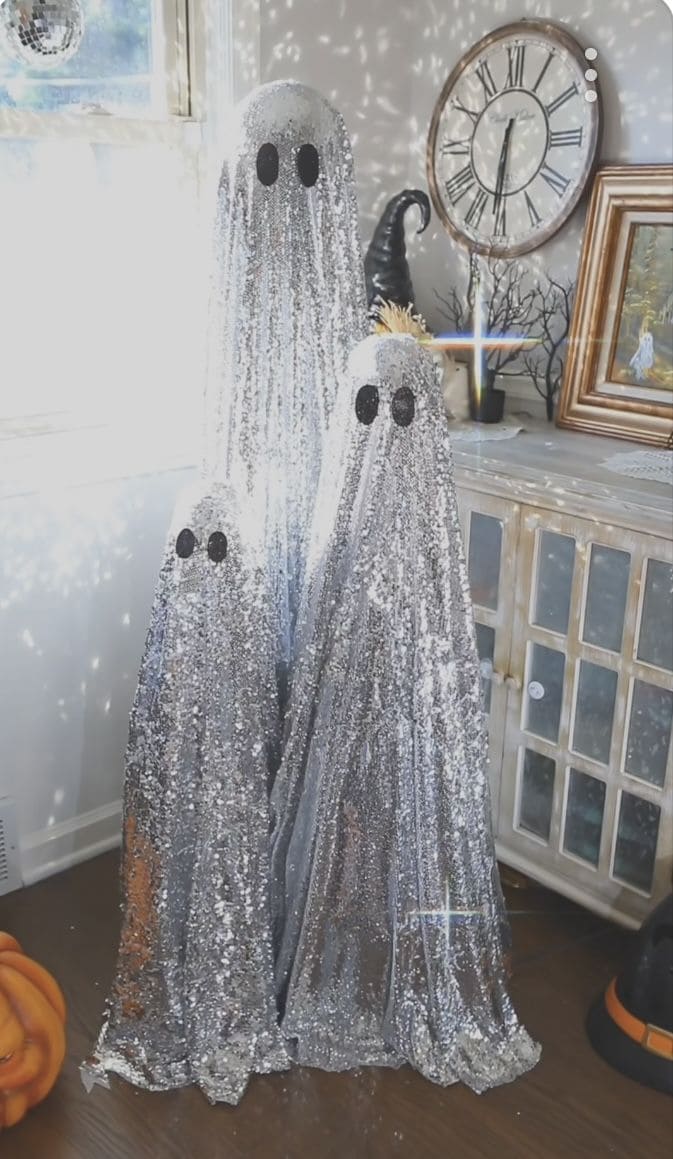
Why not give your Halloween decor a dazzling twist with these glamorous sequin ghosts?
Perfect for parties or window displays, their sparkling silver finish reflects light beautifully, turning your spooky setup into a shimmering statement piece.
You can also arrange them in varying heights to create an eye-catching, otherworldly family of ghosts.
Materials Needed
- 3 mannequin stands or foam bases (24″, 36″, and 48″ tall)
- 3 silver sequin fabric pieces (each 1.5-2 yards long)
- Black felt (6″ x 9″)
- Fabric scissors
- Hot glue gun and glue sticks
- Optional: battery-operated lights
Step-by-step Guide
Step 1: Position your mannequin stands or foam bases in a grouping with the tallest at the back and shortest in front.
Step 2: Drape each base with a piece of silver sequin fabric. Then cut two oval eyes from black felt for each ghost and secure them to the head area with hot glue.
Step 3: Adjust the draping so the sequins shimmer and catch the light from multiple angles.
Step 4: For added magic, place battery-operated lights under the fabric so the ghosts glow at night.
Step 5: Style them near a window or under a light source to enhance the sparkle effect.
#16. Minimalist Ceramic Ghost Centerpiece
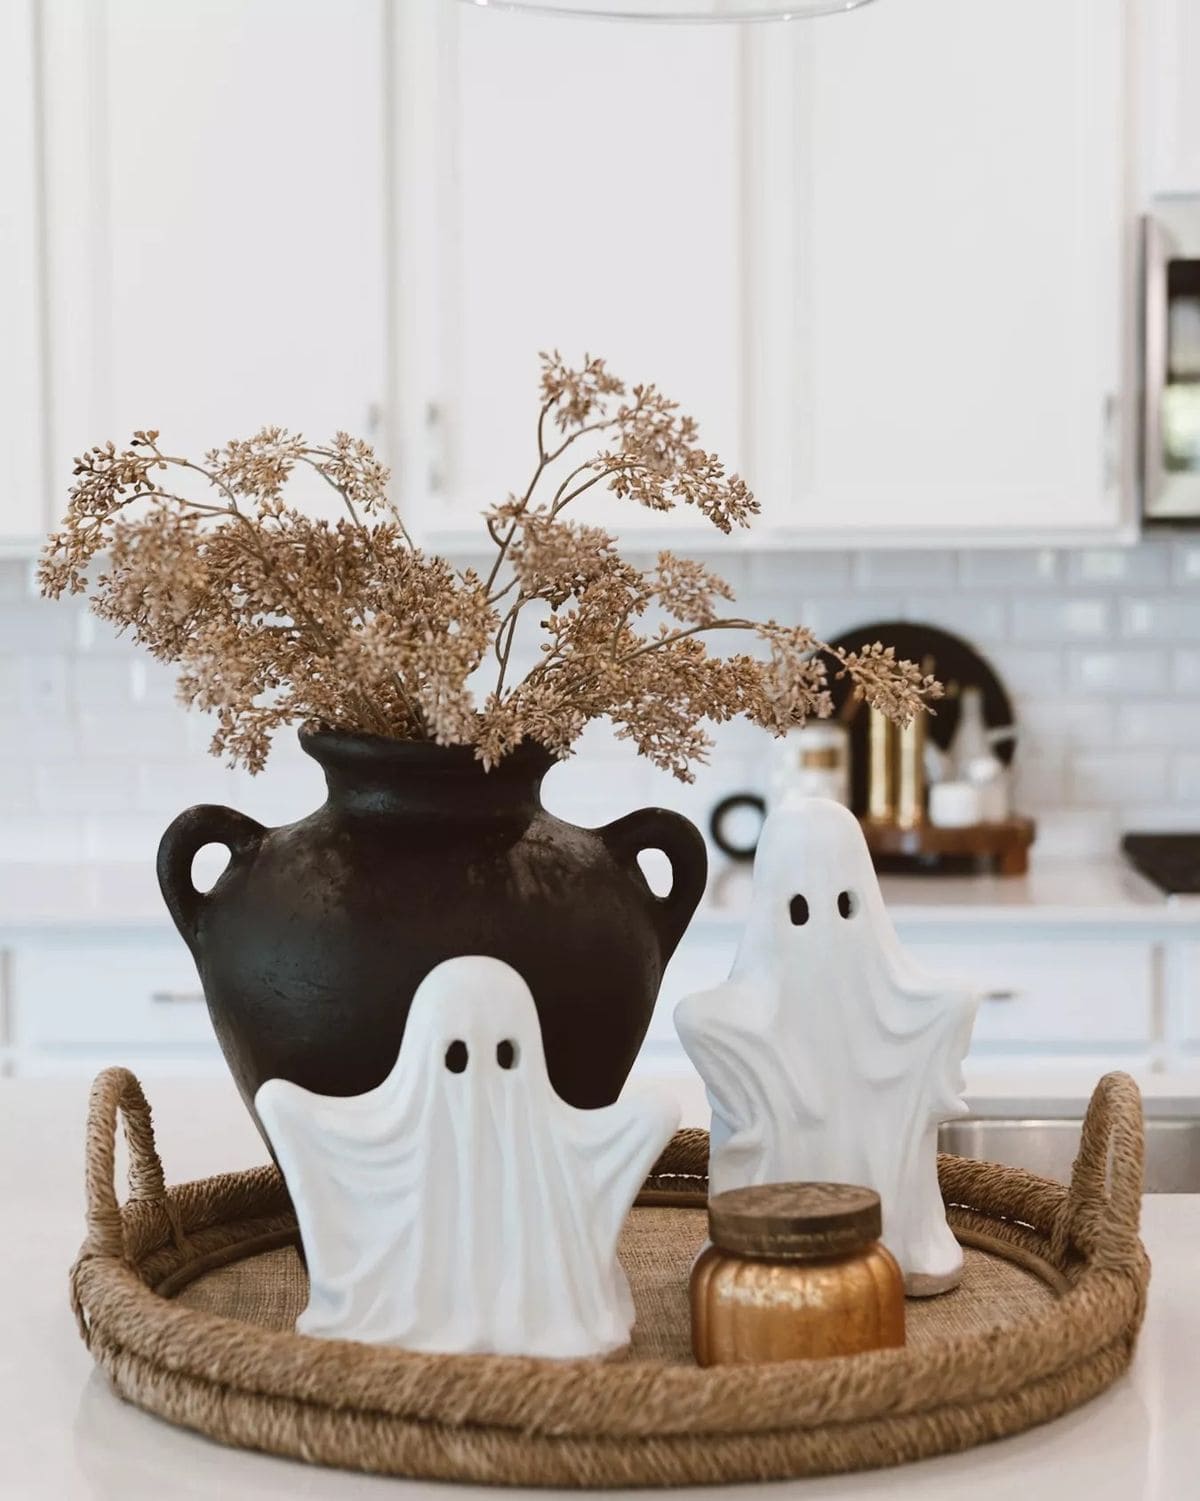
In this chic Halloween display, two smooth white ceramic ghosts, with soft draped folds and simple black eyes, stand on a woven tray alongside a matte black vase filled with dried foliage.
Also, a small gold pumpkin candle completes the look, adding a subtle autumn glow.
The neutral tones of the arrangement make it perfect for blending seasonal charm into a modern kitchen or dining area without overwhelming your decor.
Materials Needed
- 2-3 ceramic ghost figurines
- Matte black vase
- Dried branches or foliage
- Small decorative pumpkin candle
- Woven round tray
Step-by-step Guide
Step 1: Place the woven tray at the center of your table or counter.
Step 2: Position the black vase in the back and arrange dried foliage inside.
Step 3: Place the ceramic ghosts in front, staggering heights for balance.
Step 4: Add the gold pumpkin candle as a warm accent. Then adjust spacing to create a harmonious, inviting look.
#17. Jammin’ Ghost Lanterns
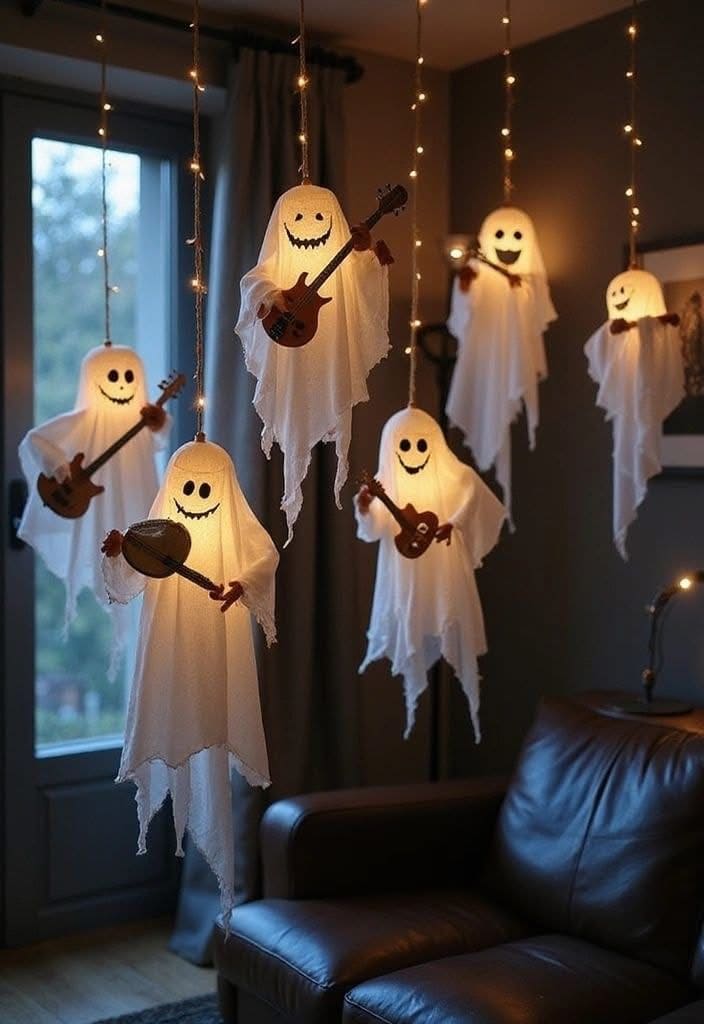
You can see floating above your living room with glowing smiles and tiny guitars in hand, these musical ghosts bring a whole new vibe to Halloween.
They look like they’re mid-song, about to start a spooky-but-fun jam session that keeps going until the witching hour. The soft, warm lights inside their cheesecloth robes give them an inviting glow.
Materials Needed
- 5-7 paper lanterns (8″-10″ diameter)
- 1 strand of warm white LED fairy lights (battery-operated, 20-30 bulbs)
- 2 yards of white cheesecloth
- Black felt sheet (8″×10″)
- Mini toy guitars or banjos (6″-8″ long)
- Clear fishing line
- Hot glue gun and glue sticks
- Scissors
Step-by-step Guide
Step 1: Assemble your paper lanterns and place a fairy light inside each one. Battery packs can be hidden at the top so they’re easy to switch on later.
Step 2: Cut cheesecloth into large enough pieces to drape fully over each lantern, letting the ends hang unevenly for that perfect ghostly flow.
Step 3: Cut big happy eyes and wide grins from the black felt, then glue them onto the ghosts’ faces.
Step 4: Hot glue the tiny guitars into their “hands.” Angle them as if they’re mid-performance for extra personality.
Step 5: Hang each ghost from the ceiling using fishing line, adjusting heights so they float at different levels.
#18. Tiered Tray Ghost Display
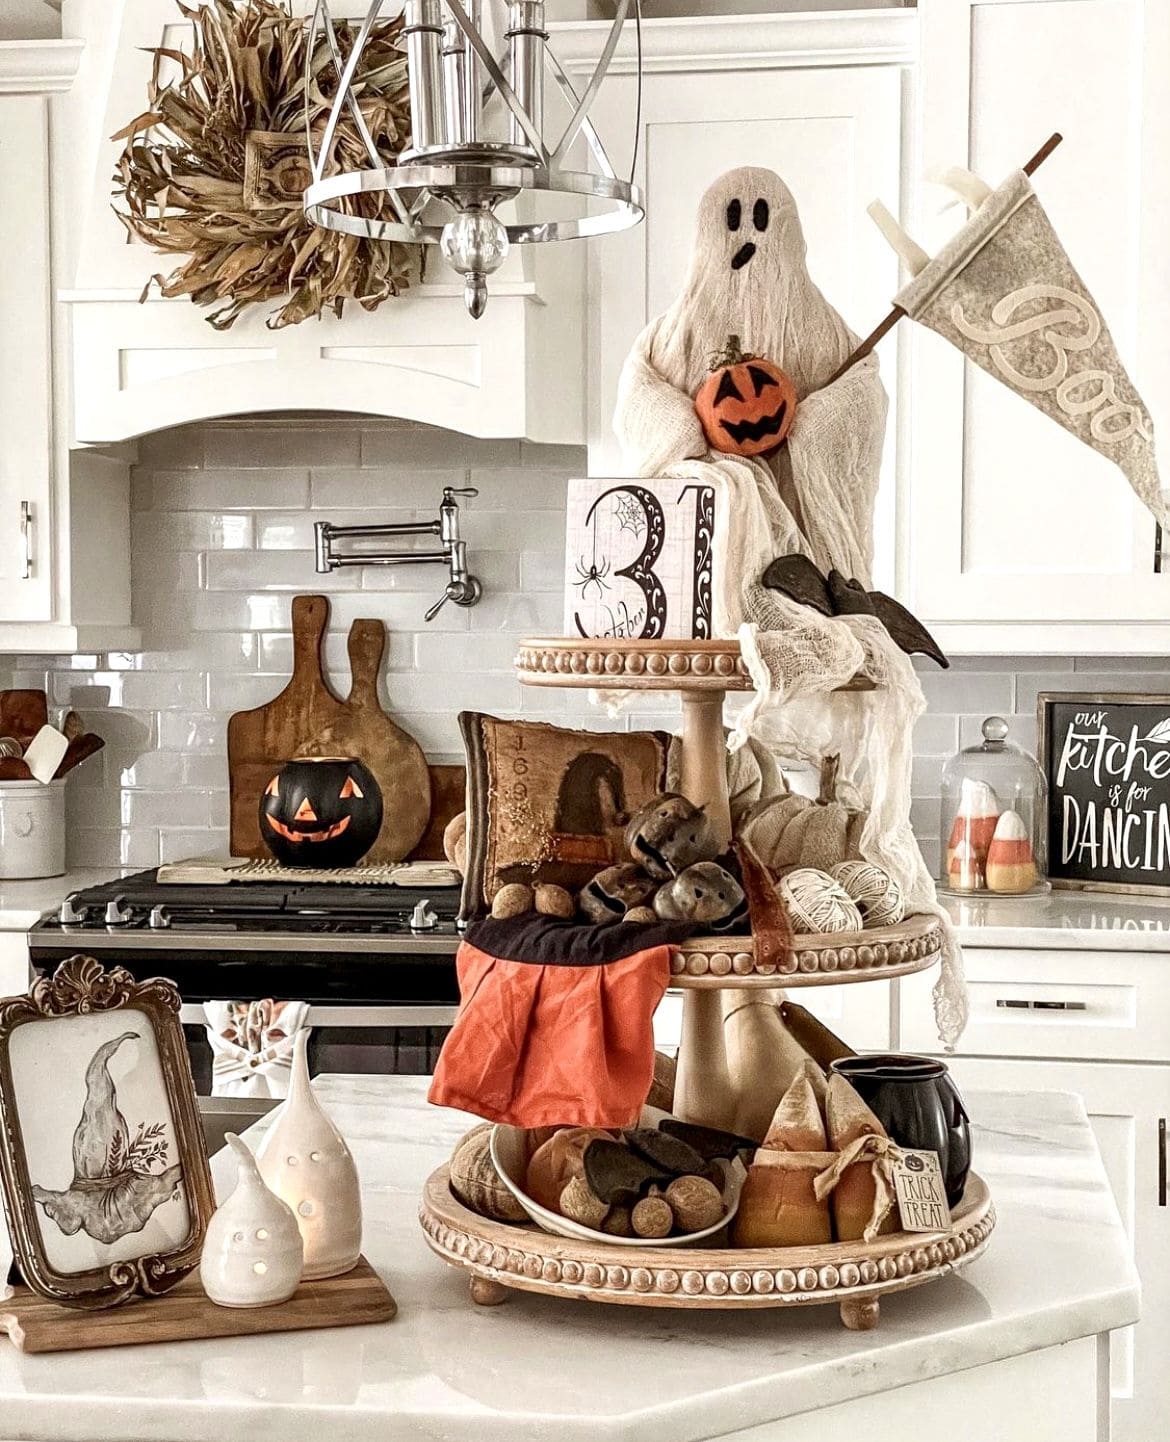
The centerpiece is a friendly ghost perched at the very top, holding a felt jack-o’-lantern bucket in one hand and waving a “Boo” flag in the other.
Draped in gauzy cheesecloth, it looks as though it floated in from a crisp autumn night. The tiered tray below is filled with rustic and cozy touches like mini pumpkins, twine balls and vintage-style Halloween trinkets.
Materials Needed
- 1 tiered wooden tray (2 or 3 tiers, about 12-16″ wide)
- 1 small ghost figure (8-10″)
- 1 piece of cheesecloth (20″×20″)
- 1 mini jack-o’-lantern bucket (3-4″)
- 1 small felt flag with dowel (approx. 8″)
- Assorted mini pumpkins (2-3″)
- Mini decorative pillows
- Twine balls or yarn balls (2-4″)
- Other rustic fillers (vintage mugs, wooden ornaments, faux bread)
Step-by-step Guide
Step 1: Place the ghost figure at the top tier and drape it with cheesecloth for a floaty, ethereal effect.
Step 2: Add the mini jack-o’-lantern bucket to one hand and secure the “Boo” flag in the other.
Step 3: Arrange rustic fillers, twine balls, and small pumpkins around the lower tiers, balancing colors and textures for a layered look.
Step 4: Fill empty spaces with small seasonal accents to give the display a full, abundant feel.
#19. Ghost Terrarium Domes
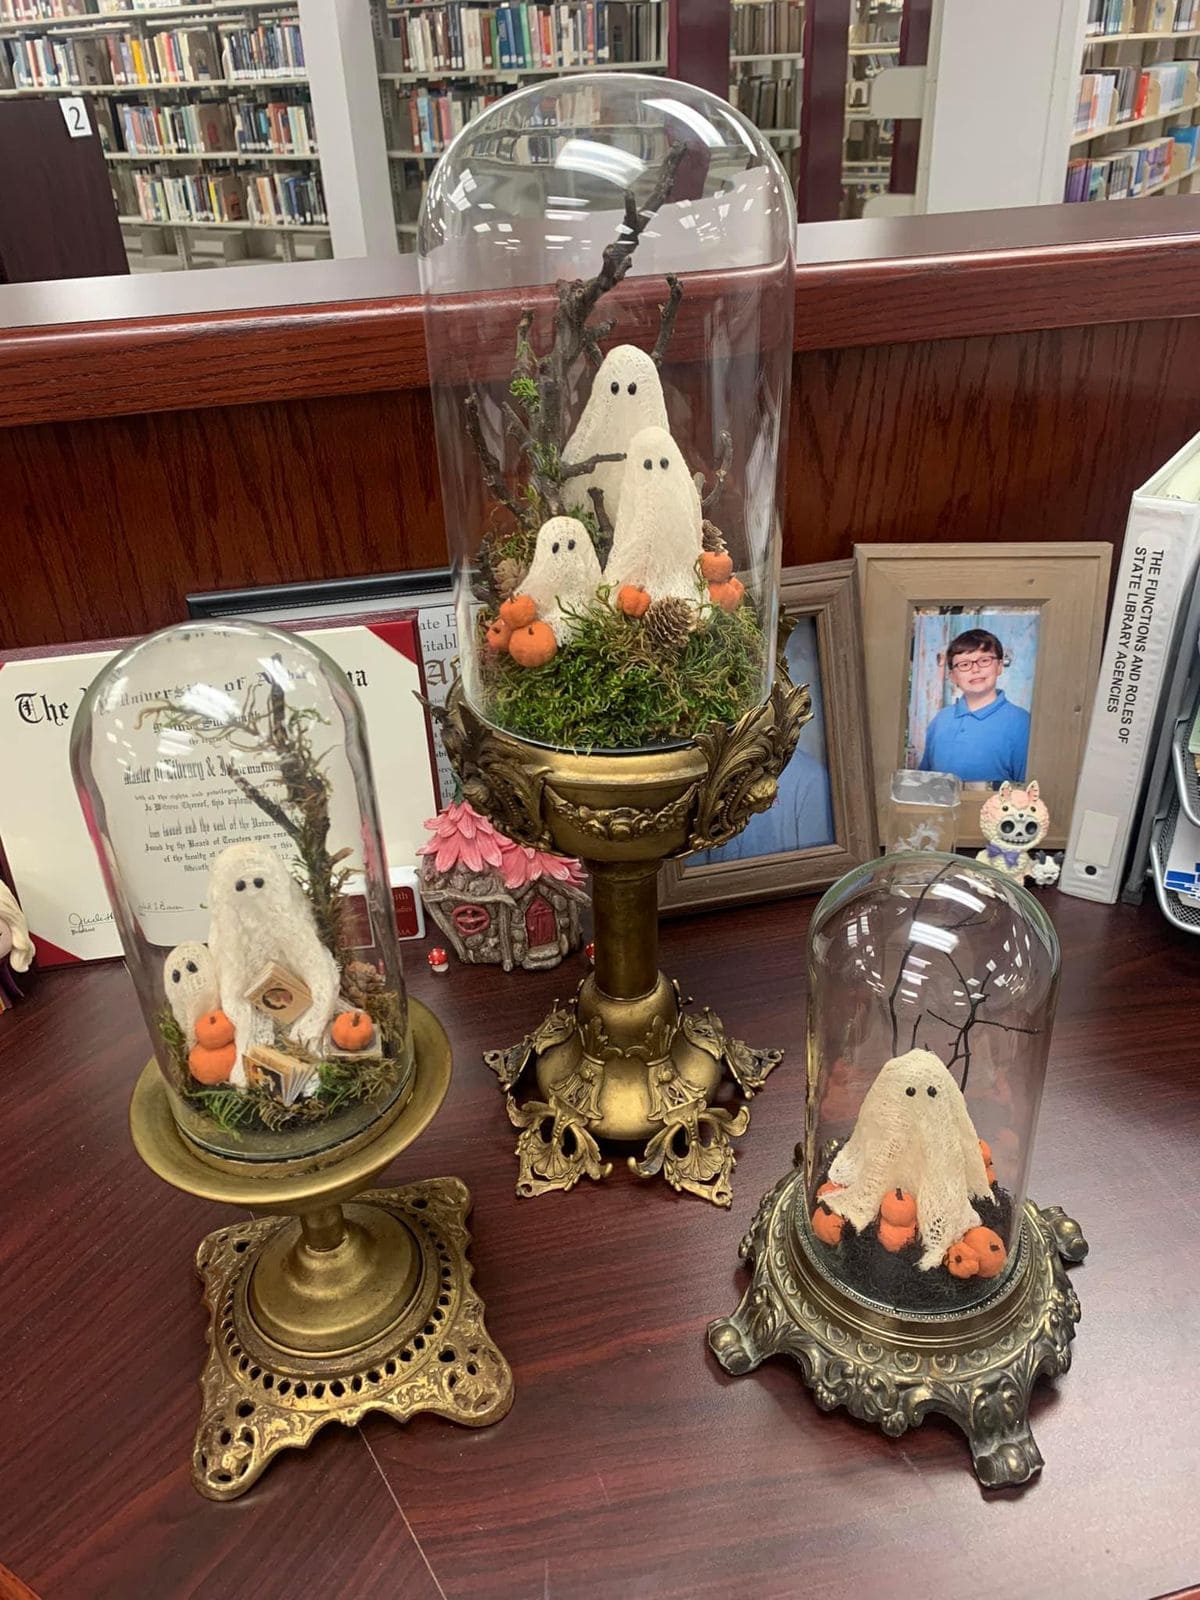
These ghost terrarium domes capture a tiny, whimsical Halloween world under glass. Each dome holds little white ghosts drifting among moss, twigs, pinecones, and miniature pumpkins, creating a charming mix of eerie and adorable.
Specially, the ornate brass bases give the whole display a vintage, almost museum-like quality, perfect for a bookshelf, entryway table, or even a library corner.
Materials Needed
- 3 glass cloches with ornate bases (various sizes)
- Mini white ghost figurines (fabric, clay, or felt)
- Dried moss and twigs
- Miniature pumpkins and pinecones
- Hot glue gun and glue sticks
- Black craft paper or fabric
Step-by-step Guide
Step 1: Line each dome base with black craft paper or fabric to create a rich backdrop for your scene.
Step 2: Arrange dried moss evenly, leaving space for your ghost figurines and decorative elements.
Step 3: Position ghosts in varied heights, you uuse small wooden blocks or corks underneath moss to give them lift and dimension.
Step 4: Add twigs for a forest-like setting and scatter miniature pumpkins and pinecones around the ghosts for seasonal charm.
Step 5: Secure delicate items with small dabs of hot glue, then carefully place the glass cloche over your scene.
#20. Yarn Witch Hat Ghost Lamp
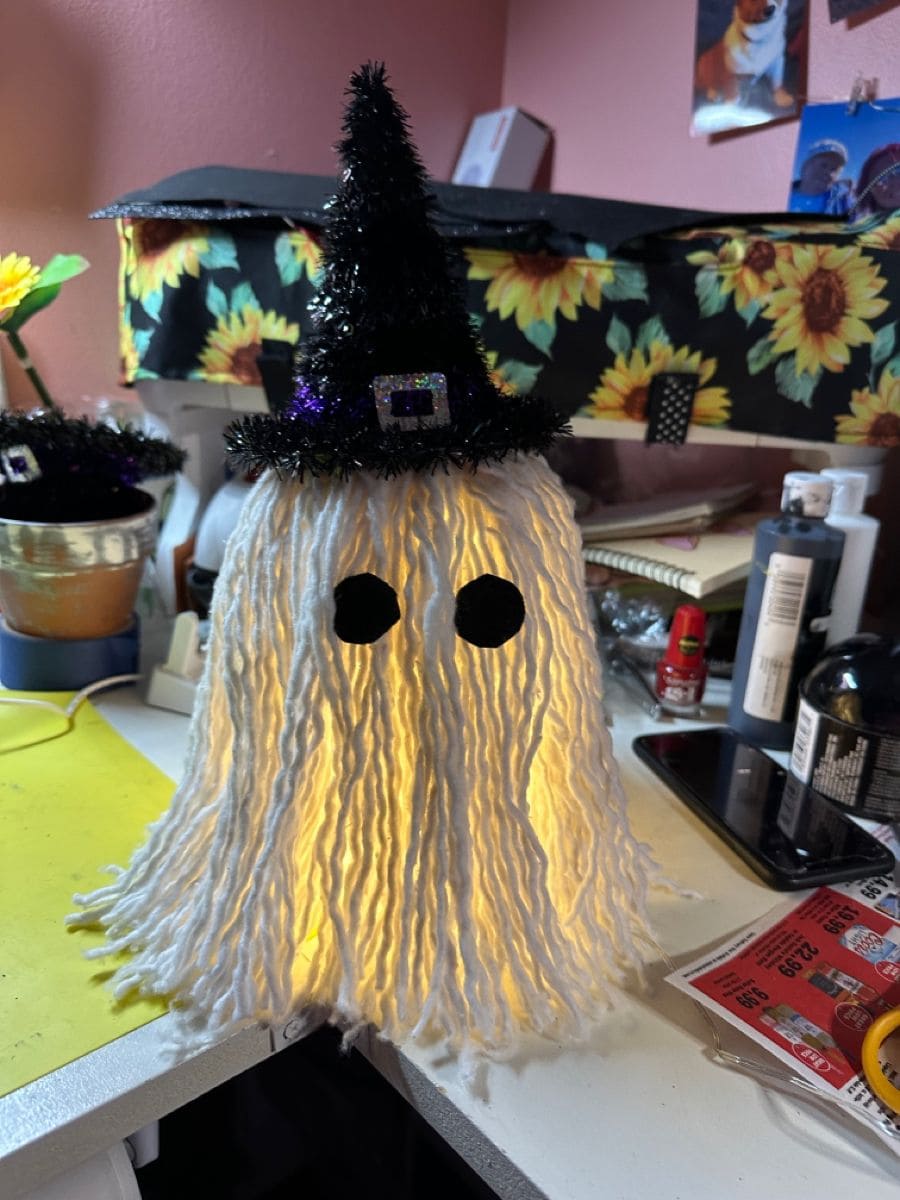
This yarn witch hat ghost lamp is a charming and slightly whimsical Halloween decoration that glows softly in the dark.
When lit from within, the yarn lets light peek through in a warm, cozy way, perfect for a Halloween night atmosphere that’s more cute than creepy.
This project works beautifully as a table centerpiece, a porch greeter, or even a playful addition to your Halloween crafting display.
Materials Needed
- 1 bundle of thick white yarn (approx. 100 ft)
- Small witch hat (store-bought or handmade)
- 2 black felt circles (1.5 inches diameter each)
- Hot glue gun and glue sticks
- Small LED puck light or battery-operated fairy lights
- Plastic bowl or round frame
Step-by-step Guide
Step 1: Cut multiple strands of white yarn to the same length (about 12-14 inches each) and hot glue them side by side around the rim of the plastic bowl or base until it’s completely covered.
Step 2: Once all strands are attached, gently shake them out to create a flowing ghost shape. You trim the ends slightly if you want a more even hem.
Step 3: Glue two black felt circles near the upper middle area to form the ghost’s eyes.
Step 4: Place an LED puck light or fairy lights inside the bowl so the ghost glows from within.
Step 5: Position the witch hat on top, securing with glue or tape if necessary.
#21. Textured Ghost Crowd Canvas
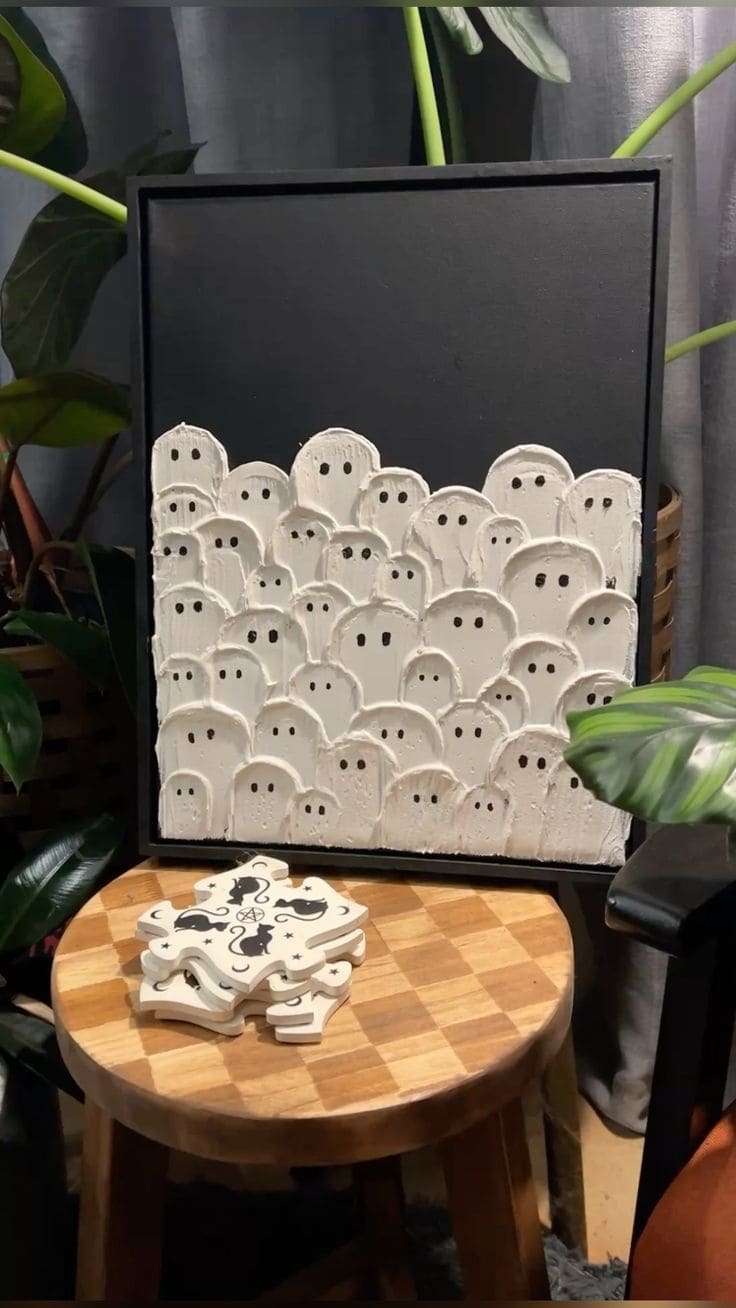
The raised ghost shapes stand out against a deep black background, giving the illusion of a spooky crowd peeking out from the canvas. It’s the perfect handmade Halloween wall decor for those who prefer a modern yet whimsical aesthetic.
Materials Needed
- 1 stretched canvas (16″ x 20″)
- Lightweight modeling paste or joint compound (2-3 cups)
- Black acrylic paint (8 oz)
- White acrylic paint (8 oz)
- Palette knife
- Small round paintbrush
- Painter’s tape
Step-by-step Guide
Step 1: Paint the entire canvas black and let it dry completely.
Step 2: Using a palette knife, apply modeling paste in overlapping ghost shapes along the bottom half of the canvas. Smooth and shape each ghost so they have rounded tops and distinct edges.
Step 3: Once dry, paint the ghosts white, keeping the textured surface visible.
Step 4: Use a small brush to paint two black oval eyes on each ghost.
Step 5: Display on a wall or shelf for a playful, artsy Halloween touch.
Read more: 21 Charming Framed Ghost Ideas to Haunt Your Halloween Wall
#22. Vintage Floral Clay Ghosts
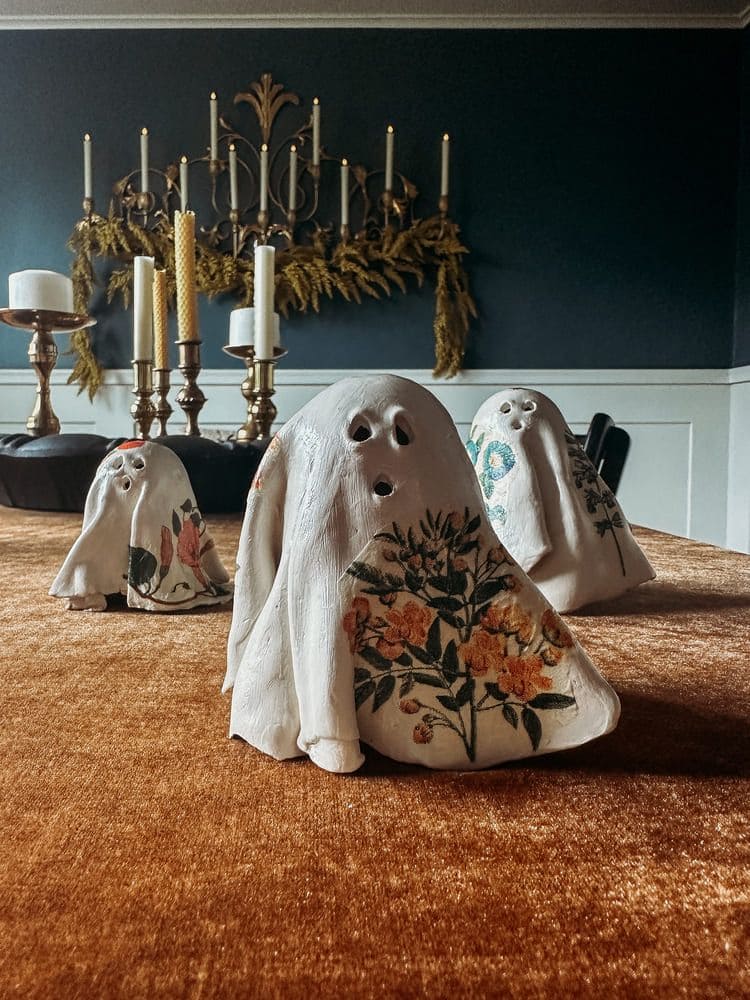
Crafted from clay and dressed in ghostly drapes, each piece features delicate decoupage floral patterns that give them an old-world, romantic appeal.
Perfect for a dining table centerpiece or a mantel display, they bring both whimsy and sophistication to your seasonal decor.
Materials Needed
- Air-dry clay (2-3 lbs for 3 ghosts)
- Rolling pin
- Small balloon or aluminum foil ball forms (5″-8″ height)
- X-Acto knife
- Floral decoupage paper or napkins
- Mod Podge (matte finish)
- White acrylic paint (4-6 oz)
- Small paintbrush
- Black paint or marker
Step-by-step Guide
Step 1: Roll out the clay to about 1/4-inch thickness. Then drape it gently over your balloon or foil form to create the ghost’s flowing shape.
Step 2: Smooth and adjust the folds to look like natural fabric draping.
Step 3: Use an X-Acto knife to cut out round eye and mouth holes while the clay is still soft.
Step 4: Let the clay dry completely (24-48 hours), then remove the form inside.
Step 5: Paint the ghost white, allowing texture to show for a fabric-like effect.
Step 6: Cut out floral patterns from decoupage paper and attach them with Mod Podge, smoothing gently.
Step 7: Now you can add black paint to define the facial features, and let it dry before displaying.
