Garden & Crafty - Garden, DIY, Home
No Result
View All Result
  • GARDEN
    • Garden Tips
    • Garden Guide
    • Garden Care
    • Garden Ideas
  • DIY
    • Diy Project
    • Crafty Ideas
  • HOME
    • Decoration
    • Cleaning
    • Tips & Hacks
  • About Us
  • GARDEN
    • Garden Tips
    • Garden Guide
    • Garden Care
    • Garden Ideas
  • DIY
    • Diy Project
    • Crafty Ideas
  • HOME
    • Decoration
    • Cleaning
    • Tips & Hacks
  • About Us
No Result
View All Result
Garden & Crafty - Garden, DIY, Home
Home Guide

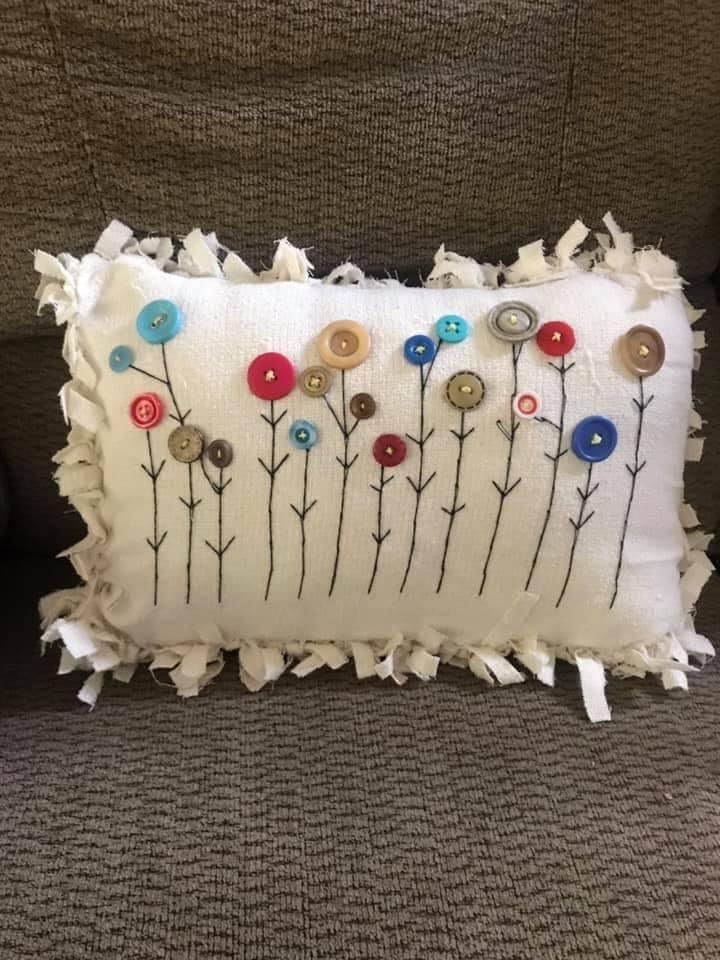
DIY Button Garden Pillow with Stitched Stems

Lois Capone by Lois Capone
August 19, 2025
in Guide
Reading Time: 2 mins read

DIY Button Garden Pillow with Stitched Stems

It feels like a meadow stitched right onto fabric with tall stems reaching upward, each crowned with a button bloom.

The mix of colors, shapes, and textures brings out a sense of childlike joy, almost as if flowers are dancing across the pillow.

Materials Needed

  • 1 pillow insert (12 x 18 in / 30 x 45 cm)
  • 1 neutral pillow cover fabric (front and back, 12 x 18 in)
  • 20 assorted buttons in different sizes, shapes, and colors
  • Embroidery floss or strong thread (black for stems, matching thread for buttons)
  • Embroidery needle and regular sewing needle
  • Fabric pencil or erasable marker
  • Scissors
  • Optional: Fabric strips

Step-by-step Guide

Step 1: Cut your fabric pieces to fit the pillow insert. If you want the knotted edge look, cut the front and back panels about 2 inches larger all around so you’ll have fabric to tie later.

Step 2: Arrange your buttons on the front fabric to decide where each flower will go.

Tips: You can play with color placement, scatter brights among neutrals for a balanced, eye-catching effect.

Step 3: Use a fabric pencil to draw straight stems beneath each button. Vary the lengths so some flowers look tall while others are shorter, giving the design more movement.

Step 4: Stitch the stems with black embroidery floss using a backstitch. Then add tiny side branches here and there so the flowers feel more natural.

Step 5: Sew the buttons securely in place at the top of each stem. Now, mix large and small ones side by side, and layer a few smaller buttons on top of larger ones for dimension.

Step 6: If adding the knotted border, place the front and back fabrics together (wrong sides facing), cut small slits evenly around the edges, and tie matching strips into knots to close the pillow sides.

Otherwise, sew the panels together, leave an opening, insert the pillow form, and finish stitching.

Tips:

This pillow is pure fun because no two will ever look the same. I like to use mismatched buttons collected from old shirts, coats, or thrift finds as it adds a story to each flower.

If you prefer a more elegant look, stick to a single color palette like all white or all wood-toned buttons.

And don’t worry about every stem being perfectly straight; a little wobble makes it look even more organic, like real flowers swaying in the breeze.

SharePin
Lois Capone

Lois Capone

Lois Capone is a wife and mom in her 50s who enjoys sharing gardening, DIY tips, and home decor ideas. She believes that with some inspiration, anyone can create a special feel in their home and garden.

Related Posts

Guide

Create Colorful Mini Weavings on Wooden Squares

There’s something meditative about weaving on a tiny scale. As you loop yarn over and under each strand, you start...

by Lois Capone
October 7, 2025
Guide

Craft Mini Driftwood Weavings to Add a Cozy Boho Touch

If you’ve ever admired woven wall art in cozy studios or boutique cafés, this is your chance to make your...

by Lois Capone
October 7, 2025
Guide

Create a Radiant Woven Circle from Scrap Yarn and Cardboard

This circular weaving craft brings together simplicity and joy. With just a piece of cardboard and a few strands of...

by Lois Capone
October 7, 2025
Guide

Create Adorable Pet Art with Mini Woven Blankets

Imagine your pet tucked under a handmade blanket, dreaming away after a long day of play. You’ll weave a small,...

by Lois Capone
October 7, 2025
Guide

Craft Colorful Beaded Bracelets with a DIY Cardboard Loom

This project transforms cardboard into a mini bead loom, turning small glass or plastic beads into wearable art. You’ll find...

by Lois Capone
October 7, 2025
Guide

Make a Whimsical Yarn Doll Through Simple Weaving

Creating this woven yarn doll feels like crafting a childhood memory. There’s something delightful about giving her shape and color...

by Lois Capone
October 7, 2025
Load More

Categories

  • Cleaning (6)
  • Crafty Ideas (163)
  • Decoration (164)
  • DIY (8)
  • Diy Project (229)
  • GARDEN (39)
  • Garden Care (61)
  • Garden Guide (134)
  • Garden Ideas (348)
  • Garden Tips (128)
  • Guide (687)
  • HOME (90)
  • Tips & Hacks (20)


Garden & Crafty - Garden, DIY, Home

© 2024 gardenandcrafty.com

Navigate Site

  • About Us
  • Privacy Policy
  • Terms Of Service
  • Disclaimer
  • Cookie Policy
  • Webstories
  • Sitemap

Follow Us

No Result
View All Result
  • GARDEN
    • Garden Tips
    • Garden Guide
    • Garden Care
    • Garden Ideas
  • DIY
    • Diy Project
    • Crafty Ideas
  • HOME
    • Decoration
    • Cleaning
    • Tips & Hacks
  • About Us
  Â