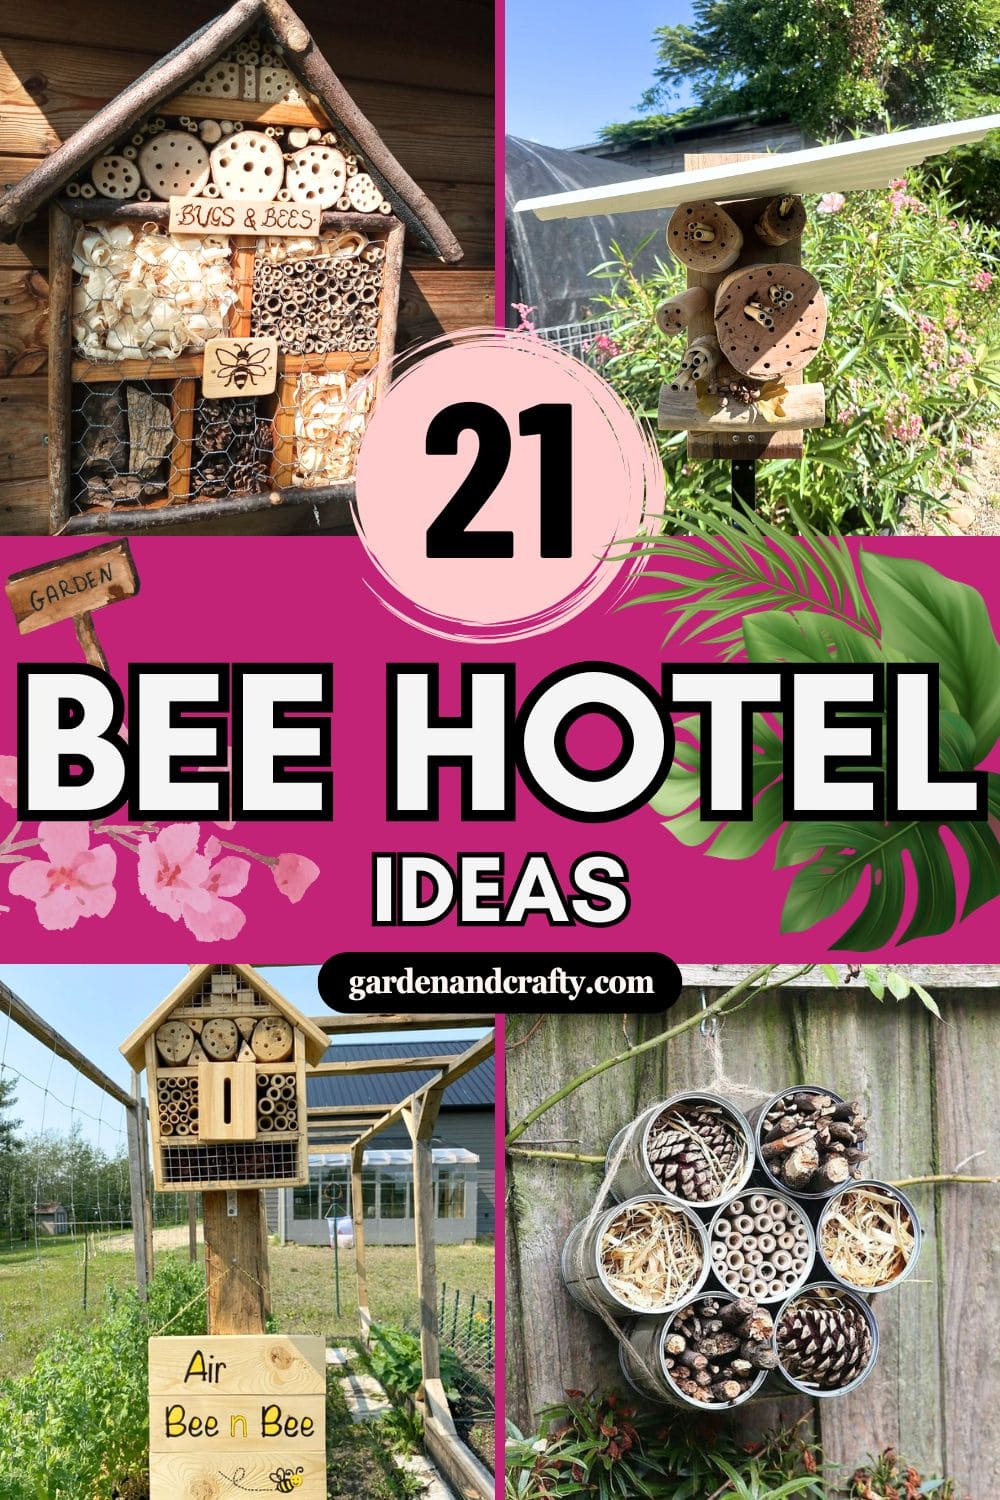
If you’re passionate about helping pollinators, your garden can be more than just a pretty space, it can be a sanctuary.
While planting nectar-rich flowers is a great start, adding a DIY bee or insect hotel takes your efforts to the next level.
These small structures offer safe nesting spots for solitary bees, ladybugs, and other beneficial insects that are crucial for pollination and pest control.
Plus, they’re surprisingly easy and fun to build. Whether you love rustic charm or modern designs, these 21 ideas will help your garden truly come alive.
#1. Flower-Shaped Tin Can Bee Hotel
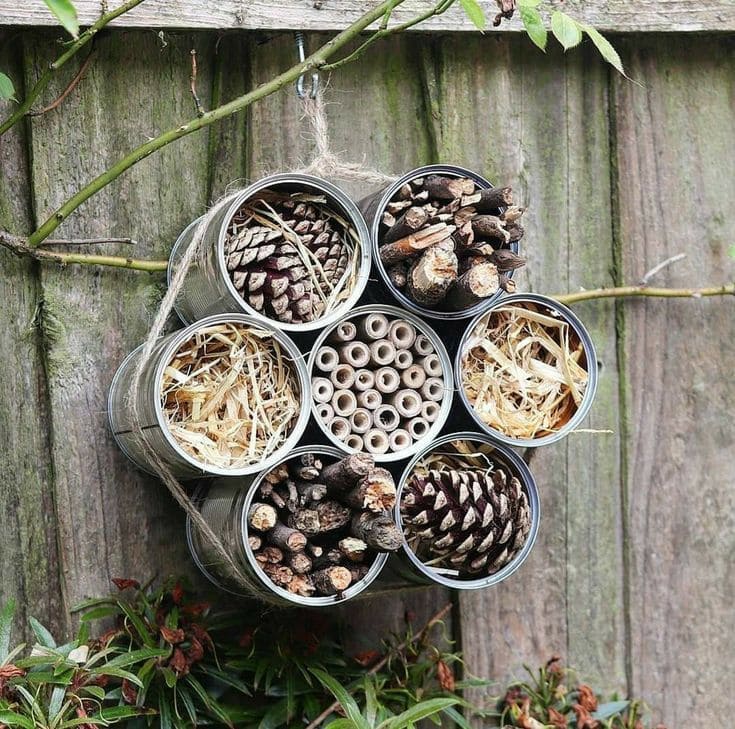
If you’ve got a few tin cans, some backyard scraps, and a heart for pollinators, you’ve already got the makings of a beautiful bee hotel.
This simple yet stunning design uses upcycled materials like pinecones, twigs, bamboo, and straw to create a cozy sanctuary for solitary bees.
Additionally, it’s low-cost, low-waste, and packed with good intentions.
Materials Needed
- 7-9 empty tin cans (standard size ~400g)
- 2-3 handfuls of pinecones
- A bunch of dry twigs (approx. 4 inches)
- A bundle of straw or dried grass
- 20-30 hollow bamboo sticks (cut into 4-inch lengths)
- Natural twine (2-3 feet)
- Hot glue gun
- Hook
Step-by-step Guide
Step 1: Clean and dry your tin cans thoroughly. You make sure there are no sharp edges or use sandpaper if needed.
Step 2: Sort your natural fillers: trim twigs and bamboo to fit snugly inside the cans. Then arrange each can with a different filler for variety and texture like twigs, pinecones, straw, and bamboo sticks.
Step 3: Use hot glue or strong adhesive to attach the cans side-by-side in a flower pattern.
Step 4: Wrap twine or garden wire around the outer cans securely, tying it tightly so they hold together.
Step 5: Mount your bee hotel on a fence or wall that gets morning sun and is sheltered from heavy rain.
#2. Air Bee n Bee Insect Hotel
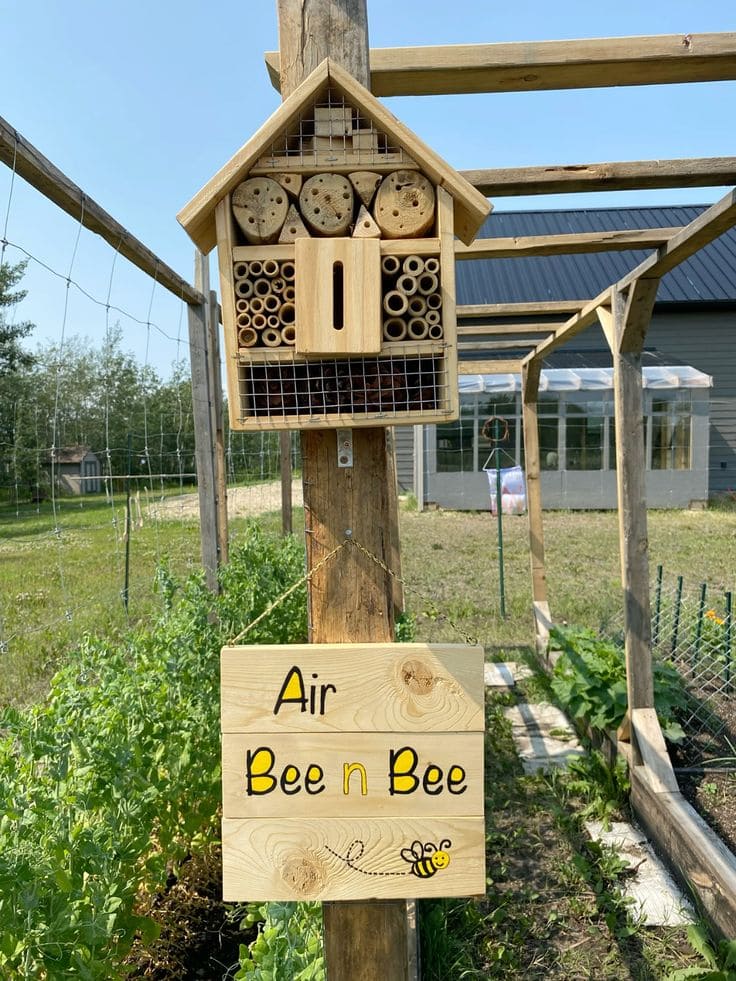
This adorable insect hotel combines function with humor, proudly labeled as an “Air Bee n Bee” to welcome all six-legged guests in style.
Also, mounted securely on a post and topped with a gabled wooden roof, it features drilled wooden rounds, stacked bamboo tubes, and a protective wire mesh, the perfect combo for solitary bees, ladybugs, and other beneficial insects.
Materials Needed
- 1 small wooden crate (about 12″ x 14″)
- 4-5 hardwood rounds (drilled with 1/8″ to 3/8″ holes, 3″ deep)
- Bamboo tubes (cut into 4-6″ lengths)
- Chicken wire
- Wood screws and backing board
- 1 flat wooden panel
- Black and yellow outdoor acrylic paint
- Hanging chain or hooks
- Clear weatherproof sealant
Step-by-step Guide
Step 1: Construct or repurpose a small wooden house frame. You ensure the roof overhang protects against rain.
Step 2: Drill holes into hardwood logs, varying diameters to attract different bee species. Then sand down sharp edges.
Step 3: Cut and bundle bamboo tubes tightly, ensuring all are hollow and clean inside.
Step 4: Insert bamboo, drilled wood rounds, and additional fillers like small sticks into the hotel, separating layers with thin wood pieces or wire mesh.
Step 5: Secure chicken wire across the front to keep materials in place while still allowing access.
Step 6: Paint a small wooden sign with “Air Bee n Bee” and a cute bee trail using black and yellow.
Step 7: Mount the entire setup in a sunny, sheltered spot, ideally near flowering plants.
#3. Sunny Pole-Mounted Insect Hotel
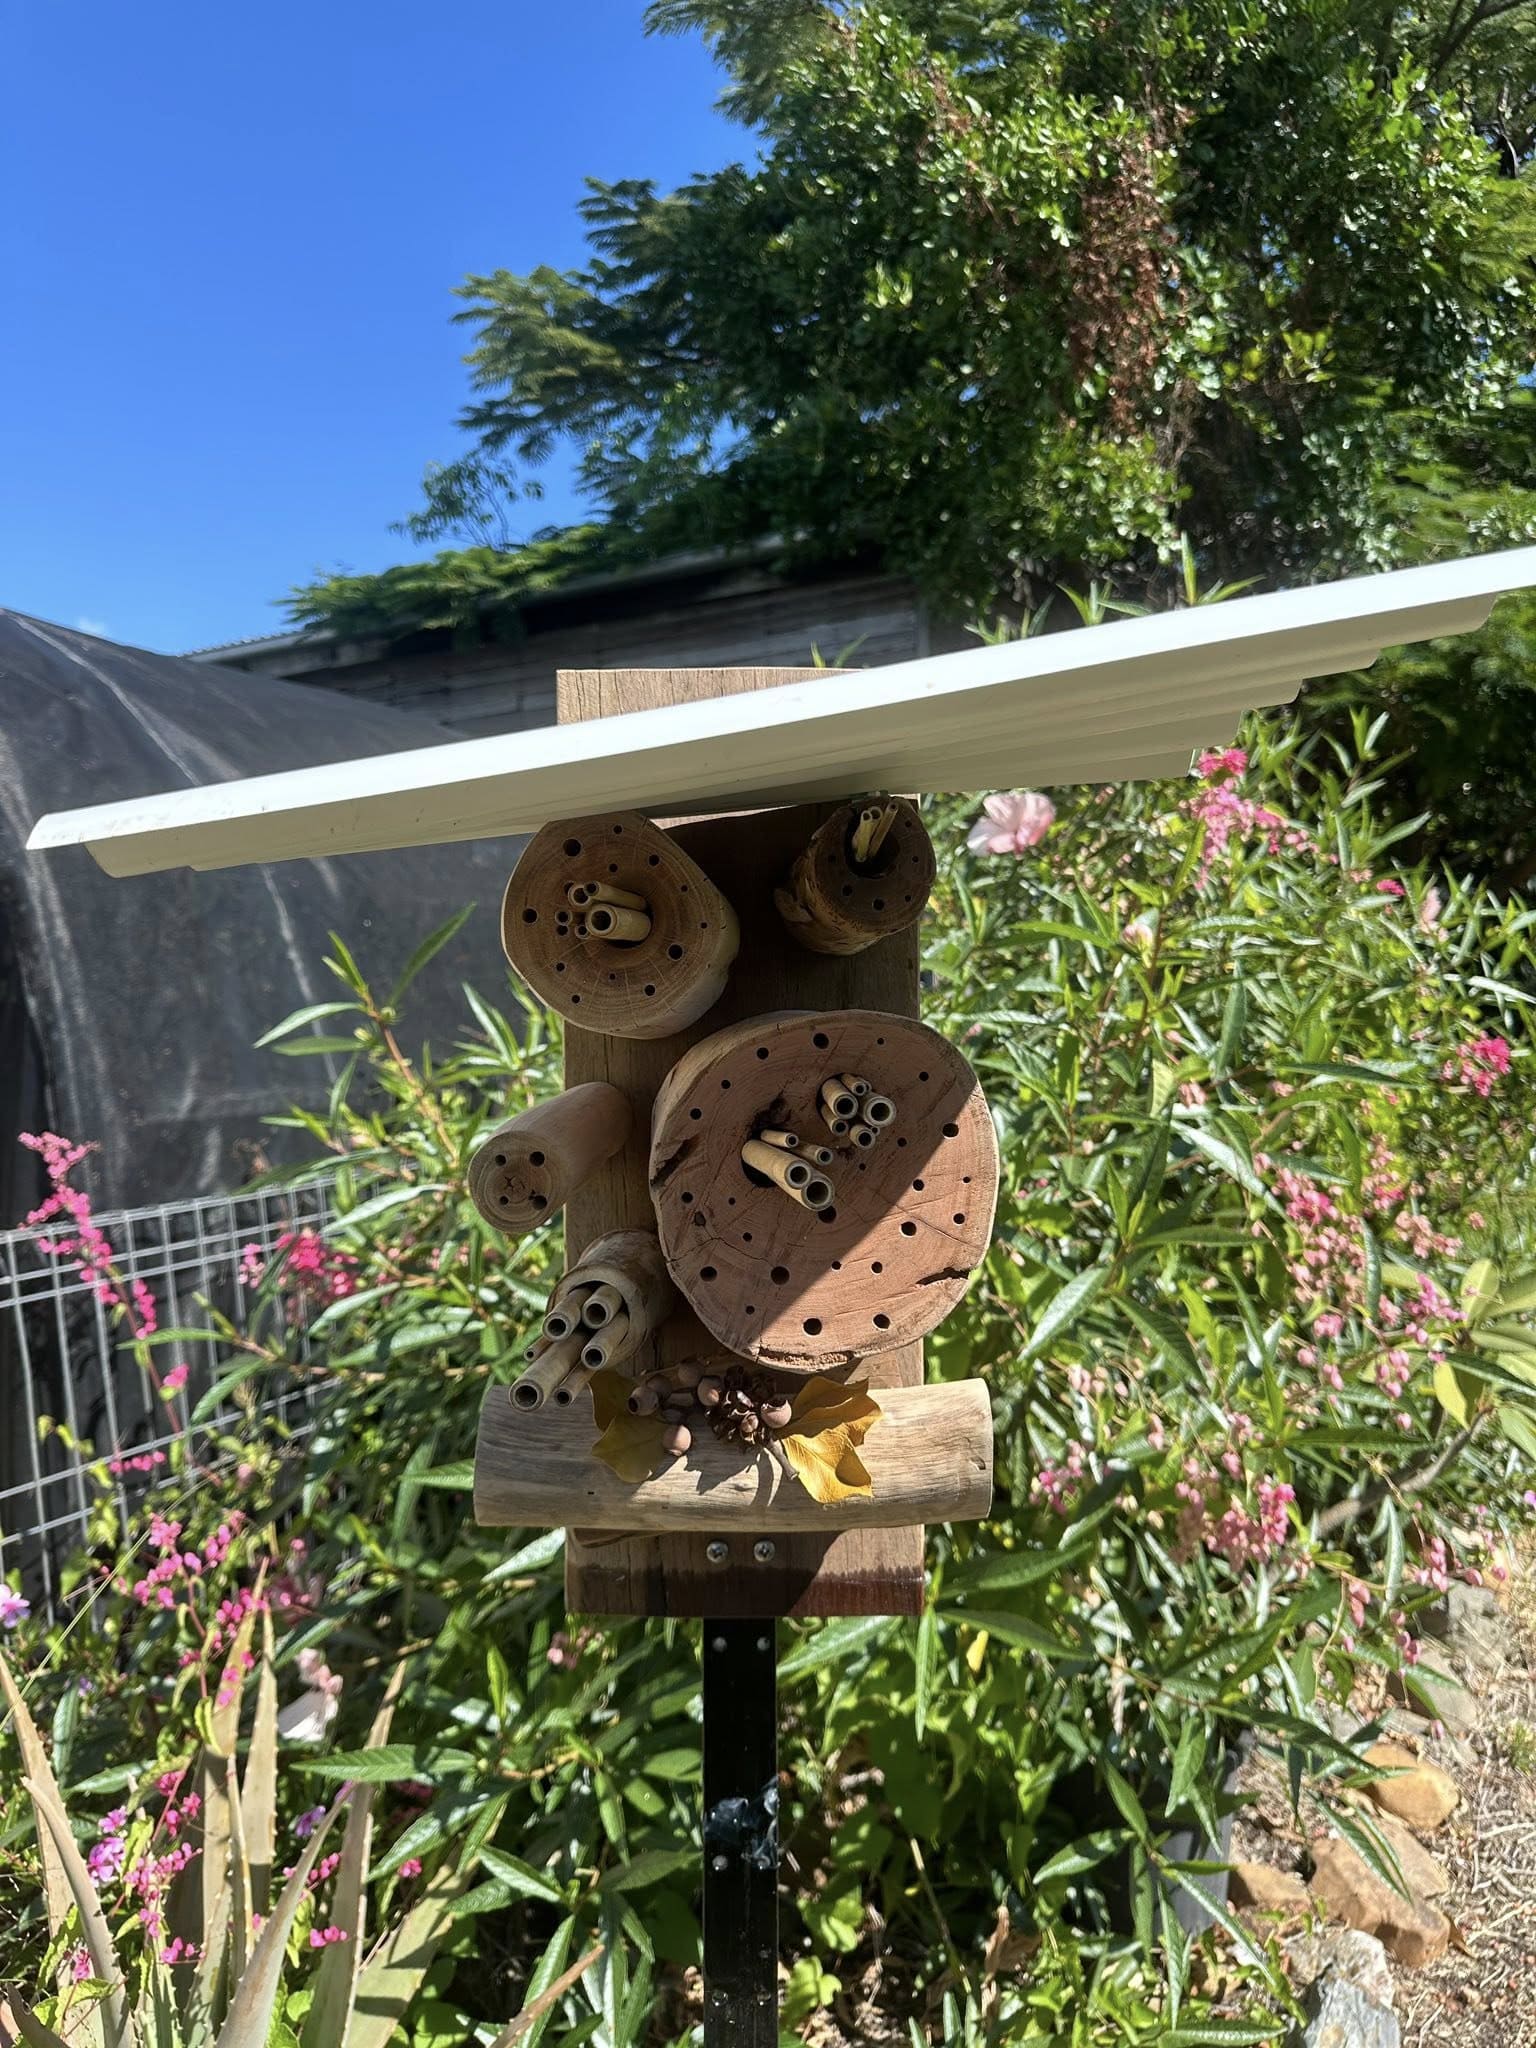
This pole-mounted bee hotel is proof that even the simplest structures can make a huge difference.
Made from sections of drilled logs and bamboo canes mounted onto a wooden board, it’s topped with a broad white plastic roof that protects it from rain while reflecting heat.
Materials Needed
- 1 wooden backing board (about 10×14 inches)
- Several small logs (4-6 inches in diameter)
- Bamboo pieces, dry hollow stems, or paper straws (4-6 inches long)
- Screws or wood glue
- Drill with various bit sizes (3-10 mm)
- One large plastic or metal sheet (approx. 14×20 inches)
- Metal pole, wooden stake, or fence post
- Optional: dry leaves, acorns, and decorative bits
Step-by-step Guide
Step 1: Begin by cutting logs into flat-backed slices and drilling holes 3-5 inches deep into each. Then space the holes apart and use varied sizes.
Step 2: Cut bamboo sticks to equal lengths and bundle them tightly. You can secure them using glue or fit them into drilled logs.
Step 3: Arrange the logs and bamboo clusters artistically on the wooden backing.
Step 4: Next, attach a large waterproof roof over the top using brackets or screws.
Step 5: Mount your finished hotel onto a pole or stake and place it in a sunny, south-facing spot among flowers or herbs to attract native pollinators.
#4. Stacked Style with a Splash of Sunshine
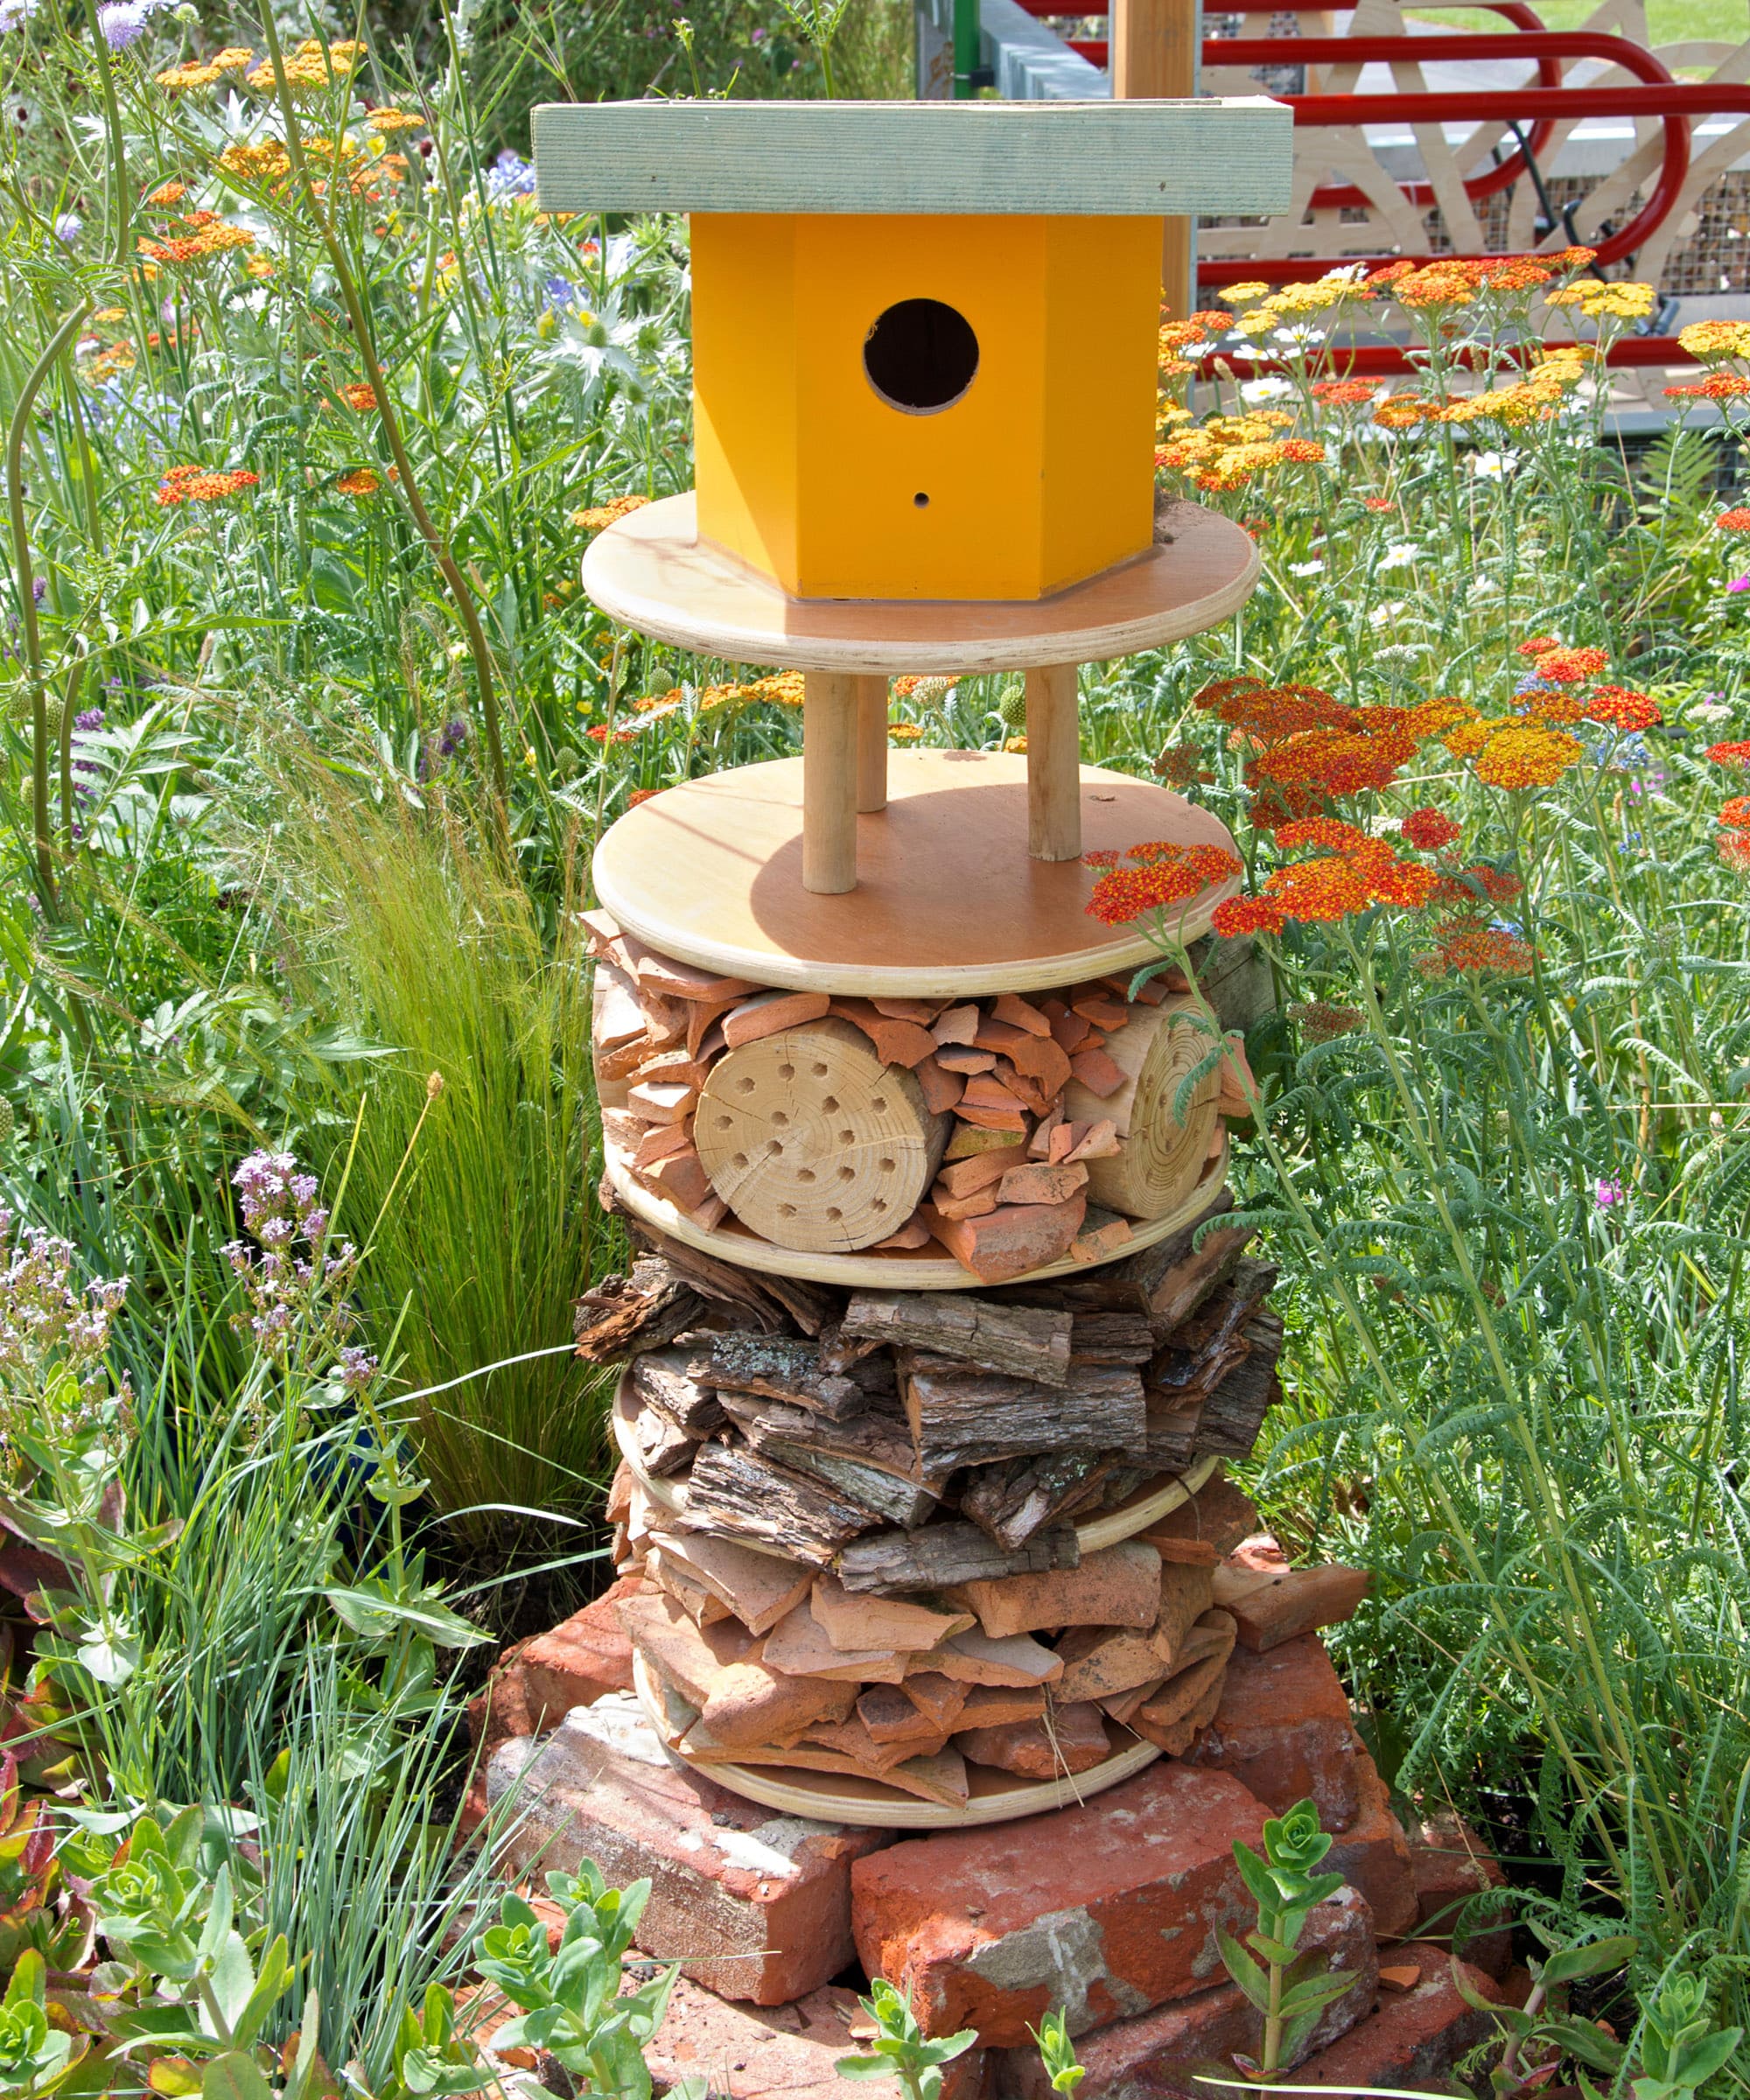
Who says bug hotels can’t be both functional and fabulous? This cheerful stack is a burst of color and texture in the middle of a blooming garden.
Built vertically with circular platforms, each level offers a unique habitat: bark for beetles, clay shards for spiders, drilled wood rounds for solitary bees, and dry nooks for all kinds of beneficial crawlers.
And at the very top is a bright yellow birdhouse adds a pop of charm and invites feathered friends to perch and patrol the garden.
Materials Needed
- 3-4 wooden discs (12-14 inches diameter)
- Brightly painted birdhouse
- 4 wooden dowels per level
- Clay tile shards, bark, drilled wood slices
- Reclaimed bricks
- Wood glue and screws
- Optional: clear sealant
Step-by-step Guide
Step 1: Stack bricks to create a solid and level base.
Step 2: Begin layering discs with short dowels between each, attaching with screws and wood glue. You should leave space for bugs to crawl through.
Step 3: Fill each tier with diverse natural materials: bark for shelter, clay shards for warmth, and wood slices with drilled holes for nesting bees.
Step 4: Attach the birdhouse to the top platform securely. You have to make sure the hole size suits your local bird species.
Step 5: Place the tower in a sunny, flower-rich corner of your garden.
#5. Brick Lodge Bee Hotel
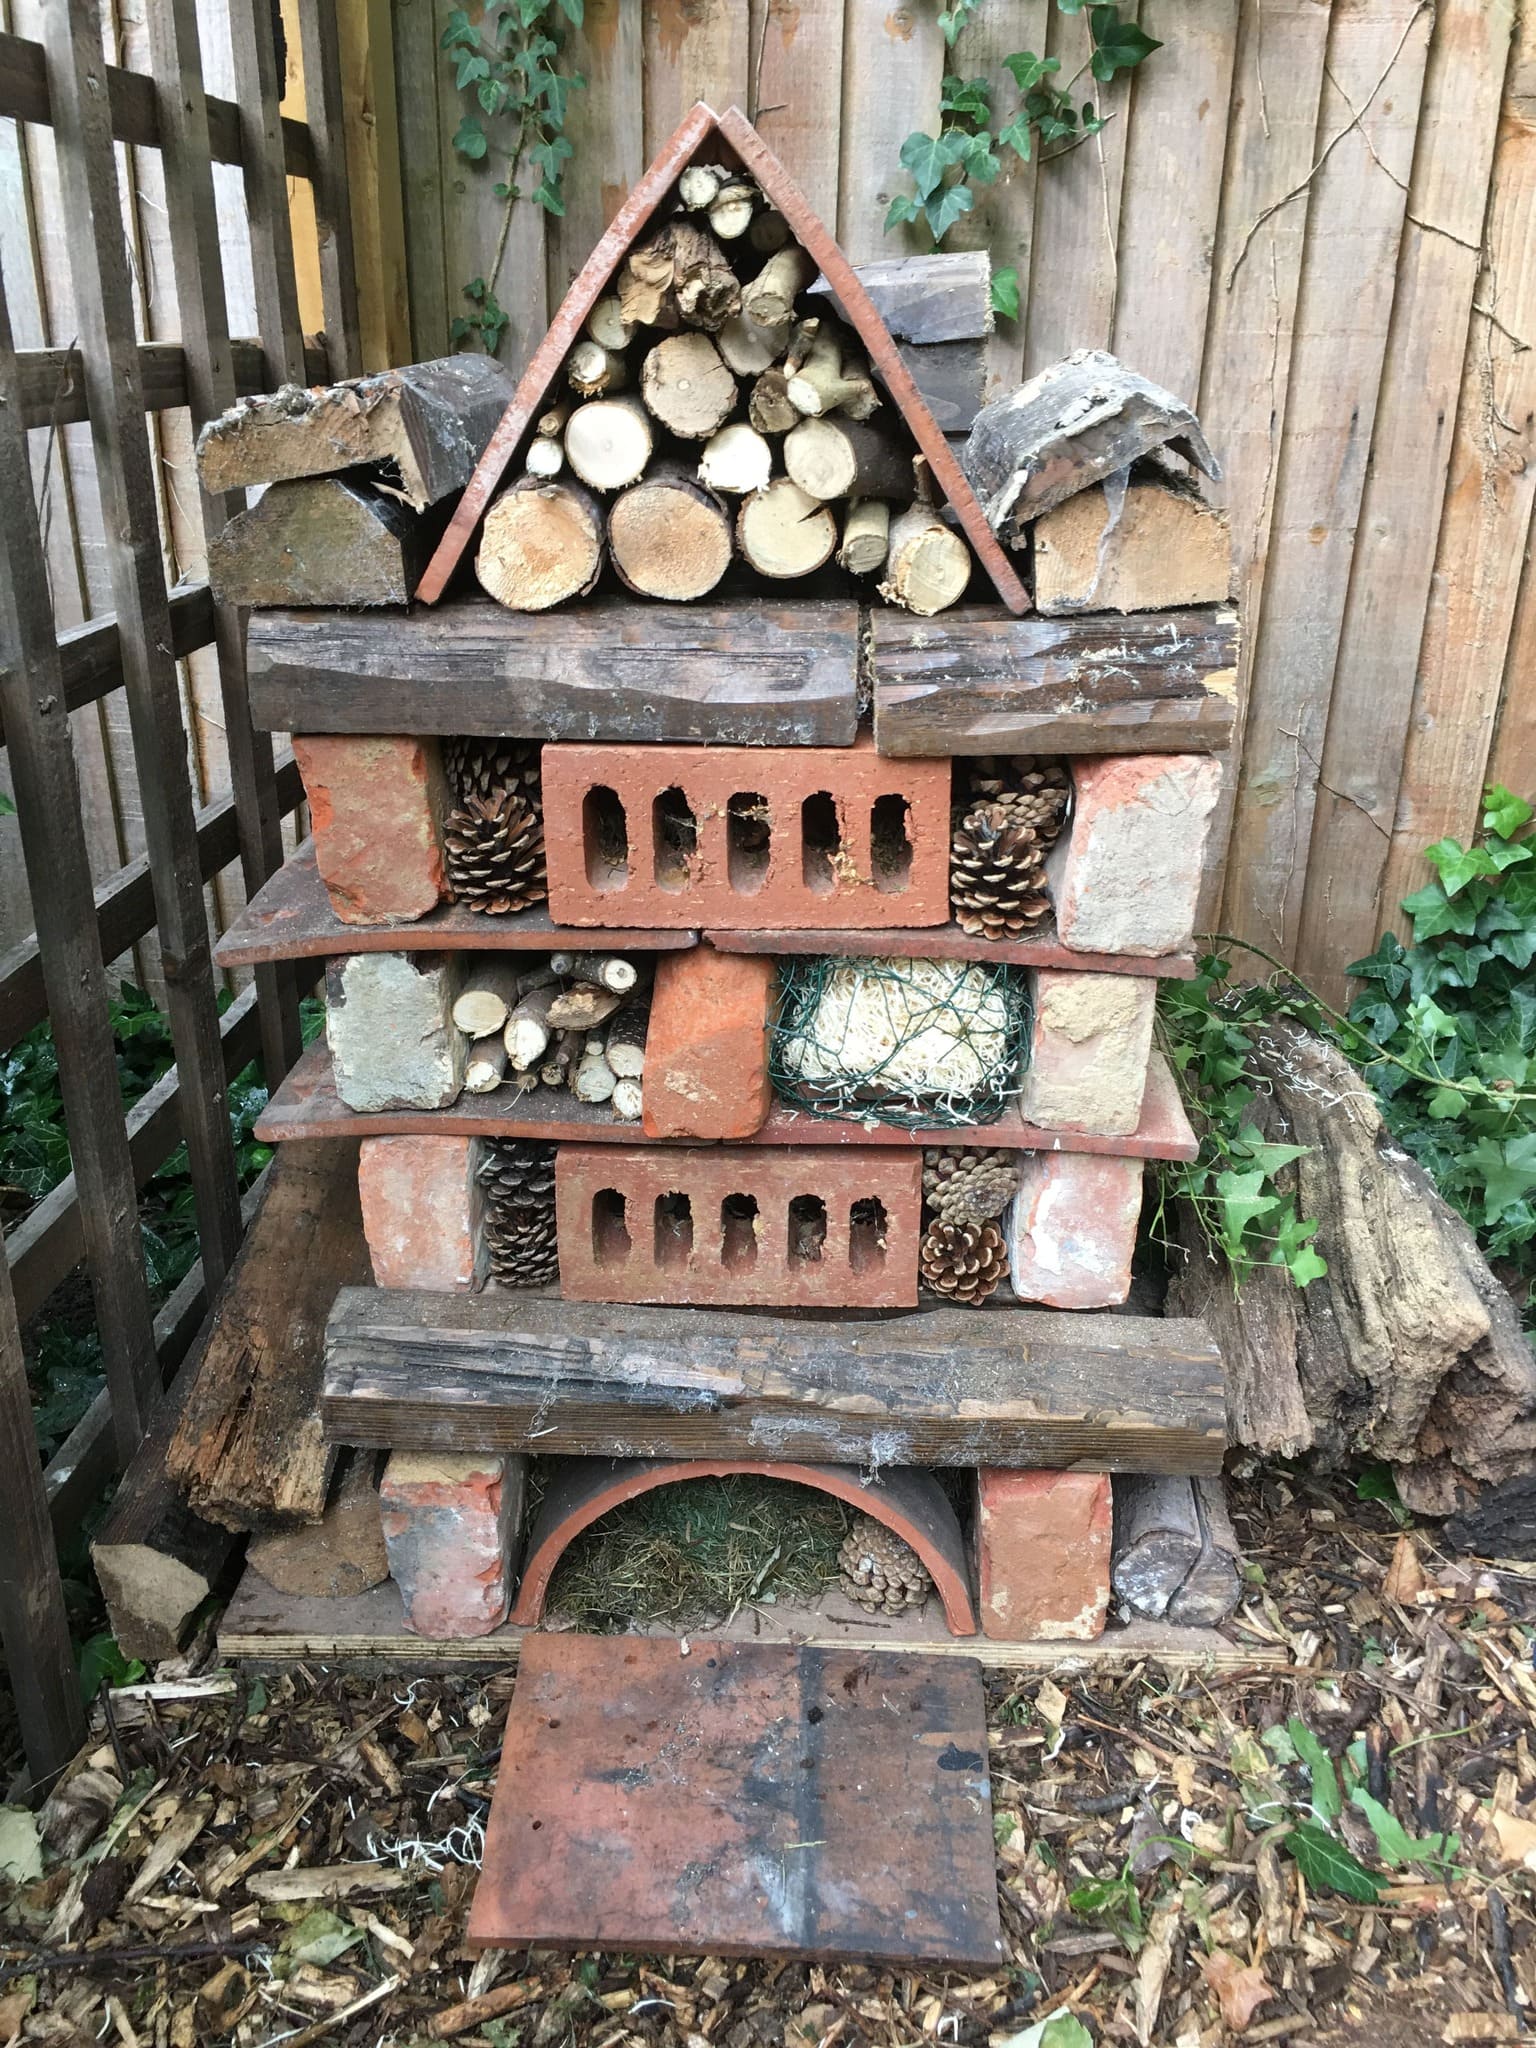
This miniature villa for bees is built from a mix of salvaged bricks, stacked timber, pinecones, logs, and natural fillers.
It’s a charming, earthy project that gives off strong woodland-cottage vibes and the best part is that you don’t need to hammer a single nail.
If you’ve got leftover construction materials or access to old bricks and timber, this is a perfect upcycled solution to support pollinators in style.
Materials Needed
- ~12-14 bricks with holes or vents
- Firewood logs, cut to 5-8” length
- 6-8 pinecones
- Old tiles
- Straw, hay, dry grass (2 handfuls)
- Small stones, bark, or wood scraps
- Chicken wire (optional)
Step-by-step Guide
Step 1: Choose a level patch of ground and place two bricks or flat tiles as the base. Then add heavier items like logs and bricks first.
Step 2: Layer your materials, alternating between bricks with holes, bunches of pinecones, and stacks of logs to create different textures and hiding spots.
Step 3: Fill gaps with hay, bark, and sticks. Now you secure straw bundles with wire if needed to prevent wind loss.
Step 4: Add a roof using tiles or reclaimed boards, ensuring it’s slightly slanted for water runoff. Then tuck it near a fence or tree line for stability.
#6. Rustic Log Bee Hotel
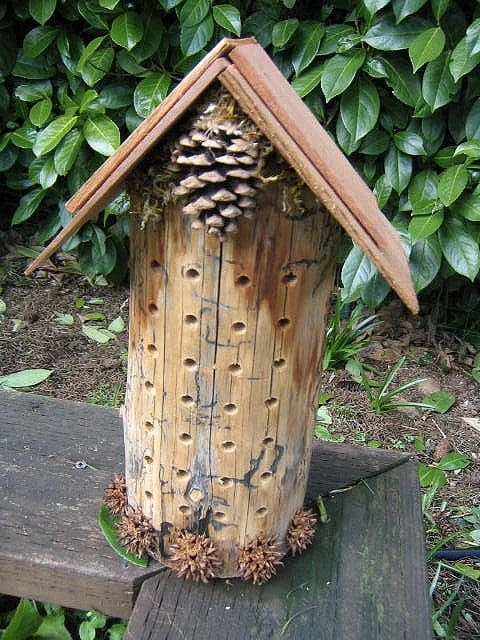
Made from a vertical log with dozens of neat drill holes, the log cabin mimics the natural nesting places bees crave.
Plus, the pitched wooden roof protects it from rain, while pinecones and seed pods add both charm and functionality by giving shelter to other helpful bugs.
Materials Needed
- One medium to large dried log (10-14 inches tall, 5-8 inches in diameter)
- Drill with bits in varying sizes (2-10 mm)
- Small wooden tiles
- Natural decorations: pinecones, sweetgum balls, moss
- Wood glue
- Optional: sandpaper
Step-by-step Guide
Step 1: Find a sturdy log that can stand upright on its own. Then sand the top surface flat if needed.
Step 2: Drill holes 3–6 inches deep across the face of the log. You should space them evenly, and use a variety of bit sizes to attract different species.
Step 3: Construct a mini A-frame roof using wood tiles or reclaimed boards. Then nail or glue it securely to the top of the log.
Step 4: Decorate the base and top with pinecones, seed pods, and moss to make it more inviting to insects and add visual flair.
Step 5: Place it on a bench, stump, or sunny spot where it stays dry.
#7. Grand Wooden Insect Mansion
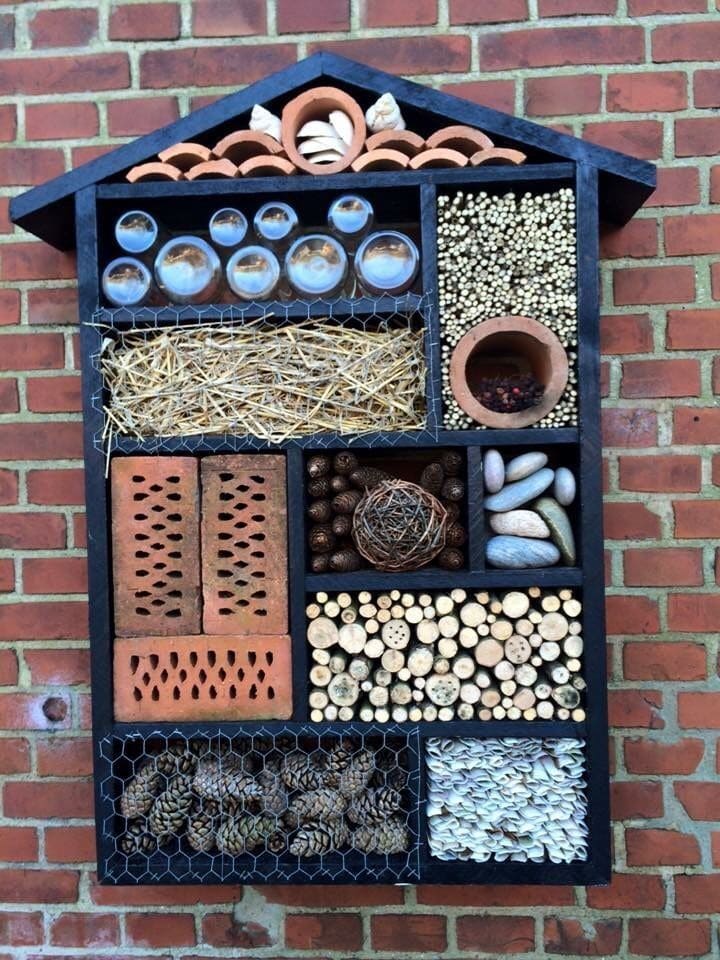
Wow, this architectural gem is a deluxe bee and bug hotel that feels right at home against a brick wall. Its thoughtful design blends function with elegance, offering multiple rooms made of terracotta pipes, wood rounds, drilled bricks, straw, and even oyster shells.
I believe it’s an ideal choice if you want to support biodiversity in your garden in a big, beautiful way without sacrificing aesthetics.
Materials Needed
- Wooden boards (1” thick)
- Terracotta pipes
- Drilled wood logs and blocks
- Hollow bamboo canes (cut to 4-6″ lengths)
- Bricks with holes
- Chicken wire
- Pinecones, straw, acorns, twigs, smooth river stones, and shells
- Nails, screws, drill, and wood glue
Step-by-step Guide
Step 1: Cut and assemble a rectangular wooden frame with a slanted roof; secure using screws and wood glue.
Step 2: Divide the interior with smaller wooden slats to create separate sections for materials.
Step 3: Fill each section with different nesting materials like logs with drilled holes, pinecones behind chicken wire, straw bundles, bricks, reeds, and shells.
Step 4: Mount your finished structure on a sunny wall about 3-5 feet off the ground, ideally near flowering plants or a garden.
#8. Concrete Stack Bee Hotel
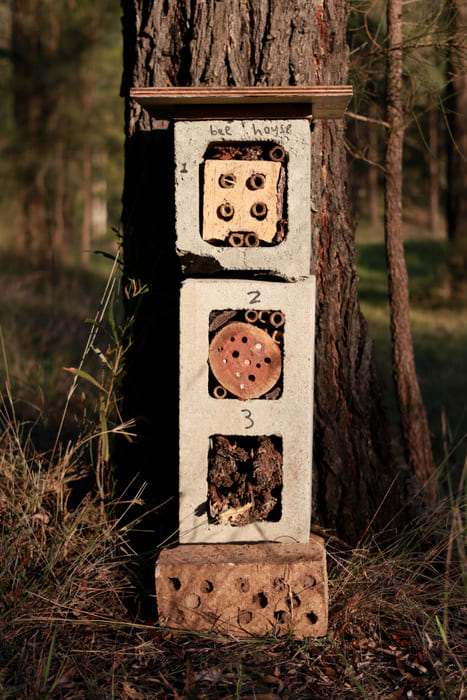
This bee house may not look fancy, but it’s full of charm, grit, and ecological purpose. Built with stacked concrete blocks, each floor has a unique interior from drilled wood slices to tightly packed bark.
It’s a fantastic example of using what you already have around the yard to create a multi-room haven for solitary bees and other pollinators.
Materials Needed
- 3 hollow concrete blocks (approx. 8″ x 8″ x 16″)
- 1 clay or wood tile
- Drilled wooden discs (3-10 mm holes)
- Twigs, bark, pinecones, dry moss
- Optional: brick with drilled holes
- Permanent marker
Step-by-step Guide
Step 1: Choose a shaded or partially sunny location with a tree or post for support. Then stack your concrete blocks vertically, starting with a brick base if needed for height.
Step 2: Fill each compartment creatively. You can use drilled logs and bamboo canes in the top block, a mix of larger holes in the middle, and bark and twigs for beetles or other bugs in the bottom.
Step 3: Place a tile or wooden board on top to act as a roof and protect the setup from rain.
Step 4: Finally, add some hand-drawn charm! Label the compartments or give it a name like “Bee House” for an extra personal touch.
#9. Whimsical Tudor-Style Insect Hotel Village
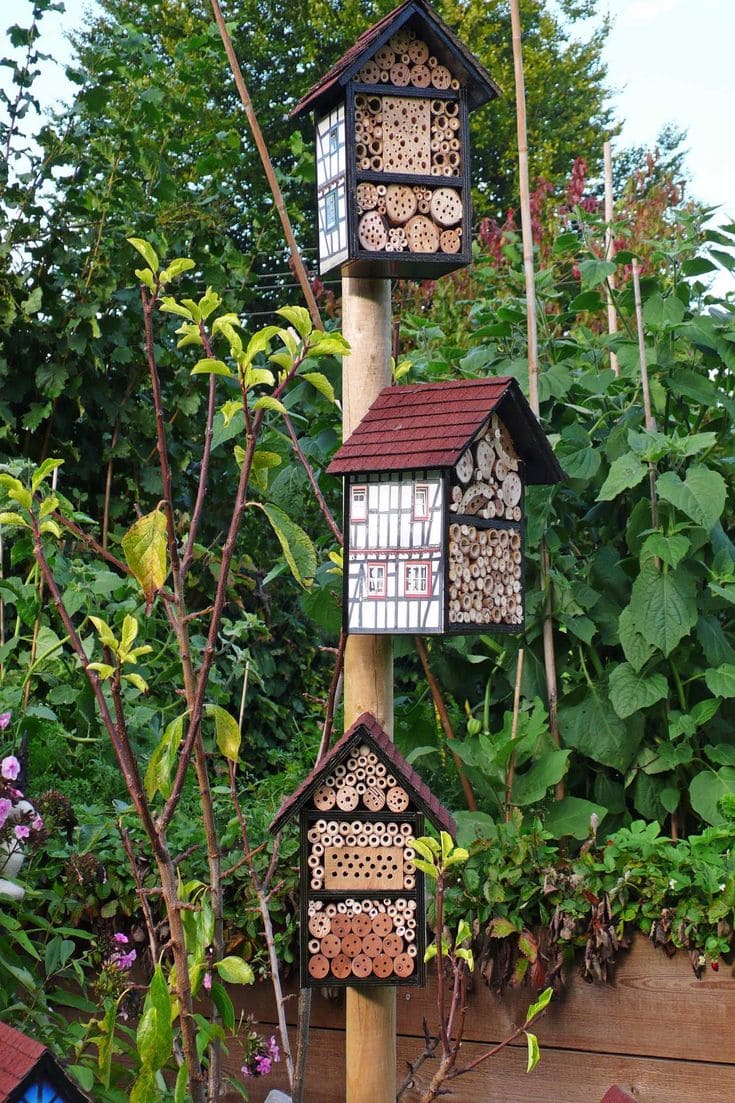
Tucked into a lush green garden, this enchanting trio of Tudor-inspired insect hotels looks like it was plucked straight out of a fairytale.
Moreover, each house is styled like a miniature timber-framed cottage, with red-shingled roofs, painted windows, and neat compartments filled with drilled wood, bamboo, and twigs.
Materials Needed
- 3 wooden house-shaped boxes
- Plywood sheets
- Red mini shingles
- Hardwood blocks (drilled with 2-8mm holes)
- Bamboo tubes (cut to 4-5″)
- Branches, bark, pine cones
- Wood screws, nails, and weatherproof wood glue
- Clear exterior-grade sealant
- 1 tall garden post (5-6 feet tall) and mounting brackets
Step-by-step Guide
Step 1: Build or buy three wooden house frames with pitched roofs. Then paint the fronts to resemble traditional Tudor houses using white and black weatherproof paint.
Step 2: Fill each house with a mix of natural materials like bamboo for solitary bees, logs with deep holes for mason bees, pinecones and bark for beetles and lacewings.
Step 3: Attach shingles or tiles to the roof for both visual appeal and rain protection. You should use waterproof adhesive and screws to secure each tile layer.
Step 4: Mount each structure on a central wooden post using brackets or L-plates. Then space them vertically to provide height variation and interest.
Step 5: Place the post in a sunny, sheltered spot, ideally near flowering plants, herbs, and veggies.
#10. Rustic Log Cabin Bee Hotel
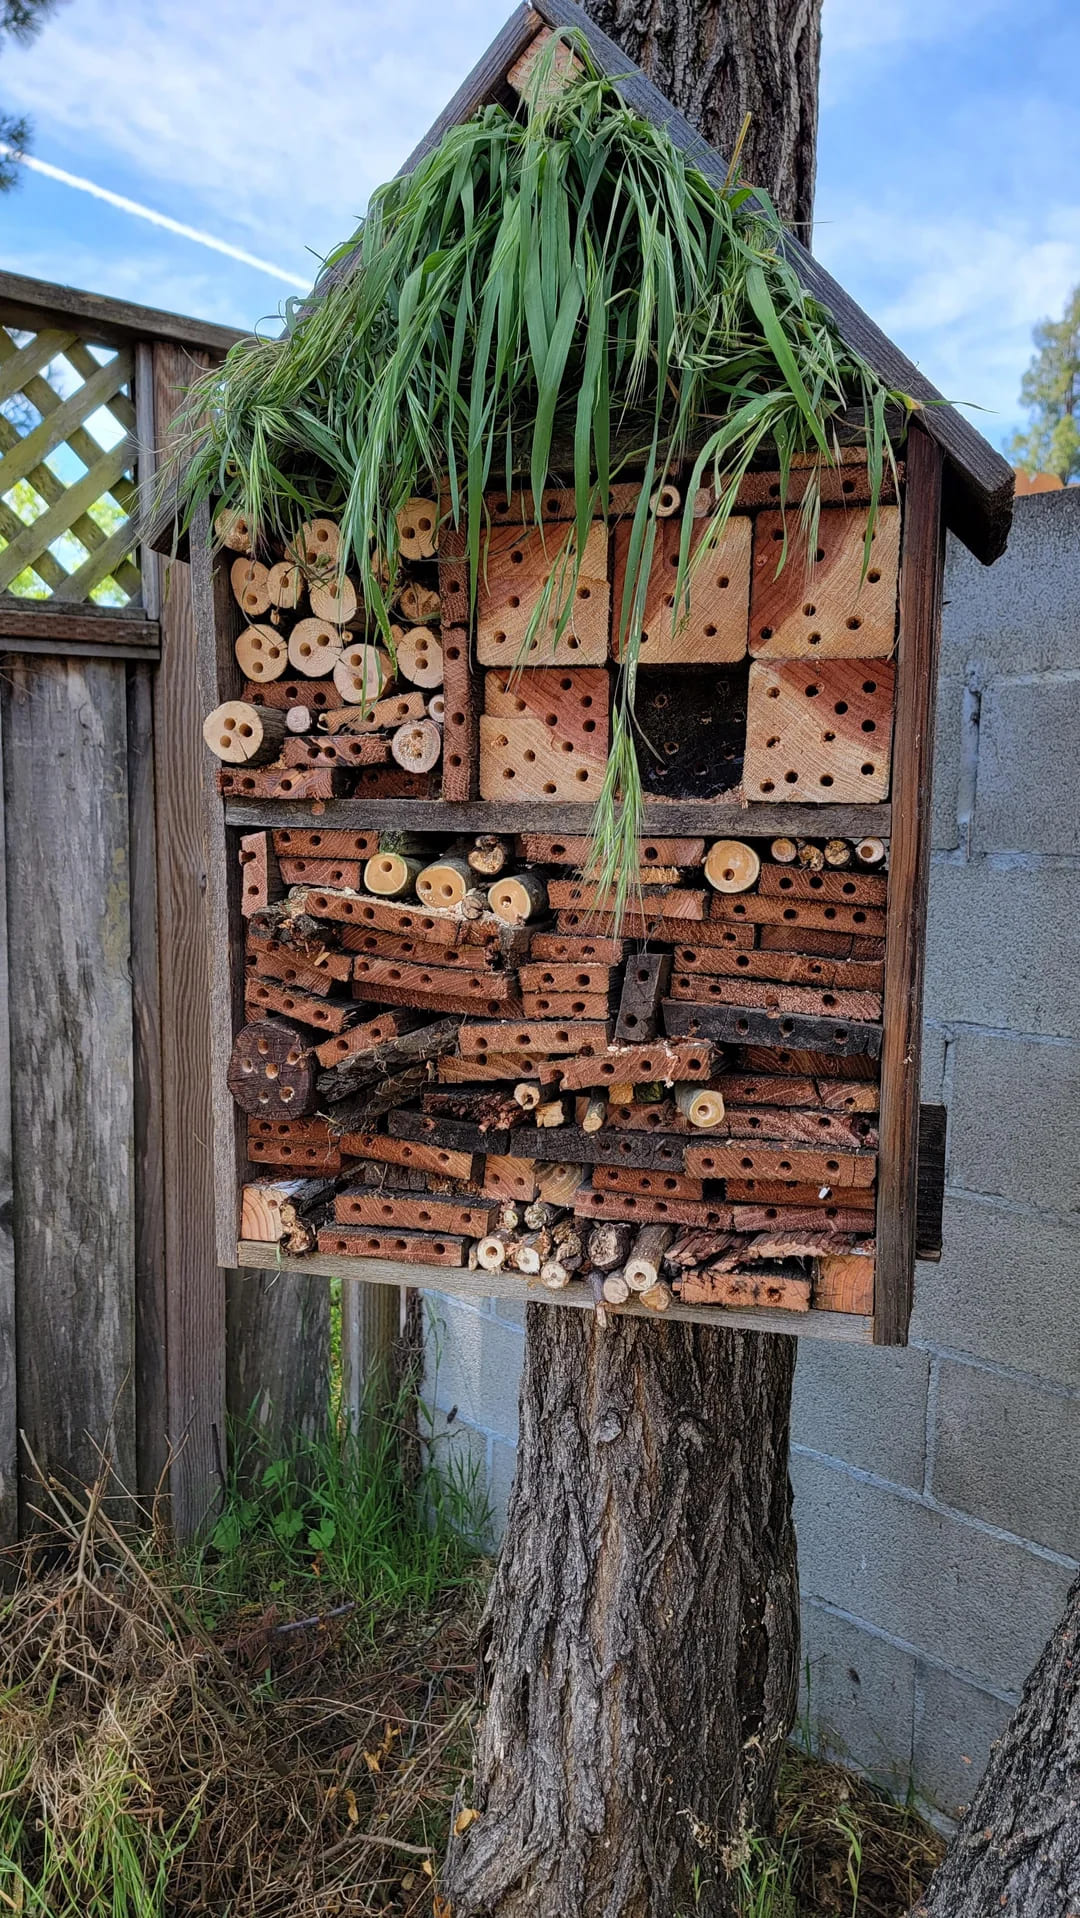
This robust bee hotel feels like a woodland retreat, crafted with care and purpose. Made from blocks of wood and sticks with precision-drilled holes, it mimics the natural nooks bees adore.
Moreover, the living roof topped with tufts of wild grass offers extra insulation and an earthy charm that blends into the garden.
If you’ve got a pile of old timber or wood offcuts lying around, this is your chance to build something beautiful and buzzing with life.
Materials Needed
- 1 wooden box frame with pitched roof (approx. 20” x 30”)
- Assorted wood blocks (cut into 3″-6″ lengths)
- Power drill with 3-6mm drill bits for hole variety
- Hollow stems (cut to 4″-5″)
- Natural twigs, bark, and logs
- Dried ornamental grass
- Nails
Step-by-step Guide
Step 1: Cut your wood blocks and drill holes of varying sizes 3-4″ deep into the surface.
Step 2: Fill your wooden frame by tightly stacking the drilled blocks, sticks, bark, and hollow stems fitting them like a puzzle.
Step 3: Add bunches of dried grass on the roof, securing them with garden twine or staple gun for a soft, natural top.
Step 4: Finally, mount your log cabin on a sturdy tree or post in a sunny, sheltered area, at least 3 feet off the ground.
#11. Bumblebee-Themed Hanging Bee Hotel
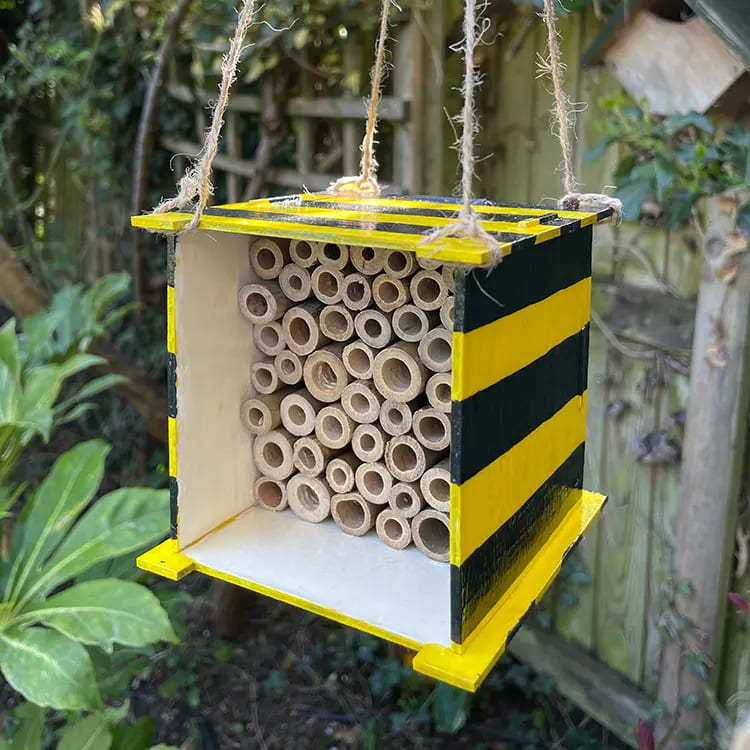
Painted in bold black and yellow stripes, this design mimics the look of a fuzzy bumblebee while providing a cozy nesting space for solitary bees. The bamboo tubes offer safe, dry tunnels where bees can lay their eggs.
Plus, building it yourself lets you add as much personality as you lik whether that’s with fun paint, custom sizes, or even a little nameplate. Your buzzing garden buddies will thank you.
Materials Needed
- Small wooden box (approx. 6x6x6 inches)
- ~30-40 hollow bamboo sticks (around 5-6 inches)
- Acrylic paint in black and yellow
- Paintbrush
- Twine (2 lengths, each about 18 inches)
- 2 screw-in eye hooks
- Hot glue
Step-by-step Guide
Step 1: Clean and dry your wooden box thoroughly. Make sure the interior and edges are smooth and safe for bees.
Step 2: Paint the outside of the box in alternating black and yellow stripes to give it a fun bumblebee-inspired look.
Step 3: Insert the bamboo sticks into the open side of the box. Then arrange them tightly so they don’t fall out. Add glue at the base if needed for extra hold.
Step 4: Screw two eye hooks into the top of the box and tie twine through each for hanging. Now you hang the hotel in a sunny, sheltered garden spot about 3-5 feet above ground.
#12. Bugs and Bees Chalet
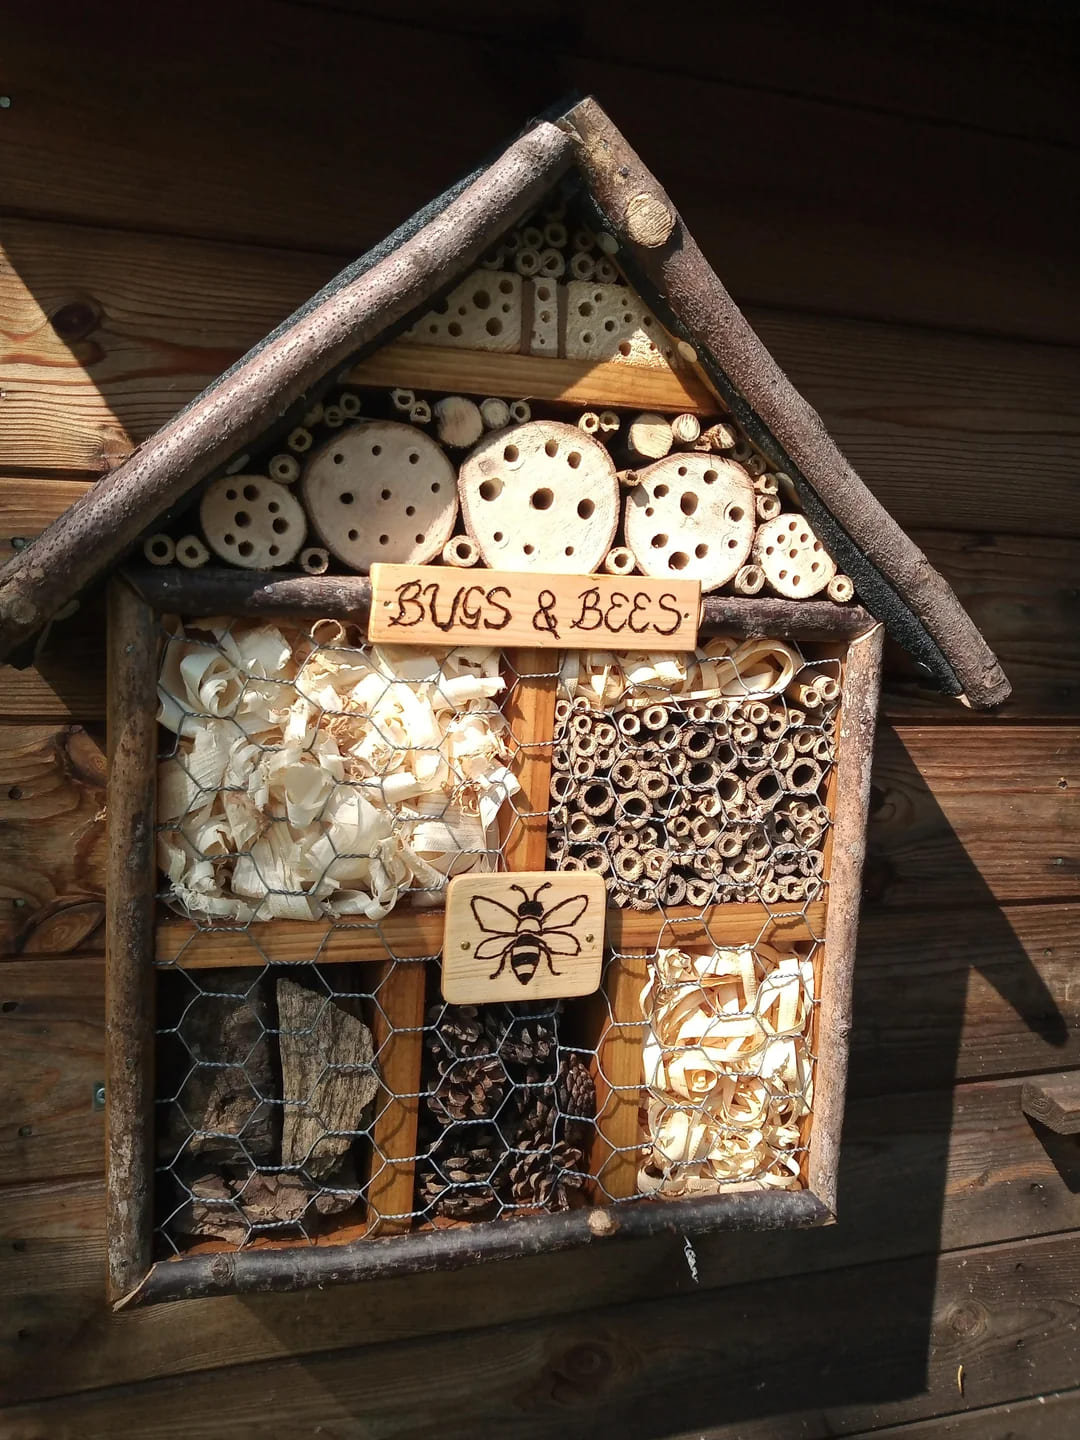
Framed with branches and filled with a mix of drilled logs, curled wood shavings, bark, pinecones, and bamboo tubes, this insect hotel offers a boutique-style stay for solitary bees, ladybugs, and other garden allies.
Specially, the handmade wooden signs with one etched with a bee, the other labeled “Bugs & Bees” add personality that makes it feel like a tiny woodland lodge.
Materials Needed
- 2 sturdy sticks and 4 planks
- Small logs (drilled with 3-10 mm holes)
- Curled wood shavings
- Pinecones, bark, and hollow stems
- Chicken wire
- Nails or wood glue
- Small wood signs (optional)
Step-by-step Guide
Step 1: Cut and assemble the wooden frame into a house shape using planks. Then use two twigs for the roof’s A-frame as it gives the hotel a warm, handmade look.
Step 2: Divide the inside into sections using smaller wood strips or dividers.
Step 3: Fill each section with a different nesting material: curled wood shavings for lacewings, bark for beetles, drilled logs for bees, and pinecones for spiders or ladybugs.
Step 4: Attach chicken wire across the front to keep things secure but breathable.
Step 5: Mount your hotel to a shed or tree trunk at least 3 feet off the ground, in a sunny, dry spot protected from wind.
#13. Diamond Frame Pollinator Nook
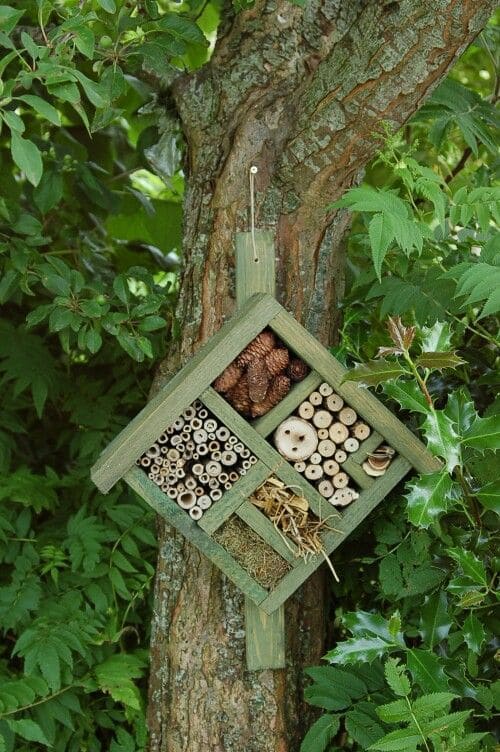
Shaped like a tilted house, this diamond-frame insect hotel is as charming as it is functional.
Plus, its small size makes it ideal for tight spaces, just hang it on a tree trunk and let nature take over. The mix of pinecones, bamboo, drilled logs, and straw ensures a variety of insects feel right at home.
Materials Needed
- 4 wooden slats (about 12″ long each)
- Wood glue
- Small plywood sheet
- 6-8 pinecones
- Bamboo canes, cut into 4-5″ pieces
- 2-3 wooden blocks, drilled with holes of various sizes
- Straw (2 handfuls)
- Dried grass
- Green exterior paint (optional)
- Hanging hook
Step-by-step Guide
Step 1: Cut the wooden slats at 45-degree angles to form a diamond shape, and glue or screw them together.
Step 2: Attach a backing board to the frame using nails or glue. Then paint the frame with green exterior paint and let it dry fully before assembling.
Step 3: Divide the interior into four compartments using smaller wood pieces.
Step 4: Fill each section with different natural materials like pinecones in one, bamboo canes in another, drilled logs in the third, and straw or moss in the last.
Step 5: Attach a hook or loop at the top and hang the hotel on a sturdy tree or post in partial sun.
#14. A-Frame Alpine Lodge
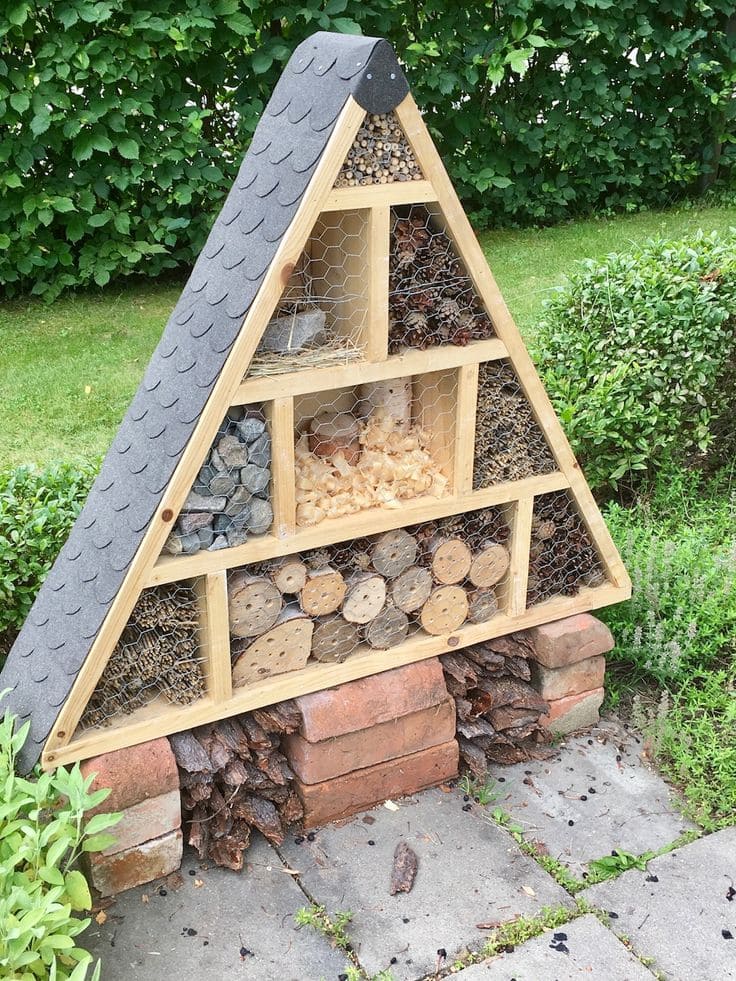
If Swiss chalets and cozy cabins make your heart flutter, this A-frame insect hotel might just steal the show.
Designed like a miniature mountain lodge, this structure offers more than visual charm, it’s a full-service retreat for your garden’s tiny helpers.
Moreover, sections packed with pine cones, bark, hay, drilled logs, and gravel provide nesting and overwintering space for solitary bees, beetles, ladybugs, and more.
Materials Needed
- Triangular wooden frame with interior dividers (approx. 3 ft tall)
- Roofing felt
- Chicken wire mesh
- Wood screws and staple gun
- Pine cones, straw, bark, hay, wood shavings
- Drilled logs (holes 2-10 mm wide)
- Stones and broken terracotta
- Bricks or wood blocks
Step-by-step Guide
Step 1: Construct an A-frame triangle using treated or weather-resistant wood. You should divide the interior into several sections using crossbars.
Step 2: Add a secure base using bricks or wood to keep the structure off the ground and prevent rot or flooding.
Step 3: Fill each compartment with varied natural materials. Then use pinecones, straw, and wood shavings to attract lacewings and ladybugs; fill other sections with logs and drilled branches for native bees.
Step 4: Staple chicken wire across the front of each section to keep the contents in place.
Step 5: Mount the structure in a sunny, sheltered corner near flowering plants. You keep the base weed-free and check yearly to refresh or clean materials as needed.
#15. Garden Therapy Mini Bee Habitat
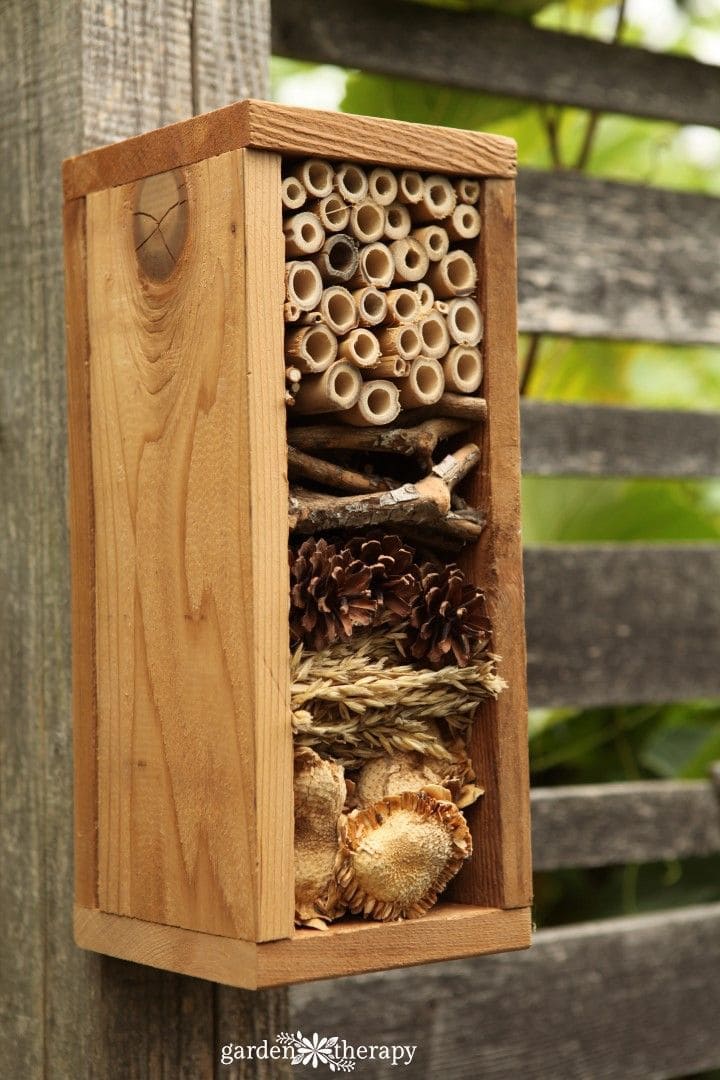
Crafted from simple cedar planks, this hotel is packed with a variety of natural textures like bamboo tubes, twigs, pinecones, straw, and seed heads making it an irresistible nesting spot for solitary bees like mason bees.
Also, the clean, minimal design fits beautifully in modern gardens, and it hangs easily on any wooden post or fence. A wonderful starter project if you’re dipping your toes into pollinator gardening!
Materials Needed
- 4 cedar boards (2″ x 12″)
- Bamboo stems, cut to 4-6″
- Dry sticks
- 2-3 pinecones
- A handful of dry straw
- Dried seed pods
- Wood glue
- Hanging hook
Step-by-step Guide
Step 1: Cut and assemble the cedar boards into a box frame, securing the backboard tightly with glue or nails.
Step 2: Fill the top section with tightly packed bamboo or reed tubes for nesting.
Step 3: Stack dry twigs in the next layer, followed by pinecones and straw for shelter variety.
Step 4: Finish the bottom with dried mushroom caps or seed heads for texture and hiding spots.
#16. Rustic Triangle Forest Bee Lodge
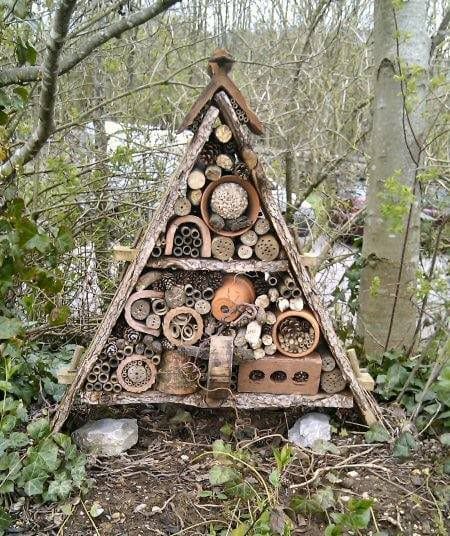
Nestled among trees like a secret woodland retreat, this A-frame bee hotel is a dream for nature lovers and garden pollinators alike.
Moreover, the triangular shape adds a whimsical charm while offering incredible structure and support for a variety of nesting materials. Its earthy tones and natural textures let it blend beautifully into any wild garden space.
If you want to give your buzzing friends a cozy and eco-friendly habitat, this design hits all the sweet spots.
Materials Needed
- Wooden planks (around 3-4 feet tall)
- Screws, nails, wood glue, and a saw
- Assorted hollow sticks and bamboo (cut to 4-6″)
- Small terracotta pots, clay pipes, and drilled wood blocks
- Pinecones, dry bark, straw, and brick pieces
- Chicken wire (optional)
- Two large stones
Step-by-step Guide
Step 1: Cut your wooden planks to create an A-frame triangle and secure them together tightly using screws and wood glue.
Step 2: Add horizontal shelves across the interior to divide the space into tiers or zones.
Step 3: Fill each section with different materials, tuck in bamboo bundles, stack small logs, nestle clay pots, and fill corners with pinecones or bark.
Step 4: Place your lodge in a shaded or semi-shaded garden spot, and ensure the base is stable using bricks or large rocks.
#17. Abstract Insect Hotels
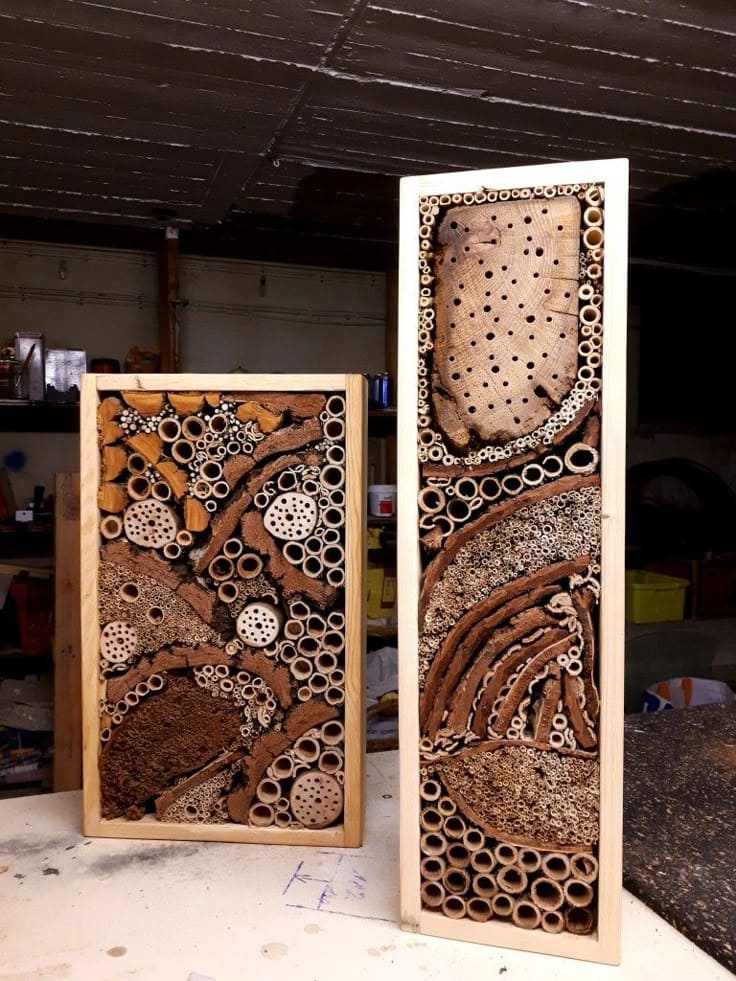
Who says bug hotels can’t be beautiful? These artistic masterpieces blend function with flair.
Designed with intentional curves, geometric segments, and textured depth, these vertical frames look more like gallery art than insect homes.
These pieces would look equally at home on a patio wall, fence, or modern backyard studio.
Materials Needed
- 2 wooden box frames (approx. 18”-24” tall, 3”-4” deep)
- Bamboo poles
- Round hardwood slices
- Tree bark, coconut husk, pine cones, straw, twigs
- Fine sawdust
- Wood glue
- Optional: waterproof sealer
Step-by-step Guide
Step 1: Begin by building or sourcing sturdy rectangular frames. You choose deep frames to accommodate layering materials at different angles.
Step 2: Sketch a rough design inside the frame, you should consider using curves, waves, or circles to guide the layout.
Step 3: Carefully position sections of bamboo, drilled wood, bark, and filler materials according to your design.
Step 4: Ensure you have a variety of hole sizes for different insect species. Then mix textures so there’s shelter for both pollinators and pest-eaters.
Step 5: Seal the frame if desired, then hang it in a dry, sheltered location. For artistic display, mount it near your patio, greenhouse, or outdoor seating area where you and the bugs can enjoy it equally.
#18. Painted Mug Bee Hotel
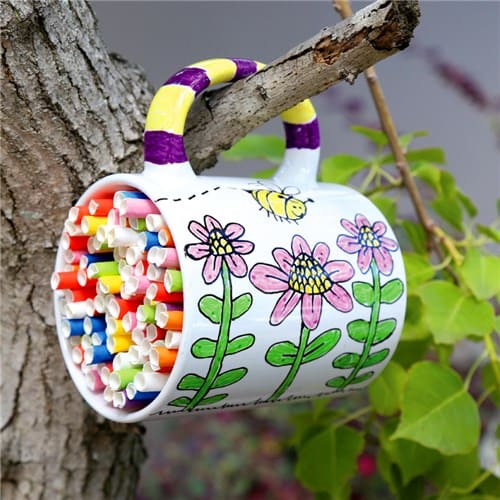
If you’ve got an old mug sitting in the cupboard collecting dust, it’s time to give it new life as a cheerful home for your garden bees!
This mug hotel combines whimsy and function. The colorful, hand-painted flowers and bees on the outside feel like a love letter to pollinators, while the rolled paper straws tucked inside offer a cozy hideaway.
Materials Needed
- 1 ceramic mug with handle
- Permanent markers
- 25-35 paper drinking straws
- Hot glue gun
- Twine (optional)
Step-by-step Guide
Step 1: Clean and dry your mug thoroughly. This helps paint stick better and keeps it safe for bees.
Step 2: Decorate the outside of the mug with flowers, bees, or your own fun doodles using paint or markers.
Step 3: Cut the paper straws to fit the depth of the mug, then roll and stuff them tightly inside, ensuring they won’t fall out. Then add a dab of hot glue at the back for extra stability.
Step 4: Use the handle to hang your bee hotel on a sturdy tree branch or nail it gently to a wooden fence. You need to ensure the open side faces slightly downward to avoid rain collecting inside.
#19. Nature-Stacked Bin Bee Retreat
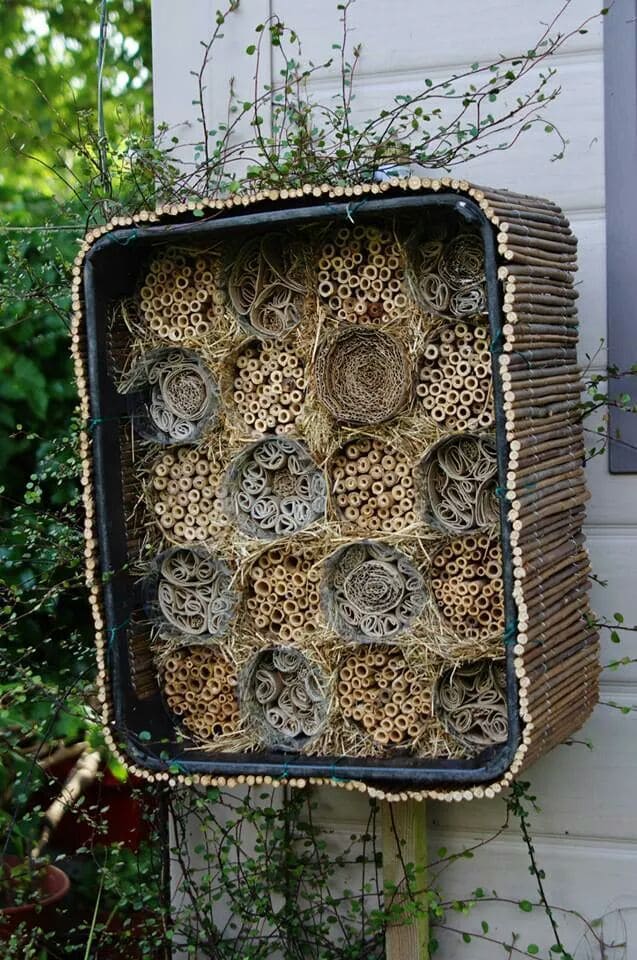
Using a recycled storage bin as the outer shell, the design combines straw, rolled paper, bamboo, and hollow stems in a tidy grid pattern that feels both structured and inviting.
What makes this one special is its soft organic look like the bees might have designed it themselves. If you love recycling and want to add a meaningful piece to your garden, this is the one.
Materials Needed
- 1 large old plastic bin (approx. 16-18″ wide)
- Dozens of paper towel rolls, bamboo sticks, and natural reeds (cut to 5-6″)
- Shredded straw
- Jute twine
- Twigs or small branches
- Nails
Step-by-step Guide
Step 1: Clean your old bin thoroughly and remove any labels or sharp edges.
Step 2: Arrange and pack tightly rolled tubes, bamboo, and reeds inside in layers, alternating materials for texture and function.
Step 3: Tuck straw or hay into the gaps to secure everything in place.
Step 4: Decorate the exterior by hot-gluing twigs around the bin frame, and mount your hotel on a post or wall that gets partial sun.
#20. Cardboard Bug Hotel for Kids
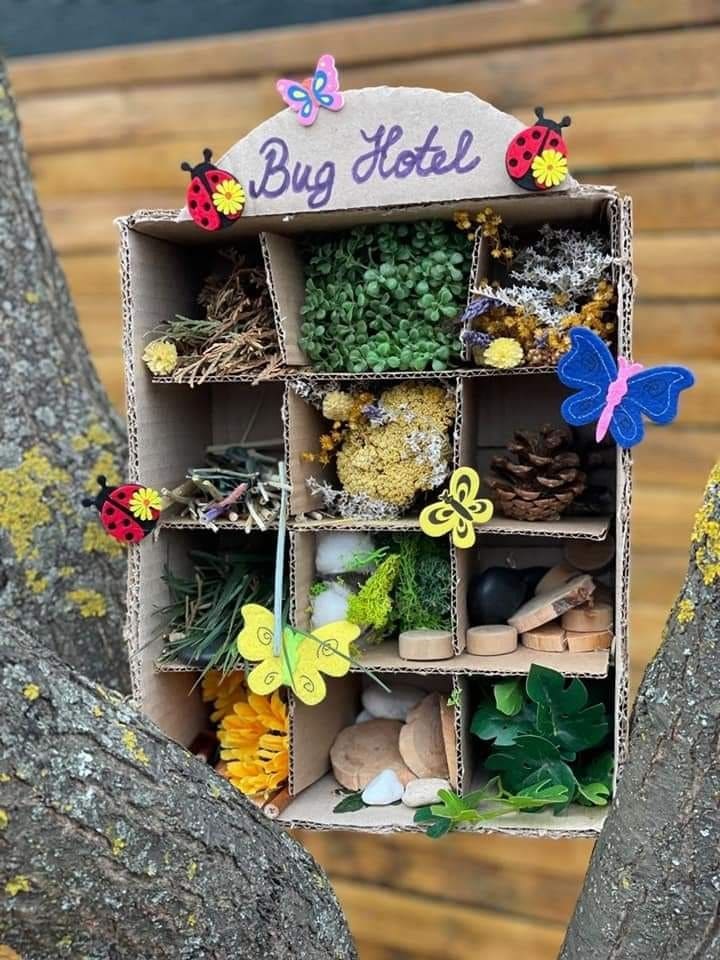
Wow, this playful cardboard bug hotel is a perfect weekend project for little hands and big imaginations. Using natural textures like pinecones, moss, leaves, and bark, each room becomes its own tiny ecosystem.
Specially, the handwritten sign and cheerful butterfly stickers make it feel like a welcoming lodge for nature’s tiniest guests. It’s a fun way to teach children about insect habitats and biodiversity without spending a dime.
Materials Needed
- 1 cardboard box (approx. 12″ x 8″ x 4″)
- Small cardboard pieces
- Natural fillers: pinecones, dried flowers, sticks, moss, bark, stones, leaves, etc.
- Non-toxic glue
- Decorative stickers
Step-by-step Guide
Step 1: Cut your cardboard box to create a front-facing open frame, then divide the inside into small square compartments using strips of cardboard.
Step 2: Fill each section with a variety of natural materials like twigs, flowers, moss, and more. You can mix textures to attract different bugs.
Step 3: Decorate the front with markers, write “Bug Hotel,” and let your kids add stickers or small paper cutouts.
Step 4: Finally, place the bug hotel in a dry, sheltered corner of your garden or wedge it between tree branches as shown in the photo.
#21. No Vacancy Bug Motel
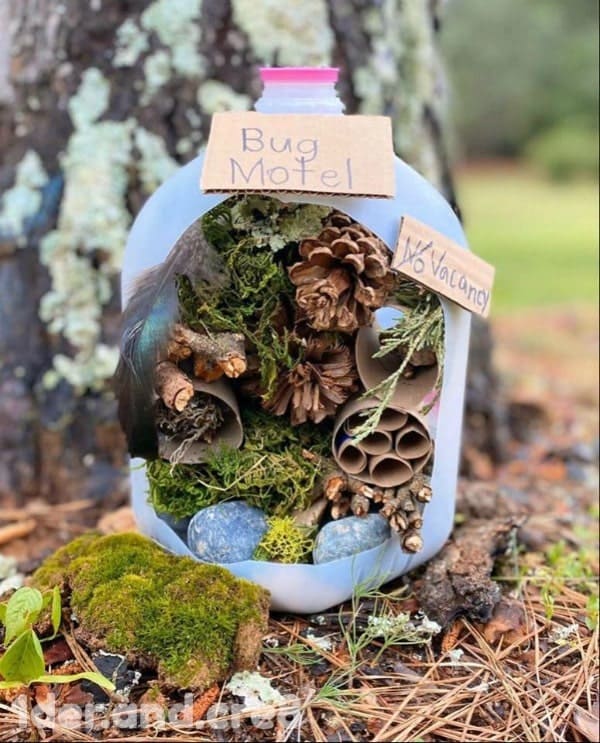
This quirky little bug motel proves that luxury living doesn’t require a big budget. Built inside a recycled plastic milk jug, it’s a cozy sanctuary bursting with textures and earthy layers.
And the hand-lettered cardboard signs are pure personality. It’s the perfect weekend project for kids or beginner gardeners, offering both fun and functionality in one upcycled masterpiece.
Materials Needed
- 1 clean plastic milk jug (gallon size)
- Small sticks, twigs, pinecones
- Moss, bark, or dried leaves
- Cardboard tubes
- A few smooth rocks (optional)
- Cardboard
- Scissors and hot glue (optional)
Step-by-step Guide
Step 1: Rinse out a gallon jug and cut a large opening on one side to create the lobby, then leave the handle intact for easy carrying or hanging.
Step 2: Collect natural materials from your backyard like pinecones, twigs, moss, bark, and even feathers.
Step 3: Layer and stuff the materials inside the jug, using rolled cardboard as tiny bug rooms and pinecones for hiding spots.
Step 4: Add signage made from scrap cardboard as it’s a fun way to personalize your creation!
Step 5: Place the jug at the base of a tree, nestled among rocks or garden soil to keep it from tipping over.
