Garden & Crafty - Garden, DIY, Home
No Result
View All Result
  • GARDEN
    • Garden Tips
    • Garden Guide
    • Garden Care
    • Garden Ideas
  • DIY
    • Diy Project
    • Crafty Ideas
  • HOME
    • Decoration
    • Cleaning
    • Tips & Hacks
  • About Us
  • GARDEN
    • Garden Tips
    • Garden Guide
    • Garden Care
    • Garden Ideas
  • DIY
    • Diy Project
    • Crafty Ideas
  • HOME
    • Decoration
    • Cleaning
    • Tips & Hacks
  • About Us
No Result
View All Result
Garden & Crafty - Garden, DIY, Home
Home Guide

Easy Guide to Making Rustic Pine Branch Christmas Cards

Lois Capone by Lois Capone
November 23, 2025
in Guide
Reading Time: 2 mins read

IN THIS ARTICLE:

Toggle
  • Materials Needed
  • Step-by-step Guide

Easy Guide to Making Rustic Pine Branch Christmas Cards

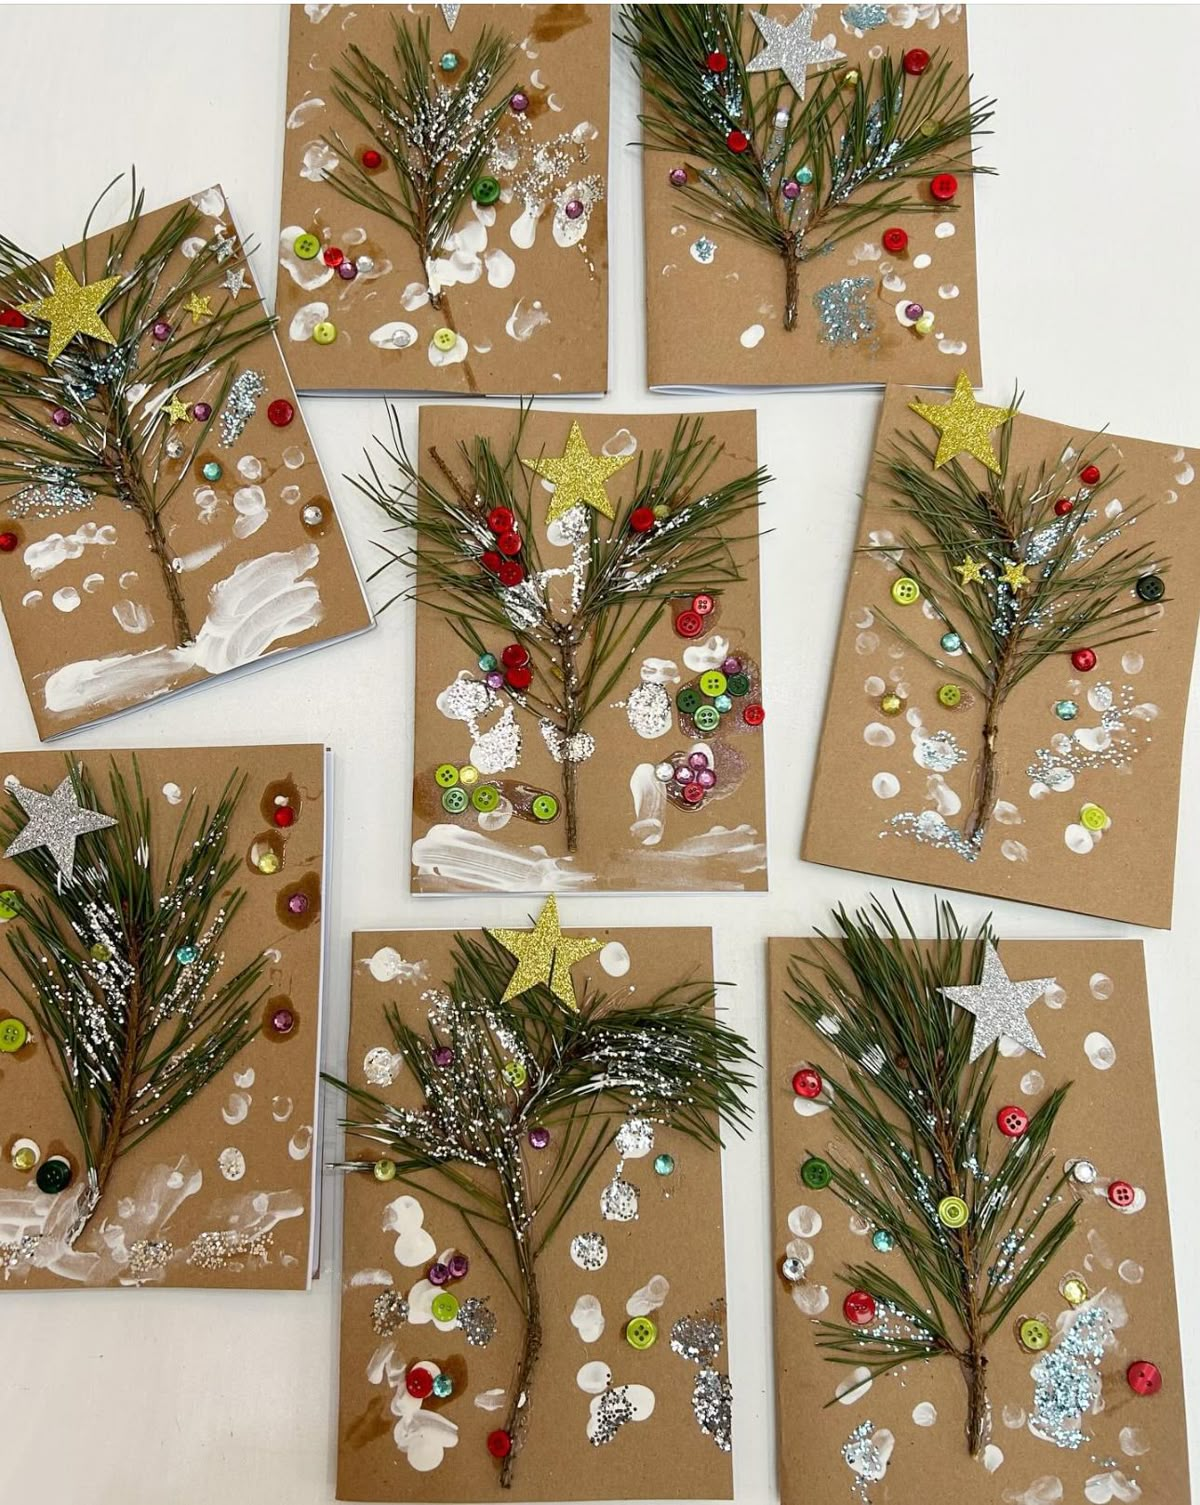
There’s something comforting about a handmade Christmas card, especially one built from natural bits you can gather right outside your door.

These rustic pine branch cards feel nostalgic and simple in the best way, mixing real greenery with soft “snow,” bright buttons, and gentle sparkle.

They look like tiny winter scenes tucked onto kraft paper, and every card turns out different with some a little playful, some more elegant, all full of personality.

This is the kind of holiday craft that feels relaxing, easy to share with kids, and surprisingly beautiful when you’re done.

Materials Needed

  • Kraft paper sheets, A5 or 8.5″×5.5″ (folded into cards)
  • 7-10 pine sprigs, each about 4-6 inches long
  • White acrylic paint (2 oz bottle)
  • Cotton swabs or a small round paintbrush
  • Craft glue or hot glue
  • Glitter, silver or white (1 small vial)
  • Buttons, assorted sizes 0.3-0.6 inches, around 20-30 pieces
  • 15-20 sequins or mini craft gems (optional)
  • Foam or glitter star stickers, 1-1.5 inches (one for each card)
  • Scissors
  • Scrap paper or paper plate for paint

Step-by-step Guide

Step 1: Fold your kraft paper into a firm card base. Then smooth the edges so the card sits flat and is ready for decorating.

Step 2: Trim the pine sprigs to around 4-6 inches. Now you glue one sprig onto the card front with the thicker end at the bottom, forming the shape of a Christmas tree.

Step 3: Add snow by dipping a cotton swab or small brush in white paint. Then dot the paint randomly around the pine branch, creating falling snowflakes and soft patches at the bottom.

Step 4: Decorate the branches with buttons and sequins. You should space them out like ornaments, mixing colors and sizes for a cheerful look.

Step 5: Place a foam star sticker at the top of the pine sprig. This instantly gives the tree a finished, festive shape.

Step 6: Spread a thin layer of glue where you want a bit of sparkle. Sprinkle glitter lightly, then tap the card gently to shake off the excess.

Step 7: Finally, lay the card flat and let everything dry completely before writing inside.

Tip: Dry pine sprigs always work best as they’re less sticky, easier to glue, and won’t leave resin marks on your finished cards.

Tags: Christmas carddiy Christmas cardshandmade Christmas cards
SharePin
Lois Capone

Lois Capone

Lois Capone is a wife and mom in her 50s who enjoys sharing gardening, DIY tips, and home decor ideas. She believes that with some inspiration, anyone can create a special feel in their home and garden.

Related Posts

Guide

Create Colorful Mini Weavings on Wooden Squares

There’s something meditative about weaving on a tiny scale. As you loop yarn over and under each strand, you start...

by Lois Capone
October 7, 2025
Guide

Craft Mini Driftwood Weavings to Add a Cozy Boho Touch

If you’ve ever admired woven wall art in cozy studios or boutique cafés, this is your chance to make your...

by Lois Capone
October 7, 2025
Guide

Create a Radiant Woven Circle from Scrap Yarn and Cardboard

This circular weaving craft brings together simplicity and joy. With just a piece of cardboard and a few strands of...

by Lois Capone
October 7, 2025
Guide

Create Adorable Pet Art with Mini Woven Blankets

Imagine your pet tucked under a handmade blanket, dreaming away after a long day of play. You’ll weave a small,...

by Lois Capone
October 7, 2025
Guide

Craft Colorful Beaded Bracelets with a DIY Cardboard Loom

This project transforms cardboard into a mini bead loom, turning small glass or plastic beads into wearable art. You’ll find...

by Lois Capone
October 7, 2025
Guide

Make a Whimsical Yarn Doll Through Simple Weaving

Creating this woven yarn doll feels like crafting a childhood memory. There’s something delightful about giving her shape and color...

by Lois Capone
October 7, 2025
Load More

Categories

  • Cleaning (6)
  • Crafty Ideas (193)
  • Decoration (171)
  • DIY (8)
  • Diy Project (291)
  • GARDEN (39)
  • Garden Care (65)
  • Garden Guide (141)
  • Garden Ideas (363)
  • Garden Tips (150)
  • Guide (688)
  • HOME (90)
  • Tips & Hacks (22)


Garden & Crafty - Garden, DIY, Home

© 2024 gardenandcrafty.com

Navigate Site

  • About Us
  • Privacy Policy
  • Terms Of Service
  • Disclaimer
  • Cookie Policy
  • Webstories
  • Sitemap

Follow Us

No Result
View All Result
  • GARDEN
    • Garden Tips
    • Garden Guide
    • Garden Care
    • Garden Ideas
  • DIY
    • Diy Project
    • Crafty Ideas
  • HOME
    • Decoration
    • Cleaning
    • Tips & Hacks
  • About Us