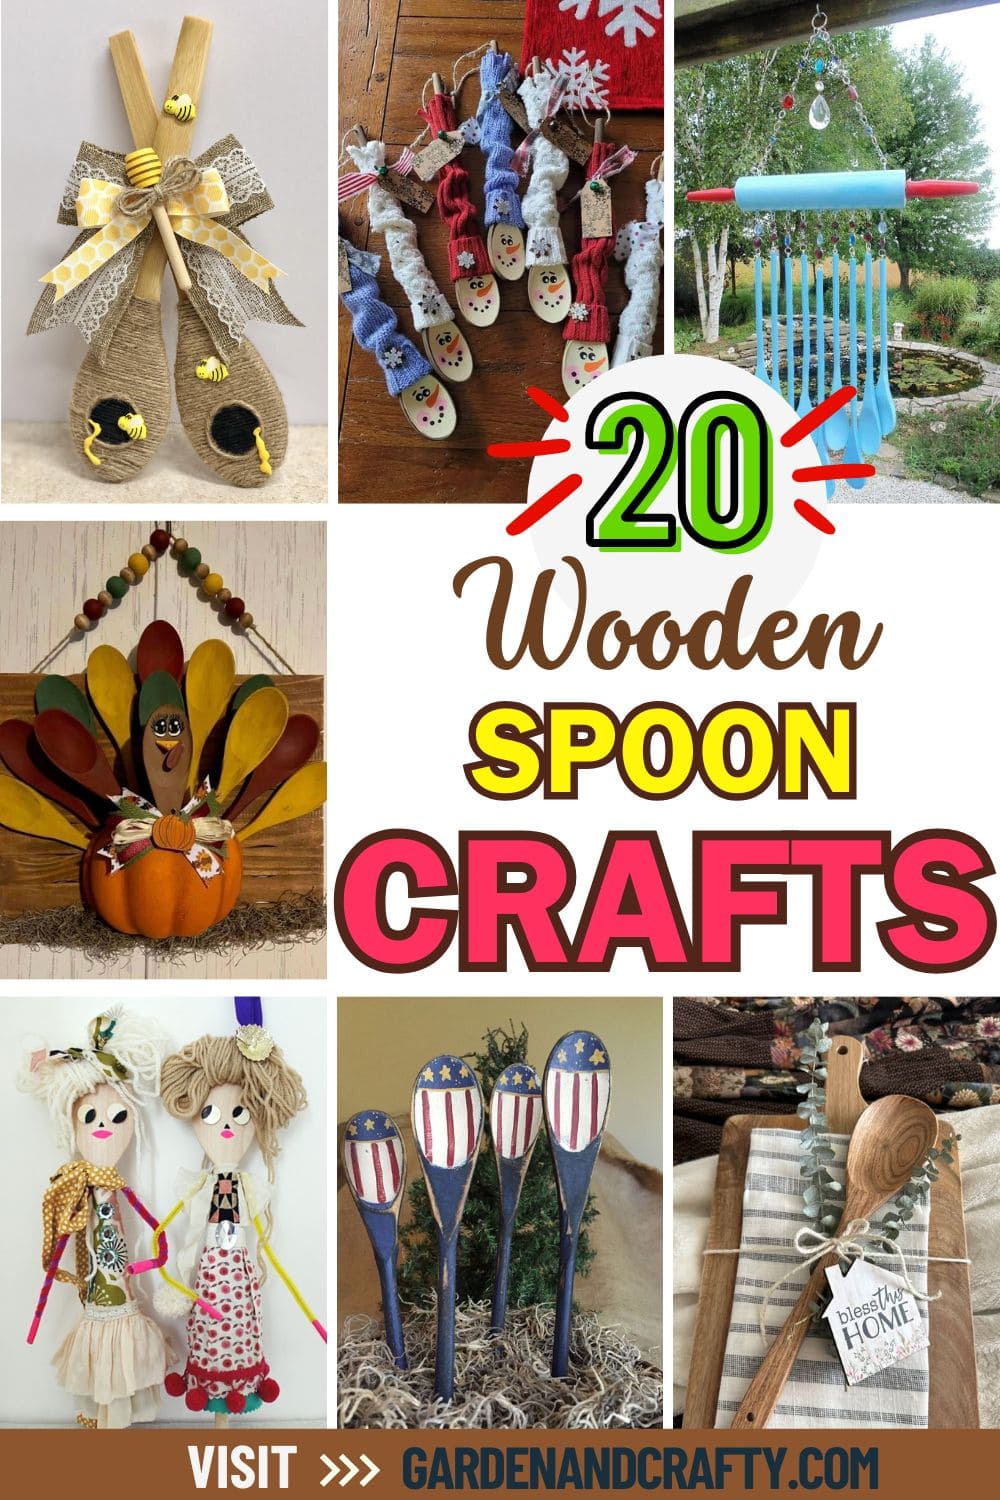
Looking for a fun, affordable way to add a little charm to your home or craft time? Wooden spoon crafts might be your new obsession.
These humble kitchen staples can be transformed into the most delightful decorations, puppets, gifts, and seasonal accents.
Whether you’re crafting with kids, decorating for the holidays, or simply looking for a creative outlet, these spoon ideas are as versatile as they are adorable.
#1. Rustic Honeybee Wooden Spoon Craft
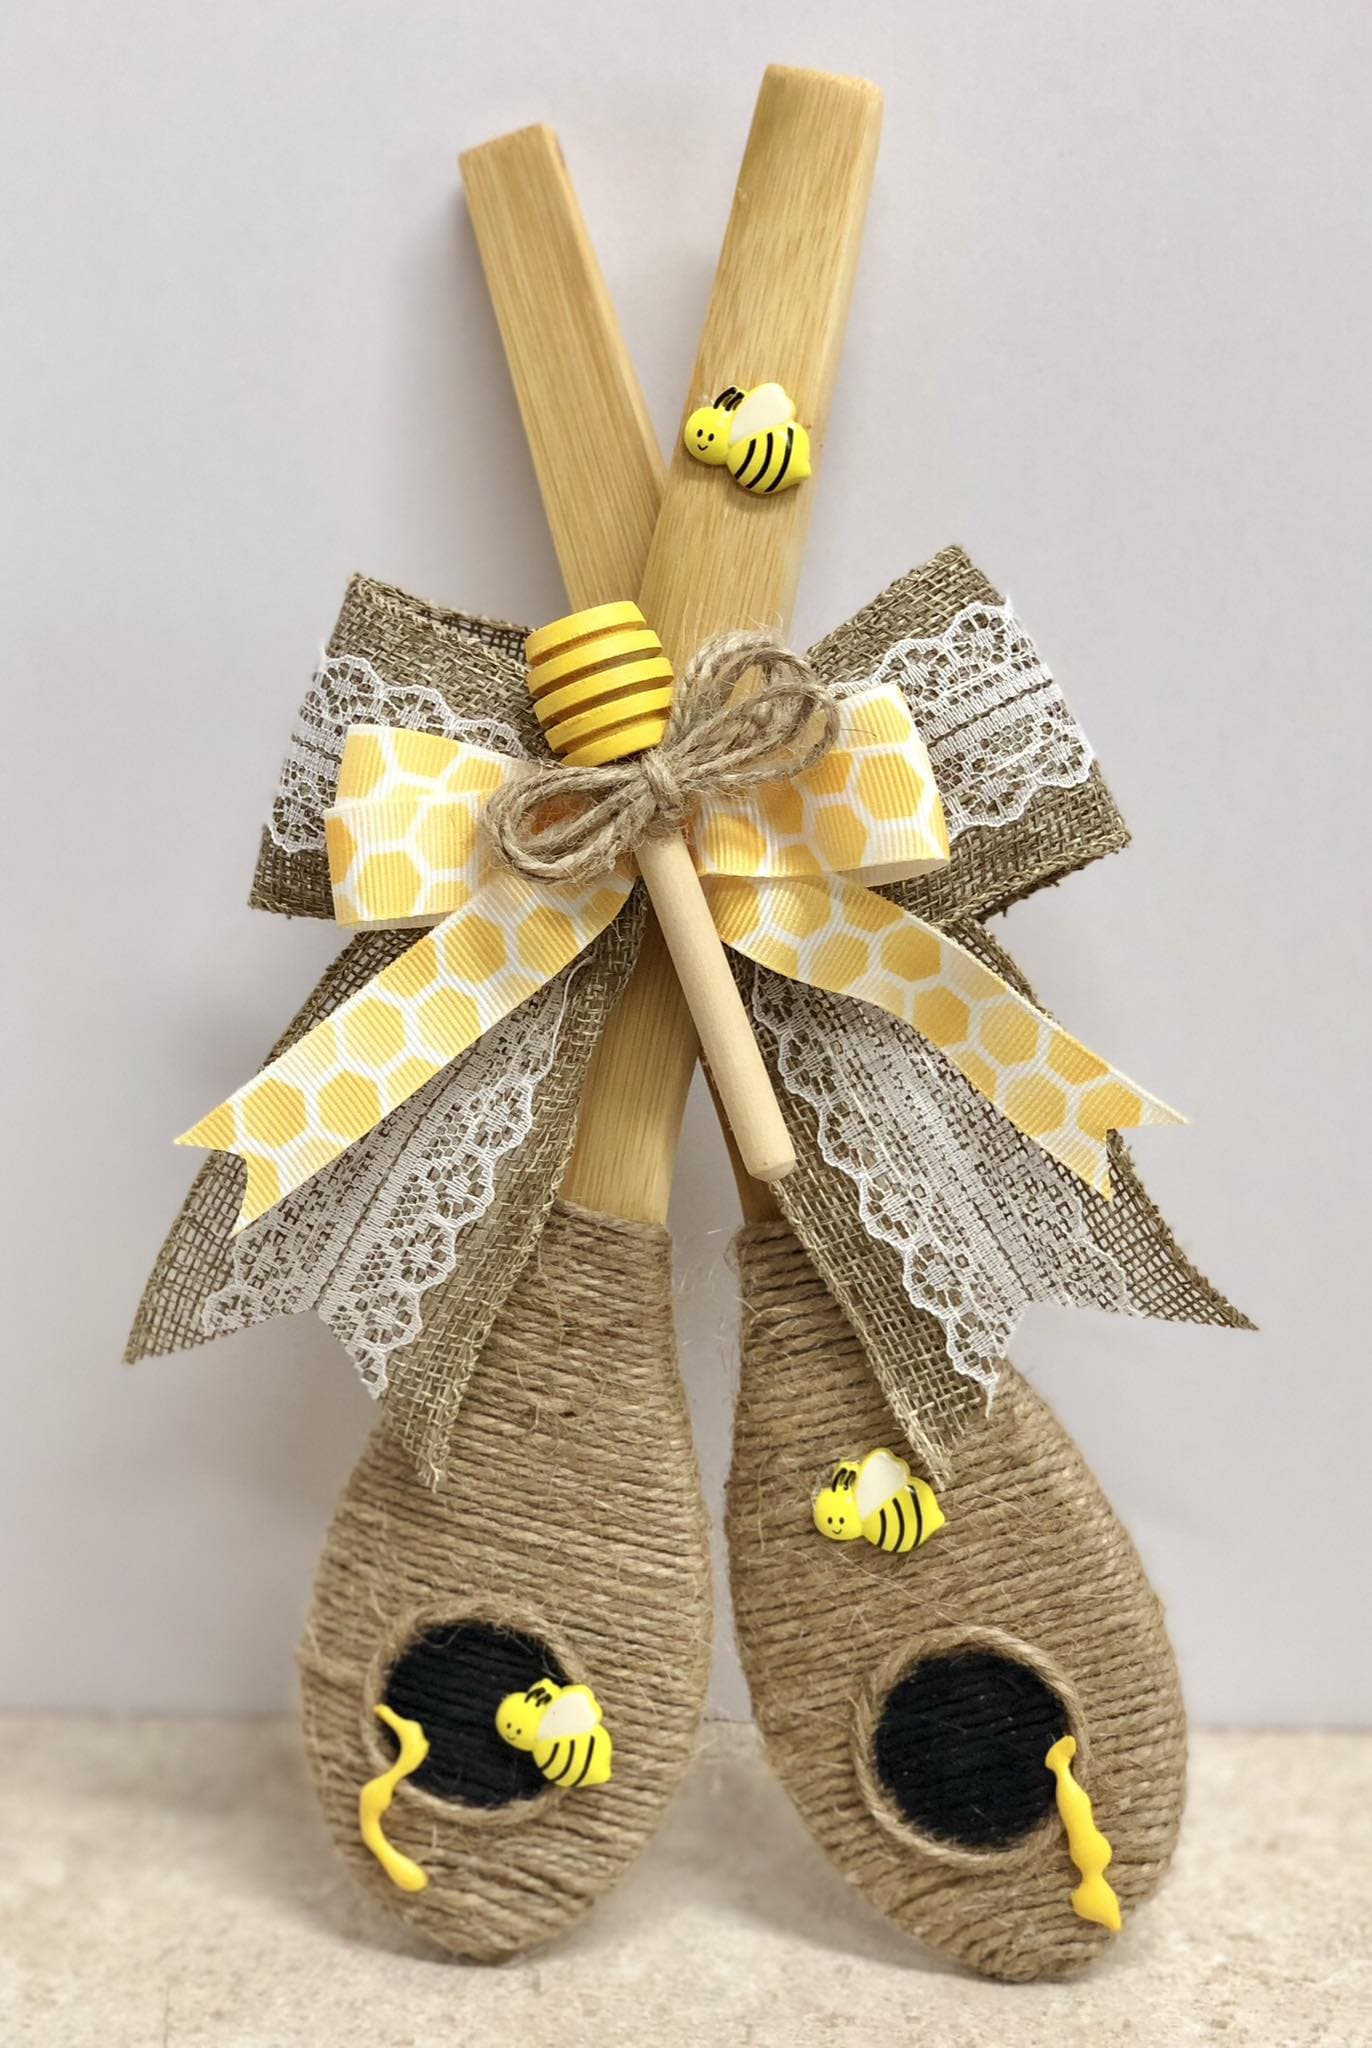
This buzzing little craft brings the charm of a country garden right into your kitchen décor.
With textured twine, cheerful bee embellishments, and a honeycomb-patterned bow, these wooden spoons make a sweet farmhouse-style statement.
Perfect for springtime decorations or thoughtful handmade gifts for bee lovers.
Materials Needed
- Two wooden spoons
- Jute twine or hemp cord
- Hot glue gun and sticks
- Small plastic or wooden bees
- Mini honey dipper
- Ribbon (yellow honeycomb print, lace, burlap)
- Black felt or fabric (for hive holes)
- Scissors
Step-by-step Guide
Step 1: Starting at the base of the spoon handle, tightly wrap twine around the bowl of the spoon and secure with hot glue as you go.
Step 2: Cut two circles of black felt and glue them near the center of each spoon to represent beehive entrances.
Step 3: Add tiny bee embellishments around the hive holes, facing inward or outward for realism.
Step 4: Create a layered bow using lace, burlap, and honeycomb ribbon. Secure with hot glue where the handles cross.
Step 5: Add a decorative honey dipper and a small jute twine bow at the center of the ribbon.
#2. Thanksgiving Turkey Wall Hanging
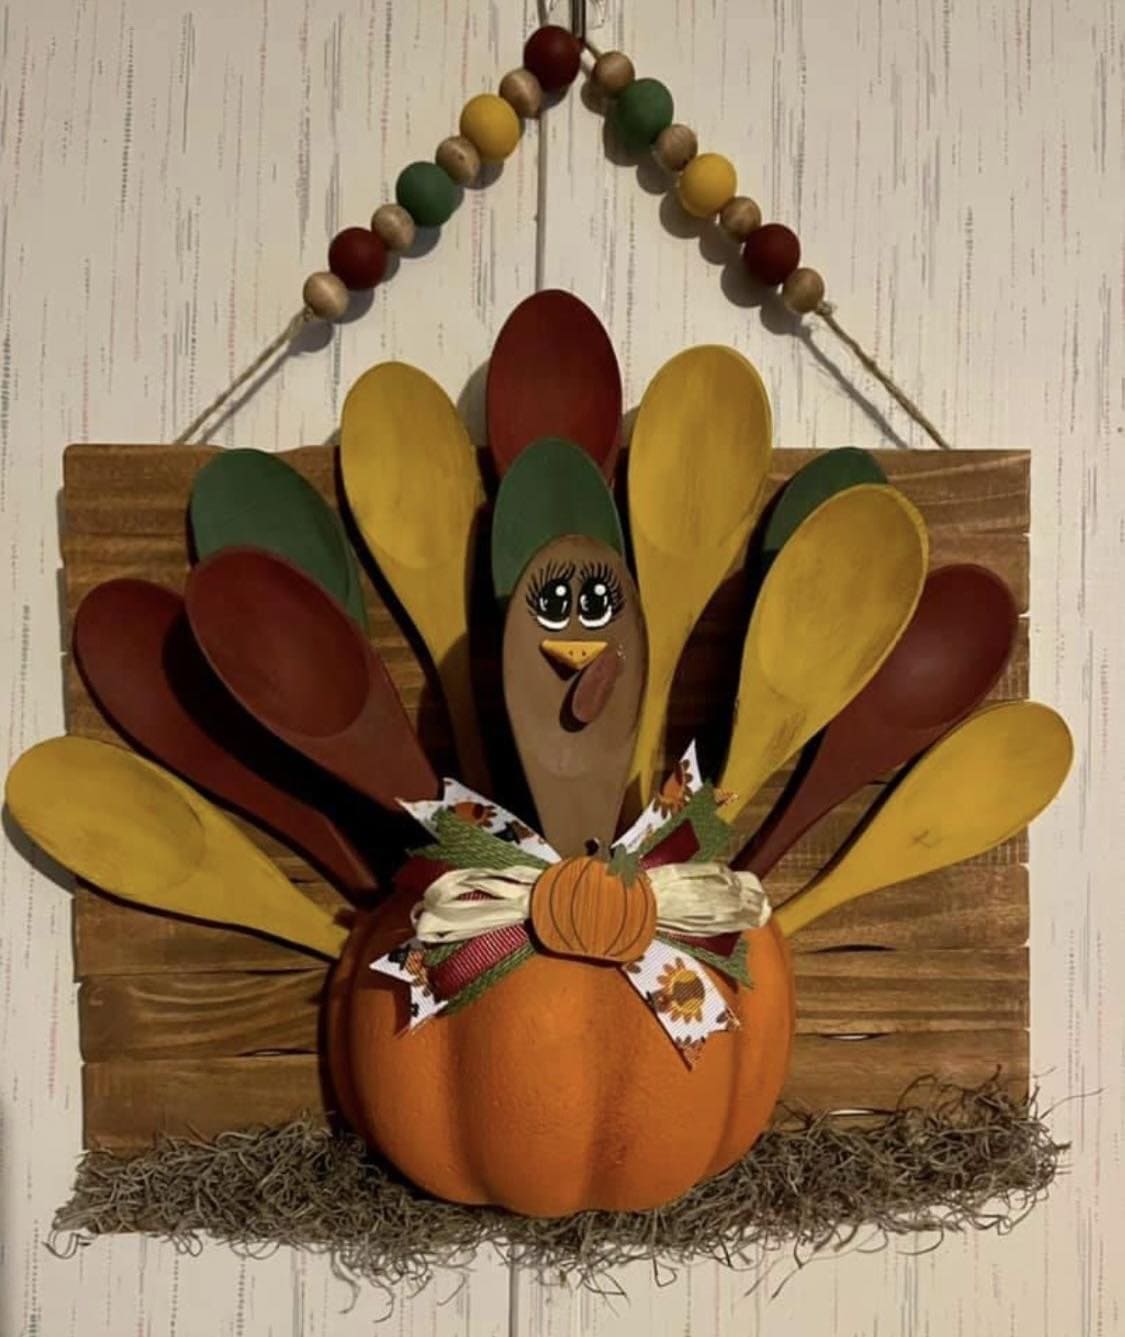
Warm, festive, and brimming with fall charm, this whimsical Thanksgiving turkey wall decor uses painted wooden spoons to create a vibrant feather fan.
Mounted on rustic wood slats and adorned with a faux pumpkin body, a bow-tied raffia ribbon, and a hand-painted turkey face, this craft infuses your space with homespun harvest cheer.
Whether hung in a kitchen or hallway, it’s a delightful way to celebrate the season with handmade personality.
Materials Needed
- 1 small faux pumpkin or foam pumpkin cut in half
- 8-10 wooden spoons
- Acrylic paint (fall colors: red, mustard, green, brown)
- 1 wooden slat plaque or reclaimed wood board
- Raffia, ribbon, or burlap for bow
- Decorative beads and string for hanging
- Paintbrushes, hot glue gun, glue sticks
- Black and white paint markers
Step-by-step Guide
Step 1: Paint each wooden spoon in your chosen autumn tones. Allow them to dry completely. Use a mix of colors for visual balance.
Step 2: Choose one spoon for the turkey’s head. Then add personality by painting large eyes, a beak, and a wattle using fine brushes or paint markers.
Step 3: Glue the painted spoons onto the wooden plaque in a fan shape, forming the turkey’s tail feathers.
Step 4: Secure the halved faux pumpkin to the base of the spoons to create the turkey’s body.
Step 5: Tie a ribbon or raffia bow and glue it just beneath the face for a finished, festive touch. Add small decorative elements if desired.
Step 6: Attach a beaded or jute hanger to the back. Hang it on your wall or door to add cheerful Thanksgiving vibes to your home.
#3. Spooky Halloween Wooden Spoon Characters
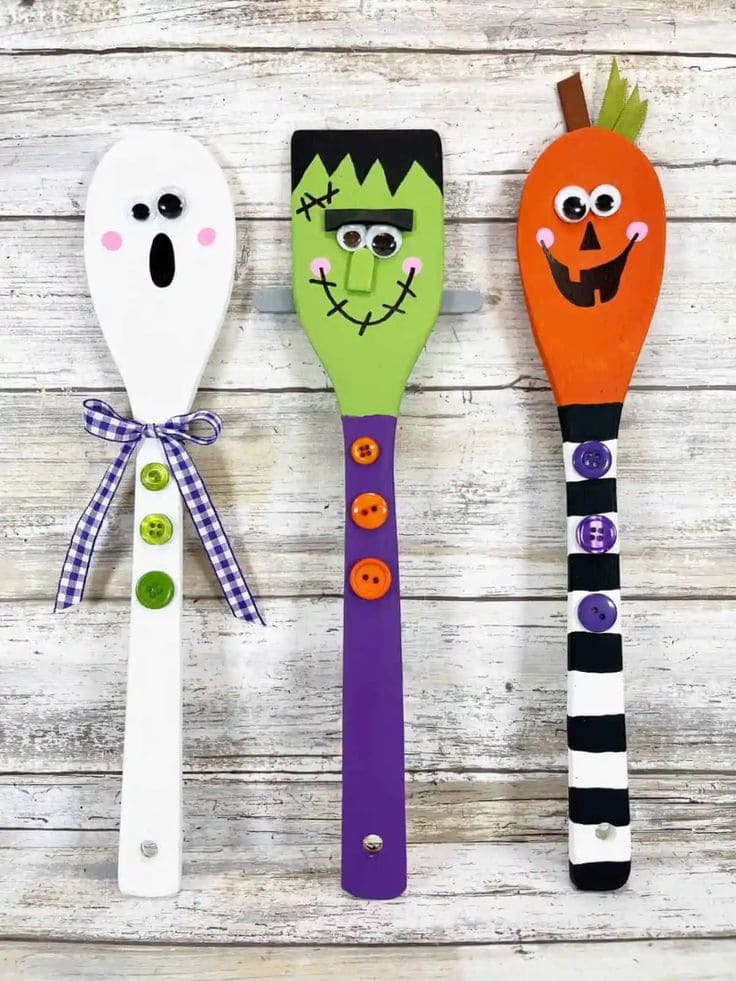
Add playful fright to your seasonal décor with these whimsical Halloween-themed wooden spoon characters!
Featuring a ghost, Frankenstein, and pumpkin, each spoon is painted in vivid colors and adorned with googly eyes, buttons, and expressive features.
These spooky cuties make excellent shelf sitters, party favors, or easy craft night projects that kids and adults alike will enjoy.
Materials Needed
- 3 wooden spoons or spatulas (varied shapes)
- Acrylic paint: white, green, orange, purple, black
- Paintbrushes or foam brushes
- Googly eyes (various sizes)
- Buttons in Halloween colors (green, orange, purple)
- Ribbon (optional: gingham, Halloween prints)
- Hot glue gun or craft glue
- Permanent markers or paint pens for fine details
- Small wooden pieces (optional for noses or stems)
Step-by-step Guide
Step 1: Paint each spoon with its base color white for ghost, green for Frankenstein, orange for pumpkin. Let them dry completely.
Step 2: Add face details using black paint or marker: mouth, eyes, stitches, and nose outlines. For the pumpkin, glue a brown and green paper “stem” on top.
Step 3: Attach googly eyes and buttons for added personality using hot glue. Add extra embellishments like ribbon bows or felt accents.
Step 4: Paint Frankenstein’s hair with black triangles, stripe the pumpkin’s handle in black and white for flair, and dot pink cheeks if desired.
Step 5: Display in a jar, poke into floral foam, or hang them from a Halloween tree or wreath for a fun and crafty touch.
#4. Whimsical Spoon Puppet Dolls
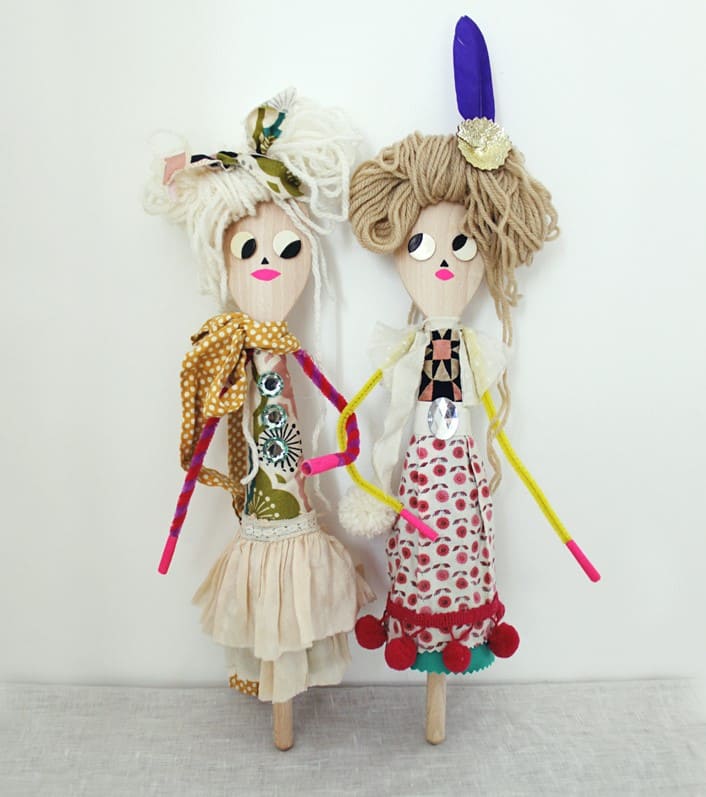
These DIY spoon puppets are full of personality, flair, and storytelling charm.
Made with wooden spoons, scraps of fabric, yarn, and found embellishments, each puppet becomes its own quirky character.
Perfect for imaginative play, classroom theater projects, or unique party crafts, they bring endless fun and creativity to little hands.
Materials Needed
- Wooden spoons (any size)
- Fabric scraps for clothing
- Yarn or string for hair
- Pipe cleaners for arms
- Buttons, beads, felt, or feathers for details
- Glue gun or strong craft glue
- Googly eyes or paper cutouts
- Scissors
Step-by-step Guide
Step 1: Begin by creating a face using googly eyes or paper eyes, then add a drawn or glued-on mouth and cheeks.
Step 2: Attach yarn or string to the top of the spoon to create hair. Then style it wild, curly, or braid it.
Step 3: Dress your puppet with layers of fabric glued around the handle, forming skirts, tops, or robes. Add bows, trims, or buttons for flair.
Step 4: Twist pipe cleaners and glue them to the sides of the spoon for movable arms. You can also attach small pom-poms or beads for hands.
Step 5: Finish with any personal touches like glitter, hats, or feathers. Let dry and then bring your puppet to life through storytelling or display.
#5. Snowman Spoon Ornaments with Cozy Sock Scarves
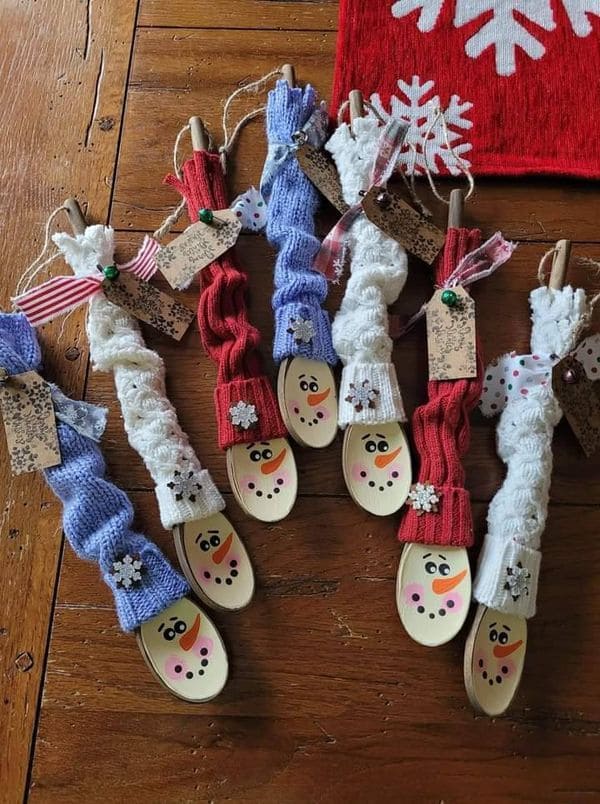
Adorably festive, these snowman spoon ornaments turn ordinary wooden spoons into cheerful winter characters.
With painted snowman faces, knit sock wraps for hats and scarves, and glittering embellishments like snowflakes or bells, they make delightful holiday gifts or tree decorations.
Tied with rustic tags or ribbons, they offer a homespun charm that perfectly complements any cozy Christmas setting.
Materials Needed
- Plain wooden spoons
- Acrylic paint and fine-tipped brush (black, orange, pink)
- Old socks or sweater sleeves (various colors)
- Mini jingle bells, faux snowflakes, or buttons
- Hot glue gun and scissors
- Twine or ribbon
- Optional: kraft tags for gift labeling
Step-by-step Guide
Step 1: Paint cheerful snowman faces on the back of each wooden spoon using black for eyes and mouth, orange for the carrot nose, and pink for rosy cheeks.
Step 2: Cut a sock or sweater sleeve to fit as a hat or scarf.
Next, stretch it over the handle and adjust the folds for a snug fit. You can secure it with a small dab of glue.
Step 3: Add decorative accents like snowflakes, buttons, or bells with hot glue. Personalize with color or glitter if desired.
Step 4: Tie a ribbon or twine around the handle to hang your ornament. You can also attach a kraft tag to write names or holiday wishes.
Step 5: Display these in a Christmas basket, on a wreath, or give them out as charming handmade gifts.
#6. Minimalist Wooden Spoon Lions
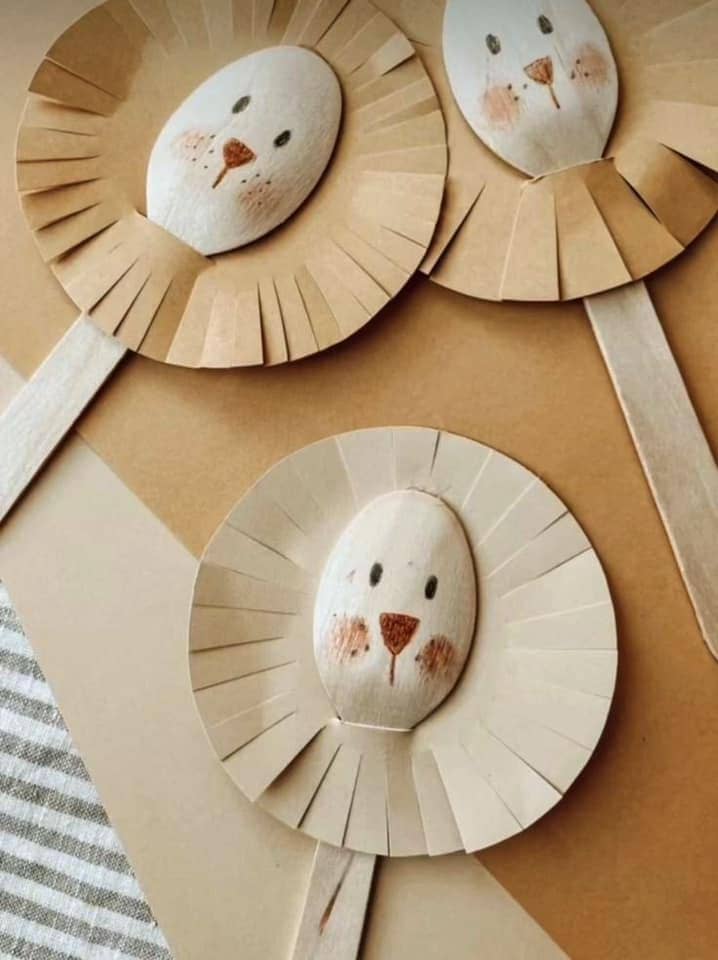
These sweet lion spoon crafts blend neutral tones with soft, handmade character.
With gentle features and a paper mane, this design is perfect for toddlers or young children learning through creative play.
The simple materials and muted palette make it suitable for storytime props, nursery decorations, or calming classroom crafts.
Materials Needed
- Wooden spoons (light or unfinished)
- Beige or kraft construction paper
- Colored pencils or soft-tip markers (brown, pink, black)
- Glue stick
- Scissors
Step-by-step Guide
Step 1: Draw a soft lion face on the spoon bowl using black and brown markers, add dot eyes, a rounded nose, whisker dots, and faint pink cheeks.
Step 2: Cut a wide paper circle to serve as the mane. You can use scissors to snip evenly around the edges, creating a fringe.
Step 3: Cut a slit in the bottom of the circle so it can slide up around the spoon neck, then secure with glue.
Step 4: Let everything dry, then display as wall art, story props, or in a jungle-themed play basket.
#7. Rustic Patriotic Wooden Spoon Flags
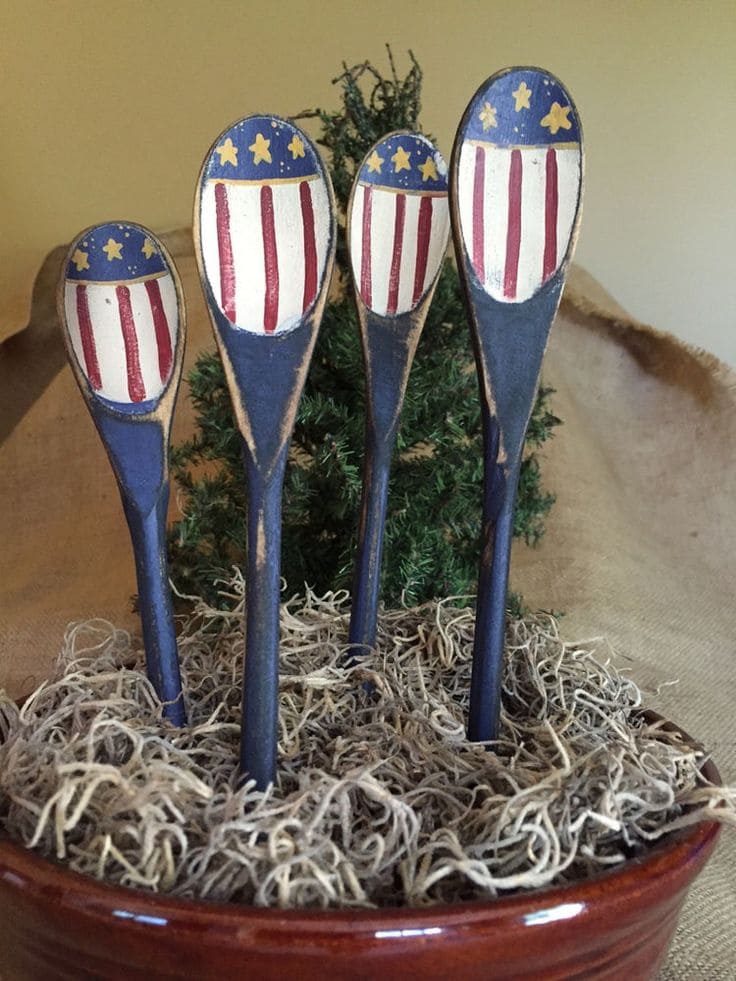
Show your love for the red, white, and blue with these vintage-style patriotic spoon flags.
Hand-painted with stars and stripes, these charming spoons add an Americana flair to planters, table centerpieces, or Independence Day displays.
The distressed navy handles and primitive brushstroke detailing give them an aged, farmhouse appeal perfect for country-style decorating year-round.
Materials Needed
- Wooden spoons
- Acrylic paint (navy blue, red, white, and yellow)
- Paintbrushes (fine-tip for stars and detail work)
- Sandpaper or sanding block
- Optional: clear matte sealer spray
- Floral moss or filler (if displaying in pots)
Step-by-step Guide
Step 1: Paint the handle and bowl of each wooden spoon with a base coat of navy blue. Let dry fully.
Step 2: On the bowl portion, paint vertical red stripes and a white background to mimic the U.S. flag.
Step 3: Add yellow stars across the top blue portion using a detail brush or stencil.
Step 4: Lightly sand the edges and surface to create a timeworn, rustic finish.
Step 5: Display the spoons in a terracotta pot with Spanish moss, or tuck them into centerpieces for a festive Fourth of July look.
#8. Rustic Wooden Spoon Scarecrows
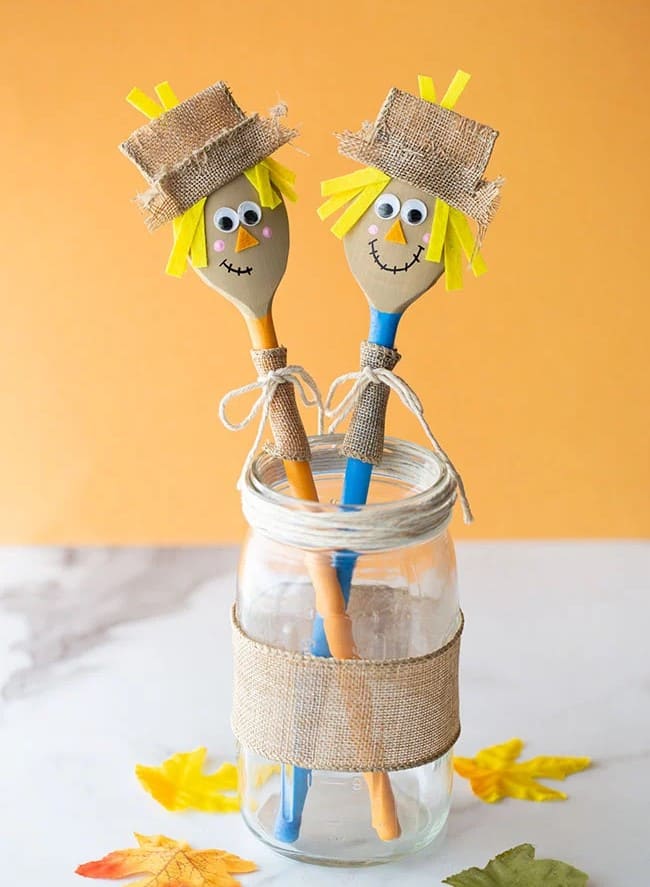
These playful scarecrow spoons radiate cozy fall charm with their bright smiles, burlap hats, and cheerful personalities.
Designed as a kid-friendly project or seasonal decor, they’re perfect for adding warmth to your home during autumn.
Whether displayed in a mason jar or tucked into a harvest-themed arrangement, these little characters bring handcrafted delight to Thanksgiving tables or classroom crafts.
Materials Needed
- Wooden spoons
- Googly eyes
- Yellow construction paper (for hair)
- Orange paper (for noses)
- Burlap ribbon or scrap fabric (for hats and collars)
- Acrylic paints (blue, tan, orange, or preferred hues)
- Black marker
- Glue gun or tacky glue
- Scissors
Step-by-step Guide
Step 1: Paint the handle and face area of each spoon in fun harvest tones. Let them dry completely.
Step 2: Glue googly eyes to the bowl of the spoon and add triangle noses cut from orange paper. Then draw smiles with a black marker.
Step 3: Cut thin strips of yellow paper and glue behind the spoon’s head for straw-like hair.
Step 4: Wrap a piece of burlap or ribbon around the neck for a cozy scarf. You now tie or glue it in place.
Step 5: Shape small rectangles of burlap into floppy scarecrow hats, securing them to the top of the spoon with glue.
Step 6: Display in a mason jar or insert into a wreath for festive farmhouse vibes all season long.
#9. Rustic Bless This Home Spoon Gift Bundle
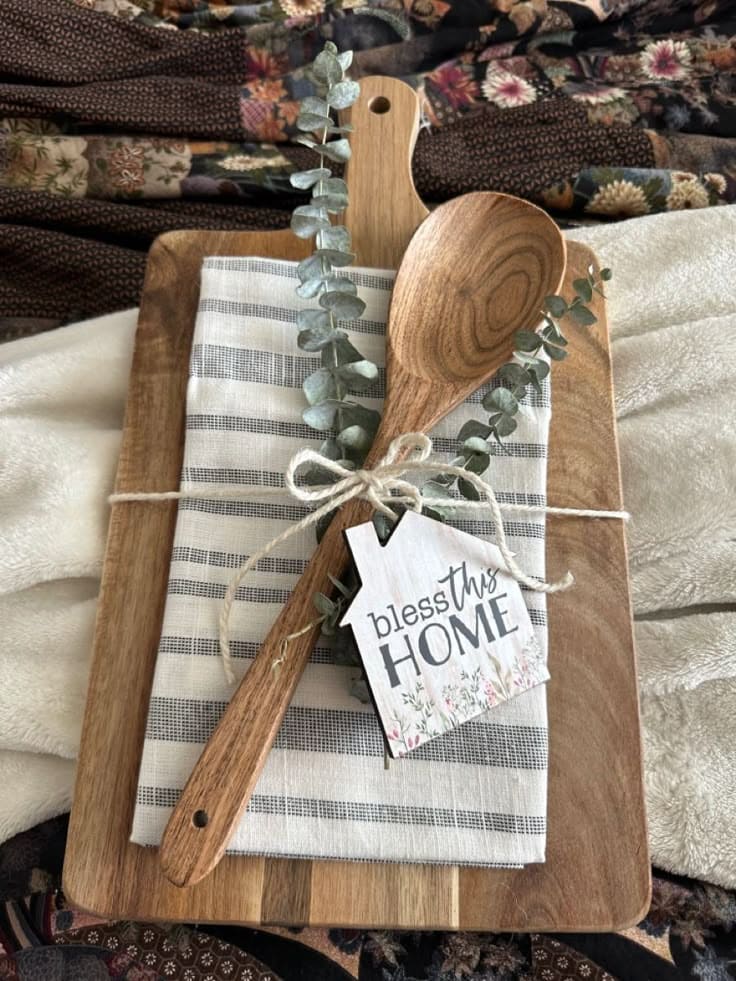
This cozy, farmhouse-inspired craft blends charm and simplicity in a thoughtful presentation.
You can see a wooden spoon rests atop a layered cutting board and tea towel, adorned with twine, eucalyptus sprigs, and a heartwarming tag.
Whether it’s a hostess gift, housewarming present, or just a sweet kitchen accent, this understated bundle radiates warmth and welcome with every rustic detail.
Materials Needed
- 1 wooden spoon (plain or engraved)
- 1 small wooden cutting board
- 1 folded dish towel or tea towel
- Twine or jute string
- Faux eucalyptus sprigs or greenery
- Decorative wooden tag with “Bless This Home” quote
- Optional: hot glue or mini clothespin
Step-by-step Guide
Step 1: Fold the tea towel neatly and place it centered on the cutting board.
Step 2: Lay the wooden spoon diagonally across the towel.
Step 3: Tuck in eucalyptus sprigs or greenery under the spoon handle for texture.
Step 4: Tie everything together with a rustic bow of twine around the center of the bundle.
Step 5: Attach or hang the “Bless This Home” tag from the bow for a meaningful final touch.
Step 6: Finally, use as a gift topper or display in your kitchen as a cozy farmhouse accent.
#10. Heavenly Singing Spoon Angel
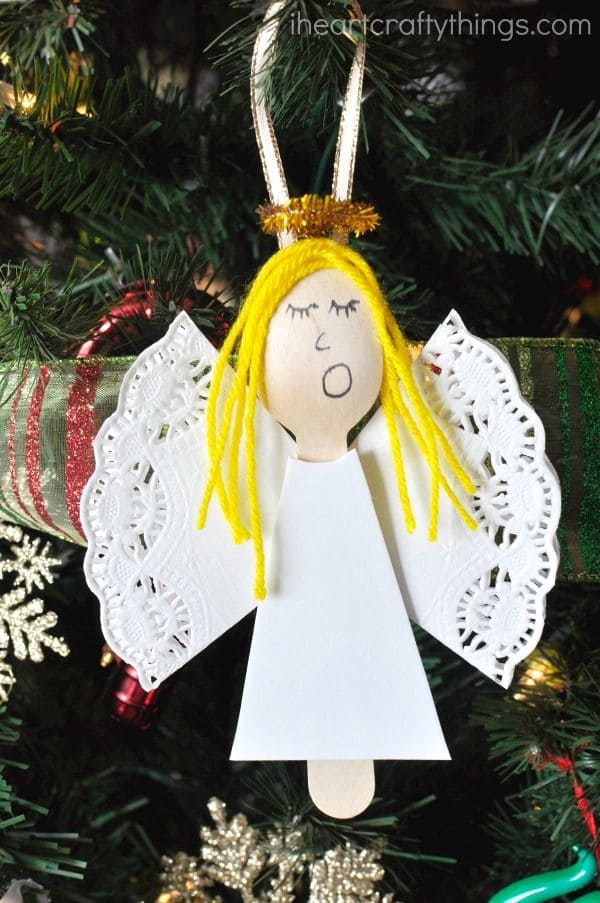
This charming singing angel ornament captures the warmth and wonder of the holidays.
Its sweet expression, flowing yellow yarn hair, and delicate doily wings make it perfect for decorating the Christmas tree or gifting to loved ones.
Whether made as a classroom project or at home around the holidays, it brings an angelic note to any setting.
Materials Needed
- Wooden spoon
- White paper doilies
- White cardstock or construction paper
- Yellow yarn
- Gold pipe cleaner
- Ribbon or twine for hanging
- Glue, scissors, black marker
Step-by-step Guide
Step 1: Cut and glue yellow yarn strands to the back of the spoon head to create the angel’s hair.
Step 2: Draw the angel’s singing face using a black marker such as closed eyes, circular mouth, and eyebrows.
Step 3: Cut a triangle from white cardstock to form the angel’s robe and glue it to the spoon handle.
Step 4: Fold a paper doily in half and attach behind the robe to form wings.
Step 5: Twist a gold pipe cleaner into a halo and glue it to the top, adding ribbon for hanging.
#11. Vintage Memory Spoon With Photo Transfer
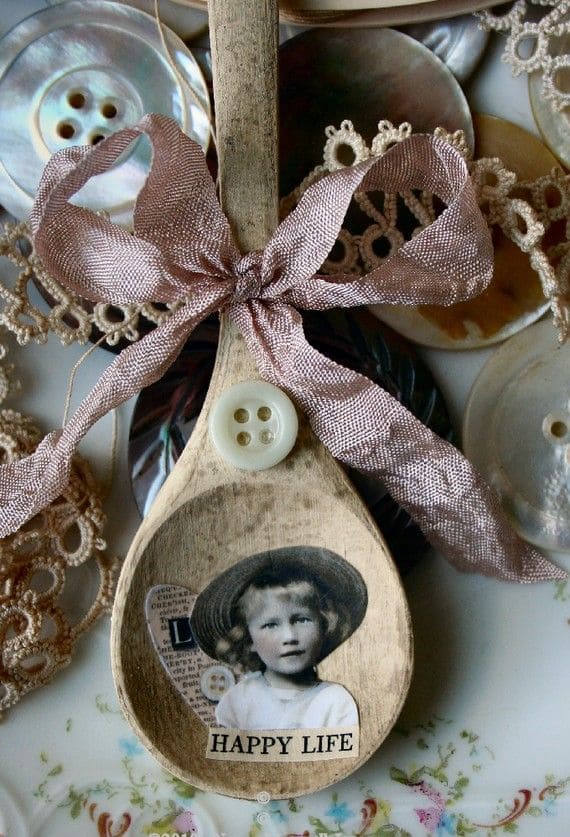
Whimsical and nostalgic, this vintage memory spoon craft transforms an ordinary wooden utensil into a heartfelt keepsake.
Featuring a sepia-toned photo transfer, a single button, and a soft ribbon bow, this piece radiates charm and simplicity.
Whether showcasing a beloved family photo or vintage print, it makes a unique decorative accent or a thoughtful handmade gift.
Materials Needed
- Wooden spoon (unfinished or distressed for vintage look)
- Vintage photo or printed image (laser printed)
- Mod Podge or photo transfer medium
- Button (antique or ivory-toned)
- Decorative ribbon (lace or soft fabric bow)
- Small embellishments (optional: hearts, tags, charms)
- Sandpaper (for distressing)
- Craft glue or hot glue gun
Step-by-step Guide
Step 1: Lightly sand the spoon to smooth the surface and enhance photo adhesion. Wipe clean before applying any glue.
Step 2: Apply Mod Podge or photo transfer medium to the printed photo.
Next, press image side down onto the spoon and smooth out air bubbles. Let dry for several hours or overnight.
Step 3: Dampen the paper with a wet cloth and gently rub to reveal the transferred image. Repeat until all paper residue is removed.
Step 4: Glue a decorative button at the neck of the spoon and tie a soft ribbon into a bow above it for a charming finish.
Step 5: Add optional embellishments like a small word tag or vintage-style sticker.
#12. Snowman Face Melt Wooden Spoon Ornaments
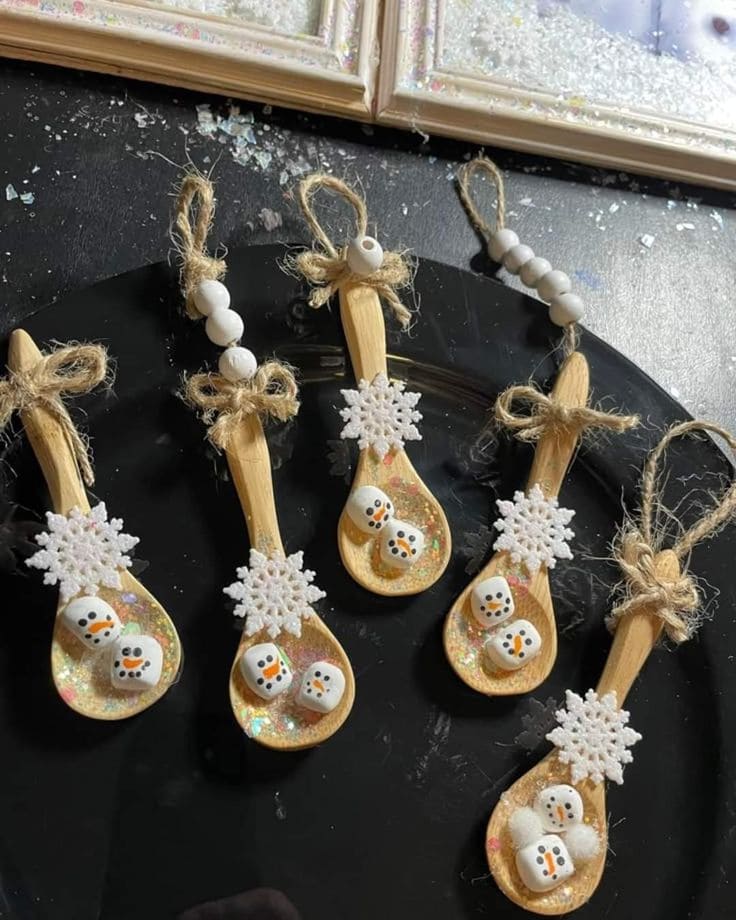
These charming wooden spoon ornaments capture a whimsical winter scene, a trio of tiny melting snowman faces nestled in glittery snow.
With rustic twine loops and wooden bead accents, these pieces combine farmhouse warmth with festive sparkle.
Each spoon is hand-decorated with shimmering resin or glitter, faux snowflakes, and mini snowmen made from marshmallow-like clay or foam.
Materials Needed
- Mini wooden spoons
- Clear-drying glue or craft resin
- Fine glitter or iridescent snowflake flakes
- Small foam or clay snowman heads (painted faces)
- Mini snowflake embellishments
- Jute twine
- Small wooden beads (white)
- Hot glue gun
Step-by-step Guide
Step 1: Cover the spoon head with clear glue or resin. Sprinkle in iridescent glitter to mimic a snowy sparkle. Let it cure or dry completely.
Step 2: Hot glue two or three mini snowman heads to the bowl of the spoon in a casual, melting arrangement.
Step 3: Add a small snowflake embellishment just above the spoon’s bowl for a festive touch.
Step 4: Tie a rustic bow around the neck of the spoon using jute twine.
Next, slide on two or three wooden beads and knot at the top to create a loop for hanging.
Step 5: Use as tree ornaments, cocoa bar decor, or tuck one into a holiday card for a sweet handmade surprise.
#13. Glittery Mermaid Spoon Puppets
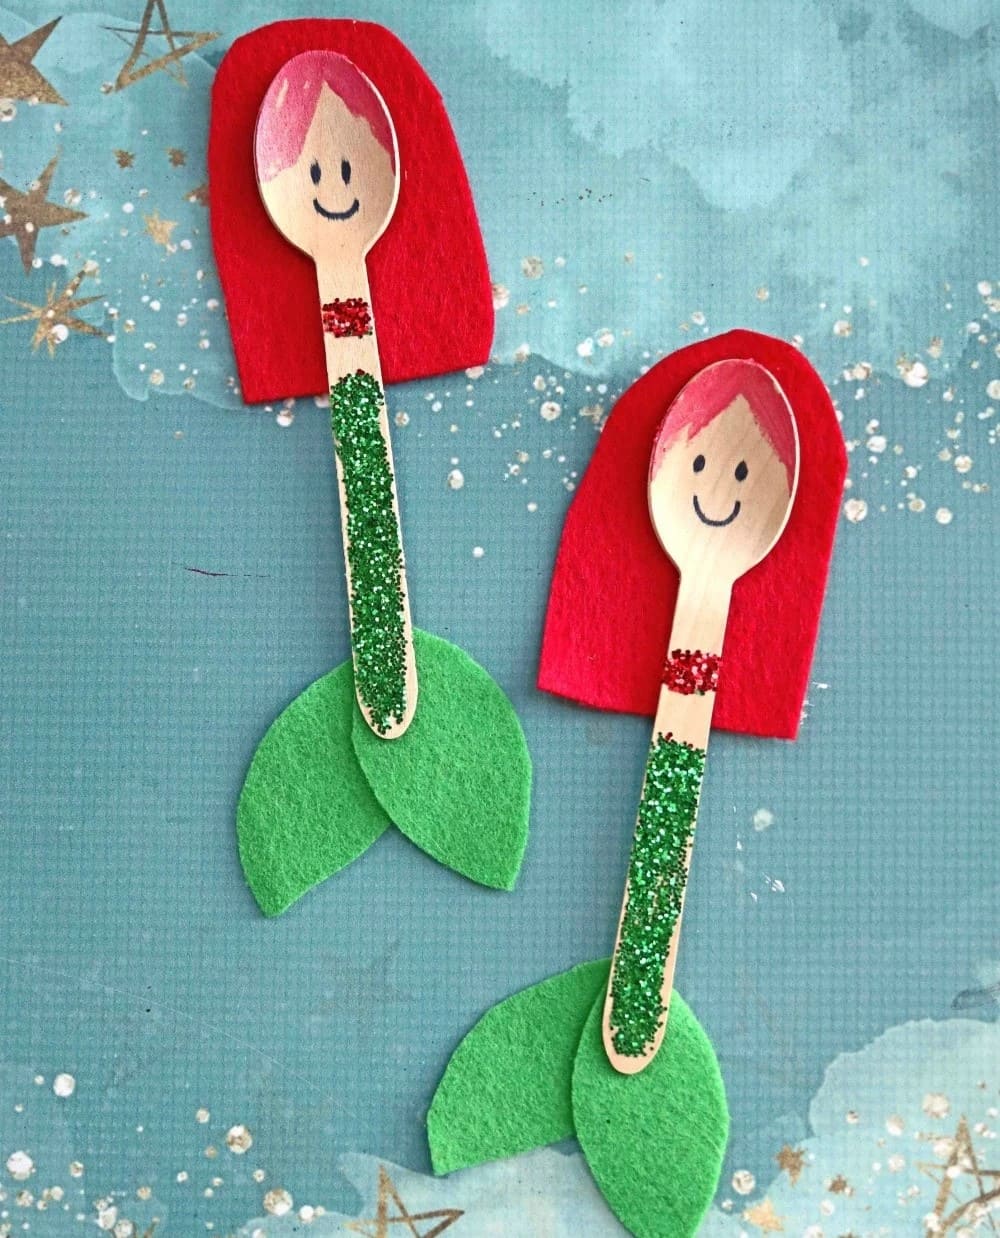
Wow, these enchanting mermaid puppets are a splash of creativity and sparkle, perfect for ocean-themed crafts or magical storytelling.
Made with simple wooden spoons, felt, glitter, and markers, they’re easy enough for kids to make and charming enough to display.
Whether you’re planning a mermaid party, a summer playdate, or just looking for a rainy-day craft, these tiny sirens of the sea will inspire imaginative adventures under the waves.
Materials Needed
- Wooden craft spoons
- Red and green felt sheets
- Green and red glitter
- Glue (tacky glue or hot glue for quicker setting)
- Scissors
- Black marker for face details
- Pink crayon or marker for hair
Step-by-step Guide
Step 1: Draw a happy face on the rounded part of each spoon and add pink hair with a marker or crayon.
Step 2: Cut out small rectangles of red felt for tops and leaf-like tail fins from green felt.
Step 3: Apply glue down the handle of the spoon and sprinkle with green glitter to create the shimmering tail.
Step 4: Glue on the red felt top just below the spoon face, and attach the tail fins to the bottom of the handle.
Step 5: Let everything dry, and then let your mermaids swim into an afternoon of pretend play or story time fun.
#14. Minimalist Wooden Spoon Wreath
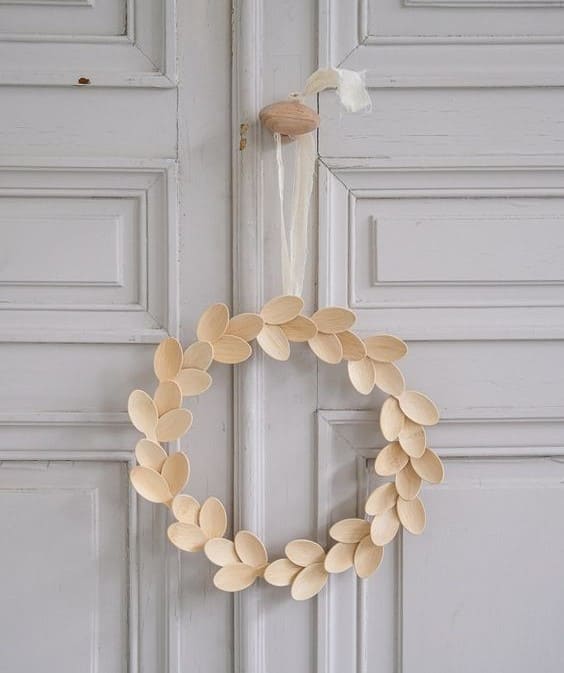
This strikingly elegant wreath transforms humble wooden spoon heads into a sculptural wall accent.
With its clean, symmetrical design and natural wood finish, it’s a beautiful nod to Scandinavian simplicity.
Whether hung on a door or displayed indoors, it brings organic texture and serene balance to any space.
Materials Needed
- 20-25 wooden spoons (flat or round heads)
- Wire wreath frame or thick cardboard cut into a ring
- Hot glue gun and glue sticks
- Ribbon or twine
- Scissors or a small saw
- Optional: clear varnish or wood sealant
Step-by-step Guide
Step 1: Using scissors or a small saw, carefully remove the handles from the wooden spoons, leaving only the oval heads.
Step 2: Arrange the spoon heads overlapping slightly in a circular layout to visualize the wreath design before gluing.
Step 3: Attach each spoon head to the wreath form with hot glue, maintaining consistent spacing and angle for a uniform look.
Step 4: Once dry, attach a length of ribbon or twine to the top of the wreath for hanging.
Step 5: For a more finished piece, you can lightly coat the spoons with a clear wood sealant or matte varnish.
#15. Decoupage Wooden Spoon Bouquet
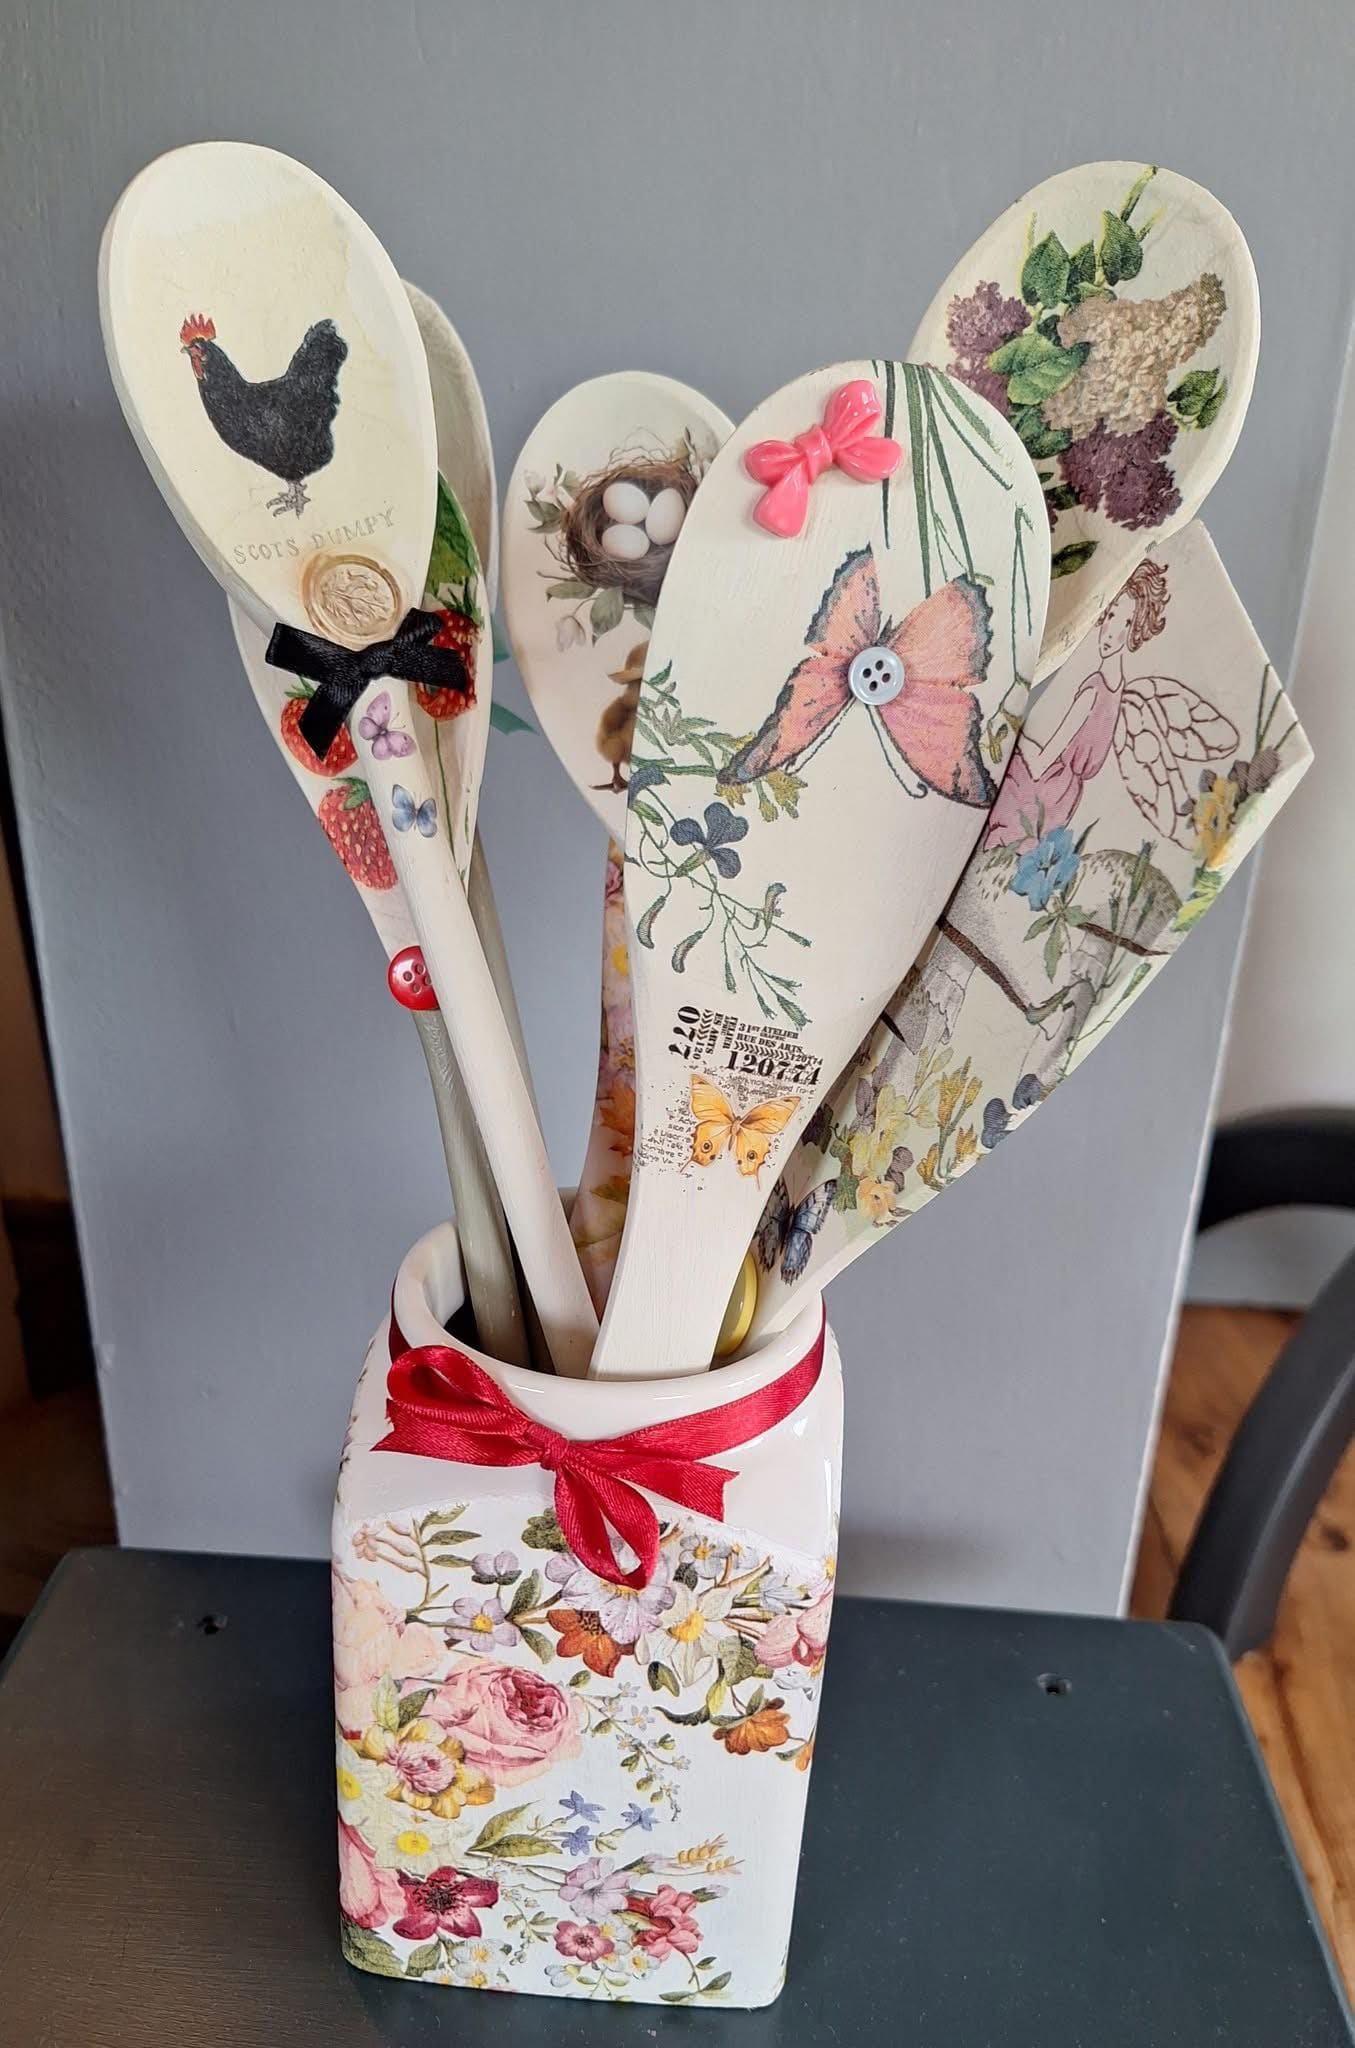
This delightful wooden spoon bouquet turns everyday utensils into charming art pieces with a vintage cottagecore vibe.
Each spoon is adorned with delicate decoupage motifs like birds, butterflies, fairies, florals, and even whimsical chickens.
Embellished with buttons, bows, and gloss, they’re displayed together in a coordinating floral ceramic container, creating a cheerful kitchen accent or a heartfelt handmade gift.
Materials Needed
- 6-8 unfinished wooden spoons
- Printed paper napkins, tissue, or decoupage paper
- Decoupage glue (like Mod Podge) and soft brush
- Acrylic paint (optional base coat)
- Small embellishments: buttons, bows, charms
- Glossy sealer (spray or brush-on)
- Ceramic container or painted jar
- Ribbon for bow (optional)
Step-by-step Guide
Step 1: Lightly sand each spoon if needed, then paint with a white or cream base coat to help the decoupage designs stand out.
Step 2: Cut out your images from napkins or paper. Then use only the top printed layer if using napkins.
Step 3: Apply a thin layer of decoupage glue to the spoon head.
Next, gently place your cutout, then smooth with fingers or plastic wrap to avoid wrinkles.
Step 4: Once dry, seal with another layer of glue or clear gloss sealer. Tjendd buttons, bows, or stickers for extra flair.
Step 5: Repeat with each spoon. Arrange the finished pieces in a decorative floral container.
Finally, tie a ribbon around the jar’s neck for a lovely finishing touch.
#16. Patriotic Bald Eagle Spoon Craft
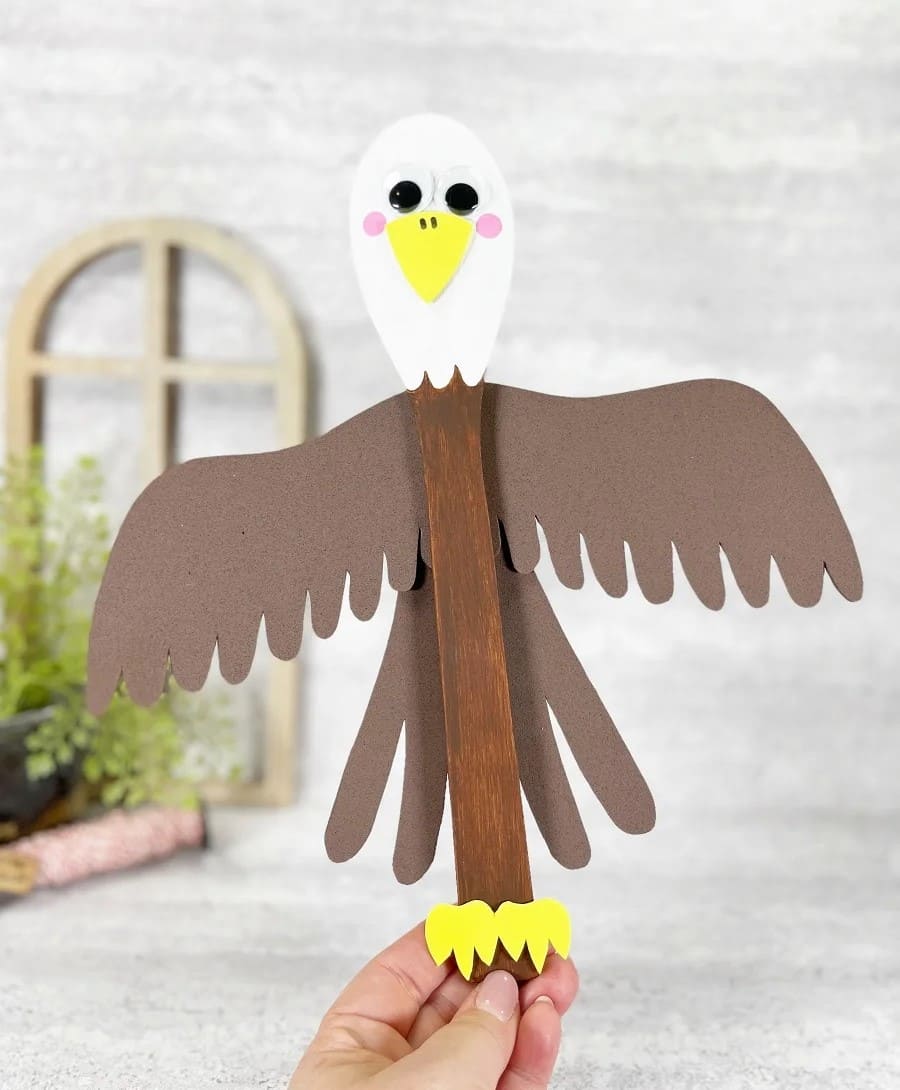
This bold and proud bald eagle craft is a fun, symbolic way to celebrate American spirit and wildlife appreciation.
With wide-spread wings and an expressive face, it’s ideal for Independence Day, classroom units on national symbols, or simply celebrating creativity.
This is a true fantastic mix of art and education in one simple project.
Materials Needed
- Wooden spoon
- Brown paint or marker
- White paint or acrylic pen
- Yellow and pink construction paper
- Brown craft foam or cardstock
- Googly eyes
- Glue, scissors, pencil
Step-by-step Guide
Step 1: Paint the spoon handle brown for the eagle’s body and the top white for the head.
Step 2: Cut out two large brown foam wings and two smaller feathered tail pieces; glue them to the back of the spoon.
Step 3: Add googly eyes and a yellow paper beak, then cut out tiny pink circles for the cheeks.
Step 4: Cut out yellow talons and glue them at the bottom of the spoon handle.
Step 5: Let dry completely before displaying as part of your patriotic or wildlife-themed décor.
#17. Wooden Spoon Fairy Dolls With Glittering Wings
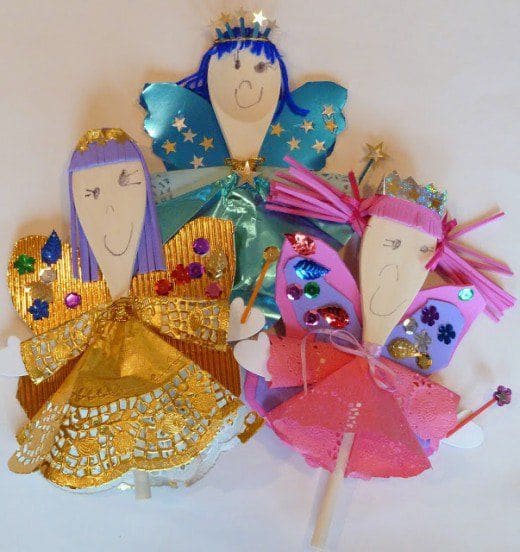
Full of sparkle and imagination, these wooden spoon fairy dolls are a magical project perfect for children or whimsical décor lovers.
With shiny wings, beaded crowns, and handmade paper dresses, each fairy bursts with color and charm.
Their sweet hand-drawn faces and playful embellishments make them perfect for classroom art, party favors, or enchanting shelf sitters.
Materials Needed
- Wooden spoons (plain or painted)
- Colorful foil, cardstock, or craft paper for wings and dresses
- Glitter, sequins, stickers, and rhinestones
- Yarn or raffia for hair
- Craft glue or hot glue gun
- Scissors
- Markers or pens
- Pipe cleaners or small dowels (optional fairy wand)
Step-by-step Guide
Step 1: Draw or paint faces on the back of each wooden spoon. Then add rosy cheeks, big smiles, and sparkling eyes for extra character.
Step 2: Cut and fold decorative paper into skirt shapes. Glue the paper skirts around the spoon base like dresses.
Step 3: Cut wing shapes from metallic paper or cardstock. You can decorate wings with sequins, foil stars, or gems. Glue to the spoon’s back.
Step 4: Attach yarn or raffia hair to the spoon tops. Tie or glue a tiny crown or halo above the hair using ribbon, pipe cleaners, or stickers.
Step 5: Finish by adding a mini wand or flower in their hands using pipe cleaners or paper cutouts. Let dry before displaying or gifting.
#18. Cheerful Santa Spoon Ornaments
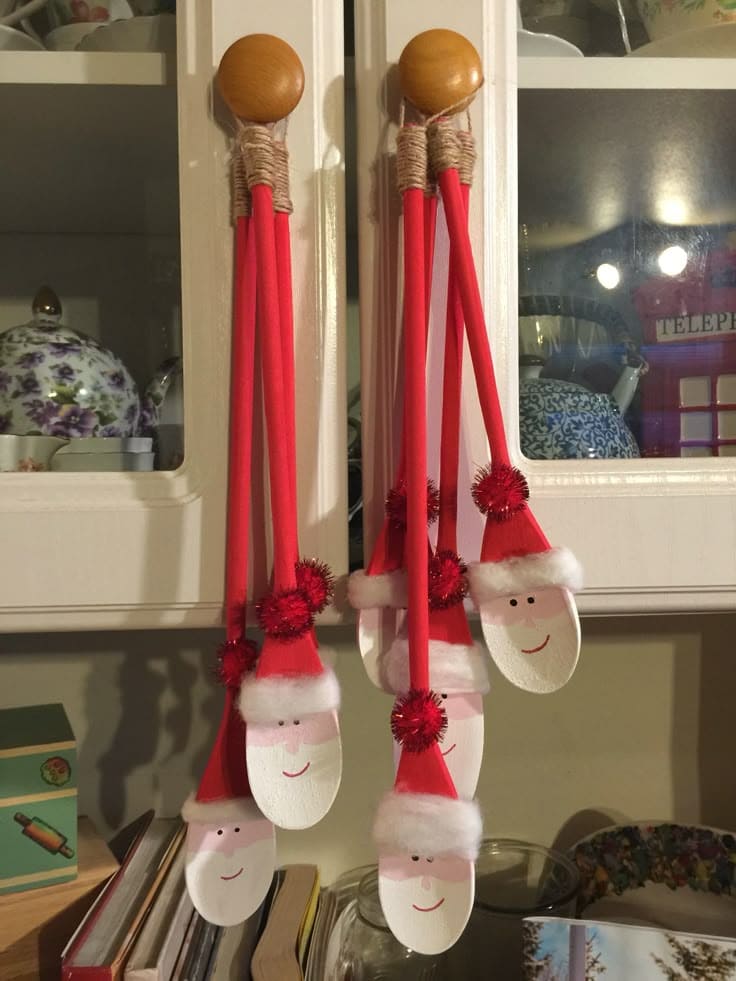
Spread holiday joy with these simple yet whimsical Santa spoon ornaments, perfect for hanging on cabinet knobs, walls, or trees.
With rosy cheeks, jolly smiles, and iconic red hats trimmed in fuzzy white, each spoon captures the spirit of St. Nick in a heartwarming, handmade way.
Whether you make a set for your own kitchen or give them as festive favors, these Santas are a merry and memorable addition to your Christmas crafting.
Materials Needed
- Wooden spoons (light-colored or pre-painted white)
- Acrylic paint (pink, red, black)
- Mini Santa hats or red felt and white faux fur
- Small red pom-poms
- Hot glue gun and glue sticks
- Optional: twine or ribbon
Step-by-step Guide
Step 1: Paint a light pink horizontal band near the bowl of each spoon for Santa’s face, and leave the lower portion white for the beard.
Next, add tiny black eyes and a smiling red mouth.
Step 2: Create a Santa hat using red felt and faux fur trim, or use pre-made mini hats. Then attach to the top of each spoon with hot glue.
Step 3: Glue a red pom-pom to the top of the hat or around the neck area for extra flair.
Step 4: Tie ribbon or twine around the handle for hanging, or simply rest them on knobs, hooks, or wreaths for display.
Step 5: Group them in bunches for playful visual impact, or gift individually as cheerful stocking stuffers or party favors.
#19. Whimsical Rolling Pin and Wooden Spoon Wind Chime
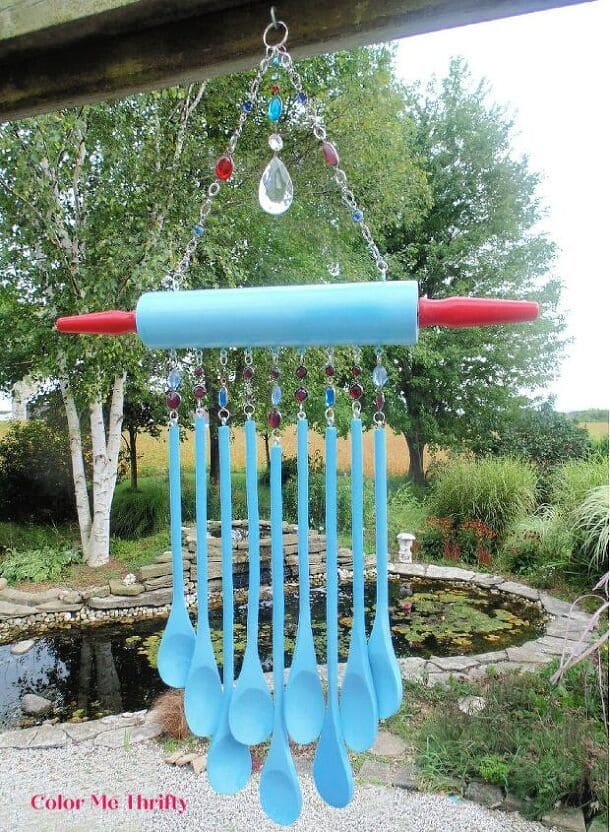
Charming and full of character, this upcycled wind chime uses a painted rolling pin as its anchor, with colorful wooden spoons and sparkling beads dancing beneath it.
Ideal for porches, gardens, or kitchen windows, this whimsical piece transforms everyday utensils into a breezy visual delight.
The rhythmic clinking of spoons adds a gentle, cheerful sound to your outdoor haven.
Materials Needed
- 1 old or wooden rolling pin
- 8–10 wooden or plastic spoons (lightweight preferred)
- Spray paint or acrylic paint (for spoons and rolling pin)
- Strong fishing line or jewelry wire
- Beads, crystals, or charms (optional)
- Small screw eyes or hooks
- Drill and hanging hook
Step-by-step Guide
Step 1: Paint the rolling pin and spoons in your preferred colors. Let them dry completely.
Step 2: Drill small holes into the rolling pin (bottom for spoon strings, top for hanging wires).
Step 3: Thread the spoons onto fishing line or wire, adding beads and charms if desired. Tie securely.
Step 4: Attach the spoon strings to the drilled holes along the bottom of the rolling pin.
Step 5: Secure three or four chains or bead strands to the top for hanging. Finish with a hook or ring.
Step 6: Hang in a breezy area and enjoy the cheerful tinkle of spoons on summer days.
#20. Mini Hot Cocoa Wooden Spoon Ornaments
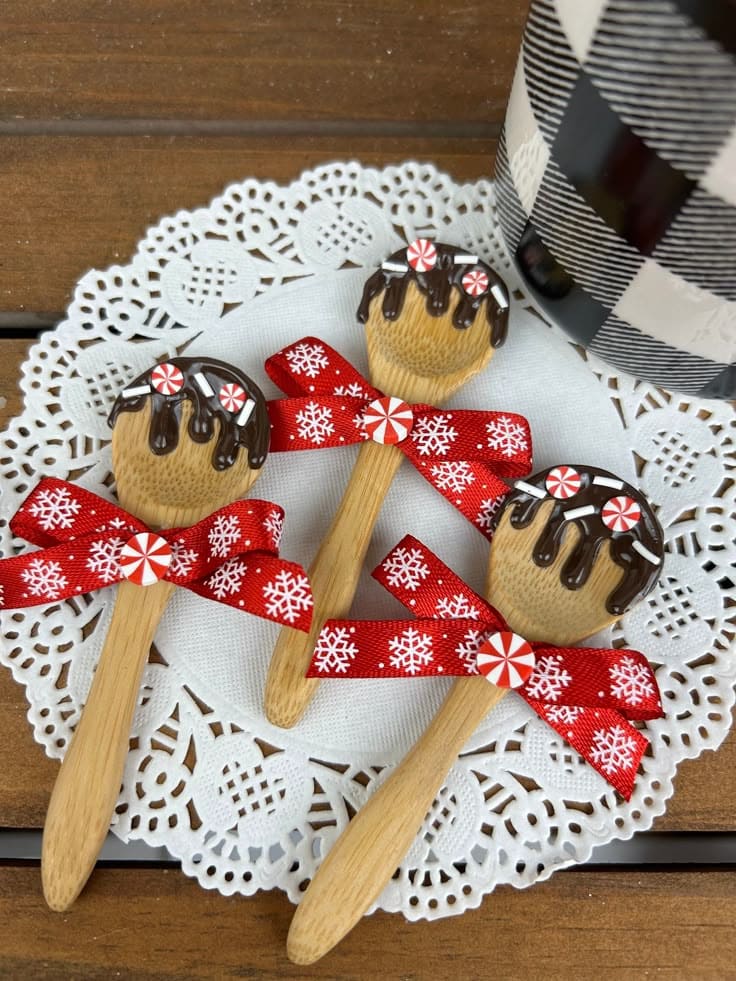
Whimsical and irresistible, these mini wooden spoon ornaments are a festive treat for the eyes.
Topped with faux chocolate drips and peppermint clay accents, each spoon captures the essence of a cozy winter cup of cocoa.
Plus, a bright red snowflake ribbon completes the look, turning simple materials into sweet Christmas keepsakes or holiday party favors.
Materials Needed
- Mini wooden spoons
- Brown puff paint or 3D fabric paint (chocolate effect)
- Miniature peppermint embellishments or clay slices
- Red holiday ribbon with snowflake print
- Small round candy embellishments or buttons
- Hot glue gun
- Optional: twine or hook
Step-by-step Guide
Step 1: Lay the spoons on a flat surface. Then use brown puff paint to mimic dripping chocolate over the spoon head.
Step 2: Once dry, hot glue mini peppermint slices and faux candy toppers into the chocolate section.
Step 3: Create a bow from the red snowflake ribbon and attach it just below the spoon head using hot glue.
Step 4: Add a central embellishment (like a peppermint button) to the bow for extra charm.
Step 5: If desired, hot glue a twine loop or ornament hook to the back for hanging.
