Don’t toss out those old salt shakers just yet as they’re bursting with creative potential.
With a little imagination, you can turn these tiny glass containers into charming home accents, seasonal décor, or even whimsical art pieces.
You’ll love how simple and satisfying these projects are, proving that even the smallest things can add a big touch of personality to your space.
#1. Adorable Snowmen Made from Salt Shakers
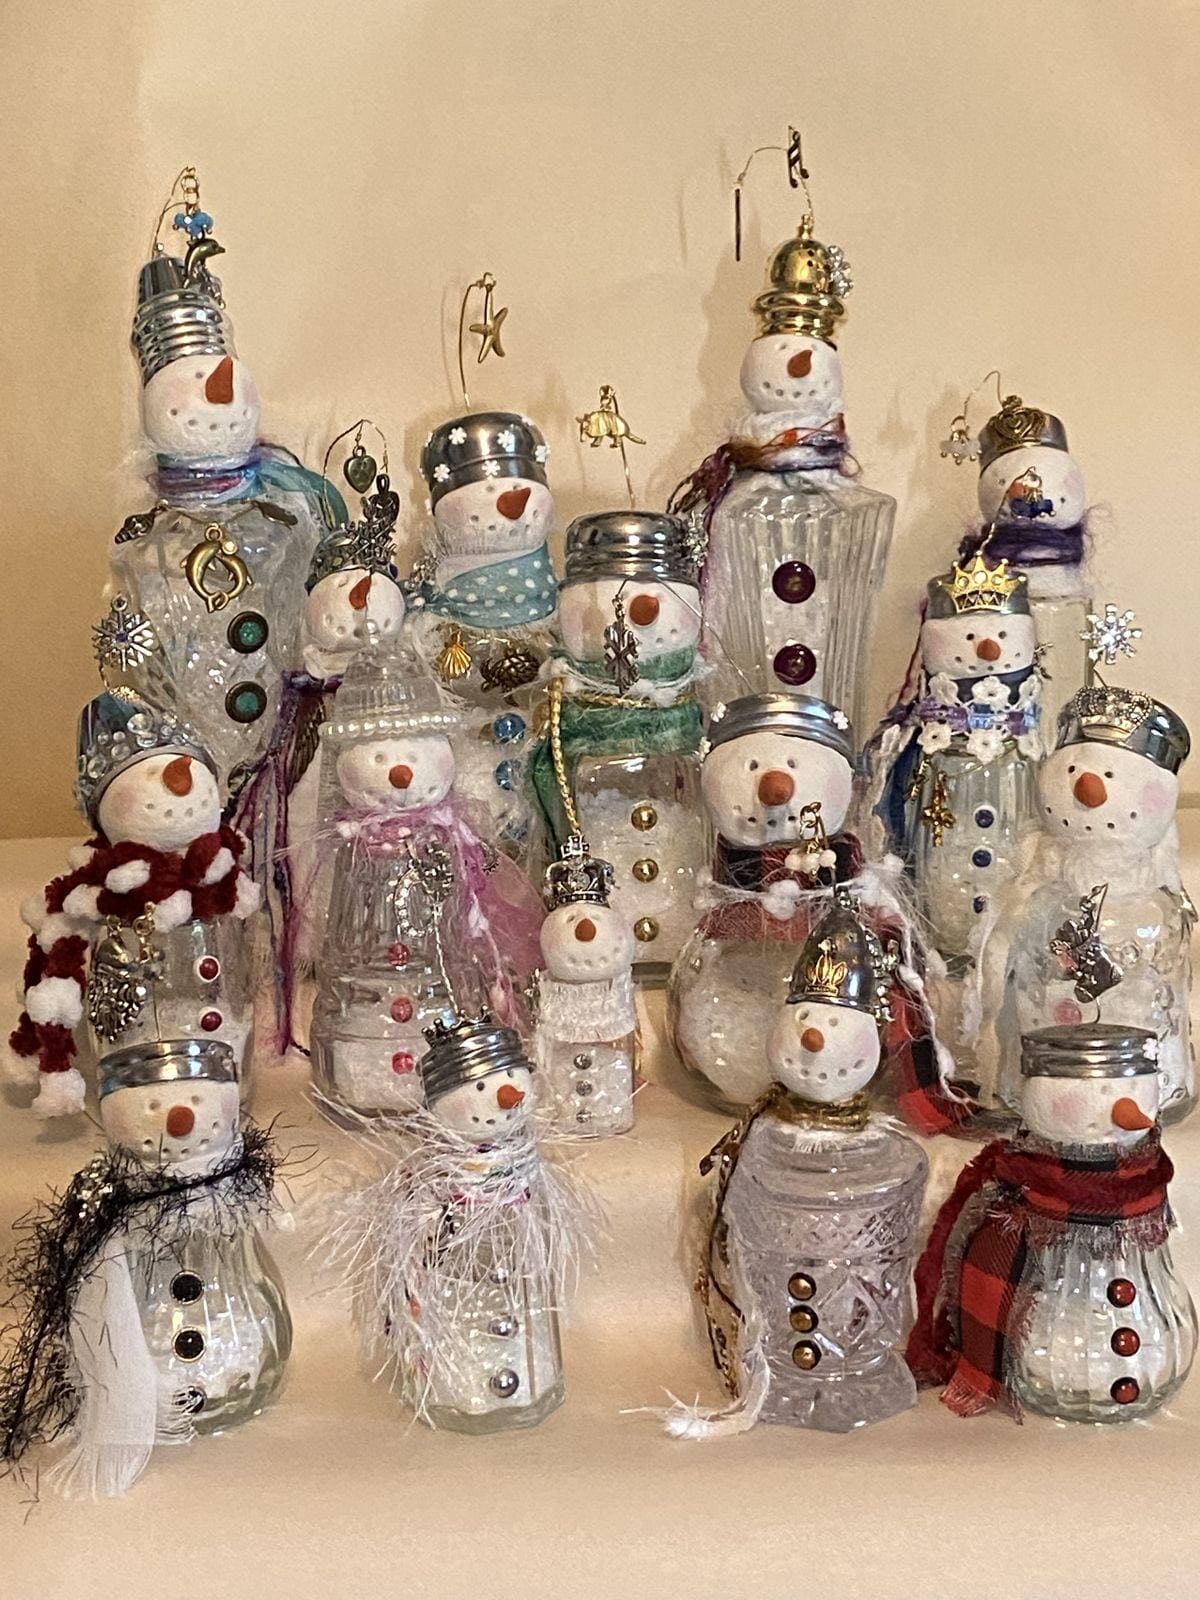
A handful of old salt shakers can easily become a cheerful family of snowmen, each one with its own personality.
This project brings warmth and nostalgia to your winter decorating, perfect for gifting or lining up on a mantel.
You’ll love how the glass sparkles under the lights, and how each scarf, button, and charm makes your snowmen feel delightfully unique.

- 6-8 empty glass salt shakers ((3-4 inches tall))
- Small foam or wooden balls ((1.5-2 inches for heads))
- White acrylic paint or spray paint
- Tiny fabric scraps or ribbon ((10-12 inches each) for scarves)
- Mini buttons, beads, or rhinestones ( for decoration)
- Orange clay or paint (for carrot noses)
- Hot glue gun and glue sticks
- Black marker or paint (for eyes and smiles)
- Optional: glitter, charms, or small hats ( for detail)
-
Wash and dry the salt shakers thoroughly. You can fill the inside with fake snow, small beads, or white glitter to give your snowmen a magical sparkle.
-
Paint the foam or wooden balls white and let them dry. Once dry, draw eyes and a smile using a fine marker or tiny brush. Then shape a small piece of orange clay into a nose, glue it on, and let it set.
-
Glue each head on top of a salt shaker, holding it for a few seconds until secure. If your lid is removable, you can glue the ball directly onto the metal cap.
-
Wrap a strip of fabric or ribbon around the neck as a scarf, tying it snugly or adding a drop of glue to hold it in place. Choose colors that fit your winter theme, plaid, silver, or soft pastels all work beautifully.
-
Decorate the body by gluing on buttons, beads, or rhinestones for the snowman’s outfit. Then add a light sprinkle of glitter for that frosty finish.
-
For a personal touch, top each snowman with something special such as a crown charm, a jingle bell hat, or a cozy bit of yarn. Every one of them will turn out a little different, and that’s what makes them so charming.
#2. Button Flower Bouquet in a Salt Shaker
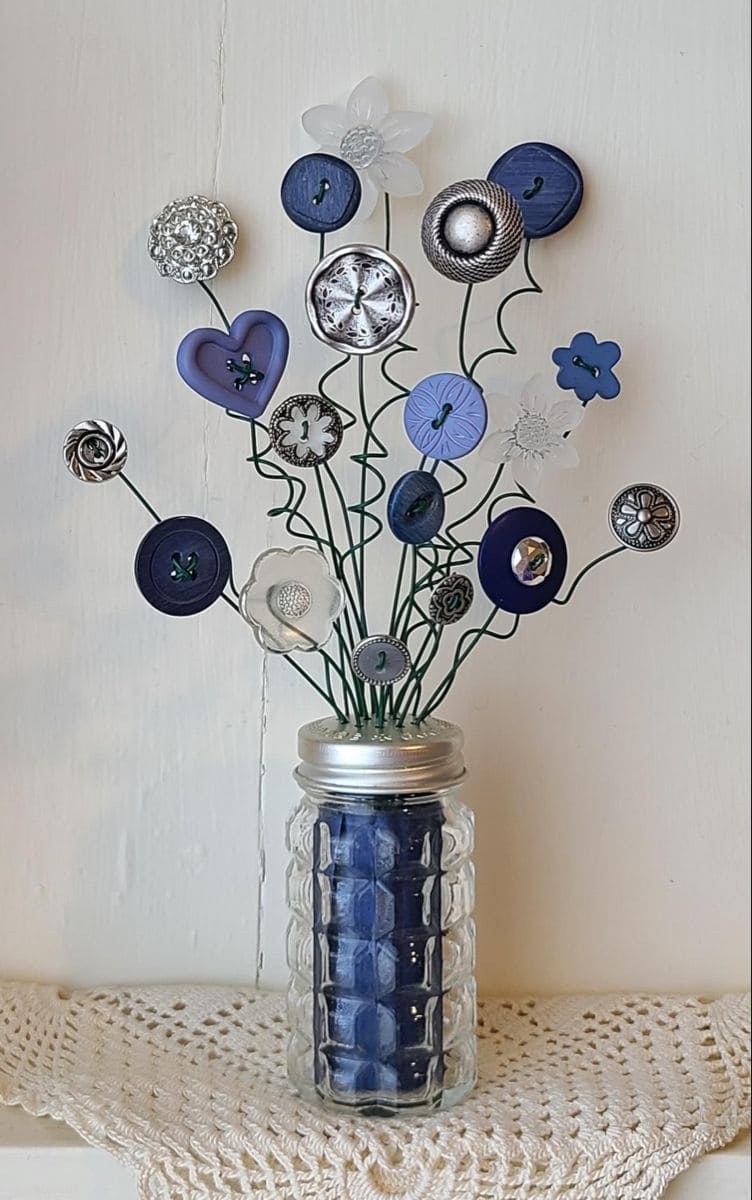
Who knew that a handful of buttons could bloom so beautifully?
This upcycled salt shaker project brings together color, creativity, and nostalgia in one charming display.
Each flower is made by layering buttons of different sizes and threading them onto wire, turning your forgotten sewing stash into a permanent bouquet that never fades.

- 1 clear glass salt shaker ((4 inches tall))
- 15-20 assorted buttons ((sizes 0.5-1.5 inches))
- 10-15 pieces of floral wire ((12-14 inches long))
- 1 pair of wire cutters and round-nose pliers
- Small piece of foam or floral clay ((to secure stems inside shaker))
- Optional: ribbon, lace, or fabric scraps ( for decoration)
-
Sort through your button collection, picking a mix of sizes and colors that go well together. Layering 2-3 buttons per flower gives a fuller, more textured look.
-
Cut several lengths of floral wire, each about 12 inches long. Thread one wire through the holes of your button stack and twist it tightly underneath to secure the petal. Then adjust the wire so the button faces upward like a flower head.
-
Continue creating more flowers in different shapes and colors. Try combining clear buttons for delicate petals or metallic ones for a touch of sparkle.
-
Once all your button flowers are made, press a small piece of foam or floral clay into the salt shaker to hold the stems firmly. Next, insert the wire flowers one by one, bending and shaping them until they fan out naturally.
-
Wrap a piece of ribbon or lace around the shaker’s neck for a soft, finished look. You can even paint the lid or add a bow for extra charm.
You can try using buttons from old clothing or heirlooms, each flower will carry its own little story, turning your bouquet into a keepsake filled with memories.
#3. Mini Winter Wonderland in a Salt Shaker
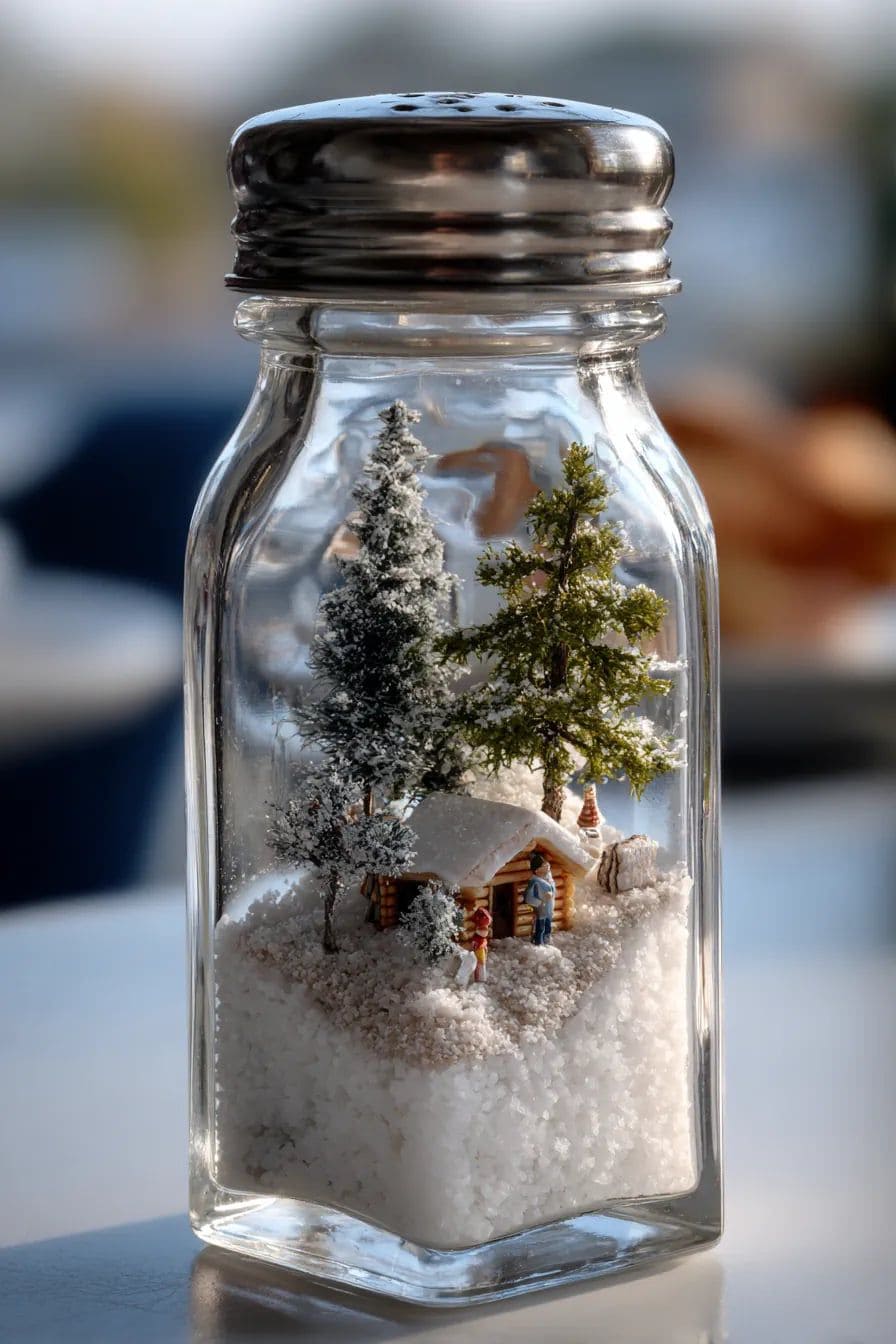
Wow, this magical little craft captures the coziness of winter inside a palm-sized shaker.
Imagine a snowy cabin surrounded by pine trees, all shimmering under soft light, it’s like holding a snow globe without the shake.
Perfect as a Christmas decoration or thoughtful handmade gift, this project combines creativity with nostalgia.

- 1 clear glass salt shaker ((about 4 inches tall))
- Coarse sea salt or white glitter ((2-3 tablespoons))
- Miniature trees, figurines, and a small house ((scale 1:87 or smaller))
- Tweezers and craft glue
- Optional: Optional:
-
Remove the lid and fill the bottom of the shaker with coarse salt or white glitter. This creates a soft, snowy ground that looks magical through the glass.
-
Using tweezers, carefully position your mini house, trees, and any small figures. Start with the largest piece (like the cabin) and work outward.
-
Add a dab of glue at the base of each item to keep them secure. Then allow the glue to dry before adding more salt if needed to bury the bases slightly for a natural snowy effect.
-
Replace the lid gently once everything is set. If you’re adding a light, tuck the tiny LED under the lid or around the base for a warm glow.
-
Display your winter wonderland on a mantel or use it as a charming handmade gift. You can even tie a ribbon around the top for a festive touch.
#4. Rustic Salt Shaker Flower Arrangement
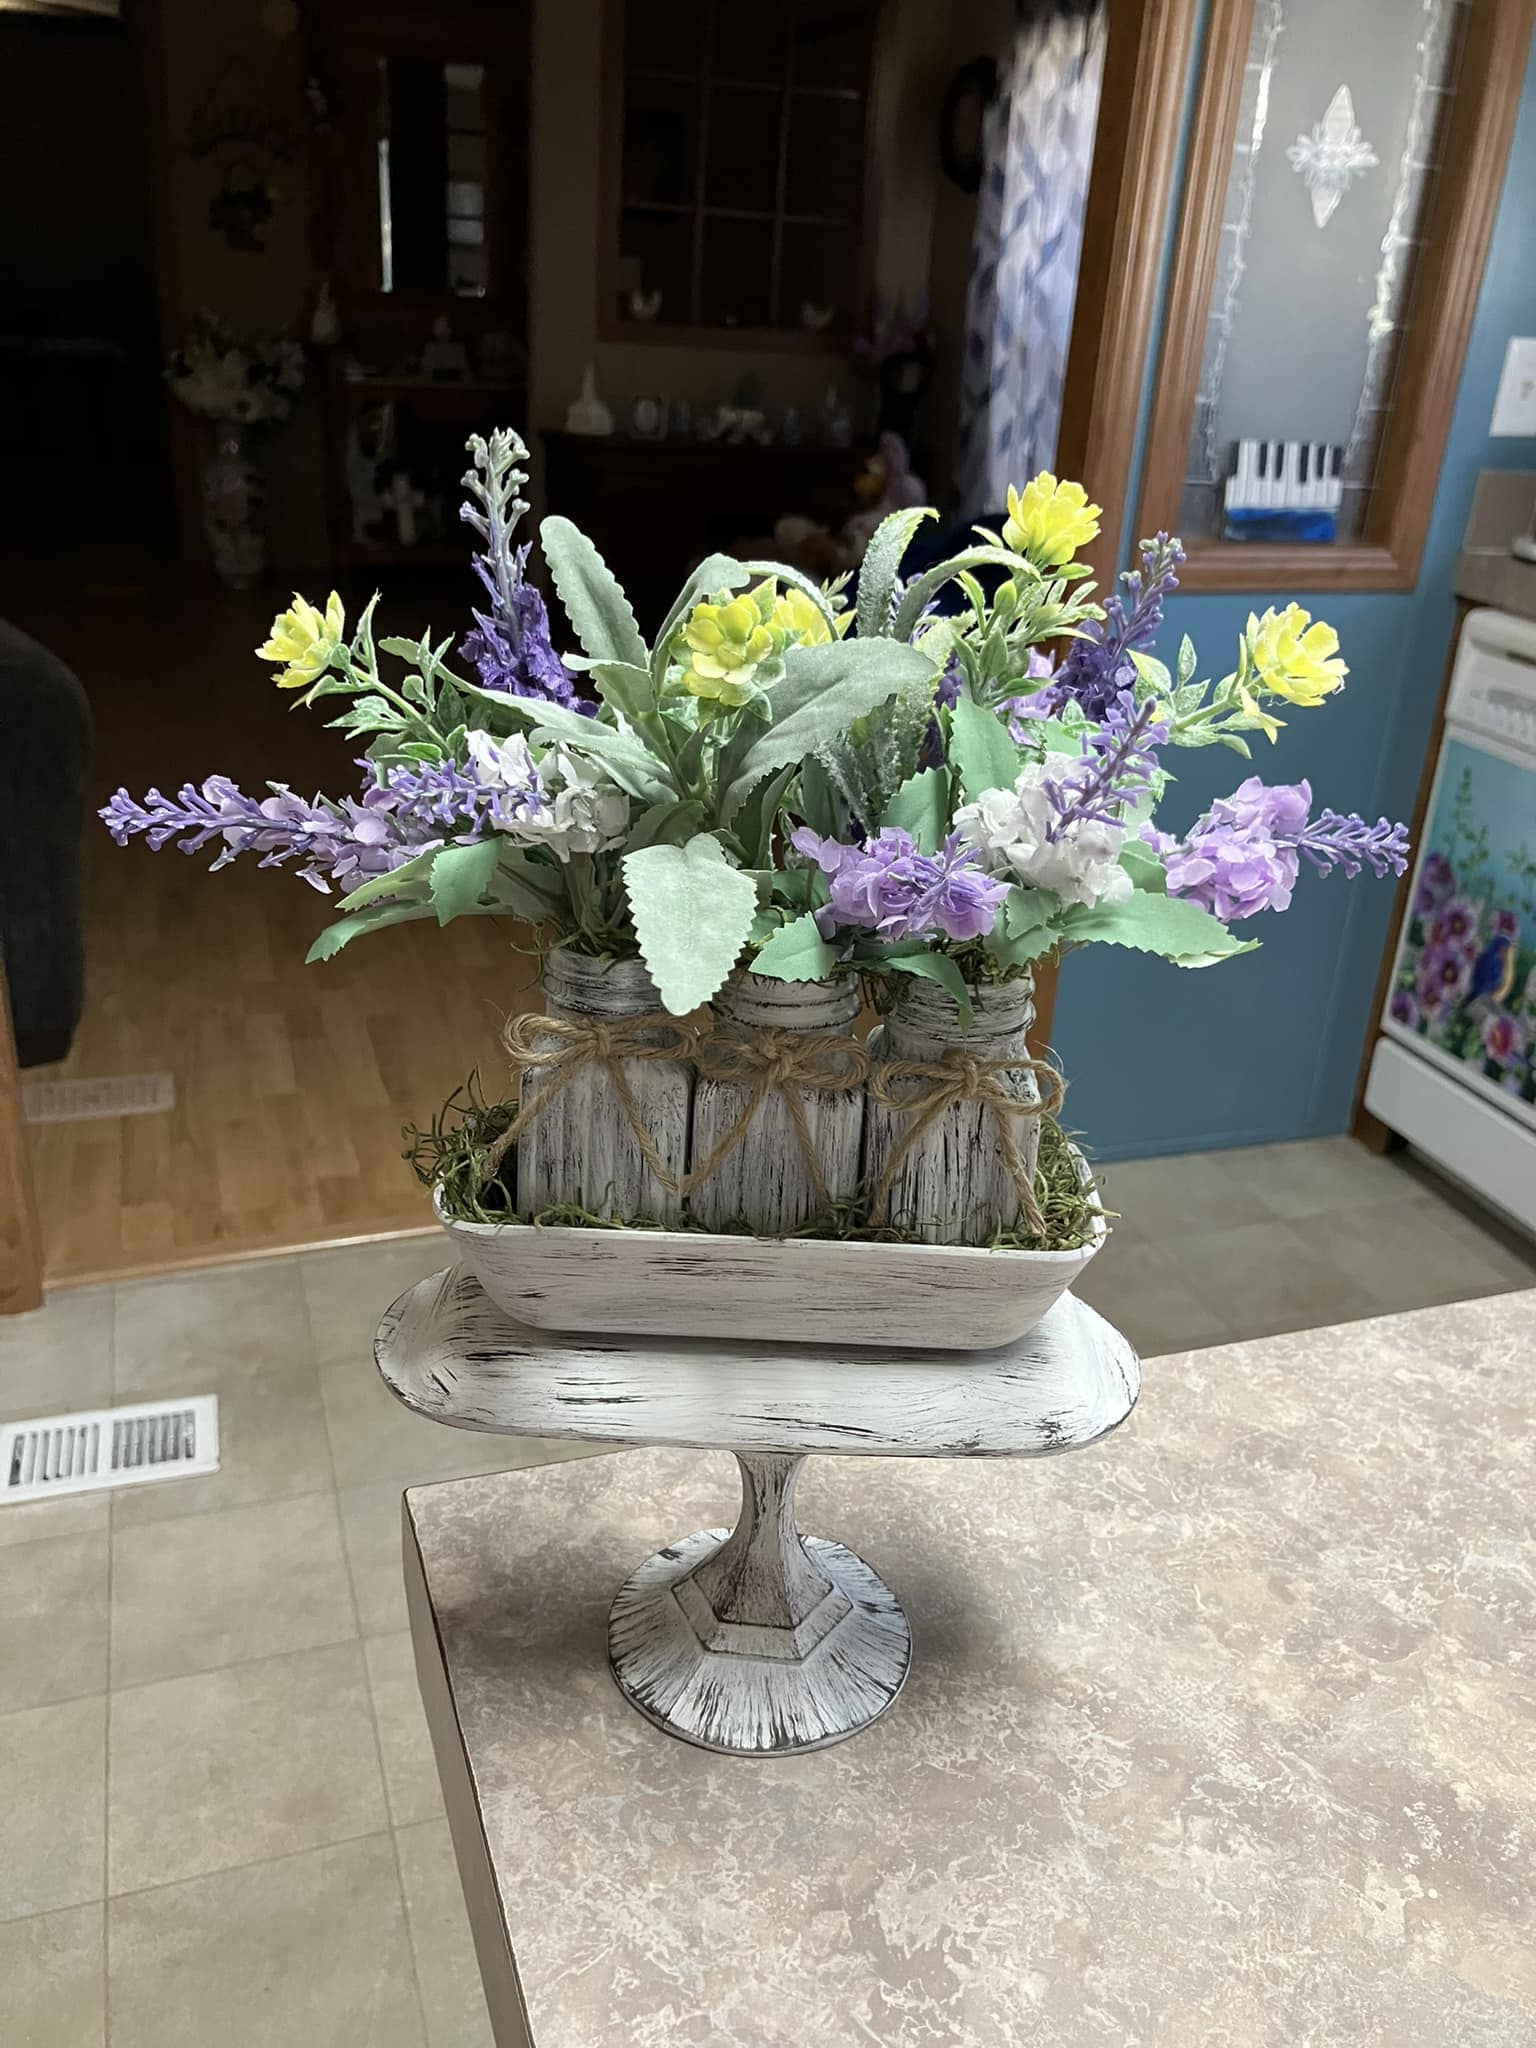
Why not give old salt shakers a new purpose with this farmhouse-inspired floral centerpiece?
When grouped together and tied with twine, they form a charming rustic display that brightens any kitchen table or entryway.
It’s a simple yet stunning way to bring nature indoors without spending much.

- 4-6 glass salt shakers ((about 3-4 inches tall))
- Small artificial flowers ((lavender, yellow blooms, greenery))
- Decorative tray or small wooden bowl ((8-10 inches wide))
- Jute twine ((2-3 feet))
- Spanish moss or faux grass ((1 handful))
- Hot glue gun and glue sticks
-
Clean the salt shakers and remove their lids. If the holes are large, keep them open for the stems; if not, remove the tops completely.
-
Arrange your flowers by cutting stems to fit each shaker. Mix heights and textures such aas tall lavender, leafy greens, and smaller filler blooms create a fuller look.
-
Fill each shaker with your chosen flowers, then tie a piece of jute twine around their necks for a cozy farmhouse touch. You can knot them individually or tie all together for one bundle.
-
Place a layer of moss or faux grass in your tray or wooden bowl, then set the shakers snugly inside. Adjust the flowers until they fan out naturally.
-
For extra charm, lightly distress the tray or base with white paint for a weathered look.
#5. Vintage Salt Shaker Angels
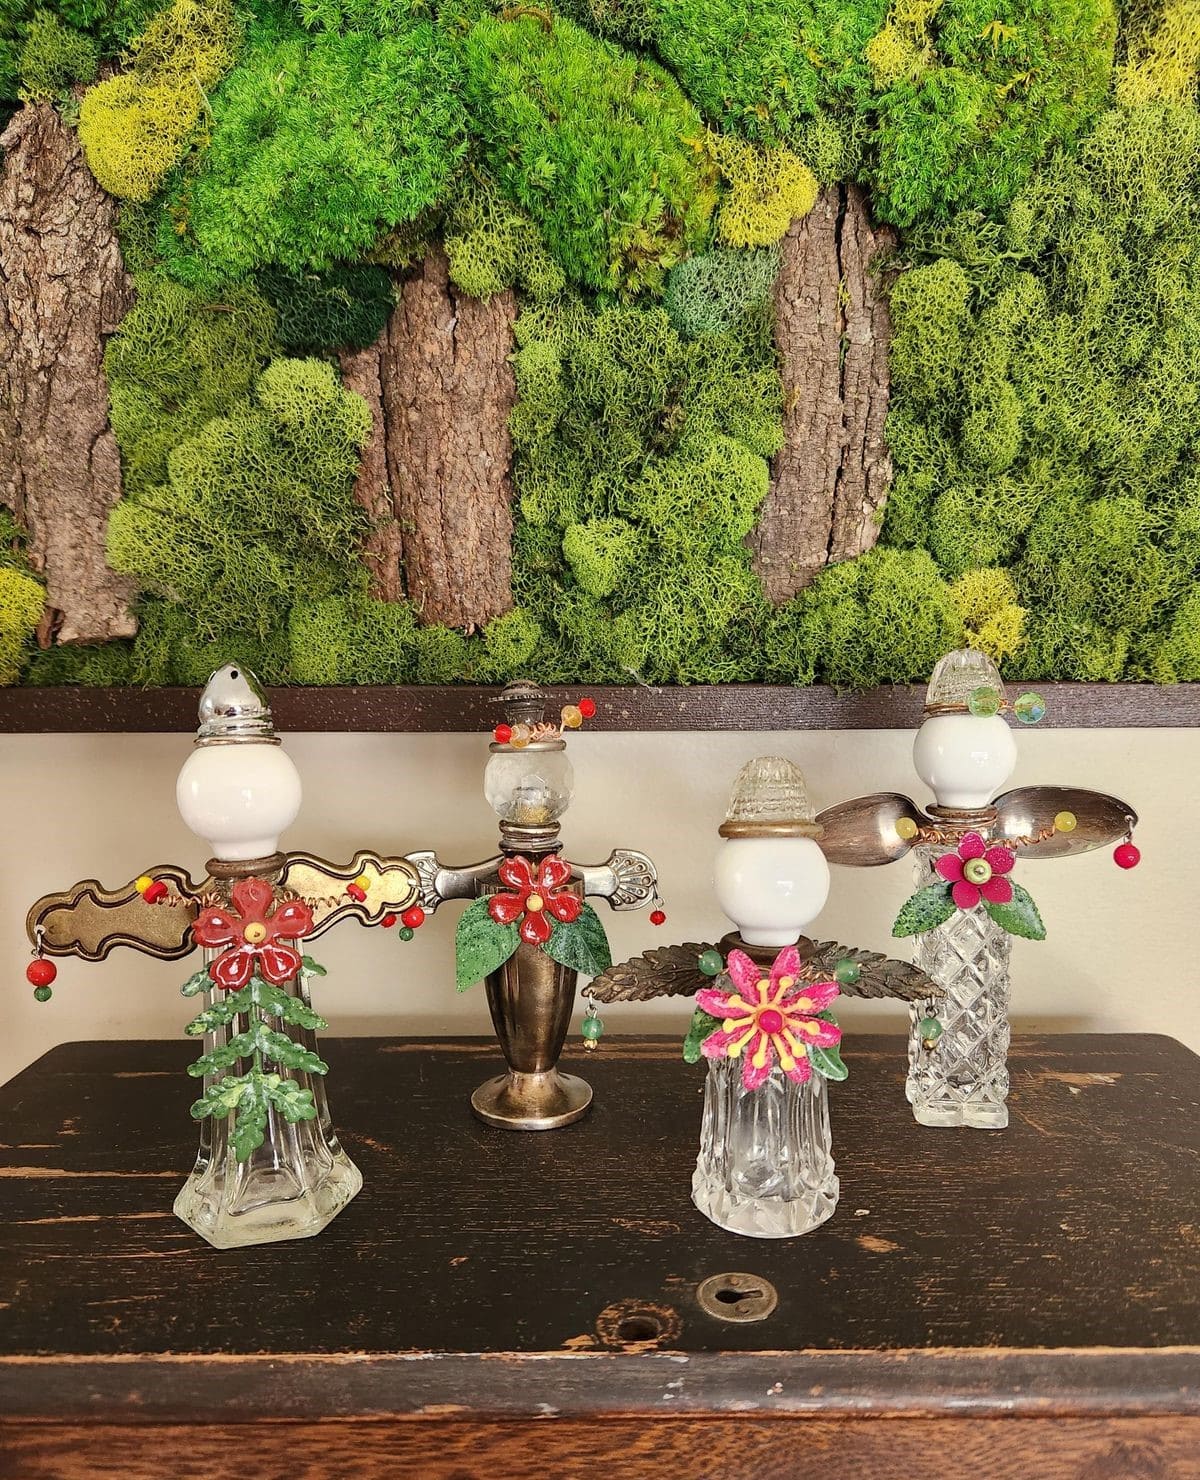
These delicate salt shaker angels bring old-world charm to your holiday décor.
Each angel combines sparkling glass, silver spoons, and colorful embellishments to create a figure that looks both whimsical and elegant.
They’re perfect for Christmas mantels, gift toppers, or year-round keepsakes that remind you of handmade love and creativity.

- 3 vintage glass salt shakers ((3-4 inches tall))
- 3 round white knobs or ceramic balls (for heads (1 inch diameter))
- 3 old silver spoons or knife handles ((for wings))
- Small artificial flowers, beads, and ribbons ((various colors))
- Hot glue gun and glue sticks
- Metallic paint or glitter ((optional for accents))
-
Clean your salt shakers thoroughly and let them dry. These will form the angel bodies, so choose ones with unique cuts or patterns for extra sparkle.
-
Glue a white knob or small ceramic ball on top of each shaker to create the head. Then hold it steady until the glue sets.
-
Attach spoon handles or old silverware pieces to the back of each shaker to form wings. You position them symmetrically and secure firmly with glue.
-
Decorate the front with a small artificial flower or bead cluster as the angel’s heart. Next, add tiny touches like ribbon bows or dangling beads to bring them to life.
-
Optionally, brush a little metallic paint or glitter along the wings and shaker edges for a glowing effect.
#6. Handy Sewing Kit from a Salt Shaker
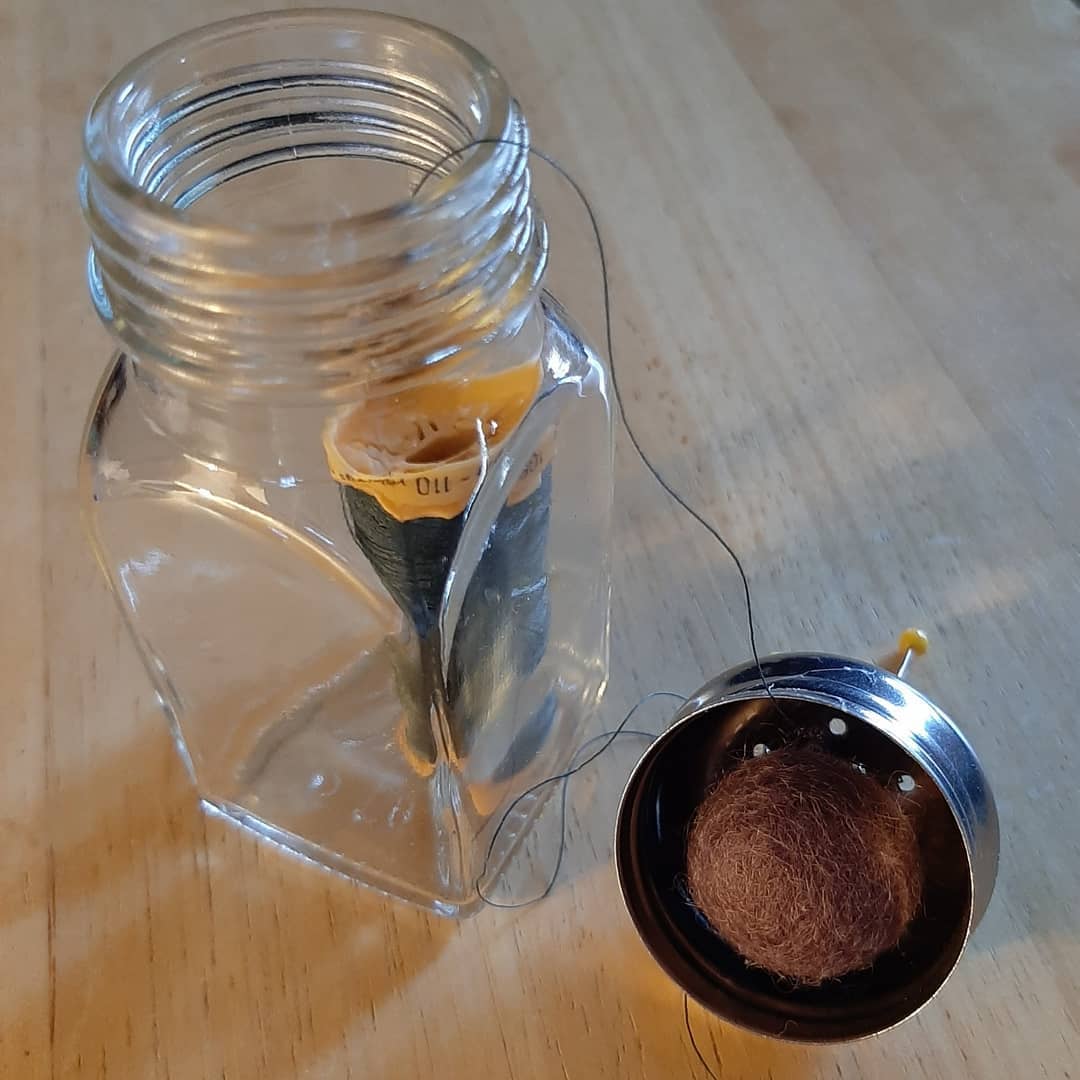
Instead of losing needles, thread, or pins in drawers, you can turn one into a charming mini sewing kit.
It’s not just practical, it feels like a nod to the creativity of generations before us.
Compact, clever, and adorable, this upcycled piece makes mending small tears feel a little more joyful. You’ll find yourself smiling each time you reach for it.

- 1 empty glass salt shaker ((around 3-4 inches tall))
- 1 small felt ball or scrap of foam ((1 inch diameter))
- 2-3 spools of thread ((small size))
- A few sewing needles and straight pins
- Small scissors or a needle threader ((optional))
- Hot glue or strong craft adhesive
-
Start by cleaning the salt shaker thoroughly and letting it dry completely. This ensures no dust or moisture gets inside your sewing supplies.
-
Take your small felt ball (or foam piece) and glue it securely onto the inside of the shaker’s metal lid. This will serve as your soft pincushion for holding needles and pins. Let the glue dry for at least 15 minutes.
-
Wind two or three colors of thread into small spools or around bits of cardboard. Slide them carefully into the shaker along with a few spare needles and safety pins.
-
Once the glue on the lid is set, push a few pins or needles into the felt. It should hold firmly without wobbling.
-
Close the lid gently and keep it in your craft basket or travel bag. The transparent glass makes it easy to see what’s inside, and the soft top means your tools are always within reach.
If you travel often, make one for your suitcase, it’s perfect for quick clothing fixes on the go and adds a handmade charm to your packing essentials.
#7. Elegant Pink Bottle Brush Tree in a Salt Shaker
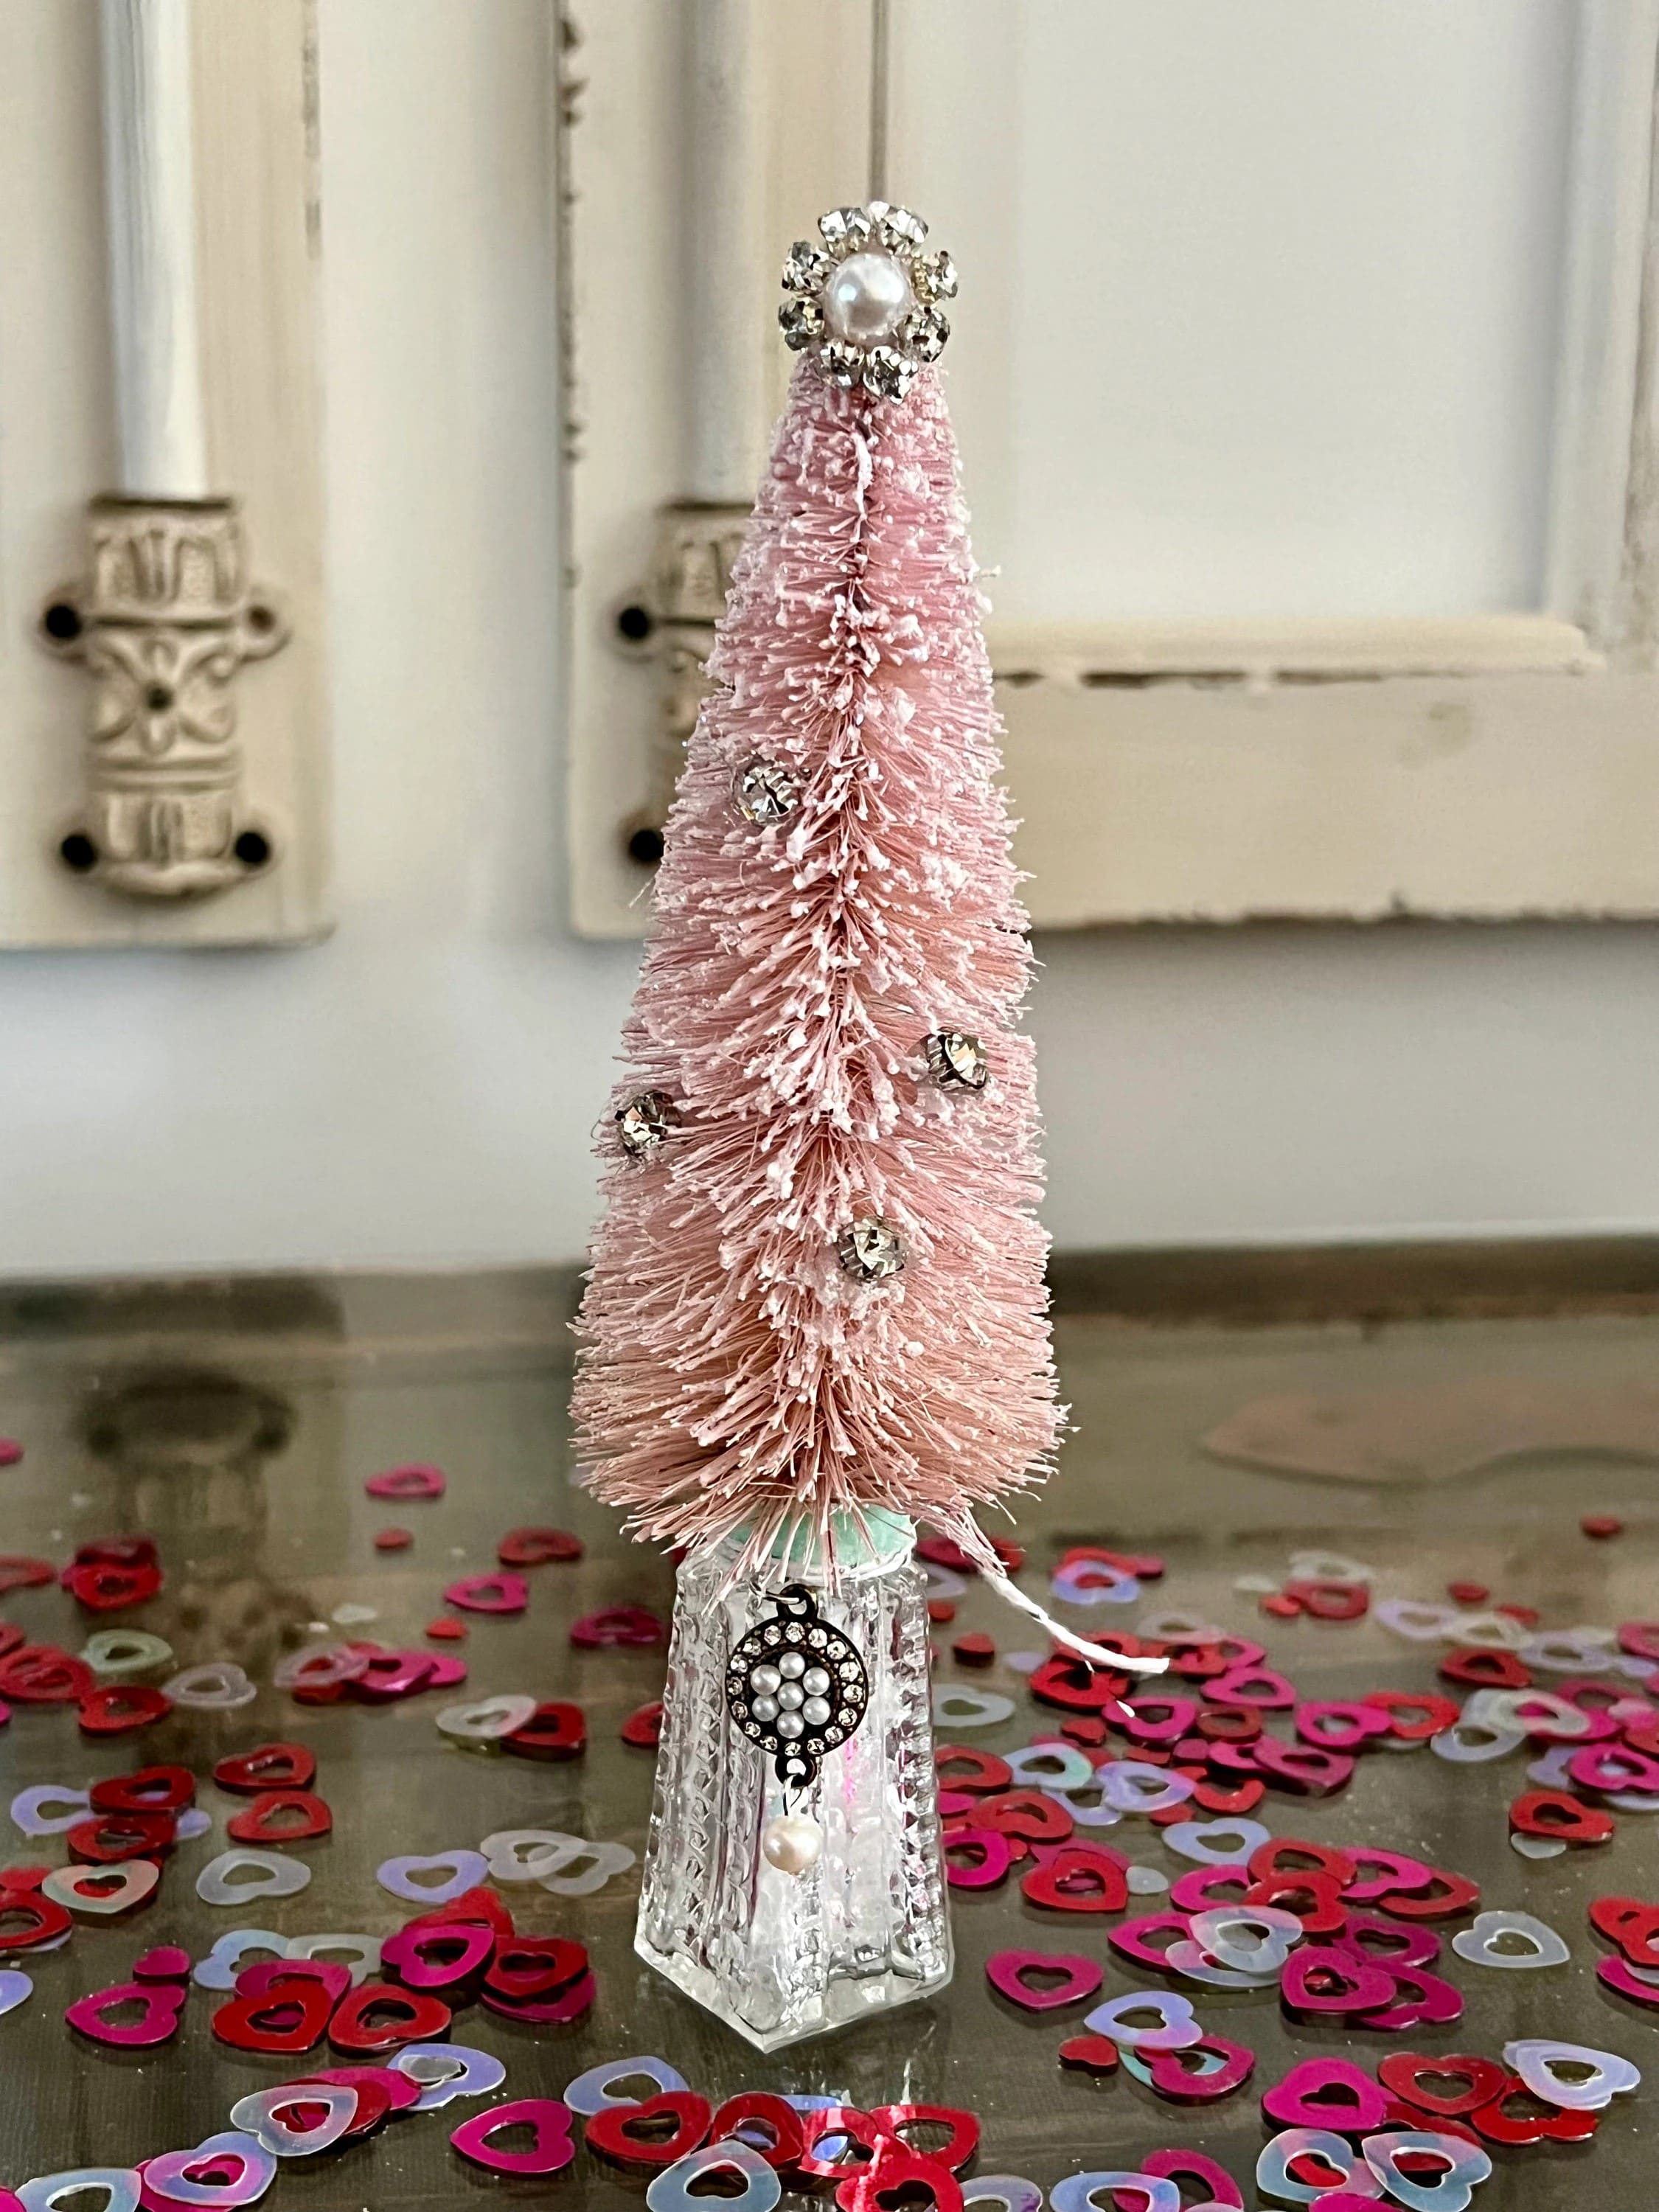
This charming upcycle transforms a simple salt shaker into a dazzling miniature Christmas tree.
Soft pink hues, pearly accents, and vintage sparkle come together beautifully, perfect for adding a touch of romance to your holiday décor.
It’s small enough for a mantel or vanity yet striking enough to catch the eye of every guest.

- 1 vintage glass salt shaker ((about 3-4 inches tall))
- 1 small pink bottle brush tree ((6-7 inches tall))
- Rhinestone or pearl embellishments ((6-8 pieces))
- Small brooch or charm ( for decoration)
- Hot glue gun and glue sticks
- Optional: glitter or fake snow (for added shimmer)
-
Clean your salt shaker thoroughly and remove any lid residue. If the lid has holes, you can leave it off for a cleaner look.
-
Place a small amount of hot glue on the top of the shaker and carefully press the base of your bottle brush tree into place. You hold it steady for 30 seconds while the glue sets.
-
Once secure, decorate your tree with rhinestones or pearls. Use tweezers for precise placement and vary the spacing for a natural, glimmering effect.
-
Add a brooch, charm, or small piece of jewelry to the shaker base for an elegant finishing touch. This adds vintage charm and makes your tree feel one-of-a-kind.
-
For extra sparkle, lightly dust the branches with glitter or sprinkle artificial snow for a frosted look.
#8. Vintage Salt Shaker Photo Holders
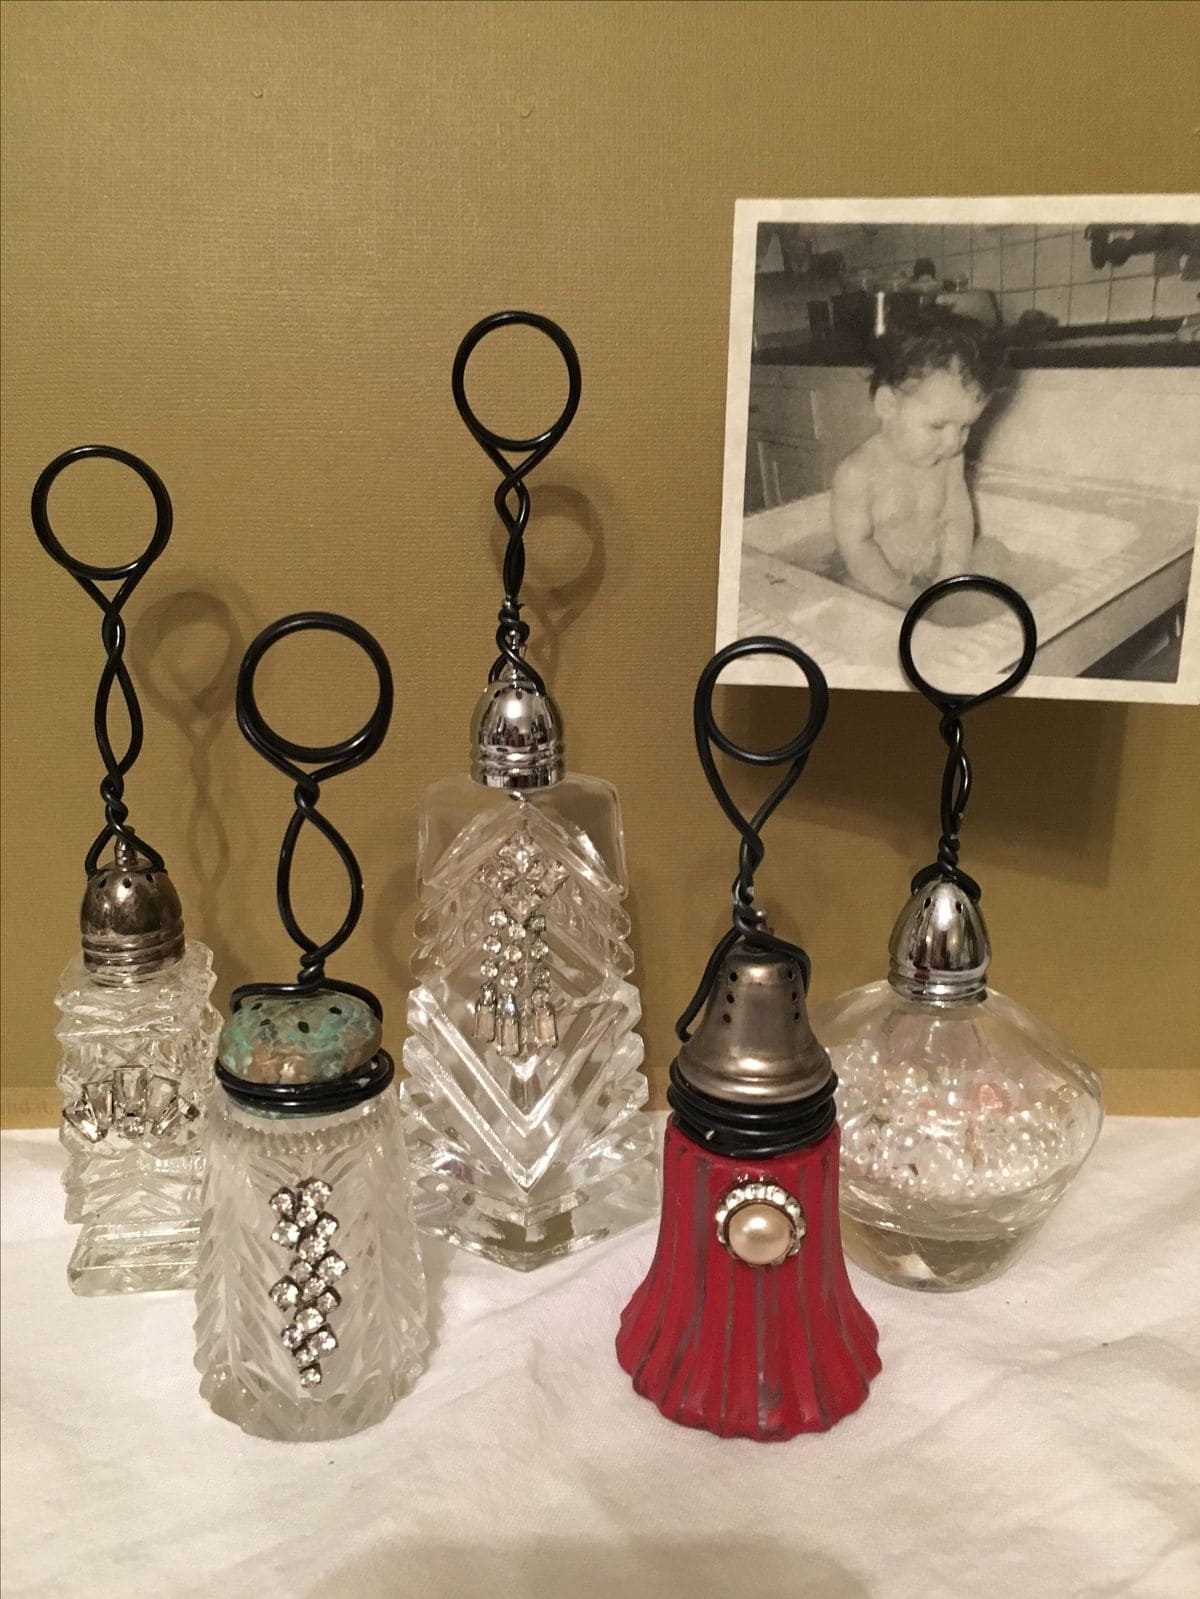
How about giving your old salt shakers a new life as elegant photo or note holders?
These sparkling little keepsakes combine vintage charm with practicality, turning memories into tabletop art.
The mix of crystal glass, metallic lids, and decorative accents creates a timeless look that fits beautifully into shabby-chic or rustic decor.

- 4-6 vintage salt shakers ((around 3-4 inches tall))
- 16-18 gauge black craft wire ((cut into 12-inch pieces))
- Wire cutters and round-nose pliers
- Small rhinestones, pearls, or old jewelry pieces
- Hot glue gun and glue sticks
- Optional: filler like small beads, pearls, or glitter
-
Start by washing and drying each salt shaker thoroughly. If you want, fill the bottom with tiny pearls, beads, or sparkly glitter for extra flair.
-
Take a length of wire and use round-nose pliers to twist one end into a small circle about 1 inch wide. This loop will hold your photo or card. Twist the wire below the loop a few times to create a firm base.
-
Insert the other end of the wire through one of the shaker’s lid holes. If the lid doesn’t have holes, gently wrap the wire around the lid’s neck instead and secure it with a few twists.
-
Once the wire is steady, decorate the shaker’s body with rhinestones, old earrings, or vintage brooches. Use hot glue to attach them securely. A touch of red paint or a single pearl can add personality and balance.
-
Insert your favorite photo, note, or recipe card into the wire loop. Finally, adjust the height of the wire for variety if making several holders.
These make charming handmade gifts for weddings, anniversaries, or holidays, especially when paired with a black-and-white photograph or a handwritten message.
#9. Mini Nature Terrarium in a Salt Shaker
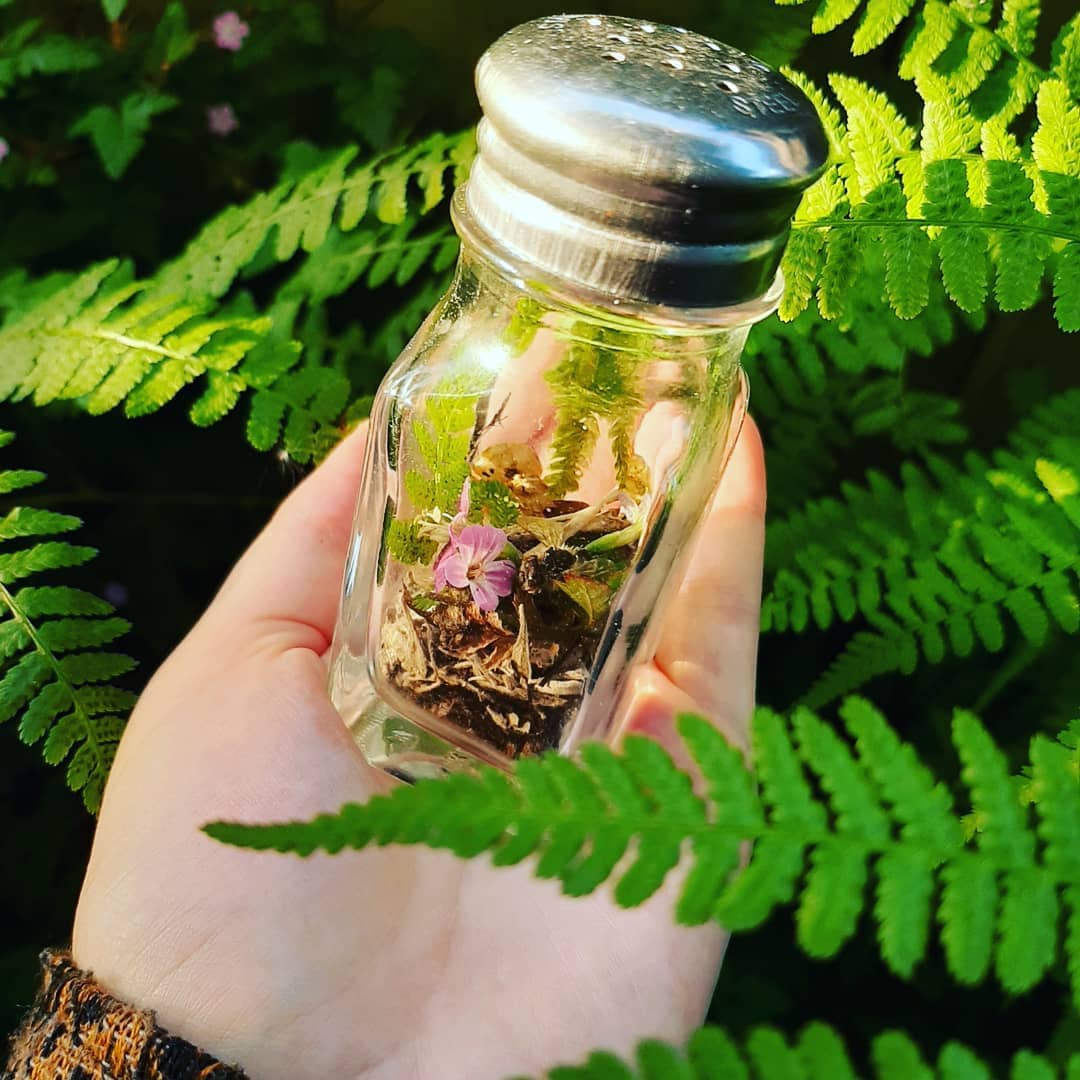
Turning an old salt shaker into a mini terrarium is a gentle way to celebrate nature’s tiny wonders.
Inside that little glass world, moss curls softly against the soil, and a small flower quietly adds color.
It’s peaceful, grounding, and surprisingly easy to make. Each time you look at it, you’ll feel a hint of the forest.

- 1 glass salt shaker ((3-4 inches tall, clean and dry))
- 1 tablespoon of damp potting soil or forest dirt
- Small piece of live moss ((around 2×2 cm))
- 1 tiny flower or dried bloom
- 1 pair of tweezers
- 1 small stick or cotton swab
- 1 dropper or spray bottle with water
-
Begin by removing the metal lid and cleaning your shaker thoroughly with warm water and soap. Make sure it’s fully dry, moisture on the glass can create unwanted fog.
-
Using a small spoon, drop in about one tablespoon of soil. Gently press it down with your stick to create a flat, stable base. This layer will hold moisture for your plants.
-
With tweezers, place a small piece of moss on top of the soil. Try to keep it loose and natural-looking—don’t press too hard. You want the moss to sit comfortably, not smothered.
-
Add a delicate flower or tiny leaf for color. Position it so it stands out against the green, almost like a secret bloom waiting to be discovered.
-
Carefully mist the inside using your dropper or spray bottle. Only a few drops are needed as too much water can cloud the glass.
-
Replace the lid, then set your mini terrarium in a spot with soft, indirect light. Every week or two, remove the lid briefly to air it out and add a tiny mist of water if it looks dry.
#10. Salt Shaker Fairy Figurine
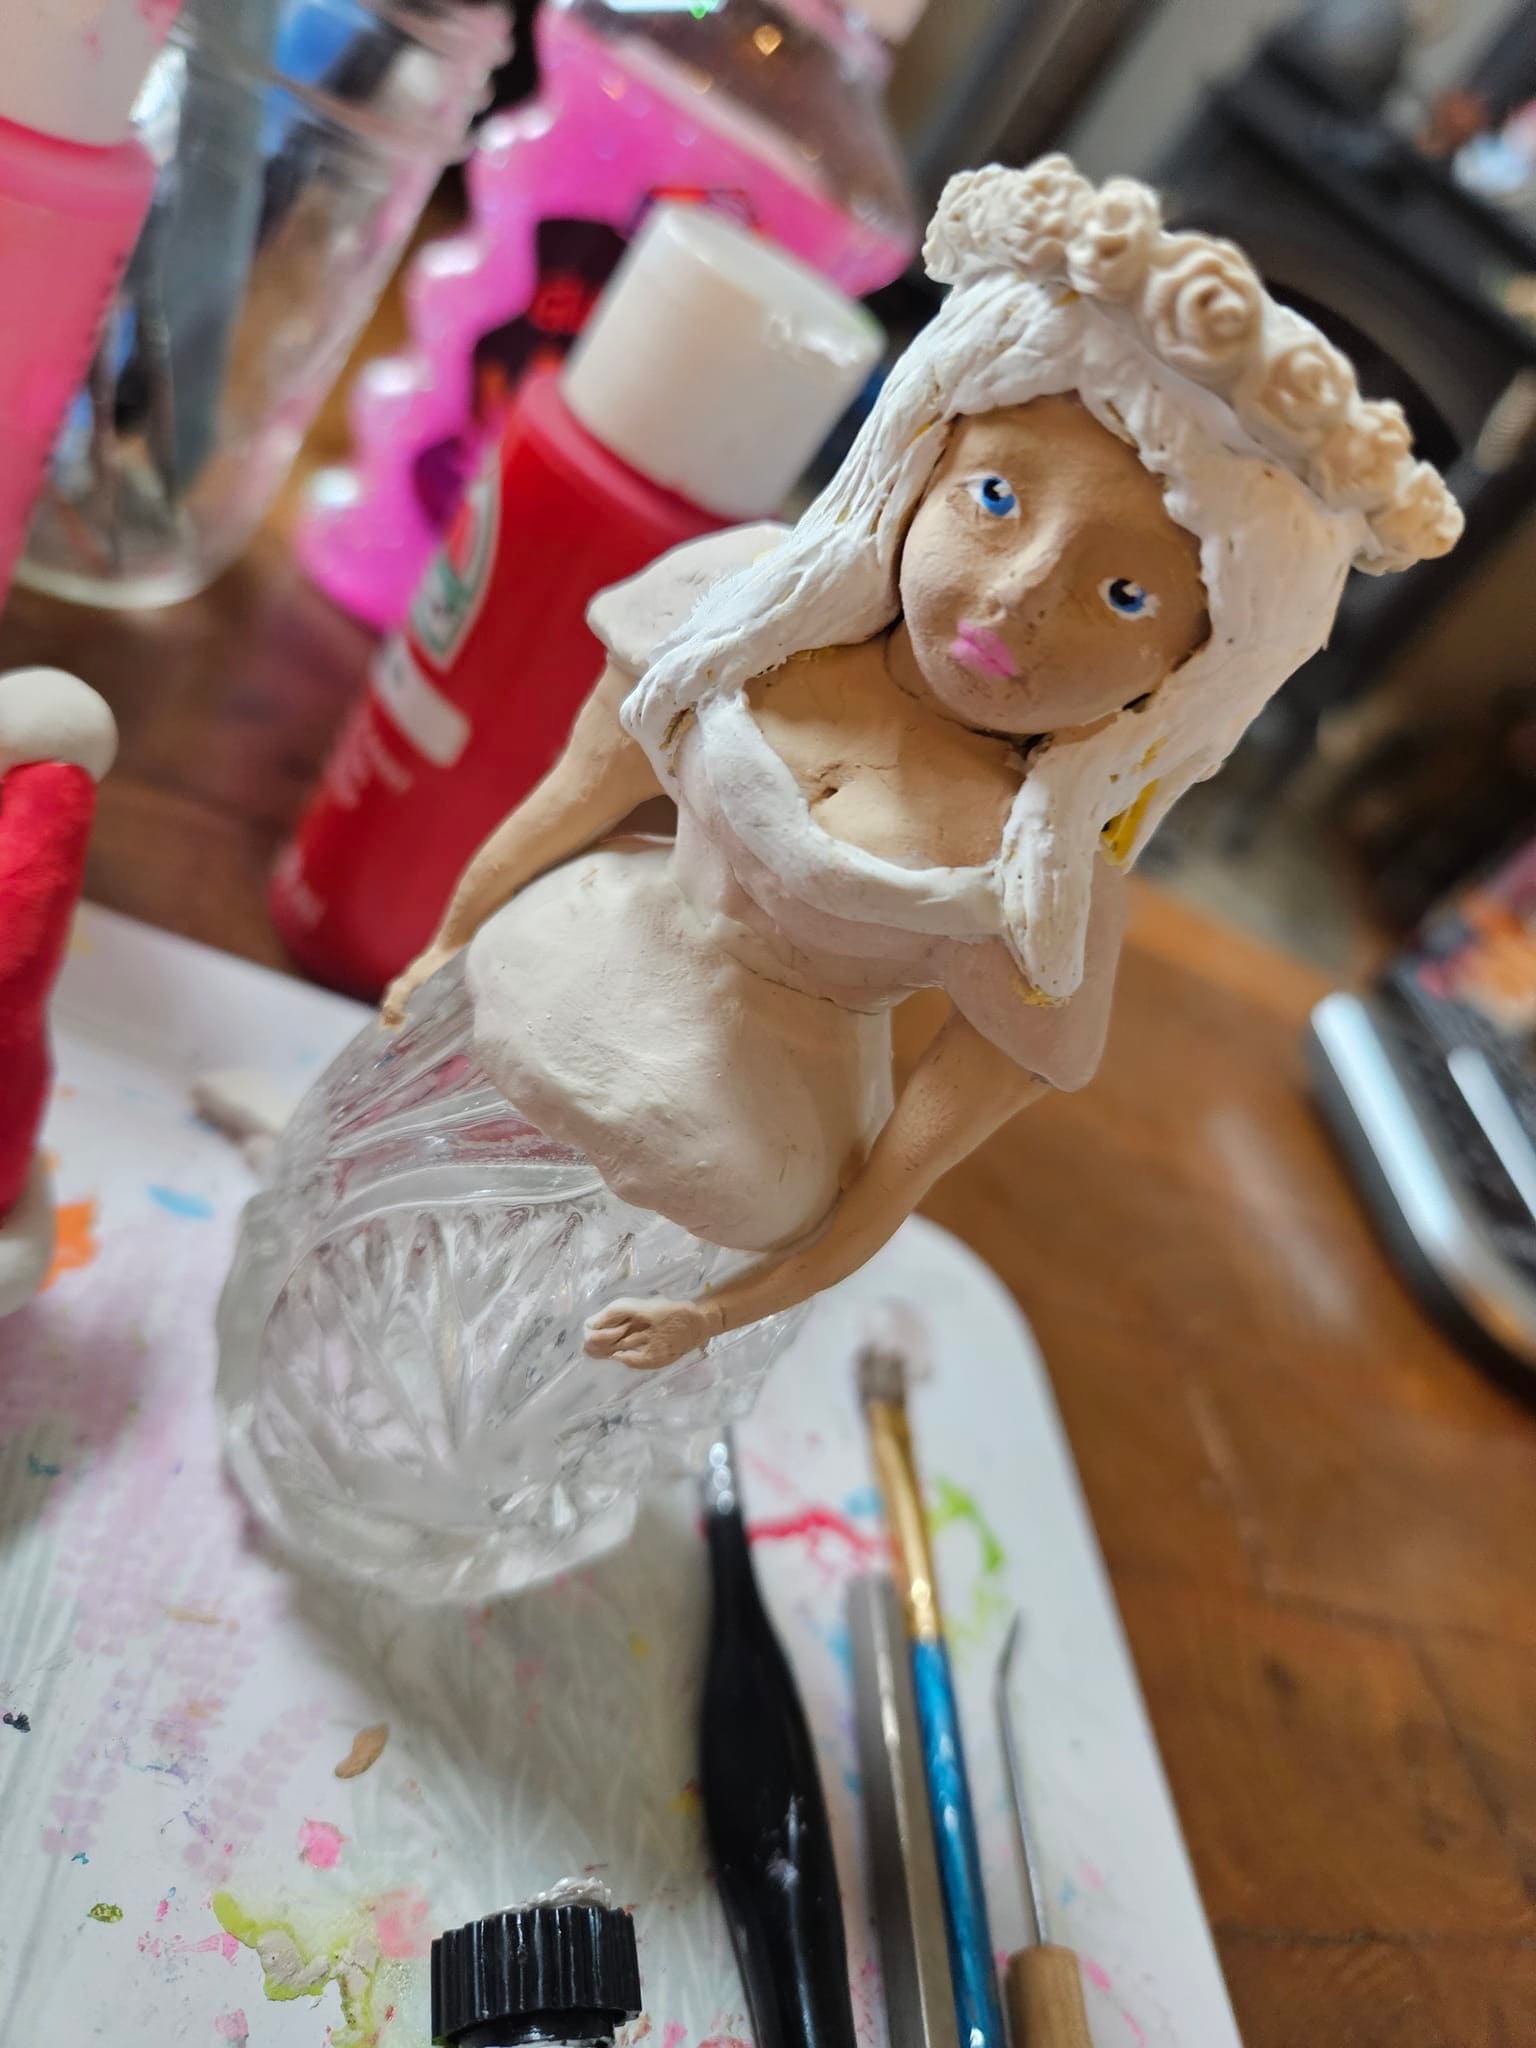
Transform an old salt shaker into a delicate fairy or goddess figure that looks like she’s stepped out of a storybook.
The clear glass makes a perfect base for her gown, while clay and paint bring her personality to life.
It’s a project that lets your imagination take the lead, you can craft a bride, woodland nymph, or celestial queen depending on your mood.

- 1 clear glass salt shaker ((about 4-5 inches tall))
- Air-dry or polymer clay ((100-150g))
- Acrylic paints ((skin tones, white, metallics, etc.))
- (skin tones, white, metallics, etc.)
- Clear gloss varnish ((optional for shine))
- Small accessories like faux flowers, lace, or beads
-
Begin with a clean salt shaker. Decide on the character’s style like fairy, goddess, or vintage doll and imagine how her dress will flow over the glass base.
-
Roll and shape the clay for the upper body directly onto the shaker’s top. Then smooth it gently with your fingers, blending seams as you go. Sculpt delicate features like the face, shoulders, and arms. You can add texture for hair or press in tiny clay flowers for a crown.
-
Let the clay dry completely (or bake if using polymer clay). Once hardened, paint the figure with gentle, natural tones. Next, add rosy cheeks, painted eyes, or shimmering details to make her come alive.
-
For extra detail, glue a few faux pearls, beads, or lace around her waist or neckline. You can even dust a little glitter over the dress for a magical touch.
-
Finish with a coat of clear gloss varnish for shine and protection. Display her on a windowsill or mantel where sunlight can illuminate her glass gown.
#11. Halloween Salt Shaker Scarecrow and Witch
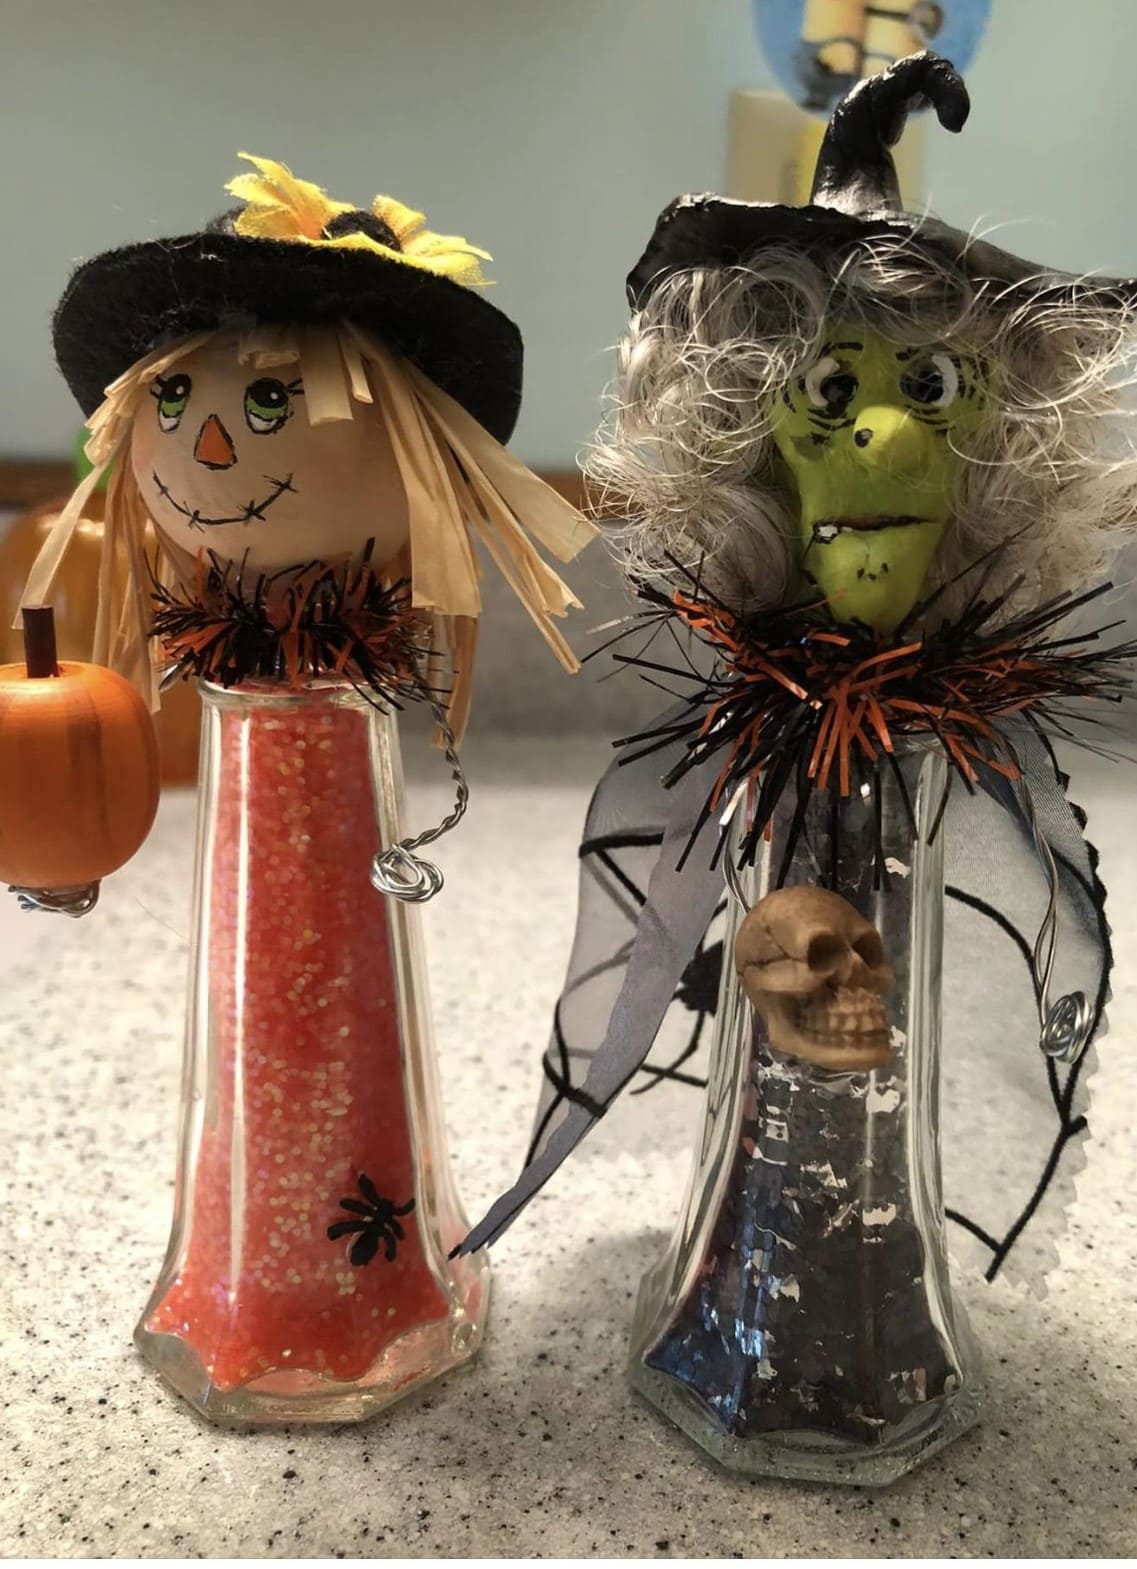
These playful Halloween figurines bring spooky fun to your décor using nothing more than old salt shakers and a few craft supplies.
The scarecrow radiates autumn cheer with straw hair and a pumpkin prop, while the witch adds a mischievous twist with her green face and wild hair.
Together, they’re the perfect DIY duo for your Halloween shelf or party table.

- 2 glass salt shakers ((4-5 inches tall))
- Orange and black glitter or tiny beads ((for shaker filling))
- 2 small foam balls ((1.5 inches diameter))
- Acrylic paint ((green, beige, black, orange, white))
- Black felt or craft foam ((for hats))
- Straw pieces or raffia ((for scarecrow hair))
- Small decorations (Small decorations)
- Hot glue gun, glue sticks, and fine paintbrushes
-
Fill one shaker with orange glitter for the scarecrow and another with dark glitter for the witch. This gives each figure a festive base.
-
Paint one foam ball beige for the scarecrow’s head and the other green for the witch. Once dry, use a fine brush to paint facial details, a stitched smile and bright eyes for the scarecrow, and sharp features for the witch.
-
For the scarecrow, glue small pieces of straw or raffia around the bottom of her head as hair. For the witch, use curly craft hair or thin yarn for a wild look.
-
Cut and glue small black felt hats for both figures. Then add ribbons, mini flowers, or spider web fabric to accessorize.
-
Attach each head to its shaker base with hot glue. Finish by gluing tiny props like a pumpkin or skull to complete their Halloween personalities.
You can display them with LED candles or faux cobwebs to create an enchanting Halloween vignette that feels both eerie and adorable.
#12. Whimsical Mushroom Terrariums in Salt Shakers
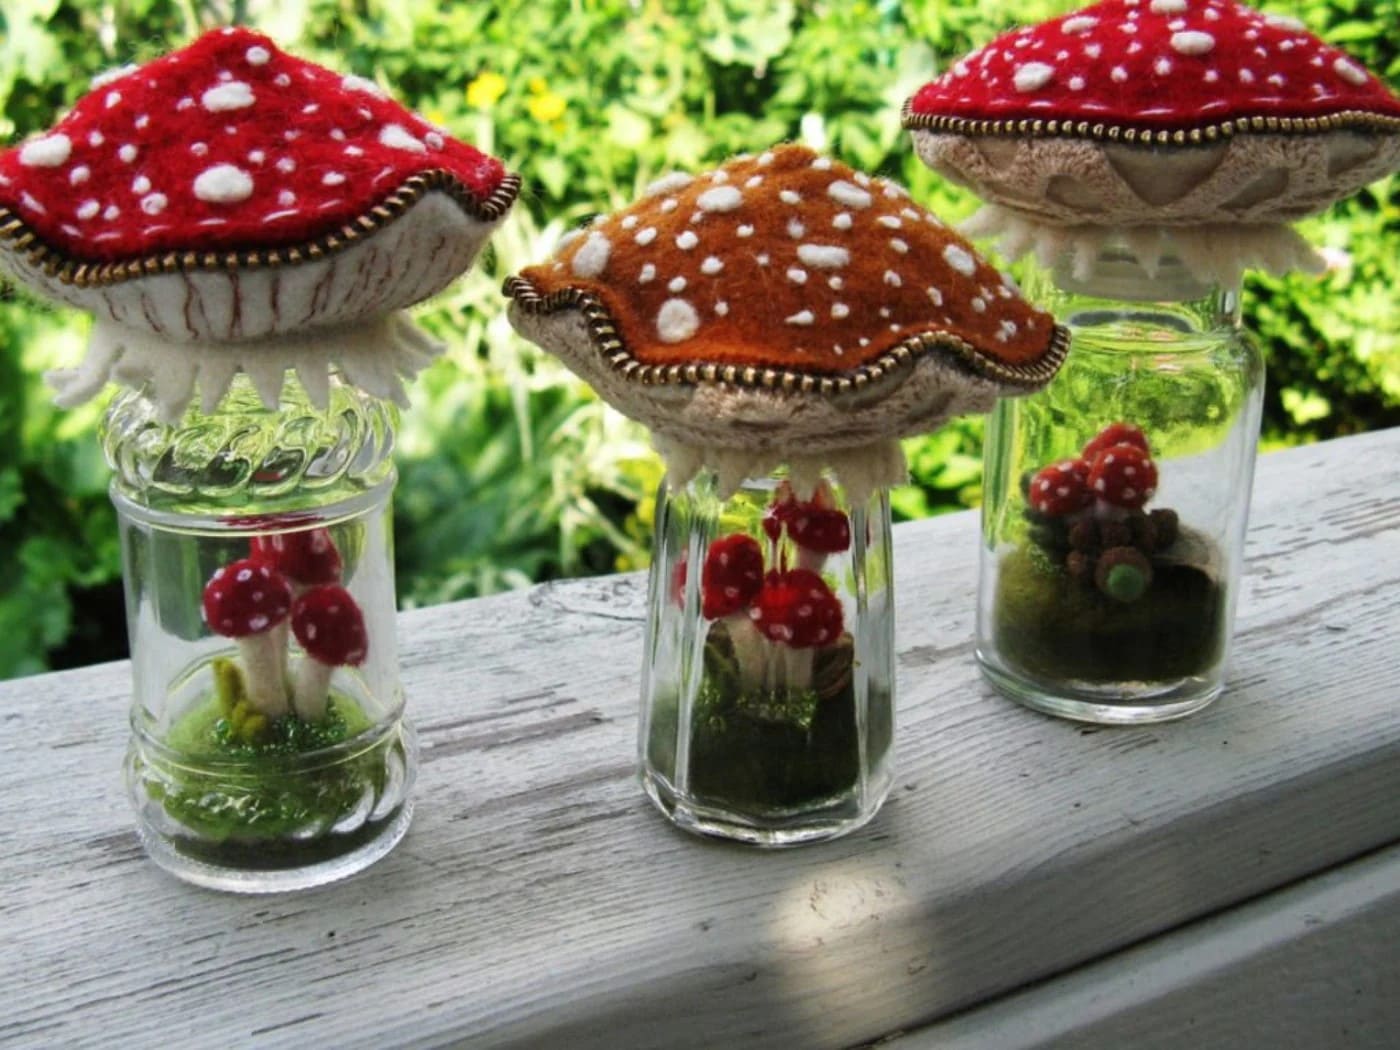
Look at these upcycled salt shakers! They bring a touch of fairytale charm to your home.
Each one becomes a tiny woodland scene, complete with miniature mushrooms nestled in soft moss.
The felted mushroom caps on top add warmth and whimsy, making them perfect as autumn decorations or unique gifts for nature lovers.
Plus, they look especially lovely when grouped together, like a magical little forest waiting to be discovered.

- 3 clear glass salt shakers ((about 3-4 inches tall))
- Small felt or clay mushrooms ((1-2 inches tall))
- Green felt or faux moss ((a few small pieces))
- Red, orange, and brown felt (for mushroom caps (4×4 inches each))
- Stuffing or cotton (for padding)
- Hot glue gun and glue sticks
- Decorative zipper trim or gold thread ((optional for edges))
-
Clean and dry your salt shakers. Then cut small circles of green felt to fit the shaker bottoms and glue them inside to create a mossy base.
-
Place your mini mushrooms inside each shaker. Use a dab of glue to secure them in place so they stand upright. You can also add tiny details like acorns, twigs, or beads if you want a forest-floor effect.
-
To make the mushroom tops, cut two felt circles (one slightly smaller). Stitch or glue them together along the edge, leaving a small gap. Then lightly stuff them with cotton to give a rounded shape.
-
Attach the felt tops to the shaker lids using hot glue. You can embellish the edges with zipper trim, beads, or gold thread for extra charm.
-
Finally, screw the lids back on, and admire your enchanting mushroom world.
