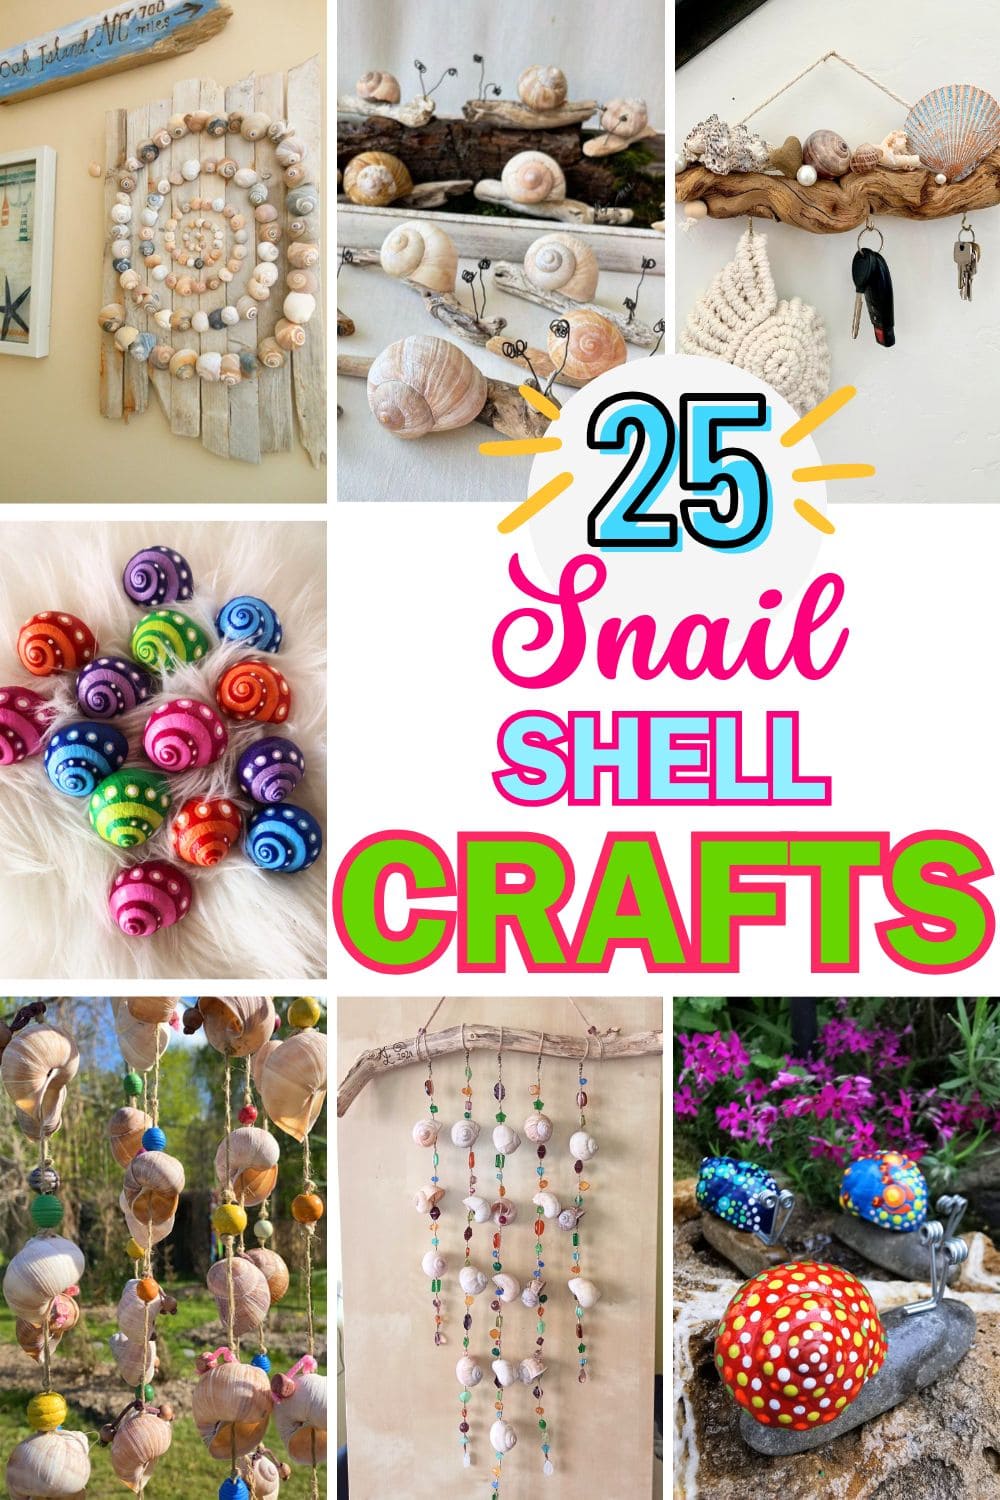
Every walk along the beach feels like a treasure hunt. Tucked between grains of sand and bits of driftwood, you’ll often spot small, delicate snail shells, nature’s quiet masterpieces.
Rather than letting them sit forgotten in a jar or, worse, tossing them aside, why not turn those coastal keepsakes into beautiful handmade decor?
These little spiral wonders can become the heart of meaningful, creative projects that brighten your home and reflect your love for the sea.
From whimsical ornaments to elegant wall hangings, these 25 inspiring snail shell crafts celebrate the charm of seaside finds.
#1. Natural Snail Shell Grapevine Wreath
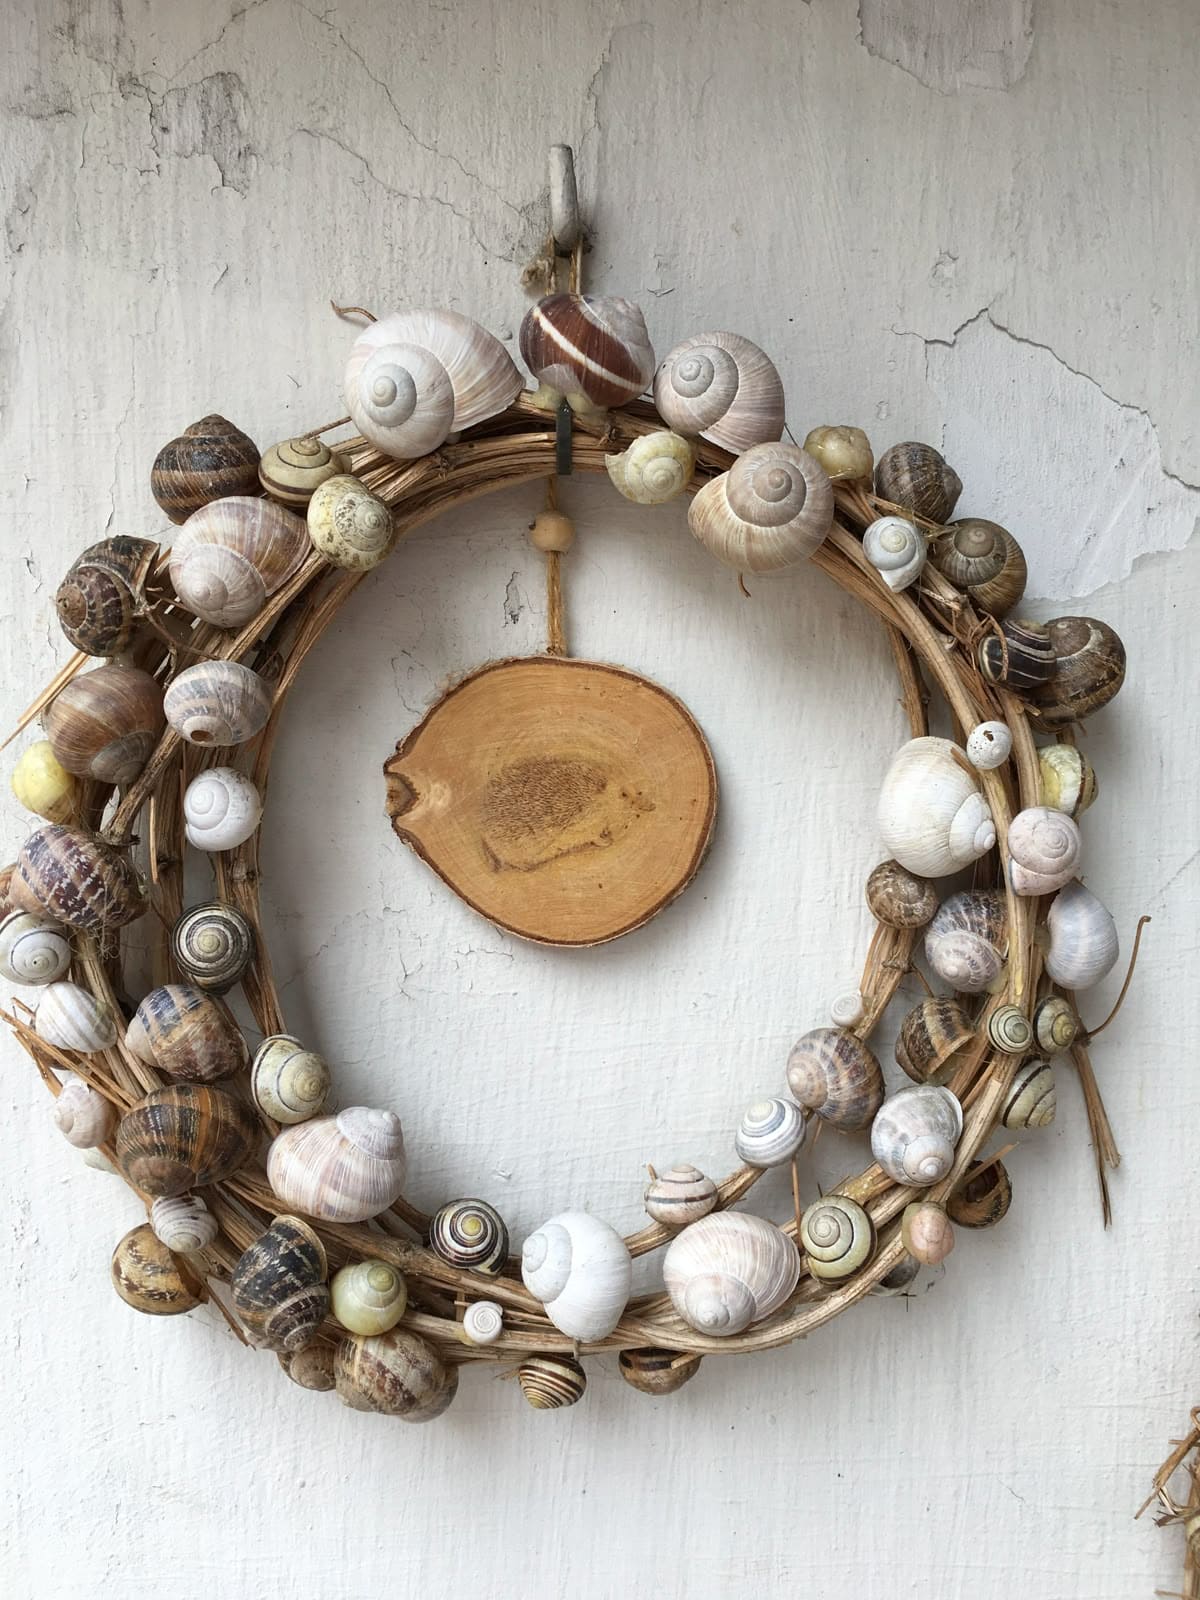
This snail shell wreath brings a rustic yet refined charm that feels like a quiet afternoon walk in the woods.
Each shell, weathered and unique, clings to a woven grapevine circle like little nature stories frozen in time. Hung on a plain wall, it becomes a serene, textured centerpiece that whispers of simplicity and coastal calm.
You can display it all year long, its neutral palette blends with nearly any seasonal decor. Add a tiny wooden plaque or small charm in the center for a more personal touch.
Materials Needed
- Grapevine wreath base (12-14″)
- 30-40 empty snail shells (assorted sizes)
- Hot glue gun and glue sticks
- Jute rope
- Optional: small wooden slice
Step-by-step Guide
Step 1: Start by cleaning your snail shells gently with warm soapy water and letting them dry fully.
Step 2: Lay out the design before gluing, scatter shells of various sizes around the wreath for a balanced look.
Step 3: Use a hot glue gun to attach the shells one at a time. Then press and hold each for a few seconds to set.
Step 4: Tie a jute loop at the top of the wreath to hang it securely on your wall or door.
Tips: If your wreath will hang outdoors, spray it with a clear sealant to protect the shells from moisture and fading.
#2. Driftwood Snail Garden Figures
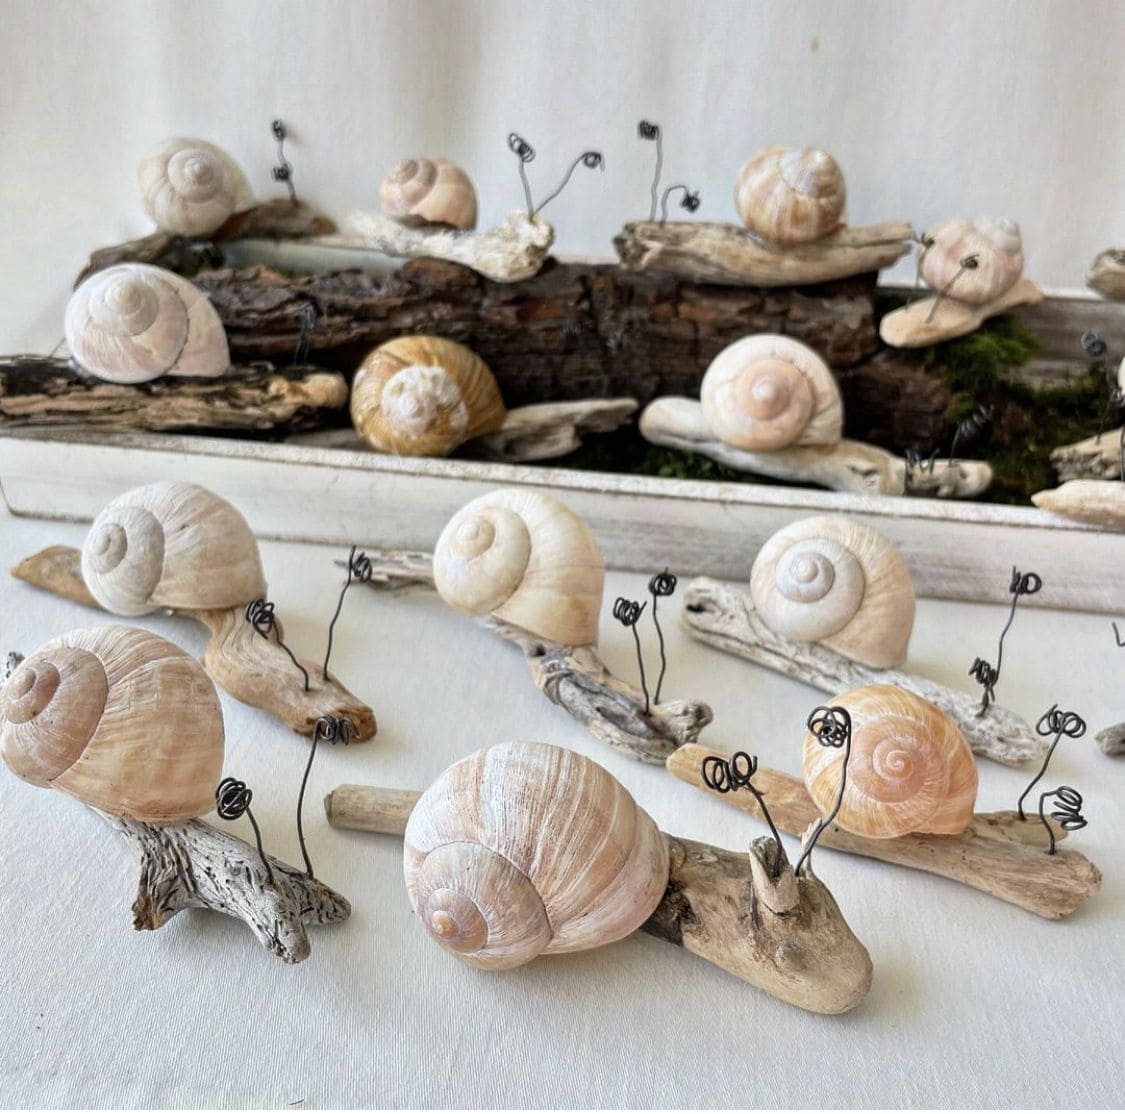
If you adore coastal textures and woodland vibes, these driftwood snail sculptures are the perfect craft for you. These little creatures look like they just crawled out of a storybook garden.
Perfect for windowsills, terrariums, or rustic centerpieces, this craft brings together beachcombing treasures and minimal tools to create something beautifully organic.
Materials Needed
- Small driftwood pieces (4″-6″ long)
- Snail shells
- Black craft wire
- Hot glue gun
- Wire cutters and a round-nose plier
Step-by-step Guide
Step 1: Select pieces of driftwood that are stable when laid flat. They’ll serve as the bodies of the snails.
Step 2: Using your glue, attach a snail shell to the rear end of the wood piece.
Step 3: Cut two short lengths of wire for antennae. Then twist the tips into spirals with round-nose pliers to add character.
Step 4: Insert or glue the wire antennae near the front of each driftwood piece.
#3. Rainbow Spiral Snail Shells
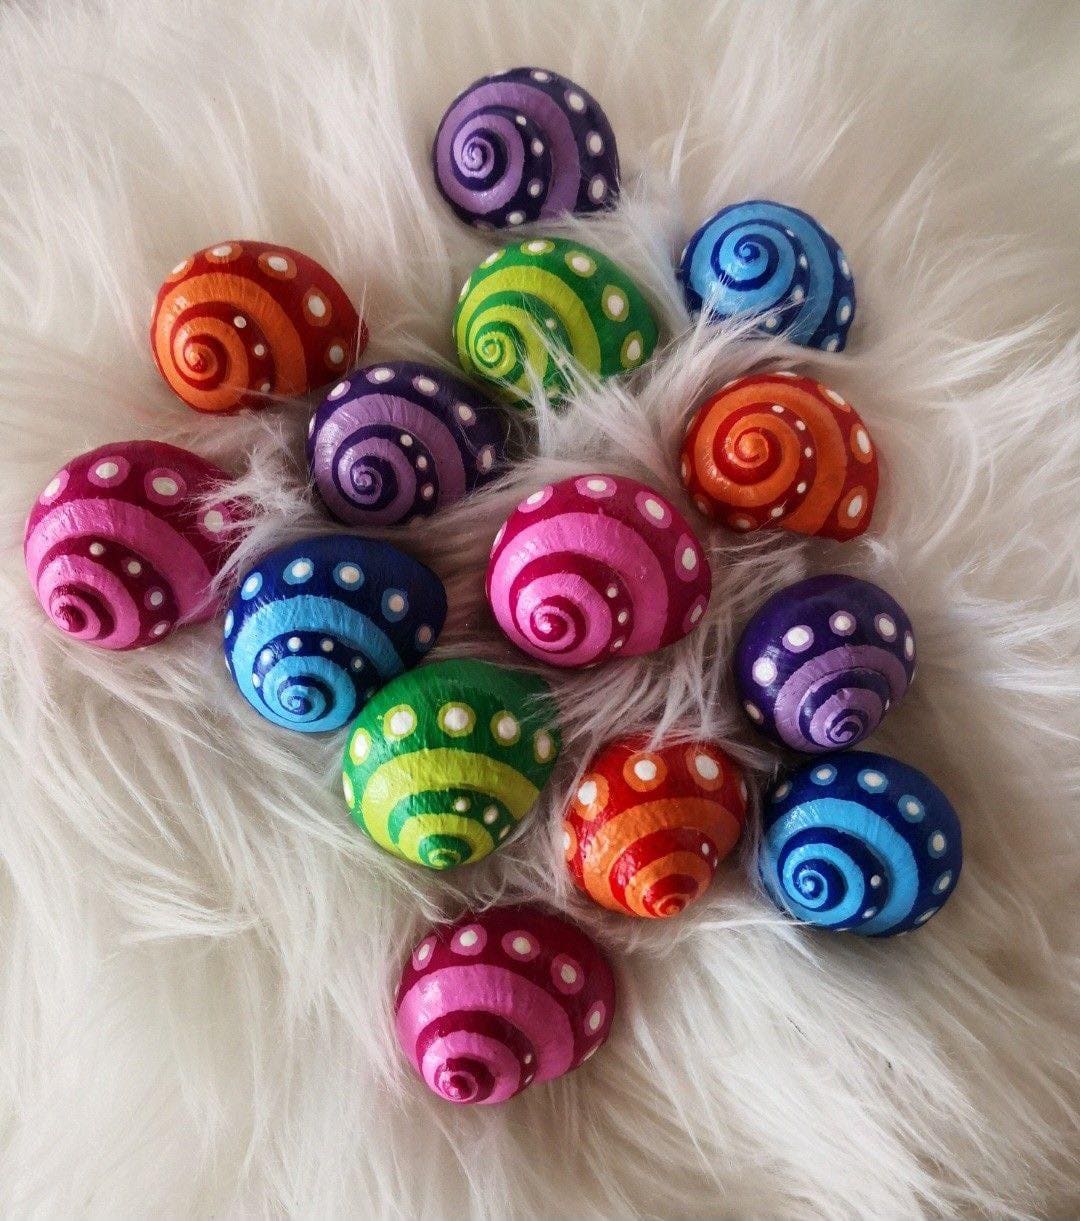
If you love bold colors and playful patterns, these rainbow spiral snail shells will absolutely brighten your day.
Each one becomes a tiny piece of art, bursting with whimsical energy and cartoon-like charm. Lined with spirals and dotted with painted polka dots, they almost look like candy.
You can display these cheerful creations in a glass bowl, scatter them across a windowsill, or tuck them into a fairy garden to surprise your guests with a pop of personality.
Materials Needed
- Snail shells (clean and dry)
- Acrylic paints in various bright colors
- Small paintbrushes
- White paint pen
- Clear varnish (optional)
Step-by-step Guide
Step 1: Paint the base color of each shell and let it dry completely.
Step 2: Add spiral lines around the shell using a contrasting shade, then layer on white dots for extra charm.
Step 3: Allow everything to dry, then finish with a glossy topcoat if desired.
Tips: You should use a toothpick dipped in white paint to keep your dots neat and even, or experiment with metallic accents for a cosmic twist.
#4. Coastal Driftwood Key Holder With Shell Accents
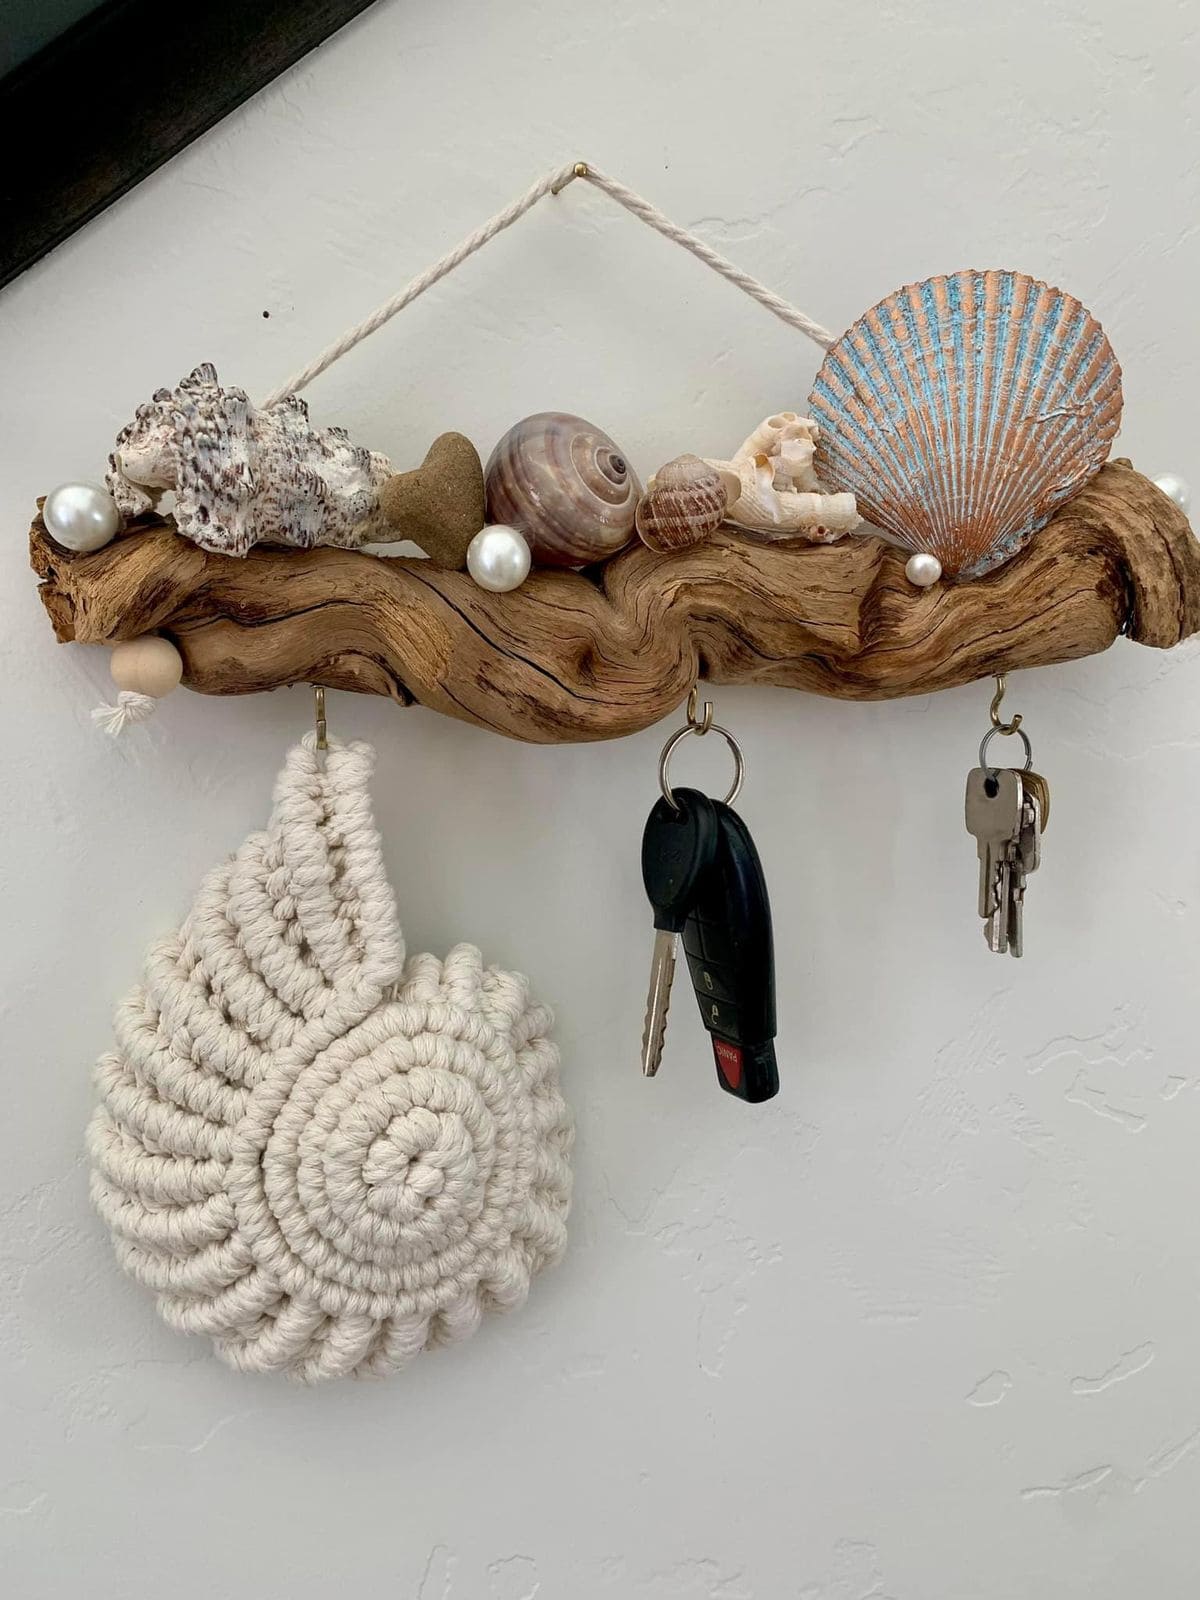
This handcrafted key holder brings the breezy vibe of the shore right into your entryway.
A piece of naturally twisted driftwood becomes both art and utility, adorned with seashells, coral pieces, and faux pearls that whisper of salt air and sandy toes.
Also, three sturdy hooks below offer a home for your keys, accessories, or even a macramé bag. It’s a playful but functional way to keep things tidy while adding a personal coastal statement to your wall.
Materials Needed
- Driftwood piece (10-14 inches)
- Assorted seashells, faux pearls, and coral
- 3-4 metal hooks
- Hot glue gun and strong adhesive
- Twine or rope
Step-by-step Guide
Step 1: Clean the driftwood and ensure it has a flat back or add a backing board for stability.
Step 2: Arrange your shells and decorations along the top until the layout feels balanced. Then secure each decorative element with hot glue.
Step 3: Screw or glue metal hooks to the underside for hanging keys or accessories.
Step 4: Tie a piece of twine on each side and knot securely for wall mounting.
Tips: You can use lightweight decorations to prevent tipping, and seal the wood with clear coat for durability if used near doors or windows.
#5. Spiral Shell Art on Driftwood Planks
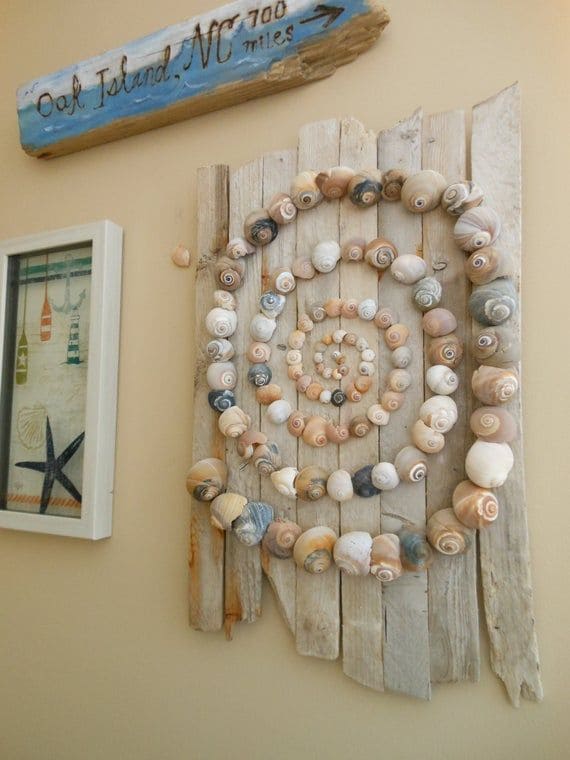
This striking wall piece captures the spirit of the sea with a hypnotic spiral of natural snail shells, carefully arranged on rustic reclaimed driftwood slats.
Furthermore, the blend of sandy neutrals and oceanic blues adds depth and movement to your beachy decor.
Hanging this on your wall instantly brings texture, rhythm, and a sense of calm to your space, it’s like a seashell mandala grounded in driftwood.
Materials Needed
- 40-60 assorted snail shells
- Driftwood boards (approximately 18” x 24”)
- Strong craft adhesive
- Sawtooth hangers
Step-by-step Guide
Step 1: Arrange your driftwood planks vertically and glue or nail them together on a horizontal backing strip.
Step 2: Lay out the shells on the wood to create a spiral pattern, starting from the center and increasing shell size outward.
Step 3: Secure each shell in place using a strong adhesive, holding briefly to ensure it sticks firmly.
Step 4: Let the entire piece dry flat for a few hours. Then attach hanging hardware on the back, and display it proudly on your wall.
#6. Colorful Snail Shell Wind Chime
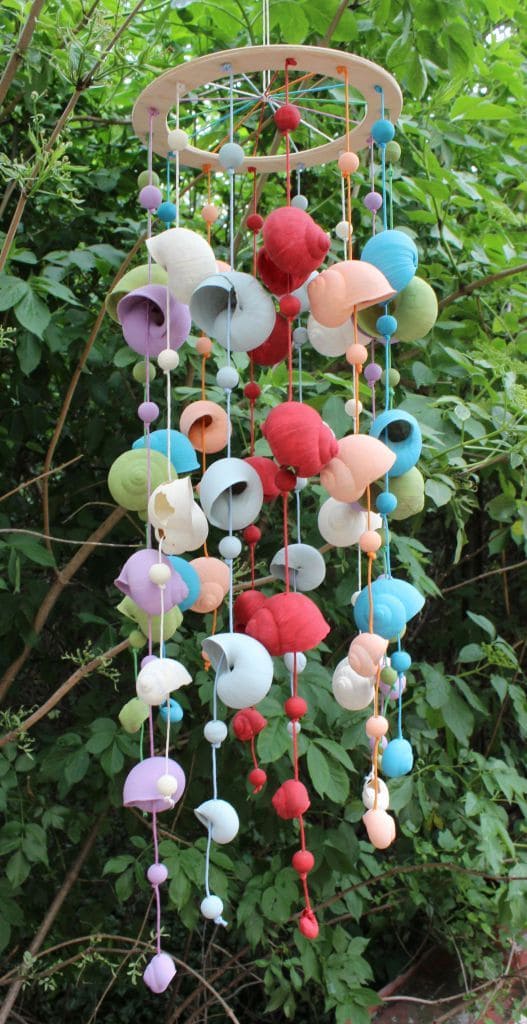
This vibrant wind chime brings a burst of joy to any outdoor space with its kaleidoscope of hand-painted snail shells and matching wooden beads.
Plus, each strand dances in the breeze, creating a soft, whimsical clinking sound while showcasing an array of pastel and bold hues.
I think this mobile-style piece has a playful charm that instantly brightens porches, patios, or gardens.
Materials Needed
- Snail shells (various sizes)
- Acrylic paint in assorted colors
- Paintbrushes and sealer (optional)
- Wooden beads (multiple colors and sizes)
- Colored yarn
- Wooden hoop (10-12 inches)
- Hot glue gun
- Hanging hook
Step-by-step Guide
Step 1: Paint the snail shells in a variety of colors. Then let them dry fully before sealing (optional).
Step 2: Cut several lengths of yarn and start threading shells and beads, alternating them creatively along each strand.
Step 3: Tie or glue the ends of each strand securely to the wooden ring, spacing them evenly around the circle.
Step 4: Add a few strong threads across the center for structural support and create a hanging loop at the top.
Step 5: Now, you hang it outside where wind can catch the strands and let the colors flutter with the breeze.
#7. Painted Snail Shell Garden Critters
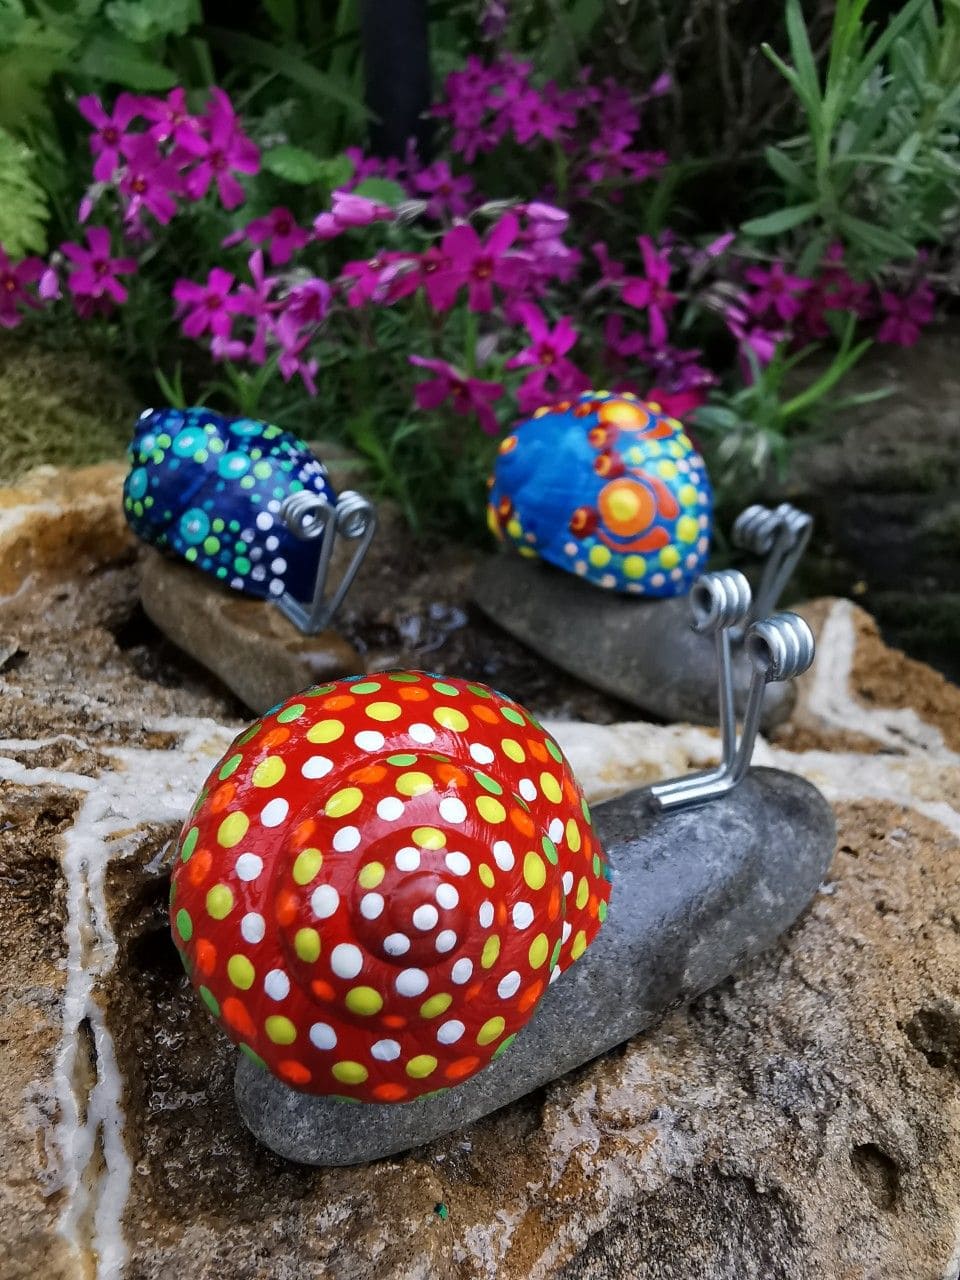
These joyful garden snails are bursting with personality and color, turning ordinary rocks and shells into playful garden companions.
Their coiled antennae add a cheeky touch and a sense of motion. Set on smooth stones, they’re sturdy enough for outdoor display and perfect for nestling among flowers or along stepping stones.
Materials Needed
- Snail shells (cleaned and dry)
- Acrylic paints in various colors
- Small paintbrushes
- Smooth flat stones (3-5 inches long)
- Craft wire
- Hot glue gun
- Clear sealant spray (optional)
Step-by-step Guide
Step 1: Paint the snail shells with dot patterns or mandala-inspired designs. Then let each layer dry before adding more details.
Step 2: Once dry, apply a coat of clear sealant for outdoor durability if desired.
Step 3: Curl wire into small spiral shapes to mimic snail antennae and glue them into the front of the shell opening.
Step 4: Finally, secure each finished snail onto a smooth flat stone using strong adhesive for stability.
#8. Coastal Snail Shell Hanging Garland
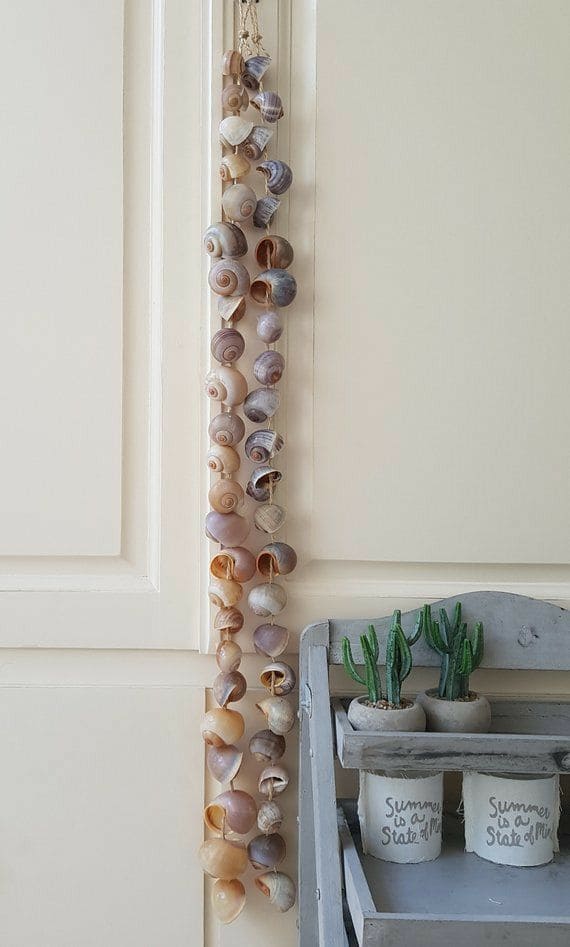
This stunning vertical garland captures the calm rhythm of the ocean with its spiral shells swaying gently against the wall.
Bonus, natural tones of cream, lavender, and soft browns create a soothing coastal aesthetic that suits beach cottages, boho bedrooms, or even sunny patios.
It’s a lovely way to showcase your beachcombing finds, turning simple snail shells into tranquil decor that whispers of summer breezes and seaside adventures.
Materials Needed
- 40-50 snail shells (varied in size and tone)
- Natural jute twine
- Small hand drill
- Hot glue (optional)
- Scissors
Step-by-step Guide
Step 1: Carefully drill a small hole into the top of each snail shell using a hand drill or Dremel tool.
Step 2: Cut several long strands of twine (around 3 to 4 feet) depending on your desired hanging length.
Step 3: Thread each shell onto the twine, spacing them evenly. Then knot both above and below each shell to secure placement.
Step 4: Once all strands are complete, tie them together at the top in a secure knot and hang them on a hook or nail.
#9. Driftwood and Shell Air Plant Wall Hanging
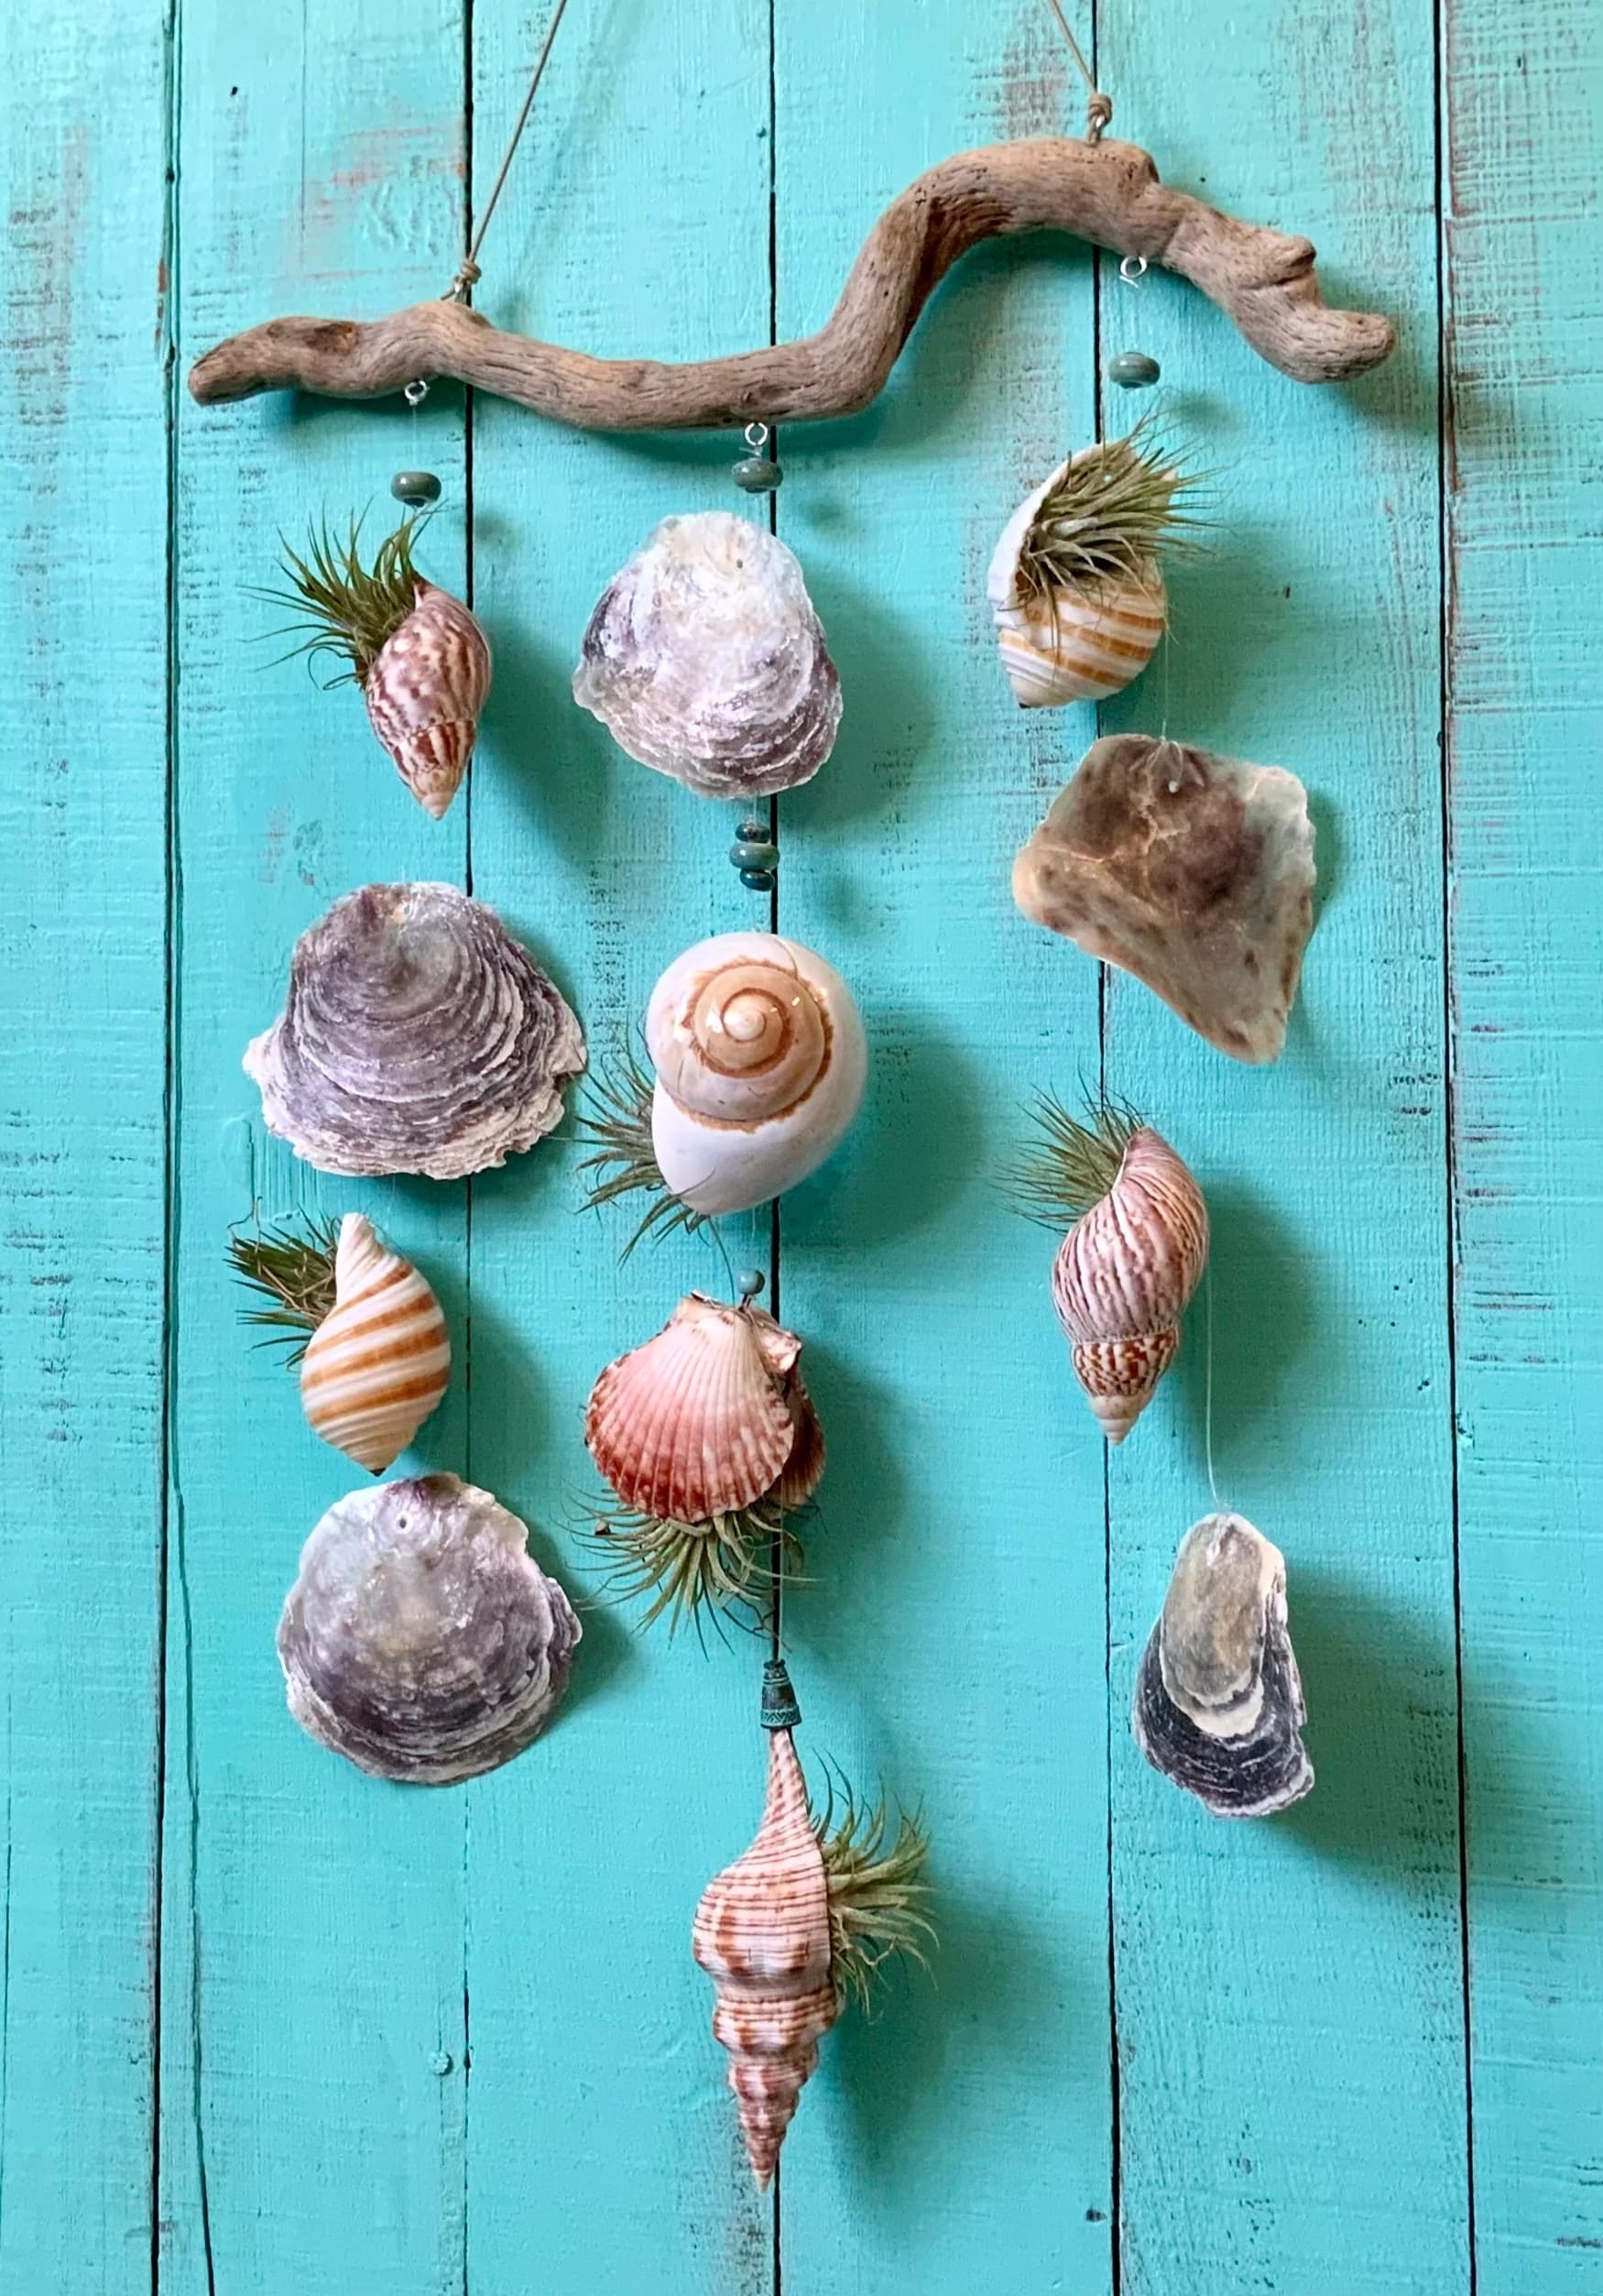
Nature’s textures collide beautifully in this breezy wall hanging made from sun-bleached driftwood, assorted sea shells, and wispy air plants.
You can see each piece hangs in balance, like a little oceanic mobile frozen mid-sway. The teal background makes the colors pop, but this would look equally stunning against white walls or hung near a breezy window.
Materials Needed
- Driftwood branch (about 12-16 inches)
- 5-7 air plants
- 10-12 various seashells (mixed types)
- Fishing line
- Glue gun
- Small beads (optional)
- Wall hook or nail
Step-by-step Guide
Step 1: Clean the driftwood and shells. Then attach air plants to the tops of shells using a tiny dab of hot glue.
Step 2: Cut lengths of fishing line and tie shells and beads at different intervals.
Step 3: Secure each strand to the driftwood, spacing them out to avoid tangling.
Step 4: Add a hanging loop to the top of the wood, then hang and enjoy your living sea-inspired art.
#10. Gilded Snail Shell Decor
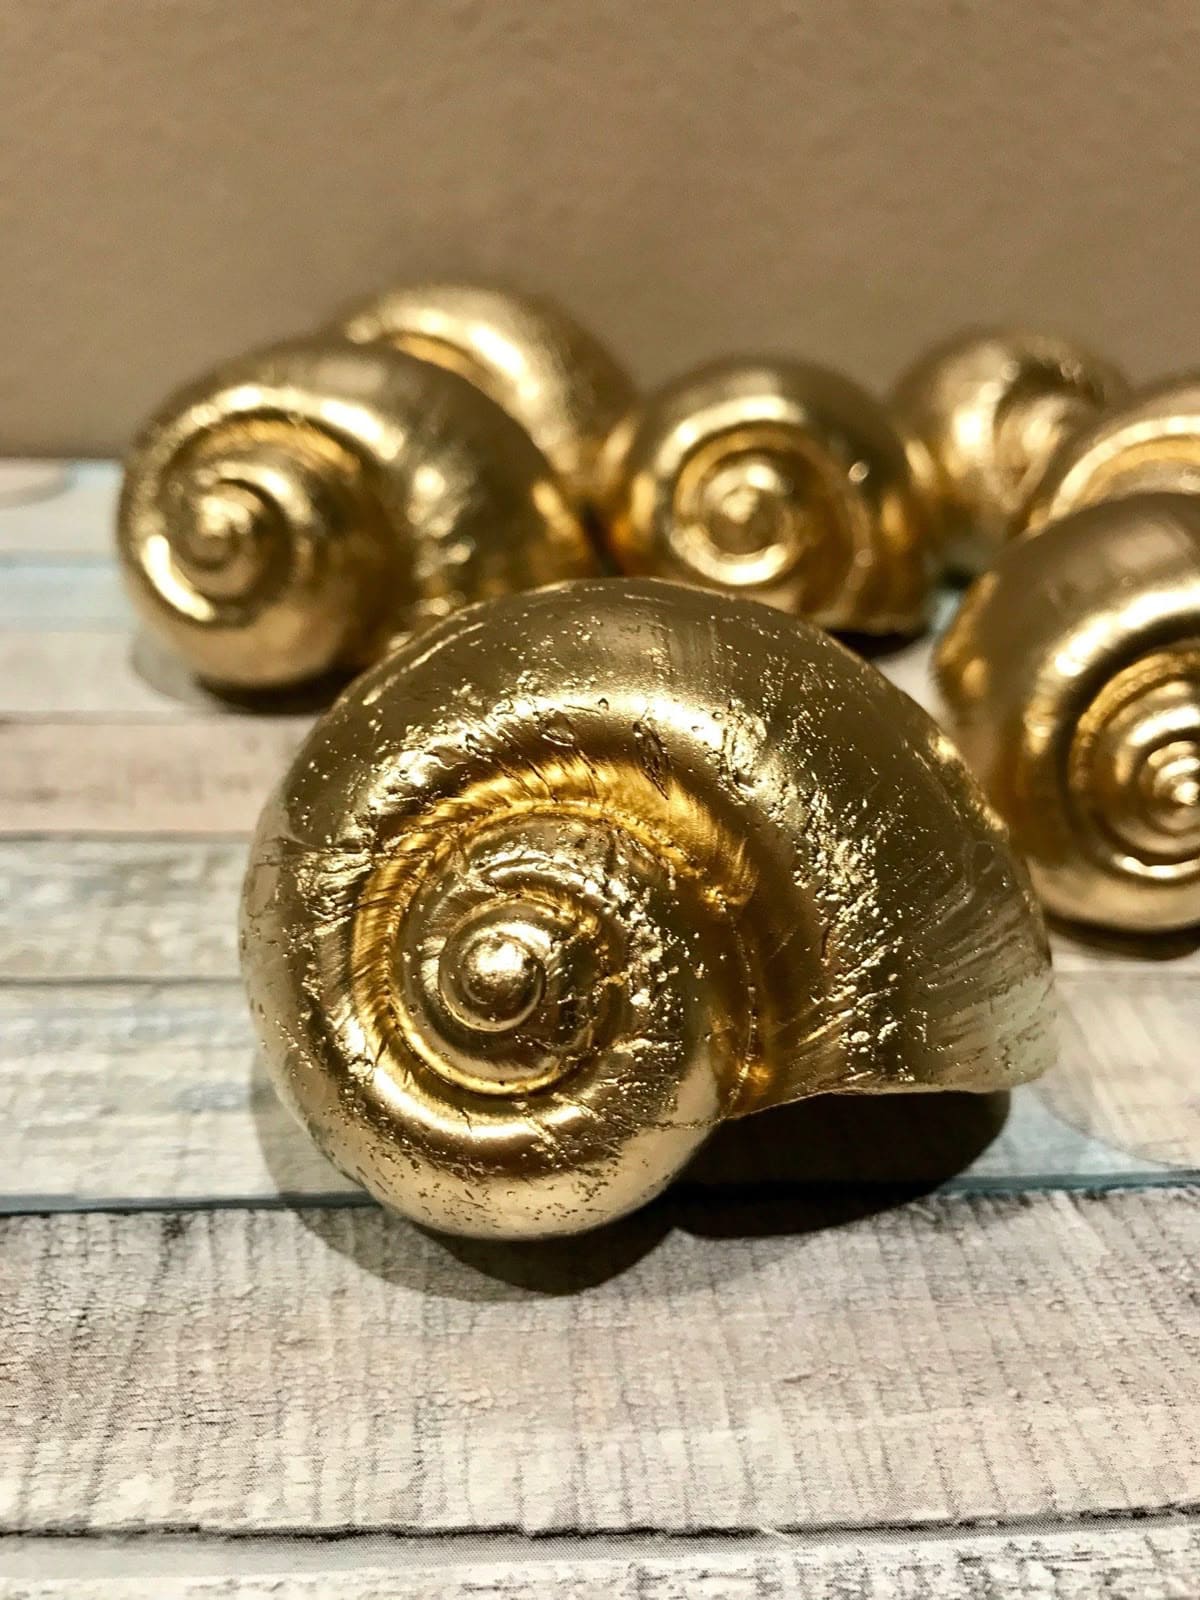
These golden snail shells bring pure sophistication to any space. They shimmer like hidden treasure, catching the light with every curve.
If you’re looking for a way to blend coastal nature with a luxurious aesthetic, this project is your golden ticket.
Plus, use them as table scatter for dinner parties, fill a glass jar for a glam accent, or glue them onto wreaths or shadow boxes for a high-end rustic twist.
Materials Needed
- Snail shells
- Gold metallic spray paint or gilding paint
- Protective gloves and mask
- Paint sealer (optional)
- Drop cloth or cardboard
Step-by-step Guide
Step 1: Lay out your shells on a drop cloth in a well-ventilated space or outdoors. Then spray or brush on a coat of gold paint, turning each shell to cover all angles evenly.
Step 2: Let dry, then apply a second coat for a richer finish.
Step 3: Optional: Seal with a clear gloss spray to protect the paint and add a glossy shine.
#11. Coastal Seashell Napkin Rings
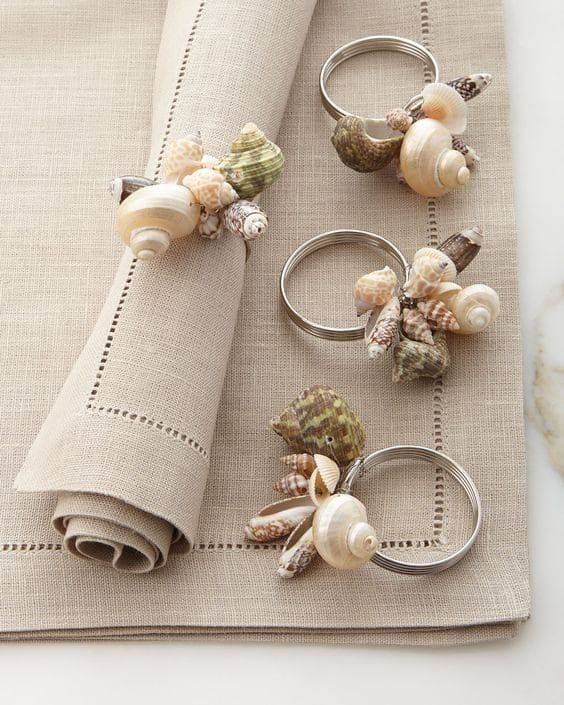
You can also bring the calm charm of the coast right to your dinner table with these elegant seashell napkin rings.
These small accessories add a surprising amount of style and texture to a simple table setting. Whether you’re planning a summer gathering or just want to relive a seaside memory, they infuse every meal with a soft, ocean breeze vibe.
Materials Needed
- Plain metal or wooden napkin rings
- Miniature seashells (assorted shapes and colors)
- Hot glue gun and glue sticks
- Optional: Pearl beads or small faux sea glass
- Protective mat or work surface
Step-by-step Guide
Step 1: Choose and group 4-6 shells per ring based on size and color harmony.
Step 2: Apply a small amount of hot glue and begin layering the shells onto the ring. You can fill in any gaps with smaller shells or decorative accents like pearls.
Step 3: Let everything dry fully and test each ring for durability.
Step 4: Style them with soft napkins in natural hues for an effortlessly coastal table.
Tips: If using real shells, rinse and dry them thoroughly before gluing to remove any residue or salt that might interfere with adhesion.
#12. Handmade Snail Shell Bracelet
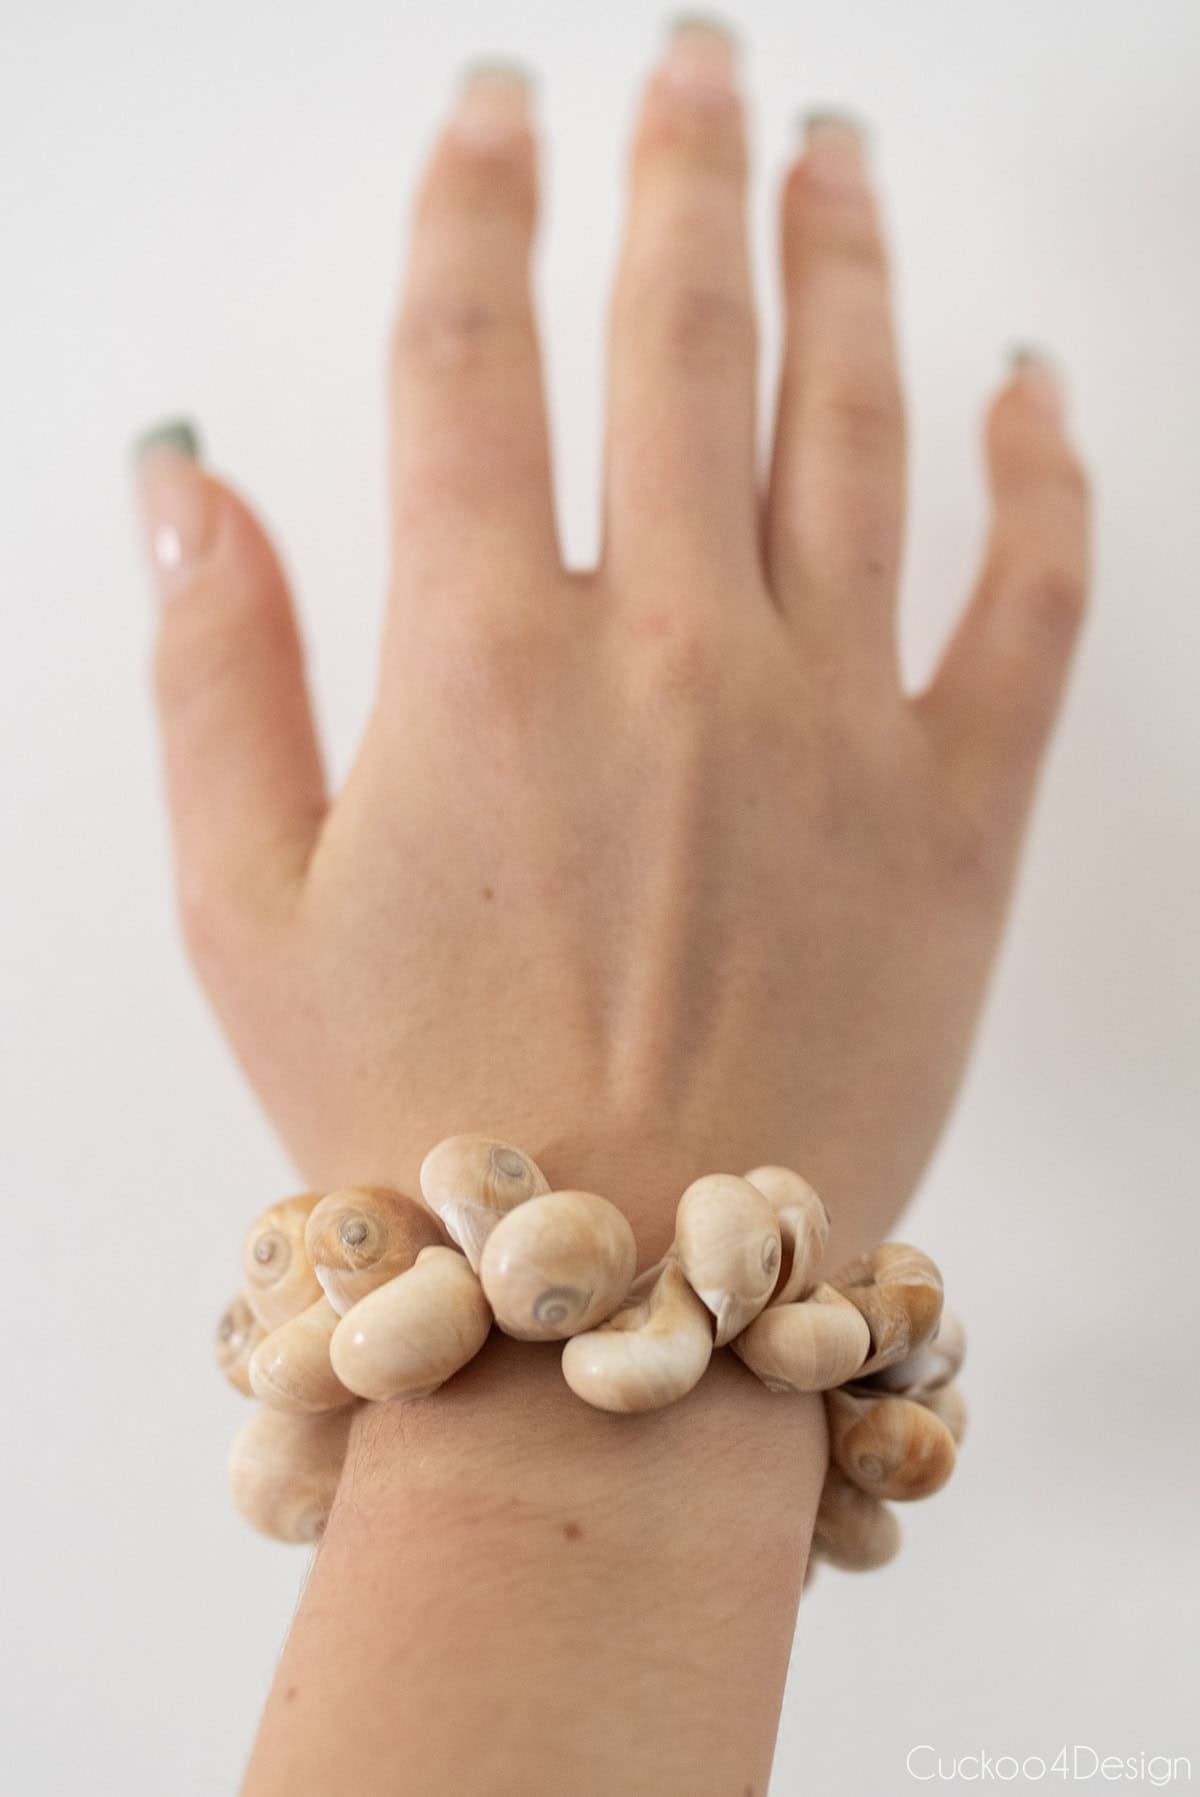
Earthy, tactile, and totally unique, this snail shell bracelet brings coastal charm to your wrist in the most natural way.
Each tiny shell carries its own story from the sea, forming a textured, chunky piece that’s just as much a statement as it is a conversation starter.
Moreover, the bracelet feels grounded and organic, with a sculptural edge that makes it stand out from mass-produced jewelry.
Materials Needed
- 20-30 small snail shells
- Elastic string (approx. 25-30 cm)
- Drill with tiny bit
- Scissors
Step-by-step Guide
Step 1: Carefully drill a small hole through each snail shell, preferably at the top curve for a balanced look.
Step 2: Cut a length of elastic string and begin threading shells one by one, alternating sizes for variety.
Step 3: Check the fit around your wrist and add more shells if needed. Then tie a double knot tightly and pull it into a shell to hide it.
Step 4: Trim excess string and test the bracelet’s stretch before wearing it proudly.
#13. Beachy Shell Cocktail Picks
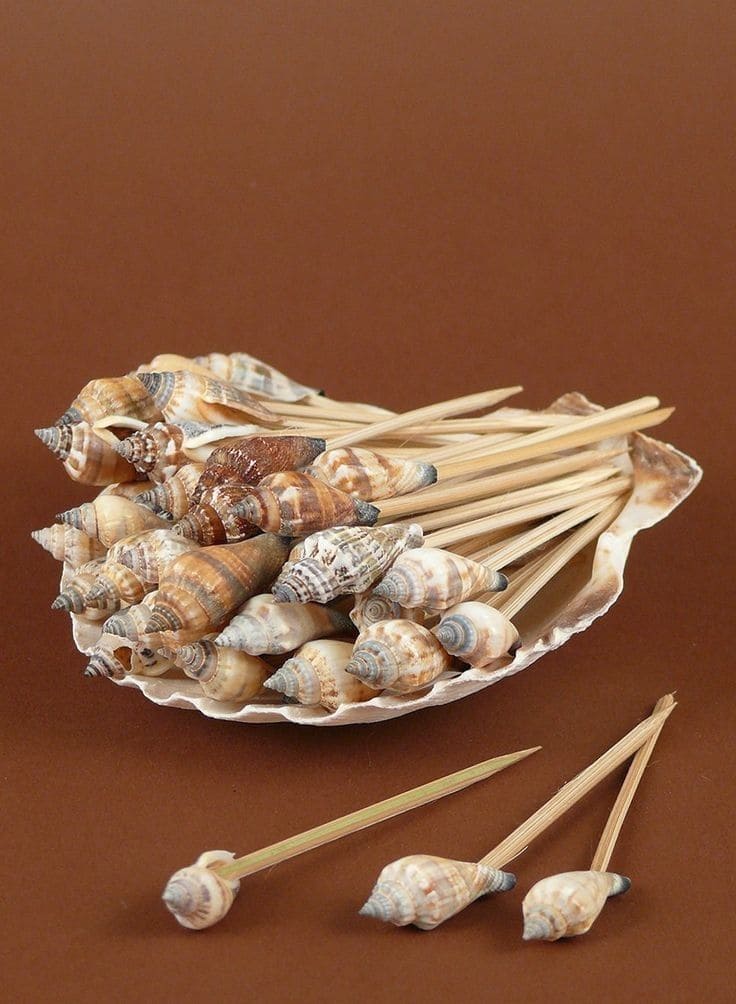
You can bring a splash of seaside charm to your table with these shell-tipped cocktail picks. They’re a clever and simple way to elevate party snacks or summer drinks with a coastal twist.
You don’t need to be a crafting expert to make them, just a little glue and a handful of pretty sea snail shells will do the trick.
You can also line them up in a seashell bowl or glass tumbler for an extra pop of beachy beauty.
Materials Needed
- Small snail shells
- Bamboo skewers
- Strong craft glue
- Large clam shell
Step-by-step Guide
Step 1: Choose snail shells that are similar in size and have flat bases for easy gluing.
Step 2: Next, apply a dot of glue to the flat end of each skewer and attach a shell securely.
Step 3: Let them dry upright in a foam block or resting against a cup to ensure the glue sets evenly.
Step 4: Once dry, arrange the finished picks in a shell or jar for display and use.
#14. Snail Shell Botanical Sculpture Display
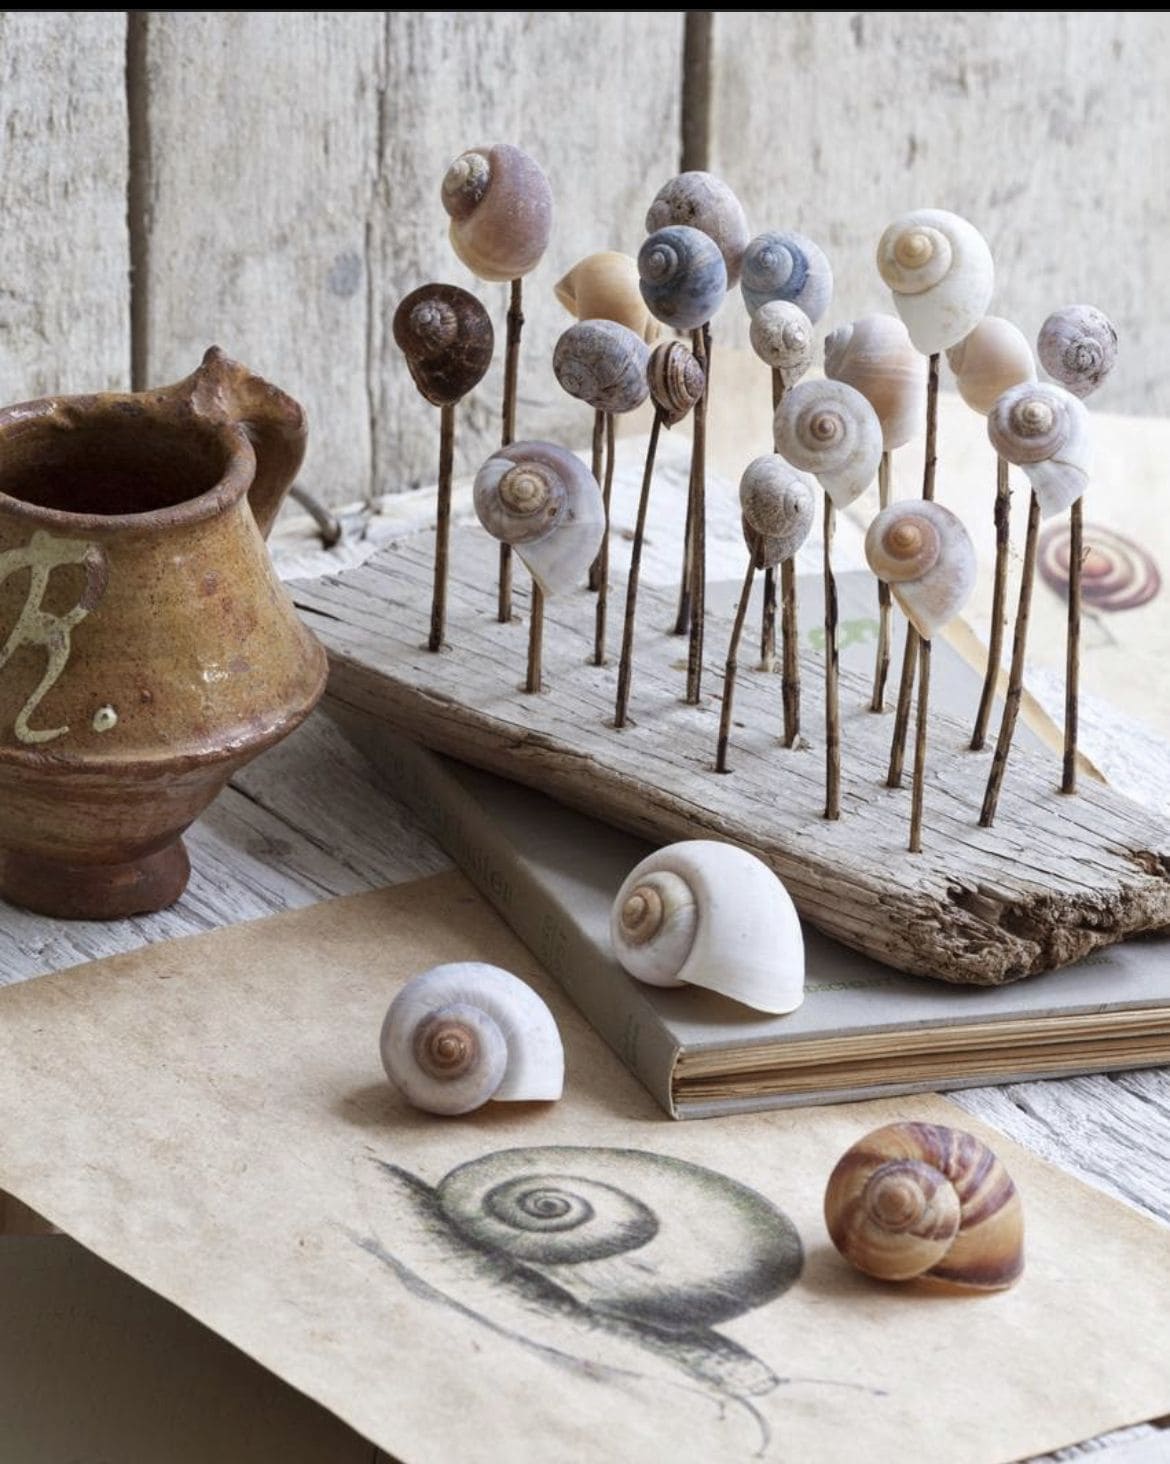
There’s something poetic about turning snail shells into a standing forest of delicate stems. This arrangement looks like nature paused mid-breath.
By attaching shells to thin twigs and anchoring them into weathered driftwood, you get a sculptural piece that echoes botanical study and folk art.
Perfect as a table centerpiece, a bookshelf accent, or part of a coastal cottage vignette, it invites people to stop and look a little closer.
Materials Needed
- 20-25 snail shells in varying tones and sizes
- 20-25 thin twigs or sticks (5-7 inches tall)
- 1 piece of driftwood (approx. 12-15 inches)
- Drill with small bit or hand awl
- Hot glue
Step-by-step Guide
Step 1: Drill or puncture small holes in the driftwood where you’ll place each twig, spacing them unevenly for a more natural look.
Step 2: Insert and glue each twig securely into the drilled holes to stand upright.
Step 3: Attach one snail shell to the top of each twig using hot glue, making sure it’s centered and balanced.
Step 4: Once dry, gently shake the driftwood to ensure all parts are stable. Then place your sculpture where it can be admired like n a shelf, windowsill, or rustic display nook.
#15. Adorable Clay and Shell Snail Pets
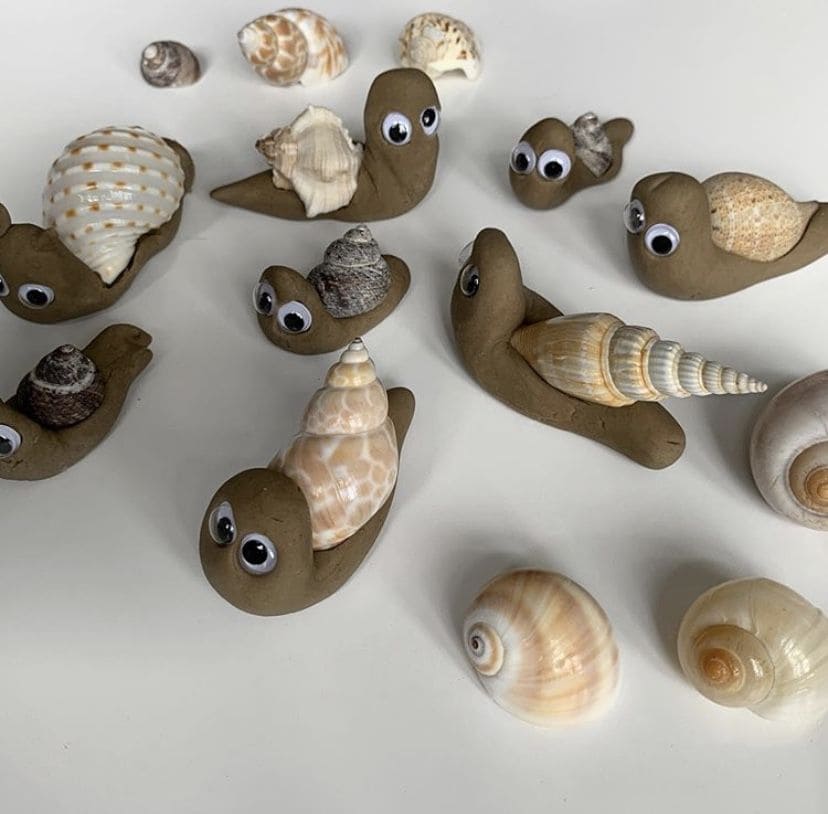
These handmade snail critters are almost too cute to handle. With their wide googly eyes and colorful real shell homes, they bring an instant smile and a playful touch to any shelf or windowsill.
I believe kids especially love making them, but trust me, adults can’t resist sculpting a few either.
Materials Needed
- Air-dry clay or polymer clay (brown, tan, or natural tones)
- Small seashells
- Googly eyes (0.5″ or smaller)
- Craft glue
- Optional: toothpick
Step-by-step Guide
Step 1: Roll a piece of clay into a fat teardrop or banana shape for the snail’s body. Then flatten one end slightly to form a head.
Step 2: Press two googly eyes onto the head or attach them with craft glue for more security.
Step 3: Choose a shell and gently press it into the back of the clay body to create the home. Now, you let it sit firmly but without breaking the shell.
Step 4: Allow the snails to dry fully if using air-dry clay. Once dry, you can optionally seal them with a light varnish for added shine and durability.
#16. Snail Shell and Bead Garden Curtain
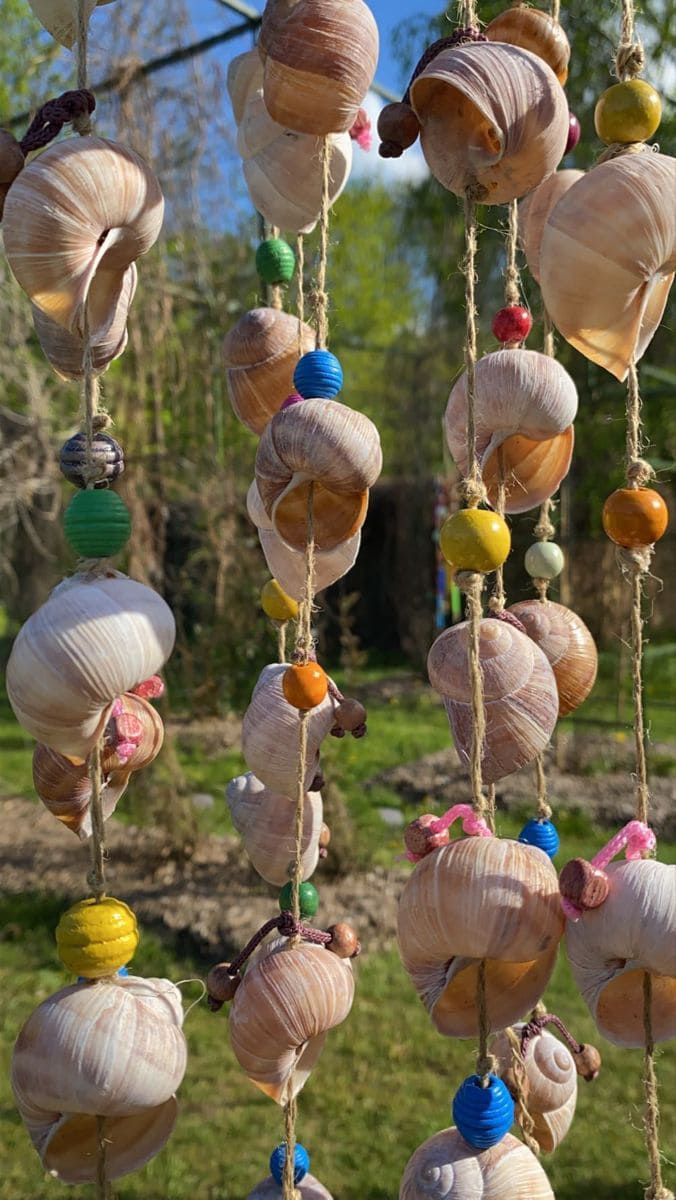
By combining naturally weathered snail shells with brightly colored wooden beads, each strand becomes a playful cascade that catches light and movement.
When the wind whispers through, it creates a soft, organic rattle that feels like summer days by the sea.
This hanging piece doubles as a privacy screen and an artistic focal point in outdoor areas. It feels joyful, rustic, and delightfully handmade.
Materials Needed
- 25-30 snail shells
- 20-30 large wooden or ceramic beads in various colors
- Jute twine (about 10 feet)
- Small wooden rod (1-2 feet long)
- Hot glue gun (optional)
Step-by-step Guide
Step 1: Cut multiple lengths of jute string depending on how many hanging strands you’d like (typically 5-7).
Step 2: Thread a combination of shells and beads onto each strand, tying knots beneath them to hold them in place.
Step 3: Once all strands are filled, tie the tops of each one to the wooden rod or dowel, spacing them evenly.
Step 4: Hang the finished curtain in a breezy spot using hooks, nails, or garden hangers.
Step 5: If needed, secure shells in place with hot glue to prevent slipping over time.
#17. Sparkling Snail Shell Jewels
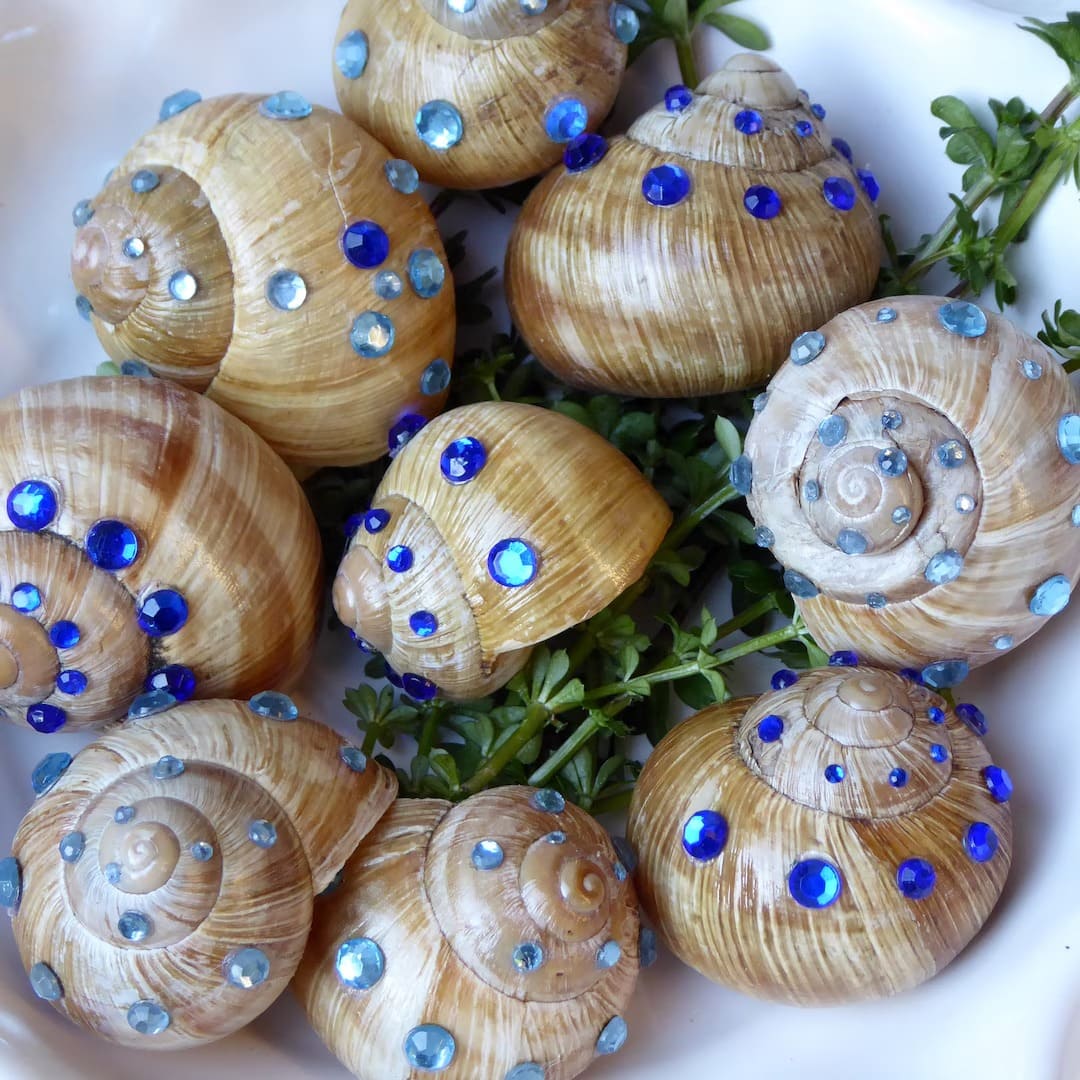
Let’s turn nature’s spiral wonders into little treasures by adorning snail shells with colorful gems. These glimmering beauties catch the light like ocean treasure washed ashore.
Whether you scatter them across a garden bed or use them as whimsical bowl fillers indoors, they’ll charm anyone who spots them.
This is a fun, no-fuss project that’s perfect for a rainy afternoon craft session, great for kids too.
Materials Needed
- 10-12 clean, empty snail shells
- Flat-back rhinestones
- Clear-drying craft glue
- Toothpick
- Optional: glitter or metallic paint
Step-by-step Guide
Step 1: Rinse and dry your snail shells thoroughly before decorating. Then dot small amounts of glue along the shell ridges or randomly across the surface.
Step 2: Use tweezers or a toothpick to gently place rhinestones onto the glue spots.
Step 3: Let them dry fully before handling or displaying them in a shallow bowl or garden nook.
Tips: For extra sparkle, you lightly brush the shells with metallic paint before adding gems, or use glow-in-the-dark jewels for a night garden surprise.
#18. Coastal Snail Shell Candle Centerpiece
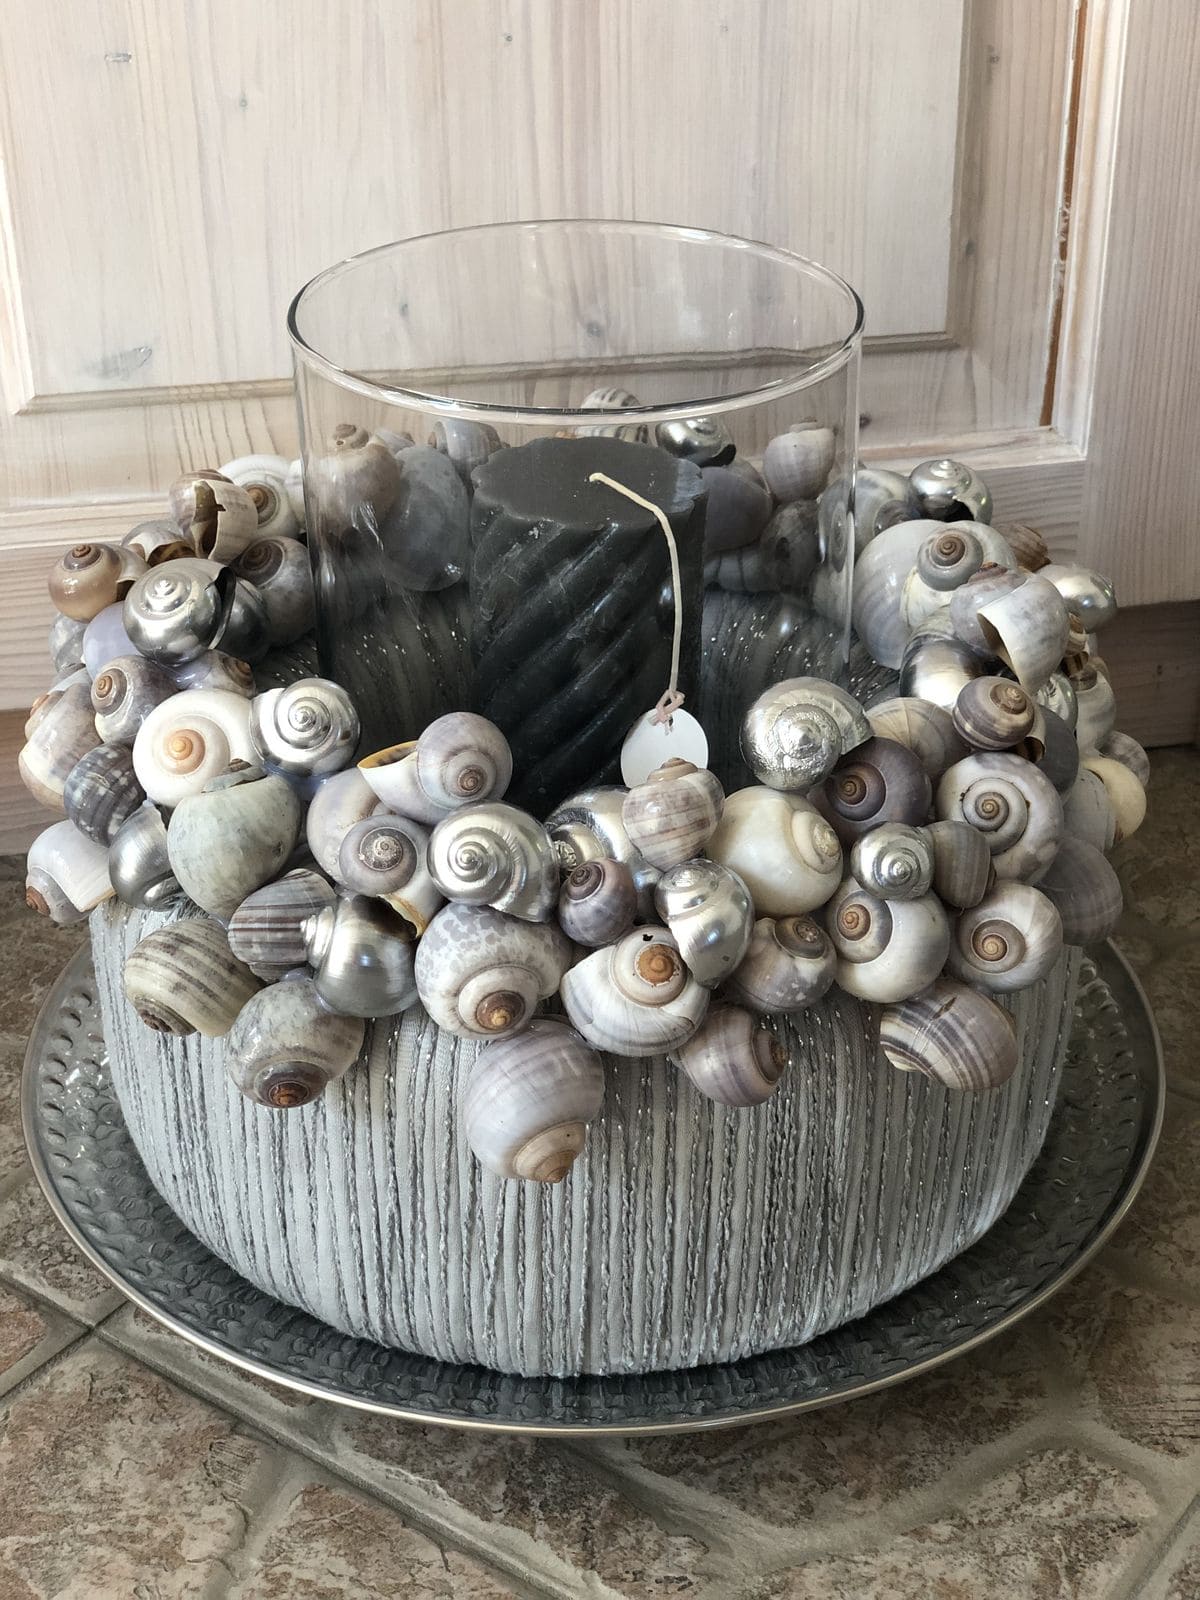
If you want a showstopping accent for your table, this candle centerpiece wrapped in glossy snail shells radiates quiet elegance with a coastal soul.
Additionally, the muted silver, pearl, and sand-toned shells create a wreath-like ring that instantly draws the eye and reflects candlelight with soft shimmer.
You can use it as a seasonal piece or keep it on display year-round for a touch of coastal charm in any room.
Materials Needed
- 1 large cylindrical candle (3-4 inches diameter, 5-6 inches tall)
- 1 hurricane glass or wide jar
- 60-80 snail shells in soft neutral tones
- Styrofoam wreath base (10-12 inches)
- Hot glue gun and glue sticks
- Optional: silver spray paint
Step-by-step Guide
Step 1: Spray the wreath base with silver or neutral paint if desired and let it dry fully.
Step 2: Starting from the outer edge, hot glue the snail shells onto the base, working in circular layers toward the center.
Step 3: Fill in gaps with smaller shells or accent pieces for a full, textured look.
Step 4: Now, you place the candle inside the hurricane glass and nestle it into the center of the wreath.
Step 5: Set the completed piece on a charger plate or tray for easy moving and extra polish.
#19. Rainbow Snail Shell Garden Stake
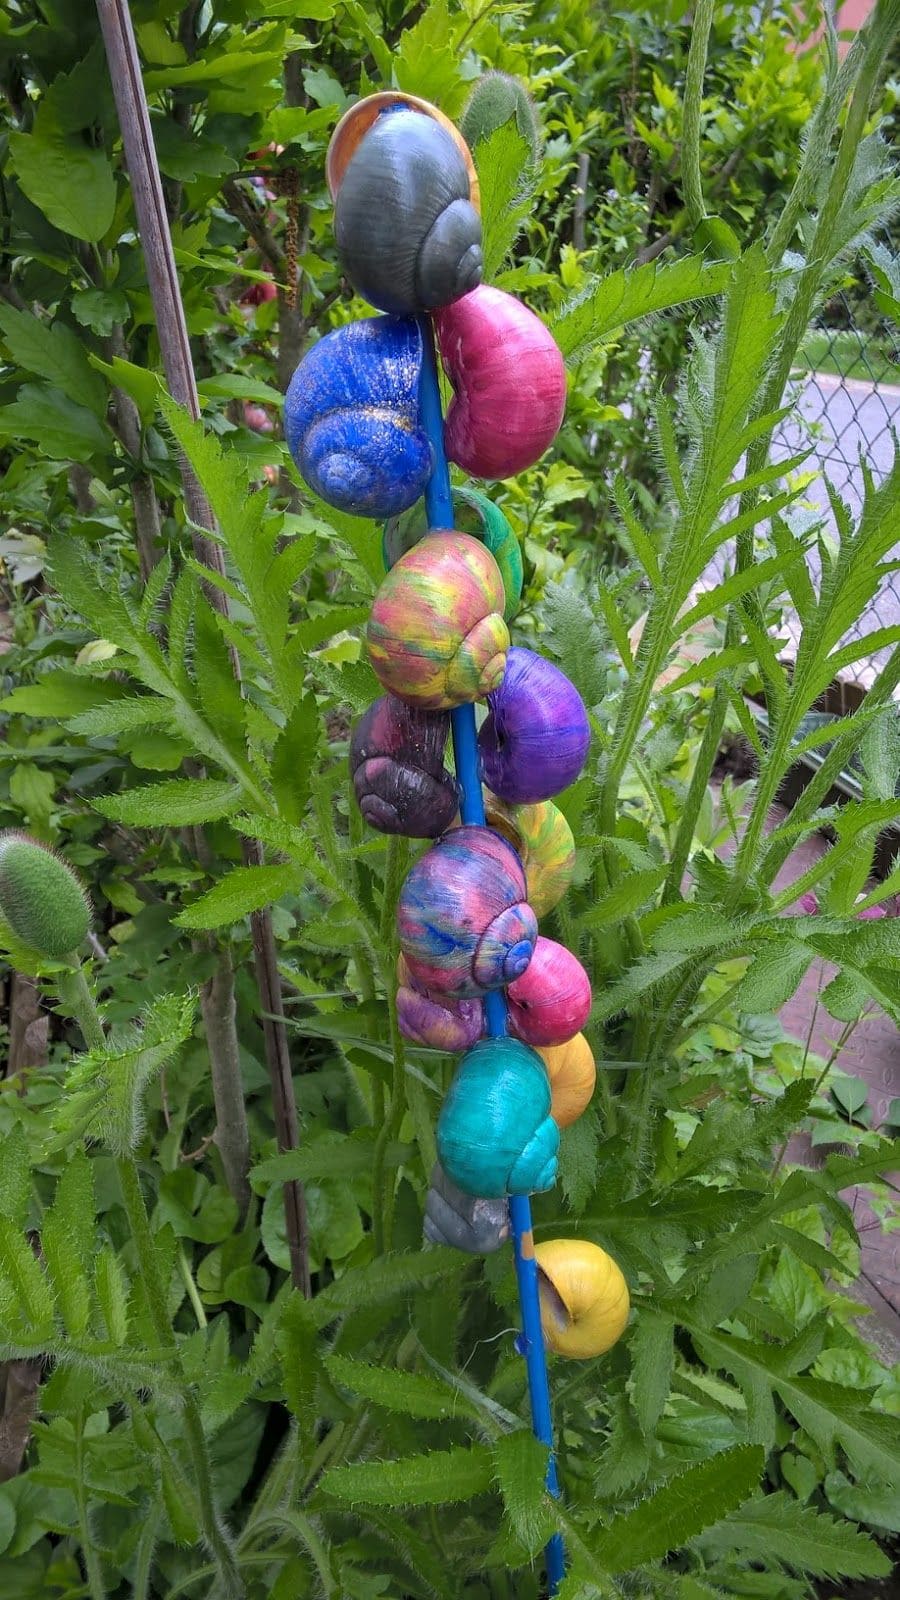
What about adding a burst of joyful color to your garden with this whimsical snail shell stake? Each painted shell turns into a tiny jewel nestled along a garden rod, catching sunlight and drawing smiles from every visitor.
You don’t need to be a painter, just let the colors flow. Whether you go with bold brights or soft pastels, your garden will thank you with a little extra magic.
Materials Needed
- 10-15 clean snail shells
- Outdoor acrylic or enamel paint
- Paintbrushes
- Clear sealant spray (UV-protectant)
- Strong garden stake
- Hot glue
Step-by-step Guide
Step 1: Paint each snail shell in your chosen colors. You can swirl, splatter, or color-block for different effects.
Step 2: Allow all shells to dry completely, then spray with a clear sealant to protect them from moisture and sun exposure.
Step 3: Glue the shells onto the garden stake, spacing them evenly or layering as you like.
Step 4: Let dry and cure fully before placing the stake securely into the soil.
#20. Whimsical Snail Dolls with Fabric Bodies
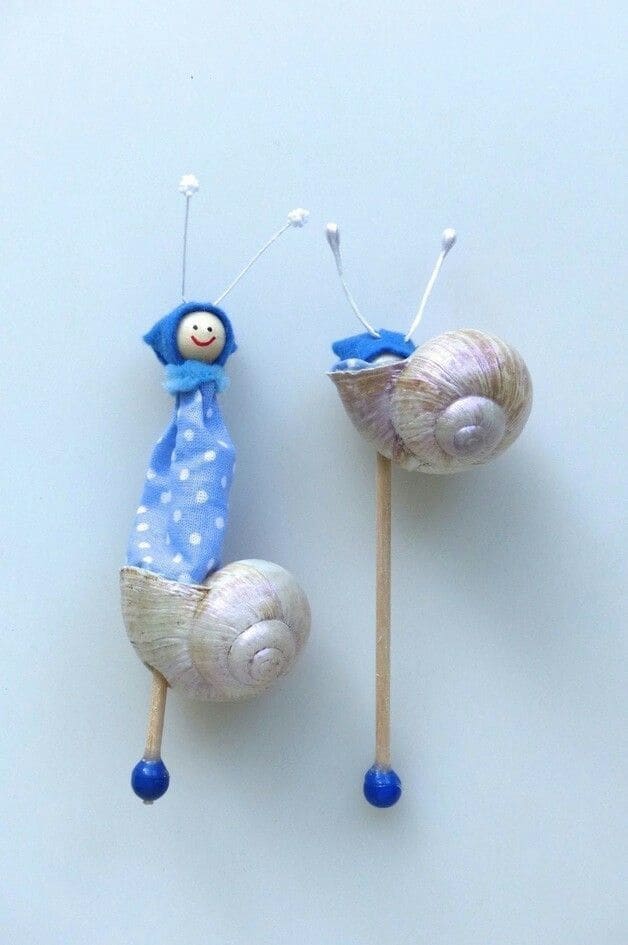
If you love charming miniatures, these snail dolls will steal your heart. Their spotted fabric “bodies” and playful antennae give them a personality that’s hard to ignore.
Specially, these are delightful for decorating nursery shelves, using in seasonal displays, or even adding to whimsical fairy gardens.
You can customize the fabric patterns or colors to reflect your own playful spirit.
Materials Needed
- 2 empty snail shells
- Small fabric scraps (polka-dot or patterned cotton)
- Wooden beads (0.5″ diameter)
- Thin sticks
- Straight pins with decorative ends
- Glue gun
- Permanent marker
Step-by-step Guide
Step 1: Cut fabric into small rectangles and wrap them to form loose bodies that will sit inside the shell.
Step 2: Attach a wooden bead to the top of each fabric body to form the snail’s head. Then use straight pins as antennae by gluing them into the wooden beads.
Step 3: Insert sticks into the shell’s base to make whimsical legs, adding glue to secure.
Step 4: Now you just draw on smiles or tiny eyes with a fine marker to give each snail its own joyful expression.
#21. Nautical Snail Shell Curtain Tieback
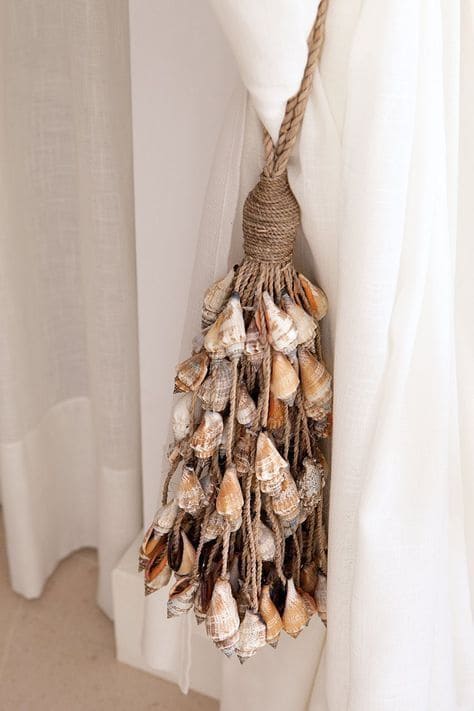
Why not infuse your home with a touch of seaside elegance using this beautifully crafted snail shell curtain tieback?
Made with sturdy jute rope and dozens of natural-toned snail shells, this piece adds texture and coastal flair to any room.
I believe no matter how you live near the ocean or just dream of it, this tieback can bring that breezy, beach-house charm right into your living space.
Materials Needed
- 40-60 snail shells (cone-shaped or elongated)
- Jute rope (approx. 2 meters)
- Hot glue gun
- Scissors
- Twine or small rope
Step-by-step Guide
Step 1: Cut your jute rope into equal strands, depending on how full you’d like the tieback.
Step 2: Wrap one end of the bundle with thinner twine to form a tassel-like base, securing tightly with glue.
Step 3: Start attaching snail shells to the lower ends of each rope strand using a glue gun, spacing them randomly or layering closely.
Step 4: Once all shells are attached and glue is dry, test the weight and make sure everything is secure.
Step 5: Now, drape the tieback around your curtain and loop the top end over a hook or knot it casually for a natural, relaxed look.
#22. Minimalist Shell-Edged Vanity Mirror
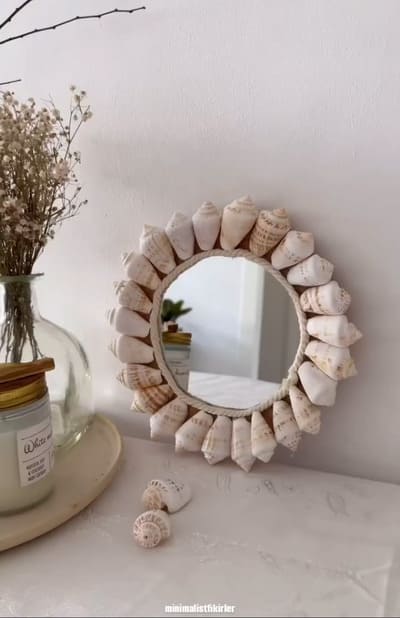
This dreamy mirror design turns a simple reflective surface into a charming coastal accent. Each cone-shaped shell is placed with care, forming a symmetrical halo around the frame that feels both soft and structured.
You can easily set it on your vanity, dresser, or hallway shelf, and let it quietly steal attention.
Materials Needed
- Small round mirror (6-8 inches)
- 30-40 cone-shaped seashells (uniform size)
- Cardboard or wooden backing disc
- Hot glue gun and glue sticks
- Jute rope (optional)
Step-by-step Guide
Step 1: Cut your backing base to match the mirror’s size, leaving a 1-inch border if desired.
Step 2: Center and glue the mirror onto the backing using strong adhesive or hot glue.
Step 3: Begin gluing the seashells one by one around the edge, points facing outward.
Step 4: Optional: You wrap jute rope around the inner edge for a clean, finished touch.
#23. Snail Shell and Bead Driftwood Chime
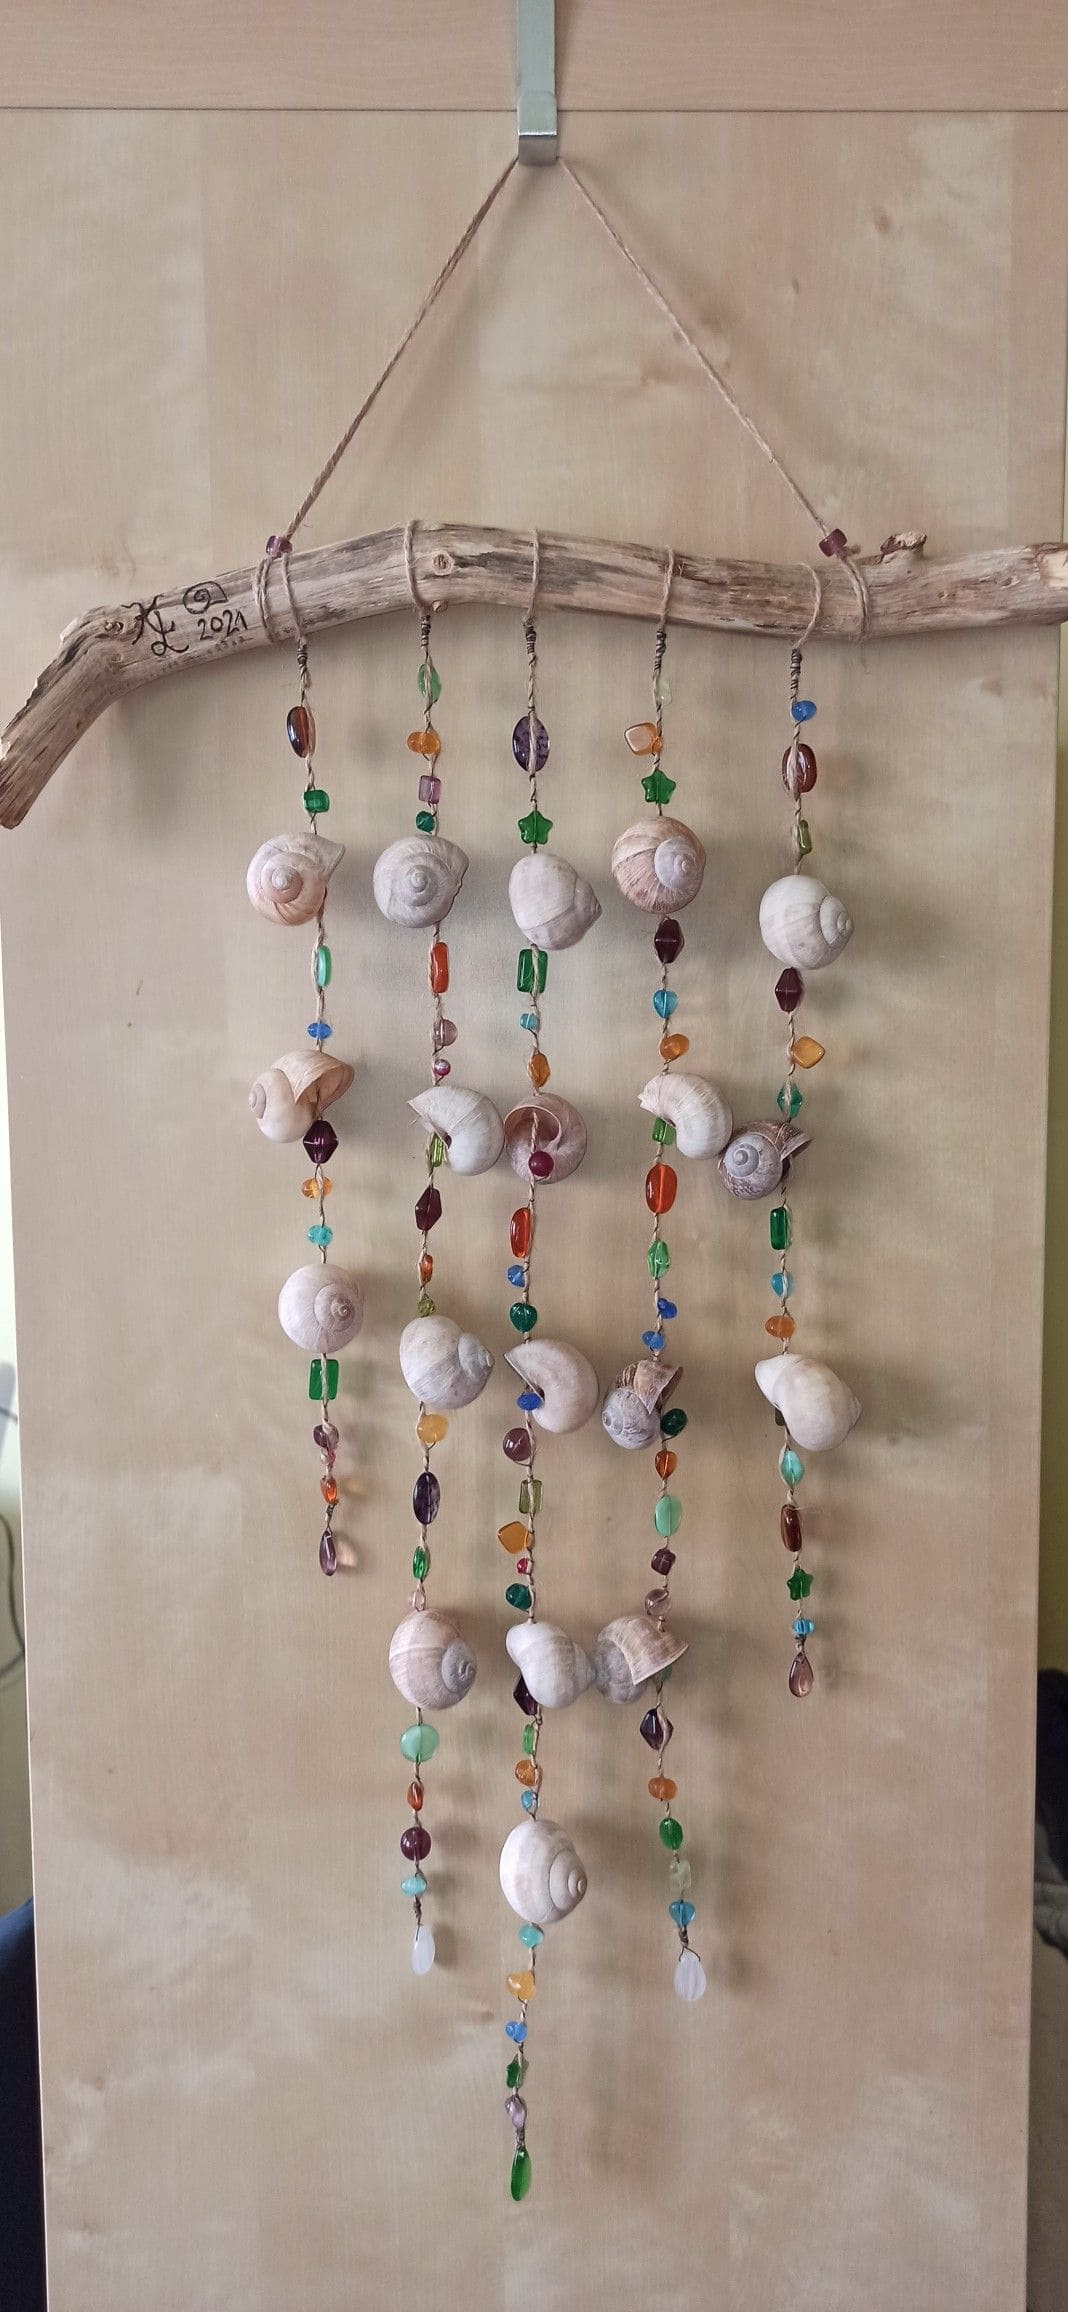
There’s something soothing about this simple yet vibrant shell and bead chime. Hanging from a rustic piece of driftwood, strands of natural snail shells and colorful glass beads sway gently in the breeze.
Additionally, the mix of earthy tones and translucent beads creates a lovely balance between organic texture and sparkling light play.
Materials Needed
- 25-30 snail shells
- Glass beads in assorted shapes and colors
- Sturdy driftwood branch (around 16-18”)
- Natural twine
- Drill with small bit (optional)
- Glue
Step-by-step Guide
Step 1: Clean the driftwood and attach a hanging loop with twine or jute.
Step 2: Arrange your beads and snail shells into several hanging strands, alternating for color and weight balance.
Step 3: Use bead wire or clear string to thread them together. If your shells don’t have holes, you can carefully drill small ones or glue the shells to the string.
Step 4: Tie each strand to the driftwood, spacing them evenly across the branch.
Step 5: Finally, hang your creation in a spot with natural light to enjoy the sparkle and shadow play.
Tips: For a more natural finish, you should try using sea glass or wooden beads mixed with the shells.
#24. Hand-Painted Snail Shell Collection
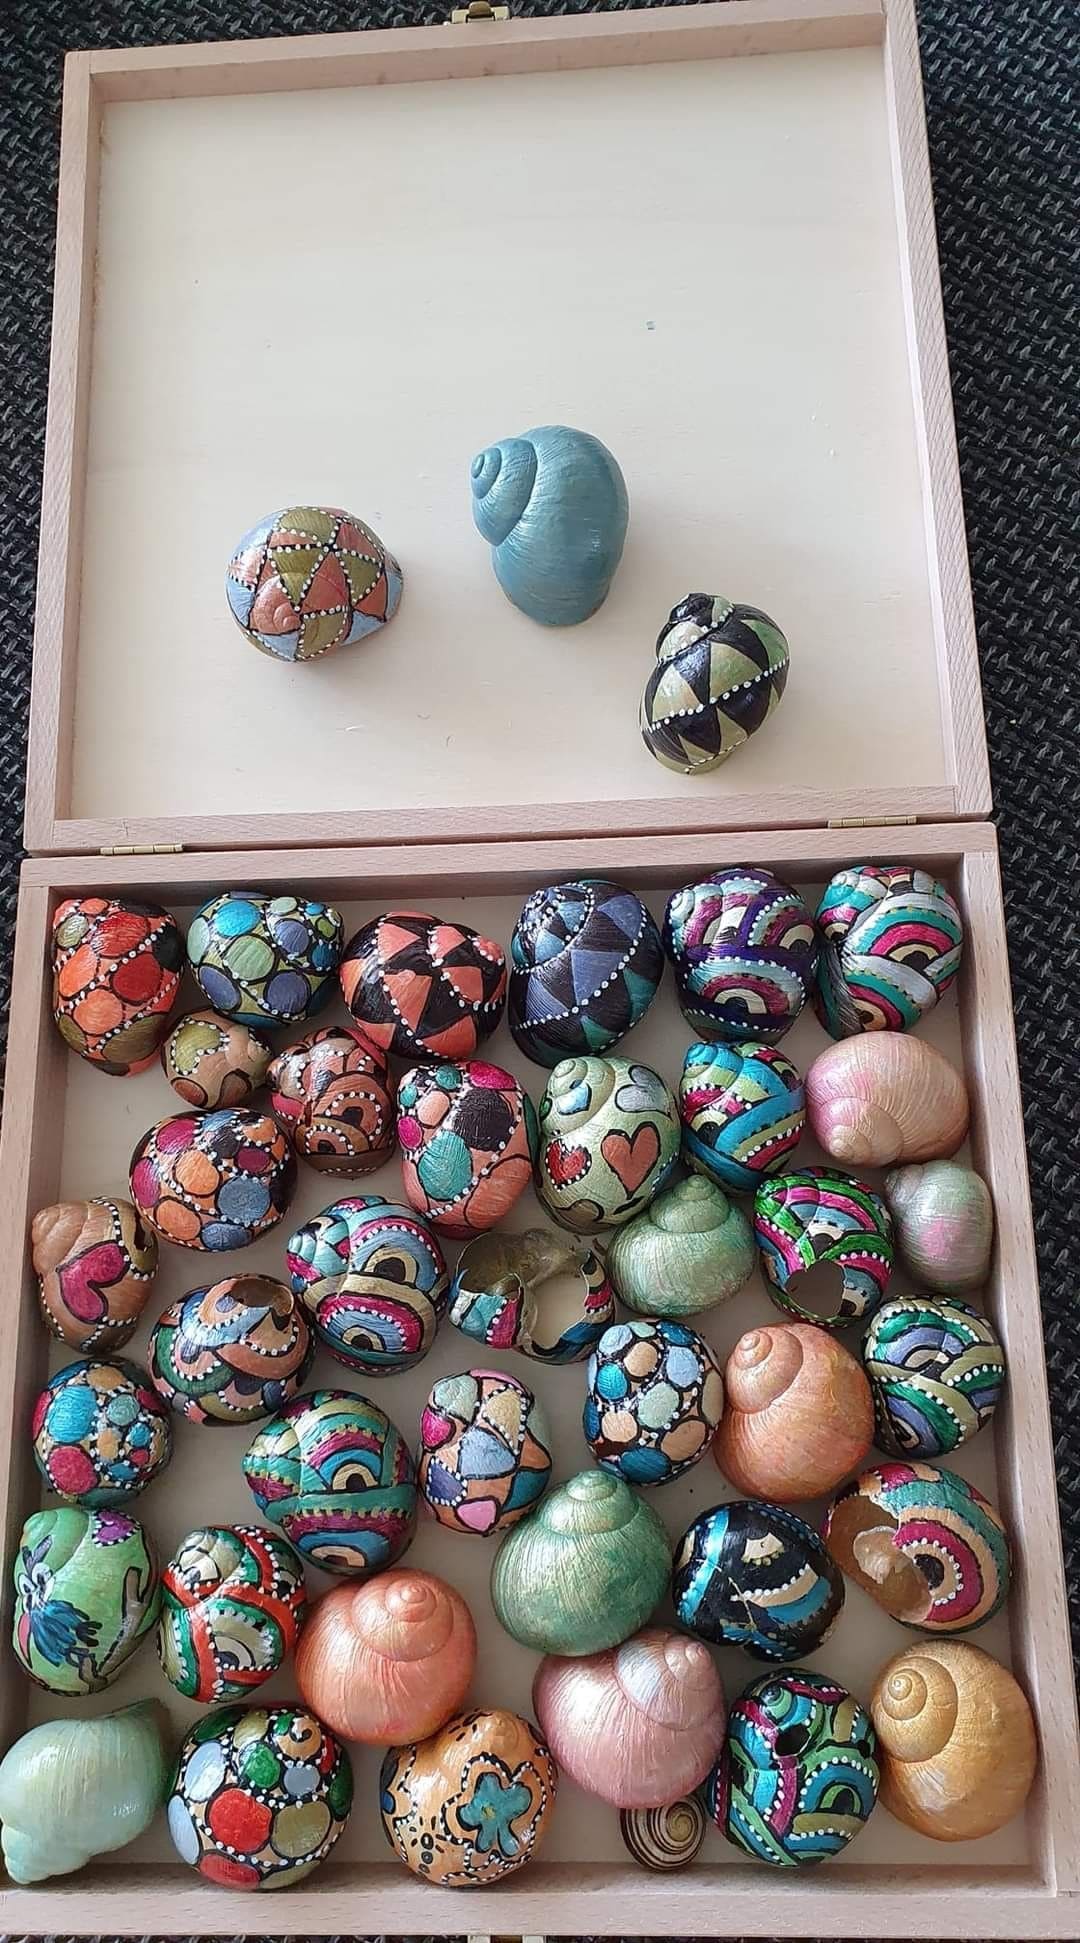
Interestingly, this treasure box of hand-painted snail shells turns nature’s leftovers into vibrant little masterpieces. It’s like holding a carnival in the palm of your hand.
Whether you display them in a shadow box, scatter them across your coffee table, or gift them as keepsakes, these miniature art shells instantly spark curiosity and delight.
Materials Needed
- 20-30 cleaned snail shells
- Acrylic paint or paint pens
- Detail paintbrushes
- Glossy sealer
- Small wooden display box (optional)
Step-by-step Guide
Step 1: Clean and dry your shells thoroughly before starting. Then sketch your pattern ideas on paper or go freehand directly with paint.
Step 2: Use small brushes or paint pens to decorate the shells. Let dry completely between layers.
Step 3: Apply a coat of glossy sealant to preserve the colors and give a polished look.
Step 4: Arrange in a wooden box, dish, or mini shelves as a joyful display piece.
Tips: Metallic paints and dotting tools create extra dimension. So, you can try themes like mandalas, florals, or abstract swirls for variety.
#25. Coastal Shell Bottle Toppers
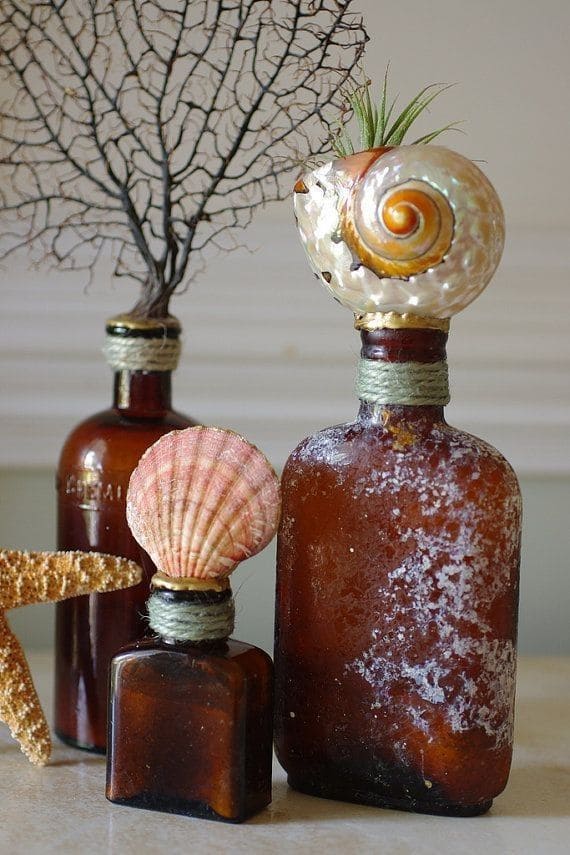
These repurposed amber bottles are topped with sea-inspired stoppers that bring a breath of coastal air into any room.
From spiraled snail shells to delicate scallops and even a touch of greenery, each piece feels like it was plucked from a sailor’s keepsake box.
Moreover, these bottle toppers can add charm to a bathroom shelf, coastal vignette, or beach-themed centerpiece.
Materials Needed
- Vintage glass bottles (various sizes)
- Snail shells, scallop shells, or other large sea finds
- Twine or jute rope (1/4″ thick)
- Hot glue gun
- Optional: small air plant
Step-by-step Guide
Step 1: Clean and dry your bottles. Then wrap twine around the bottle necks, securing it with hot glue for a beachy touch.
Step 2: Attach shells to the tops using strong adhesive or hot glue; ensure they sit securely.
Step 3: Add small details like faux seaweed or mini plants to one or two toppers for variety.
Step 4: Arrange the finished bottles together on a shelf or window sill to catch the light and add warmth.
