Old neckties often sit forgotten in closets. But what if I told you they’re the perfect material for your next beautiful DIY project?
With their bold patterns, silky textures, and vintage charm, neckties are surprisingly versatile. From home décor to fashion accessories, these once-formal staples can be transformed into stunning, functional creations.
Whether you’re preserving a loved one’s memory or simply decluttering creatively, this collection of 22 brilliant repurposed necktie ideas will spark your imagination and warm your heart.
#1. Necktie Reindeer Ornaments
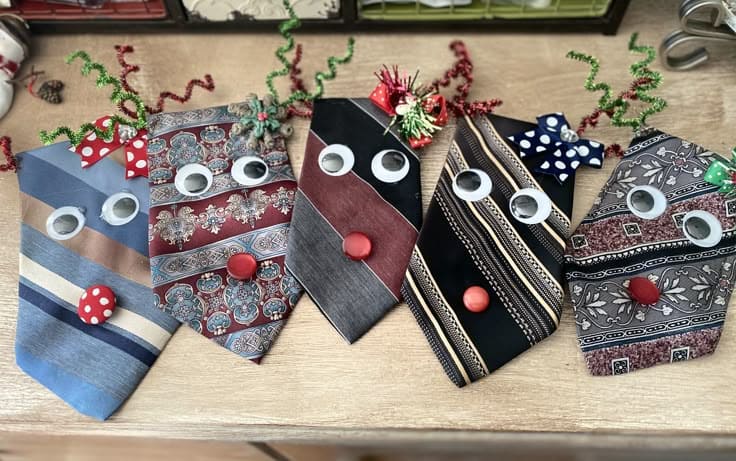
Bring a dose of whimsy to your Christmas decorations with these quirky reindeer made from old neckties. Each one has googly eyes, a bright red nose, and twisted pipe cleaner antlers that give them personality.
Materials Needed:
- 1 necktie per reindeer
- 2 googly eyes (1–1.5 cm)
- 1 red pom-pom or button for nose
- 1 small ribbon for bowtie
- 2 pipe cleaners for antlers
- Hot glue gun
Step-by-step Guide:
Step 1: Cut the necktie to your desired length and fold the top slightly for a clean edge.
Step 2: Glue on the googly eyes and a red nose toward the center.
Step 3: Twist pipe cleaners into spirals and glue to the back as antlers.
Step 4: Add a mini ribbon or bowtie to finish your reindeer’s festive look.
#2. Midnight Drama Tie Necklace
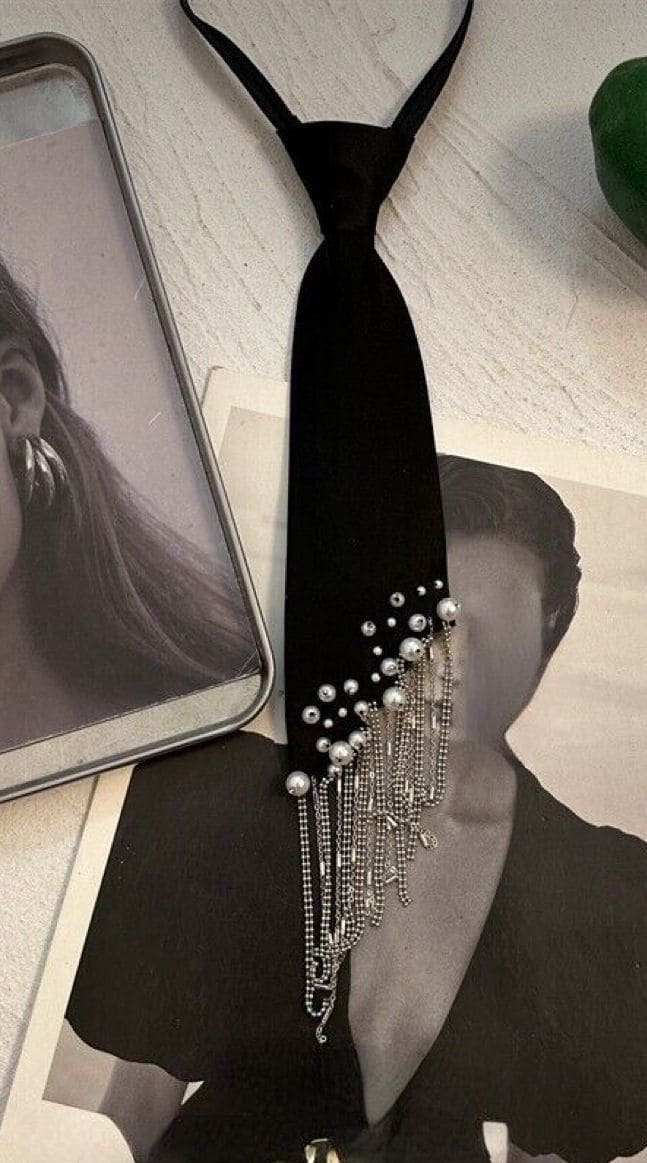
By adding cascading chains and a scattering of faux pearls, this simple black tie becomes a bold statement piece.
Materials Needed:
- 1 black necktie
- 10–15 assorted faux pearls
- 4–5 silver chain strands (varied lengths: 4–10 inches)
- Strong fabric glue or needle & thread
- Needle-nose pliers (optional)
Step-by-step Guide:
Step 1: Lay the necktie flat and plan your bead and chain arrangement near the bottom.
Step 2: Secure faux pearls using fabric glue or stitch them for extra durability.
Step 3: Attach the silver chains so they hang in staggered lengths. Sew or glue one end of each strand securely.
#3. Necktie Tote Bag
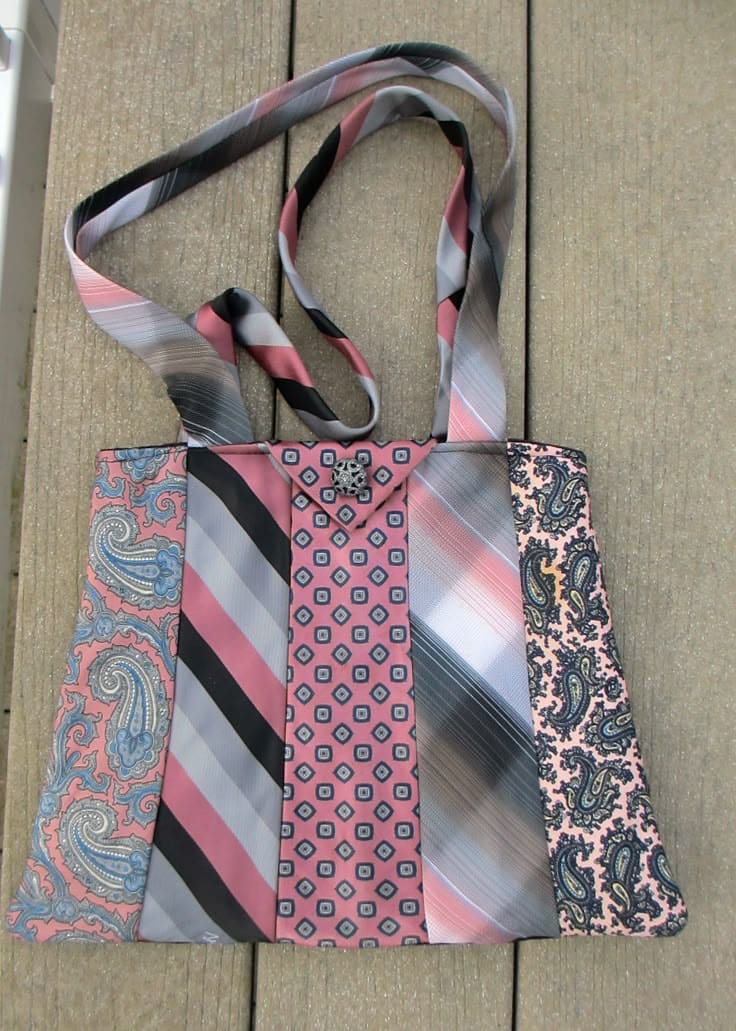
This necktie tote was such a satisfying upcycle. I gathered a few silky ties with matching tones from a thrift shop and stitched them into a structured and surprisingly sturdy bag.
Materials Needed:
- 6–8 old neckties
- Lining fabric (approx. 12″x16″)
- Matching thread
- Button or magnetic snap
- Sewing machine or hand needle
Step-by-step Guide:
Step 1: Choose and lay out your neckties in the order you want. Trim bottom points if needed.
Step 2: Sew the ties together along their long sides to create a panel. Press flat.
Step 3: Cut lining fabric to the same size as your tie panel. Sew it to the tie panel, leaving the top open.
Step 4: Turn right side out, add straps made from ties, and attach a closure (button or snap).
#4. Necktie Obi Belt
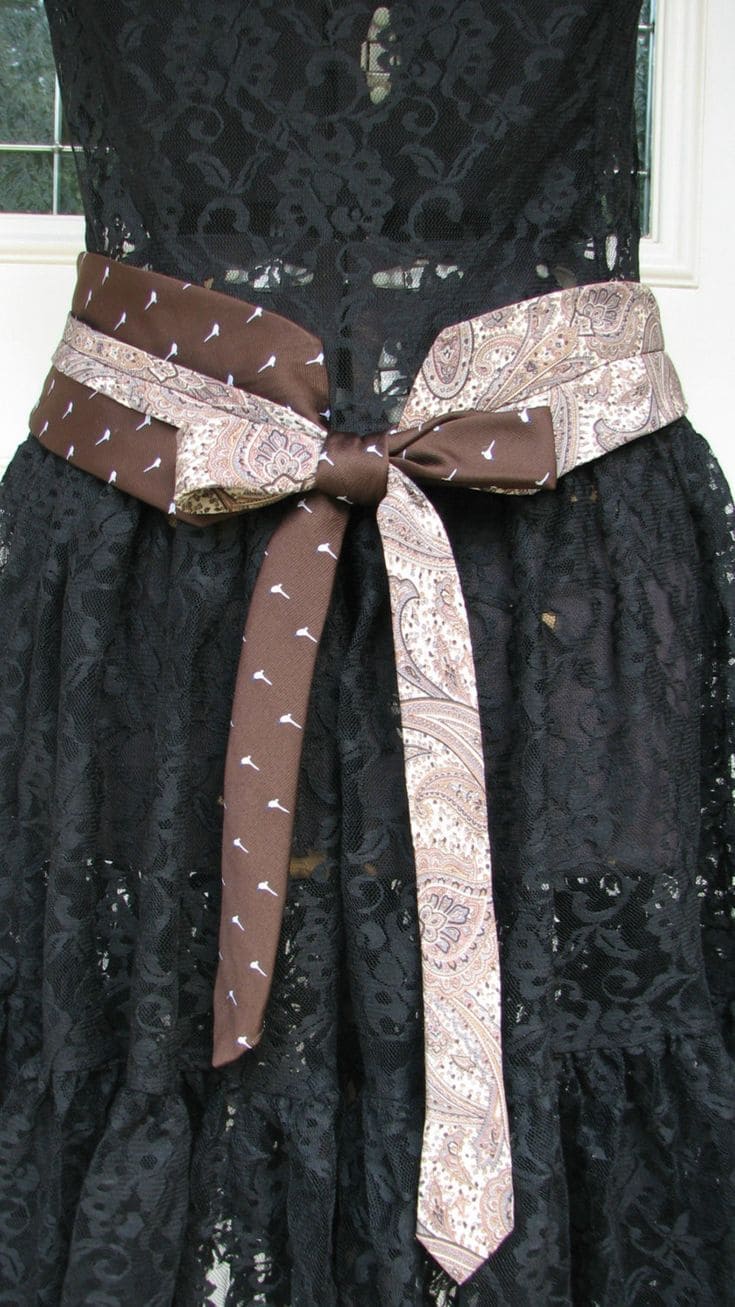
Repurposing ties into a chic obi belt is one of my favorite no-sew upcycles. It’s effortless, elegant, and surprisingly flattering.
Materials Needed:
- 2 coordinating neckties
- Fabric glue or needle & thread
- Iron (optional for crisp edges)
Step-by-step Guide:
Step 1: Lay the ties flat and press if wrinkled. Trim tips if needed for symmetry.
Step 2: Overlap narrow ends slightly and glue or stitch together. This forms the center.
Step 3: Wrap around your waist, criss-cross at the back, and tie a bow at the front.
Step 4: Optional, secure the center with a brooch or stitch down the bow to hold its shape.
#5. Vintage Tie Drawstring Bag
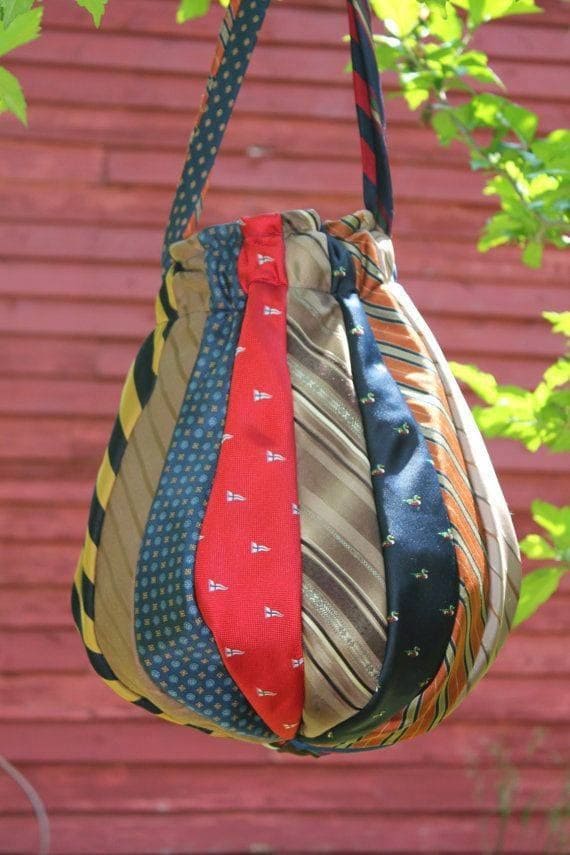
This whimsical drawstring bag made from old neckties feels like a charming walk through a flea market.
Materials Needed:
- 10–12 assorted neckties
- Matching fabric for lining
- Drawstring cord
- Basic sewing tools (thread, scissors, pins, machine)
Step-by-step Guide:
Step 1: Cut ties to equal lengths, preserving the pointed ends for the base shape.
Step 2: Sew the long edges of the ties together, forming a circular body.
Step 3: Attach a circular bottom from lining fabric and sew in place.
Step 4: Line the inside, insert a drawstring casing at the top, and thread the cord through.
#6. Necktie Rooster Table Topper
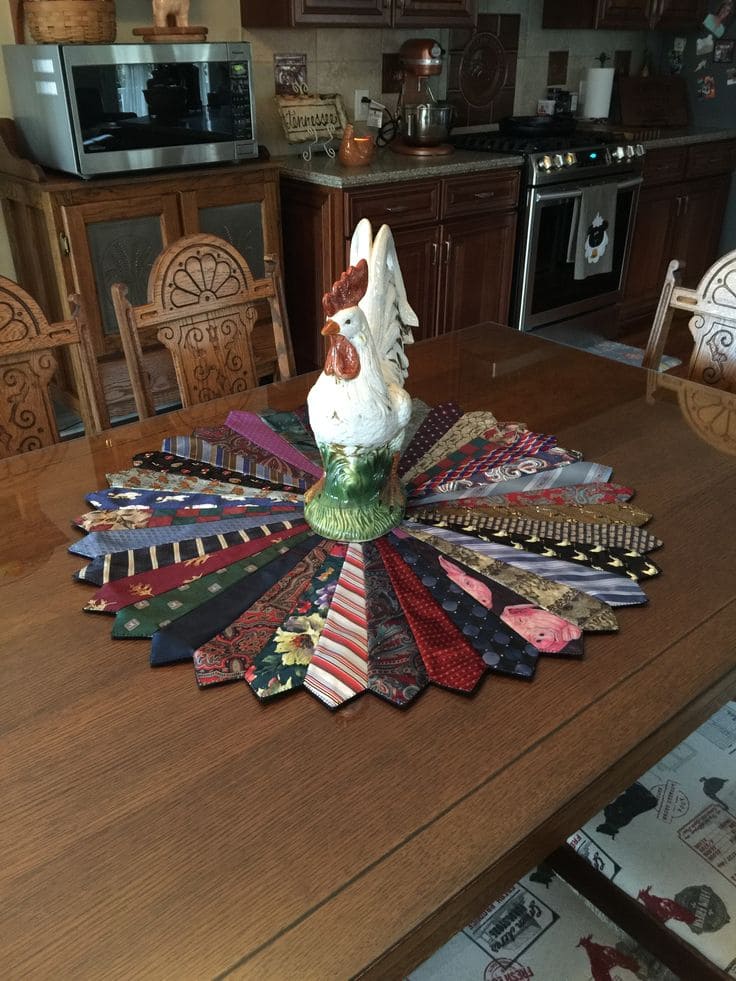
This whimsical table centerpiece gives old neckties a brand-new life, radiating out like a patchwork sunburst beneath a proud ceramic rooster.
Materials Needed:
- 20–24 repurposed neckties
- Fusible interfacing (optional for sturdiness)
- Backing fabric (approx. 20″ x 20″)
- Hot glue or fabric glue
- Sewing machine or hand needle & thread
Step-by-step Guide:
Step 1: Iron and trim each tie to the same length (around 18–20″).
Step 2: Arrange the ties in a circular pattern, overlapping slightly for a fan effect.
Step 3: Secure the ties onto a square backing fabric using hot glue or stitch them down.
Step 4: Add interfacing if needed and sew around the edge to keep it neat.
#7. Gentle Glow Necktie Lampshade
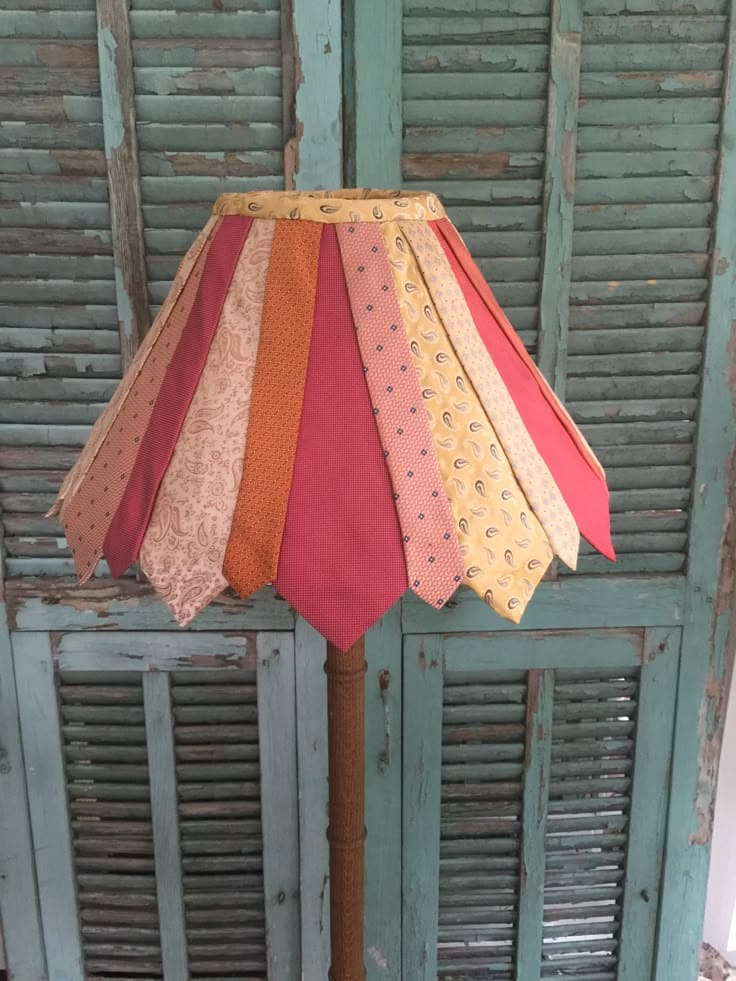
I transformed a handful of soft-toned vintage ties into this cozy, scalloped lampshade. Each tie brings a gentle, muted pattern that filters light with warmth.
Materials Needed:
- 10–14 neckties in coordinating colors
- Old lampshade frame
- Hot glue gun and sticks
- Fabric tape or trim (optional, for finishing)
Step-by-step Guide:
Step 1: Remove old shade material, leaving only the metal frame.
Step 2: Cut each tie to the same length, enough to reach from the top to the bottom of the frame with a small overhang.
Step 3: Glue each tie around the frame, overlapping slightly at edges.
Step 4: Cover the top edge with coordinating fabric trim for a clean, finished look.
#8. Punk-Inspired Statement Tie
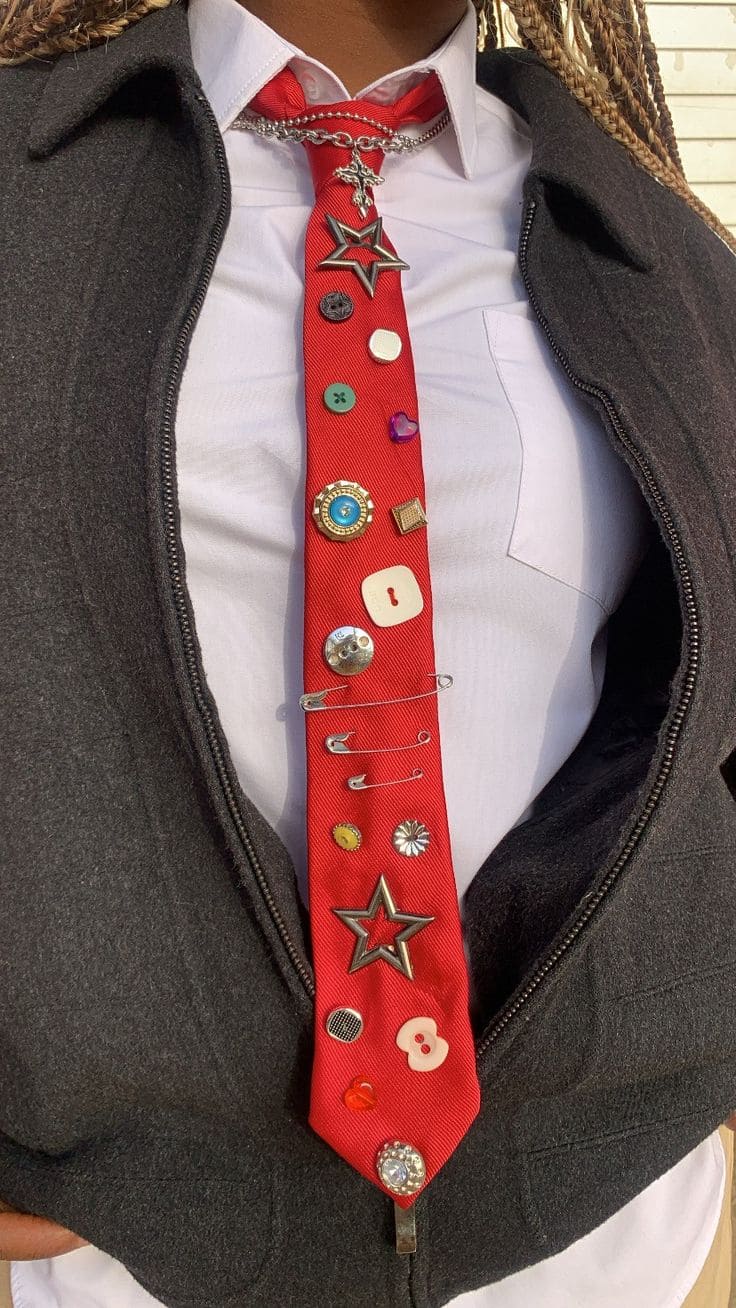
This DIY project transforms an old tie into a wearable piece of self-expression using an eclectic mix of pins, buttons, and tiny charms.
Materials Needed:
- 1 bold-colored necktie (preferably red)
- 10–15 assorted buttons, charms, or pins
- Safety pins (3–5 small)
- Needle & thread or fabric glue (optional)
Step-by-step Guide:
Step 1: Choose a tie and lay it flat. Decide on a rough placement for each embellishment.
Step 2: Attach each item using either stitching or glue, mixing textures and shapes freely.
Step 3: Add safety pins as both decoration and functional accents.
#9. Patchwork Tie Pouf Cushions
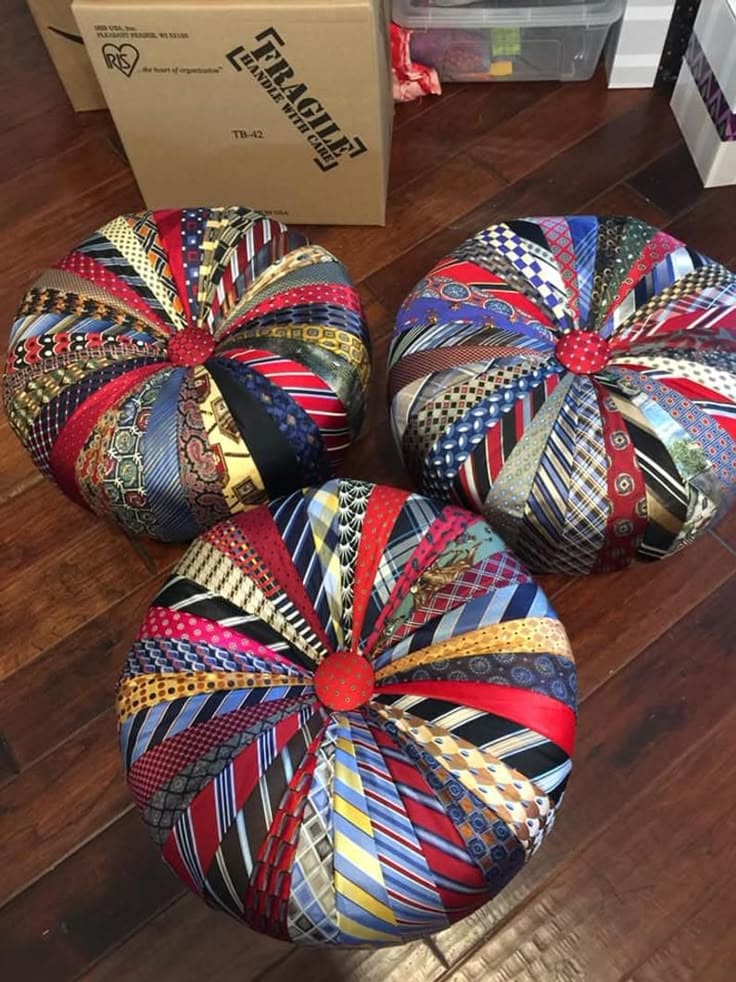
These vibrant pouf cushions are made entirely from old neckties and they’re bursting with color, texture, and a whole lot of character.
Materials Needed:
- 18–24 neckties per cushion
- Heavy-duty thread
- Needle or sewing machine
- Fabric circle (for the base and center button, 5″ diameter)
- Stuffing or old pillow inserts
Step-by-step Guide:
Step 1: Trim the wide ends of each tie to equal lengths (about 18–20 inches).
Step 2: Stitch the ties side by side into a circular panel.
Step 3: Sew the panel into a dome shape, closing it with a base circle.
Step 4: Stuff generously, then hand-sew the center button for a tufted finish.
#10. Silly Necktie Snake Toy
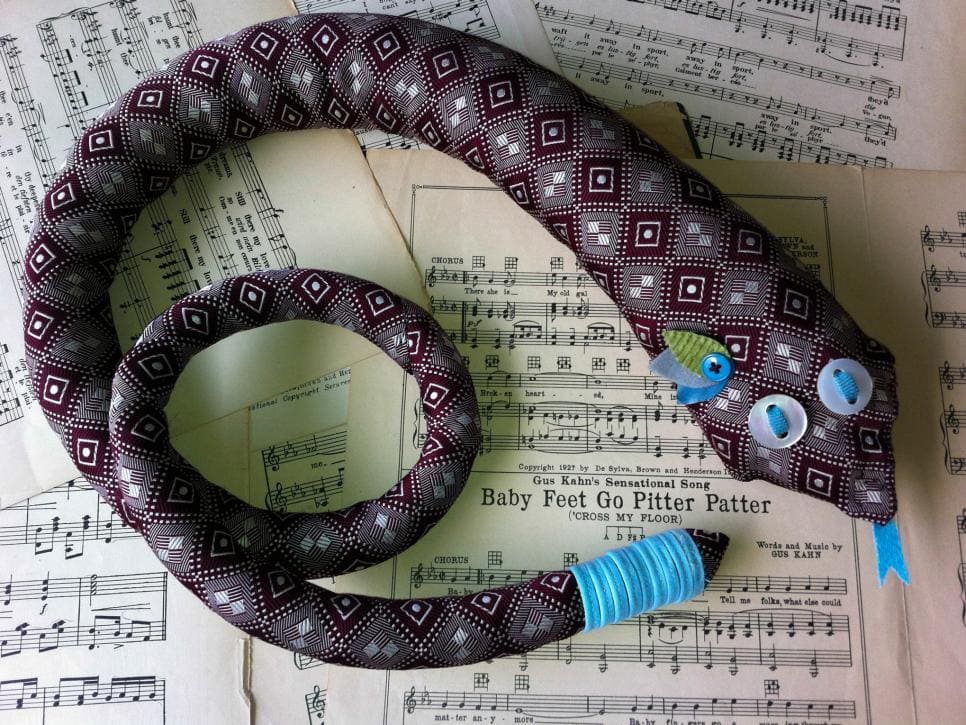
This budget-friendly craft is perfect for upcycling and makes a delightful handmade gift or a cozy desk buddy.
Materials Needed:
- 1 patterned necktie
- Polyester stuffing
- 2 buttons (for eyes)
- Felt scraps (tongue, eyelids)
- Embroidery floss or yarn
- Needle & thread or glue
Step-by-step Guide:
Step 1: Stuff the tie evenly with polyester filling, shaping it as you go.
Step 2: Sew or glue the wide end shut, forming the snake’s head.
Step 3: Add button eyes and felt eyelids, stitching or gluing in place.
Step 4: Attach a felt tongue and wrap colorful thread near the tail for fun detail.
#11. Vintage Necktie Brooch Cravat
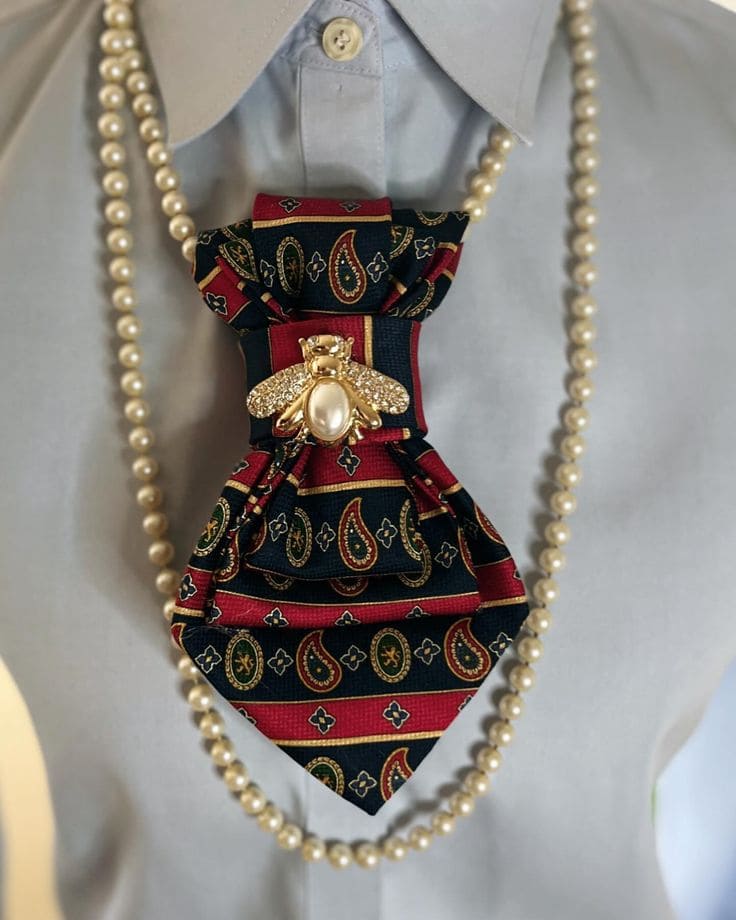
The vintage pattern, paired with a dramatic bee brooch and layered pearls, creates a refined and theatrical statement.
Materials Needed:
- 1 patterned necktie
- 1 decorative brooch (bee or cameo style)
- Needle & thread or hot glue
- Safety pin or brooch backing
Step-by-step Guide:
Step 1: Fold the tie accordion-style into a cravat shape, letting the wide end hang below.
Step 2: Secure the folds by stitching or using a few dots of hot glue on the back.
Step 3: Attach the brooch at the center front to hold everything in place.
Step 4: Pin a safety clasp or brooch pin to the back and wear it under a collared shirt.
#12. Dresden Tie Pillow
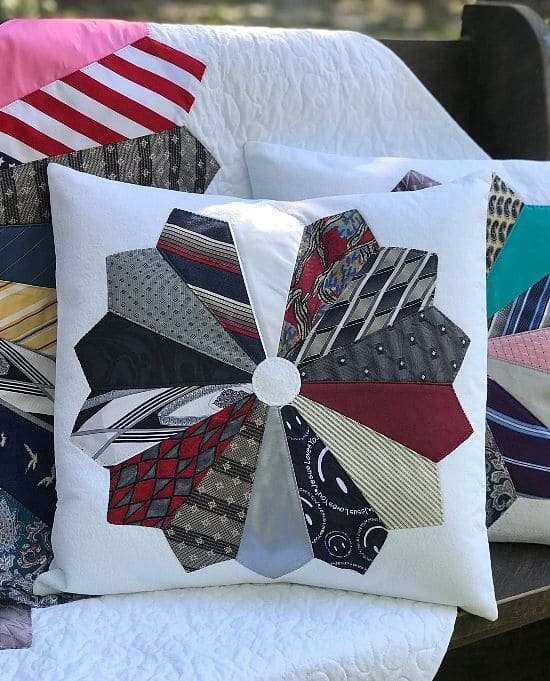
This repurposed tie pillow blends nostalgia with charm. Each petal-shaped piece comes from a different old necktie, some from thrift shops, others from family wardrobes.
Materials Needed:
- 12 assorted neckties (cut to approx. 7–8 inches)
- 16″ x 16″ fabric square (for pillow front)
- Pillow insert (16″x16″)
- Matching fabric for pillow back
- Sewing machine or needle & thread
- Fabric glue (optional)
- Felt circle for center
Step-by-step Guide:
Step 1: Cut each tie to uniform lengths, tapering ends to form petals. Press flat.
Step 2: Arrange the ties in a circle on the front fabric square, overlapping slightly.
Step 3: Sew or glue each tie piece down securely, then attach the felt circle in the center.
Step 4: Sew the front and back pillow panels together, leaving one side open. Insert pillow, then stitch closed.
#13. Repurposed Necktie Wreath
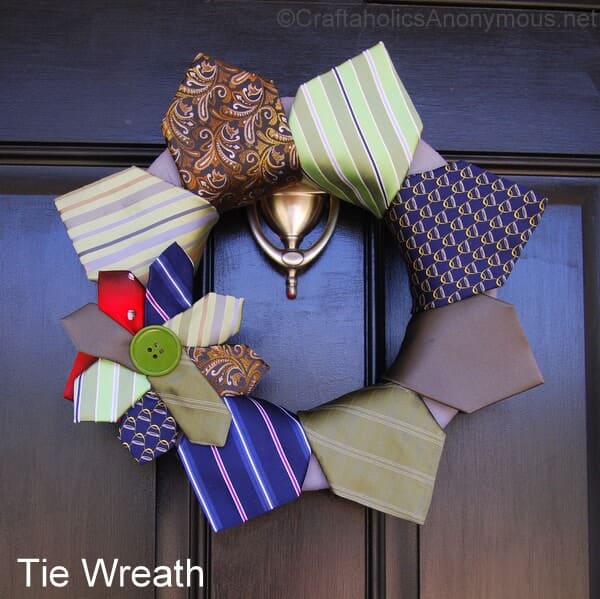
Whether you’re decorating for Father’s Day, a graduation, or just want a unique year-round wreath, this low-cost, high-style project brings personality to any entryway.
Materials Needed:
- 8–12 old neckties (varied patterns)
- 1 foam or wire wreath form (12–14 inches)
- Hot glue gun or fabric glue
- 1 large decorative button or embellishment
Step-by-step Guide:
Step 1: Wrap each tie around the wreath form, overlapping slightly. Use glue to secure each one in place.
Step 2: Arrange the tie tips creatively—angled outward, tucked, or layered for texture.
Step 3: Add a few small ties or extra pieces into a bow shape, securing with a statement button.
#14. Necktie Revival Dress
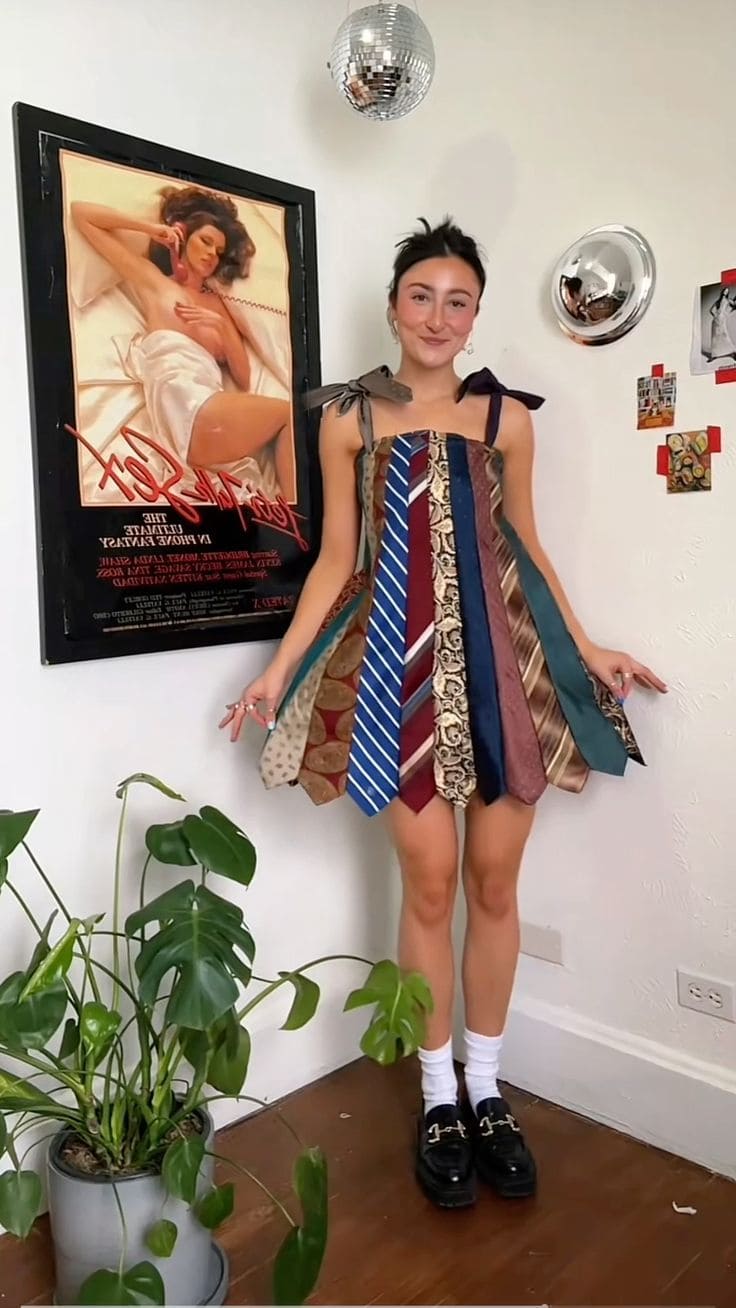
This unforgettable dress brings old-school charm and upcycled flair into the modern moment. Made entirely from thrifted neckties, it’s bold, playful, and surprisingly flattering.
Materials Needed:
- 10–14 old neckties (wide-bottomed work best)
- Fabric lining or ribbon for base structure
- Sewing machine or needle & thread
- Pins, scissors, and measuring tape
- 2 straps (ribbons or leftover ties)
Step-by-step Guide:
Step 1: Lay out your neckties side by side in the order you want, creating a skirt shape. Overlap edges slightly for a fuller look.
Step 2: Sew them together side by side at the edges to form a wide panel. Trim top edges so they’re even.
Step 3: Cut a fabric band or ribbon to fit your chest width and sew the top of the ties to this band to create a fitted bodice.
Step 4: Add two shoulder straps—either ribbon or tie remnants—then hem the bottom and line the inside if needed. Slip it on, twirl, and own the room.
#15. Necktie Wallet and Key Holder
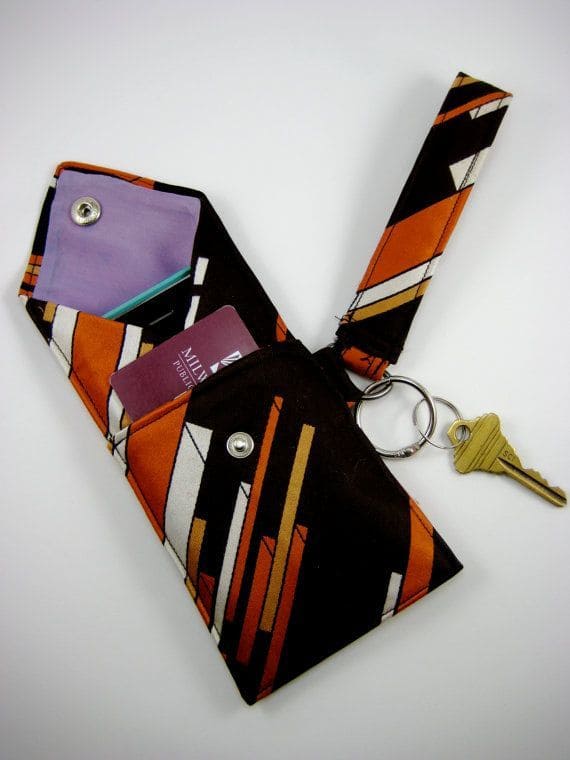
This DIY necktie wallet is not only stylish and compact, but also cleverly functional. It fits cards, cash, and a key ring while keeping things lightweight.
Materials Needed:
- 1 sturdy necktie
- 1 snap button
- Key ring
- Needle & thread or sewing machine
Step-by-step Guide:
Step 1: Cut the tie to your desired wallet length, leaving enough fabric to create a flap.
Step 2: Fold the tie into a wallet shape, and stitch or glue the edges to form two card slots.
Step 3: Add a snap button to secure the flap closed.
Step 4: Sew a small loop on the side and attach a key ring to complete the holder.
#16. Upcycled Necktie Statement Necklace
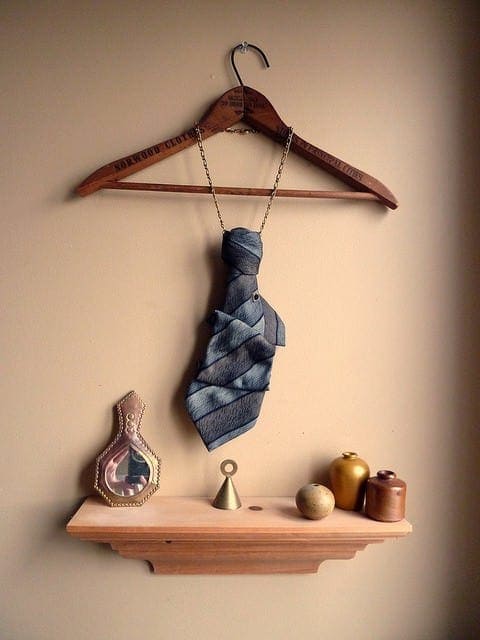
Who said neckties were only for suits? This elegant DIY turns a vintage or patterned tie into a statement necklace that’s equal parts fashion and conversation starter.
Materials Needed:
- 1 necktie (preferably silk or satin)
- 1 necklace chain (18–24 inches)
- 2 small jump rings
- Needle and thread or hot glue
Step-by-step Guide:
Step 1: Fold the tie into sculpted layers or pleats and secure them with light stitching or fabric glue.
Step 2: Attach the narrow end of the tie to the chain using jump rings.
Step 3: Adjust the drape and length, making sure it sits comfortably when worn.
#17. Tied and True Skirt
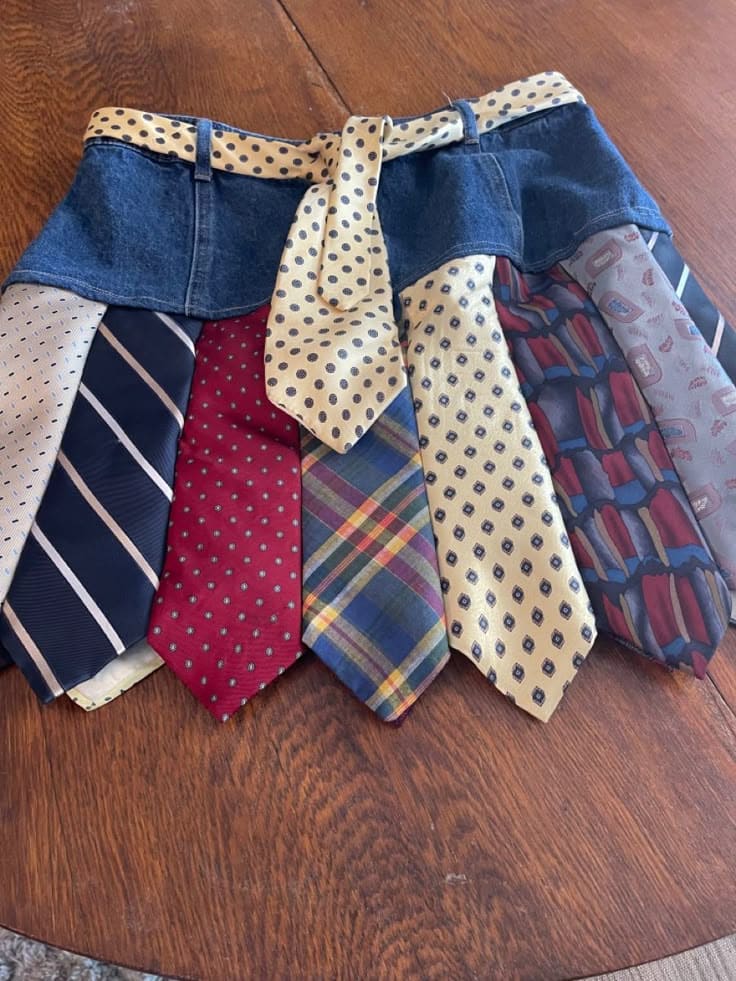
This DIY is perfect for breathing new life into both old jeans and retro ties. It’s a bold piece that turns heads and tells stories—each stripe and pattern woven into a one-of-a-kind mini.
Materials Needed:
- 10–14 neckties
- 1 denim waistband (cut from old jeans)
- Matching thread and needle or machine
- Scissors, pins, measuring tape
- 1 extra tie for belt
Step-by-step Guide:
Step 1: Cut the ties to your desired skirt length, aligning the pointed ends at the bottom.
Step 2: Sew the ties edge to edge into a full strip wide enough to wrap your hips.
Step 3: Cut the waistband from a pair of jeans, keeping the button and zipper intact.
Step 4: Attach the row of neckties to the waistband by sewing the tops of the ties to the inside edge.
Step 5: Thread one more tie through the belt loops to complete the look or let it hang loose as flair.
#18. Classy Tie Wine Carrier
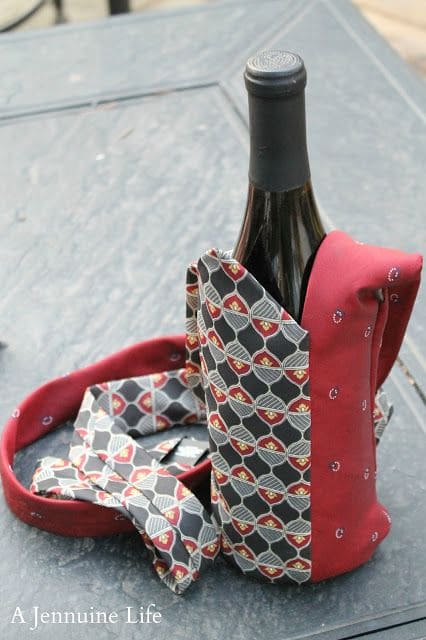
With just two coordinating ties and a few stitches, you get an upcycled wrap that adds elegance to any bottle, perfect for dinner parties or thank-you gifts.
Materials Needed:
- 2 neckties (coordinating patterns)
- Needle and thread or hot glue
- Small piece of felt (optional for bottle base)
- Scissors
Step-by-step Guide:
Step 1: Wrap one tie around the bottle and trim excess; stitch or glue to secure the seam.
Step 2: Use the second tie to create a loop handle by stitching the ends to opposite sides.
Step 3: Add a small felt circle to the bottom for extra support if desired.
Step 4: Tie a knot or bow with the narrow ends for flair.
#19. Necktie Zip Pouches
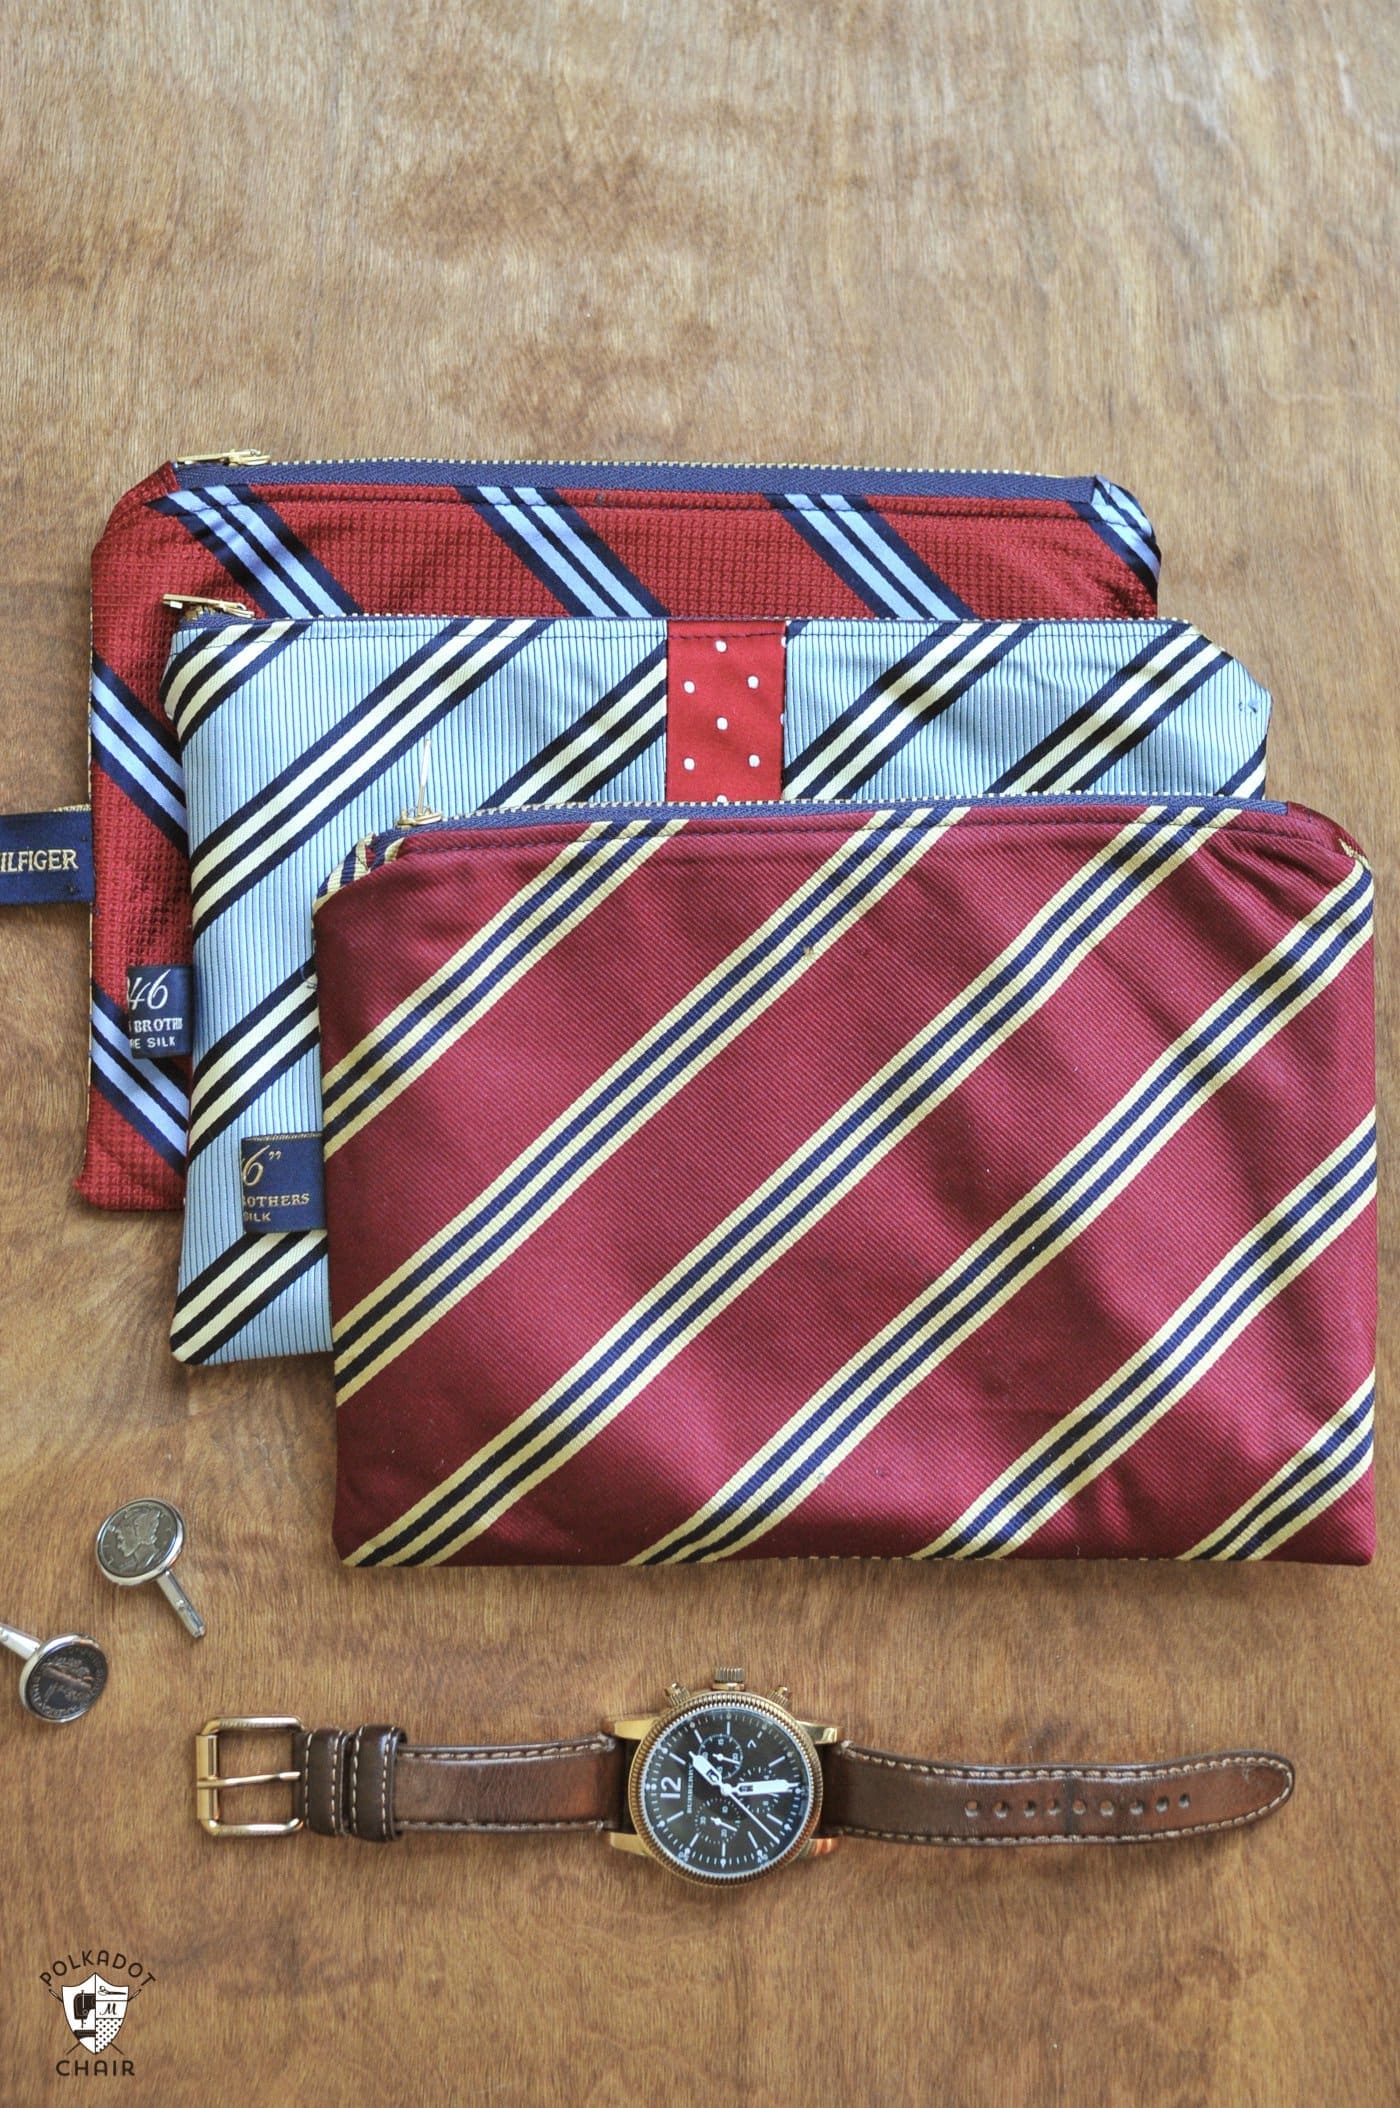
Whether you’re storing coins, cords, or keepsakes, each pouch carries a whisper of a past life, maybe even a dad’s favorite tie.
Materials Needed:
- 1–2 old neckties per pouch
- 1 zipper (7–9 inch)
- Lining fabric (optional, 6″ x 9″)
- Sewing machine or needle and thread
Step-by-step Guide:
Step 1: Unpick the necktie and iron it flat. Trim to desired size.
Step 2: Cut lining to match the outer tie fabric.
Step 3: Sew one side of the zipper to the tie fabric and lining. Repeat for the other side.
Step 4: Stitch around the pouch edges, right sides in, leaving zipper open.
#20. Celestial Pierced Tie
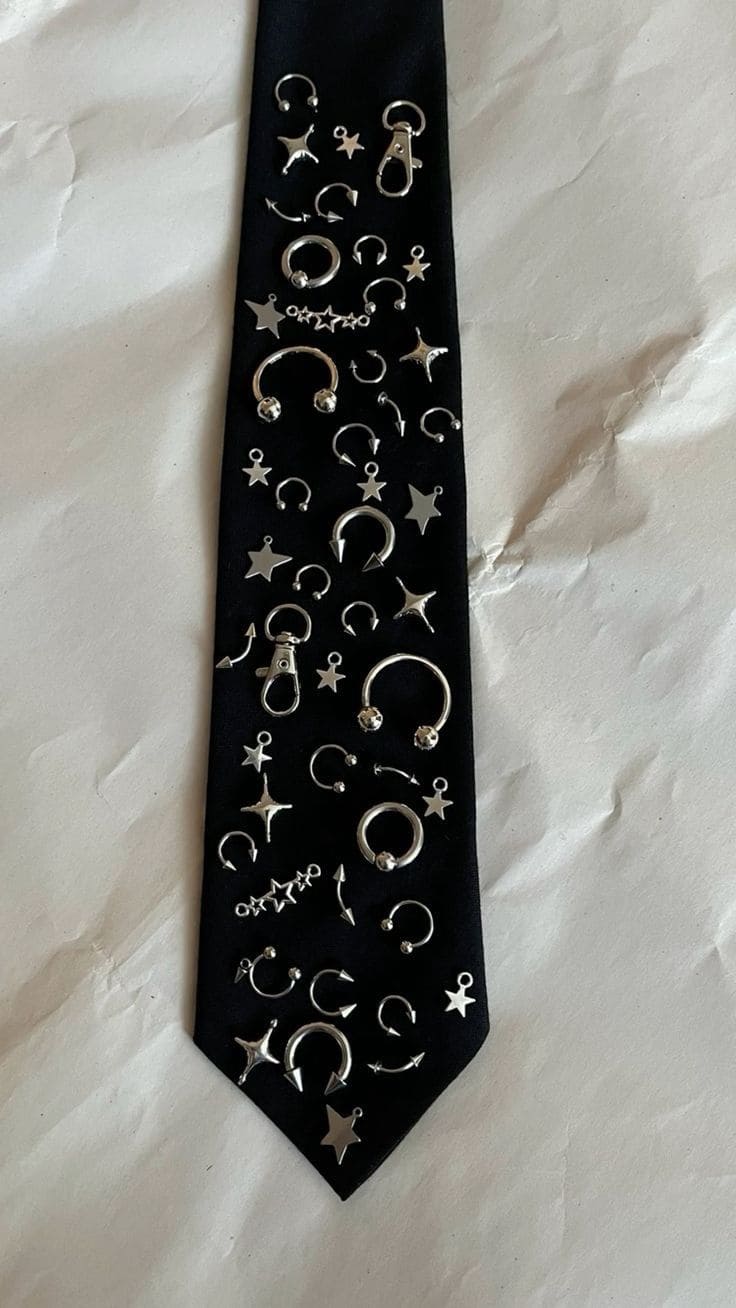
Channel your inner cosmic rebel with this edgy upcycled tie, studded with faux piercings, stars, and metallic charms.
Materials Needed:
- 1 solid black necktie
- 15–25 silver faux piercings or earring hoops
- Small star and moon-shaped metal charms
- Jewelry pliers and needle (optional)
- Super glue or strong fabric glue
Step-by-step Guide:
Step 1: Lay your tie flat and plan the placement of your piercings and charms in a scattered pattern.
Step 2: Carefully pierce or glue each item in place—alternate between hoops, stars, and circular barbells.
Step 3: Add celestial charms randomly for contrast.
#21. Necktie Angel Ornaments
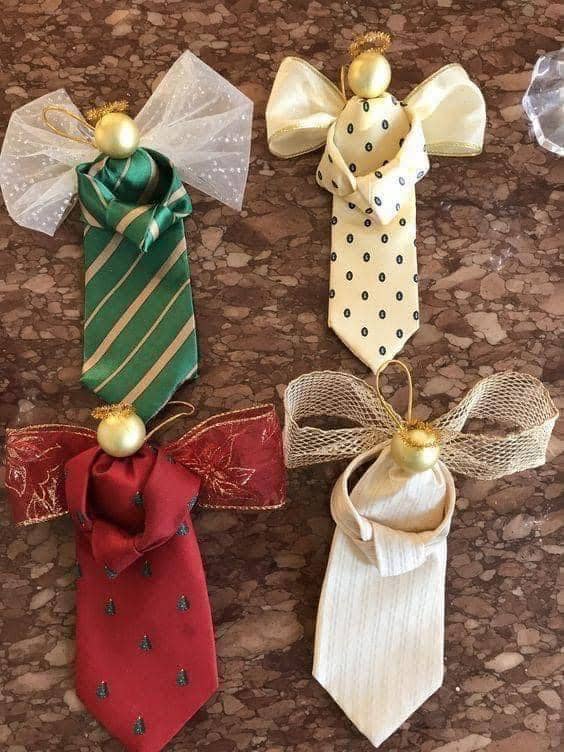
These adorable angel ornaments made from vintage neckties bring warmth, nostalgia, and a touch of charm to your holiday decor.
Materials Needed:
- 1 necktie per angel
- 1 small gold ornament ball (1–1.5″)
- Decorative ribbon or mesh (8″ long for wings)
- Gold pipe cleaner (for halo)
- Hot glue gun and scissors
Step-by-step Guide:
Step 1: Fold the necktie into a “body” shape, with the knot forming the collar.
Step 2: Hot glue a gold ornament to the top for the head.
Step 3: Shape ribbon or mesh into wings and glue to the back of the tie.
Step 4: Twist a pipe cleaner into a halo and glue it behind the ornament head. Add a hanger or string if desired.
#22. Sunburst Necktie Quilt Wall Hanging
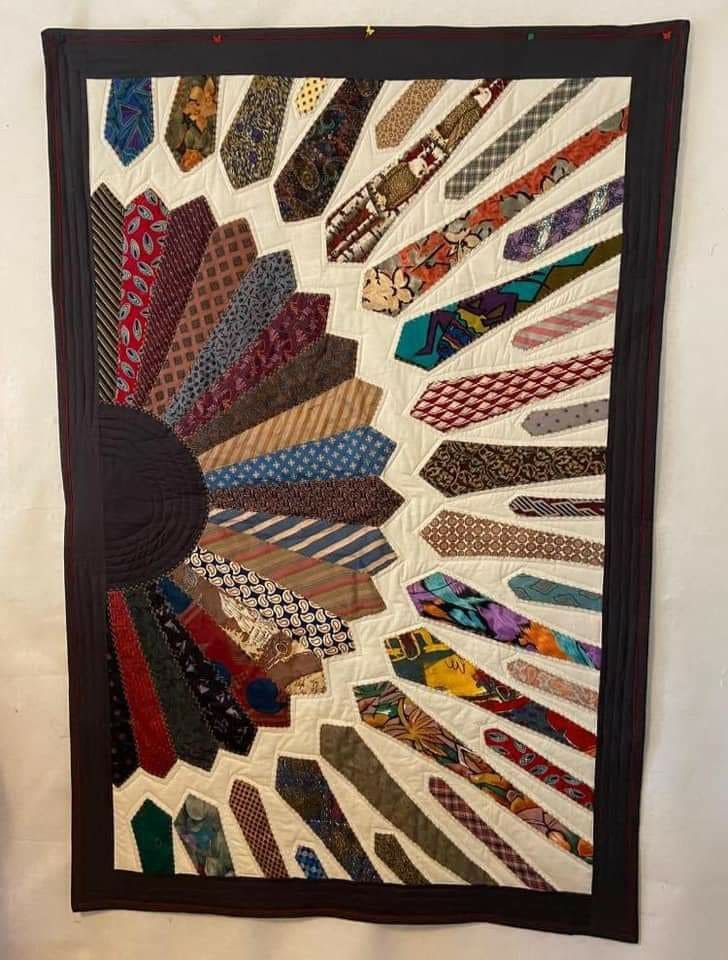
A breathtaking tribute to both vintage fashion and handcrafted artistry, this quilt transforms a collection of old neckties into a radiant sunburst design.
Materials Needed:
- 30–40 neckties
- 1.5 yards quilt backing
- 1 yard batting
- Fabric glue or fusible interfacing
- Sewing machine & basic sewing tools
Step-by-step Guide:
Step 1: Cut neckties open and press flat. Trim to desired widths, keeping their tapered ends.
Step 2: Arrange ties in a radial sunburst pattern on your batting. Pin in place.
Step 3: Stitch each tie down onto the batting, then layer with the backing fabric.
Step 4: Quilt through all layers, following the tie pattern for cohesion. Add binding to finish edges.


