Old music sheets often end up forgotten in drawers or tucked away in dusty boxes, their melodies long silent.
Instead of letting those pages fade with time, you can give them a second life through creativity.
These delicate, timeworn papers carry history, emotion, and beauty that deserve to be displayed, not discarded.
From ornaments to candles and wreaths, these 20 beautiful music sheet crafts bring vintage charm and harmony into every corner of your home.
#1. Vintage Christmas Music Sheet Rolling Pins
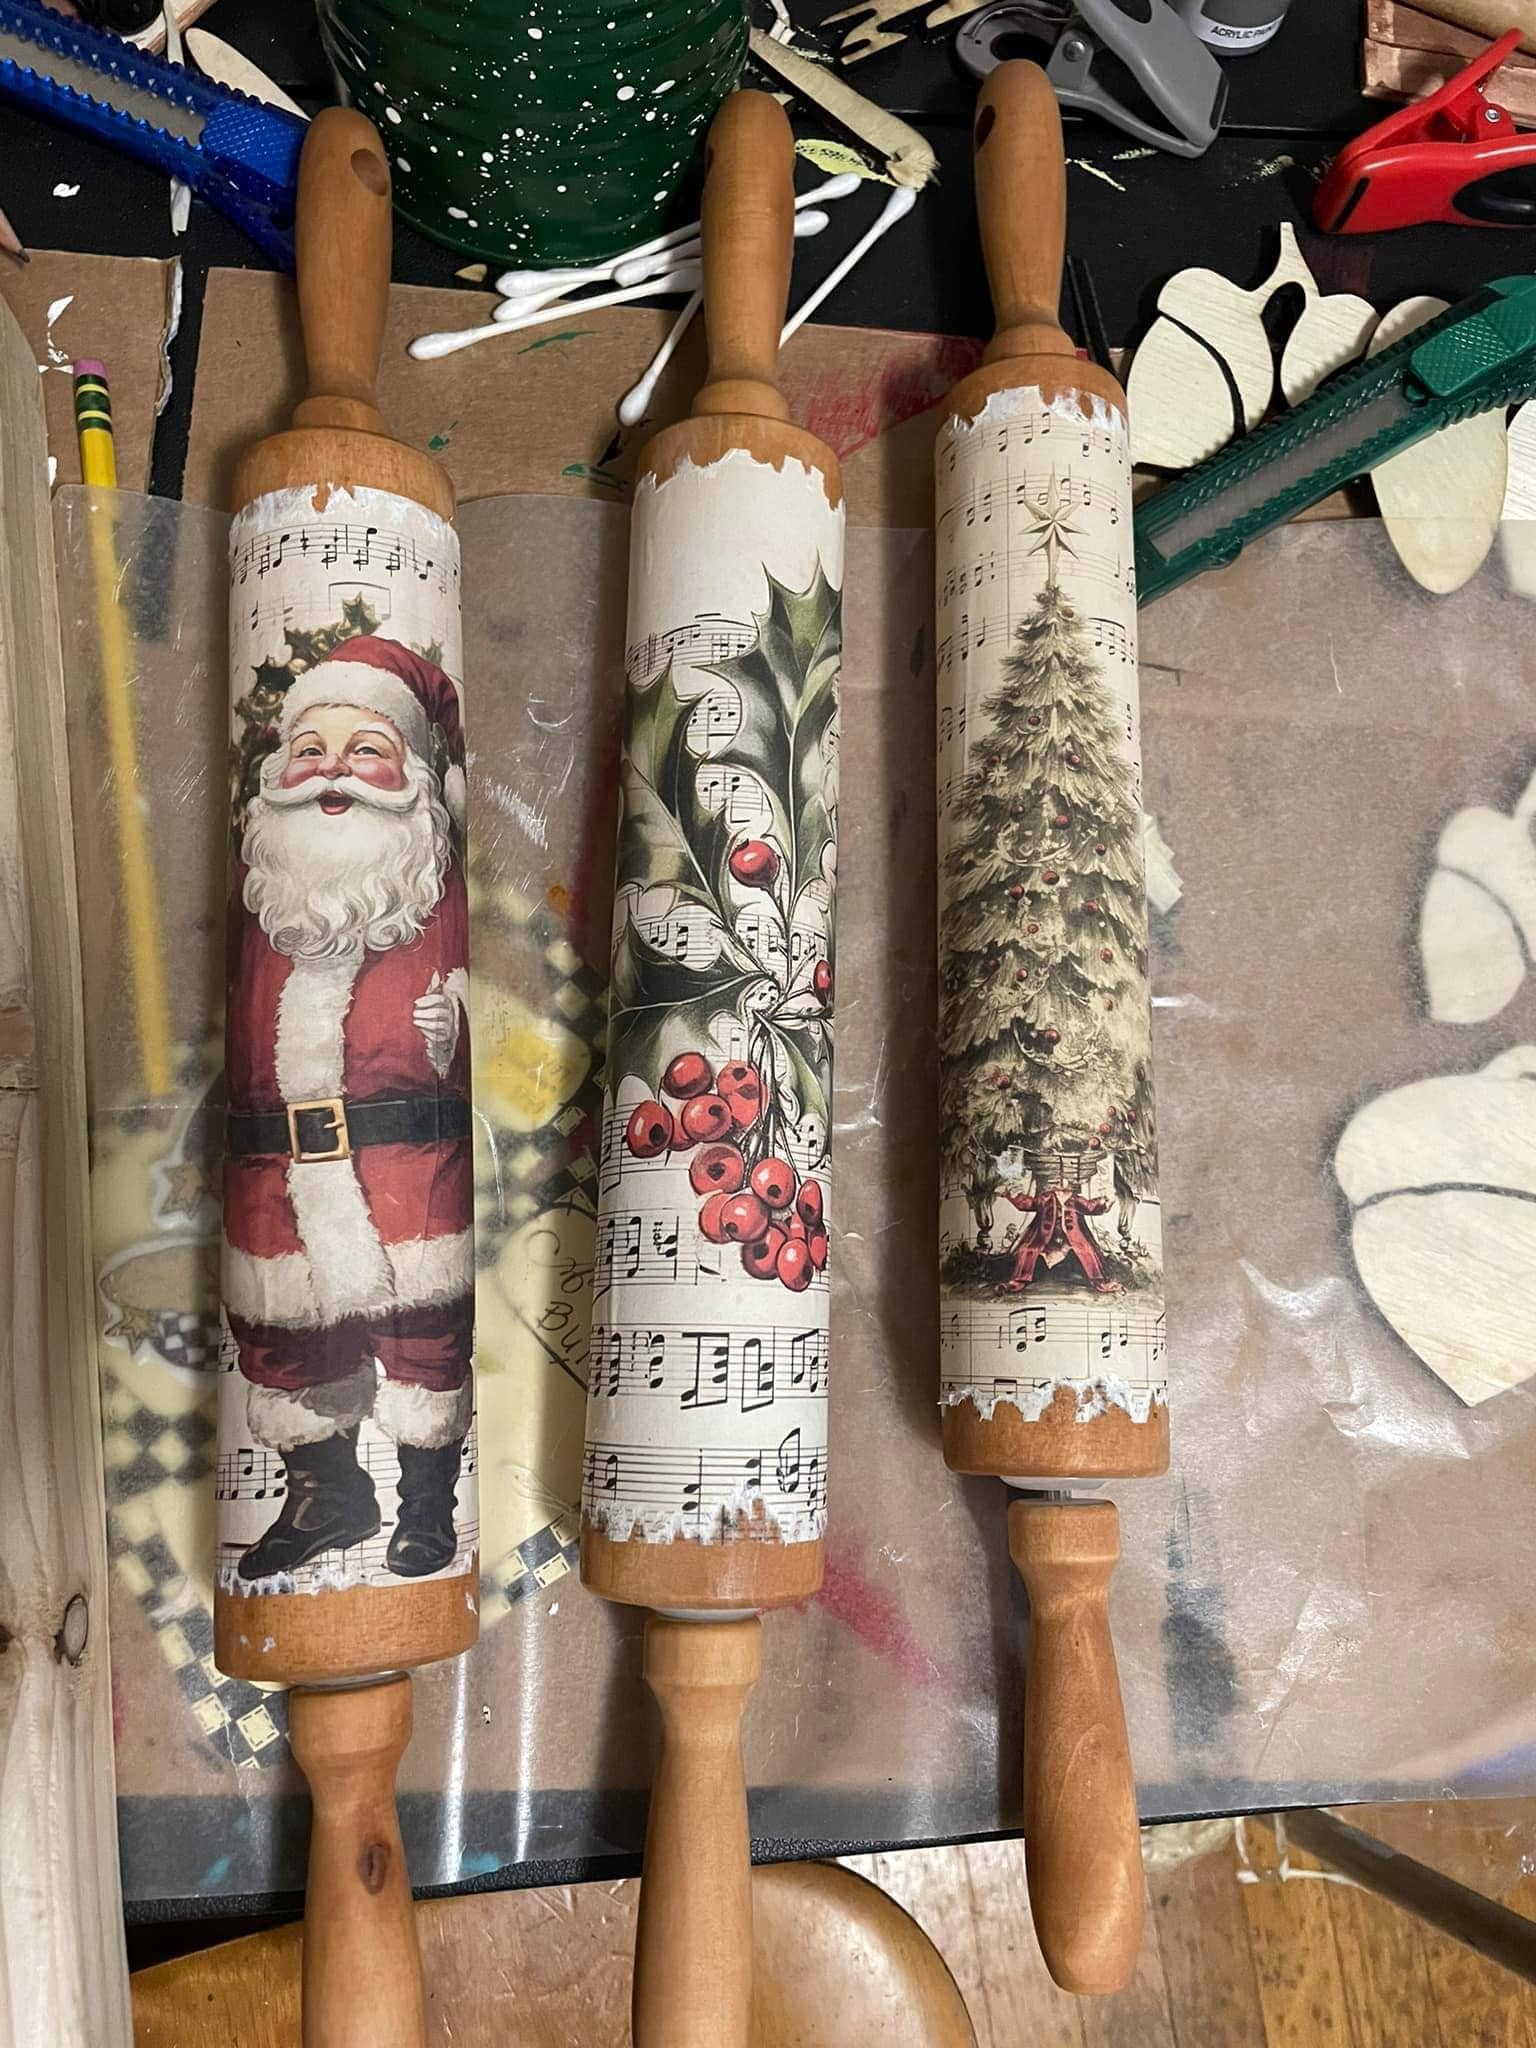
Why not turn your old rolling pins into vintage Christmas treasures with this heartwarming craft?
Each design tells a story with Santa’s jolly smile, the holly’s festive glow, and the calm beauty of a Christmas tree.
The music sheet backdrop adds a nostalgic charm, blending two comforting traditions: baking and holiday caroling.

- 3 wooden rolling pins (standard 17-inch length)Soft paintbrush and sponge
- Vintage or printed music sheets (A4 size, 1 per pin)
- Decoupage glue or Mod Podge (120 ml)
- Vintage Christmas images (Santa, holly, tree – cutouts or napkins)
- Scissors and ruler
- Clear acrylic sealer spray (optional for durability)
-
Clean the rolling pins thoroughly to remove any dust or oil. Make sure the surface is dry before applying anything.
-
Measure the flat section of each pin and cut your music sheets to fit around it. Apply a thin layer of Mod Podge evenly on the pin using a soft brush. Then carefully wrap the music sheet around, smoothing out bubbles with your fingers or a sponge.
-
Once dry, place your Christmas image cutouts on the music sheet background. Brush a layer of Mod Podge under and over each image to seal it smoothly.
-
To create an antique look, lightly brush or dab a bit of diluted brown or gold paint along the edges. Let dry before applying a final coat of Mod Podge or sealer to protect the design.
-
Display your festive rolling pins on a kitchen shelf, hang them with ribbons, or wrap them as a thoughtful handmade gift.
#2. Music Sheet Angel Ornament

There’s a quiet beauty in this handmade angel ornament, a blend of melody and faith folded delicately into one.
Crafted from vintage music sheets, its pleated wings and flowing gown capture the spirit of Christmas in the simplest way.
Hanging it on the tree feels like inviting peace into your home, note by note.

- 1 sheet of music paper (8.5×11 inches)
- 1 wooden bead (¾ inch diameter)
- 1 ribbon or string (10 inches long)
- Hot glue gun and glue sticks
- Scissors
- Optional: gold paint, glitter, or ink pad for edges
-
Cut the music sheet in half horizontally. One half will form the angel’s body, and the other will become the wings. Then fold each section accordion-style, making pleats about ½ inch wide.
-
For the body, fold the pleated paper in half and secure the top with glue or a small string to create a fan shape. You need to repeat with the smaller half to form wings.
-
Glue the wings to the back of the body section so that they spread slightly wider. This creates a graceful, layered effect.
-
Thread the ribbon through the wooden bead to make a loop for hanging, then glue the bead onto the top center as the angel’s head. Hold it for a few seconds until it sets firmly.
-
Optional, you can brush the edges of the paper with gold paint or glitter for a subtle festive glow. And now hang your angel on the tree or use it as a gift tag topper.
#3. Music Sheet Angel Heart Art
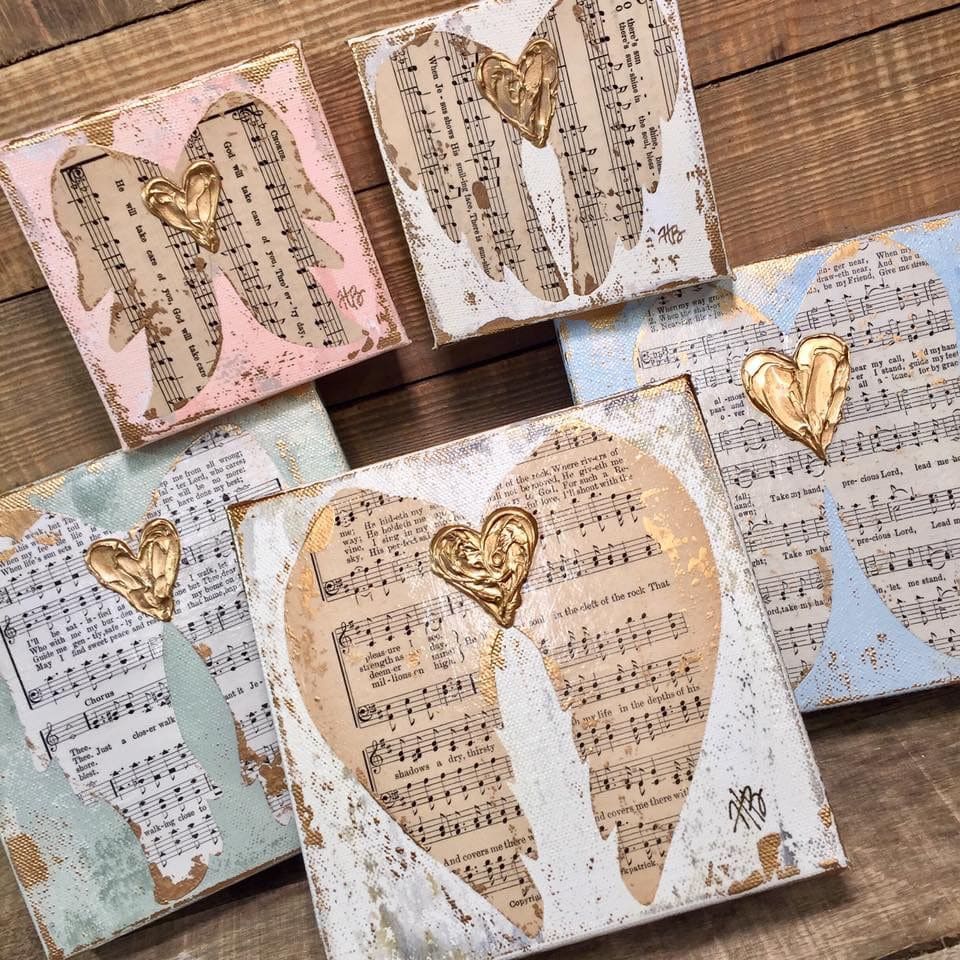
These angel heart canvases blend art, faith, and melody into one soulful creation.
Each piece feels like a hymn captured in color, aged music sheets form angel wings, while textured gold hearts add warmth and grace.
The combination of soft pastels and gilded touches gives a peaceful charm that fits beautifully into any home.

- 1–2 vintage or printed music sheets (A4 size)
- 1 square canvas (8×8 inches or preferred size)
- Acrylic paints in pastel tones (white, pink, blue, beige)
- Gold metallic paint or modeling paste (about 20 ml)
- Paintbrushes: small detail and flat brush
- Scissors and glue stick or Mod Podge
- Palette knife (for gold texture effect)
-
Begin by painting the canvas background with soft pastel colors using a wide flat brush. You can blend two shades for a gentle, cloud-like effect.
-
Cut out two large wing shapes from your music sheets. Adjust them to fit nicely in the center of your canvas. Lightly brush Mod Podge on the back of each wing and press them down smoothly onto the surface.
-
With white or cream paint, lightly outline the wings to give them definition and a soft contrast against the background.
-
Using a palette knife, apply gold paint or modeling paste to form a small heart at the center where the wings meet. You can create texture by dabbing and layering the paint for a raised, 3D look.
-
Once dry, you can add small gold highlights or speckles around the wings for a radiant touch.
#4. Rolled Music Sheet Tree Ornaments

Wow, these rolled music sheet ornaments bring a nostalgic and elegant note to any Christmas tree.
They capture the charm of old carols and pair it beautifully with lace, pearls, and twine.
Each one looks like a tiny scroll of holiday cheer, perfect for filling your home with the warmth of handmade charm.

- 3–4 vintage music sheetsJute twine (2–3 ft per ornament)
- Hot glue gun and glue sticks
- Cream lace ribbon (18–20 inches per ornament)
- Small faux pearl beads (8 mm)
- Mini jingle bells (0.5 inch)
- Small dried flowers or baby’s breath sprigs (optional)
- Scissors
-
Cut each music sheet into strips about 3×5 inches. Roll each piece tightly from one end to the other to form a small scroll. You should secure the edge with a thin line of hot glue so it doesn’t unravel.
-
Cut a 10-inch piece of twine, make a loop for hanging, and glue both ends to the back of the scroll. Press lightly to secure it.
-
Tie a lace ribbon into a neat bow and glue it to the front of the scroll. Next, add a pearl bead or jingle bell in the center of the bow for a charming accent.
-
If you want a more whimsical touch, tuck a small sprig of dried flowers or baby’s breath behind the bow before gluing.
-
Once the glue is set, hang your ornaments on the tree. The neutral tones pair beautifully with warm white lights and natural décor, creating a graceful look that feels timeless and tender.
#5. Vintage Music Sheet Welcome Wall Frame
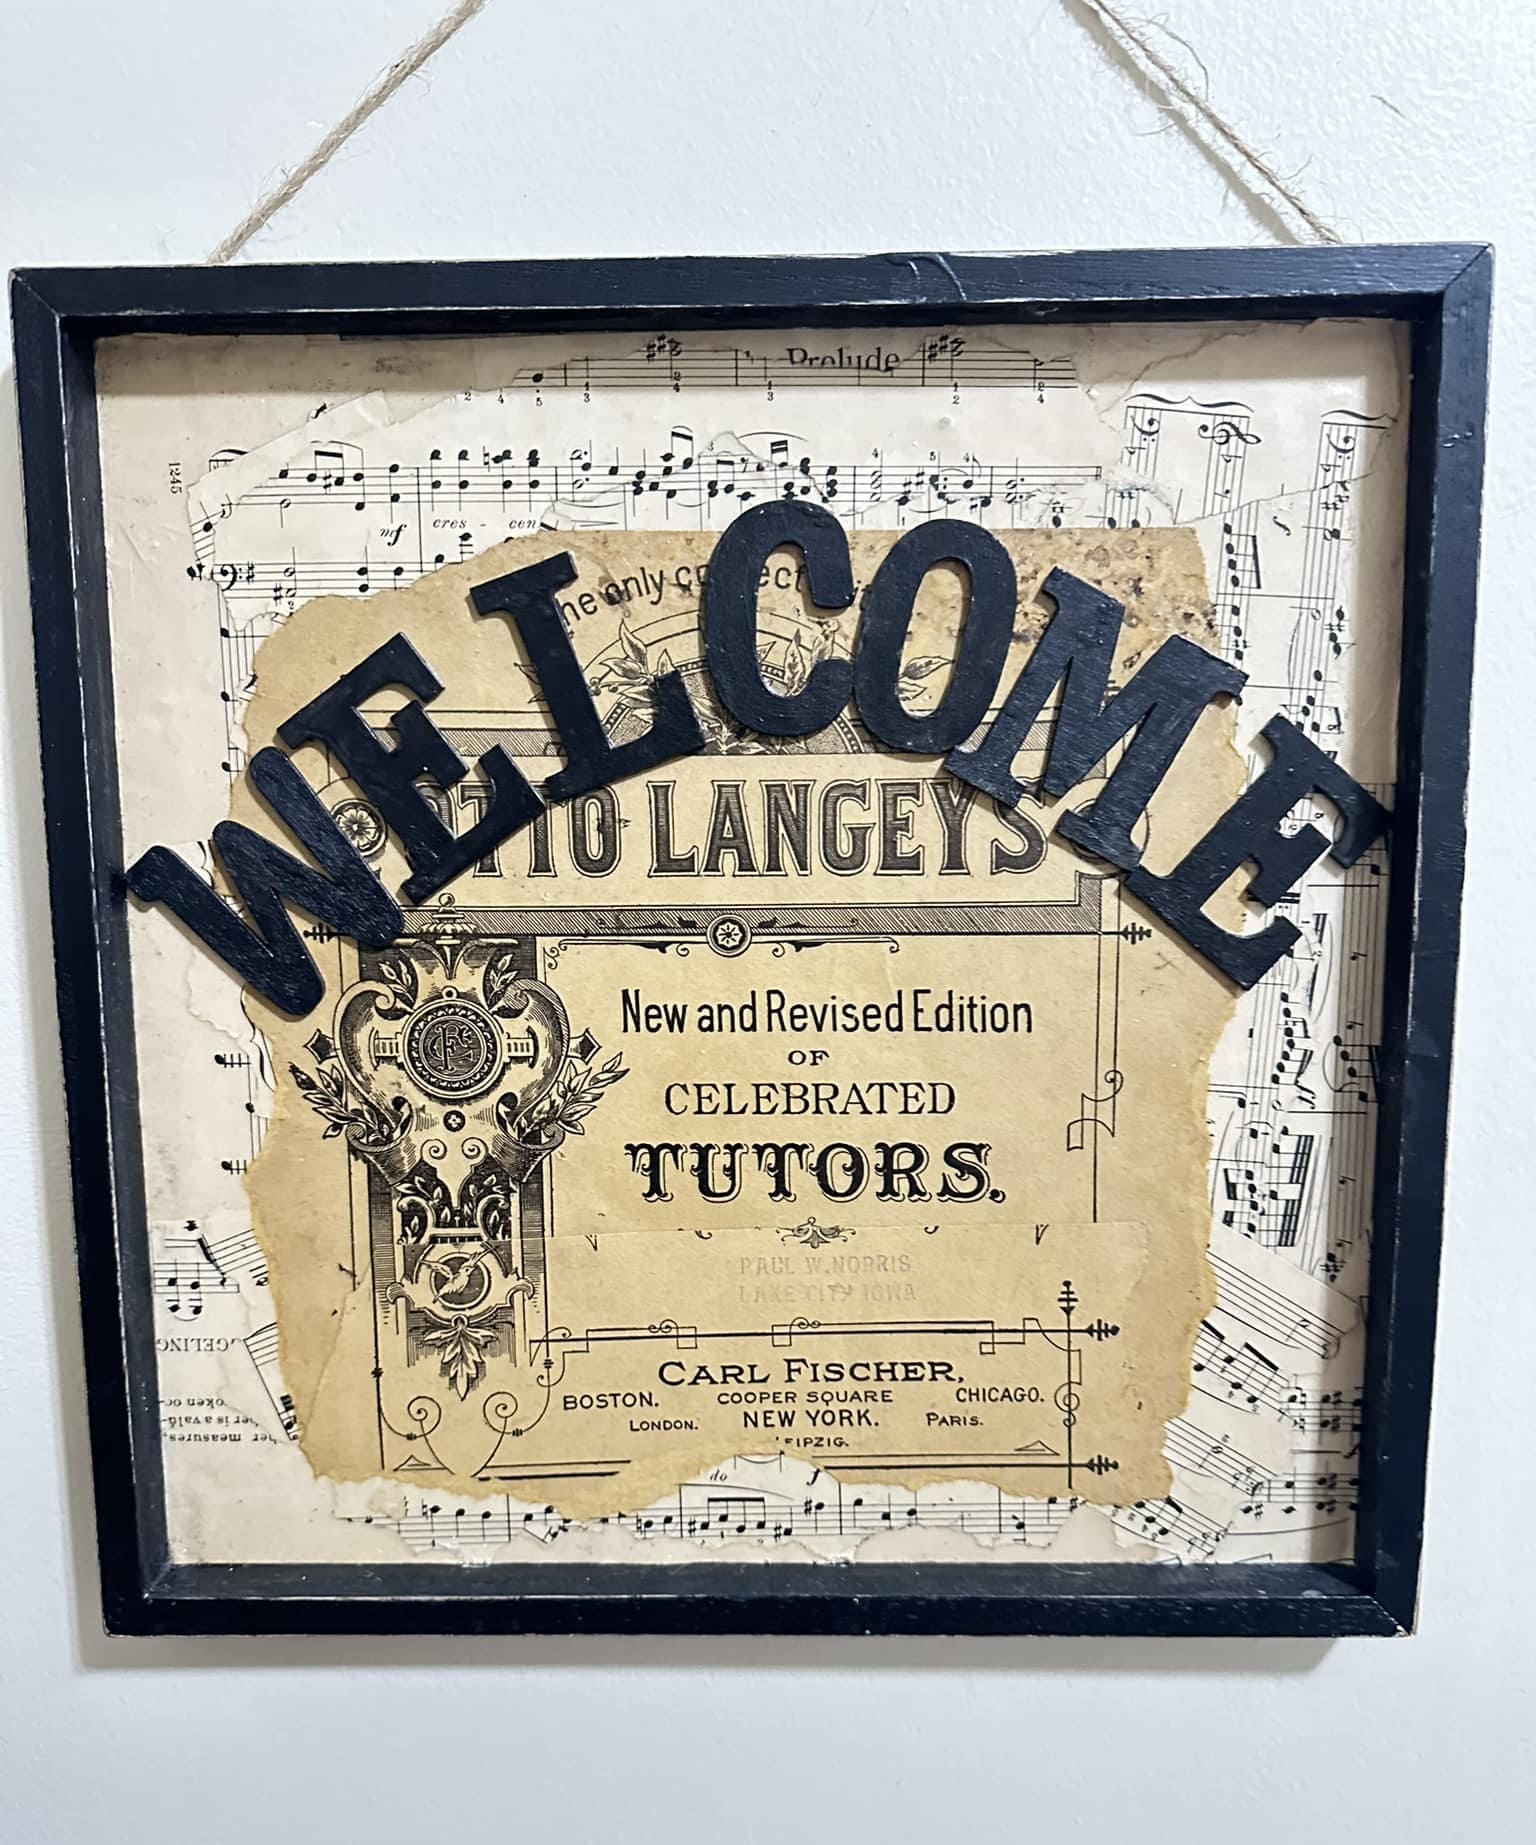
Look! This rustic wall frame carries a nostalgic charm that instantly warms any entryway or music room.
It blends aged sheet music with a distressed title page, layered beautifully under bold black wooden letters spelling “WELCOME.”
Moreover, the contrast of vintage paper and clean lettering gives it that timeless character.

- 1 wooden frame (10×10 inches)
- Vintage or printed music sheets (2–3 pages)
- 1 old book or title page with decorative typography
- Wooden “WELCOME” letters (7–8 letters, approx. 1.5 inches tall)
- Hot glue gun and glue sticks
- Mod Podge or decoupage glue (50 ml)
- Foam brush
- Scissors and craft knife
- Optional: twine for hanging and brown ink for distressing
-
Remove the glass from the frame and cut a piece of music sheet to fit as the background. You should use Mod Podge to glue it onto the frame backing, smoothing gently to avoid wrinkles.
-
Layer a torn, aged page with an ornate title or vintage text over the background. Overlap slightly for depth, securing it with Mod Podge or a glue stick. You can age the paper by brushing diluted coffee or brown ink around the edges for an authentic look.
-
Arrange your wooden letters in an arc or straight line across the top portion of the page. Once satisfied with placement, glue each letter carefully using hot glue.
-
Reassemble the frame, adding twine at the top if you want to hang it. Optionally, lightly brush black or bronze paint along the frame edges to give it a weathered fee
#6. Layered Music Sheet Christmas Trees

Have you ever wanted your holiday décor to hum with creativity?
These layered music sheet Christmas trees bring vintage charm and a touch of whimsy to any mantel or table.
The stacked paper layers mimic a forest of soft, melodic branches.

- 6–8 vintage or printed music sheets (8.5×11 inches)
- Wooden dowels (length: 10–12 inches)
- Wooden bases or round stands (diameter: 3–4 inches)
- Wooden or paper stars (2–3 inches)
- Hole punch or awl
- Scissors or paper cutter
- Optional: silver glitter, small paper stars for decoration
- Hot glue gun and glue sticks
-
Cut your music sheets into squares of various sizes, ranging from 1 inch to 5 inches. Slightly crumple the edges or curl the corners to give the paper a more natural, textured look.
-
Use a hole punch or awl to make a small hole in the center of each square. This will allow you to stack them on the wooden dowel later.
-
Insert the dowel into the wooden base using hot glue to secure it upright. Start stacking the largest paper squares at the bottom, gradually layering smaller ones as you move up, alternating angles for a full, tree-like shape.
-
Once you reach the top, glue a wooden star or paper cutout to crown your tree.
-
For extra sparkle, brush the paper edges with a touch of glitter or add small silver stars in between layers.
#7. Rustic Cinnamon Stick Christmas Tree on Music Sheet

This rustic Christmas tree craft combines the cozy scent of cinnamon with the timeless beauty of sheet music.
Each cinnamon stick feels like a piece of nature’s melody, stacked together to form a warm, textured tree that radiates vintage charm.
The aged paper backdrop, the star topper, and the soft floral detail at the corner make this piece perfect for farmhouse décor or a handmade gift.

- 10–12 cinnamon sticks (3–6 inches in varying lengths)
- 1 small wooden picture frame (8×10 inches)
- 1 printed or antique music sheet (A4 size)
- Hot glue gun and glue sticks
- 1 small wooden star topper
- Small piece of driftwood or thick twig (for the trunk)
- Faux greenery sprigs and twine bow
- Optional: linen flower, vintage button, and craft paint for distressing
-
Start by removing the glass from your frame. Cut your music sheet to fit perfectly inside, then glue or tape it onto the backing board. You can lightly crinkle the paper or brush diluted coffee around the edges for an aged look.
-
Lay out your cinnamon sticks in a triangle shape, starting with the longest stick at the bottom and gradually shortening each one toward the top. Once you’re happy with the arrangement, glue each stick in place on the music sheet background.
-
Glue the small twig or driftwood piece at the bottom center to serve as the tree trunk. Then attach a small wooden star to the top of your cinnamon tree.
-
Decorate the corner of the frame with faux greenery, berries, and a twine bow. Add a small linen flower or button for an extra rustic touch.
-
If you like a more distressed finish, lightly brush white or metallic gold paint along the frame edges.
#8. Music Sheet Mitten Ornaments

What about turning classic carols into something you can hang and cherish?
These music sheet mitten ornaments are a heartwarming blend of vintage and cozy, perfect for rustic Christmas décor.
Each mitten carries the warmth of winter and the nostalgia of a favorite hymn, finished with textured cuffs, charming buttons, and handmade bows.

- 2–3 printed or vintage music sheets (8.5×11 inches)
- Wooden mitten cutouts (6–8 inches tall) or sturdy cardboard
- Mod Podge or decoupage glue (30 ml)
- Paintbrush
- Scissors
- Burlap and fabric scraps for bows (6–8 inches each)
- Soft fuzzy fabric or chenille (4×2 inch pieces for cuffs)
- Large black buttons (1–2 per mitten)
- Hot glue gun and glue sticks
- Twine or wire for hanging (8–10 inches)
-
Trace your mitten shapes onto music sheets and cut them out neatly. Brush a layer of Mod Podge onto the wood or cardboard base, place the music sheet cutout on top, and smooth out any wrinkles.
-
Cut strips of fuzzy fabric or chenille for the mitten cuffs. Glue them along the top edge of each mitten to give that cozy, wintery look.
-
Add a large black button to each cuff as a decorative accent. Then, tie together burlap and gingham fabric strips into a layered bow, securing it at the mitten’s top corner with hot glue.
-
Attach a twine or wire loop to the back for hanging.
-
For extra charm, lightly distress the edges of the mittens with brown ink or chalk.
#9. Music Sheet Clothespin Set
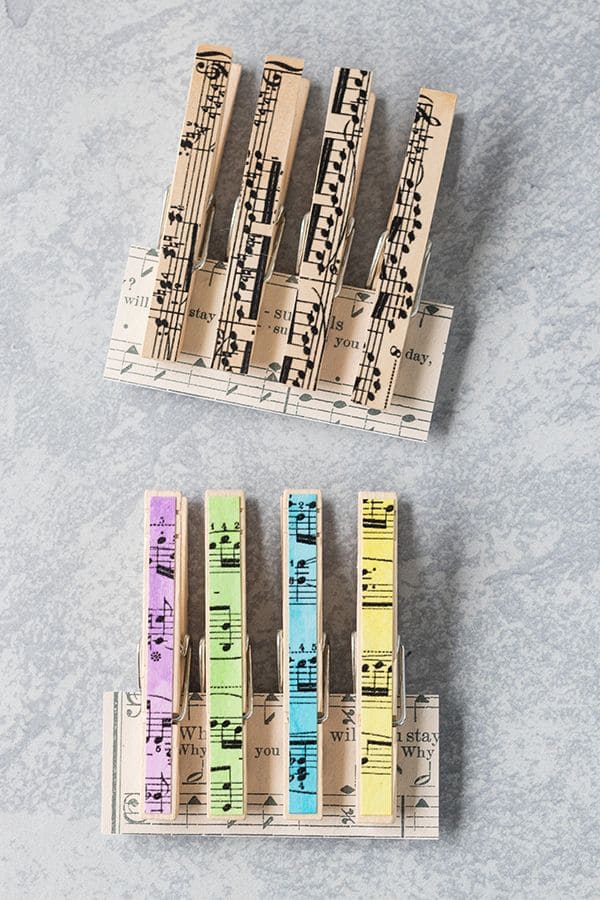
These music sheet clothespins turn everyday items into charming works of art.
They’re perfect for clipping notes, photos, or small crafts while adding a melodic touch to your workspace or gift packaging.
They make thoughtful handmade gifts for musicians, teachers, or anyone who appreciates creative details that sing with personality.

- 8 wooden clothespins (standard size 3.25 inches)
- Vintage or printed music sheet (1 full page)
- Acrylic paints (pastel shades optional)
- Mod Podge or decoupage glue (30 ml)
- Paintbrush
- Scissors or craft knife
- Fine-grit sandpaper (optional for smooth edges)
-
If you’d like to add color, paint the tops of your clothespins using pastel acrylics. Let them dry completely before moving to the next step.
-
Cut narrow strips of music sheet to match the width and length of each clothespin. Keep the musical notes centered for the best visual effect.
-
Apply a thin coat of Mod Podge on the flat surface of the clothespin, then press the music strip gently into place. Then smooth out air bubbles using your fingertip or a small brush handle.
-
Once the paper adheres well, brush another light layer of Mod Podge on top to seal it. Let it dry fully to achieve a glossy, protected finish.
-
If desired, lightly sand the edges for a clean look. You can also tie them in small sets with twine for gifting.
#10. Noel Music Sheet Hoop Ornament

If you love vintage-inspired Christmas décor, this Noel music sheet hoop ornament brings together rustic charm and timeless melody.
The Scrabble tiles add a playful touch that feels personal and heartfelt.
Hung on your tree or given as a handmade gift, this little treasure captures the warmth of holiday crafting and the joy of creating something beautiful from simple materials.

- 1 small embroidery hoop (4–6 inches in diameter)
- 1 piece of printed or vintage music sheet (A5 size)
- 4 wooden Scrabble tiles (letters N, O, E, L)
- Hot glue gun and glue sticks
- Twine or jute string (20 inches for hanging and bow)
- Faux greenery sprigs and red berries (small bunch)
- Scissors
- Small lace ribbon (about 12 inches)
-
Cut your music sheet slightly larger than the hoop’s size. Place it inside the embroidery hoop, tightening the screw at the top to secure it snugly. Then trim any excess paper around the edges for a clean finish.
-
Arrange the Scrabble tiles across the center to spell “NOEL.” Glue each one down carefully, keeping the spacing even.
-
At the bottom of the hoop, glue small pieces of faux greenery and red berries together to form a mini Christmas arrangement. You can layer them with bits of lace or ribbon for texture.
-
Wrap twine around the greenery and tie it into a small bow. For an extra festive touch, you can lightly brush gold paint on the edges of the leaves or tiles.
-
Finish by tying a lace bow at the top of the hoop and attaching a loop of jute string for hanging.
#11. Christmas Carol Sheet Wreath
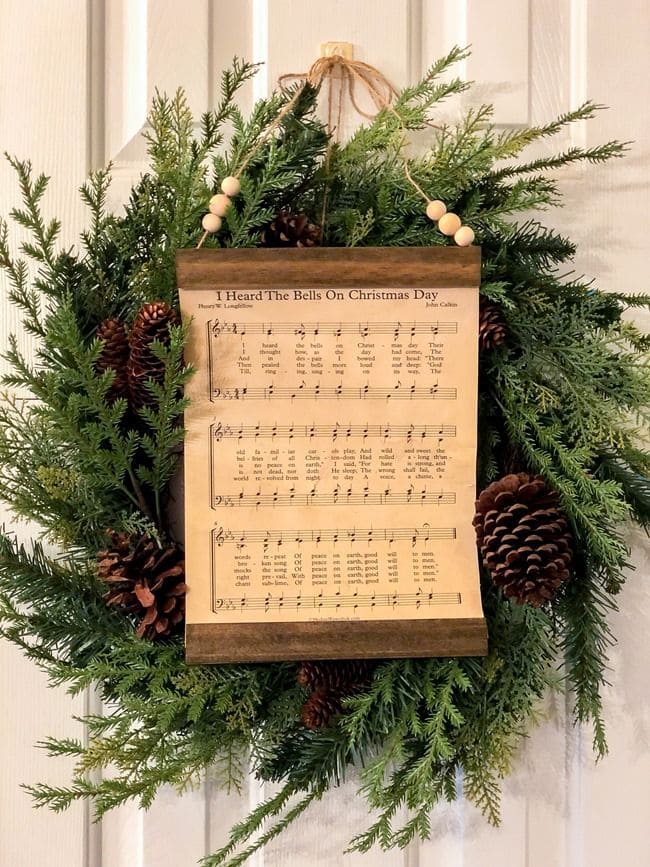
You can almost hear the melody before you even step through the door.
This Christmas carol wreath brings a timeless charm that sings of peace, warmth, and nostalgia.
The rustic greenery frames a printed carol, a tribute to the music that fills every cozy corner during the holidays.

- 1 printed Christmas carol sheet (A4 or 8.5×11 inches)
- 1 grapevine or evergreen wreath base (14–16 inches)
- Fresh or faux pine greenery (enough to fill the wreath)
- Pinecones (6–8 medium-sized)
- Twine or jute rope (2–3 feet)
- 6–8 wooden beads
- Two thin wooden strips (length: 9 inches, width: 1 inch)
- Hot glue gun and glue sticks
- Scissors and floral wire
-
Begin by arranging your pine greenery evenly around the wreath base. Use floral wire or hot glue to secure the branches. You then add pinecones in small clusters for a natural woodland look.
-
Take your printed carol sheet and glue one wooden strip along the top edge and another along the bottom, creating a scroll effect. Lightly distress the edges with brown ink for a vintage finish.
-
Thread a piece of twine through the top wooden strip. Then add wooden beads on each side before tying the ends together to make a hanger.
-
Attach the finished scroll to the center of the wreath using glue or wire, making sure it’s securely placed.
-
For a final touch, tie a rustic bow from jute rope or burlap and glue it above the carol sheet.
#12. Minimalist Music Sheet Christmas Tree Card

This minimalist Christmas card proves that simplicity can sing the sweetest tune.
Torn strips of music sheets transform into the shape of a Christmas tree, evoking the warmth of classic carols in a quiet, elegant way.
Plus, a single golden star crowns the design, giving it just the right touch of festivity.

- 1 green cardstock sheet (A5 size)
- Glue stick or craft glue
- Scissors or tearing ruler
- 1 vintage or printed music sheet (A4 size)
- 1 gold star sticker or gold marker
- White gel pen or silver calligraphy pen for lettering
- Optional: glitter for decoration
-
Cut or tear the music sheet into six to seven strips, each slightly shorter than the one below it. These will form the layers of your Christmas tree.
-
Arrange the strips from longest to shortest on the center of the green cardstock. Once you’re happy with the shape, glue each strip in place, starting from the bottom and moving upward to create a tapered tree silhouette.
-
Add a gold star at the top of the tree using a sticker or by drawing one with a gold pen. If desired, lightly brush glue on the edges of the paper and sprinkle a bit of glitter for a soft shimmer.
-
Write your greeting beneath the tree, such as “Merry Christmas” or “Frohes Fest” (German for “Happy Holidays”), using a white or silver pen.
-
Let the card dry completely before gifting or mailing it.
Refer to: 25 Handmade Christmas Card Ideas That Spread Your Love and Joy
#13. Music Sheet Ornament Discs
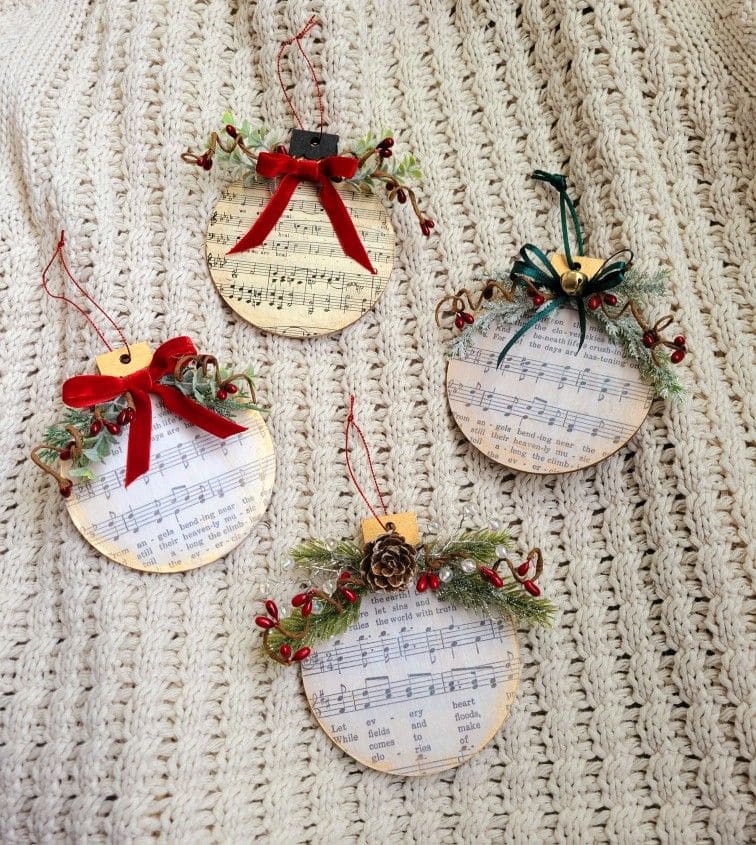
These music sheet discs bring the soul of old carols right into your home.
Each piece captures a page of timeless melody, wrapped in festive greenery and ribbon.
They’re lightweight, easy to make, and perfect for gifting to someone who cherishes handmade holiday treasures.

- 4–6 round wooden discs (diameter: 3.5–4 inches)
- Vintage or printed music sheet (2–3 pages)
- Mod Podge or decoupage glue (30 ml)
- Paintbrush
- Scissors
- Mini pinecones or artificial greenery sprigs
- Small red berries or faux holly decorations
- Velvet ribbon (12–15 inches, assorted colors)
- Hot glue gun and glue sticks
- Twine or ornament string (8 inches per disc)
-
Cut out circles of music sheet to match the size of your wooden discs. Then apply a thin coat of Mod Podge on the surface, press the paper down smoothly, and seal it with another coat.
-
Lightly brush the edges with brown ink or diluted paint for a vintage touch. This gives each ornament that aged, classic look.
-
Glue a small cluster of greenery, pinecones, and red berries at the top of each disc. You can add a velvet ribbon bow for a festive finish.
-
Attach a loop of twine to the back or drill a small hole through the top edge for hanging
-
Once dry, you hang them on your Christmas tree, wreath, or mantle garland.
#14. Music Sheet Gift Wrap Magic

Your holiday gifts deserve a wrapping that sings as beautifully as the thought behind them.
This music sheet wrapping idea brings a vintage melody to your presents, turning each box into a small piece of art.
The soft, aged paper pairs beautifully with a rich velvet ribbon, while a touch of holly and a silver bell add that festive sparkle.

- Printed or vintage music sheets (A3 or larger for bigger gifts)
- Scissors
- Double-sided tape or glue stick
- Silver bell or ornament (optional)
- Small holly sprig or faux greenery
- Gift box
- Velvet ribbon (2 yards, width: 1 inch)
-
Flatten your music sheets and, if needed, tape several together to fit around your gift box. Align the musical notes neatly for a clean look.
-
Wrap your gift just like traditional wrapping paper. Use double-sided tape for invisible seams and fold the corners crisply to keep it elegant.
-
Wrap the velvet ribbon around the box vertically and horizontally, tying a snug bow on top. Adjust until it looks full and balanced.
-
For that finishing touch, attach a silver bell or a piece of holly to the bow using a small dab of glue or a twist of floral wire.
-
Place it near candlelight or a Christmas tree and watch how it glows, a perfect blend of nostalgia and artistry that turns even a simple gift into a piece of festive decor.
#15. Silent Night Nativity Music Sheet Craft
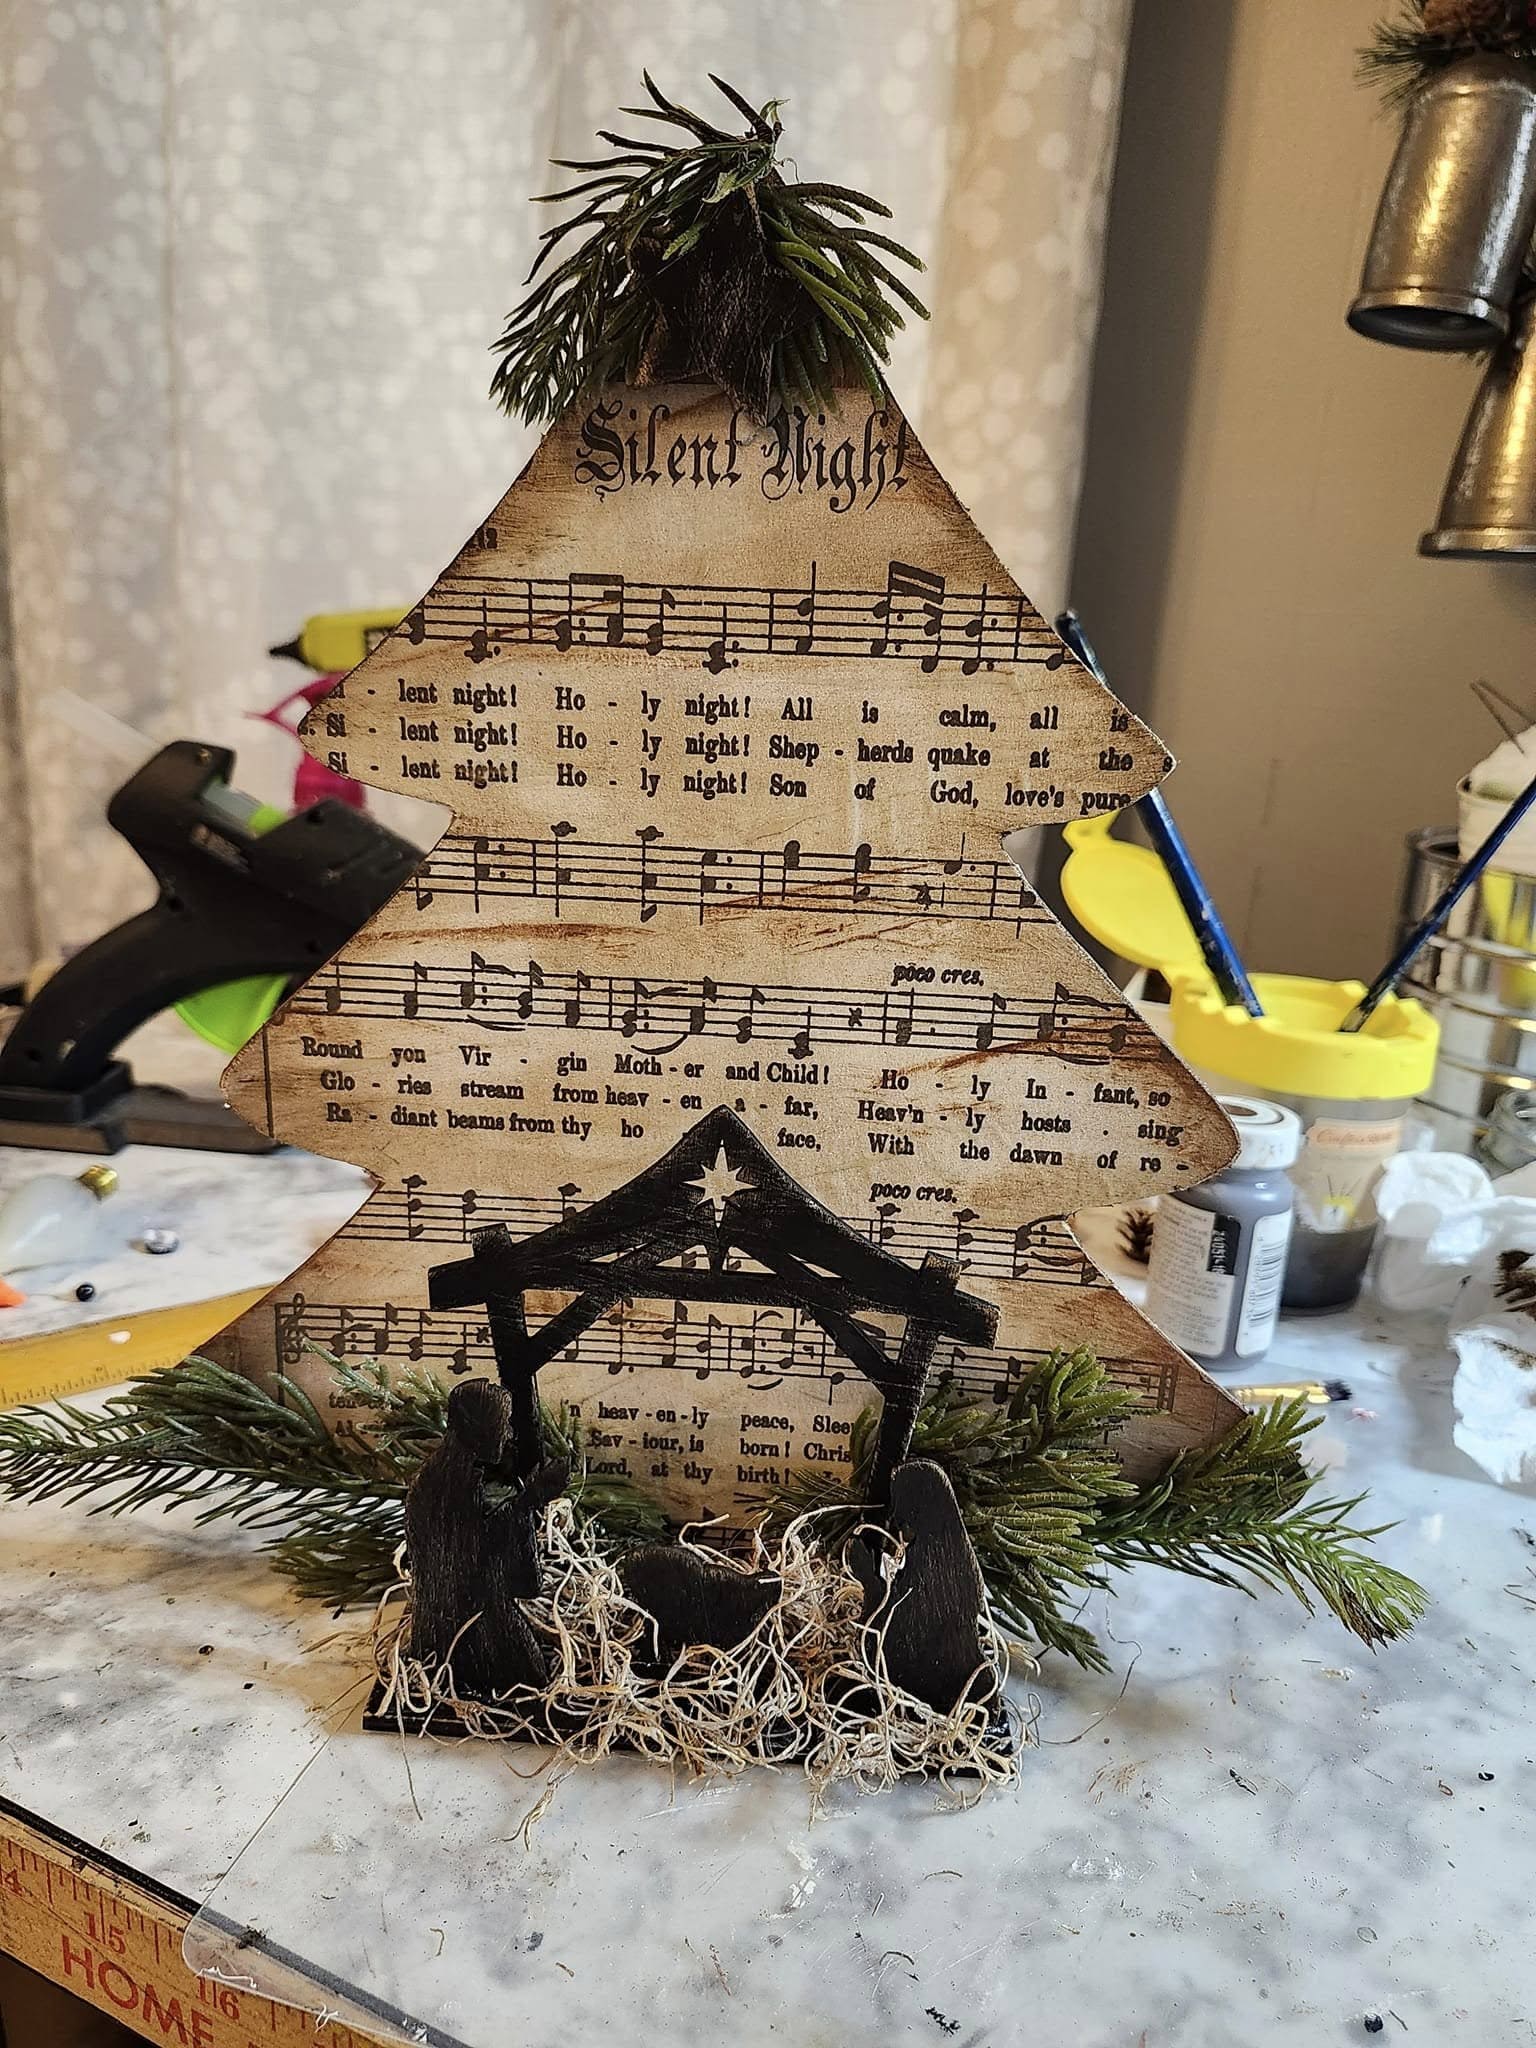
If you love Christmas crafts with a touch of nostalgia, this nativity decor brings warmth and meaning to your holiday display.
The soft notes of the hymn printed on aged paper create a vintage background for a simple wooden nativity scene.
The rustic look of greenery and twine adds an earthy charm, while the silhouette figures tell the story of peace and love.

- Printed or original “Silent Night” music sheet
- Wooden Christmas tree cutout or sturdy cardboard (about 10–12 inches tall)
- Hot glue gun and glue sticks
- Faux greenery or pine sprigs
- Scissors and paintbrush
- Mod Podge or craft glue
- Optional: jute string, star embellishment, or moss for detail
- Small wooden nativity figures or black paint for silhouettes
-
Trim your music sheet to fit the tree shape. If you’re using multiple sheets, arrange them to cover the surface completely. Then apply Mod Podge evenly over the base and carefully press the sheet down, smoothing out any wrinkles.
-
Once dry, lightly brush the edges with brown or gold paint for an aged look. This gives the craft that cozy, vintage Christmas glow.
-
Attach your nativity figures at the bottom center. If you’re painting silhouettes, sketch the stable outline first, then fill it with black paint.
-
Glue a few small pine sprigs or faux greenery along the base for a natural finish. You can also add a bow or star at the top for a festive accent.
-
Let everything dry completely before displaying it on your mantel, shelf, or table.
#16. Jolly Santa Music Sheet Candle
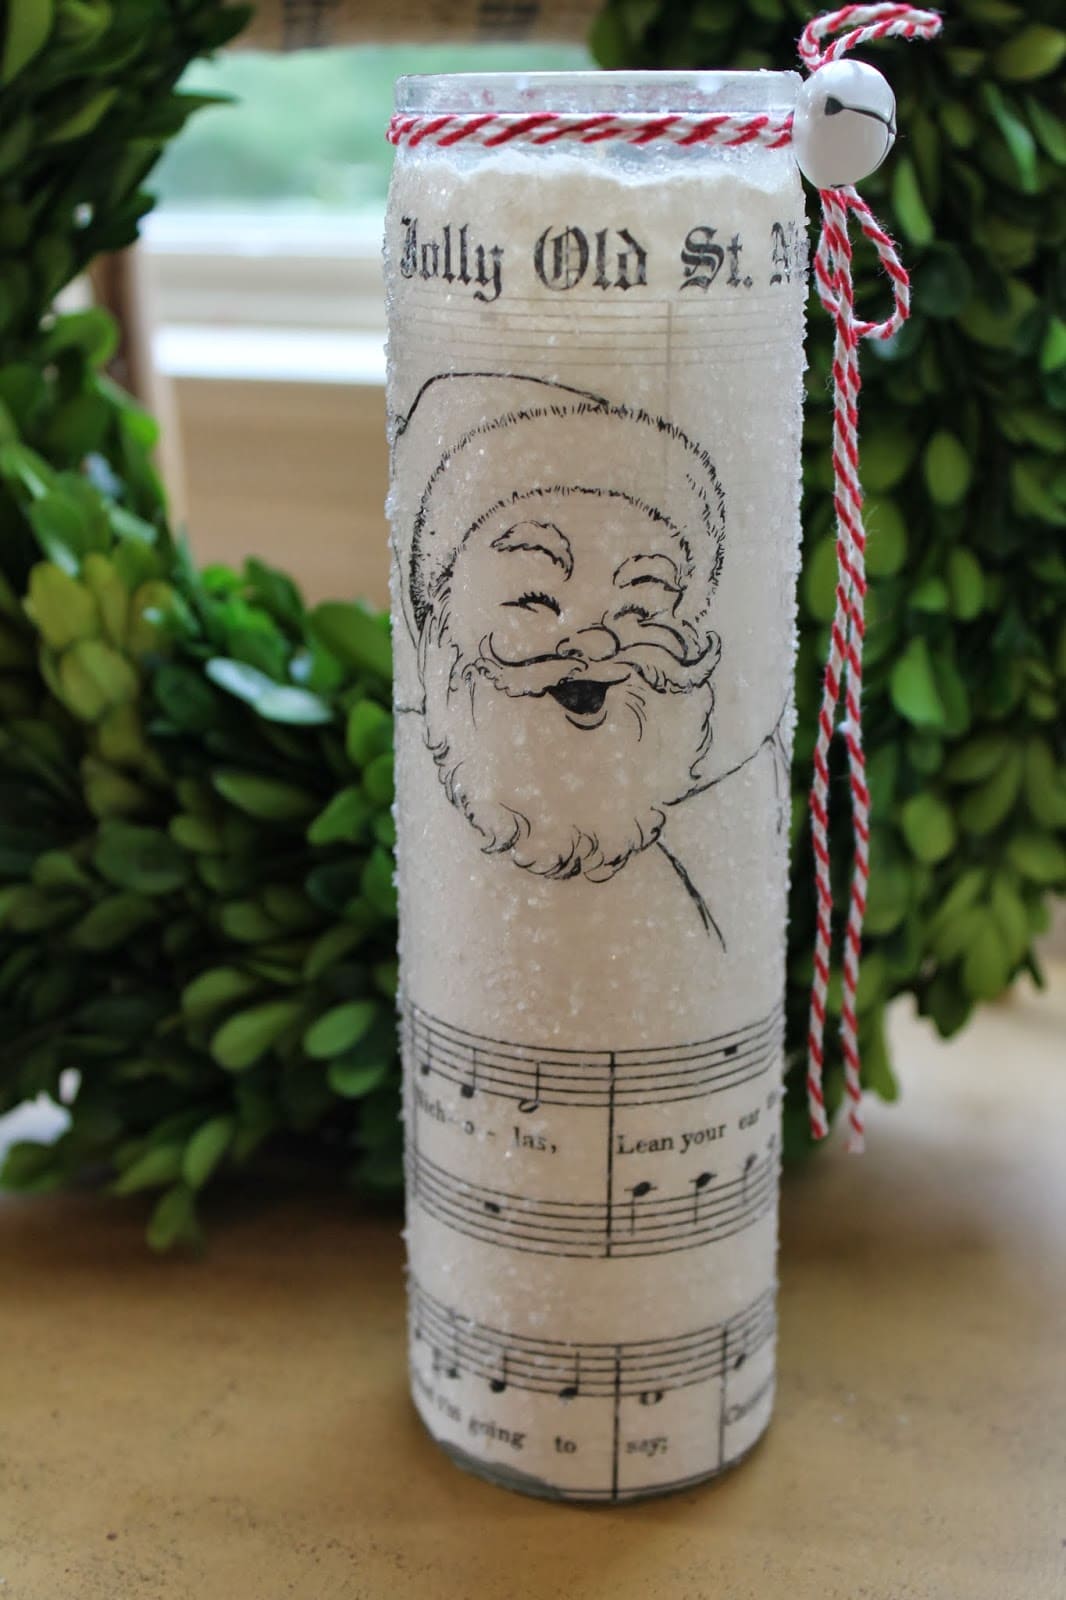
When your home needs a cozy touch of old-fashioned Christmas charm, this Santa-themed candle brings it beautifully to life.
Wrapped in a vintage sheet, it radiates nostalgia and warmth.
The sugar-like sparkle gives it a frosted glow, and the red-and-white twine tied with a tiny bell adds that merry little detail that feels straight out of Santa’s workshop.

- Tall glass pillar candle or flameless LED candle
- Printed vintage Santa music sheet (trimmed to candle height)
- Mod Podge or decoupage glue
- Paintbrush or sponge applicator
- Epsom salt or fine glitter for the frosted effect
- Red and white baker’s twine
- Small silver or white bell
-
Cut your music sheet to fit around the candle’s height and circumference. Then apply a thin layer of Mod Podge to the candle surface.
-
Carefully wrap the music sheet around, smoothing out any air bubbles as you go. Seal the outer layer with another thin coat of Mod Podge.
-
While the glue is still slightly tacky, sprinkle Epsom salt or fine glitter evenly across the candle for a shimmering snow effect.
-
Tie the baker’s twine around the top, finishing with a small bell for a sweet jingle touch.
-
Let everything dry completely before displaying. When lit (or glowing if LED), your candle will look like a song brought to life.
#17. Rolled Music Sheet Flower Vase
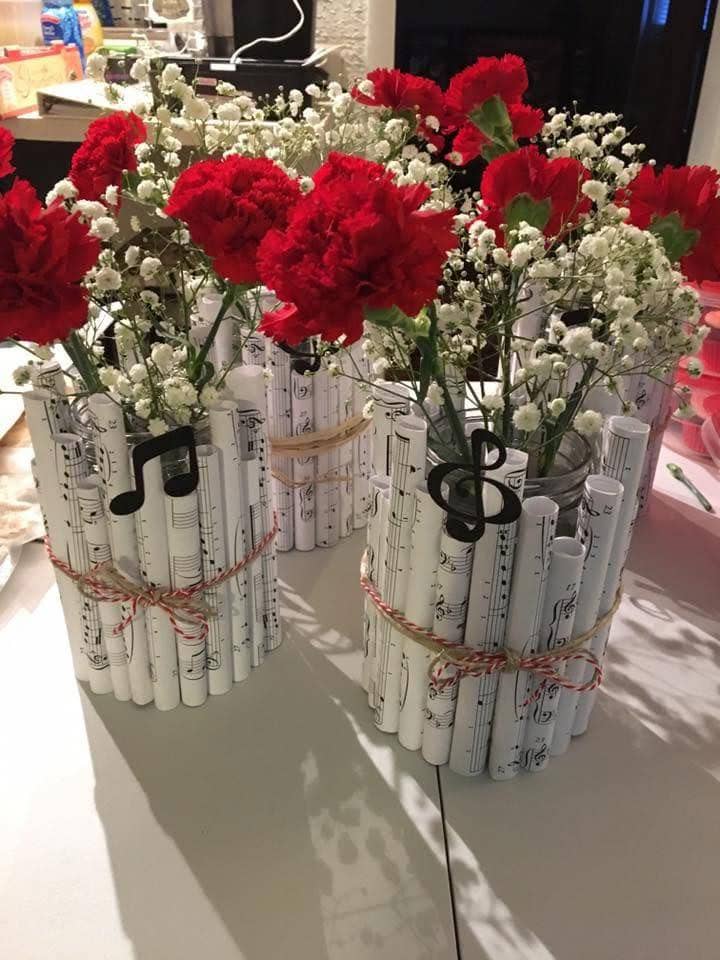
There’s something timeless about turning old music sheets into art that feels alive again.
Each page, curled gently around a glass jar, tells a quiet story of rhythm and romance.
When paired with a few fresh blooms, it feels like the notes themselves are blooming along with the flowers.

- 6–8 old or printed music sheets (A4 size)
- 1 glass jar or vase, 5–6 inches tall
- Twine, ribbon, or jute string (about 50–60 cm)
- Hot glue gun or double-sided tape
- Scissors
- Optional: small wooden or paper musical note embellishments
-
Starting from one corner, roll each sheet tightly into a tube about the width of your thumb. Then add a small dot of glue along the edge to hold the shape. Repeat until all sheets are rolled.
-
Once the rolls are ready, apply a strip of hot glue (or double-sided tape) vertically along one side of your vase. Attach the first roll, pressing gently for a few seconds to secure it in place.
-
After covering the entire vase, cut a length of twine or ribbon and wrap it around the middle or top edge. Tie it into a small bow.
-
To give it a musical flourish, glue small decorative note cutouts or charms onto the front of the vase.
-
Finally, fill your vase with flowers, branches, or even dried arrangements.
#18. Rustic Music Sheet Bunny and Bottle Decor
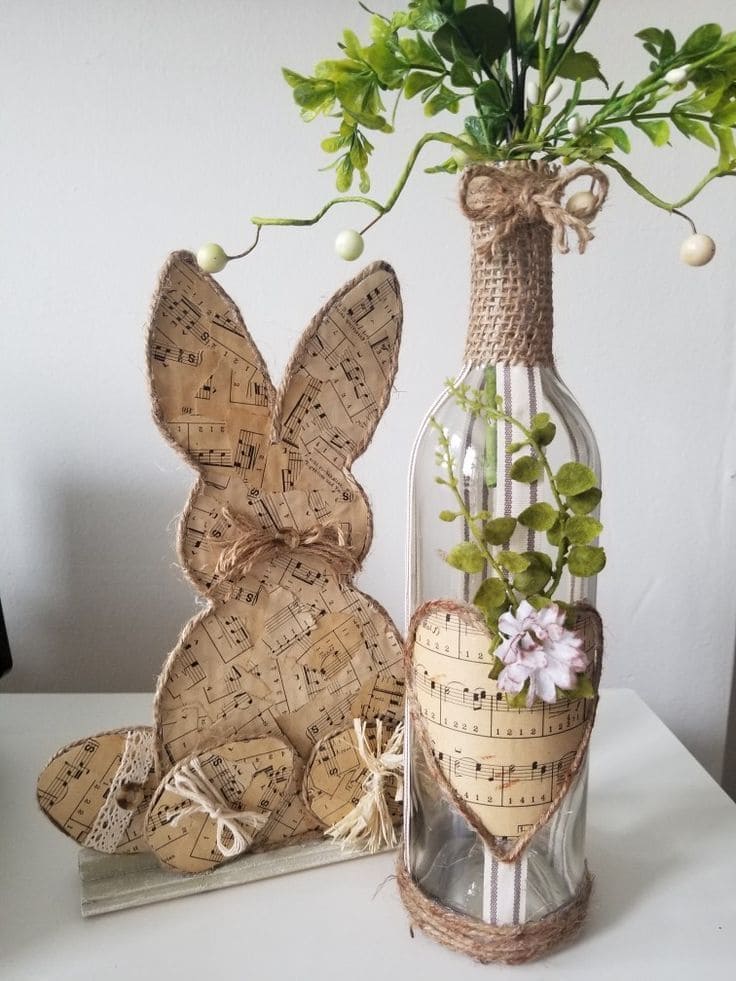
This delightful duo, a rustic bunny and a vintage-inspired vase, turns recycled paper into timeless art.
The bunny brings cozy farmhouse charm, while the bottle captures soft elegance with its twine and floral heart.
Together, they create a perfect mix of nature and nostalgia, ideal for Easter or year-round decoration.

- 3–4 vintage or printed music sheets (8.5×11 inches)
- One glass bottle or wine bottle (height: 10–12 inches)
- Burlap ribbon (1 yard)
- Artificial greenery and small flowers
- Scissors
- Mod Podge or decoupage glue (30 ml)
- Paintbrush
- Hot glue gun and glue sticks
- Wooden bunny cutout or thick cardboard (approx. 8–10 inches tall)
- Jute twine (3–4 meters)
-
Cut your music sheets into small, irregular pieces. Brush Mod Podge over the bunny surface and carefully layer the paper pieces, smoothing them as you go.
-
Wrap jute twine around the bunny’s neck and base to give it a rustic accent. You can add a small bow made of lace or twine for charm.
-
For the bottle, cut a heart shape from your music sheet. Then apply Mod Podge on the back and press it gently onto the bottle’s surface.
-
Decorate the bottle’s neck with burlap and twine. Attach faux greenery and small flowers using hot glue.
-
Now display the two together, the bunny on one side and the vase on the other.
#19. Vintage Music Sheet Bookmark with Tassel
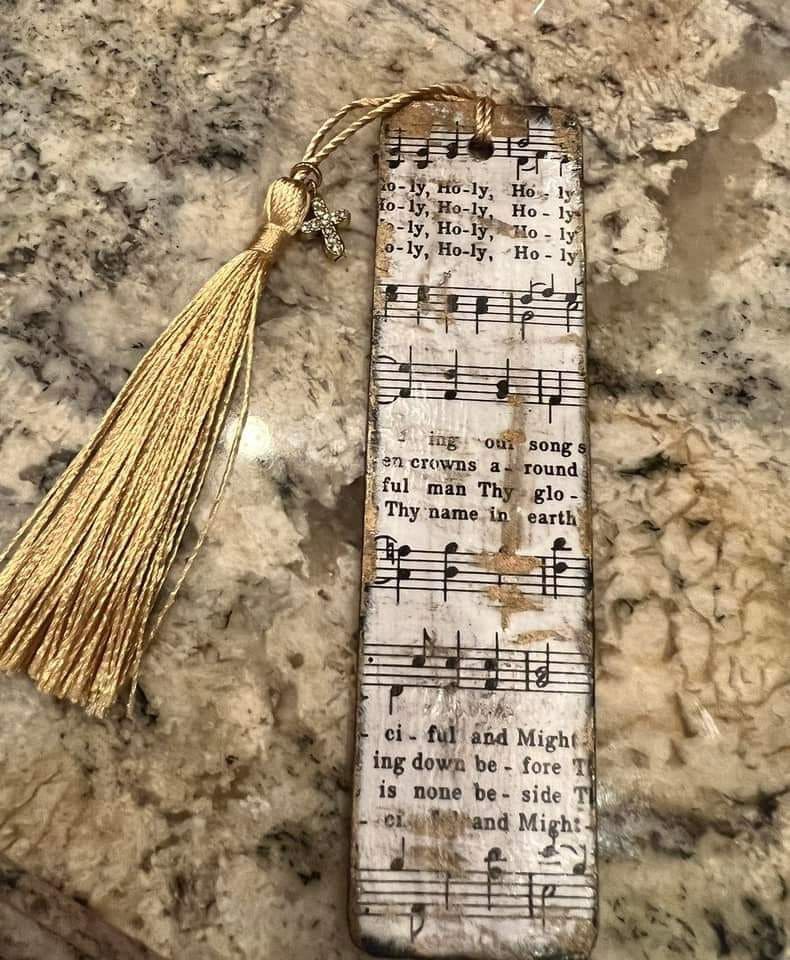
There’s something poetic about turning an old hymn sheet into a keepsake that holds your place in another story.
This vintage-style bookmark combines aged paper charm with gentle gold details, creating a meaningful piece perfect for book lovers, choir members, or Christmas gifts.
The tassel adds elegance, while the subtle cross charm brings a quiet spiritual touch.

- 1 piece of cardboard or chipboard (2×6 inches)
- Music sheet paper (enough to cover both sides)
- Paintbrush or foam brush
- Gold tassel or embroidery thread (10–12 inches long)
- Small charm or bead (optional)
- Sandpaper and distress ink or brown paint for antique effect
- Clear sealer spray (optional for protection)
- Mod Podge or decoupage glue (50 ml)
- Hole puncher
-
Cut your cardboard base to the desired bookmark size. Then trim two music sheet rectangles to match the size, leaving a small edge for sanding later.
-
Apply a thin, even layer of Mod Podge to one side of the cardboard and carefully press the music sheet onto it, smoothing out any air bubbles. Repeat on the other side.
-
Once dry, lightly sand the edges to blend the paper into the base. To give it a vintage touch, brush a bit of brown paint or distress ink along the edges and corners.
-
Seal the surface with another coat of Mod Podge or clear spray for durability. Punch a hole at the top center and insert your tassel. Now, add a charm or bead for a decorative accent.
See also: 20 Creative DIY Bookmark Ideas for Every Book Lover
#20. Vintage Music Sheet Garland
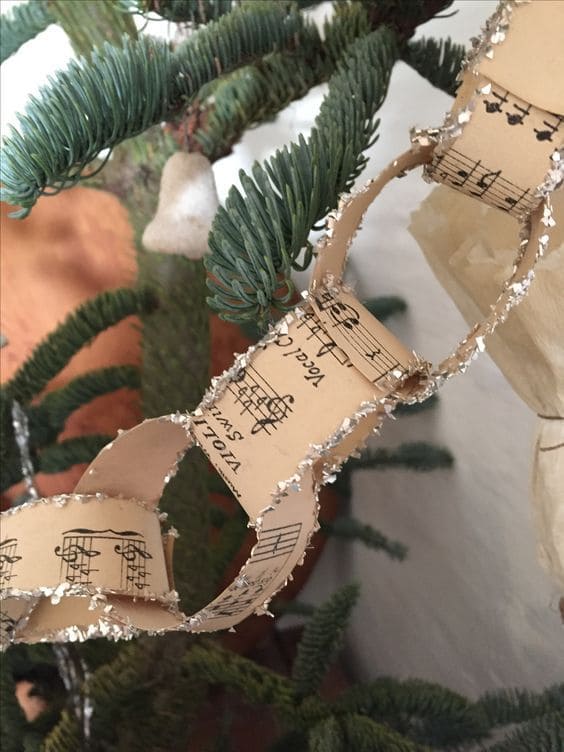
Ever wondered how to make your Christmas tree look straight out of a classic holiday movie?
This vintage music sheet garland brings that nostalgic sparkle you can’t find in store-bought decorations.
Each link of this handmade chain glimmers softly with a touch of glitter, turning even the simplest branch into a story of melody and warmth.

- 2–3 sheets of vintage or printed music paper (8.5×11 inches)
- Scissors or paper cutter
- Glue stick or hot glue gun
- Fine silver or gold glitter (1 small jar)
- Clear-drying craft glue (30 ml)
- Small paintbrush
-
Cut your music sheets into long strips about 1×6 inches each. Slightly ink or smudge the edges with brown if you want a more antique look.
-
Take one strip, form it into a circle, and glue the ends together. Then thread the next strip through it before closing the loop to start forming your chain.
-
Mix a small amount of craft glue with a bit of water to thin it slightly. You can use your paintbrush to coat the outer edges of each paper ring.
-
Sprinkle glitter along the glued edges while it’s still wet, tapping off any excess. Let the garland dry completely on wax paper to prevent sticking.
-
Once dry, drape your garland across the Christmas tree, along a mantel, or around a doorway. The shimmering music notes will catch the light beautifully, filling your space with that old-world festive charm that never goes out of tune.


