Have you ever wondered what to do with old, unused keys collecting dust in drawers? Instead of letting them sit forgotten, why not transform them into something beautiful and meaningful?
Upcycling old keys is a fantastic way to breathe new life into these tiny metal relics, turning them into unique home decor, jewelry, and even functional art pieces.
Whether you love vintage aesthetics, rustic charm, or whimsical creativity, there are endless ways to repurpose keys into stunning crafts. From key wind chimes to wall art and elegant accessories, this list of 24 brilliant ideas will inspire you to unlock your creativity and give those old keys a brand-new purpose!
#1. Enchanted Key Dragonflies
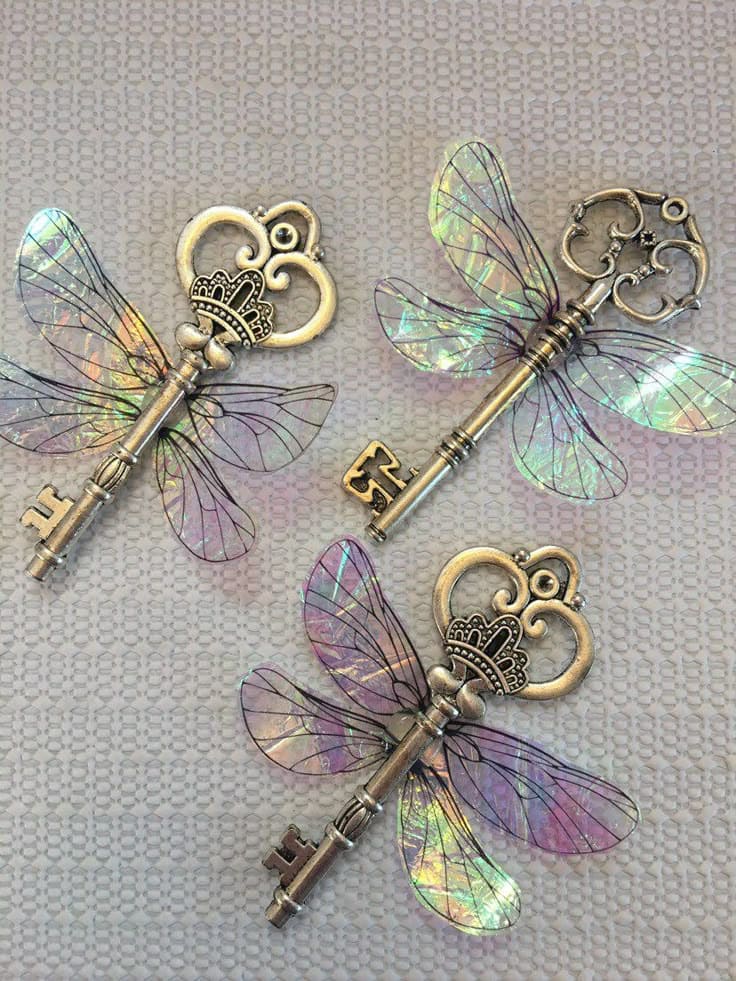
Inspired by the magical beauty of dragonflies, this DIY project transforms antique keys into dazzling, winged creations that look like they flew straight out of a fairy tale.
Materials Needed:
- 3 antique or ornate skeleton keys
- Iridescent or transparent plastic wings (can be repurposed from faux butterflies or made from clear acetate sheets)
- Fine wire (24–26 gauge, silver or bronze)
- Jewelry pliers
- Small jump rings
- Hot glue gun or strong adhesive
- Acrylic paint or metallic rub
Instructions:
- Clean the antique keys and optionally apply a light coat of metallic rub or acrylic paint to enhance their aged, mystical look. Let dry.
- If repurposing faux butterfly wings, carefully remove them from their base. If making your own, cut wing shapes from acetate sheets and lightly curve them for a natural effect.
- Next, attach the wings by placing the wings where the dragonfly’s body meets the key’s ornate handle, then secure them with a small amount of strong adhesive or a hot glue gun.
- If you want extra durability, use small jump rings threaded through pre-made holes in the wings to attach them to the key.
- Finally, gently bend the wings into a natural shape and adjust the wire wrapping for a polished, seamless look.
#2. Charming Village Key Holder
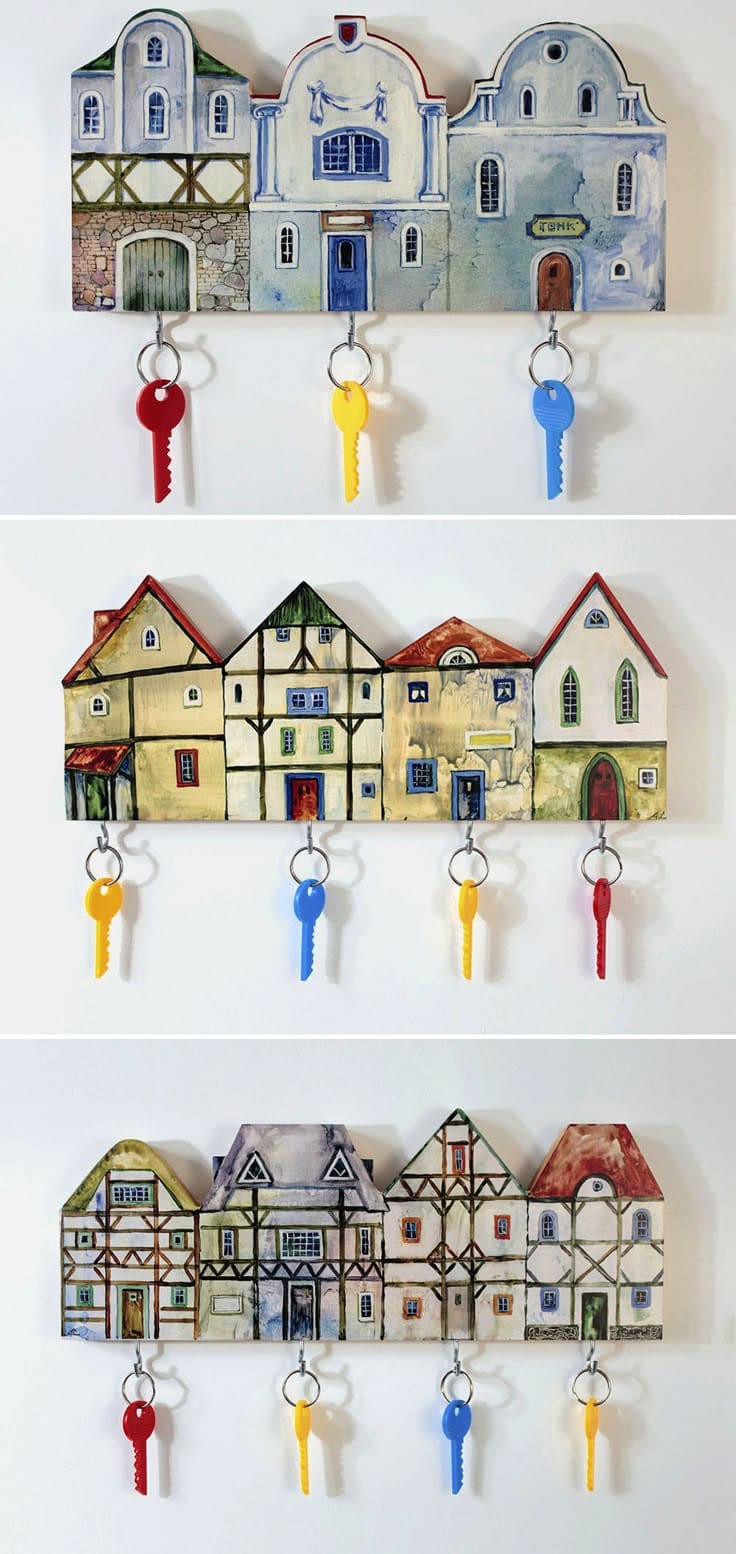
Anyone who loves both organization and creativity will adore this DIY village-style key holder! This project transforms a simple wooden board into a hand-painted row of whimsical houses while keeping your keys neatly stored in a decorative way.
Materials Needed:
- 1 rectangular wooden board (approximately 12×6 inches)
- Acrylic paints (variety of colors for the house design)
- Paintbrushes (fine and medium sizes)
- Pencil
- 3–5 small metal hooks
- Drill and small screws
- Sandpaper
- Clear varnish
- Saw
Instructions:
- Sand the wooden board to ensure a smooth painting surface. If desired, cut the top into a series of peaks to mimic rooftops.
- Use a pencil to outline the houses, doors, windows, and any additional details like bricks or shutters.
- Next, fill in the design with acrylic paints, using different colors for variety. Let each layer dry before adding fine details with a smaller brush.
- If you want a glossy or long-lasting finish, apply a clear varnish and allow it to dry completely.
- Drill small pilot holes evenly spaced along the bottom of the board. Screw in the metal hooks securely to hold keys.
- Hang the key holder in an entryway or kitchen, adding a charming and functional touch to your home decor.
#3. Musical Key Wall Art Masterpiece
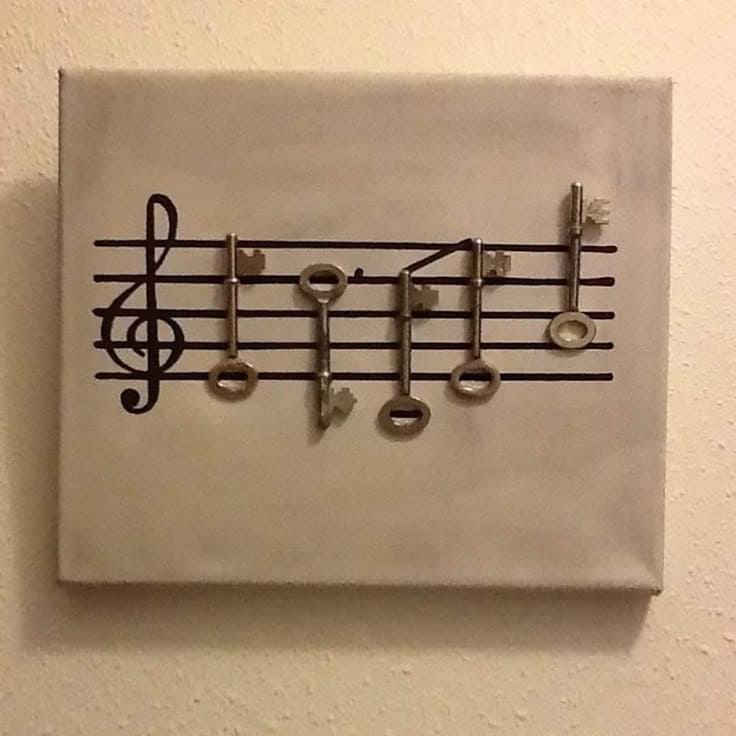
Wow! Who knew old keys could create such a stunning tribute to music? This DIY musical key wall art blends vintage charm with creative expression, making it a perfect decor piece for musicians, music lovers, or anyone who appreciates unique, upcycled art.
Materials Needed:
- 1 blank canvas or wooden board (size of choice)
- 5 old metal keys (various sizes for visual interest)
- Black acrylic paint or a permanent marker
- Fine-tip paintbrush or ruler
- Strong adhesive
- Clear varnish (optional)
Instructions:
- If using a canvas, paint it with a soft neutral tone like beige, gray, or white for a clean background, then let it dry completely.
- Use a ruler and black paint or a marker to create five evenly spaced parallel lines across the canvas, adding a treble clef on the left side.
- Lay out the keys on the staff to resemble musical notes, experimenting with placement for an artistic and balanced look.
- Once satisfied with the arrangement, use a strong adhesive to attach each key to its designated position. Press firmly and allow the glue to set completely.
- Optionally, apply a thin layer of clear varnish to seal the design and enhance durability.
#4. Vintage Key DIY Jewelry Creations
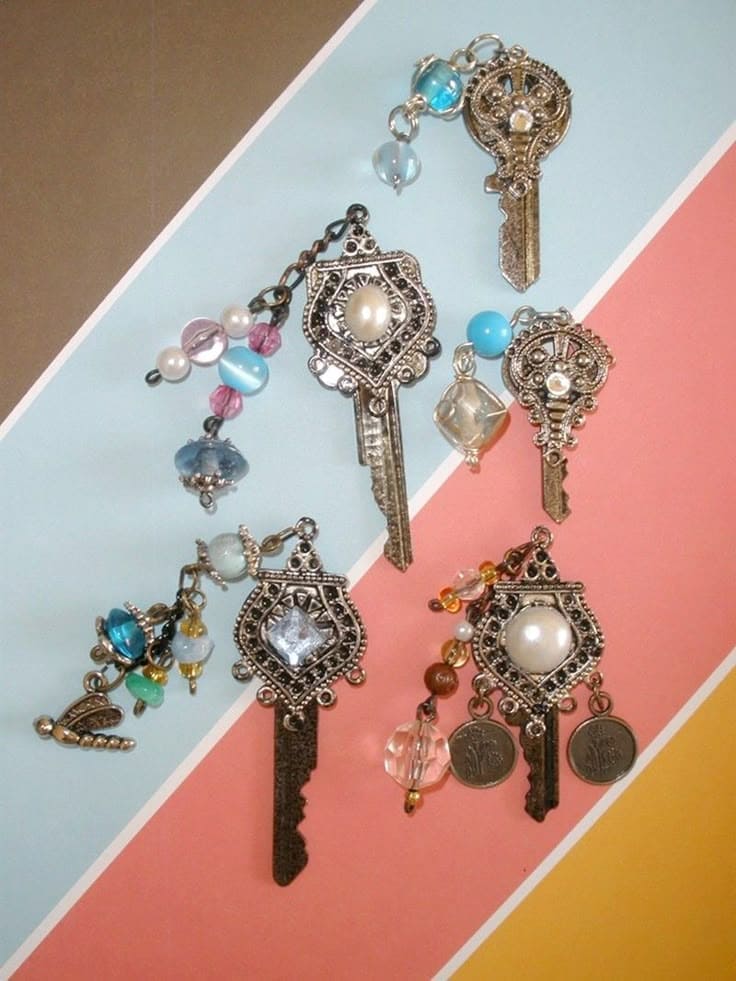
Your old keys can become dazzling statement pieces with this vintage key charm DIY! This project transforms ordinary keys into stunning decorative accessories with beads, pearls, and intricate embellishments, making them perfect for keychains, pendants, or gifts.
Materials Needed:
- 5 antique or vintage-style keys
- Assorted beads (glass, pearl, or metallic)
- Jewelry wire (24–26 gauge)
- Jump rings (various sizes)
- Small charms or trinkets
- Chain segments or key rings
- Jewelry pliers and wire cutters
- Hot glue gun
Instructions:
- Firstly, choose ornate keys for a vintage look. Wipe them clean to remove dust or tarnish.
- Using jewelry wire, thread beads and small charms onto jump rings, creating decorative dangles.
- Wrap fine jewelry wire around the top section of the key, incorporating beads and charms as you go. Twist tightly to secure.
- Attach a jump ring or small chain loop at the top so the key can be used as a pendant or keychain.
- If desired, glue pearls or rhinestones onto the key’s head for an elegant finish.
#5. Vintage Key Charm Bottles
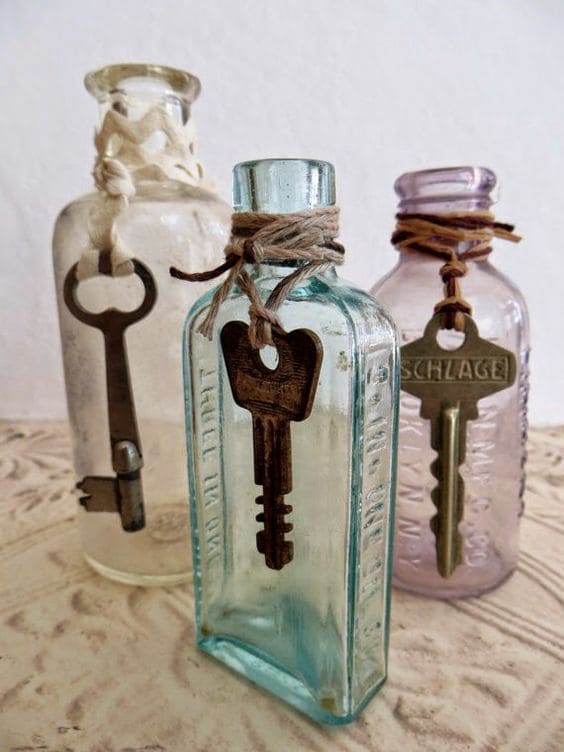
This enchanting DIY craft transforms old keys into timeless decorative pieces using vintage glass bottles. The rustic charm of twine-wrapped bottles with antique keys makes for a stunning display, perfect for home decor or gifts.
Materials Needed:
- 3 vintage glass bottles
- 3 antique or old-fashioned keys
- Natural jute twine or cotton lace ribbon
- Scissors
Instructions:
- Clean the glass bottles thoroughly, removing any dust or labels for a polished look.
- Next, choose keys with interesting shapes and patinas to enhance the vintage appeal.
- Cut about 12 inches of jute twine per bottle. Wrap it securely around the neck of each bottle, leaving extra length for a rustic, unfinished effect.
- Finally, thread the twine through the key’s hole and knot it tightly so the key dangles in the center of the bottle. Adjust for symmetry.
#6. Whimsical Hand-Painted Key Ornaments
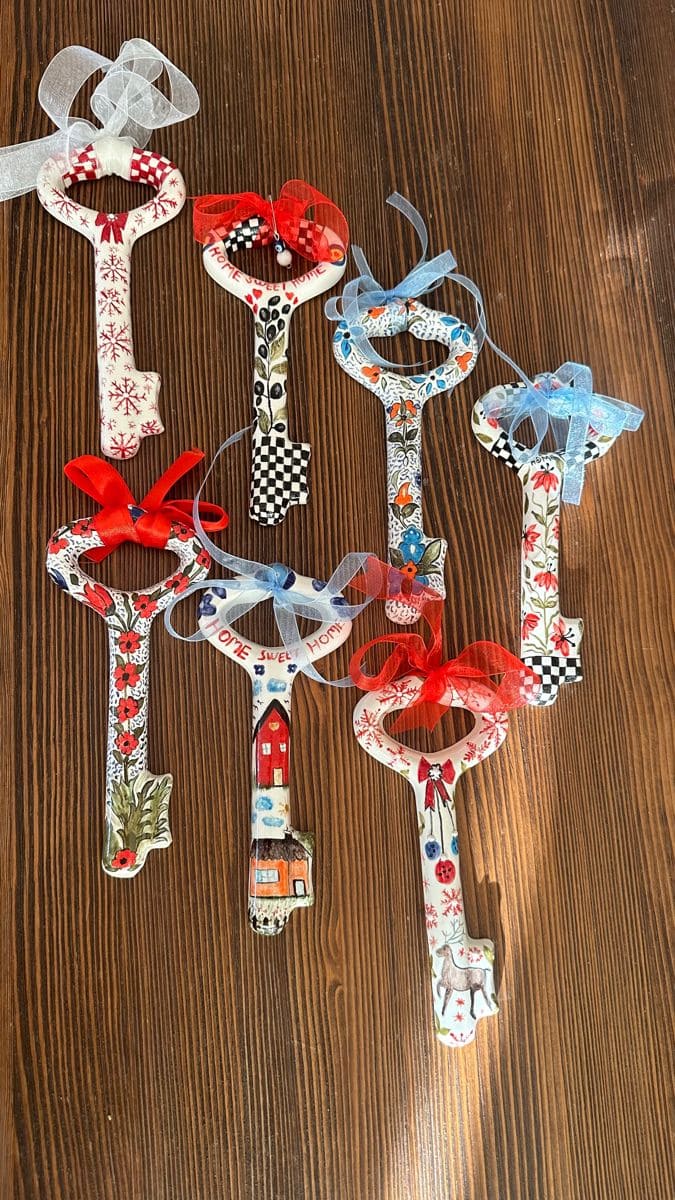
How about transforming old keys into vibrant, one-of-a-kind ornaments? This DIY craft breathes new life into forgotten keys by adding colorful hand-painted designs, delicate ribbons, and a personal touch.
Materials Needed:
- 7 old metal keys (preferably large, vintage-style keys)
- Acrylic paints (various colors)
- Fine-tip paintbrushes
- Clear varnish or Mod Podge
- Decorative ribbons (red, blue, white, or preferred colors)
- Permanent marker
- Small embellishments (beads, buttons, or charms)
- Hot glue gun
Instructions:
- Wash the keys with soap and water to remove dirt or grease. Let them dry completely.
- Use a light-colored acrylic paint as a primer to help designs stand out. Allow it to dry fully before adding details.
- Use fine-tip brushes to create floral patterns, abstract designs, or festive elements like snowflakes and houses. Add lettering with a permanent marker if desired.
- Once the paint dries, apply a clear varnish or Mod Podge to prevent chipping and enhance durability.
- Thread a decorative ribbon through the key’s top hole and tie a bow for easy hanging.
#7. Bohemian Key Charm Necklace
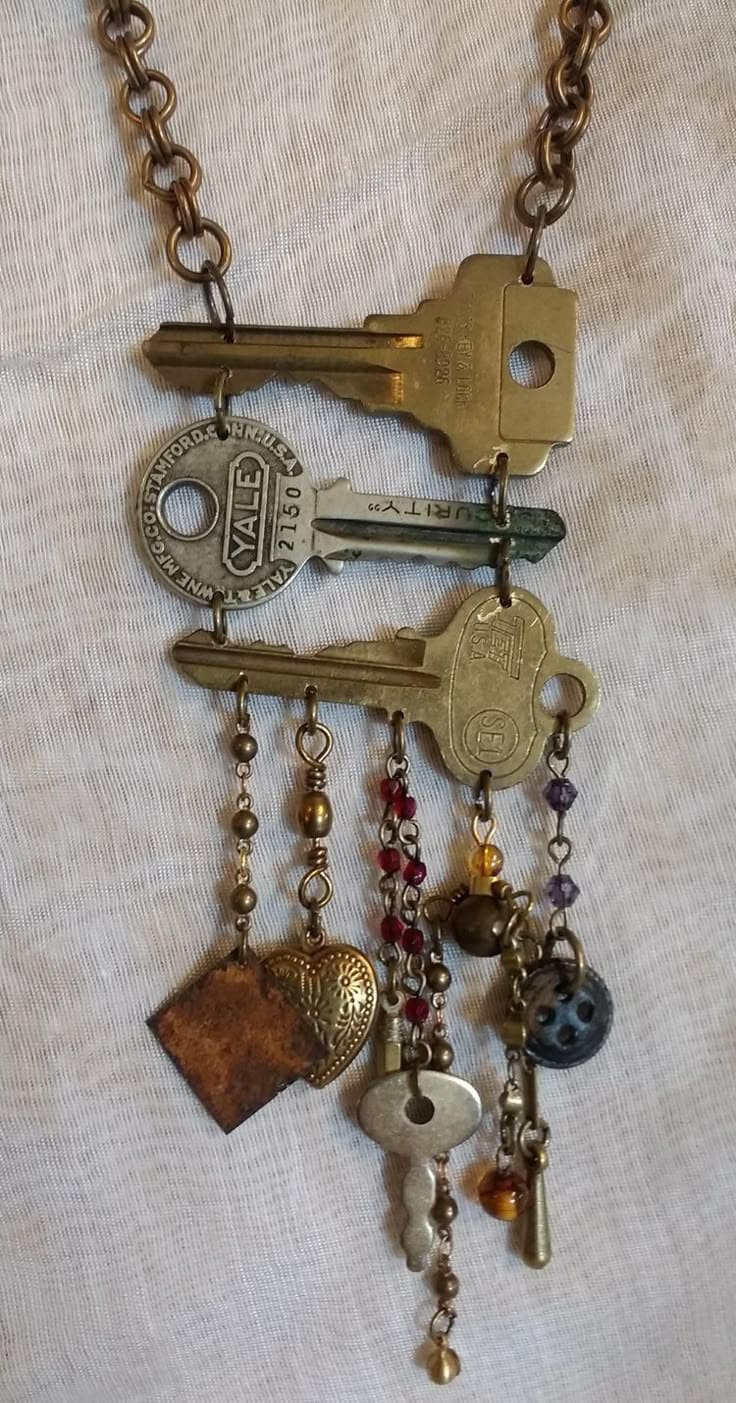
This DIY vintage key necklace blends rustic metal, elegant beads, and eclectic charms to create a wearable piece of history with a unique artistic touch.
Materials Needed:
- 3–5 vintage or antique-style keys (different shapes and sizes)
- 1 sturdy metal chain (bronze or antique gold)
- Assorted beads (glass, metallic, or gemstone)
- Jump rings (various sizes)
- Jewelry wire (24-gauge, for beaded chains)
- Jewelry pliers and wire cutters
- Small charms (hearts, gears, or lockets for added personality)
- Lobster clasp
Instructions:
- Clean the old keys if necessary and arrange them in a cascading or layered design to find a visually appealing balance.
- Use jump rings to connect the keys securely to the base of the necklace chain, spacing them evenly.
- Thread assorted beads onto jewelry wire, securing them with wrapped loops. Attach these beaded strands between the keys for a dangling effect.
- Use small jump rings to attach decorative charms or trinkets that complement the rustic aesthetic.
- Connect both ends of the chain with a lobster clasp, ensuring it is sturdy and comfortable to wear.
- Wear your bohemian key charm necklace as a bold statement piece or gift it to someone who appreciates unique, handcrafted jewelry.
#8. Antique Key Cross Pendant
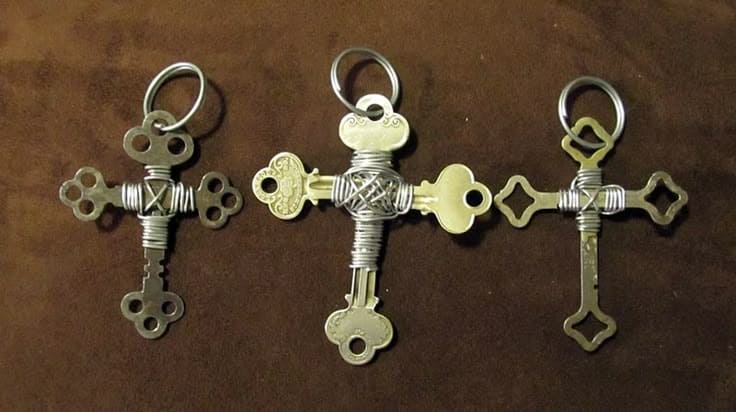
Have you ever wanted to create a unique, symbolic piece of art using repurposed materials? This DIY key cross project transforms vintage keys into stunning handmade pendants, blending history, faith, and creativity into a one-of-a-kind design.
Materials Needed:
- 4 antique or vintage-style keys (similar sizes for symmetry)
- 24-gauge jewelry wire (silver, bronze, or gold)
- Wire cutters and needle-nose pliers
- Jump ring or key ring
- Strong adhesive
- Small decorative charms
Instructions:
- Lay out four keys in a cross shape, ensuring a balanced design. The longest key should be vertical, while two matching keys create the horizontal arms.
- Start wrapping jewelry wire tightly around the intersection where the keys meet, creating an “X” pattern for stability and style. Use pliers to twist and secure the wire ends.
- Attach a jump ring or key ring at the top by threading it through the existing hole in the top key. If your key lacks a hole, wrap extra wire at the top to form a loop.
- Cut excess wire and use pliers to tuck in sharp ends. Adjust the shape and alignment of the keys as needed.
#9. Sculptural Key Metal Art Piece
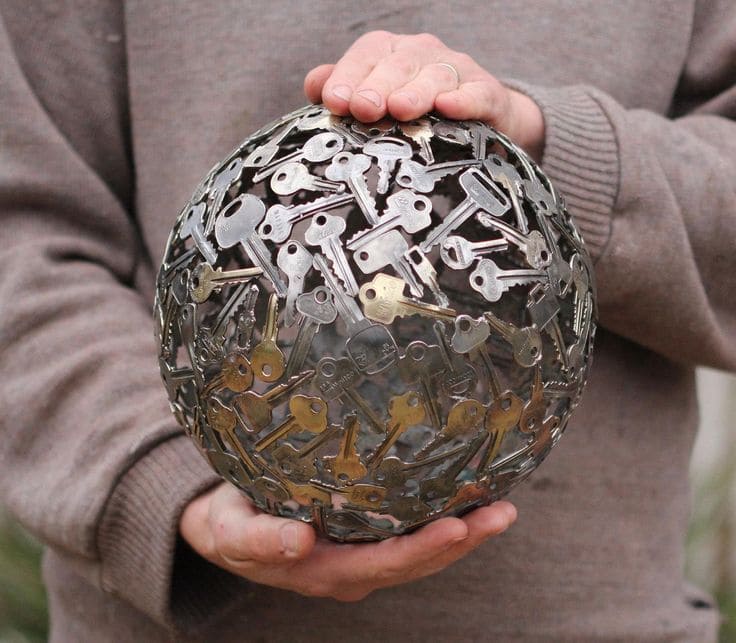
This DIY key sphere is a bold, eye-catching piece of art that plays with light and texture, making it a perfect addition to garden decor, industrial-style interiors, or modern sculpture collections.
Materials Needed:
- 50–100 old metal keys (various sizes for texture)
- A large metal or glass sphere (as a base mold)
- Strong metal adhesive
- Protective gloves
- Sandpaper or steel wool
- Clear sealant spray
Instructions:
- If the keys are tarnished or dirty, clean them using sandpaper or steel wool to enhance their metallic shine.
- Use a round mold like a glass lamp cover, an inflatable ball, or a metal frame to shape your sphere.
- Start gluing or welding keys directly onto the mold, overlapping them slightly for a structured, woven effect.
- Continue layering and connecting keys in a circular pattern, making sure each key has at least two points of attachment for durability.
- Remove the Base (If Using a Temporary Mold): If you used a glass or inflatable base, carefully detach it once the glue or welds are completely set, leaving a hollow metal sphere.
- If desired, spray the sphere with a clear sealant to protect it from rust and outdoor wear.
#10. Rustic Key Christmas Tree
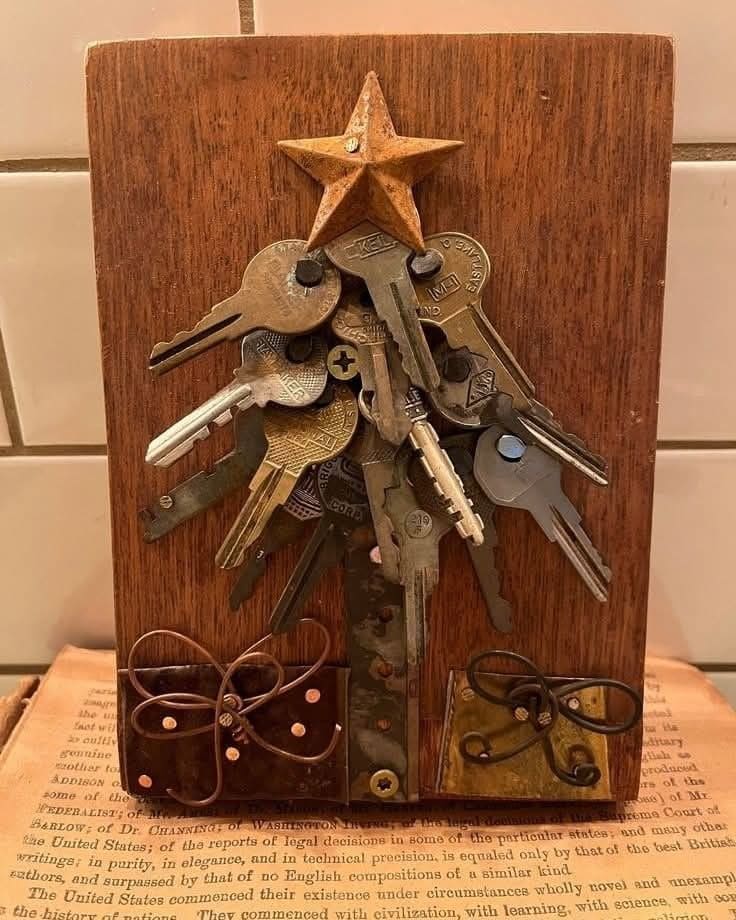
With a handful of old keys and a little creativity, you can craft a stunning rustic Christmas tree that blends vintage charm with festive spirit.
Materials Needed:
- 10–20 old metal keys (varied sizes and shades for texture)
- 1 wooden board (approximately 8×12 inches)
- 1 small metal or wooden star
- Small nails or strong adhesive
- Hammer
- Brass or copper wire
- Metallic spray paint or polish
Instructions:
- Sand the wooden board for a smooth finish, then stain or leave it natural for a rustic touch.
- Lay out the keys in a Christmas tree shape, starting with a single key at the top and widening as you go down to form branches.
- Use nails or strong adhesive to fix the keys in place, ensuring they overlap slightly for depth and texture.
- Position the star at the top of the key tree and secure it with glue or a small nail.
- Wrap brass or copper wire around the base like tree garland, or attach small embellishments like bells or beads for extra charm.
#11. Timeless Vintage Key Art
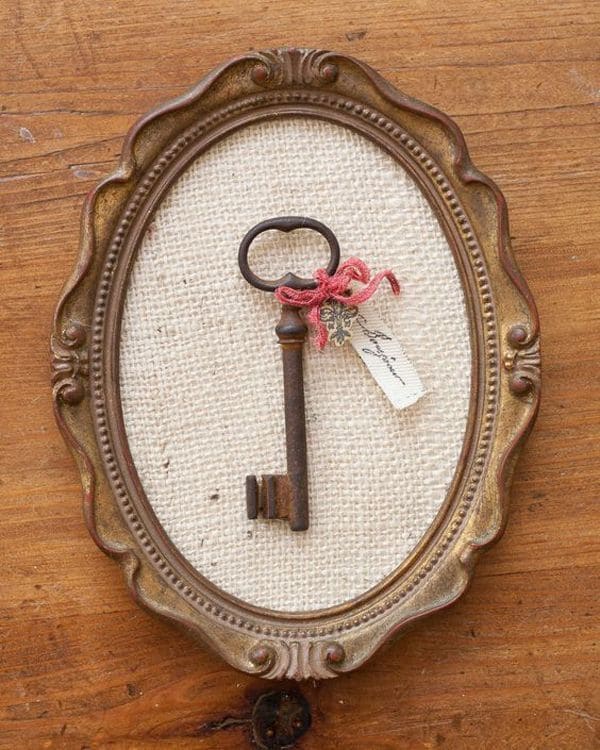
You can turn an antique key into an elegant, sentimental piece of art that adds a touch of vintage charm to your home. This framed key display is a simple yet meaningful way to preserve history.
Materials Needed:
- 1 ornate vintage frame (oval or rectangular)
- 1 antique or old-fashioned key
- Burlap or linen fabric
- Scissors
- Hot glue gun or strong adhesive
- Decorative ribbon, lace, or tag
- Small nails or tacks
Instructions:
- Remove the glass from the frame, keeping only the decorative border. If needed, clean or paint the frame for a refreshed look.
- Trim a piece of burlap or linen to fit the frame backing. Secure it tightly with glue, ensuring a smooth surface.
- Center the key on the fabric and decide on its placement. Use hot glue or small tacks to secure it firmly in place.
- Tie a small ribbon or lace around the key for an extra vintage feel. Attach a tiny handwritten tag with a meaningful date or name for a personal touch.
#12. Whimsical Key Wind Chime Candle Holder
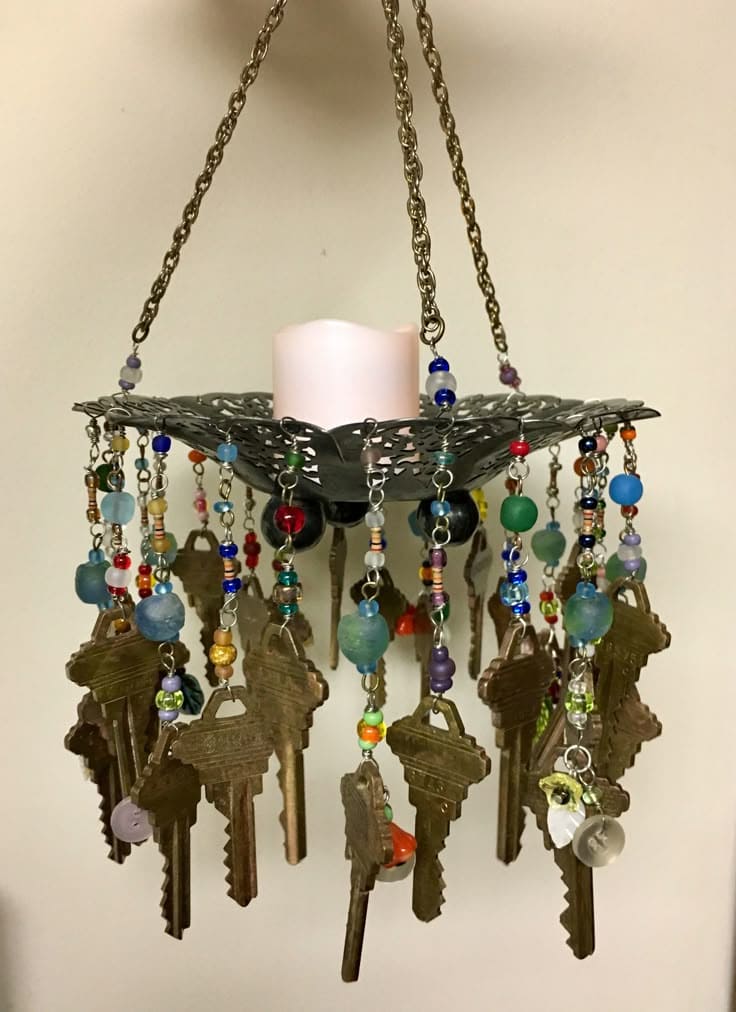
If you love turning forgotten treasures into mesmerizing home decor, this upcycled key chandelier is the perfect DIY project!
Materials Needed:
- 1 metal plate or decorative tray (preferably with holes for hanging)
- 12–15 old keys
- Assorted glass or wooden beads (colorful, different sizes)
- 12–15 small metal chains or jewelry wires
- Jump rings and pliers
- 3 metal chains
- 1 LED candle
- Drill
Instructions:
- Use a decorative metal plate or tray with pre-made holes; if necessary, drill small holes evenly around the edges for attaching key chains.
- Thread beads onto jewelry wire or small chains, attaching an old key at the end of each. Secure with jump rings.
- Use pliers to fasten the beaded key chains through the holes on the plate, ensuring even spacing for a balanced look.
- Attach three equal-length metal chains to the edges of the plate, connecting them at the top with a strong jump ring or hook.
- Finally, place an LED candle in the center of the tray for a soft, ambient glow. If using a real candle, ensure your materials are heat-resistant.
#13. Shabby Chic Key Ornaments
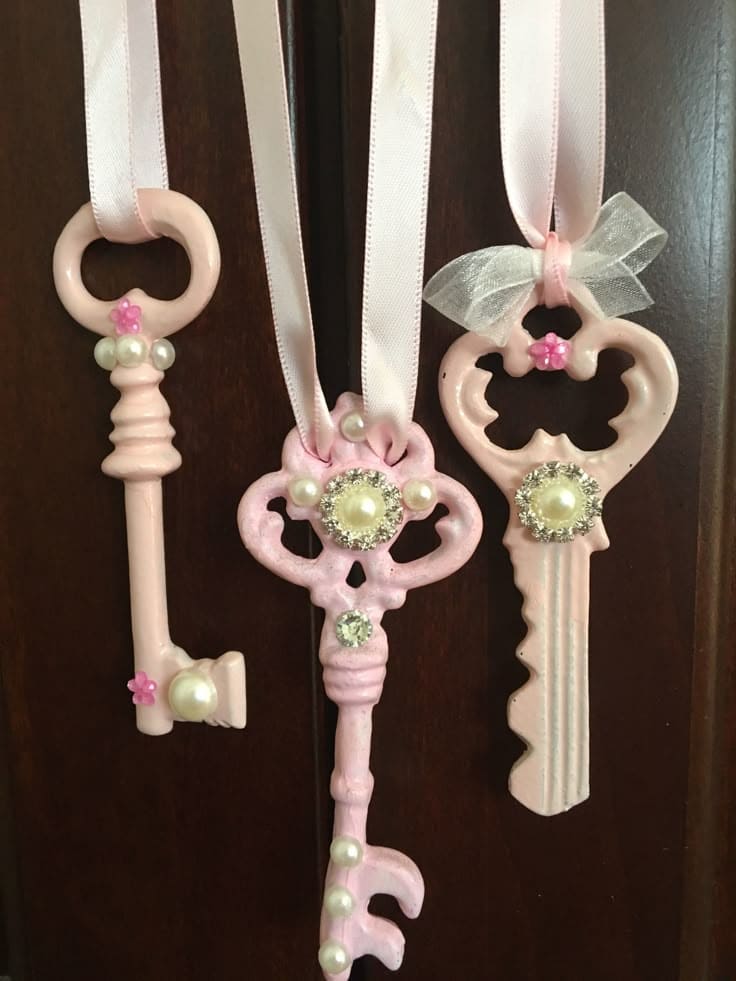
Instead of letting old keys collect dust, why not transform them into elegant shabby chic ornaments? These beautifully upcycled keys, adorned with soft pastel paint, pearls, and ribbons, make stunning decorative accents for weddings, nurseries, or vintage-inspired spaces.
Materials Needed:
- 3 antique or vintage-style keys
- Light pink or pastel acrylic paint
- Small paintbrushes
- Pearl embellishments (flat-back pearls, beads, or rhinestones)
- Hot glue gun and glue sticks
- Sheer or satin ribbon (white, pink, or pastel)
- Small decorative charms (optional for extra sparkle)
Instructions:
- Clean your keys thoroughly to remove dirt or rust. Let them dry completely before painting.
- Apply a coat of pastel pink or another soft color, ensuring even coverage. Let them dry before adding a second coat if needed.
- Using a hot glue gun, carefully attach flat-back pearls, rhinestones, or small charms to enhance the vintage aesthetic.
- Then, cut a piece of satin or sheer ribbon, loop it through the key’s top, and tie a small bow for easy hanging.
#14. Vintage Key Butterflies
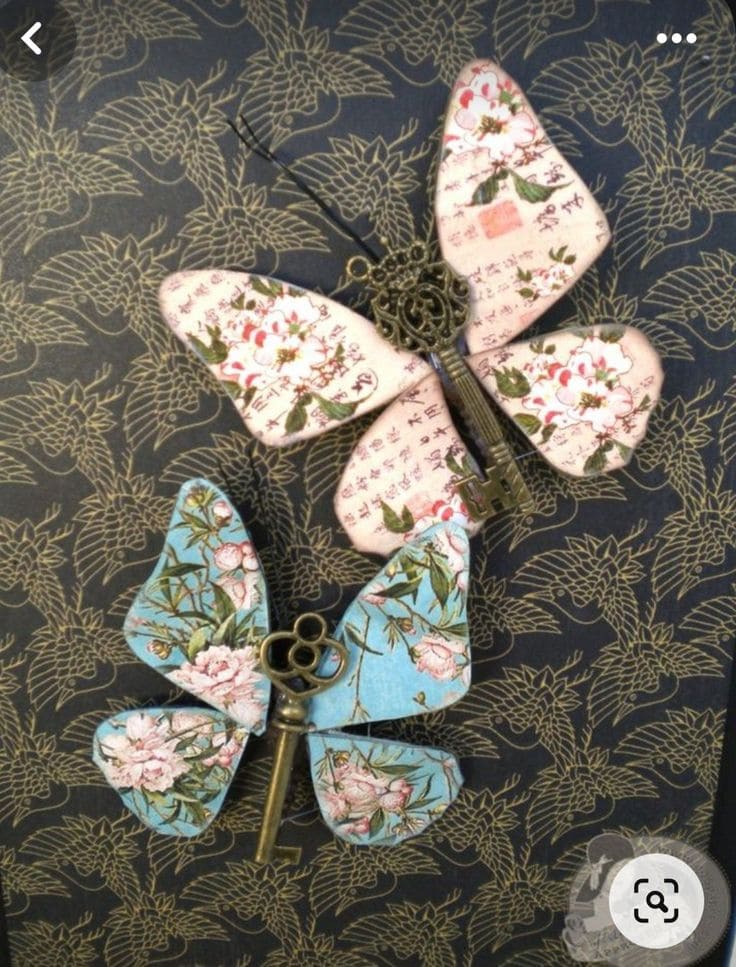
For a truly enchanting way to upcycle old keys, transform them into delicate butterfly decorations with floral-patterned wings!
Materials Needed:
- 2 antique or vintage-style keys
- Decorative fabric or patterned paper (floral, lace, or script designs)
- Stiff cardboard or thin foam (for wing support)
- Scissors
- Hot glue gun and glue sticks
- Fine wire
- Small paintbrush and Mod Podge
- Black or metallic marker
Instructions:
- Start with cleaning your keys and decide on their orientation, usually placing them vertically, as they will form the butterfly’s body.
- Cut four wing shapes from stiff cardboard or thin foam, ensuring symmetry for a balanced butterfly look.
- Glue decorative fabric or patterned paper onto the wing cutouts. Use Mod Podge to seal and add a slight sheen. Let dry completely.
- Position and glue the wings securely onto the back of the key, making sure they are evenly spread out. Hold in place until the glue sets.
- Cut two small pieces of fine wire, curl the ends slightly, and glue them to the top of the key to resemble antennae.
- Use a marker to outline or accentuate the wings if desired, adding definition to the edges.
#15. Rustic Key Hook Organizer
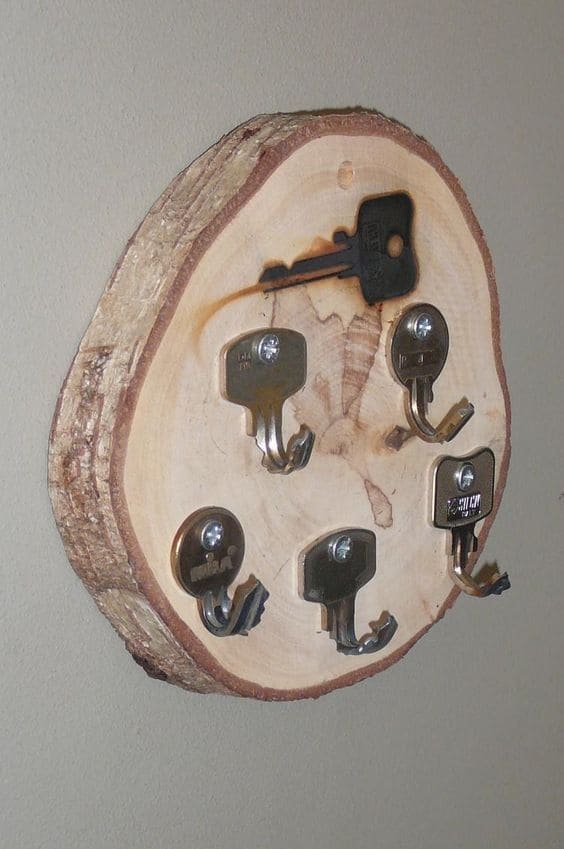
The blend of natural wood and repurposed keys creates this charming, functional key holder. This DIY project transforms old keys into sturdy hooks while maintaining a rustic, handcrafted aesthetic.
Materials Needed:
- 1 round wood slice (about 8–10 inches in diameter)
- 4–5 old metal keys
- Strong screws (one per key)
- Power drill with drill bits
- Sandpaper
- Wood stain or sealant (optional)
- Wall mounting hardware (brackets, screws, or adhesive strips)
Instructions:
- Sand the surface to remove rough edges, keeping the natural bark for a rustic effect. Apply a wood stain or sealant if desired and let it dry.
- Using pliers, bend each key slightly at a 90-degree angle to form a hook shape.
- Evenly space the keys on the wood slice and mark screw hole positions with a pencil.
- Drill small pilot holes at the marks, then use screws to secure each key hook tightly.
- Yu can also heat a key with a lighter and press it into the wood for a vintage-inspired silhouette.
#16. Upcycled Key Owl Art
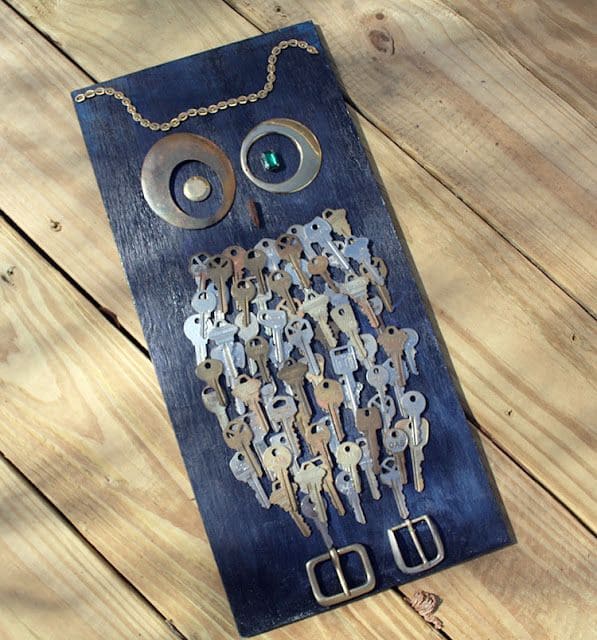
Even the most ordinary objects, like old keys, can be transformed into an extraordinary work of art! This DIY owl wall decor combines scrap metal and vintage keys to create a striking, textured design.
Materials Needed:
- 1 wooden board (approx. 12×24 inches)
- 30–50 old metal keys (various sizes for texture)
- 2 large metal washers
- 1 small gemstone or glass bead
- Metal chain
- 2 small metal belt buckles or hinges
- Strong adhesive or nails
- Black or dark blue paint
- Paintbrush and sandpaper
Instructions:
- Sand the wood to smooth out rough edges, then paint it with black or dark blue to create a rich backdrop for the owl. Let it dry.
- Attach two large washers as eyes, gluing a small glass bead or gemstone in one for a captivating effect, then use a small piece of metal or a painted wooden strip for the beak.
- Arrange and glue a short length of metal chain above the eyes to form a curved brow.
- Start layering and gluing keys from the top down, slightly overlapping them to mimic feather texture. Use a mix of old and new keys for depth.
- Secure two small belt buckles or hinges at the bottom to resemble talons.
#17. Vintage Key Clock
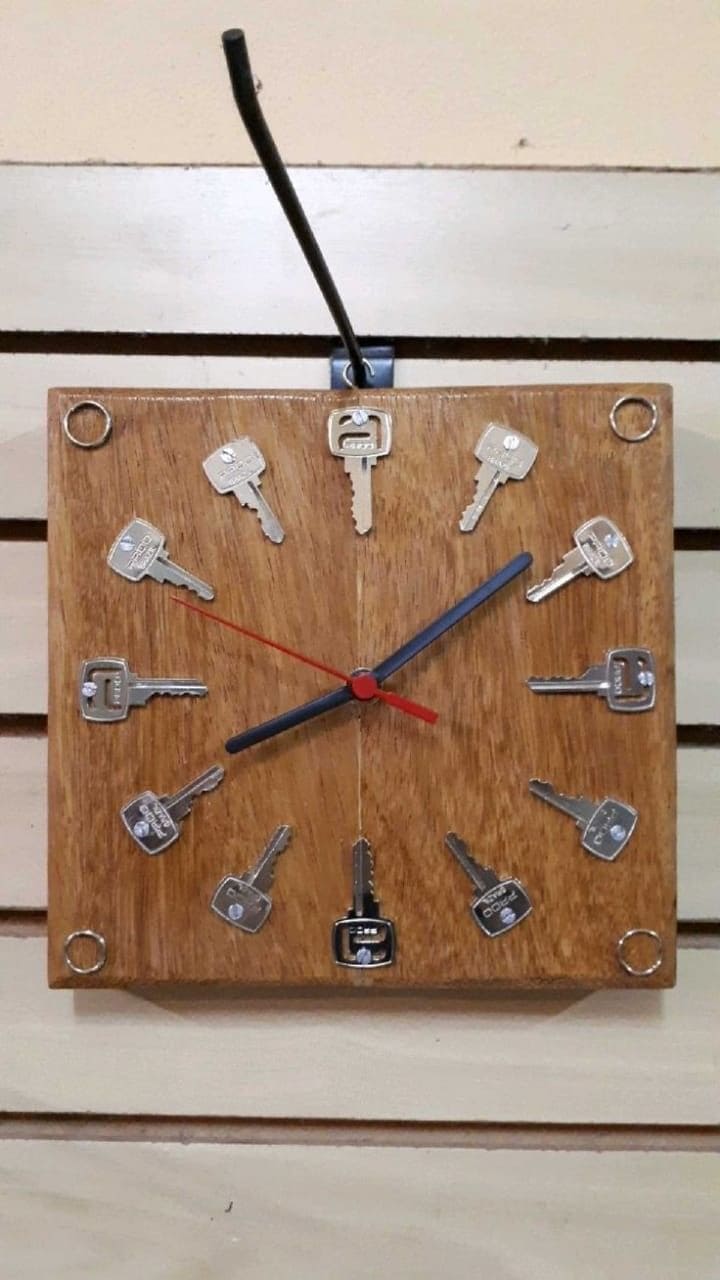
By repurposing old keys into a functional work of art, you can create a rustic yet stylish clock that blends history with modern craftsmanship. This DIY key clock is an eye-catching statement piece,.
Materials Needed:
- 12 old keys
- 1 wooden board (square or round, about 12 inches wide)
- Clock mechanism kit
- Drill with a hole saw attachment
- Strong adhesive or small nails
- Sandpaper
- Wood stain or paint
- Measuring tape and pencil
Instructions:
- Sand the wooden board to remove rough edges. If desired, stain or paint it to match your decor and let it dry.
- Use a measuring tape and pencil to mark the 12 key positions evenly around the board.
- Drill a hole in the middle of the board to install the clock mechanism, then secure each key at its designated hour position using strong adhesive or small nails.
- Follow the kit instructions to attach the clock hands and motor through the drilled hole. Ensure the hands move freely without obstruction.
- Finally, you just double-check key alignment, tighten any loose parts, and ensure the clock hands function smoothly.
#18. Festive Snowman Key Ornaments
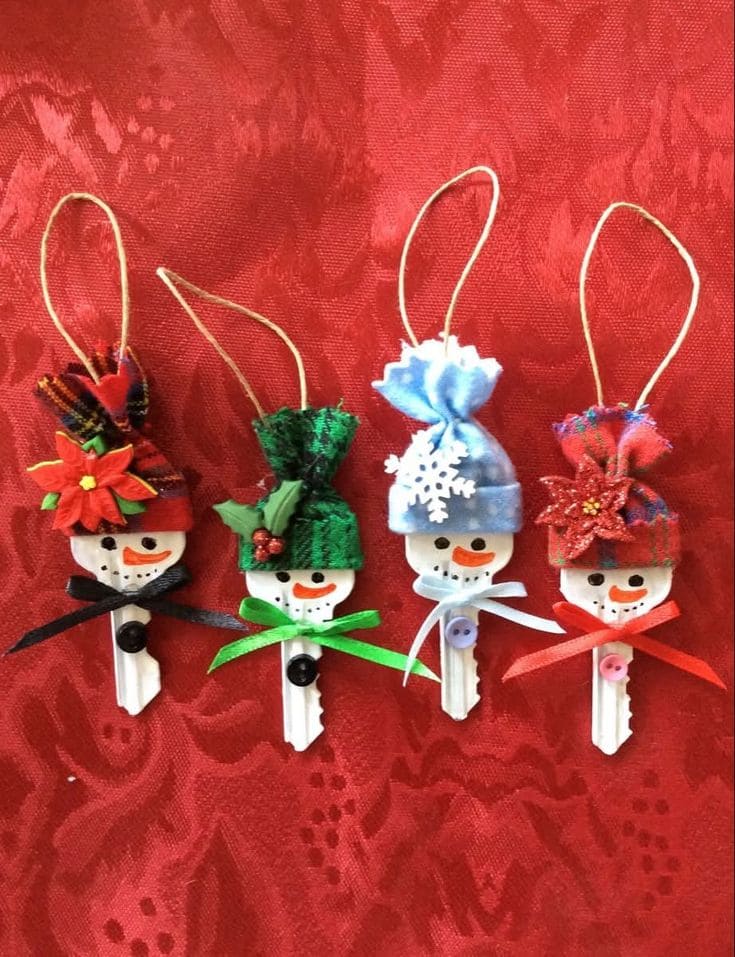
On Christmas day, why not turn old keys into adorable snowman ornaments? This delightful craft transforms ordinary keys into festive holiday decorations with cheerful faces, cozy hats, and bright ribbons.
Materials Needed:
- 4 old metal keys
- White acrylic paint
- Fine-tip permanent markers (black and orange)
- Small fabric scraps (felt, flannel, or fleece for hats)
- Twine or thin ribbon
- Mini buttons
- Small holiday embellishments (snowflakes, poinsettias, holly, etc.)
- Hot glue gun and glue sticks
- Scissors
Instructions:
- If using dark-colored keys, apply a coat of white acrylic paint and let them dry completely before decorating.
- Use a black marker to create two eyes and a dotted smile. Draw an orange carrot nose for a classic snowman look.
- Cut a small rectangle of fabric, wrap it around the top of the key, and secure it with glue. Gather and tie the top with twine to create a hat shape.
- Tie a small ribbon below the snowman’s face to resemble a scarf. Use different colors for variety.
- Attach one or two mini buttons down the length of the key for a cute finishing touch, then add small holly leaves, snowflakes, or poinsettias to the hat for extra festive charm.
- You can also glue a small loop of twine or ribbon to the back of the hat so the ornament can be hung on a tree or wall.
#19. Vintage Key Leather Bracelets
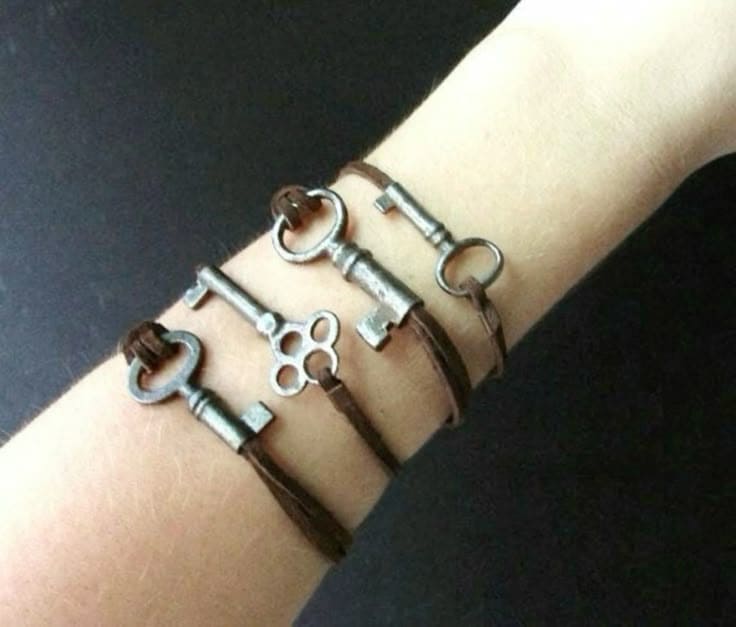
Like a piece of history wrapped around your wrist, these vintage key leather bracelets exude rustic charm and individuality. This DIY project transforms old keys into wearable art, making each bracelet a unique statement of style and nostalgia.
Materials Needed:
- 1 antique or vintage-style key (per bracelet)
- 12–15 inches of leather cord or suede strap
- Strong jewelry glue or jump rings
- Scissors
- Adjustable bracelet clasp or sliding knot technique
- Pliers
Instructions:
- First, pick a small, lightweight antique key that will sit comfortably on your wrist, then measure and cut a leather strip about 12–15 inches long, adjusting for wrist size.
- Next, use pliers to attach two small jump rings to either side of the key, threading the leather cord through them.
- Now, you just trim any excess leather and test the fit before wearing.
#20. Rustic Key Heart Wall Art
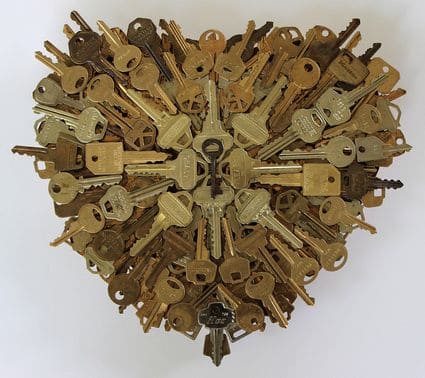
On the hunt for a meaningful way to repurpose old keys? This striking heart-shaped key collage transforms forgotten keys into a breathtaking piece of wall decor, symbolizing love, memories, and creativity in one stunning arrangement.
Materials Needed:
- 40–50 old keys (various sizes and shades for texture)
- 1 sturdy wooden or cardboard heart-shaped base (pre-cut or DIY)
- Strong adhesive glue
- Spray paint (optional)
- Hanging hook or wire
Instructions:
- Lay out the keys on the base without gluing yet, creating a balanced, layered pattern. Start from the center and radiate outward for a sunburst effect.
- Using a hot glue gun or industrial-strength adhesive, begin securing the keys in place, layering them to create depth and texture.
- If desired, spray-paint the entire piece in a metallic gold, bronze, or antique finish for a uniform aesthetic. Let dry completely.
- Finally, you can display yours on a wall by attaching a sturdy hook or wire to the back.
#21. Magical Santa’s Key
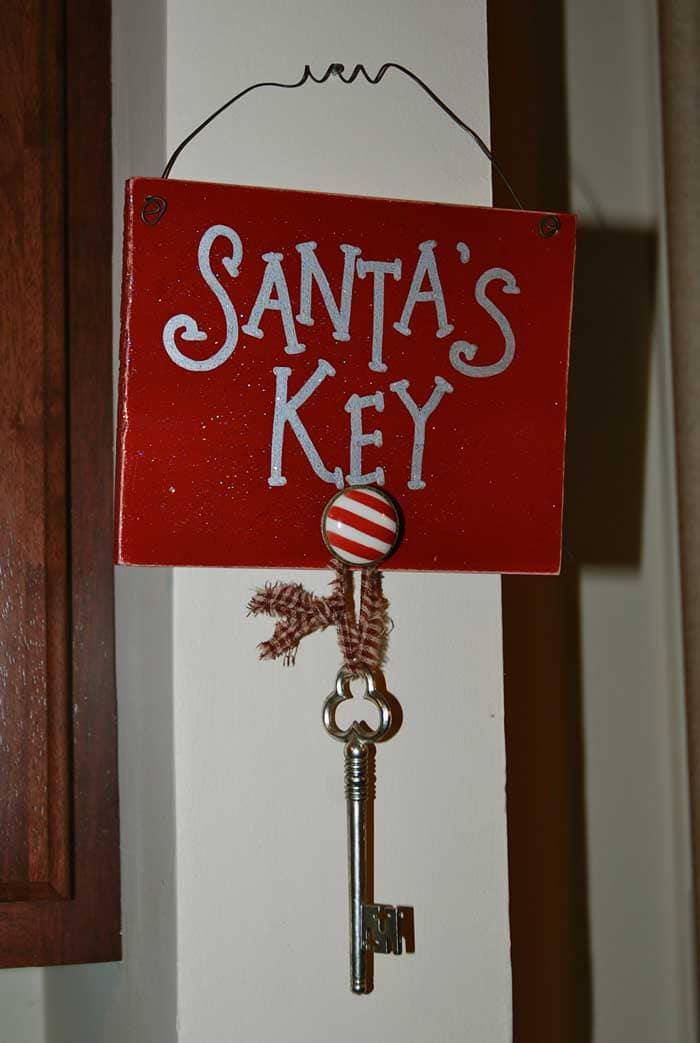
This charming keepsake is perfect for families who want to create a fun tradition, ensuring Santa has a special way to enter and leave gifts.
Materials Needed:
- 1 vintage or decorative key
- 1 wooden plaque (approx. 6×8 inches)
- Red acrylic paint
- White or silver paint pen
- Paintbrushes
- Ribbon or twine
- Decorative button or embellishment
- Hot glue gun and glue sticks
- Drill or wire hanger
Instructions:
- Apply a coat of red acrylic paint to the wooden plaque and let it dry completely.
- Using a white or silver paint pen, write “Santa’s Key” in large, festive letters. Let dry before handling.
- Secure a holiday-themed button or embellishment below the text using hot glue.
- Tie a piece of ribbon or twine around the key’s handle, creating a loop to attach it to the plaque.
- Then, glue or knot the twine onto the button or base of the plaque so the key dangles freely.
#22. Key Collage Mixed-Media DIY Art
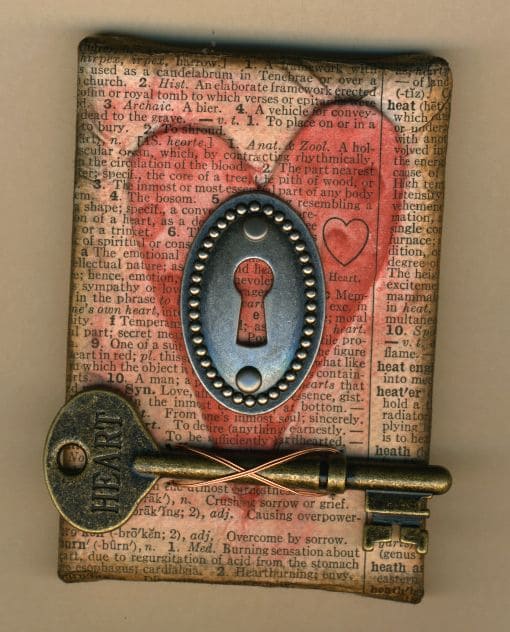
I am sure every old key holds a story, and this vintage-inspired collage turns that nostalgia into a beautiful mixed-media art piece.
Materials Needed:
- 1 small wooden or sturdy cardboard panel (approx. 5×7 inches)
- Vintage dictionary or book pages (preferably with words related to “heart” or “key”)
- 1 antique key
- 1 decorative keyhole plate
- Acrylic paint (red, brown, or antique gold)
- Mod Podge or strong craft glue
- Small paintbrush
- Distress ink or brown ink pad
- Thin copper wire
- Scissors
Instructions:
- Cut out dictionary or book pages and arrange them to cover the entire wooden or cardboard panel. Use Mod Podge or glue to adhere them, smoothing out any wrinkles. Let dry.
- Lightly brush the edges with brown distress ink or watered-down brown acrylic paint to create an aged, vintage effect.
- Using red acrylic paint, lightly paint a heart shape in the center of the panel. Blend it slightly into the background for a worn, rustic feel.
- Secure the keyhole plate in the center of the heart using glue. This adds depth and an intriguing focal point.
- Take thin copper wire and wrap it around the antique key for added texture.
- Attach the decorated key near the bottom of the collage, angling it slightly for a dynamic look.
- Apply a final coat of Mod Podge over the entire surface for protection and a subtle sheen. Let it dry completely.
#23. Illuminated Key Chandelier
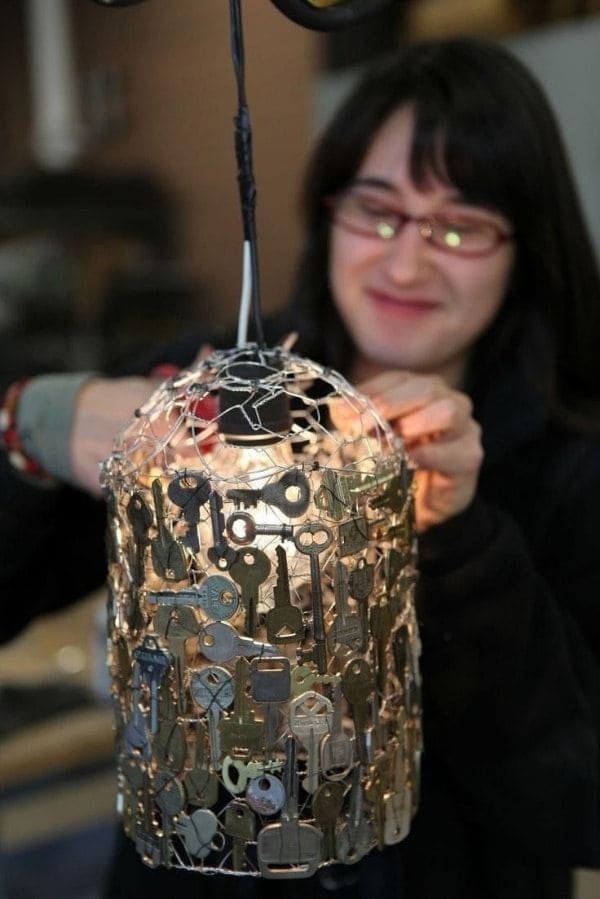
Many forgotten keys can be transformed into a breathtaking industrial-style chandelier that casts beautiful shadows and warm ambient light.
Materials Needed:
- 50–100 old metal keys (varied sizes for texture)
- Chicken wire or a wire lampshade frame
- Metal wire (24-gauge for securing keys)
- Pliers and wire cutters
- Hanging pendant light kit
- Spray paint
- Strong adhesive
Instructions:
- If using chicken wire, shape it into a cylindrical or dome-like form, securing the edges with metal wire. If using a lampshade frame, remove any fabric or unnecessary components.
- Using pliers, thread the keys through the wire openings or attach them individually with thin metal wire, ensuring they overlap slightly for a layered effect.
- Spray paint the entire piece in a metallic shade like bronze, silver, or black for a polished finish. Let dry completely.
- Secure the pendant light kit in the center of the frame, ensuring the bulb hangs freely without touching the keys.
#24. Vintage Key Charm Necklace
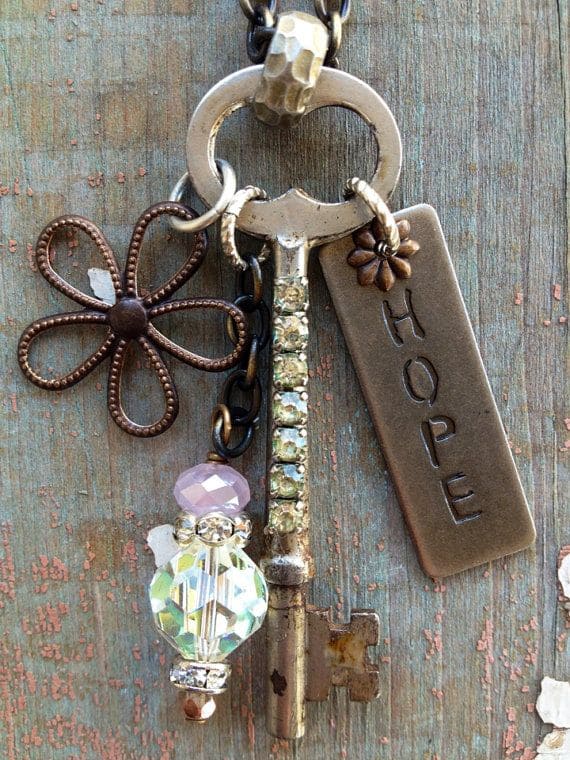
This enchanting vintage key charm necklace is more than just jewelry—it’s a personal statement infused with elegance, history, and meaning. By embellishing an antique key with beads, charms, and inspirational words, you can create a timeless accessory that holds sentimental value.
Materials Needed:
- 1 antique or vintage-style key
- Rhinestone chain or small decorative gems
- Strong jewelry glue or adhesive
- Jump rings (various sizes)
- Bronze or antique-finish chain necklace
- Metal charms (words, flowers, or symbols of hope and love)
- Glass or crystal beads
- Jewelry pliers and wire cutters
Instructions:
- Clean the antique key and ensure it’s free of rust or dirt. This will make the embellishments adhere better.
- Attach a strip of rhinestone chain along the key’s shaft using strong jewelry glue. Let it dry completely.
- Use jump rings to attach metal charms, a stamped word tag (like “Hope”), and a decorative wire flower for added character.
- Next, thread a crystal or glass bead onto wire, secure it with wrapped loops, and attach it to the key with a jump ring.
- Open a large jump ring with pliers and loop it through the key’s top hole, then connect it to the necklace chain.
