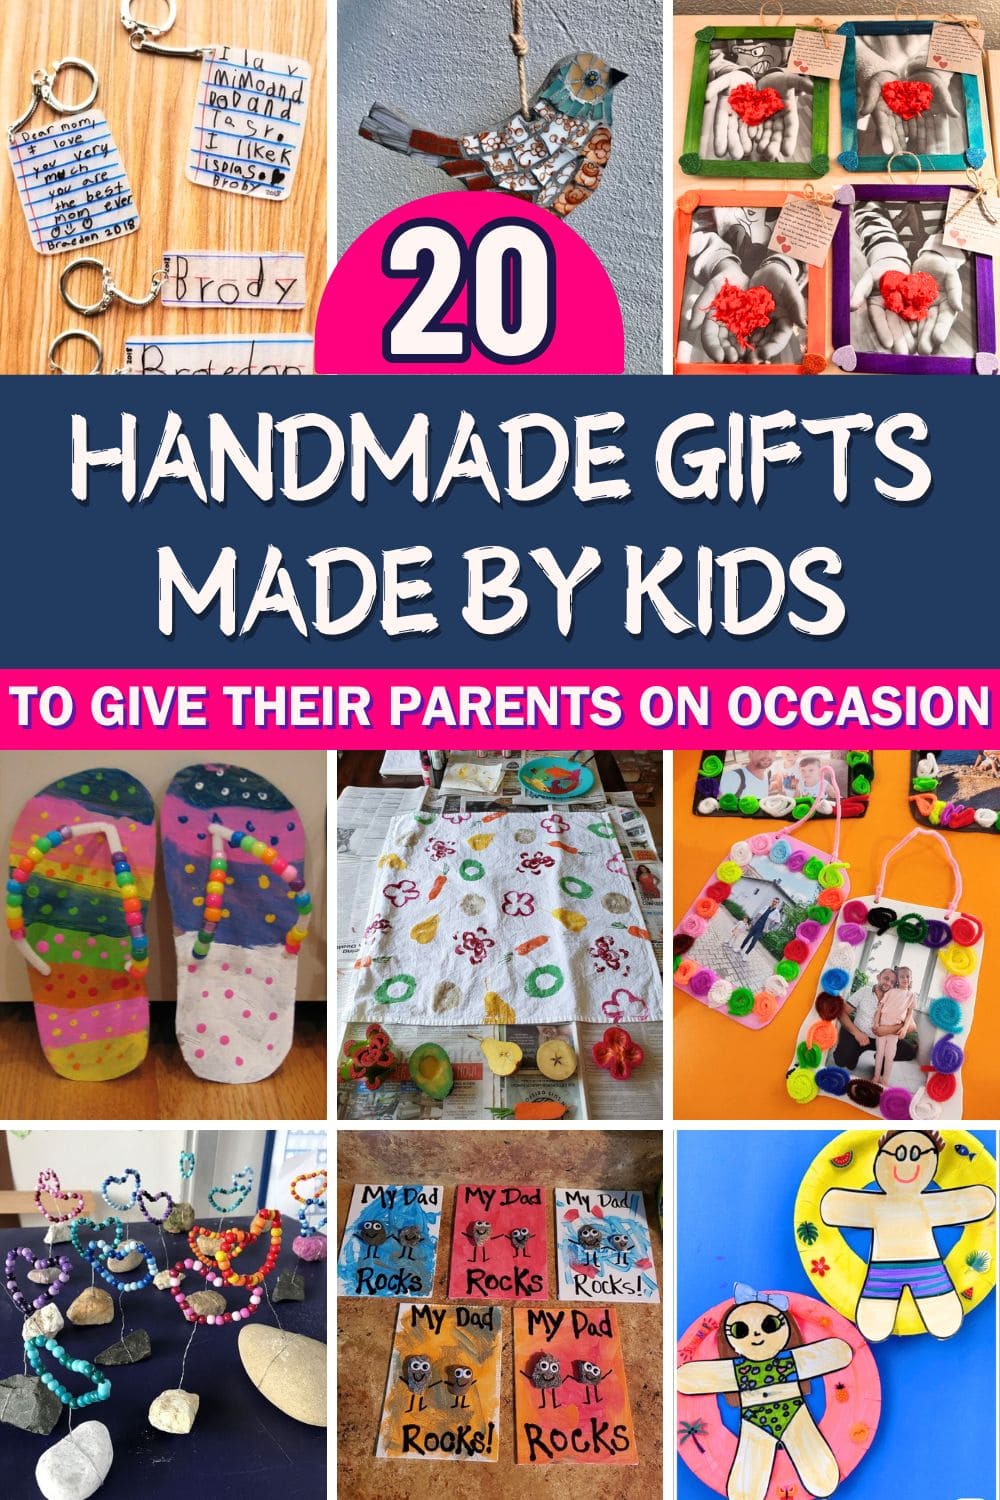
One afternoon, my niece handed me a crumpled paper flower taped to a popsicle stick and whispered, “It’s magic, it makes you happy.” And strangely, it did.
That little flower lopsided, glittery, and made with pure joy still lives on my desk, brightening even the dullest days.
They aren’t polished or perfect, but they’re bursting with heart. Each one tells a story only a child could imagine. A rock becomes a buddy, a cardboard cutout turns into a superhero, and every brushstroke speaks love.
In this article, you’ll discover 20 handmade gifts from kids that are sure to melt any parent’s heart.
#1. Handprint Heart Frame
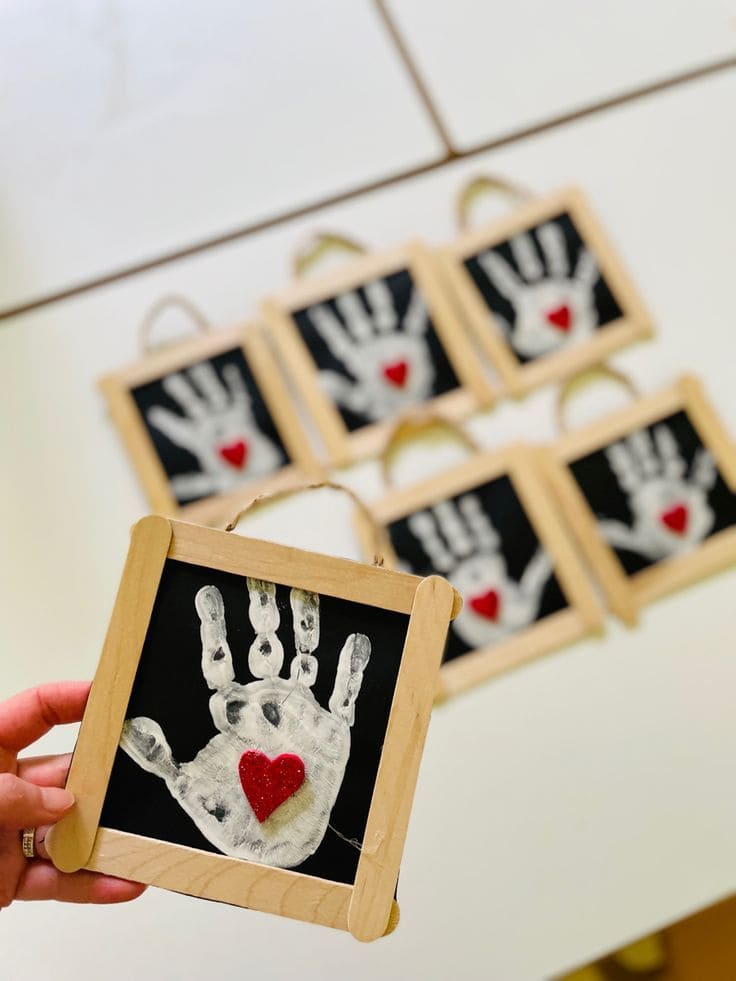
Nothing captures the essence of childhood love quite like a tiny handprint with a heart nestled right in the center.
These precious popsicle stick frames hold more than just art – they cradle the very essence of your little one’s affection.
When you see that white handprint pressed against the deep black background with its bright red heart, it’s like holding a piece of their soul in your hands.
Materials Needed
- 30-40 wooden craft sticks (jumbo size, 6 inches long)
- 6-8 pieces black construction paper (8.5″ x 11″)
- 1 bottle white washable paint (4 oz)
- 1 bottle red acrylic paint (2 oz)
- 6 small foam brushes (½ inch wide)
- 1 bottle white school glue (4 oz)
- 1 roll double-sided tape
- 6 small wooden heart cutouts (1 inch wide)
- Baby wipes (1 pack)
- Scissors and pencil
Step-by-Step Guide
Step 1: Create your frame by gluing four craft sticks together in a square shape. Let dry for 30 minutes, then cut your black construction paper to fit perfectly inside the frame opening, leaving about ¼ inch border all around.
Step 2: Paint your child’s entire hand with white paint using a foam brush, making sure to cover the palm and all fingers evenly. Then press their hand firmly onto the center of the black paper.
Step 3: Next, paint the small wooden heart with red paint and let it dry completely. Once both are dry, use a small dot of glue to attach the red heart right in the center.
Step 4: Secure the finished artwork inside your craft stick frame using double-sided tape on the back edges.
#2. Rainbow Bead Flip-Flop Art
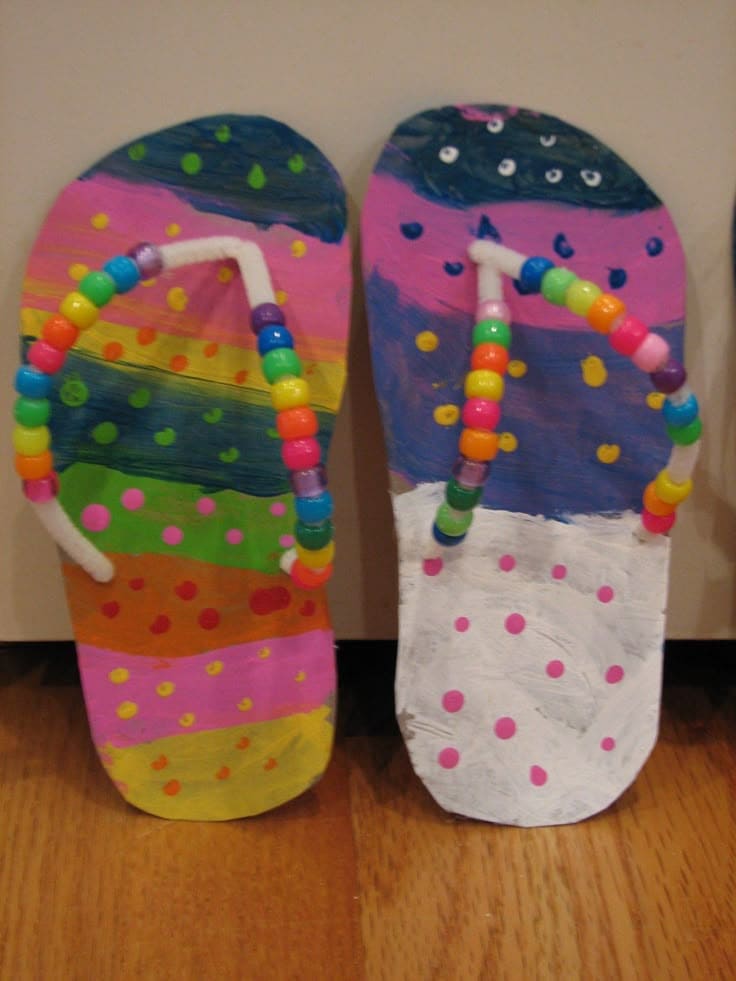
These colorful cardboard flip-flops are pure sunshine and joy wrapped into a handmade surprise. Kids can turn simple scraps into a cheerful gift that screams summer fun.
With hand-painted soles and bright beaded straps, each pair is totally unique, just like the little artist who made them.
Parents will adore this playful keepsake, especially when it’s made with love and tiny hands. It’s a fun, budget-friendly project that’s part painting, part threading, and all heart.
Materials Needed
- 2 cardboard pieces (about 9 x 4 inches each)
- Acrylic or tempera paints in assorted colors
- 2 pipe cleaners (1 per flip-flop)
- 20-25 plastic beads per pair
- Scissors and pencil
Step-by-step Guide
Step 1: Trace the shape of your feet or use a flip-flop as a guide onto cardboard, then cut out two sole shapes.
Step 2: Paint fun patterns, stripes, or polka dots on each sole, then let dry completely.
Step 3: Thread colorful beads onto each pipe cleaner and shape them into a Y strap.
Step 4: Poke small holes in the cardboard and insert the pipe cleaner ends, bending and securing them on the back with tape or glue.
#3. Colorful Pipe Cleaner Photo Frames
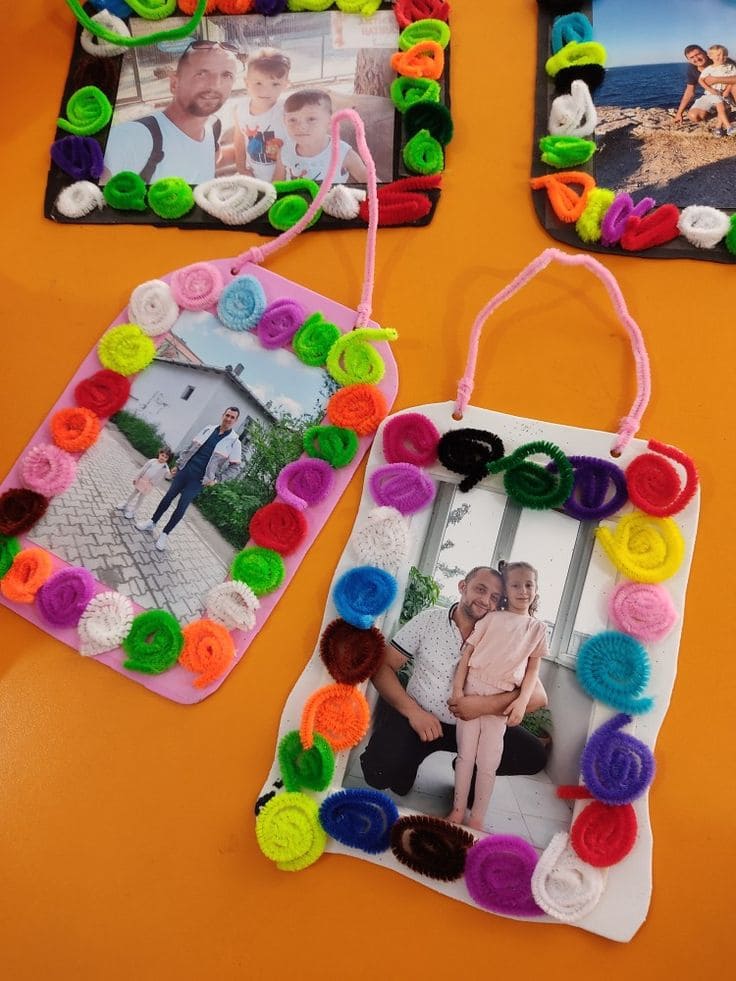
Wow, this handmade gift is all about the heart. Kids can turn a favorite photo into a cheery, tactile keepsake by wrapping it with swirls of colorful pipe cleaners.
Also, these soft, twisty spirals not only frame the photo but give it a burst of energy and joy. It’s the kind of present parents will proudly hang up and it costs next to nothing to make.
Materials Needed
- 1 printed photo (4×6 inches works best)
- 1 sheet of thick cardstock (at least 5×7 inches)
- 12 to 16 colorful pipe cleaners
- Craft glue or hot glue
- Hole punch
- 1 extra pipe cleaner or yarn piece
Step-by-step Guide
Step 1: Glue your printed photo to the center of the cardstock or foam sheet, leaving about an inch of border on each side.
Step 2: Cut the pipe cleaners in half if needed, then coil them tightly into little spirals. Then mix up the colors to keep it playful.
Step 3: Glue the pipe cleaner spirals around the edges of the photo to create a bold, bright frame.
Step 4: Punch two holes at the top and twist a pipe cleaner through to make a hanger. Let everything dry, then proudly gift it to someone who deserves that daily smile.
#4. Heart in Hands Photo Frame
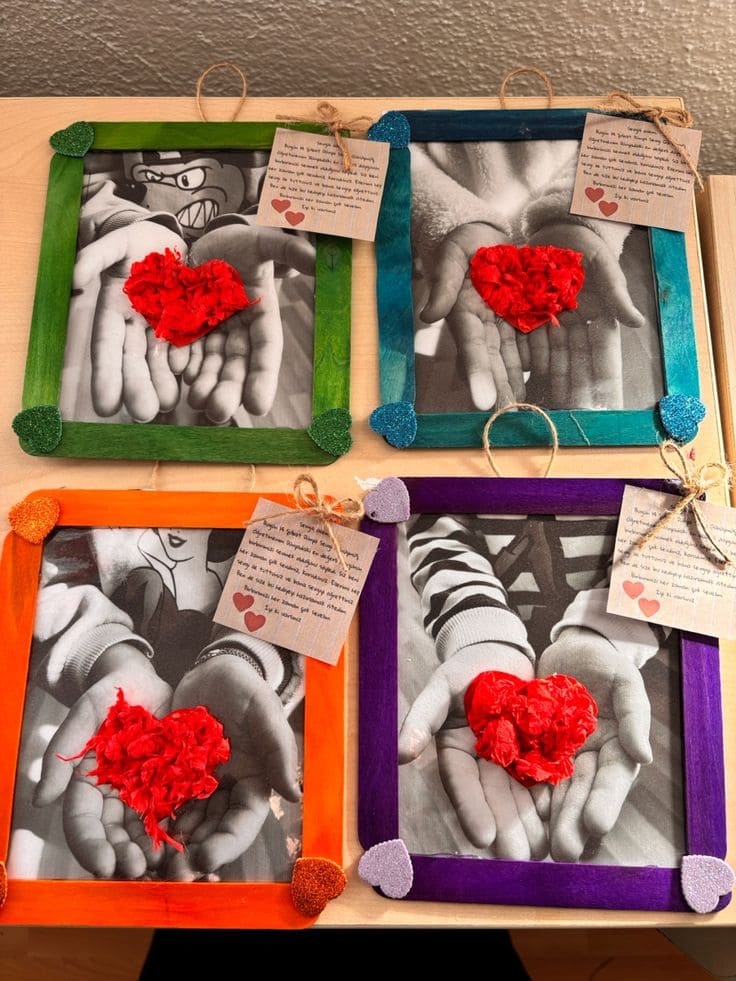
Sometimes the most powerful gifts come from the simplest gestures like little hands holding their heart out to you.
This touching photo frame project captures that beautiful moment when your child literally offers you their love, transformed into a keepsake that will make you smile through tears every single time you see it.
For less than $10 in supplies, you’re creating something that no amount of money could ever buy.
Materials Needed
- 4-5 black and white photos of child’s cupped hands (5″ x 7″)
- 20-25 wooden craft sticks (6 inches long)
- 4-5 bottles acrylic paint (2 oz each)
- 2-3 sheets red tissue paper
- 1 bottle white school glue (4 oz)
- 4-5 small foam brushes (½ inch wide)
- 1 roll natural twine (25 feet)
- 4-5 small craft tags (2″ x 3″)
- 1 pack glitter pom-poms
- Scissors and pencil
Step-by-Step Guide
Step 1: Paint your craft sticks in bright colors and let dry completely. While they dry, take several photos of your child’s hands cupped together as if holding something precious, then print them in black and white.
Step 2: Create frames by gluing four painted craft sticks together in squares, overlapping corners slightly. Then add colorful pom-poms to each corner, let frames dry for 20 minutes.
Step 3: Help your child tear red tissue paper into small pieces, then scrunch and glue them onto the photo to create a textured heart shape right in their cupped hands.
Step 4: Mount the finished photo in the colorful frame, then help your child write a sweet message on a small tag.
#5. Handprint Tote Bags
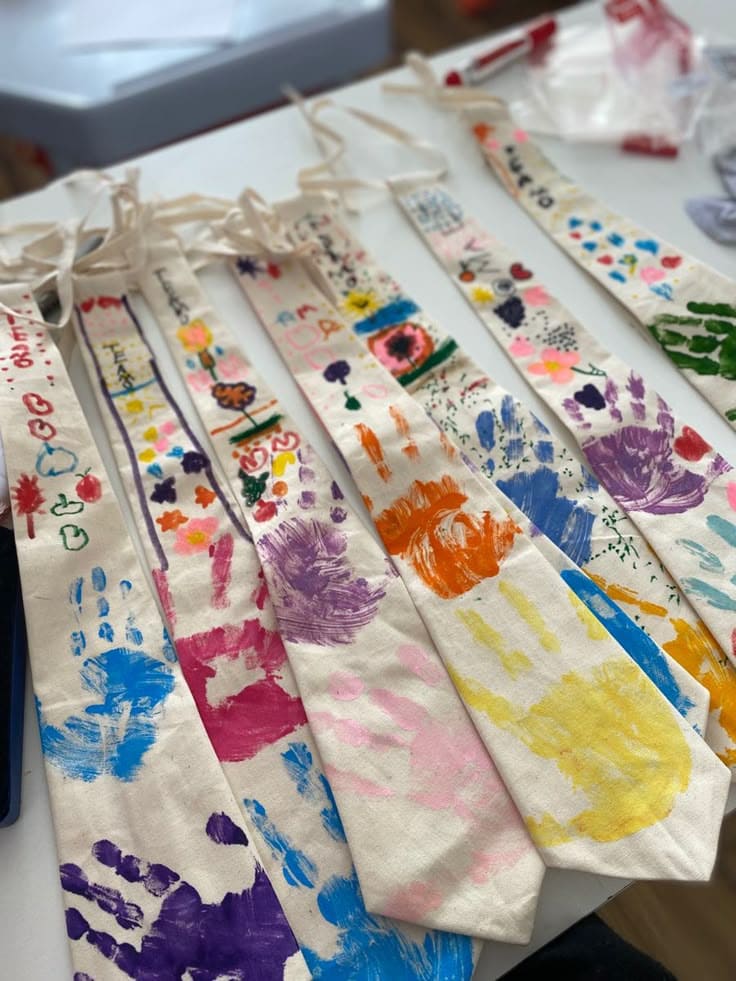
There’s something magical about watching your child’s tiny hands create something beautiful for you. These handprint tote bags capture that pure joy in vibrant splashes of color on natural canvas.
You’ll find yourself reaching for these bags not just for groceries, but as a daily reminder of those precious little fingers that painted them with such enthusiasm.
Also, the beauty of this project lies in its simplicity and the freedom it gives young artists.
Materials Needed
- 4-6 plain canvas tote bags (13″ x 15″)
- Washable acrylic paint (2 fl oz bottles)
- 6-8 disposable paper plates (9-inch diameter)
- Foam brushes
- 2 baby wipes (80 wipes each)
- Plastic tablecloth (54″ x 108″)
- Aprons
- 4-6 cardboard inserts (12″ x 14″)
Step-by-Step Guide
Step 1: Transform your workspace into an art studio by covering the table with the plastic tablecloth and sliding a cardboard piece inside each tote bag.
Step 2: Help your little artist choose their first color and use a foam brush to paint their entire palm and fingers evenly.
Step 3: Continue the magic by layering different colored handprints across the bag, allowing each print to dry for 2-3 minutes before adding the next.
Step 4: Once the artistic vision is complete, set the bags aside to dry completely for 24 hours.
#6. Yarn-Wrapped Photo Hanger
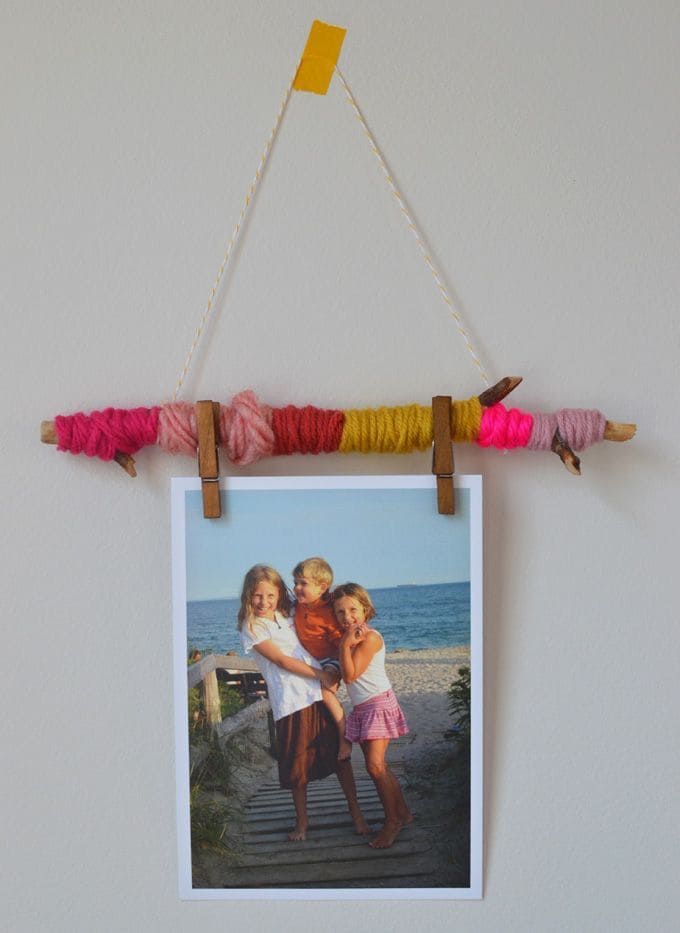
Sometimes the most beautiful gifts come from the simplest ideas. This yarn-wrapped photo hanger transforms an ordinary stick into a vibrant display for your most treasured memories.
I believe you’ll watch your child’s face light up as they carefully wind each colorful strand, creating their own rainbow pattern that’s as unique as they are.
When you hang this on your wall, you’re showcasing your child’s creativity and the warmth of handmade love.
Materials Needed
- 1 wooden dowel (12-15 inches long, ¾ inch diameter)
- 6-8 colors yarn skeins
- 1 roll twine (20 feet)
- 2 small wooden clothespins
- 1 piece washi tape (1 inch wide)
- Scissors
- 1 favorite family photo (4×6 or 5×7 inches)
Step-by-Step Guide
Step 1: Start by securing one end of your first yarn color to the dowel with a small piece of tape. Begin wrapping the yarn tightly around the stick, overlapping each loop slightly to create a solid band of color about 1-2 inches wide.
Step 2: When you’re ready to switch colors, simply cut the current yarn and tape down the end. Start your next color right where the previous one ended, creating a seamless rainbow effect. Let your child choose the color order – there’s no wrong way to make a rainbow.
Step 3: Continue wrapping different colored sections until the entire dowel is covered, leaving about 1 inch on each end unwrapped for a natural wood accent. The beauty is in the imperfection – some sections might be thicker than others, and that’s perfectly wonderful.
Step 4: Cut a 16-inch piece of twine and tie each end to the unwrapped portions of the dowel to create a hanging loop. Clip your favorite photo to the yarn using the wooden clothespins, and your memory keeper is ready to brighten any wall.
#7. Sparkly Shell Card
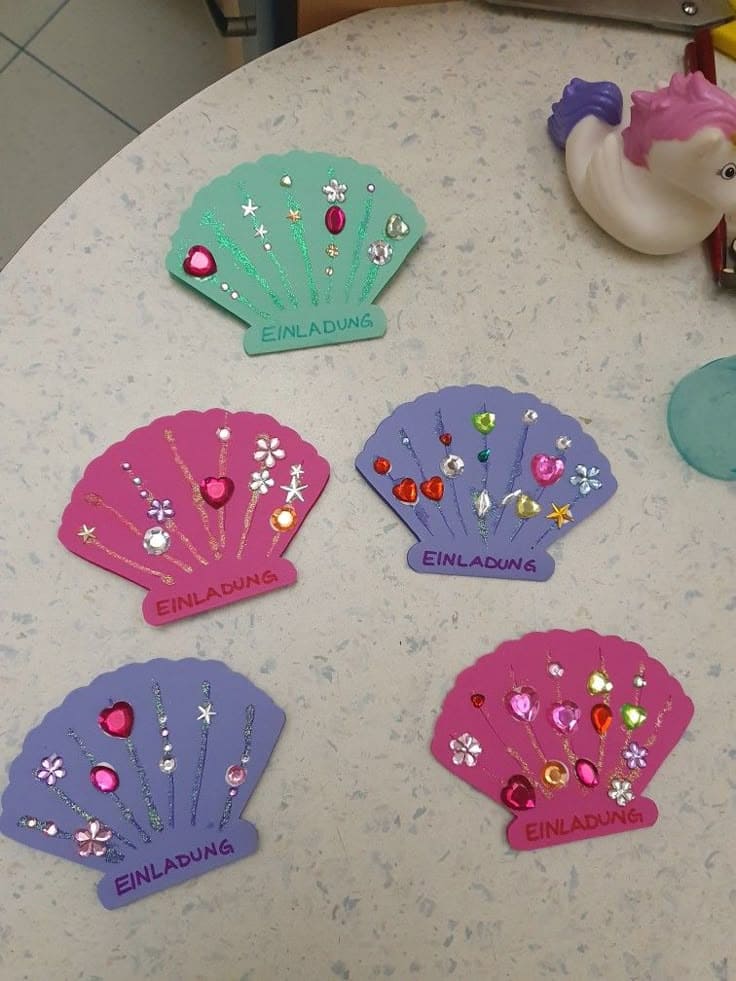
This little seashell card is more than just glitter and stickers — it’s a mini burst of love straight from your child’s hands. With its bright colors and shiny decorations, it feels like something pulled from a magical underwater world. Kids can personalize it with sweet notes, making it a keepsake that parents will want to hold onto forever. It’s inexpensive, easy to pull off with a few supplies, and brings out all the joy of giving something handmade.
Materials Needed
Colored cardstock (1 sheet per card, cut into a shell shape)
10–15 self-adhesive rhinestones and gem stickers per card
2–3 glitter glue pens in various colors
Pencil and scissors
Black or colored marker for writing messages
Step-by-step Guide
Step 1: Lightly sketch a seashell shape on your cardstock and cut it out carefully with scissors.
Step 2: Add glitter glue lines radiating from the base of the shell to the edges — think of how a real shell looks. Let that dry for a few minutes.
Step 3: Decorate the shell with rhinestones and stickers, placing them along the glitter lines or wherever your child thinks they sparkle best.
Step 4: Write a short message like “You’re the best!” or “I love you, Mom!” in the open space or on a small tab at the bottom.
#8. My Dad Rocks Art
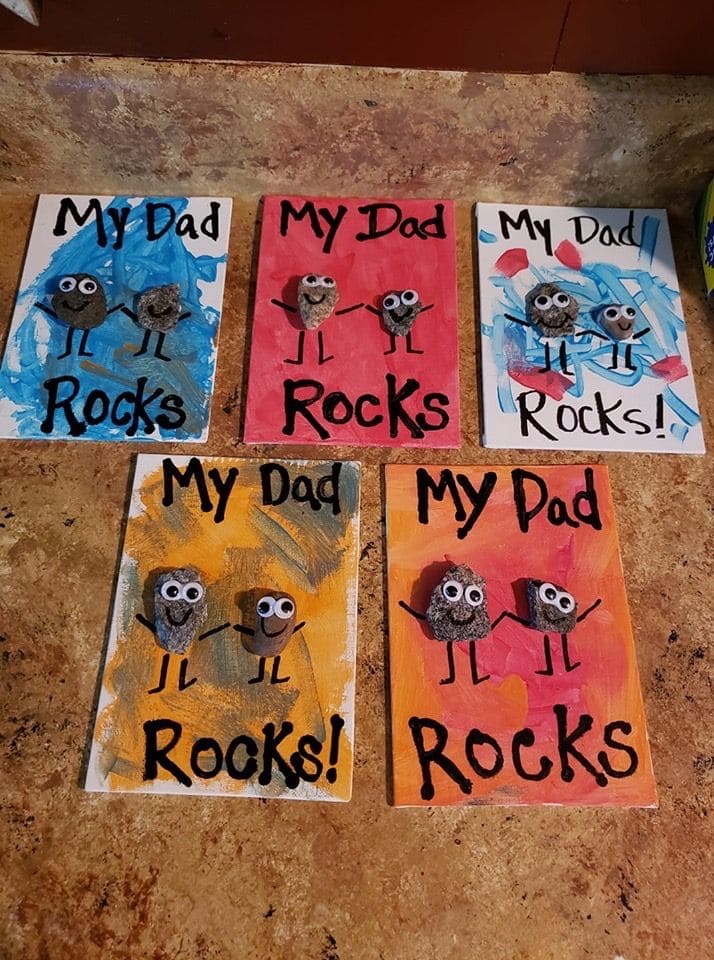
This hilarious and heartfelt gift is perfect for Father’s Day or just to make Dad smile after a long day.
Kids love picking out the funniest-shaped rocks to turn into mini versions of themselves, and the pun is that it never gets old.
With paint, googly eyes, and a bit of glue, you’ll turn nature into a little piece of love. Each card is a mix of personality and creativity, and no two are ever the same.
Materials Needed
- 2 small, smooth pebbles
- 1 thick sheet of cardstock (5×7 inches)
- Acrylic paint (3 to 4 assorted colors)
- Paintbrushes
- Black permanent marker
- 2 googly eyes per rock
- White glue
Step-by-step Guide
Step 1: Paint the background of your cardstock in bold, fun colors and let it dry completely.
Step 2: Choose your pebbles, glue them onto the card, and let the glue set.
Step 3: Add googly eyes to the rocks and draw arms and legs using a marker to make them look like you and Dad.
Step 4: Write “My Dad Rocks!” across the top and bottom in big, playful letters. Then let everything dry before gifting it with a proud little smile.
#9. Beaded Heart Sculptures on Stone
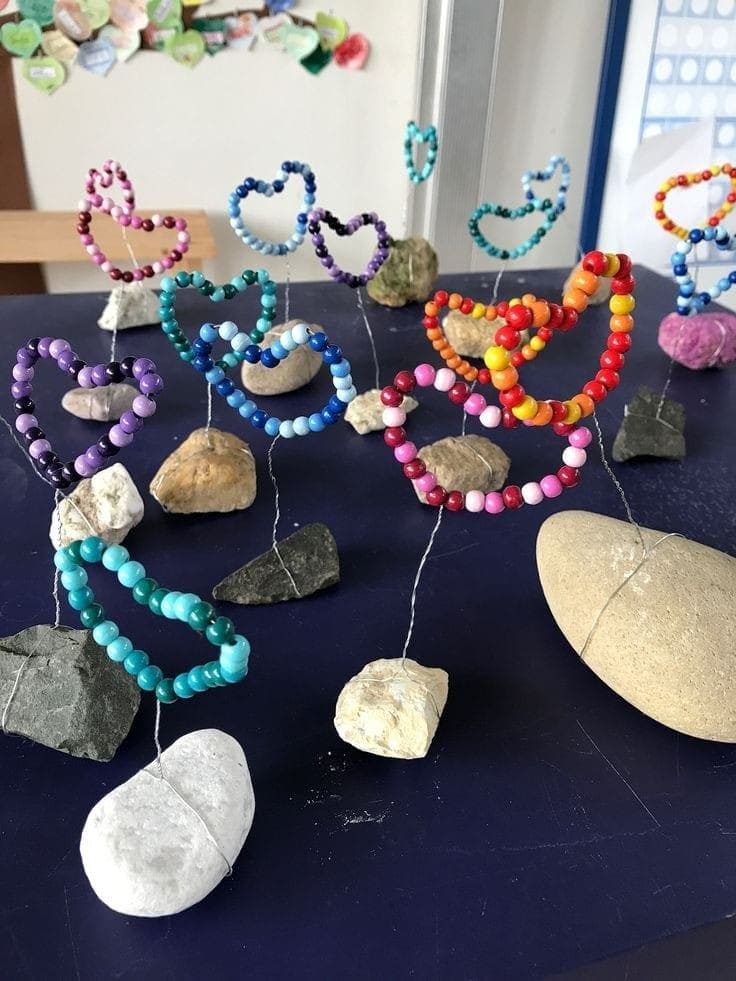
These sweet little heart sculptures are such a fun mix of nature and color. By using beads, wire, and real stones, kids can create a handmade gift that feels both earthy and joyful.
Plus, each one is different depending on the rock you find and the color combo you pick, which makes the final piece feel personal and full of charm.
Materials Needed
- 1 smooth palm-sized rock
- 1 piece of craft wire (around 20 inches)
- 20 to 25 small plastic or wooden beads
- Wire cutters
Step-by-step Guide
Step 1: Begin by threading the beads onto the center of the wire, leaving a few inches free on each end.
Step 2: Once you’ve added the beads, twist the beaded portion into a heart shape and twist the ends of the wire to secure it in place.
Step 3: Wrap the remaining wire around your stone to anchor the heart. You make sure it’s snug, and position the heart so it stands up proudly.
Step 4: Gently adjust the heart’s shape and height. Now you’ve got a little sculpture full of color, love, and creativity.
#10. Personalized Shrink Film Keychains
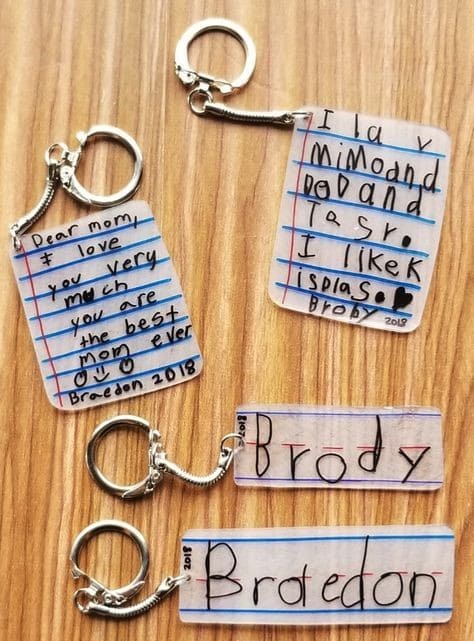
Imagine carrying a piece of your child’s heart with you wherever you go! These adorable shrink film keychains are such a unique and personal gift.
Your child’s own handwriting or drawings become miniature keepsakes, perfectly preserved. It’s like magic watching the plastic shrink in the oven, transforming their precious message into a durable, charming charm.
Materials Needed
- Shrink film sheets: 1-2 sheets
- Permanent markers
- Hole punch
- Baking sheet
- Parchment paper
- 2-4 key rings or keychain findings
- Oven
- Scissors
Step-by-step Guide
Step 1: Have your child draw or write their message on the dull, unprinted side of the shrink film using permanent markers.
Step 2: Carefully cut out the drawn or written designs using scissors. Before baking, use the hole punch to create a hole where you want to attach the key ring.
Step 3: Preheat your oven according to the shrink film package instructions (usually around 300-350°F or 150-175°C). Then place a piece of parchment paper on a baking sheet and arrange your shrink film pieces on top.
Step 4: Bake for the time specified on the package. Watch them carefully as they curl up, then flatten out. Once they have flattened completely and appear thicker, remove them from the oven.
#11. Wood Slice Photo Ornaments
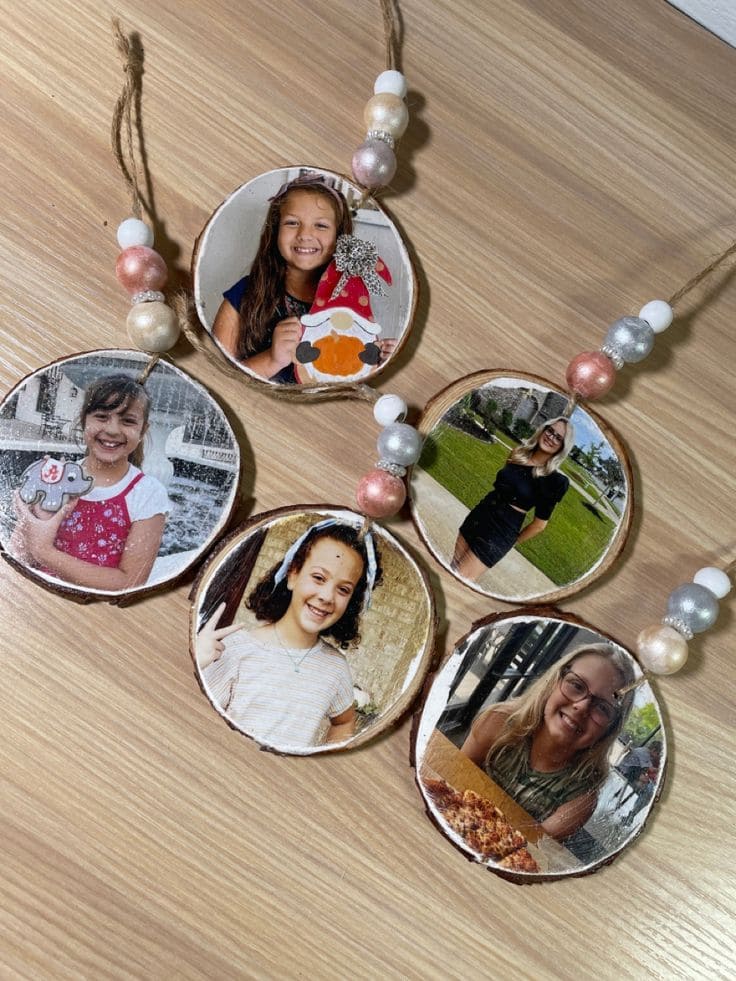
These sweet little keepsakes capture a moment in time and turn it into a rustic handmade gift that any parent will treasure.
Using real wood slices and a favorite photo, your child can craft something heartfelt and decorative. The added beads and twine give it that cozy farmhouse charm.
Materials Needed
- 1 wood slice (approx. 3 to 4 inches in diameter)
- 1 printed photo
- Mod Podge
- Foam brush
- Twine (about 10 inches per ornament)
- 4 to 5 decorative wooden or plastic beads
- Scissors and hole punch
- Hot glue gun (optional)
Step-by-step Guide
Step 1: Cut your photo into a circle slightly smaller than the wood slice. Then use a foam brush to apply Mod Podge onto the wood surface.
Step 2: Press the photo onto the wood slice, smoothing out any bubbles. You should apply another layer of Mod Podge on top to seal it. Let dry completely.
Step 3: Punch a small hole near the top edge of the slice or glue the twine to the back if it’s too thick to punch.
Step 4: String 4 to 5 beads onto the twine, then tie the ends securely to create a hanger.
#12. Button Heart Ornaments
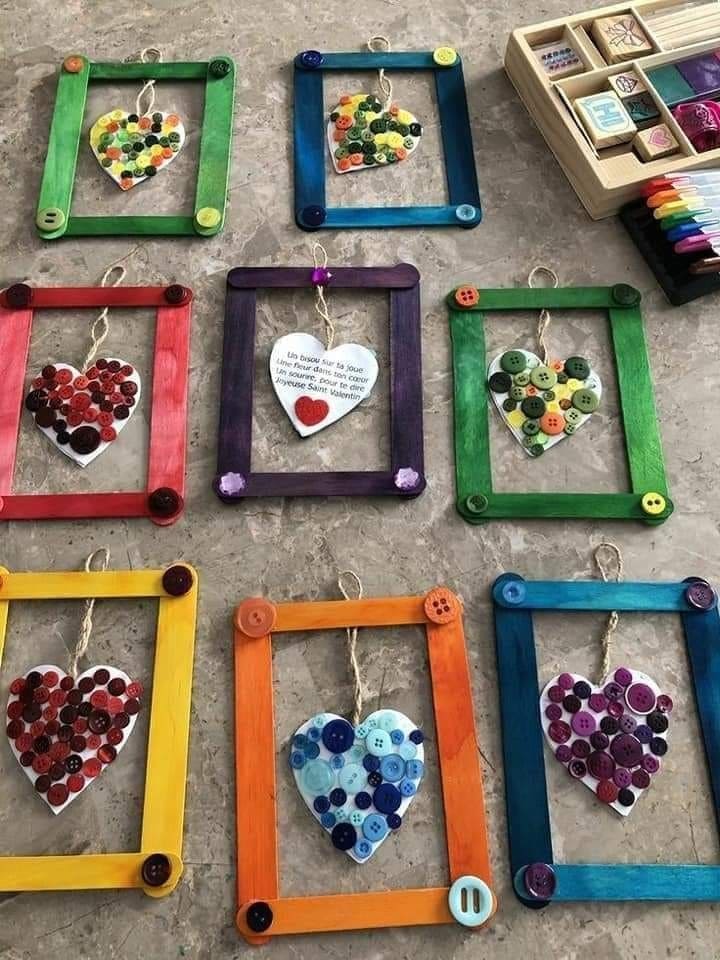
Interestingly, these button heart ornaments capture that childhood wonder of finding beauty in the simplest things.
The vibrant popsicle stick frames showcase these button treasures like tiny galleries, each one a window into your child’s creative soul.
Bonus, this project turns forgotten buttons into heirlooms, transforming your craft supplies into something that sparkles with personality.
At around $12 for enough materials to make a whole collection, it’s an affordable way to create ornaments that will hang on your tree for years to come, each one whispering stories of the little hands that made them.
Materials Needed
- 40-50 wooden craft sticks (6 inches long)
- 8-10 bottles acrylic paint (2 oz each)
- 300-400 mixed buttons (various sizes, ¼ inch to 1 inch diameter)
- 8-10 white cardstock heart shapes (3 inches wide)
- 1 bottle strong craft glue (4 oz)
- 8-10 small foam brushes (½ inch wide)
- 1 roll natural twine (50 feet)
- 1 pack small decorative buttons
- Scissors
- Pencil
Step-by-Step Guide
Step 1: Paint your craft sticks in vibrant colors and let dry completely. While they dry, help your child sort buttons by color families, all the reds together, blues in another pile.
Step 2: Glue four painted craft sticks together to form a square frame, overlapping the corners slightly. Then add a small decorative button to each corner for extra charm.
Step 3: Let your child arrange buttons on the white cardstock heart, overlapping them slightly to create a mosaic effect.
Step 4: Attach the finished button heart to the center of the frame using craft glue, then tie a 6-inch piece of twine to the top for hanging.
#13. Up Up and Away Balloon Gift
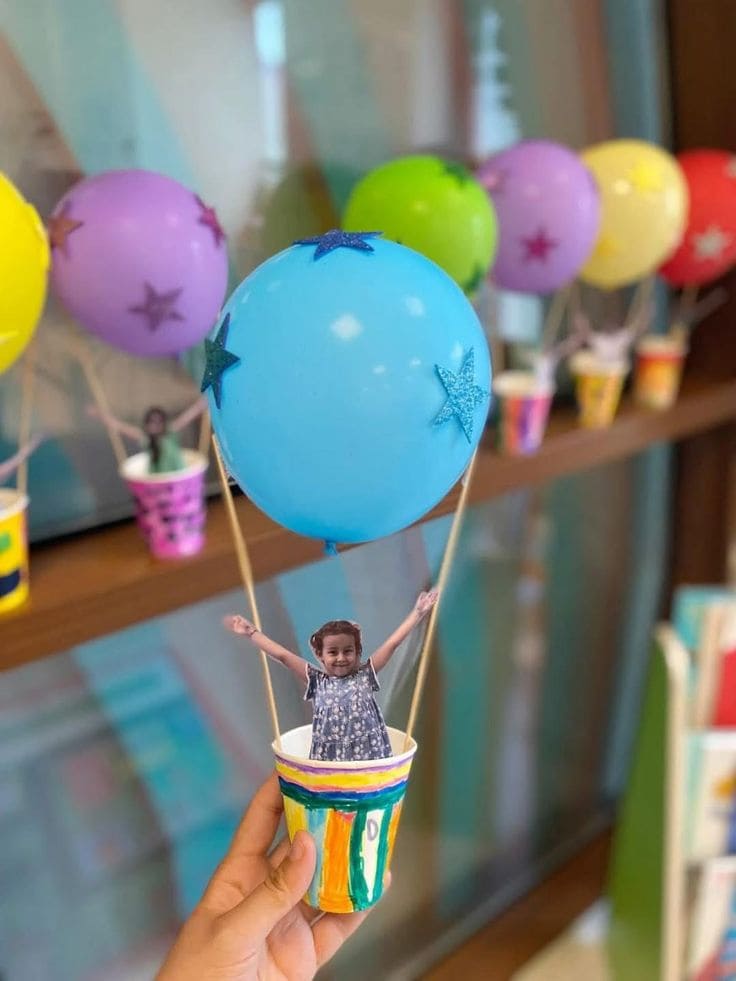
With just a balloon, a paper cup, and a smiling photo of your kiddo, you’ve got the perfect handmade gift that will lift any parent’s heart sky-high.
Specially, this project is especially fun for younger children because it’s simple, cheerful, and makes their photo look like they’re off on a joyful adventure.
Materials Needed
- 1 paper cup (standard size)
- 1 small balloon
- 2 wooden skewers
- 1 printed photo of the child (around 3 inches tall)
- 5-6 star stickers
- Markers
- Tape or glue
Step-by-step Guide
Step 1: Let your child decorate the paper cup using markers, stickers, or paint. Then set it aside to dry if needed.
Step 2: Blow up the balloon and tie it. You can use tape or glue to add sparkly stars around it.
Step 3: Tape the two skewers inside the cup to stand upright on opposite sides.
Step 4: Attach the balloon to the top of the skewers using more tape.
Step 5: Cut out your child’s photo and tape it inside the cup so it looks like they’re joyfully riding the balloon.
#14. Summer Swimmer Plate Craft
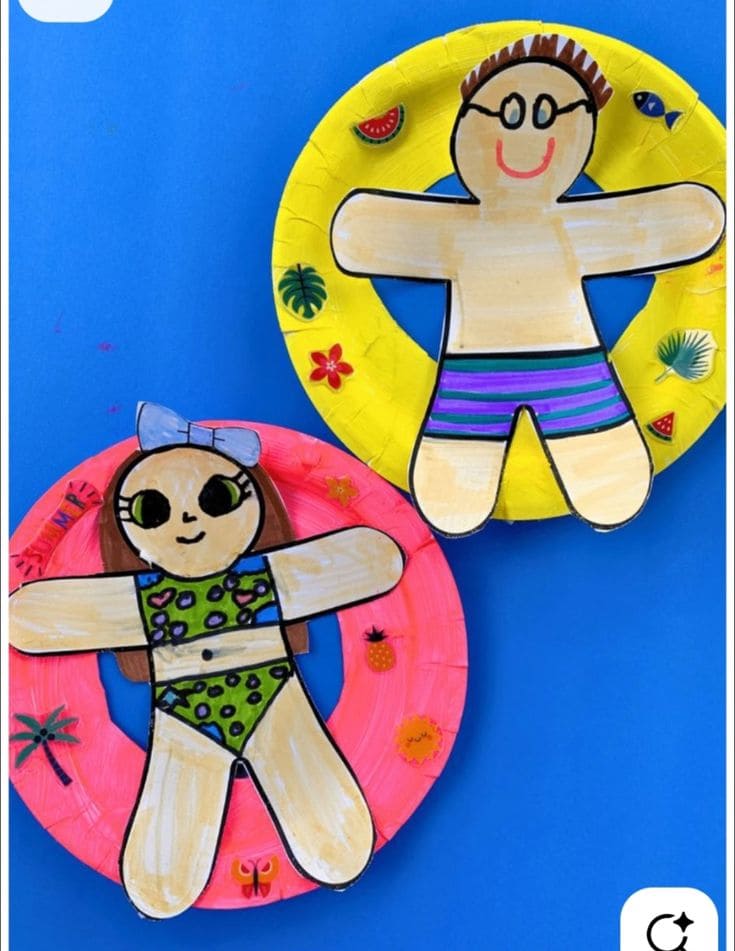
This cheerful swimming craft is perfect for little hands that can’t wait to make something sunny and fun. Kids can draw themselves in swimsuits and pop them inside painted paper plate floaties
. It’s playful, colorful, and guaranteed to bring smiles when gifted. Parents will love hanging this up on the fridge or keeping it in a memory box for years to come.
Materials Needed
- 1 paper plate per craft
- 1 sheet of white cardstock or thick paper (for the swimmer cutout)
- 2-3 colored markers or crayons
- 10-12 summer-themed stickers
- Kid-safe scissors
- Glue stick or school glue
Step-by-step Guide
Step 1: Cut a large hole out of the center of the paper plate to create the floatie ring.
Step 2: Let your child paint or color the plate in bright summer colors, then stick on summer-themed stickers once dry.
Step 3: On white cardstock, help them draw a swimmer like arms outstretched, swimsuit on, big smiles encouraged!
Step 4: Cut out the swimmer and glue it to the back of the ring so they look like they’re floating happily inside.
#15. Best Ever Ribbon Award
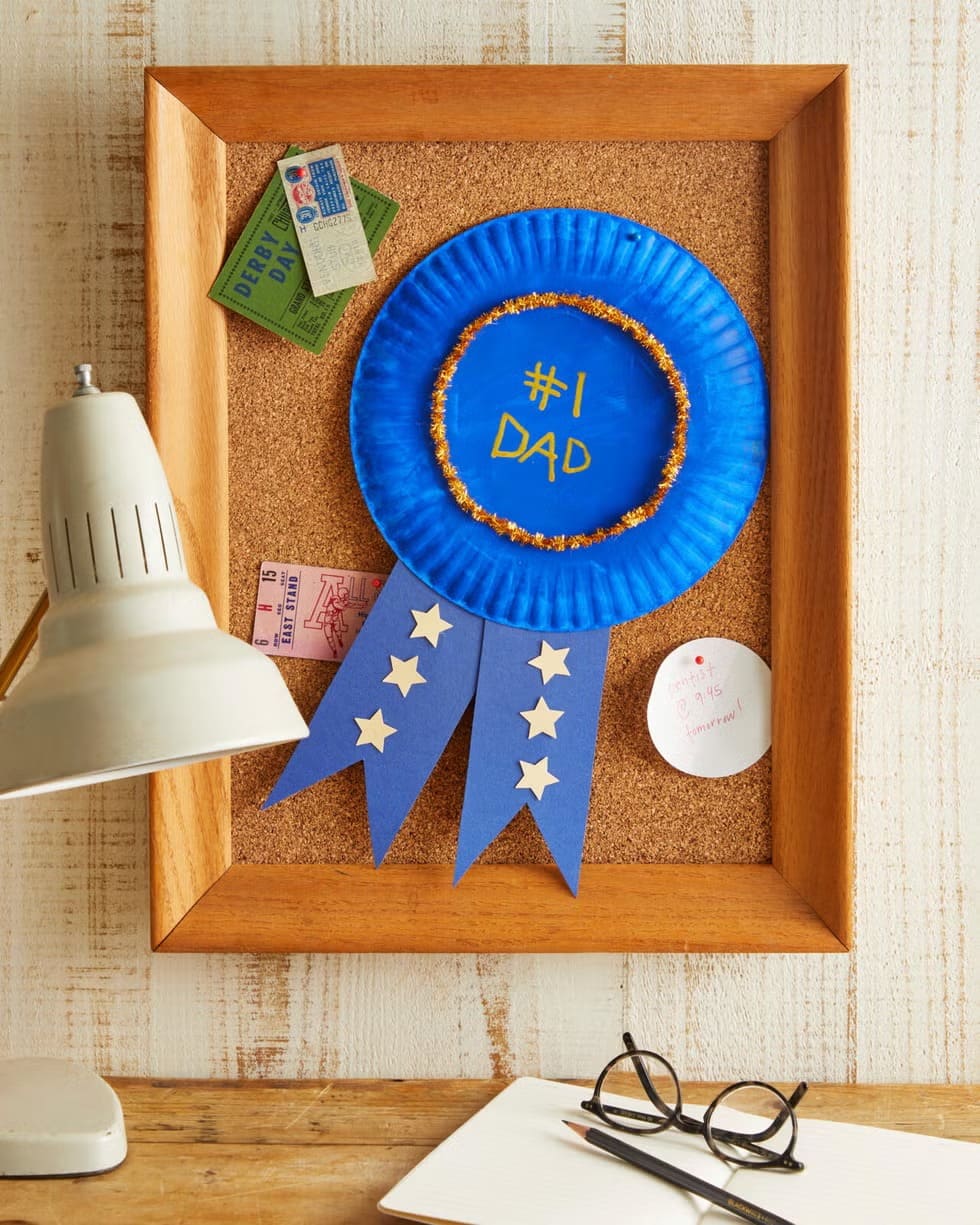
Imagine the look on your parent’s face when they receive this vibrant ribbon award, lovingly crafted by your child’s own hands!
Also, this project is a fantastic way for kids to show their appreciation and crown their parent as the champion they truly are.
he joy isn’t just in the finished product, but in the focused concentration and happy chatter as your little one brings their vision to life.
Materials Needed
- Paper plate
- Blue construction paper
- Glitter glue
- Star stickers (about 5-7)
- Markers
- Scissors
- Craft glue or tape
Step-by-step Guide
Step 1: Help your child fold the edges of the paper plate inwards to create a ruffled look, or simply leave it flat if they prefer.
Step 2: Cut two strips from the construction paper, about 2-3 inches wide and 6-8 inches long, tapering one end of each strip to a V shape to resemble a ribbon tail.
Step 3: Glue or tape the two paper strips to the back of the paper plate, allowing them to hang down. Then use markers to write a loving message like “#1 Dad,” “#1 Mom,” in the center of the paper plate.
Step 4: Finally, help your child apply glitter glue around the rim of the paper plate, or glue down a gold pipe cleaner for a textured edge. Then, let them stick the star stickers or small glitter stars onto the hanging paper ribbons for extra sparkle.
#16. Vegetable Print Tea Towel
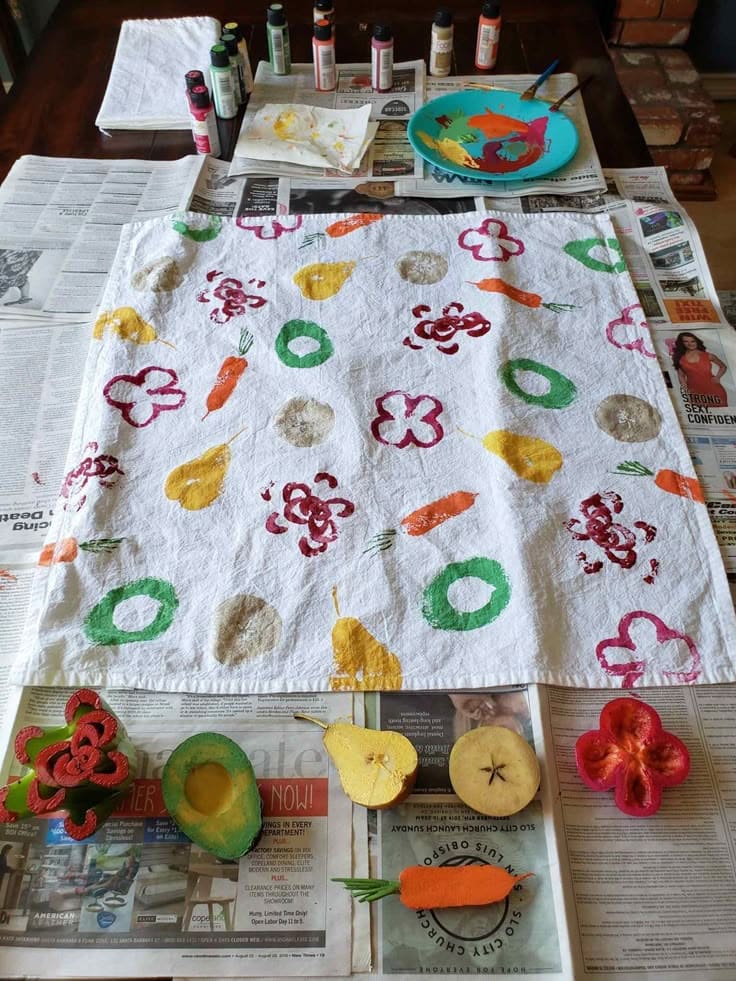
Who knew that the vegetables in your crisper drawer could become the most delightful art supplies?
This vegetable printing project turns ordinary kitchen towels into cheerful masterpieces that will make you smile every time you dry a dish.
You’ll discover the hidden artist in bell peppers, the natural stamp in an apple slice, and the perfect flower shape hiding inside a carrot’s core.
Materials Needed
- 4-6 plain white cotton tea towels (16″ x 24″)
- 8-10 bottles fabric paint (2 oz each)
- 6-8 paper plates (9-inch diameter)
- Various fresh vegetables
- 2-3 foam brushes (1-inch wide)
- Kitchen knife
- Paper towels (2 rolls)
- Newspaper or plastic tablecloth
- 1 iron
Step-by-Step Guide
Step 1: Set up your printing station by covering your work surface with newspaper. Cut vegetables in half to create flat printing surfaces.
Step 2: Squeeze different colored fabric paints onto paper plates, creating your vegetable paint palette. Then use foam brushes to evenly coat the cut surface of each vegetable with paint.
Step 3: Press each painted vegetable firmly onto the tea towel, holding for 3-4 seconds before lifting straight up.
Step 4: Once all prints are dry (about 2-3 hours), heat-set the fabric paint by placing a thin cloth over the designs and ironing on medium heat for 2-3 minutes.
#17. Photo Flower Valentine Cards
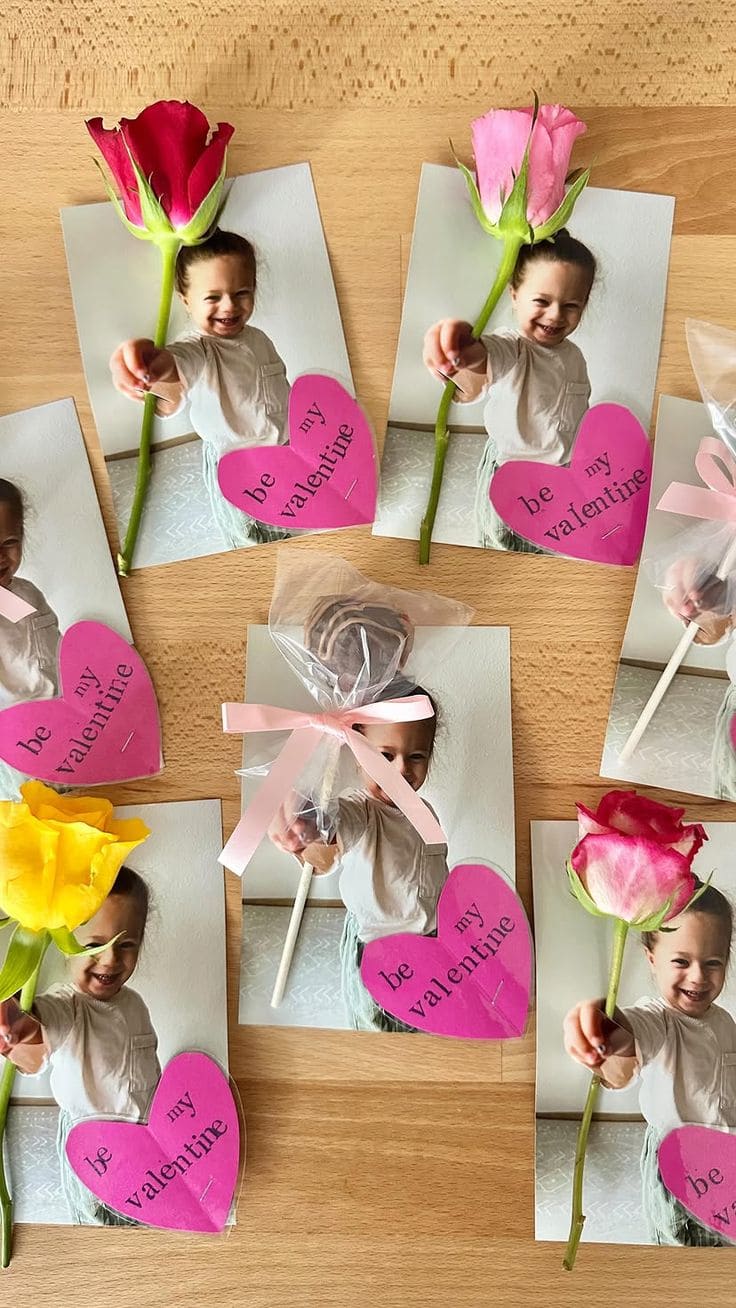
There’s pure magic in watching your child’s face light up when they see themselves transformed into a flower-giving valentine.
These adorable photo cards capture that sweet moment when little ones reach out to offer love, literally putting a flower in their hand through the wonder of crafting.
I believe your child will giggle with delight as they poke holes in their own photo, carefully threading flower stems through to create their magical transformation.
Materials Needed
- 8-10 Printed photos of child with outstretched hand (4″ x 6″)
- 8-10 pieces white cardstock (8.5″ x 11″)
- 8-10 fresh or artificial flowers with stems
- 8-10 pink paper hearts (2″ x 2″)
- 1 roll clear cellophane wrap (12″ wide)
- 1 roll pink ribbon (¼ inch wide, 10 yards)
- 1 black marker or pen
- Double-sided tape
- Scissors
- Hole punch (small)
- Optional: lollipops or small treats
Step-by-Step Guide
Step 1: Take photos of your child with their arm outstretched and hand open, as if they’re offering something special.
Step 2: Mount each photo onto white cardstock. Then use a small hole punch or scissors to carefully make a hole in the photo where your child’s fingers meet their palm.
Step 3: Help your child write sweet messages like “be my valentine” on the pink paper hearts using a black marker.
Step 4: Finally, thread a flower stem through the hole in the photo so it appears your child is holding the flower.
For extra special cards, you can wrap some in cellophane and tie with pink ribbon, or substitute lollipops for flowers to create sweet edible bouquets.
#18. Playful Pom-Pom Initials
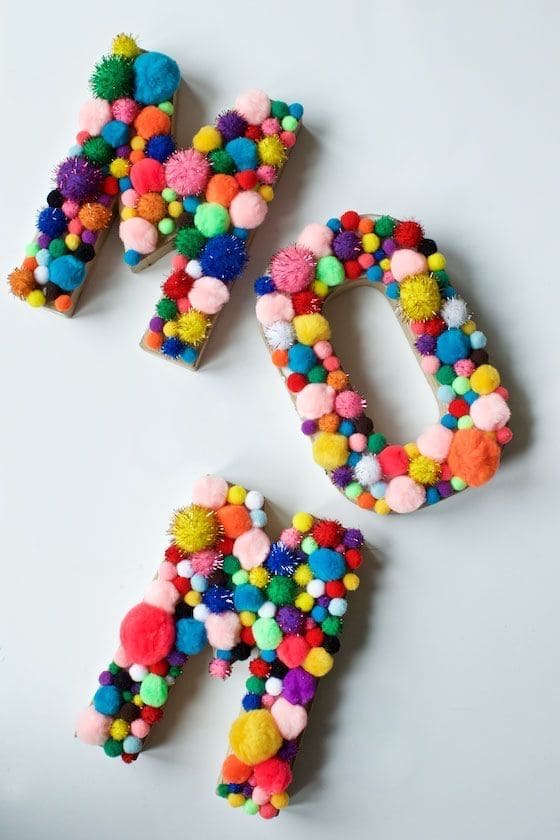
Wow, these vibrant pom-pom initials are an explosion of color and joy, truly reflecting the playful spirit of a child’s love!
Imagine the giggles and focused concentration as your little one carefully glues each fluffy pom-pom onto the letters, creating a tactile and eye-catching piece of art.
This project is all about texture and fun, and the result is a cheerful keepsake that brightens any room and reminds you of their adorable efforts.
Materials Needed
- Wooden or cardboard letters: “M,” “O,” “M,” about 6-8 inches tall
- 200-500 assorted colored pom-poms
- Craft glue
- Newspaper or protective mat
Step-by-step Guide
Step 1: Lay down newspaper or a protective mat to keep your workspace clean. Then squeeze a small amount of craft glue onto a section of one letter.
Step 2: Help your child pick up individual pom-poms and press them onto the glued area of the letter.
Step 3: Continue applying glue and pom-poms section by section until all the letters are completely covered.
Once done, set the letters aside in a safe place and allow the glue to dry thoroughly, which may take several hours or even overnight.
#19. Mirror Mirror Cardboard Craft
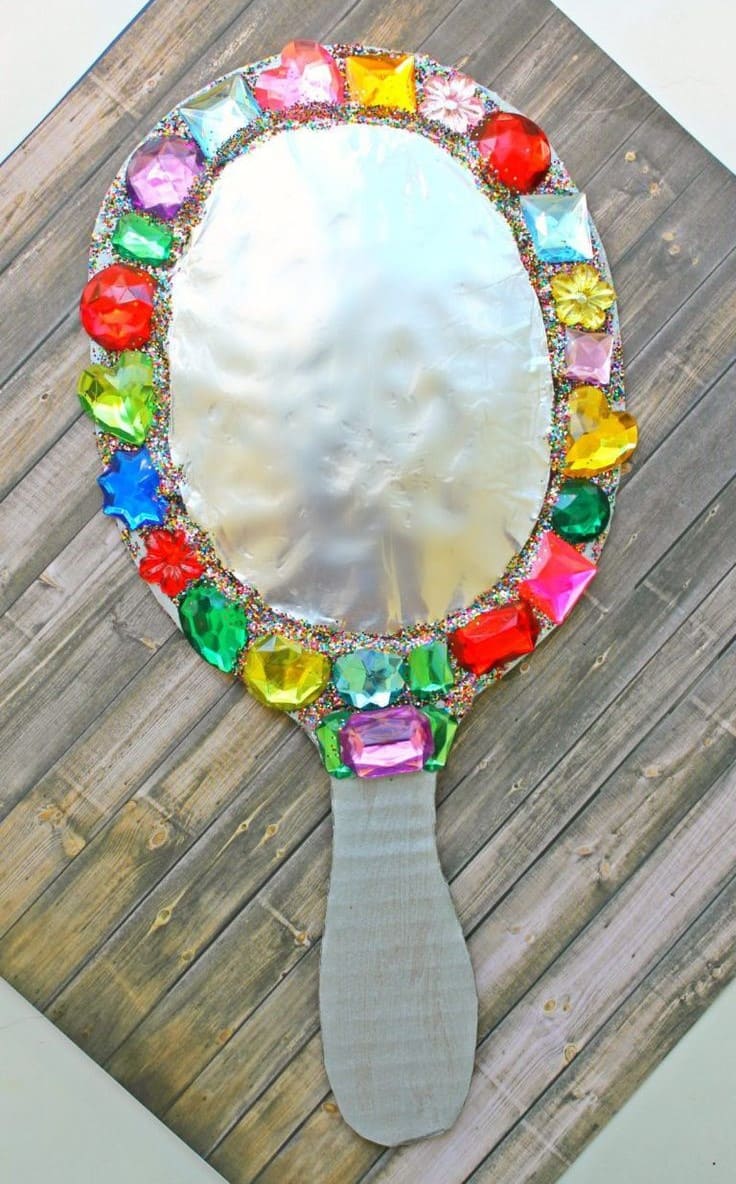
Amazingly, this sparkling pretend mirror is a total showstopper, perfect for kids who love a little glam.
Handmade with love and shiny with personality, it’s a sweet, imaginative gift that lets your child say, “You’re the fairest of them all!” to Mom or Dad.
Plus, it’s super budget-friendly and a fantastic way to reuse old cardboard.
Materials Needed
- 1 sheet of cardboard (approx. 8 x 12 inches)
- Aluminum foil (1 sheet)
- 15-20 assorted craft gems and rhinestones
- 2 tablespoons of craft glitter
- Scissors and glue
- Pencil
Step-by-step Guide
Step 1: Draw a large mirror shape with a handle onto the cardboard, then cut it out carefully.
Step 2: Glue a piece of aluminum foil to the center oval to create the mirror reflection.
Step 3: Decorate the edges with colorful gems, rhinestones, and a sprinkle of glitter for that magical touch.
Step 4: Let it dry completely, then wrap it up or hand it over with a big hug and a smile.
#20. Textured Cereal and Pasta Art
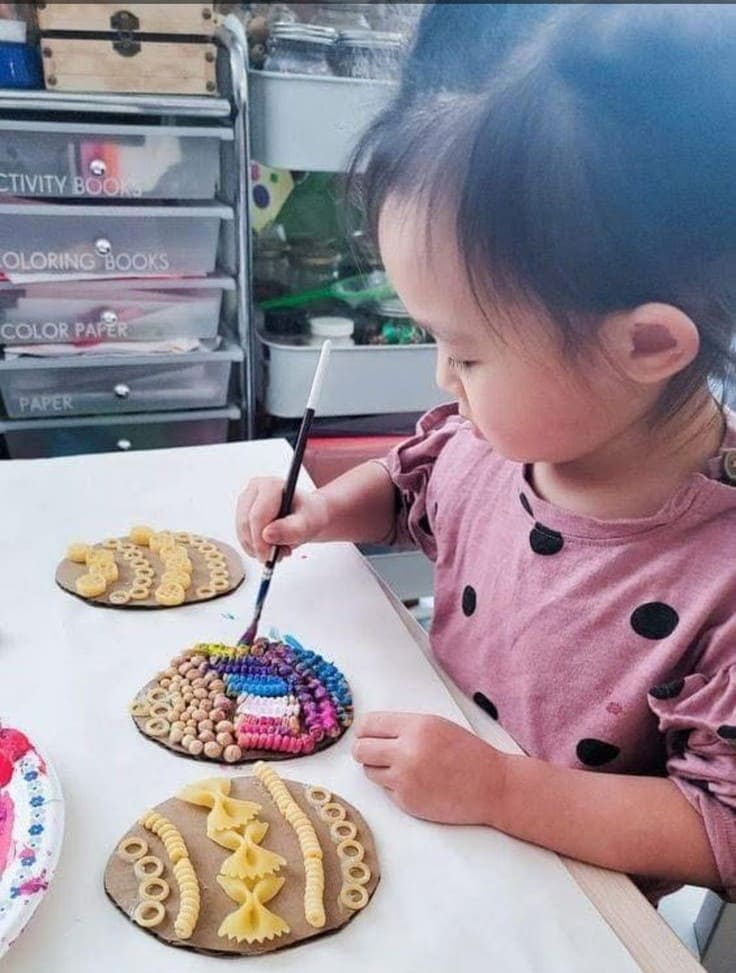
Isn’t it amazing how simple household items can transform into beautiful art in the hands of a child?
This textured art project, using everyday cereals and pasta, is a fantastic sensory experience for little ones and results in a truly unique piece.
It’s an inexpensive and engaging way to create a tactile gift that’s full of personality, a delightful reminder of their creativity and the fun they had making it just for you.
Materials Needed
- 3-4 cardboard circles (about 6-8 inches in diameter)
- Assorted dried pasta (small handfuls of each, about 1/4-1/2 cup total).
- Assorted dry cereal (small handfuls of each, about 1/4-1/2 cup total).
- Craft glue
- Child-safe paint and paintbrushes
- Paper plates
- Newspaper
Step-by-step Guide
Step 1: Prepare your workspace by laying down newspaper or an old cloth. Give your child one of the cardboard shapes and a bottle of craft glue.
Step 2: Help your child carefully place different dried pasta shapes, cereals, or legumes onto the glued areas.
Step 3: Once the entire surface is covered with pasta and cereal, set the artwork aside to dry completely.
Step 4: Once the glue is dry, set out the child-safe paints and brushes. Let your child choose colors to paint their textured artwork.
