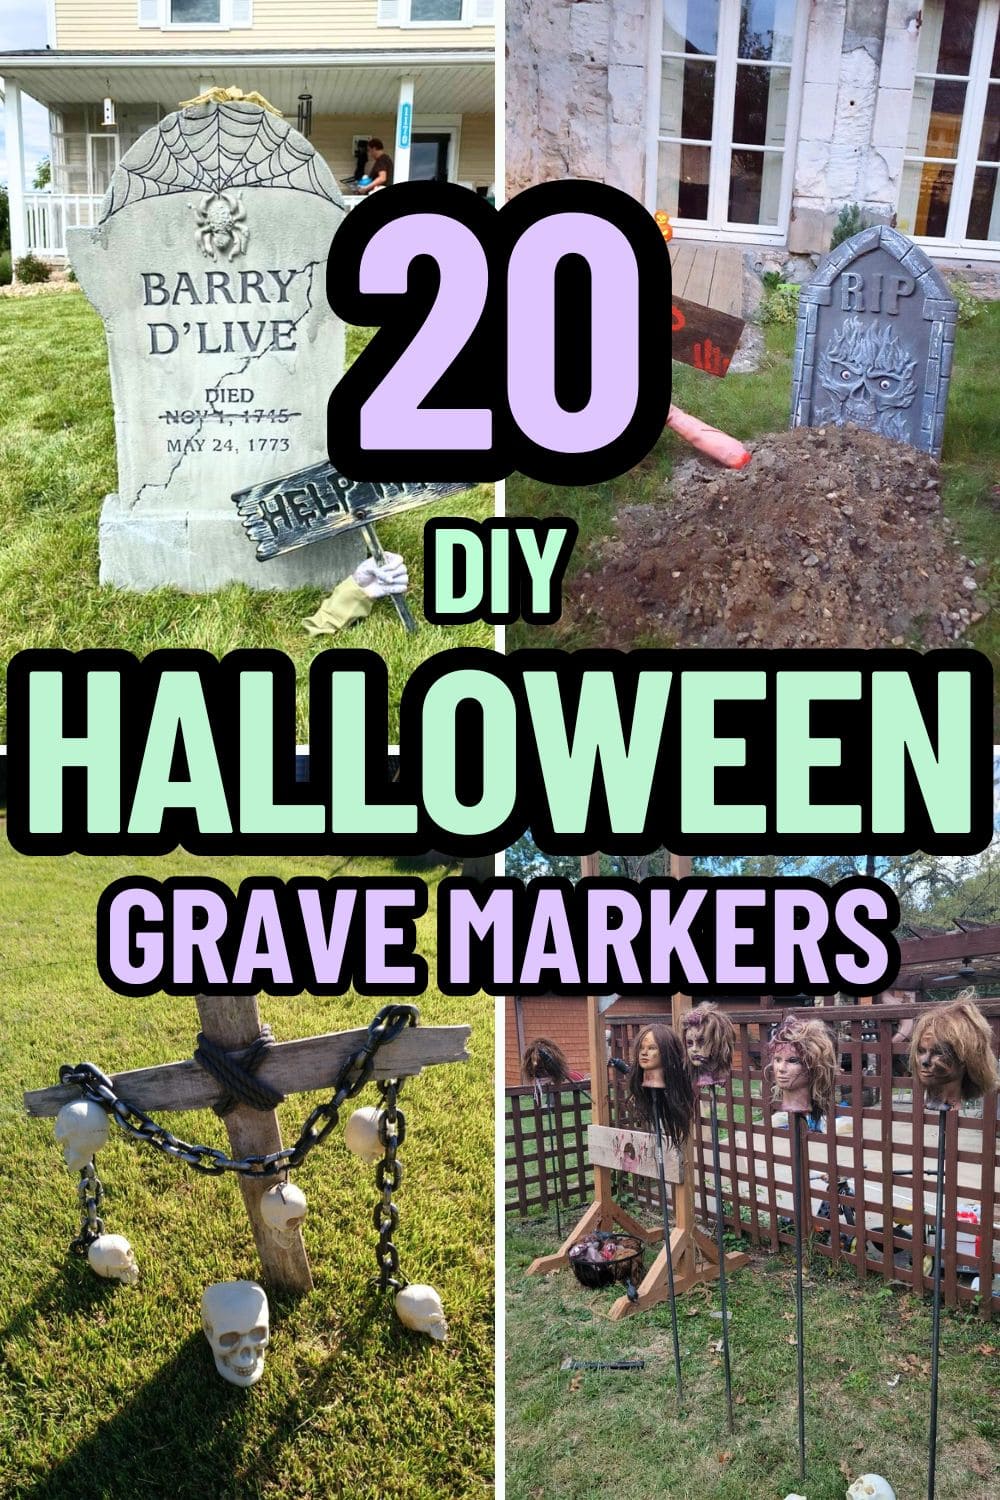
On a crisp October night, the sight of an old graveyard can stir the imagination like nothing else.
You can capture that same spine-tingling atmosphere right in your yard with handmade grave markers.
These haunting pieces don’t just serve as props, they create a chilling story for trick-or-treaters and guests to step into.
I believe that these eerie grave marker ideas will help you craft a yard that lingers in memory long after the night ends.
#1. Triple Skull Blood-Covered Crosses
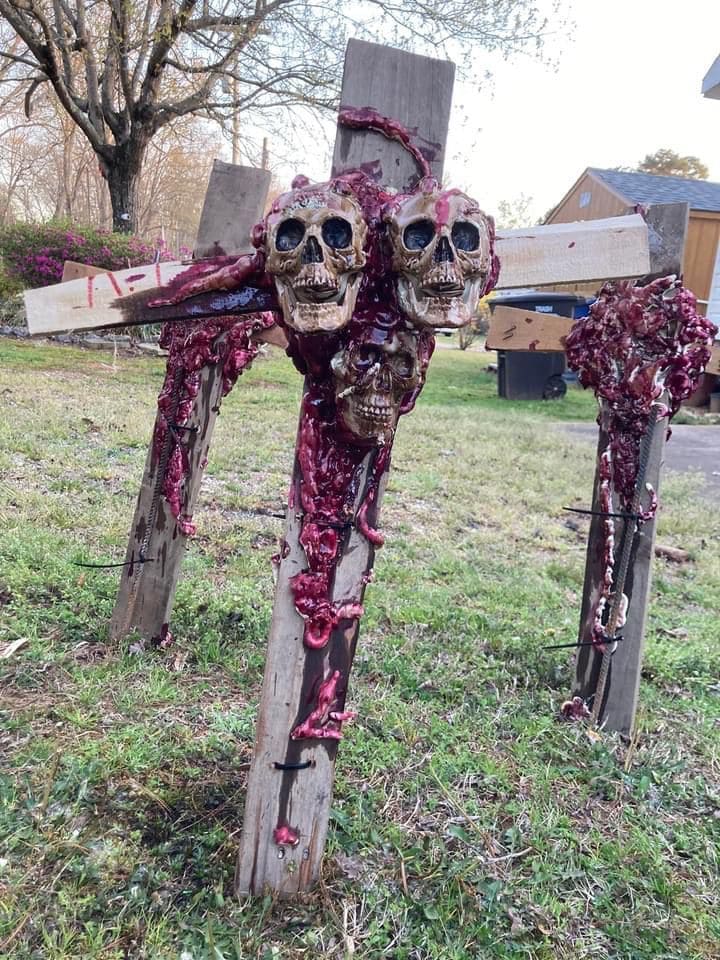
If you want to create a scene that looks like it came straight from a horror movie, these triple skull blood-covered crosses are the way to go.
The jagged wood, tangled boards, and oozing crimson detail make it look like some dark ritual took place right in your yard.
Also, three skulls are mounted at the center, staring lifelessly yet somehow full of menace.
Materials Needed
- 3-4 wooden boards (2″×4″, 3–4 ft long)
- 3 skull props (life-size, approx. 8″ tall)
- Expandable foam or papier-mâché
- Red gloss paint and black paint (1 can each)
- Wood screws and nails
- Power drill
- Black zip ties
- Optional: LED tea lights to place inside skulls
Step-by-step Guide
Step 1: Arrange the wooden boards into a cross shape, fastening with screws for stability. For a rougher, more unsettling look, let some boards stick out unevenly.
Step 2: Mount the skulls in a cluster at the center of the main cross. You can use screws from behind or heavy-duty adhesive to secure them firmly.
Step 3: Apply expandable foam or papier-mâché around the skulls and along the beams to create the look of torn flesh and sinew.
Step 4: Once dry, paint the foam a deep red and add touches of black for depth. Finish with a coat of gloss red paint for that fresh look.
Step 5: Now you just anchor the crosses into the ground, tilting slightly for a more chaotic, ritualistic effect.
#2. Skull-Chain Cross of the Damned
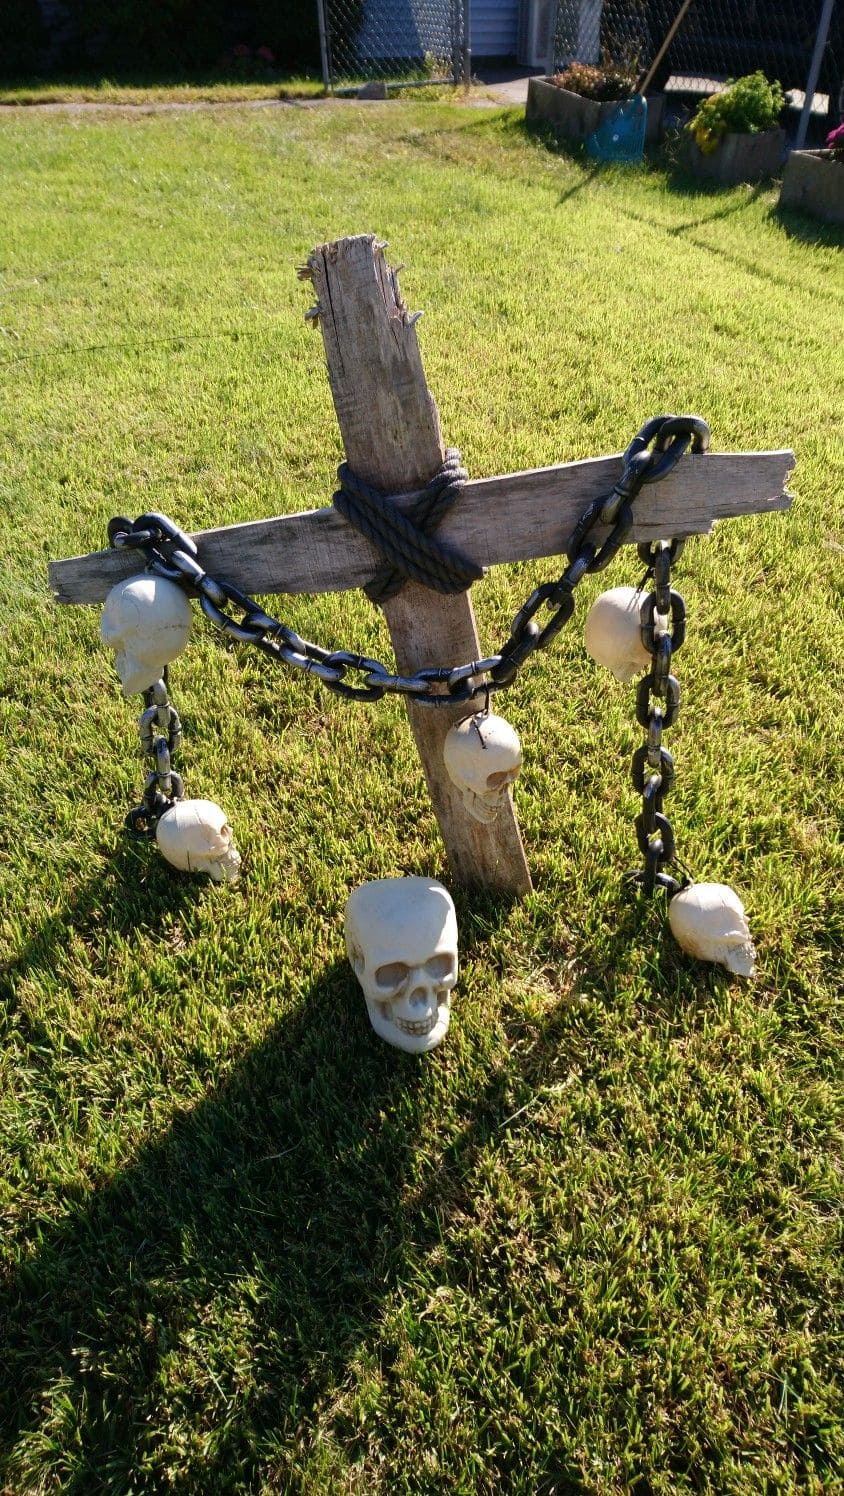
Weathered wood, frayed rope, and heavy black chains draped with skulls, this cross feels like it’s been pulled from a battlefield where no soul rests easy.
The uneven beams and splintered edges add to the sense of age, while the skulls swinging gently in the wind seem like trophies from an ancient curse.
Placed in the center of a haunted yard or at the edge of a graveyard scene, it creates a foreboding barrier that warns intruders they’re crossing into dangerous ground.
Materials Needed
- 2 weathered wooden boards (2″×4″, one 4 ft and one 3 ft)
- 5-6 plastic skulls (mix of large and small)
- Black plastic chain (6-8 ft)
- Thick black rope (3-4 ft)
- Wood screws or nails
- Dark wood stain or gray/brown outdoor paint
- Hot glue gun with glue sticks
Step-by-step Guide
Step 1: Stain or paint the boards to look old and sun-bleached, letting the natural cracks show through.
Step 2: Assemble the boards into a cross shape, fastening with screws or nails.
Step 3: Wrap the rope tightly around the center joint, leaving a few frayed ends for a worn look.
Step 4: Drape the chain across the horizontal beam, securing it at each end. Then attach the skulls to the chain so they hang at varying heights.
Step 5: Set the cross firmly into the ground and arrange one or two extra skulls at the base for added depth.
#3. Cobweb-Covered Skull Cross
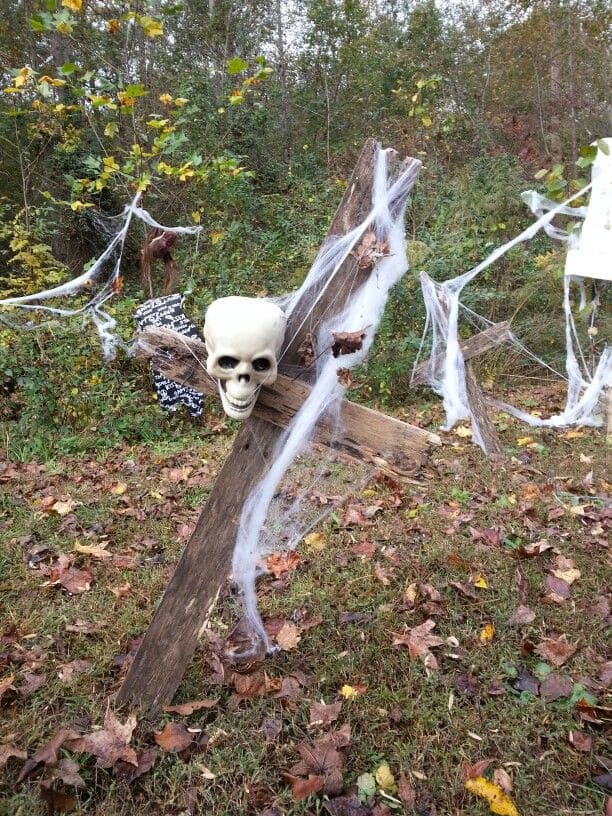
Nothing says “abandoned graveyard” like a weathered wooden cross draped in cobwebs.
This design features rough, uneven boards bound together, with a skull mounted at the center as a haunting focal point.
Stretchy faux cobwebs cling to the wood and hang loosely, swaying with the breeze and catching fallen leaves.
Materials Needed
- 2 old wooden boards (one 4 ft, one 3 ft long)
- 1 plastic skull prop
- Faux cobweb material
- Wood screws or nails
- Brown or gray outdoor paint (optional)
- Staple gun or hot glue gun
Step-by-step Guide
Step 1: Arrange and fasten the boards into a cross shape, leaving edges rough for an aged look.
Step 2: Mount the skull at the center with screws from behind or strong adhesive.
Step 3: Lightly brush the wood with brown or gray paint for a more weathered, forgotten appearance.
Step 4: Stretch faux cobwebs across the cross, pulling them thin so they look natural.
Step 5: Place the cross at a slight angle in the ground, surrounding it with scattered leaves for realism.
#4. Tribal Skull Stakes
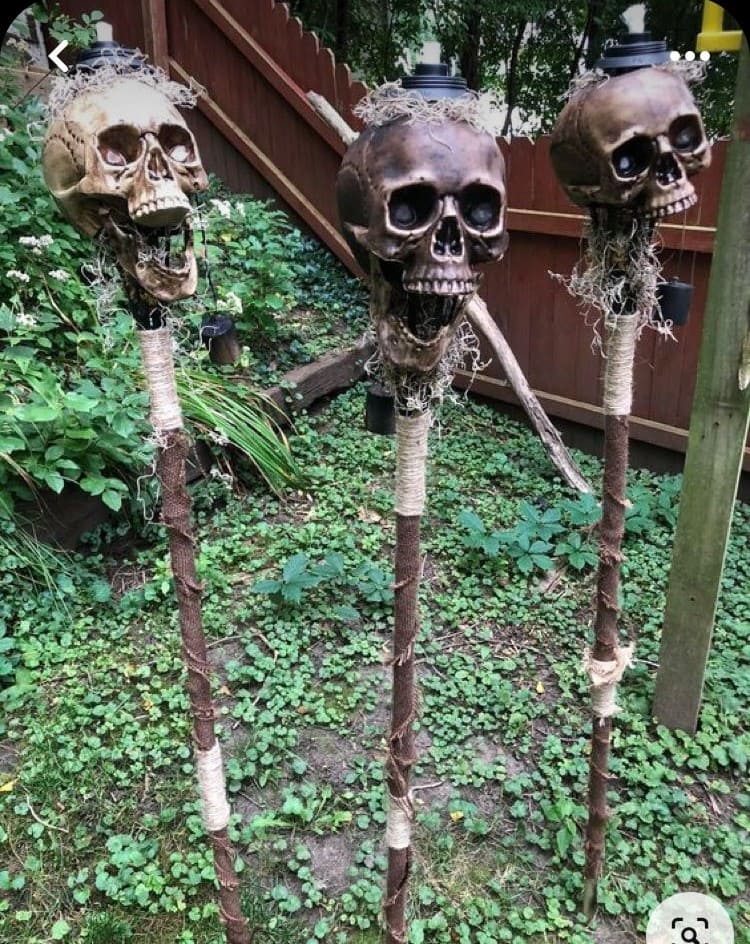
In this setup, tall, weathered poles wrapped in rough burlap and twine rise from the ground, each crowned with a grinning, hollow-eyed skull.
Spanish moss dangles like old, dried sinew, giving the impression these heads have been left as a grim warning to trespassers.
As the wind rustles through the moss, the stakes sway just slightly, making it seem like the skulls are still keeping watch.
Materials Needed
- 3-5 wooden stakes or poles (5-6 ft tall)
- 3-5 skull props (life-size, approx. 8″ tall)
- Rough burlap strips (1-2 yards)
- Jute or sisal twine (10-15 ft)
- Spanish moss (small bag)
- Hot glue gun with glue sticks
- Black and brown spray paint
Step-by-step Guide
Step 1: Spray paint the stakes with a mix of black and brown for a worn, earthy look.
Step 2: Wrap sections of each stake with burlap strips, securing them with twine. Then allow some edges to fray for an aged effect.
Step 3: Attach the skulls to the tops of the stakes using screws, nails, or heavy-duty adhesive.
Step 4: Glue small clumps of Spanish moss around the skull bases so they drape naturally.
Step 5: Place the stakes into the ground, spacing them evenly to form a path or boundary.
#5. Punny Tombstone Collection
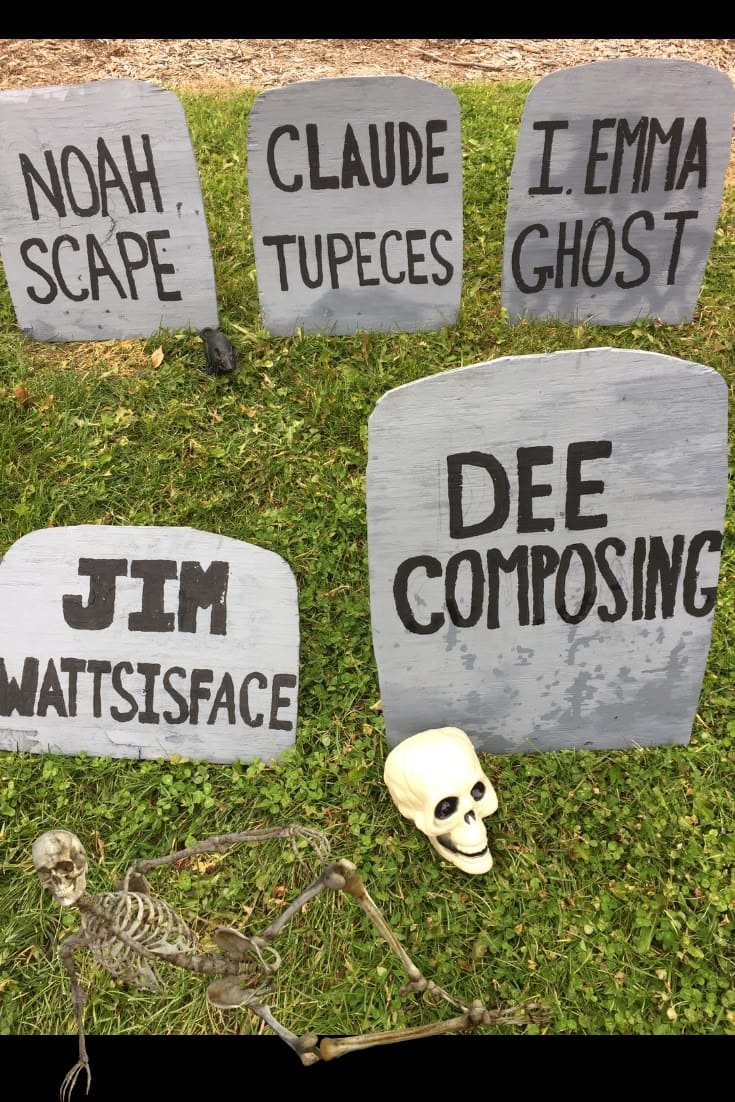
Not all grave markers have to be grim as these punny tombstones turn your Halloween yard into a comedy graveyard.
Each tombstone bears a clever name like Noah Scape, Dee Composing, and I. Emma Ghost, giving guests a reason to chuckle as they wander through.
Bonus, the grey paint and block lettering keep them looking tombstone-like from a distance, but the closer visitors get, the more they realize the joke.
Materials Needed
- Foam board or plywood sheets (cut into tombstone shapes)
- Gray outdoor paint
- Black outdoor paint
- Paintbrushes
- Wood stakes or supports
- Optional: plastic skeletons
Step-by-step Guide
Step 1: Cut foam board or plywood into rounded or angled tombstone shapes.
Step 2: Paint the front and sides with a coat of gray paint and let dry.
Step 3: Using black paint, hand-letter your chosen puns or funny names.
Step 4: Attach wooden stakes or supports to the back for stability.
Step 5: Arrange them in clusters for a comedy corner in your graveyard, adding skeletons or skulls for extra personality.
#6. Bloody Hand with “HELP ME” Sign
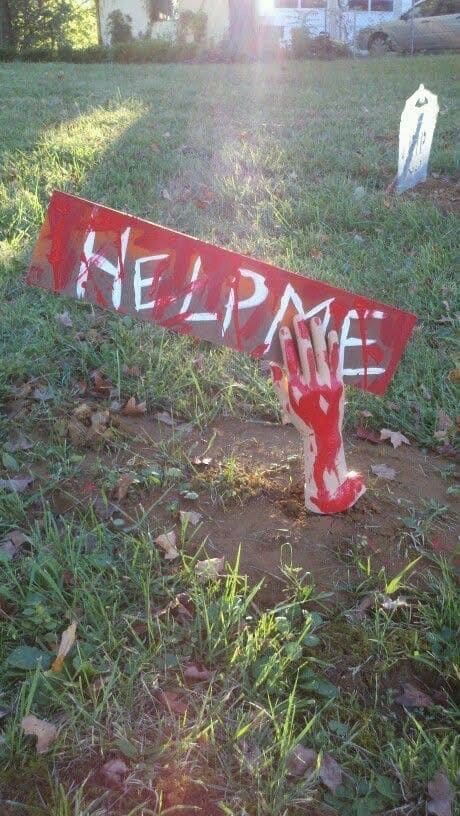
It’s the kind of scene that makes you stop in your tracks with a bloody, severed hand clawing its way out of the ground, clutching a desperate “HELP ME” sign.
The red letters look hastily smeared, as if written in panic during the final moments.
This prop is small enough to place almost anywhere, yet its visual punch is undeniable.
Materials Needed
- 1 fake severed hand prop (life-size)
- Wood plank for sign (approx. 18″×6″)
- Red and white outdoor paint
- Paintbrushes
- Hot glue gun with glue sticks
- Wooden or metal stake
Step-by-step Guide
Step 1: Paint the wood plank red and let dry completely.
Step 2: Using white paint, handwrite “HELP ME” in a rough, uneven style. Then allow some letters to smear for a distressed effect.
Step 3: Attach the fake severed hand to one end of the sign with hot glue, positioning the fingers to appear as if gripping the board tightly.
Step 4: Secure a wooden or metal stake to the back of the sign for stability.
Step 5: Drive the stake into the ground so the sign and hand angle upward as if emerging from beneath the soil.
#7. Haunted Cross with Screaming Skull
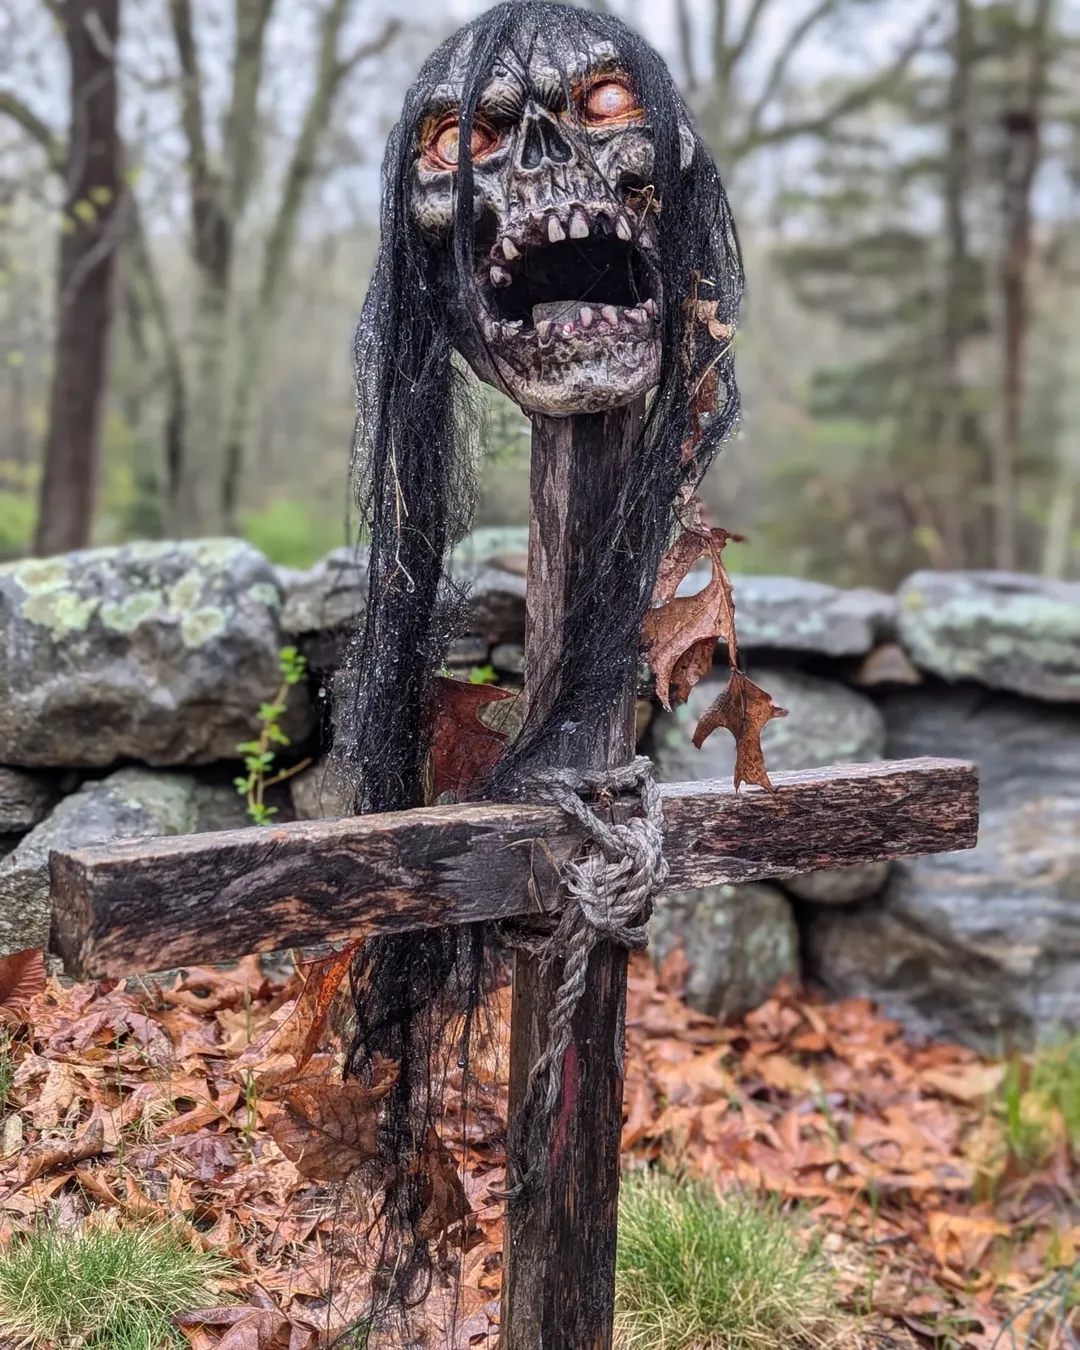
This haunted cross with a screaming skull is the kind of prop that stops people in their tracks.
Its weathered wood, twisted rope binding, and long, tattered black hair create an unsettling vision straight from an abandoned graveyard.
Moreover, the glowing eyes and open mouth make it seem like the spirit is mid-curse, warning anyone who dares to pass by.
Materials Needed
- 1 skull prop with hair (approx. 12″ tall)
- 1 vertical wooden post (4″×4″, 5 ft tall)
- 1 horizontal wooden beam (2″×4″, 3 ft long)
- Heavy-duty rope (3-4 ft)
- Black creepy cloth (1-2 yards)
- Spray paint in black, brown, and gray (1 can each)
- Hot glue gun with glue sticks
- Outdoor sealant spray
- Optional: battery-powered LED eyes
Step-by-step Guide
Step 1: Paint your wooden post and beam in a mix of black, brown, and gray for an aged, haunted look. Let dry completely.
Step 2: Attach the horizontal beam to the vertical post using screws or nails. Then wrap the joint tightly with rope for both stability and a rustic appearance.
Step 3: Mount the skull on top of the vertical post, securing it with screws or strong adhesive.
Step 4: Drape black creepy cloth over the skull’s head and shoulders, letting pieces hang loose for movement in the wind.
Step 5: Add LED eyes for a glowing effect at night, then seal with outdoor spray to protect from the weather.
Tip:
You scatter fallen leaves or faux moss around the base to blend it naturally into your yard for a more authentic, forgotten grave look.
#8. “Beware” Coffin Silhouette
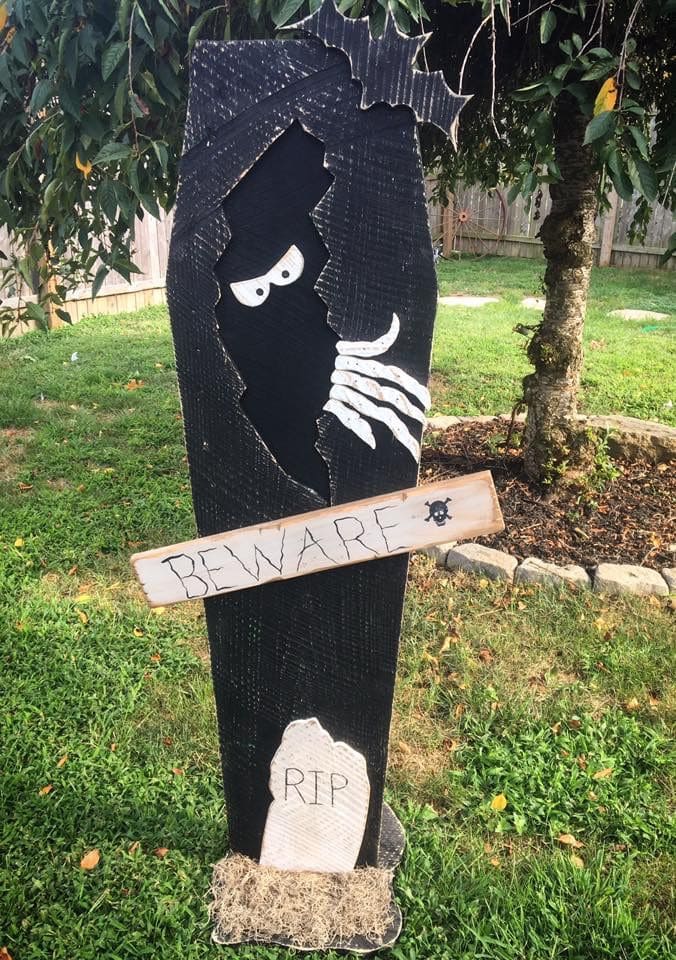
This “Beware” coffin silhouette brings a mix of whimsy and warning to your Halloween yard.
The tall, black coffin cutout features a torn opening that reveals a pair of glaring eyes and a skeletal hand, as if something inside is ready to escape.
Specially, rustic wooden plank marked with the word “BEWARE” is nailed across the front, giving visitors a cheeky yet ominous heads-up.
Materials Needed
- Large sheet of plywood or foam board (approx. 6 ft tall)
- Black outdoor paint
- White outdoor paint for eyes and hand
- Wooden plank for “BEWARE” sign (about 24″×5″)
- Brown paint or stain for the sign
- Black marker or paint
- Small foam tombstone prop
- Hot glue gun and glue sticks
- Faux moss or dried grass
Step-by-step Guide
Step 1: Cut the plywood or foam board into a coffin shape and paint it black.
Step 2: Paint a jagged torn section and fill it with white eyes and a skeletal hand to look like something is peeking out.
Step 3: Prepare the “BEWARE” sign by staining or painting the plank brown, then hand-painting the letters in black.
Step 4: Attach the sign across the coffin with nails, screws, or glue.
Step 5: Glue the small tombstone at the base and add faux moss around it for texture.
#9. Guillotine with Severed Heads Display
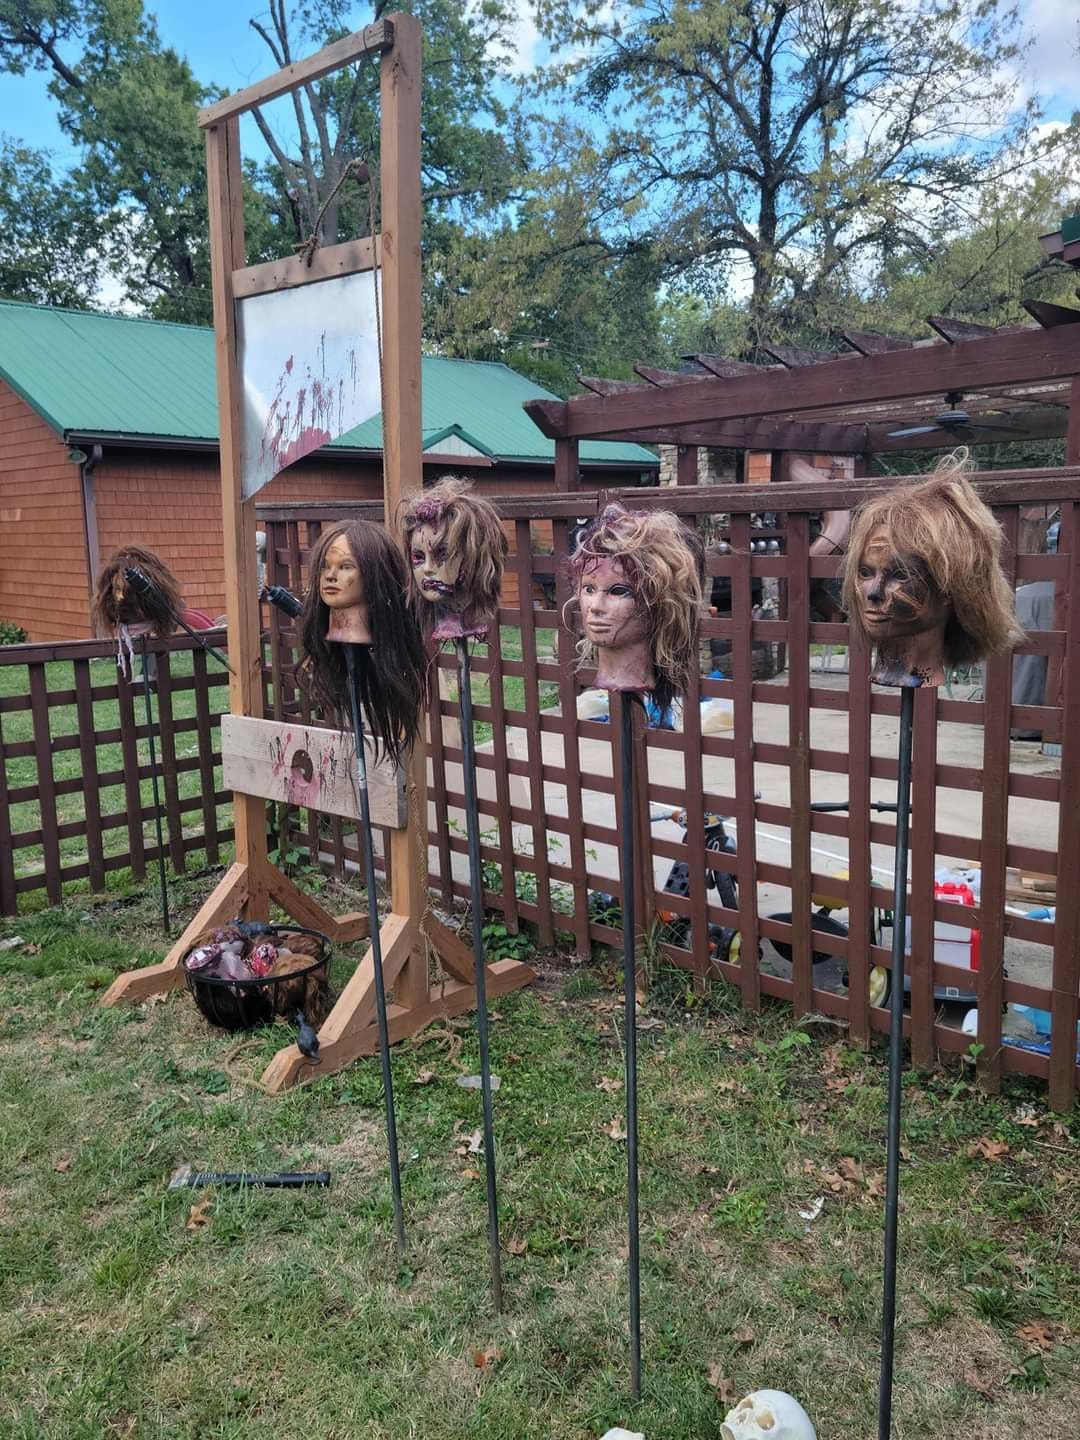
If you’re looking to create a Halloween scene that feels like a twisted history lesson, this guillotine with severed heads display is unforgettable.
The towering wooden frame, complete with a blood-streaked blade, instantly sets a dark medieval tone.
Lifelike mannequin heads mounted on metal stakes line up like trophies, their tangled hair and grimy, distressed faces telling silent tales of terror.
Materials Needed
- 1 guillotine frame (wooden, approx. 6-7 ft tall)
- 1 plywood or metal blade (18″-24″ wide)
- 4-6 mannequin heads with wigs
- 4-6 metal stakes or rebar (4-5 ft tall)
- Red and black paint for blood and aging effects
- Wood screws, nails, and brackets
- Drill and saw
- Optional: bucket or bowl filled with faux body parts
Step-by-step Guide
Step 1: Build the guillotine frame using sturdy wood, ensuring the blade section is wide enough to be seen clearly from a distance.
Step 2: Paint the wood in muted browns and grays for an aged look. Then add streaks of red paint to the blade for a fresh, chilling touch.
Step 3: Drive the stakes into the ground in a line or semicircle around the guillotine.
Step 4: Mount the mannequin heads onto the stakes. You distress the wigs with scissors and add smears of red paint for realism.
Step 5: Place a bucket or bowl at the base of the guillotine filled with faux body parts or fabric cloth soaked in red paint to complete the scene.
#10. Haunted Direction Signpost
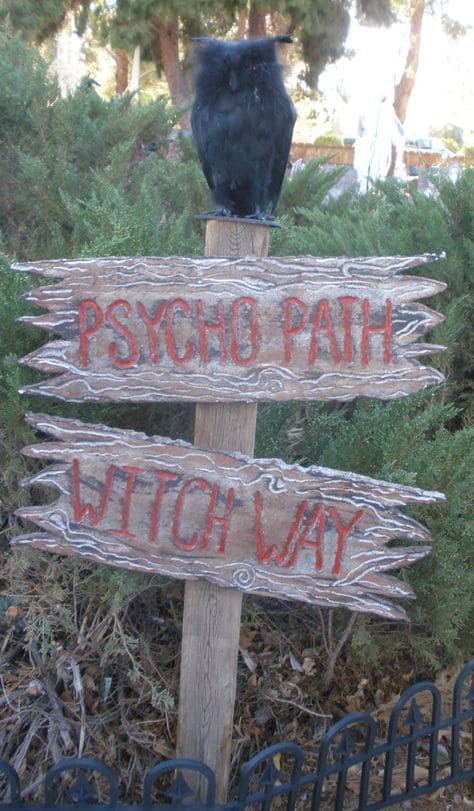
Every spooky yard needs a guide, and this haunted direction signpost is as funny as it is eerie.
With weathered wooden planks pointing visitors toward “Psycho Path” and “Witch Way,” it sets the tone for a night full of chills and chuckles.
Also, the distressed edges and bold red lettering feel like they’ve been scratched in haste, warning or perhaps daring you to follow.
Materials Needed
- 1 wooden post (4″×4″, 5–6 ft tall)
- 2-3 wooden planks for signs (each about 20″×6″)
- Black owl prop or similar spooky figure
- Outdoor wood stain or brown paint
- Red outdoor paint for lettering
- White or light gray paint for weathering effect
- Screws or nails
- Paintbrushes
Step-by-step Guide
Step 1: Paint or stain the wooden post and planks with a dark brown finish, letting some natural wood grain show through.
Step 2: Distress the edges of the planks with a hammer or sandpaper for a worn, rustic look.
Step 3: Hand-paint fun, creepy phrases like “Psycho Path” and “Witch Way” in bold red letters. You can lightly dry-brush with white or gray for an aged effect.
Step 4: Attach the planks to the post at slightly different angles for a whimsical, uneven style.
Step 5: Secure the owl prop on top, either with screws or strong adhesive.
#11. Hanging Skeleton Torture Stakes
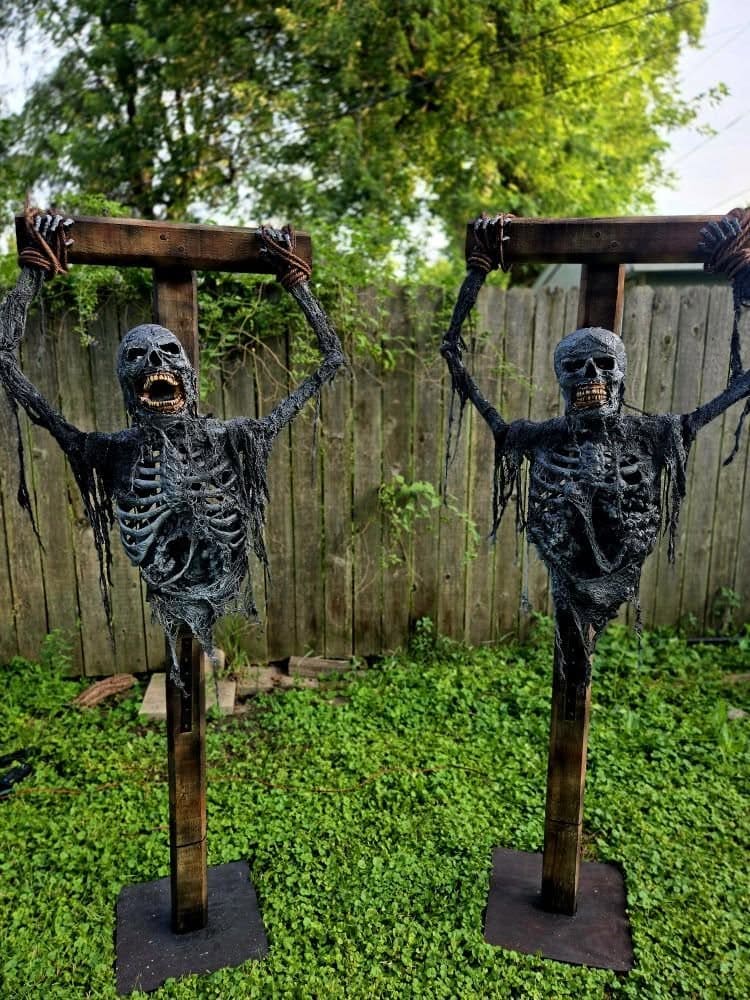
If you want to give your yard a truly hair-raising touch, these hanging skeleton torture stakes will do the trick.
Imagine visitors walking past your garden only to see two eerie, decayed skeletons suspended mid-air, their bony fingers gripping a wooden crossbar as if trapped forever.
This display works especially well along fences, creating a chilling scene that feels straight out of a haunted forest.
I bet you’ll love how the tattered fabric catches in the wind, making the skeletons look alive in the moonlight.
Materials Needed
- 2 full-size skeleton props (5-6 ft tall)
- 2 wooden stakes (4″×4″, 6 ft tall)
- 2 wooden crossbars (2″×4″, 3 ft long)
- 4 metal brackets or heavy-duty screws
- Black or brown outdoor paint (1 quart)
- Tattered black cloth or creepy cloth (2-3 yards)
- Outdoor base plates (at least 12″×12″)
- Power drill and screws
- Optional: LED spotlights
Step-by-step Guide
Step 1: Paint your stakes and crossbars in dark, weathered colors for an aged look. Let them dry completely.
Step 2: Attach each crossbar to the top of a stake using brackets or screws, ensuring it’s secure and stable.
Step 3: Position the skeleton so its hands grip the crossbar. Use screws or zip ties to keep the arms in place.
Step 4: Wrap the body in tattered cloth to enhance the decayed effect. Let some pieces dangle to flutter in the wind.
Step 5: Secure the stakes into base plates or directly into the ground. Then angle LED lights at the skeletons for a chilling night display.
#12. Coffins “For Rent”
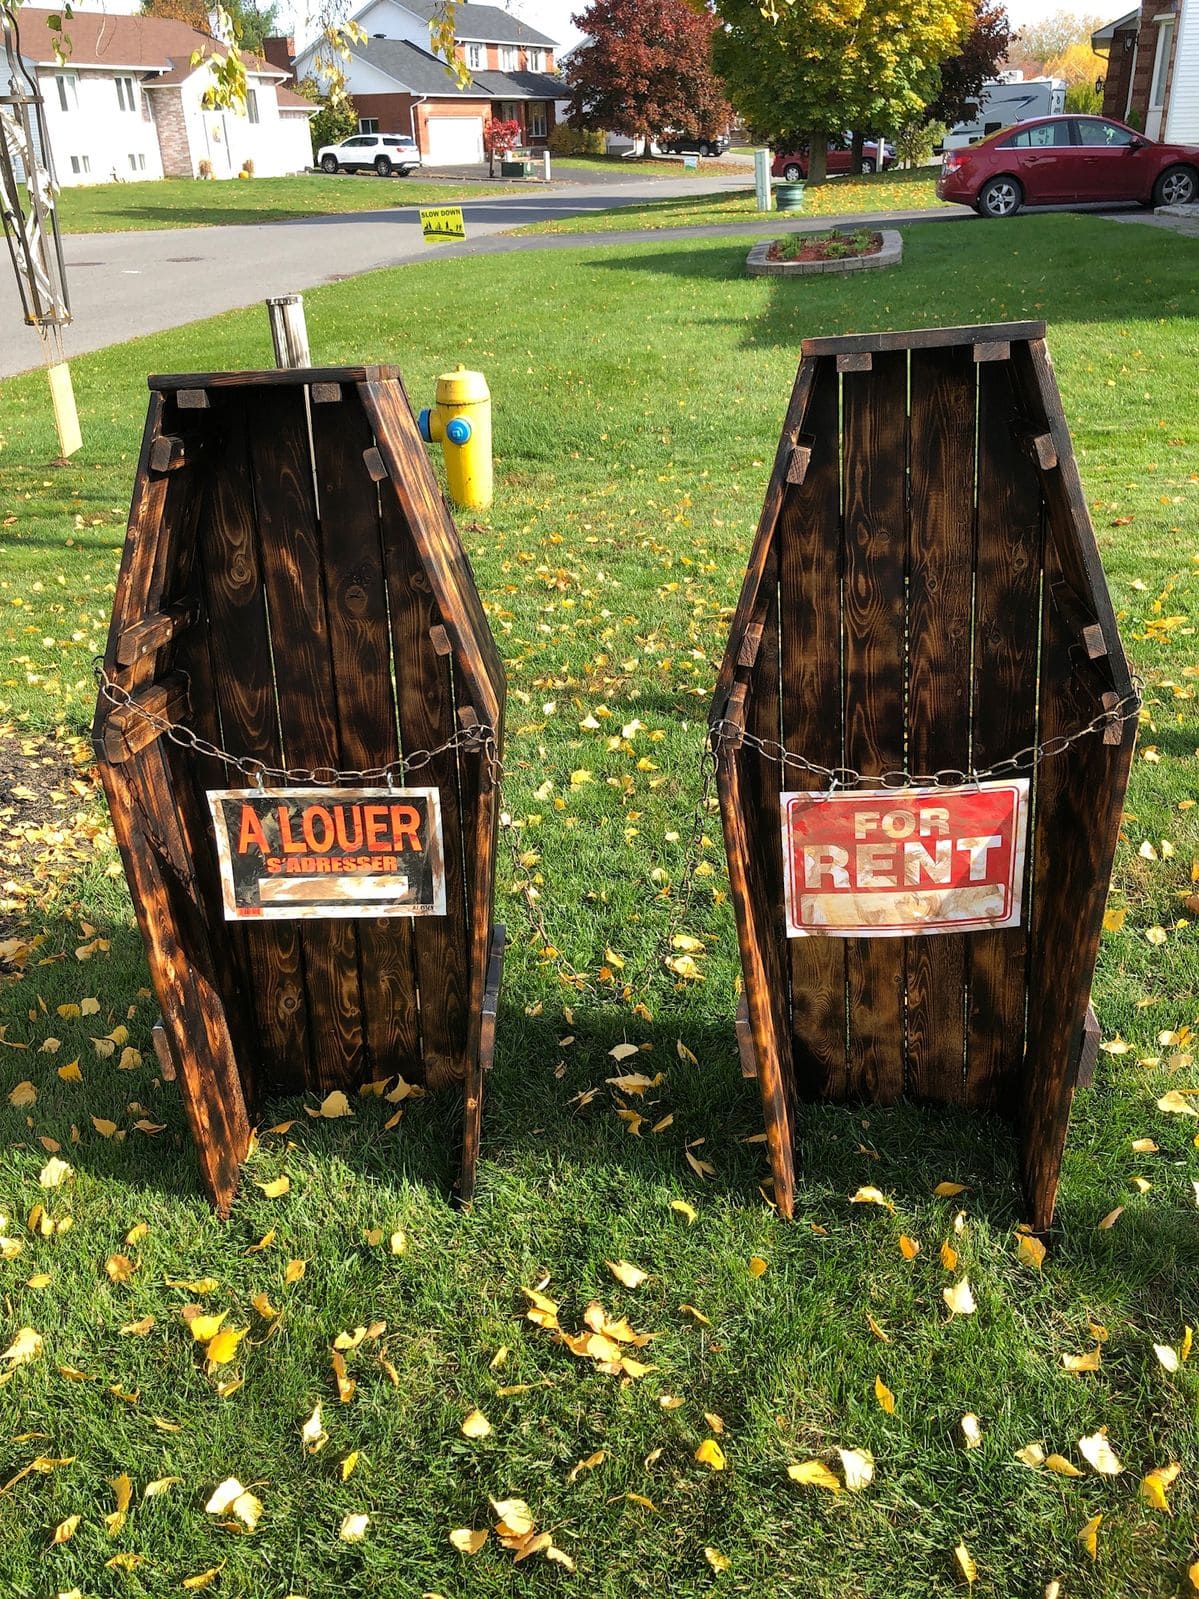
Wow, a little humor can make your Halloween display stand out and these For Rent coffins do it perfectly.
Two rustic, open wooden coffins stand side by side, each with a cheeky rental sign hanging from a chain.
Moreover, the weathered wood and blackened edges give them a creepy, old-world feel, while the joke invites guests to step closer.
Materials Needed
- 6-8 wooden planks per coffin (various lengths for coffin shape)
- Wood screws and drill
- Chains for hanging signs
- Wood stain or black/brown outdoor paint
- Stencil or printed “For Rent” and “A Louer” signs
- Clear sealant spray for weatherproofing
Step-by-step Guide
Step 1: Cut and assemble planks into the classic coffin shape, ensuring the sides are slightly angled for authenticity.
Step 2: Stain or paint the wood dark brown or black, adding burnt edges for a more aged look.
Step 3: Print or stencil “For Rent” (and optional “A Louer”) onto boards or heavy cardstock, then weather them with smudges or light sanding.
Step 4: Attach the signs to the coffins with short lengths of chain so they dangle slightly.
Step 5: Place the coffins upright and open, scattering a few faux bones or cobwebs inside for added detail.
#13. Buried Alive Grave Scene
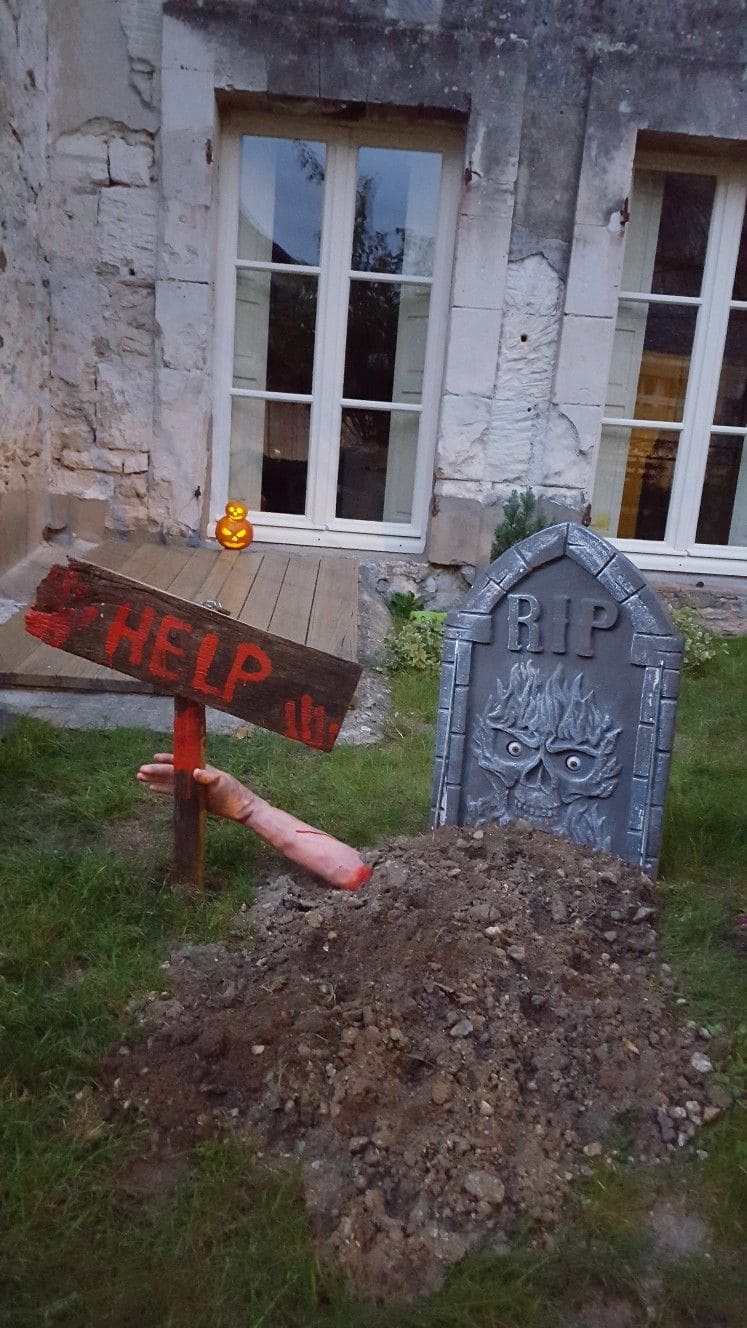
This buried alive grave scene adds a chilling twist to a classic Halloween yard.
A realistic tombstone marks the spot, but the real scare comes from the freshly dug mound of dirt and the desperate hand clawing its way out.
Plus, the nearby wooden sign, painted with frantic red “HELP” letters and bloody handprints, tells the story without a single spoken word.
Materials Needed
- 1 plastic or foam tombstone (approx. 2–3 ft tall)
- 1 fake severed arm prop
- Wood plank for “HELP” sign (about 18″×6″)
- 1 wooden stake or post (2-3 ft tall)
- Red paint for letters and handprints
- Fresh soil or mulch (enough to form a mound about 3 ft wide)
- Hammer and nails or screws
- Optional: small LED pumpkin
Step-by-step Guide
Step 1: Position the tombstone upright in your chosen spot, securing it with stakes if needed.
Step 2: Create a dirt mound in front of the tombstone to mimic a freshly dug grave.
Step 3: Push the severed arm prop into the dirt so it appears to be reaching upward.
Step 4: Paint “HELP” in large red letters on your wood plank, adding handprints for effect. Then attach it to the stake and drive it into the ground beside the mound.
Step 5: Add a small LED pumpkin or lantern nearby for a warm glow that draws attention to the scene.
#14. “Who’s Next?” Killer’s Grave
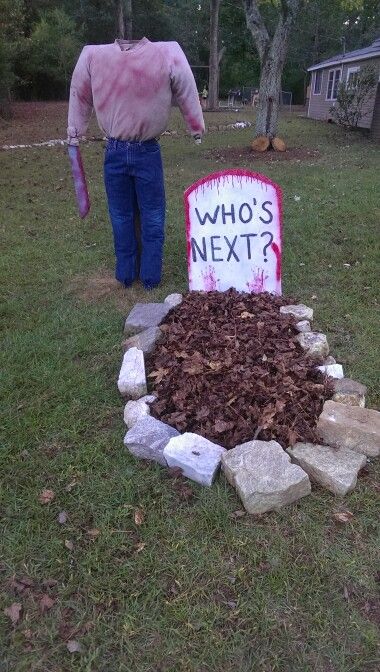
They say the grave is never full and this one seems to be waiting for its next guest.
You can see a headless, blood-stained figure stands guard, gripping a knife as if freshly returned from some grisly task.
At the foot of the leaf-filled mound, a tombstone painted in dripping red letters asks the chilling question: “Who’s Next?”
This setup plays on fear and curiosity, making it the perfect centerpiece for a lawn that wants to deliver a jolt of adrenaline.
Materials Needed
- 1 headless mannequin or stuffed shirt and jeans
- 1 plastic knife prop (painted with red blood)
- 1 tombstone or plywood cutout (about 2-3 ft tall)
- White outdoor paint
- Brown or red fabric dye
- 10-15 rocks to outline the grave
- Dry leaves or mulch
- Wooden stakes and zip ties
Step-by-step Guide
Step 1: Create the grave outline with rocks, forming an oval or rectangle. Then fill the inside with dry leaves or mulch.
Step 2: Paint the tombstone white, then add “Who’s Next?” in bold, dripping red letters. Let dry completely.
Step 3: Dress the mannequin in jeans and a long-sleeve shirt. You now stain the shirt with brown or red dye for a worn, bloody effect.
Step 4: Secure the mannequin’s body upright at the head of the grave, attaching the knife prop to one hand.
Step 5: Position the tombstone behind the mannequin so the question looms over the grave.
Tip:
You can use a motion-activated light or sound box nearby for an extra jump scare when someone walks past.
#15. Impaled Skeleton Stake
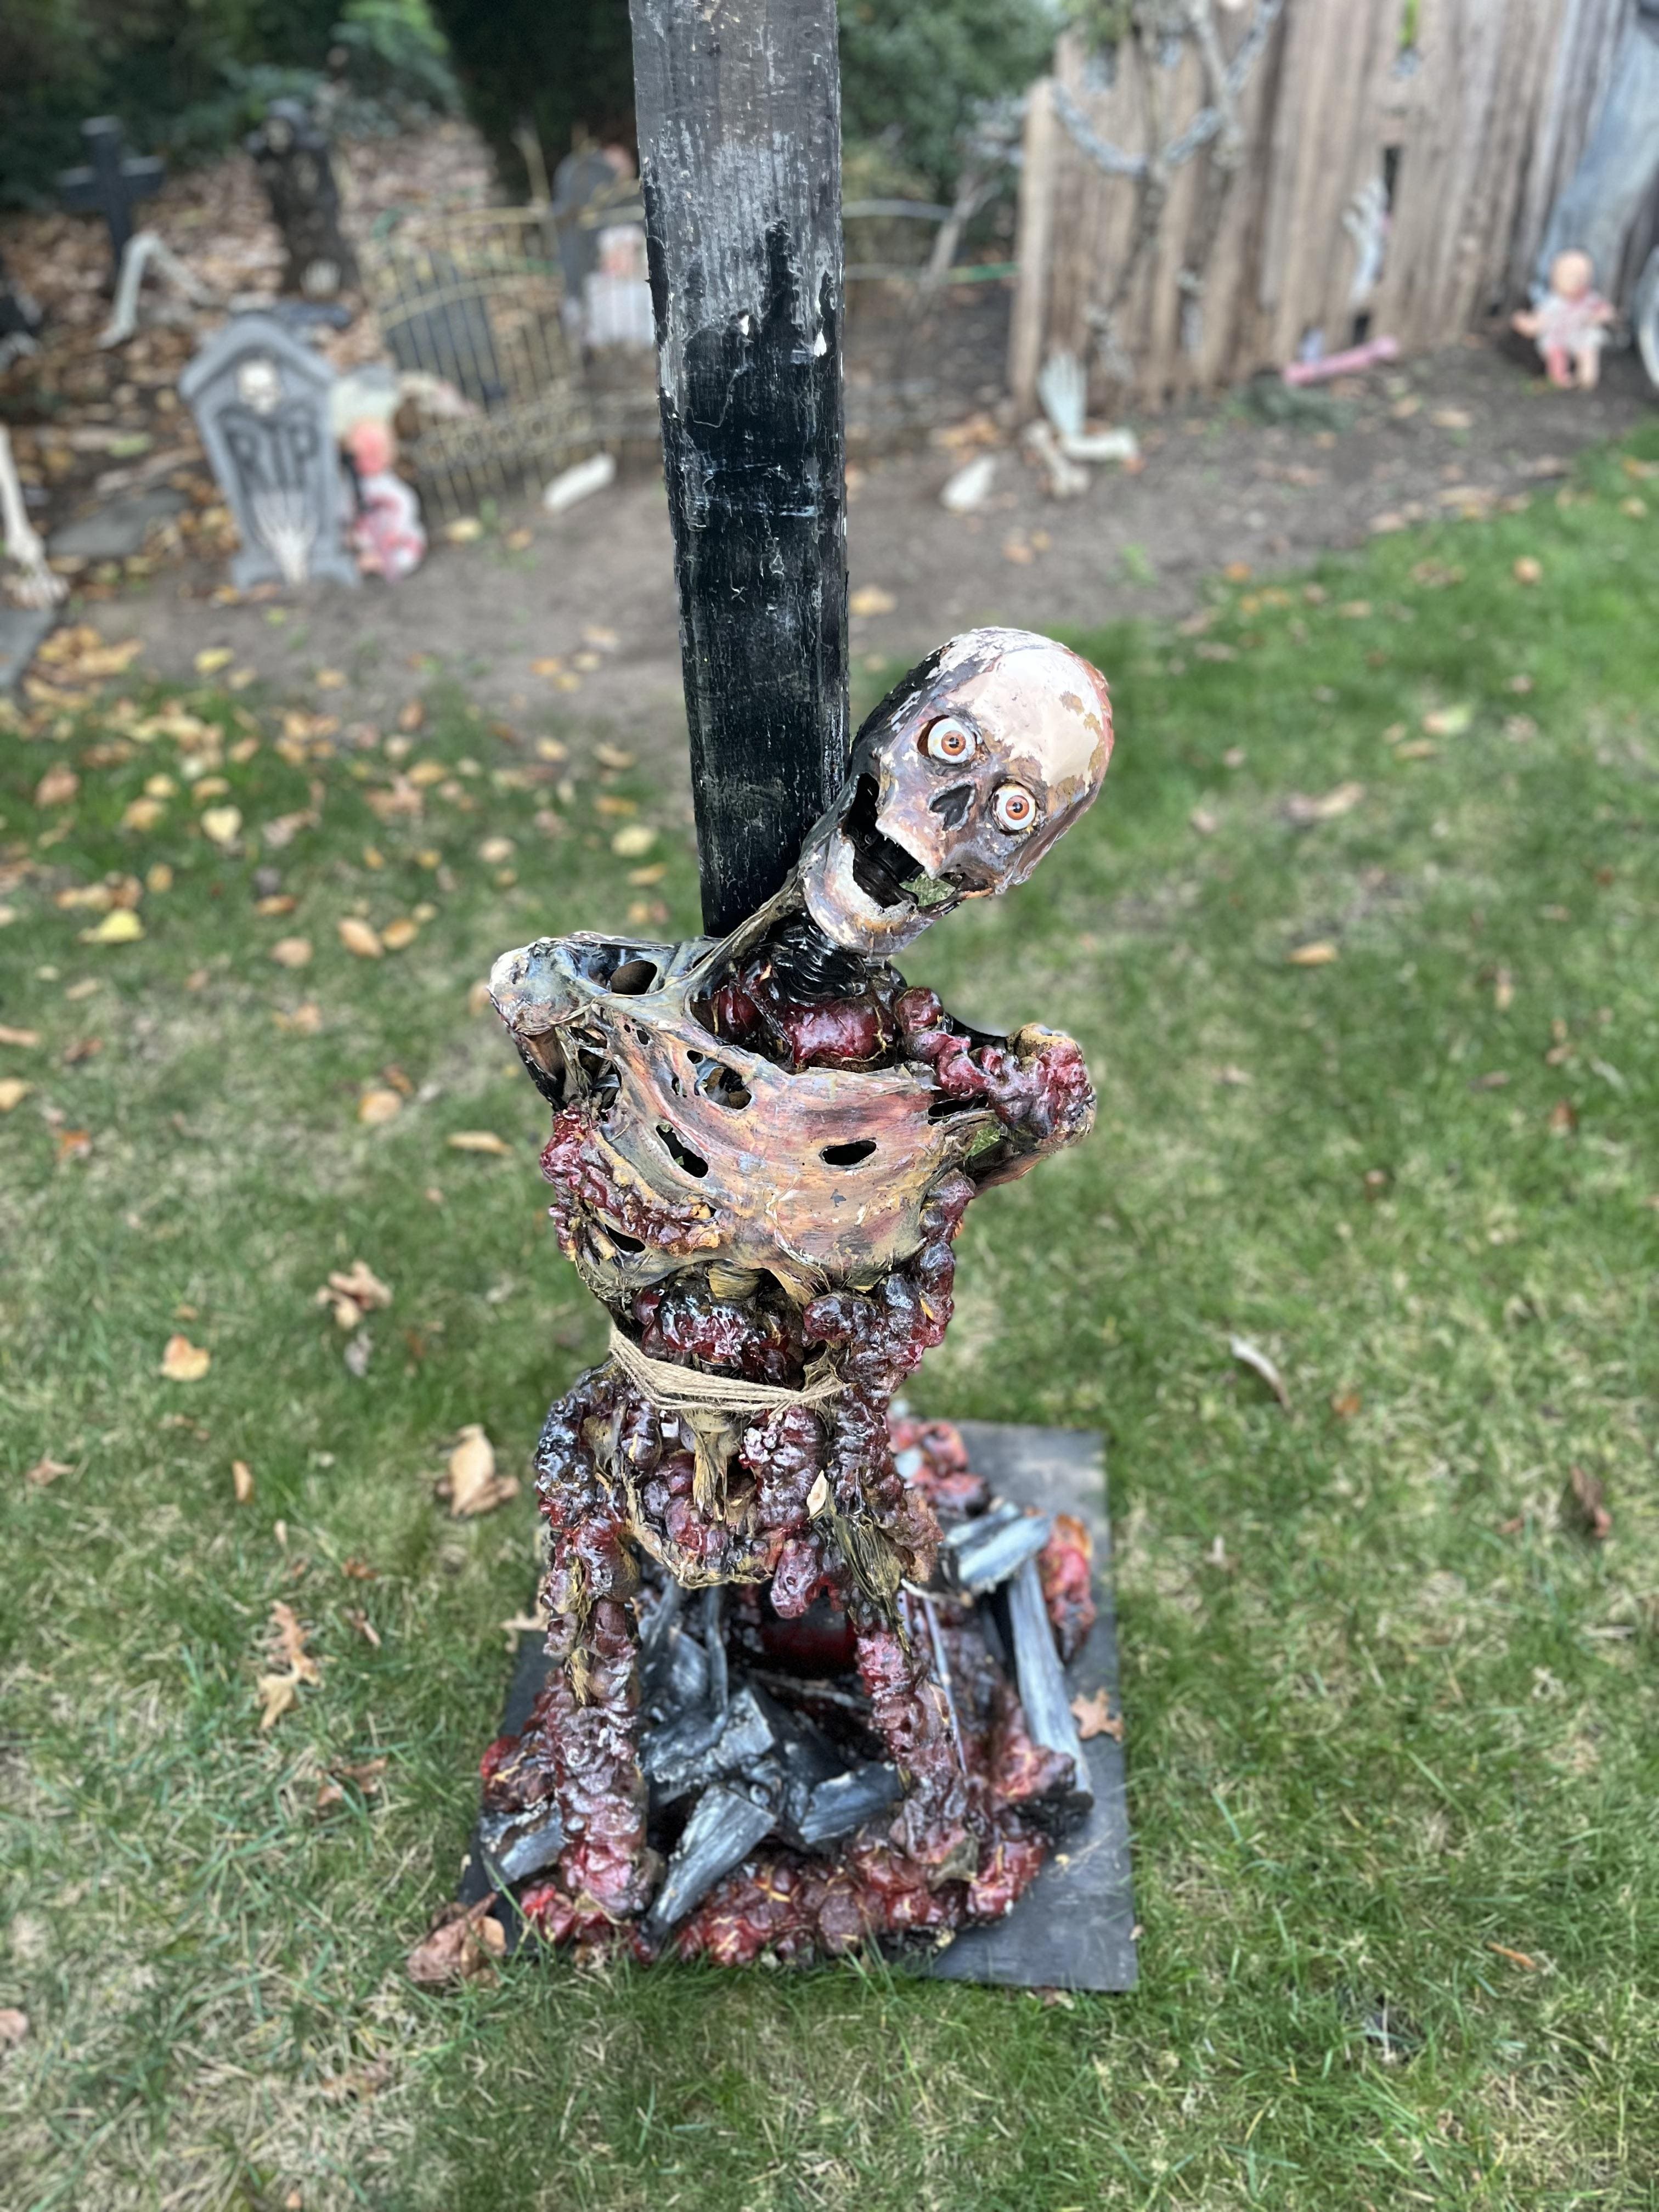
For a truly bone-chilling Halloween yard, this impaled skeleton stake is impossible to ignore.
It looks as though a tortured soul has met its fate, pierced through and forever bound to the stake, its wide-eyed stare frozen in horror.
Specially, the gory textures, charred wood effect, and twisted pose make it perfect for the center of a haunted graveyard scene.
Materials Needed
- 1 skeleton prop (4-5 ft tall)
- 1 wooden stake (4″×4″, 5-6 ft tall)
- Base plate or wooden platform (at least 12″×12″)
- Rope or twine (3-4 ft)
- Spray paint in black, dark brown, and crimson (1 can each)
- Hot glue gun with glue sticks
- Expandable foam or papier-mâché
- Outdoor clear sealant spray
Step-by-step Guide
Step 1: Paint the wooden stake in dark, weathered colors to resemble aged, burnt timber. Let it dry.
Step 2: Position the skeleton against the stake, tilting its head for a more dramatic pose. Then secure it in place with rope or twine around the torso.
Step 3: Add gore by applying expandable foam or papier-mâché around the midsection and base. Once dry, paint with layers of black, red, and brown for a realistic wound effect.
Step 4: Fix the stake into the base plate or anchor it firmly into the ground.
Step 5: Spray with clear sealant to protect from weather and finish with dim red or flickering light for a spine-tingling look.
#16. Skull-Centered Wooden Cross
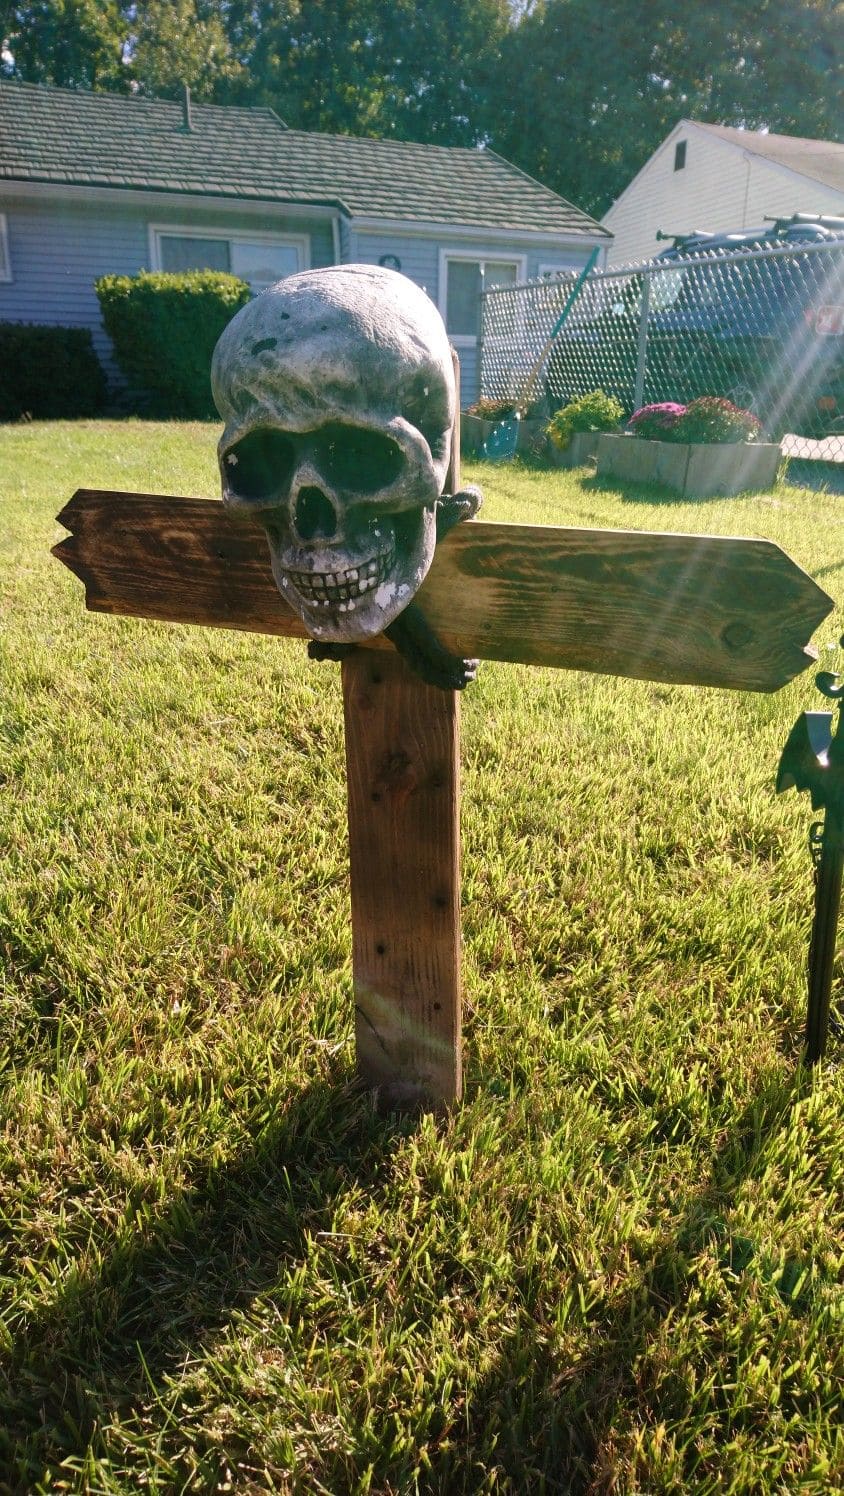
A simple wooden cross becomes instantly menacing with the addition of a weathered skull mounted right at its center.
The rough-cut beams, slightly scorched at the edges, give it the look of something crafted in haste to mark a cursed spot.
Plus, the skull’s worn surface and hollow eyes stare out into the yard, making it feel like it’s silently guarding whatever lies beneath.
Materials Needed
- 2 wooden boards (1 longer at 4 ft, 1 shorter at 3 ft)
- 1 plastic or resin skull (life-size)
- Wood screws or nails
- Black and brown outdoor paint or wood stain
- Sandpaper
- Optional: thick twine or rope
Step-by-step Guide
Step 1: Cut and sand the boards, keeping the edges slightly rough for a rustic effect.
Step 2: Stain or paint the wood in a mix of black and brown, allowing some natural wood grain to show through.
Step 3: Attach the shorter board horizontally to the longer one to form a cross.
Step 4: Mount the skull at the center using screws from behind or heavy-duty adhesive.
Step 5: Optionally wrap twine or rope around the center for added detail, then secure the cross in the ground.
Tip:
You should position a spotlight low to the ground and angle it upward so the skull’s eye sockets cast deep, eerie shadows.
#17. Zombie Hands Lawn Silhouettes
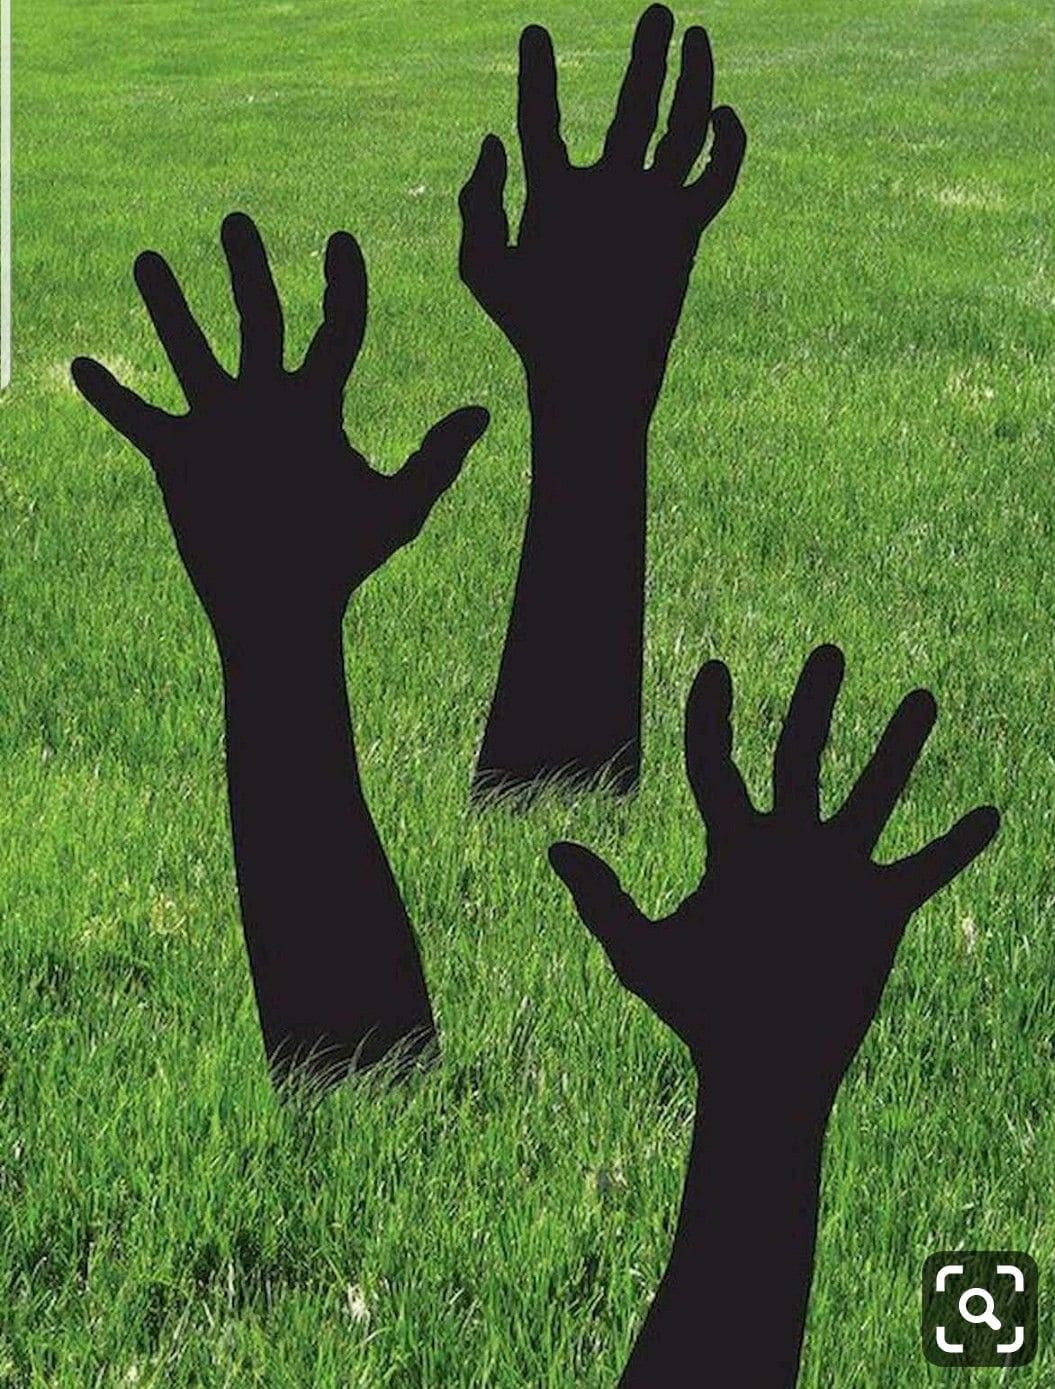
Sometimes, the simplest props make the biggest impact.
These zombie hands lawn silhouettes look like the undead are breaking through the ground, reaching for whoever dares to pass.
The stark black cutouts contrast sharply against the green grass, making them eye-catching even in daylight.
At night, a well-placed spotlight turns them into a dramatic shadow play, giving the illusion that your yard is under siege.
Materials Needed
- Black plywood or corrugated plastic sheets (large enough for 3-5 hand shapes)
- Hand silhouette templates (downloadable or self-drawn)
- Jigsaw or utility knife (depending on material)
- Black outdoor paint (1 quart)
- Metal stakes or wooden dowels (1-2 ft each)
- Drill and screws or strong adhesive
Step-by-step Guide
Step 1: Trace your chosen zombie hand silhouettes onto the plywood or plastic sheets.
Step 2: Cut out each shape carefully, smoothing any rough edges.
Step 3: Paint both sides with black outdoor paint to weatherproof and give a clean silhouette look.
Step 4: Attach metal stakes or dowels to the bottom of each hand cutout.
Step 5: Finally, arrange them in your yard, varying the angles and distances so they look like a horde emerging from the ground.
#18. Barry D’Live Tombstone
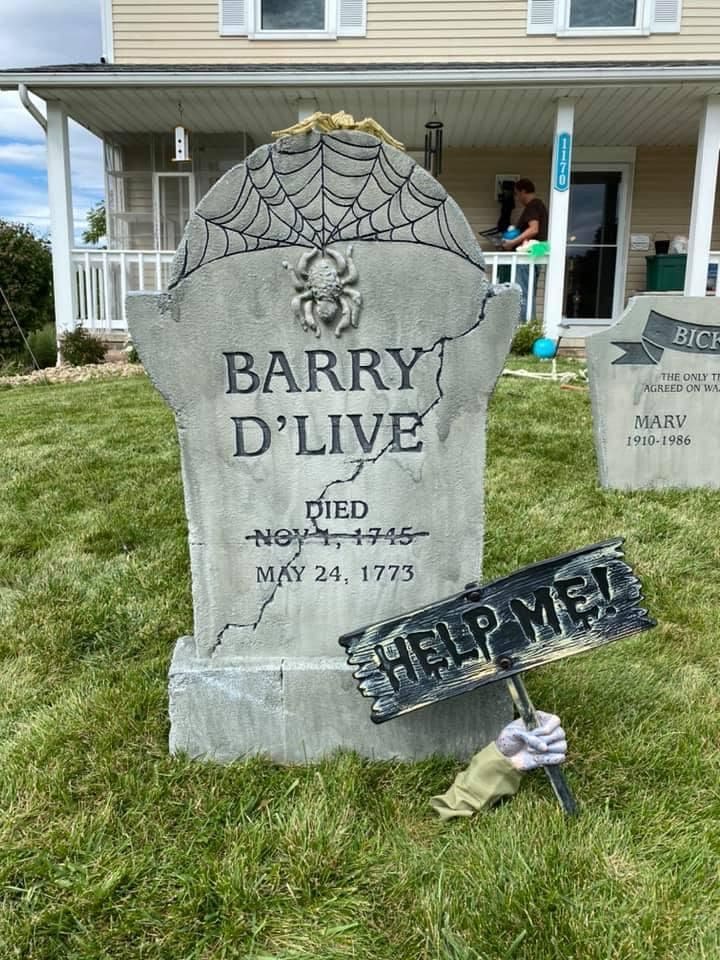
Look at this Barry D’Live tombstone! It is a clever mix of pun and fright
. The cracked stone effect, spiderweb engraving, and bold name instantly draw the eye, but it’s the unsettling “HELP ME!” sign, clutched by a hand emerging from the ground that sells the story.
Barry isn’t quite ready to rest in peace, making it a perfect piece for a graveyard setup with personality.
Materials Needed
- Foam or plywood tombstone cutout (approx. 3-4 ft tall)
- Gray outdoor paint and black paint for cracks
- Spiderweb stencil and spider embellishment
- Wooden board for “HELP ME!” sign (about 18″×6″)
- Small fake hand prop
- Hot glue gun with glue sticks
- Black and white paint
- Wooden or metal stakes for stability
Step-by-step Guide
Step 1: Paint the tombstone gray, adding darker streaks and black painted cracks for an aged look.
Step 2: Stencil or hand-paint a spiderweb design at the top, attaching a spider embellishment for texture.
Step 3: Write “Barry D’Live” in bold letters, then add a fake death date and strike through one for humor.
Step 4: Paint the “HELP ME!” sign in distressed black and white, then glue it to the fake hand prop.
Step 5: Secure the tombstone in place and position the hand with sign at the base so it looks like it’s reaching out from underground.
#19. Skull Cross with Chains
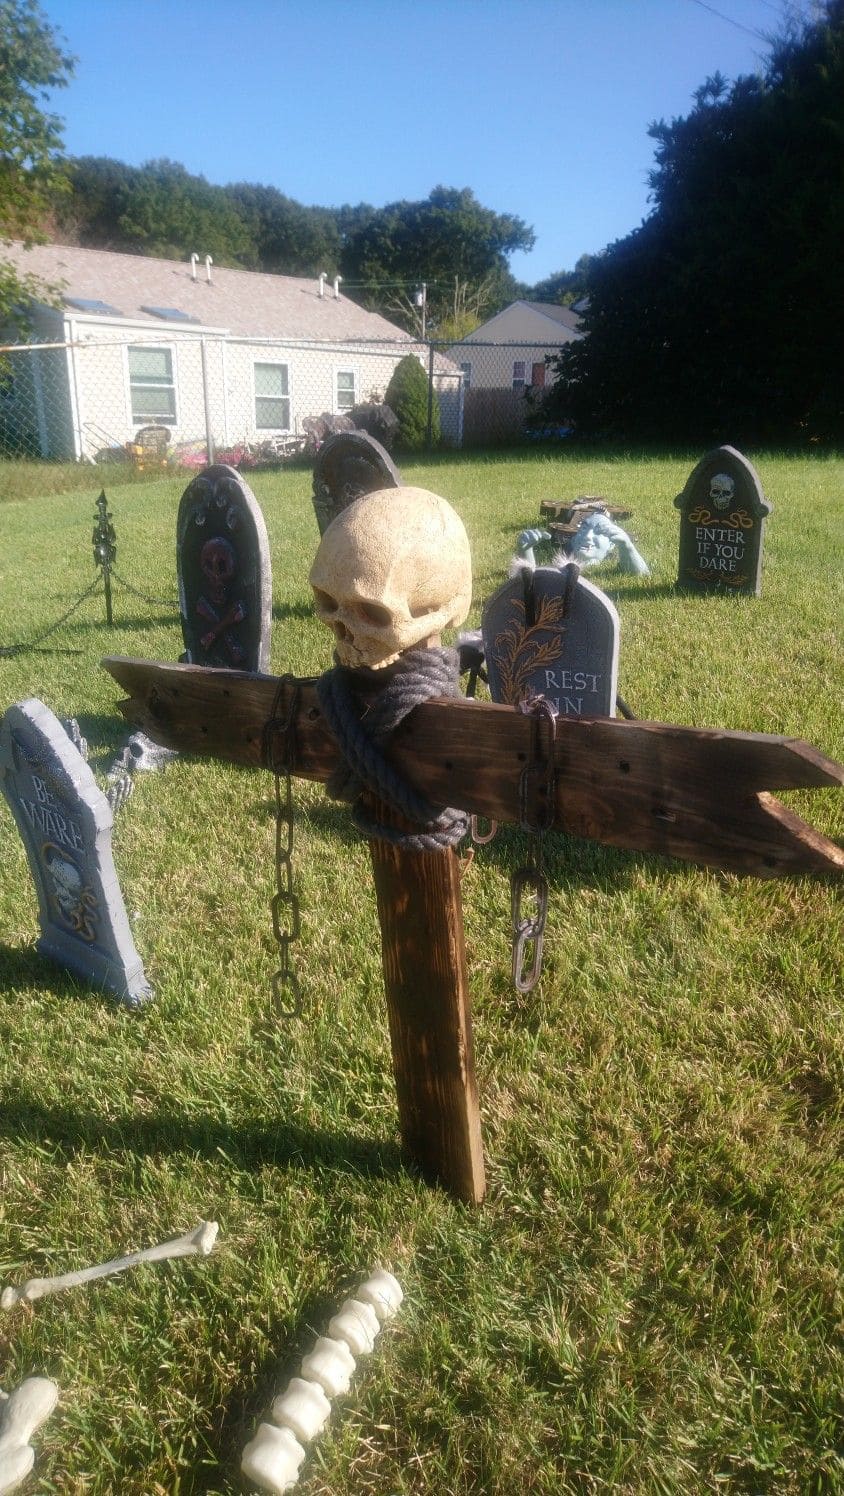
This skull cross with chains looks like something pulled straight from an old, cursed battlefield.
The weathered wood, bound tightly with rope and rusted chains, holds a lone skull at its center, a grim reminder of those who never left.
Also, the jagged ends of the cross beams and the way it leans slightly forward give it a raw, handmade feel, perfect for a haunted graveyard scene.
Materials Needed
- 2 wooden boards (2″×4″, one 4 ft and one 3 ft long)
- 1 plastic or resin skull (life-size)
- Thick black rope (3-4 ft)
- Plastic chains (4-6 ft)
- Wood screws or nails
- Dark wood stain or brown/black outdoor paint
- Hot glue gun with glue sticks
Step-by-step Guide
Step 1: Stain or paint the boards in dark, weathered colors and let dry completely.
Step 2: Attach the shorter board horizontally to the longer board to form a cross shape, using screws or nails.
Step 3: Secure the skull to the center of the cross with hot glue or screws from behind.
Step 4: Wrap the rope tightly around the cross’s center, partially covering the skull base for a bound effect.
Step 5: Drape the chains loosely over the cross, letting them hang for movement in the wind.
#20. Weathered Wooden Cross
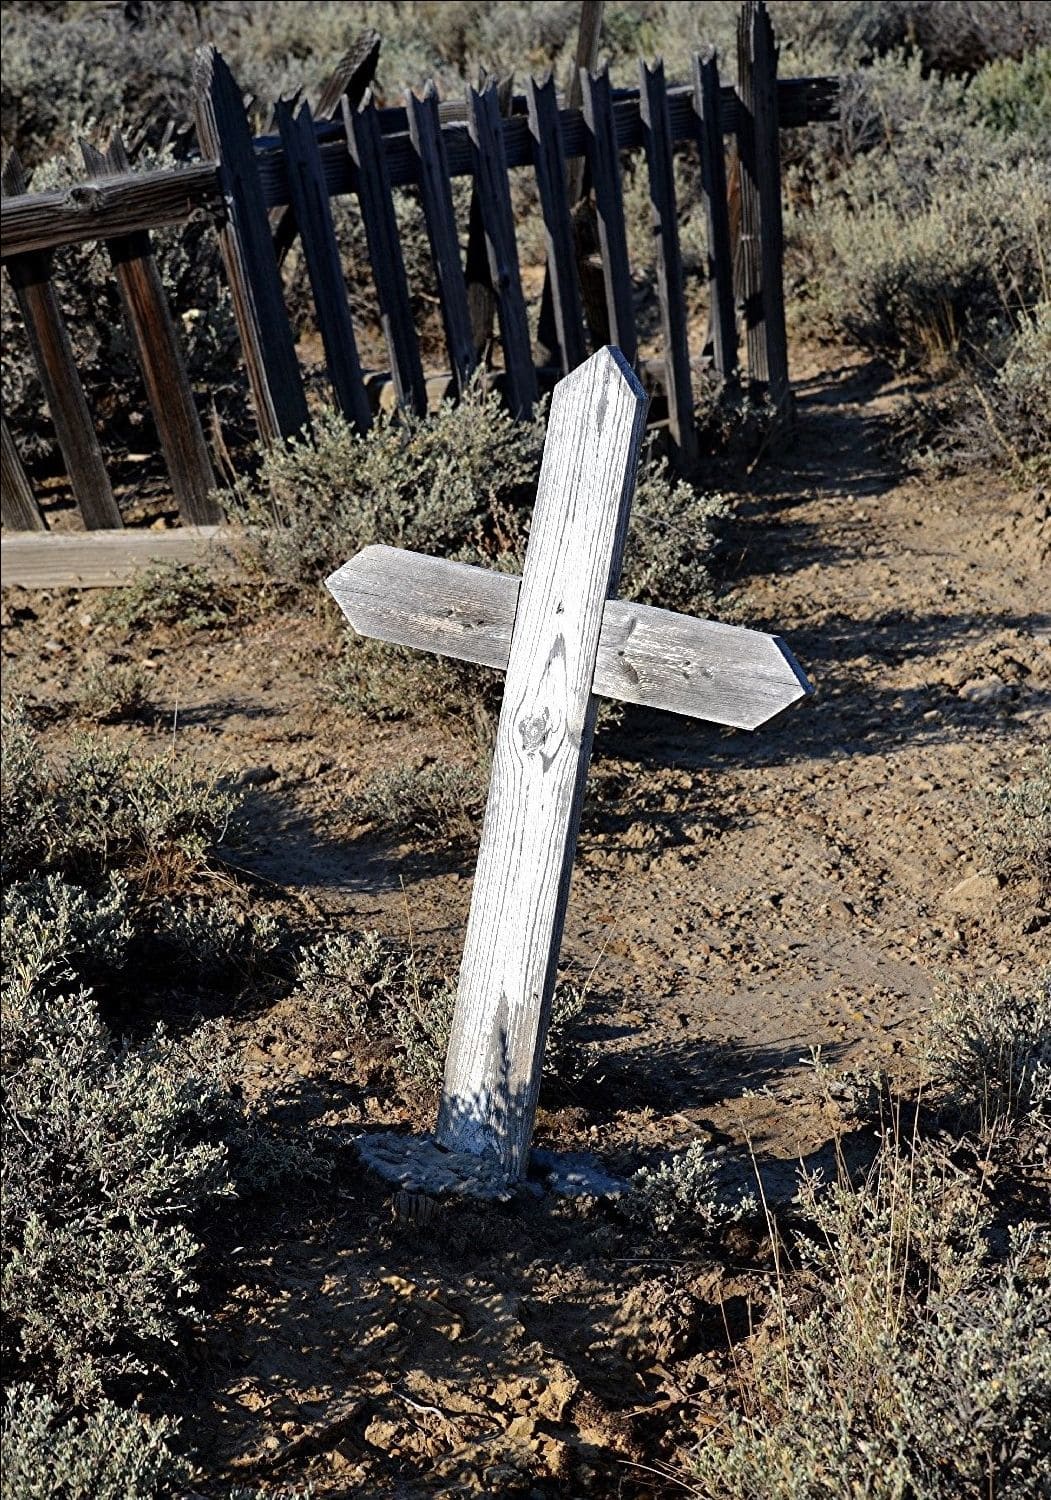
This weathered wooden cross leans slightly forward, as if the years or whatever lies beneath have pulled it toward the earth.
Its sun-bleached surface and splintered edges suggest it has stood here for decades, silently marking a forgotten resting place.
Whether placed among other tombstones or standing alone in a barren spot, it creates an atmosphere that whispers of old ghost stories and restless spirits.
Materials Needed
- 2 wooden planks (1 longer at 4 ft, 1 shorter at 2.5 ft)
- Outdoor wood stain in gray or weathered oak
- Sandpaper
- Wood screws or nails
- Hammer or drill
- Optional: black or white paint
Step-by-step Guide
Step 1: Sand the wood lightly to remove splinters but keep the rough texture intact.
Step 2: Attach the shorter plank horizontally across the longer one to form a cross.
Step 3: Stain the wood with a gray or weathered oak finish, then lightly sand again to give it an aged look.
Step 4: Optionally dry-brush with white or black paint for added distressing.
Step 5: Finally, anchor the cross into the ground at a slight angle for that authentic, timeworn feel.
Read more: 25 Spooktacular Halloween Yard Decor Ideas to Transform Your Outdoor Space
