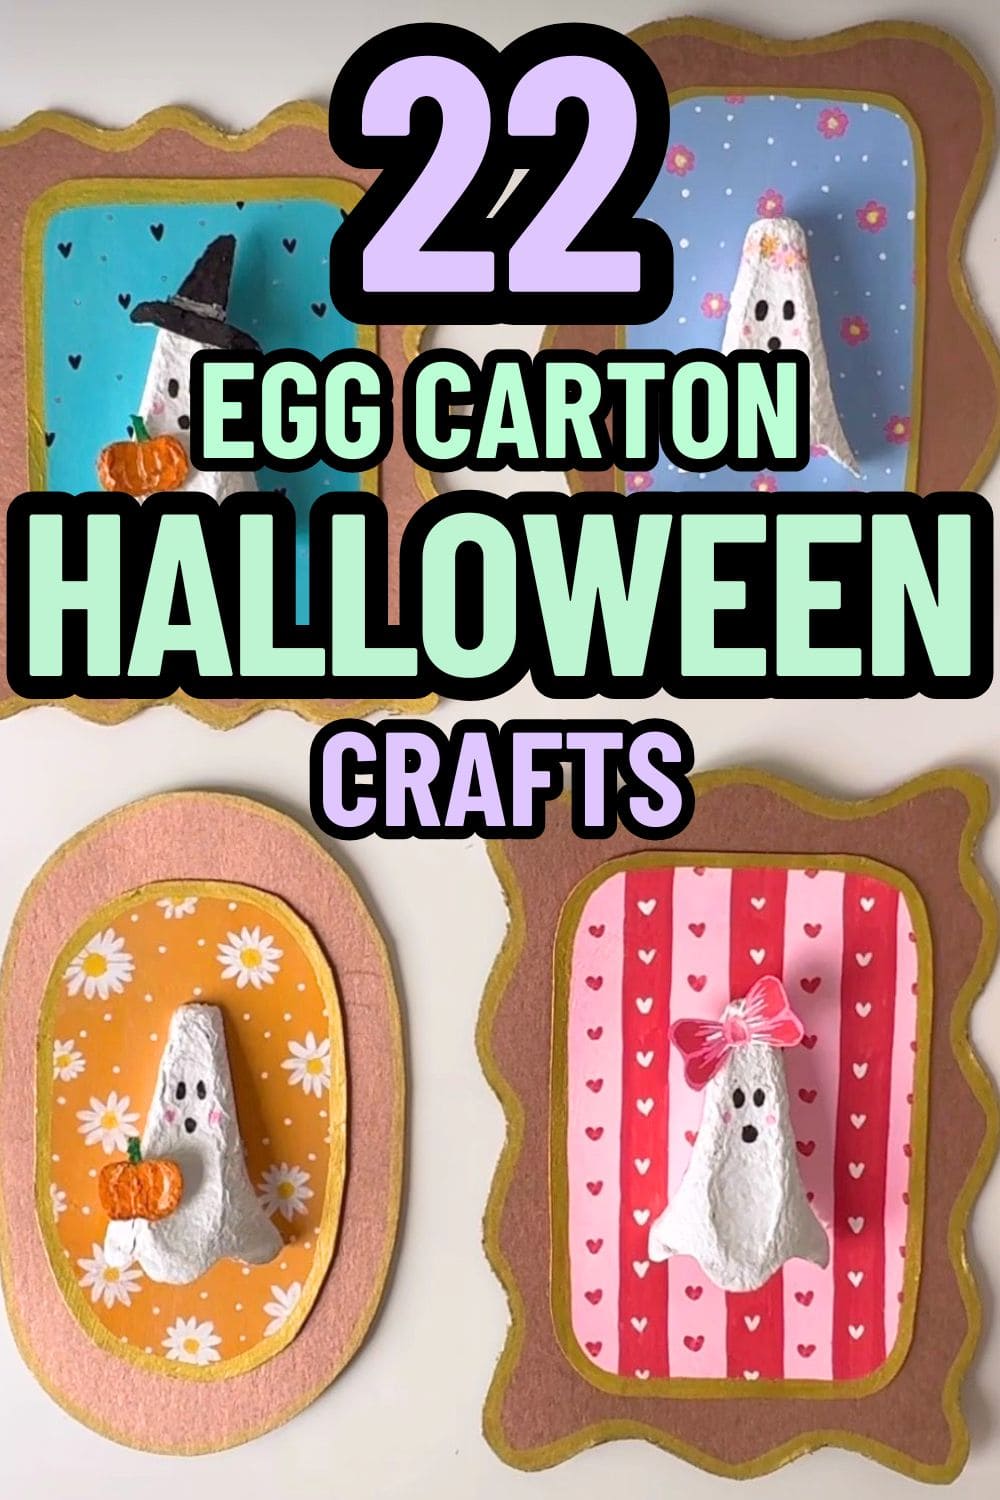
Halloween is the perfect time to turn your recycling bin into a treasure chest of creativity and egg cartons are the ultimate secret weapon.
With just a bit of paint, glue, and imagination, those humble cartons transform into the most delightful ghosts, pumpkins, witches, and monsters you’ve ever seen.
Kids love the hands-on fun, and you’ll love giving new life to something you’d normally toss away. These 22 magical Halloween egg carton crafts are easy, festive, and full of personality.
Whether you’re crafting for the classroom, decorating at home, or planning a party activity, these ideas bring spooky charm and sustainable joy to the season.
See more: 26 Fun and Easy Halloween Craft Ideas for Kids and Family
#1. Egg Carton Witch Hats
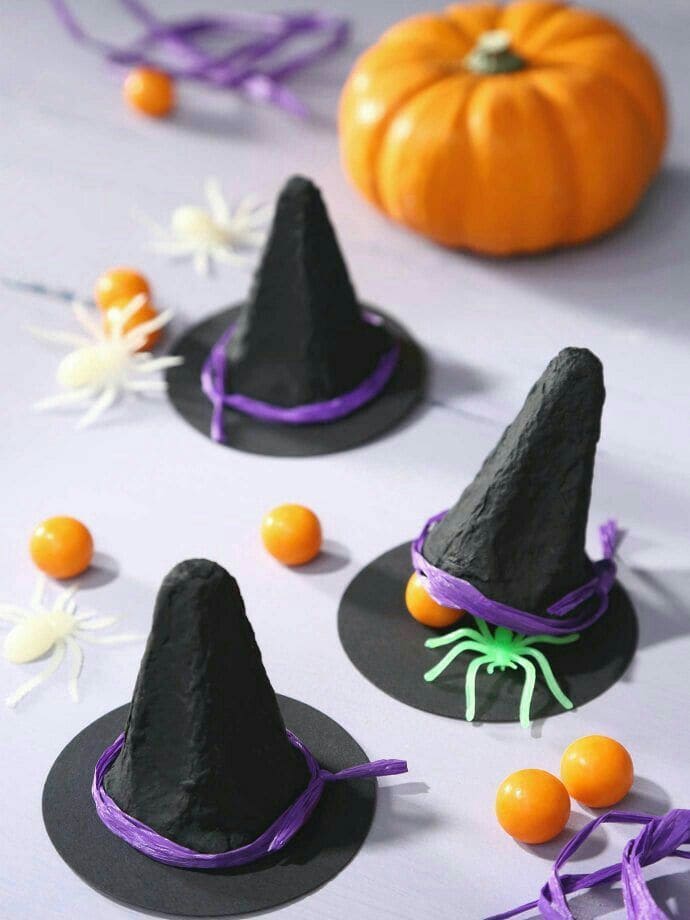
I believe these miniature witch hats are the perfect magical touch for your Halloween table or classroom display.
With just a few snips and some paint, you can transform simple egg carton cones into charming little hats ready for a coven of spooky fun.
Materials Needed
- 1 paper egg carton (for 6-8 hats)
- Black acrylic paint
- Black cardstock (cut into 3″ circles)
- Purple raffia or ribbon (about 12″ per hat)
- Mini plastic spiders or Halloween trinkets (optional)
- Hot glue gun
- Scissors
Step-by-step Guide
Step 1: Start by cutting out the pointed cone sections from your egg carton. You should give them a little trim at the bottom so they sit flat.
Step 2: Paint each cone black. A couple of coats should do it, just make sure to let them dry completely before moving on.
Step 3: Cut out black circles from cardstock to use as the hat brims, and glue the painted cones right in the center of each circle.
Step 4: Tie a piece of purple raffia or ribbon around the base of the cone, like a hatband.
Step 5: If you’re feeling extra festive, glue on a tiny spider or Halloween charm to the brim, it gives the whole thing just the right amount of spooky flair.
#2. Hanging Egg Carton Bats
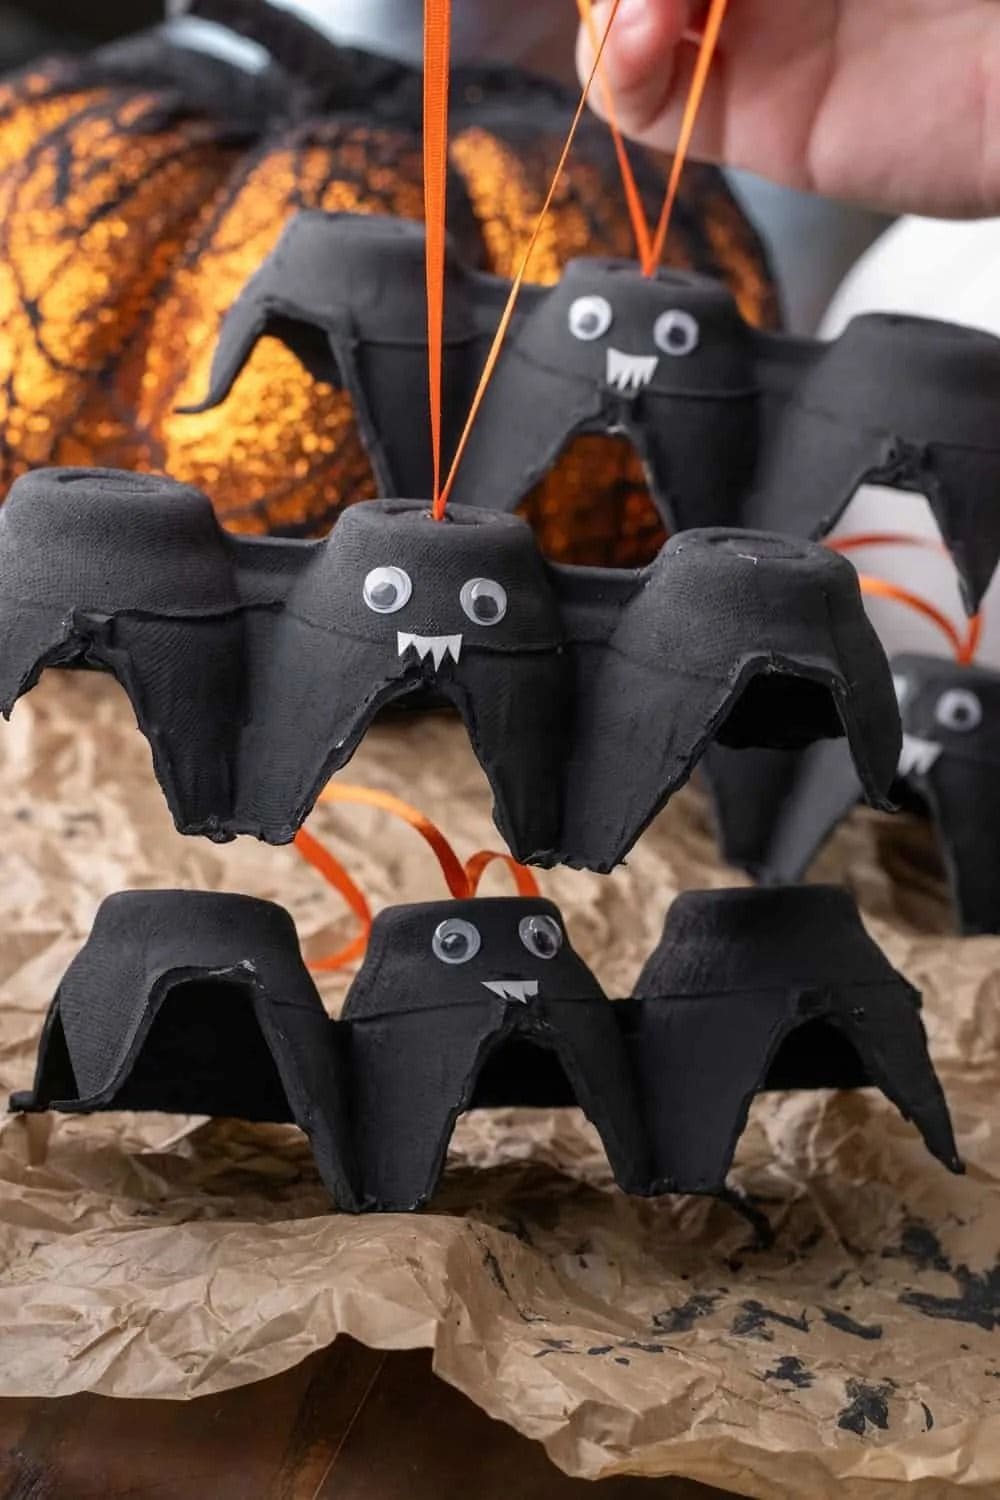
Crafted from the humblest of materials, this project turns egg carton cups into fluttery winged creatures you can hang from ceilings, windows, or even your porch.
Plus, their wide grins and googly eyes make them playful instead of eerie, perfect for younger kids to enjoy.
Materials Needed
- 1 paper egg carton (cut into 3-cup sections)
- Black acrylic paint
- 2 googly eyes per bat
- White paper scraps or sticker sheet
- Hole punch
- Orange or black ribbon (10-12″ per bat)
- Craft glue or hot glue
- Scissors
Step-by-step Guide
Step 1: Cut out three connected cups from your egg carton. These will form the bat’s body and wings. Then trim the outer cups slightly to create a curved wing look.
Step 2: Paint the entire piece black, making sure to get into all the creases. Now you set them aside to dry completely.
Step 3: Glue two googly eyes on the middle cup, this is the bat’s face! Then snip tiny triangles from white paper and stick them on just below the eyes for sharp little fangs.
Step 4: Punch a small hole in the top of the center cup, thread your ribbon through, and tie a loop so the bat can hang upside down just like a real one.
Step 5: Once everything is dry and secure, hang your bats around the house and let them fly!
#3. 3D Witch Portrait With Egg Carton Face
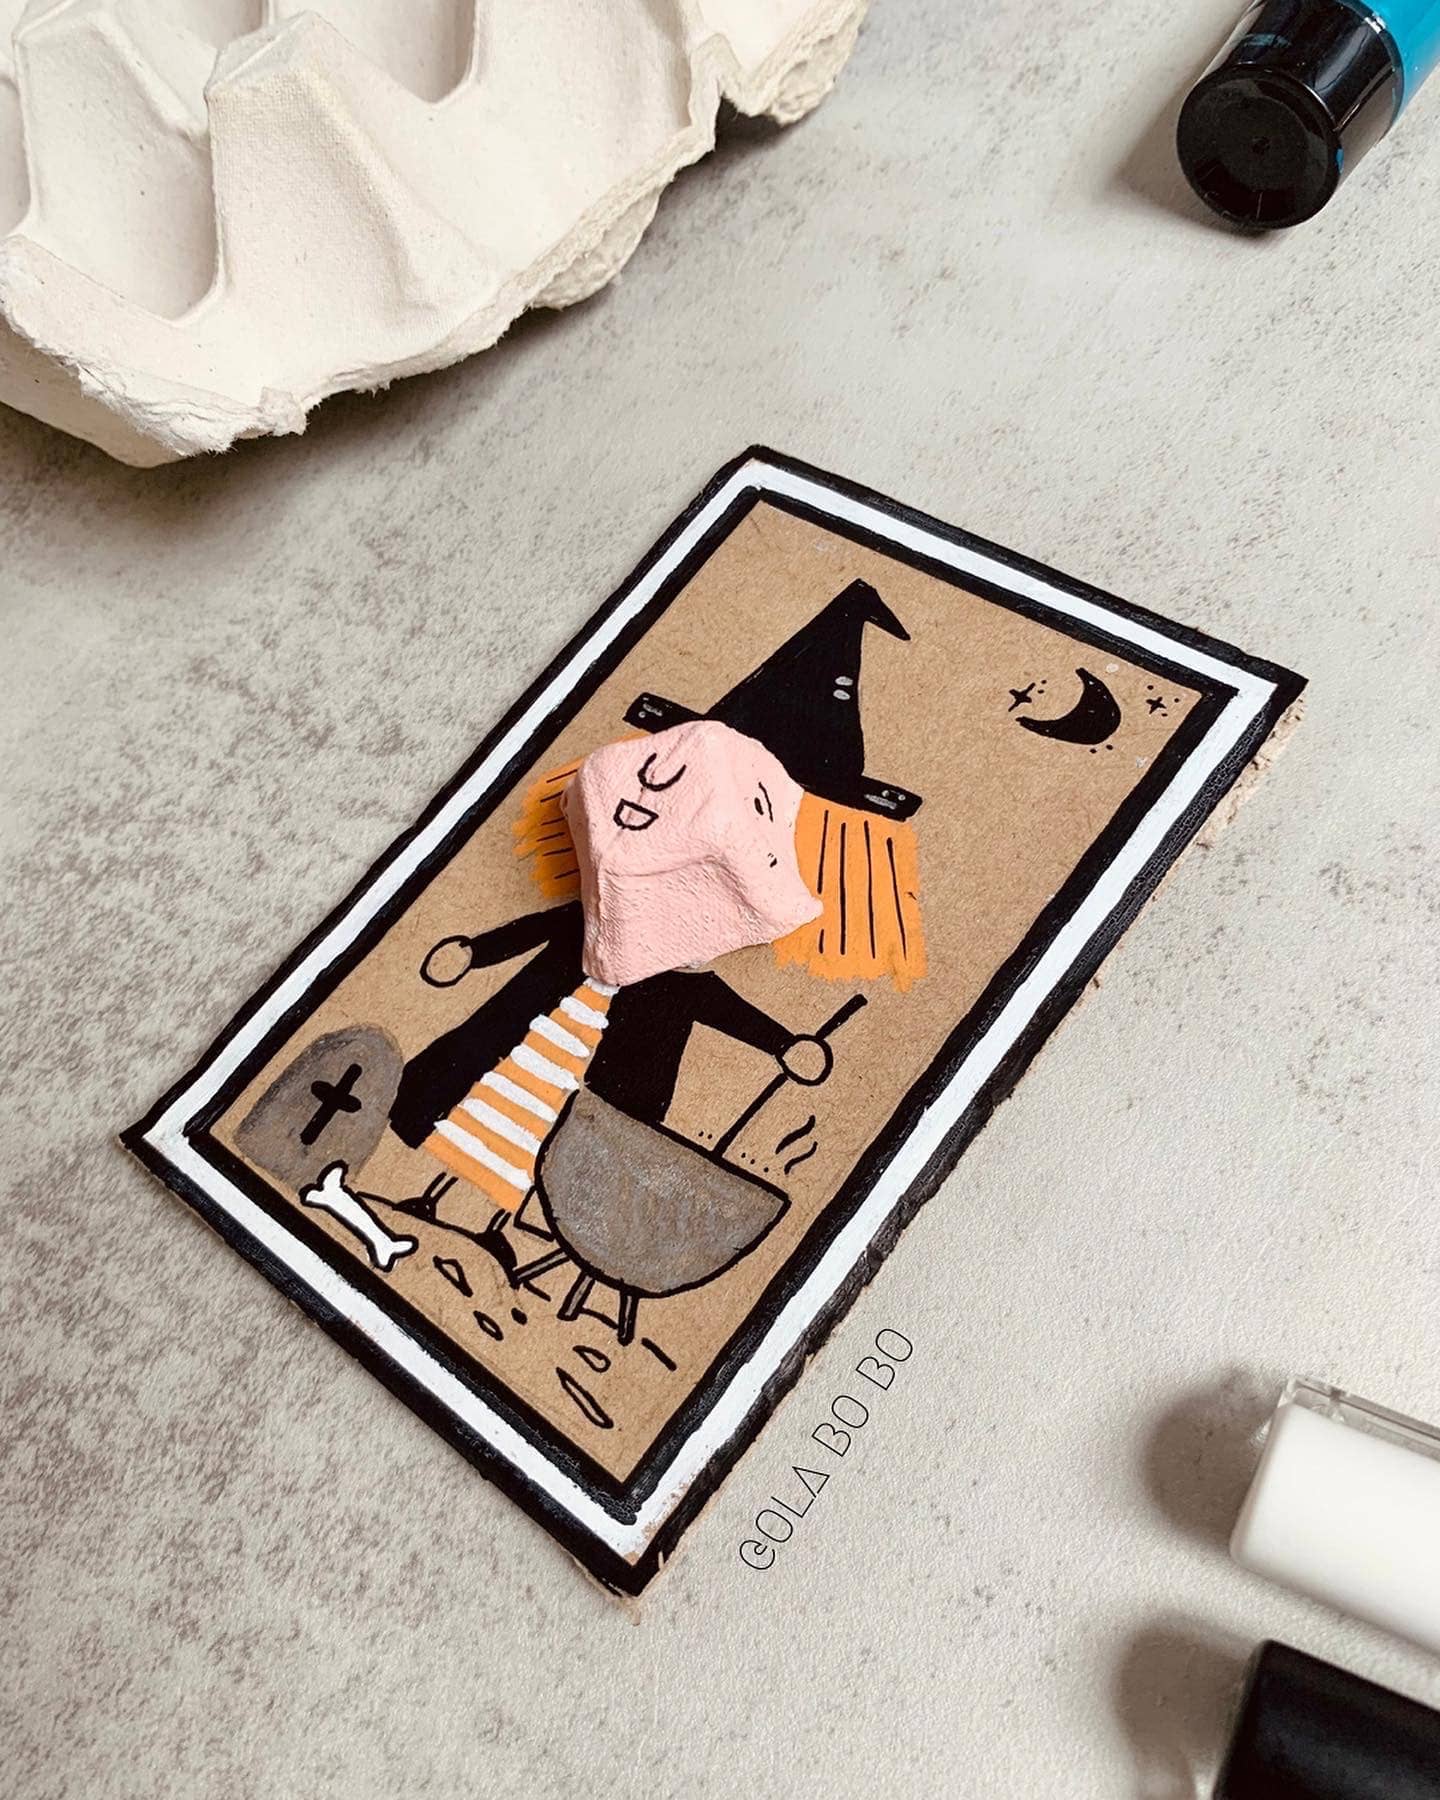
There’s something oddly delightful about this quirky witch portrait. Instead of drawing the whole face flat, you give her a real nose using an egg carton cup and that’s where the magic happens.
This craft turns a simple cardboard background into a spooky-sweet Halloween artwork with character and charm.
Your kids will love painting the witch’s crooked smile, striped outfit, and bubbling cauldron, while adults can appreciate the playful blend of 2D and 3D.
Materials Needed
- 1 egg carton cup
- Small piece of cardboard (approx. 4″x6″)
- Acrylic paints (black, orange, pink, white, gray)
- Paintbrushes (thin tip for detail)
- Glue
- Black marker
- Scissors or craft knife
Step-by-step Guide
Step 1: Trim one egg carton cup and smooth out the edges. This will become the witch’s 3D face.
Step 2: Paint the cup a skin tone of your choice, then set it aside to dry while you work on the background.
Step 3: On your piece of cardboard, sketch the witch’s body, hat, cauldron, and fun details like a striped dress or flying bats. Then paint it in bold Halloween colors and let it dry.
Step 4: Once dry, glue the egg carton piece right over where her face would be. You also add her eyes, smile, and freckles using a paintbrush or marker.
Step 5: Finally, outline everything with a fine black marker to give it that crisp, cartoonish look.
#4. Egg Carton Witch Puppet
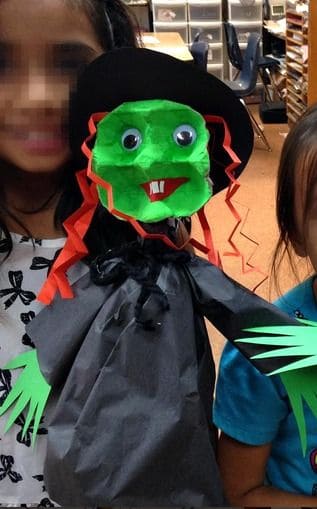
This witch puppet is bursting with character from her glowing green face to her curly paper hair and flowing gown.
At the heart of this craft is an egg carton cup, transformed into a wickedly fun head with big googly eyes, a pointy hat, and even paper fangs.
Plus, kids can design their own version and then put on a Halloween puppet show.
Materials Needed
- 1 egg carton cup
- Green acrylic paint
- 2 large googly eyes
- Black construction paper
- Red and orange paper
- Glue stick or craft glue
- Scissors
- Popsicle stick or pencil
Step-by-step Guide
Step 1: Paint the egg carton cup green and let it dry, then add red lips or paper fangs if you want to go full Halloween!
Step 2: Glue on two googly eyes and cut long strips of red or orange paper for hair. You now curl them using scissors and glue to the sides of the head.
Step 3: Cut out a cone hat and circular brim from black paper and attach it to the top of the head.
Step 4: Use black tissue or construction paper to form the witch’s dress. Then wrap and glue it to a popsicle stick so the puppet is easy to hold.
Step 5: Glue green paper hands to the arms if you’d like extra detail, now she’s ready for spell-casting and storytelling!
#5. Egg Carton Jack-O-Lantern Treat Cups
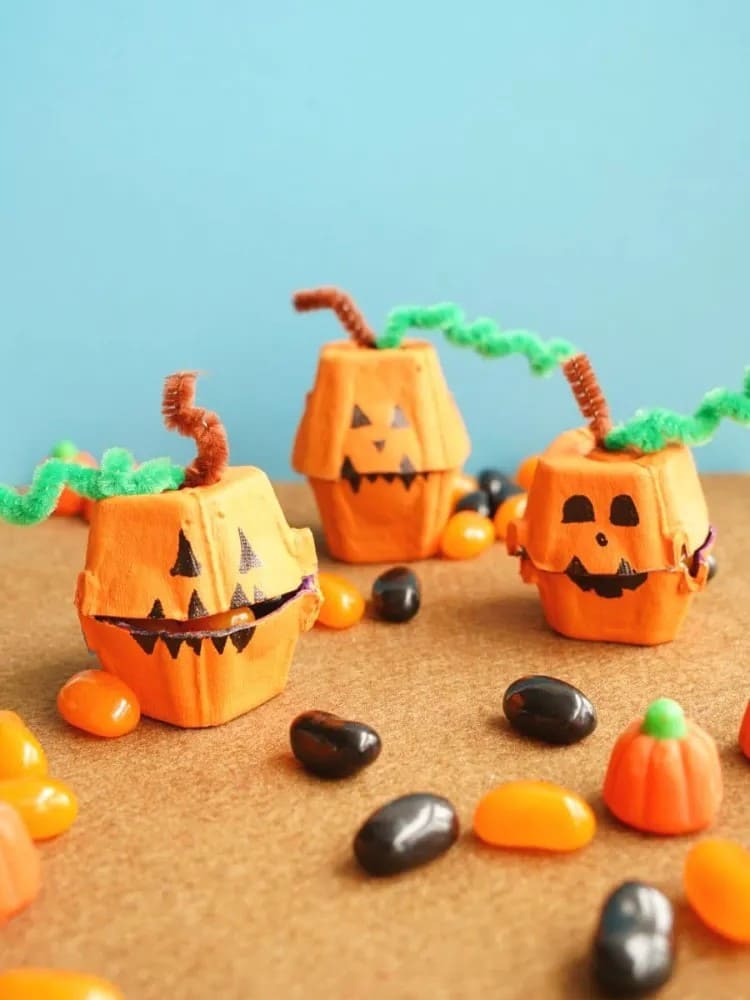
Painted bright orange and decorated with goofy or spooky faces, these cheerful little pumpkins are a perfect Halloween craft for kids.
But here’s the twist, they open like tiny treat boxes, ready to hide a candy surprise inside. A twisty green pipe cleaner makes the vine, while the stem pops up with just enough character to make each pumpkin feel unique.
Materials Needed
- 2 egg carton cups per pumpkin
- Orange acrylic paint
- Black marker
- Green and brown pipe cleaners
- Glue (hot glue or tacky craft glue)
- Scissors
- Optional: small candies
Step-by-step Guide
Step 1: Cut out two matching egg carton cups for each pumpkin and trim them so they fit together like a mini clamshell.
Step 2: Paint both cups orange inside and out, then let them dry completely.
Step 3: Draw fun jack-o’-lantern faces using a black marker, each pumpkin can have its own personality!
Step 4: Glue a short brown pipe cleaner to the top as a stem, and twist a green one around it to mimic a curly vine.
Step 5: Pop a piece of candy inside if you like, then gently glue or tie the cups together to hold the surprise.
Tip: You can add names with a tag to turn them into spooky-sweet place cards for Halloween dinner!
#6. Framed Fancy Ghost Portraits
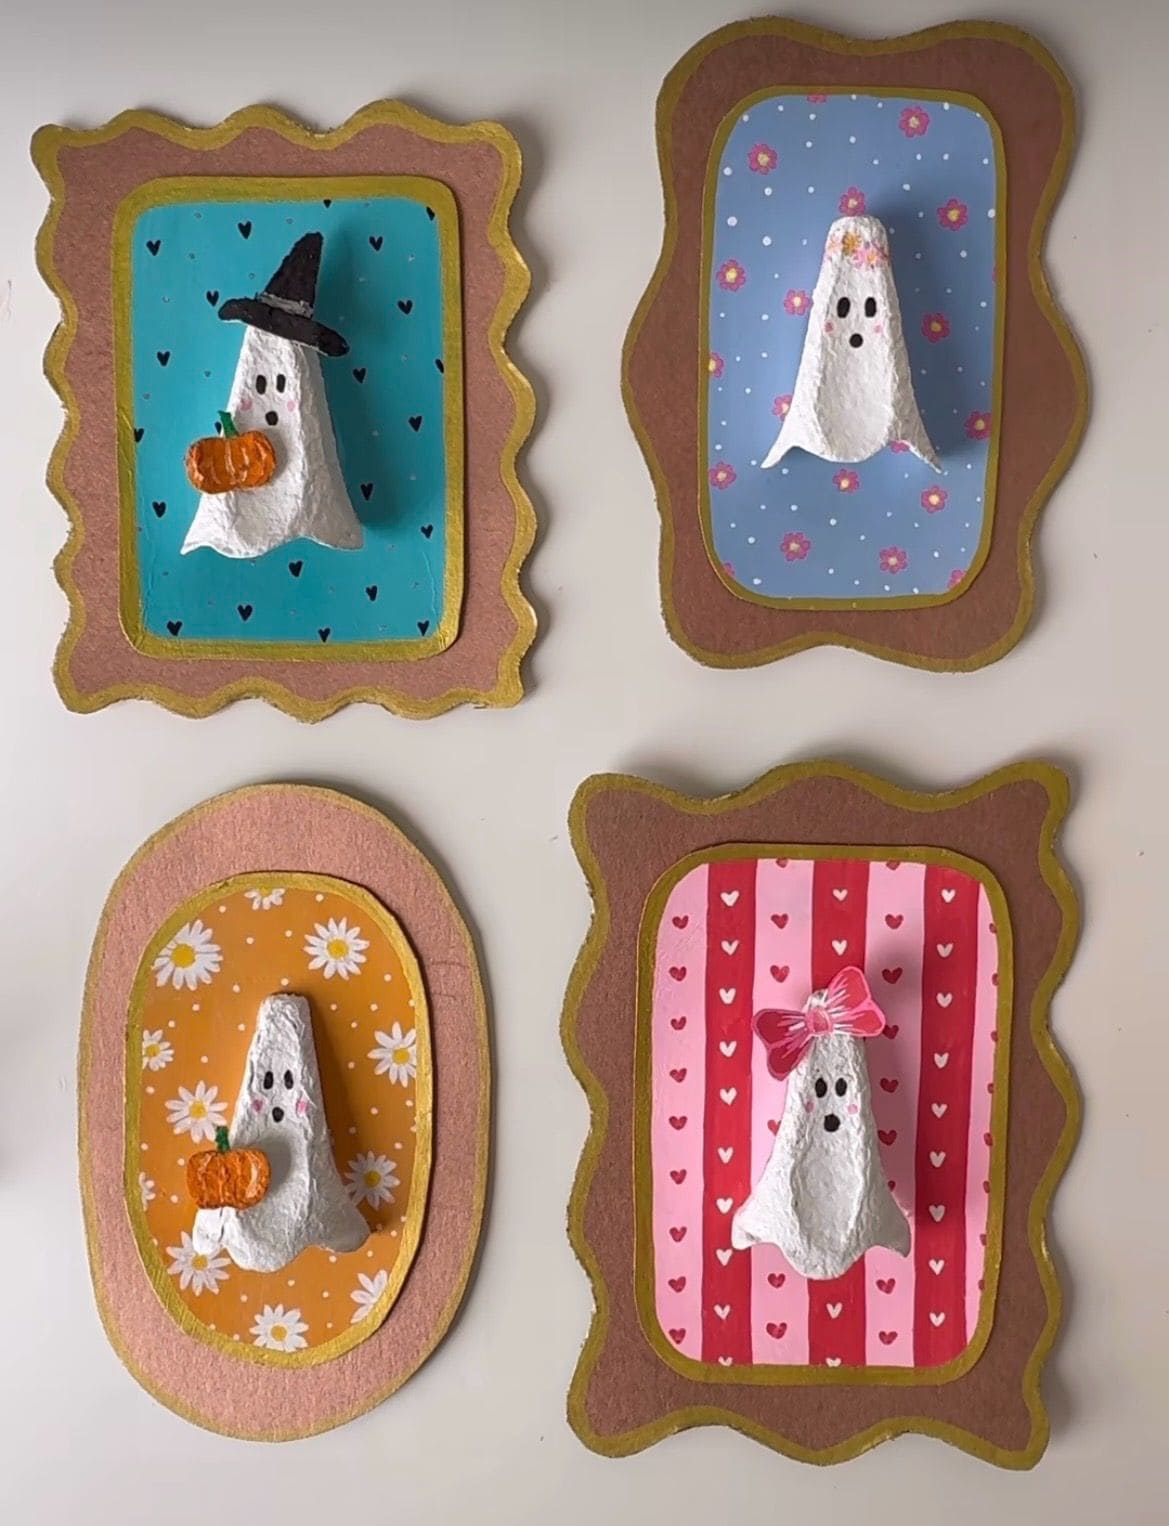
You can see each ghost is made from an egg carton cone and dressed up with tiny accessories like hats, bows, pumpkins, and flowers then mounted inside whimsically cut frames with patterned paper backdrops.
Bonus, this project blends crafting with storytelling, letting kids imagine their ghost’s name, personality, and favorite Halloween activity!
Materials Needed
- Egg carton cones (1 per ghost)
- White acrylic paint
- Scrapbook
- Cardboard
- Markers
- Mini decorations (bows, hats, tiny pumpkins, etc.)
- Glue stick or craft glue
- Scissors
Step-by-step Guide
Step 1: Cut and shape each egg carton cone to resemble a little ghost, then paint them white and let dry fully.
Step 2: Use a fine brush or marker to draw on eyes, mouth, and rosy cheeks. You now add mini accessories like bows, witch hats, or paper pumpkins to personalize each ghost.
Step 3: Cut whimsical frames from cardboard or construction paper. Then paint the edges gold or black for an antique look.
Step 4: Glue scrapbook paper in the center of each frame, then attach your finished ghost to the middle of the portrait.
Step 5: Finally, hang them gallery-style on a wall or display them on a Halloween mantel.
See more: 24 Adorably Spooky Halloween Ghost Crafts to Try This Season
#7. Flower-Crowned Egg Carton Ghosts
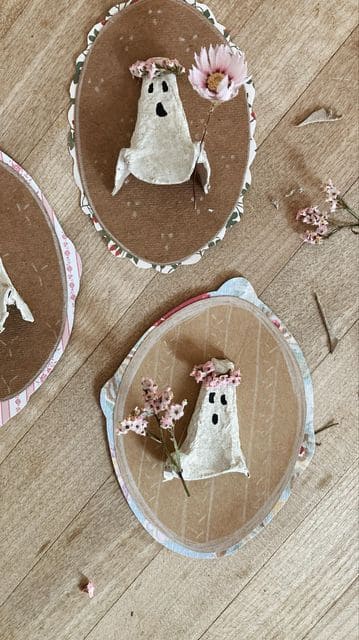
With tiny flower crowns and soft pastel backings, these dreamy little ghosts feel like Halloween’s gentler spirits, here to haunt you with kindness.
Specially, they’re perfect for a kids’ craft afternoon, but honestly, they’d look lovely as part of grown-up fall decor too.
Materials Needed
- Egg carton cups
- White acrylic paint
- Black marker or paint
- Cardboard or thick scrapbook paper
- Dried flowers or mini faux blooms
- Craft glue
- Scissors
Step-by-step Guide
Step 1: Trim egg carton pieces into soft ghost shapes with arms slightly flared. Then you paint them white and let dry fully.
Step 2: Use black paint or a marker to draw small oval eyes and a rounded mouth.
Step 3: Add a tiny crown of dried or faux flowers above each ghost’s head using a dot of glue for each bloom.
Step 4: Cut oval backings from cardboard or layered scrapbook paper, then glue your ghost to the center of the plaque.
Step 5: For a finishing touch, glue an extra flower sprig to the side of the plaque, it ties the whole look together beautifully.
#8. Creepy-Cute Egg Carton Spider or Ant
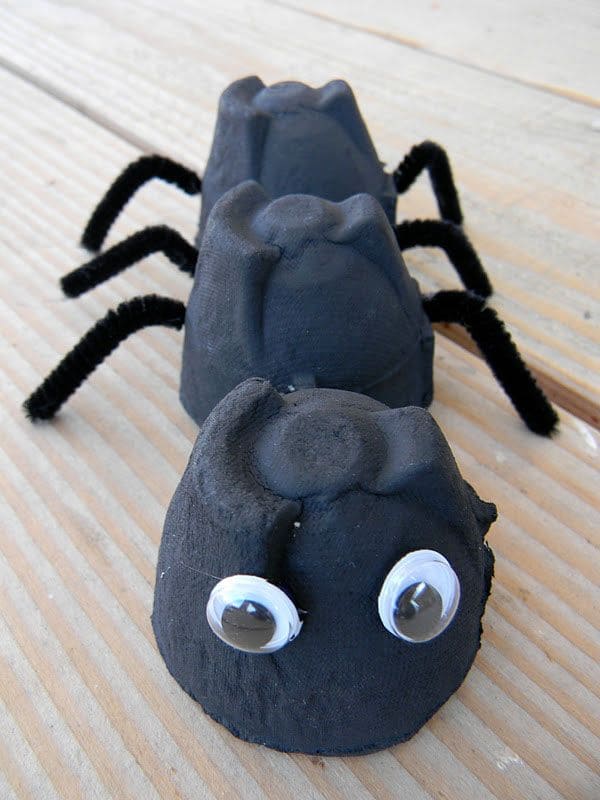
Made by connecting three egg carton cups, this little critter is a simple build that lets kids get hands-on with painting, glueing, and bending pipe cleaner legs.
Those big googly eyes give it loads of personality, and once it’s done, it looks great crawling across a bookshelf, windowsill, or Halloween centerpiece.
Materials Needed
- 3 egg carton cups (connected or glued together)
- Black acrylic paint
- 6 black pipe cleaners
- 2 googly eyes
- Hot glue gun
- Scissors
- Small paintbrush
Step-by-step Guide
Step 1: Cut three connected egg carton cups or glue three individual ones together in a row. This will form the bug’s segmented body.
Step 2: Paint the entire body black and let it dry fully. You should make sure to get in all the little crevices for a nice, even look.
Step 3: Glue two googly eyes to the front cup. Let them sit slightly wide for extra cuteness or closer together for a goofier look.
Step 4: Cut the pipe cleaners in half and poke or glue three legs on each side.
Step 5: Let your spider or ant dry completely, then display it on a table or shelf or have it sneak into someone’s lunchbox for a Halloween surprise!
#9. Colorful Egg Carton Monster Finger Puppets
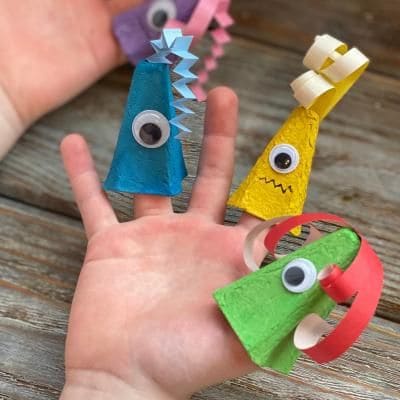
Let your imagination run wild with these silly little monster finger puppets. They’re quirky, colorful, and absolutely kid-approved.
Furthermore, this is one of those crafts that invites giggles and storytelling.
Once the monsters are made, they’re perfect for puppet shows, party favors, or just hours of imaginative play. And yes, they’re as fun to make as they are to wear!
Materials Needed
- Egg carton cups (cut into cone shapes)
- Acrylic paint in various colors
- Googly eyes
- Construction paper
- Glue stick
- Scissors
- Black marker
Step-by-step Guide
Step 1: Trim down each egg carton cone so it fits snugly over a child’s finger. You should try them on to check the size, it should sit securely but not tight.
Step 2: Paint each cone in a different bright color. Let the paint dry completely before adding details.
Step 3: Cut curly strips, zigzag tongues, or spiky hair from construction paper and glue them to the tops and sides to give each monster a personality.
Step 4: Add one or two googly eyes, then draw a fun face, teeth, or even little scars using a black marker.
Step 5: Slip them onto your fingers and bring your goofy monster squad to life!
#10. Spooky Eyeball Flower Stems
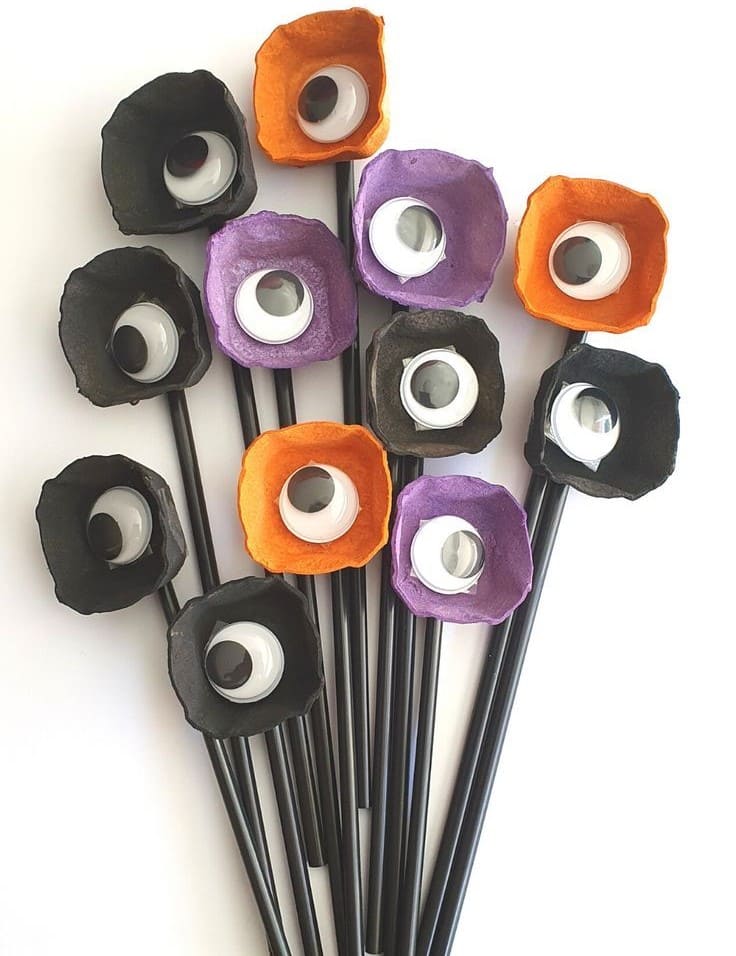
These Halloween flowers are anything but sweet! Made from painted egg carton cups and oversized googly eyes, they bloom with spooky style.
Planted on black straws or sticks, each flower becomes a creepy eye staring right back at you. They’re easy to assemble, perfect for classroom crafts or party table centerpieces.
Materials Needed
- Egg carton cups (1 per flower)
- Acrylic paint (black, purple, orange)
- Large googly eyes
- Black paper straws
- Hot glue
- Paintbrush
- Scissors
Step-by-step Guide
Step 1: Cut out individual egg carton cups and trim them into neat flower-like shapes. Then paint them in Halloween colors and set aside to dry.
Step 2: Glue a large googly eye inside the center of each painted cup, it becomes the pupil of your spooky flower.
Step 3: Once everything is dry, glue a black straw or stick to the back or bottom of the cup to form a flower stem.
Step 4: Arrange your eyeball flowers in a jar or vase for a bouquet that watches everyone in the room!
#11. Hanging Egg Carton Bats and Ghosts
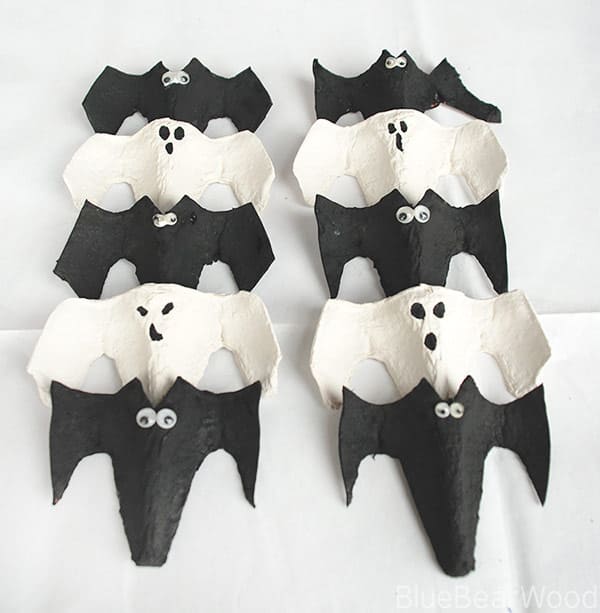
With just black and white paint and a few snips, you can turn your egg cartons into a colony of Halloween bats and floating ghosts!
This project is fast, fun, and perfect for hanging across mantels, doorways, or classroom bulletin boards.
Materials Needed
- Egg carton sections (cut into 3 connected cups)
- Black and white acrylic paint
- Googly eyes or black marker
- Paintbrush
- Scissors
- String and tape (optional)
Step-by-step Guide
Step 1: Cut your egg carton into strips of three connected cups. Then trim the outer edges into wing or draped ghost shapes depending on your design.
Step 2: Paint half the strips black (for bats) and the others white (for ghosts).
Step 3: Add googly eyes to each bat or ghost, or draw on eyes and spooky expressions with a black marker.
Step 4: Tape or glue a piece of string to the back of each one so they can be hung from ceilings, windows, or garlands.
Step 5: Now, you just arrange them in alternating colors to create a fun flying effect wherever you display them.
#12. Goofy Egg Carton Monster Chompers
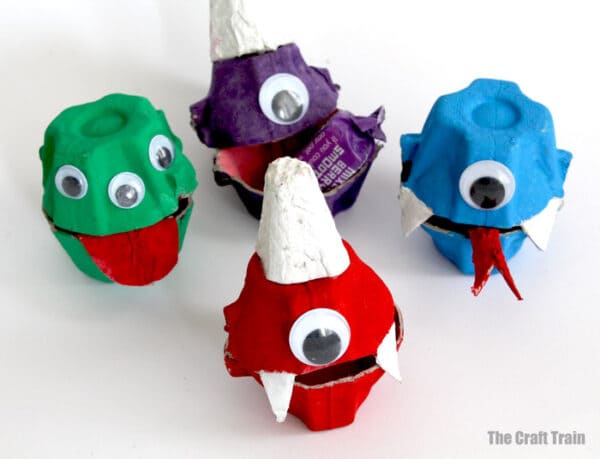
These colorful egg carton monsters are pure Halloween hilarity.
With giant mouths, googly eyes, and quirky paper tongues or fangs, they look like they’re about to gobble up the nearest piece of candy.
Plus, each one is made by stacking and painting two egg carton cups, making it a fantastic craft for younger kids who love silly faces and bright colors.
Materials Needed
- 2 egg carton cups per monster
- Acrylic paint in fun colors (green, red, purple, blue, etc.)
- Googly eyes (1 or 2 per monster)
- Red and white paper
- Glue stick
- Scissors
Step-by-step Guide
Step 1: Cut and trim two egg carton cups for each monster so they nest together like a hinged mouth. Then paint both inside and out, then let them dry.
Step 2: Cut small triangles from white paper for teeth, and a long strip of red paper for a tongue. You now curl the tongue for extra silliness.
Step 3: Glue the teeth and tongue inside one cup. Then glue the two cups together at the back edge so they open slightly like a chomping mouth.
Step 4: Add one or two googly eyes on top like crooked, stacked, or wide apart to give each monster its own goofy personality.
#13. Neon Egg Carton Monster Masks
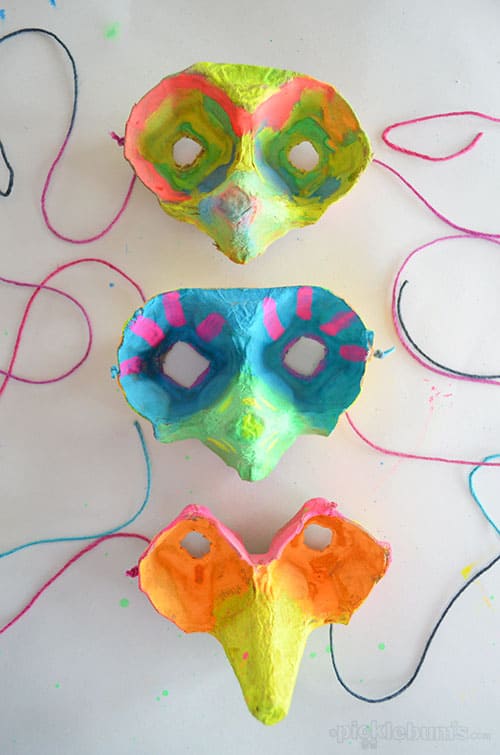
If you’re ready to trade spooky for spectacular, these neon monster masks are pure Halloween fun!
Using the base of the egg carton, you can cut and shape wildly expressive faces that look like glowing creatures from a candy-colored underworld.
Moreover, add string and you’ve got wearable masks for dress-up, puppet shows, or Halloween play. They’re mess-friendly and bursting with personality.
Materials Needed
- 1 egg carton (for 2-3 masks)
- Neon acrylic paints (blue, pink, green, orange, yellow)
- Paintbrushes and sponges
- Yarn or elastic string
- Hole punch
- Scissors or craft knife (adults only)
Step-by-step Guide
Step 1: Cut out the pointed nose section from the middle of the egg carton base, this gives your mask a great nose and cheek shape. Carefully cut eye holes as well.
Step 2: Paint your mask in vibrant, high-contrast colors. Neon paint makes them pop under UV light too!
Step 3: Add patterns like stripes, swirls, or dots. Then let each mask be as wild or simple as your imagination allows.
Step 4: Once dry, punch a hole on each side and tie on yarn or elastic so it can be worn as a mask.
#14. Glittery Egg Carton Witch Face With Yarn Hair
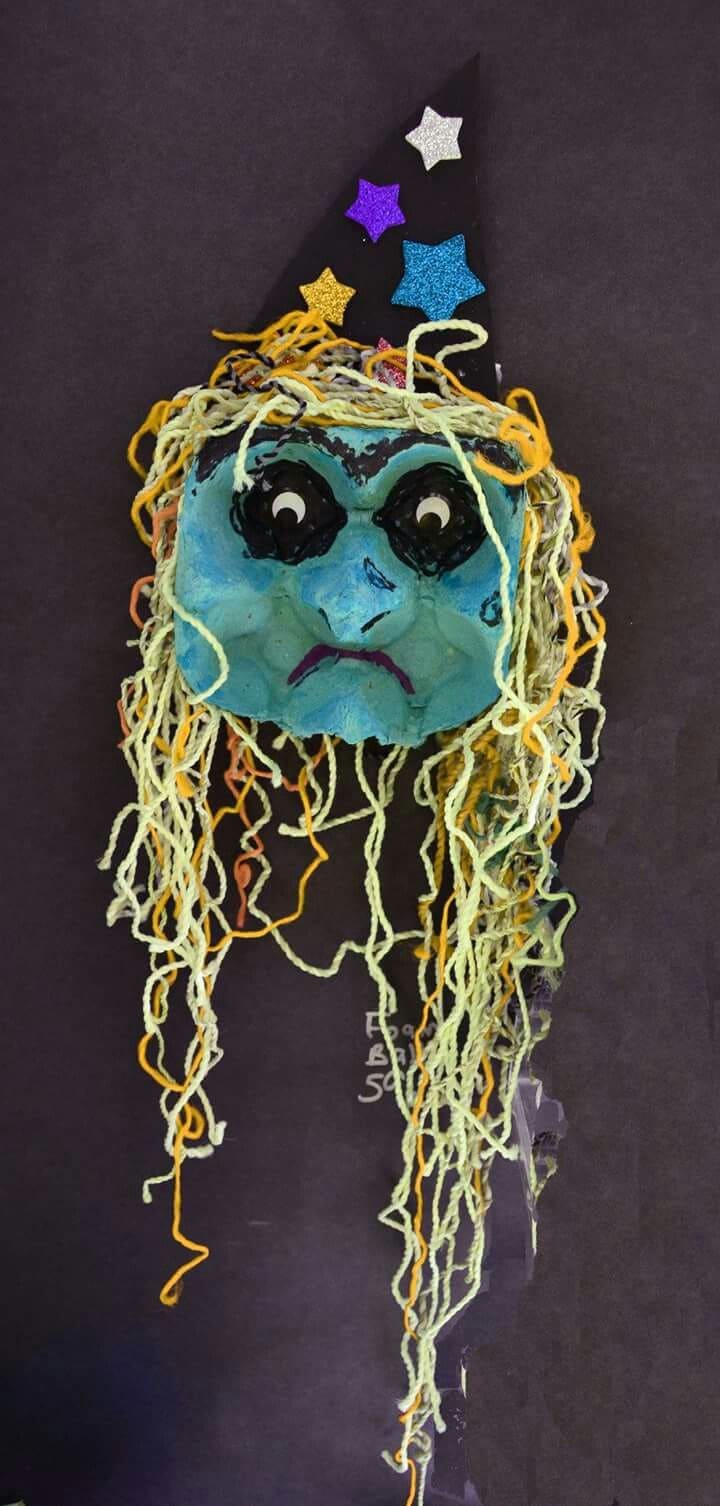
With tangled yarn hair, glittery stars, and a moody expression, this witch has serious Halloween attitude.
Her face is sculpted from a painted egg carton, complete with sunken cheeks and shadowy eyes, giving her a theatrical look that’s perfect for wall displays or classroom doors.
Kids can go all out with color, texture, and personality, whether they want a grumpy spell-caster or a sparkly enchantress.
Materials Needed
- 1 egg carton section (4 connected cups for the face)
- Blue or green acrylic paint
- Googly eyes
- Black construction paper
- Glittery star stickers
- Yarn (multiple colors)
- Craft glue or hot glue
- Scissors
- Black marker or paint
Step-by-step Guide
Step 1: Cut out a three-cup section of your egg carton. This curved shape gives your witch a defined forehead, cheeks, and chin. Then paint it a bold witchy color and let dry.
Step 2: Glue on googly eyes, then add black circles around them for that classic sunken, spooky look. Next, use a marker to draw on a crooked nose and dramatic mouth.
Step 3: Cut long pieces of yarn in various shades. Now, glue them all around the top edge of the carton to create wild, witchy hair that flows and curls.
Step 4: Make a tall triangle hat out of black paper. You can decorate it with glittery stars, sequins, or stickers, then attach it above the face like a crown.
Step 5: Hang your finished witch on a dark background to let her wild colors and textures shine!
#15. Wild and Wacky Egg Carton Monster Mask
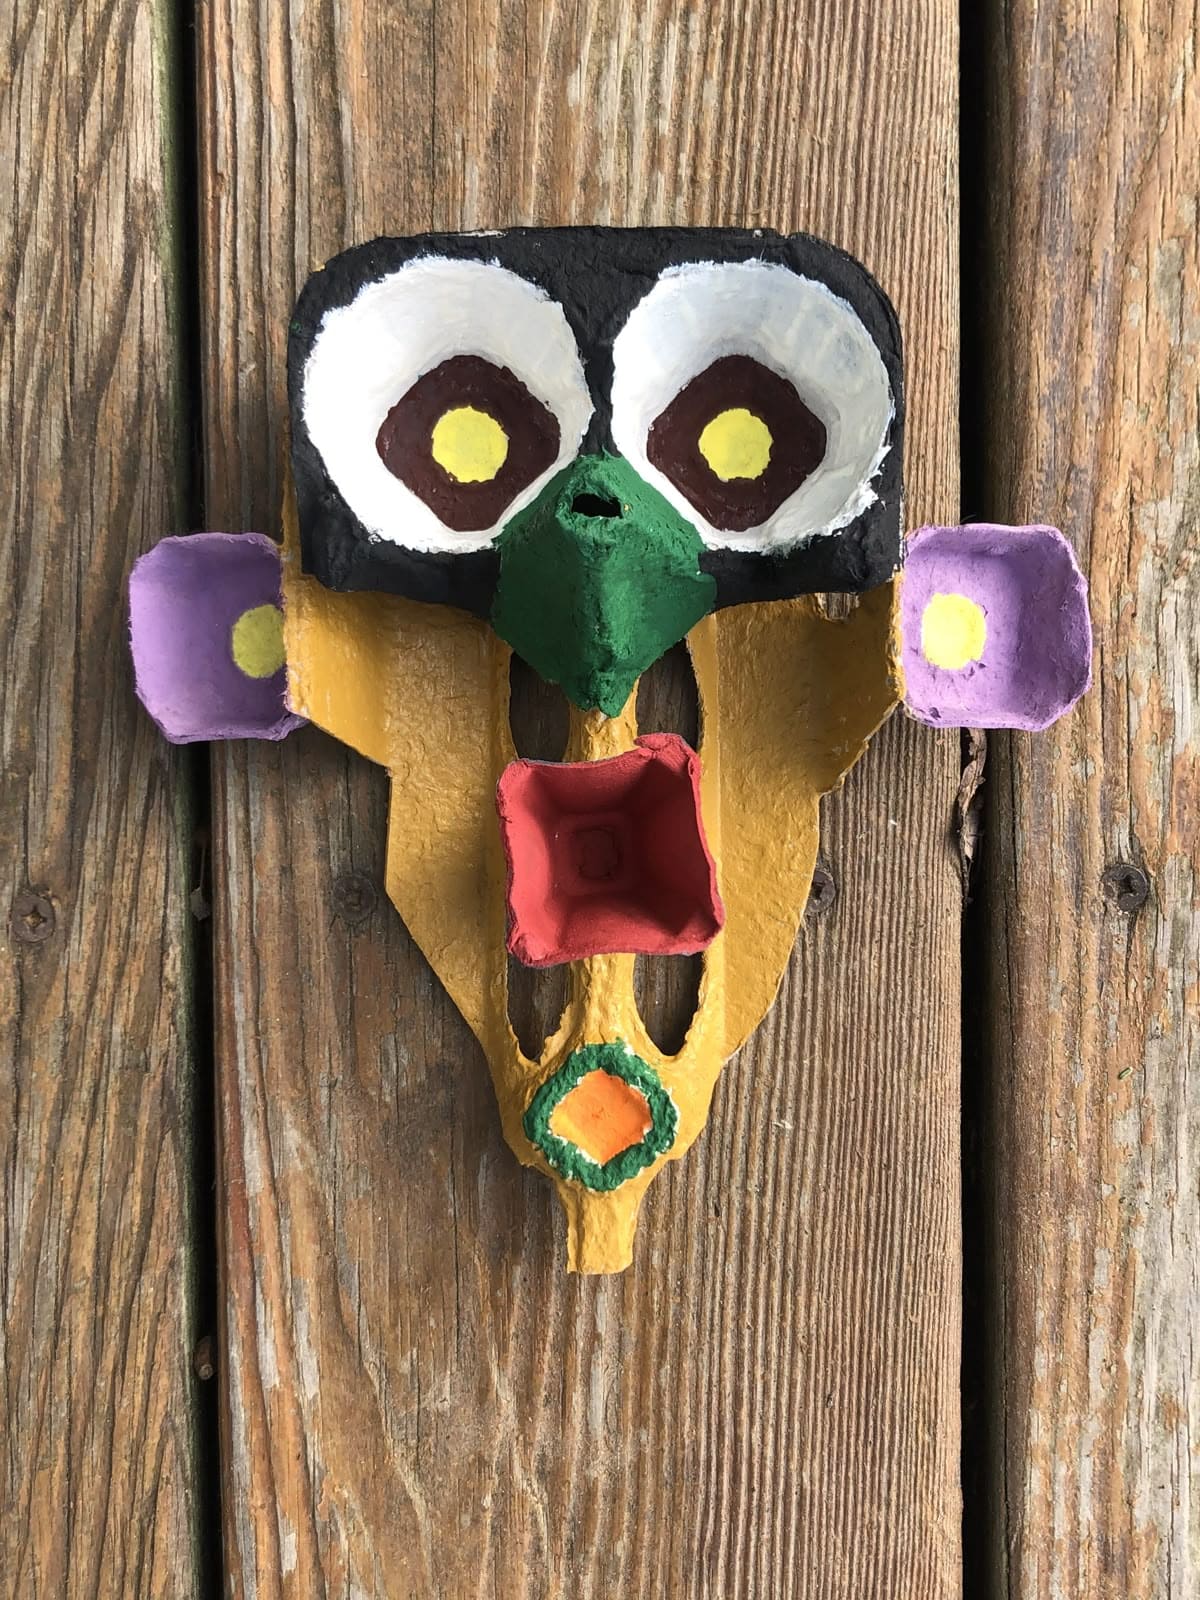
If Halloween had its own jungle spirit guide, this would be it. This playful egg carton mask channels tribal energy with wide, staring eyes, a bold color palette, and exaggerated shapes.
Bonus, this craft lets you think like a sculptor and paint like a wild child.
Materials Needed
- Several egg carton pieces (cups, dividers, and flaps)
- Acrylic paint in assorted bright colors
- Hot glue gun
- Paintbrushes (detail + large)
- Scissors
- Cardboard or wood base (optional)
Step-by-step Guide
Step 1: Gather different parts from your egg cartons like rounded cups for eyes, flaps for the nose, and sections of the tray for the face and mouth.
Step 2: Once you like the layout, start painting each piece in vibrant colors. Bold contrasts like black and white for eyes or red for the mouth make the face pop.
Step 3: Let the painted pieces dry fully, then glue everything together. Start from the center (nose or mouth) and build outward with eyes, ears, and decorative shapes.
Step 4: If you want your monster mask to hang on a wall, glue it onto a sturdy backing like cardboard or wood. Now you add a string to the back if needed.
#16. Halloween Candy Tray Made from an Egg Carton
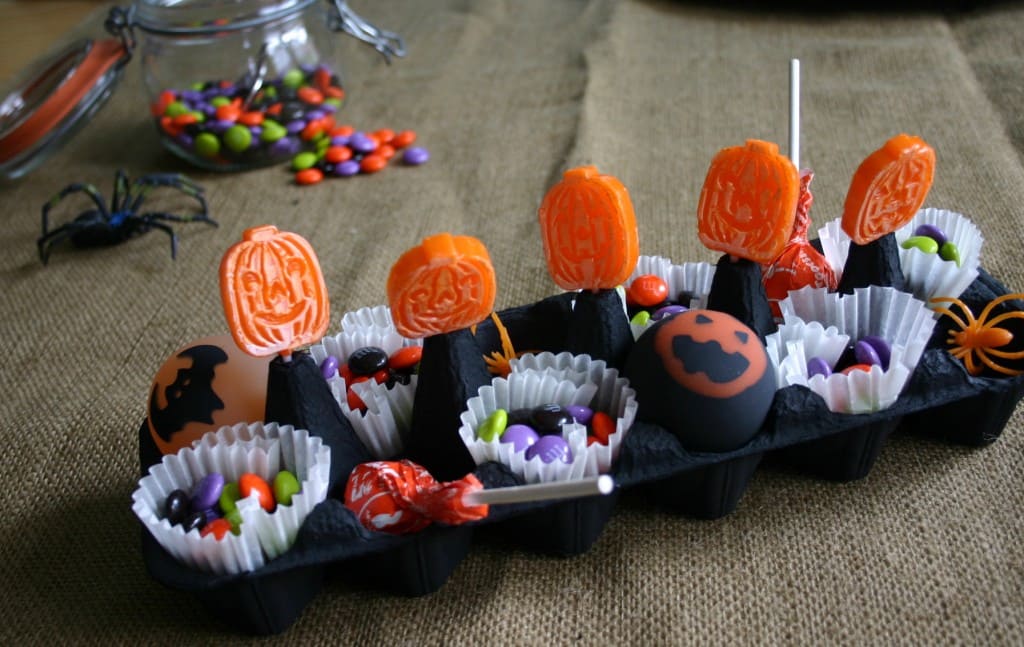
Looking for a fun way to serve Halloween treats? This DIY candy tray made from a painted egg carton is perfect for parties, classrooms, or even your doorstep on Halloween night.
Each cup holds a mini candy portion in a paper liner, while lollipops or toy spiders add festive flair.
With the egg carton painted black and decorated with themed items, it doubles as a spooky centerpiece. It’s easy to set up, kid-friendly, and makes handing out sweets extra fun.
Materials Needed
- 1 egg carton (12-cup size)
- Black acrylic paint
- 12 Halloween cupcake liners
- Mini candies (M&Ms, Skittles, jelly beans, etc.)
- Pumpkin lollipops
- Plastic spiders
- Paintbrush
Step-by-step Guide
Step 1: Paint your entire egg carton black, inside and out. Let it dry completely as this will be the base of your candy tray.
Step 2: Place one cupcake liner inside each egg cup. These act as mini candy bowls and keep the treats clean.
Step 3: Fill each liner with an assortment of colorful Halloween candy.
Step 4: Insert pumpkin lollipops or themed suckers into a few center holes for height and decoration.
Step 5: Add plastic spiders, mini pumpkins, or even glow-in-the-dark touches to complete the Halloween vibe.
Tip: If using for a party, label each candy section with a tiny toothpick flag so kids with allergies know what’s what.
#17. Feathered Egg Carton Owl
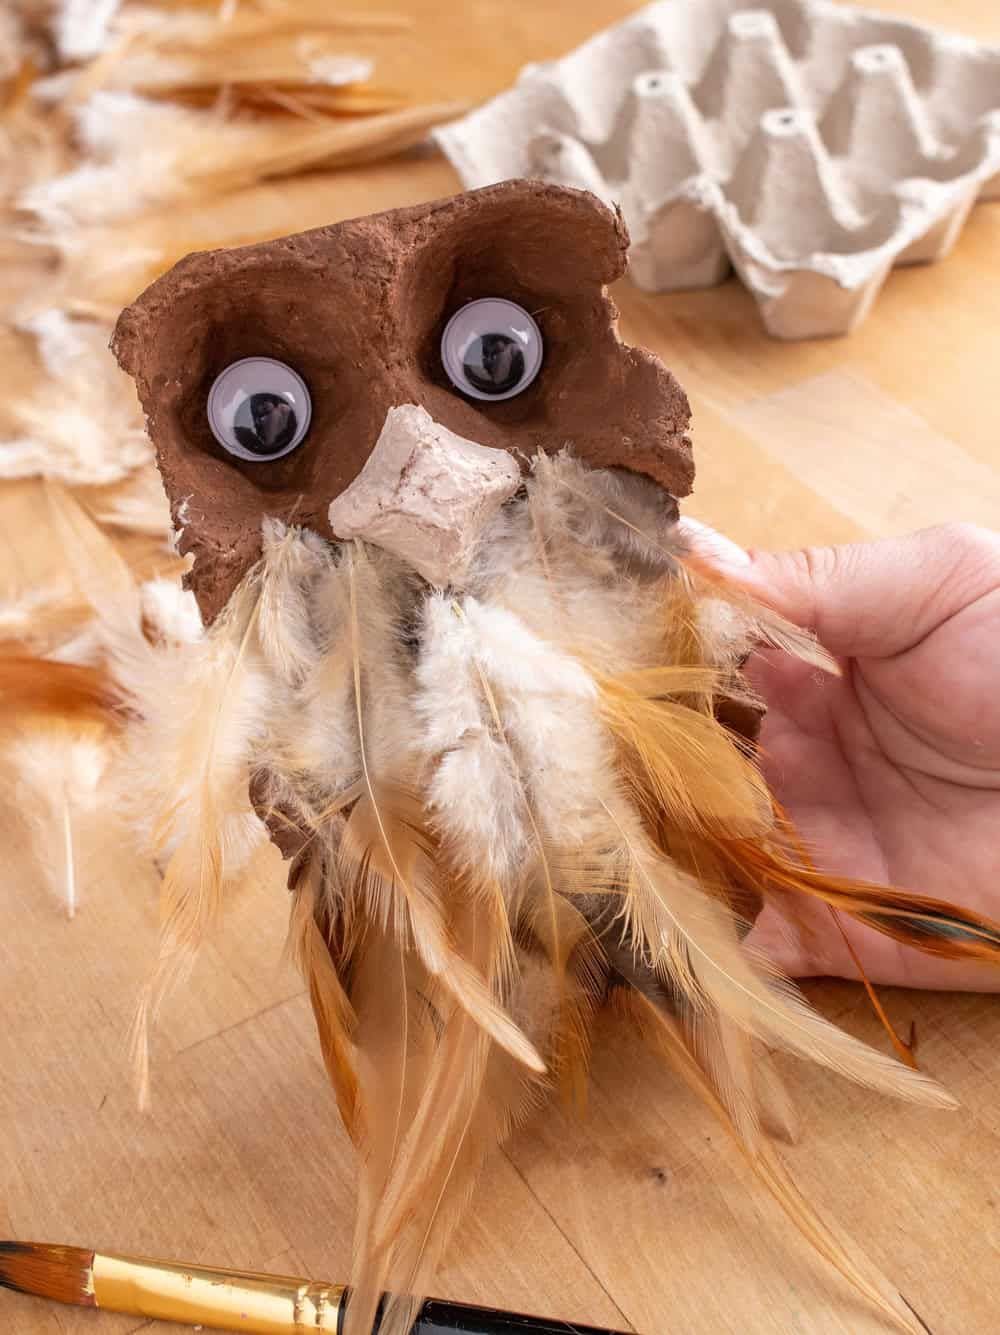
With the wide googly eyes and fluffy chest, this soft-feathered owl feels like a creature straight out of a woodland fairytale or maybe a friendly Halloween night watchman.
Using an egg carton as the base gives it just the right shape, while real feathers add gorgeous texture and movement.
I believe it’s a fun sensory project for kids and makes a charming addition to any Halloween windowsill or bookshelf.
Materials Needed
- 1 section of an egg carton (2-cup piece)
- Brown acrylic paint
- Googly eyes (large size)
- Craft feathers (cream, tan, or brown)
- Small piece of egg carton
- Glue (hot glue or strong craft glue)
- Paintbrush
- Scissors
Step-by-step Guide
Step 1: Cut two connected egg carton cups and trim around them to shape a round owl face with brows. Then paint the whole piece brown and let it dry.
Step 2: Add the large googly eyes into the cups so they sit deep, giving the owl that wide-eyed curious look.
Step 3: Snip a small triangle from another egg carton section, paint it beige or tan, and glue it between the eyes to form the beak.
Step 4: Now for the best part, start gluing feathers across the bottom and sides. Next, overlap them slightly to mimic a real owl’s cozy fluff.
Step 5: Let everything dry completely, then display your wise little owl where it can keep watch!
#18. Halloween Egg Carton Character Set
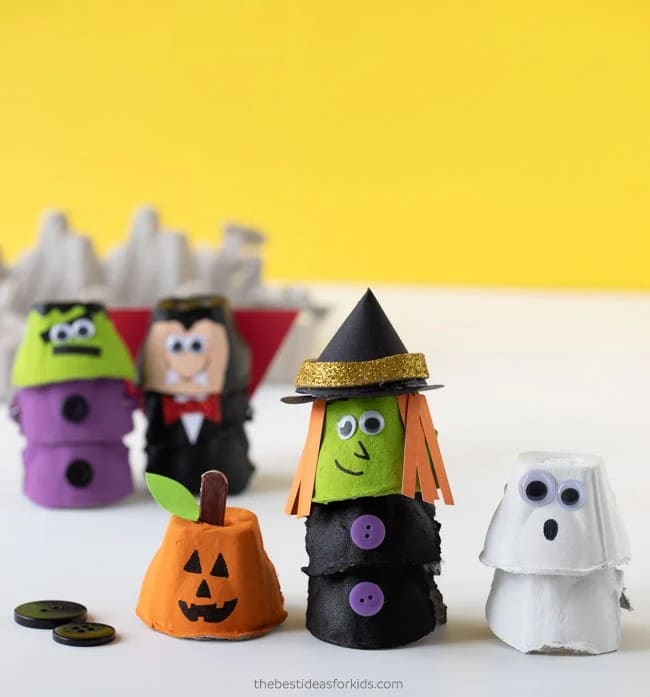
Why make one Halloween craft when you can make a whole crew?
These adorable egg carton characters bring together a ghost, a jack-o’-lantern, a witch, Dracula, and even Frankenstein, all made from simple stacked egg carton cups.
Each one has its own look and personality, and kids will have a blast painting, gluing, and styling them.
Materials Needed
- Egg carton cups (2-3 per character)
- Acrylic paint in assorted colors
- Googly eyes
- Colored paper
- Mini buttons, glitter tape, felt (optional)
- Glue stick or craft glue
- Black marker
- Scissors
Step-by-step Guide
Step 1: Stack and glue 2-3 egg carton cups for each character. Let them dry before painting.
Step 2: Paint each figure in their signature color like green for the witch, white for the ghost, orange for the pumpkin, etc. Then set aside to dry fully.
Step 3: Add facial features with a black marker or paper cutouts. You now glue on googly eyes and paper hair, capes, or hats for extra detail.
Step 4: Use small accessories like buttons, glitter tape, or felt pieces to dress them up and give each figure its own flair.
Step 5: Finally, arrange your character set together for a spooky-cute display or let kids act out their own Halloween stories!
#19. Goofy Green Egg Carton Zombies
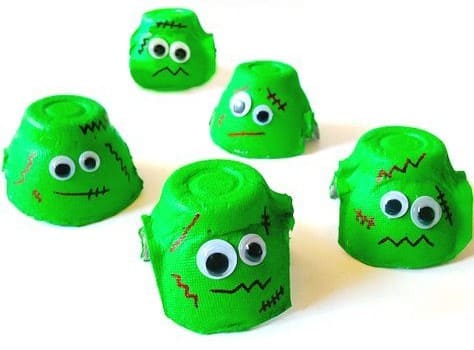
These wacky green zombie heads are equal parts spooky and silly, perfect for little hands and Halloween tables alike.
Additionally, you can keep them simple or go wild with details like scars, teeth, droopy eyes, maybe even some glittery ooze.
This is the kind of project that doesn’t need to be perfect. In fact, the messier, the better.
Materials Needed
- Egg carton cups
- Bright green acrylic paint
- Googly eyes (assorted sizes)
- Black and red markers (fine or thick tip)
- Glue
- Paintbrush
- Scissors
Step-by-step Guide
Step 1: Cut out individual cups from the egg carton and trim the bottoms flat so they sit upright.
Step 2: Paint each one a bright, toxic green. Let them dry completely before adding facial features.
Step 3: Glue on a pair of googly eyes, you should use different sizes for extra silliness. Don’t worry if they’re a bit crooked as it adds to the zombie vibe!
Step 4: Use a black marker to draw mouths, scars, stitches, or eyebrows. Then add red marker ooze if your kids are feeling extra spooky.
Step 5: Display them on shelves, use them in Halloween games, or line them up like a zombie parade!
Tip: You can also stick a lollipop or pencil through the top to turn them into zombie head toppers for party favors!
#20. Hanging Egg Carton Ghost Ornament
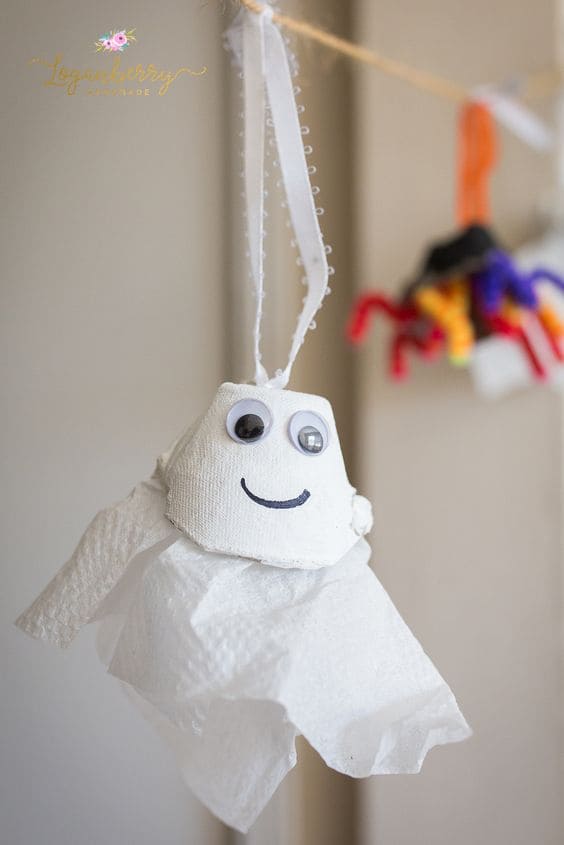
Who says ghosts have to be scary? This little floating spirit is more sweet than spooky and it’s one of the simplest Halloween crafts you can make.
With just a painted egg carton, a tissue for the ghostly body, and a ribbon for hanging, this cheerful ghost is ready to hover around your home.
Materials Needed
- 1 egg carton cup
- White acrylic paint
- 2 googly eyes per ghost
- White tissue or napkin
- Black marker
- White ribbon or string
- Glue
- Scissors
Step-by-step Guide
Step 1: Start by cutting out a single cup from the egg carton. You smooth the edges if needed, then paint it all over with white acrylic paint. Let it dry completely.
Step 2: Glue on two googly eyes, and draw a little smile beneath them using a black marker to give your ghost a friendly face.
Step 3: Drape a square of tissue or a napkin under the painted cup and secure it with glue inside the rim. Let it hang loosely so it sways like a little floating cloak.
Step 4: Punch a small hole or glue a loop of ribbon on top so your ghost can hang from a branch, hook, or string.
Step 5: Finally, you just find the perfect spot to let your friendly ghost dangle and dance in the breeze.
#21. Egg Carton Garden Witches
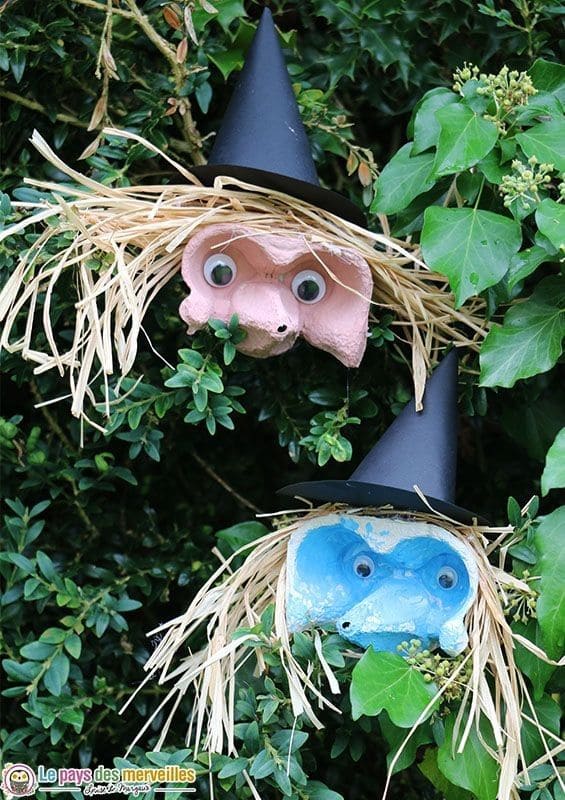
Peeking out from the bushes with straw hair and pointy hats, these little garden witches are equal parts silly and spooky.
Using upside-down egg carton sections for faces and a handful of raffia for wild hair, they come to life with a splash of paint and a dash of whimsy.
You can perch them in shrubs, hide them in flower beds, or even nestle them in Halloween wreaths.
Materials Needed
- 1 egg carton
- Acrylic paint (any fun witchy color)
- Googly eyes
- Black construction paper
- Raffia, straw, or yarn
- Hot glue gun
- Scissors
Step-by-step Guide
Step 1: Cut two connected egg carton cups per witch, keeping them intact as a face base. Then paint them any color you like like green, pink, blue and let them dry.
Step 2: Glue on googly eyes to each face and draw or paint on a small nose or mouth if desired.
Step 3: Cut strands of raffia or straw and glue them around the top and sides of the egg carton to make that iconic witchy hair.
Step 4: Roll a cone from black paper and cut a small circle brim to form a witch hat. Then you glue the hat to the top of the witch’s head.
Step 5: Tuck your finished witches into shrubs, hedges, or any outdoor nooks.
#22. Gory Eyeball Goggles
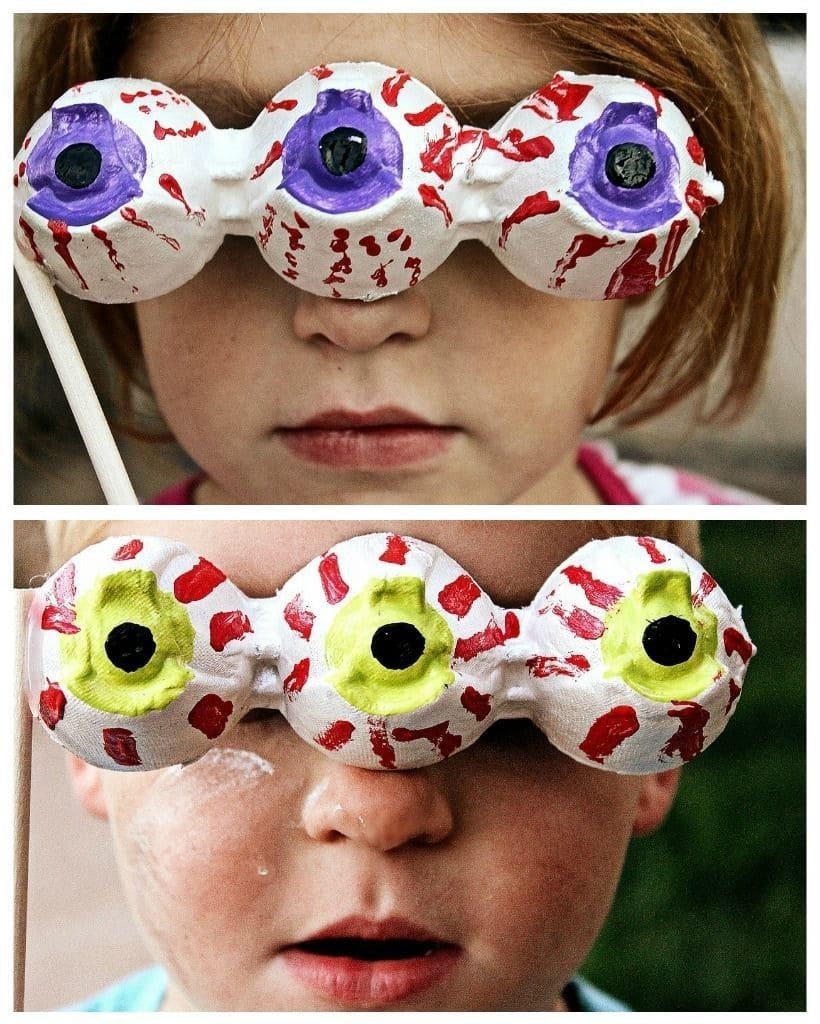
If you’re after Halloween crafts with just the right mix of silly and spooky, these eyeball goggles are the perfect fright.
Using a row of egg carton cups painted to look like bloodshot eyes, kids can hold up a set of monster vision to scare friends, snap photos, or parade around like wild little creatures.
Materials Needed
- 3 egg carton strip per mask
- White acrylic paint
- Bright paint (purple, yellow, green)
- Black paint
- Red paint or marker
- Craft stick
- Glue gun
- Scissors
Step-by-step Guide
Step 1: Cut out a strip of three connected egg cups and trim around the edges to smooth the shape. Now, you can paint the entire piece white and let it dry.
Step 2: Paint large colored irises in the center of each eye, then add black pupils and red veiny lines to make them extra creepy.
Step 3: Once dry, glue a straw or craft stick to one end of the strip so it can be held up like a mask.
Step 4: Try them on and give your scariest stare, then trade and compare eyeballs with your friends!
See more: 26 Fun and Easy Halloween Craft Ideas for Kids and Family
