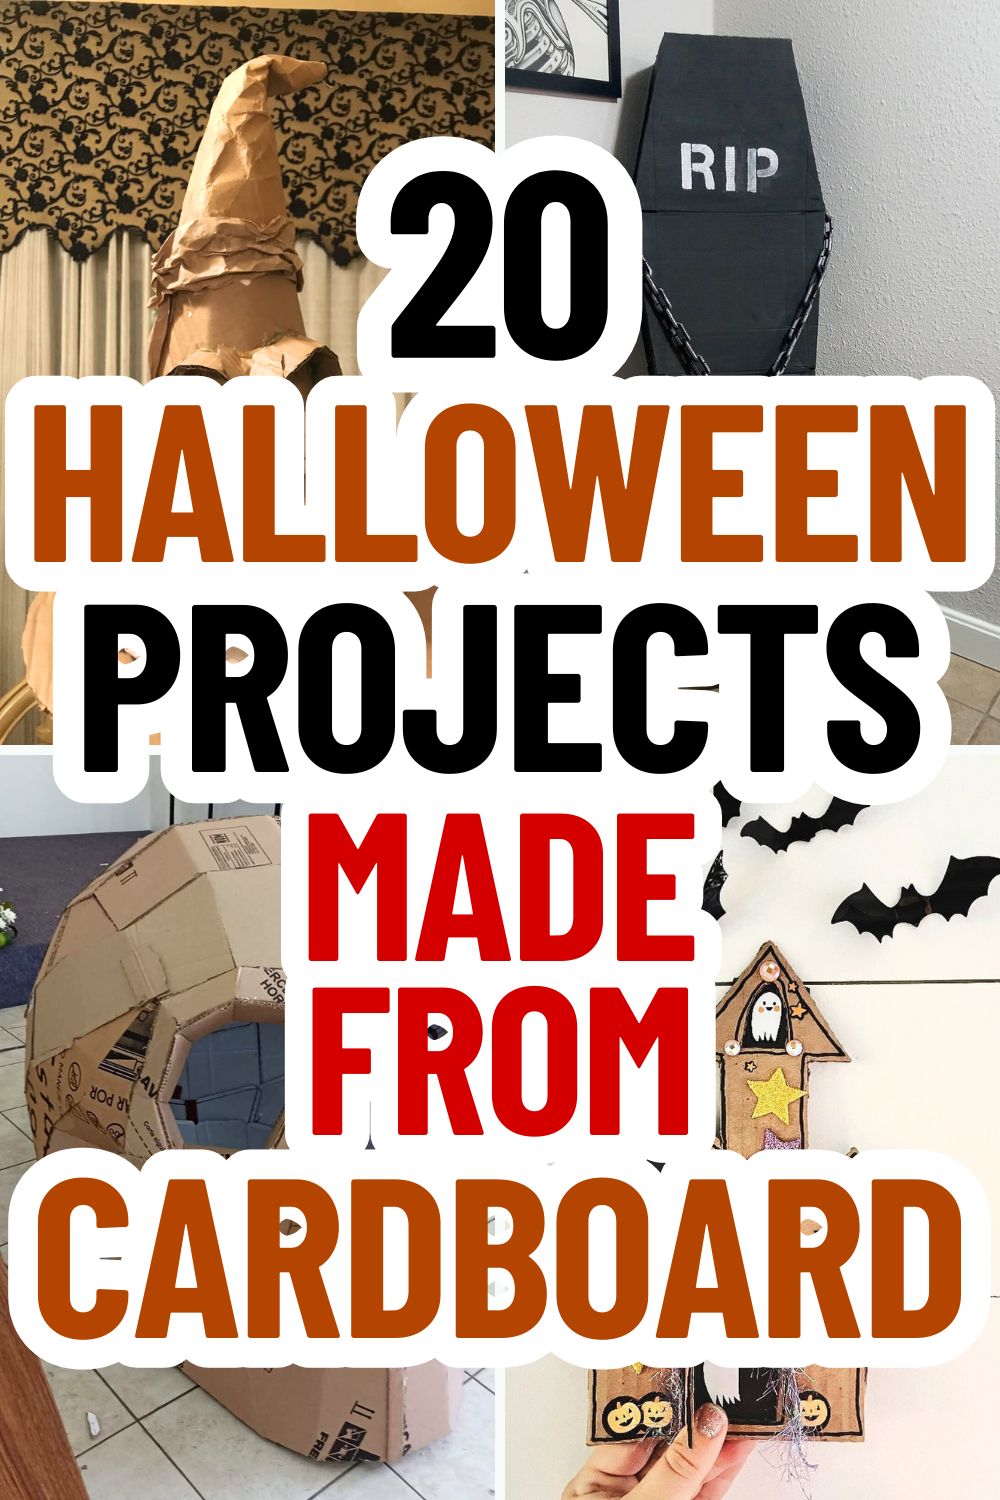
Ever looked at a pile of old cardboard and thought it could turn into something spooky? Halloween is the perfect time to get creative without spending much.
With a few recycled boxes, some paint, and a little imagination, you can craft eerie decorations that make your home look haunted in the best way.
From creepy props to festive displays, these DIY Halloween cardboard projects are easy, affordable, and fun for everyone.
#1. Creepy Paper Hand Prop
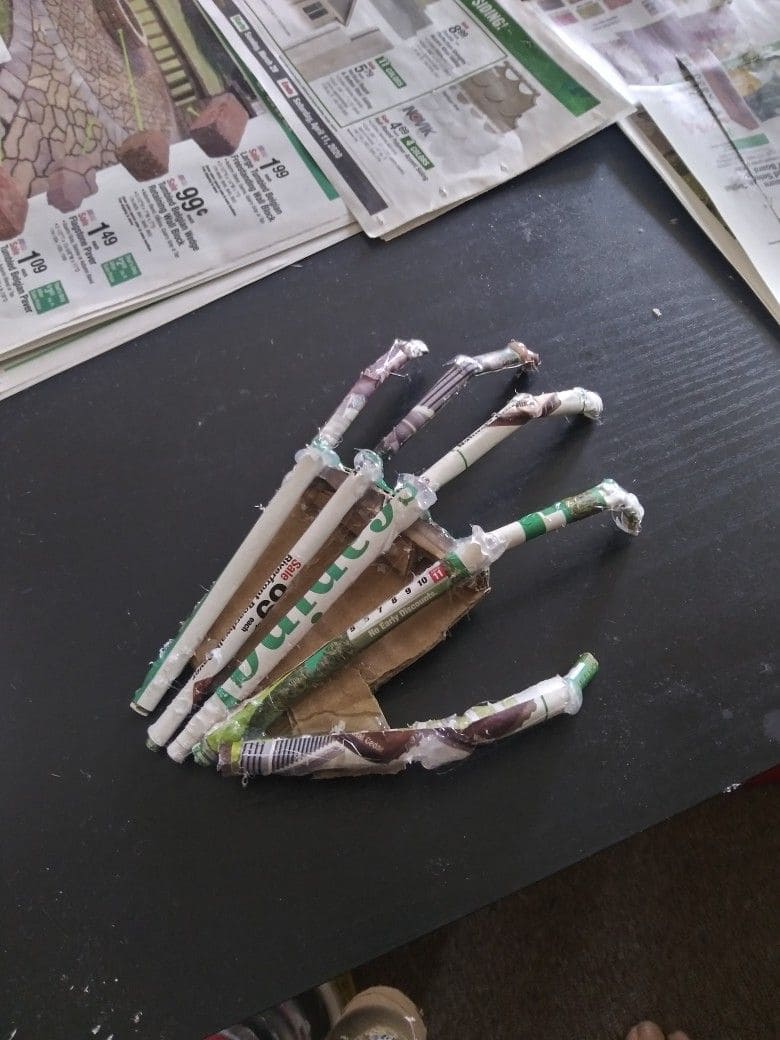
This eerie cardboard and newspaper hand prop is a fun and affordable way to add a spooky touch to your Halloween decor.
The skeletal shape makes it perfect for haunted displays, crawling out of the ground setups, or as part of a DIY witch or zombie decoration.
It’s lightweight, fully recyclable, and simple enough to make with just a few materials you already have at home.
Materials
- Cardboard (1 piece about 6x8 inches for the palm)
- 10-12 Newspaper or magazine pages
- Tape (clear or masking, 1 roll)
- Scissors
- Glue (optional for sealing)
- Black, gray, or white paint (1 small bottle)
- Paintbrush
Instructions
- Cut a rough hand shape from cardboard, about 7 inches long and 4 inches wide for a standard prop.
- Roll newspaper sheets tightly into tubes, about 6-7 inches long for each finger and 3-4 inches for thumb. Use tape to hold them.
- Bend each finger tube slightly and secure the bend with tape to create a knuckle-like form.
- Tape each rolled finger to the cardboard palm base, spacing them like a real hand.
- Wrap more newspaper or tissue around joints to give a bony or decayed look.
- Once everything’s taped securely, paint the hand with gray or white for a bone effect. Then add black shading for depth.
#2. Creepy Cardboard Shadow Silhouette
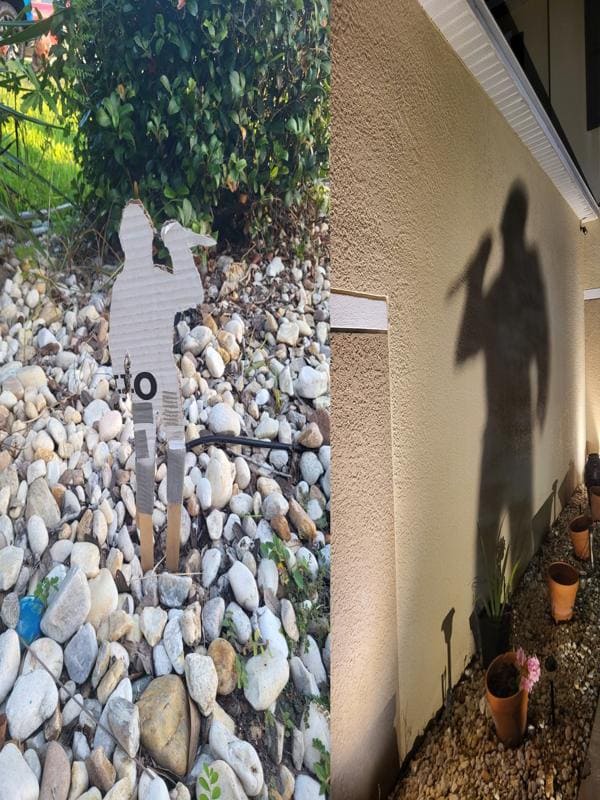
Imagine walking past your house at night and spotting a towering shadow of a figure holding a knife?
This easy cardboard Halloween craft uses a clever lighting trick to project a life-sized horror scene onto your wall.
It’s inexpensive, surprisingly quick to make, and looks unbelievably realistic in the dark. By day, it’s just a piece of cardboard. By night, it becomes pure nightmare fuel.
Materials
- Large cardboard sheet (at least 24x36 inches, double-layered for sturdiness)
- Sharp utility knife
- Pencil or marker
- Ruler or measuring tape
- Two 18-inch wooden stakes (for outdoor support)
- Duct tape (1 roll, gray or black)
- Matte black spray paint (1 can)
- Outdoor spotlight (300-500 lumens recommended)
Instructions
- Use a pencil to draw a silhouette of a scary figure on your cardboard, think of someone holding a knife or an axe. Keep the design tall and proportionate (around 3 feet high) for a dramatic effect.
- Carefully cut along the outline with your utility knife. Take your time around narrow areas like arms or tools for a clean cut.
- Tape an extra layer of cardboard behind the cutout for added thickness, especially if you live in a windy area.
- Tape or glue the wooden stakes to the back, about 6 inches apart, so the cutout can stand firmly in gravel or soil.
- Spray the front and sides with matte black paint to eliminate reflections and make the shadow more defined. Let it dry completely.
- Place the figure 3-5 feet in front of a light-colored wall or fence. Position the spotlight at a low angle, pointing upward to cast a large shadow.
- Move the light closer or farther until the shadow stretches dramatically across your wall.
#3. DIY Cardboard Coffin Prop
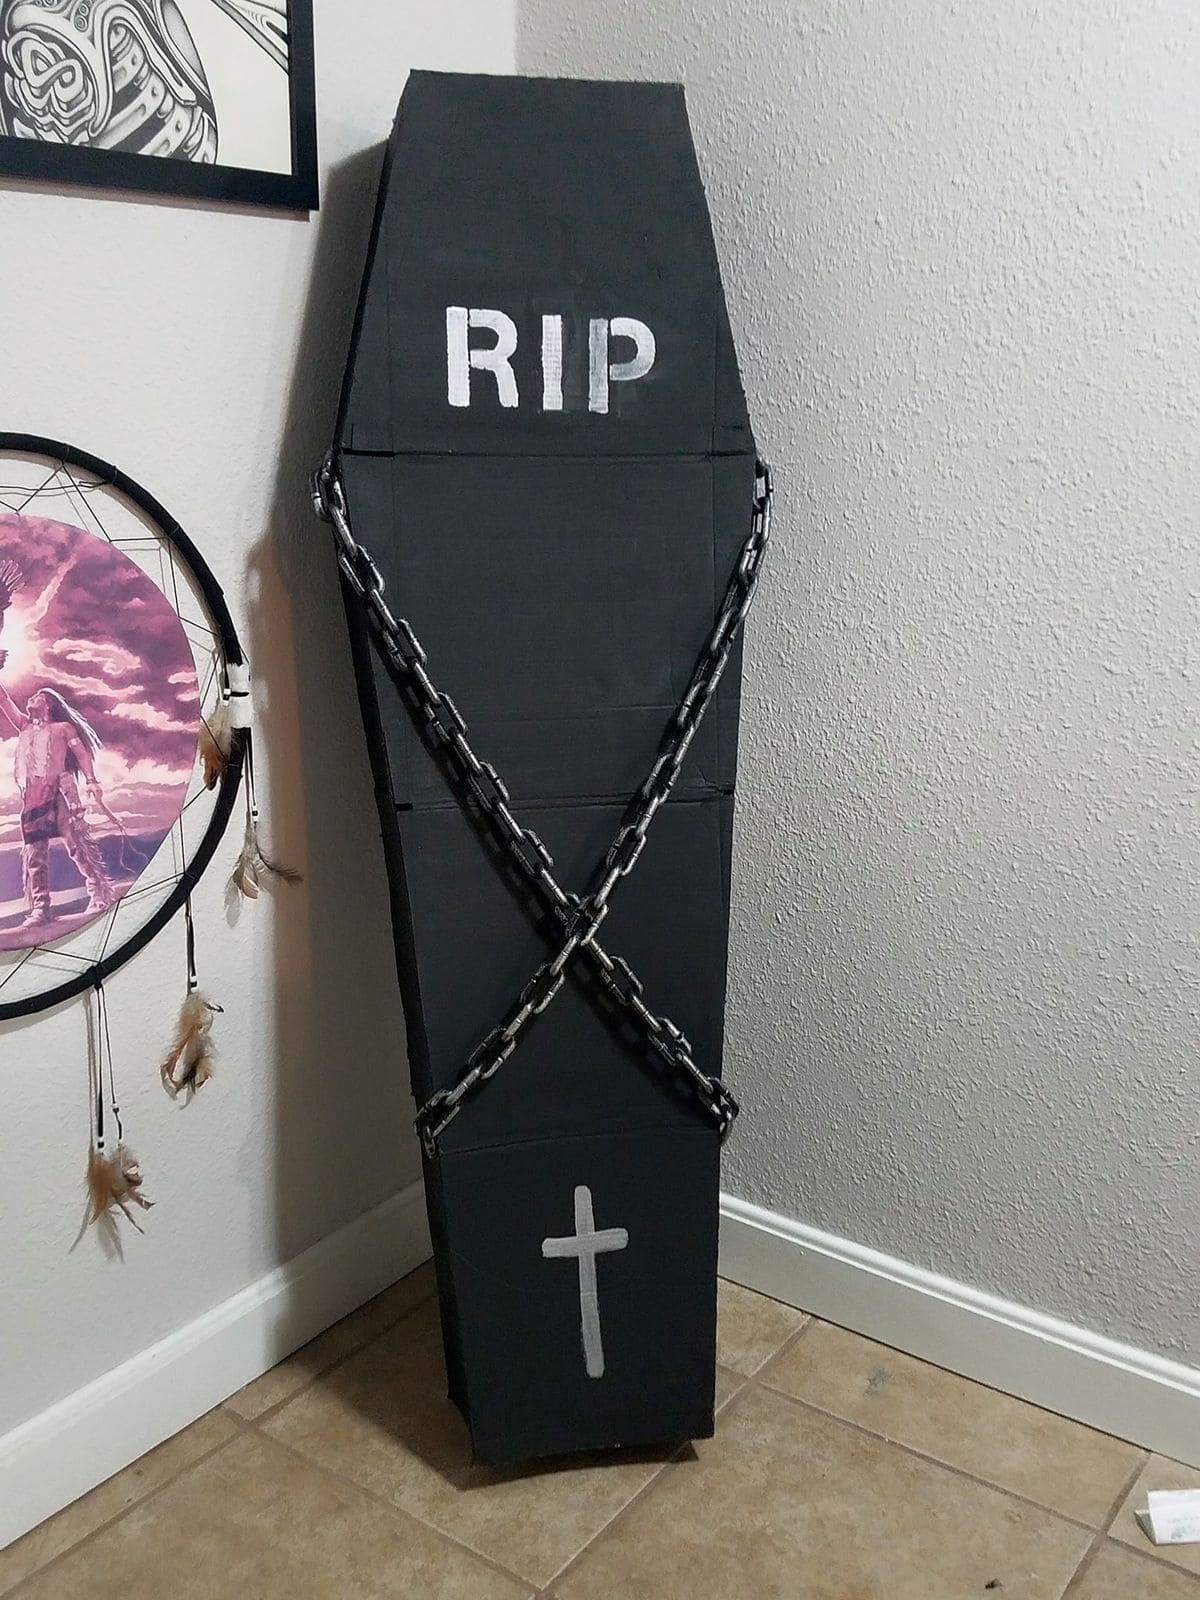
Add a spine-chilling touch to your Halloween setup with this easy-to-build cardboard coffin!
With its matte-black paint, bold RIP lettering, and plastic chains, this coffin looks convincingly creepy without the heavy lifting or expense of real wood.
It’s a fun weekend project that can be customized with LED lights or cobwebs for an even more dramatic effect.
Materials
- 3 Large cardboard sheets (each about 24x36 inches)
- Box cutter or utility knife
- Ruler or straight edge
- Hot glue gun and 8-10 glue sticks
- Black acrylic paint (1 large bottle or 1 spray paint can)
- White acrylic paint (1 small bottle for lettering and cross)
- Foam brush or paint roller
- Plastic chain (6-8 ft long, black or silver)
- Duct tape (1 roll, black for reinforcement)
- Pencil
Instructions
- Sketch a classic coffin outline on your cardboard, about 4.5 ft tall and 2 ft wide at its widest point. Then cut out the front and back panels.
- Cut long rectangular strips (4-5 inches wide) for the coffin’s edges. These will form the depth of your coffin.
- Use hot glue and duct tape to attach the side panels around the edges of one coffin shape, then seal it with the second piece of cardboard as the lid.
- Add extra strips of duct tape along seams inside and out for better support.
- Apply two coats of black paint for a solid finish. Let it dry completely.
- Paint RIP in bold white letters on the upper section and a small cross near the bottom for a graveyard touch.
- Wrap the coffin with plastic chains in an X pattern and secure with tape or glue.
Notes
#4. Cardboard Haunted Grandfather Clock
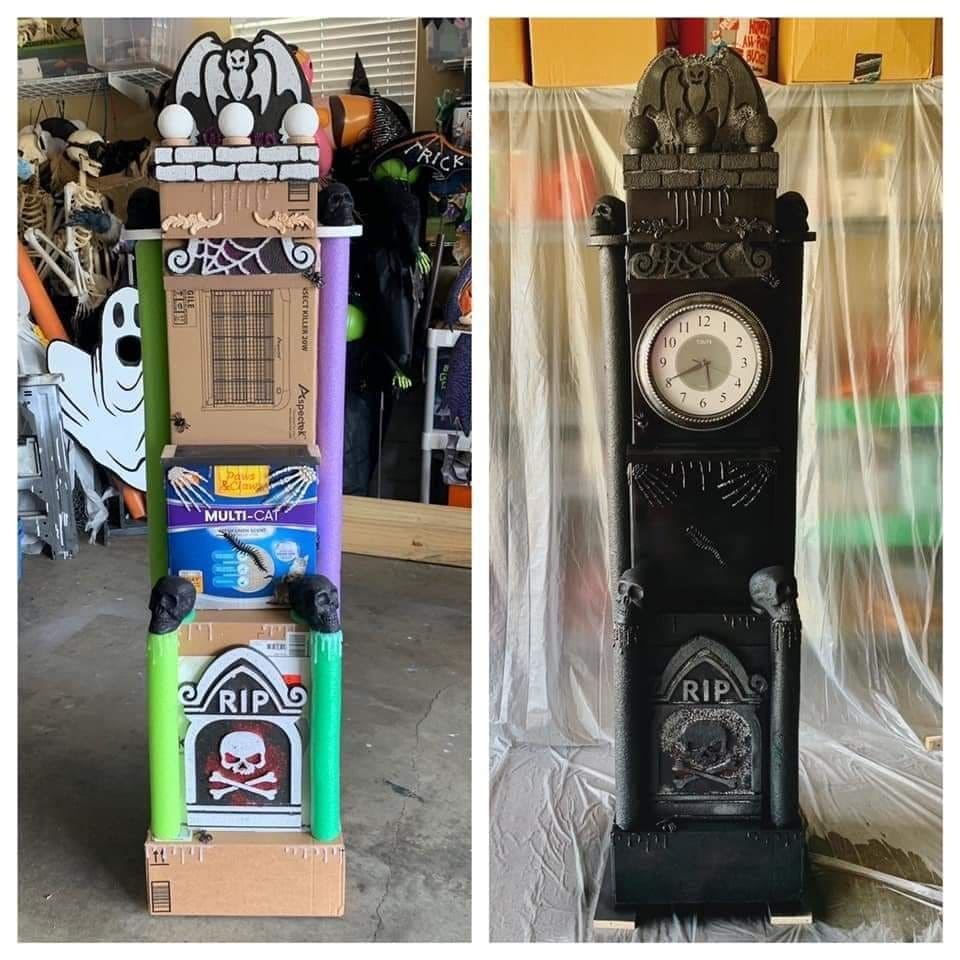
Wow, this eerie DIY Haunted clock looks like something right out of a gothic mansion and the best part? It’s made almost entirely from cardboard and recycled materials.
Once painted black, it transforms from a pile of boxes and pool noodles into a chilling Halloween centerpiece.
The fake tombstone and clock face add a hauntingly elegant touch that works perfectly for indoor or porch décor.
Materials
- 3 medium cardboard boxes (each about 12x12x18 inches)
- 1 small wall clock (8-10 inches in diameter)
- 4 pool noodles (2 green, 2 purple, each 48 inches long)
- 1 foam tombstone (12x18 inches)
- 2-4 plastic skulls (small)
- 1 bat or gargoyle decoration (foam or plastic)
- Hot glue gun and 10-12 glue sticks
- Box cutter or craft knife
- Black spray paint (2 cans, matte finish)
- Silver and gray acrylic paint (1 bottle each for dry-brushing details)
- Packing tape (1 roll)
Instructions
- Stack and tape the three cardboard boxes on top of each other. Make sure they are firmly aligned and stable.
- Cut pool noodles to match the box height. Then glue or tape two on each side to mimic gothic pillars.
- Attach the foam tombstone to the bottom front box using hot glue. This will serve as the base of your haunted clock.
- Cut a circular hole in the top box just large enough to fit your wall clock. Next, insert it snugly so the face sits flush with the cardboard.
- Glue the skulls where the columns meet, and secure the bat or gargoyle on top for that creepy, castle-like finish.
- Apply two coats of matte black spray paint evenly across the entire structure. Let dry fully.
- Once dry, use a dry brush technique with gray and silver paint to highlight edges, cracks, and decorative features for a stone-like appearance.
- Insert batteries into the clock and position your haunted masterpiece in a hallway or porch corner for maximum eerie effect.
#5. Giant Cardboard Spider Decoration
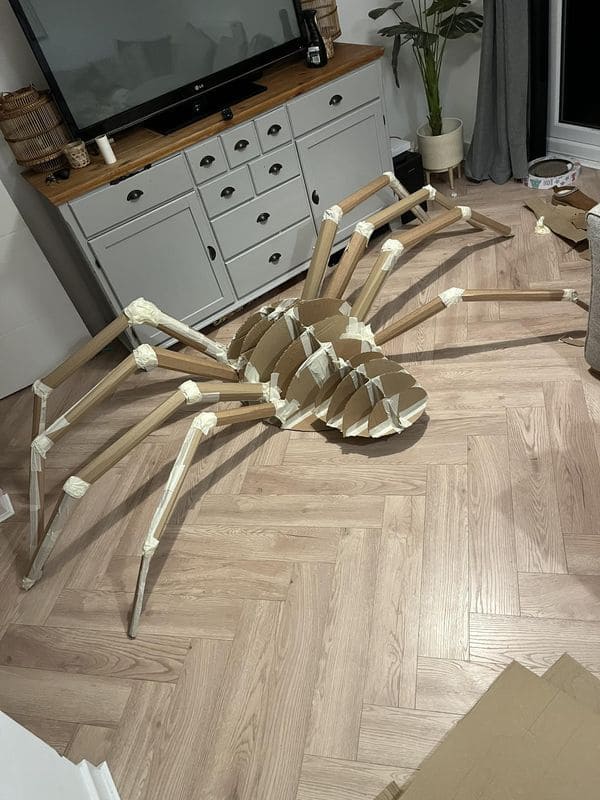
This oversized cardboard spider is the perfect Halloween showstopper with creepy, lightweight, and impressively realistic!
Its long, jointed legs and curved body shape create an unsettling presence whether it’s crouched on your porch or climbing a wall indoors.
It’s budget-friendly, built mostly from cardboard and tape, but the finished result can easily look like a professional prop once painted.
Materials
- 6 large cardboard sheets (each 24x36 inches)
- 8 Cardboard tubes or long paper mailing tubes (3 feet each for legs)
- Masking tape (2-3 rolls)
- Utility knife or box cutter
- Hot glue gun with 10 glue sticks
- Black or brown spray paint (2 cans)
- Optional: fake fur fabric (1 yard), LED eyes (2 small lights or glow sticks)
Instructions
- Draw and cut 6-8 oval shapes for the spider’s abdomen and thorax. The largest ovals should be about 20 inches long, gradually decreasing in size to form a dome when stacked.
- Stack the ovals, spacing them slightly with small cardboard strips or spacers, then glue or tape them together to create a 3D rounded body.
- Use cardboard tubes for the main leg sections. Cut each into three segments (12 inches each) and tape them at angles to form realistic bends. Reinforce joints with extra masking tape for strength.
- Cut small slots in the sides of the spider’s body where the legs will attach. Insert and glue the legs firmly in place, adjusting angles for balance.
- Add extra layers of tape or cardboard around joints and the underside to ensure stability.
- Once assembled, spray the entire spider with black paint. Add brown highlights or a light dusting of gray for texture.
- Glue pieces of fake fur on top for realism, or add glowing eyes to make it extra spooky at night.
Notes
#6. Giant Cardboard Skull Prop
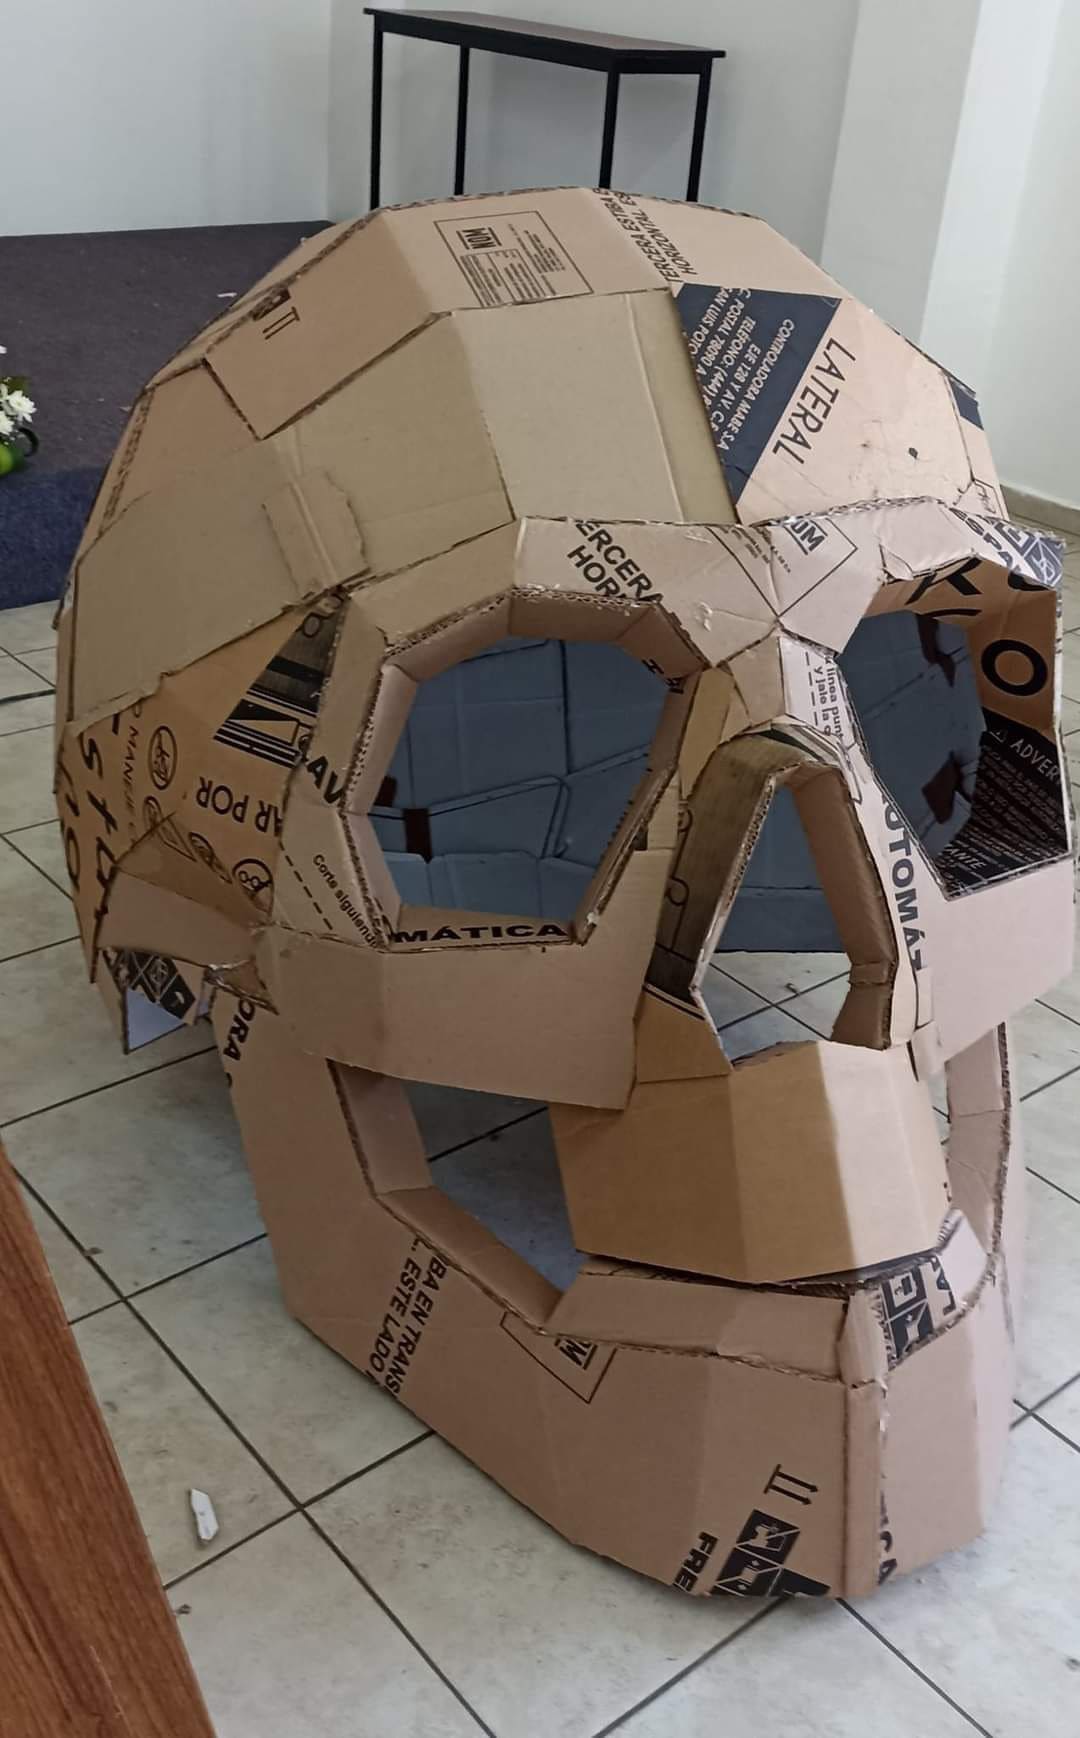
This massive cardboard skull is a show-stopping Halloween centerpiece that’s both eco-friendly and impressively eerie.
It’s lightweight but visually striking, perfect for haunted house displays or as a photo backdrop.
The geometric construction gives it a sculptural, almost artistic feel while still delivering that creepy graveyard energy.
Materials
- 4-6 large cardboard boxes (various size)
- Utility knife or box cutter
- Hot glue gun with 12-15 glue sticks
- Masking tape (1-2 rolls)
- Ruler and pencil (1 each)
- Black and white acrylic or spray paint (2 cans total)
- Sponge or brush for texturing
- Optional: paper mache mix or plaster for added durability
Instructions
- Sketch out rough geometric panels for the head, jaw, and eye sockets. Use reference photos to get proportions right.
- Cut out each piece carefully, keeping edges slightly angled for better fitting. The skull shape uses pentagons and hexagons to form curves.
- Use masking tape to test-fit the structure before gluing. Start from the top of the head and work downward to the jaw.
- Once satisfied with the shape, hot glue all seams from inside and outside for strength. Reinforce the jaw and cheekbones for stability.
- Apply a thin paper mache layer for a more solid surface or rough texture. Let it dry overnight.
- Spray the entire skull with a light gray or bone-white base. Then add black shading around the eyes, mouth, and cracks using a sponge for depth.
- Smudge darker tones for a decayed look or add moss accents if using outdoors.
#7. Cardboard Witch Silhouette Wall Art
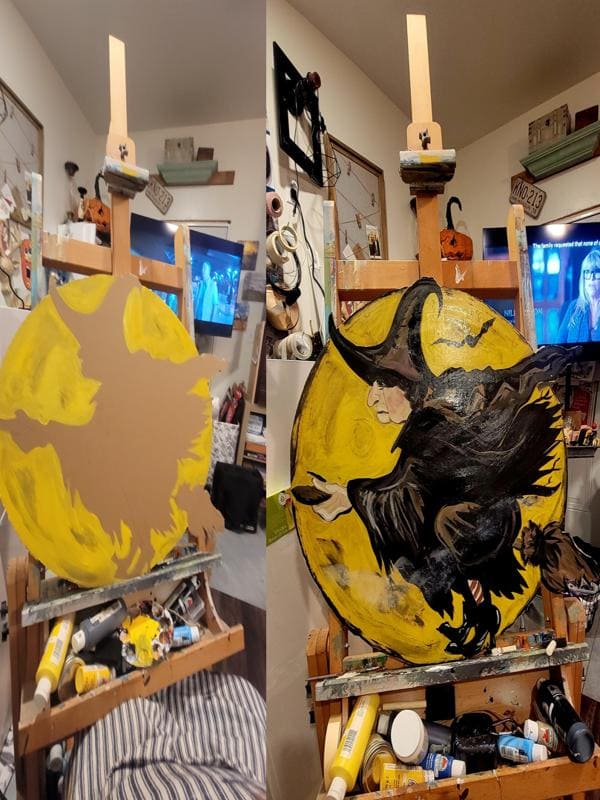
Why not turn a simple piece of cardboard into a striking Halloween decoration with this hand-painted witch silhouette?
The glowing yellow moon backdrop brings the spooky night to life, while the dark witch adds that eerie, vintage charm.
This project is great for anyone who enjoys painting and wants a custom, lightweight wall or porch display that feels both artistic and festive.
Materials
- Cardboard sheet (30x30 inches)
- Pencil and eraser
- Acrylic paints: yellow, black, brown, white (1 tube each)
- Paintbrushes (1 large flat, 1 fine detail)
- Craft knife or scissors
- Circular object or compass
- Circular object or compass
- String or wire (1 piece, 18 inches, for hanging)
Instructions
- Draw a large circle (around 28 inches in diameter) on your cardboard. Then cut it out carefully with a craft knife.
- Lightly outline a witch flying on a broomstick across the moon. You can reference vintage Halloween art or freehand your own.
- Use yellow and a touch of brown for a glowing moon effect. You can blend the edges in circular motions for a natural look.
- Paint the witch’s silhouette in black. Highlight small areas with brown or gray for subtle dimension, like folds in her cloak or hair strands.
- Once dry, add highlights or small touches like a bat or broom bristles using fine brushes.
- Spray a coat of clear sealer for protection. Attach the wire at the back for easy hanging on walls or doors.
#8. Cardboard Haunted House Craft
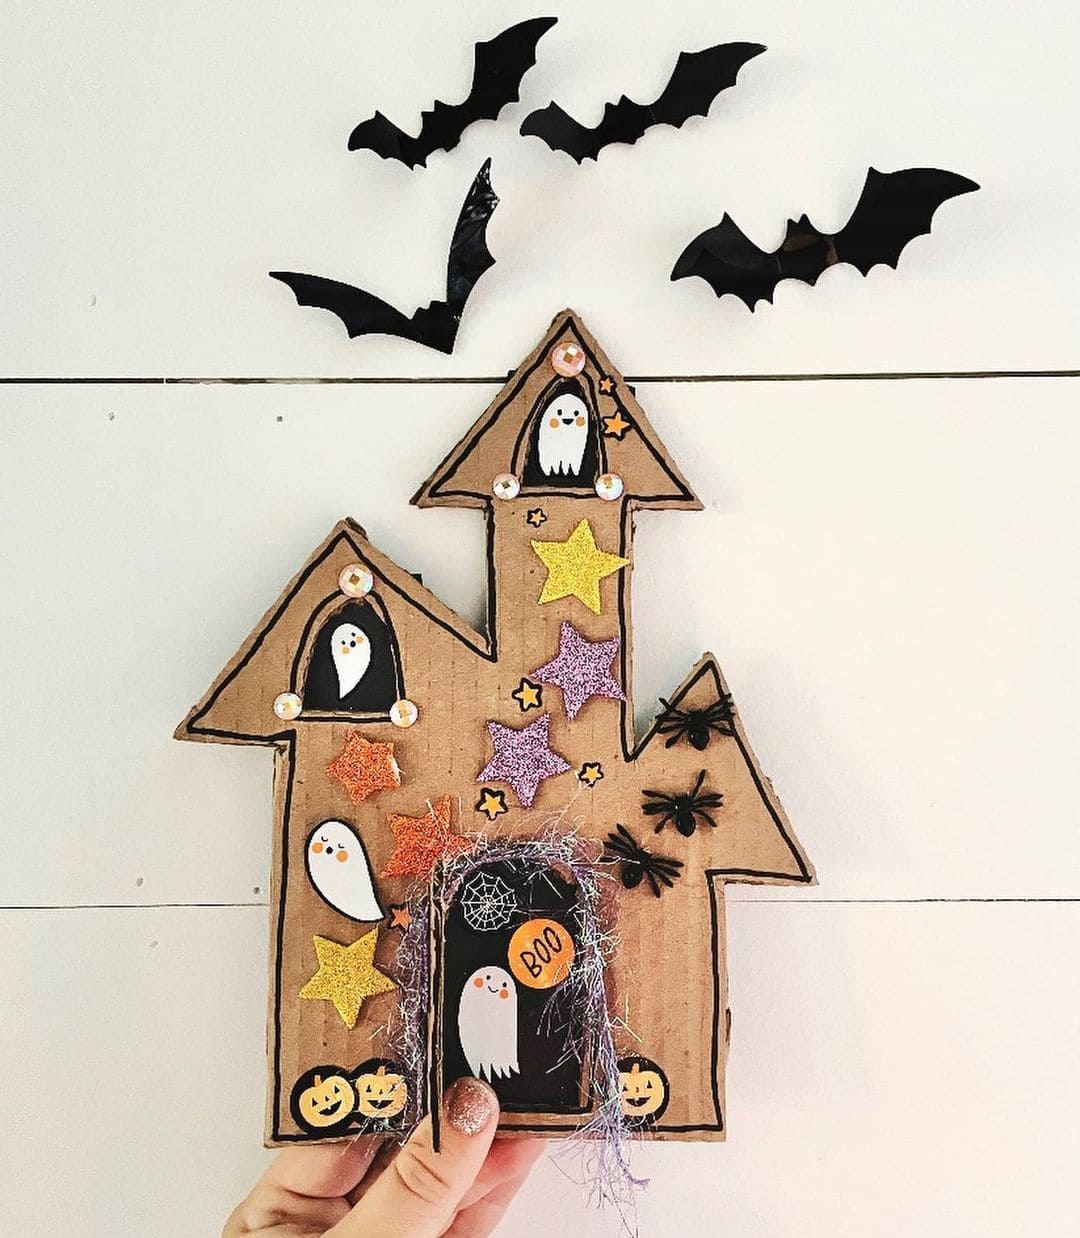
This cute and spooky cardboard haunted house is the perfect Halloween project for kids or anyone who loves festive crafts.
The charming ghosts, glittery stars, and creepy spiders bring a mix of whimsy and fright to your decor.
Hang it on the wall, prop it on a shelf, or make a few to create your own haunted village!
Materials
- Cardboard sheet (1 piece, about 10x12 inches)
- Pencil and ruler (1 each)
- Craft knife or scissors
- Black marker
- Black paint and small brush
- 10 Glitter foam stickers (stars, pumpkins, ghosts)
- 2-3 Plastic spiders
- 5-6 Small pom-poms or fake pearls
- Tinsel or yarn for trimming (12 inches)
- Hot glue gun
Instructions
- Sketch a tall, pointy haunted house with three towers on your cardboard. Include windows and a door.
- Use scissors or a craft knife to carefully cut along the outline. Then cut out the window and door areas too.
- Trace the edges and windows with a black marker to define the structure.
- Glue on ghosts, stars, pumpkins, and spiders. Next, add glitter or paint for sparkle.
- Glue tinsel or yarn around the door and add gems or pom-poms for extra charm.
#9. DIY Cardboard Halloween Direction Sign
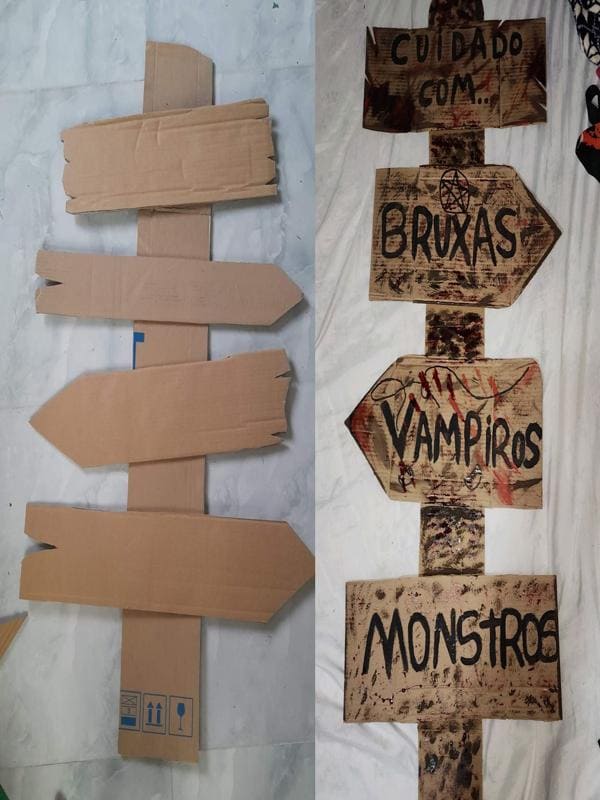
This DIY haunted direction sign adds spooky fun to your Halloween setup!
Made entirely from cardboard, it’s lightweight, easy to customize, and gives your yard or indoor display that eerie enter if you dare carnival vibe.
The uneven boards, jagged cuts, and creepy lettering make it look like something straight out of a haunted forest.
Materials
- Large cardboard sheet (about 36x20 inches) for the base post
- Additional cardboard for planks (4 pieces, each 18x5 inches)
- Box cutter or craft knife
- Hot glue gun with 6 glue sticks
- Brown acrylic paint
- Black acrylic paint
- Red paint or fake blood (small amount for effect)
- Paintbrushes (2-3 sizes)
- Permanent marker
- Ruler
Instructions
- Cut one long strip of cardboard about 36 inches tall and 6 inches wide for the post.
- Cut four horizontal boards around 18x5 inches each. Shape the edges into jagged or pointed ends for a rustic, worn look. Then slightly tear or bend the edges for more realism.
- Hot glue each horizontal plank onto the vertical post, spacing them evenly about 4 inches apart.
- Mix brown and a touch of black paint to create a weathered wood tone. Use short, uneven brush strokes to mimic wood grain. Let it dry.
- Paint eerie words like “CUIDADO COM… BRUXAS,” “VAMPIROS,” and “MONSTROS” (meaning “Beware of Witches, Vampires, and Monsters”) in bold black letters.
- Smear a mix of watered-down black and red paint over the boards with your fingers or sponge to add dirt, blood splatters, and aging effects.
- Outline the letters with a black marker for emphasis and let everything dry fully before displaying.
#10. Cardboard Creepy Tree Halloween Prop
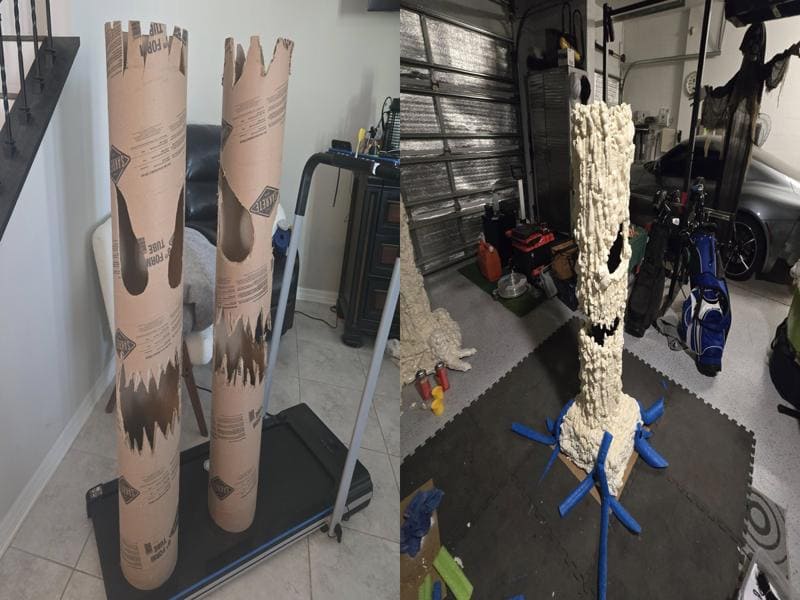
If you want your yard to look like something straight out of a haunted forest, this cardboard tree monster is your next weekend project.
Using concrete form tubes and expanding foam, you can craft tall, eerie figures that seem alive under dim light.
Their jagged mouths and hollow eyes give off a bone-chilling vibe, especially when illuminated from the inside.
Materials
- 2 concrete form tubes (each 48" tall, 10" diameter)
- Utility knife
- Hot glue gun with 6-8 glue sticks
- Expanding spray foam (3-4 cans)
- Plastic drop cloth
- Pool noodles (4-6 pieces for roots, 2” diameter)
- Cardboard base (24x24 inches)
- Black and dark brown spray paint (1 can each)
- LED floodlight or orange string lights (optional for illumination)
Instructions
- Use your utility knife to cut out menacing eyes and a jagged mouth from each cardboard tube. Vary the shapes to give each tree its own creepy expression.
- Attach the tube vertically to the cardboard base using hot glue. Then cut pool noodles in half lengthwise and glue them around the base as twisted roots.
- Spray foam all over the surface of the tube, including around the roots. Focus on creating uneven, bark-like textures. Allow it to dry fully (about 8-12 hours).
- Once dry, spray the entire structure black first, then mist over with dark brown to highlight the bark effect. You can lightly dust some gray paint for aged texture.
- Place LED lights inside or behind the eyes to make them glow at night for an extra-spooky effect.
#11. Jack Skellington Totem Decoration
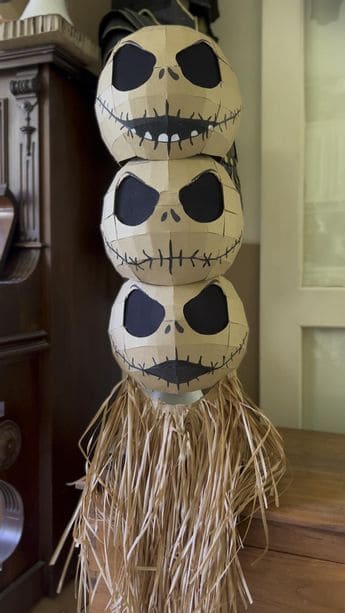
This adorable yet spooky Jack Skellington totem is a fun Halloween project that instantly captures the spirit of The Nightmare Before Christmas.
Made entirely from cardboard and a few simple materials, it’s lightweight, durable, and perfect for porch or indoor decor.
The stack of expressive Jack faces gives it a playful yet eerie charm, especially when paired with the straw-like base that adds a rustic, scarecrow-style twist.
Materials
- Cardboard sheets (3-4 medium pieces)
- Hot glue gun with 6 glue sticks
- Utility knife or scissors
- Black acrylic paint or marker
- Beige or tan paint (1 bottle, optional if not using natural cardboard)
- Raffia or straw garland (1 pack)
- Paintbrush
- Pencil for sketching
Instructions
- Cut out six curved panels from cardboard and glue them together to form a sphere-like shape. Repeat for each skull (three total).
- Tape or glue seams securely. If you want a smoother finish, brush on a thin paper mache layer and let it dry.
- Use black paint to draw Jack Skellington’s signature large eyes, stitched mouth, and nasal holes on each head. Let dry.
- Hot glue or tape the skulls together vertically to create a totem structure.
- Hot glue or tape the skulls together vertically to create a totem structure.
- Hot glue or tape the skulls together vertically to create a totem structure.
#12. Creepy Zombie Hands Window Decor
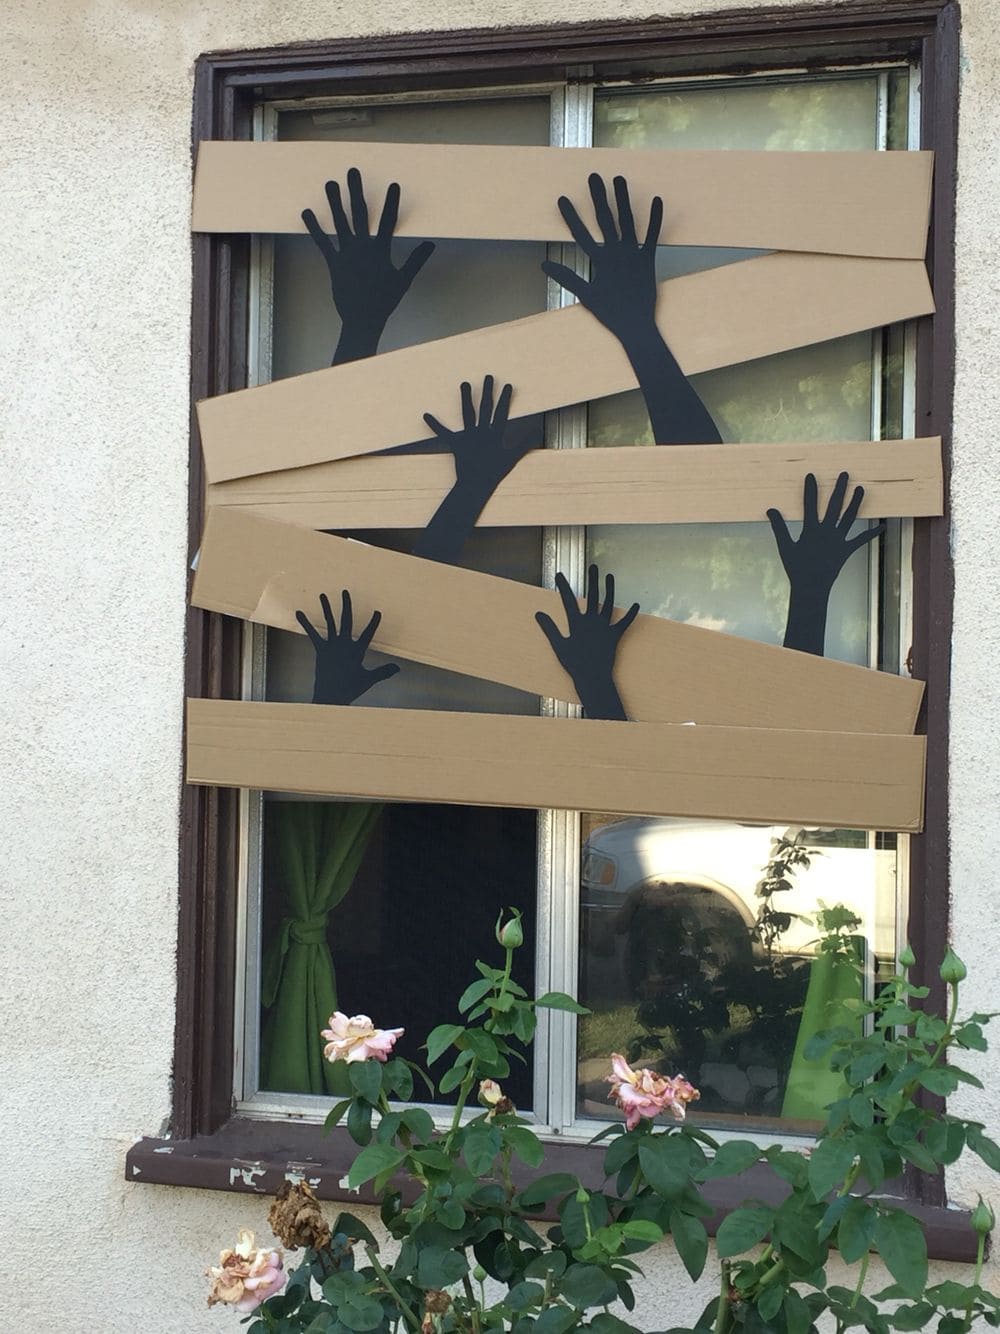
Amazingly, this cardboard zombie window display is an easy and eye-catching way to give your home a spooky haunted-house look.
It’s perfect for Halloween and takes just a few minutes to put together.
The contrast of dark hands against the tan boards creates a chilling illusion of trapped creatures trying to escape.
Materials
- 2-3 Cardboard sheets
- Black craft paper or black paint (1 sheet or small bottle)
- Pencil and scissors
- ape or glue (1 roll)
- Utility knife (optional, for cleaner cuts)
- Ruler
Instructions
- Slice cardboard into long, uneven strip, about 33-5 inches wide. Slight angles give a more realistic boarded-up look.
- Use your own hand or print a stencil to trace several reaching hand shapes on black paper or painted cardboard. Then cut them out carefully.
- Tape or glue the hands to your window glass or wall first, positioning them at various angles for movement.
- Layer the cardboard strips diagonally across the window, overlapping slightly as if nailed in place. Secure with tape or removable adhesive.
- Bend or tear the edges of the cardboard slightly to make it look aged and weathered.
#13. Cardboard Jack-O-Lantern Sculpture
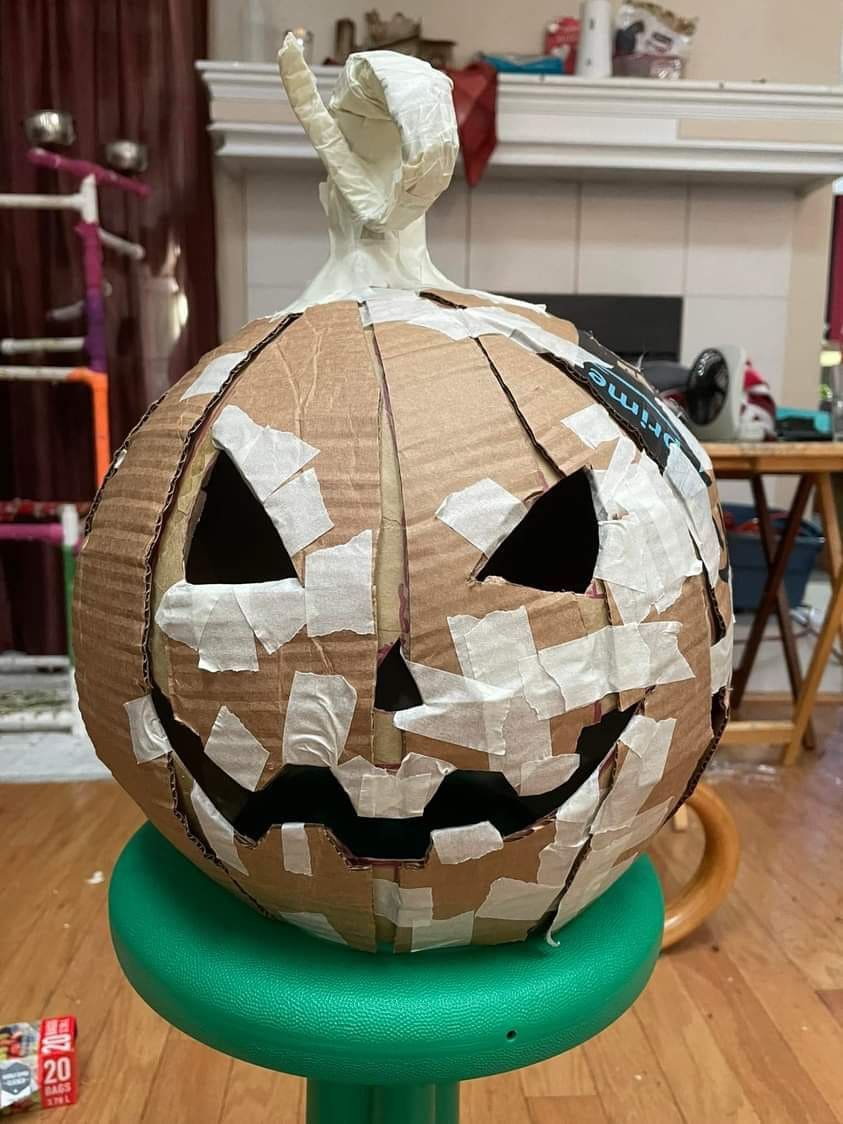
Look! This oversized cardboard pumpkin is perfect if you want a handmade Halloween centerpiece that’s both lightweight and impressive.
Its spooky carved face looks just like the real thing – minus the mess of scooping out seeds.
With a few strips of cardboard and some masking tape, you can create a realistic pumpkin form that glows beautifully when lit from inside.
Materials
- 6 Corrugated cardboard sheets (each 12x18 inches)
- Large round bowl or compass (for tracing curves)
- Masking tape (1-2 rolls)
- Utility knife or craft scissors
- Ruler or measuring tape
- Hot glue gun with glue sticks
- LED string lights or battery candle
- Orange and black acrylic paint
- Paintbrush
Instructions
- On each cardboard sheet, draw a large oval or pumpkin segment about 12 inches tall and 10 inches wide. You’ll need 8-10 identical pieces to form the full pumpkin shape.
- Use your utility knife to cut along the outlines. Then, glue or tape the edges of each piece together, slightly curving them inward to create a round 3D form.
- Once all sections are attached, cover the seams with masking tape for added strength and smoother texture. Don’t worry if it looks patchy, the paint will hide it.
- Draw a classic Jack-O’-Lantern face with a marker, then carefully cut out the eyes, nose, and mouth.
- Roll a small cardboard strip into a cone or twist it to form a stem. Attach it on top with hot glue and secure it with masking tape.
- Paint the body orange and shade the eyes and mouth edges with black for depth. Let it dry completely.
- Place LED lights or a small battery candle inside to give it that eerie nighttime glow.
#14. Mini Haunted Houses from Cardboard Scraps
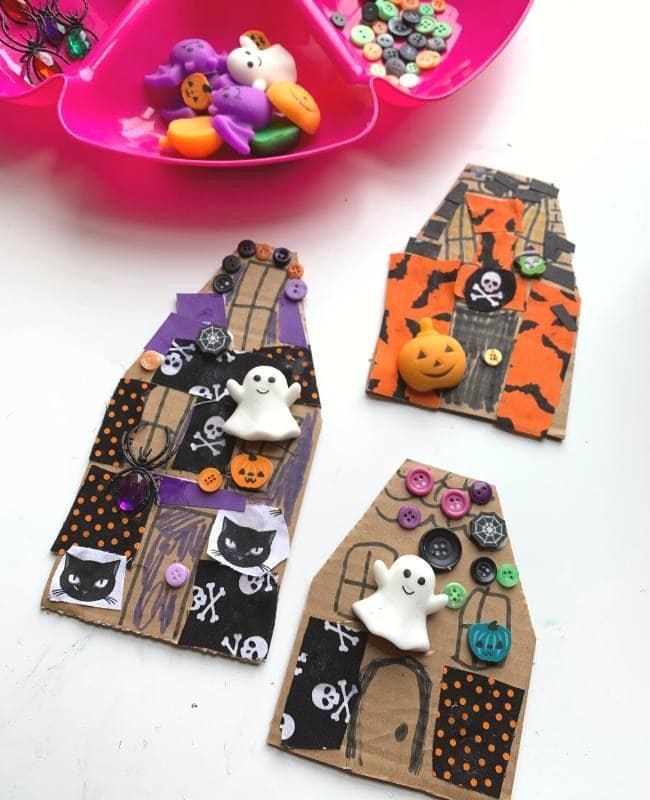
You can also turn leftover cardboard into these adorable mini haunted houses! Each one is full of personality.
This craft is great for kids or adults who enjoy decorating for the season without spending much.
You can use them as gift tags, ornaments, or wall decor for your spooky corner.
Materials
- 3-4 Cardboard scraps (4x6 inches each)
- Halloween-themed washi tape or printed paper (3-4 patterns)
- 5-6 Small Halloween buttons or mini charms
- Assorted buttons (8-10 colorful ones)
- Black marker
- Scissors
- Glue stick or hot glue gun
Instructions
- Trim cardboard into tall, pointed house shapes. You should vary the rooflines for character.
- Cover sections with Halloween washi tape or scraps of patterned paper. You can mix stripes, polka dots, and spooky icons.
- Use a marker to sketch doors, windows, or roof shingles directly onto the cardboard.
- Glue small ghost and pumpkin buttons as if they’re popping out from windows. Add spiders or webs for effect.
- Place colorful buttons around the roofline or doorway to give each house a whimsical touch.
#15. DIY Giant Witch Cauldron Prop
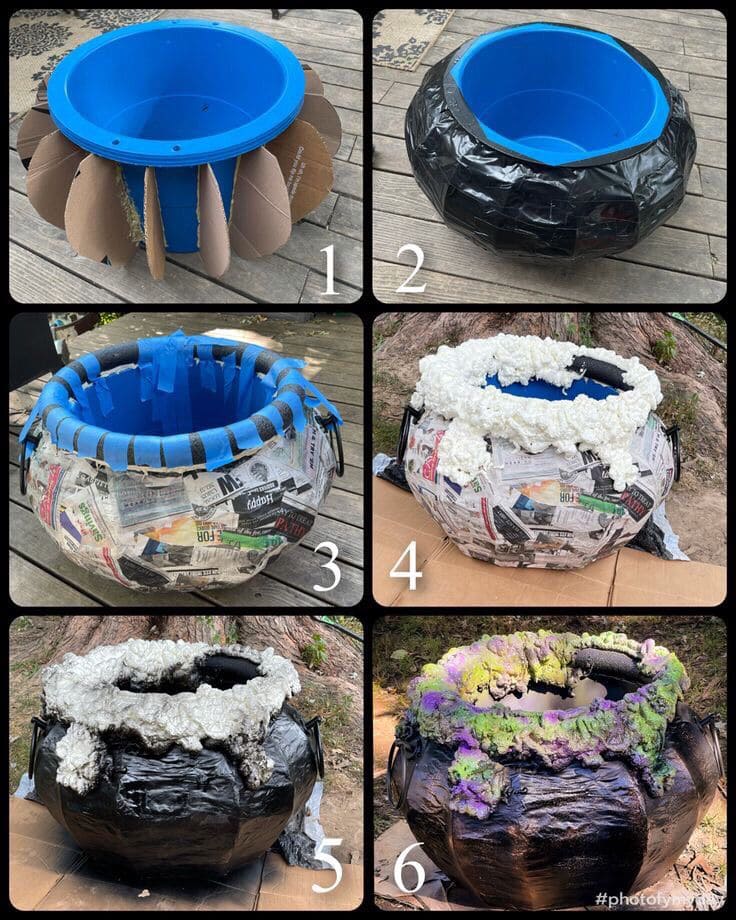
This oversized witch cauldron is the perfect centerpiece for your Halloween yard or party setup.
It’s made mostly from cardboard, foam, and paint, giving it a realistic, spooky look without spending much.
Moreover, the foamy bubbling brew effect on top makes it look like something wicked is cooking inside!
Materials
- Large plastic tub (about 20-24" wide)
- Cardboard sheets (3-4 large pieces for structure)
- Masking tape (1 roll)
- 2-3 Black trash bags
- Spray foam insulation (2 cans)
- Newspaper (10-15 sheets)
- Paper mache paste (1 cup flour + 1 cup water mix)
- Black spray paint (1 can)
- Acrylic paints in green, purple, and yellow (1 bottle each)
- Paintbrushes or sponges
Instructions
- Cut curved panels of cardboard and tape them around the sides of the tub to form a rounded cauldron shape. Ensure all gaps are tightly taped.
- Wrap black trash bags over the cardboard form and secure with tape. This creates a smooth outer layer.
- Dip newspaper strips into the paste and layer over the surface. Let it dry completely to add durability.
- Apply spray foam insulation along the rim to mimic overflowing potion. Let it expand and harden for a few hours.
- Once dry, spray the entire cauldron with black paint. Add shading around the foam for a melted, scorched look.
- Dry brush purple, green, and yellow paint over the foam for a glowing, enchanted effect.
#16. One Night Stand Cardboard Costume
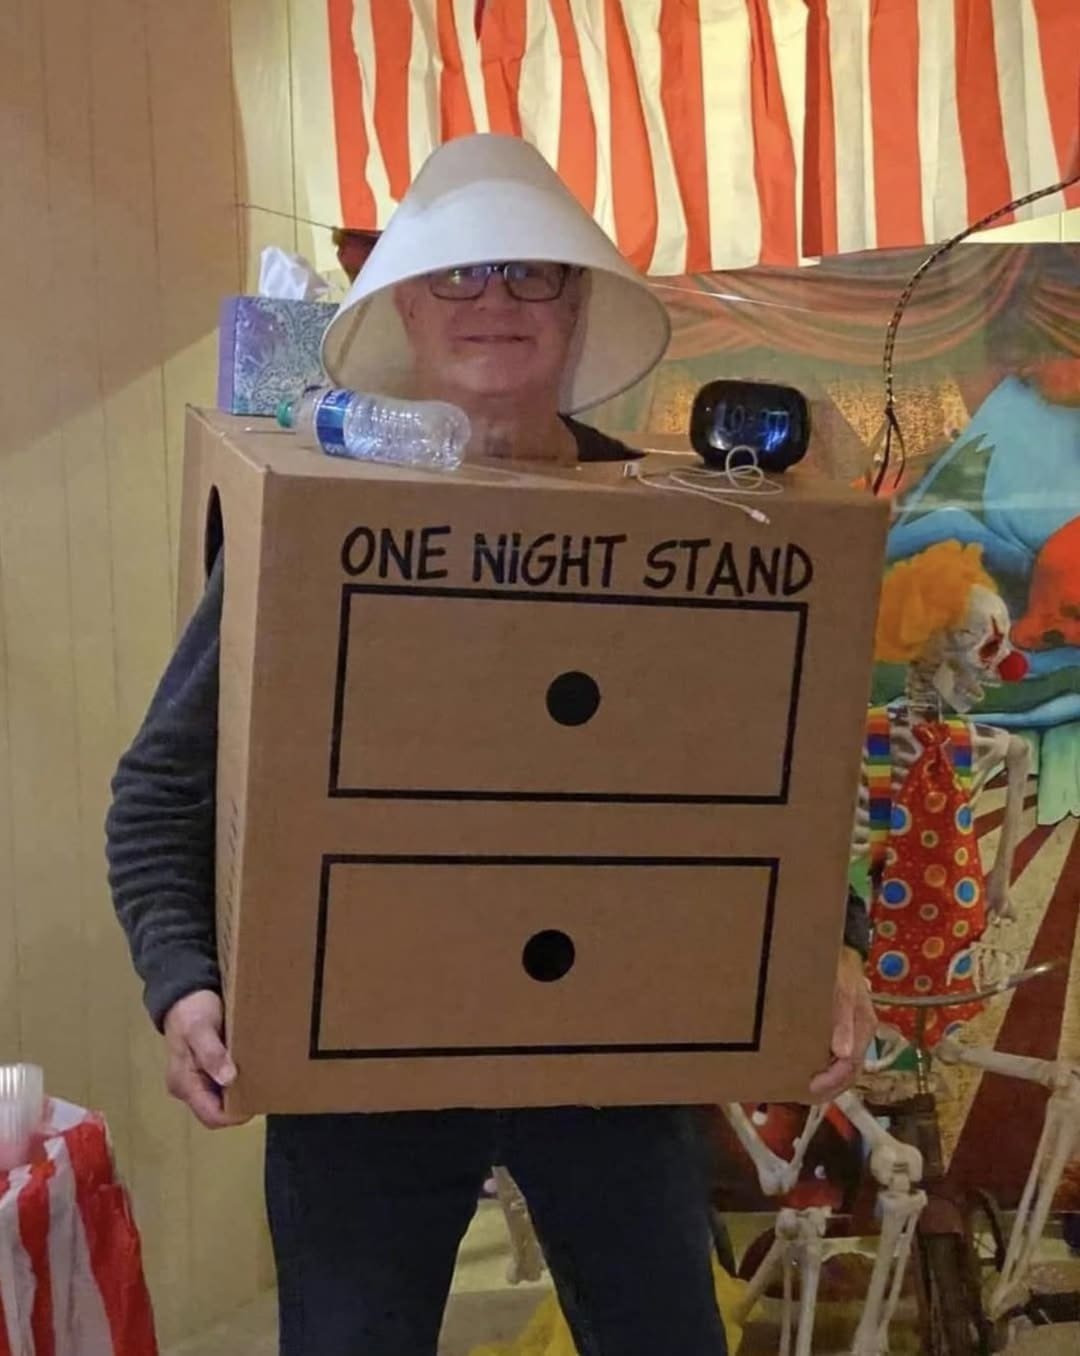
This hilarious DIY costume is a guaranteed crowd-pleaser for any Halloween party.
With just a large cardboard box, a lampshade, and a few props, you can transform yourself into a literal one night stand.
Plus, it’s comfortable to wear and budget-friendly, perfect for last-minute costume makers who still want something original and memorable.
Materials
- Large cardboard box (24x24x18 inches)
- Box cutter or utility knife
- Black permanent marker
- Duct tape or packing tape
- Old lampshade
- Small props (1-2 items: tissue box, water bottle, alarm clock, or fake candle)
- Optional: black shirt and pants for a clean base outfit
Instructions
- Cut out a large hole on the top for your head and two smaller ones on the sides for your arms. Make sure it fits comfortably.
- Using your black marker, outline two drawers on the front of the box. Then add small circles in the center for handles.
- Write “ONE NIGHT STAND” in bold letters across the top of the box. This is where the humor comes to life.
- Place an old lampshade on your head as the “lamp” sitting on the stand. Secure it with string or an elastic band if needed.
- Tape lightweight items like a tissue box, clock, or fake drink bottle on top of the box to make it look like a real nightstand.
- Slide your arms through the holes, pull it over your head, and you’re ready to steal the show at your Halloween event.
#17. DIY Spooky Candelabra from Cardboard
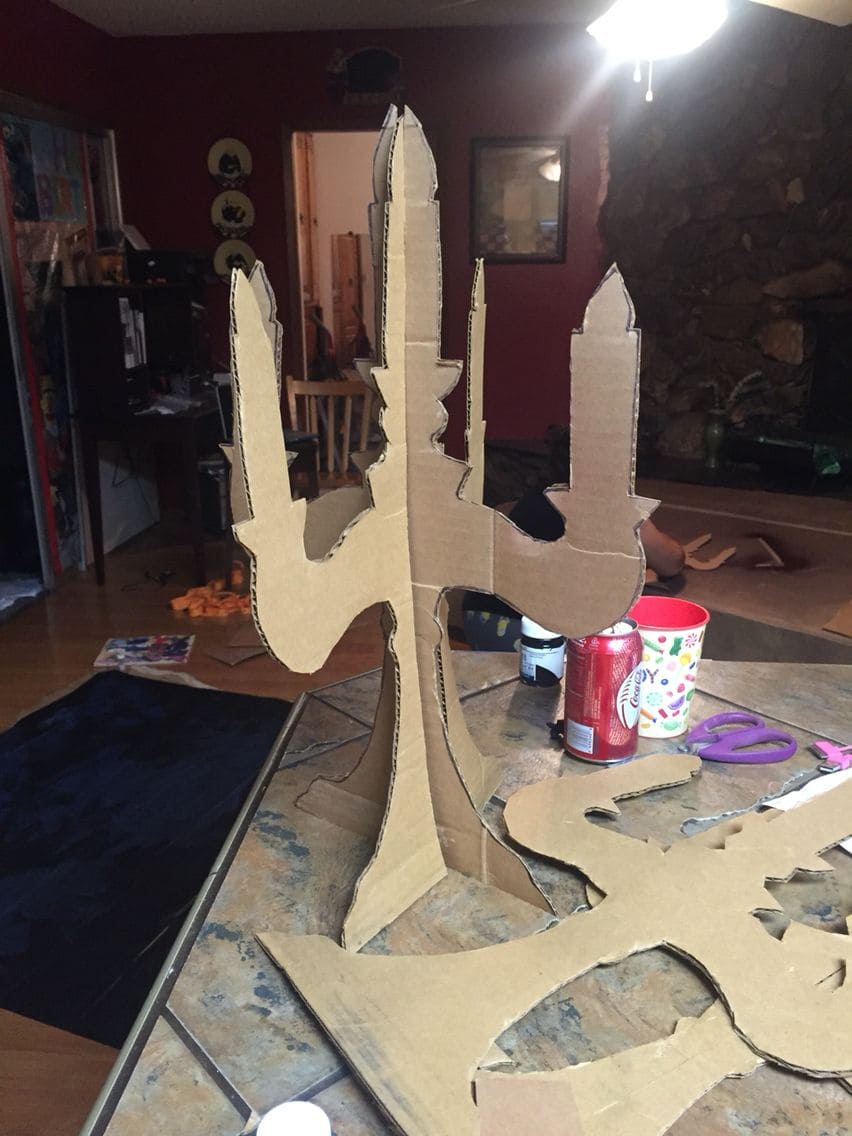
This eerie cardboard candelabra is a hauntingly elegant Halloween centerpiece that costs almost nothing to make.
Lightweight and easy to customize, it can be painted to mimic wrought iron or melted wax.
Perfect for haunted tables, mantle displays, or gothic-themed parties, it adds instant drama to your décor.
Materials
- 2 Thick cardboard sheets (18x24 inches each)
- Pencil and ruler
- Craft knife or box cutter
- Hot glue gun with glue sticks (1 set)
- Black spray paint
- Metallic silver or gold paint (optional, 1 small bottle)
- LED tea lights (3-5 pieces)
Instructions
- Sketch the candelabra shape onto the cardboard. Make two identical pieces for the front and back. Include slots in the middle (one from top to center, one from bottom to center) so they interlock.
- Carefully cut out both shapes using a craft knife. Slide the two pieces together to form a standing 3D structure. Reinforce the base with hot glue.
- Cut small cylinder shapes (about 2 inches tall) for candles and glue them on top of each branch. You can also shape melted wax drips using hot glue.
- Spray the entire piece black and let it dry. Brush on silver highlights for an antique metal finish.
- Place LED tea lights on top of each candle for a safe glowing effect.
Notes
#18. Creepy Cardboard Ticket Booth Prop
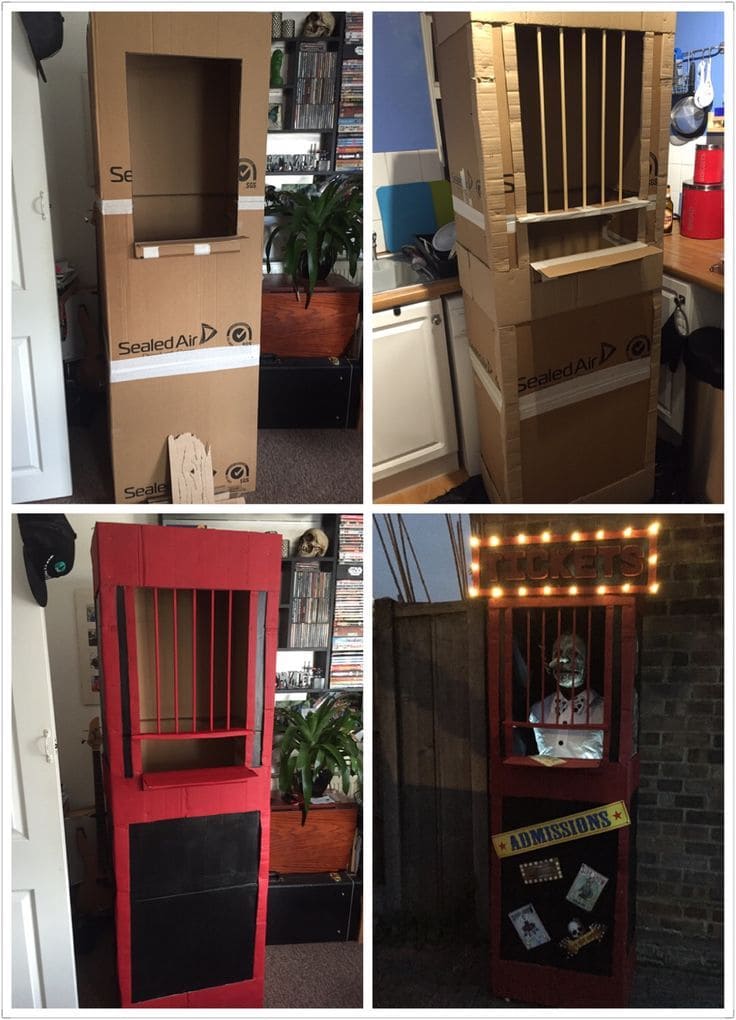
Bring a haunted carnival vibe to life with this spooky cardboard ticket booth!
It’s a clever and affordable Halloween build that turns plain boxes into a sinister display for your porch or haunted house.
With its barred window, sign, and glowing lights, it’s perfect for showcasing a creepy clown or skeleton vendor.
Materials
- 2-3 Large cardboard boxes (about 24x36 inches each)
- Box cutter or utility knife
- Hot glue gun with 12-15 glue sticks
- 10-12 Wooden dowels or thick cardboard tubes (12 inches each for bars)
- Red and black acrylic paint (1 bottle each) or spray paint (2 cans total)
- Ruler and pencil
- LED string lights (1 strand, warm or orange glow)
- Small wooden or foam board (1 piece, 24x6 inches)
- Alphabet stencils or thick marker for lettering (1 set)
- Optional: Plastic skull, clown mask, or dummy head
Instructions
- Stack and glue two large cardboard boxes vertically, cutting out a rectangular window in the upper half (approx. 18x20 inches) for the ticket window.
- Cut a 4x20-inch cardboard strip and glue it just below the window opening to create a ledge. Reinforce with extra layers underneath for stability.
- Evenly space wooden dowels or cardboard tubes across the window and glue them from the top inside edge to the counter.
- Use spare cardboard strips along the booth’s edges to strengthen corners and prevent warping.
- Coat the entire booth in red paint, then add black sections for panels and trim to create depth. Let it dry completely.
- Paint your foam board or wood piece black, then stencil “TICKETS” in bold white or yellow letters. Attach it to the top of the booth.
- String LED lights around the sign and window to give it a haunted glow. Secure with tape or hot glue.
- Add fake cobwebs, old posters, or a skeleton ticket seller inside the booth for a complete Halloween look.
#19. Creepy Cardboard Tombstone Prop
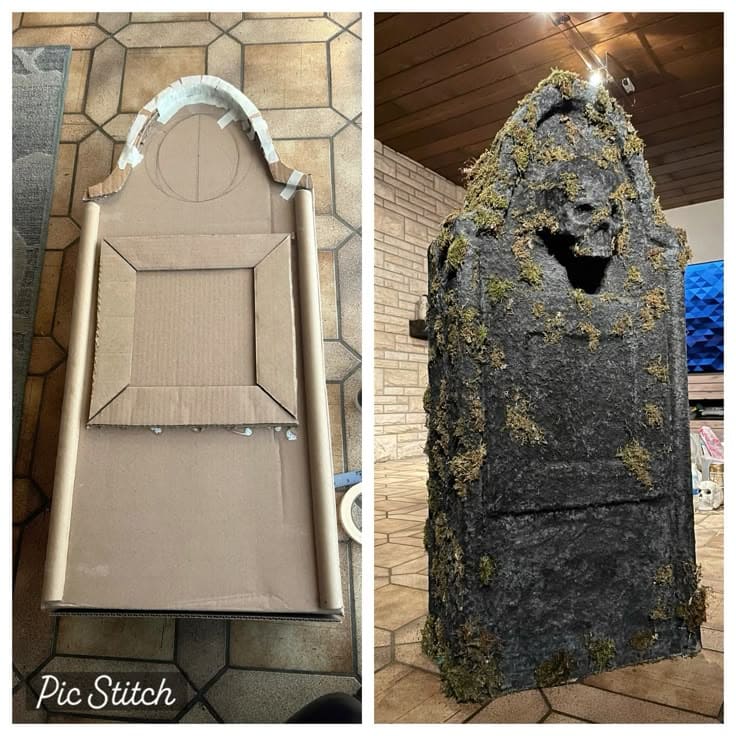
You can also turn a simple cardboard box into an eerie, moss-covered tombstone that looks like it’s been standing in a haunted graveyard for decades.
This lightweight yet realistic prop makes an excellent addition to your yard or indoor Halloween display.
With a few layers of paint, texture, and faux moss, you can give it an aged, stone-like finish that fools the eye.
Materials
- Large cardboard box (about 24x36 inches)
- Utility knife or box cutter
- Masking tape (1 roll)
- Hot glue gun with 6-8 glue sticks
- Black spray paint (2 cans)
- Gray acrylic paint (1 bottle)
- Sponge or paintbrush
- Expanding foam spray (optional, 1 can for texture)
- Faux moss or dried moss (1 bag)
- Craft glue or adhesive spray
Instructions
- Draw a tall tombstone outline on the cardboard, approximately 3 feet tall and 18 inches wide. Add a curved top for a classic design and cut it out carefully.
- Cut 2-inch-wide cardboard strips for the edges and glue or tape them along the sides to give the tombstone thickness.
- Create a frame or emblem in the center using smaller cardboard pieces. Glue them to the surface for dimension.
- Tape all seams and edges firmly to keep the structure stable.
- Tape all seams and edges firmly to keep the structure stable.
- Spray the entire tombstone with black paint. Let it dry, then lightly dab on gray paint with a sponge to create a stone effect.
- Finally, use craft glue or adhesive spray to attach moss along cracks, edges, and random patches for a decayed look.
#20. DIY Cardboard Sorting Hat
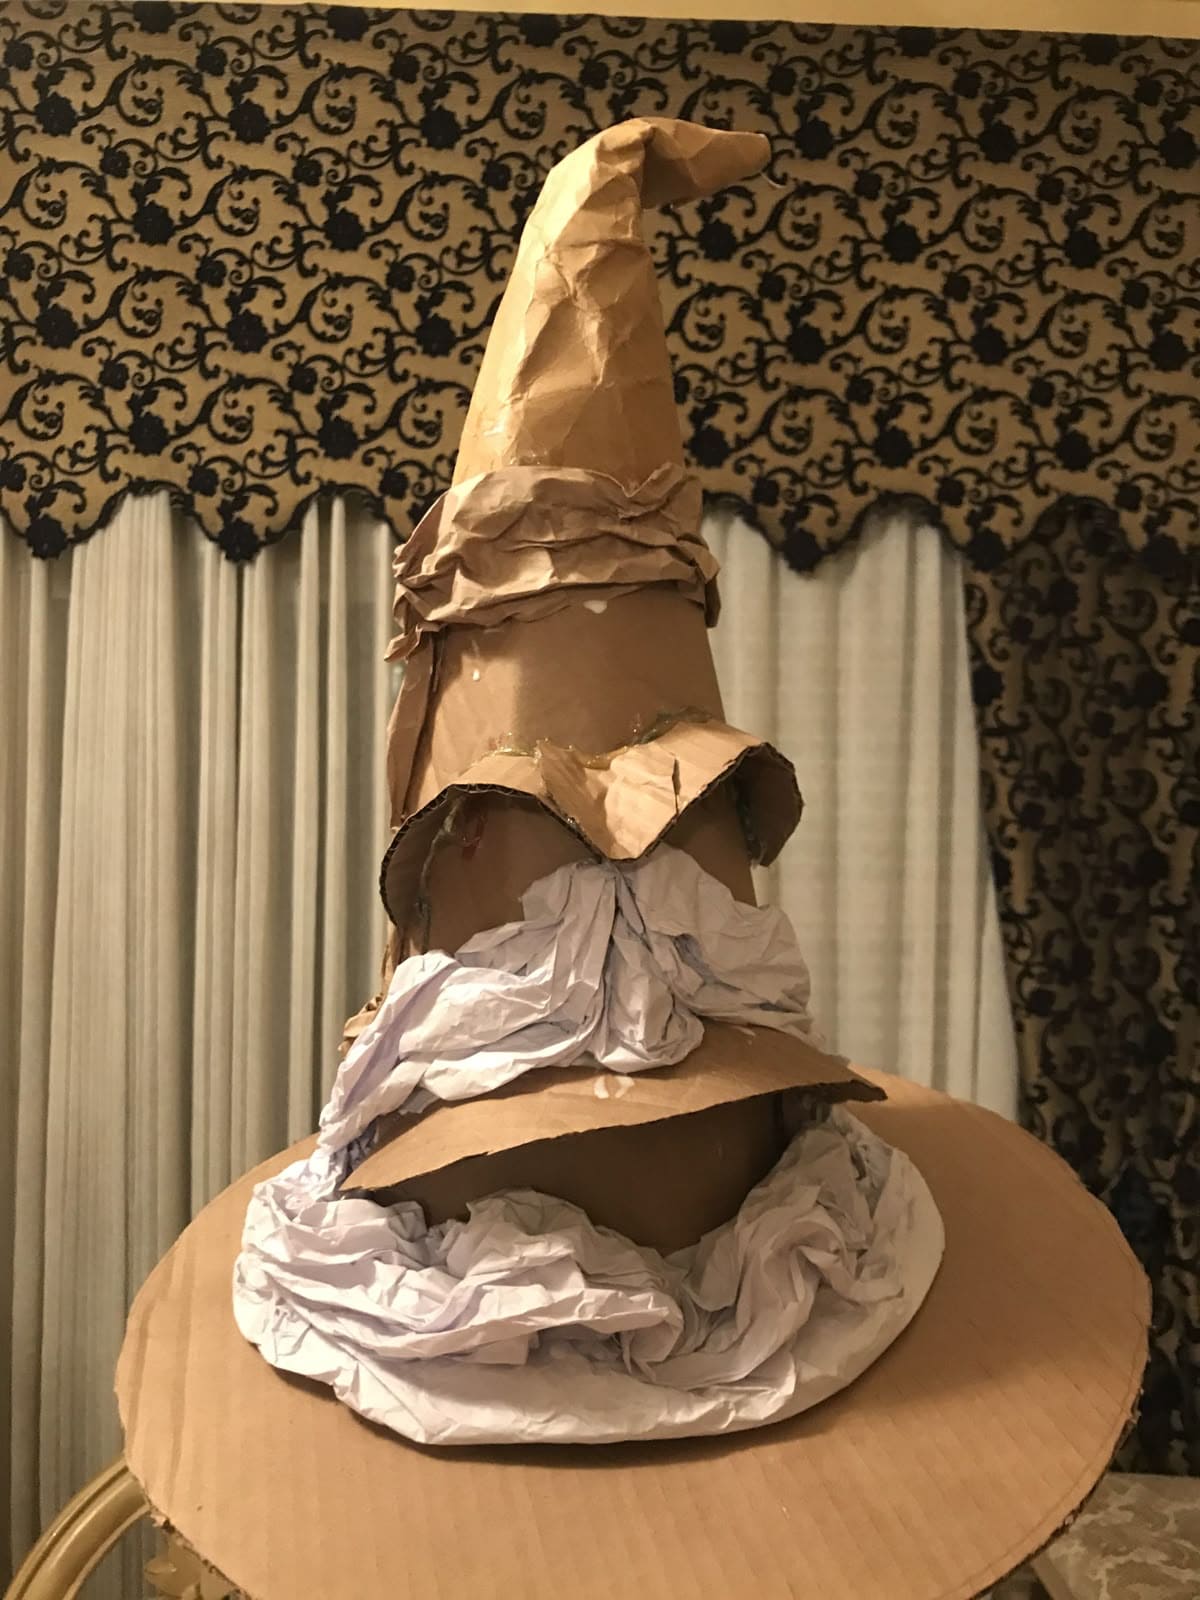
If you’re planning a magical Halloween or Harry Potter-themed party, this cardboard hat is a must-make prop.
Made entirely from recycled cardboard and paper, it captures that aged, mysterious look of the original hat from Hogwarts with all its wrinkled charm and personality.
Materials
- 1 Large cardboard sheet (24x24 inches)
- Brown kraft paper or grocery bags (4-5 large sheets)
- Crumpled white paper or newspaper (6-8 sheets)
- Hot glue gun
- Scissors or utility knife
- Brown acrylic paint
- Paintbrush
- Tape (1 roll)
Instructions
- Cut a large circle (about 18 inches wide) from cardboard for the brim. Then cut a smaller circle in the middle for the hat opening.
- Roll a separate cardboard piece into a tall cone, around 20 inches high, and glue or tape it into shape.
- Glue crumpled paper around the cone to shape the hat’s face such as eyebrows, mouth, and wrinkles. Secure tightly.
- Glue the cone to the brim’s center, reinforcing it with tape or hot glue underneath.
- Cover the hat with brown paper, crinkling it slightly for a worn effect. Smooth and glue down the edges.
- Once dry, paint the entire hat in dark brown, then dry-brush lighter brown for highlights and aging.
Read more: 25 Brilliant Christmas Craft Ideas Using Recycled Cardboard
