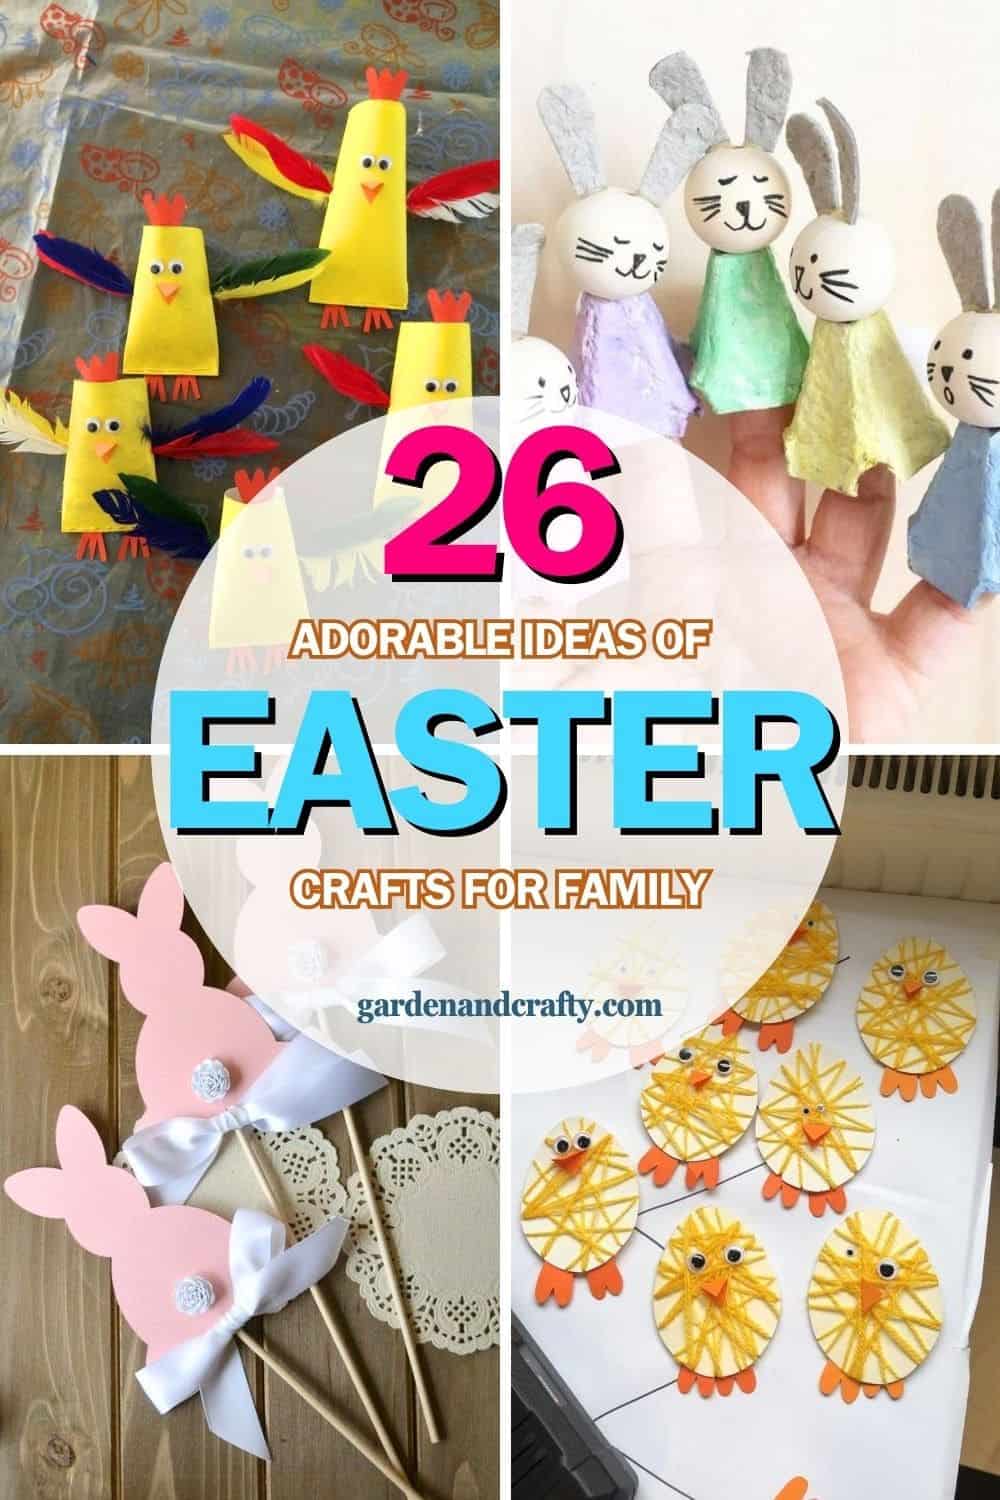
Easter is the perfect time to bond with your little ones over creative and joyful crafts. From vibrant bunnies to charming chicks, these DIY Easter projects bring the holiday spirit to life while offering endless fun for both parents and kids.
Whether you’re looking for simple crafts to keep little hands busy or more detailed projects to inspire creativity, this collection has something for everyone.
These ideas use easily accessible materials, making them budget-friendly and ideal for all ages.
#1. Colorful Feathered Toilet Roll Chicks
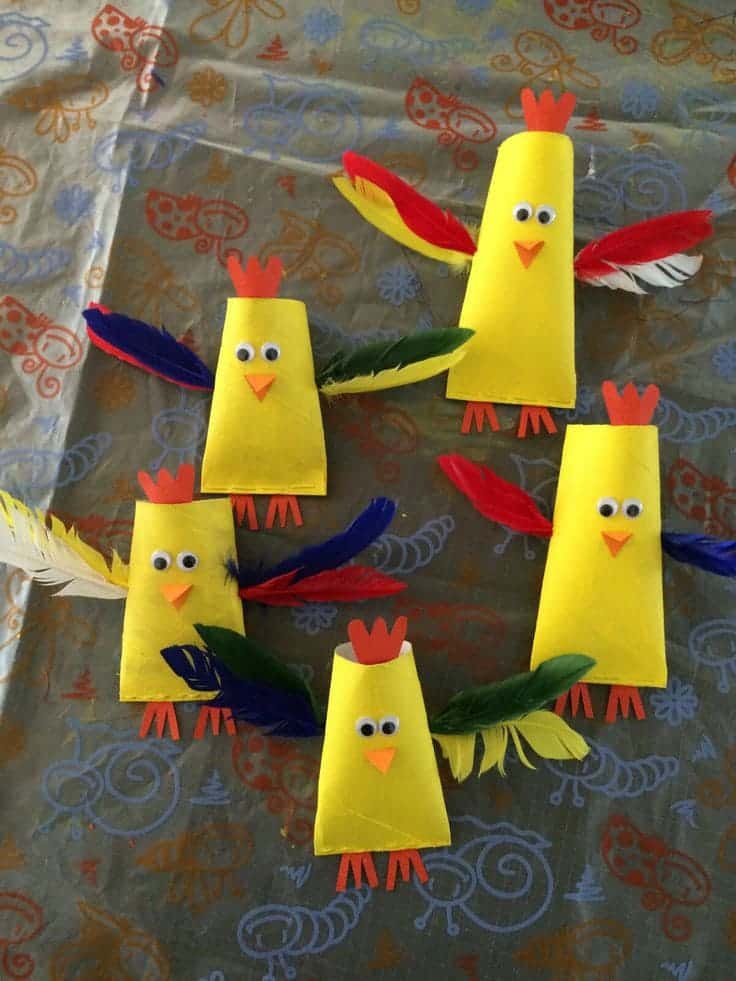
Brighten up your Easter celebrations with these adorable feathered toilet roll chicks!
This fun and vibrant craft uses simple materials, making it an ideal activity for kids and parents to enjoy together.
Materials Needed:
- Empty toilet paper rolls
- Yellow paint or yellow construction paper
- Red and orange construction paper
- Colorful feathers
- Googly eyes
- Glue
- Scissors
Instructions:
- Paint the toilet paper rolls yellow or wrap them in yellow construction paper for a vibrant base.
- Cut out beaks, combs, and feet from orange and red construction paper. Attach them to the rolls with glue.
- Add googly eyes for an animated look.
- Glue colorful feathers to the sides of the roll to create wings.
- Let your feathered friends dry, then display them proudly as cheerful Easter decor!
#2. Adorable Yarn-Wrapped Easter Lamb Wreaths
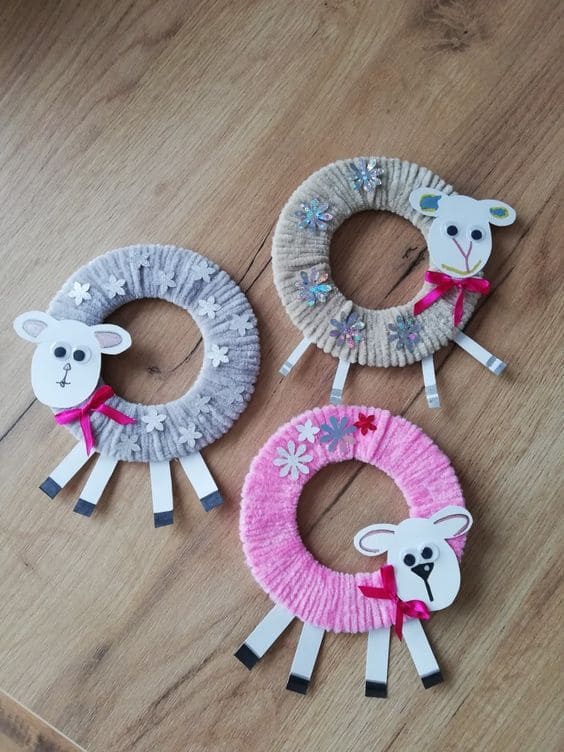
To create a cozy Easter decoration, these yarn-wrapped lamb wreaths are the perfect craft for parents and kids.
Soft textures, cute details, and customizable designs make these wreaths a delightful project for any home.
Materials Needed:
- Small foam or cardboard rings
- Yarn (any colors you like)
- White or beige cardstock for the lamb’s face
- Googly eyes
- Black marker or pen
- Ribbon for bows
- Glue or hot glue gun
- Scissors
- Decorative flowers or stickers
Instructions:
- Wrap yarn tightly around the foam or cardboard ring until fully covered, and secure the ends with glue.
- Cut a lamb face shape from cardstock and draw the facial features with a marker. Attach googly eyes for added charm.
- Glue the lamb face to the wreath and add four small strips of cardstock as legs at the bottom.
- Decorate the wreath with flowers, stickers, or ribbons. Add a bow near the lamb’s neck for a finishing touch.
#3. Rustic Bunny Mobile for Easter
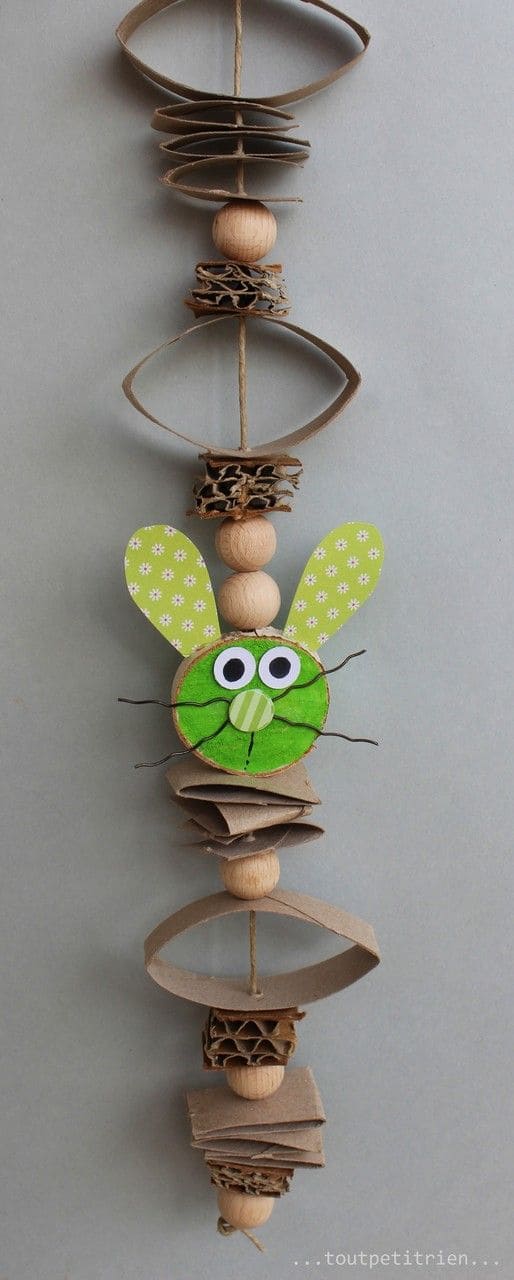
This delightful and eco-friendly bunny mobile is the perfect way to add a playful yet rustic charm to your Easter celebrations.
Made from recycled materials, it’s a creative project for kids and parents to enjoy together.
Materials Needed:
- Cardboard (corrugated and regular)
- Twine or string
- Wooden beads
- Colored paper or fabric for bunny face and ears
- Googly eyes
- Glue
- Scissors
- Hole punch
Instructions:
- Cut cardboard into oval, square, and other decorative shapes for the mobile’s segments.
- Create the bunny face using colored paper or fabric. Add googly eyes, a button nose, and whiskers with twine or wire.
- Punch holes in each cardboard piece and string them onto the twine, alternating with wooden beads for dimension.
- Attach the bunny face and ears to the twine as the centerpiece of the mobile.
- Tie knots between the pieces to keep them in place and hang your finished mobile proudly.
#4. Cheerful Chick Coop Easter Display
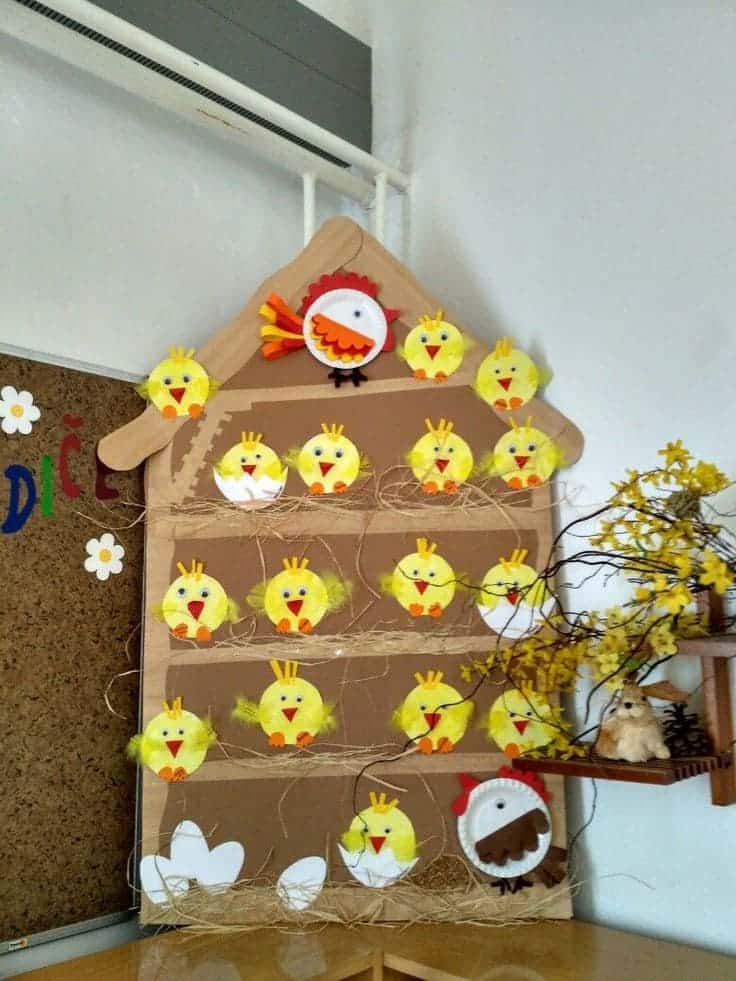
Brighten your Easter celebrations with this cheerful chick coop display that’s perfect for kids and parents to make together.
This project is ideal for classrooms or home decorations and combines creativity with festive charm.
Materials Needed:
- Brown cardboard or poster board (for the coop structure)
- Yellow paper plates or cardstock (for chicks)
- Yellow feathers
- Orange paper (for beaks and feet)
- Googly eyes
- Raffia or straw (for nests)
- Glue gun or craft glue
- Scissors
- Markers or paint (optional)
Instructions:
- Cut out a coop shape from brown cardboard and decorate it with markers or paint for a wooden effect.
- Make chicks by gluing googly eyes, orange paper beaks, and feet onto yellow paper plates or circles cut from yellow cardstock.
- Add feathers to the chicks for extra cuteness.
- Arrange raffia or straw on the coop as nests and glue the chicks onto them.
- Attach the coop to a wall or bulletin board, and add eggs or extra decorations for a finished look.
#5. Bunny String Art Magic
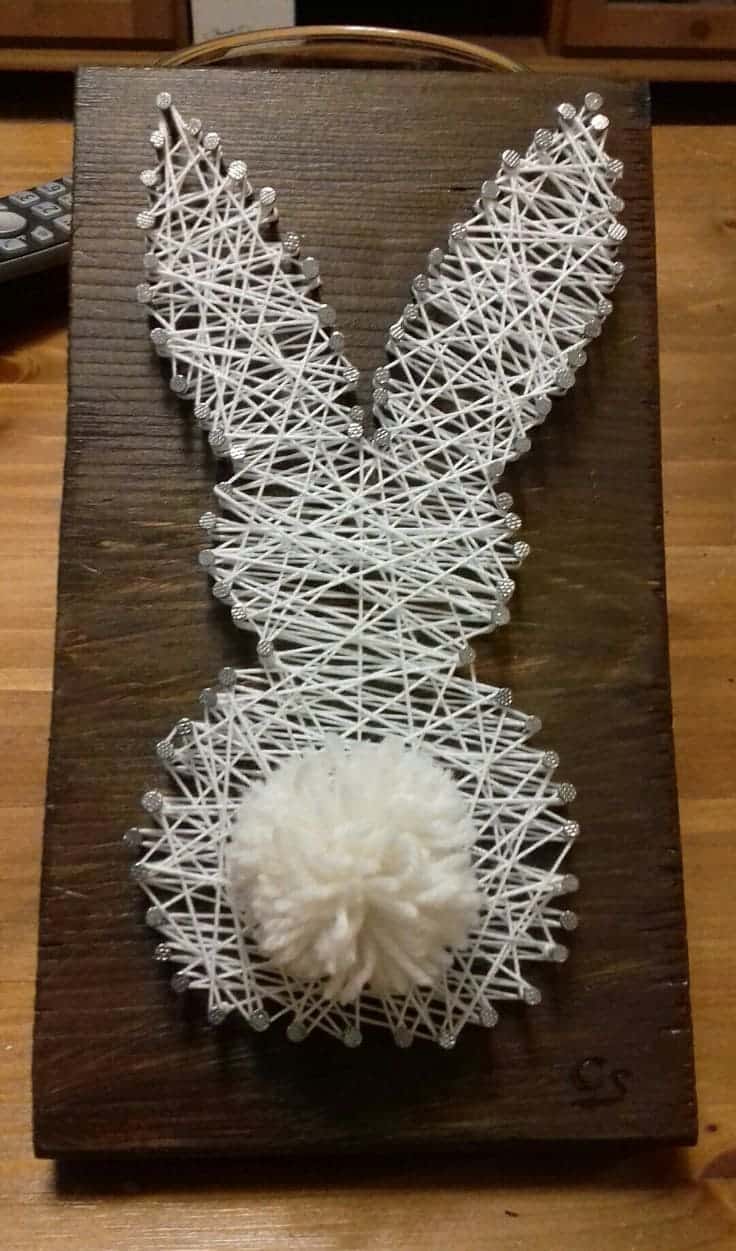
String art is a mesmerizing craft that brings simple designs to life, and this bunny-shaped string art is perfect for Easter decor.
This unique artwork combines rustic charm with playful creativity, making it a fun bonding activity for parents and kids.
Materials Needed:
- Wooden board
- Small nails
- White string or embroidery thread
- Hammer
- Bunny silhouette template
- Yarn for the pom-pom tail
- Glue
Instructions:
- Trace or print a bunny silhouette and place it on the wooden board.
- Hammer nails evenly along the outline of the silhouette, leaving space for the string to loop.
- Remove the template, then begin wrapping the white string around the nails, crisscrossing for a dense, intricate design.
- Create a fluffy pom-pom using white yarn, then glue it onto the board as the bunny’s tail.
#6. Bright and Fluffy Paper Plate Chicks
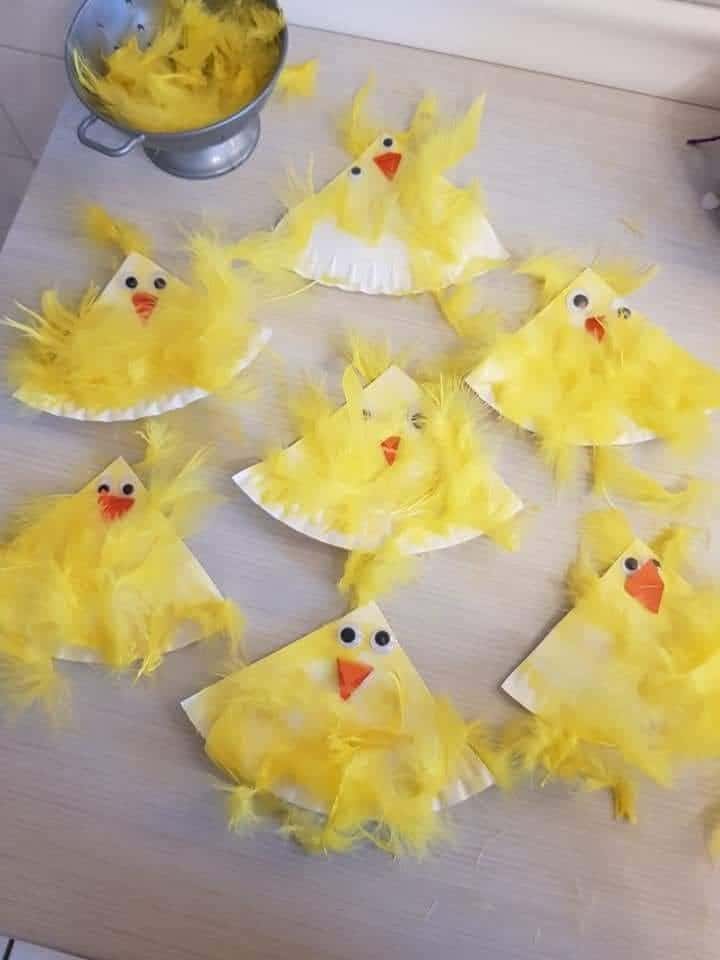
These fluffy paper plate chicks bring a burst of Easter joy to your crafting sessions. With their cheerful yellow feathers and easy-to-follow steps, they’re perfect for parents and kids to make together.
Materials Needed:
- Paper plates (cut in half)
- Yellow feathers
- Googly eyes
- Orange construction paper (for beaks)
- Glue or a glue stick
- Scissors
Instructions:
- Cut paper plates in half to create the chick’s body.
- Cover the curved side of each plate with glue and stick on yellow feathers until fully covered.
- Add googly eyes near the top of the plate for a lively look.
- Cut small triangles from the orange paper and glue them as beaks then let your fluffy chicks dry.
#7. Handprint Chick Frames
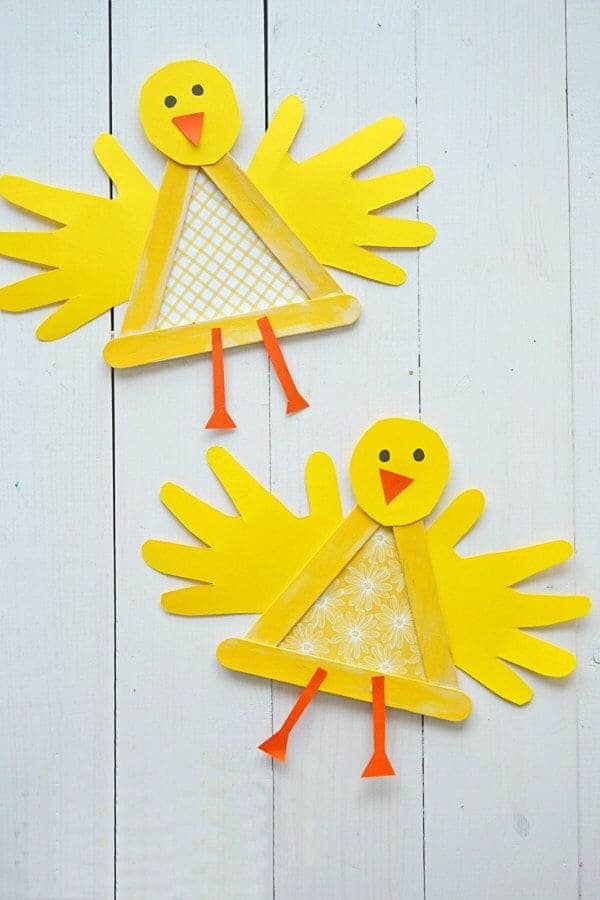
Celebrate Easter with these adorable Handprint Chick Frames, a delightful craft that combines your child’s handprints with cheerful yellow chicks.
This project adds a personal and playful touch to your Easter decorations while being a fun activity for parents and kids.
Materials Needed:
- Yellow and orange construction paper
- Craft sticks (3 per chick)
- Glue and scissors
- Googly eyes
- Patterned or plain white paper for the frame center
- Yellow paint (optional for coloring sticks)
- Marker for details
Instructions:
- Glue three craft sticks into a triangular frame and let it dry. Paint them yellow if desired.
- Trace and cut out two handprints from yellow construction paper to form the chick’s wings.
- Attach the handprints to the sides of the triangle. Glue a circle cut from yellow paper to the top of the frame for the head.
- Stick on googly eyes, an orange paper beak, and triangle legs.
- Add patterned paper or plain white paper to the back of the triangle for a cute touch.
#8. Recycled Easter Birds Craft
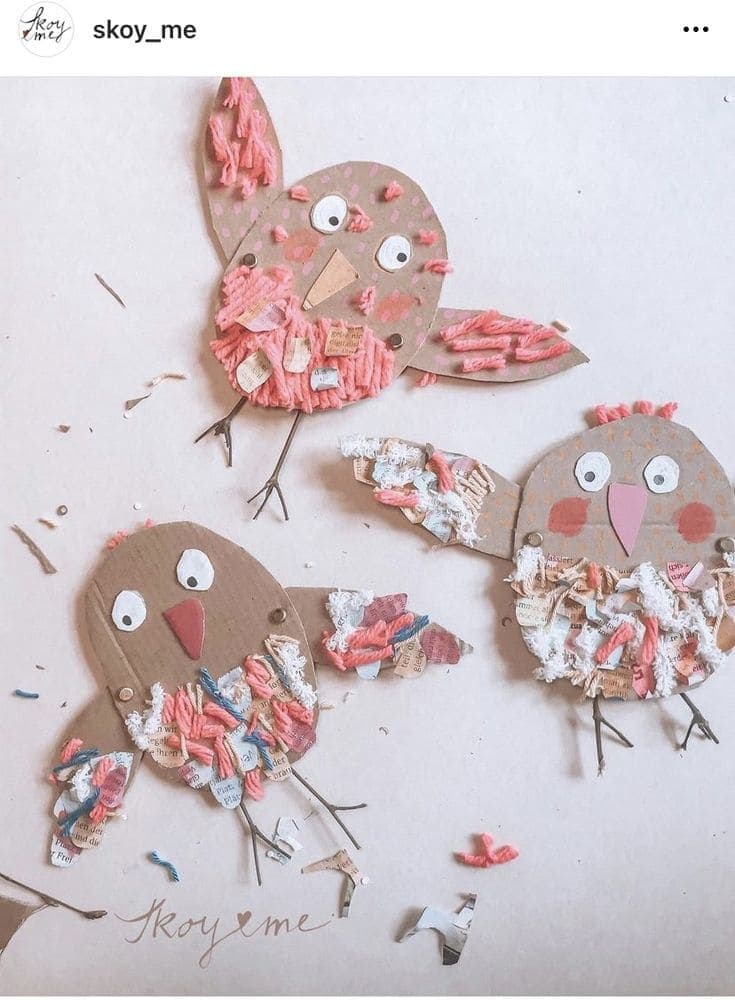
This adorable recycled Easter birds craft is the perfect way to combine creativity with sustainability.
Using simple materials like cardboard and yarn scraps, you and your kids can create these charming birds to celebrate the holiday.
Materials Needed:
- Cardboard
- Scissors
- Yarn or fabric scraps
- Glue
- Markers or crayons
- Googly eyes (optional)
Instructions:
- Cut bird shapes from cardboard, including wings and beaks.
- Decorate the cardboard with markers or crayons for added color.
- Glue yarn or fabric scraps onto the birds to create feathers.
- Attach googly eyes or draw eyes directly onto the cardboard.
#9. Lovely Paper Bag Bunny Gift Holders
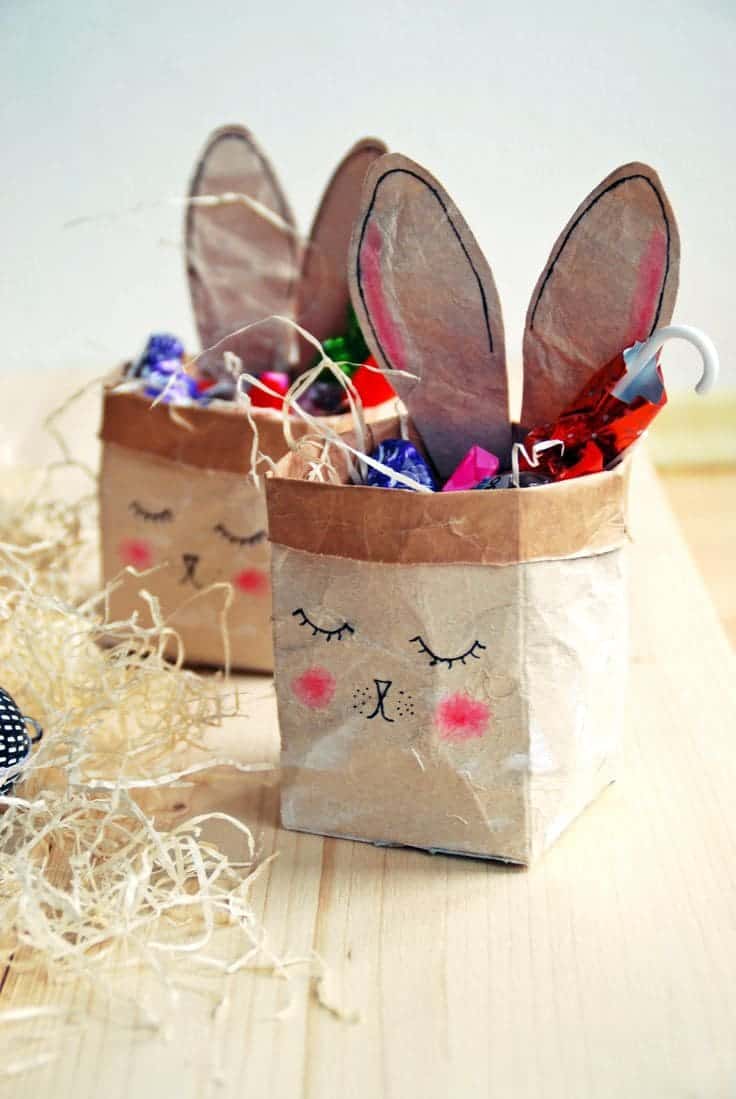
On Easter, these charming bunny-themed gift bags bring a delightful touch to your holiday celebrations.
Perfect for holding treats, they are easy to craft with your kids and offer a unique handmade flair to your gifts.
Materials Needed:
- Brown paper bags
- Colored markers or pens
- Pink blush or pastel chalk
- Craft scissors
- Glue or tape
- Twine or string
- Small treats or candy for filling
Instructions:
- Cut the paper bag’s top edges into bunny ear shapes, leaving enough room for the “face” on the bag’s body.
- Use markers to draw a cute bunny face, including closed eyes, whiskers, and a nose. Add blush to the cheeks with pastel chalk.
- Fill the bag with small treats or Easter candy.
- Fold the “ears” forward slightly and tie twine or string around the bag’s base to secure it.
#10. Rustic Wooden Easter Bunny Trio
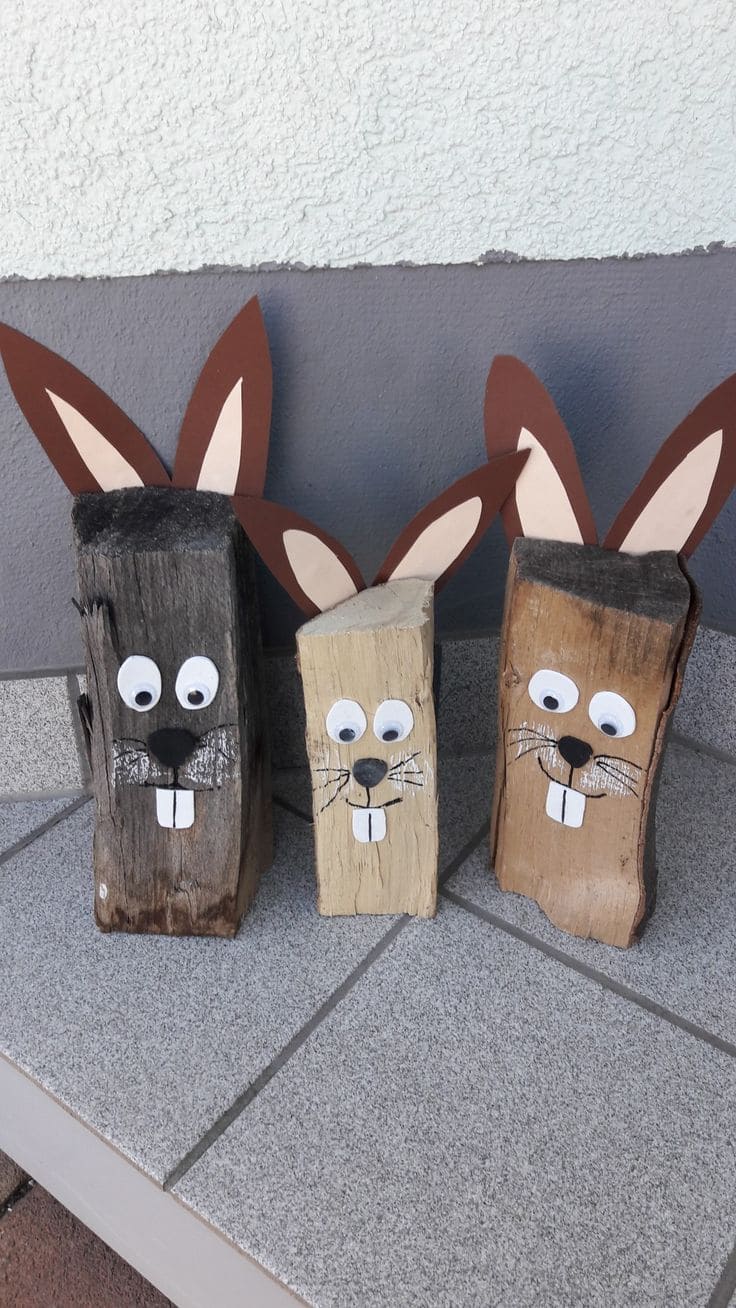
Add a charming rustic touch to your Easter decor with this delightful wooden bunny trio! Using simple materials, you can create adorable bunnies perfect for your porch or garden.
Materials Needed:
- Wooden blocks or logs
- Brown and pink construction paper
- White paint and a paintbrush
- Black marker or paint for facial features
- Googly eyes
- Glue or hot glue gun
- Scissors
Instructions:
- Clean and sand the wooden blocks to prepare them for painting.
- Cut bunny ears from brown paper and inner ear shapes from pink paper, then glue them together.
- Attach the ears to the top of each wooden block using glue.
- Paint or draw a bunny face on each block, adding googly eyes for extra charm.
- Finish by painting small white teeth to complete their adorable bunny look.
#11. Soft and Sweet Bunny Tail Garland
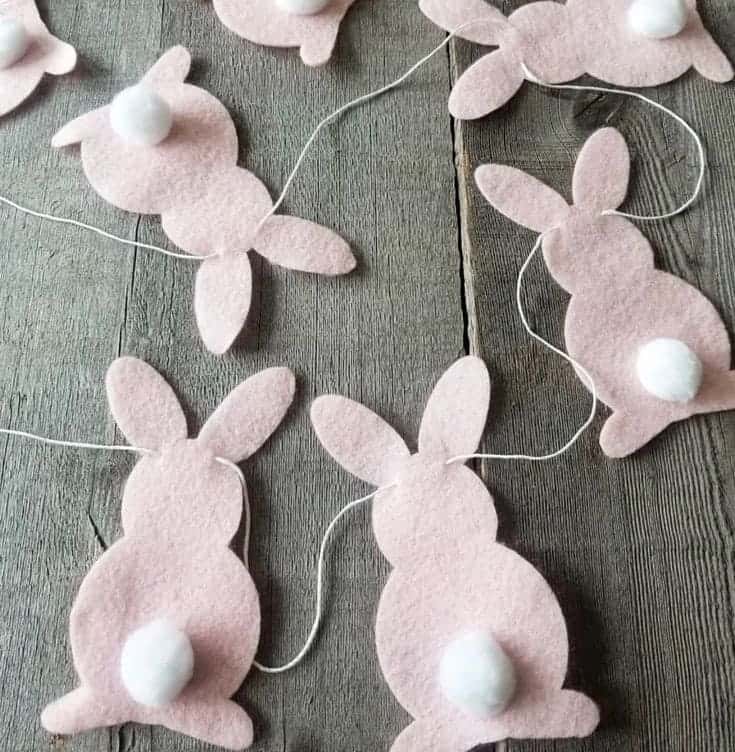
If you want to add a playful and cozy touch to your Easter decorations, this bunny tail garland is the perfect choice. It’s easy to make, adorable, and ideal for involving kids in crafting fun.
Materials Needed:
- Felt sheets (in pastel colors)
- Cotton balls or small pom-poms
- Scissors
- String or twine
- Glue gun or fabric glue
- Bunny template (printed or hand-drawn)
Instructions:
- Print or draw a bunny silhouette template and cut it out.
- Trace the bunny shape onto the felt sheets and cut out multiple pieces.
- Attach a cotton ball or pom-pom to the base of each bunny as the tail using glue.
- Thread the string or twine through the top of each felt bunny, spacing them evenly.
#12. Adorable Egg Carton Bunny Finger Puppets
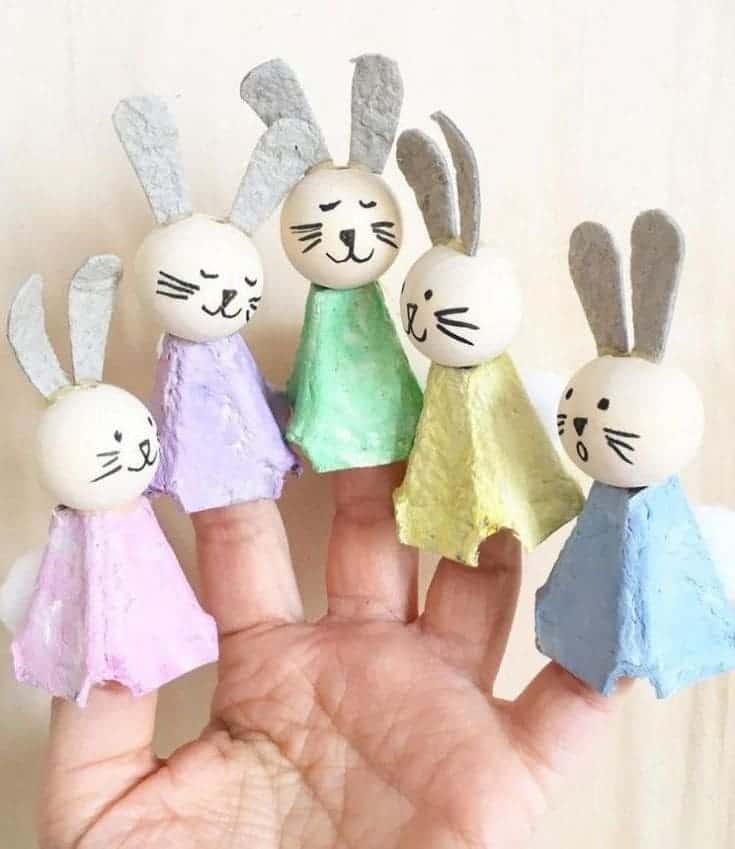
Symbolize Easter’s playful spirit with these adorable finger puppets made from egg cartons and wooden beads.
Perfect for creative fun with your kids, these bunnies bring charm and character to your holiday celebrations.
Materials Needed:
- Wooden beads
- Egg cartons
- Acrylic paints (various pastel colors)
- Black marker
- Craft glue or hot glue gun
- Scissors
- Cotton balls
- Cardboard
Instructions:
- Cut egg carton sections into individual “cups” to form the bunny bodies.
- Paint the egg carton pieces in pastel shades and let them dry.
- Use a marker to draw bunny faces on the wooden beads.
- Cut out bunny ears from cardboard, paint them, and glue them to the top of each bead.
- Attach the wooden bead heads to the painted egg carton bodies using glue.
- Finish by gluing a small cotton ball tail to the back of each bunny.
#13. Rustic Burlap Bunny Decor
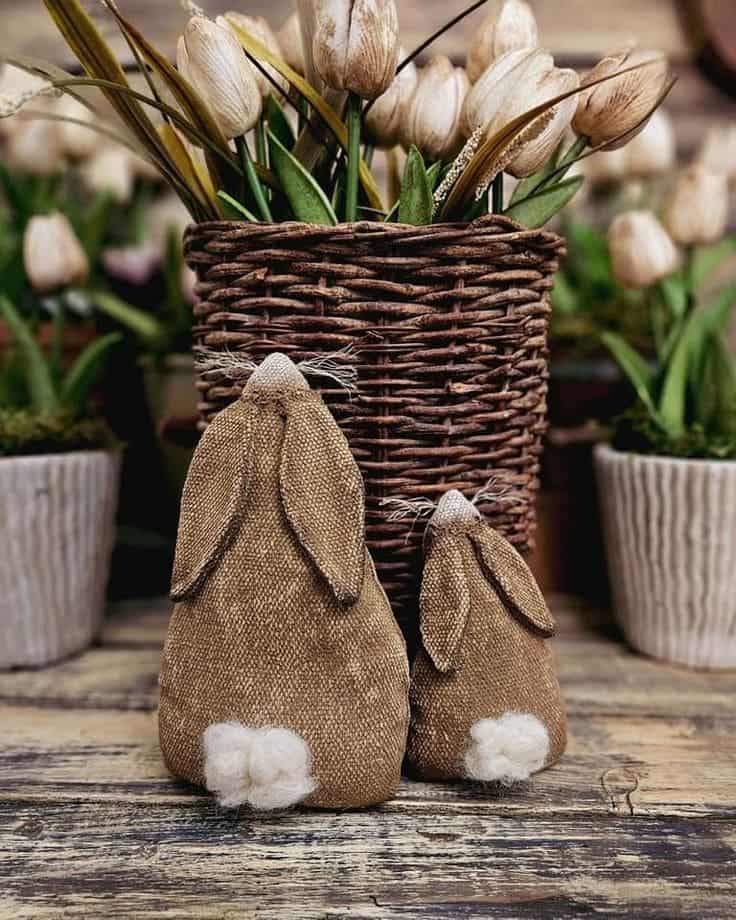
Even the simplest crafts can create the coziest vibes, like these charming burlap bunnies!
Perfect for Easter, they feature a rustic texture and adorable details, such as floppy ears and fluffy tails, that bring a farmhouse touch to your décor.
Materials Needed:
- Burlap fabric
- Cotton balls or wool for tails
- Twine or string
- Scissors
- Hot glue gun
- Stuffing material (e.g., fabric scraps or cotton)
- Needle and thread
Instructions:
- Cut two bunny shapes from the burlap fabric.
- Sew the edges together, leaving a small opening for stuffing.
- Fill the bunny with stuffing to create a plush look and close the seam.
- Attach floppy ears made from burlap with hot glue.
- Add a cotton ball or wool for the tail, securing it with glue.
#14. Quirky Paper Chick Treat Holders
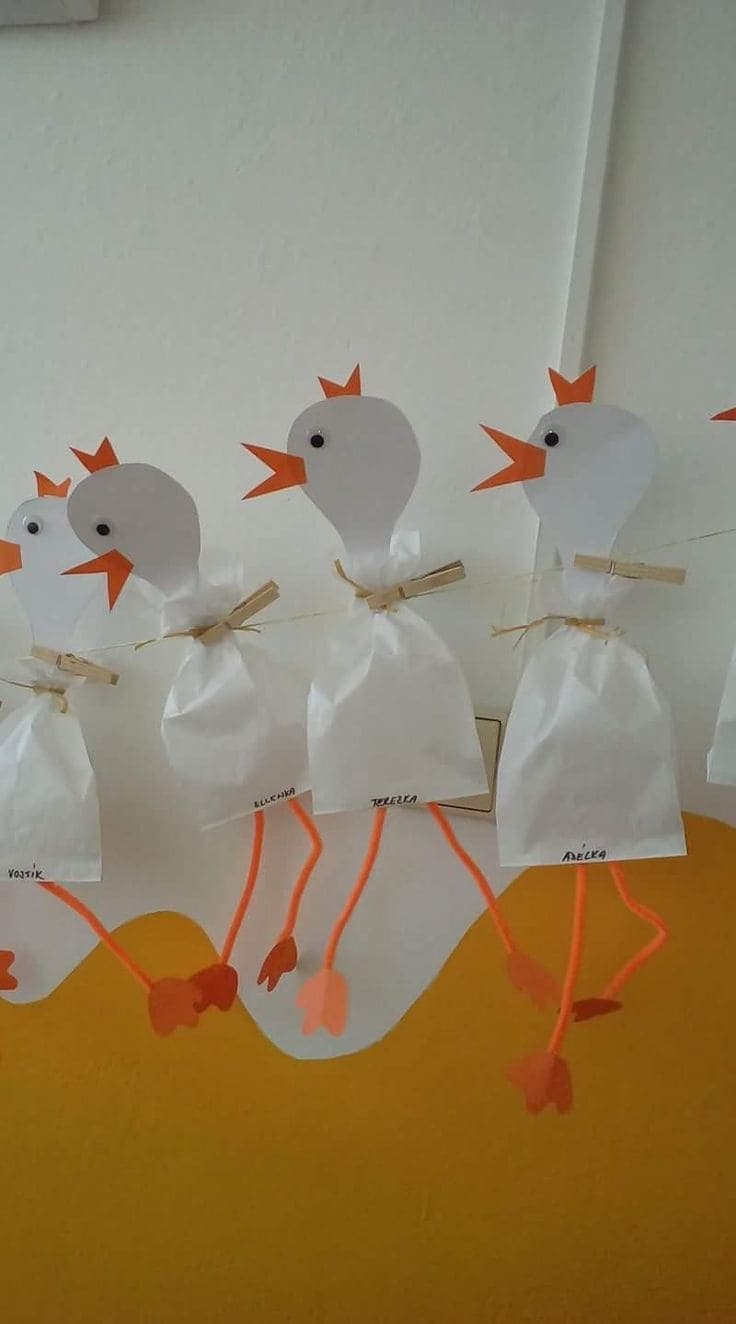
Transform simple paper bags into charming Easter chick decorations!
These delightful little chicks, complete with bright legs and adorable beaks, double as treat holders, making them perfect for kids to enjoy and share during the holiday.
Materials Needed:
- White paper bags
- Orange construction paper
- Googly eyes
- Raffia or ribbon
- Orange pipe cleaners
- Glue or tape
- Scissors
- Small treats or candies
Instructions:
- Fill each white paper bag with treats and twist the top to close. Secure with raffia or ribbon.
- Cut out chick heads, beaks, and crowns from orange construction paper. Attach googly eyes and glue the features to the top of the bag.
- Use orange pipe cleaners for legs, shaping the ends into “feet,” and tape them to the bottom of the bag.
#15. Rustic Popsicle Stick Easter Chicken Craft
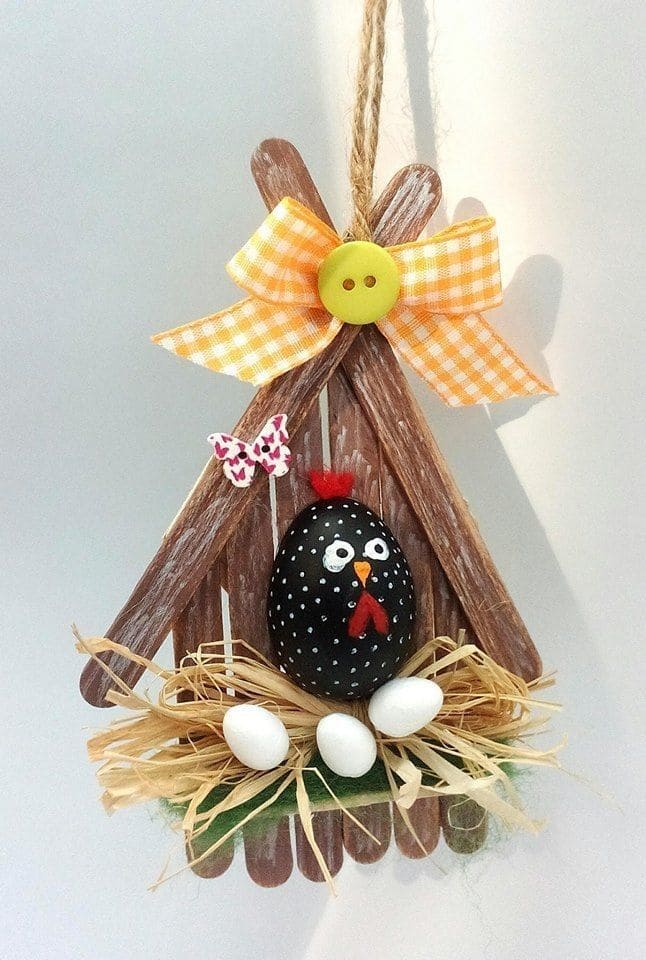
I believe this adorable rustic chicken craft will bring a unique charm to your Easter decorations. Made from popsicle sticks, it’s a creative and easy project for you and your kids to enjoy together.
Materials Needed:
- Popsicle sticks (8–10)
- Black plastic or wooden egg
- White and red acrylic paint
- Mini white eggs (decorative)
- Yellow gingham ribbon
- A small button
- Straw or raffia
- Glue or hot glue gun
- Green felt
- String for hanging
Instructions:
- Glue popsicle sticks together to form a triangular frame and paint them with a rustic wood color or leave them natural.
- Paint a black egg with small white dots and add eyes, a red comb, and a beak to resemble a chicken.
- Create a nest at the base of the triangle using straw or raffia and glue the decorative eggs inside.
- Attach the painted chicken egg to the center of the frame.
- Tie a bow with the yellow ribbon, secure it with a button, and glue it at the top of the frame.
- Add a piece of string to the back for hanging, and your charming Easter decoration is ready to brighten up any corner!
#16. Adorable Yarn-Wrapped Easter Chicks
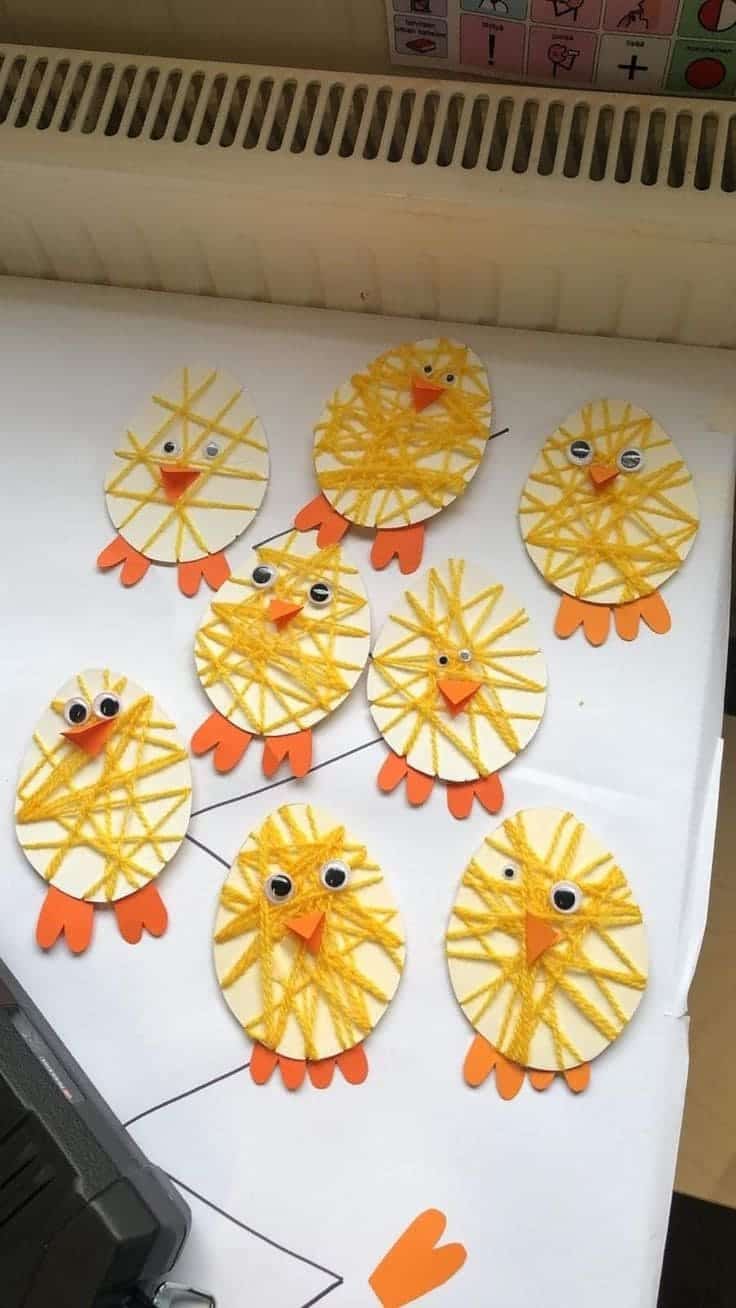
Bring vibrant Easter cheer to your craft time with these yarn-wrapped Easter chicks. Perfect for kids, this craft combines texture, color, and creativity to make charming decorations.
Materials Needed:
- Yellow yarn
- Thick cardstock or foam sheets (for the chick base)
- Orange construction paper (for beaks and feet)
- Googly eyes
- Glue or a glue stick
- Scissors
- Pencil (for tracing the base shape)
Instructions:
- Draw and cut out oval chick shapes from the cardstock or foam sheets.
- Wrap yellow yarn around each oval, securing the ends with glue to form a fluffy texture.
- Cut small triangles from the orange paper for beaks and feet and glue them in place.
- Add googly eyes to complete each chick’s adorable face.
#17. Elegant Bunny Wands
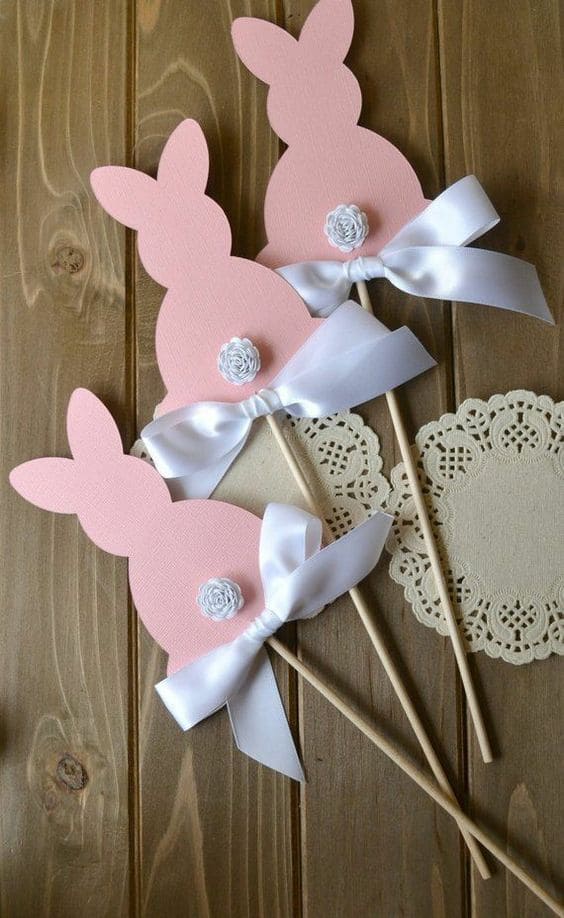
These elegant bunny wands bring a sophisticated and playful touch to your Easter celebrations. Perfect for decorations, photo props, or party favors, these wands are easy and enjoyable to create with your kids.
Materials Needed:
- Pink cardstock or any pastel-colored paper
- Wooden dowels or skewers
- White satin ribbon
- Small decorative flowers or buttons
- Hot glue gun
- Scissors
Instructions:
- Cut bunny shapes out of pink cardstock using a template or freehand drawing.
- Attach a wooden dowel to the bottom center of each bunny shape with hot glue.
- Tie a white satin ribbon into a bow and glue it below the bunny’s “neck.”
- Add a small decorative flower or button to the center of the bow for extra charm.
#18. Bunny Pinecones Figurines
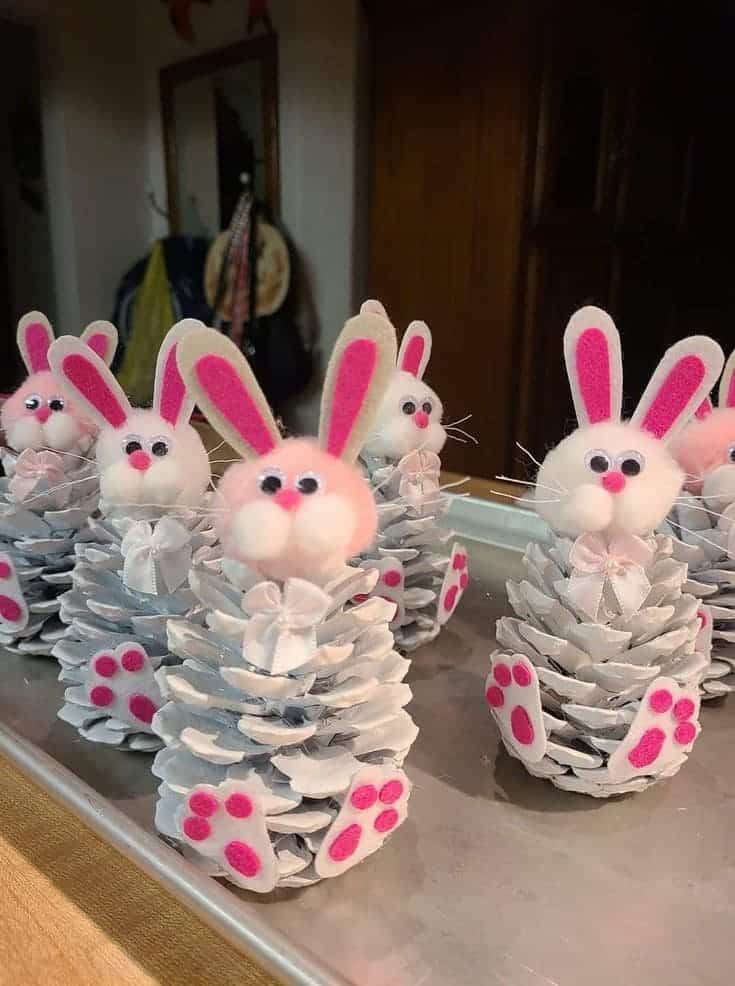
These charming pinecone bunnies bring a rustic and playful vibe to your Easter decor.
With simple materials and easy steps, this craft is perfect for parents and kids to enjoy together while celebrating the festive season.
Materials Needed:
- Pinecones
- White paint or spray paint
- Felt (white and pink)
- Pom-poms (white and pink)
- Googly eyes
- Thin wire or fishing line (for whiskers)
- Ribbon (optional, for bow ties)
- Glue
Instructions:
- Paint the pinecones white and let them dry completely.
- Cut bunny ears from white felt and smaller pink pieces for the inner ear, then glue them together.
- Attach the felt ears to the top of the pinecone.
- Glue a white pom-pom to the front for the bunny’s face and a pink pom-pom for the nose.
- Add googly eyes and thin wire pieces for whiskers.
- Create bunny feet from pink and white felt, then attach them to the base of the pinecone.
- Tie a small ribbon into a bow and glue it to the bunny for extra charm.
#19. From Twigs to Easter Chick Magic
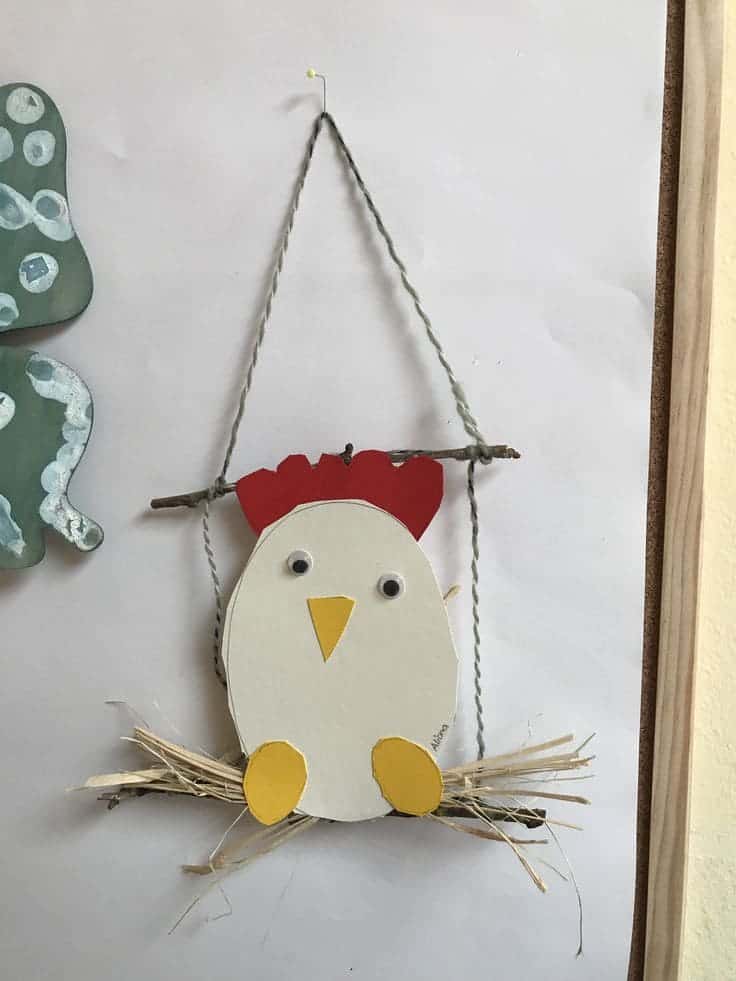
This delightful Easter Chick hanging decoration combines simplicity with rustic charm, making it an enjoyable project for parents and kids alike.
Using twigs, paper, and some creativity, you’ll create a charming handmade piece to brighten up your holiday decor.
Materials Needed:
- Cardstock or thick paper (white, yellow, and red)
- Twigs or small branches
- Straw or raffia
- Twine or string
- Googly eyes
- Scissors
- Glue
Instructions:
- Cut out an oval shape from white cardstock for the chick’s body.
- Add a red paper comb and yellow paper beak and feet.
- Attach googly eyes for an adorable touch.
- Secure twigs together to create a perch and glue straw or raffia to mimic a nest.
- Glue the chick to the perch and attach twine at the top for hanging.
#20. Cute Wooden Spoon Easter Bunny Craft
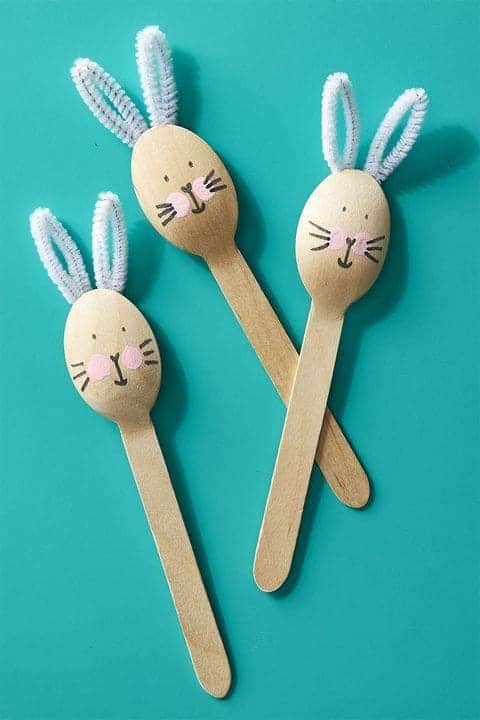
These simple yet delightful wooden spoon bunnies are perfect for Easter! With just a few materials, you and your kids can create cute bunny decorations that double as fun playtime companions.
Materials Needed:
- Wooden spoons
- Pink and black markers
- White or pastel pipe cleaners
- Glue
- Pink blush or chalk for cheeks
Instructions:
- Use the black marker to draw a bunny face on the back of the spoon, including eyes, nose, and whiskers.
- Add rosy cheeks with pink blush or chalk.
- Shape the pipe cleaners into bunny ears and glue them onto the top of the spoon handle.
#21. Rustic Wooden Clothespin Carrots
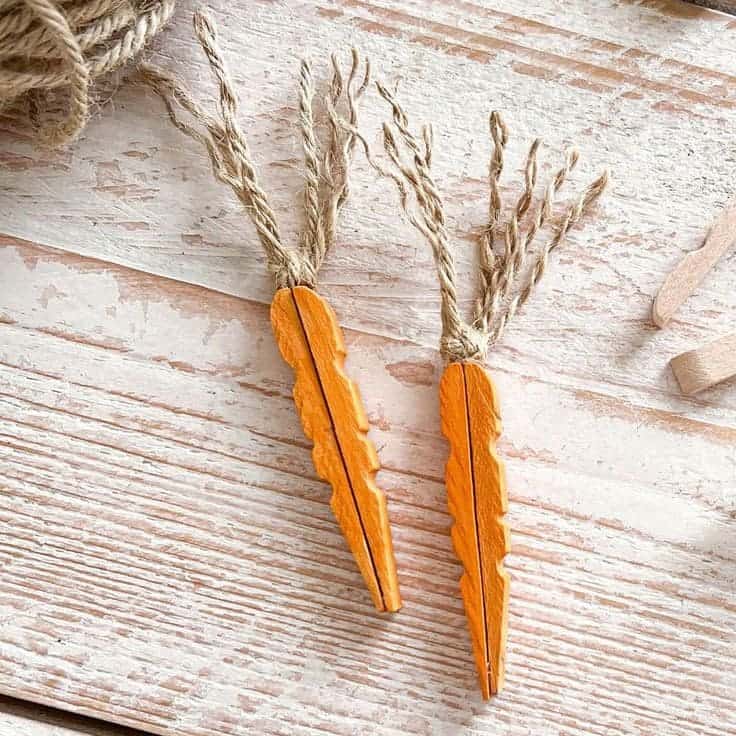
These adorable rustic carrots, crafted from simple wooden clothespins, are the perfect Easter decorations for your home.
With their natural jute tops and vibrant orange paint, they add a delightful handmade touch to your spring festivities.
Materials Needed:
- Wooden clothespins
- Orange acrylic paint
- Paintbrush
- Jute twine
- Hot glue gun
- Scissors
Instructions:
- Separate the wooden clothespins and glue the flat sides together to form a carrot shape.
- Paint the glued clothespins with orange acrylic paint and let them dry.
- Cut jute twine into small pieces, fray the ends, and glue them to the top of each carrot as leafy greens.
#22. Vibrant Bunny Wooden Slices
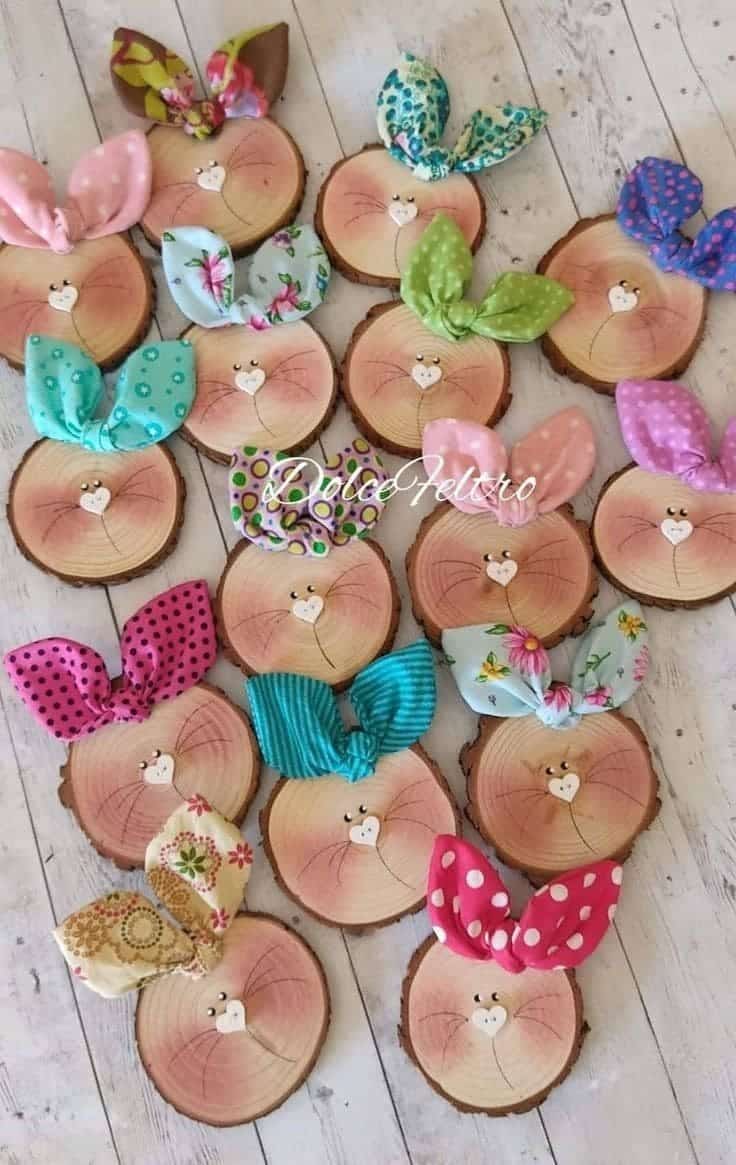
These colorful bunny wooden slices bring a cheerful touch to Easter décor. With adorable bunny faces, soft fabric ears, and natural wood textures, they’re a fun, easy craft for parents and kids to enjoy together.
Materials Needed:
- Wooden slices
- Fabric scraps
- Small heart-shaped beads
- Paint
- Paintbrushes
- Hot glue gun
- Black marker
Instructions:
- Paint bunny faces on the wooden slices, adding cheeks and whiskers with a marker.
- Cut fabric scraps into ear shapes and tie them into bows.
- Glue the ears and heart-shaped bead noses onto the wooden slice.
#23. Charming Bunny Candle Holder
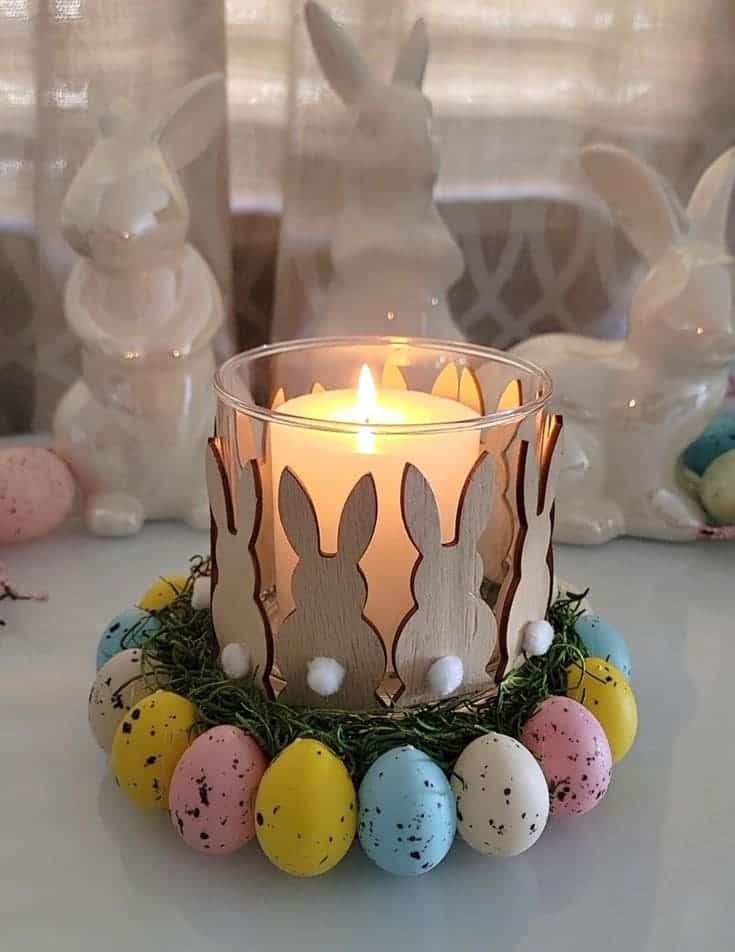
This adorable bunny candle holder is the perfect addition to your Easter decor.
With its glowing centerpiece surrounded by colorful eggs and greenery, it creates a cozy and festive ambiance for your family celebrations.
Materials Needed:
- Glass candle holder
- Wooden bunny cutouts
- Mini pom-poms (for bunny tails)
- Hot glue gun
- Faux moss or greenery
- Plastic or foam decorative eggs
- Candle
Instructions:
- By gluing the wooden bunny cutouts around the glass candle holder, create a seamless bunny-themed design.
- Stick mini pom-poms onto each bunny cutout for adorable tails.
- Arrange faux moss or greenery in a circle around the candle holder.
- Glue colorful decorative eggs around the greenery to complete the festive look.
- Place your candle inside the holder, and light it to enjoy the glowing Easter charm!
#24. Rustic Egg Carton Bunny Portraits for Easter Fun
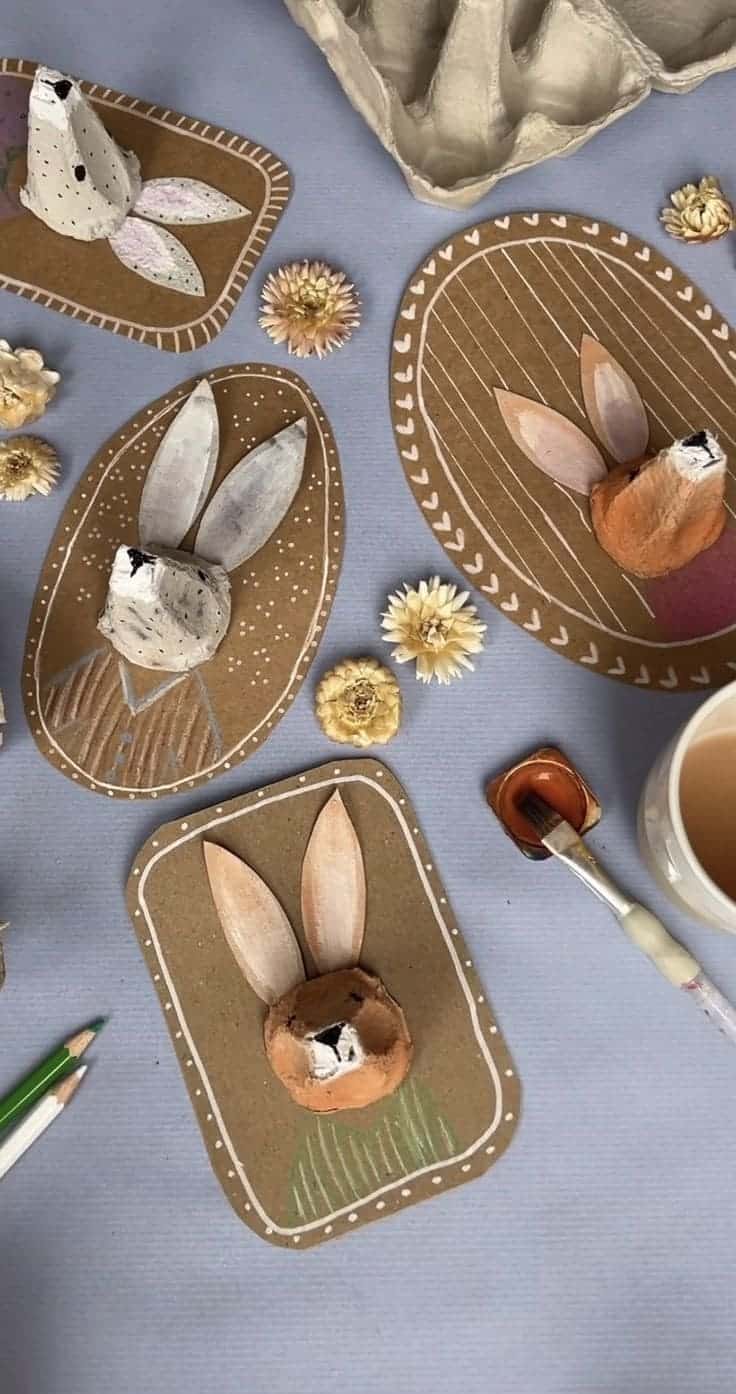
If you’re looking for a charming and eco-friendly Easter craft, these rustic bunny portraits made from egg cartons and cardboard are perfect.
They add a handmade, whimsical touch to your holiday décor while being a great project to enjoy with kids.
Materials Needed:
- Egg cartons
- Cardboard
Acrylic paints (brown, white, pink, and green) - Paintbrushes
- Scissors
- Craft glue
- Colored pencils or markers
Instructions:
- Cut the egg cartons into sections to form bunny faces.
- Paint the egg carton pieces with your chosen colors and let them dry.
- Cut oval-shaped pieces from cardboard for the portrait backgrounds.
- Paint or decorate the cardboard with patterns, grass, or polka dots using paints or markers.
- Attach the egg carton bunny faces to the cardboard using craft glue.
- Add painted or drawn details such as bunny ears and noses.
#25. Playful Easter Spoon Bunnies
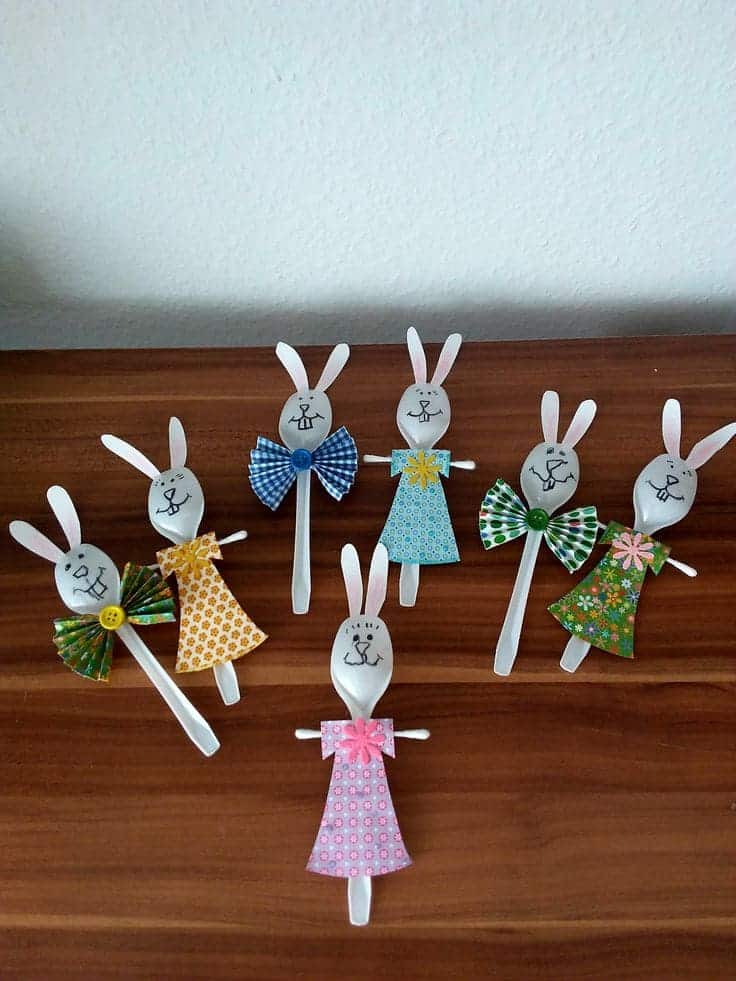
These charming Easter spoon bunnies are a whimsical and creative way to celebrate the season.
With colorful dresses, cheerful bows, and adorable faces, they’re perfect for crafting with kids or decorating your home.
Materials Needed:
- Plastic spoons (white or clear)
- Craft paper (various colors/patterns)
- Ribbon or pre-made bows
- Buttons (optional)
- Black permanent marker
- Glue or hot glue gun
- Scissors
Instructions:
- Draw a cute bunny face on the rounded part of each spoon using a black permanent marker.
- Cut out bunny ears from craft paper and glue them onto the top of the spoon.
- Create little dresses or shirts with the craft paper and attach them to the handle.
- Decorate with ribbons, bows, or buttons for added flair.
#26 Adorable DIY Pom-Pom Bunny Ornaments
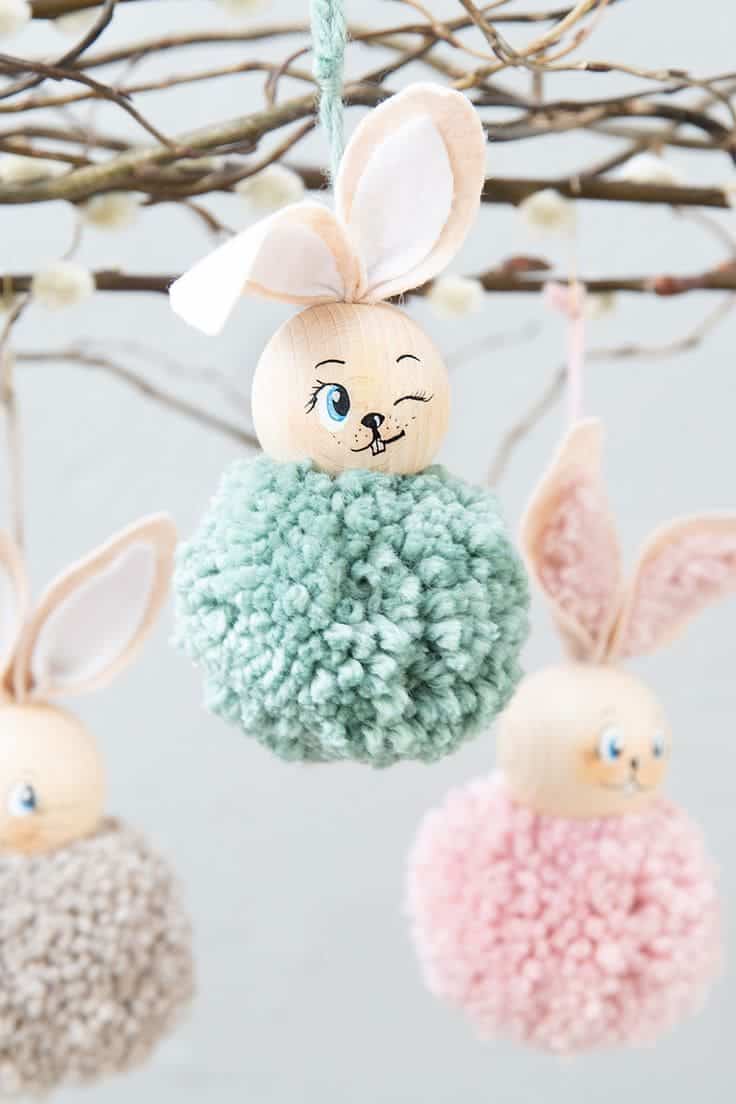
These charming pom-pom bunnies will add a whimsical touch to your Easter decor and are a delightful craft for parents and kids.
With their soft, fluffy bodies and playful faces, these handmade ornaments are easy to create and perfect for Easter tree decorations or gifts.
Materials Needed:
- Yarn (variety of pastel colors)
- Wooden beads
- Felt
- Marker or paint
- Glue gun
- Scissors
- String or twine
Instructions:
- Wrap yarn around your fingers or a pom-pom maker until it’s thick, tie it in the center, and trim to form a fluffy ball.
- Draw a cute bunny face on the wooden bead using a marker or paint. Let it dry.
- Cut felt into ear shapes and glue them to the top of the wooden bead.
- Attach the wooden bead to the pom-pom using a glue gun.
- Tie a string or twine to the top of the wooden bead for hanging.
