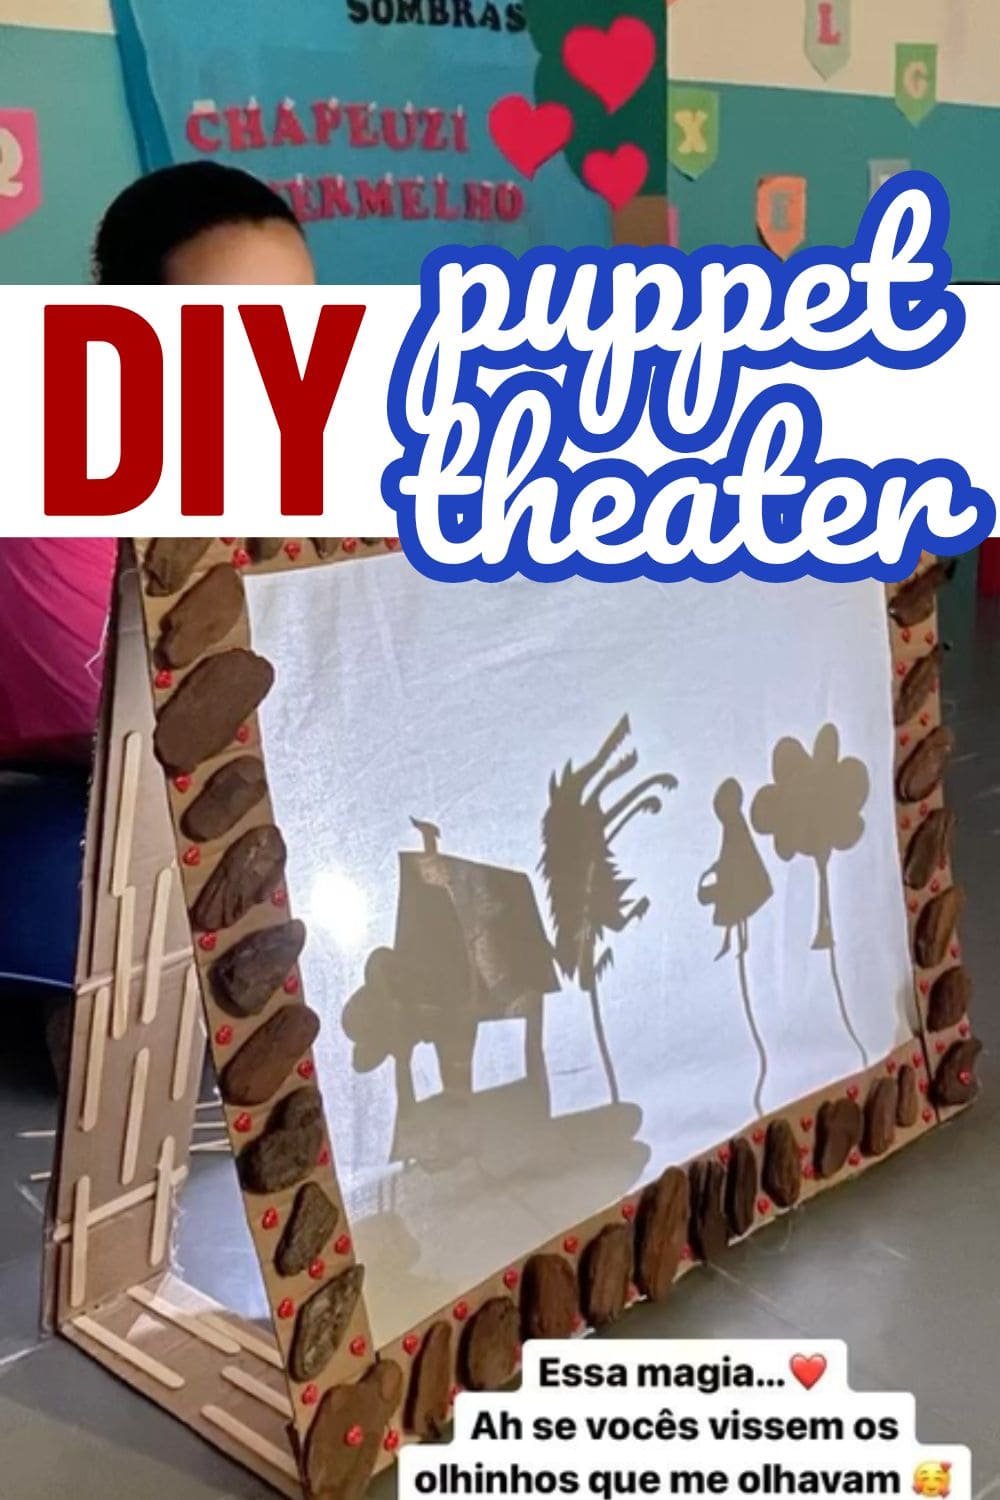
There’s something magical about putting on a puppet show. It sparks imagination, builds storytelling skills, and brings a whole lot of laughter to any afternoon.
With just a few craft supplies and a bit of creativity, you can turn an ordinary box, curtain, or PVC pipe into a stage full of character and charm.
These 21 DIY puppet theater ideas are perfect for hands-on families, creative classrooms, or rainy day boredom busters.
#1. Tabletop Puppet Theater with Curtains and Garland
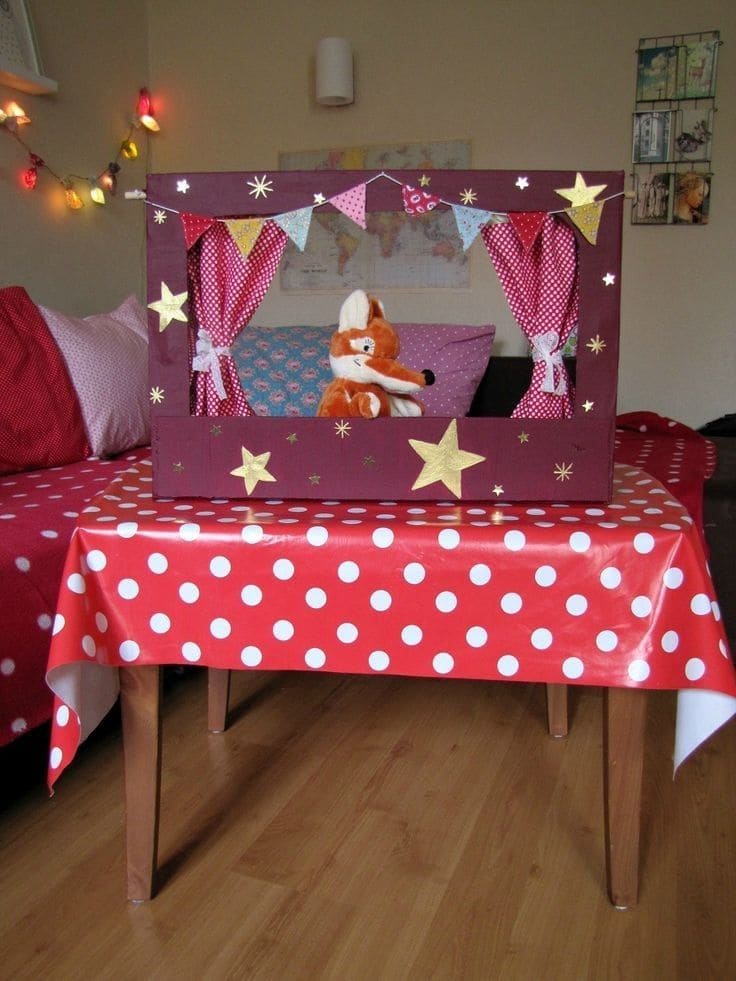
This tabletop puppet theater adds a splash of cheerful whimsy to any playroom or classroom setup.
Made from a medium cardboard box, it sits perfectly on a table and transforms into a festive stage with a few creative touches.
Add old stars scattered across the frame create a magical, celebratory feel, ideal for puppet storytelling, hand puppets, or stuffed animal performances.
Materials Needed
- Cardboard box (approx. 20″ H × 30″ W × 10″ D)
- 2 pieces of fabric (each 10″ × 18″) for curtains
- Decorative string and mini flags for bunting
- Gold paper or star stickers
- Scissors or box cutter
- Glue stick or tape
- String or ribbon to tie back curtains
Step-by-step Guide
Step 1: Cut out a large rectangular window (about 16″ × 22″) in the front panel of your box.
Step 2: Attach fabric panels behind the cutout to act as curtains. Then tie each with ribbon or string for a gathered look.
Step 3: Decorate the front surface with star cutouts, stickers, or glitter accents for sparkle.
Step 4: String up your garland of mini flags across the top using tape or glue at each corner.
Step 5: Place your theater on a sturdy table and get your puppets ready for action.
#2. Cardboard Box Shadow Puppet Theater
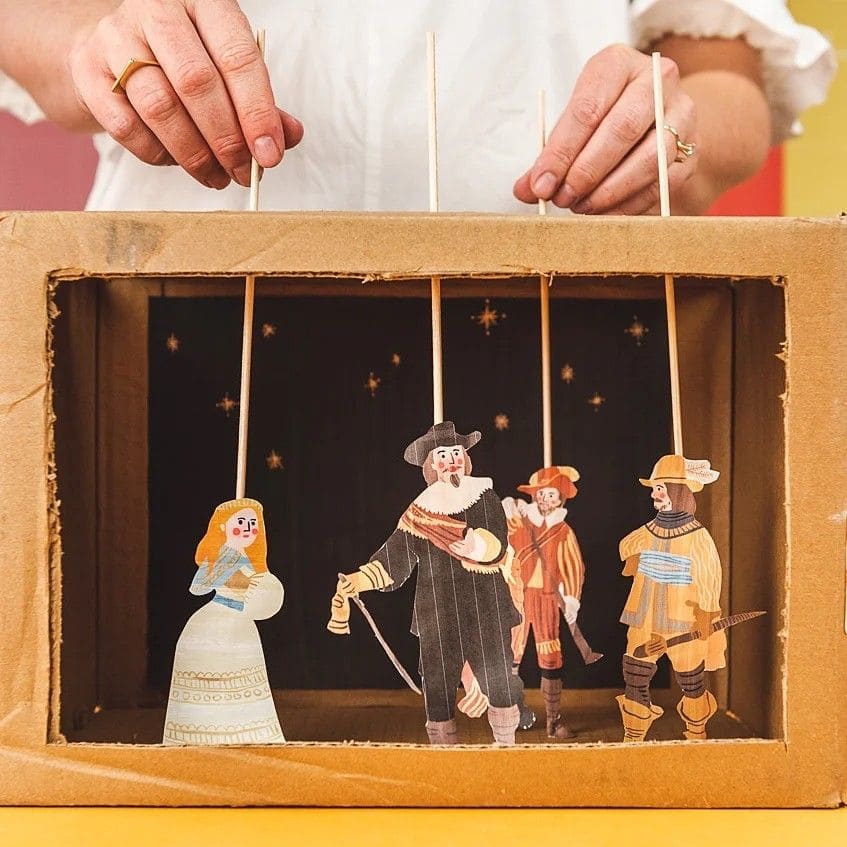
This simple cardboard puppet stage is perfect for kids who want to dive straight into storytelling.
Using just a recycled box and paper cutouts on skewers, you can stage classic tales or invent your own dramatic adventures.
The design is intentionally rough-around-the-edges, giving it a handmade charm that lets imagination do most of the work.
Materials Needed
- Cardboard box (approx. 18″ × 12″ × 9″)
- Black construction paper or painted background
- Paper or cardstock for characters
- Wooden skewers or craft sticks
- Scissors, glue, tape, markers
Step-by-step Guide
Step 1: Cut a large rectangle from one side of the box to serve as the stage window.
Step 2: Line the back interior with black paper and add small yellow stars for a night sky effect.
Step 3: Create character puppets using thick paper or printouts, attaching them to wooden skewers.
Step 4: Reinforce the top edge of the box to prevent bending as puppets are moved up and down.
Step 5: Start the show by sliding characters in from the bottom or manipulating from above!
#3. Enchanting Shadow Puppet Theater Inspired by Little Red Riding Hood
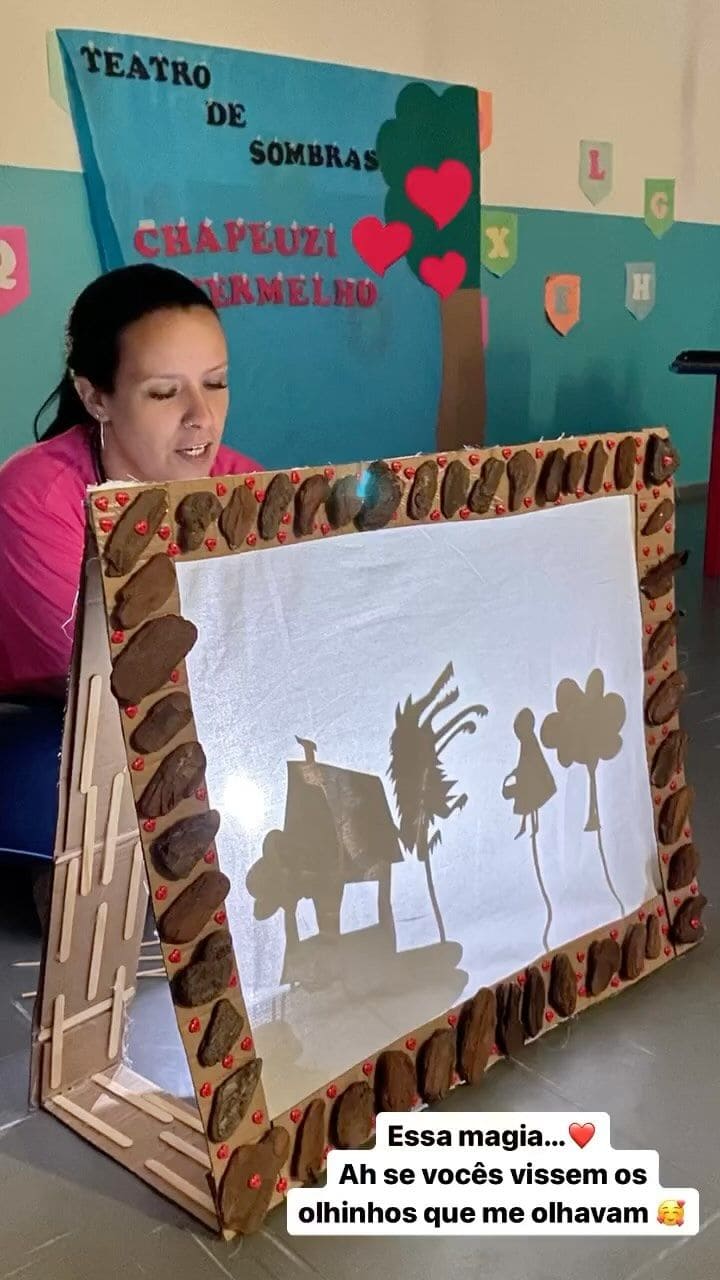
Designed with a freestanding triangular frame, it transforms a simple storytelling moment into a mesmerizing play of light and shadow.
The screen measures approximately 20 inches wide by 14 inches tall, large enough to showcase expressive silhouette puppets.
Decorated with natural bark, small faux berries, and popsicle sticks, the whole piece feels like it stepped out of a forest.
Materials Needed
- 2 cardboard panels (approx. 24 x 16 inches)
- White sheer fabric or parchment paper (20 x 14 inches)
- Hot glue gun and scissors
- Natural materials: bark pieces, small stones, faux berries
- Popsicle sticks (6–8) for structure and puppet handles
- Black cardstock for shadow puppets (8.5 x 11 inches)
- Desk lamp or LED flashlight for lighting
Step-by-step Guide
Step 1: Cut two large cardboard pieces (24 x 16 inches) and form a freestanding triangle using popsicle sticks at the base for support.
Step 2: Cut a 20 x 14 inch window in the center of one cardboard panel, then glue the white fabric tightly across the back to form your shadow screen.
Step 3: Attach the second panel behind the screen panel, forming a slanted triangle that stands on its own.
Step 4: Decorate the outer border with natural bark, sticks, or red embellishments to mimic forest charm.
Step 5: Cut out shadow characters from black cardstock and glue them to sticks for easy movement behind the screen.
Step 6: Set a lamp 8-10 inches behind the screen and dim the room to bring your story to life through shadows.
#4. Hanging Circus Puppet Theater Curtain
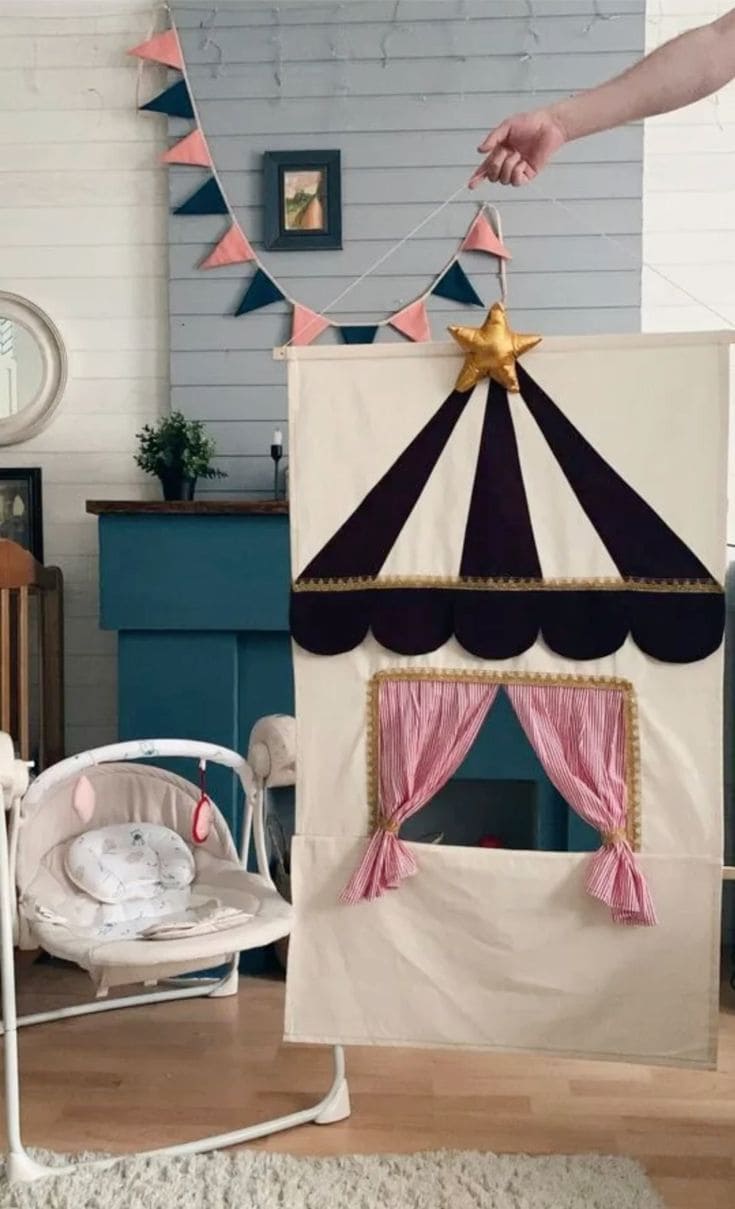
Transform any doorway into a stage with this hanging puppet theater inspired by vintage circus tents.
The full fabric panel measures approximately 24″ W × 38″ H, ideal for standard door frames or between bookshelves.
Bold black felt stripes radiate from a plush golden star at the top, forming a classic tent peak, while the bottom half showcases a window opening trimmed in gold ribbon and pink striped curtains.
Materials Needed
- Cream-colored fabric panel (24″ W × 38″ H)
- Black felt (2 sheets 12″ × 18″)
- Gold ribbon trim (2 yards)
- Pink striped fabric for curtains (2 pieces, 10″ × 15″)
- Plush gold star (store-bought or handmade)
- Wooden dowel or curtain rod (26″ long)
- Sewing kit or fabric glue
- Thin rope or cord for hanging
Step-by-step Guide
Step 1: Cut your cream fabric into a rectangle and hem the edges for a clean finish. Create a 2″ loop at the top for inserting the dowel.
Step 2: Cut and attach black felt stripes in a radiating pattern to form a tent roof. Add a plush star where the stripes meet.
Step 3: Sew or glue gold ribbon below the scallops and around the window frame to define the theater look.
Step 4: Attach the pink curtains on each side of the window and tie them back for a polished effect.
Step 5: Insert the dowel through the top loop and hang it using rope or string secured to hooks or a doorway.
#5. Felt Forest Puppet Box with Fairy Tale Friends
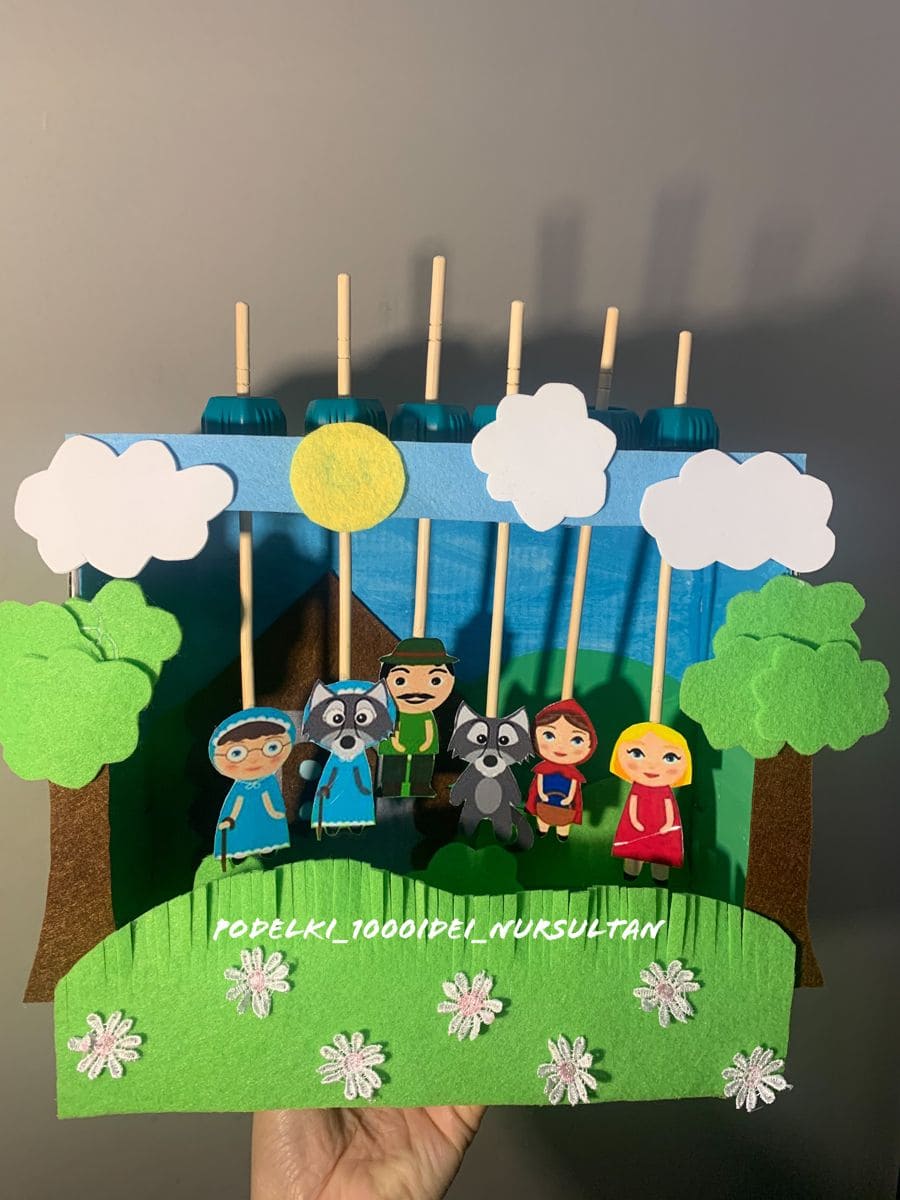
Crafted with care and full of cheerful colors, this felt-covered puppet box is a wonderful stage for telling fairy tales.
The sturdy cardboard box is decorated with blue sky, white clouds, a yellow sun, and green grass layered with felt.
Trees and flowers flank the front, creating a vibrant woodland setting.
Characters like Little Red Riding Hood, Grandma, the Hunter, and wolves are mounted on wooden skewers and can peek over the top for playful storytelling.
Materials Needed
- Medium cardboard box (approx. 10″ × 12″ × 5″)
- Colored felt sheets (green, blue, brown, white, yellow)
- Craft glue and scissors
- Wooden skewers or sticks (8″–10″ long)
- Printed or hand-drawn paper puppets
- Mini artificial flowers (optional)
Step-by-step Guide
Step 1: Cover the box with blue felt for the sky and brown for the forest interior.
Step 2: Cut and glue green grass, trees, and flower embellishments to the outside.
Step 3: Create a top panel with clouds and a sun to frame your story stage.
Step 4: Attach paper puppet characters to skewers and insert them through holes or slots at the back.
Step 5: Decorate the base with flowers or characters to complete your forest scene.
#6. Cardboard Town Puppet Theater
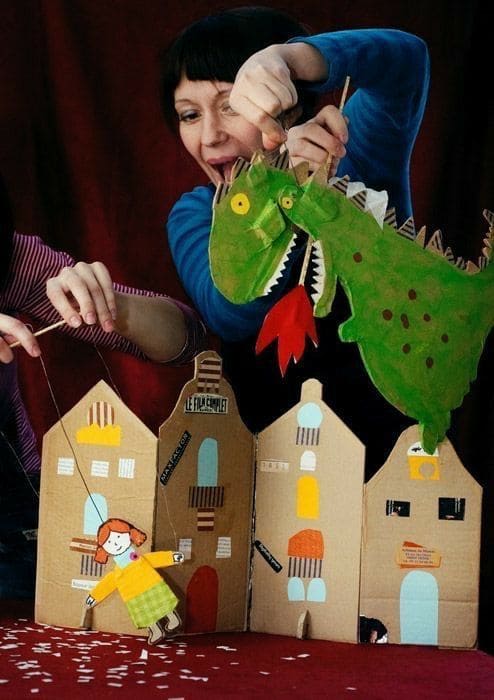
This playful puppet theater turns scrap cardboard into an entire storybook village.
With painted paper puppets and a fire-breathing dragon stealing the spotlight, kids won’t just watch a tale unfold, they’ll invent their own.
You can reuse any shipping box to create the charming buildings, complete with cut-out windows and hand-drawn details that look adorably homemade.
Materials Needed
- Large cardboard sheets or shipping boxes (at least 20″ × 30″)
- Colored paper, markers, and paint
- Glue stick or craft glue
- Yarn or string (24″ lengths for each puppet)
- Wooden skewers or sticks (10″–12″) for controls
- Scissors or craft knife
- Optional: googly eyes, tissue paper for fire effects
Step-by-step Guide
Step 1: Cut your cardboard into tall building shapes—aim for pieces around 10″ wide by 14″–16″ tall. Add different roof shapes and door/window outlines for charm.
Step 2: Paint or decorate each building using craft paper, markers, or old magazine cutouts. Don’t forget signs or window shutters!
Step 3: Create characters from thick paper or thin cardboard (about 6″–8″ tall). Color them in, glue on googly eyes, and add yarn for hair.
Step 4: Tape or tie 24″ yarn pieces to the puppet arms or head, then attach them to 10″–12″ sticks for simple controls.
Step 5: Set the buildings up in a row or arc as your stage and get ready to tell a tale—dragons, heroes, and all!
#7. Forest Ballet Cardboard Puppet Theater
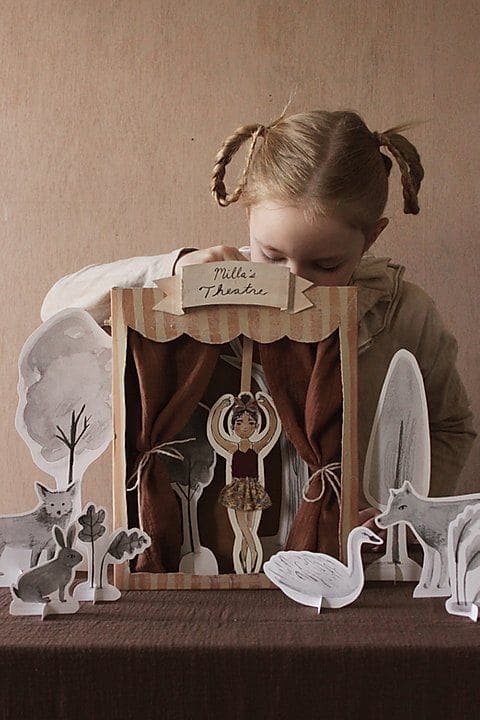
Charming and theatrical, this handmade puppet theater brings a woodland ballet to life.
Made from a vertical cardboard box, the stage features a hand-lettered sign, chocolate brown curtains, and a ballerina puppet suspended from above.
What makes it magical is the addition of hand-painted forest creatures and trees surrounding the scene.
These extra props add depth and set the mood for a whimsical outdoor performance, allowing kids to feel like true directors of their own ballet tale.
Materials Needed
- Cardboard box (approx. 15″ × 10″ × 5″)
- Brown fabric scraps for curtains
- Twine, paper, watercolor paints or markers
- Printed or hand-drawn woodland animals and trees
- Glue, scissors, tape
- Paper or cardboard puppets with stick handles
Step-by-step Guide
Step 1: Cut out a rectangular window in the box and reinforce the edges with tape or cardstock.
Step 2: Attach two pieces of brown fabric as curtains and tie them back with twine.
Step 3: Paint or print forest trees and animals; cut them out and secure them standing with folded tabs.
Step 4: Create your puppet (like the ballerina) and hang or slide it using string or sticks.
Step 5: Add a sign like “Mila’s Theatre” for a personalized touch, then let the show begin!
#8. Vintage-Inspired Christmas Puppet Theater
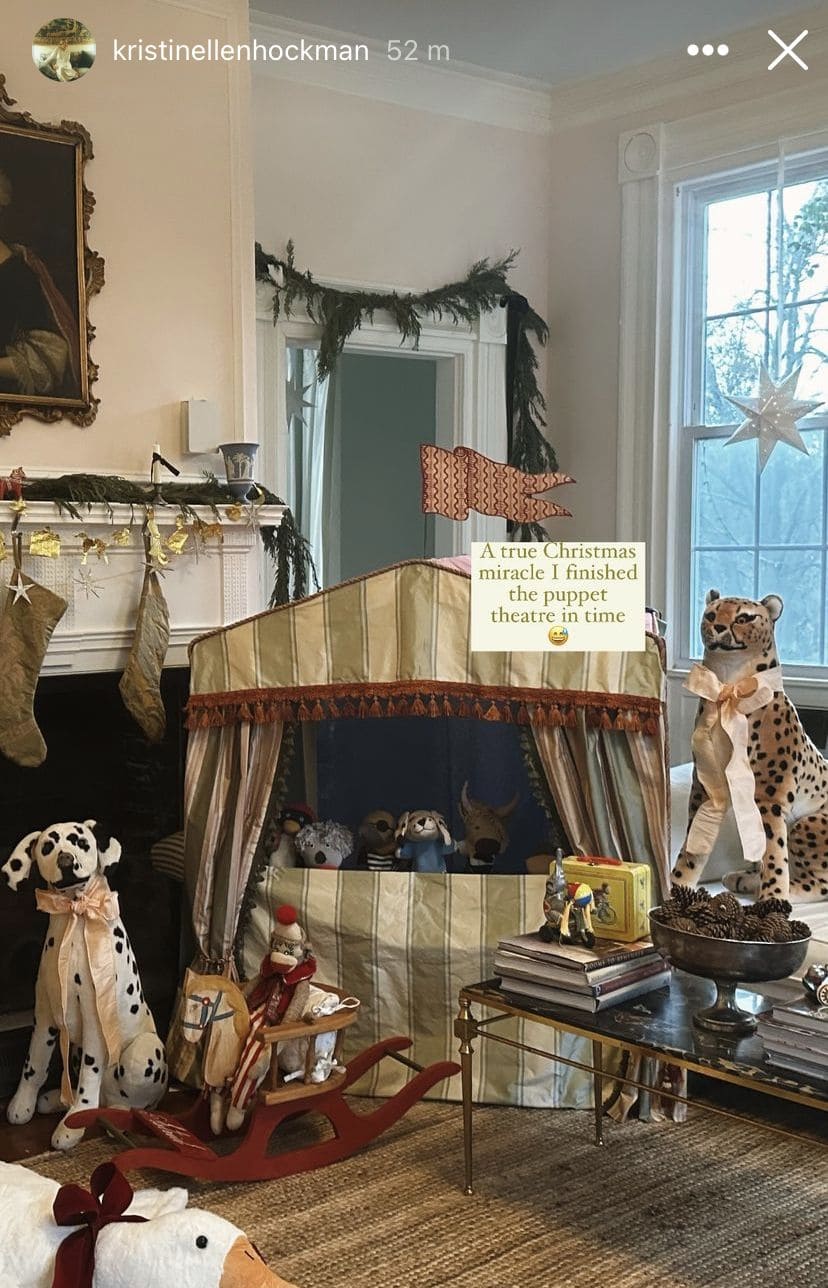
There’s something magical about a handmade puppet stage dressed in vintage holiday charm.
The exterior features a striped ivory and sage green fabric shell, framed with luxe tassel trim in burnt orange and velvety draped curtains.
Inside, a deep navy backdrop gives life to stuffed animals and puppets ready to perform.
With a whimsical flag topper and gold accents, this setup feels like it belongs in a holiday storybook.
Materials Needed
- Cardboard or wood base (34″ W × 30″ H × 16″ D)
- Striped fabric for outer shell (approx. 2 yards)
- Blue or dark fabric for interior backdrop (1 yard)
- Tassel fringe trim (3 yards)
- Gold ribbon and flag fabric
- Wooden dowels or frame supports
- Glue gun, scissors, and staples
Step-by-step Guide
Step 1: Build a stable frame using cardboard panels or lightweight wood, then secure all corners.
Step 2: Drape the striped fabric over the frame, attaching it smoothly along all edges with staples or glue.
Step 3: Mount the dark interior fabric inside to create a contrasting performance area.
Step 4: Add velvet curtains to each side and fix them with ribbon tiebacks for a theater look.
Step 5: Decorate with a flag on top and fringe across the opening for a finished touch.
#9. Doorway Hanging Puppet Theater Curtain
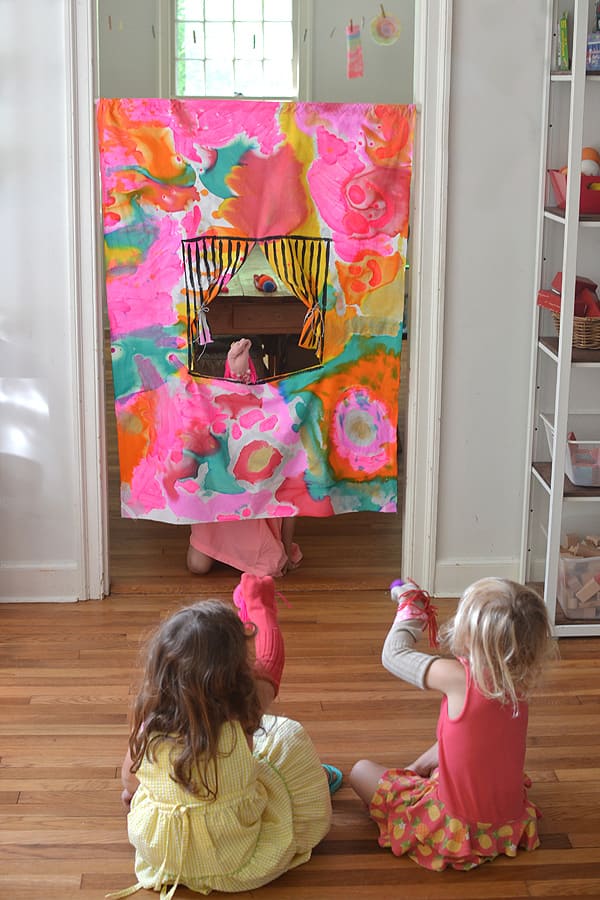
This whimsical doorway puppet theater turns any hallway into a stage for imagination.
You can see a large piece of hand-painted fabric is dyed in brilliant, swirling colors of pink, coral, teal, and yellow.
Also, a stage window measuring is cut in the center (at child height), then framed with yellow-and-black striped curtains, which are tied open with ribbon.
The curtain is hung using tension rods or clips at the top of a doorway, making setup and takedown quick and renter-friendly.
Materials Needed
- Large cotton fabric (approx. 36 x 60 inches)
- Fabric dye or watercolor paints
- Scissors and sewing pins
- Striped fabric for mini curtains (two pieces, approx. 10 x 12 inches)
- Ribbon ties and thread
- Sewing machine or hot glue gun
- Tension curtain rod or adhesive hooks
Step-by-step Guide
Step 1: Dye or paint the large fabric piece with colorful swirls and allow it to dry.
Step 2: Cut a window opening in the center, about 14 x 12 inches, positioned 24 inches from the bottom edge.
Step 3: Hem the edges of the window or reinforce with bias tape.
Step 4: Sew and attach striped curtain pieces to the top edge of the window, adding ribbon ties to hold them open.
Step 5: Add a loop or pocket along the top of the main fabric for hanging on a curtain rod or secure with clips.
Step 6: Hang it in the doorway and let the storytelling begin!
#10. DIY Castle Puppet Theater Box for Imaginative Royal Adventures
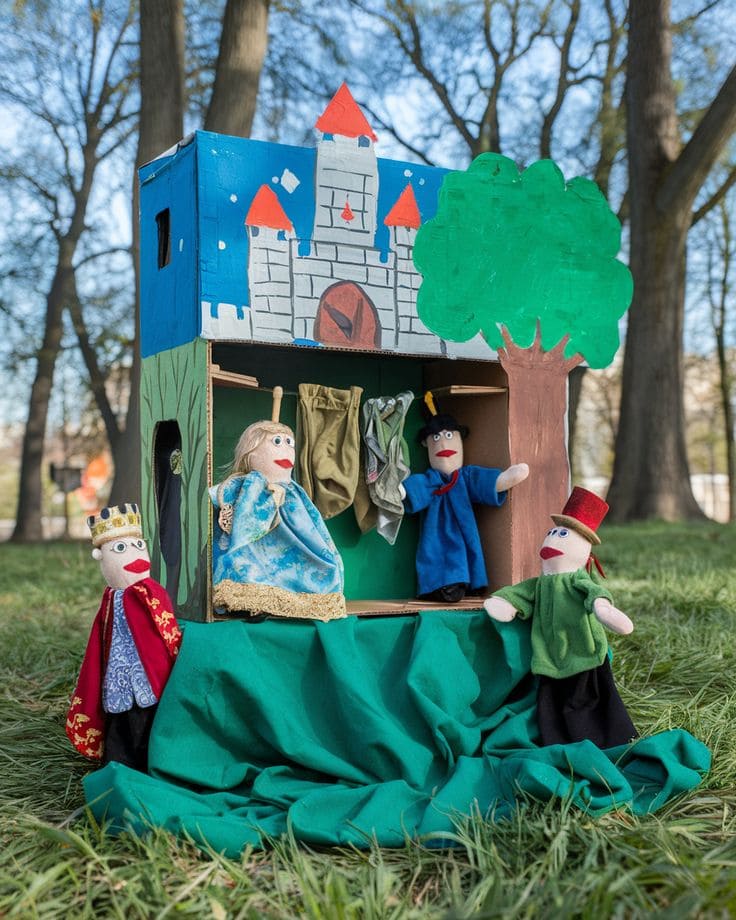
This magical puppet theater combines cardboard creativity with medieval flair, creating a miniature castle stage fit for a king, queen, and an entire royal court.
The base structure is made from a cardboard box, with the upper facade painted as a stone castle complete with red-roofed towers.
Moreover, the tree on the side adds a whimsical 3D element using foam or painted cardboard, while the green draped cloth hides the puppeteer underneath for seamless storytelling.
Whether it’s a dragon tale or a prince’s quest, this theater brings the scene to life outdoors or inside.
Materials Needed
- Large cardboard box (approx. 18 x 12 x 20 inches)
- Acrylic paints and brushes
- Fabric scraps for curtains and costumes (approx. 10 x 10 inches per piece)
- Glue gun or strong craft glue
- Hand puppets or DIY sock puppets (6–8 inches tall)
- Foam board or painted cardboard for tree and details
- Green fabric (at least 1 yard) for hiding the puppet handler
Step-by-step Guide
Step 1: Cut a stage window (about 12 x 8 inches) on one side of the box, centered about 5 inches from the base.
Step 2: Paint the upper box section to resemble a castle with towers, bricks, and a drawbridge door.
Step 3: Attach small rods or skewers inside the stage window to hang mini fabric curtains.
Step 4: Add side props like the foam tree and painted scenery using glue or tape for dimension.
Step 5: Drape green fabric over the front of the box and table base to conceal the performer.
Step 6: Create or use existing hand puppets and bring your castle characters to life with voice and movement.
#11. Playroom Puppet Theater with Golden Curtains
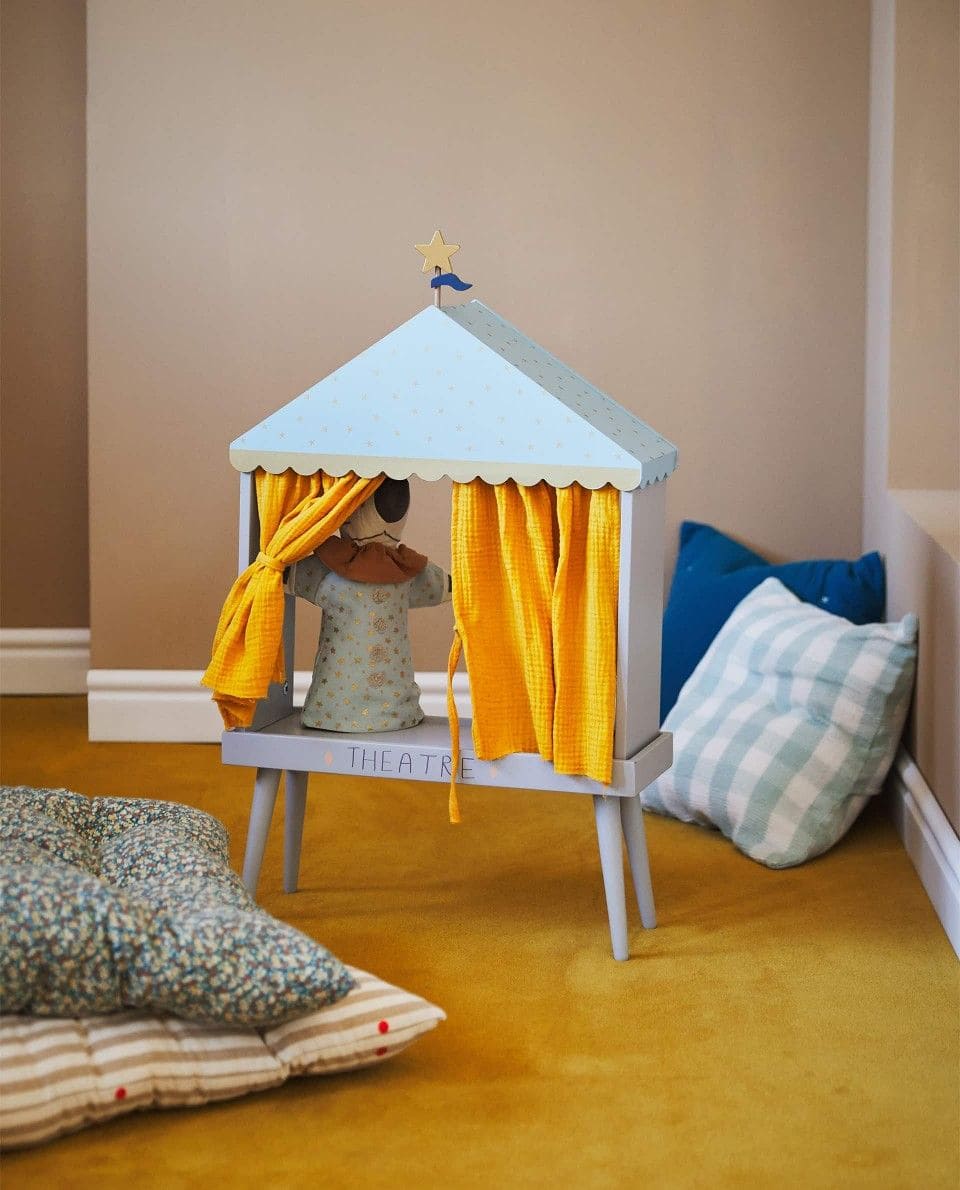
Wow, this petite puppet theater brings so much cheer into a child’s room with its whimsical roof and sunny yellow curtains.
The star-topped roof and pale blue paint make it feel like something straight out of a fairy tale, while the curtain ties invite kids to control their own stage time.
If you’re hoping to add a little wonder to a cozy play corner, this is your chance to create an heirloom-style piece that sparks pretend play for years.
Materials Needed
- Wood or thick cardboard (cut to 20″ W × 28″ H × 12″ D)
- Light blue paint and star topper
- Fabric for curtains (2 pieces, approx. 15″ × 18″ each)
- Wooden legs or 4 short table legs
- Curtain ties, screws, paintbrush, hot glue
Step-by-step Guide
Step 1: Assemble a basic theater frame using wood or thick cardboard, ensuring it stands about 28 inches tall on legs.
Step 2: Paint the structure in a soothing pastel hue and attach a decorative roof cutout with a star for charm.
Step 3: Hang golden curtains on a thin rod or dowel, adding ties on each side for an open stage look.
Step 4: Screw in the legs to lift the structure to kid-height, ensuring stability and balance.
Step 5: Add finishing touches like painted lettering or little stars to personalize it further.
#12. Underwater Mermaid Box Theater with Glittery Gold Curtains
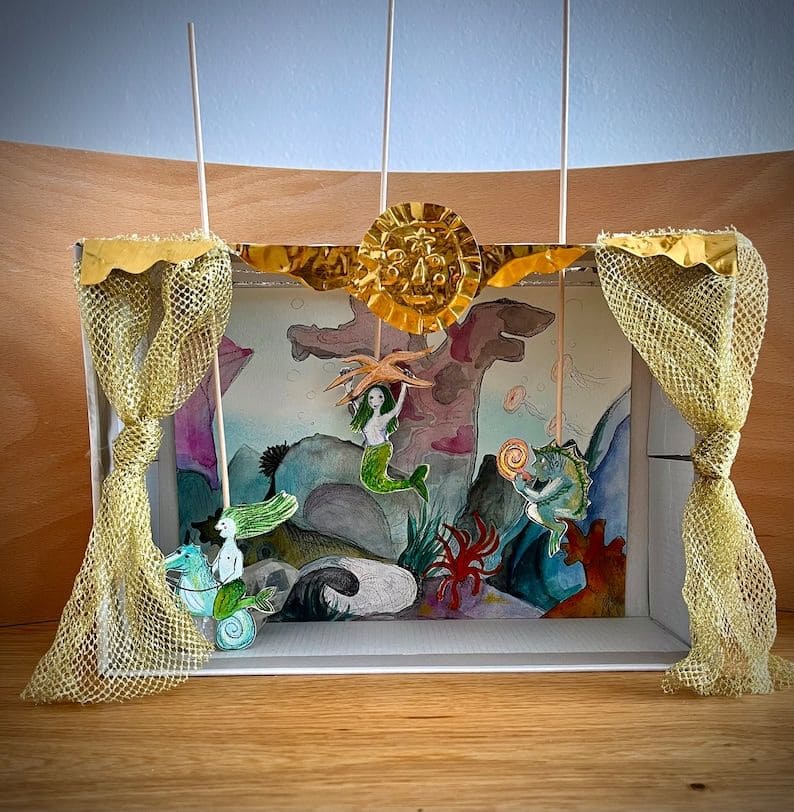
Wow, this dreamy underwater puppet theater brings the magic of the ocean into a small performance box, glowing with shimmer and mermaid charm.
Constructed from a shallow cardboard box, the stage features a hand-painted aquatic backdrop with soft watercolor-like tones and whimsical sea creatures.
Mermaids and sea creatures are mounted on thin skewers for easy maneuvering during the show.
Materials Needed
- Shallow cardboard box (approx. 14 x 9 x 4 inches)
- Watercolor paints or printed underwater background (approx. 11 x 8 inches)
- Mesh fabric for curtains (two 10 x 6 inch pieces)
- Golden foil for top decor (1 circular piece, 4 inches diameter)
- Wooden skewers or dowels (3 pieces, 12 inches each)
- Printed or hand-drawn sea creatures (4–5 inches tall)
- Glue, tape, and scissors
Step-by-step Guide
Step 1: Cut the front face of the box to create a wide window about 12 x 7 inches, centered for stage viewing.
Step 2: Paint or glue the underwater scene to the back interior panel of the box.
Step 3: Create a golden sun emblem using foil and glue it at the top center, anchoring your skewers behind it.
Step 4: Tie back mesh curtains with twine or ribbon, attaching them to the inside sides of the box frame.
Step 5: Glue your mermaids and fish to skewers, then thread them through the top or back panel for movement.
Step 6: Set the scene on a table and narrate your deep-sea adventure!
#13. Striped Animal Puppet Theater with Playful Characters
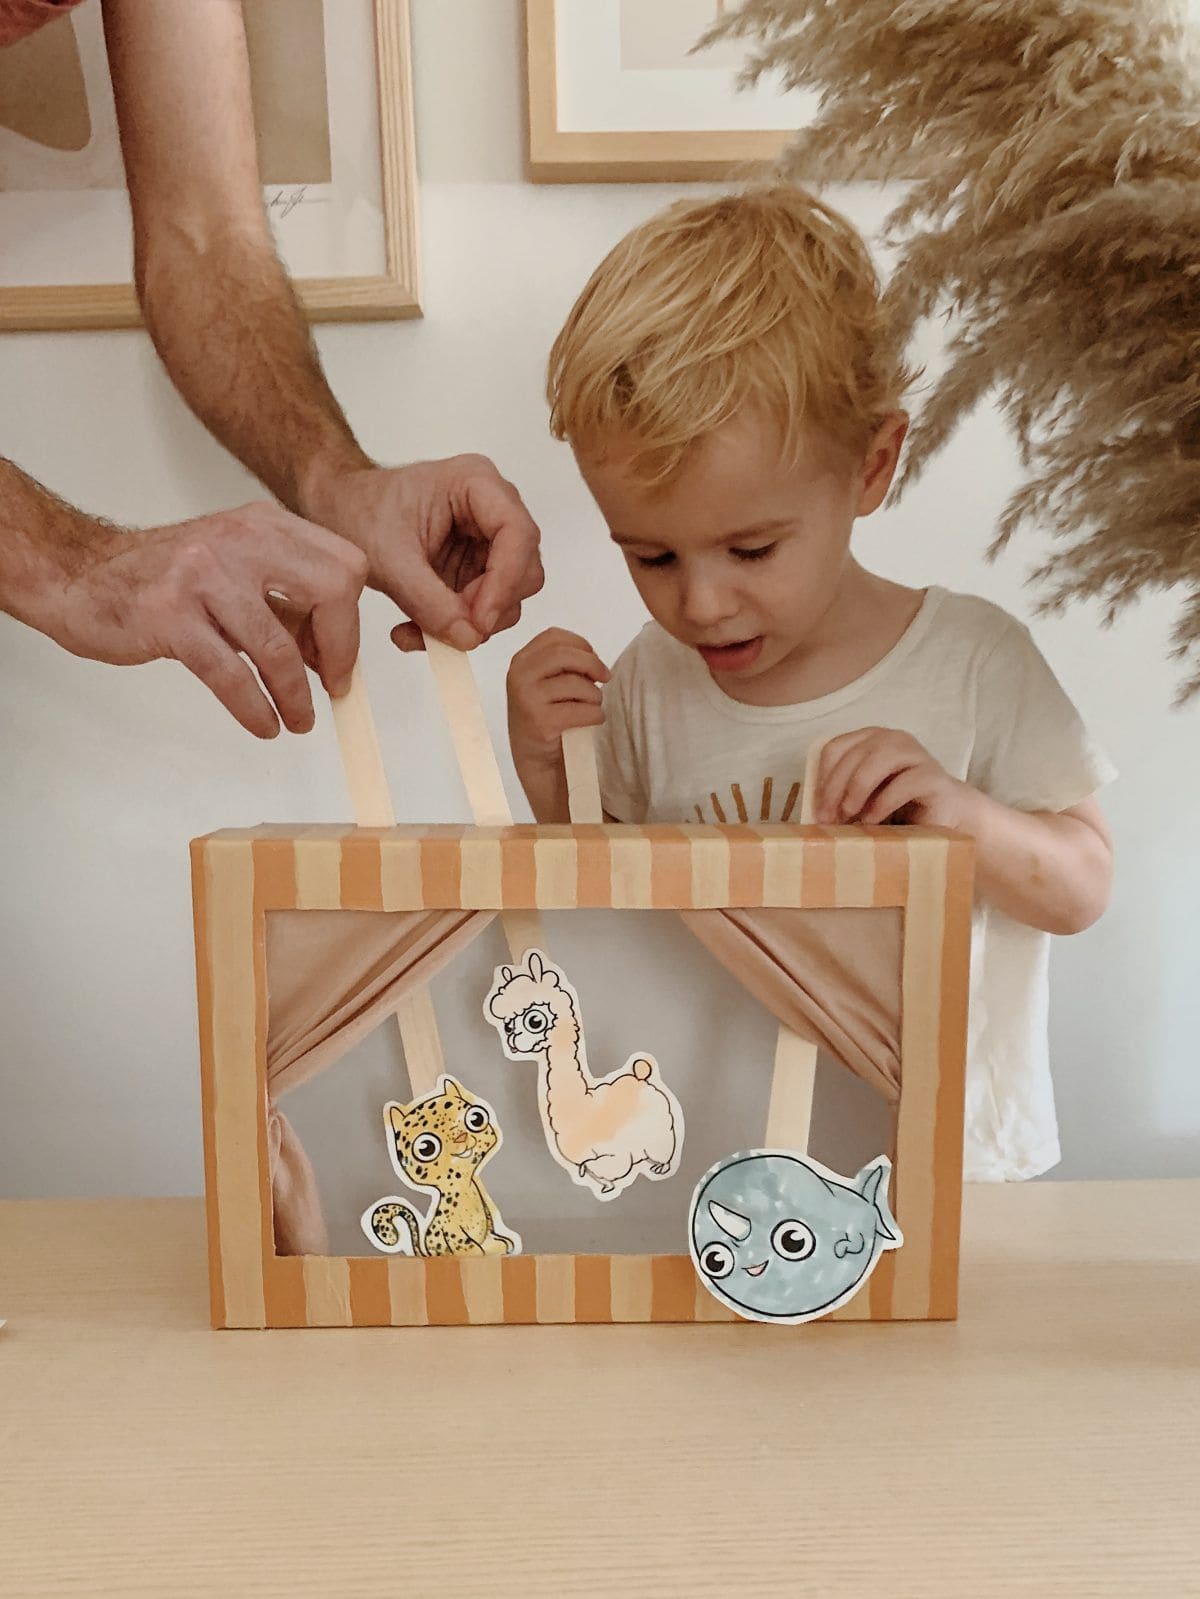
This delightful puppet theater, made from a recycled cardboard box, invites laughter and storytelling with its striped orange-and-cream design and pastel curtain backdrop.
Popsicle sticks hold quirky, cartoon-style characters like a leopard, llama, and narwhal.
Plus, the whole project has a cozy, homemade charm and turns ordinary playtime into an interactive show.
Materials Needed
- Rectangular cardboard box (approx. 8″ × 12″)
- Acrylic paint or markers for stripes
- Neutral fabric scraps for curtains
- Popsicle sticks or craft sticks (6″-8″)
- Printed or drawn animal cutouts
- Tape or glue
Step-by-step Guide
Step 1: Cut out a large rectangular window in one side of the box to create the theater frame.
Step 2: Paint vertical stripes on the outside for a vintage look.
Step 3: Attach small fabric curtains on the inside edges and tie them back.
Step 4: Draw or print cartoon animals, then glue each to a popsicle stick.
Step 5: Slide the stick puppets through slits in the top or back to begin the show.
#14. Vintage-Style Mini Puppet Theater on Wheels
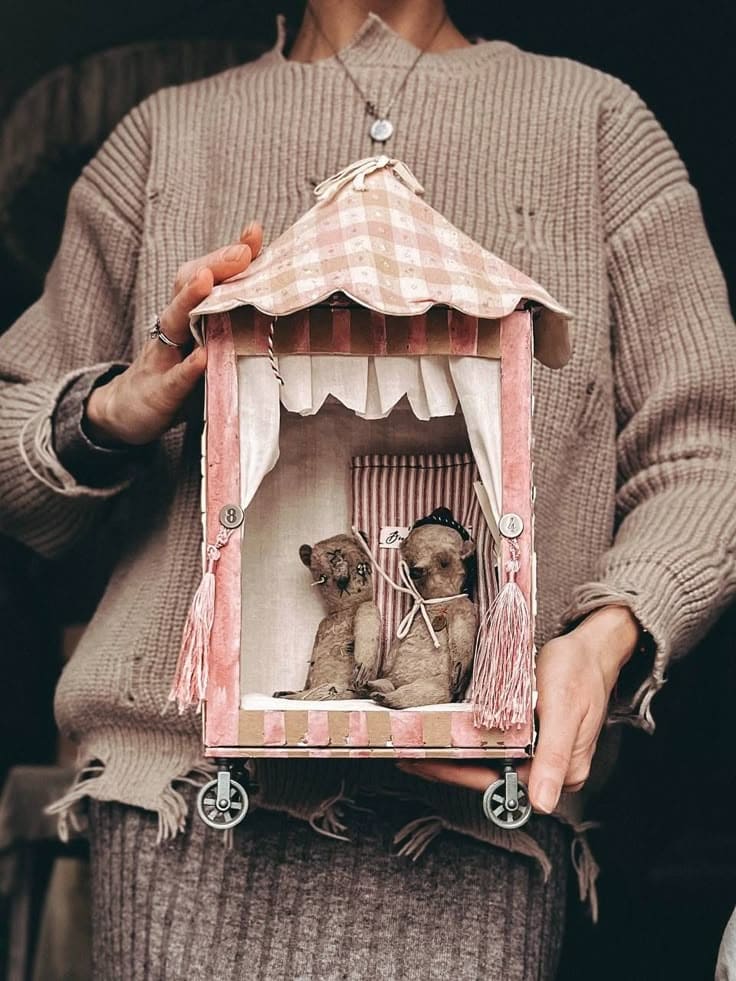
This charming little puppet theater feels like it stepped out of a storybook.
It’s dainty, nostalgic, and entirely handmade, perfect for displaying miniature puppets or teddy bears.
Also, the striped backdrop and gathered curtains give it a dreamy, circus-inspired elegance, while the tiny tassels and numbered buttons add delightful character.
Even the wheels underneath bring this piece to life, giving you the option to roll it gently during a performance or simply use it as enchanting décor in a child’s room.
Materials Needed
- Cardboard box (approx. 10″ W × 14″ H × 6″ D)
- Gingham and striped fabric (12″ × 20″)
- 4 small toy wheels or wooden spools
- Mini curtain cord and tassels
- Decorative buttons (2 large, 2 small)
- Glue gun and fabric glue
- Mini plush toys or puppets for staging
Step-by-step Guide
Step 1: Cut out a front window (approx. 7″ × 9″) in your cardboard box to form the stage opening.
Step 2: Cover the entire box in fabric using glue. Create a scalloped roof from cardboard and wrap it in matching gingham.
Step 3: Add side curtains and back fabric as a backdrop. Glue tassels and buttons at the curtain ties.
Step 4: Attach toy wheels or small spools to each corner to allow mobility.
Step 5: Place your mini bears or puppets inside and start a whimsical show!
#15. Floor-Standing Shadow Puppet Theater
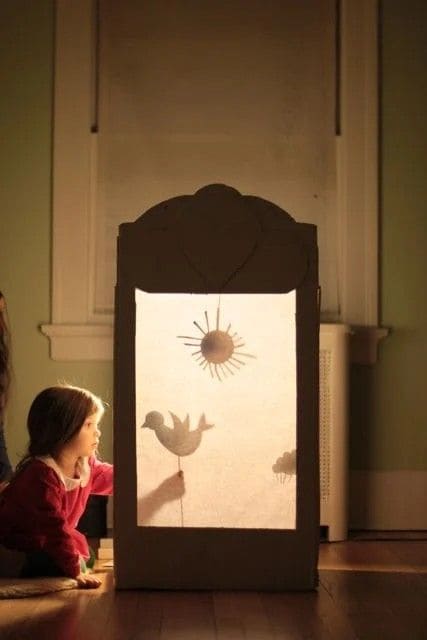
If you want a puppet stage that feels immersive and dramatic, this floor-standing version is a dream come true.
The soft fabric screen (usually sheer white muslin or parchment paper) glows beautifully with backlighting, making each shadow silhouette appear crisp and vivid.
You can cut whimsical shapes like birds, suns, and trees from cardboard or cardstock and use dowels or bamboo skewers to maneuver them.
Materials Needed
- Large cardboard box (approx. 24″ W × 48″ H × 12″ D)
- White fabric (like muslin) or parchment paper, 20″ × 30″
- Black cardstock or thin cardboard
- Wooden skewers, dowels, or straws for puppets
- Hot glue gun or tape
- Craft knife or scissors
- Lamp or flashlight for lighting
Step-by-step Guide
Step 1: Cut a large rectangular window (20″ × 30″) on one vertical panel of your cardboard box.
Step 2: Stretch and tape or glue your fabric or parchment paper behind the opening—this will serve as your screen.
Step 3: Optional: Cut decorative arches or hearts along the top for a theatrical silhouette.
Step 4: Create shadow puppets from black cardstock and attach them to dowels or sticks.
Step 5: Dim the lights, place a lamp behind the box, and start your storytelling with moving silhouettes.
#16. Mini Fox Forest Puppet Theater
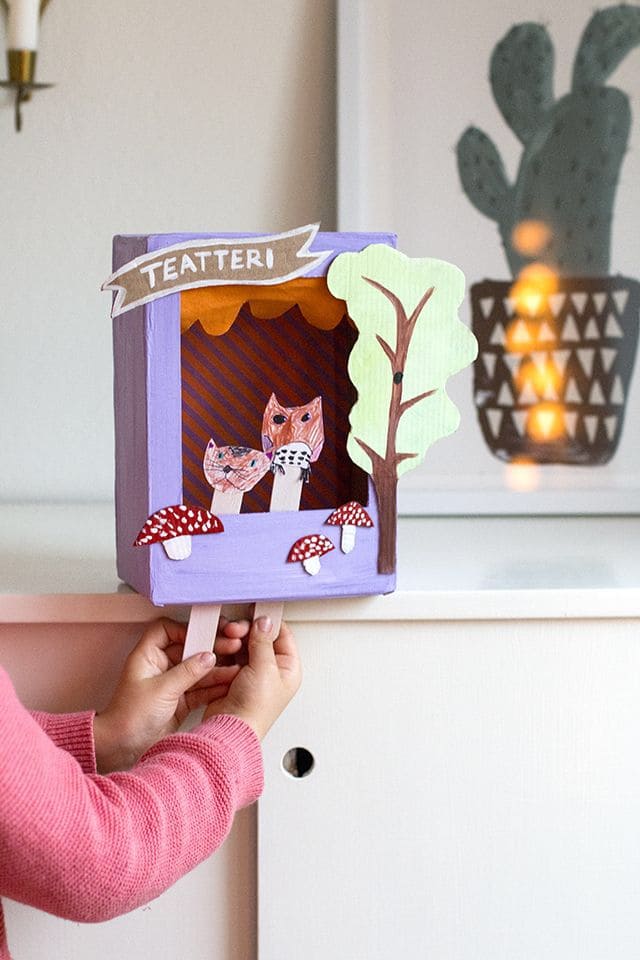
Crafted from a small recycled cardboard box, it’s painted a cheerful lavender with a scalloped curtain design, a labeled sign saying “Teatteri”, and a pop-up tree on the side.
Inside the scene, friendly fox puppets on craft sticks peek through a woodland setting complete with spotted mushrooms.
Perfect for little hands and quick stories, it invites kids to bring their favorite animal tales to life without needing much space or setup.
Materials Needed
- Small cardboard box (approx. 8″ × 6″ × 3″)
- Acrylic paints in lavender, orange, and brown
- Craft sticks (6” long)
- Colored paper for trees, mushrooms, and sign
- Glue, scissors, black pen
- Printed or hand-drawn animal characters
Step-by-step Guide
Step 1: Cut out a window in the front of the box, leaving about a 1-inch frame all around.
Step 2: Paint the outside and inside of the box in your chosen colors, then let it dry.
Step 3: Decorate the background using paper or paint, then add stripes, trees, or stars.
Step 4: Glue on paper mushrooms, trees, and a sign at the top to complete the forest scene.
Step 5: Attach your animal characters to craft sticks and slot them through the bottom to play.
#17. DIY Shadow Box Puppet Theater
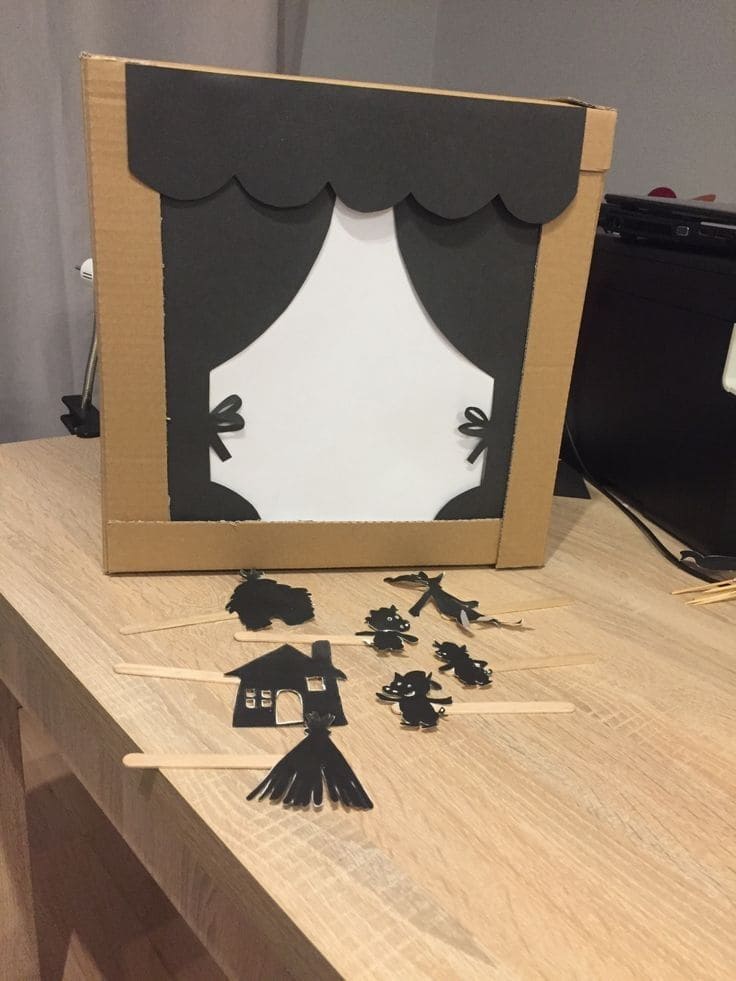
This clever shadow box theater is perfect for storytelling by flashlight.
You’ll turn a regular cardboard box into a whimsical puppet stage, then cut out charming silhouette puppets to bring spooky or magical tales to life.
The stage’s front cutout acts as a screen for your stories, while a white paper or thin plastic sheet allows light to shine from behind.
Altogether, they cast crisp shadows of witches, animals, or whatever your imagination dreams up.
Materials Needed
- Cardboard box (approx. 12″ W × 16″ H × 10″ D)
- White tracing paper or baking parchment (10″ × 14″)
- Black cardstock or stiff black paper
- Popsicle sticks or wooden skewers
- Glue stick or double-sided tape
- Scissors or craft knife
- Flashlight or lamp
Step-by-step Guide
Step 1: Cut a large rectangular window (about 10″ × 14″) into one side of your box to create the screen opening.
Step 2: Tape or glue the white paper behind this cutout to act as the projection screen.
Step 3: Decorate the box’s front with curtain shapes using black cardstock to give it that theater flair.
Step 4: Cut shadow puppet shapes from black cardstock, around 3″–6″ tall, and glue each to a stick for easy handling.
Step 5: In a dim room, shine a flashlight from the back of the box and let your puppets dance across the glowing stage.
#18. Forest Animal Puppet Theater with Handheld Character Sticks
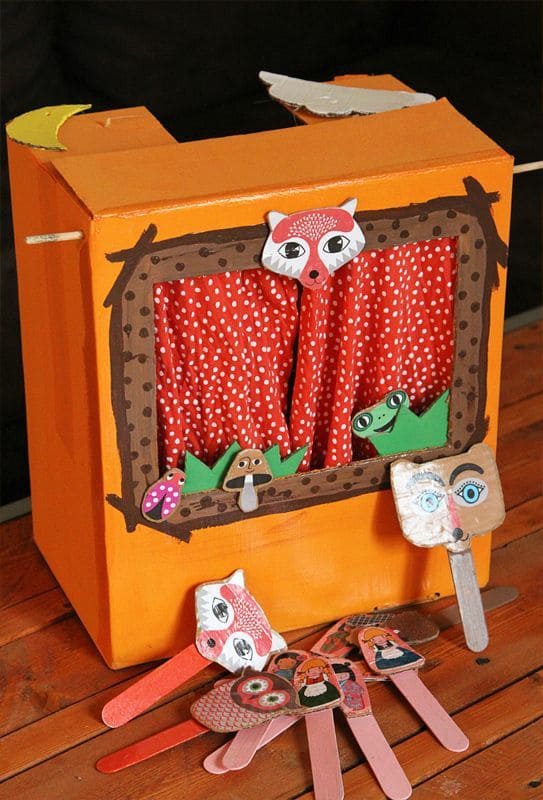
Designed from a tall cardboard box, the box is turned on its side and painted in bright tones with a brown window frame and red polka-dot curtains.
Plus, the red fabric curtain pieces can be pulled apart to reveal handmade characters hiding behind grass cutouts.
There’s even a moon and cloud attached to the top for whimsical charm.
Materials Needed
- Cardboard box (approx. 16 x 14 x 8 inches)
- Acrylic paint in orange, brown, green, and pink
- Red fabric for curtains (2 pieces, 7 x 10 inches each)
- Printed or hand-drawn forest characters (5-7 total, 4-6 inches tall)
- Craft sticks (6-7 inches long)
- Construction paper or felt for grass and mushroom cutouts
- Glue, scissors, and tape
Step-by-step Guide
Step 1: Cut a large window on the box front about 11 x 9 inches, leaving a 1.5-inch border.
Step 2: Paint the exterior orange and frame the window with brown, adding playful forest accents.
Step 3: Glue curtains inside the top window frame and add curtain ties if desired.
Step 4: Cut and glue green grass, mushrooms, and small critters onto the stage front.
Step 5: Create characters by drawing or printing animals, gluing them to popsicle sticks.
Step 6: Add a paper moon and cloud on top for extra flair, then start your puppet show!
#19. Outdoor PVC Puppet Theater with Red Curtains
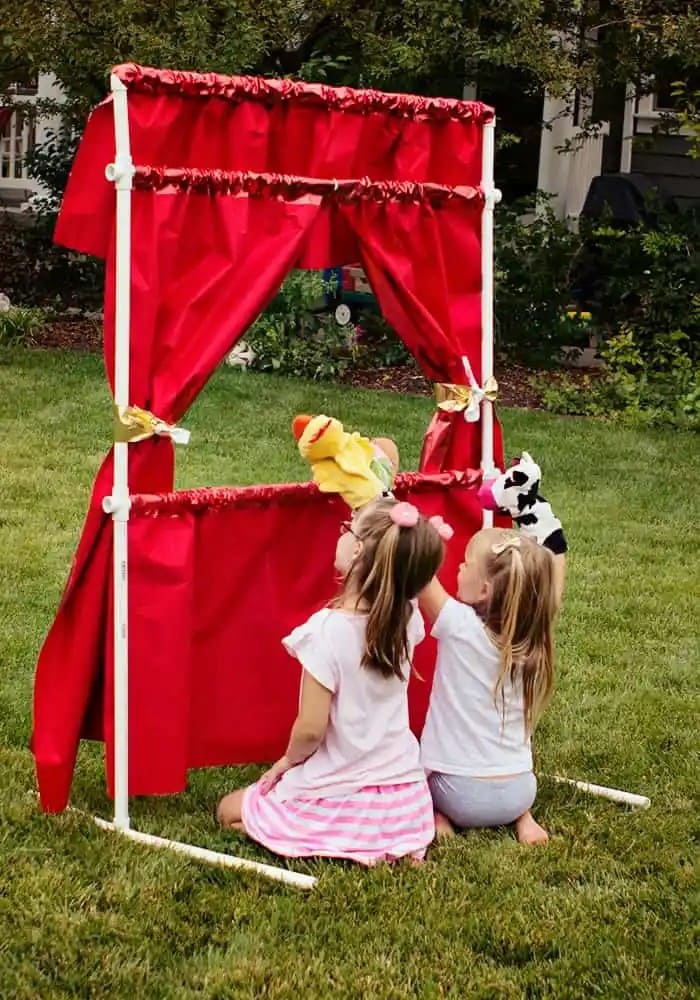
Built using white PVC pipes, the frame stands providing a sturdy and lightweight structure that’s easy to assemble and disassemble.
The vibrant red curtains are gathered on rods and tied back with golden ribbon, adding a classic theatrical flair.
Also, its freestanding design makes it ideal for indoor or outdoor play, and it can be placed on the lawn, carpet, or playroom floor.
Materials Needed
- 1/2-inch or 3/4-inch PVC pipes (total length approx. 20 feet)
- PVC elbow and T connectors (12–14 pieces)
- Red fabric (approx. 2 yards)
- Thread, sewing machine, and ribbon ties
- Scissors and measuring tape
- Optional: PVC pipe cutter
Step-by-step Guide
Step 1: Cut PVC pipes to build a frame: 2 pieces at 48 inches (top/bottom), 2 at 60 inches (sides), and 4 at 24 inches (legs and mid-frame).
Step 2: Assemble using T and elbow connectors for the rectangular shape and stability legs at the bottom.
Step 3: Sew simple rod-pocket curtains from red fabric and slide them onto the top and middle horizontal bars.
Step 4: Tie the side curtains open with golden ribbon or leave them closed for dramatic effect.
Step 5: Let your kids sit behind the lower curtain panel and bring characters to life above the stage line.
#20. Tall Cardboard Puppet Theater with Star Arch
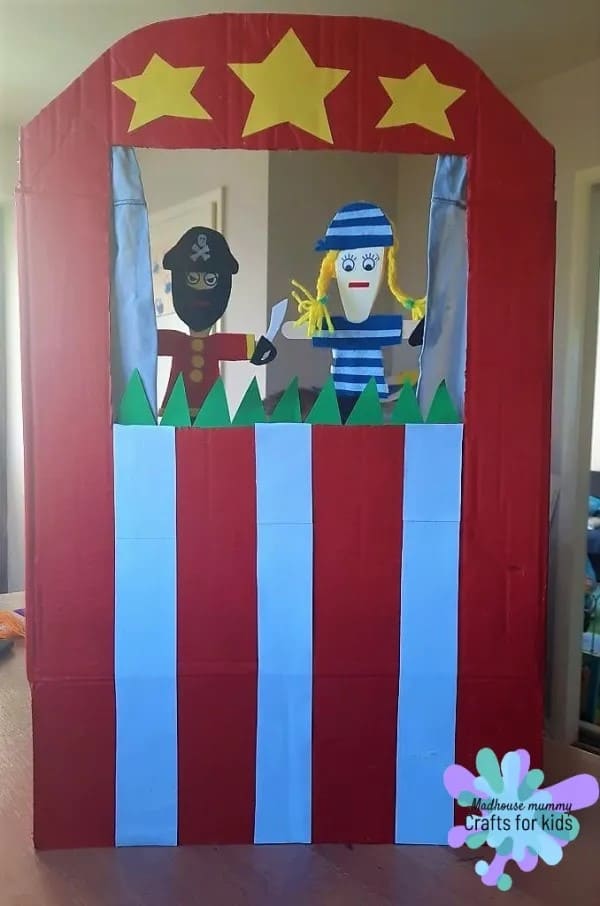
This dramatic, carnival-style puppet theater is made from a tall cardboard box, transformed with bright paint and playful shapes.
Standing about 60 inches tall and 30 inches wide, it features a large stage cutout, perfect for hand puppets to pop up from below.
Plus, the arched top is decorated with three large yellow stars, giving it a cheerful circus-like appearance.
Materials Needed
- Large cardboard box (approx. 60 in tall × 30 in wide)
- Red, white, yellow, and green paint
- Utility knife or box cutter
- Glue or double-sided tape
- Silver or metallic fabric (for curtains, optional)
- Markers or black paper (for puppet features)
Step-by-step Guide
Step 1: Choose a large appliance box or tape two smaller ones together to create a 60″ × 30″ frame.
Step 2: Cut a window (18″ × 24″) about 36″ up from the bottom for your stage opening.
Step 3: Paint the base with vertical red and white stripes using a ruler for even spacing (around 6″ wide each).
Step 4: Cut an arch at the top and glue three yellow stars above the stage.
Step 5: Add green triangle “grass” details at the stage bottom and optional curtains for flair.
#21. Shoebox-Style Puppet Theater with Rainbow Backdrop
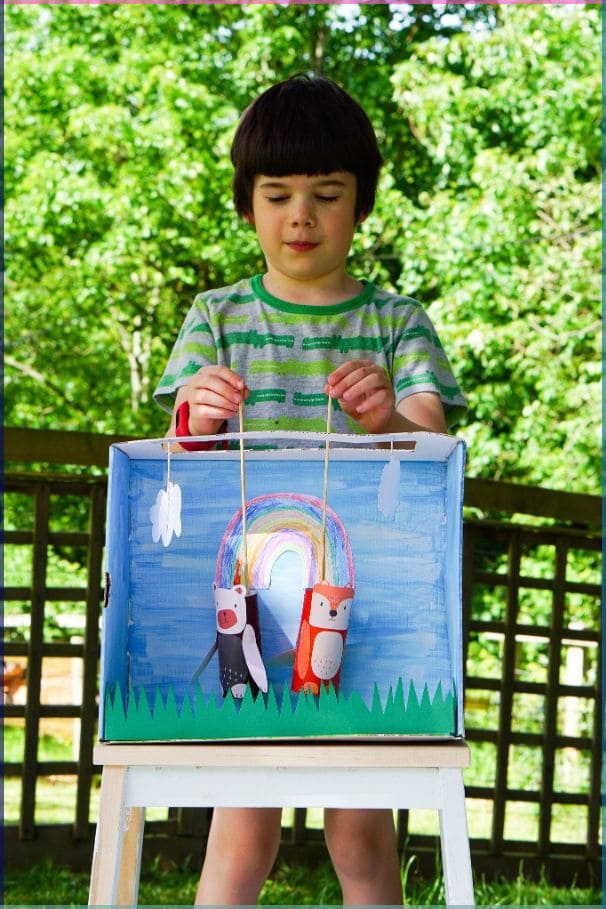
This charming tabletop puppet theater is made from a medium-sized cardboard box, about 12 inches tall, 18 inches wide, and 10 inches deep.
Set on a small table or stool, it transforms into a bright and whimsical stage.
The inside is painted sky blue, with a hand-drawn rainbow and two fluffy clouds made from white cardstock.
You can see it’s compact, easy to carry outside, and simple enough for kids to build on their own.
Materials Needed
- Cardboard box (approx. 12 in tall × 18 in wide × 10 in deep)
- Blue paint or marker for the background
- Cardstock (for rainbow, clouds, and grass)
- Cardboard tubes (for puppets)
- Wooden skewers or dowels (10-12 in long)
- Glue, scissors, and tape
Step-by-step Guide
Step 1: Cut out the top flaps of the box so the interior is accessible and stands open toward the audience.
Step 2: Paint the inside with sky blue and let it dry. Now, add a rainbow using colored markers or paint, and glue on cloud shapes and grass strips.
Step 3: Decorate cardboard tubes as animal puppets, punch two holes at the top, and tie strings through to hang from skewers.
Step 4: Tape the skewers across the top of the box so you can raise and lower the puppets with ease.
