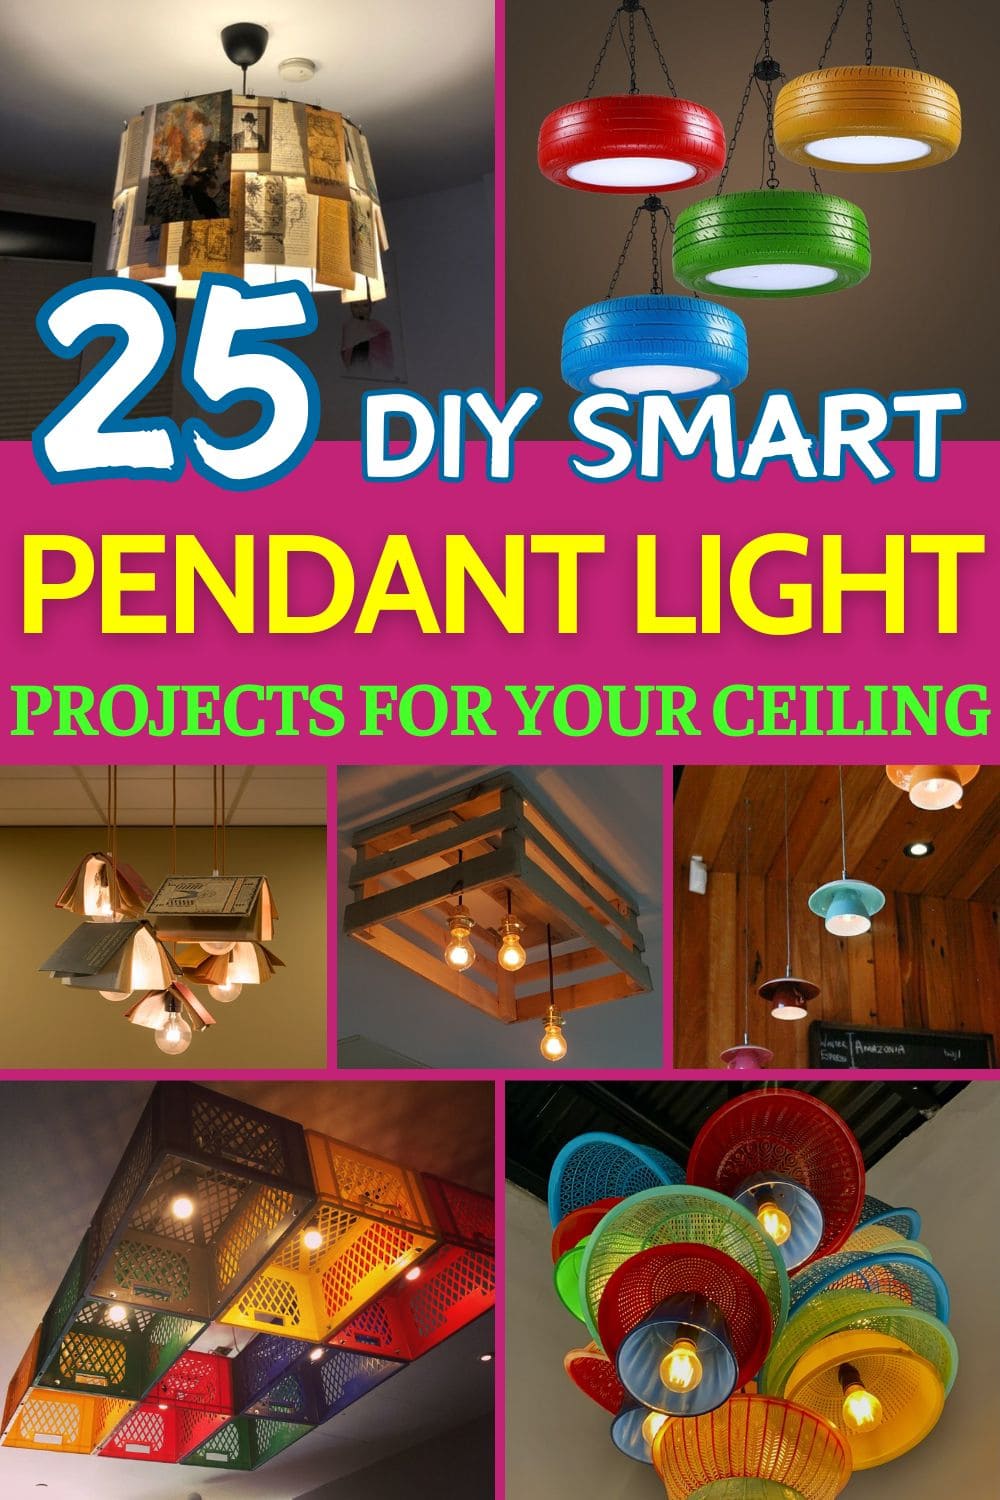
Why settle for boring store-bought lighting when you can create something wildly original using items already lying around? From cassette tapes to colanders, these 25 DIY pendant light ideas prove that creativity has no limits.
Some of these might make you do a double take like a chandelier made from soda bottles or lamps crafted from plastic cups.
It’s not just about saving money (though you will); it’s about making something that actually tells a story. Each of these lights adds a splash of color, a pinch of character, and a whole lot of fun to your space.
If you’re itching for a weekend project that’s easy, bold, and a little quirky, these DIY ideas are going to light you up.
#1. Colorful Milk Crate Ceiling Light Grid
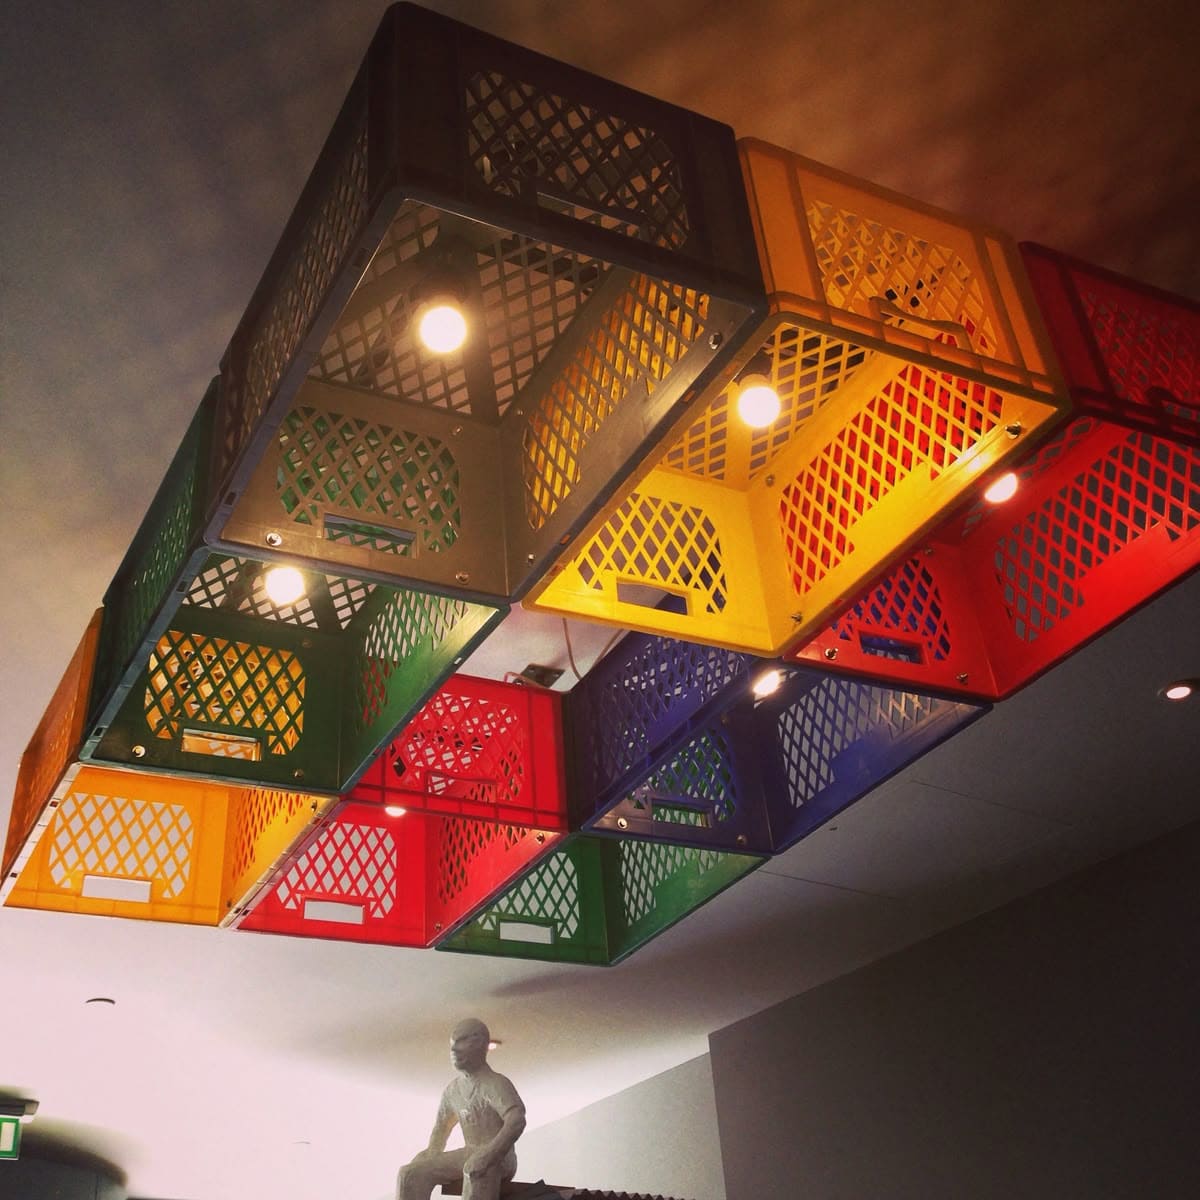
Who knew a bunch of plastic milk crates could become a ceiling centerpiece? This brilliant light fixture makes a bold, playful statement using repurposed crates in a rainbow of colors.
Plus, each crate is mounted to the ceiling with recessed lights fitted inside, casting a soft glow while showcasing the geometric texture of the plastic.
Materials Needed
- 12-16 plastic milk crates in assorted colors
- Recessed LED puck lights
- Mounting screws and ceiling anchors
- Drill and screw gun
- Wire connectors and safe lighting installation tools
Step-by-step Guide
Step 1: Lay out your crate pattern on the floor first to determine color arrangement and spacing.
Step 2: Drill holes in the crate bases to fit the puck lights or LED fixtures snugly.
Step 3: Secure each crate to the ceiling using anchors and screws, ensuring they’re level and aligned.
Step 4: Install the lights into each crate opening, connect wiring safely, and test illumination.
#2. Colander Basket Pendant Light Cluster
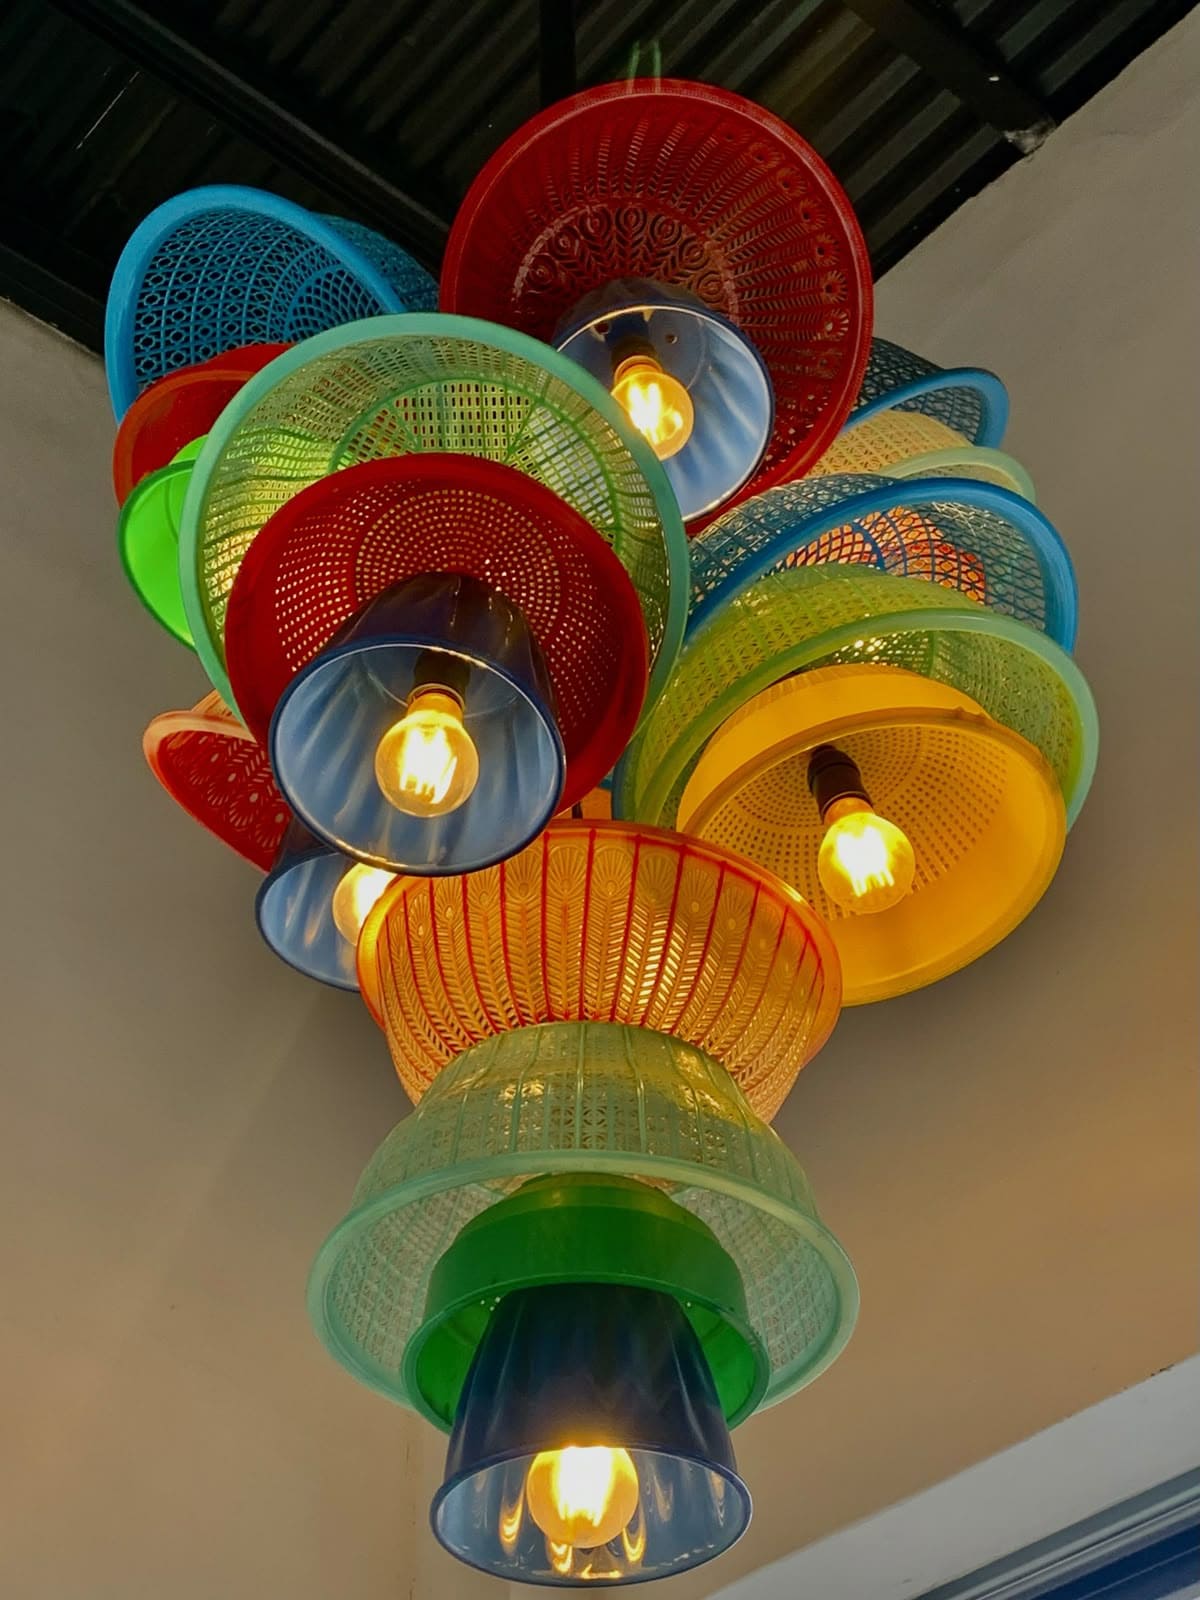
Wow, this bold and colorful chandelier turns everyday plastic colanders into a vibrant work of functional art.
Instead of tossing out old kitchen strainers, you stack them into layered shades that beam with personality.
Specially, the mix of hues from ruby red to ocean blue creates an instant conversation starter in your dining area, café, or creative studio.
Materials Needed
- 10-12 plastic colanders (approx. 10″-14″ diameter)
- 10-12 pendant light kits (E26 sockets with cords)
- LED Edison-style light bulbs
- Power drill with drill bit set (¼” bit recommended)
- Zip ties or small metal rings
- Ceiling hook
Step-by-step Guide
Step 1: Choose colanders in a variety of sizes and colors. Then drill a hole in the base of each colander to fit the light socket snugly.
Step 2: Insert the pendant light socket through the drilled hole, then tighten the ring or nut from inside to keep it secure.
Step 3: Arrange your colanders in a cascading cluster. Overlap some for layered effect. You can use zip ties or rings to loosely hold them together.
Step 4: Mount the light cluster to the ceiling using a sturdy hook or plate, ensuring the weight is supported evenly.
Step 5: Finally, install the bulbs and test each light to make sure connections are safe and functional.
#3. Retro Coke Bottle Crate Chandelier
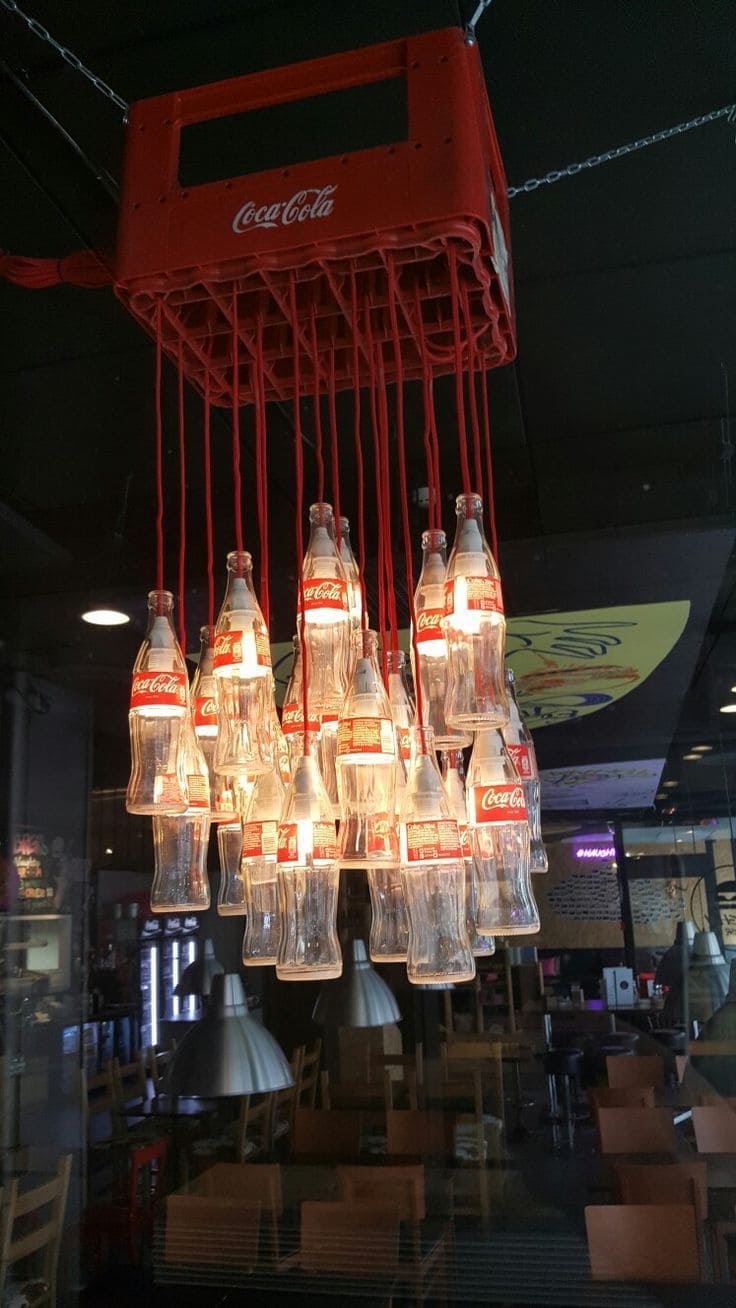
There’s something wildly nostalgic and undeniably cool about this Coca-Cola chandelier.
Using a bright red Coke crate as the base, dozens of glass bottles hang with glowing bulbs inside, turning a simple drink container into a showstopping light fixture.
Moreover, the playful use of color and branding instantly makes it a conversation piece, ideal for cafes, lofts, or anyone who loves vintage Americana.
Materials Needed
- 1 Coca-Cola bottle crate
- 18-24 empty glass Coca-Cola bottles
- Red electrical cord
- Small LED bulbs (low-heat)
- Drill and bottle-cutting kit (optional)
- Chain and ceiling hooks
Step-by-step Guide
Step 1: Clean and dry all bottles thoroughly. You drill small holes in the crate base for each cord.
Step 2: Insert bulbs into the bottles or fit the bottles over hanging bulbs if not cutting them.
Step 3: Thread the cords through the crate and secure bulbs inside the bottles.
Step 4: Mount the crate to the ceiling using chain links and connect all electrical wires safely.
#4. Upcycled Teacup Pendant Lights
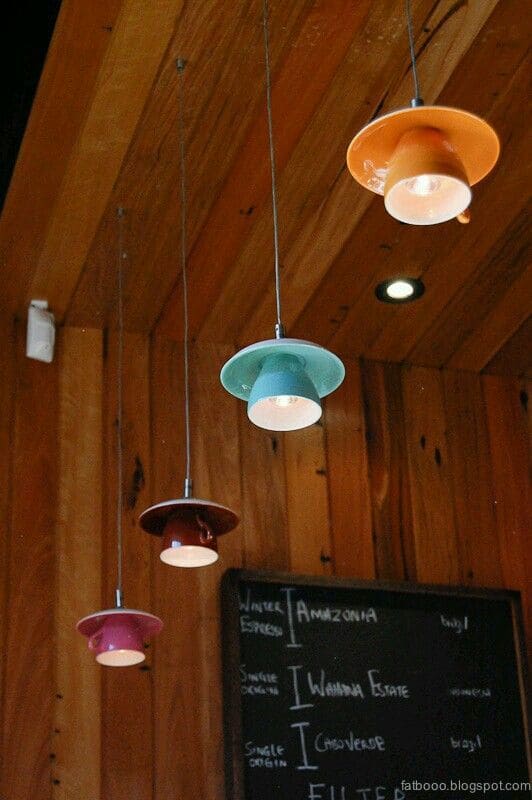
These teacup pendant lights add a playful and unexpected twist to any space. They dangle in colorful rows like floating hats like charming, quirky, and full of personality.
Perfect for kitchens, cafes, or breakfast nooks, this design brings a sweet vintage touch that invites smiles and conversation.
You can mix and match colors for a cheerful display or stick to a theme for a more polished look.
Materials Needed
- 4-6 vintage teacups and matching saucers
- Drill with ceramic bit
- Pendant light cord set
- Strong adhesive (optional)
Step-by-step Guide
Step 1: Drill a hole in the center of each teacup base to fit the light socket through.
Step 2: If using saucers, drill a matching hole and adhere the cup on top of the saucer using strong ceramic glue.
Step 3: Thread the pendant cord through the cup and secure the light socket in place.
Step 4: Hang the cords at staggered lengths for a cascading lighting effect and install your bulbs.
#5. Bookish Pendant Light Cluster
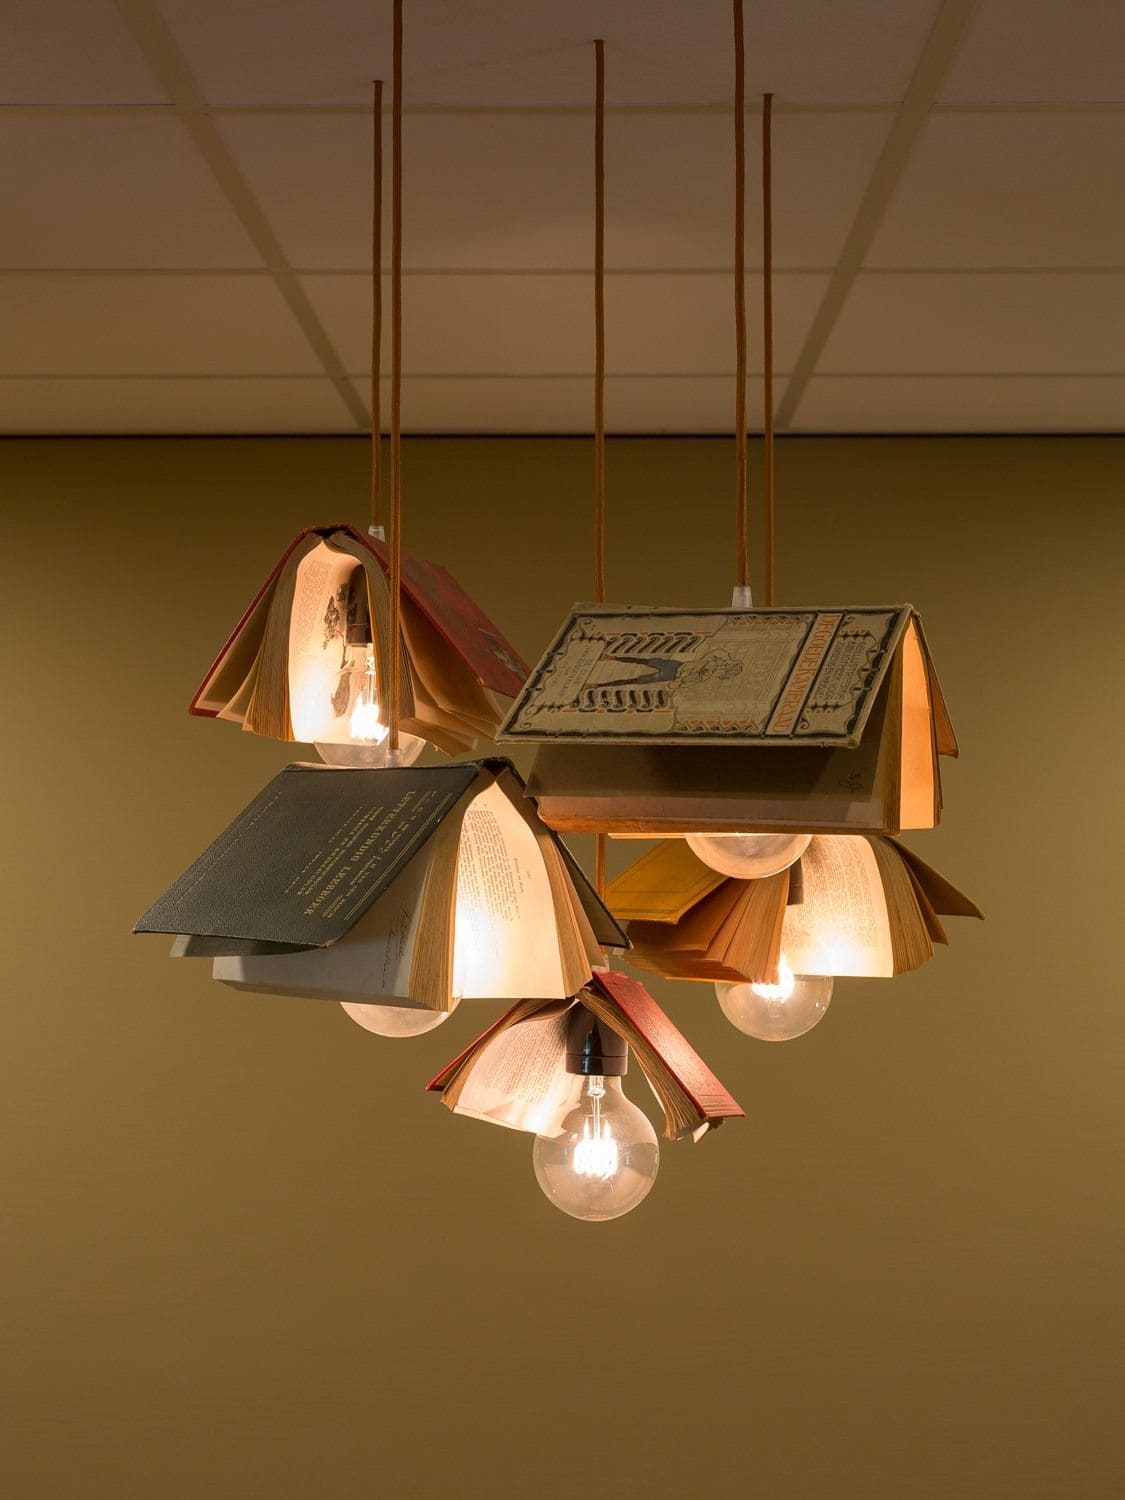
For literature lovers, this lighting idea is a dream come true. Old hardcovers become whimsical shades, casting soft light through gently opened pages.
Moreover, each book becomes a part of the story making your ceiling look like a floating library of imagination.
This piece feels intellectual, warm, and slightly rebellious in the best way, especially if you use forgotten books that deserve a second life.
Materials Needed
- 6-8 vintage hardback books
- Pendant light kit with cords (6-8 lights)
- LED Edison bulbs
- Drill with hole saw or Dremel
- Ceiling canopy
- Hot glue (optional)
Step-by-step Guide
Step 1: Carefully open each book midway and drill a hole in the center to fit your light socket.
Step 2: Insert the pendant socket through the hole, letting the bulb hang slightly below the pages.
Step 3: Arrange the cords at varying lengths from a canopy or wooden fixture for layered effect.
Step 4: Tighten and secure each book so they rest open like flying pages. You should adjust pages for balance.
#6. Glowing Yarn Ball Chandelier
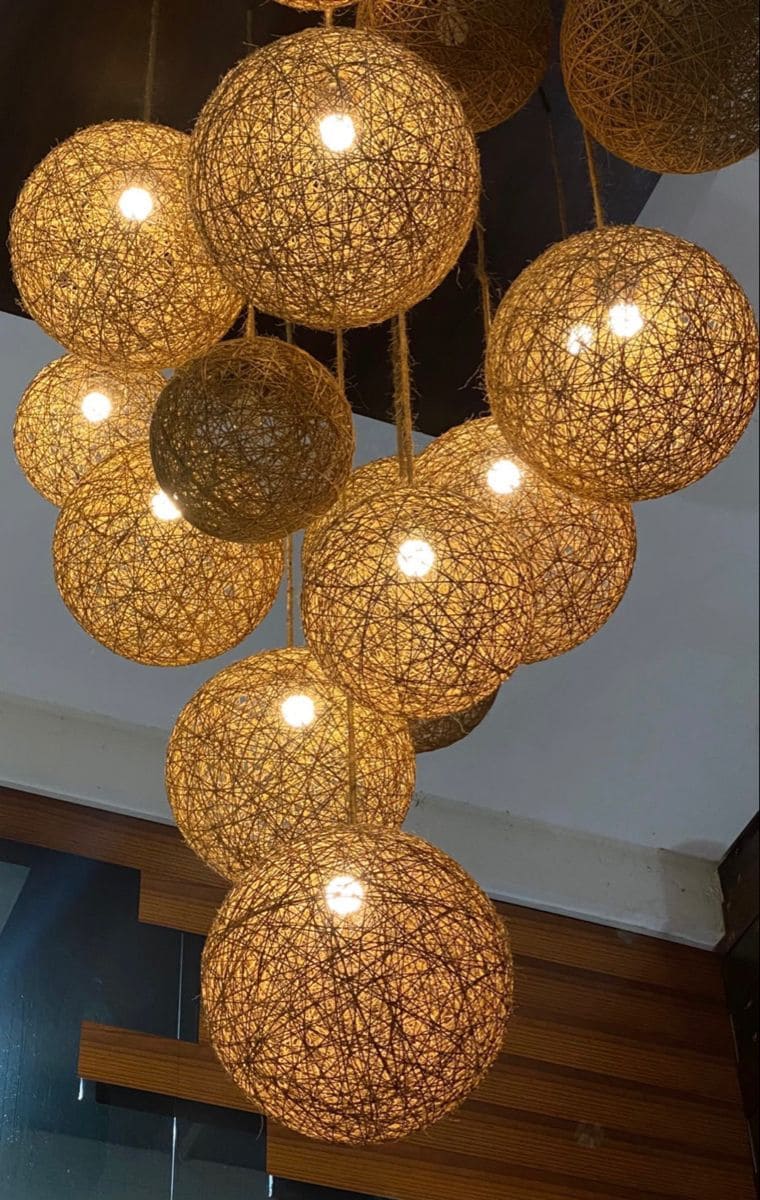
If you want something magical and earthy, this glowing yarn ball chandelier casts the most enchanting shadows.
Plus, each sphere is hand-wrapped with twine, forming an airy cocoon around the bulb that lets the light peek through like soft starlight.
Clustered together, these orbs make a statement without feeling heavy. It’s a cozy way to bring warmth into your living room or stairwell, and the natural tones of jute blend beautifully into wood, white, or minimalist spaces.
Materials Needed
- 10 balloons (8″-14″ in diameter)
- 2 rolls of jute (200 yards each)
- 1 bottle white glue (16 oz)
- 1 cup cornstarch + 1/2 cup warm water
- 10 pendant light kits with LED bulbs (E26 base)
- Ceiling hooks and electrical mounting board
Step-by-step Guide
Step 1: Inflate balloons to various sizes. You should mix glue, cornstarch, and water in a bowl until smooth.
Step 2: Dip twine in the mixture and wrap around the balloon in random directions until covered.
Step 3: Let dry completely (24-48 hours), then pop the balloon and remove it from inside.
Step 4: Insert pendant bulb kits and hang the globes in varying lengths for visual depth.
#7. Wooden Crate Ceiling Lights
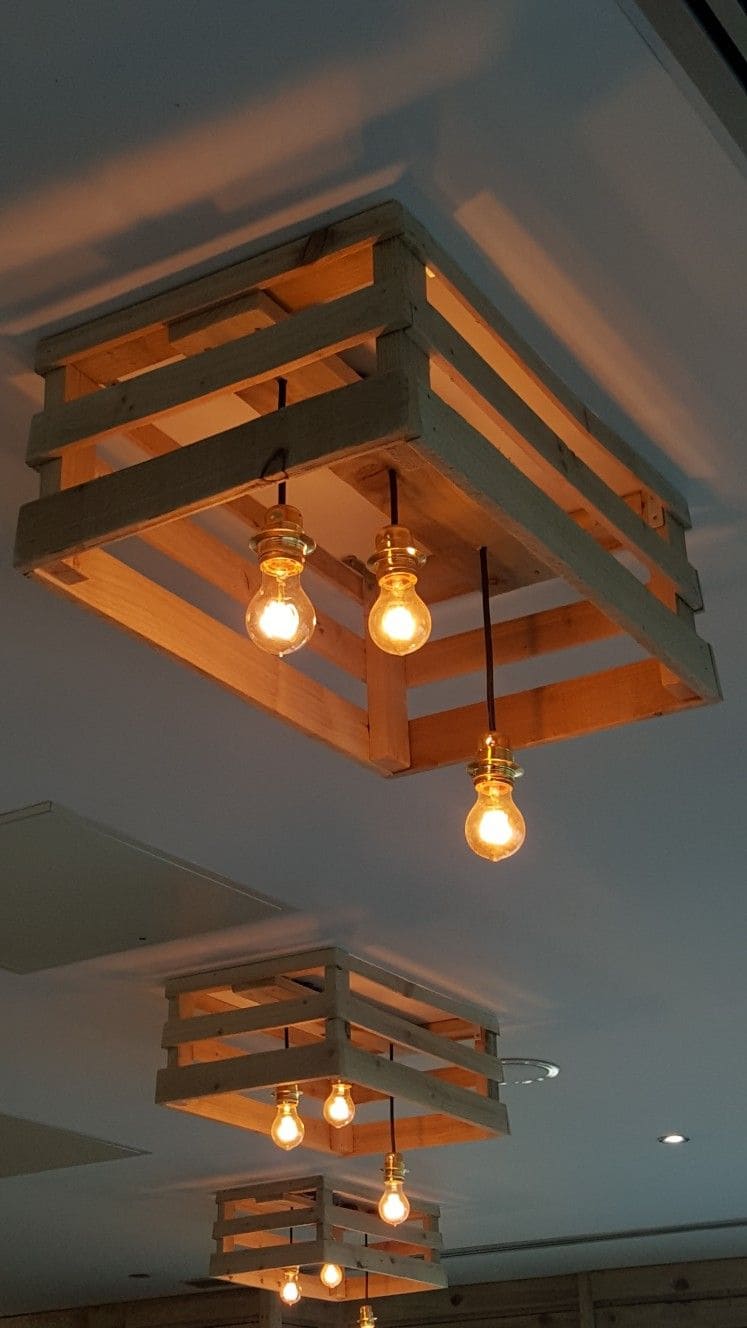
If you’re craving a warm, rustic ambiance, these wooden crate ceiling lights are a simple yet impactful solution.
I believe each crate acts like a floating lantern, enclosing warm bulbs in a soft, wooden glow. The design casts cozy, linear shadows across the ceiling, turning plain white space into a textured canvas of light.
Materials Needed
- 2-3 wooden crates (approx. 18″×12″×6″)
- Light bulb sockets with wiring
- 3-6 Edison-style LED bulbs
- Mounting hardware (screws, brackets, anchors)
- Drill and screwdriver
Step-by-step Guide
Step 1: Clean the wooden crates and sand any rough edges if needed. You can also apply a light stain or leave them natural for a raw finish.
Step 2: Drill holes in the top of each crate to fit your light socket cords through securely.
Step 3: Install the light sockets and wire them according to your ceiling’s connection, making sure to keep safety in mind.
Step 4: Secure each crate directly to the ceiling using mounting brackets or anchors.
Step 5: Finally, screw in the bulbs and enjoy the warm, structured glow.
#8. Wine Bottle Chandelier Light
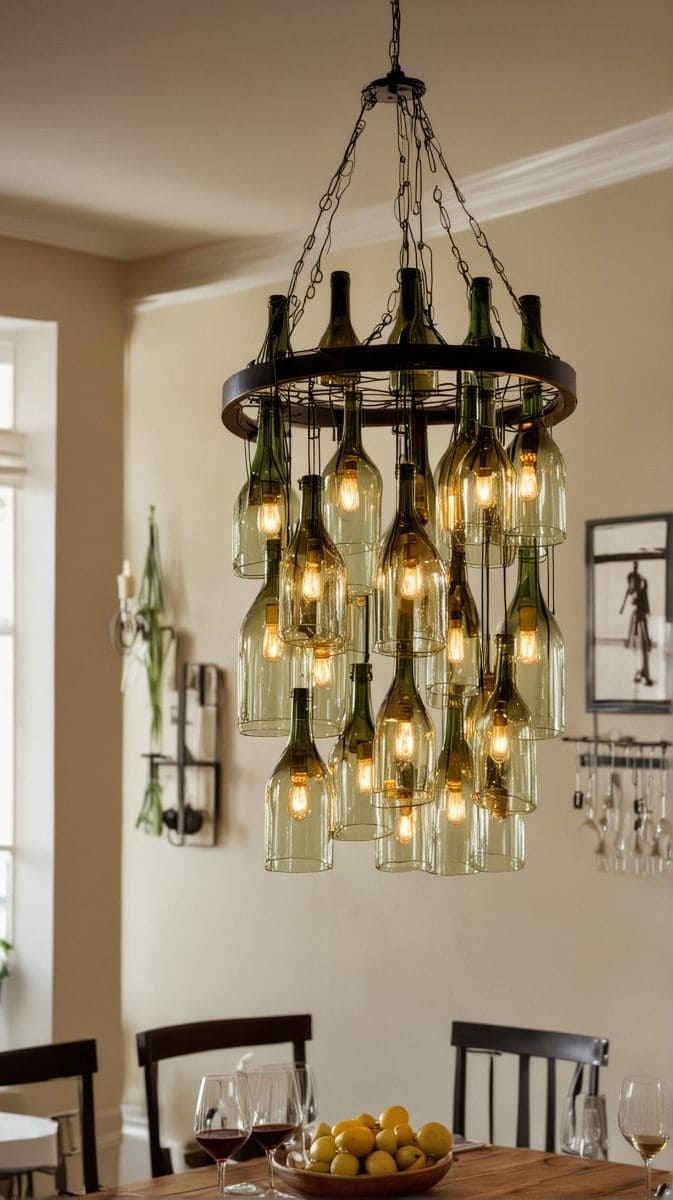
What about turning your love for wine into a bold statement piece with this dazzling wine bottle chandelier?
Crafted from cut glass bottles, this fixture cascades with glowing charm, offering a warm, rustic touch to your dining or entertaining area.
Bonus, the symmetry of the bottles and the soft glow from vintage-style bulbs create an inviting ambiance that’s equal parts industrial and elegant.
Materials Needed
- 15-20 empty wine bottles
- Bottle cutter and safety gloves
- Light fixture with multiple bulb sockets
- Sturdy metal ring
- Chain and ceiling hook
Step-by-step Guide
Step 1: Carefully cut the bottoms off your wine bottles and sand the edges to avoid sharp surfaces.
Step 2: Attach light sockets to the chandelier frame and thread wires through each bottle neck.
Step 3: Secure the bottles over the bulbs using clamps or wire supports.
Step 4: Now hang your chandelier securely and install dimmable bulbs for ambient control.
#9. CD Wall Hanger Light Fixture
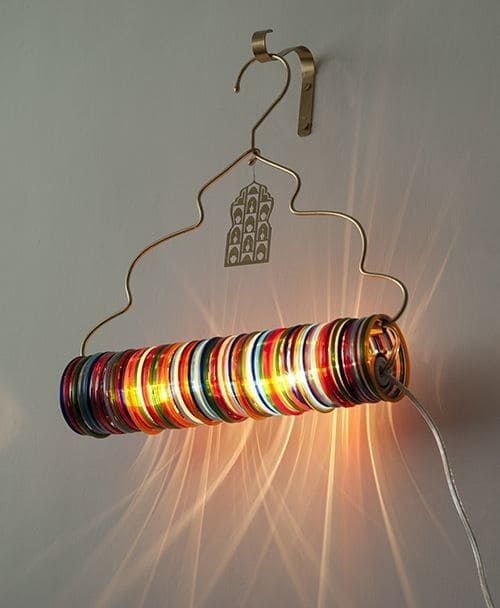
This radiant wall light turns a stack of forgotten CDs into a dazzling light display. Suspended on a golden wire hanger, each reflective disc captures and scatters light like stained glass, throwing rainbow patterns across the room.
You’ll appreciate how the light flickers softly through the discs, casting mesmerizing shadows that shift with every angle. This one’s not just a lamp, it’s a piece of living wall art.
Materials Needed
- 1 sturdy metal clothes hanger (approx. 16″ wide)
- 25-30 used CDs or DVDs
- 1 LED tube light (12″-14″ length)
- Strong wire or zip ties
- Wall hook or adhesive wall hanger
Step-by-step Guide
Step 1: Slide the CDs onto the LED tube light until the full length is covered.
Step 2: Carefully attach both ends of the tube light to the hanger using wire or zip ties, securing it firmly in the curved base of the hanger.
Step 3: Hang the finished piece on a wall hook or door hanger where light can freely radiate.
Step 4: Plug in the LED light and adjust CD placement if needed to balance the look.
#10. Vintage Fan Cage Light Fixture
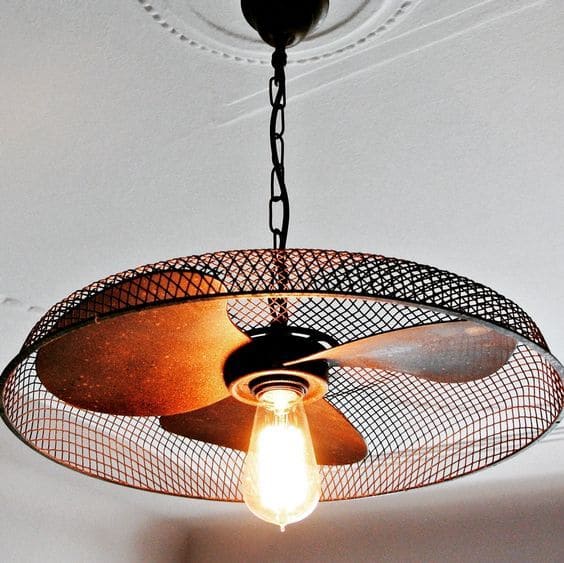
This upcycled ceiling light transforms an old fan guard into a captivating industrial centerpiece. With its open mesh design and exposed filament bulb, the fixture casts moody shadows that instantly add character to a room.
Also, the fan blades remain for added drama, making the piece not only functional but deeply sculptural. It’s minimal, raw, and completely unforgettable.
Materials Needed
- Old metal fan with guard and blades
- Pendant light kit with Edison bulb
- Matte black spray paint (optional)
- Drill and metal screws
- Chain and ceiling hook
Step-by-step Guide
Step 1: Disassemble the fan and clean all metal parts thoroughly. If needed, spray paint the fan guard and blades for a refreshed finish.
Step 2: Install the pendant light socket through the center of the guard, threading wires securely.
Step 3: Attach the fan blades for a bold decorative touch and hang your light from a sturdy chain.
#11. Pallet Board Pendant Light Fixture
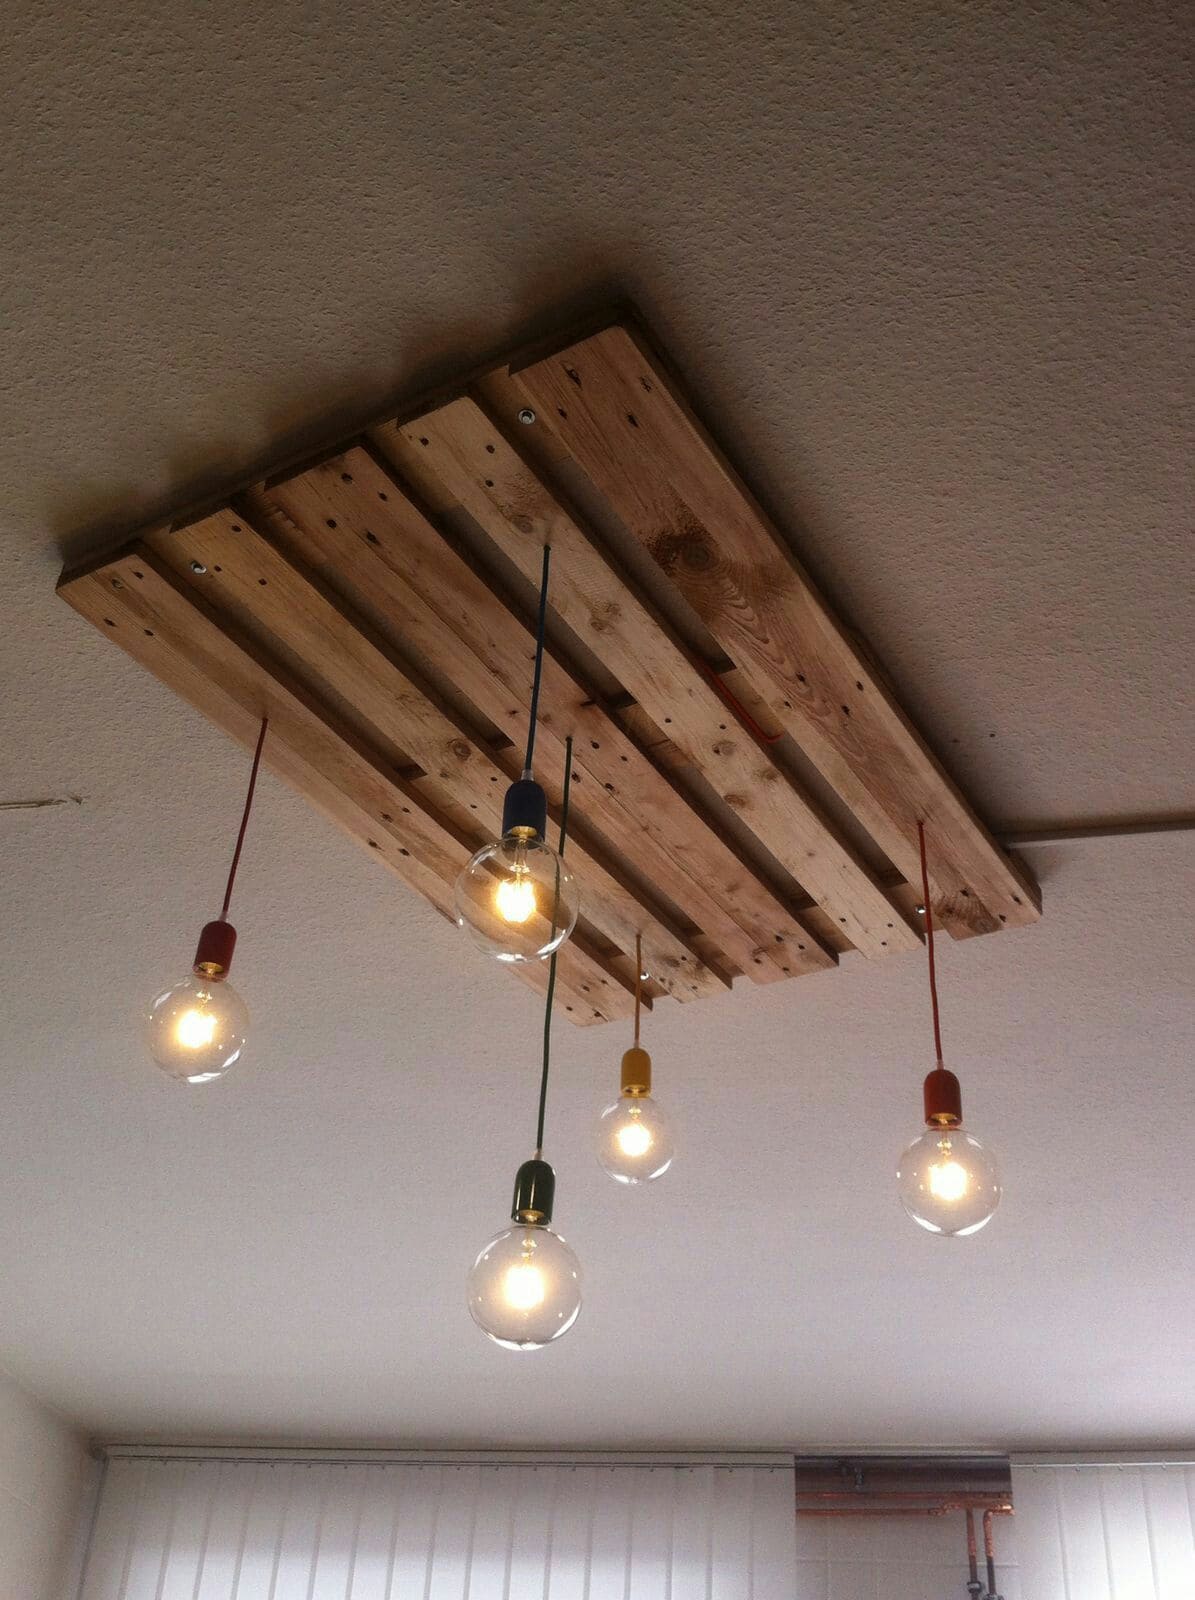
Look at this pallet board ceiling fixture, it brings industrial flair and cozy warmth together in perfect balance.
By mounting a pallet flat against your ceiling, you create a sturdy anchor that allows pendant bulbs to hang freely in staggered lengths.
I think it’s a brilliant way to repurpose old wood while personalizing the space with a light show that feels both relaxed and elevated. You’ll love how this simple setup gives your ceiling an entirely new story.
Materials Needed
- 1 wooden pallet (approx. 40″×24″)
- 5-6 colored fabric cord pendant light kits
- 5-6 LED globe bulbs
- Screws and heavy-duty ceiling anchors
- Drill and screwdriver
Step-by-step Guide
Step 1: Sand the pallet to remove splinters and optionally stain or seal it for a smoother finish.
Step 2: Mark and drill holes for each pendant light kit to hang through the pallet slats.
Step 3: Thread the cords through the holes and secure them in place from the top using the fixture hardware.
Step 4: Mount the pallet securely to the ceiling with anchors, ensuring it’s firmly held in place.
Step 5: Screw in the bulbs, connect the wiring, and flip the switch to admire your handmade lighting centerpiece.
Tips: You can customize each cord with a different color or adjust bulb heights to create a sense of movement and visual rhythm.
#12. Rustic Cheese Grater Pendant Light
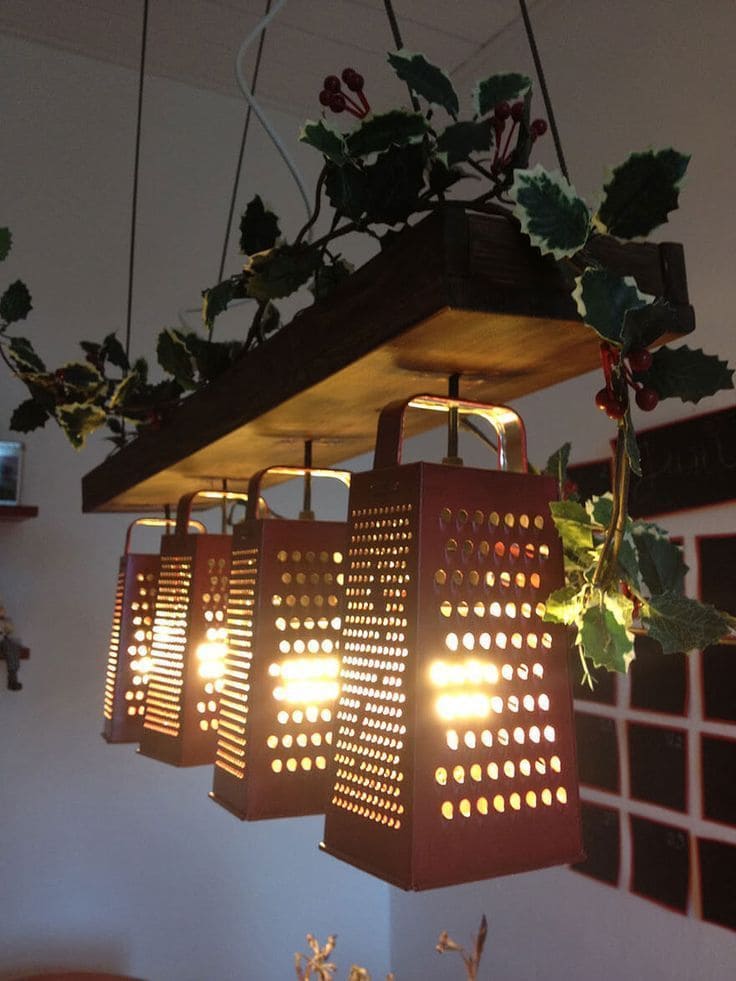
This quirky pendant light made from vintage cheese graters brings an industrial yet playful charm to your kitchen or dining area.
When lit, the perforations scatter warm speckles of light across your walls like stars at dusk. Suspended from a wooden beam and wrapped in faux ivy, this setup feels both raw and cozy.
Materials Needed
- 4-5 metal box graters (standard size: approx. 5″×4″×10″)
- 1 wooden plank (around 24″-36″ long)
- Pendant light kits with sockets and wiring
- Screws, drill, and metal-cutting tool
- Chain or rope
- Faux greenery (optional)
Step-by-step Guide
Step 1: Drill a hole into the top of each cheese grater large enough for the light socket to pass through.
Step 2: Attach the graters to the underside of the wooden plank using screws or metal brackets.
Step 3: Insert the sockets and bulbs into each grater, securing the wires neatly along the top of the wood.
Step 4: Suspend the wooden plank from your ceiling using chains or sturdy rope.
Step 5: You can also add faux ivy or berry vines around the plank for a festive, earthy touch.
#13. Cassette Tape Jellyfish Light
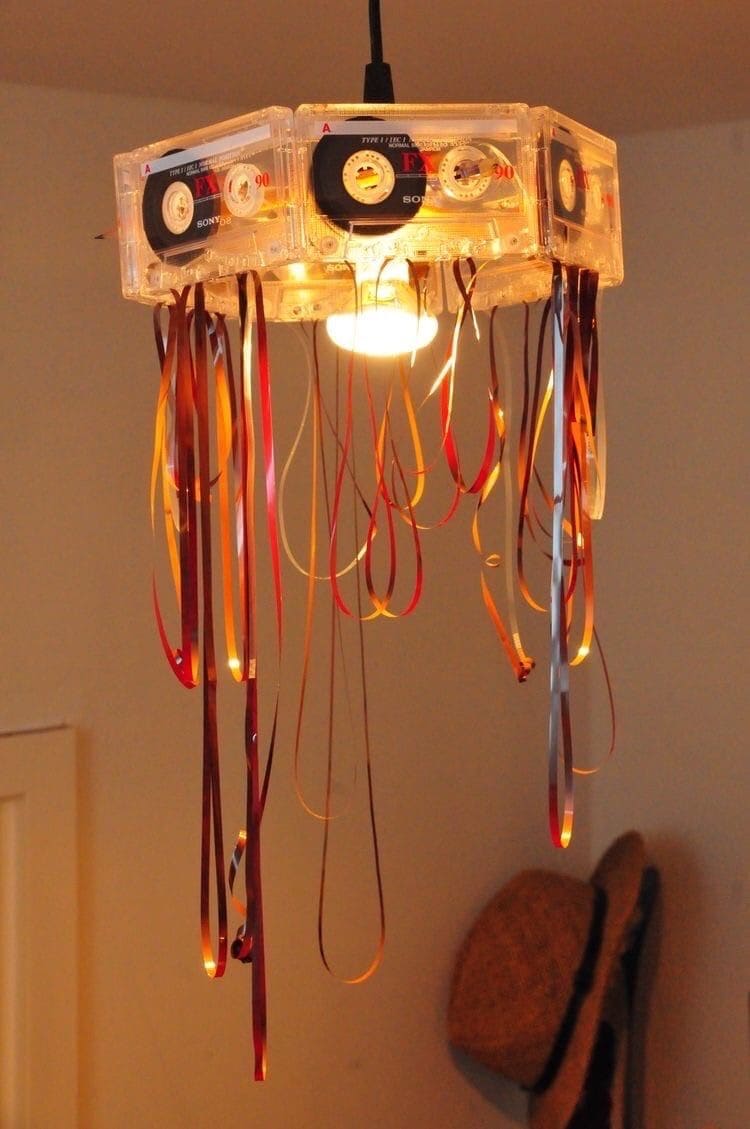
Why don’t we revive the retro charm of the ’80s and ’90s with this quirky cassette tape pendant light?
The real star, though, is the cascading magnetic tape that falls like jellyfish tentacles, fluid, tangled, and glowing in the bulb’s warmth.
It adds personality and nostalgia to creative corners, music rooms, or even playful dining spaces. It’s a light with rhythm, memory, and a touch of rebellious fun.
Materials Needed
- 6-8 cassette tapes (preferably clear)
- Strong adhesive or glue gun
- Single pendant light fixture and LED bulb
- Optional: extra magnetic tape strips
Step-by-step Guide
Step 1: Arrange the cassette tapes into a cube or octagon shape around the light bulb socket.
Step 2: Use hot glue or superglue to connect the tapes securely at their edges.
Step 3: Insert a warm LED bulb and thread the socket through the center of the taped frame.
Step 4: Unwind and attach magnetic tape strips to the bottom for a flowing, jellyfish-like look.
#14. Twisted Rope Pendant Light
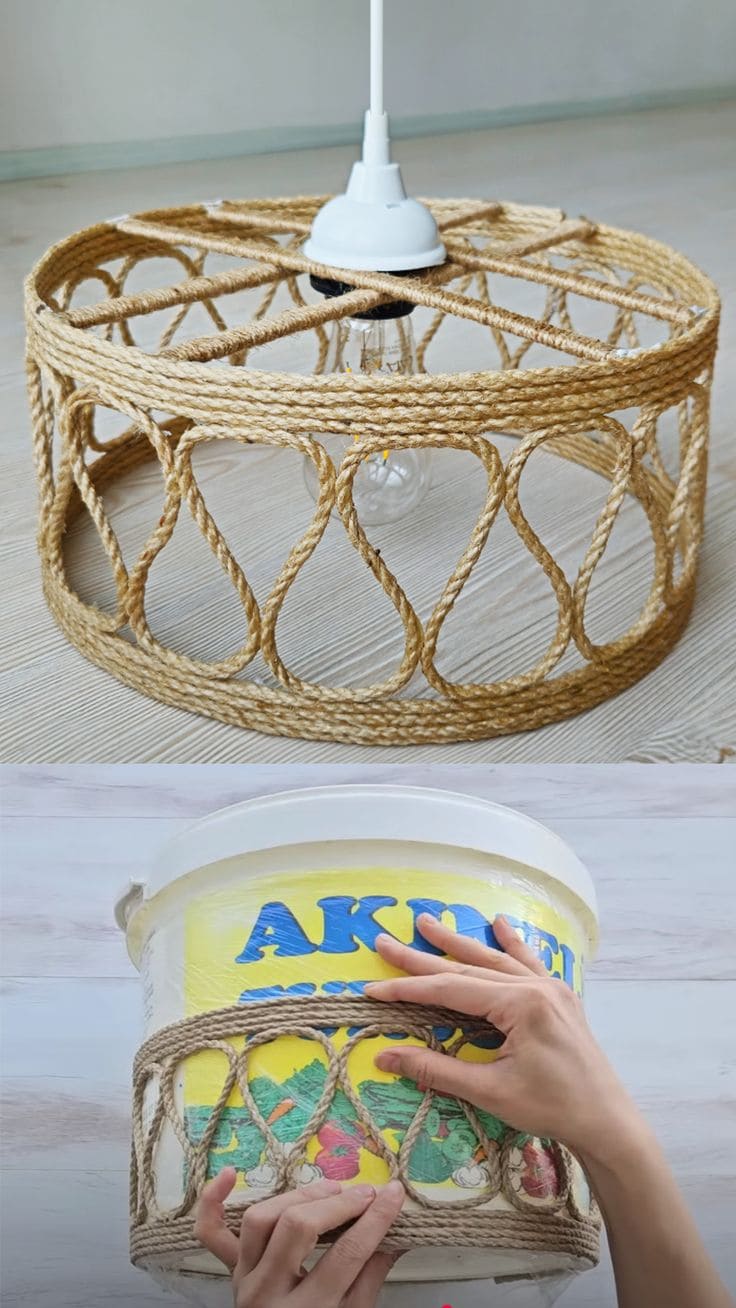
By wrapping sturdy jute cord around a basic bucket or container, you can create an airy lattice pattern that glows with natural warmth when the bulb flickers on.
Also, the symmetry of the rope loops gives the design visual balance, while the soft diffusion of light through the openwork makes it feel organic and grounded.
Of course, you’re turning something as ordinary as a utility pail into something extraordinary that speaks of coastal homes and slow-living days.
Materials Needed
- 1 large plastic bucket
- Natural jute rope (approx. 30 ft)
- Hot glue gun and glue sticks
- Clear wrap
- Scissors
- Light fixture cord set with bulb
Step-by-step Guide
Step 1: Wrap the outside of your bucket mold in clear wrap to prevent sticking.
Step 2: Begin forming rope loops along the side of the bucket, gluing as you go to secure the curves in place.
Step 3: Once the sides are fully looped, form the top and bottom circles with glued rope to lock everything together.
Step 4: Let the structure dry fully, then gently remove it from the bucket mold.
Step 5: Attach your light cord through the center opening and screw in a bulb. Finally, hang where it’ll catch both light and attention.
#15. Recycled Skateboard LED Ceiling Light
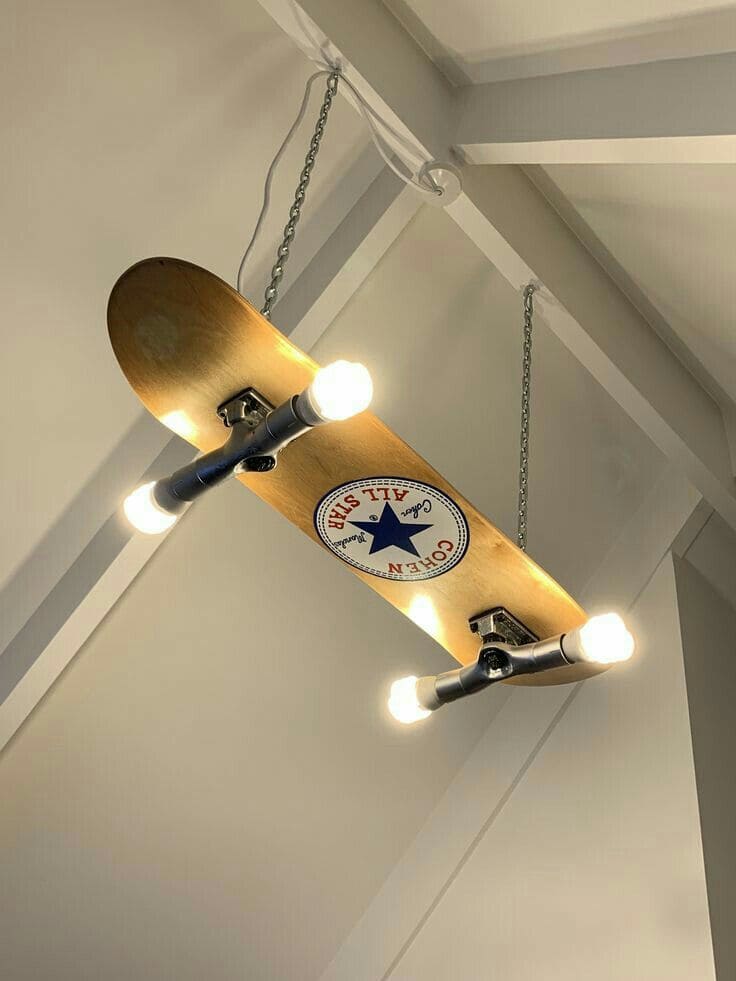
If you’ve got an old deck that’s gathering dust or a thrifted gem with character, turn it into a ceiling fixture that screams personality.
Mounted with four bright LED bulbs on industrial-style pipe fittings, this piece fuses function with urban artistry.
Plus, the hanging chain suspension adds a raw, industrial vibe while keeping the fixture secure. You’re creating a ceiling statement that reflects motion, youth, and a little mischief.
Materials Needed
- 1 skateboard deck (standard 8” x 32”)
- 4 LED light bulbs (E26 base)
- 2 pipe fittings with T-connectors (black steel or PVC)
- 2 ceiling chains (each 24” long)
- 2 ceiling hooks
- Drill with bit
- Wire, sockets, and connectors
Step-by-step Guide
Step 1: Drill through the deck where you’ll install the light pipes. You should space them evenly near each end for balance.
Step 2: Attach your pipe fittings through the deck and screw on the bulb sockets at the ends of each arm.
Step 3: Secure chains to the trucks or pre-drilled holes and hang from anchored ceiling hooks.
Step 4: Wire your light components safely and connect to a switch or existing ceiling power source.
Step 5: Finally, screw in the bulbs and flip the switch.
#16. Lace-Doily Pendant Lights

There’s something nostalgic and beautifully delicate about lace doilies. When transformed into pendant lights, they glow like blooming flowers frozen in midair.
This project blends the charm of vintage textiles with the warmth of ambient light, creating a piece that feels both handcrafted and timeless.
Whether hung above a rustic dining table or in a reading nook, these lights feel like poetry.
Materials Needed
- 10 cotton lace doilies (8-14 inches in diameter)
- 1 bottle fabric stiffener (16 oz)
- 10 small balloons
- Disposable gloves and a mixing bowl
- Pendant light cords and LED bulbs
- Ceiling mounting hardware
Step-by-step Guide
Step 1: Inflate the balloons to your desired shape. You drape a doily over each one to test the fit.
Step 2: Dip each doily into fabric stiffener and fully coat it, then drape it over the balloon.
Step 3: Let dry for 24 hours until the lace is hardened. Pop and remove the balloons carefully.
Step 4: Cut a small hole at the top for your bulb socket and insert the pendant cord.
#17. Glowing Dome Light Made from Plastic Cups
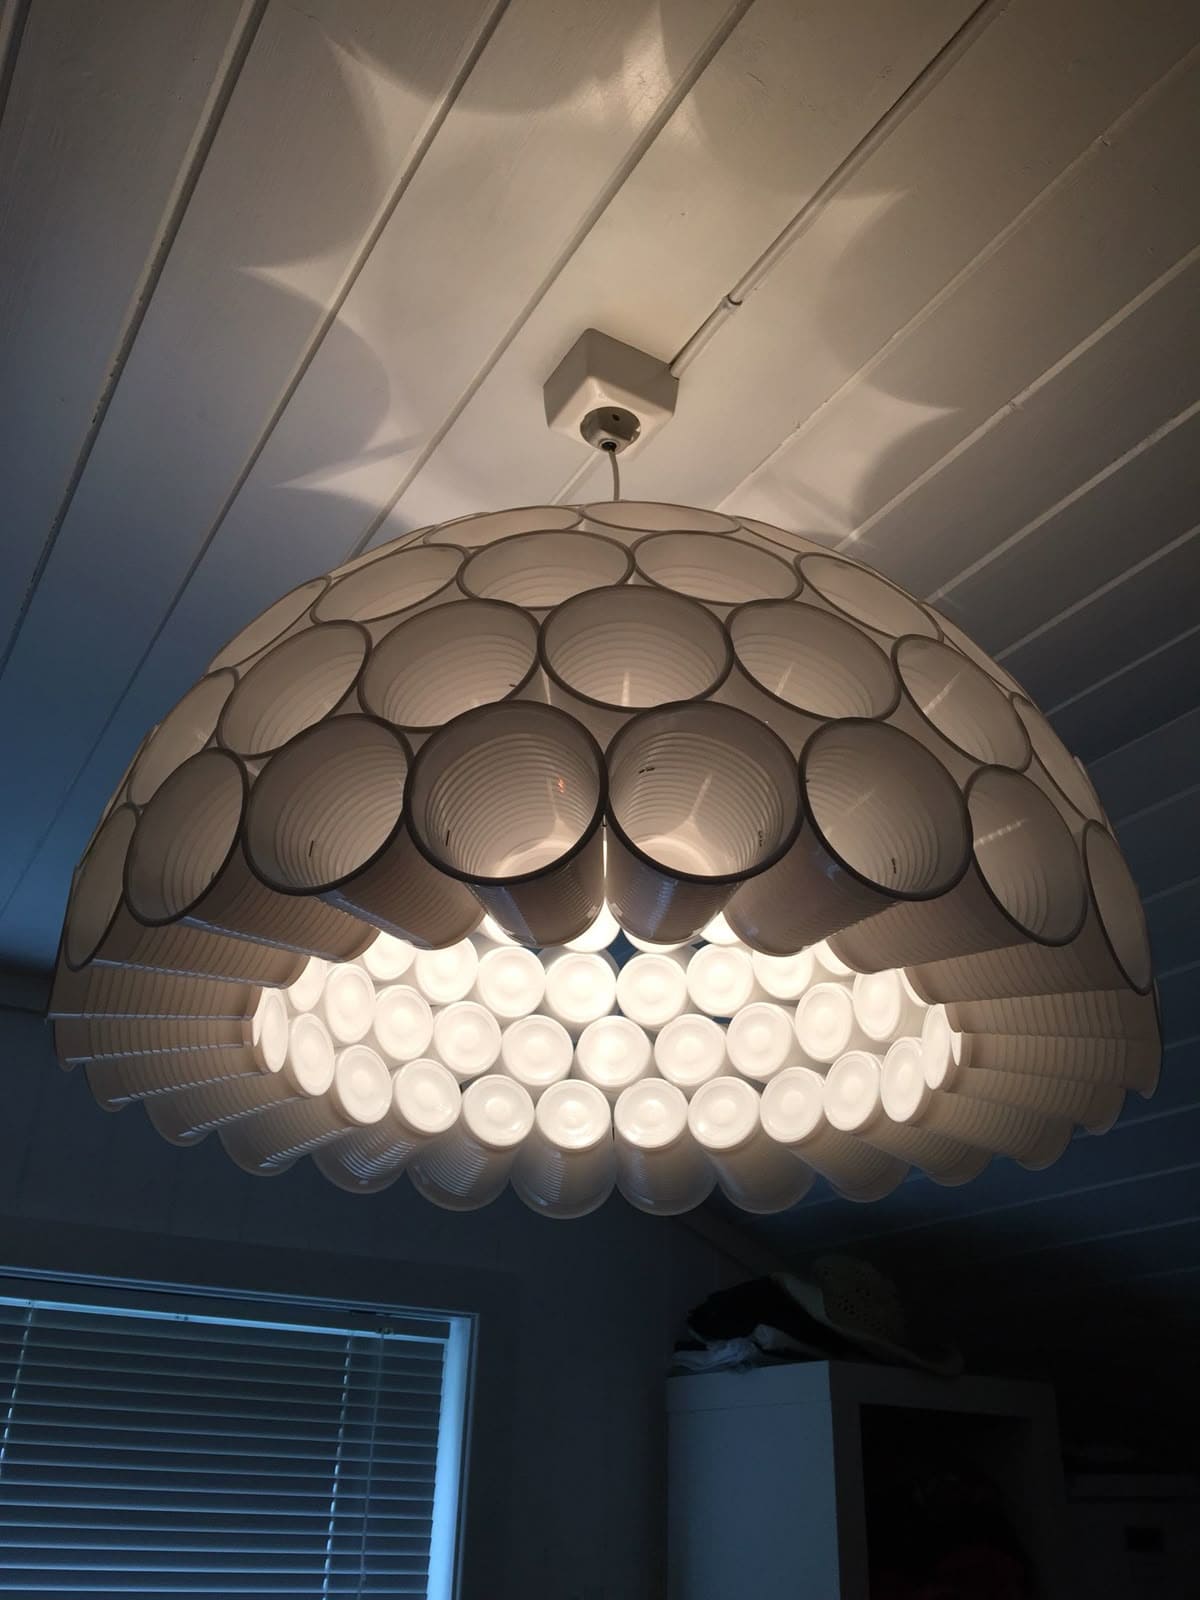
This dramatic dome light proves that even the most disposable items like plastic cups can become showstopping decor.
Stacked and glued in a mesmerizing honeycomb pattern, the cups create a sculptural pendant that casts soft, diffused light and playful shadow shapes on the ceiling.
Specially, the oversized shape adds presence without feeling heavy, perfect for playrooms, creative studios, or modern entryways.
Materials Needed
- 80-100 white plastic cups (medium size)
- Hot glue gun and glue sticks
- Pendant light kit with LED bulb
- Heat-resistant plastic-safe spray (optional)
- Metal ring
Step-by-step Guide
Step 1: Begin gluing cups side-by-side in circular rows, slowly curving them inward to form a dome shape.
Step 2: As the shape develops, leave a center space at the top to insert the light fixture.
Step 3: Reinforce the structure with extra glue, then install the pendant bulb through the center gap.
Step 4: Attach a wire or ring for ceiling suspension and mount it securely.
#18. Upcycled Colander Cluster Light
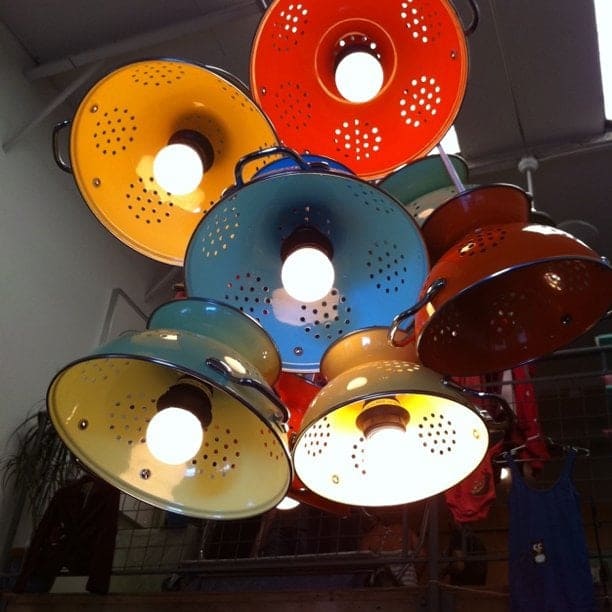
Who knew your kitchen colanders could become a lighting masterpiece? This whimsical project takes enamel strainers in bold, vintage colors and flips them into charming pendant lights.
The perforated holes scatter soft patterns on nearby walls, while the vibrant finishes bring a playful, retro twist to any space.
Materials Needed
- 6-8 metal colanders (various colors, approx. 9”-12” diameter)
- Light socket kits with cords
- Drill with metal bit
- Chain or metal frame
- Ceiling hook and plate
- LED bulbs
Step-by-step Guide
Step 1: Drill holes in the center base of each colander to fit your light socket (if one doesn’t already exist).
Step 2: Attach sockets securely inside each colander and thread cords through the top handles or drilled holes.
Step 3: Mount your colanders to a central frame or hang individually from ceiling hooks in a cluster design.
Step 4: Wire all sockets safely to a central power source and secure your cluster to the ceiling with sturdy hooks.
Step 5: Screw in bulbs and flip the switch, your kitchen tools just became an art installation.
#19. Literary Paper Shade Light
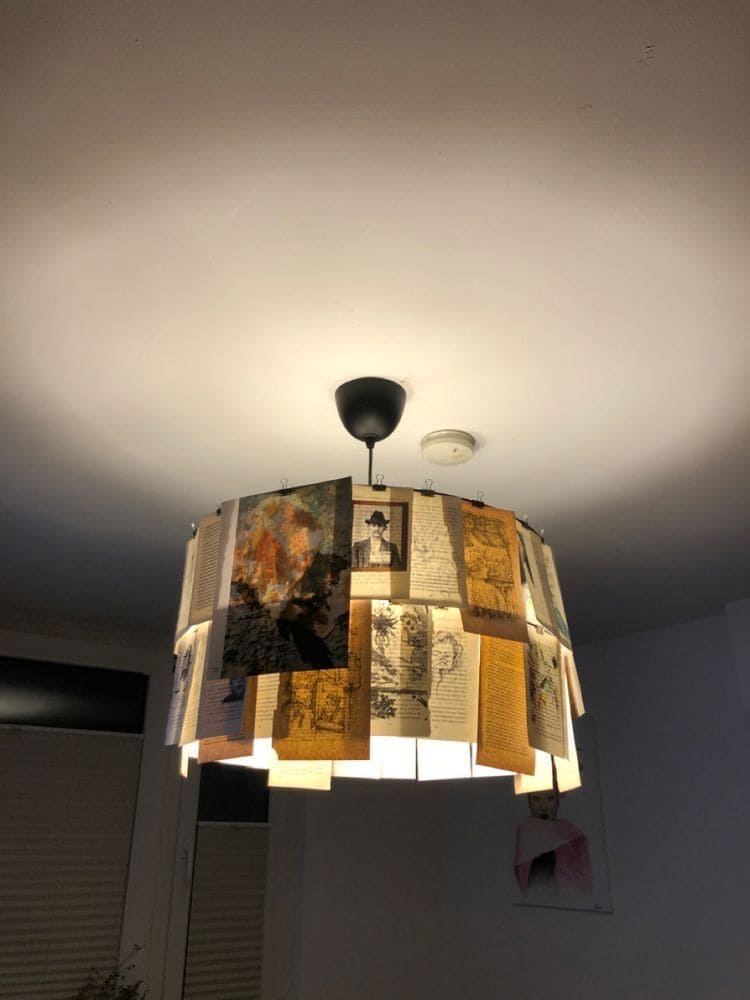
For those who love poetry, old letters, or vintage illustrations, this literary light fixture turns words into a warm, atmospheric glow.
Every piece tells a different story, and together they create a soft patchwork of nostalgia. The result is cozy, artsy, and deeply personal, perfect for reading nooks, bedrooms, or creative spaces.
Materials Needed
- 1 plain drum lampshade frame
- Collection of old book pages, letters, or printed paper (15-30 pieces)
- Mini binder clips
- LED bulb (low heat)
Step-by-step Guide
Step 1: Gather paper pieces in various tones and sizes, ideally aged or printed for texture.
Step 2: Clip them evenly around the edge of the lampshade frame, layering for dimension.
Step 3: Ensure papers don’t touch the bulb, you should use an LED bulb that gives off little heat for safety.
Step 4: Mount the fixture and adjust paper as needed to balance the shape and light diffusion.
#20. Hanging Trellis Chandelier with Ivy and Bulbs
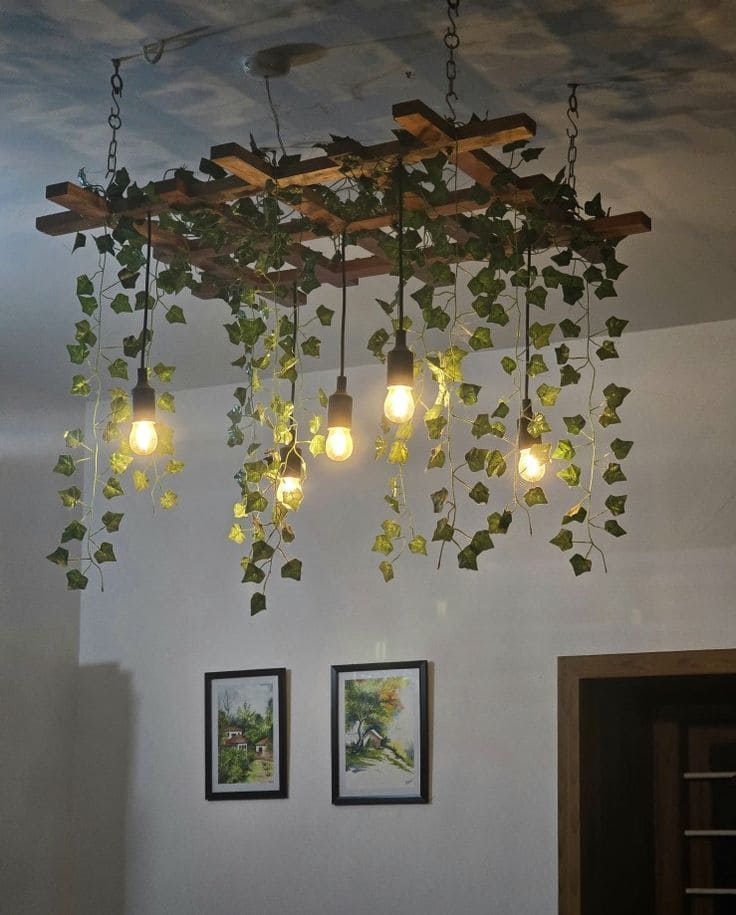
Why not transform your ceiling into a dreamy green canopy with this rustic trellis chandelier?
A grid of wooden slats floats above the room, gently wrapped in cascading faux ivy and glowing vintage-style bulbs. It gives the space a soft forest ambiance like fireflies flickering through leaves.
You’ll love how it turns any dining area, hallway, or creative studio into a calming oasis. The gentle contrast between raw wood and warm light evokes a grounded, earthy charm.
Materials Needed
- 1 wooden trellis (approx. 36″ x 24″)
- 5 pendant light cords with vintage-style LED bulbs (E26/E27 base)
- 3 ceiling hooks with anchors
- 3 metal chains, 36″ long each
- Faux ivy vines (3-4 strands, 6 ft. long each)
- Staple gun
Step-by-step Guide
Step 1: Attach pendant cords to the trellis using clamps or hooks, spacing them evenly.
Step 2: Wrap faux ivy loosely around the trellis slats, allowing strands to dangle naturally.
Step 3: Secure three chains to the trellis corners and hang it from the ceiling hooks.
Step 4: Finally, plug in the light cords and adjust the height of each bulb to vary the layers of light.
#21. Tin Can Cluster Pendant Light
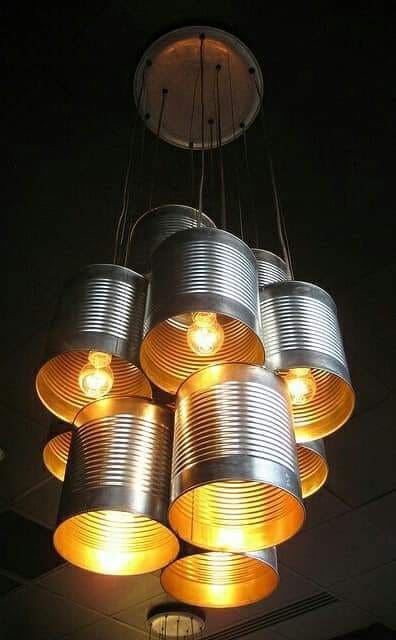
This industrial-style chandelier turns humble tin cans into a striking centerpiece. Each can acts as its own mini pendant shade, reflecting warm light in bold metallic tones.
Suspended at varying heights, they create a layered effect that feels modern, edgy, and unapologetically upcycled.
Ideal for lofts, creative studios, or dining spaces that favor bold character over polish. It’s gritty, sustainable, and surprisingly elegant in its glow.
Materials Needed
- 8-10 empty tin cans
- Drill with metal bit
- Pendant light kit with multiple bulb holders
- Spray paint (optional)
Step-by-step Guide
Step 1: Drill a centered hole in the base of each tin can to fit the light socket through.
Step 2: Optional: You spray paint the inside of each can with gold or copper for a rich glow.
Step 3: Insert the socket from your pendant kit into the drilled hole and secure it.
Step 4: Arrange cans at different heights from a ceiling mount and screw in warm LED bulbs.
#22. Woven Sombrero Pendant Light
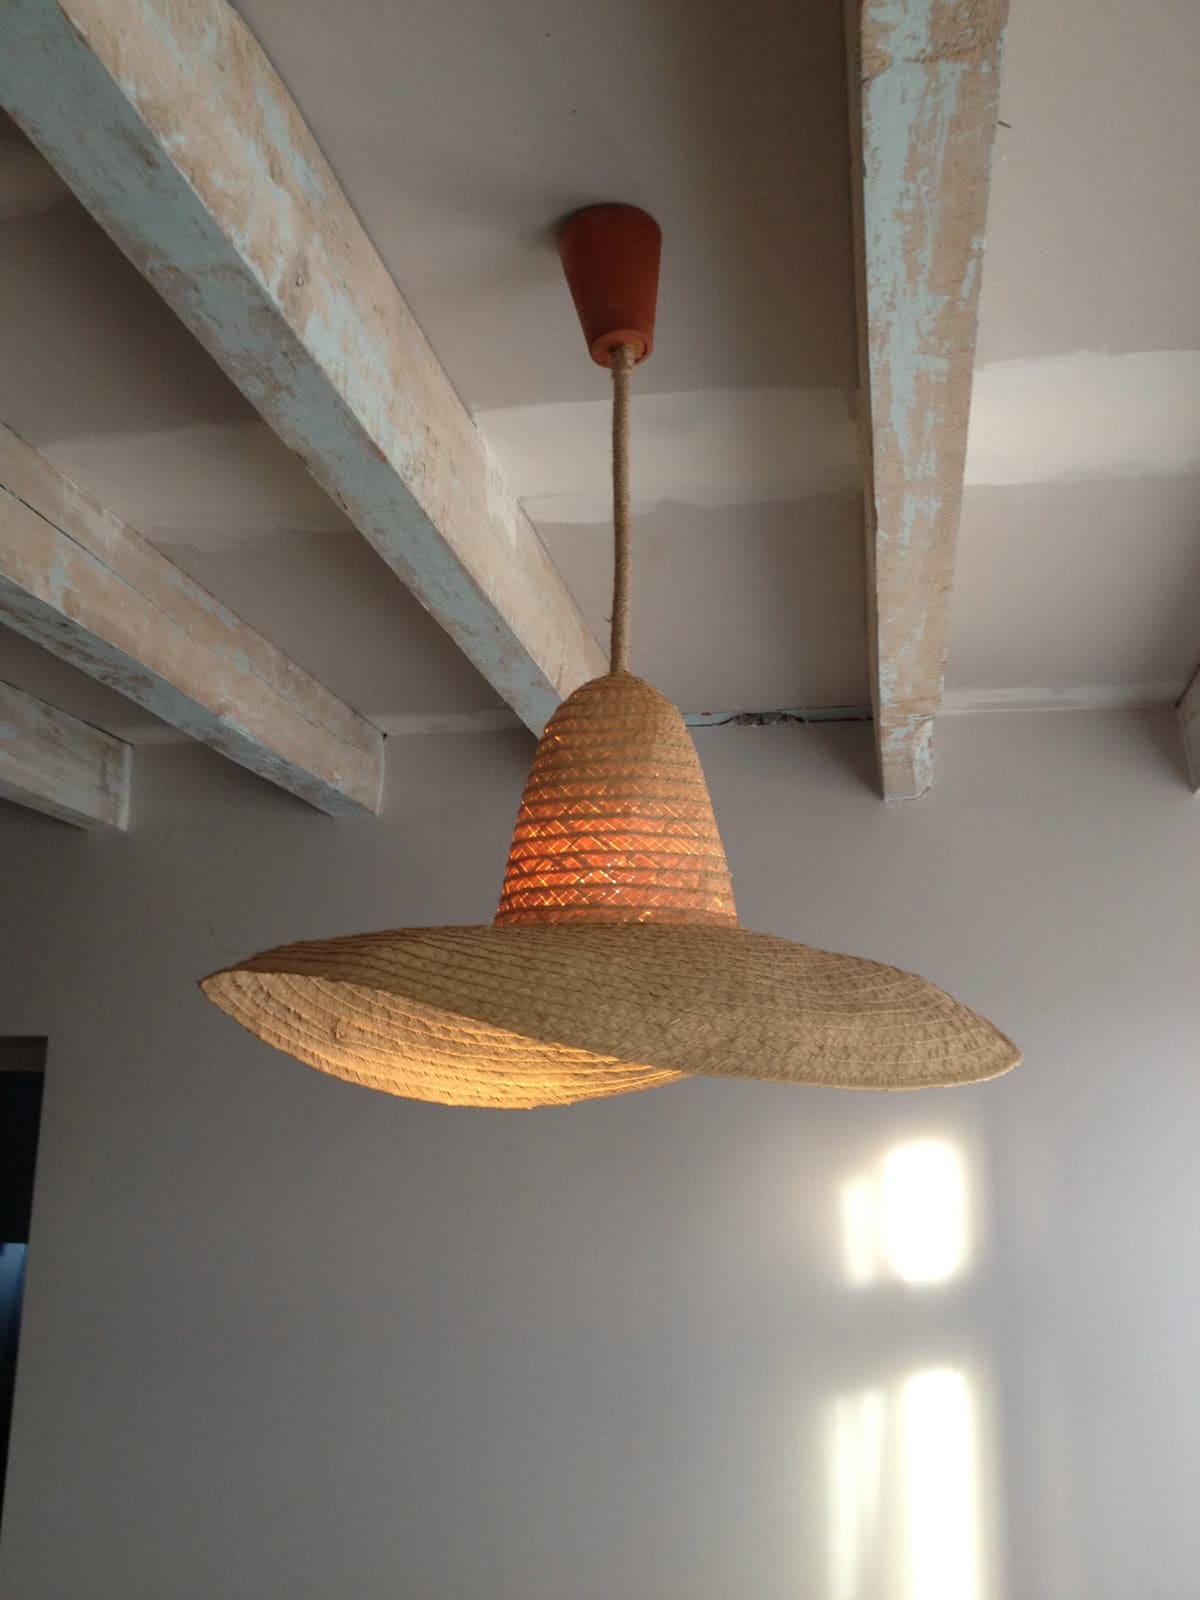
This playful yet earthy light fixture turns a simple straw sombrero into a charming ceiling centerpiece. Its wide-brimmed shape casts a broad, diffused glow that feels both rustic and relaxed.
Additionally, the natural woven texture adds warmth and character, making it a great fit for boho, coastal, or eclectic interiors.
This is one of those unexpected DIYs that works because it doesn’t take itself too seriously.
Materials Needed
- 1 straw sombrero hat
- Pendant light cord set
- Low-heat LED bulb
- Sharp scissors or utility knife
- Hot glue (optional)
Step-by-step Guide
Step 1: Cut a hole in the top of the sombrero just wide enough for the light socket to pass through.
Step 2: Insert the pendant cord through the top hole, securing it snugly around the socket base.
Step 3: Screw in the LED bulb, then hang from a ceiling hook or canopy.
Step 4: Adjust the hat’s position so it hangs level and evenly spreads the light below.
Tips: You should choose a hat with tight weaving to diffuse light softly or go loose-weave for more dramatic glow patterns.
#23. Vibrant Tire Pendant Lights
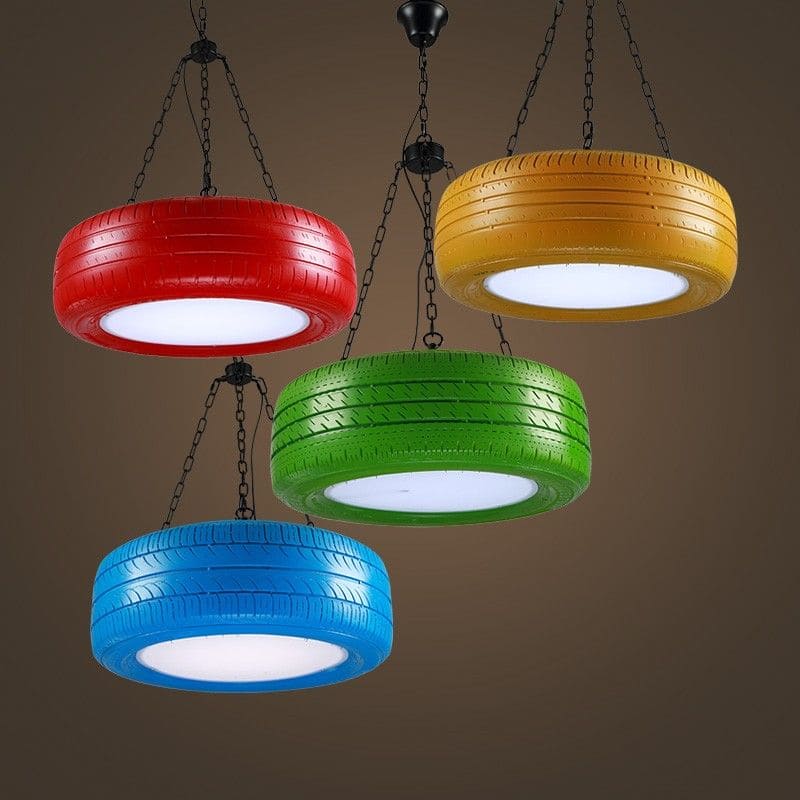
Old tires don’t have to sit forgotten in the garage, they can be turned into an eye-catching, industrial-chic lighting feature.
This colorful ceiling installation transforms used tires into bold statement pendants, each painted in playful hues and lit from within for a soft, diffused glow.
Bonus, the sturdy shape gives the room depth, while the paint brings energy and fun into the mix. If you love giving discarded things a second life, this one’s for you.
Materials Needed
- 4 used tires (cleaned and dried)
- Spray paint in bright colors (red, yellow, green, blue)
- LED panel lights or diffused LED bulbs
- Chain and ceiling hooks
- Drill
- Mounting brackets
- Electrical cord set
Step-by-step Guide
Step 1: Clean the tires thoroughly with soap and let them dry completely.
Step 2: Spray paint each tire a different color. You should let the paint cure fully before handling.
Step 3: Drill holes for chains and install the lighting components inside each tire using brackets or a mounted LED panel.
Step 4: Attach chains evenly around the tire and secure to a ceiling hook or beam. Then wire your lights safely through the ceiling fixture and test for even brightness.
#24. Boho Tassel Halo Chandelier
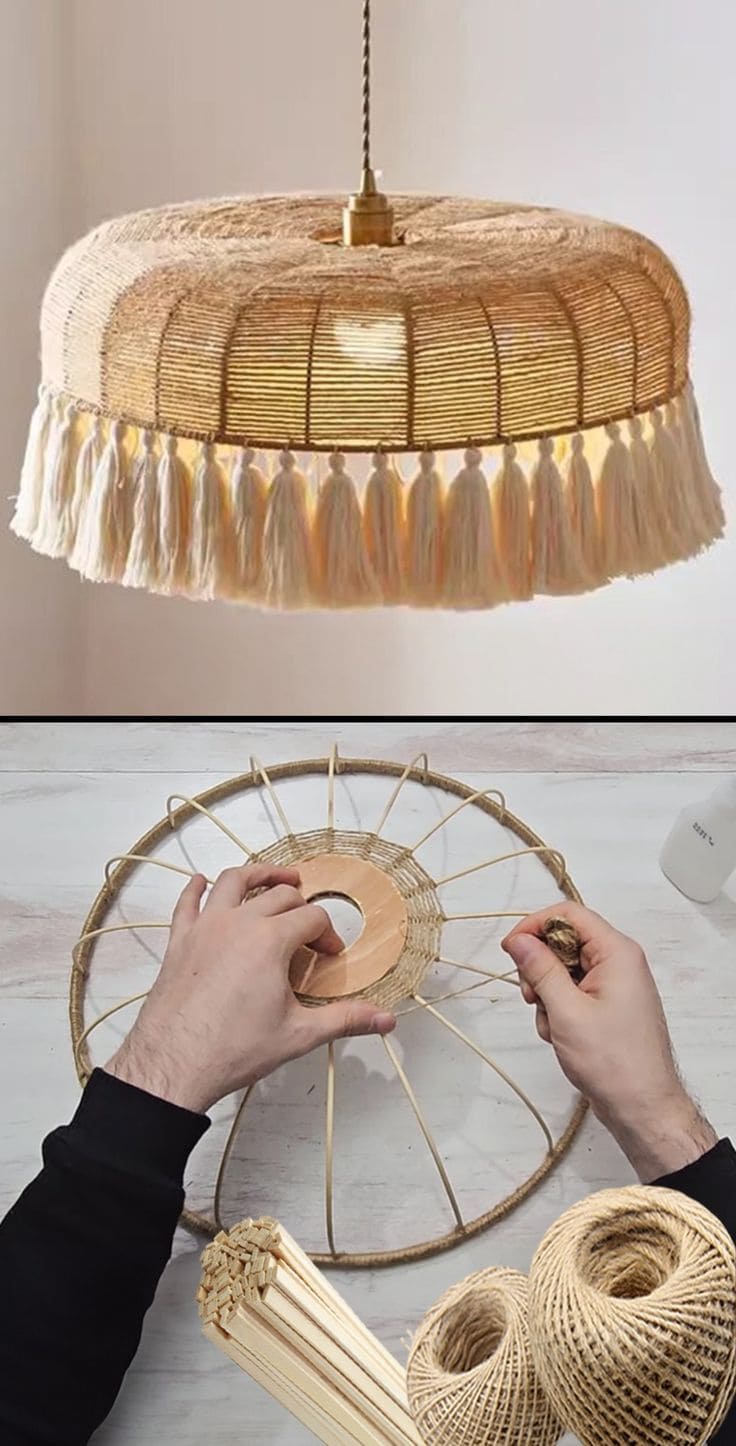
If your space craves something airy, artistic, and softly dramatic, this halo chandelier wrapped in twine and finished with cotton tassels might be the charm it needs.
I believe it’s both structured and free-spirited, its woven texture captures the organic rhythm of natural fibers, while the playful tassels around the edge gently dance with the light breeze.
Materials Needed
- Metal lampshade ring set
- Natural twine
- Wooden skewers or thin bamboo sticks
- Hot glue gun and glue sticks
- White or cream yarn for tassels
- Scissors
- Light fixture cord set
Step-by-step Guide
Step 1: Create a circular base using two metal rings, connecting them with evenly spaced bamboo sticks using glue or strong twine ties.
Step 2: Wrap twine around the vertical and horizontal lines, weaving slowly and evenly to cover the frame.
Step 3: Make tassels by wrapping yarn around your hand or a book, tying at the top, and trimming the ends. Make enough to cover the lower edge.
Step 4: Glue tassels evenly along the bottom ring, spacing them to your liking for a full fringe effect.
Step 5: Attach your pendant light kit to the center and hang your fixture where it can be admired from all sides.
#25. Upcycled Gin Bottle Chandelier
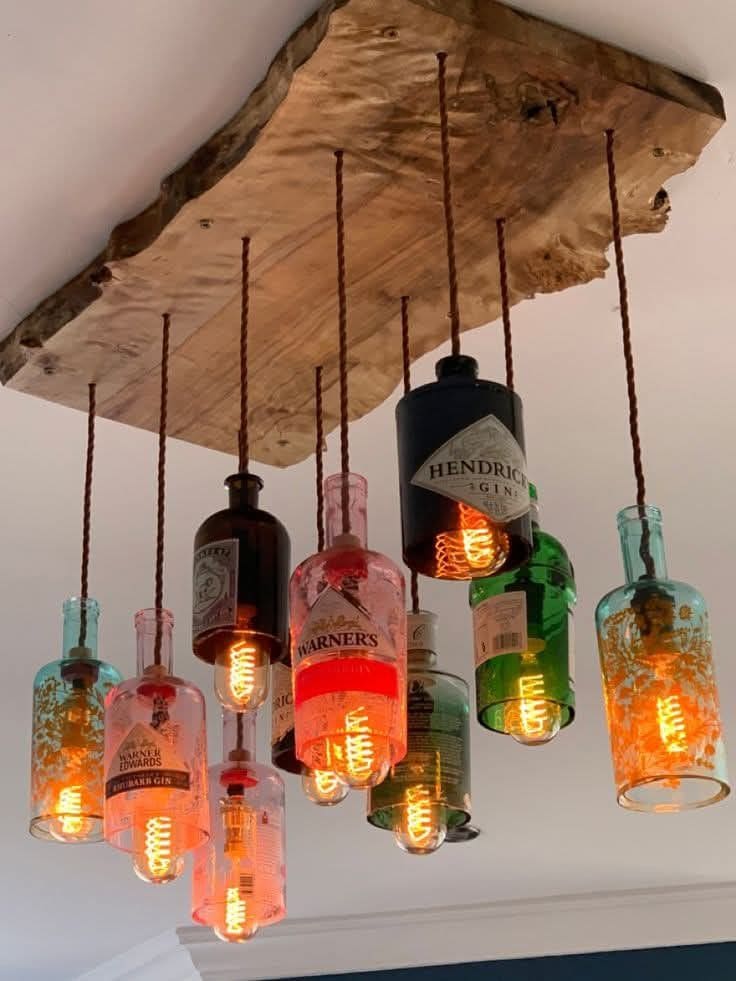
This bold, eye-catching chandelier blends rustic charm with colorful character, all crafted from empty gin bottles and a slab of natural wood.
You can see each bottle acts as a glowing pendant, showcasing unique labels and hues while housing spiral filament bulbs for a warm vintage glow.
Perfect for a home bar, dining room, or kitchen nook that thrives on conversation. It’s one of those designs that instantly steals the spotlight and tells a story.
Materials Needed
- 10-12 empty gin bottles (various colors and shapes)
- Large slab of polished reclaimed wood
- Pendant light kits with vintage filament bulbs
- Heavy-duty cord and wiring
- Glass cutting tool
- Sandpaper or glass file
Step-by-step Guide
Step 1: Use a glass cutter to neatly remove the bottom of each gin bottle. Then smooth the edges thoroughly.
Step 2: Drill holes in the wood slab where each pendant cord will pass through.
Step 3: Thread the cords through the wood and bottles, securing sockets and bulbs in place.
Step 4: Wire all pendants together behind the slab and mount it securely to the ceiling.
