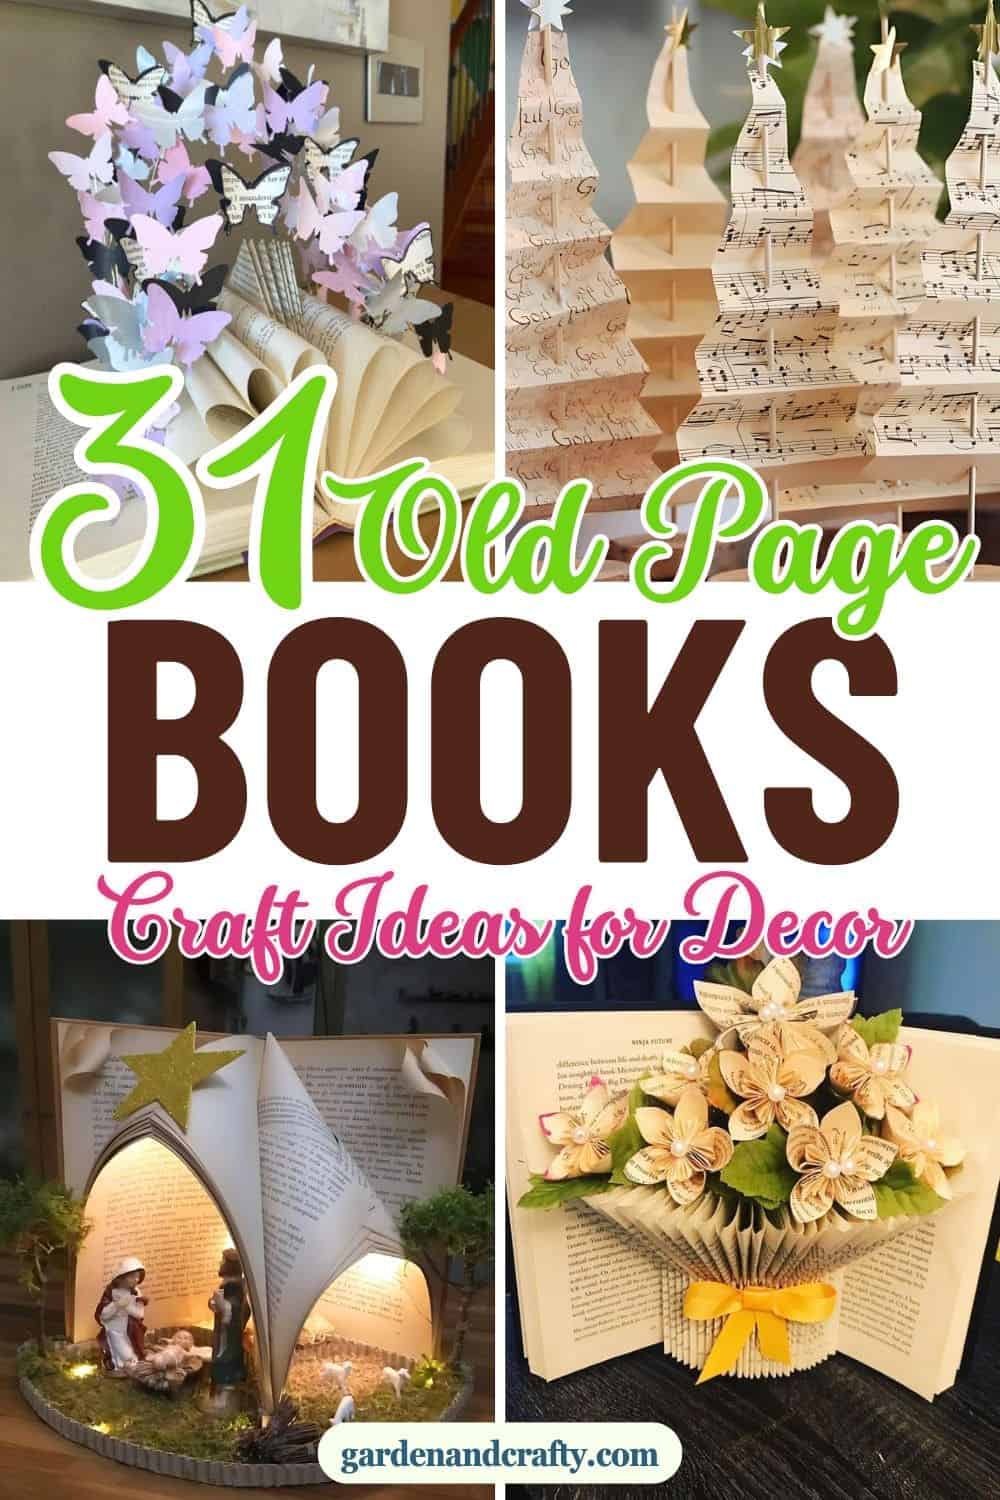
Got a stack of old books gathering dust? Instead of tossing them, why not transform those pages into stunning, high-end projects?
With a little creativity, you can breathe new life into forgotten books and turn them into eye-catching decor pieces, personalized gifts, or even functional home accessories.
These upcycling ideas combine style and sustainability, letting you craft unique treasures that add charm to your space. From intricate wall art to elegant table centerpieces, this list of 31 creative projects will inspire you to see old books in an entirely new way.
#1. Charming Book Page Christmas Gift Wrap
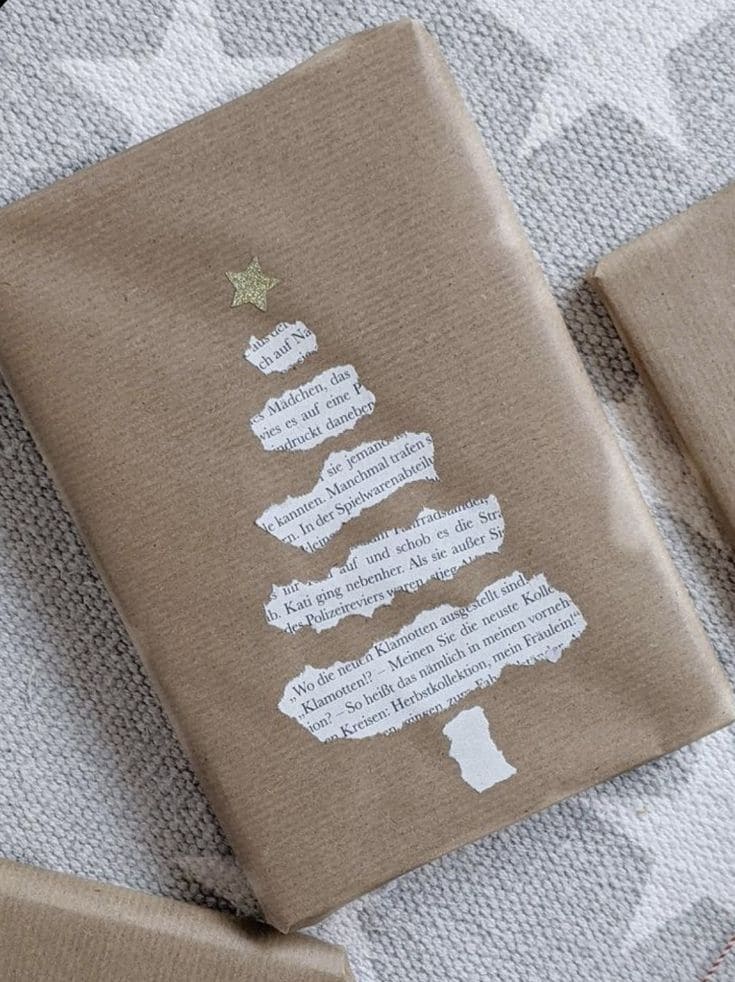
Like combining elegance with sustainability, this unique gift-wrapping idea transforms old book pages into festive designs. Perfect for making your presents stand out with a personal and eco-friendly touch.
Materials Needed:
- Brown kraft paper
- Old book pages
- Scissors
- Glue stick or double-sided tape
- Small gold star sticker or glitter paper
- Pen or pencil for guidance
Instructions:
- Wrap the gift in brown kraft paper, ensuring smooth edges.
- Tear or cut book pages into strips or shapes resembling a Christmas tree. Arrange the pieces to form the tree outline on the wrapped gift.
- Secure the pieces in place with glue or double-sided tape.
- Add a gold star sticker or cutout at the top of the tree for a festive finish.
- Personalize further with handwritten notes or small embellishments if desired.
#2. Enchanting Book Page Nativity Scene Display
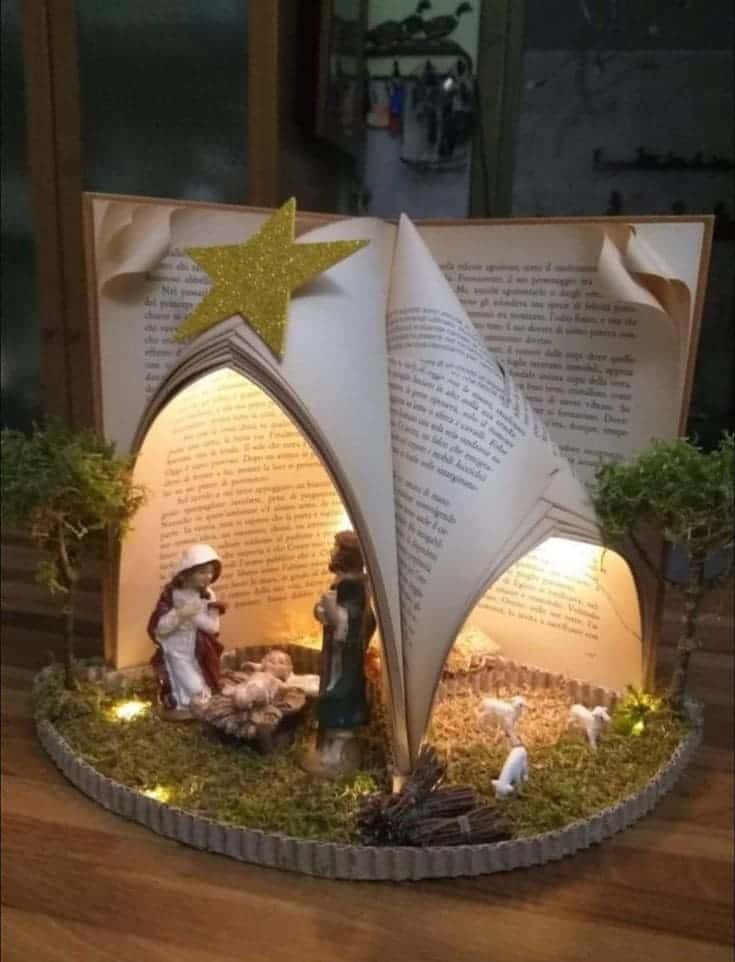
Who can resist the charm of a handmade Nativity scene crafted from a vintage book? This unique decoration adds warmth and spirituality to your holiday setup, blending creativity with traditional symbolism.
Materials Needed:
- An old hardcover book
- Small Nativity figurines
- LED string lights
- Gold glitter paper for the star
- Hot glue gun
- Moss or faux grass
- Corrugated cardboard for the base
- Scissors and crafting knife
Instructions:
- Open the book and fold a few pages inward to create arched shapes resembling a stable. Secure with glue if necessary.
- Cut a corrugated cardboard circle or oval for the base, ensuring it accommodates the open book and figurines.
- Glue the book onto the cardboard base.
- Attach moss or faux grass to the base, covering it completely for a realistic ground effect.
- Next, arrange Nativity figurines in the center, under the book’s arches, and secure them with glue.
- Add LED string lights around the base and inside the arches for a glowing effect.
- Cut a star from gold glitter paper and attach it to the top of the book for the finishing touch.
#3. Graceful Ballerina Wall Art with Book Pages
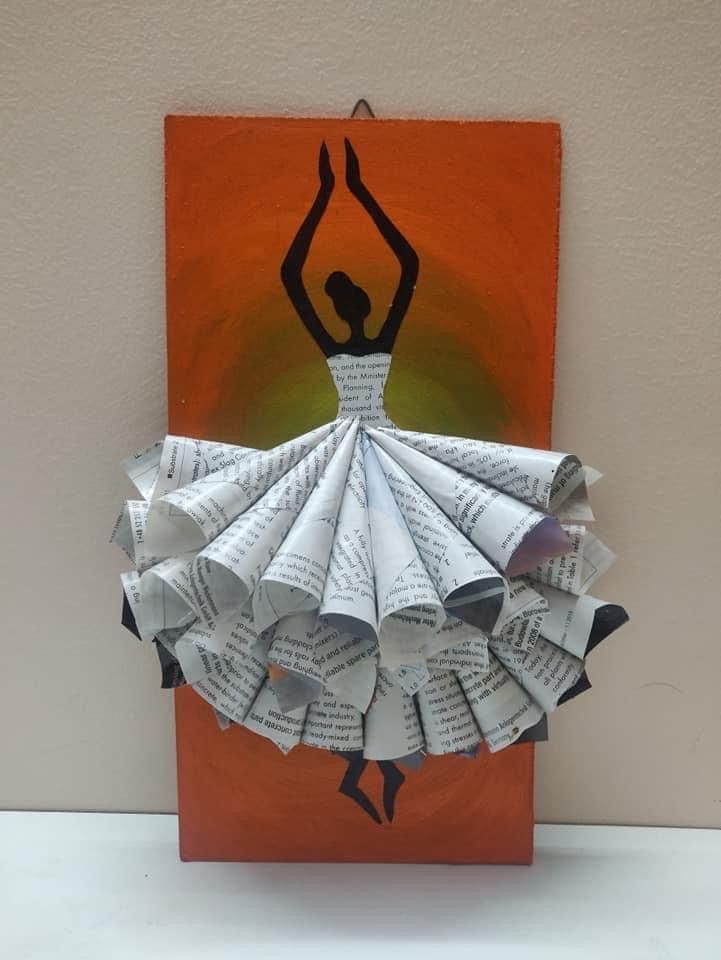
The combination of recycled book pages and a delicate ballerina silhouette creates this striking and artistic wall décor.
Perfect for adding an elegant and personal touch to any room, this craft highlights your creativity and love for upcycling.
Materials Needed:
- Old book pages
- Canvas or cardboard for the base
- Acrylic paints (for background and silhouette)
- Paintbrushes
- Hot glue gun or strong adhesive
- Scissors
Instructions:
- Paint the canvas or cardboard in vibrant colors to create a stunning backdrop. Let it dry completely.
- Sketch and paint a ballerina silhouette in the center of the canvas using black acrylic paint. Allow it to dry.
- Roll or fold old book pages into cone shapes and secure them with glue.
- Arrange and glue the book page cones below the ballerina silhouette to form a flowing dress.
- Add final touches if desired, such as shading or glitter, then hang your masterpiece.
#4. Vintage Pressed Flower Literary Card
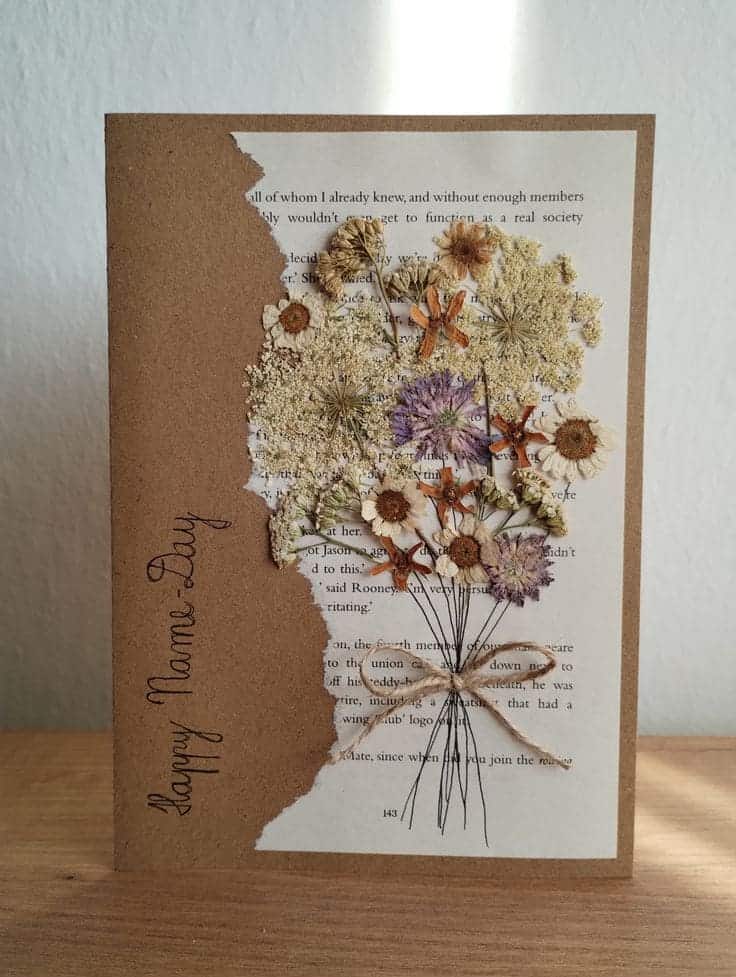
Your creativity can bloom beautifully with this elegant pressed flower card idea.
By combining the natural charm of dried flowers with the timeless appeal of old book pages, this project creates a heartfelt, eco-friendly keepsake.
Materials Needed:
- Old book page or printed text sheet
- Kraft paper or blank card base
- Pressed flowers
- Glue or double-sided tape
- Twine or ribbon for decoration
- Scissors or craft knife
Instructions:
- Fold the kraft paper into a card shape or use a pre-made blank card. Tear or cut an old book page to fit as a decorative element.
- Glue or tape the torn book page to the front of the card, slightly off-center for a layered effect.
- Place pressed flowers in a bouquet or scattered arrangement on the book page. Experiment with placements before securing.
- Carefully attach the flowers using small amounts of glue or double-sided tape.
- Tie a small bow with twine or ribbon and attach it near the base of the flowers for a polished look.
- Finally, personalize the card with a thoughtful message or decorative handwriting.
#5. Elegant Folded Book Flower Bouquet
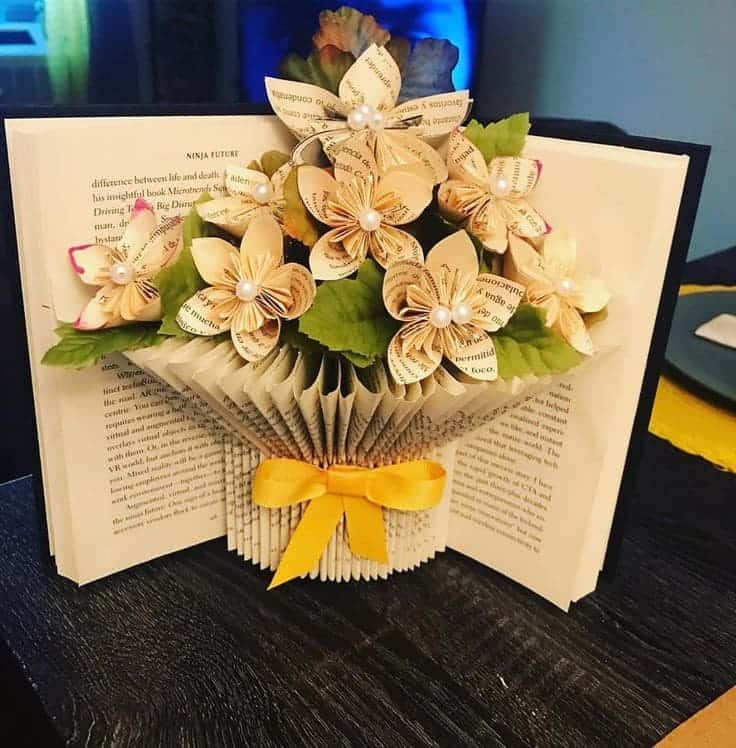
You can imagine transforming a simple book into a magical burst of butterflies, creating an artistic statement that captivates any viewer.
This project merges upcycling with creativity, turning old pages into a vibrant and delicate masterpiece.
Materials Needed:
- Hardcover book
- Old book pages (if different from the hardcover book)
- Scissors
- Hot glue gun or craft glue
- Artificial leaves
- Small pearl beads
- Floral wire or thin stems
- Ribbon (any color)
Instructions:
- Open the hardcover book to its center. Fold each page in half vertically to create a fan shape, giving the appearance of a bouquet base.
- Cut petals from old book pages and assemble them into flower shapes using glue. Attach pearl beads at the center of each flower for added elegance.
- Attach floral wire or thin stems to the back of each flower. Add artificial leaves to complete the realistic floral look.
- Insert the flowers and leaves into the folded pages of the book, securing them with glue where necessary.
- Tie a vibrant ribbon around the base of the folded pages for a polished look.
#6. Charming Bee-Themed Book Page Shadow Box
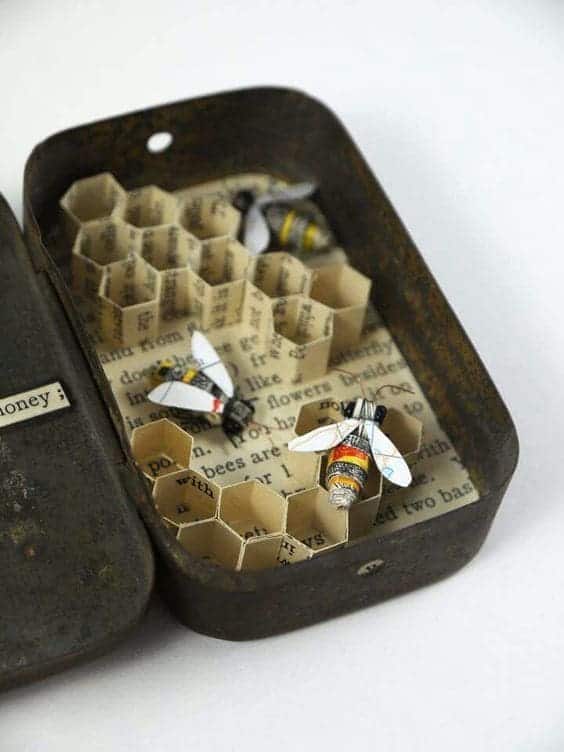
I am sure you’ll adore this intricate shadow box showcasing bees and honeycomb crafted from old book pages.
It’s a creative and meaningful piece for bee lovers or eco-friendly decorators, combining vintage aesthetics with delightful detail.
Materials Needed:
- An old tin box or small shadow box
- Old book pages
- Black and yellow markers or paint
- Scissors and glue
- Small wire or pipe cleaners (for bee bodies)
- A ruler (for precise cuts)
Instructions:
- Cut book pages into small strips and fold them into hexagonal shapes to mimic a honeycomb. Glue the edges to secure each hexagon, then arrange them inside the tin or shadow box, gluing them into place.
- Use wire or pipe cleaners to form tiny bee bodies. Paint or color them black and yellow. Cut small wings from book pages and attach them to the bees.
- Place the bees inside the honeycomb, gluing them at various angles for a lively, buzzing effect. Add any small text or captions from the book pages for added charm.
- Finally, decorate the exterior of the box if desired, or leave it rustic for a vintage look.
#7. Charming Folded Book Page Christmas Tree Display
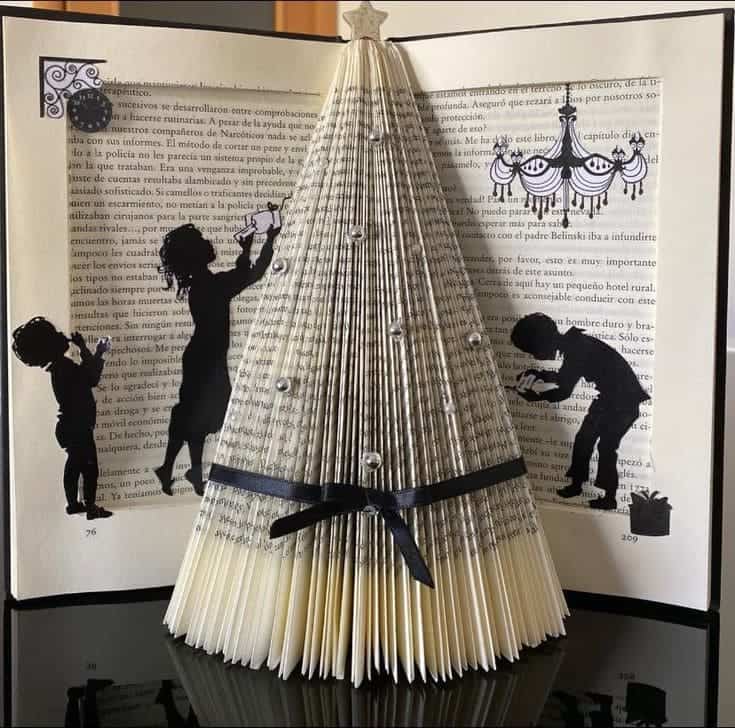
Have you ever thought about turning an old book into a breathtaking holiday masterpiece?
This folded book page Christmas tree, framed by a storybook backdrop, creates a stunning centerpiece that’s elegant, eco-friendly, and incredibly unique.
Materials Needed:
- Old hardcover book
- Ribbon (preferably black or festive colors)
- Decorative beads or rhinestones
- Small star ornament
- Glue
- Scissors or craft knife
- Black paper silhouettes (optional)
Instructions:
- Remove the cover of your book if needed, leaving the pages intact.
- Fold each page diagonally toward the spine to create a tree-like structure. Repeat for all pages.
- Secure the folded book upright and tie a ribbon around the middle for added elegance.
- Glue rhinestones or beads as ornaments onto the tree.
- Place a star ornament at the top.
- Eventually, add black paper silhouettes to the background for a magical storytelling effect.
#8. Glamorous Map Page Snowflake Ornament
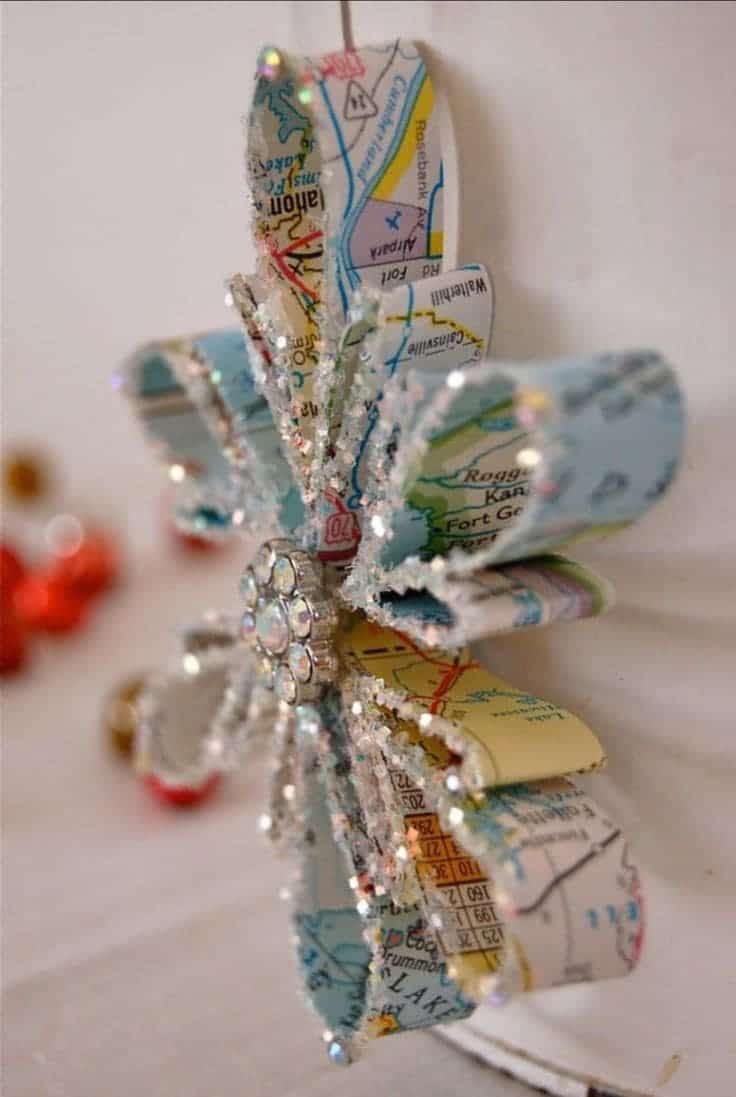
Do you want to turn outdated maps or old pages into dazzling holiday ornaments?
This charming snowflake craft combines creativity with eco-friendliness, perfect for adding a personal, glittering touch to your seasonal décor.
Materials Needed:
- Old maps or book pages
- Scissors
- Hot glue gun
- Glitter glue or loose glitter
- Decorative gem or button for the center
- String or ribbon for hanging
Instructions:
- Cut the map or book pages into even strips (around 1 inch wide and 5 inches long).
- Loop each strip to form a petal shape and glue the ends together. Repeat for six to eight petals.
- Arrange the petal loops into a snowflake shape by gluing them at their bases.
- Add glitter glue along the edges of each petal for a sparkling effect.
- Place a decorative gem or button in the center for an elegant finish.
- Attach a string or ribbon loop to the back for easy hanging.
#9. Vintage-Inspired Book Page Bookmark Tags
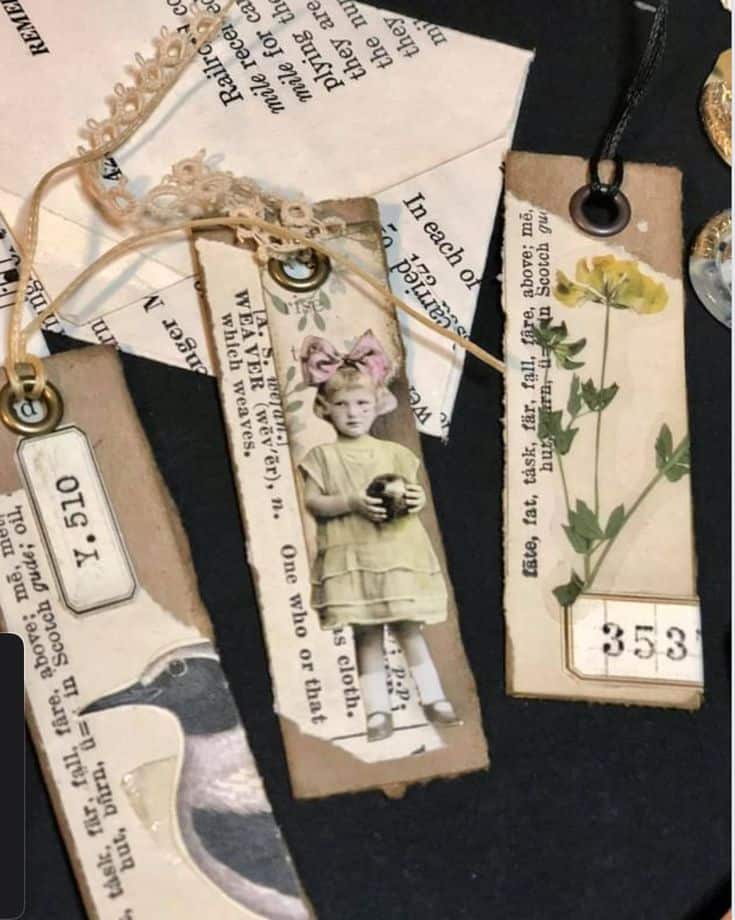
This charming DIY project turns old book pages into exquisite, vintage-style bookmark tags.
Perfect as thoughtful gifts or personalized additions to your book collection, these tags combine nostalgia and creativity for a truly unique craft.
Materials Needed:
- Old book pages
- Cardstock or kraft paper
- Scissors or craft knife
- Hole punch
- Decorative elements (lace, dried flowers, vintage photos)
- Mod Podge or glue
- Eyelets and string/ribbon
- Optional: distress ink for aged effect
Instructions:
- Cut the cardstock into bookmark shapes of your desired size.
- Glue book page pieces onto the cardstock, covering it partially or fully.
- Add decorative elements like lace, dried flowers, or vintage photos.
- Use distress ink to age the edges for a vintage look.
- Punch a hole at the top, add an eyelet, and tie a string or ribbon through it.
#10. Sailing Through Stories Masterpiece
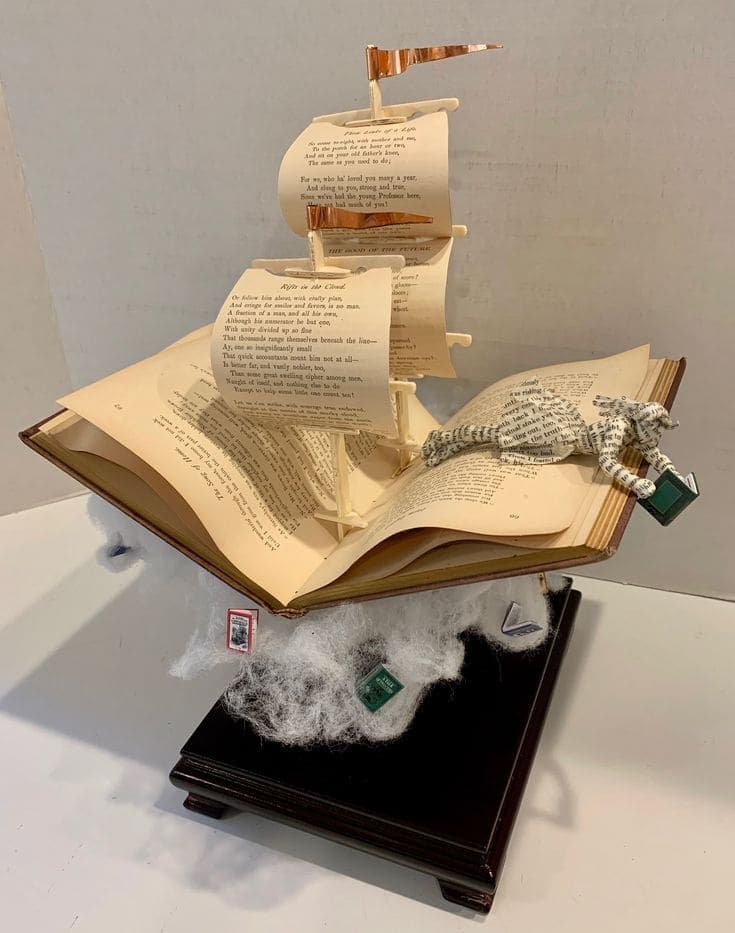
This imaginative book ship craft combines the beauty of literature with the charm of nautical design. It’s perfect for transforming an old book into a stunning centerpiece or gift for book lovers.
Materials Needed:
- An old hardcover book
- Wooden skewers or craft sticks
- Hot glue gun
- White paper or additional book pages for sails
- Cotton or stuffing for the “sea” effect
- Miniature objects like a figurine or tiny book props (optional)
- Scissors and craft knife
Instructions:
- Open the hardcover book, propping some pages upright to mimic waves. Use a craft knife to shape the open pages if needed.
- Create a ship structure using skewers or craft sticks, gluing them together to form masts and a base for the sails.
- Cut sail shapes from white paper or book pages, attaching them to the masts with glue. Add small details like flags or patterns for extra charm.
- Secure the ship onto the open book with glue.
- Arrange cotton or stuffing around the base for a soft “sea” effect.
- Finally, add miniature props, like a sailor figurine or tiny book accents, to personalize your design.
#11. Charming Miniature Village on Book Pages
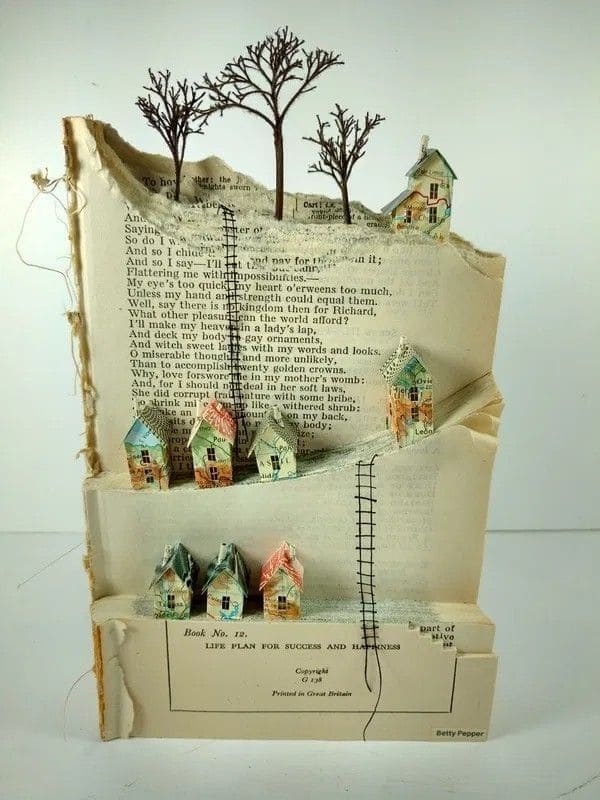
You can also turn an old book into an enchanting miniature village! This craft creates a dreamy landscape with tiny houses, trees, and layers of torn pages, making it a stunning centerpiece or decor.
Materials Needed:
- An old hardcover book
- Scrapbook or colored paper for houses
- Twigs or craft wire for trees
- Hot glue gun
- Scissors or craft knife
- Markers or watercolor paints
- Fine black pen for details
Instructions:
- Select a hardcover book with sturdy pages.
- Tear and layer pages to create a 3D hillside effect. Secure each layer with glue.
- Cut out tiny house shapes from scrapbook paper, fold them, and glue them into boxes. Decorate with markers or watercolors.
- Attach the houses to the layered book pages using a hot glue gun.
- Use twigs or craft wire to create miniature trees and glue them into the scene.
- Add final details, like ladders or paths, with a fine pen or leftover paper.
#12. Elegant Music Sheet Vase Craft for Floral Arrangements
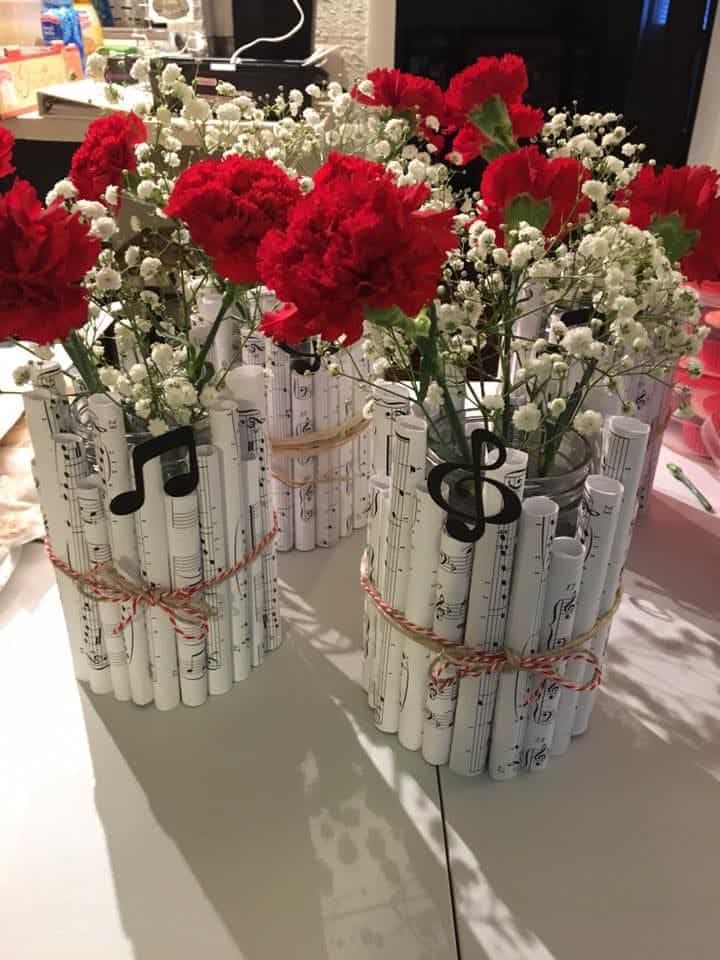
I believe this stunning craft combines the timeless beauty of music with vibrant floral arrangements, making it perfect for music lovers or special events.
These decorative vases wrapped in rolled music sheets exude a classy and personal touch.
Materials Needed:
- Glass jars or vases
- Old music sheet pages (or printed ones)
- Scissors
- Twine, ribbon, or string
- Hot glue or double-sided tape
- Floral embellishments (optional)
- Flowers or faux greenery
Instructions:
- Cut the music sheets into uniform rectangles to fit the height of the vase or jar.
- Roll each sheet into a tube and secure the edge with tape or glue.
- Attach the rolled music sheets around the vase using hot glue or double-sided tape, ensuring they are evenly spaced.
- Wrap a piece of twine, ribbon, or decorative string around the middle of the vase and tie it into a bow for a finished look.
- Add small embellishments like musical notes or charms if desired.
- Finally, fill the vase with fresh flowers, dried florals, or greenery, and display proudly on a table or mantle.
#13. Charming Book Page Treat Bags with Lace
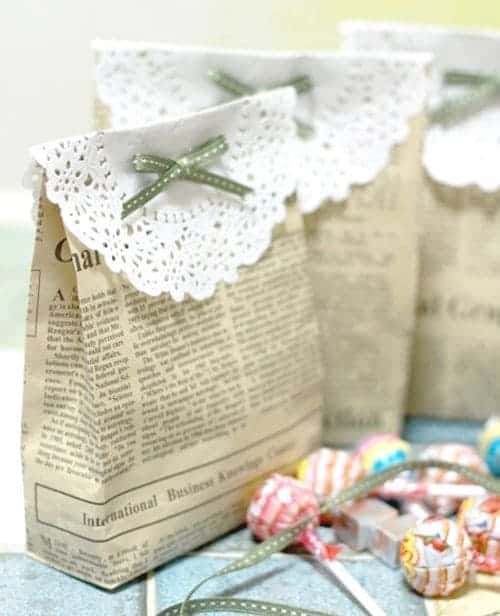
Any small gift or treat becomes extra special when presented in these delicate and eco-friendly book page treat bags.
Combining vintage aesthetics with practical utility, they’re perfect for parties, weddings, or thoughtful favors.
Materials Needed:
- Old book pages or newspaper
- Paper doilies
- Ribbon (any color or design)
- Glue stick or double-sided tape
- Scissors
Instructions:
- Fold the old book page into a bag shape by creasing the edges and securing with glue or tape.
- Trim the top of the bag for an even finish.
- Fold a paper doily over the top opening of the bag to act as a decorative flap.
- Use a ribbon to tie a small bow and glue it onto the doily for an elegant touch.
- Fill the bag with treats or gifts, and your charming DIY packaging is ready!
#14. Elegant Vintage Book Page Table Runner
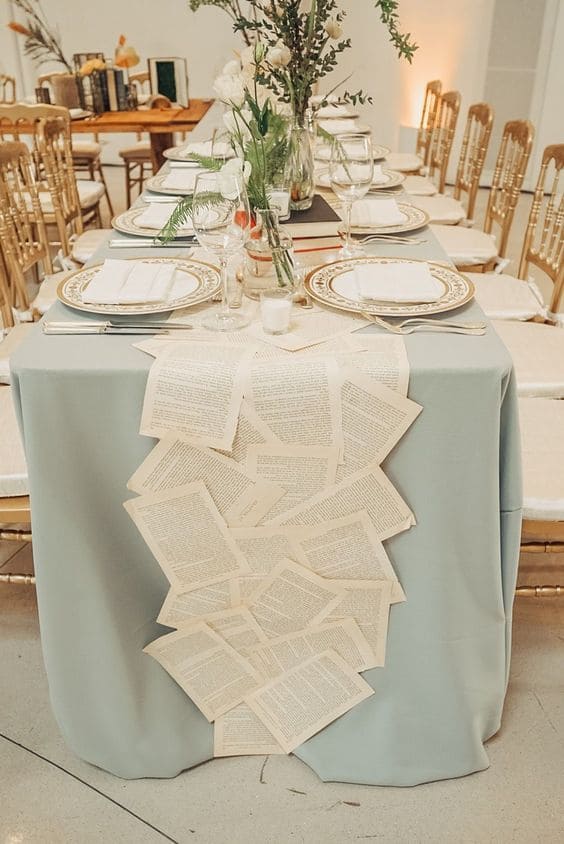
Whatever your theme, this delightful DIY book page table runner is an enchanting way to add literary charm to your dining setup.
It’s perfect for weddings, parties, or casual gatherings, creating a one-of-a-kind centerpiece that’s eco-friendly and creative.
Materials Needed:
- Old book pages
- Clear tape or double-sided tape
- Tablecloth (optional base layer)
- Scissors
Instructions:
- Lay a tablecloth on your table if desired, as the base for the runner.
- Arrange the old book pages in a cascading or overlapping pattern along the center of the table.
- Secure the pages together with clear or double-sided tape, ensuring they stay in place but maintain a natural, flowing look.
- Continue layering pages until the runner reaches your preferred length.
- Add a touch of elegance by placing vases, candles, or other decorative elements along the runner for a cohesive theme.
#15. Literary Wall Collage of Old Pages
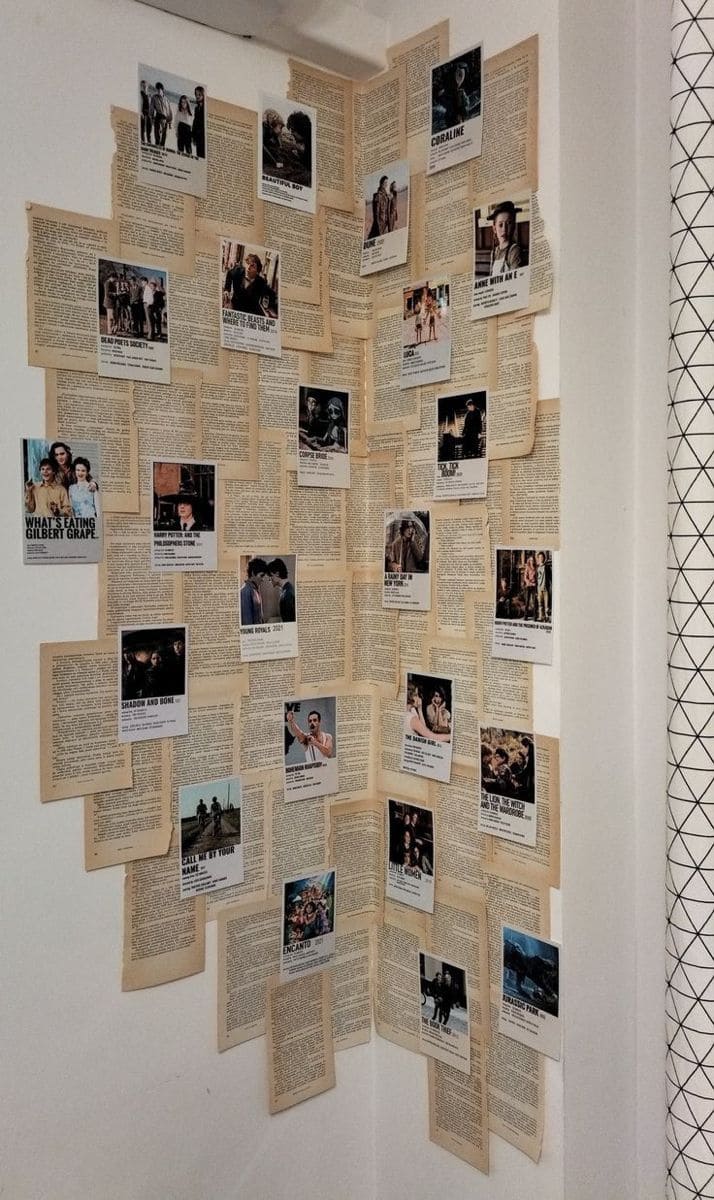
To save and showcase the timeless beauty of literature, this DIY wall collage transforms old book pages into a stunning backdrop.
It’s perfect for personalizing a corner with nostalgic charm while blending vintage aesthetics with modern creativity.
Materials Needed:
- Old book pages
- Photos, prints, or small posters
- Double-sided tape or glue dots
- Ruler or straight edge (optional)
- Scissors
Instructions:
- Choose a section of your wall to decorate and decide on the layout.
- Carefully tear or cut out old book pages, ensuring clean edges or an artistic rugged look.
- Arrange the pages on the wall to create a layered base, overlapping edges for a dynamic effect.
- Secure the pages with double-sided tape or glue dots to avoid damaging the wall.
- Add photos or small posters on top of the book page base for an extra personalized touch.
#16. Mesmerizing Butterfly Explosion on Book Pages
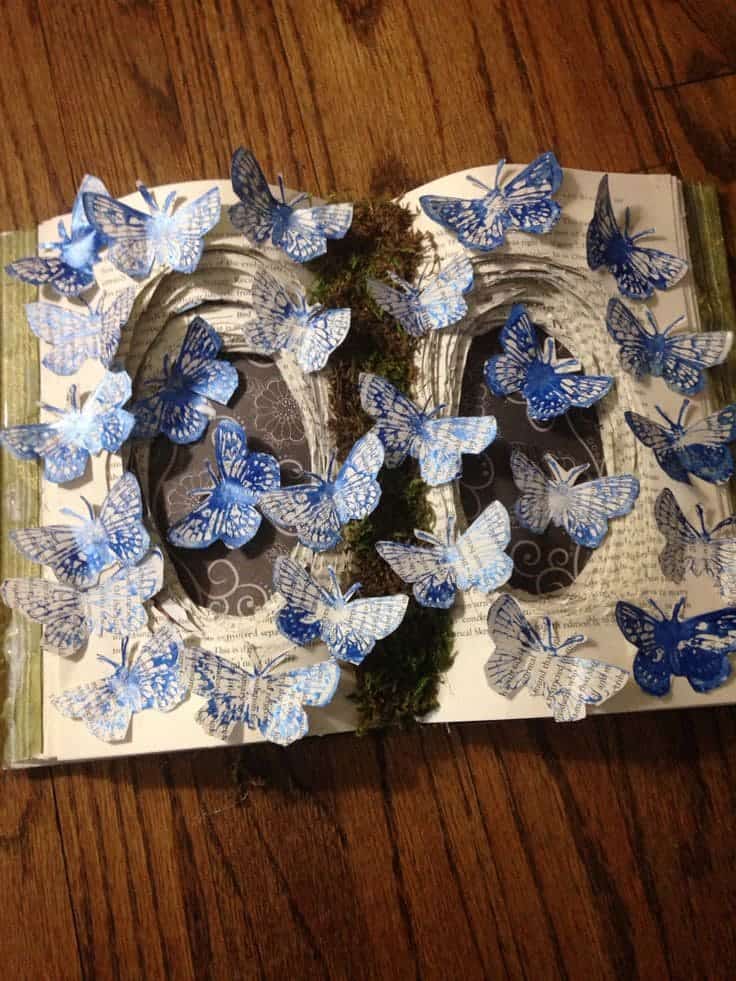
By transforming an old book, you can create a stunning display of 3D butterflies bursting from its pages. This enchanting craft is perfect as a decorative piece or an inspiring gift for book lovers.
Materials Needed:
- An old hardcover book
- Blue or patterned craft paper
- Scissors or butterfly paper punch
- Hot glue gun
- Moss or decorative foliage
- Pen or pencil for shaping wings
Instructions:
- Select a hardcover book and open it to the middle. Use scissors or a craft knife to carve out a recessed area in the pages.
- Cut out butterfly shapes from craft paper or use a butterfly paper punch.
- Gently curl the wings using a pencil to give them a 3D effect.
- Glue moss or foliage along the center of the carved book for a natural look.
- Attach the butterflies to the book using hot glue, arranging them as if they are flying out.
- Layer and position the butterflies for a dynamic, “in-motion” appearance.
#17. Rustic Book Page Star Ornaments
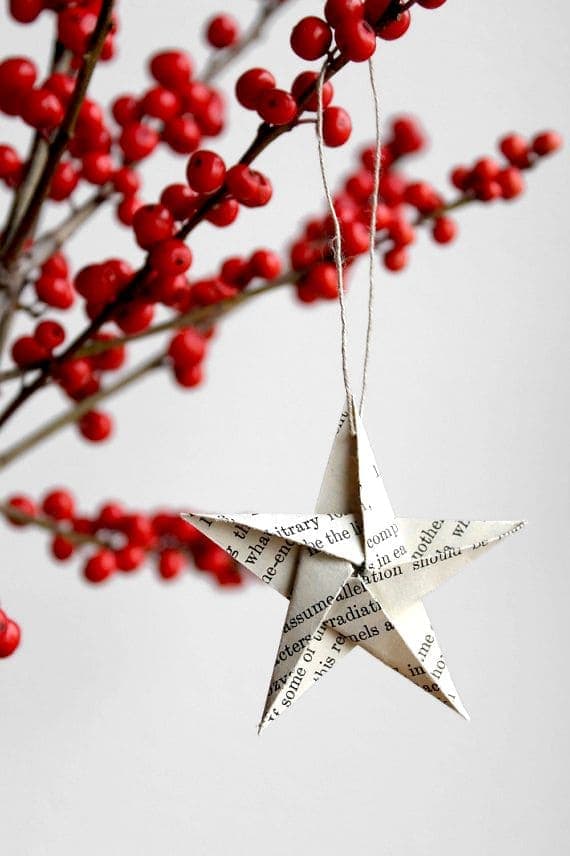
Your Christmas tree deserves a touch of timeless elegance, and these book page star ornaments are the perfect way to achieve it.
Their rustic charm and eco-friendly design make them a stunning yet simple DIY project.
Materials Needed:
- Old book pages
- Star template (or freehand drawing)
- Scissors
- Glue stick or hot glue gun
- Twine or string
- Pencil
Instructions:
- Trace a star shape onto two book pages using a template or freehand drawing. Cut out the shapes.
- Fold both stars in half to create a crease and add a 3D effect.
- Glue the two stars together along the creases, leaving one side slightly open to form a dimensional shape.
- Attach a piece of twine or string to the top with glue, forming a loop for hanging.
- Allow the ornament to dry completely before placing it on your tree or gift decorations.
#18. Enchanting Folded Book Page Christmas Trees
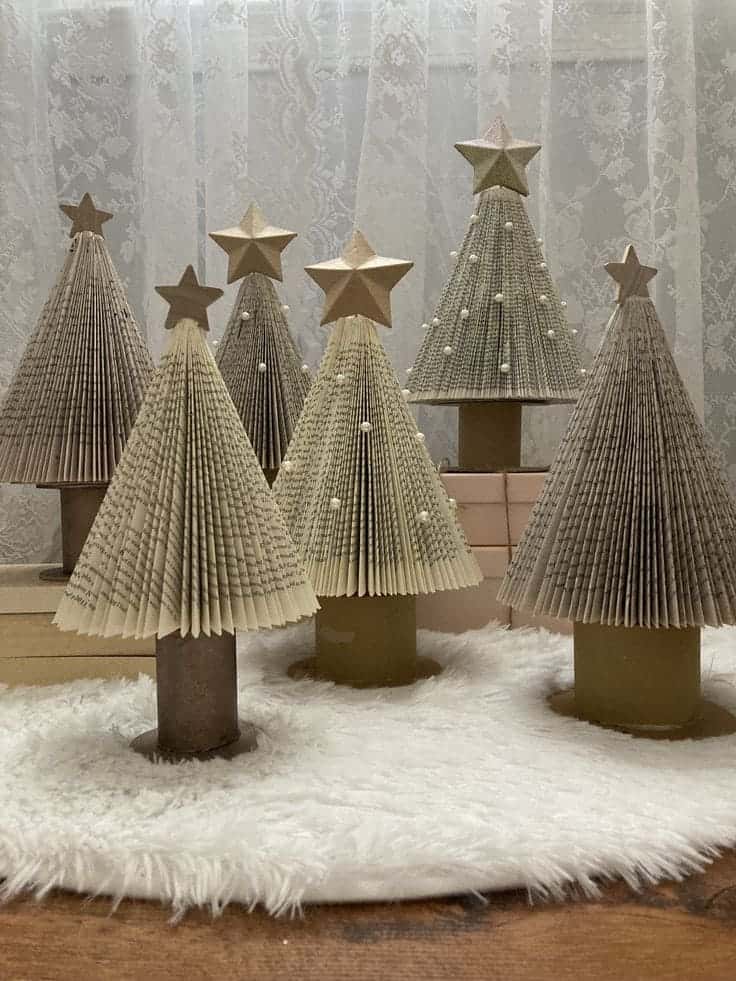
On Christmas day, these beautifully folded book page trees will bring vintage charm and elegance to your holiday décor.
Perfect as table centerpieces or mantle decorations, they are eco-friendly and radiate creativity.
Materials Needed:
- Old book pages or sheet music
- Wooden dowels or skewers
- Small wood slices or corks (for the base)
- Hot glue gun
- Scissors
- Small star stickers or cutouts
Instructions:
- Cut book pages or sheet music into decreasing rectangular sizes for a tiered look.
- Fold each piece accordion-style, ensuring the folds are even and crisp.
- Slide each folded piece onto a wooden skewer or dowel, starting with the largest at the bottom and stacking smaller pieces upward.
- Use hot glue to secure the skewer into a wood slice or cork base.
- Add a star sticker or cutout to the top of the skewer for a festive finish.
#19. Vintage-Inspired Envelope from Old Book Pages
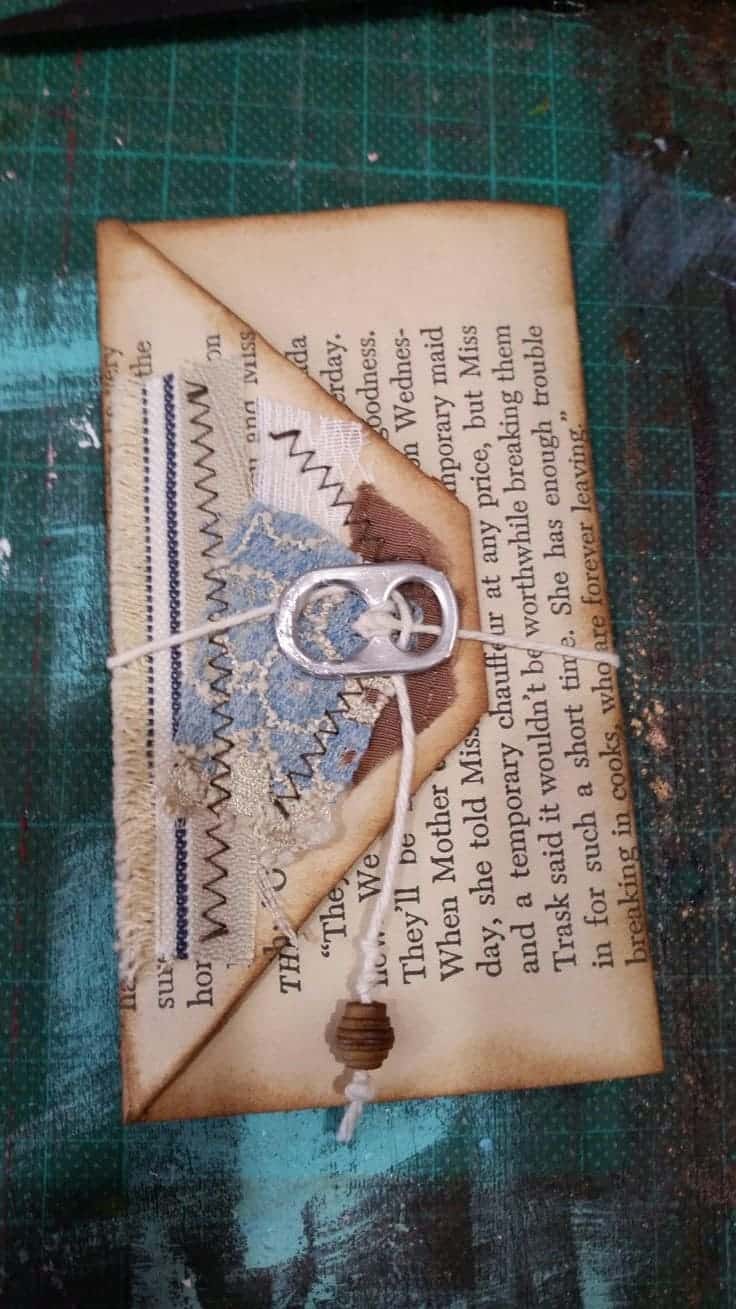
Instead of letting old book pages collect dust, turn them into charming vintage-style envelopes.
These make perfect holders for small notes, keepsakes, or even gift cards, adding a personalized and nostalgic touch.
Materials Needed:
- Old book pages
- Scissors
- Sewing machine or needle and thread
- Fabric scraps (lace, burlap, or patterned fabric)
- Pull-tab from a soda can
- Twine or string
- Small bead (optional)
- Glue
Instructions:
- Cut a rectangular piece from an old book page and fold it into an envelope shape, leaving a flap.
- Use a sewing machine or hand stitch along the edges of the folded sides for a decorative effect.
- Attach fabric scraps or lace to the envelope flap with glue for texture and visual interest.
- Fix a soda can pull-tab onto the flap with twine. Loop the string through the pull-tab and attach a bead at the end for closure.
- Age the edges of the paper by lightly brushing them with a damp tea bag or brown ink for a rustic look.
#20. Book Page Vintage Globe Art
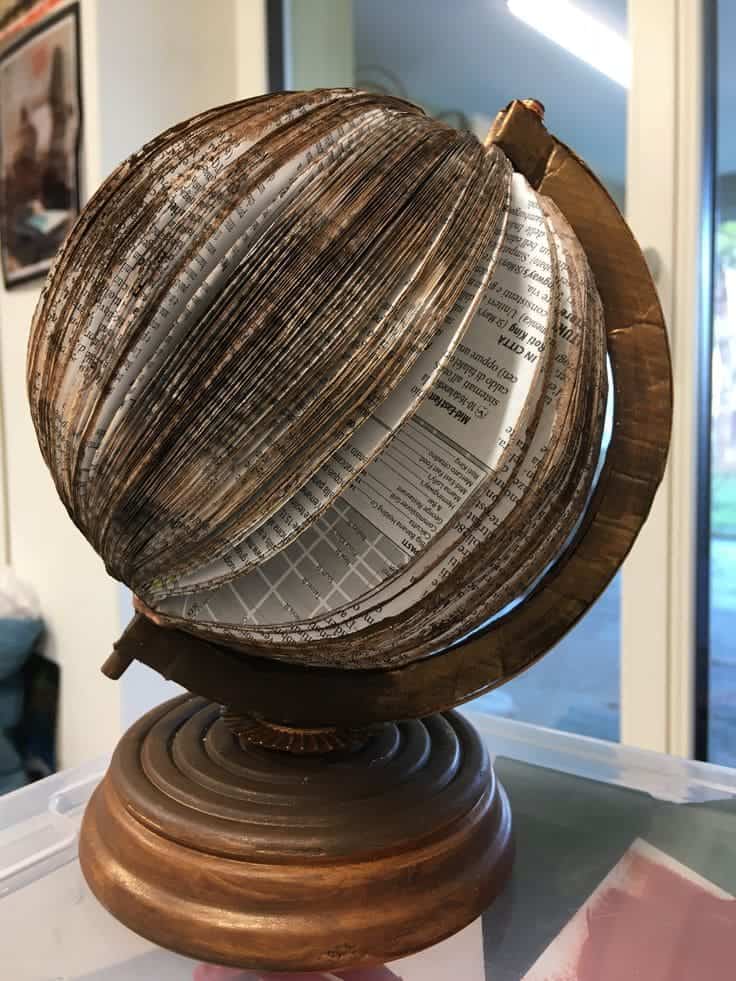
Inspired by wanderlust and creativity, this book page globe art is a stunning centerpiece for any space.
Combining a vintage aesthetic with repurposed materials, it’s a thoughtful nod to travel and timeless literature.
Materials Needed:
- Old hardcover book
- Wooden globe stand (or old globe base)
- Craft knife or sharp scissors
- Glue (hot glue or strong craft adhesive)
- Gold or metallic paint (optional for the base)
- Brown ink or paint for distressing
Instructions:
- Remove the hardcover binding, leaving the spine intact. Fan the pages evenly around to form a globe shape, securing the edges with glue where needed.
- Trim any uneven edges with a craft knife to perfect the spherical appearance.
- Paint the globe stand or base in gold or metallic tones if desired. Allow it to dry completely.
- Secure the bottom of the book’s spine to the globe stand using strong adhesive or hot glue.
- Use brown ink or paint to lightly distress the pages for a vintage look.
#21. Elegant Vintage Book Wedding Cake Decor
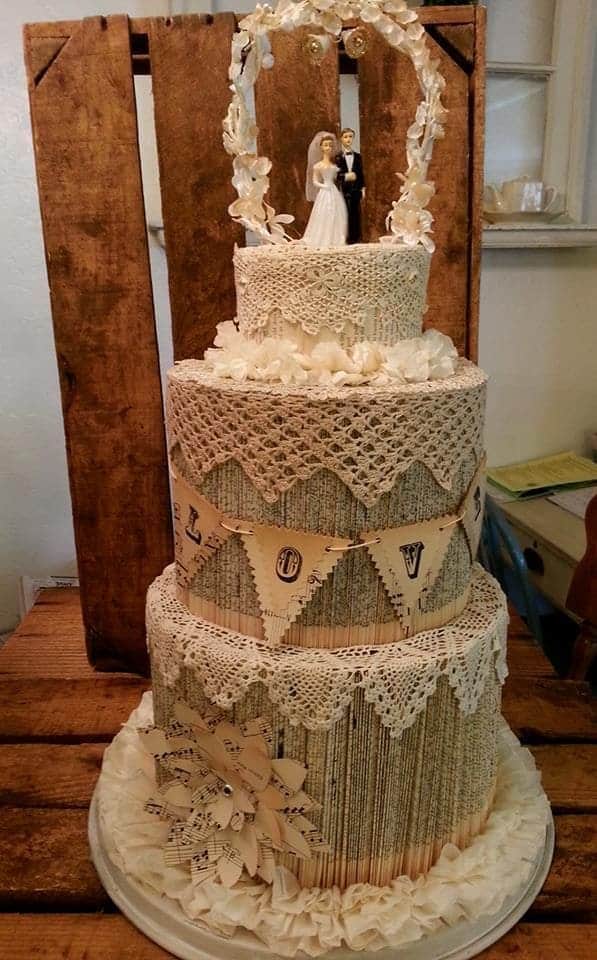
Nothing better than creating a stunning wedding centerpiece using upcycled book pages and lace!
This DIY project adds a romantic, vintage flair to your special day, perfect for book-loving couples or rustic-themed weddings.
Materials Needed:
- Old books (with sturdy pages)
- Hot glue gun and glue sticks
- Lace trims or doilies
- Cardboard cake rounds or tiers
- Paper flowers (optional)
- Small wedding figurines or toppers
- Scissors
- String or twine for decoration
Instructions:
- Roll book pages into firm cylinders, gluing them to the cardboard rounds to form each “cake tier.” Ensure they stand upright and are evenly spaced.
- Stack the tiers on top of one another, securing them with glue. Adjust for stability and alignment.
- Wrap lace or doilies around each tier for an elegant touch. Secure with glue or pins.
- Attach paper flowers, bunting with “LOVE” letters, or other decorative elements to enhance the design.
- Place the wedding figurines or your chosen topper at the very top. Add final details like small ruffles or bows.
#22. Timeless Paper Roses in Rustic Vase
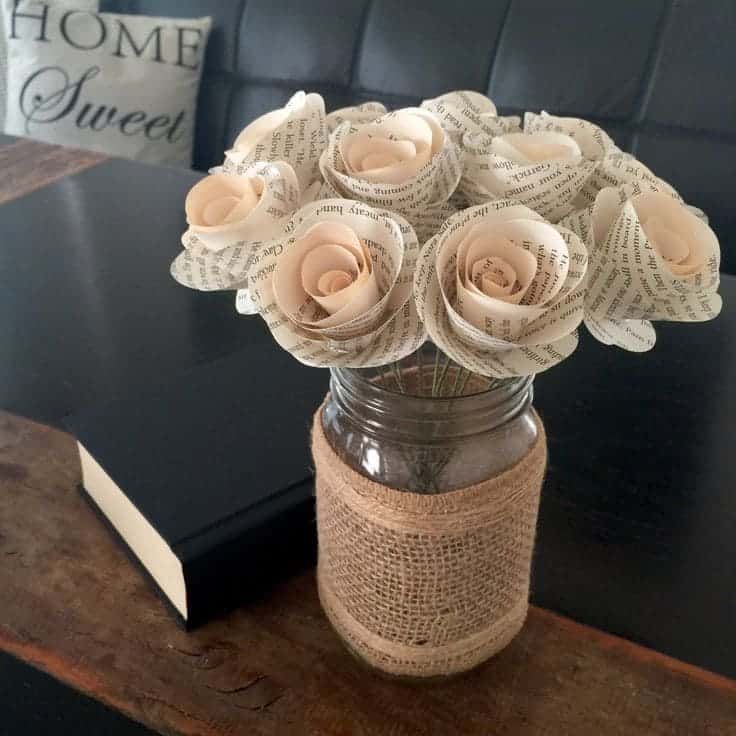
For someone who adores timeless charm and eco-friendly crafts, these paper roses made from old book pages are an absolute treasure.
This creation beautifully combines vintage vibes with delicate artistry, making it a perfect centerpiece or gift.
Materials Needed:
- Old book pages
- Scissors
- Pencil
- Hot glue gun
- Floral wire or wooden skewers
- Mason jar or vase
- Burlap ribbon
- Twine or jute string
Instructions:
- Draw and cut different sizes of petal shapes on the book pages. You’ll need several petals for each flower.
- Wrap the smallest petal around the wire or skewer to create the rosebud. Secure with glue. Gradually add petals around the bud, slightly overlapping each layer.
- Wrap the burlap ribbon around the mason jar, securing it with glue or string. Place your completed paper roses in the jar.
- Tie a jute string bow around the jar for a rustic touch. Arrange the flowers for a full, lush look.
#23. Floating Pages Installation Captivating Literary Decor
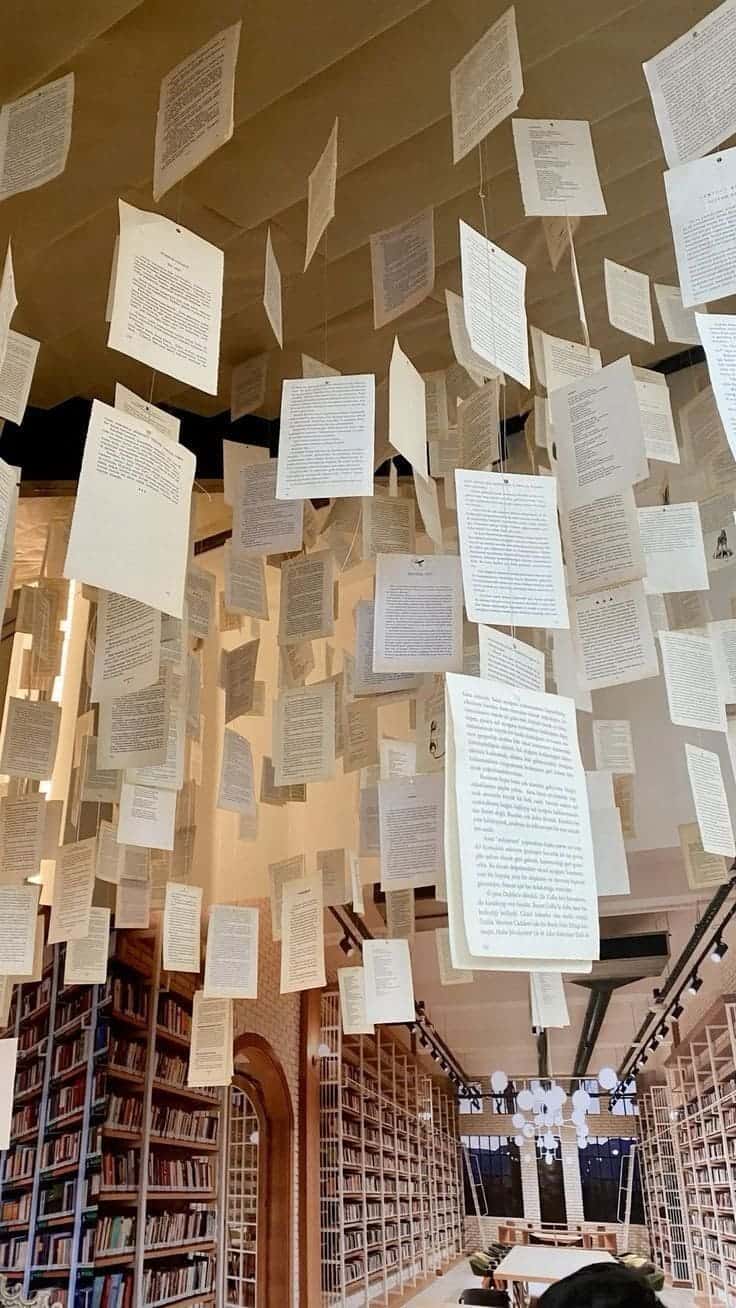
What about transforming old book pages into a breathtaking floating art installation?
This unique design gives an ethereal and creative vibe, perfect for libraries, bookshops, or literary events. It feels like stepping into a magical story!
Materials Needed:
- Old book pages or printed sheets
- Transparent thread or fishing line
- Small metal eyelets or holes for threading
- Ceiling hooks or adhesive strips
- Scissors or hole punch
Instructions:
- Carefully detach pages from an old book, ensuring clean edges.
- Punch small holes at the top of each page or install eyelets for threading.
- Cut varying lengths of transparent thread and attach to the pages.
- Secure the other end of the thread to ceiling hooks or adhesive strips, spacing the pages randomly for a dynamic look.
- Adjust the height and positioning to create a floating, layered effect.
#24. Elegant Sheet Music Cone Decorations
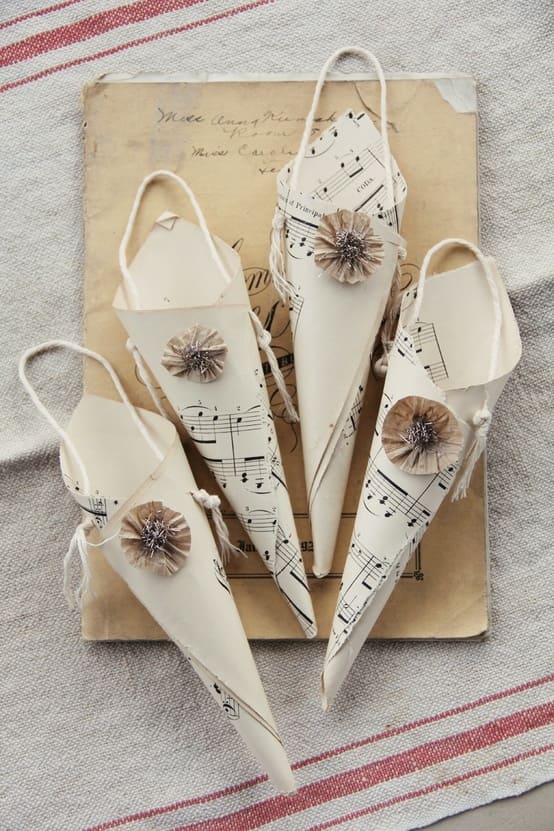
These charming cones crafted from vintage sheet music bring a timeless elegance to your holiday décor or special occasions.
Perfect for holding small treats, flowers, or gifts, they blend simplicity with a nostalgic touch.
Materials Needed:
- Vintage sheet music or old book pages
- Scissors
- Glue stick or hot glue gun
- Twine or ribbon for handles
- Small embellishments like paper rosettes or glitter accents
Instructions:
- Cut the sheet music or book pages into a large semi-circle. Roll it into a cone shape and secure with glue.
- Cut a length of twine or ribbon and glue each end to opposite sides of the cone’s opening to form a handle.
- Decorate the front with paper rosettes, glitter, or small ornaments for added flair.
- Finally, use the cones to hold small gifts, flowers, or holiday treats.
#25. Rustic Book Page Sunflower Decor
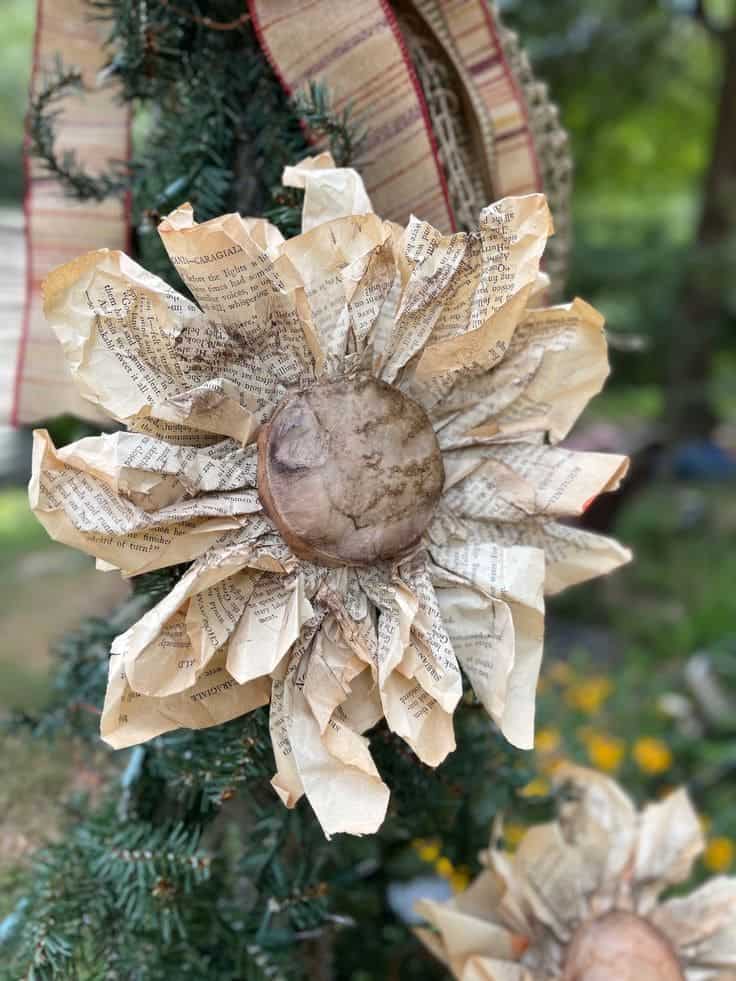
Even in the garden or indoors, this charming sunflower craft brings warmth and creativity to your space.
By repurposing old book pages, you create a stunning rustic decoration that’s both eco-friendly and elegant.
Materials Needed:
- Old book pages
- Scissors
- Hot glue gun
- Brown paper or cardboard
- Tea or coffee for staining
- Paintbrush
- Wire or floral stick for mounting
Instructions:
- Brew tea or coffee and lightly brush it onto the book pages. Let them dry for a vintage effect.
- Cut the dried pages into petal shapes, varying sizes for layering.
- Use brown paper or cardboard to cut a circular base. Crumple slightly and stain for a rustic look.
- Start gluing the largest petals to the back of the flower center. Gradually layer smaller petals for depth.
- Glue a wire or floral stick to the back of the flower for mounting.
#26 Rustic Autumn Book Page Leaf Garland
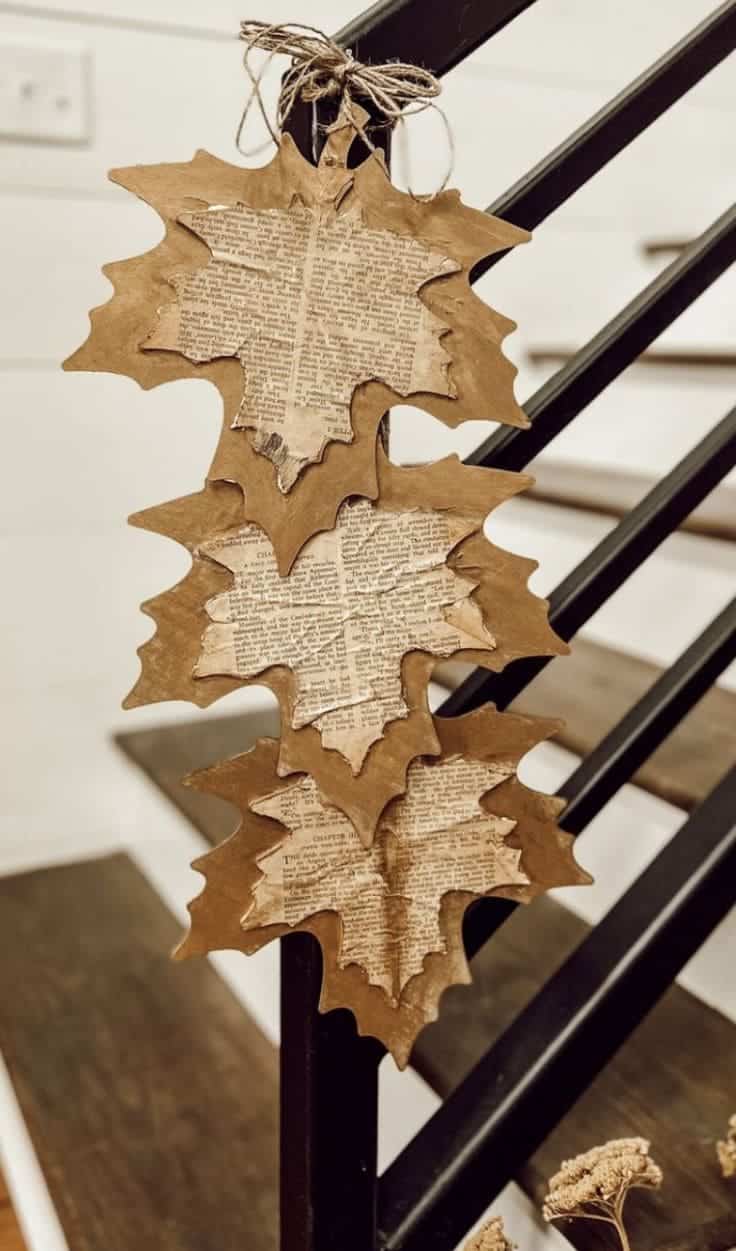
If you love autumnal decorations with a vintage flair, this DIY garland brings the season indoors with rustic charm.
Materials Needed:
- Old book pages
- Cardboard or kraft paper
- Scissors
- Glue stick or hot glue gun
- Jute twine or string
- Hole puncher (optional)
- Brown paint or ink (optional for aging effect)
Instructions:
- Cut out leaf shapes from cardboard or kraft paper to create a sturdy base for your garland.
- Tear old book pages into slightly smaller leaf shapes and glue them onto the cardboard cutouts.
- Use a hole puncher to create small holes at the top of each leaf for threading.
- String the leaves onto jute twine, spacing them evenly and tying knots to secure.
#27. Heartfelt Literary Garland from Vintage Pages
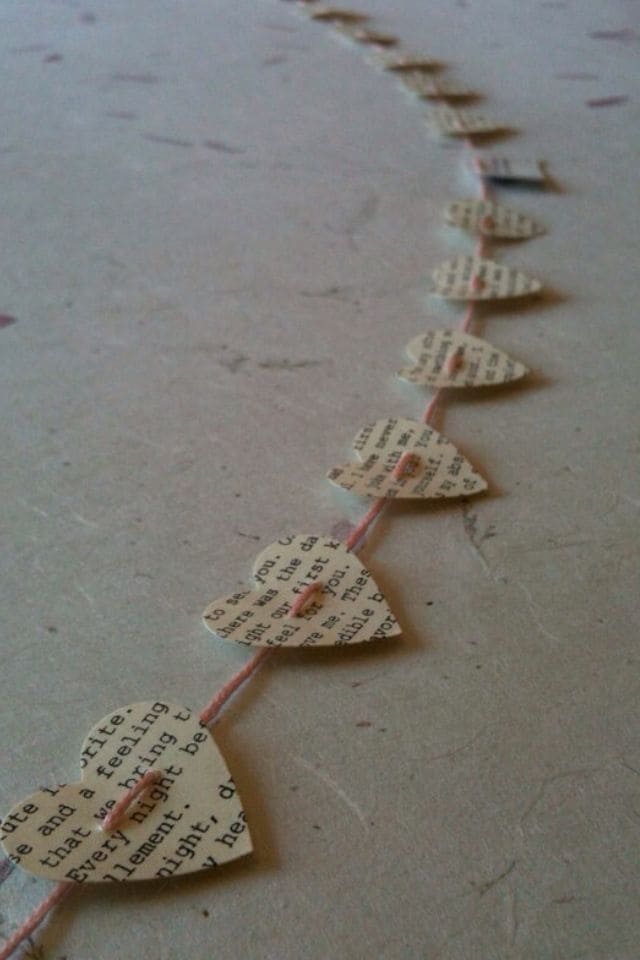
This simple yet elegant garland transforms old book pages into a string of heartfelt beauty. Perfect for decorating any space, it gives a nostalgic charm to weddings, parties, or cozy reading nooks.
Materials Needed:
- Old book pages
- Scissors
- Twine or string
- Hole puncher
- Needle and thread (optional)
Instructions:
- Cut heart shapes from old book pages using scissors.
- Use a hole puncher to make two small holes near the center of each heart.
- Thread twine or string through the holes, spacing the hearts evenly along the garland.
- Optionally, use a needle and thread to secure each heart in place for added durability.
#28. Romantic Vintage Book Page Heart Wreath
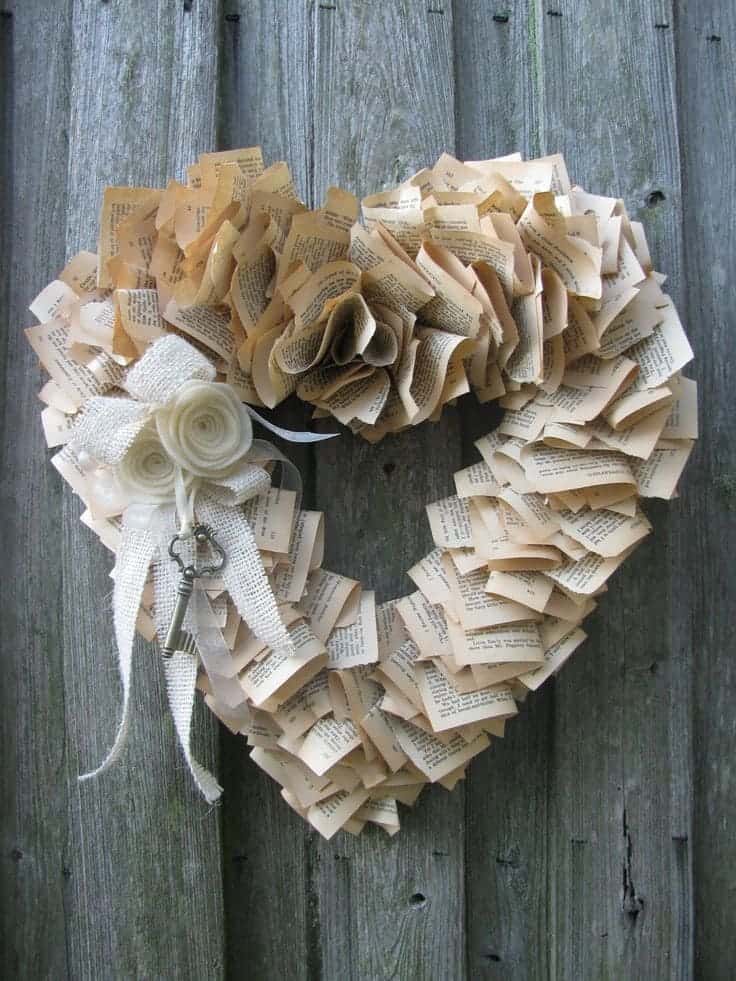
Some crafts speak the language of love, and this romantic book page heart wreath is a perfect example.
Its vintage charm, combined with delicate details, makes it a stunning addition to your décor or a thoughtful handmade gift.
Materials Needed:
- Old book pages
- Wire or a pre-made heart-shaped wreath frame
- Hot glue gun
- Burlap ribbon or fabric
- Felt for flowers (optional)
- Decorative key or embellishments
- Scissors
Instructions:
- Create or prepare a heart-shaped wreath frame using wire or purchase one pre-made.
- Fold or scrunch old book pages into petal-like shapes and secure them with glue at the base.
- Attach each folded page to the wreath frame, layering them closely to create fullness.
- Once the entire frame is covered, decorate with a burlap bow, felt flowers, or a decorative key.
#29. Rustic Book Page Candle Holder Decor
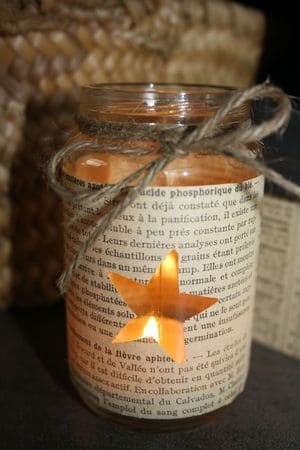
Adding a warm, vintage glow to your home is effortless with this charming book page candle holder.
It blends rustic beauty with sustainability, making it an enchanting accent piece for any room or event.
Materials Needed:
- Old book pages
- Glass jar (any size)
- Twine or jute string
- Scissors
- Glue stick or double-sided tape
- Battery-operated tealight candle
- Star-shaped stencil or cutter
Instructions:
- Wrap the glass jar with an old book page and secure it with glue or double-sided tape.
- Cut out a star-shaped hole in the book page before wrapping or use a stencil to mark and cut the shape once wrapped.
- Tie twine or jute string around the neck of the jar for a rustic touch, adding a bow for elegance.
- Finally, place a battery-operated tealight candle inside the jar.
#30. Elegant Hanging Sculptures from Old Books
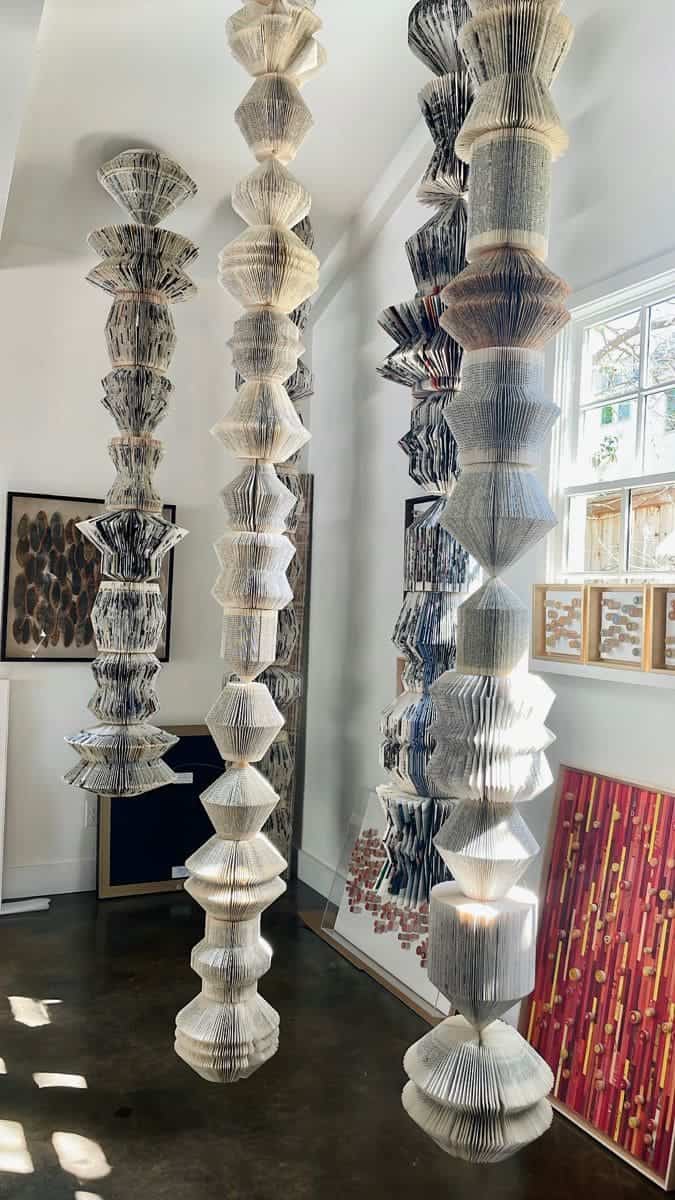
Although books are for reading, transforming them into dramatic hanging sculptures gives them new life as captivating decor.
These unique book art installations add character to your space, making it both creative and thought-provoking.
Materials Needed:
- Old hardcover books
- Transparent string or fishing line
- Hot glue gun or strong adhesive
- Scissors or craft knife
- Ceiling hooks or adhesive strips
Instructions:
- Choose old books with firm pages that fold easily.
- Fold pages in different geometric shapes (e.g., triangles or accordion folds) to create a textured look.
- Secure the shapes in place with glue, forming layered patterns.
- Attach the sculptures to transparent string or fishing line for a floating effect.
- Hang the strings from the ceiling using hooks or adhesive strips, varying the lengths for depth.
#31. Whimsical Butterfly Book Sculpture Display
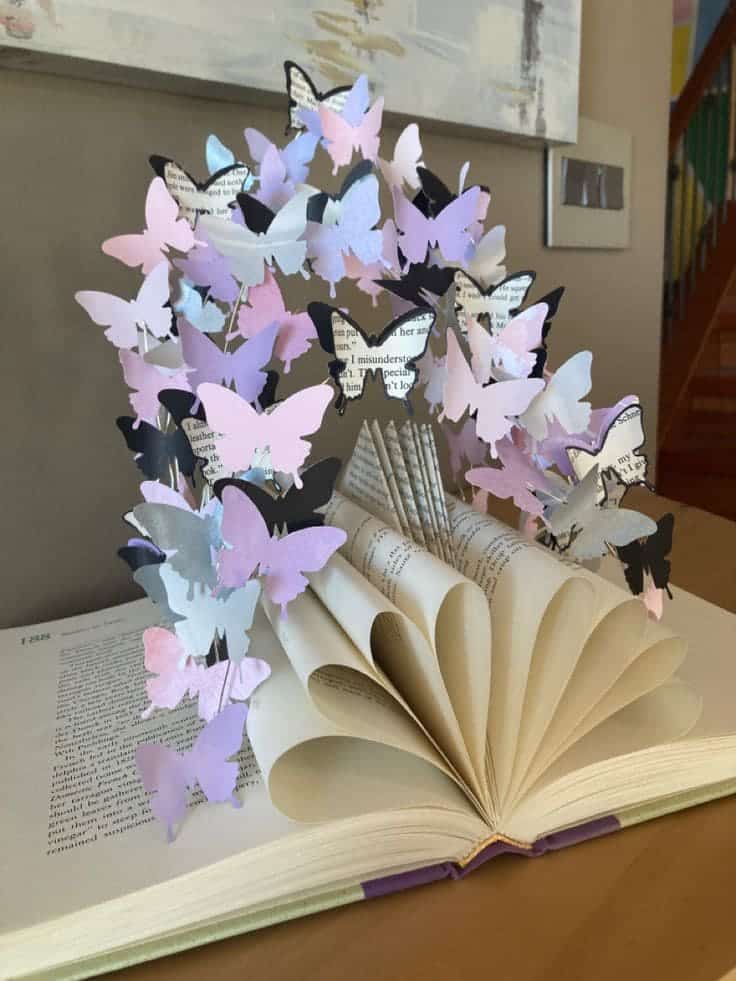
Imagine bringing life and movement to an old book with a stunning butterfly sculpture.
This enchanting piece transforms simple materials into a vibrant, decorative masterpiece for book lovers and craft enthusiasts alike.
Materials Needed:
- Old hardcover book
- Colored and patterned paper (or old book pages)
- Butterfly stencil or craft punch
- Scissors
- Hot glue gun or craft glue
- Wire or thin sticks (optional, for added dimension)
Instructions:
- Open the book to the middle. Fold individual pages into a fan shape by folding them inward to create an arch.
- Using stencils or a butterfly craft punch, cut out various sizes of butterflies from colored or patterned paper. Mix materials for a dynamic look.
- Use hot glue or craft glue to attach butterflies directly to the book’s folded pages, edges, and surrounding areas.
- Use thin wire or sticks to mount some butterflies above the book, giving the display height and depth.
- Adjust butterfly placements to create a balanced and lively arrangement.
