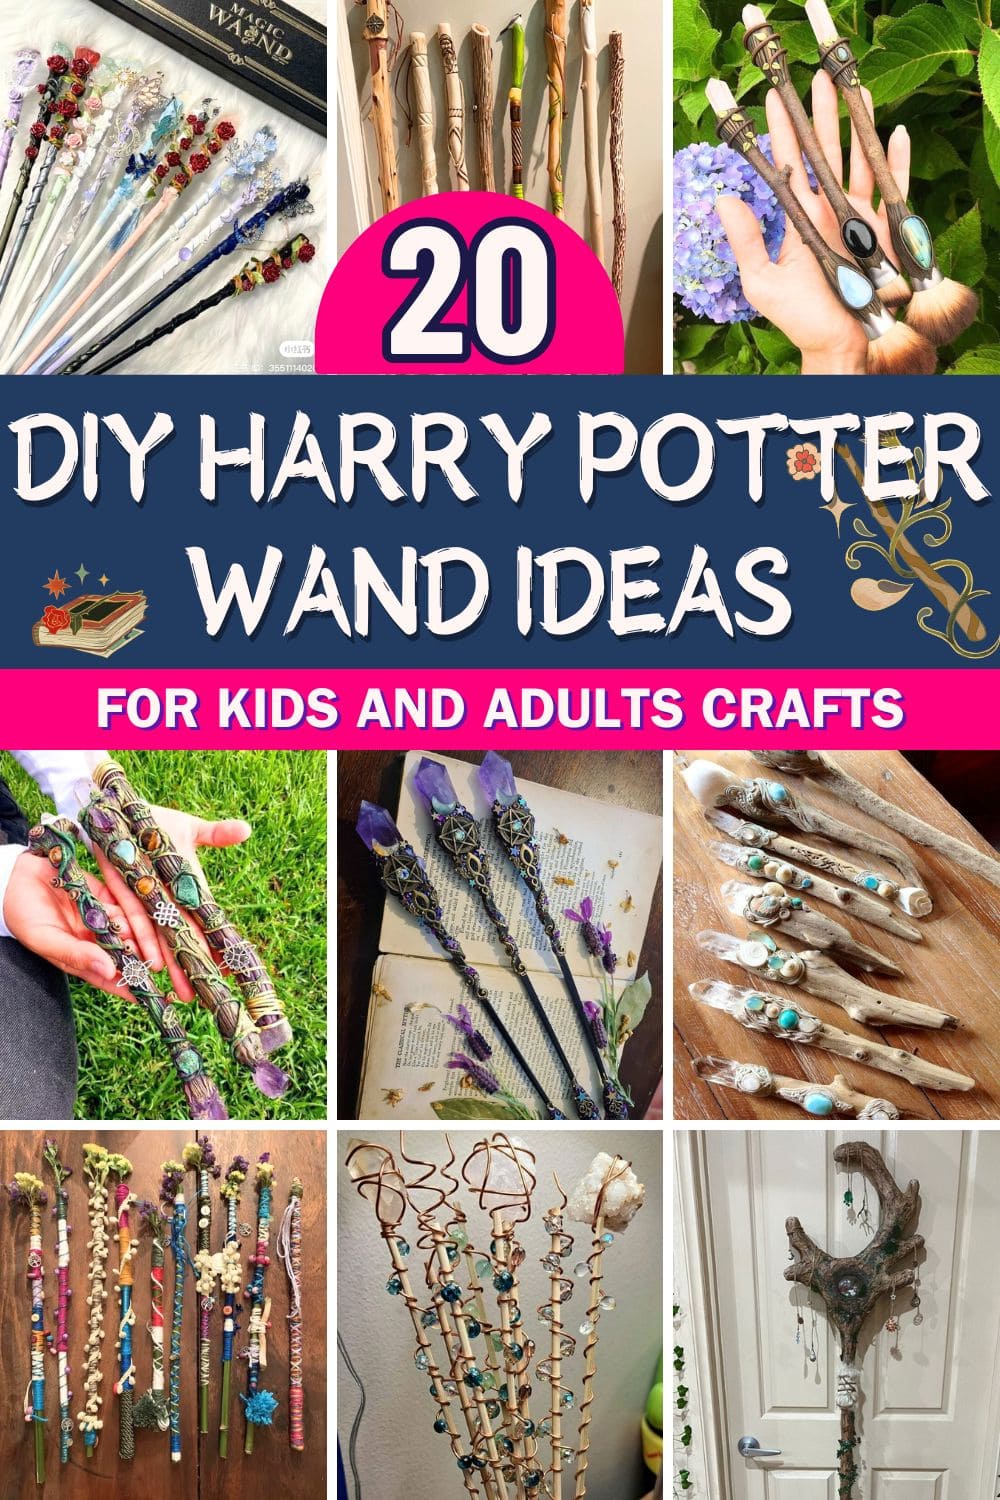
When Halloween comes, there’s no better way to stand out from the crowd than by carrying a wand that looks like it came straight from Ollivanders.
Whether you’re dressing as a Hogwarts student, a woodland witch, or a fantasy mage of your own creation, a handmade wand adds that personal touch. These 20 DIY wand ideas go far beyond glitter and glue, think crystals, carved wood, polymer clay, and magical details that feel like they belong in a spellbook.
Some are rustic, others glamorous, but all are wildly creative and fun to make. Are you ready to level up your costume with a wand that truly feels like yours? Let’s craft some magic.
#1. Woodland Guardian Magic Wand Staff
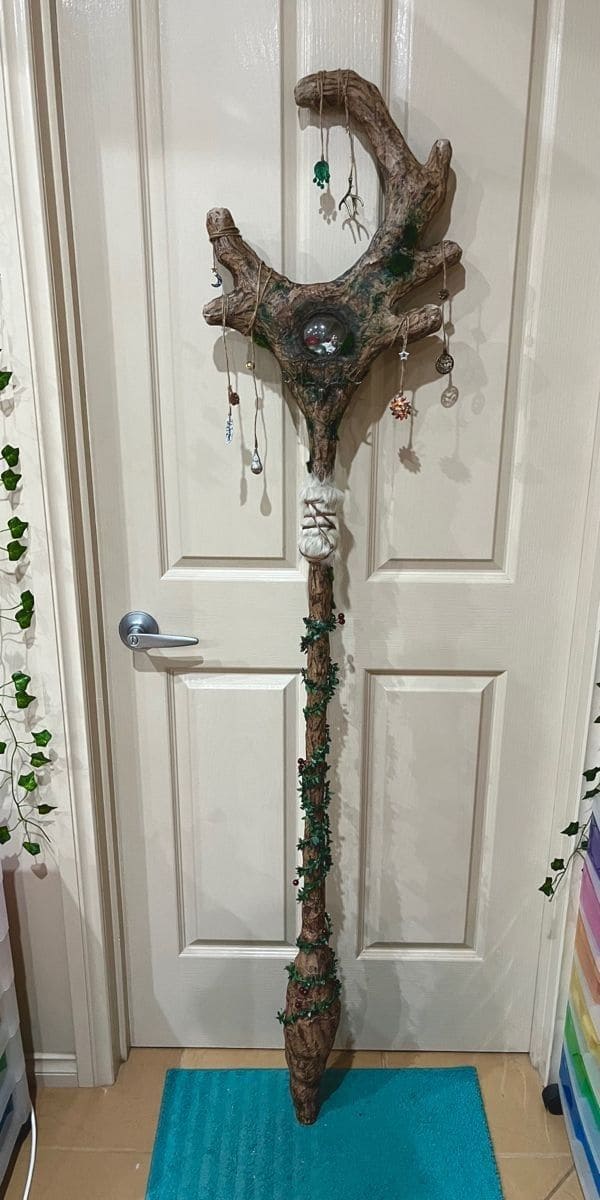
You know that feeling when you hold something and it feels alive? That’s what this handmade magic staff evokes.
Inspired by the deep, enchanted woods of the Forbidden Forest, this piece merges rustic, nature-infused design with a protective magical aura.
Materials Needed
- 1 sturdy tree branch (approx. 4.5-5 feet long)
- 1 glass ornament ball
- Hot glue sticks and glue gun
- Brown, moss green, and black acrylic paint
- Small faux ivy vines (about 2-3 meters)
- Lightweight clay
- White faux fur (10×10 cm piece)
- Jute twine or natural rope (1–2 meters)
- 10 assorted small charms or pendants
- Optional: jewelry string
- Paintbrushes, sponge, scissors
Step-by-step Guide
Step 1: Choose a branch that already has an interesting shape, preferably with a forked or antler-like top and clean off any loose bark or debris.
Step 2: Secure the ornament ball in the center of the top fork using hot glue, then build around it with clay to create a natural cradle effect.
Step 3: Paint the entire staff using a dry-brush technique, you want to start with brown as the base, then blend in moss green and black to give it an aged texture.
Step 4: Wrap twine below the head and glue the faux fur around it; then use string to create a crisscross tribal look.
Step 5: Wind ivy vines down the length of the staff and glue in place, adding beads or tiny berries for forest vibes.
Step 6: Tie or glue your charms to the ends of the top branches, letting them dangle freely like talismans catching energy from the air.
#2. Elven Crystal Core Wand
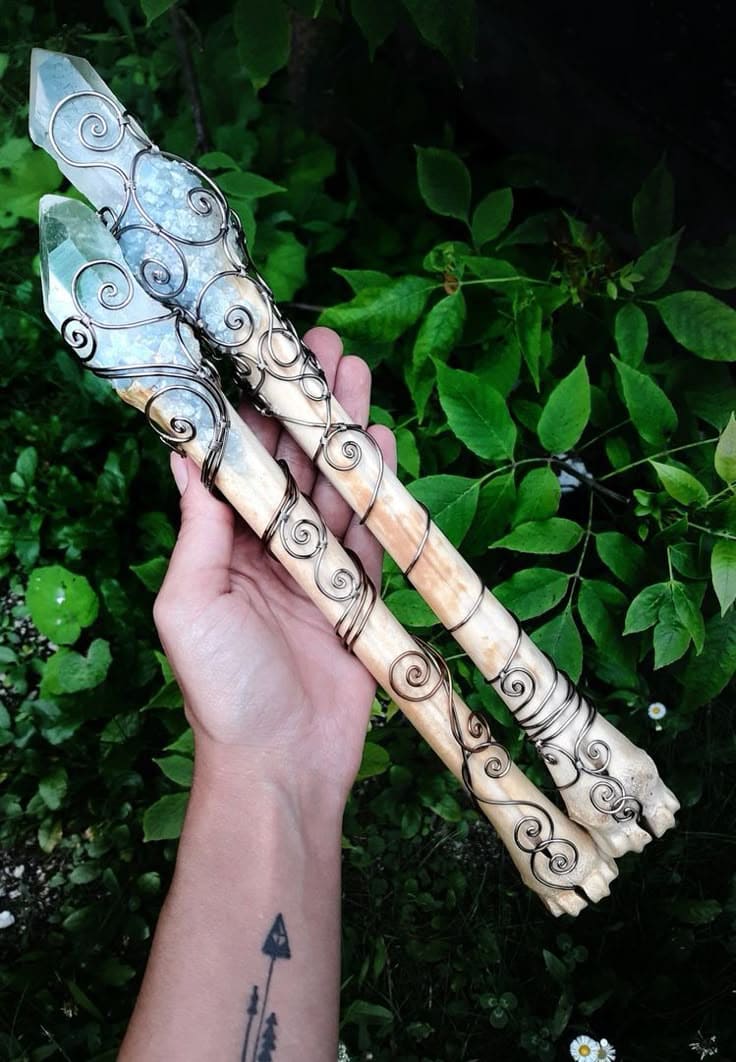
Crafted with soft-toned wood and crowned with raw crystal points, each wand glows with an inner calm. Also, the swirling wire wrap adds an enchanted look, as if the magic is inside the wand.
When you hold one, it feels like you’re wielding something ancient, yet completely personal like nature and spellcraft finally found balance.
Materials Needed
- 1 small wooden dowel (approx. 10-12 inches long, ½ inch thick)
- 1 raw quartz crystal (about 2-3 inches long)
- Copper jewelry wire (2-3 meters)
- Hot glue
- Wood stain (optional)
- Sandpaper (medium and fine grit)
- Wire-cutters and round-nose pliers
Step-by-step Guide
Step 1: Sand your wooden dowel until it’s smooth and rounded at the edges, giving it a soft, wand-like shape.
Step 2: Use wood stain to lightly tint the wand, then let it dry completely for a natural tone.
Step 3: Attach the crystal to the tip of the wand using hot glue or strong adhesive; you should hold it steady until fully secure.
Step 4: Take your wire and begin wrapping around the crystal and down the wand in swirling, spiral patterns, then use pliers to shape tight curls and loops for a magical aesthetic.
Step 5: Tuck and secure the ends of the wire into the wood so nothing pokes out.
#3. Starlight Spiral Crystal Wands
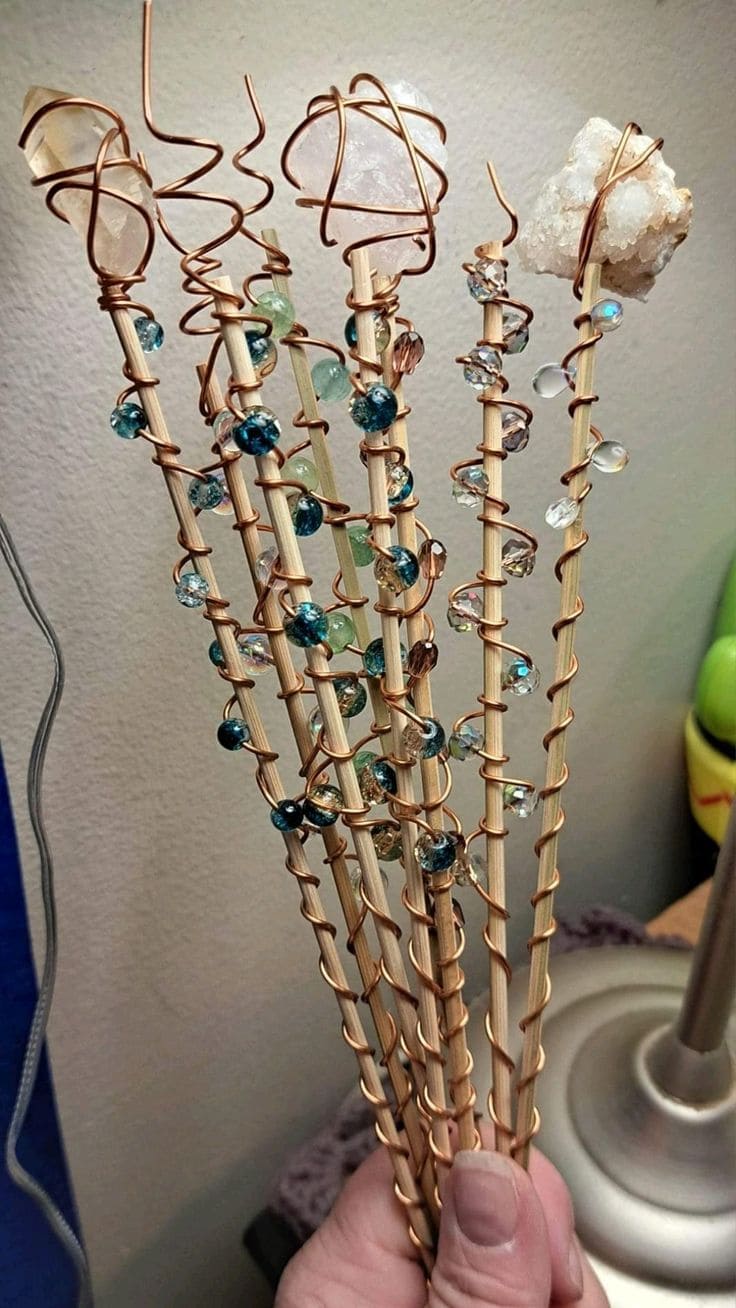
Wow, with clear quartz points at the top and copper wire spiraling down like a comet’s tail, these wands feel fresh, ethereal, and full of energy.
Specially, lightweight and elegant, these are perfect for elemental air spells, moonlit rituals, or gifting to a beginner witch who’s just discovered their sparkle.
Materials Needed
- Thin wooden dowels (6-8 inches long, about ¼ inch thick)
- Copper craft wire (18- or 20-gauge, 1-2 meters per wand)
- Small crystal chunks (~1 inch each)
- 8-12 glass beads per wand
- Round-nose pliers and wire cutters
- Hot glue
Step-by-step Guide
Step 1: Select your wooden dowel and lightly sand if needed. You can stain it, but leaving it natural creates a clean, light vibe.
Step 2: Wrap a section of copper wire around the top of the dowel. Next, nestle the crystal at the tip and tighten the wire around it, securing with glue if needed.
Step 3: Spiral the rest of the wire downward in a loose coil, threading beads along the way. Then, place them at varied intervals for a constellation-like effect.
Step 4: When you reach the bottom, twist the wire to secure it or snip and press it flat against the wand base.
#4. Boho Nature Wands
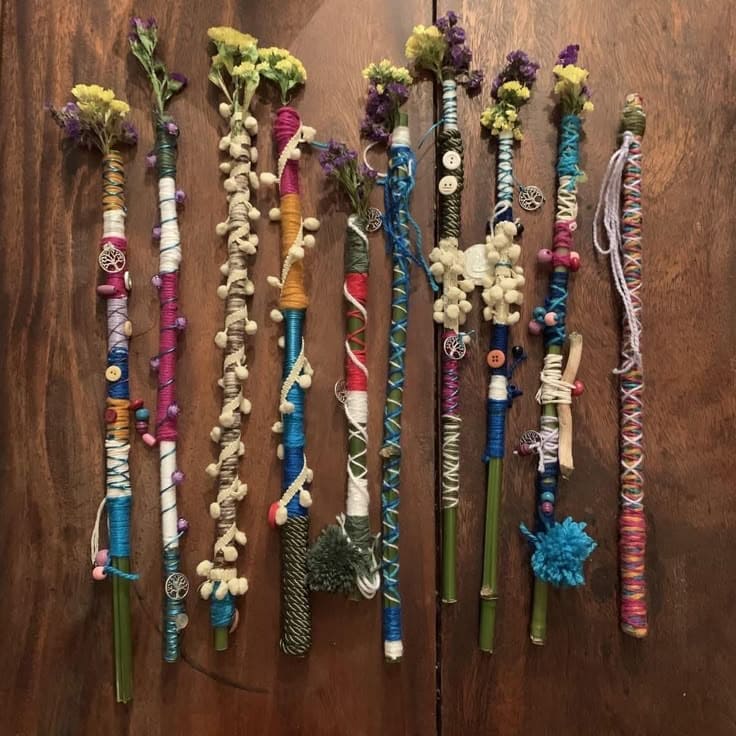
These wands are all about joy. Every thread, charm, and flower seems to hold a blessing, a memory, or a giggle.
Whether you’re making them with kids, giving them as festival favors, or decorating your altar with bright energy, these wands remind us that magic can be playful, heartfelt, and wildly colorful.
Materials Needed
- Small sticks (about 8-10 inches long)
- Assorted yarn in various colors (30-50 inches per wand)
- Mini pompom strings
- 3-6 buttons, charms, and wooden beads per wand
- Dried flowers (lavender, statice, billy balls)
- Hot glue gun
- Scissors and optional needle
Step-by-step Guide
Step 1: Start wrapping yarn around the base of the stick, mixing colors, textures, and directions for a boho look. Knot as you go to secure each section.
Step 2: Glue or tie small buttons, beads, pompoms, or charms along the wrapped parts to add texture and personality.
Step 3: Wrap and tuck in dried flowers at the top, securing them with a bit of glue or thread so they sit like a wand crown.
Step 4: Add extra finishing touches like crisscross lacing, tassels, or a loop for hanging, then give it a little spin and watch the colors dance.
#5. Chakra Crystal Healing Wands
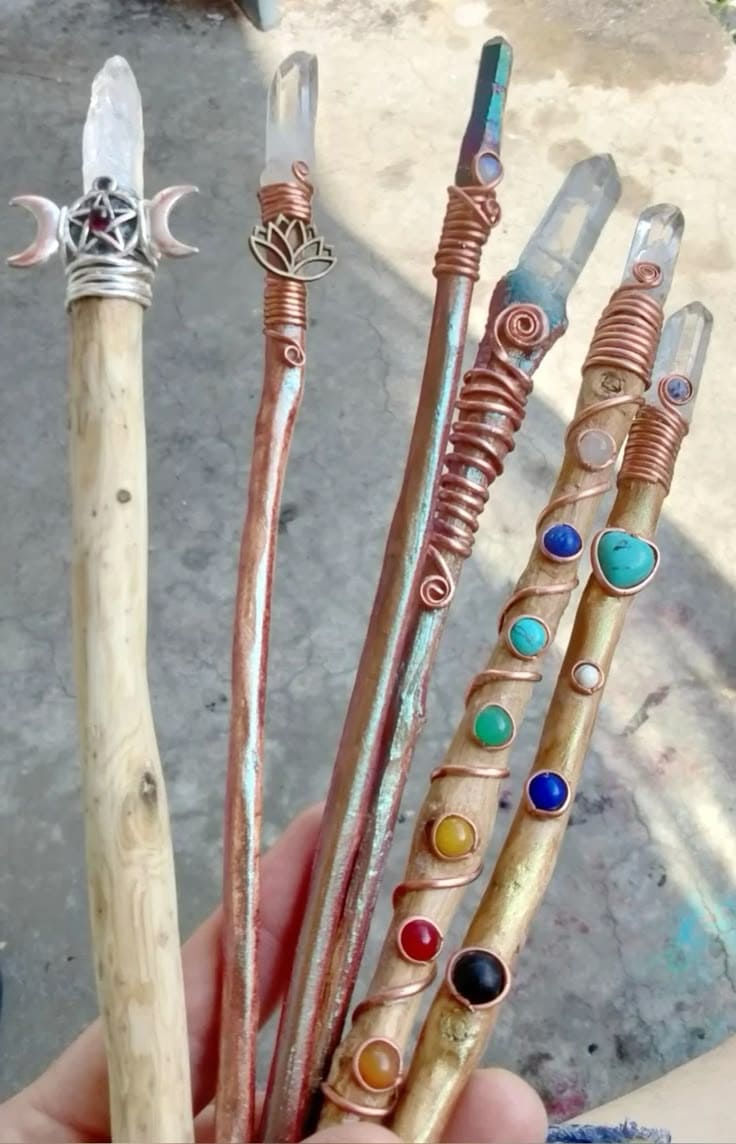
If you’ve ever wanted to hold clarity, color, and energy all in one place, this is it. Each wand balances wood’s earthy warmth with copper’s conductive magic and the metaphysical power of chakra gemstones.
Additionally, the wire wrapping is artistic but also functional, drawing energy up from your palm and through the quartz crystal tip like a lightning rod for your intentions.
Materials Needed
- Small driftwood (8-10 inches long)
- Clear quartz points (about 1.5-2 inches)
- Copper craft wire (18-gauge or 20-gauge, 1.5-2 meters per wand)
- Small chakra gemstone cabochons (red, orange, yellow, green, blue, indigo, violet)
- Super glue
- Sandpaper (medium and fine grit)
- Optional: metallic paints
- Jewelry pliers and wire cutter
Step-by-step Guide
Step 1: Sand your wand smooth and clean. You can leave the wood natural or accent it with gold/bronze paint to add shimmer.
Step 2: Secure the quartz point to the top of the wand using copper wire and glue, wrapping it tightly to hold it like a crown.
Step 3: Begin wrapping the wand with copper wire in loose spirals. Then leave space to place chakra stones at even intervals down the handle.
Step 4: Glue each gemstone into its spot, following the chakra order: red at the base, violet near the top.
Step 5: Finish by tightening your wire wrap, adding decorative curls or spirals near the top for style.
#6. Runic Forest Spirit Wands
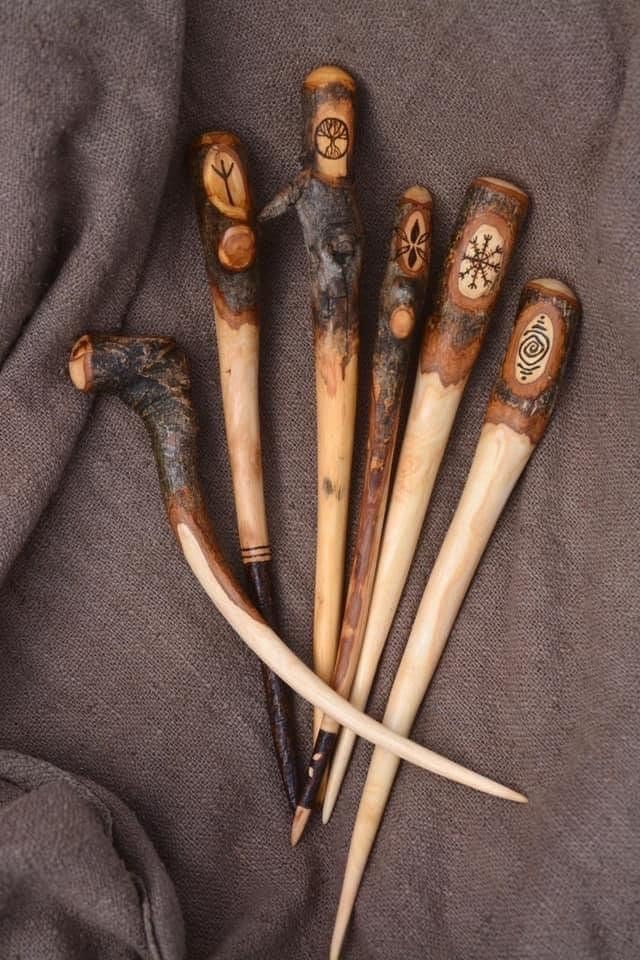
Oh my God, these wands speak softly but carry deep magic.
Plus, these are for the wandmakers who value nature’s quiet magic, for witches and wizards who know that power doesn’t always shimmer, sometimes, it hums.
Materials Needed
- Small branches (6-10 inches long, around ¾ inch thick)
- Carving knife
- Fine-grit sandpaper
- Woodburning pen
- Wood stain (optional)
- Pencil
- Soft cloth
Step-by-step Guide
Step 1: Choose branches with natural character like knots, curves, and bark variations add charm. You can use a carving knife to shape one end to a point, leaving bark partially intact for contrast.
Step 2: Sand the wand smooth, especially the pointed tip and grip area. Leave some rough textures if you want a more primitive, wild look.
Step 3: Lightly draw your rune, sigil, or symbol onto the top section using pencil. Then carefully burn the design in using a pyrography pen.
Step 4: Optional, you can add extra rings, dots, or line details using the burner for decoration or spellcasting intention.
Step 5: Finish with a coat of wood stain or rub-in oil to deepen the color and protect the wand.
#7. Ocean Pearl Mermaid Wand
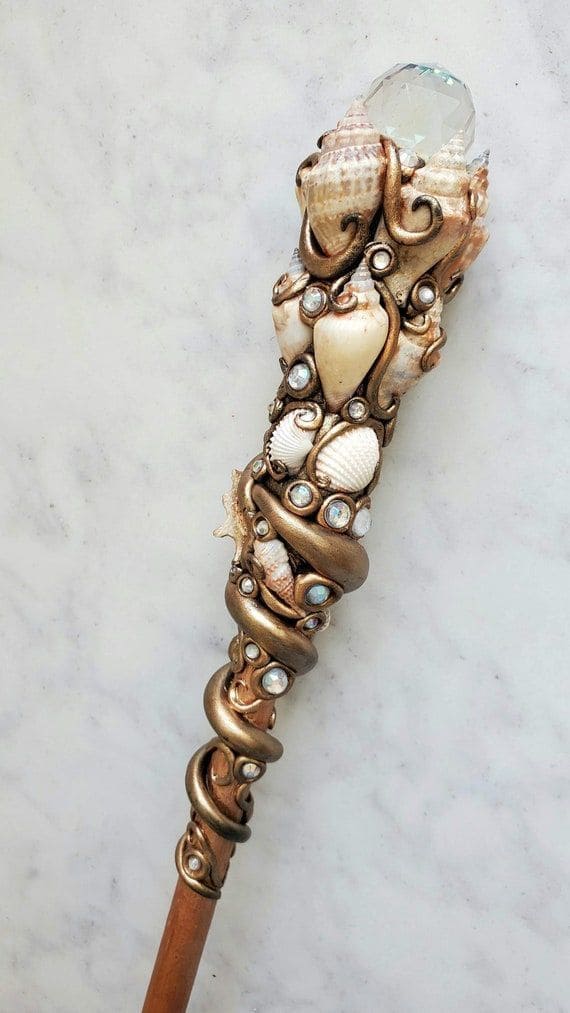
Who can resist the beauty of this wand?
Swirled with golden sea motifs, adorned with real shells and glistening crystals, and crowned with a glass gem that catches the light like sea foam on a sunny tide, it feels like it holds the spirit of the ocean itself.
Materials Needed
- 1 wooden dowel (about 12-14 inches long, ½ inch thick)
- 12 assorted small seashells
- Iridescent glass bead (1.5-2 inches wide)
- Air-dry clay with bronze tone (100-150g)
- 15 flat-backed gems
- Gold, bronze, and pearl acrylic paints
- Paintbrush, clay sculpting tool, and glue gun
- Optional: fine glitter
Step-by-step Guide
Step 1: Shape the top third of the wand with clay, wrapping it around the stick in a spiral and pressing seashells into the surface as you go.
Step 2: Embed the glass bead at the top like a crown jewel, then build clay up around its base for a secure hold and decorative frame.
Step 3: Add swirls, tiny fin shapes, and ridges with your sculpting tool to give the piece an ocean-worn, magical texture.
Step 4: Paint everything in layers, you should start with bronze, then lightly brush over highlights with pearl and gold. Next, add glitter while the paint is still tacky for extra shimmer.
Step 5: Finish by gluing rhinestones into crevices and gaps between the shells for that glistening, treasure-like sparkle.
#8. Enchanted Ivy Crystal Staff
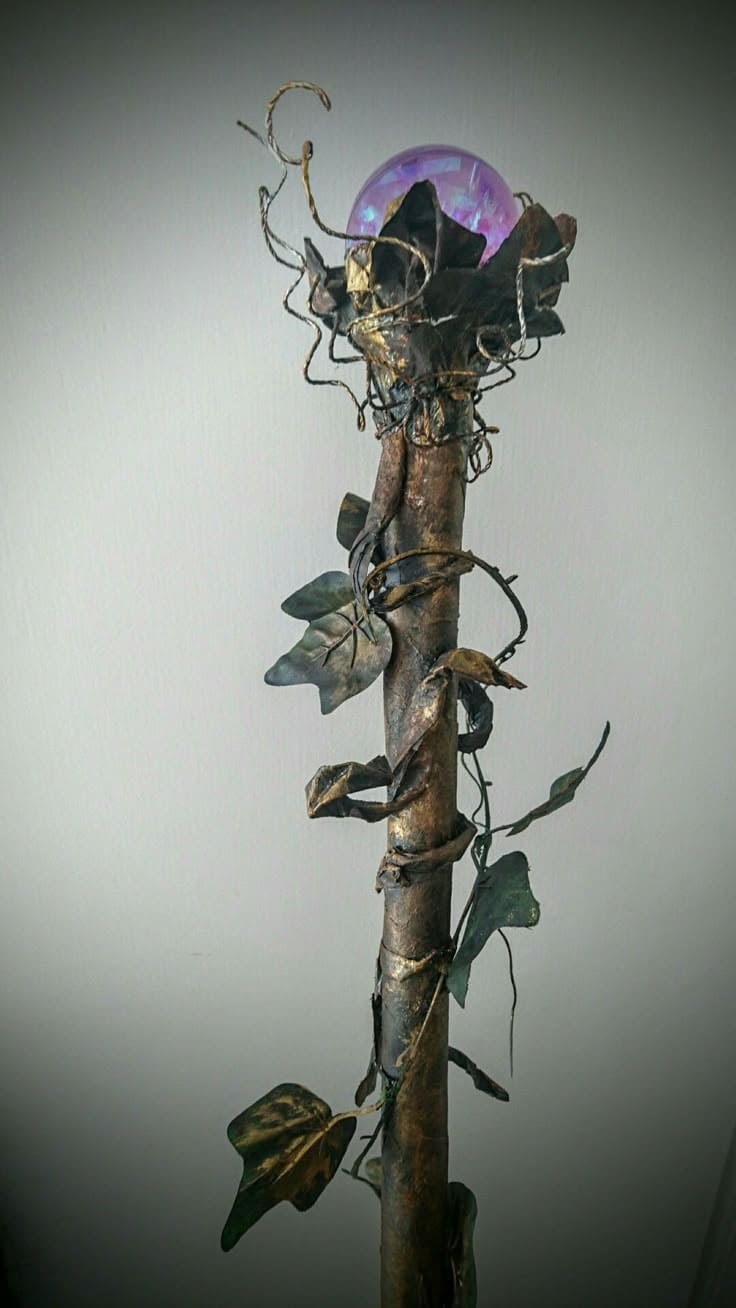
You can see the staff looks like it was grown rather than crafted, wrapped in mystical ivy that clings to ancient bark as if protecting its power source – a radiant, glowing orb held in place by dark metallic petals.
If you’ve ever dreamed of channeling your inner forest guardian or casting nature-based spells under a full moon, this one’s your soulmate.
Materials Needed
- 1 large wooden stick (about 3.5-5 feet long)
- 1 iridescent glass ball (approx. 3-4 inches wide)
- Dark craft wire (2-3 meters)
- Faux ivy vines (2 meters)
- Metallic leaves
- Gold and black acrylic paint
- Hot glue and glue gun
- Brown masking tape
- Scissors and pliers
Step-by-step Guide
Step 1: Choose a thick wooden staff or broom handle and sand it slightly to smooth rough areas while preserving texture.
Step 2: Use hot glue to fix the glass orb to the top of the staff, then shape petals or leaf forms around it with craft foam or metallic paper and glue them to look like a blooming crown.
Step 3: Wrap ivy vines down from the crown, spiraling around the staff and securing with glue in spots so it looks natural and slightly overgrown.
Step 4: Twist craft wire into tendrils and wrap them gently around the top near the orb, then llet them loop and curl as if they’re alive.
Step 5: Use gold and black acrylic paint to highlight edges of the vines, petals, and staff to give it a weathered, magical finish.
Step 6: Wrap brown tape around parts of the handle for grip and aged texture.
#9. Lunar Crystal Energy Wands
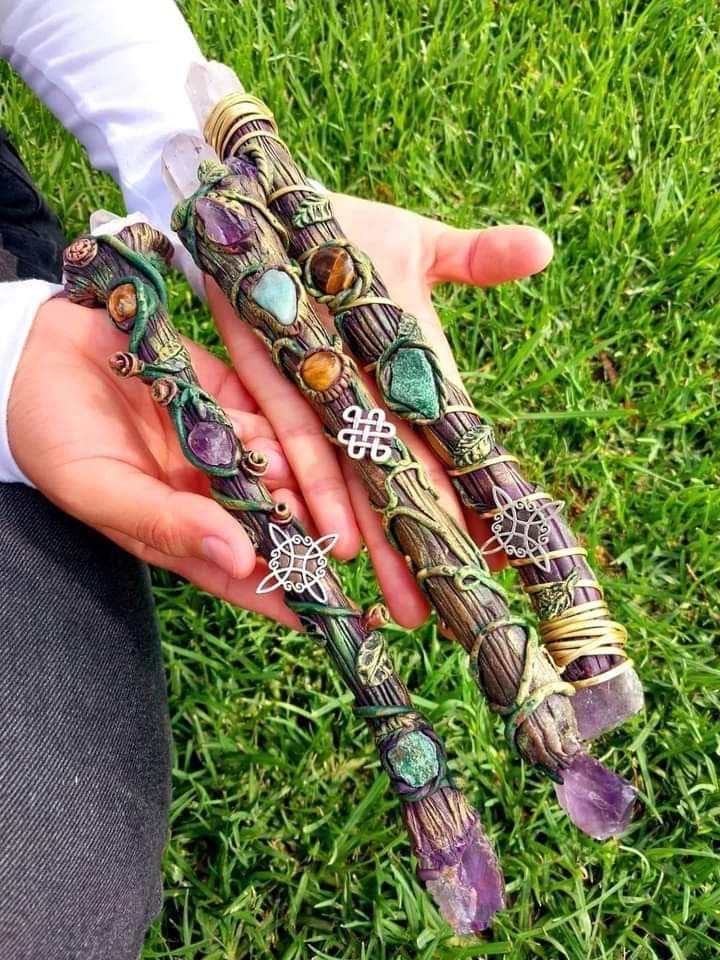
Each wand in this set is crowned with a powerful quartz crystal and adorned with unique symbols like a lotus blossom, a crescent moon, chakra stones giving each piece its own energetic language.
Besides, these are perfect for energy healing, meditation, or simply keeping on your altar to remind you that you are aligned, charged, and fully in your power.
Materials Needed
- Natural wooden sticks (8-10 inches long)
- Quartz crystal points (1-2 inches each)
- Copper wire (18- to 20-gauge, 1.5-2 meters per wand)
- 7 chakra gemstone cabochons
- Metal embellishments (crescent moons, lotus charms, spirals)
- Craft glue
- Fine sandpaper
- Optional: iridescent paint
Step-by-step Guide
Step 1: Lightly sand your wooden stick until smooth and clean. You can leave the natural color or apply a shimmer coat for a subtle glow.
Step 2: Position the quartz crystal at the top of the wand. You use wire and glue to hold it securely in place, then wrap the base with spiraled copper for a magical, handcrafted look.
Step 3: Attach metal charms near the crystal using wire, then wind the copper wire downward in loose spirals, gluing chakra stones along the wand in the correct order.
Step 4: Add finishing touches like curled copper loops or highlighted paint strokes.
#10. Celestial Amethyst Moon Wand
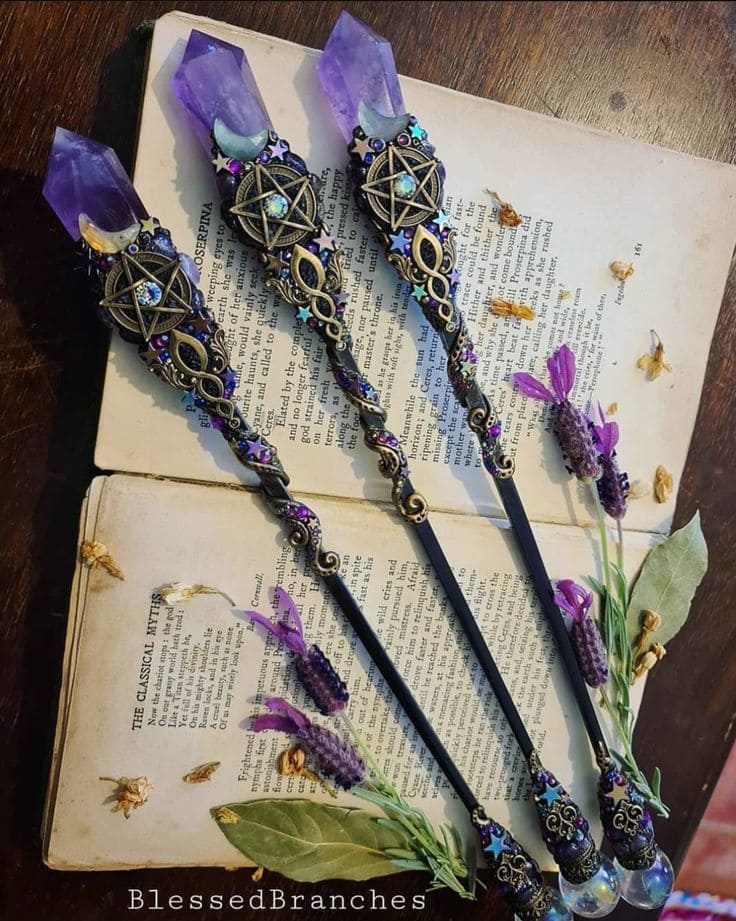
This wand radiates celestial energy with its amethyst point, crescent moon embellishment, and ornate brass pentacle centerpiece.
What’s more, the deep black handle grounds the design in mystery, while the detailing glows with divine femininity. It’s a wand made for moon rituals, dreamwork, or for anyone who finds magic in the stars.
Materials Needed
- 1 resin wand base (about 10-12 inches)
- Amethyst crystal point (2-3 inches long)
- Crescent moon and brass pentacle charm
- 10-20 iridescent rhinestones, star sequins, and cabochons
- Strong craft glue
- Decorative filigree wrap, metal gears
Step-by-step Guide
Step 1: Paint your wand base black and let it dry fully, this creates contrast and a dramatic celestial effect.
Step 2: Attach the amethyst point to the top of the wand using strong glue or epoxy, ensuring it’s centered and secure.
Step 3: Layer your embellishments around the base of the crystal, you need to start with the brass pentacle, then glue on the crescent moon and surrounding filigree.
Step 4: Add gems, stars, and iridescent details along the upper half of the wand in a spiral or clustered design to mimic constellations.
#11. Spirit of the Sky Feather Wand
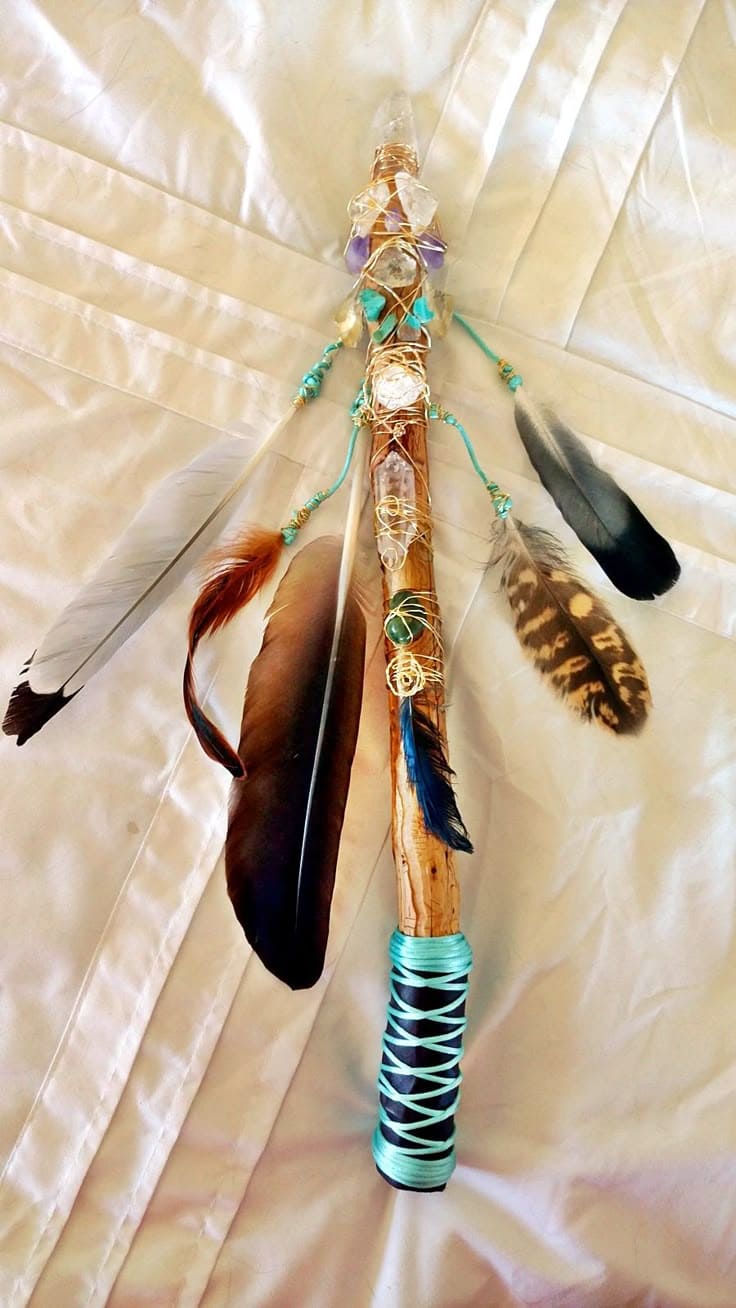
This wand feels like it was born from the wind. With a crown of clear quartz and amethyst, feathers from many wings, and sky-blue thread binding it all together, it captures the raw movement of energy in flight.
Perfect for air rituals, smudging, or ancestral connection, this wand carries the kind of magic that listens before it speaks.
Materials Needed
- A smooth wooden stick (approx. 10-12 inches long)
- Assorted crystals (clear quartz, amethyst, turquoise, etc.)
- Copper craft wire (18- to 22-gauge, 2 meters)
- 5-7 feathers
- Blue strong thread (about 1.5 meters)
- Hot glue
- Optional: wooden beads or bone charms
Step-by-step Guide
Step 1: Choose a natural stick that fits comfortably in your hand. Sand if needed, then clean off any dust or splinters.
Step 2: Wrap faux leather around the base of the wand to create a grippable handle. Then secure with glue and wind sky-blue thread around it in a crisscross pattern.
Step 3: Affix your largest quartz crystals at the top using wire. You can wrap the wire in a spiral down the shaft and press in smaller stones like turquoise or moonstone.
Step 4: Tie or glue feathers to the top or sides, fanning them outward so they flutter freely.
#12. Wizards Hand-Carved Walking Staffs
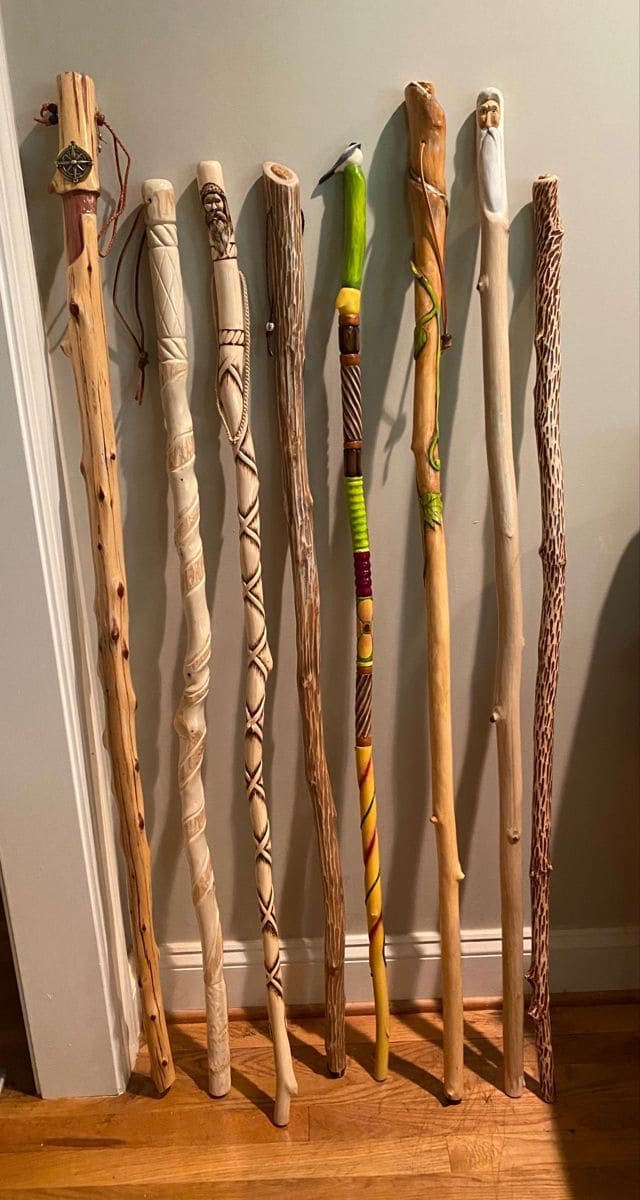
Each of these staffs tells its own story. Some twist like enchanted vines, others bear etched runes or wise old faces, and one is boldly painted like it just walked out of a fantasy scroll.
Holding one, you can feel time slow down as if you’ve stepped into a sacred tradition of wandcraft passed from one hand-carver to the next.
Materials Needed
- Hardwood branches (4-6 feet long)
- Carving knife and chisel set
- Sandpaper (medium to fine grit)
- Woodburning tool
- Acrylic paint
- Wood stain
- Leather cord, feathers, or beads
Step-by-step Guide
Step 1: Select a straight, dry hardwood stick and remove any bark or protruding knots using a drawknife or carving tool.
Step 2: Sand it thoroughly to reveal the grain and soften sharp edges. Plan your design whether it’s spiral grooves, geometric carvings, or a sculpted top.
Step 3: Carve your chosen pattern carefully, adding texture or detail with gouges and chisels. If sculpting a figure or animal, block it out first, then refine.
Step 4: Burn runes, symbols, or outlines using a pyrography tool for added depth. Then apply wood stain or finishing oil to seal and bring out the natural tones.
Step 5: Add decorations like wrapped leather cord, beads, or even mounted carved accents like birds or crystals.
#13. Whimsy Witch Charm Wands
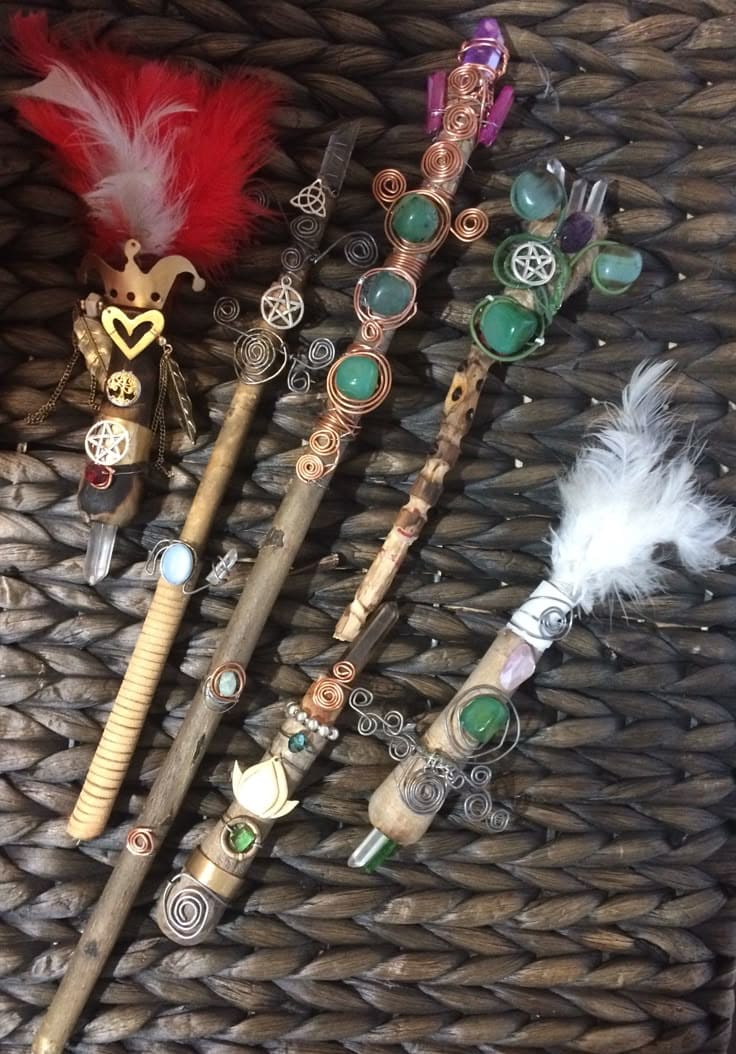
These wands are wonderfully chaotic, a celebration of intuition and playfulness. They feel like something you’d make in a cozy spell circle with friends, each design guided more by gut than by rules.
Materials Needed
- Wooden sticks (approx. 8-10 inches)
- Assorted crystals (quartz, aventurine, rose quartz, amethyst, etc.)
- Copper craft wire (1-2 meters per wand)
- Feathers (red, white, spotted, or dyed)
- Charms, coins, bells, and pentacle pendants
- Beads, pearls, metal findings
- Strong glue
- Optional: thread, embroidery floss, leather strips, polymer clay details
Step-by-step Guide
Step 1: Choose your wand base and remember that the more personality it already has, the better.
Step 2: Wrap the top in wire to create a crystal nest. You slot in your chosen gem or point, then spiral wire around it to hold it steady and decorative.
Step 3: Layer on charms, beads, and additional spirals.
Step 4: Tie or glue on feathers at the top or side, letting them flow or fluff to give the wand a living, breathing energy.
Step 5: Finally, add ribbon, wrapped thread, or even stacked findings near the base for grip and contrast.
#14. Colorful Magic Nature Wands
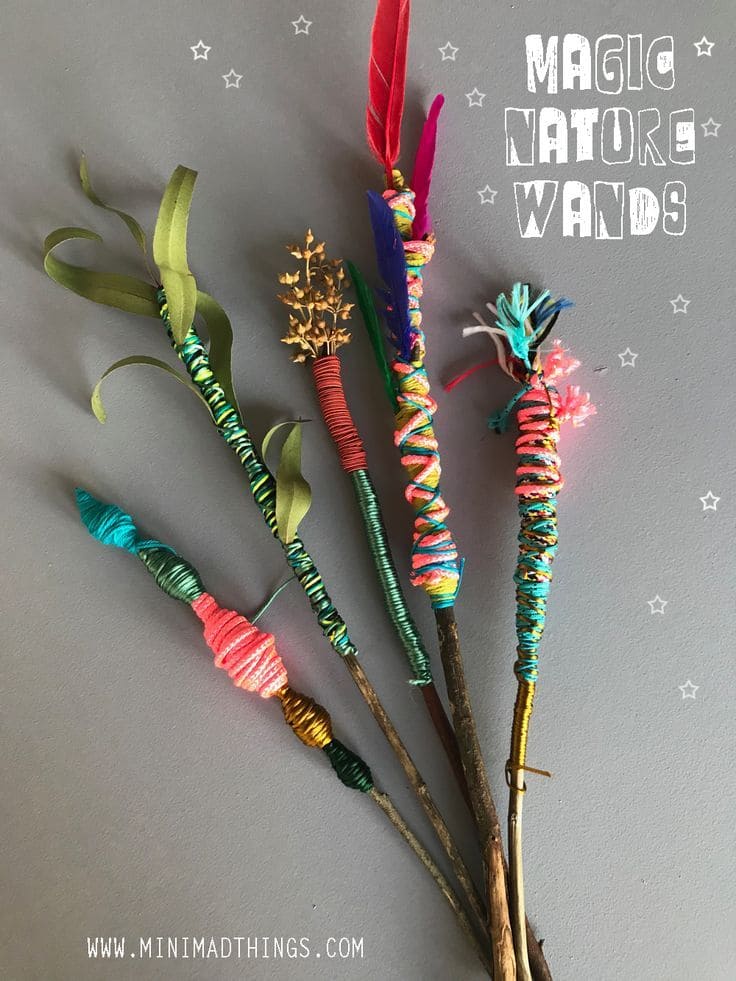
These joyful nature wands feel like a child’s imagination made visible. With bright yarn, feathers, ribbons, and treasures from the garden, they’re the perfect beginner’s wand.
Materials Needed
- Thin natural sticks (8-10 inches long)
- Assorted yarn in bold colors (2-3 meters per wand)
- Feathers, leaves, seed pods, dried flowers
- Hot glue gun
- Optional: ribbon scraps, buttons, pompoms, small bells
- Scissors
Step-by-step Guide
Step 1: Head outside and find sticks with charm, then clean off any dirt and trim to size if needed.
Step 2: Wrap yarn tightly around the top third of each stick, mixing colors and textures to create a layered look. You should knot securely and trim excess.
Step 3: Glue or tie on feathers, dried flowers, or natural finds like pods and leaves.
Step 4: Add ribbons, beads, or little bells if desired. Then wave your wand and make up a spell.
#15. Driftwood Sea Stone Wands
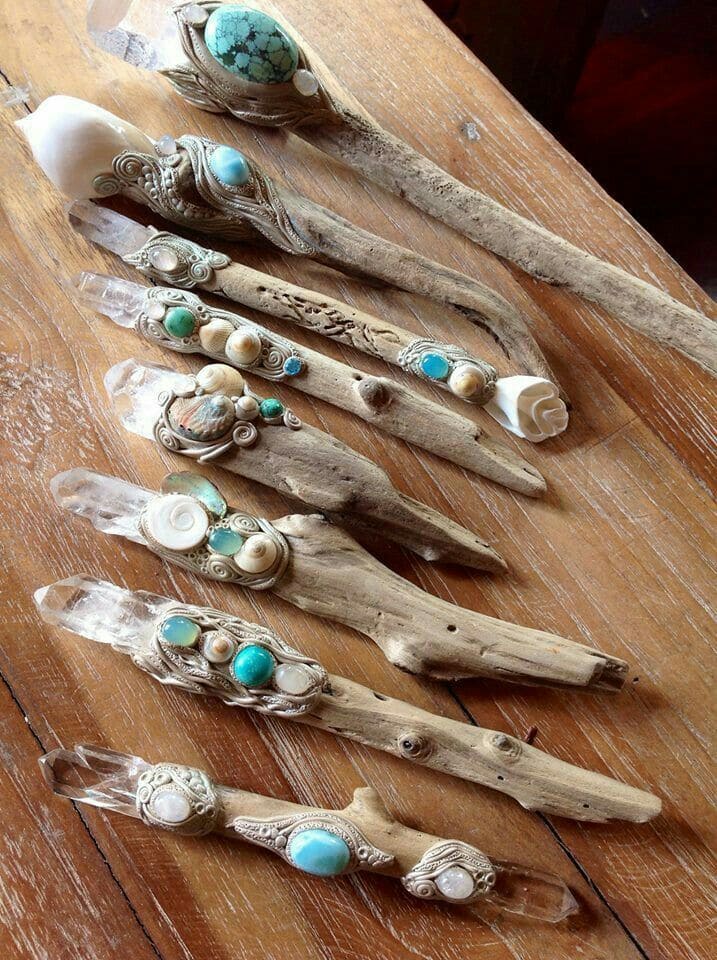
There’s something ancient about these wands as if they’ve been waiting by the ocean for a worthy hand.
Kids and even adults will immerse in this project as each wand is raw yet refined, evoking ocean magic, moonlight rituals, and quiet, tidal power.
Materials Needed
- Natural driftwood sticks (8-10 inches long)
- Assorted beach stones, shells, and turquoise cabochons
- Quartz crystal points (~1.5 inches each)
- Silver polymer clay
- Jewelry adhesive
- Optional: mica powder
- Sculpting tools
Step-by-step Guide
Step 1: Choose a driftwood stick that has natural curves or texture. Then gently clean with a damp cloth and let it fully dry.
Step 2: Sculpt a cradle using silver-toned polymer clay around one end and press your crystal into the clay base. Now, add side stones and secure them in place.
Step 3: Use sculpting tools to add swirls, leaves, or water patterns into the clay, blending around the objects for a unified look.
Step 4: Bake or cure according to the clay’s instructions or let air dry. Optionally, you an brush with mica powder to accent the textures.
#16. Hogwarts-Style Glitter Wand Collection
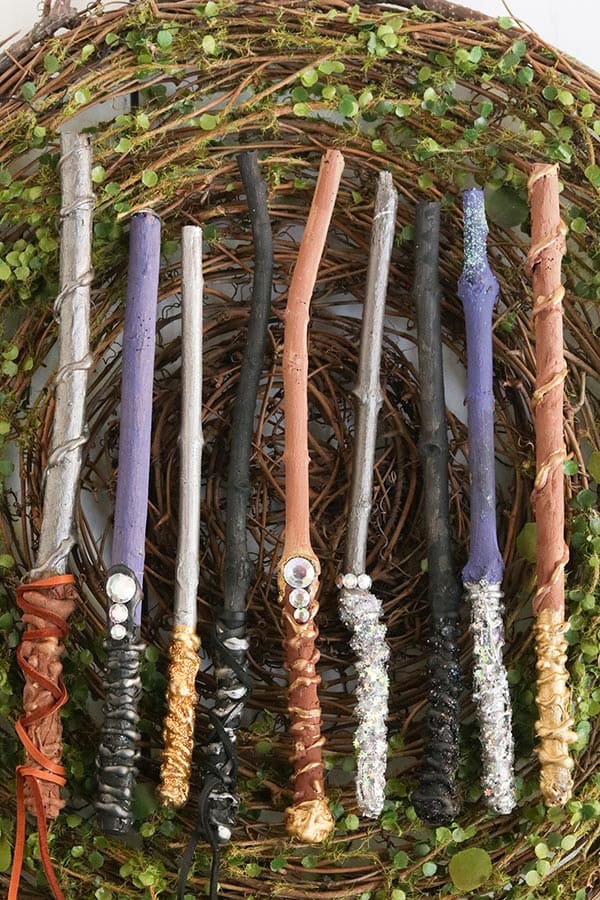
These fantasy wands look like they’ve been plucked straight from Diagon Alley and dipped in a cauldron of creativity.
Moreover, they’re sturdy, sparkly, and wonderfully persona, perfect for party favors, Halloween costumes, or a weekend crafting session where you don’t mind getting a little glitter on your robes.
Materials Needed
- Small branches (approx. 10-12 inches long)
- Acrylic paint (black, purple, silver, gold, brown)
- Hot glue gun and glue sticks
- Fine glitter
- Plastic rhinestones, flat-back gems, or beads
- Mod Podge
- Optional: faux leather cord
- Paintbrushes and paper towels
Step-by-step Guide
Step 1: Use hot glue to create ridges, spirals, and knobs on one end of each stick, this becomes the wand’s handle.
Step 2: Paint each wand using your favorite color scheme. You can try black and silver for a Slytherin feel, or purple and gold for something more celestial.
Step 3: While paint is still tacky, sprinkle glitter over the handle or wand tip for extra shine. You can also glue on gems and rhinestones for an elegant, royal finish.
Step 4: Once everything is dry, brush on a layer of Mod Podge to seal and protect your design.
Step 5: Add finishing touches like wrapped cord, metallic wax highlights, or a charm dangling from the hilt.
#17. Colorful Polymer Clay Wizard Wands
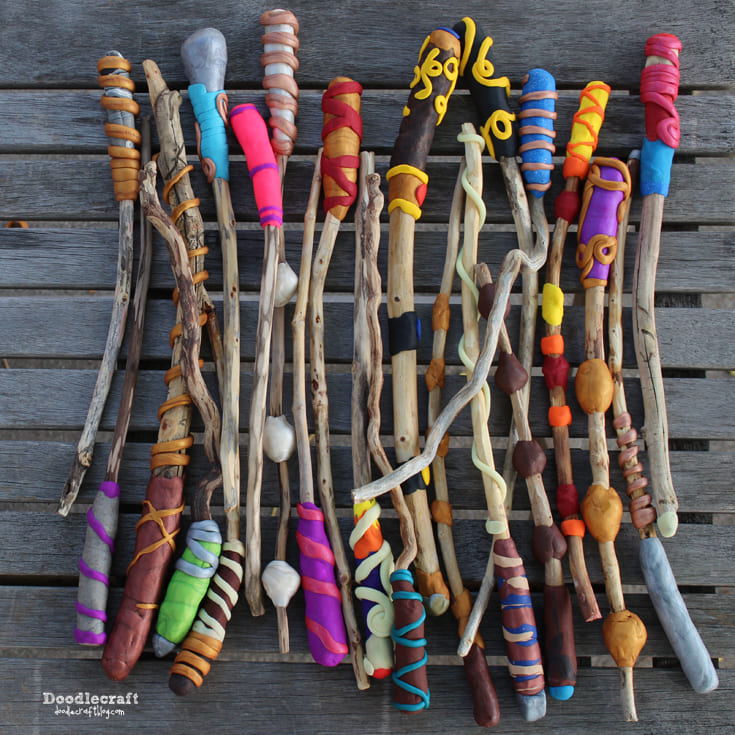
These vibrant wands are where imagination meets craft clay. Each piece feels like a potion bottle turned into a spellstick, swirled with glowing magic, quirky textures, and fantasy flair.
Whether you’re making them with kids, friends, or just for your own creative joy, these wands are perfect for hands-on fun and over-the-top charm.
Materials Needed
- Dried sticks (about 8-2 inches long)
- Polymer clay in various colors (metallic, neon, natural tones)
- Baking tray and parchment paper
- Clay tools
- Optional: mica powder, paint, or glitter
- Oven (usually ~265°F/130°C)
Step-by-step Guide
Step 1: Pick out natural wood sticks with fun textures or knots as they give your wand instant character.
Step 2: Wrap polymer clay around the base or tip of each stick, pressing it to bond and shaping it into spirals, balls, runes, or handles.
Step 3: Mix colors or layer clay strips for marbled or striped effects. Then add ridges, spikes, or dots to create magical textures.
Step 4: Bake the wands on a parchment-lined tray according to your clay’s instructions (usually 15-30 minutes).
#18. Enchanted Crystal Makeup Wands
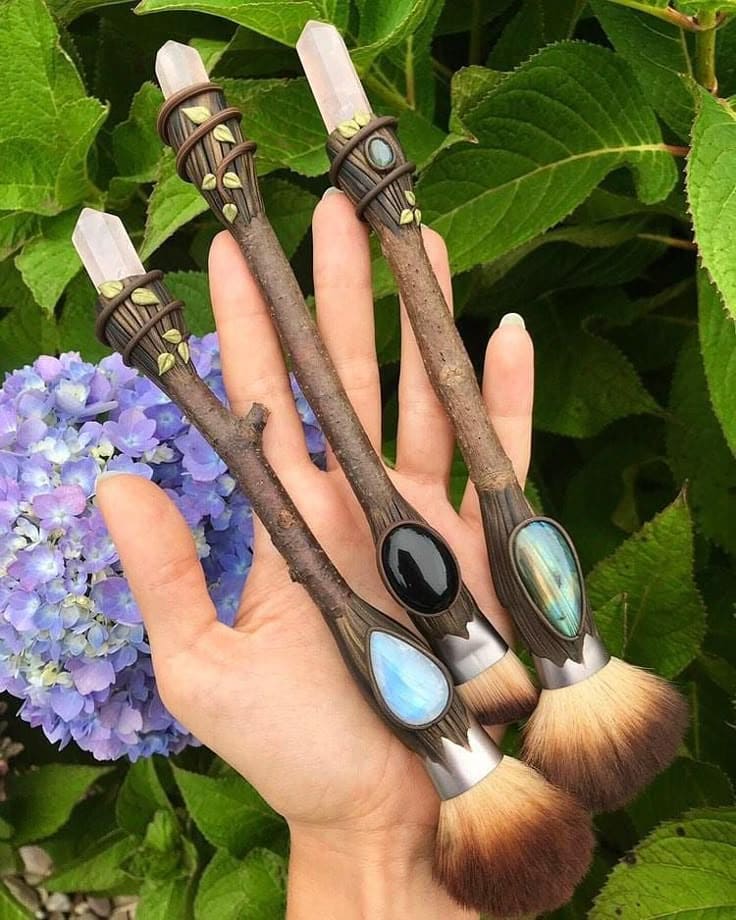
Yes, you can cast spells while contouring. These magical hybrid tools double as makeup brushes and miniature wands, perfect for those who blend potions and pigments alike.
Also, with clear quartz points and gemstone accents, they bring elegance to your vanity while channeling a little moonlit power.
Materials Needed
- Makeup brush handles
- Small sticks (about 6-8 inches)
- Clear quartz points (1-1.5 inches each)
- Polymer clay (earth tones + green)
- Oval gemstone cabochons
- Strong craft glue
- Optional: mica powder
- Sculpting tools and oven
Step-by-step Guide
Step 1: If using existing brushes, cut or break the old handles to prepare the base. Then glue the stick securely in place if using a new wooden twig as a handle.
Step 2: Sculpt polymer clay around the top and base of the stick where it meets the brush and where the crystal will sit. You now add vine wraps, leaf shapes, and natural curves.
Step 3: Press the gemstone into the clay base near the brush side and the crystal into the top crown area. You can blend the clay around both for a seamless, sculpted effect.
Step 4: Use a toothpick or sculpting tool to carve textures into the vines and leaves.
#19. Moon and Blossom Enchanted Wands
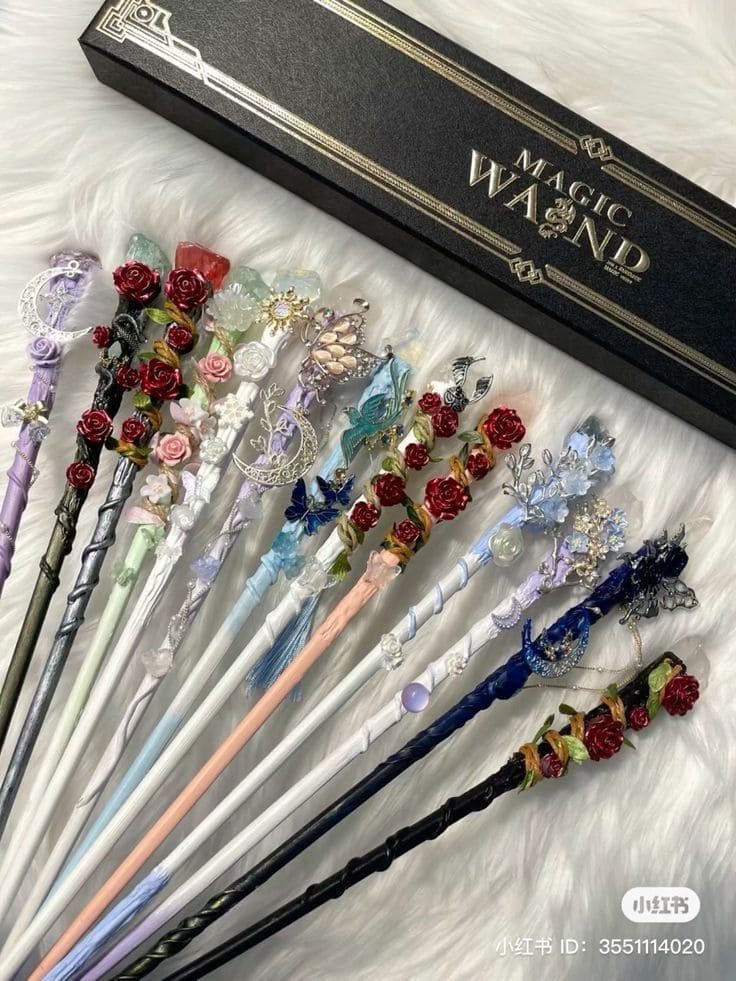
Who can believe just with sparkling moon charms, fluttering butterflies, cascading roses, and pastel gradients, this project looks like it was handcrafted by a moon goddess, or summoned from a fairytale dimension?
Specially, these wands are perfect for display, cosplay, or gentle glam spells and for creators who cherish detail, softness, and sparkly enchantment.
Materials Needed
- Wooden dowels (10-12 inches)
- Polymer clay (white, pastel, black)
- Artificial flowers (mini roses, cherry blossoms, blue hydrangea)
- Moon, butterfly, or star charms
- Pearl beads, rhinestones, tiny tassels
- Acrylic paint in pastel
- Hot glue gun
- Optional: glitter top coat
Step-by-step Guide
Step 1: Paint your dowels in dreamy base colors like soft pink, midnight black, lavender, or pearl white.
Step 2: Sculpt or glue tiny vines, clay wraps, or embossed spirals around the handle for texture and grip. Then accent with pastel or gold paint if desired.
Step 3: Carefully glue artificial flowers, roses, or leaves along the top third of the wand. You now add small bead clusters for shine.
Step 4: Attach moon charms, butterflies, or dangling crystal chains near the top.
Step 5: Finish with a glitter sealant for a glassy finish that protects all the details.
#20. DIY Hot Glue Magic Wands
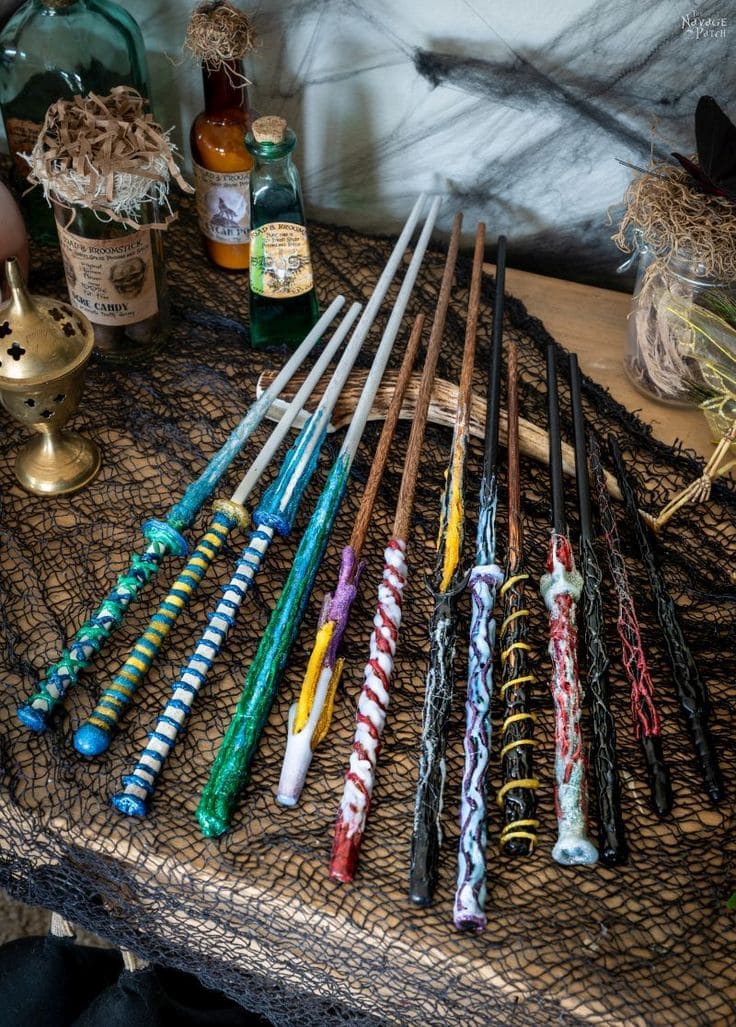
Made with basic materials and pure imagination, these wands are flashy, textured, and perfect for parties, cosplay, or Halloween chaos.
With some basic materials and a fearless attitude toward color, you can whip up a batch of dramatic wands that look far more magical than their humble origins suggest.
Materials Needed
- Chopsticks (10-12 inches)
- Hot glue gun and plenty of glue sticks
- Acrylic paint (black, brown, metallics, brights) and small paintbrushes
- Optional: glitter, glow-in-the-dark paint, metallic wax, yarn
- Mod Podge
Step-by-step Guide
Step 1: Heat your glue gun and begin building textures directly onto the chopstick.
Step 2: Let the glue cool and harden completely. You’ll already start seeing your wand’s personality take shape.
Step 3: Paint your wand with a base coat like black, brown, or metallic tones are ideal for drama. Then add layered colors, dry-brushed highlights, or ombre effects for depth.
Step 4: While paint is wet or tacky, dust on glitter or use glow-in-the-dark paint for a hidden surprise.
Step 5: Finish with a clear coat of Mod Podge to protect the paint and give your wand a subtle sheen.
