Ever wondered what a ghost’s whisper would sound like dancing in the wind? That’s the magic of Halloween wind chimes. These are charmingly eerie, with every rattle and tinkle telling its own little haunted tale.
I remember the first one I made with painted bones and a rusted key, it creaked like a lost spirit tapping at the porch.
This collection of 23 handmade Halloween wind chimes captures that same delightful eeriness. Crafted with skull beads, creepy crawlies, bells, and cauldrons, they’re perfect for welcoming trick-or-treaters or startling unsuspecting guests.
#1. Porchside Skeleton Rattle Wind Chime
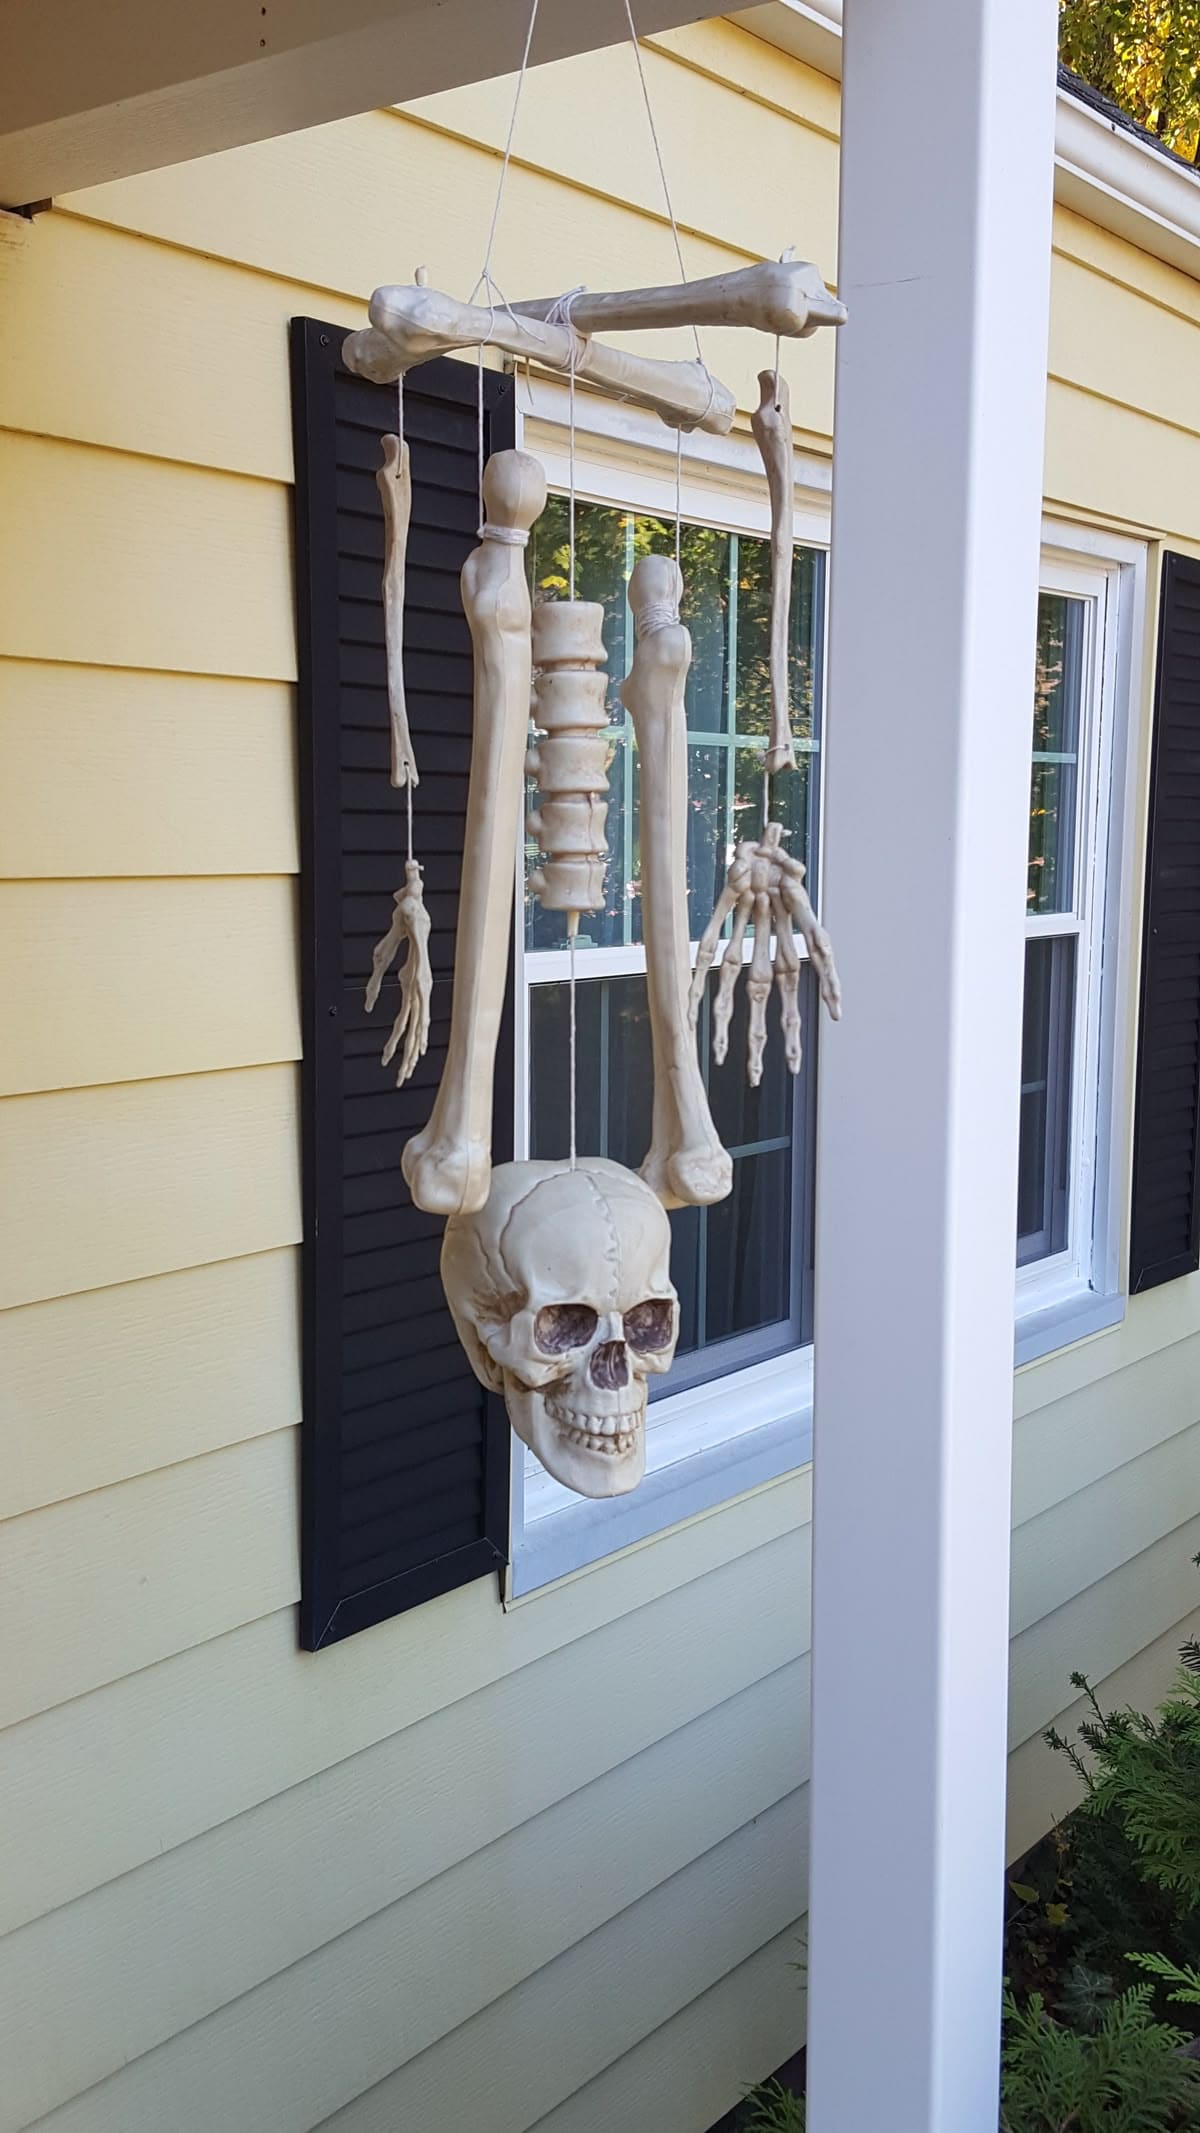
If your Halloween vibe leans toward bold and bony, this full-size skeleton chime is your golden ticket. It’s less whispering spirits and more skeletons dancing in the wind.
Hung right outside your door, this ghoulish wind chime becomes a Halloween greeter, rattling gently when the breeze picks up or when trick-or-treaters approach.
Plus, the oversized skull, dangling bones, and reaching hands make it look like a spirit’s trying to crawl back from beyond.
Materials Needed
- 1 plastic full-size skeleton (3-4 ft tall)
- Strong twine or clear fishing line (10-15 ft)
- Hot glue gun or small drill
- Scissors
- Sturdy stick, bone prop, or wooden dowel (12″-16″)
Step-by-step Guide
Step 1: Dismantle the skeleton and decide which bones you want to feature. Long bones and hands work great for dramatic effect.
Step 2: Use a hot glue gun or drill small holes to create threading points in each piece. Be careful not to crack plastic while drilling.
Step 3: Cut varying lengths of twine and string the bones, leaving the skull for the lowest point for extra impact.
Step 4: Tie all strands securely to your top piece (stick or bone), then hang from a sturdy hook or nail on your porch.
#2. Halloween Harvest Shell Wind Chime
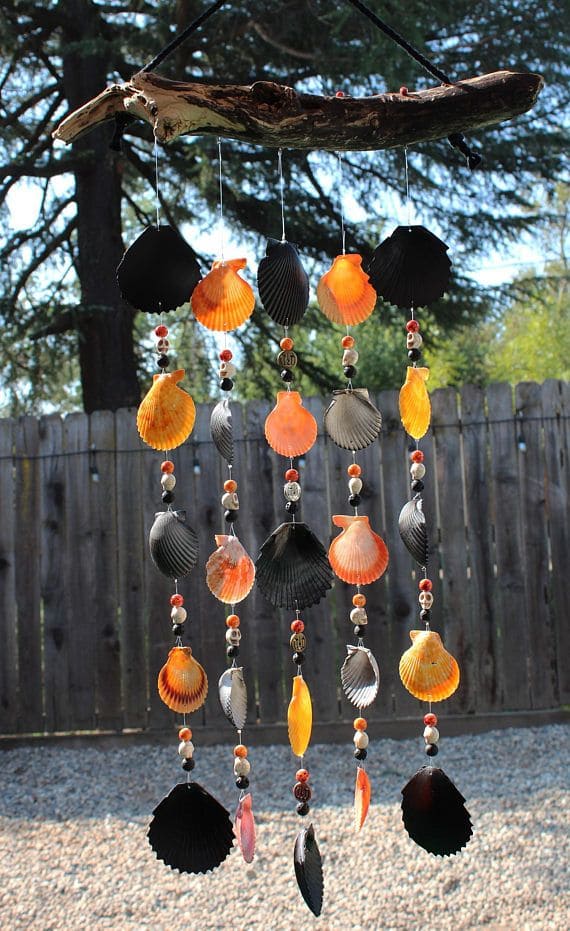
With a rustic driftwood hanger and cascading lines of painted seashells in black, orange, and warm pumpkin hues, tthis autumnal wind chime brings an earthy-meets-eerie vibe to your porch.
Each shell is spaced with Halloween-toned beads, giving the whole piece a rhythmic rattle and shimmer as the wind passes. It’s the kind of unexpected Halloween decor that makes people stop, stare, and smile.
Materials Needed
- 1 piece of driftwood (12-16 inches)
- 20-30 seashells (various sizes)
- Black, orange, and metallic paints
- Small drill or nail
- Clear fishing line
- Assorted beads in fall and Halloween colors
- Strong glue (optional)
Step-by-step Guide
Step 1: Paint shells in orange, black, and bronze tones. Let dry completely.
Step 2: Drill or poke holes at the top of each shell carefully. Then you just string shells and beads onto fishing line, alternating for color balance.
Step 3: Tie each strand to the driftwood, spacing them evenly. Finally, add a loop of string to the top for hanging and test the balance.
#3. Skeleton Bamboo Wind Chime
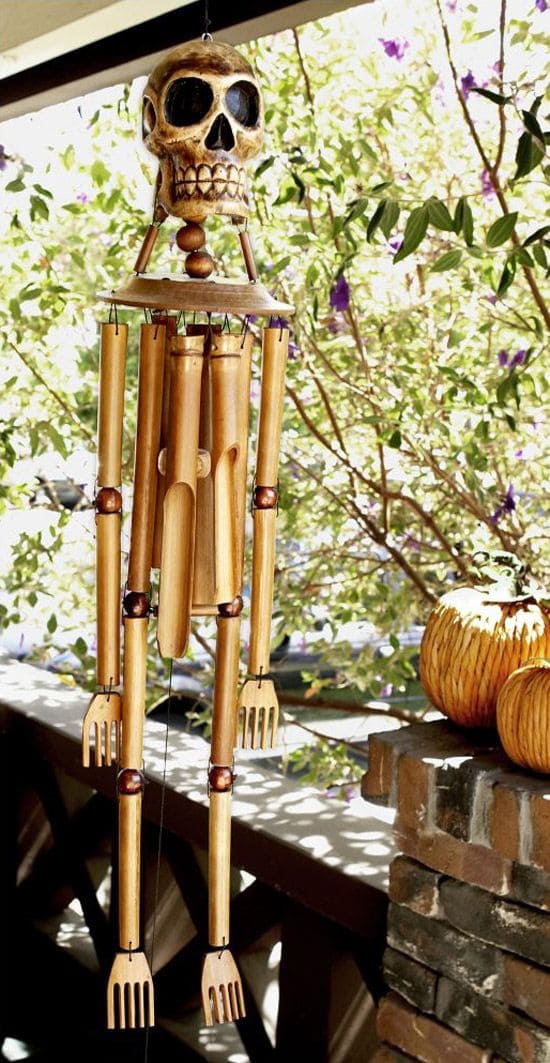
There’s something bone-chillingly delightful about this skeletal wind chime. Made from smooth bamboo tubes and beads, it takes on a full-bodied form complete with a skull head and rake-like wooden hands.
When the wind hits, you’ll hear a low clack and hollow percussion that’s both eerie and oddly musical like a skeleton doing a tap dance.
Materials Needed
- 1 large faux skull (approx. 6-8 inches tall)
- 10-12 bamboo chime tubes (6-12 inches in length)
- 8-10 round wooden beads (1 inch diameter)
- 4 mini wooden forks or slotted wood pieces (approx. 3-4 inches)
- Strong nylon cord
- Drill with small bit (1/8 inch)
Step-by-step Guide
Step 1: Start by securing the faux skull as the top anchor. Then drill small holes at the bottom to thread your strings through.
Step 2: String and tie bamboo tubes in two layers: torso center and limbs. You can use beads as joints between sections.
Step 3: Attach wooden forks at the ends of the arms and legs to mimic skeletal hands and feet.
Step 4: Finally, suspend the entire skeleton using the center string, making sure it’s balanced and wind-responsive.
#4. Colorful Halloween Character Wind Chime
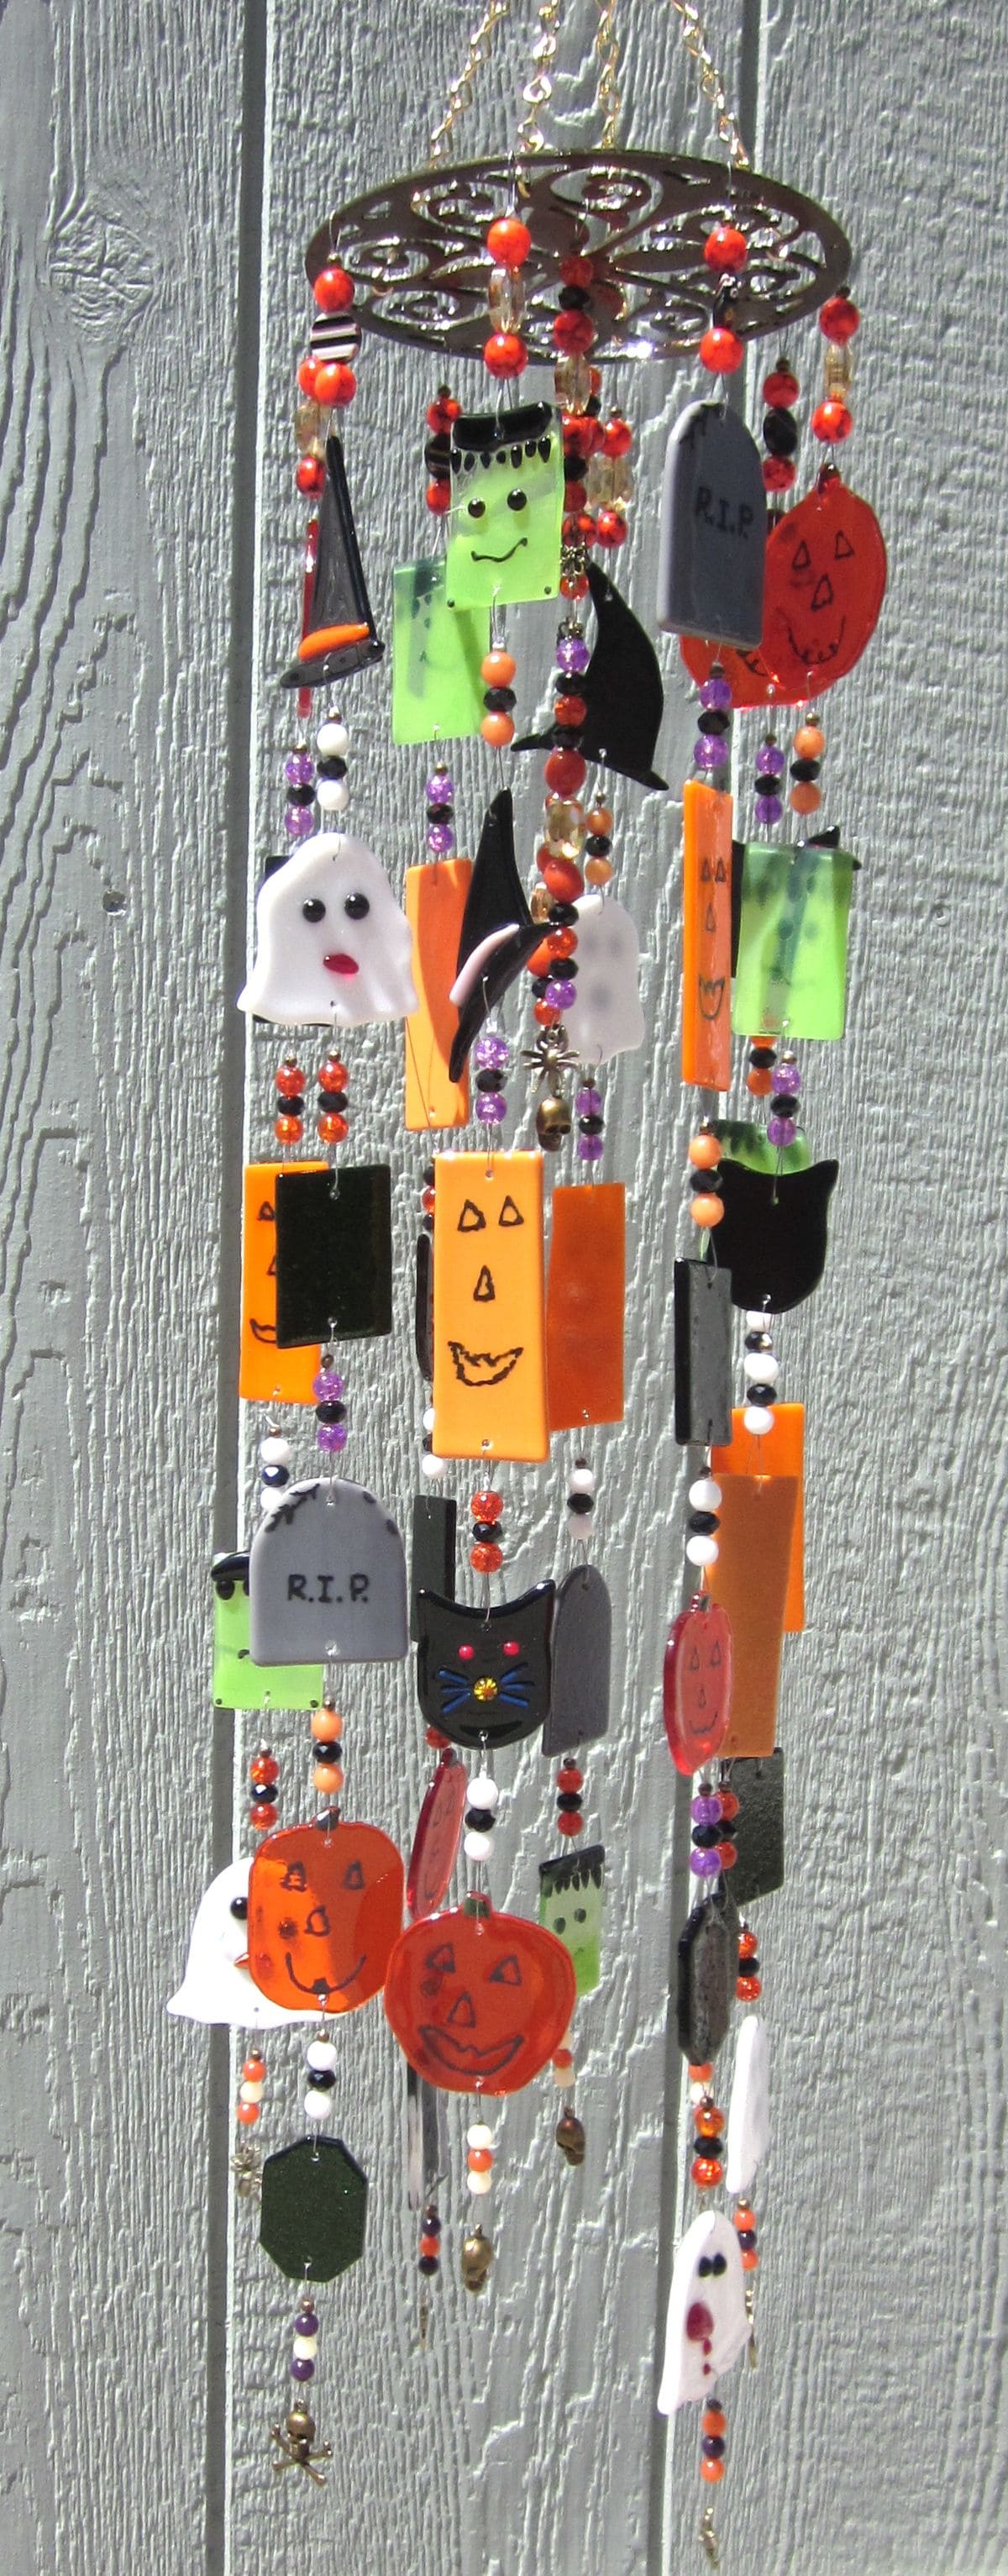
This wind chime feels like Halloween threw a party and invited everyone including Frankenstein, ghosts, jack-o’-lanterns, witches, tombstones, and even a few sneaky black cats.
Moreover, each character is handcrafted from vibrant plastic or acrylic, strung along with playful beads in Halloween’s iconic palette: orange, black, purple, and white.
As sunlight hits the pieces, they shimmer with cheerful energy, perfect for hanging near your front door or in a trick-or-treat zone to delight kids and grownups alike.
Materials Needed
- 1 round metal trivet or hanging ring (8-10 inches wide)
- 20-25 Halloween-themed acrylic or shrink-plastic charms (1-2 inches tall)
- Assorted plastic beads (approx. 50-60 beads in Halloween colors)
- Fishing line or clear jewelry cord (2-3 yards)
- Small jump rings or eye screws for attaching charms
- Chain or strong string
Step-by-step Guide
Step 1: If using shrink plastic, draw and color your Halloween characters, then bake according to instructions and let cool.
Step 2: Punch holes in the top of each charm and attach jump rings.
Step 3: Thread beads and characters alternately on fishing line, tying knots or using crimps between each piece to secure spacing.
Step 4: Now you just tie each strand to the trivet or ring, spacing them evenly. Then add a hanging chain to the top.
#5. Haunted Bell Bead Chime
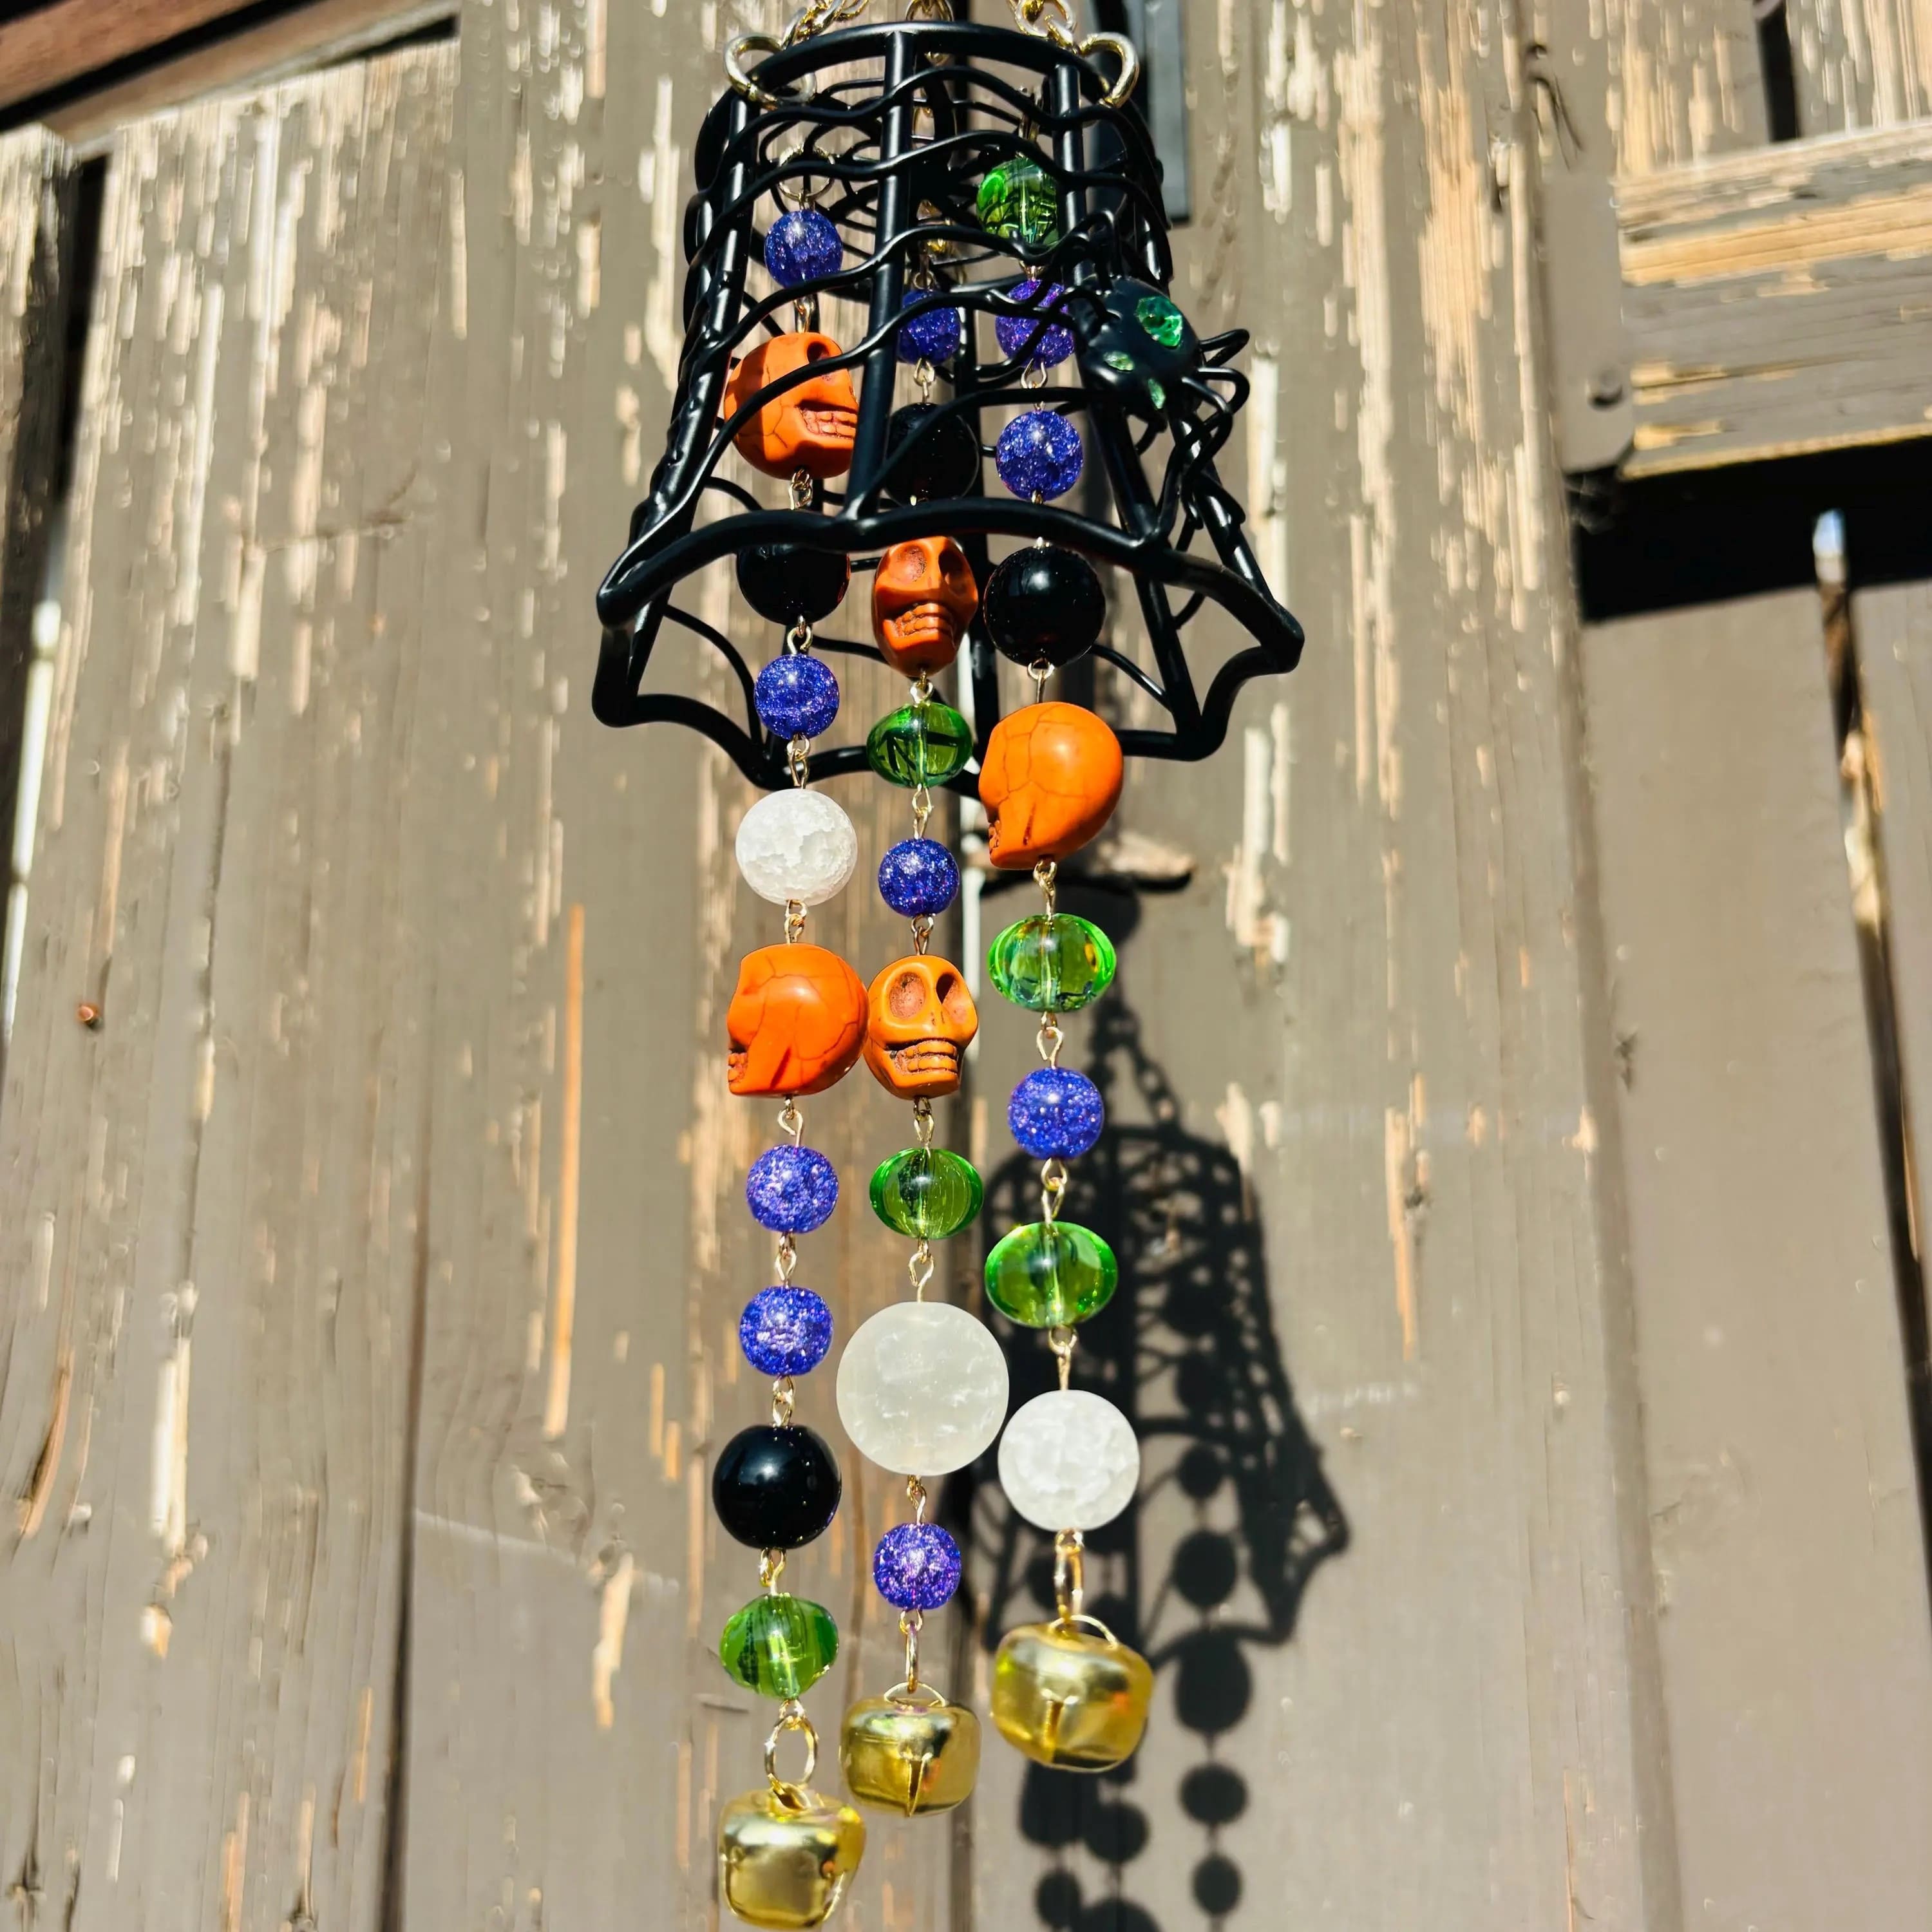
Suspended from a black spiderweb-like cage, strands of beads dangle freely, featuring translucent green and purple spheres, matte black globes, and mini orange skulls that add the perfect dose of spooky charm.
At the bottom, golden bells chime with a soft jingle whenever the breeze hits.
Plus, the mix of vibrant colors and fun shapes gives it a festive and lighthearted look, great for porch decor, Halloween parties, or even as a quirky wall hanging inside.
Materials Needed
- 1 black metal spiderweb cup or lampshade (approx. 5″ diameter)
- 10-12 assorted beads (green, purple, black, white – 0.5″-1″)
- 4-5 mini skull beads (approx. 0.75″)
- 4 gold jingle bells (1″ diameter)
- Jewelry wire or beading thread (20-24 gauge)
- Small pliers and wire cutters
- Hanging ring
Step-by-step Guide
Step 1: Start by cutting your jewelry wire into 4 equal strands about 10 inches long.
Step 2: Thread a pattern of beads and skulls onto each wire, ending with a bell.
Step 3: Use pliers to loop and secure the ends so beads and bells stay in place.
Step 4: Attach each strand through the bottom openings of your spiderweb holder. Now, you add a ring to the top for easy hanging.
Tip: You can personalize this even more by adding glow-in-the-dark beads or using themed charms like bats or pumpkins!
#6. Pumpkin and Ghost Seashell Wind Chime
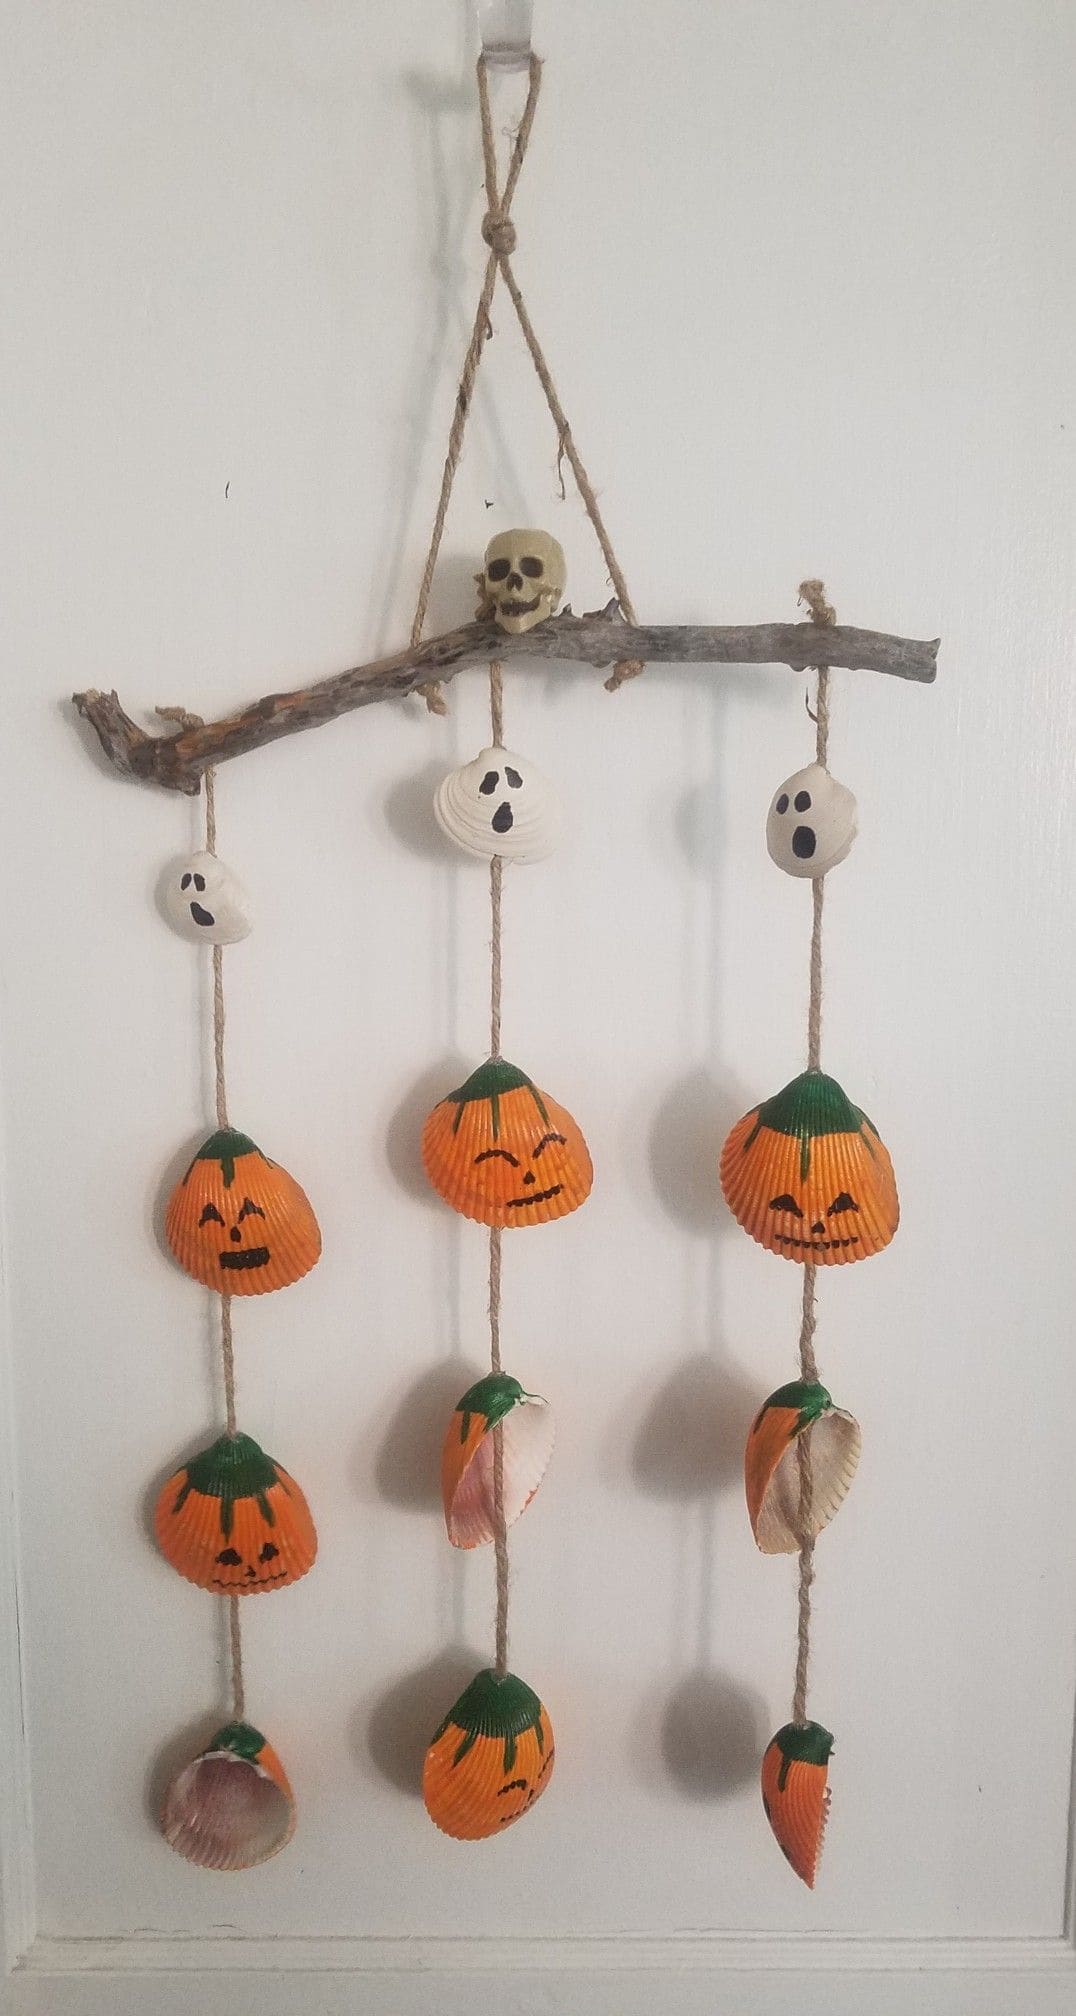
This DIY Halloween wine chime turns ordinary beach shells into a playful gathering of mini jack-o’-lanterns and wailing ghosts. With a rustic branch and twine, you’ll craft a spooky chorus that dances with every breeze.
Bonus, the little pumpkin faces each wear a different mood giving your porch or doorway a personality of its own.
It’s an eco-friendly craft with charm and chatter that welcomes autumn with a giggle. Perfect for coastal homes or nature lovers who enjoy mixing spooky with sustainable.
Materials Needed
- 15 scallop seashells (2-3″)
- 3 white clam shells (1.5-2″)
- 1 dry branch (10-12″ long)
- 6 ft natural twine or jute rope
- Small plastic skull (1-2″)
- Acrylic paint (orange, green, black, white)
- Paintbrushes (small tip and flat)
- Hot glue gun and glue sticks
Step-by-step Guide
Step 1: Rinse and dry your shells thoroughly before painting. Then paint the large scallop shells orange with green tops to mimic pumpkins.
Step 2: On each pumpkin, use black paint to draw fun, different jack-o’-lantern faces. For the clam shells, paint them white and add wide-eyed ghost expressions in black.
Step 3: Cut twine into three 18″ strands and glue three shells (spaced evenly) onto each one. You should alternate ghosts and pumpkins for variety.
Step 4: Tie the top ends of the twine to the branch. Then glue a small plastic skull to the center as a topper for a whimsical touch.
Step 5: Tie another loop of twine to the ends of the stick to hang your chime where breezes can bring it to life.
#7. Halloween Fabric Circle Wind Chime
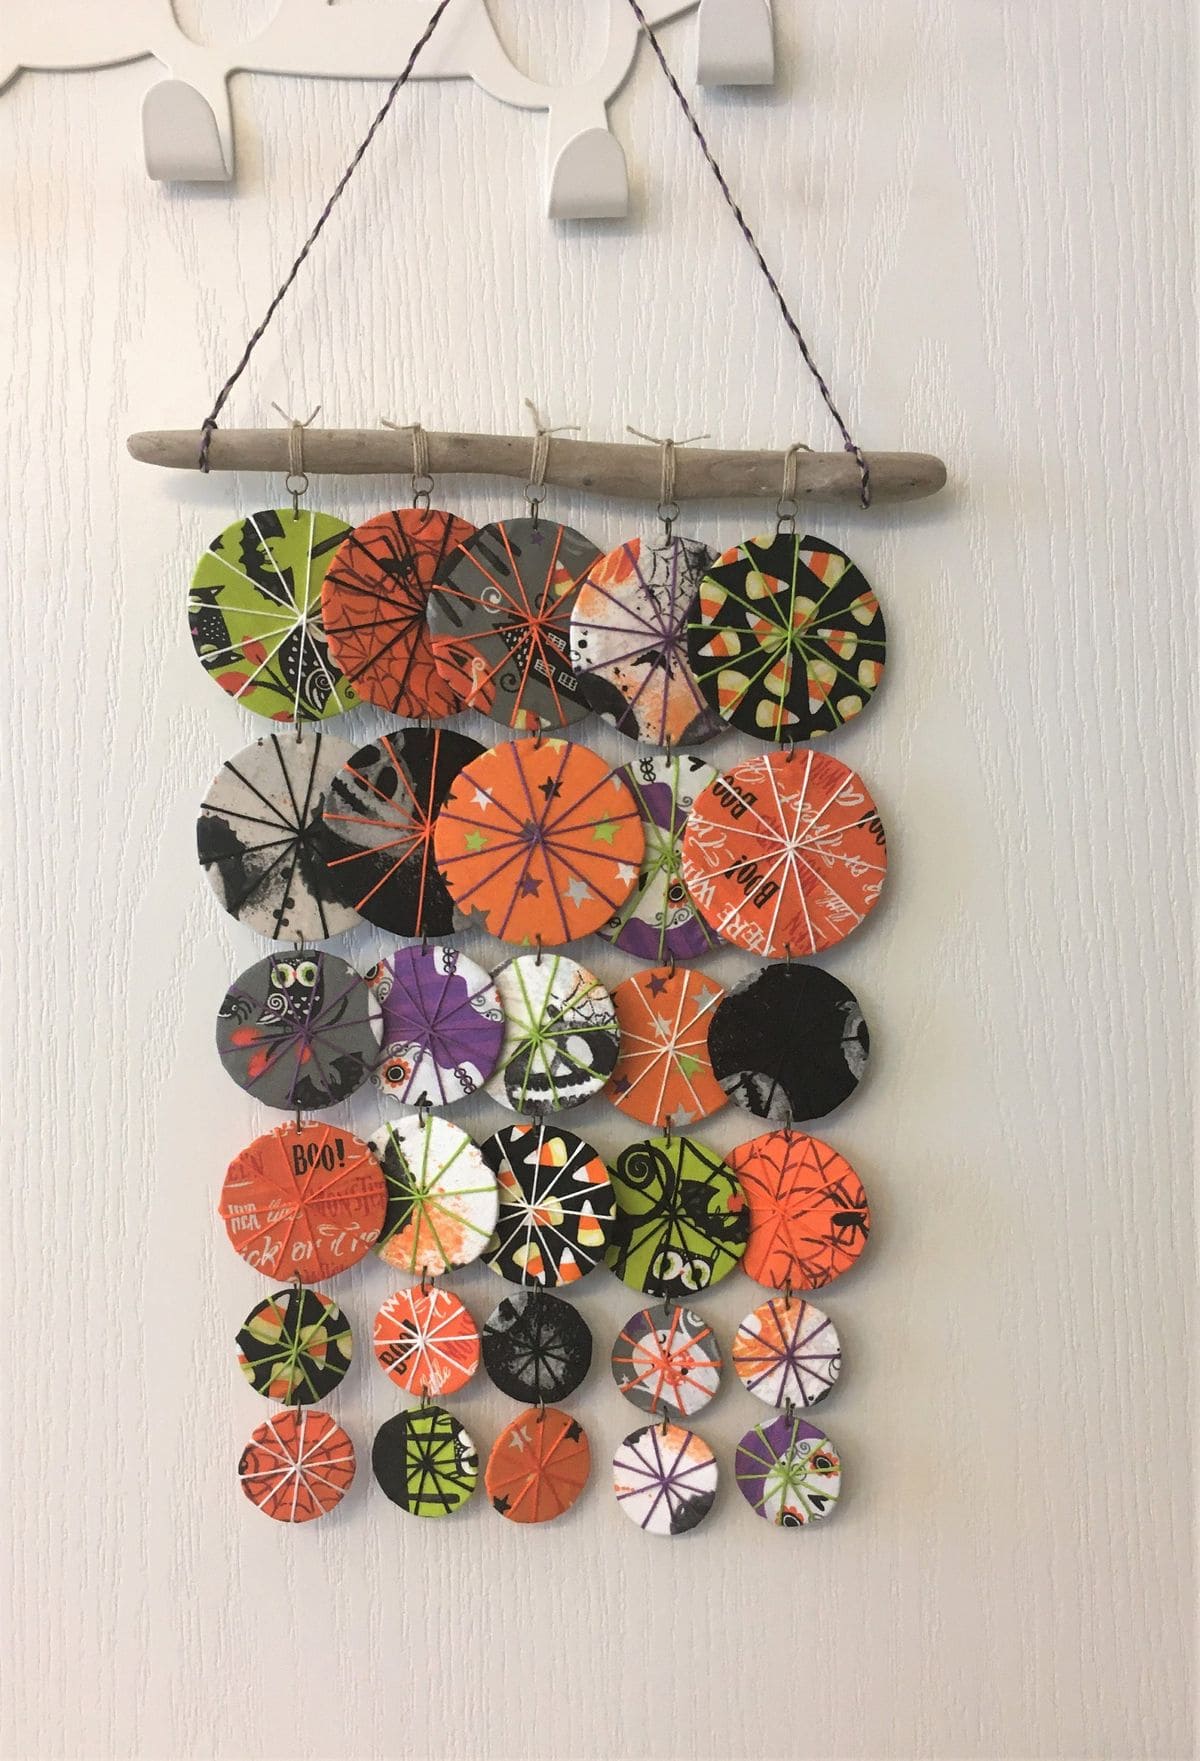
Using stiff fabric circles wrapped with bright embroidery floss, this colorful hanging piece turns traditional spooky colors like orange, black, green, purple into a cheerful patchwork of seasonal charm.
Each disc swings freely, catching the light and adding playful texture to your entryway or window. It’s perfect if you love Halloween but want something more festive than frightful.
Materials Needed
- 1 driftwood or smooth branch (12-14 inches long)
- 30 stiffened fabric or felt circles (1.5-3 inches diameter)
- Embroidery thread in Halloween colors (black, green, orange, purple)
- Hot glue gun
- Small jump rings or thread
- Twine or cord
Step-by-step Guide
Step 1: Cut out your fabric or felt circles in varying sizes. Then back them with interfacing or glue two layers for extra stiffness.
Step 2: Wrap embroidery thread around each circle in a web-like or starburst pattern. You should secure ends with glue.
Step 3: Attach each circle to the driftwood using jump rings or knotted thread, arranging from largest at top to smallest at the bottom.
Step 4: Add a piece of twine at both ends of the driftwood and tie together to create a hanger.
#8. Beaded Black Magic Wind Chime
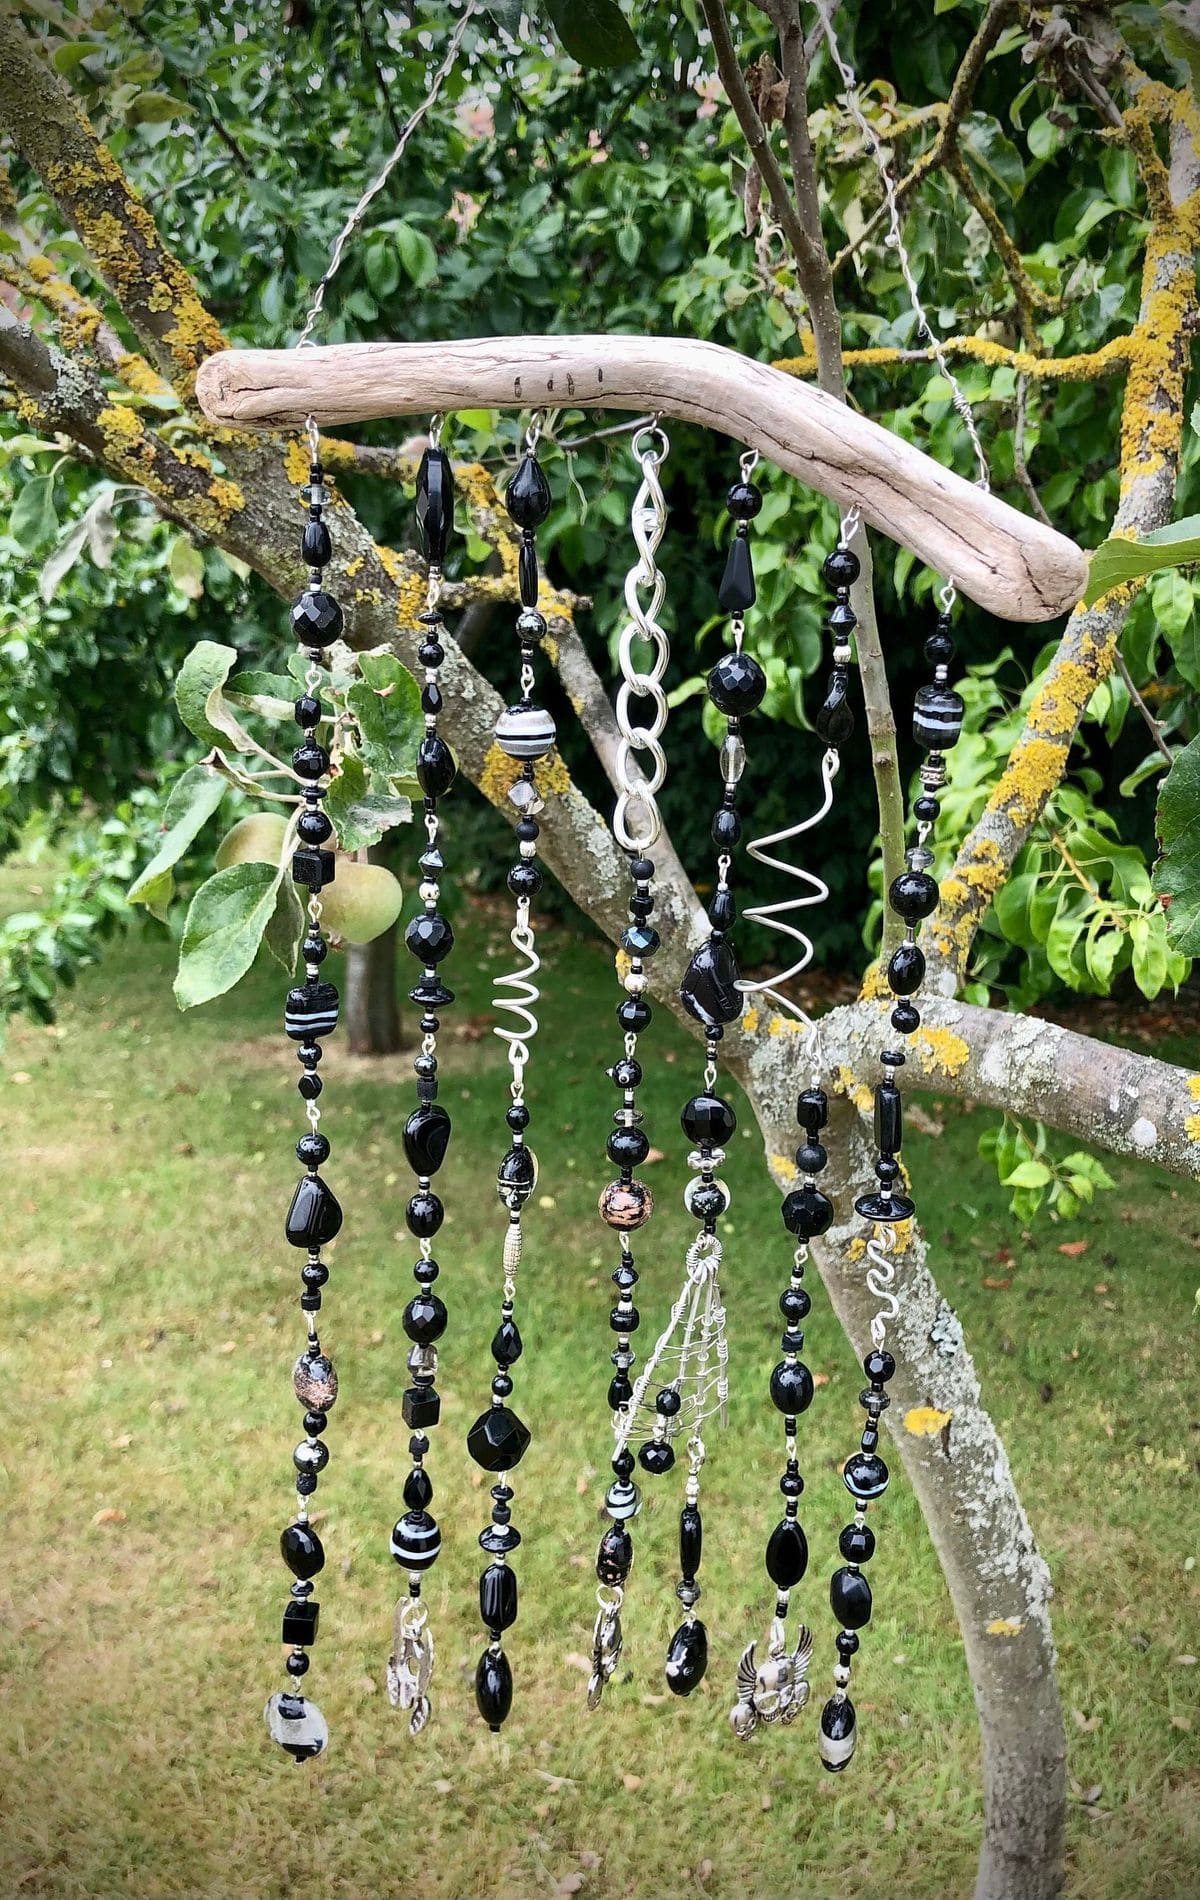
This beaded beauty looks like it was strung by a woodland sorceress. Suspended from a twisted branch, each strand sways with jet-black and deep silver beads, hand-wired spirals, and polished stones that shimmer like tiny orbs of dark energy.
The natural driftwood topper gives it an earthy vibe, while the monochrome palette leans into spooky season with subtle sophistication.
Materials Needed
- 1 driftwood branch (12-18 inches long)
- Assorted black and silver glass beads
- Jewelry wire or thin craft wire (silver preferred)
- Round-nose pliers, wire cutters
- Fishing line or thread
- Eye screws or screw hooks (optional)
Step-by-step Guide
Step 1: Cut wire strands and begin threading beads in various patterns. You can add spiral wire shapes or charms between beads for variation.
Step 2: Secure each end of the strand by wrapping wire or knotting. Then leave a loop at the top for hanging.
Step 3: Attach the strands evenly spaced along the driftwood using wire or eye hooks.
Step 4: Add a hanging wire or thread to the top of the driftwood for display.
#9. Skull and Bat Gothic Mobile
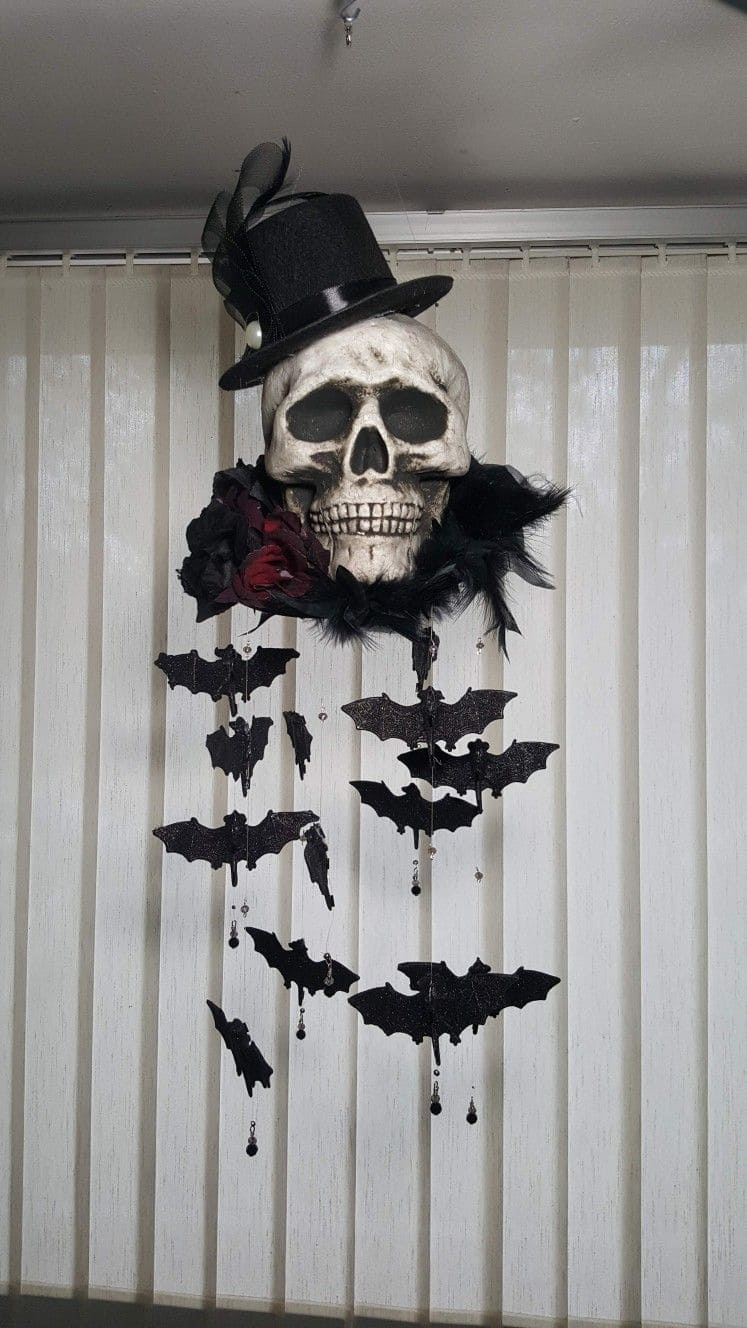
This chime is giving haunted ballroom with a dash of vampire elegance. A dramatic skull, crowned in a dapper top hat and black feathers, presides over an aerial dance of glittering black bats.
Also, each bat dangles on delicate thread, adorned with tiny black beads and glimmering gems that shimmer in the light like enchanted tears.
This project is perfect for indoor Halloween decor or a porch corner where wind can make the bats twirl.
Materials Needed
- 1 foam or plastic skull (life-sized)
- Mini top hat (store-bought or handmade)
- Black craft feathers and faux roses
- Black glitter cardstock
- Fishing line or invisible thread (5-6 strands)
- Small beads, gems, or charms for bat tails
- Glue gun, scissors, needle
Step-by-step Guide
Step 1: Glue the hat, feathers, and floral accents to your skull to create the gothic crown.
Step 2: Cut out bats from glitter cardstock. You should vary sizes for visual interest. Then add beads or gems at the bottom for weight and sparkle.
Step 3: Attach bats to clear thread using hot glue or a needle to pierce and tie.
Step 4: Suspend each bat strand from the bottom of the skull, spacing them for balance. Now, attach a hook to the top of the skull for hanging.
#10. Pumpkin Harvest Wind Chime
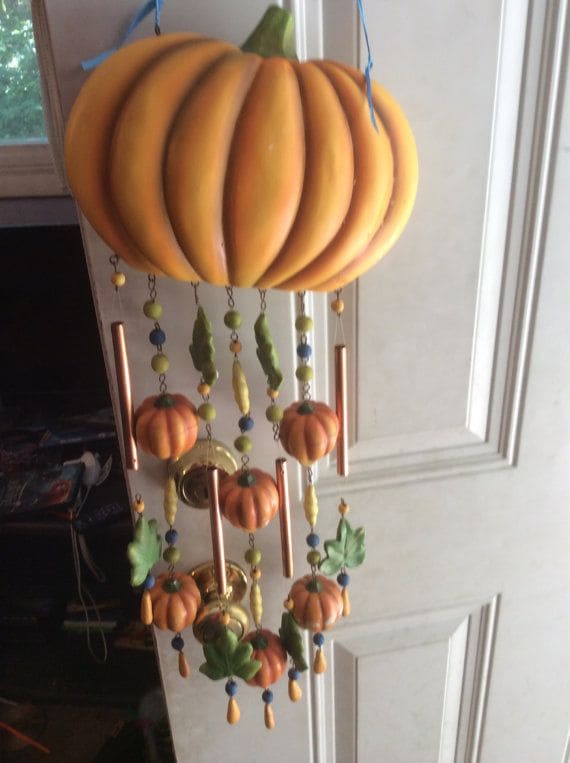
This charming pumpkin wind chime brings the golden hues of fall right to your front porch.
With a large gourd-like top anchoring the design, it cascades down into adorable mini pumpkins, copper chime rods, leafy accents, and cheerful beads in earthy tones.
Plus, the warm colors and rustic textures sing autumn with every breeze, offering a soft, metallic tinkling sound that feels like the season whispering hello.
Materials Needed
- 1 large lightweight foam or plastic pumpkin (approx. 10 inches)
- 6-8 miniature foam pumpkins (2-3 inches each)
- 6-8 copper wind chime rods (4-6 inches)
- Assorted fall-themed beads and faux leaves
- Strong fishing line or nylon thread
- Drill or hot glue
Step-by-step Guide
Step 1: Carefully hollow the large pumpkin base if needed and add hanging hooks underneath.
Step 2: String beads, mini pumpkins, and copper rods onto fishing line in varied lengths for visual movement.
Step 3: Add faux leaves between elements to break up the shapes and create natural flow.
Step 4: Tie or glue the strands to the inside of the pumpkin base. Then you can hang with a sturdy ribbon or hook.
#11. Enchanted Trinket Talisman Chime

If you’ve got a drawer full of old keys, lone earrings, and forgotten baubles, this is your moment. This chime turns cast-off treasures into a spellbinding display of movement, sound, and mystery.
As the wind teases through the beads and charms, each piece dances like it’s telling a story of witches’ keys, celestial dreams, and ghostly whispers.
Specially, the vibrant mix of purples, golds, and feathers brings out that boho-spiritual vibe with a touch of gothic glam.
Materials Needed
- 1 metal hoop (8″-10″ diameter)
- 15-20 assorted vintage charms, keys, trinkets (1″-3″)
- 20-25 beads in various sizes and finishes
- 4-6 small feathers (purple and white)
- Jewelry wire (24 gauge) or fishing line (at least 15 ft)
- Chain or rope for hanging (about 12″)
- Small jump rings, pliers
Step-by-step Guide
Step 1: Start by attaching three equal lengths of chain or rope to the hoop, meeting at the top. This will be your hanging support.
Step 2: Use wire or jump rings to string beads and trinkets together in strands about 6″-12″ long. You should alternate texture and shine to create contrast.
Step 3: Add feathers to several strands by wrapping wire securely at the shaft base or using hot glue for lightweight charms.
Step 4: Attach all the strands to your hoop, spacing them evenly. Make sure the center strand hangs slightly longer for dimension.
#12. Bone Collector’s Wind Chime

Minimalist, eerie, and undeniably captivating, this skeletal mobile turns natural history into a bold Halloween statement.
The bleached bones dangle like a relic from some forgotten forest ritual. Suspended from a gently curved branch, each piece swings and clicks with every breeze, creating a delicate rattle that feels both organic and otherworldly.
This is your conversation starter, a centerpiece for a haunted porch or witchy interior where folklore and nature meet in silence.
Materials Needed
- 1 sturdy curved stick or driftwood piece (18-24 inches long)
- 10-12 cleaned animal bones (small mammals like rodents or birds), or replica resin bones for safety
- Clear nylon thread or fishing line (3-5 yards)
- Mini drill or hot needle
- Optional: wood stain
Step-by-step Guide
Step 1: Clean and dry your bone pieces thoroughly. If using replicas, ensure they’re lightweight and pre-drilled.
Step 2: Tie fishing line around each bone or thread it through drilled holes, leaving varied lengths for a cascading effect.
Step 3: Attach the lines to the stick, spacing them for balance and movement. You now adjust tension until everything hangs evenly.
Step 4: Add a hanging loop to the top of the stick, then suspend it in your entryway or against a brick wall for max drama.
#13. Witch Doctors Bone Wind Chime
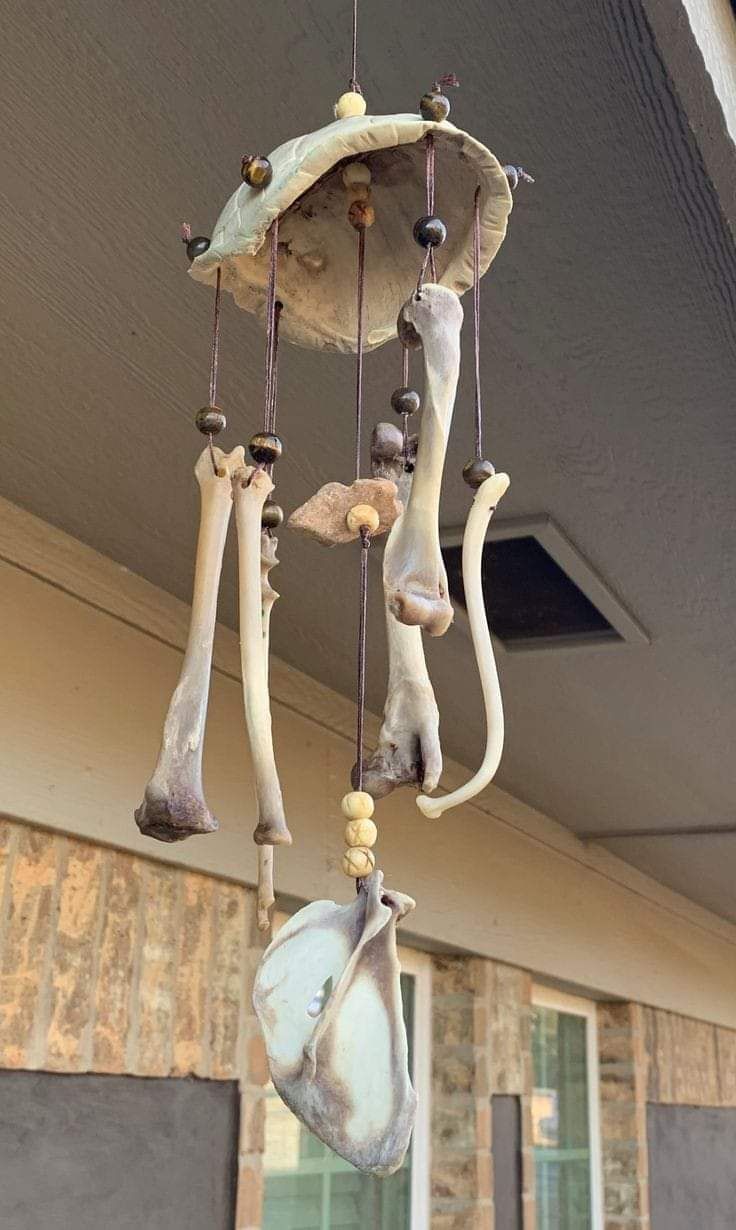
Primitive, raw, and full of mystery, this bone wind chime carries the aura of ancient rituals and dark folklore.
Strung from what appears to be a cured animal hide or raw-edged clay disc, it holds an unsettling beauty that feels like it belongs in a desert witch’s hut.
Each bone is carefully placed between aged wooden and stone beads, creating a rattle that hums with primitive resonance. It’s haunting without being gruesome, just enough to make passersby pause.
Materials Needed
- 1 round clay or leather base (6-8 inches in diameter)
- 8-10 real or imitation animal bones (varied sizes)
- 20-30 natural wood or stone beads (8-12 mm)
- Waxed twine or jute string (2-3 yards)
- Awl or mini drill to thread bones and base
Step-by-step Guide
Step 1: Prepare your base by creating evenly spaced holes around the edge for threading.
Step 2: String beads and bones alternately on each length of twine, allowing each strand to hang at different levels.
Step 3: Thread the top of each strand through the base and knot securely from inside.
Step 4: Finally, add a loop or cross-tied string on top for hanging, and display in a breezy corner for full creepy effect.
#14. Dreamcatcher of the Bone Spirits
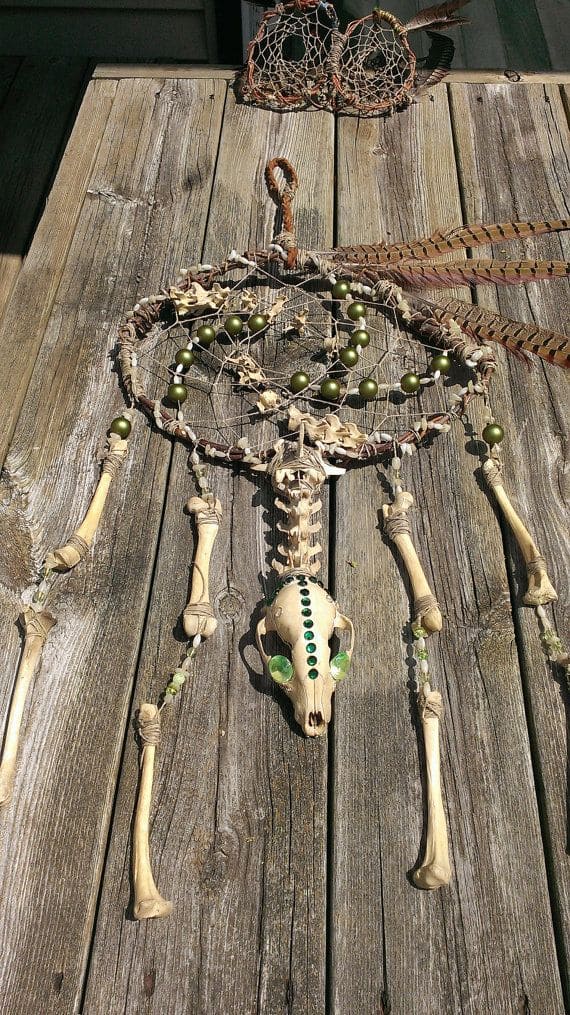
With a large hoop webbed in sinew-like cord, strung with bones, beads, feathers, and a jewel-eyed skull centerpiece, this piece blurs the line between dreamcatcher and relic.
The beads glint like captured thoughts, while the crisscrossed threads resemble the tension between worlds.
Moreover, each movement, each rattle of bone, feels like an echo of forgotten wisdom. Hang this one where light hits it, and you might just catch a flicker of magic.
Materials Needed
- 1 large metal or vine hoop (12″-14″ diameter)
- 8-10 assorted animal bones (5″-9″)
- 1 animal skull (approx. 5″ long, with flat back for stability)
- Jute twine or waxed cord (at least 20 ft)
- Green and black glass beads (at least 30 total)
- Adhesive rhinestones
- Optional: pheasant feathers, wire, hot glue gun
Step-by-step Guide
Step 1: Wrap your hoop with twine tightly, knotting it at one end. Then begin weaving the web, loop the cord across the hoop in segments, pulling taut with each round.
Step 2: Tie beads into the web at various points. You should focus on asymmetry for a more mystical, organic look.
Step 3: Drill small holes in the ends of each bone or wrap wire securely around them. Then use twine or beading wire to hang 4-6 from the bottom edge of the hoop.
Step 4: Glue or wire the skull at the center of the lower portion. Then embellish with rhinestones and feathers as desired.
See also: 22 Adorably Spooky DIY Halloween Garlands You’ll Want to Hang Everywhere
#15. Enchanted Moon Face Crystal Wind Chimes

These whimsical moon face chimes look like they were plucked straight from a fantasy realm. Each round celestial face glows in radiant hues framed with jeweled stars and surrounded by cascading crystals.
Plus, the glint of dangling prisms and glass teardrops dances with light and motion, casting rainbows on nearby surfaces.
There’s a dreamlike serenity in the expression of each moon, making it feel like a guardian spirit watching over your space. Hang it where sunlight or moonlight can hit, it’ll sparkle like magic every time the breeze stirs.
Materials Needed
- 3 round moon face medallions (4-5 inches in diameter)
- 20-30 crystal or glass beads in assorted colors
- Decorative chain or wire
- Jump rings and jewelry pliers
- Optional: LED backlight disc or glow-in-the-dark paint
- Top hook or ring for ceiling/wall hanging
Step-by-step Guide
Step 1: Attach jump rings around the medallion to hold chains and beads. Then use jewelry pliers to string beads, crystals, and charms along hanging chains.
Step 2: Secure each strand to the moon face frame with jump rings or glue for extra hold.
Step 3: Add a sturdy chain or ribbon at the top for hanging.
Step 4: Optional: You can add LED backlight or glow paint to enhance the night-time glow.
#16. Potion Bottle and Orb Wind Chime
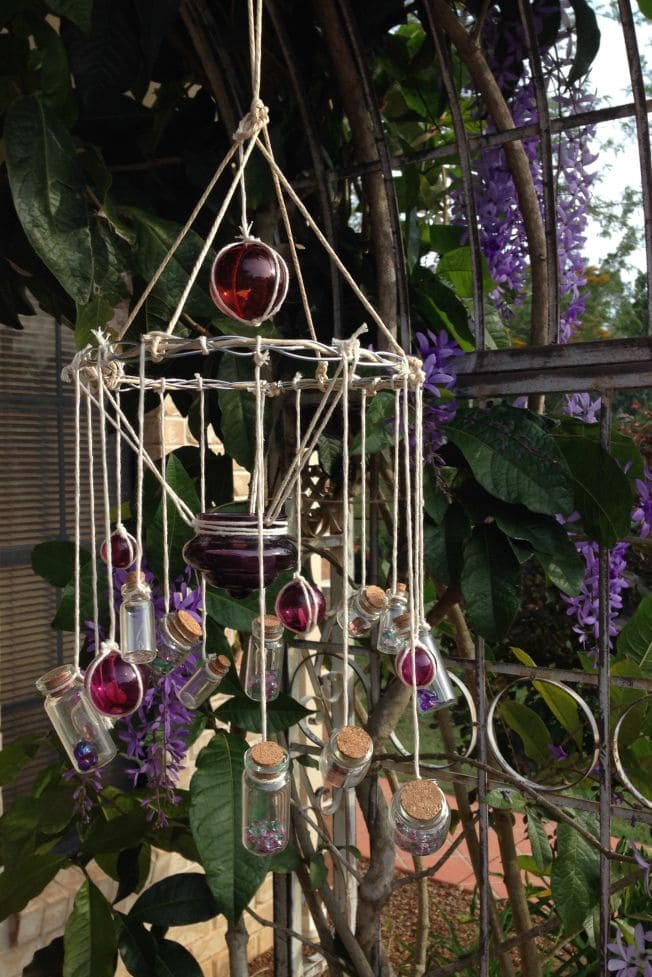
This ethereal wind chime looks like it belongs in a garden straight out of a fantasy novel. Mini glass bottles filled with glittering beads and gemstones swing gently alongside translucent purple orbs, all suspended by natural twine from a circular ring.
At the center, a larger potion-like jar and a glowing red sphere create a focal point that draws the eye.
The combination of delicate clinks and soft light reflections gives this piece a dreamlike aura, perfect for enchanting a pergola, fairy garden, or whimsical corner of your porch.
Materials Needed
- 1 metal or wooden ring (10-12 inches in diameter)
- 10-12 mini glass bottles with corks (2-3 inches tall)
- 3-5 colored glass orbs or marbles
- Decorative filler: beads, glitter, tiny crystals (approx. 1/2 cup total)
- Natural jute or hemp twine (2-3 yards)
- Strong glue or wire to secure corks if needed
Step-by-step Guide
Step 1: Fill each glass bottle with decorative beads or glitter, then cork them securely. Then add a drop of glue inside each cork for extra hold.
Step 2: Wrap twine around the necks of each bottle and glass orb, knotting securely and leaving long strands for hanging.
Step 3: Attach each strand to the ring, spacing them evenly, with the largest orb and bottle in the center.
Step 4: Tie multiple twine pieces upward to form a cone shape and join them at the top for hanging support.
#17. Floating Skull Horror Wind Chime
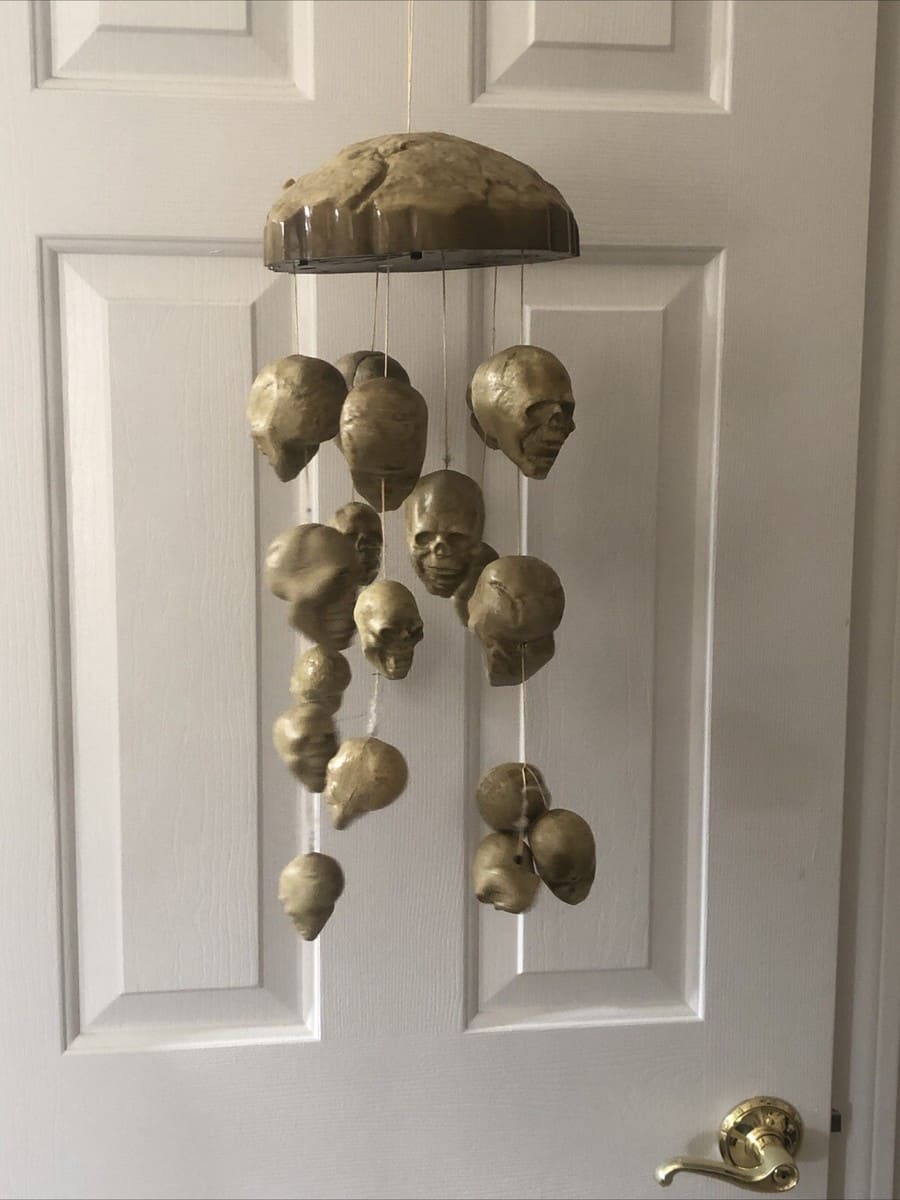
Crafted with an unsettling arrangement of golden skulls, this macabre wind chime dangles like a warning from the beyond.
Whether it’s swaying slightly on your porch or hanging quietly in the entryway, it sets the mood instantly: creepy, bold, and absolutely Halloween.
Bonus, the uneven hanging heads and dark golden hue give it a forgotten-catacomb vibe, like something unearthed from a cursed pirate wreck.
Materials Needed
- 1 plastic bowl or dome (8-10 inch diameter)
- 12-15 plastic skulls (1-2 inch size)
- Gold spray paint (or bronze for an aged look)
- Twine or jute string
- Hot glue gun and glue sticks
- Drill or sharp tool to make holes in base
Step-by-step Guide
Step 1: Spray paint the skulls and the bowl in gold. Let them dry completely for at least 2 hours.
Step 2: Drill or poke 10-12 evenly spaced holes around the edge of the bowl.
Step 3: Cut twine in varying lengths, tie skulls to each end, and thread them through the holes. Then knot securely inside and use hot glue to keep strings in place if needed.
Step 4: Add a central string for hanging and test balance before mounting.
Tip: For an extra eerie effect, you can also add a battery-operated light inside the dome to cast glowing shadows through the heads at night.
#18. Rustic Gemstone and Copper Wind Chime
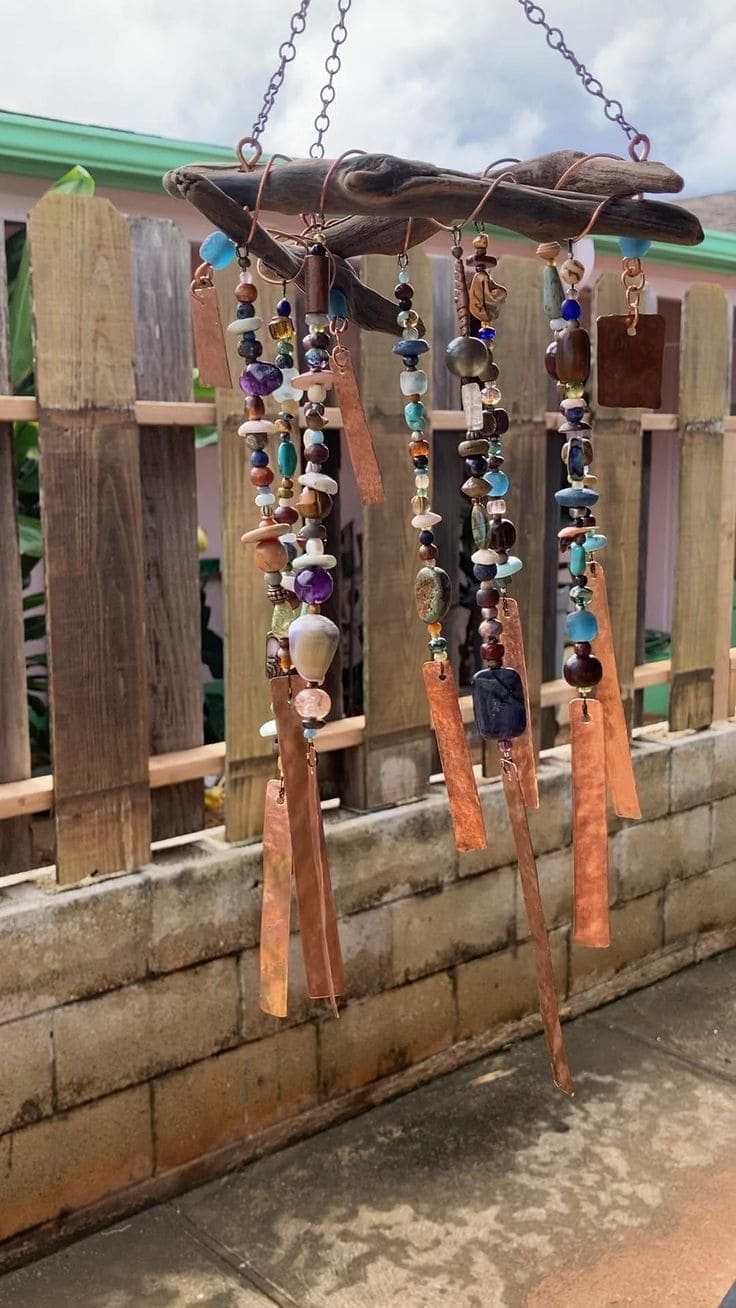
This handmade wind chime feels like a piece of alchemy in motion. It pairs raw copper strips with chunky gemstone beads like amethyst, turquoise, tiger’s eye, and more, each one unique in shape and story.
Specially, the strands are suspended from twisted driftwood branches, held in place by sturdy copper wire, giving off a natural, untamed vibe.
When the wind moves, the copper pieces gently clink together, creating a low, earthy tone that’s grounding and soothing.
Materials Needed
- 2 driftwood sticks (each around 12 inches long)
- 20-25 assorted gemstone beads (approx. 0.5-1 inch each)
- 6-8 copper strips (1″x6″) with holes at the top
- 18-20 gauge copper wire
- Beading wire or fishing line
- Chain and hooks
Step-by-step Guide
Step 1: Wrap the driftwood with copper wire to form a stable base and attach a chain at the top for hanging.
Step 2: String the gemstone beads onto beading wire, adding 3-4 stones per strand with a copper strip at the bottom of each one.
Step 3: Tie or secure the strands evenly across the driftwood base, using wrapped wire or knots.
Step 4: Hang the finished chime where it catches both sunlight and breeze, it’ll sing and sparkle with every movement.
#19. Rustic Wreath Bell Charm Wind Chime

Amazingly, this piece feels like it belongs in a woodland cottage or a peaceful herb witch’s sanctuary. Twined with leafy greens and wrapped in twine, the grapevine wreath base sets a grounded tone.
Suspended below are three brass bells, each flanked with black beads and meaningful charms. When the wind blows or you gently brush past, the soft jingling creates a calming and sacred sound that feels cleansing.
Materials Needed
- 1 grapevine wreath (10-12 inches diameter)
- 3 small brass bells (2-inch wide)
- 12-15 black round beads
- Small charms (sun, pentagram, vial with cork, etc.)
- Twine and artificial leaves
- Strong thread or black nylon cord
- Hook or ribbon
Step-by-step Guide
Step 1: Decorate the grapevine wreath by wrapping it with twine and gluing faux greenery throughout.
Step 2: Cut equal lengths of cord and string on beads and bells for each hanging section.
Step 3: Add a charm to each strand, placing it slightly above or below the bell for balance. Then tie or glue each strand to the base of the wreath.
Step 4: Add a secure hanging loop to the top of the wreath and display.
#20. Bone and Bead Gothic Wind Chime
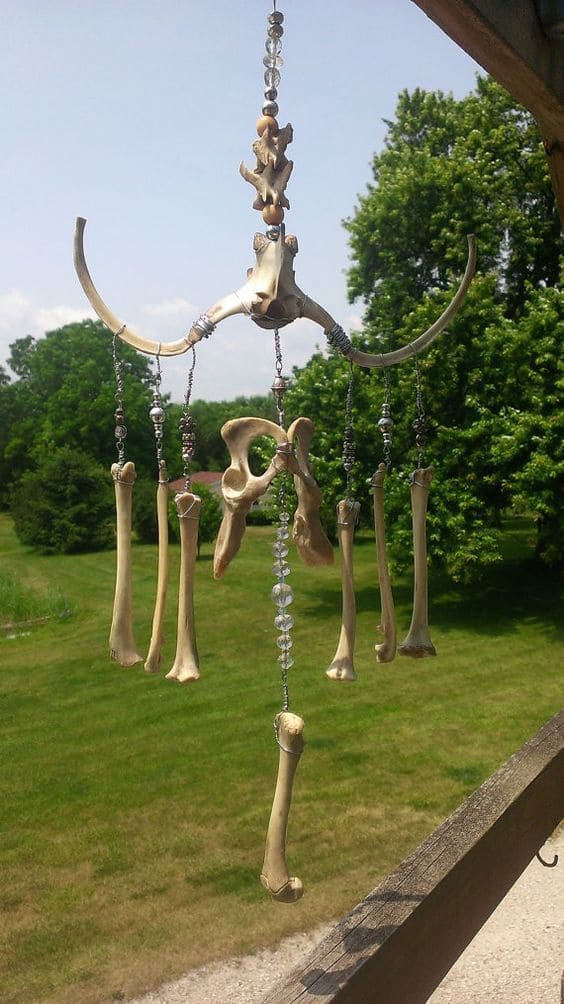
If you’re looking to create something striking, eerie, and almost otherworldly, this bone-and-bead wind chime will speak to your darker aesthetic.
It blends the quiet clatter of bone with the soft shimmer of glass beads, evoking the mood of a forgotten forest shrine or a witch’s hilltop perch.
Additionally, you can use real bones or opt for lightweight plastic replicas. The crescent-like frame adds a celestial twist, as if moon magic meets graveyard chic.
Materials Needed
- 10–12 assorted bones (real or replica, 4″-8″)
- 1 large animal pelvis or spine piece (6″-8″)
- 1 horned or curved branch or antler (10″-12″)
- 50-70 glass or acrylic beads (mixed sizes)
- Fishing line or strong beading wire (approx. 10 ft)
- Small screw eye hooks
- Drill with small bit (if using real bone)
Step-by-step Guide
Step 1: If using real bones, carefully drill a small hole near the top of each one. For plastic versions, glue or screw in small eye hooks.
Step 2: Thread beads onto your wire or fishing line in varying sequences, leaving space to attach bones. Then tie or loop securely.
Step 3: Connect 4-6 bones across the antler or curved top, keeping lengths uneven for a staggered look. Let one string hang lower with a larger bone for a central anchor.
Step 4: Add a ring or loop at the top for hanging, ensuring weight is balanced to avoid tipping.
#21. Gothic Glam Halloween Crystal Wind Chime
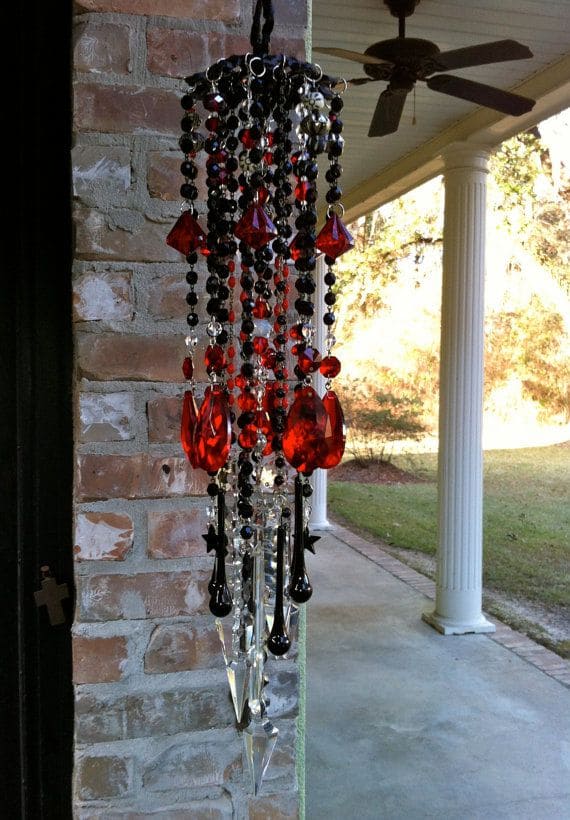
If you’re craving something dark and moody with a splash of elegance, this Gothic Glam Wind Chime is pure enchantment.
Cascading strands of red, black, and clear acrylic beads shimmer like a vampire’s treasure hoard. Teardrop gems, faceted crystals, and glossy black droplets give off a Victorian drama that feels both mysterious and decadent.
You can easily hang this from a porch or overhang and let the sun hit it just right, it sparkles by day and looks haunting by dusk.
Materials Needed
- 1 black-painted metal or wooden ring (6-8 inch diameter)
- Assorted acrylic beads in red, black, and clear (100+ pieces)
- 5-6 large teardrop acrylic pendants (red and clear)
- Fishing line or black thread
- Glue gun and scissors
- Optional: black ribbon
Step-by-step Guide
Step 1: Paint your base ring if needed, then measure and cut string for your hanging strands.
Step 2: Alternate beads and crystal pendants on each line, tying securely after every 3-4 pieces.
Step 3: Add larger gems at the bottom of each strand for extra weight and drama.
Step 4: Tie all strands to the ring, spacing them evenly. Then attach a center strand with a long pendant for extra flair.
Step 5: Add a ribbon loop or hook to hang your finished piece from a ceiling or porch beam.
#22. Creepy Crawly Spider Mobile
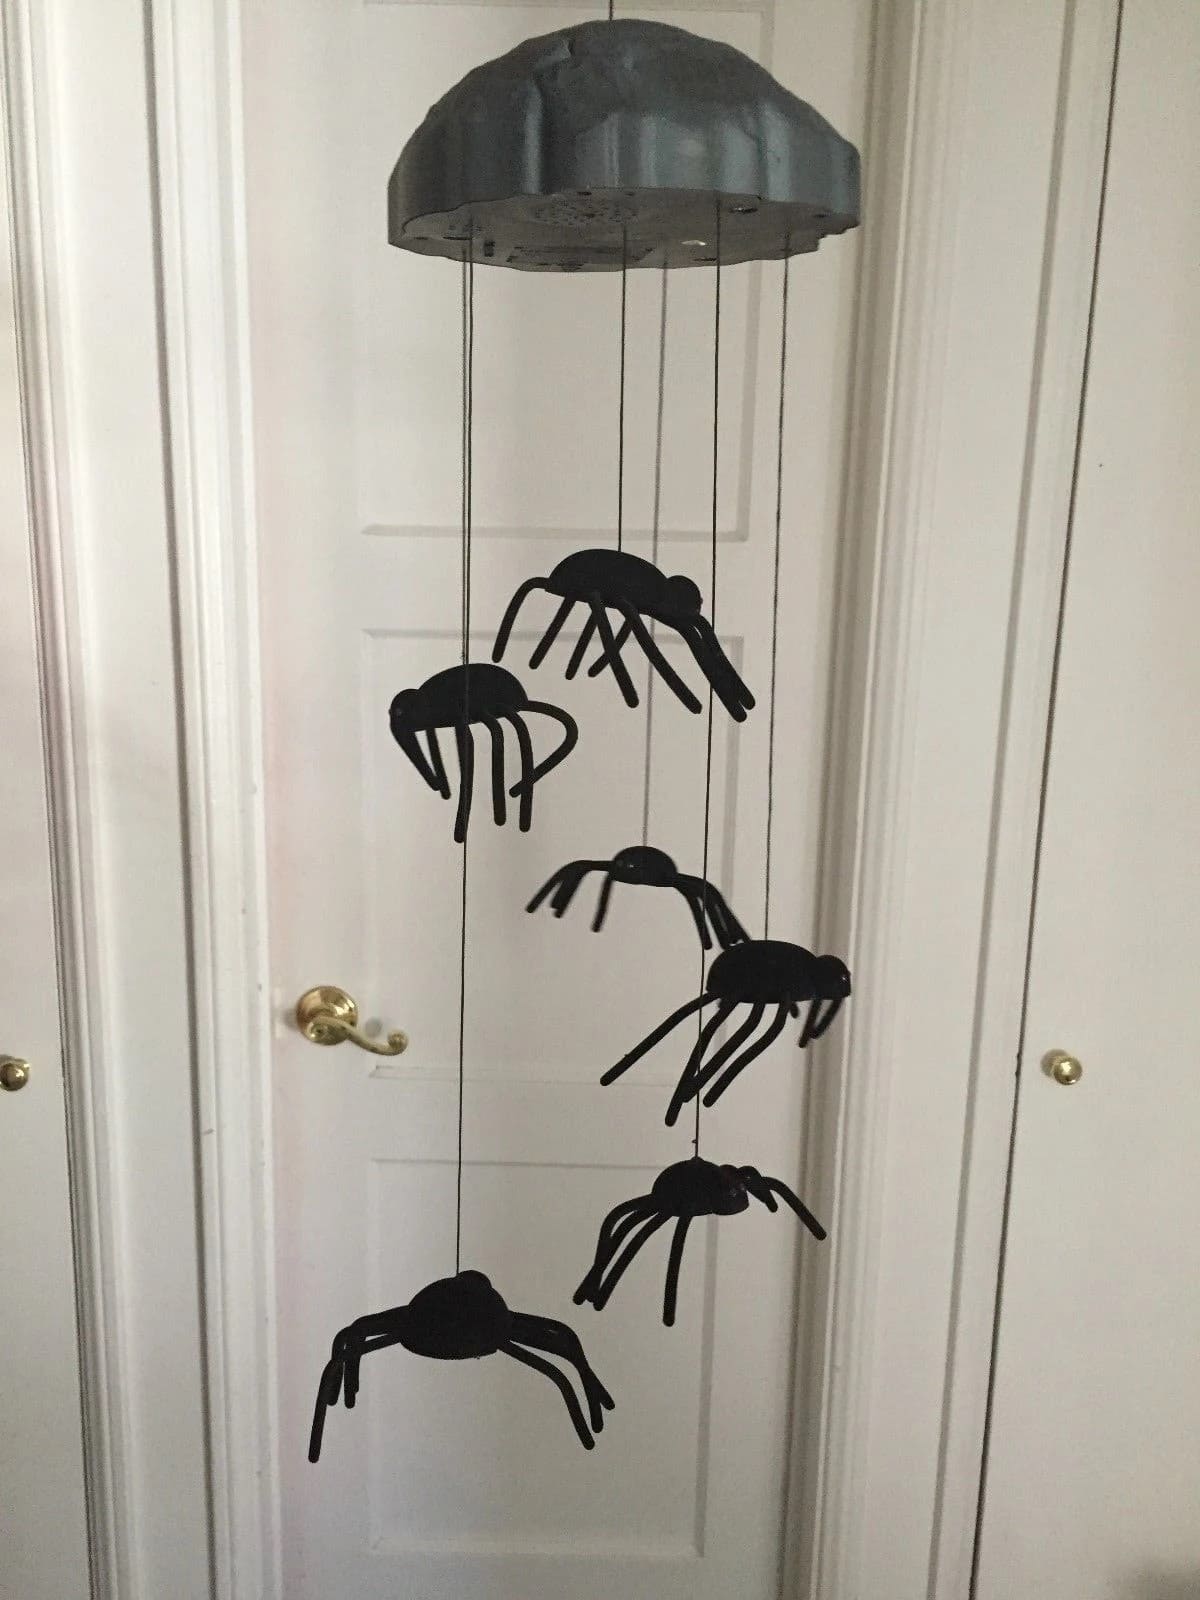
You can see black spiders with bent pipe cleaner legs dangle ominously from black thread, suspended from a dome-like base that looks like an overturned cauldron lid.
The minimalist design gives it that extra creepy edge, it doesn’t shout “boo,” it whispers it. A little movement from the wind or a passing shadow, and these eight-legged creatures sway like they’re alive.
Materials Needed
- Plastic bowl or dome (8-10 inches)
- Black spray paint (matte finish)
- 6-8 black plastic spiders (medium to large size)
- Black thread or fishing line
- Hot glue or strong adhesive
- Craft knife
- Hook or string
Step-by-step Guide
Step 1: Paint the dome or bowl black and let it dry completely. Then poke evenly spaced holes around the edge of the dome to hang the spiders.
Step 2: Tie black thread to each spider and adjust the lengths for a staggered look.
Step 3: Thread the strings through the holes and knot or glue them on the inside.
Step 4: Finally, add a loop to the top of the dome for hanging.
#23. Painted Terra Cotta Halloween Bell
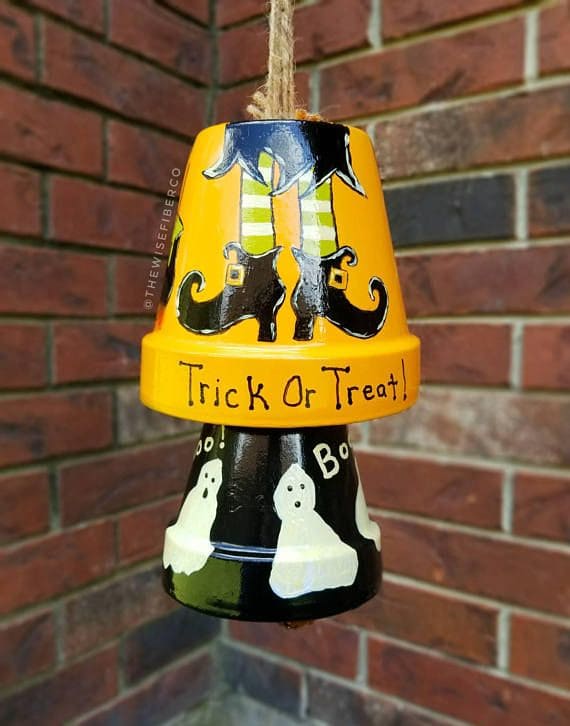
This whimsical wind chime turns ordinary flowerpots into a festive Halloween delight!
Two inverted terra cotta pots are hand-painted including one bright orange with witchy boots and striped stockings, the other black with floating white ghosts and playful “Boo!” messages. Together, they chime softly as they sway in the breeze.
Plus, the stacked design makes a bold, vertical accent, while the cheerful art style gives it major curb appeal.
Materials Needed
- 2 terra cotta pots (one 5″, one 4″)
- Acrylic paint (black, white, orange, green, yellow, etc.)
- Paintbrushes (fine tip for details)
- Clear gloss sealant spray
- Twine or jute rope (approx. 18″)
- Small bell or clapper
Step-by-step Guide
Step 1: Paint each pot with your base colors and allow them to dry completely.
Step 2: Add ghost faces, witch boots, and lettering using fine brushes or paint markers. Once the design is finished and dry, spray with a sealant to protect your art.
Step 3: Thread the rope through both pots and tie a bell or heavy bead at the end to act as the clapper. Then tie a secure knot at the top for hanging.
Tip: If you want a louder chime, add a small metal washer inside the bottom pot to help the bell ring clearly.
Read more: 27 Beautiful DIY Wind Chime Ideas to Add Music to Your Backyard


