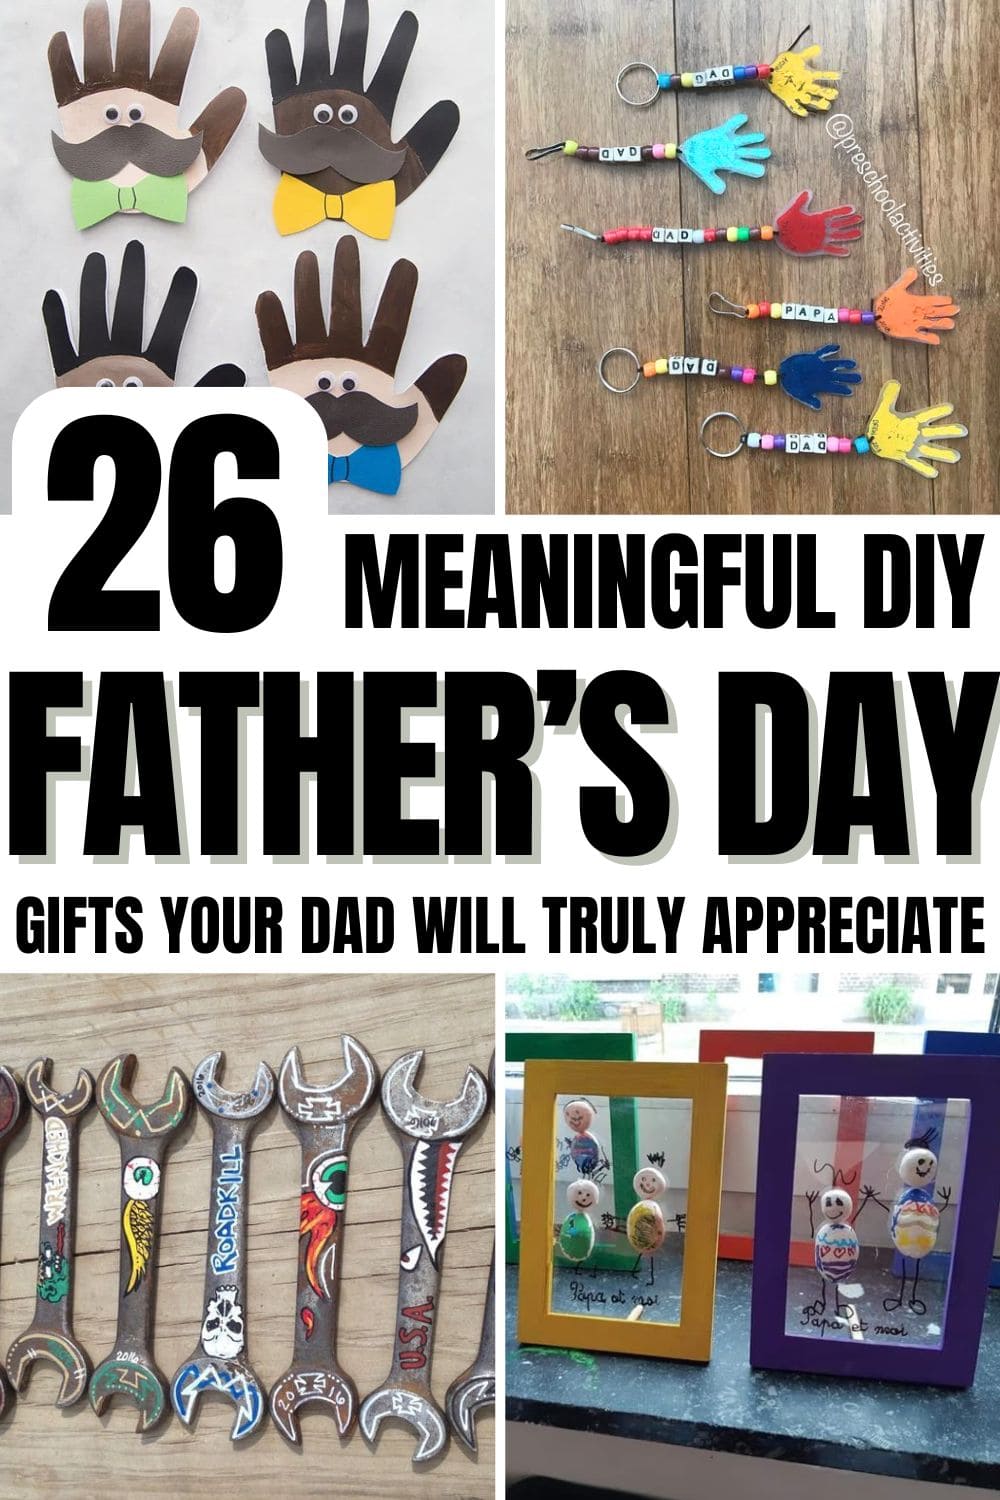
Every Father’s Day, I find myself searching for something that feels personal, something that says “thank you” in a way a store-bought gift just can’t.
If you’ve ever felt the same, you’re in the right place. These 26 meaningful DIY Father’s Day gift ideas are perfect for showing your dad just how much he means to you.
Whether he’s a grill master, a garden lover, or a quiet coffee drinker, you’ll find a creative project here that suits his style.
This article contains affiliate links. If you purchase through them, I may earn a small commission at no extra cost to you. Thank you for your support!
#1. DIY Cute Painted Wrenches
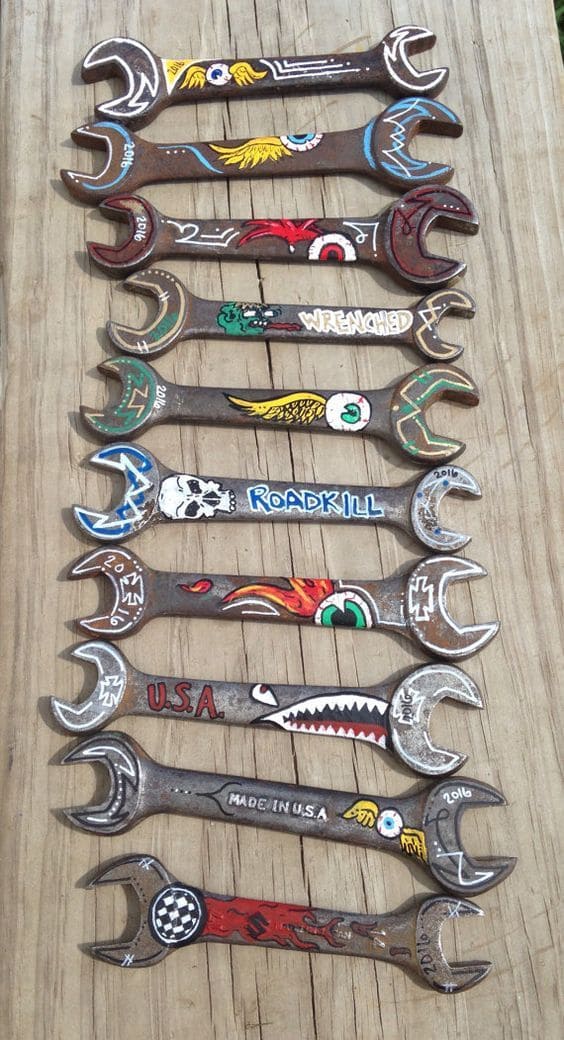
If your father has a love for cars, tools, or anything vintage and rusty, this is the kind of project that makes him smile.
Materials Needed
- 5-10 Old wrenches
- Acrylic paint set
- Detail paintbrushes
- Clear sealant spray
- Optional: stencil letters, sandpaper, painter’s tape
Step-by-step Guide
- Sketch out your design on paper first. You can go wild with flames, eyes, text (like “Wrenched” or “Roadkill”), skulls, or patriotic symbols.
- Use fine brushes and acrylic paints to fill in your designs on the wrenches. For clean lines, painter’s tape can help mask off sections.
- If you want to add stenciled words like “U.S.A” or “Made in U.S.A,” lightly trace the stencil onto the wrench before painting.
- Once dry, spray the painted wrenches with a clear sealant to protect them from scratches and moisture.
#2. Fathers Day Tie Craft
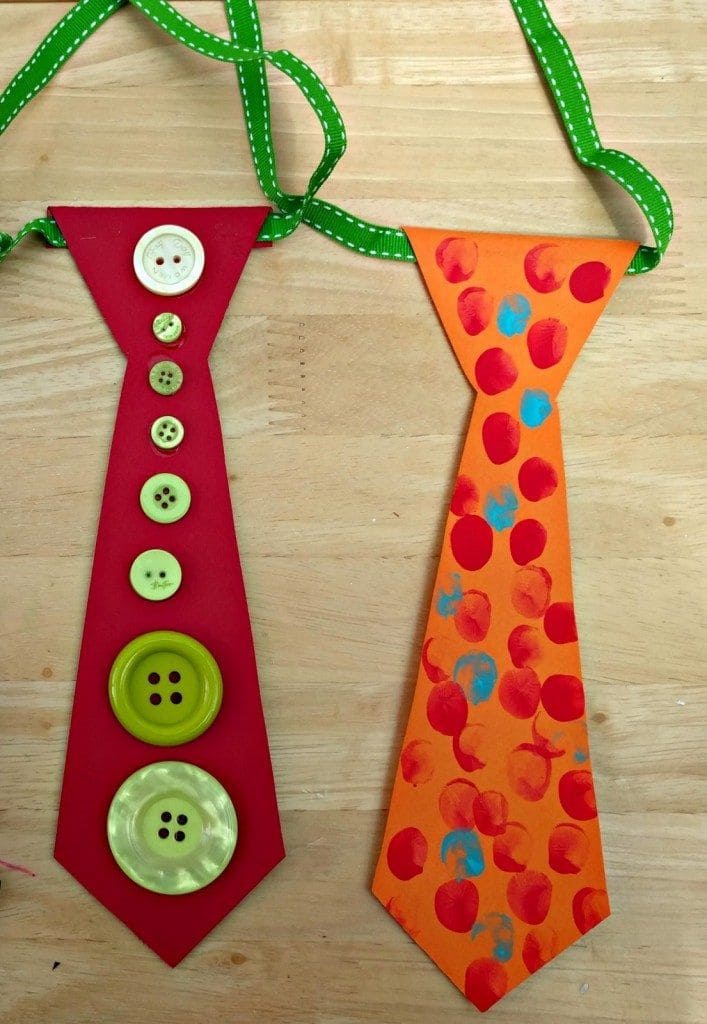
These ties are wearable, silly, and totally heartwarming. One has bright buttons stacked like a candy parade, the other covered in finger-painted dots.
Materials Needed
- 2-5 construction papers (9×12 inches)
- 6–8 assorted buttons
- Washable paints
- Green ribbon (14–18 inches long)
- Glue stick
- Scissors
- Pencil and tie template (optional)
Step-by-step Guide
- Cut out a large tie shape from your chosen colored construction paper.
- For the button version, arrange your buttons from small to large down the center of the tie and glue them firmly in place.
- For the painted tie, dip your fingers into colorful paint and press dots all over the tie’s surface. Mix colors for a fun look and let dry completely.
- Attach the ribbon to the back corners using glue or tape so it can be worn like a real necktie.
#3. Superhero Bottle Openers
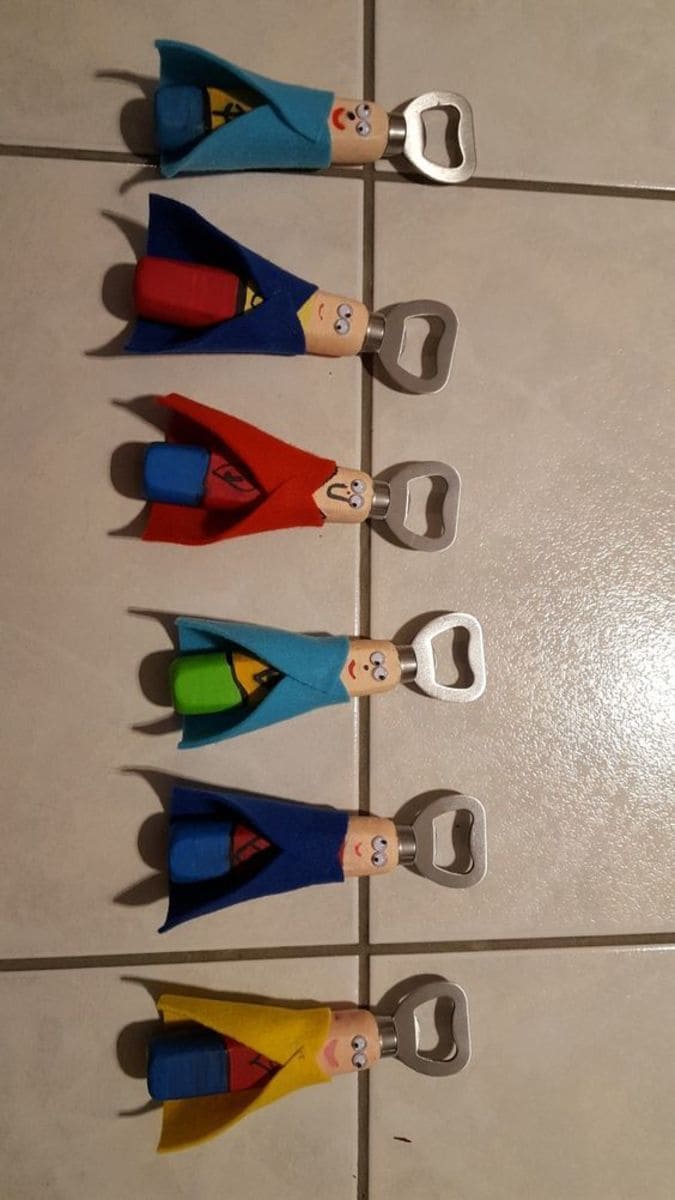
Imagine handing Dad a cold drink and this mini-caped crusader. It’s an easy craft for kids and a fun way to turn something practical into something unforgettable.
Materials Needed
- 1 Wood-handled bottle opener per gift
- 1 Colored felt sheet per cape
- 2 Mini googly eyes per figure
- Black fine-tip marker
- Hot glue gun
- Acrylic paint or markers
Step-by-step Guide
- Paint or draw a superhero costume onto the wooden handle of the bottle opener. You can mimic Superman’s “S” or create your own hero emblem.
- Cut a triangle-shaped piece of felt and wrap it around the back of the opener’s handle as a cape.
- Glue two googly eyes just below the metal opener part and use the black marker to draw a smile, eyebrows, and any hair details.
#4. Fathers Day Pebble Art
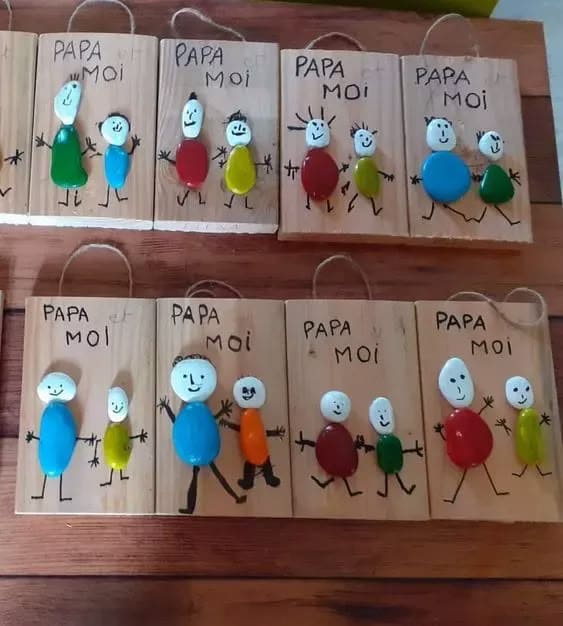
Each stone becomes a little character – Dad and child hand in hand, sharing love and laughter.
Materials Needed
- Small wooden plaque (approx. 6×4 inches)
- 4 Flat craft pebbles per project
- Strong craft glue
- Black permanent marker
- Twine
- Optional: Paint
Step-by-step Guide
- Select and paint four pebbles: two large ones for Dad and the smaller ones for you.
- Use glue to attach the stones firmly onto the wooden plaque, spacing them to allow room for drawn arms and legs.
- Once dry, draw stick figure limbs and smiling faces using a fine-point paint pen or permanent marker. Add details like hair or accessories.
- Above the figures, write “Papa” and your name in a playful or simple font, then loop a piece of twine through holes to the back to hang the art.
#5. DIY Paper Toolbox Ideas
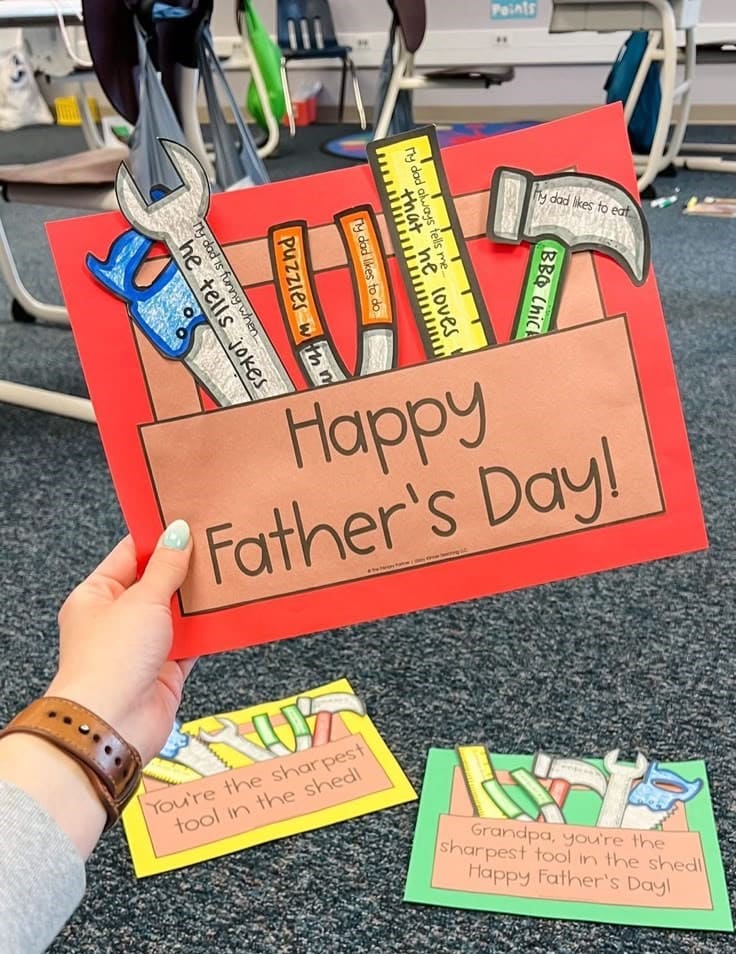
I’ve done this with second graders and even pre-K, every time, it turns into a laugh-fest. Kids write silly, sweet, or downright genius things on each tool.
Materials Needed
- 1 Colored cardstock
- Tool templates – preprinted or hand-drawn
- Scissors
- Glue stick
- Black markers or pens
- Optional: crayons or colored pencils
Step-by-step Guide
- Print or trace tool shapes onto colored paper. You’ll need about 5–6 different tools per project (hammer, wrench, ruler, screwdriver, etc.).
- On each tool, ask the child to write something their dad or grandpa loves, says, or does often. Encourage them to think creatively and personally.
- Cut out a paper rectangle (the toolbox base) and a slightly larger one (the pocket flap). Attach only the edges of the flap to the base with glue to form a pouch.
- Insert the tools into the “toolbox” pocket. Arrange so the top of each tool sticks out and the writing is visible.
- Add a title and let the kids decorate around the message.
#6. Tool-themed Gift Wrap
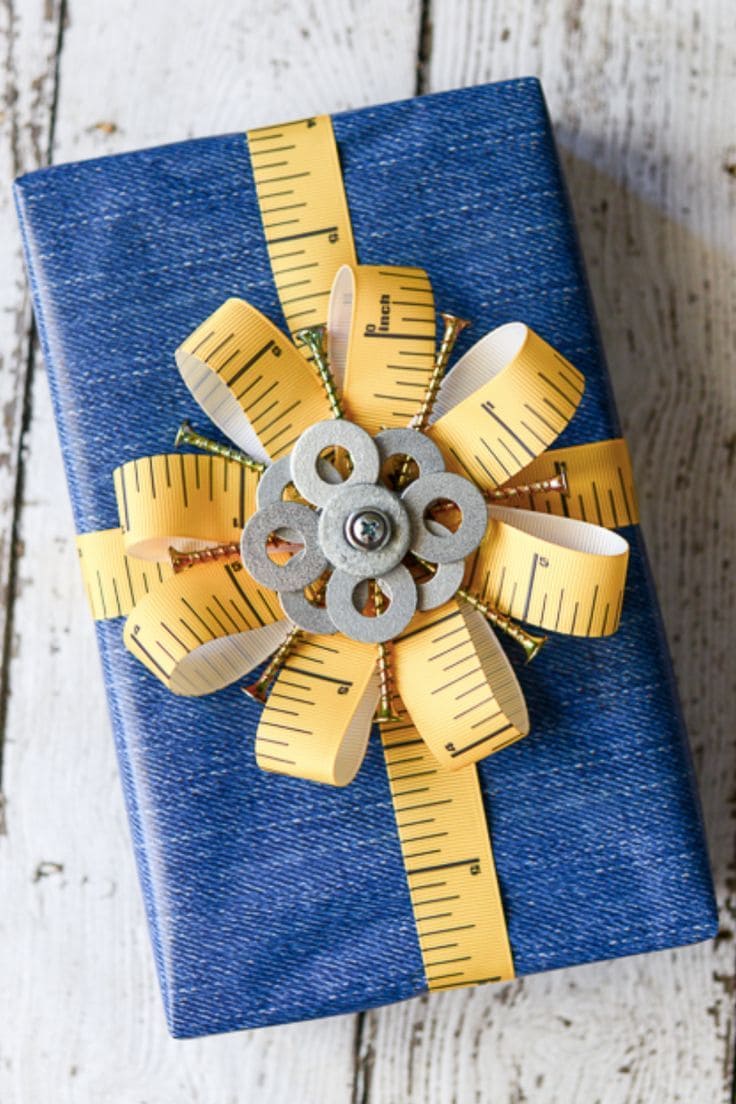
I loved putting this together last year with some scrap washers from the garage and a few pieces of ribbon that looked like a measuring tape.
Materials Needed
- 1 Boxed gift
- 1 Denim-look gift wrap paper roll
- Measuring tape ribbon (1 yard)
- 6 pieces assorted washers and nuts
- Strong craft glue
Step-by-step Guide
- Wrap your gift in denim-look paper, keeping the folds clean and flat.
- Cut and attach the measuring tape ribbon like a standard gift cross-wrap. Leave some ribbon tails hanging or looped in bow shapes.
- Create a “bow” using small loops of the tape ribbon and arrange them in a radial pattern on the center of the box.
- Stack a few washers and metal nuts to form a flower-like centerpiece, then glue the metal flower onto the ribbon bow. Tuck in gold pipe cleaners behind it for sparkle if desired.
#7. Colorful DIY Popsicle Stick Frame
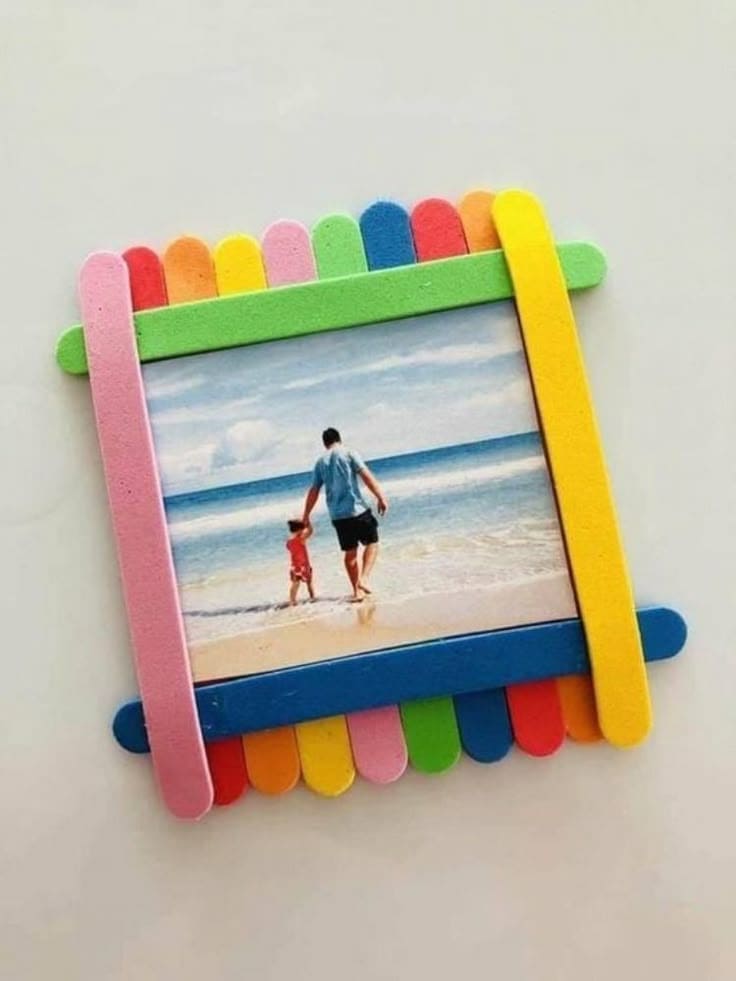
Perfect for small hands and big hearts, this simple frame turns an ordinary photo into something full of love, color, and personality.
Materials Needed
- 12 colorful popsicle sticks
- 1 favorite 4×6 photo
- Craft glue
- Cardboard backing (optional)
- Magnet strip
- Scissors
Step-by-step Guide
- Line up 8 popsicle sticks vertically side-by-side for the back layer. Glue them together edge-to-edge and let them dry to form the backing.
- Cut your photo to fit the frame. Glue it horizontally across the center of the backing.
- Use 4 more popsicle sticks (different colors for contrast) to create a square or rectangle border around the photo.
- Optional: Glue a piece of cardboard to the back for extra support.
#8. Dad Rock Portrait Frame
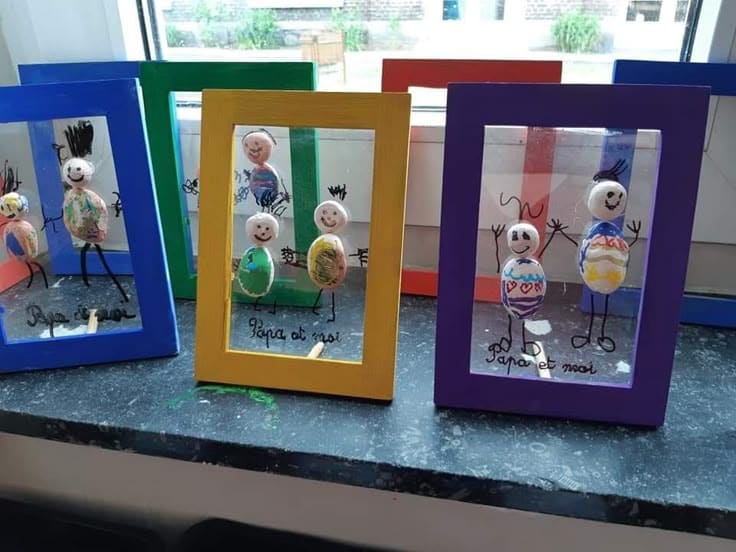
This cheerful Father’s Day craft is a total heart-stealer. It’s wildly fun, delightfully quirky, and has that perfect “Dad’ll never throw this away” energy.
Materials Needed
- Mini wooden photo frames (4×6 inch)
- 1 Clear plastic sheet per frame
- 4 small smooth pebbles per frame (1–2 inches)
- Acrylic paints
- Hot glue gun
- Permanent marker
- Colorful paint
Step-by-step Guide
- Start by painting your wooden frames in bright, solid colors.
- Paint pebbles as little characters – one for Dad, and one or more for each child. Add faces, shirts, and patterns using acrylic paint or markers.
- Cut and insert a clear plastic sheet in place of the glass. Use a permanent marker to draw arms, legs, and little details around the pebbles (like hearts, ties, or names).
- Carefully glue the decorated pebbles onto the plastic using hot glue.
- Add your own custom title with a permanent marker beneath the figures.
#9. Charming Gift Bag for Dad
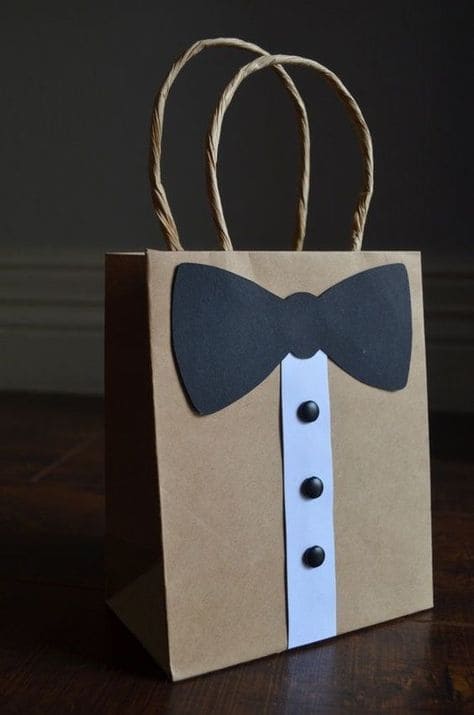
Whether you’re gifting socks, snacks, or handmade goodies, this DIY bag elevates the entire gesture.
Materials Needed
- 1 Brown kraft gift bag (8×10 inches)
- 1 Black cardstock; 1 White cardstock (1×7 inches)
- 3 Black buttons
- Glue stick
- Scissors
Step-by-step Guide
- Cut out a bowtie from black cardstock using scissors or a printable template if you’d like even edges.
- Cut a vertical white strip about 1 inch wide and glue it down the center front of the gift bag.
- Glue the black bowtie shape to the top of the white strip, aligning it just under the handles.
- Evenly space and glue three black buttons or pom poms down the white strip to mimic a shirt front.
#10. Lovely Sweet Clay Plaques
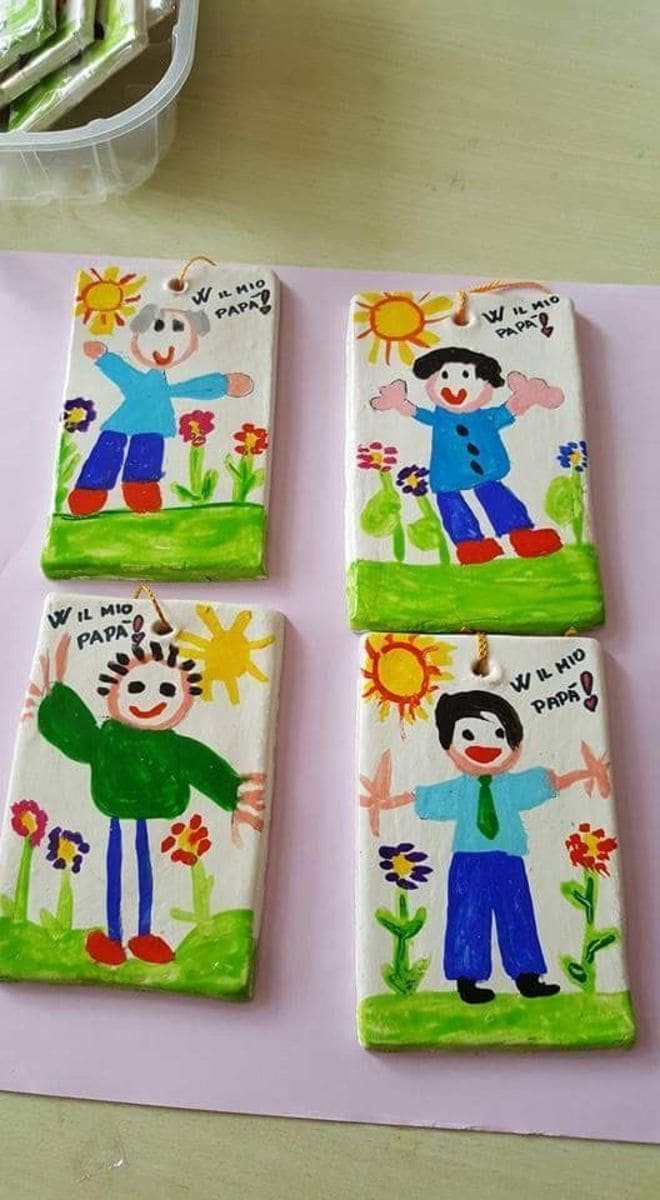
With bright flowers, big smiles, and the Italian message “W il mio papà!” (“Hooray for my dad!”), they become beautiful keepsakes.
Materials Needed
- Air-dry clay (1/2 inch thick, size 4×6 inches)
- Acrylic paints
- Paintbrushes set
- Pencil
- Yarn or ribbon
- Plastic straw
- Optional: Clear sealant
Step-by-step Guide
- Roll out air-dry clay to about 1/2 inch thickness. Cut into a rectangle shape about 4×6 inches using a butter knife or clay tool.
- Use a straw to poke a hole near the top for hanging, then sketch a fun scene using pencil like sun, flowers, and a smiling dad.
- Add your own message with a thin brush or marker once dry.
- After paint fully dries, loop ribbon or yarn through the hole.
#11. DIY String Art DAD Sign
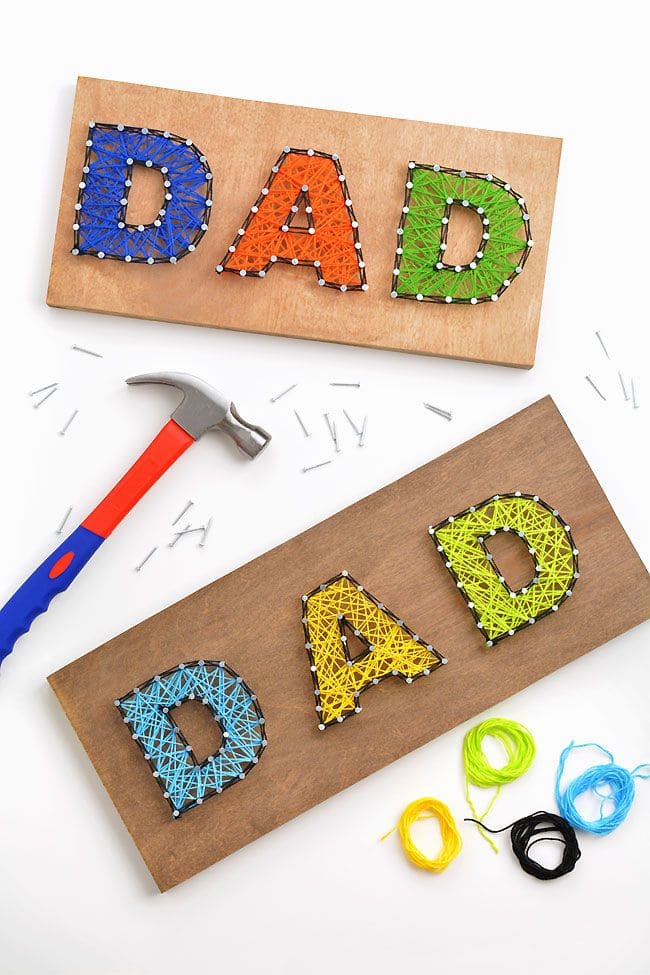
This string art “DAD” sign is one of those crafts that feels just as satisfying to make as it is to give. It’s the perfect balance of hands-on and heartfelt.
Materials Needed
- 1 Wood board (approx. 12″ x 6″)
- 60 Small nails per sign
- 3–4 colors of embroidery floss
- Optional: Paper template (~4″ tall)
- Masking tape
- Hammer
- Scissors
Step-by-step Guide
- Start by printing or drawing your “DAD” template. Center it on the wood board and tape it down.
- Hammer nails about ½ inch apart along the edges of the letters, then carefully tear the paper away when finished.
- Tie your first string color to a nail and begin looping it randomly across the inside of the letter shape. Fill in each letter with different string colors for a bold look.
- Once satisfied, knot the string tightly on a nail and trim the excess. Do the same for each letter.
#12. Fathers Day Handy Dad craft
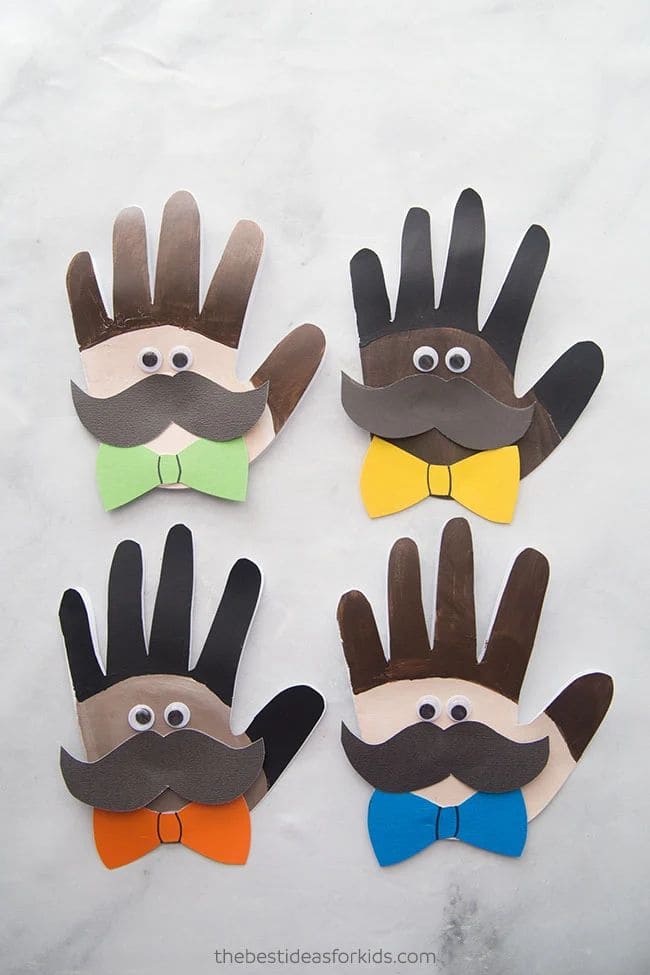
Made from your child’s own handprint, it’s one of those keepsakes dads tuck away forever.
Materials Needed
- 4-8 Colored cardstocks
- 2 Googly eyes (1 cm size) per craft
- Glue stick
- Scissors
- Pencil
- Optional: Black marker
Step-by-step Guide
- Start by tracing the child’s hand on colored cardstock and cut it out.
- Cut out a mustache, hair, and a bowtie from different cardstock. You can use a template or freehand.
- Glue the hair on top, the mustache across the palm, and the bowtie at the base of the hand. Then stick on two googly eyes above the mustache.
#13. Fathers Day Memo Board
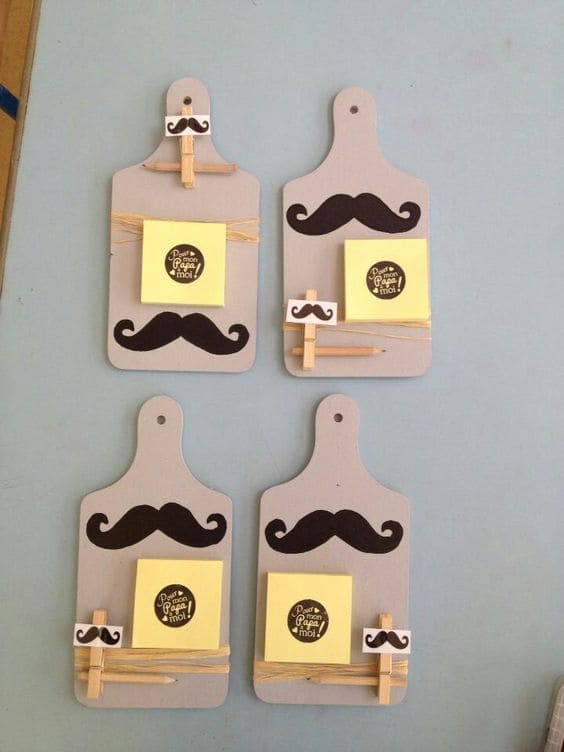
This memo board is both hilarious and handy because what dad doesn’t need help remembering where he put his notes?
Materials Needed
- 2-4 Mini cutting boards (around 8″ tall)
- Black adhesive vinyl
- 1 Mini clothespin per board
- 4 Sticky notes
- Elastic cord
- Pencil or mini pen
- Glue gun
- Mustache sticker
Step-by-step Guide
- Begin by attaching a large mustache cutout to the center of the board using glue or adhesive backing.
- Wrap twine or elastic cord around the lower third of the board to create a band for the pencil. Glue the ends securely at the back.
- Glue the clothespin near the top or bottom edge, then add a small mustache sticker or cutout on it for extra flair.
- Stick a pad of Post-it notes onto the board using the sticky backing or a dab of glue to hold it steady.
- Add a handwritten note for an extra personal touch.
#14. Foam Shirt Photo Frame
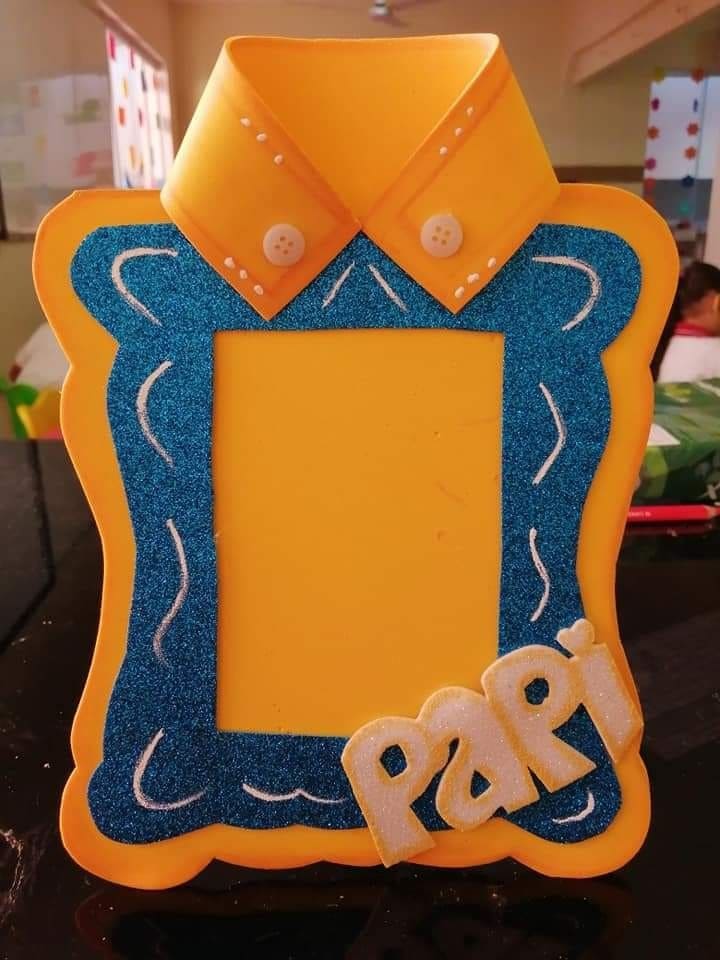
Every dad deserves to see how loved he is, especially when it’s framed in something made by little hands.
Materials Needed
- 4 Craft foam sheets: 2 sheets yellow, 1 sheet blue glitter, 1 sheet white
- 1 small piece of cardboard backing (6×8 inches)
- White puffy paint
- 2 Small buttons (~0.4 inch diameter)
- Glue gun
- Scissors
- Photo print (3×4 inches)
Step-by-step Guide
- Cut the base of the photo frame from yellow foam to approximately 6×8 inches with a wide border.
- From the blue glitter foam, cut an inner decorative frame shape slightly smaller than the base. Glue it over the yellow frame.
- To create the shirt collar, cut a triangle from yellow foam and fold each side inward to form the collar tips. Glue in place above the frame and add two small buttons for a realistic touch.
- Cut the word “Papi” from white foam and outline it with yellow or glitter accents. Attach this in the bottom corner of the frame.
- Attach your photo to the back so it shows through the opening, then glue a cardboard piece behind the entire frame for support.
#15. DIY Little Handprint Craft
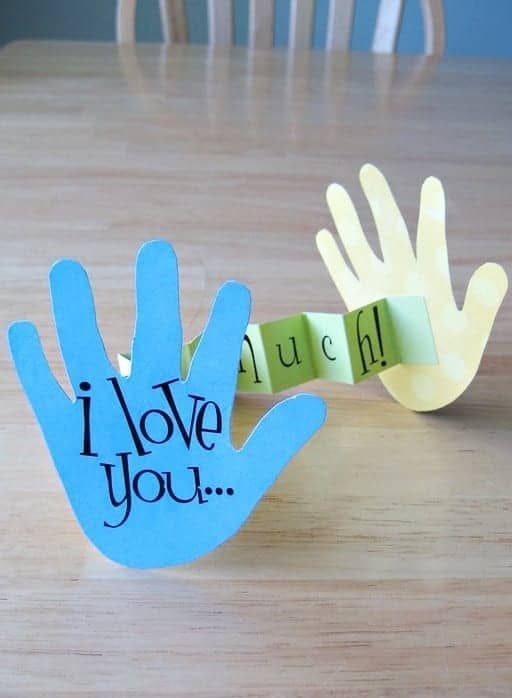
This little handprint craft is one of those ridiculously simple but deeply meaningful Father’s Day projects that takes only minutes but says so much.
Materials Needed
- 2 Colored cardstock sheets
- 1 Green construction paper (about 1.5″ x 11″)
- Black marker
- Scissors
- Glue stick
Step-by-step Guide
- Have your child place both hands on the cardstock and trace them. Cut out each hand carefully.
- Cut a strip of green construction paper about 1.5 inches wide and 11 inches long. Fold it accordion-style.
- Write “I love you…” on the front of the first hand and “…very much!” on the strip, spread across the folds. End with a cute heart or exclamation mark on the second hand.
- Attach one end of the accordion strip to the back of each hand using glue or double-sided tape.
#16. Colorful Little Handprint Keychains
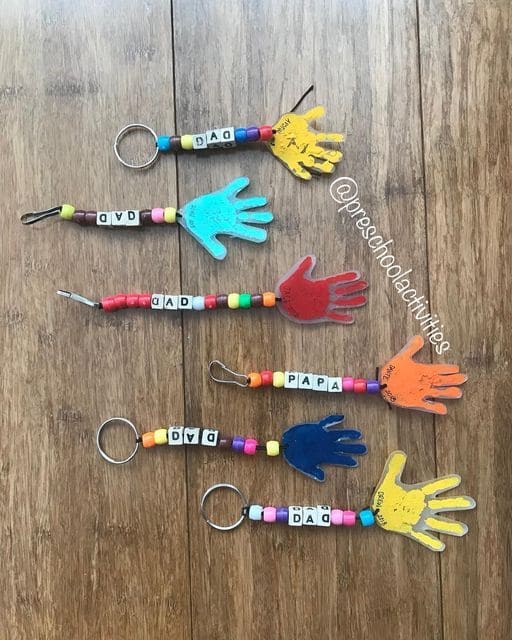
I love how each one includes a painted mini hand cutout, just the right size for a keychain but big enough to carry all the love in the world.
Materials Needed
- 4-5 Foam sheets (4×6 in.)
- Alphabet letter beads
- 5–6 colorful pony beads per keychain
- 1 key ring per project
- Elastic cord or pipe cleaners
- Hole puncher
- Scissors
- Permanent marker
Step-by-step Guide
- Trace your child’s hand onto a foam sheet using a pencil, then cut it out carefully.
- Punch a small hole near the wrist of the hand cutout using a hole puncher.
- String pony beads and alphabet beads onto your elastic cord or pipe cleaner, placing the name or “DAD” in the center.
- Thread the handprint through the bottom and tie it securely or twist the pipe cleaner to secure everything.
- Attach the looped end to a keyring or clip, making sure it’s tight enough to hold up through regular use.
#17. DIY #1 Beste Papa Plate
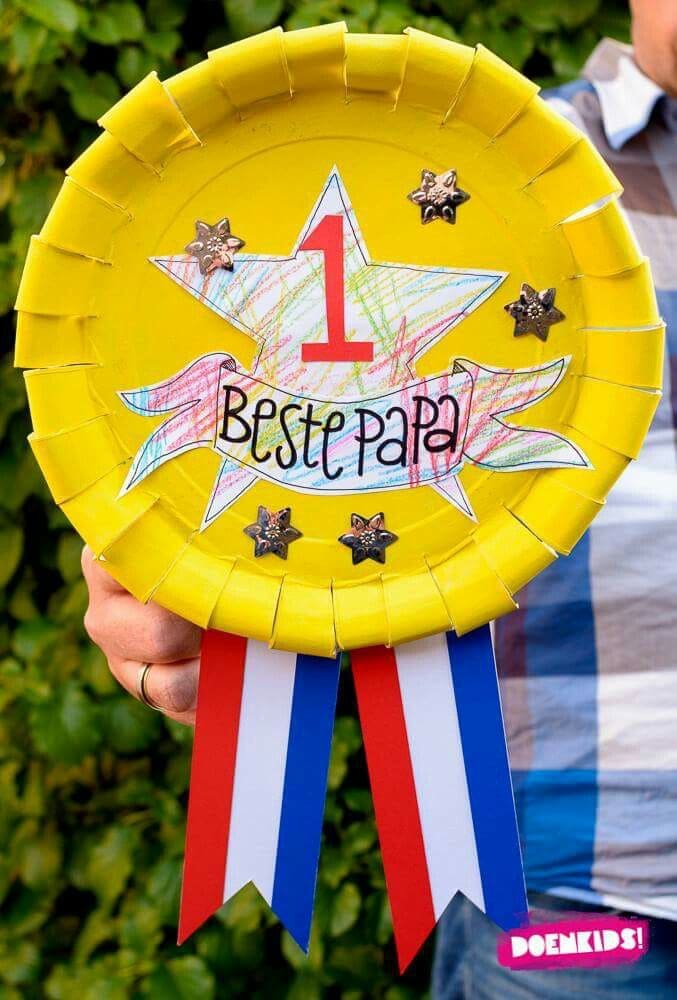
When I made one of these with my niece, she insisted on giving her dad the award before breakfast and he wore it on his chest the entire day, grocery run included.
Materials Needed
- 1 large paper plate (at least 10 inches wide)
- Yellow acrylic paint
- Construction paper, 1 sheet white for star, 1 sheet red/blue
- Coloring pencils
- Scissors and glue stick
- 5 decorative star stickers
- Black marker
- Hole punch (optional)
Step-by-step Guide
- Paint the entire surface of the paper plate yellow and let it dry fully. Meanwhile, cut a large star shape from white paper and let the kids scribble or color all over it.
- Write a big bold “1” in red at the top of the star, and beneath it, glue a ribbon banner labeled “Beste Papa.”
- Glue the decorated star in the center of the plate. Add shiny gold star stickers around it like medals.
- Cut three long strips (about 1.5 x 8 inches each) from red, white, and blue paper. Glue them to the bottom back of the plate.
#18. DIY French Fry Love Note Holder
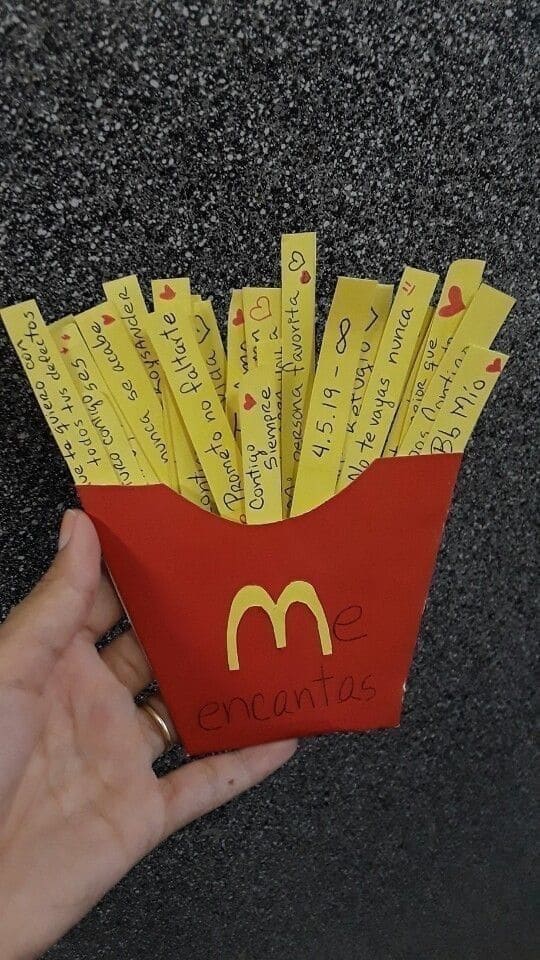
Shaped like a red McDonald’s fry box, but instead of greasy potatoes, it’s filled with “fries” made of yellow paper strips, each one written with sweet little messages, promises, or favorite memories.
Materials Needed
- 1 Red cardstock
- 2–3 Yellow construction paper sheets cut into strips (approx. 1×6 inches each)
- Black pen
- Glue stick
- Scissors
- 1 foam sheet (optional)
Step-by-step Guide
- Cut a large red rectangle (about 5×8 inches), then shape it into a curved french fry container, folding it in half and cutting the top curve to mimic a fast-food holder.
- Glue or tape the two side edges together, leaving the top open like a pocket.
- Cut multiple strips of yellow paper (each about 1 inch wide and 6 inches long) to represent fries.
- On each fry strip, write a heartfelt message, inside joke, or compliment, then add a yellow “M” logo using foam and write your own phrase on the front.
- Insert the paper fries into the red pocket and watch Dad smile as he reads each one.
#19. DIY Mustache Banner
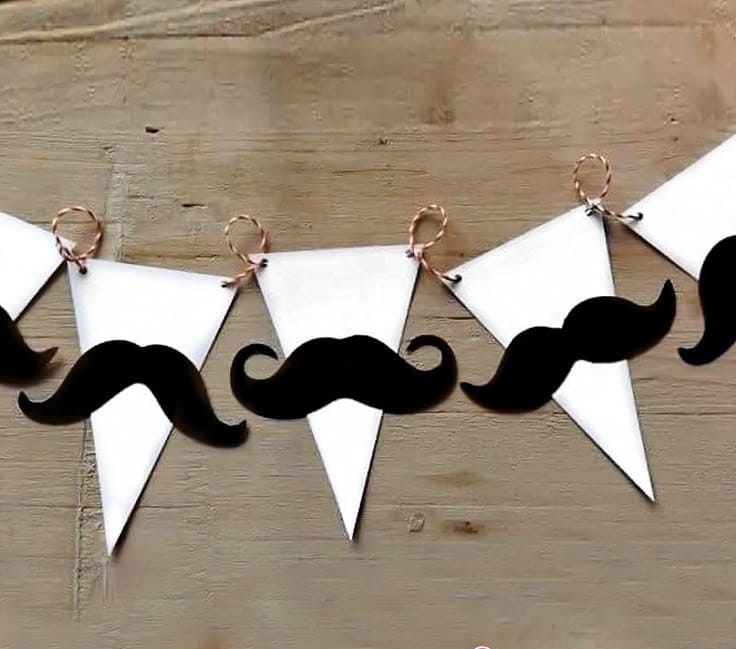
This DIY mustache banner adds instant charm and laughter to any Father’s Day setup. It’s cheeky, simple, and made entirely from basic craft supplies.
Materials Needed
- Cardstock sheets: 5 white and 2 black
- Mustache template – printed and cut out
- Twine
- Hole punch
- Glue stick
- Scissors
Step-by-step Guide
- Cut the white cardstock into equal triangle banner shapes, each one should be about 4 inches wide at the top and 6 inches long.
- Print out or trace mustache shapes onto the black cardstock and carefully cut them out.
- Attach one mustache to each triangle using glue or double-sided tape.
- Punch two holes at the top corners of each triangle. String them together using baker’s twine or any decorative string.
#20. Patriotic Greeting Card
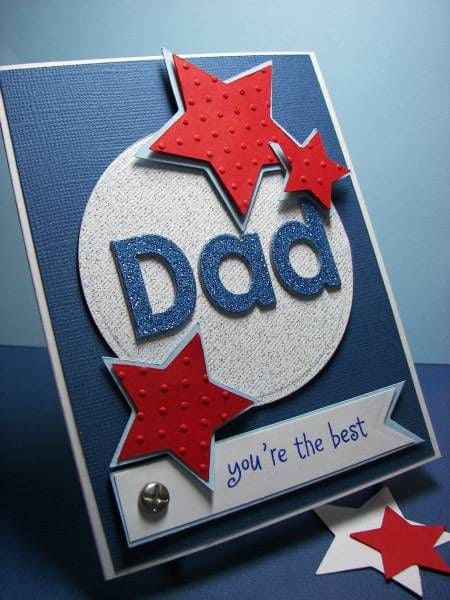
I remember crafting a version of this with my little cousin, he picked the sparkliest glitter and insisted on adding more stars. His dad kept the card on his nightstand all year.
Materials Needed
- 1 White blank greeting card base (5×7 inches)
- 3 Glitter cardstocks: red, blue, white, silver
- 1 star-shaped stencil sizes
- Circle stencil (4” diameter)
- Alphabet stickers (for the word “Dad”)
- 1 decorative brad
- Foam adhesive dots
- Glue stick
Step-by-step Guide
- Start with a navy blue cardstock layer slightly smaller than your white card base and glue it on for contrast.
- Cut a large 4-inch circle from white glitter or embossed cardstock and center it on the card front.
- Cut three red stars of varying sizes. Use a dotted embossing folder if available, or simply outline with pen for texture. Mount the stars with foam dots for a 3D effect.
- Add “Dad” using thick glitter letters or blue foam alphabet stickers centered across the circle.
- Cut a white banner and stamp or write “you’re the best” using a blue marker or calligraphy pen.
- Glue the sentiment banner below the circle, and press everything gently to secure.
#21. DIY Glitter Trophy Gift
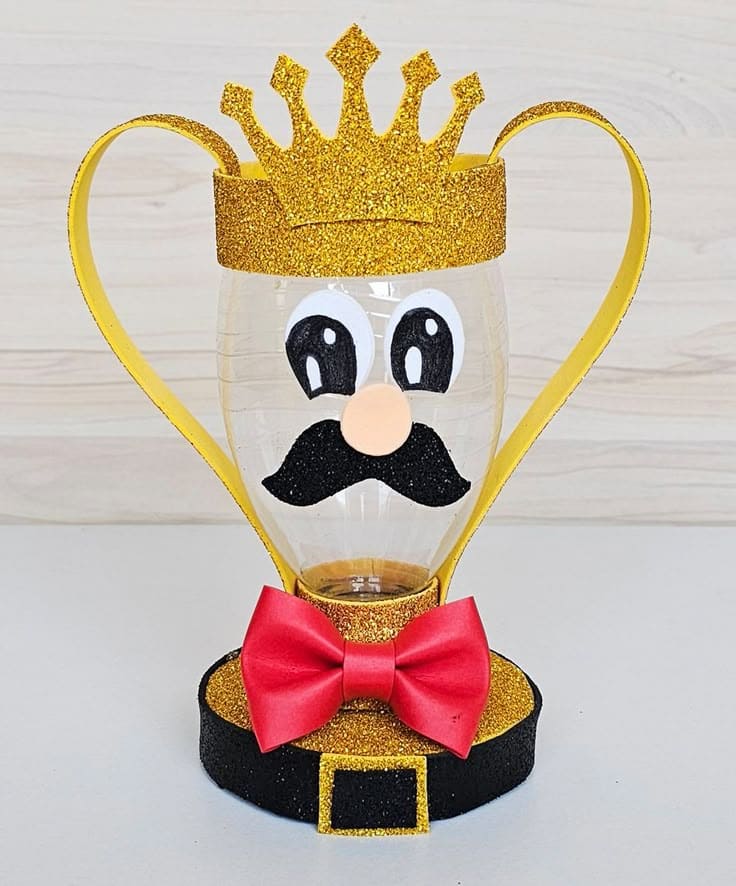
Made from an upcycled plastic bottle and dressed like a king with a golden crown, red bow tie, and mustache, it’s a fun way to crown Dad “Best Dad Ever.”
Materials Needed
- 1 large clear plastic bottle (1.5–2L)
- 2-3 Gold glitter foam sheets
- 1 Black foam sheet
- Red satin ribbon
- 2 Googly eyes
- Peach/beige foam
- Hot glue gun
- Scissors
Step-by-step Guide
- Cut the bottom third of a large plastic bottle, then cut two long strips from the gold glitter foam and glue them as handles on each side of the bottle.
- For the base, cut a circle from the black foam and a slightly smaller circle from the gold glitter foam. Layer and glue them together, then attach your bottle base to the center.
- Cut a glittery crown and wrap it around the top of the bottle. Add a glittery belt buckle to the black foam strip that wraps around the base for extra charm.
- Glue on the eyes, a round peach foam “nose,” and a black mustache underneath.
- Finish with a large red bow at the front and you’re ready to present it to your hero!
#22. My Dad Rocks Picture Frame
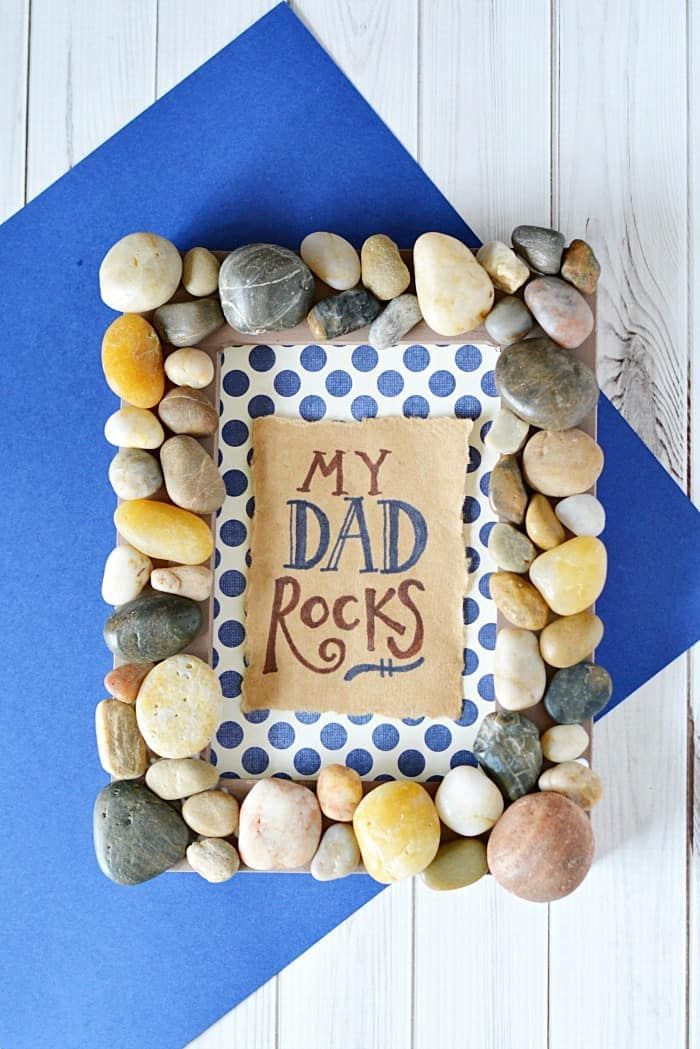
This picture frame is an absolute classic with a clever twist, perfect for outdoorsy dads or those who appreciate a handmade touch.
Materials Needed
- 1 Plain wooden frame (4×6 or 5×7 inches)
- 60-68 Smooth river rocks
- Strong craft glue
- Decorative paper
- Acrylic paint and brush (optional)
Step-by-step Guide
- Begin by choosing a photo, patterned paper, or draw your own message. Cut it to fit behind the frame’s opening.
- Glue the stones one by one around the outer edge of the frame. Mix sizes and shapes to create a natural, balanced look. Let it dry thoroughly.
- Insert the decorated background with your message or a photo inside the frame.
#23. Upcycled Tie Flower Pillows
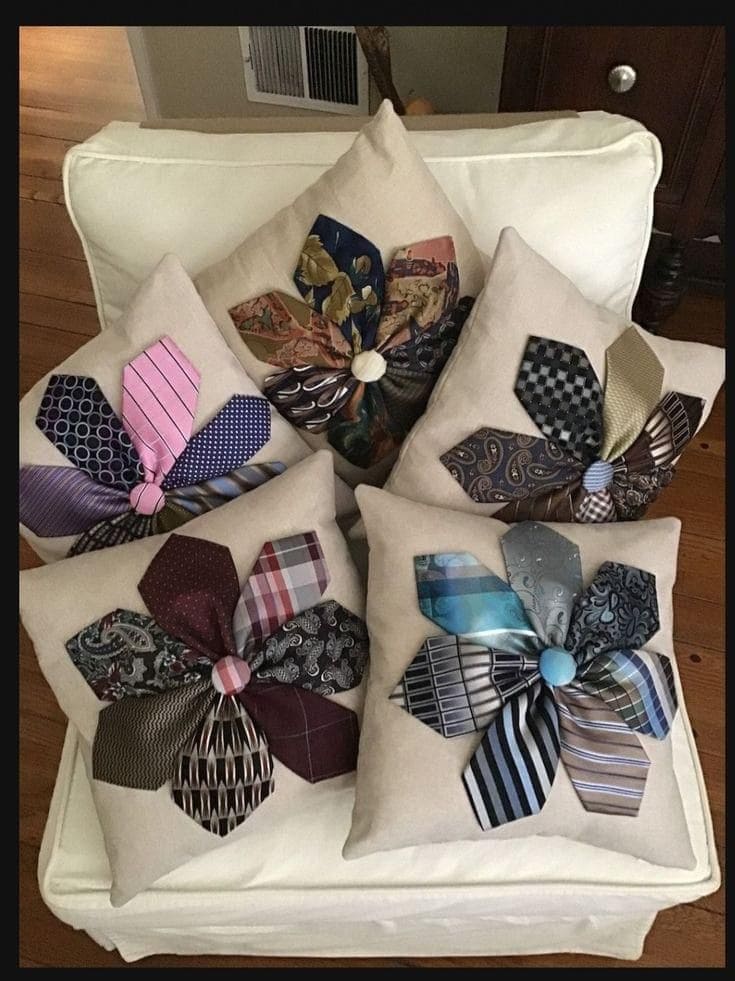
These pillows carry more than fabric; they carry history. Each petal was once part of a story – a meeting, a celebration, a Tuesday morning coffee.
Materials Needed
- 1 plain pillow cover (16×16 inches)
- 6–8 old ties
- 1 large decorative button (1 to 1.5 inches in diameter)
- Needle and thread
- Scissors
- Optional: lightweight interfacing
- Pillow insert (optional)
Step-by-step Guide
- Cut each tie to roughly 6–7 inches in length, trimming the narrow end into a rounded point if desired. You’ll need 6 to 8 “petals” per flower.
- Optional: iron lightweight interfacing onto the back of each tie piece for added structure.
- Arrange ties in a circular flower shape, overlapping slightly at the center point. Either stitch or use fabric glue to secure each petal.
- Add a decorative button in the center of the flower to cover the join point and give it a finished look. Let everything dry if glued, then insert your pillow.
#24. Adorable Tool-themed Wall Hanging
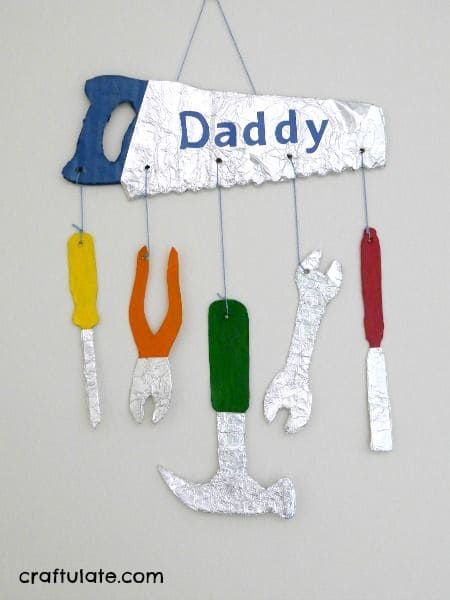
This wall hanging is a Father’s Day craft that truly nailed it! It’s a playful tribute to any handy dad, made entirely from cardboard and foil, but it looks like a little metal workshop in motion.
Materials Needed
- 2-3 Cardboard sheets (10×14 inches)
- 1 Aluminum foil roll
- Acrylic paint set
- 1 yard yarn
- Glue stick
- Scissors
- Hole punch
- Optional: a marker
Step-by-step Guide
- Sketch tool shapes (like a hammer, wrench, screwdriver, and saw) onto cardboard, then cut out all the shapes carefully using scissors.
- Cover the metal part of each tool with aluminum foil. Press gently to create texture and shine, then trim any extra foil.
- Paint the handles with bright acrylic colors. Let dry for 10–15 minutes.
- Punch a small hole in each tool and in the saw base where the strings will attach.
- Cut strings of varying lengths and tie each one to a tool and then to the base. Glue the knots down for extra security.
- Add a string on top to hang the whole project. Personalize with the word “Daddy” using letter stickers or markers.
#25. Silly Paper Hair Characters
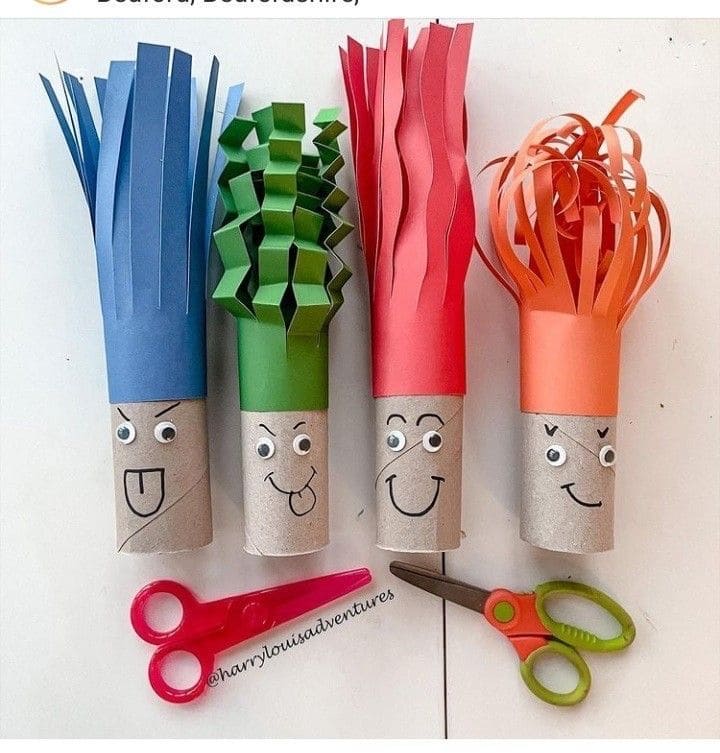
These are bursting with personality and so much fun to make for Father’s Day. Each one is a unique little tribute with wacky hair and goofy faces.
Materials Needed
- 1 toilet paper roll per craft
- 1 construction paper per hairdo
- 2 googly eyes
- Glue stick
- Scissors
- Black marker
Step-by-step Guide
- Wrap and glue a strip of colored paper around the top of each toilet paper roll to act as the character’s “hair.” Leave about half an inch extending above the roll.
- Use scissors to cut the extended paper into strips for wild hairstyles. Try straight cuts, spirals, or zigzags for fun texture.
- Glue two googly eyes on the front and draw different facial expressions below them.
#26. Super Papa Toilet Paper Roll Craft
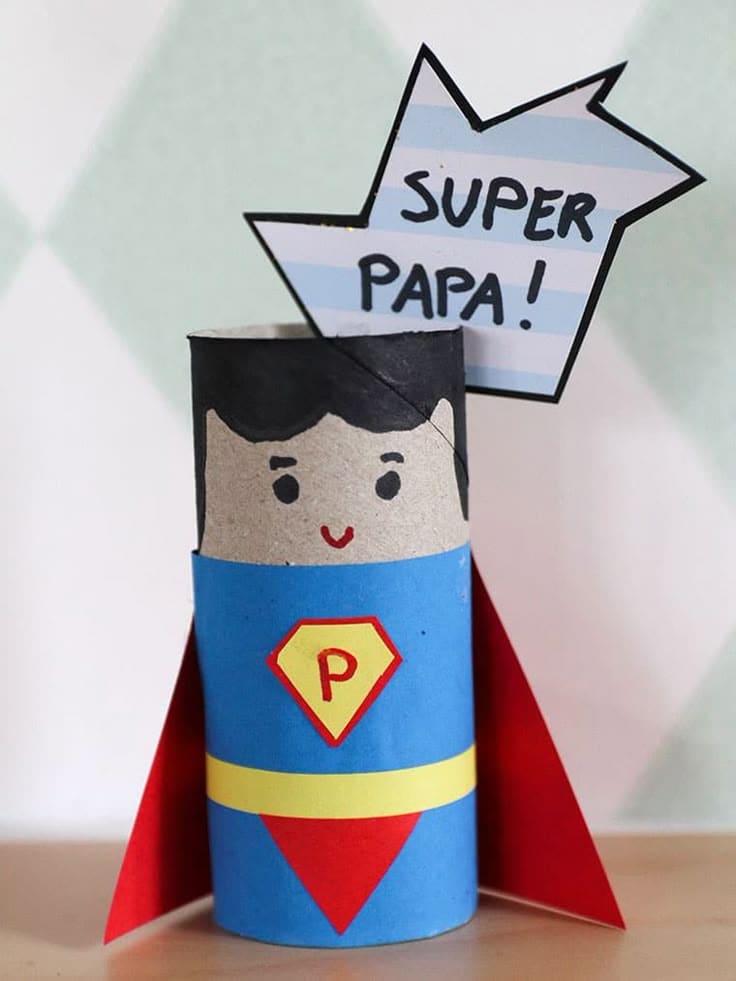
There’s something about calling your dad a “Super Papa” that makes him smile like a kid again. This craft is a quick, budget-friendly way to turn a humble toilet paper roll into a superhero tribute.
Materials Needed
- 1 empty toilet paper roll
- Construction paper: Blue, red, yellow, black (9″ x 12″ sheets)
- Scissors
- Glue stick
- Black marker
- 1 White cardstock
- Crayons (optional)
Step-by-step Guide
- Cut a piece of blue paper to wrap around the toilet roll and glue it in place. Then cut out a red triangle for the suit detail and a yellow strip for the belt. Glue both onto the blue body wrap.
- Draw a face directly onto the upper part of the roll using a marker. Add any other features like hair, ears or eyebrows with paper or marker.
- Cut a red triangle or trapezoid shape for the cape and glue it to the back. For the chest badge, cut a small yellow diamond and write a “P” on it before gluing it to the front.
- Finish with a handmade “SUPER PAPA!” speech bubble and attach it with a small dab of glue or tape.
