Easter is the perfect time to embrace creativity and bring families together with fun and easy craft projects.
From adorable bunny decorations to festive home accents, these 28 delightful DIY Easter bunny craft ideas are designed to spark joy and encourage hands-on bonding between parents and kids.
Whether you’re a seasoned crafter or a beginner, there’s something for everyone in this collection.
#1. Playful Cardboard Bunny Portraits
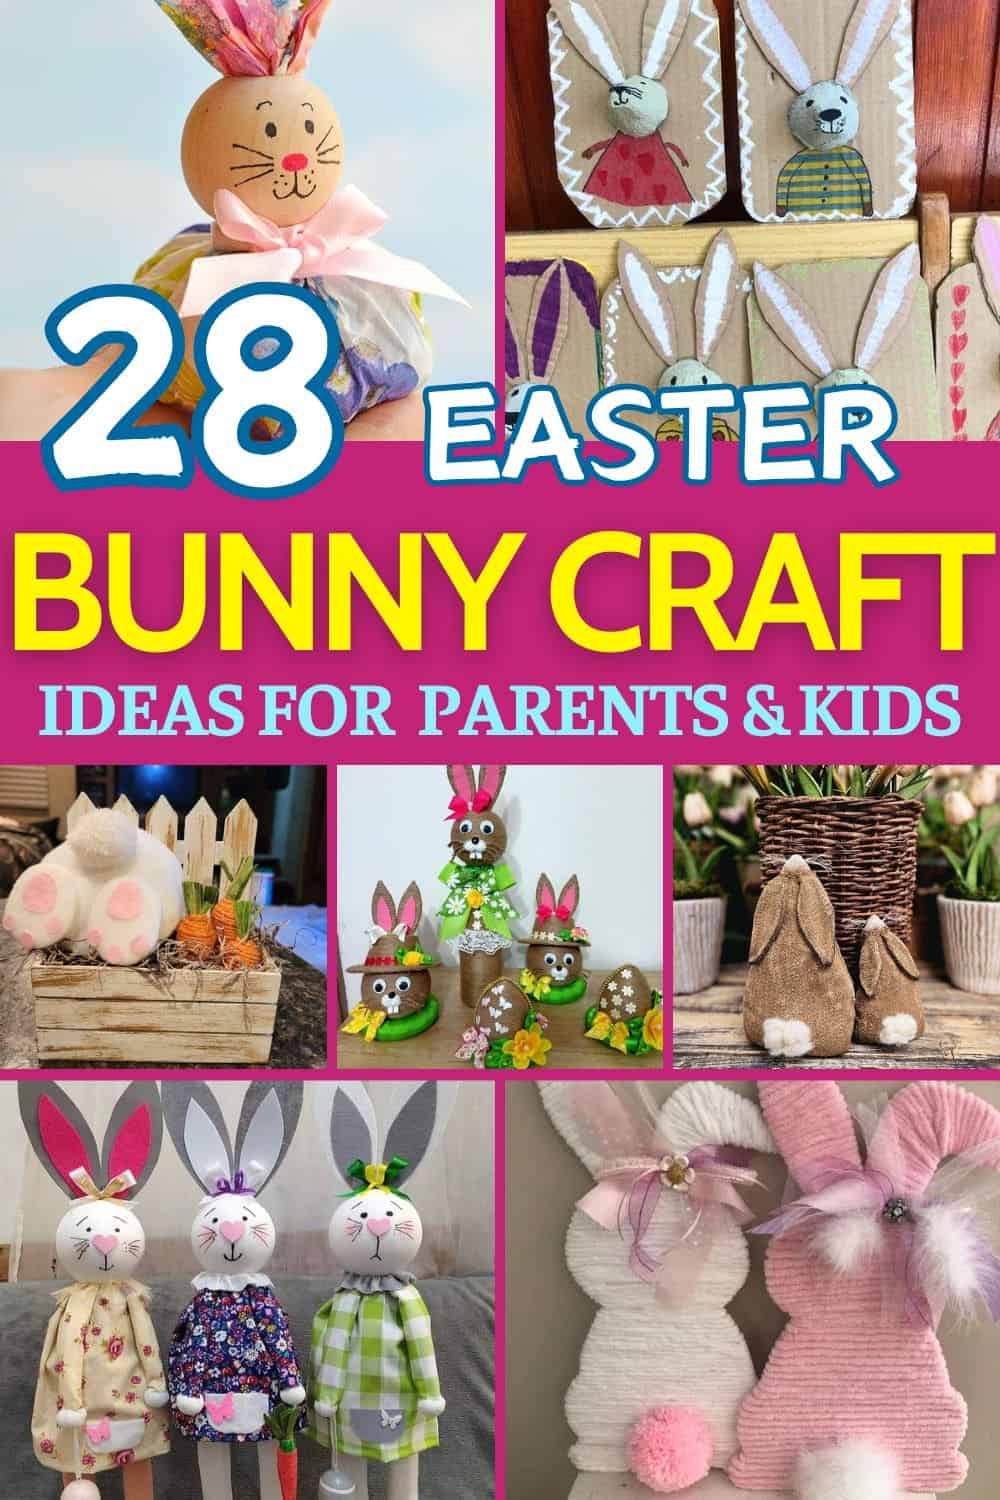
You and your kids will love creating these adorable bunny portraits using recycled cardboard and egg cartons!
With their handmade appeal and colorful designs, these crafts are not only eco-friendly but also perfect for adding a personal touch to your Easter celebration.
Materials Needed:
- Recycled cardboard
- Egg cartons (for bunny faces)
- Acrylic paint (various colors)
- Paintbrushes
- Markers or colored pens
- Scissors
- Hot glue gun
- Cotton or craft foam (for bunny ears)
Instructions:
- Cut rectangular or oval pieces from the cardboard to form the base of your portraits.
- Paint the base with a decorative border, leaving the center plain for the bunny design. Let it dry completely.
- Cut out small sections of the egg carton to create bunny faces. Paint them with soft colors, such as white or beige, and draw facial features with a fine brush or marker.
- Make ears by cutting shapes from cardboard or craft foam. Paint the inner sections pink and glue them onto the bunny face.
- Attach the bunny face to the center of the cardboard base using hot glue.
- Add clothing details by painting or drawing fun patterns like stripes, polka dots, or hearts onto the cardboard around the bunny face.
#2. Adorable Twine Bunny
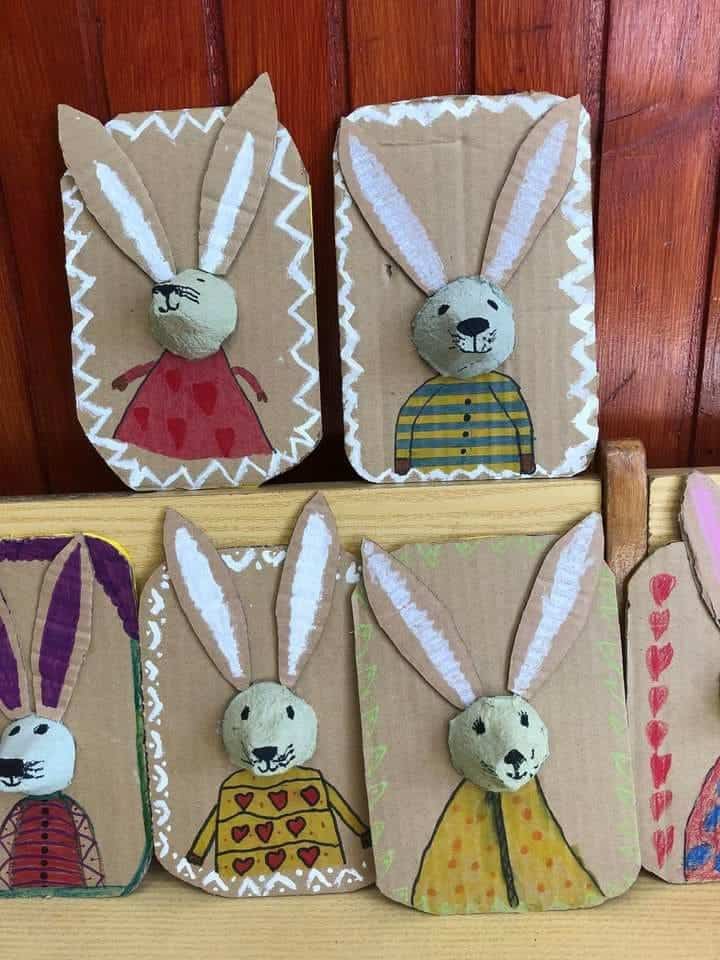
With its cheerful green outfit, bright bow, and delicate floral accents, this twine bunny is the ultimate Easter centerpiece.
Its handcrafted charm and creative use of materials make it a delightful addition to any holiday display.
Materials Needed:
- Twine or jute rope
- Foam or cardboard base (for the bunny head and body)
- Pink and white felt (for ears)
- Googly eyes
- Cotton balls or pom-poms (for the nose and tail)
- Ribbon and lace (for decorations)
- Faux flowers and small embellishments
- Hot glue gun
- Scissors
Instructions:
- Wrap the foam or cardboard pieces for the bunny’s head and body with twine, ensuring they’re tightly covered. Secure the ends with glue.
- Attach the head to the body using hot glue.
- Cut ear shapes from cardboard and cover them with twine. Add pink felt to the inner parts of the ears and glue them onto the bunny’s head.
- Glue on googly eyes, a pom-pom nose, and small pieces of twine for whiskers to complete the bunny’s face.
- Decorate the body with a colorful ribbon bow and add lace for a playful outfit.
- Embellish the base with faux flowers, mini eggs, or other festive details for an extra touch of Easter charm.
#3. Adorable Felt Bunny Pencil Toppers
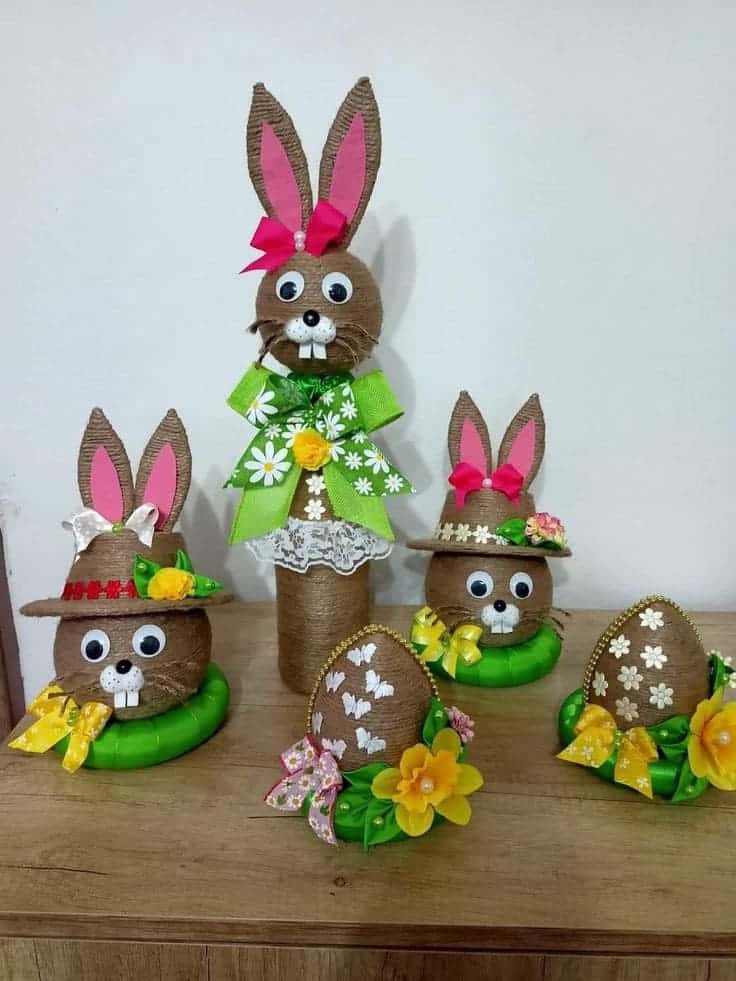
Who wouldn’t love these charming felt bunny pencil toppers to brighten their writing tools?
They’re cute, practical, and make a wonderful handmade gift or Easter craft for kids and adults alike.
Materials Needed:
- White felt (for bunny heads)
- Blue felt (for bow ties)
- Brown thread or embroidery floss
- Buttons (small for bow center)
- Scissors
- Needle (or fabric glue)
- Pencils
Instructions:
- Cut two identical bunny head shapes from the white felt for each topper.
- Sew or glue the edges together, leaving the bottom open. Add facial details like eyes, whiskers, and a nose using brown thread or embroidery floss.
- Cut bow tie shapes from the blue felt and sew or glue them just below the bunny face. Add a small button to the center of the bow for decoration.
- Insert the pencil into the open bottom of the bunny head, securing it with fabric glue if needed.
#4. Glittery Bunny Hair Clips with Fluffy Tails
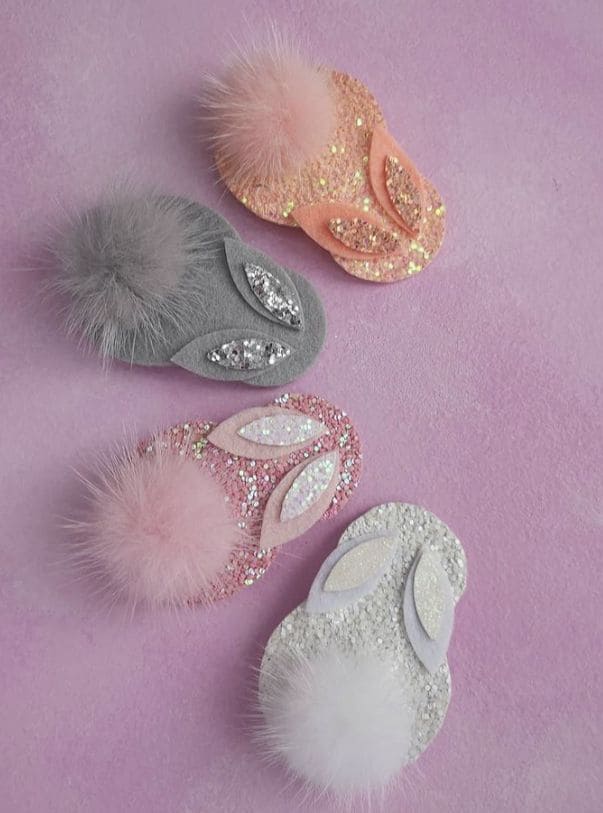
By adding sparkle and fluff, these glittery bunny hair clips transform any hairstyle into a festive Easter accessory.
Perfect for kids and adults, they’re easy to make and bring a touch of glam to your springtime celebrations.
Materials Needed:
- Glitter foam sheets (various colors)
- Faux fur pom-poms (for tails)
- Plain hair clips
- Felt sheets (for ears)
- Scissors
- Hot glue gun
Instructions:
- Cut bunny shapes from glitter foam sheets, ensuring they are slightly larger than your hair clip for a secure fit.
- Cut small ear shapes from felt and glue them onto the top of the bunny body. Add inner ear details using different colors of felt for contrast.
- Attach a faux fur pom-pom to the bottom of the bunny shape to act as a fluffy tail.
- Finally, secure the bunny cutout onto the hair clip using hot glue, ensuring it is centered and firmly attached.
#5. Adorable Hanging Bunny Basket
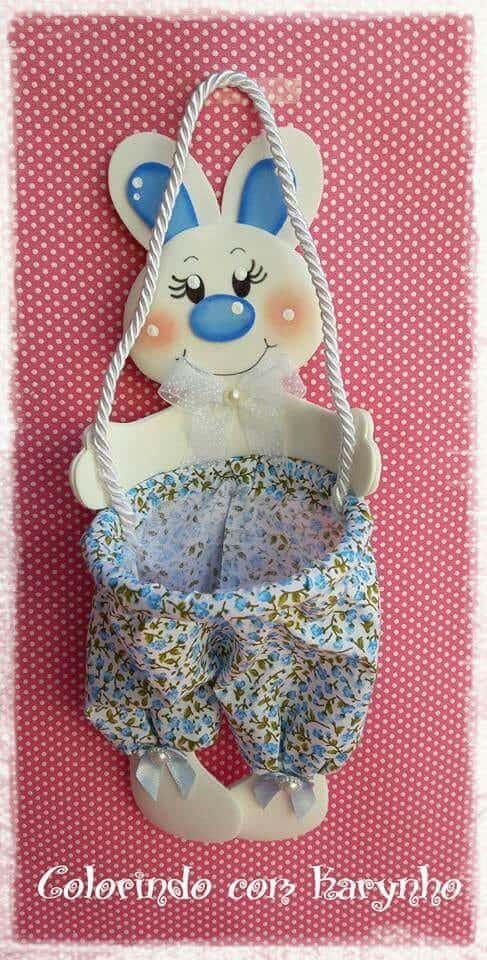
You can create this cute and functional bunny basket to hold Easter goodies or small gifts.
Its charming design, complete with a floral fabric pouch and happy bunny face, makes it a delightful addition to any Easter celebration.
Materials Needed:
- Foam sheet (for the bunny)
- Floral fabric (for the basket)
- Rope or thick string (for the handle)
- Hot glue gun
- Scissors
- Markers or paint (for facial features)
- Small embellishments (like bows or pearls)
Instructions:
- Cut a bunny shape from the foam sheet. Add details to the face, such as eyes, nose, and whiskers, using markers or paint.
- Cut a rectangular piece of floral fabric and sew or glue it into a pouch shape. Attach the pouch to the bunny’s body with hot glue, ensuring the top remains open for storing items.
- Glue a piece of rope or string to the bunny’s hands to create a hanging handle.
- Add embellishments like bows or pearls to the bunny for extra charm.
#6. Charming Vintage Bunny Decor with Musical Notes
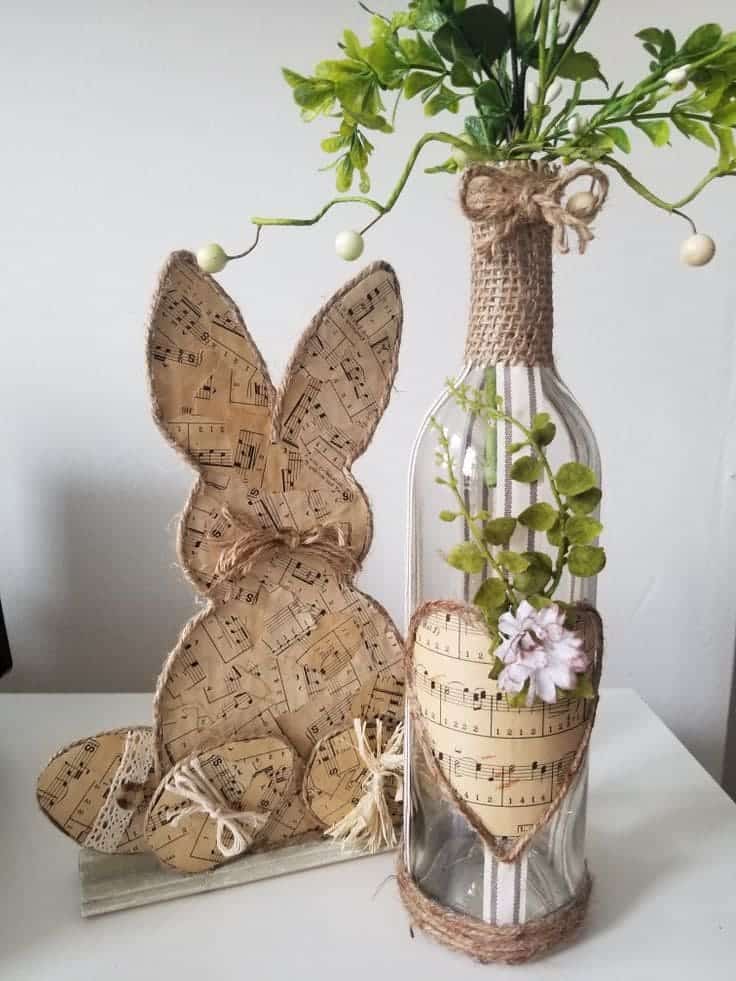
With its charming vintage style, this DIY bunny crafted from sheet music and twine adds a cozy, nostalgic touch to your Easter décor.
It’s a unique blend of music, nature, and craftiness, making it a standout piece for your spring celebrations.
Materials Needed:
- Sheet music or vintage book pages
- Scissors
- Twine or jute rope
- Hot glue gun
- Clear glass bottle
- Burlap ribbon
- Faux greenery or flowers
- Cardboard (for structure)
Instructions:
- Cut out bunny shapes from cardboard, creating the body and ears. Cover each piece with sheet music, gluing it in place securely.
- Use twine to add texture to the edges of the bunny shapes, wrapping it around the body and ears for a rustic look.
- For the bunny base, create a small stand from cardboard, attaching the bunny securely with glue.
- For the bottle, wrap it with burlap ribbon, securing the ends with hot glue.
- Cut out a heart shape from sheet music and attach it to the front of the bottle, adding faux greenery and flowers to the top for a finishing touch.
#7. Playful Painted Bunny Figures
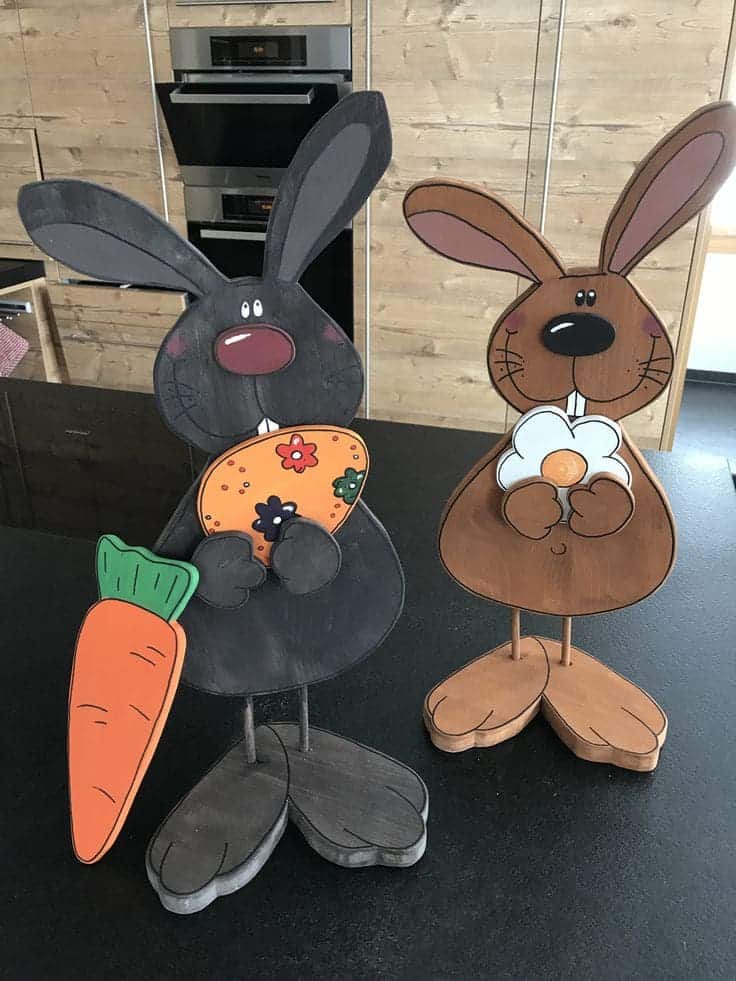
Whether you prefer a cute bunny holding a carrot or one with a flower, these painted wooden bunny figures are a perfect way to add personality and charm to your Easter decorations.
Materials Needed:
- Wooden bunny cutouts (two large ones)
- Acrylic paints (black, brown, orange, white, and pink)
- Paintbrushes
- Wooden carrot cutout
- Glue (for securing pieces)
- Small decorative flowers or buttons (optional)
- Scissors
Instructions:
- Start by painting the wooden bunny figures in your choice of colors, using brown or black for the body and pink for the noses and ears. Let them dry completely.
- Paint a wooden carrot cutout with orange and green, and glue it to one of the bunnies. For the second bunny, create a flower shape using paint or small decorative flowers, gluing it to the bunny’s hands.
- Paint the bunny faces, adding eyes, a mouth, and whiskers with a fine brush.
- Attach the bunnies’ feet by gluing smaller wooden pieces or simply painting the feet shapes directly on the bunnies.
#8. Whimsical Painted Wine Bottle Bunnies
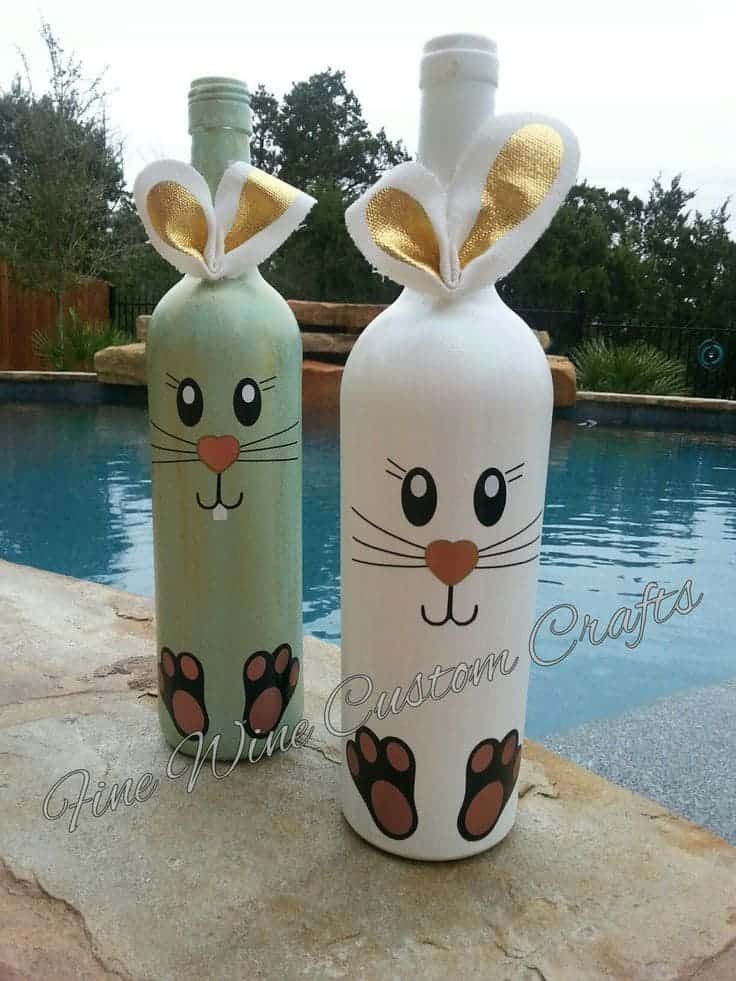
You can transform simple wine bottles into adorable Easter bunny decorations with this creative DIY craft.
With painted bunny faces, cute paws, and oversized ears, these charming bunnies will bring a playful touch to your spring décor.
Materials Needed:
- Empty wine bottles (cleaned)
- Acrylic paints (white, green, pink, black)
- Fabric (for the bunny ears)
- Scissors
- Paintbrushes
- Hot glue gun
- Black marker or fine-tip paintbrush
Instructions:
- Start by painting the wine bottle in a base color of your choice (white or green work well). Let the paint dry completely.
- Using black paint or a marker, draw large eyes, a nose, and a mouth for the bunny face. Add whiskers with a fine-tip paintbrush or marker.
- Cut out ear shapes from fabric, using a soft fabric for the outer part and a contrasting fabric (like gold) for the inner part of the ears. Glue them securely to the top of the wine bottle.
- Paint or glue little paw prints at the bottom of the bottle to create the bunny feet.
- For a final touch, glue a small pom-pom to the back of the bottle as the bunny’s fluffy tail.
#9. Charming Easter Bunny Dolls with Colorful Dresses
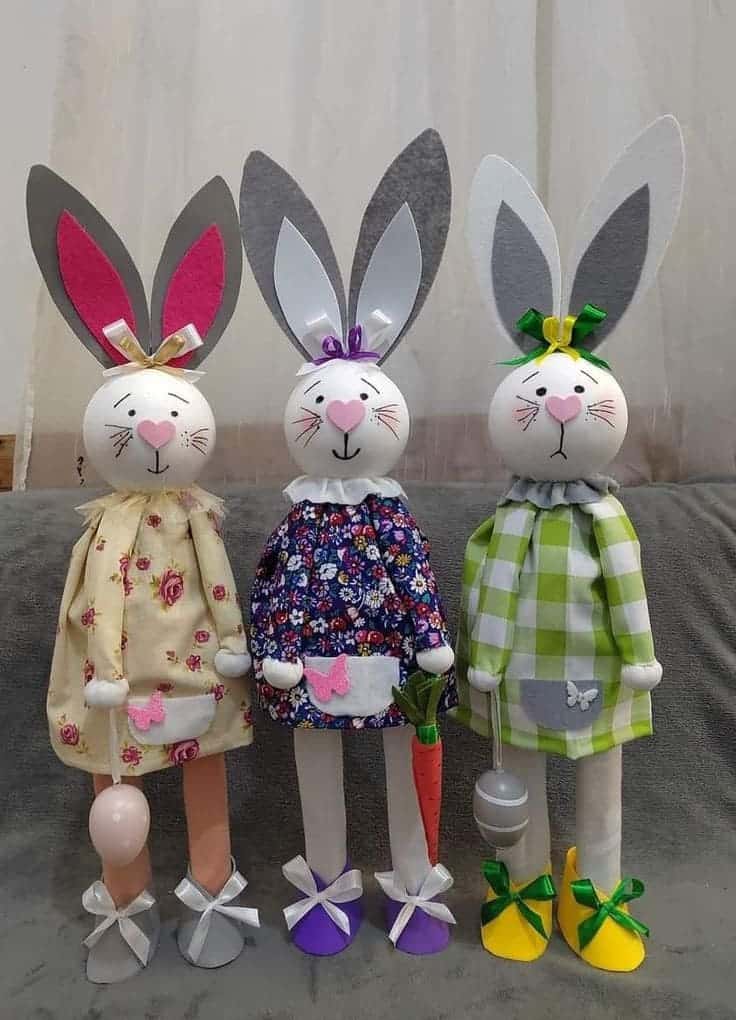
How about crafting these delightful Easter bunny dolls dressed in vibrant outfits?
Their adorable expressions, floppy ears, and playful accessories make them the perfect centerpiece for your holiday décor or a fun gift for loved ones.
Materials Needed:
- Foam balls
- Felt sheets (gray, pink, white)
- Cotton fabric (various patterns for dresses)
- Wooden sticks or dowels (for the body and legs)
- Cardboard
- Acrylic paint
- Ribbons and mini bows
- Small embellishments (butterflies, carrots, or baskets)
- Hot glue gun
- Scissors
Instructions:
- Paint the foam balls white and draw the bunny’s face using a fine brush or marker. Add a pink heart-shaped nose and rosy cheeks for extra charm.
- Cut ear shapes from felt (gray and white) and glue them onto the foam ball. Attach a ribbon or bow near the ears for decoration.
- Create the body by attaching the foam ball to a wooden stick and securing it firmly.
- Sew or glue a small dress from patterned fabric and slide it over the wooden stick, covering the base. Add ruffles or embellishments to the dress as desired.
- Paint cardboard to resemble shoes and glue them to the ends of the stick legs. Use ribbons to tie small bows for added detail.
- Finish by adding accessories like a mini felt carrot, a basket, or other Easter-themed items.
#10. Charming Moss Bunny with Carrots and Bows
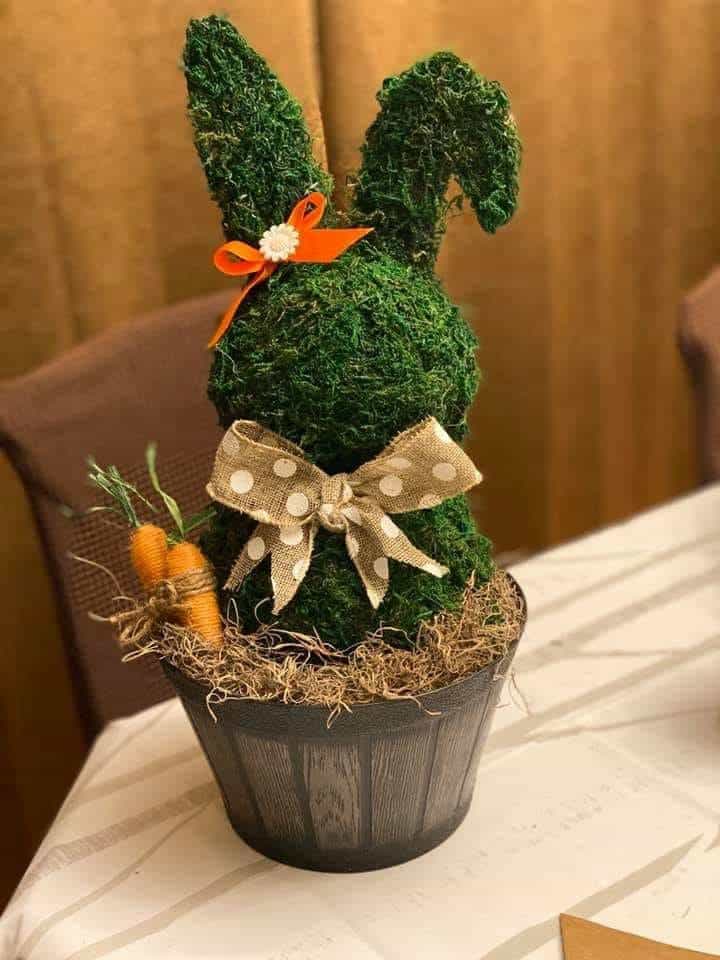
Wow, this charming moss bunny centerpiece will bring a burst of greenery and whimsy to your Easter décor!
With its lush mossy texture, vibrant orange carrots, and playful bows, it’s the perfect springtime addition to any table or mantel.
Materials Needed:
- Moss-covered foam bunny shape (or foam and moss sheets)
- Small flower pot (or any planter)
- Burlap ribbon (with polka dots or any design you prefer)
- Small artificial carrots
- Twine
- Orange ribbon
- Spanish moss or straw
- Hot glue gun
Instructions:
- Start by placing the moss-covered bunny shape into the flower pot. If you’re using foam, apply glue and press the moss onto it until it’s fully covered.
- Fill the base of the pot with Spanish moss or straw for a natural, earthy look.
- Secure two artificial carrots with twine to the side of the pot, adding a bit of moss around the base for a finished effect.
- Create a bow from burlap ribbon and attach it around the bunny’s neck with glue.
- Add a small orange ribbon to the top of the bunny’s ears, tying it in a bow to complete the look.
#11. Vibrant Spring Bunny Wreath
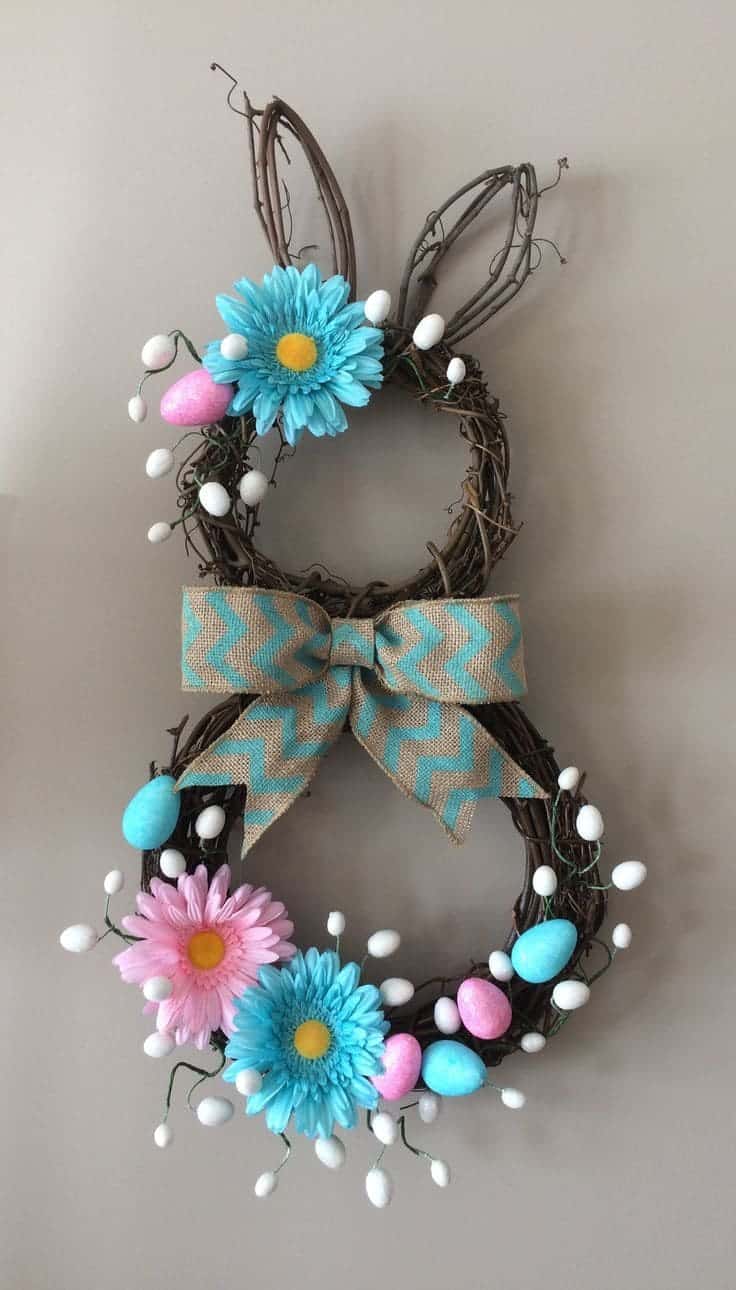
Your front door will instantly bloom with charm when you hang this vibrant Easter bunny wreath!
It’s an eye-catching combination of colorful flowers, Easter eggs, and a playful bunny shape, making it the perfect seasonal accent for any home.
Materials Needed:
- Grapevine wreath (large for the body, small for the head)
- Faux flowers (blue and pink daisies)
- Plastic Easter eggs (assorted colors)
- Twigs or floral wire
- Burlap ribbon
- Hot glue gun
- Scissors
Instructions:
- Attach the small grapevine wreath to the large wreath to form the bunny’s head and body. Secure them with hot glue or floral wire.
- Shape the ears by bending twigs or floral wire into long ear shapes and securing them to the top of the smaller wreath.
- Attach large blue and pink daisy flowers to the bottom of the bunny’s body using hot glue.
- Glue plastic Easter eggs around the wreath, using different colors to add a festive touch.
- Tie a large burlap ribbon into a bow and glue it to the center of the wreath for a finishing touch.
#12. Rustic Burlap Bunnies with Polka Dot Charm
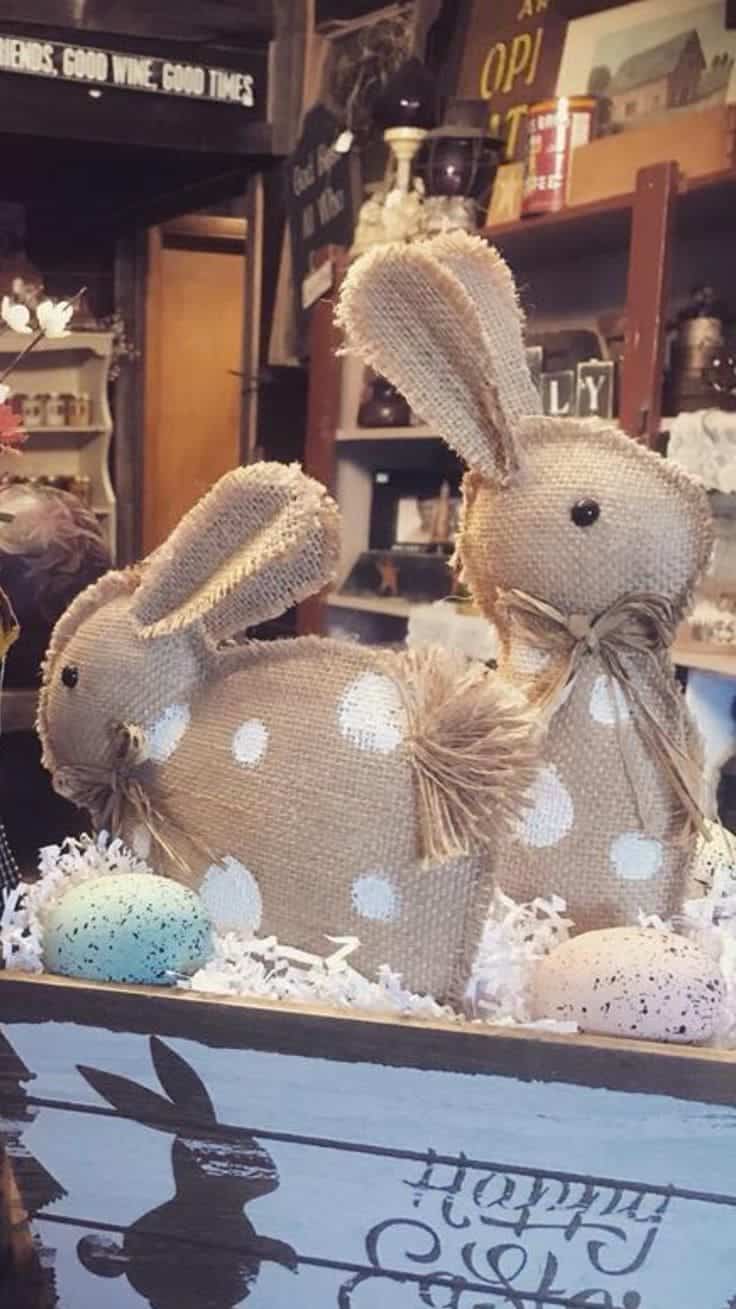
From farmhouse to festive, these rustic burlap bunnies with polka dot patterns bring the perfect combination of simplicity and charm to your Easter décor.
With their soft texture, playful designs, and adorable tails, they’re ideal for creating a cozy holiday vibe.
Materials Needed:
- Burlap fabric
- White paint
- Twine or jute rope
- Cotton balls or yarn
- Black beads or buttons
- Scissors
- Hot glue gun
- Stuffing material (cotton or fabric scraps)
Instructions:
- Cut two identical bunny shapes from the burlap fabric. Paint white polka dots on the front piece and let it dry.
- Sew or glue the two pieces together along the edges, leaving a small opening at the bottom.
- Fill the bunny with stuffing material to give it a soft, plump look, then close the opening securely with glue or thread.
- Create a small tail by gluing a cotton ball or rolled yarn to the back of the bunny.
- Eventually, use black beads or buttons to make the eyes, and tie a small bow around the neck with twine for a rustic touch.
#13. Charming Felt Bunny Cutlery Holders
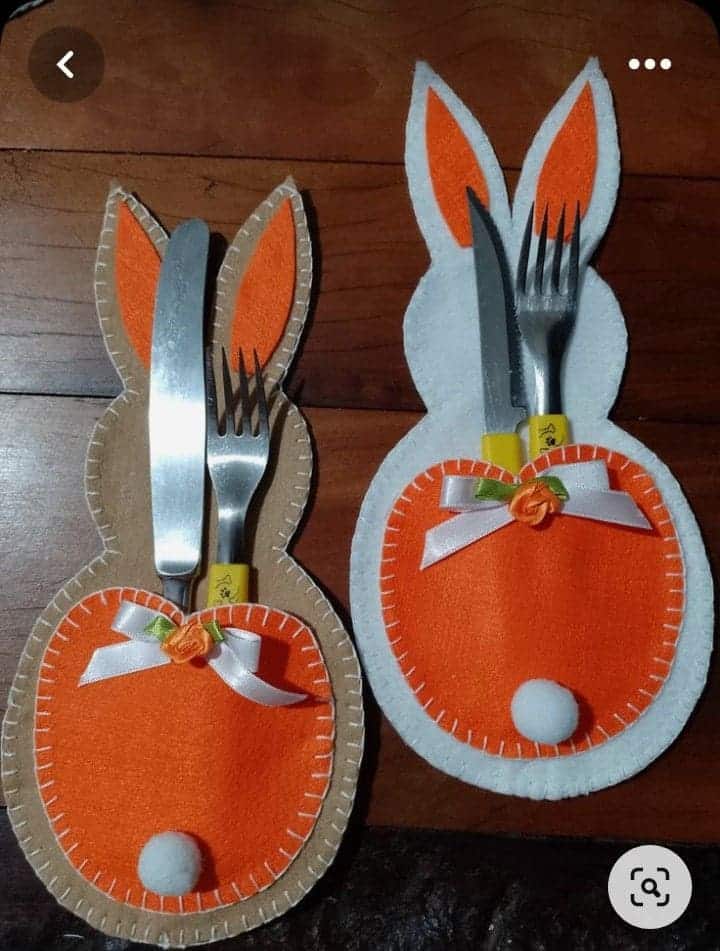
I bet these adorable felt bunny cutlery holders will be the talk of your Easter table!
With their playful bunny shape, bright colors, and functional design, they’re perfect for adding festive cheer to your dinner setting.
Materials Needed:
- White and orange felt
- Brown felt or sturdy fabric
- Scissors
- Needle and thread
- Small pom-poms
- Ribbon and small decorative flowers
- Cutlery
Instructions:
- Cut two bunny-shaped pieces of felt for each holder: one for the front and one for the back. Use white or brown felt for the bunny base.
- Cut an oval pocket shape from orange felt and sew or glue it to the front bunny piece, leaving the top open to hold cutlery.
- Add a small pom-pom to the back of the bunny as its tail.
- Decorate the pocket with a bow made of ribbon and a small flower for added charm.
- Sew or glue the front and back pieces together, leaving the top of the ears open for a neat finish.
#14. Rustic Bunny Wreath with Soft Textures
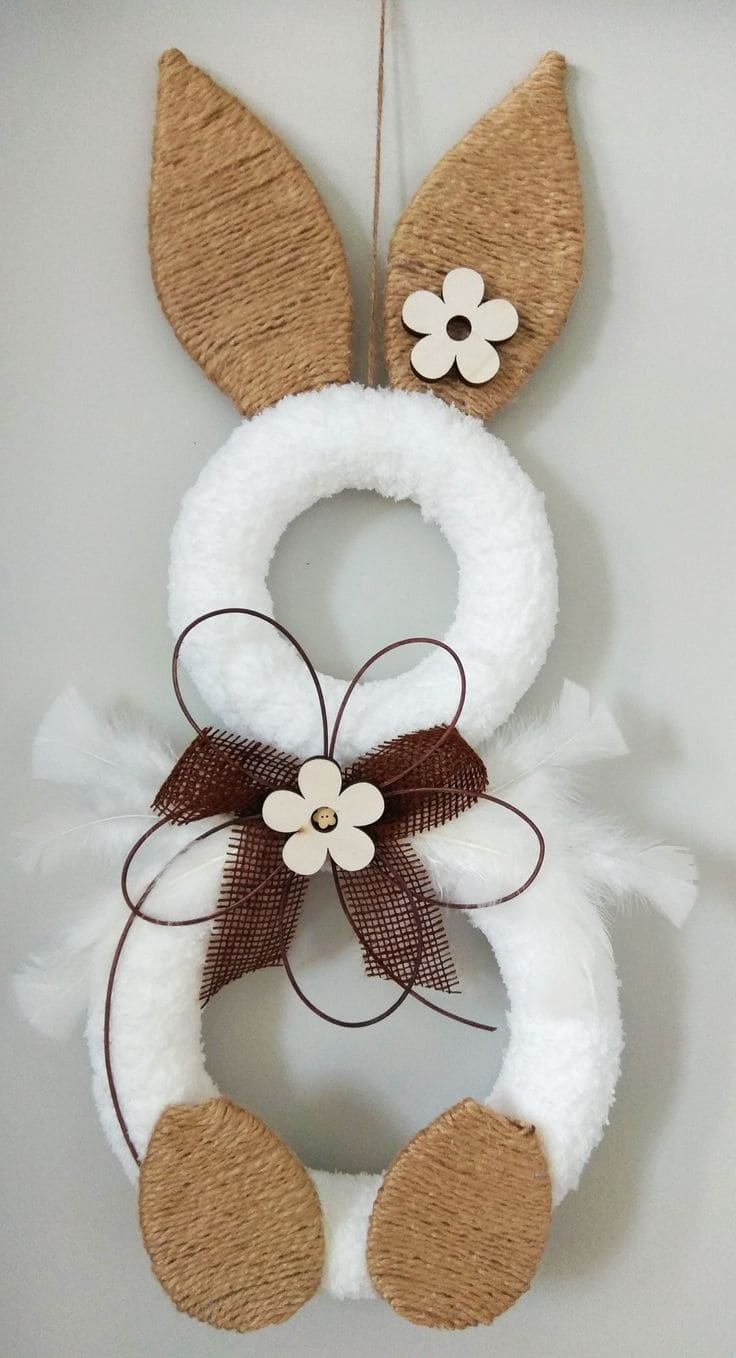
Inspired by the warmth of farmhouse charm, this rustic bunny wreath combines soft textures with natural accents.
Its fluffy design, twine-wrapped ears, and adorable floral bow make it a standout Easter decoration for your home.
Materials Needed:
- Two foam wreath forms (one smaller, one larger)
- White fluffy yarn
- Twine or jute rope
- Burlap ribbon or mesh
- Faux feathers
- Wooden flower embellishments
- Hot glue gun
- Scissors
Instructions:
- Wrap both foam wreath forms with white fluffy yarn, ensuring full coverage, and secure the ends with glue.
- Attach the smaller wreath (head) to the larger one (body) using hot glue.
- Cut two ear shapes from sturdy cardboard and wrap them tightly with twine or jute rope. Glue the ears to the top of the smaller wreath.
- Create a decorative bow using burlap ribbon or mesh. Add a wooden flower embellishment to the center and glue the bow to the base of the smaller wreath.
- Arrange faux feathers around the body for a delicate and whimsical touch.
- Finally, attach additional wooden flower embellishments to the wreath as desired, and ensure all pieces are securely glued.
#15. Rustic Easter Bunny Floral Teacup Display
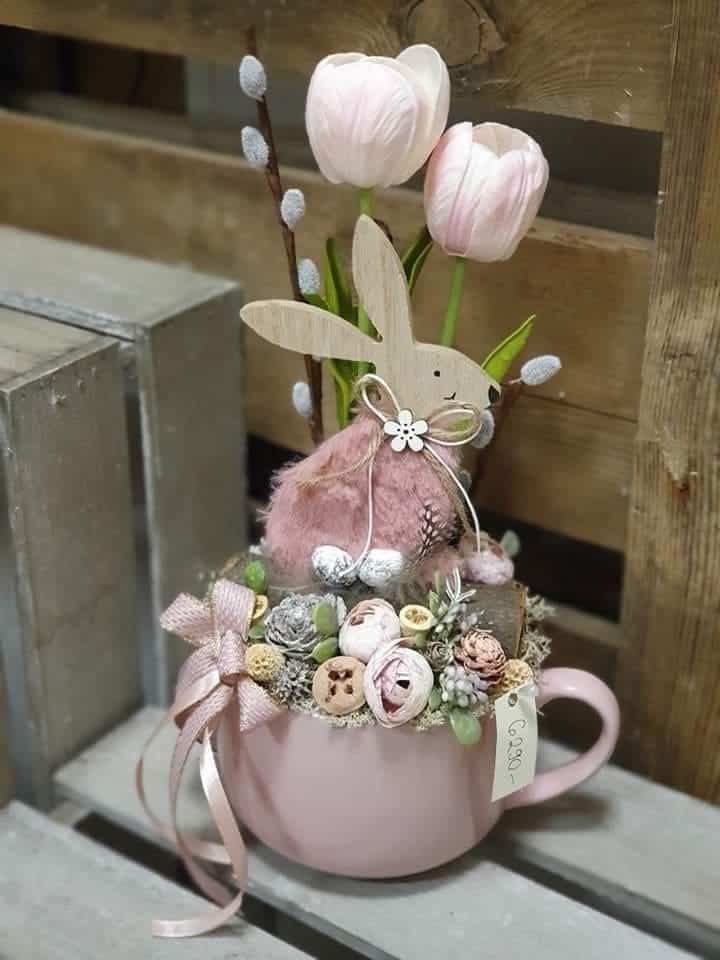
If you love blending rustic charm with elegance, this Easter bunny teacup centerpiece is perfect for you.
The soft pastel tones, floral details, and fuzzy bunny figure create a delightful spring decoration that’s both unique and heartwarming.
Materials Needed:
- Large ceramic teacup or mug
- Faux tulips or spring flowers
- Wooden or felt bunny figure
- Moss, small twigs, and dried flowers
- Mini decorative eggs
- Ribbon for bow
- Hot glue gun
- Scissors
Instructions:
- Fill the teacup with moss to create a natural-looking base. Secure it with hot glue to ensure it stays in place.
- Arrange faux tulips or spring flowers in the back of the teacup, using twigs or floral foam for support if needed.
- Place the bunny figure at the center, gluing it securely to the moss.
- Surround the bunny with small dried flowers, decorative eggs, and twigs, creating a balanced and full look.
- Tie a ribbon into a bow and glue it to the handle or front of the teacup for an extra touch of elegance.
#16. Minimalist Toilet Roll Bunnies
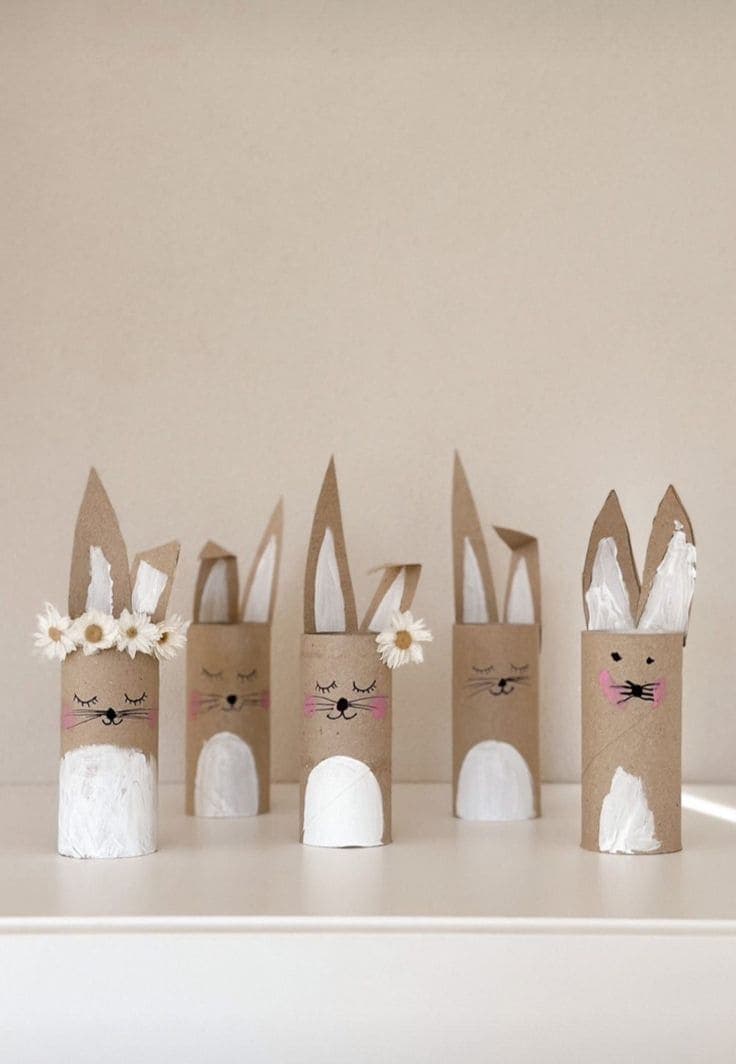
Don’t worry about fancy materials; this charming Easter craft uses simple toilet rolls to create adorable bunny figures with delicate floral accents.
Their neutral tones and clean design make them perfect for adding a subtle, elegant touch to your holiday décor.
Materials Needed:
- Toilet paper rolls
- White acrylic paint
- Paintbrushes
- Black marker or fine-tipped paintbrush
- Pink paint or blush
- Artificial mini flowers or daisy chains
- Scissors
Instructions:
- Paint the lower half of each toilet roll with white acrylic paint to mimic the bunny’s body, leaving the upper part unpainted. Let it dry.
- Cut out long bunny ears from the top of the toilet roll, shaping them with scissors for a realistic look. Paint the inner sections of the ears white.
- Use a black marker or fine-tipped brush to draw the bunny’s facial features, such as closed eyes, a nose, whiskers, and a tiny smile. Add rosy cheeks using pink paint or blush.
- Finally, glue small artificial flowers or a daisy chain around the top of the roll to create a floral crown for some of the bunnies.
#17. Charming Bunny Candle Holders with Burlap Ears
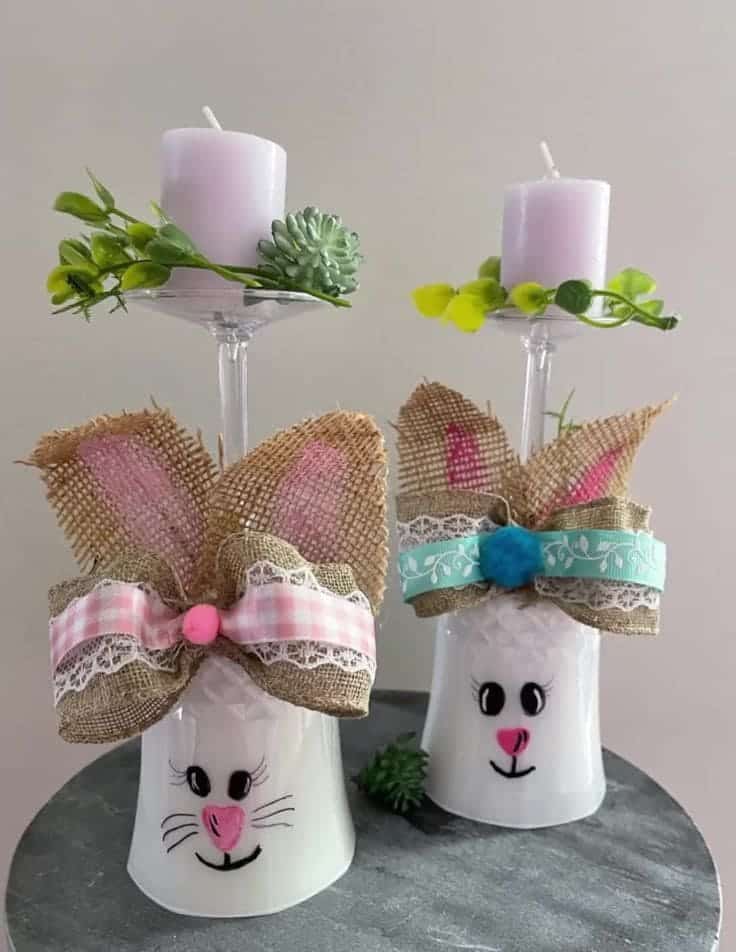
Even your candles can get into the Easter spirit with these adorable bunny candle holders!
Made with simple glassware, burlap ears, and a little paint, these bunnies will brighten up your holiday décor with a touch of whimsy.
Materials Needed:
- Glass candle holders
- White paint
- Pink and black markers or paint
- Burlap fabric
- Ribbon
- Pom-poms
- Small faux greenery (optional)
- Hot glue gun
- Scissors
Instructions:
- Paint the glass candle holders white to create the bunny’s face and body. Allow the paint to dry completely.
- Use the black marker to draw eyes, and the pink marker or paint to create the nose and cheeks. Add whiskers with a fine black pen or paintbrush.
- Cut out ear shapes from the burlap fabric and glue them to the top of the glass holder to form bunny ears.
- Attach a small pom-pom to the front of the holder as the bunny’s nose.
- Tie a cute ribbon bow around the base of the candle holder, securing it with hot glue.
- Optionally, glue small faux greenery around the top or the ribbon for extra festive charm.
#18. Cute Wooden Block Bunny
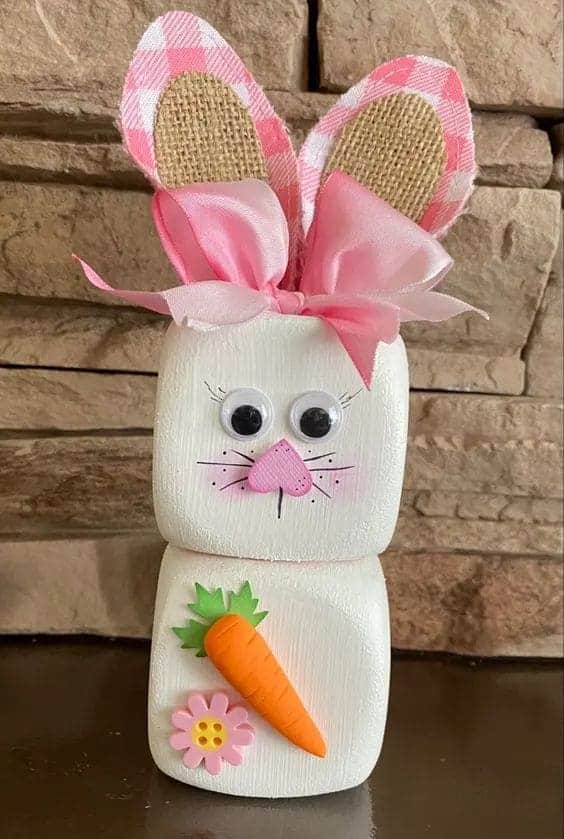
For a quick and charming Easter craft, this adorable wooden block bunny is perfect!
With its simple design, playful features, and a sweet carrot and flower, this bunny makes a delightful addition to any Easter display.
Materials Needed:
- Wooden blocks (2 stacked)
- White paint
- Pink and purple markers
- Googly eyes
- Pink felt
- Pink ribbon
- Burlap
- Foam carrot and flower stickers
- Hot glue gun
- Scissors
Instructions:
- Stack three wooden blocks and glue them together to form the bunny’s body. Paint the entire stack white.
- Draw the bunny’s face on the top block using pink and purple markers. Add googly eyes and a pink felt heart for the nose.
- Cut out ear shapes from burlap and pink fabric, then glue them onto the top block to form the bunny’s ears.
- Tie a pink ribbon into a bow and attach it to the top of the ears.
- Stick a foam carrot and flower sticker to the bottom block to add a cute accessory.
#19. Rustic Burlap Bunny Decor with Soft Tails
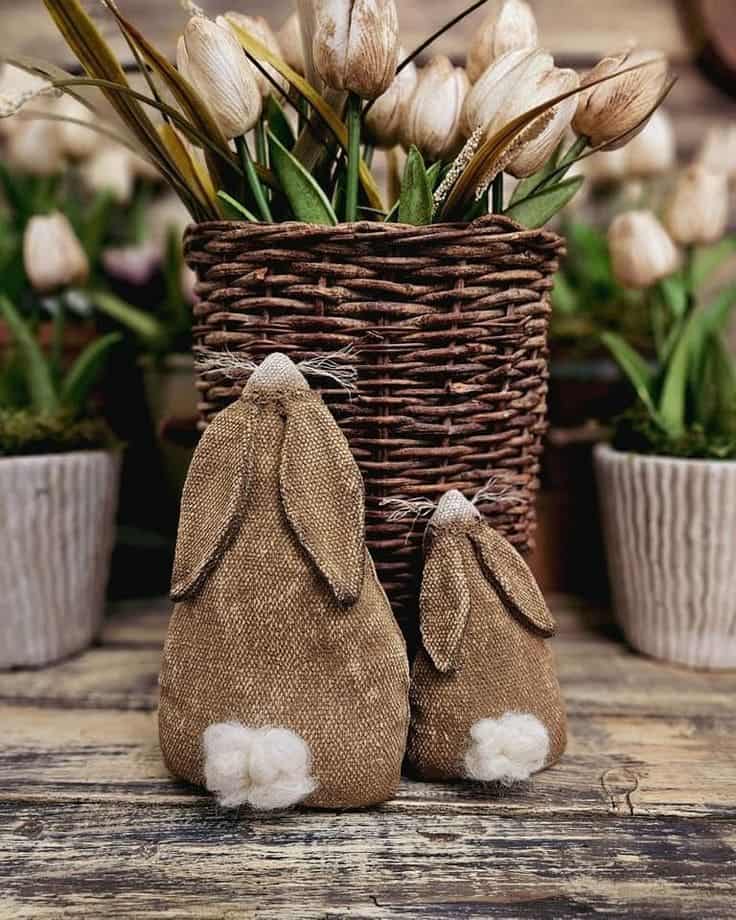
The rustic charm of these burlap bunnies will effortlessly elevate your Easter décor.
With their soft, fluffy tails and simple, earthy tones, these bunnies add a cozy, handmade touch to any room.
Materials Needed:
- Burlap fabric
- White wool or cotton
- Needle and thread or hot glue gun
- Scissors
- Twine or jute
- Small amount of stuffing
- Fabric glue (optional)
Instructions:
- Cut two bunny shapes from the burlap fabric. Make the larger shape for the body and a smaller one for the head.
- Use a needle and thread (or hot glue) to sew or glue the two pieces together, leaving a small opening at the bottom for stuffing.
- Fill the body with a little stuffing to give it a soft, plump look.
- Attach a small tuft of white wool or cotton to the back of the bunny to form a fluffy tail.
- Cut small pieces of twine or jute for the whiskers and glue them around the bunny’s face.
- If desired, add more decorative touches, such as small felt ears or fabric bows.
#20. Fabric-Wrapped Bunny with a Wooden Head
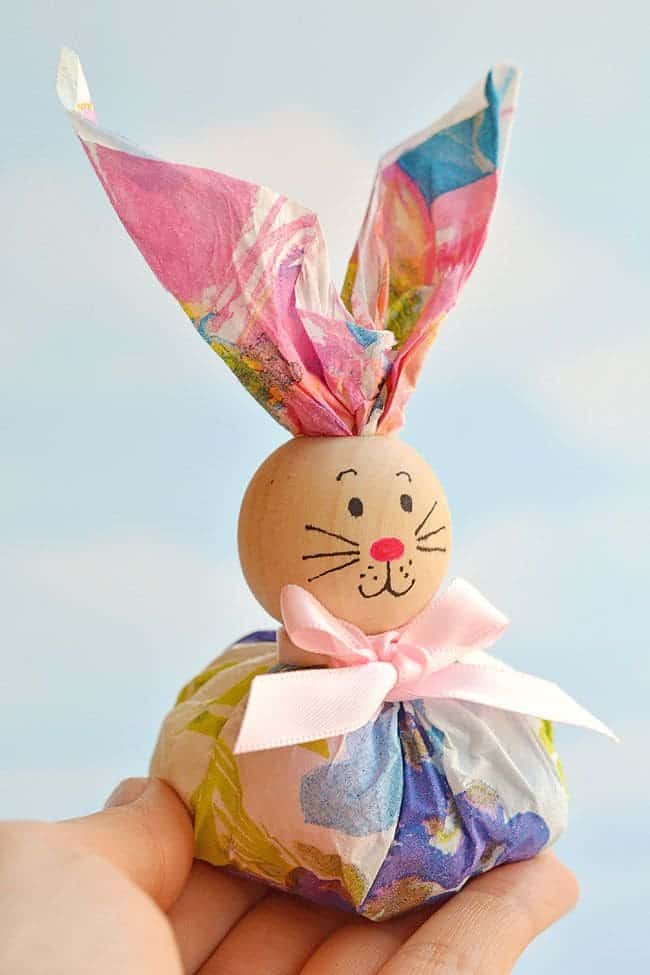
In just a few simple steps, you can create this charming and colorful fabric-wrapped bunny with a wooden head.
Its whimsical design, with its painted facial features, floppy ears, and pretty bow, makes it a perfect DIY Easter decoration.
Materials Needed:
- Wooden bead or small ball
- Colorful fabric (flower-patterned works well)
- Pink ribbon
- Black marker
- Pink paint
- Scissors
- Hot glue gun or fabric glue
Instructions:
- Start by painting the wooden bead or ball with a pink nose and adding simple facial features using the black marker. Let the paint dry.
- Cut a piece of fabric large enough to wrap around the bottom of the bead, leaving extra for the bunny’s body.
- Gather the fabric at the top and twist it to form bunny ears. Secure the twist with glue.
- Attach the fabric to the bottom of the wooden bead, making sure it forms a gathered, skirt-like shape.
- Tie a pink ribbon around the “neck” of the bunny to finish the look and add a cute bow.
#21. Creative Button and Object Bunny Art
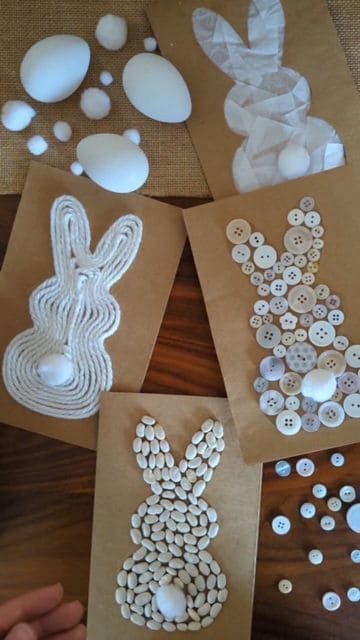
If you’re looking for a simple yet creative Easter craft, these button and object bunny art pieces are perfect.
They’re a playful way to use everyday materials, like buttons, yarn, and egg shapes, to create cute bunny silhouettes that are sure to impress.
Materials Needed:
- White buttons (or any light-colored buttons)
- White cotton balls
- White egg-shaped objects
- Yarn
- Cardstock or brown craft paper
- Glue gun or strong adhesive
- Scissors
Instructions:
- Start by cutting out the basic outline of a bunny shape from your cardstock or brown craft paper.
- Use yarn to create the body and outline of the bunny, securing it in place with glue.
- Glue white buttons along the body of the bunny to create the body and ears, filling in the shapes.
- Place a cotton ball at the bottom of the bunny to represent the fluffy tail, and glue in place.
- For additional texture, use small egg-shaped objects to fill in any gaps or create other bunny features.
#22. Charming Plush Bunny Silhouettes
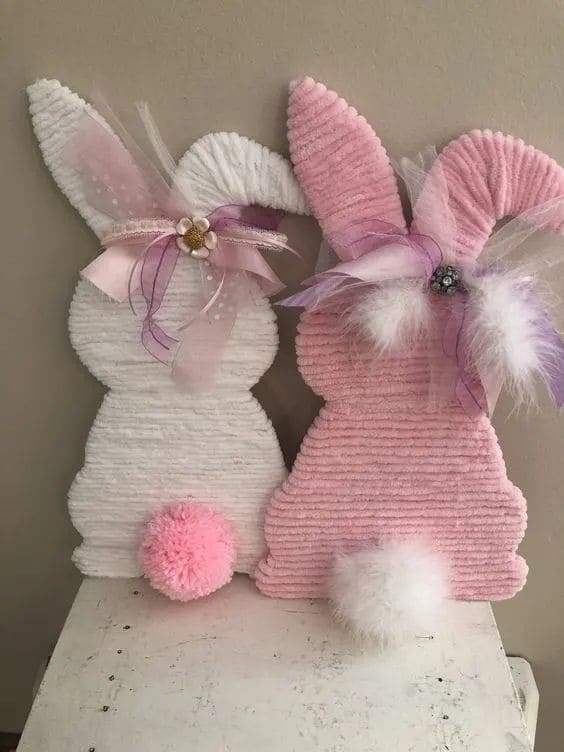
To add a soft, plush touch to your Easter décor, these adorable bunny silhouettes are perfect.
With their fluffy pom-pom tails, elegant bows, and sweet pastel colors, these bunnies will instantly bring joy and whimsy to any room.
Materials Needed:
- White and pink corduroy fabric
- Large pom-poms
- Ribbon (in pastel colors)
- Glue gun or sewing materials
- Scissors
- Cardboard or foam board
- Decorative flowers (optional)
Instructions:
- Cut bunny shapes from cardboard or foam board, tracing a simple bunny silhouette.
- Cut the fabric into strips, and glue or sew it onto the bunny shapes, creating a textured look with the corduroy fabric.
- Attach a fluffy pom-pom to the back of each bunny for the tail.
- Create bows with the pastel ribbons and glue them onto the top of the bunny ears. Add decorative flowers for an extra touch of charm.
- Allow everything to dry or set properly if glued, and then display these soft bunnies on tables or hang them on your walls as an adorable Easter accent.
#23. Creative Newspaper Bunny Art
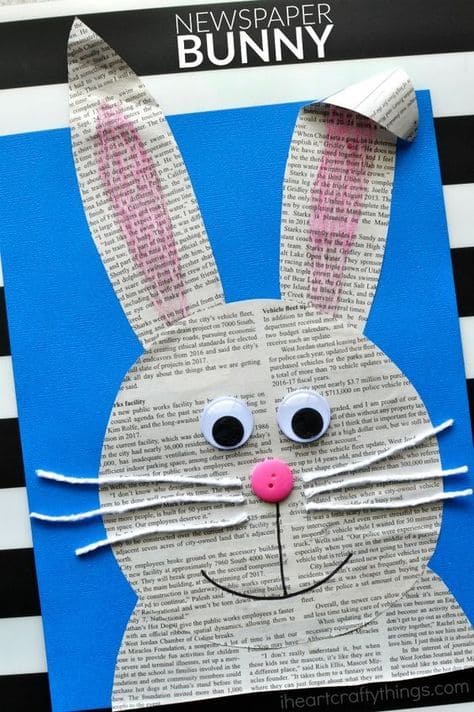
Even with old newspapers lying around, you can create this delightful bunny art! It’s a simple, eco-friendly Easter craft that’s perfect for kids, combining texture and whimsy with minimal effort.
Materials Needed:
- Old newspapers
- Colored construction paper (background)
- Pink crayon or paint
- Googly eyes
- Pink button or pom-pom (for the nose)
- White yarn or string (for whiskers)
- Scissors
- Glue stick or craft glue
Instructions:
- Cut a large circle and two long ovals from the newspaper to form the bunny’s head and ears.
- Glue the newspaper pieces onto a sheet of colored construction paper, positioning the circle as the head and the ovals as ears.
- Add pink accents to the inner parts of the ears using a crayon or paint for a playful touch.
- Attach googly eyes and a pink button or pom-pom to the face for the eyes and nose.
- Cut small pieces of white yarn or string and glue them near the nose to create whiskers then draw a simple smile with a marker.
#24. Whimsical Bunny Egg Decorations with Floral Crowns
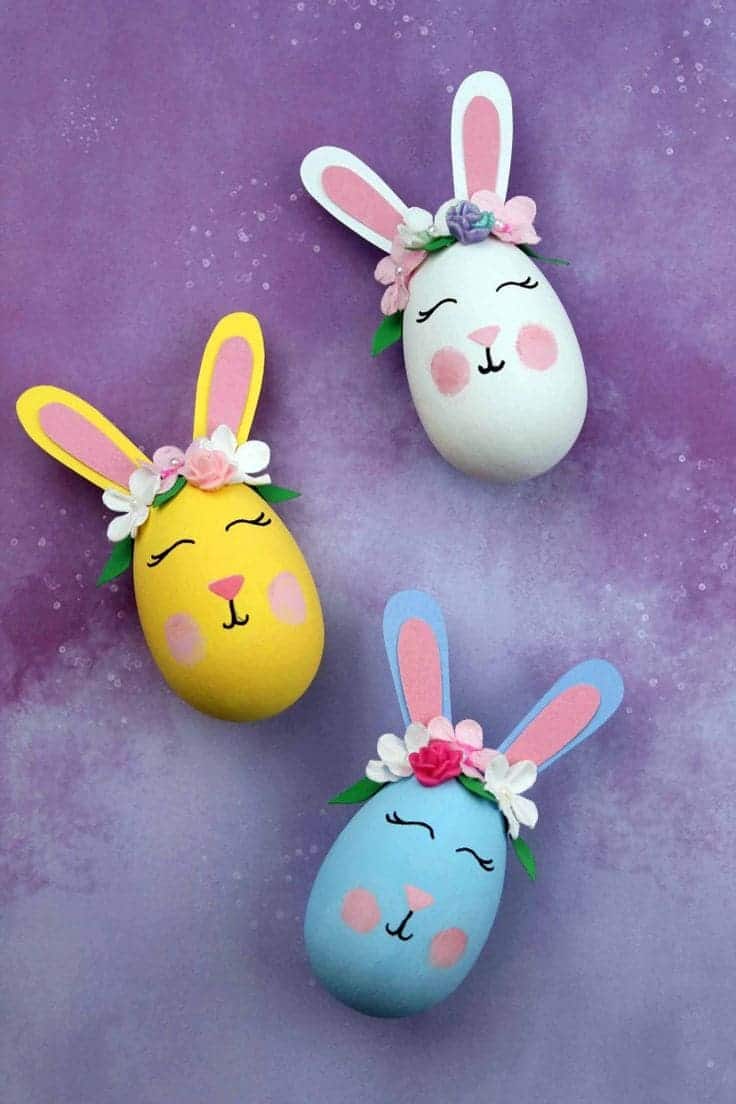
These adorable bunny egg crafts feature vibrant pastel colors and charming floral crowns, making them perfect for Easter festivities.
With their sweet, hand-painted details and playful ears, these bunnies will add a touch of elegance and fun to your holiday décor.
Materials Needed:
- Plastic or hard-boiled eggs
- Acrylic paint (white, yellow, blue, pink)
- Paintbrushes
- Craft foam (white, pink, green)
- Artificial mini flowers
- Hot glue gun
- Black marker or fine-tipped paintbrush
Instructions:
- Paint the eggs with your chosen base color (white, yellow, or blue) and let them dry completely.
- Cut bunny ear shapes from white craft foam and smaller inner ear shapes from pink foam. Glue the pink pieces onto the white ones.
- Attach the ears to the top of the eggs using a hot glue gun.
- Draw the bunny’s face using a black marker or fine-tipped paintbrush, adding whiskers, a nose, and closed eyes. Add pink cheeks with paint for extra charm.
- Create a floral crown by gluing small artificial flowers and green foam leaves around the base of the ears.
#25. Charming Sock Bunny Centerpiece
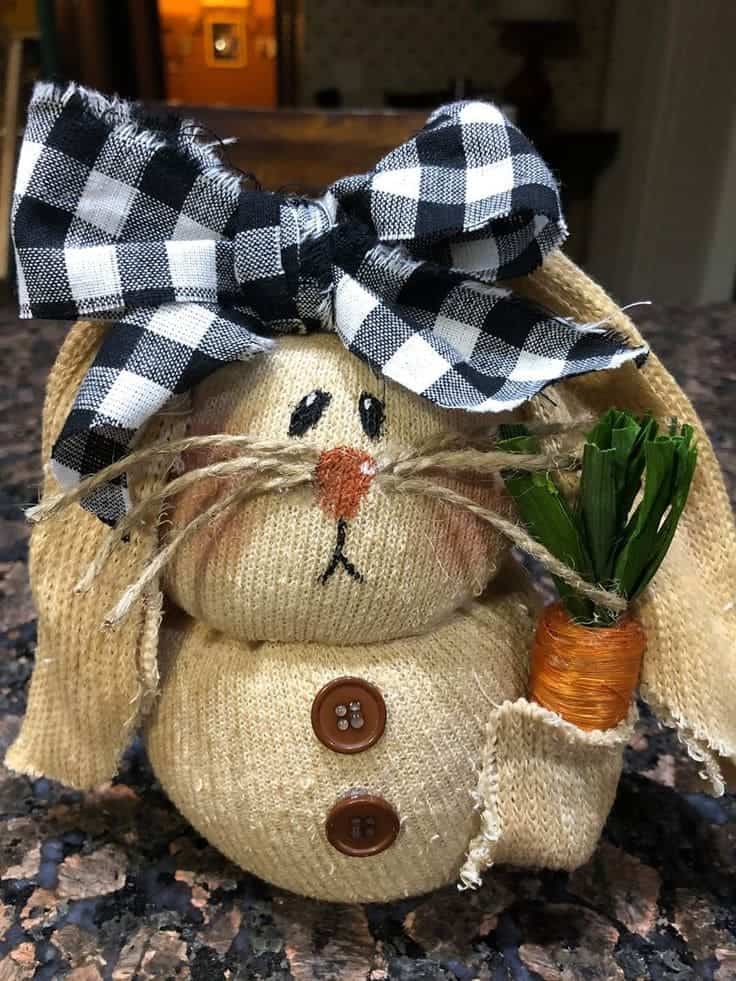
This delightful DIY project transforms a simple sock into an adorable Easter bunny with rustic charm.
Its floppy ears, hand-drawn face, and a playful plaid bow create a cozy, farmhouse vibe that’s perfect for Easter décor.
Materials Needed:
- Beige or light brown sock
- Rice or stuffing
- Twine or rubber bands
- Black and orange markers
- Fabric scraps
- Buttons
- Artificial greenery or ribbon
- Orange thread or string
- Hot glue gun
Instructions:
- Fill the sock with rice or stuffing to form two rounded sections for the body and head. Secure with twine or rubber bands.
- Shape the ears by cutting the top part of the sock and trimming it into long, floppy ear shapes.
- Use markers to draw the bunny’s face, including the nose, whiskers, and eyes.
- Attach buttons to the body with hot glue for decorative charm.
- Create the carrot by wrapping orange string around greenery or ribbon and gluing it in place.
- Tie a fabric bow around one ear or the neck for a farmhouse finish.
#26 Cozy Plaid Bunny Wall Hanging with Bow
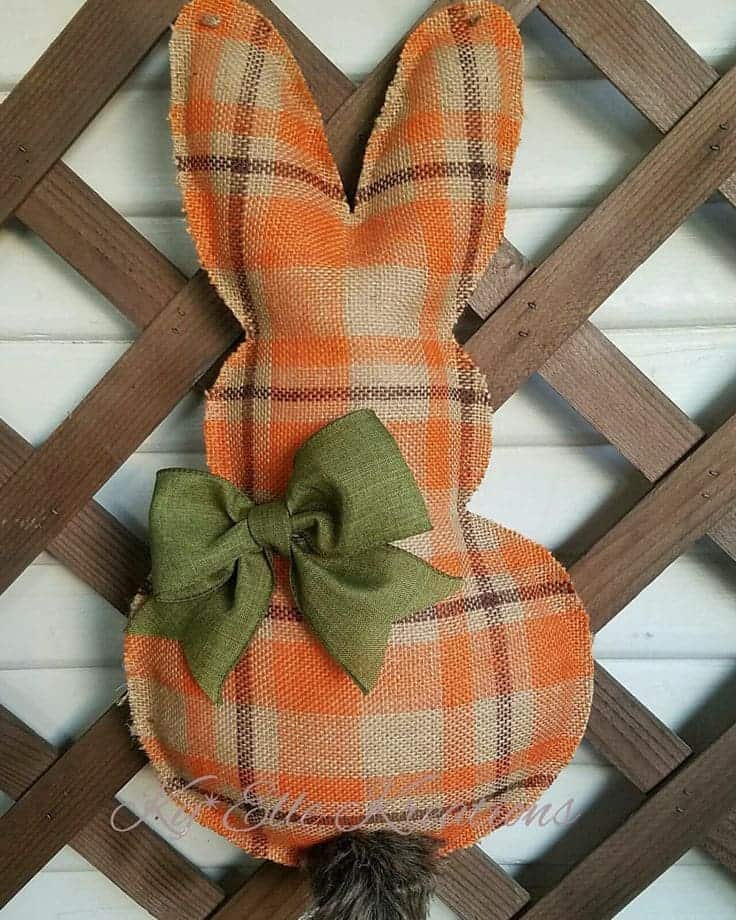
Made with charming plaid fabric and rustic details, this bunny wall hanging is a delightful way to bring a warm, farmhouse vibe to your Easter décor.
Its soft texture, vibrant colors, and elegant bow make it a standout piece for any home.
Materials Needed:
- Plaid fabric (orange or any spring color)
- Stuffing material (cotton or fabric scraps)
- Green burlap ribbon or bow
- Sewing needle and thread (or hot glue gun)
- Scissors
- Faux fur or pom-pom
- Twine
Instructions:
- Cut two bunny-shaped pieces from the plaid fabric. Make them slightly larger than your desired finished size to allow for seams.
- Sew the two fabric pieces together along the edges, leaving a small opening at the bottom. If you prefer, use hot glue for a no-sew option.
- Stuff the bunny with cotton or fabric scraps until it’s plump and evenly filled. Sew or glue the opening closed.
- Attach a faux fur tail or pom-pom to the back of the bunny using glue or thread.
- Tie a green burlap ribbon into a bow and glue it to the bunny’s neck area for a decorative touch.
- Add a loop of twine at the top for easy hanging on walls, doors, or fences.
#27. Whimsical Bunny Butt Wall Hanging with Carrots
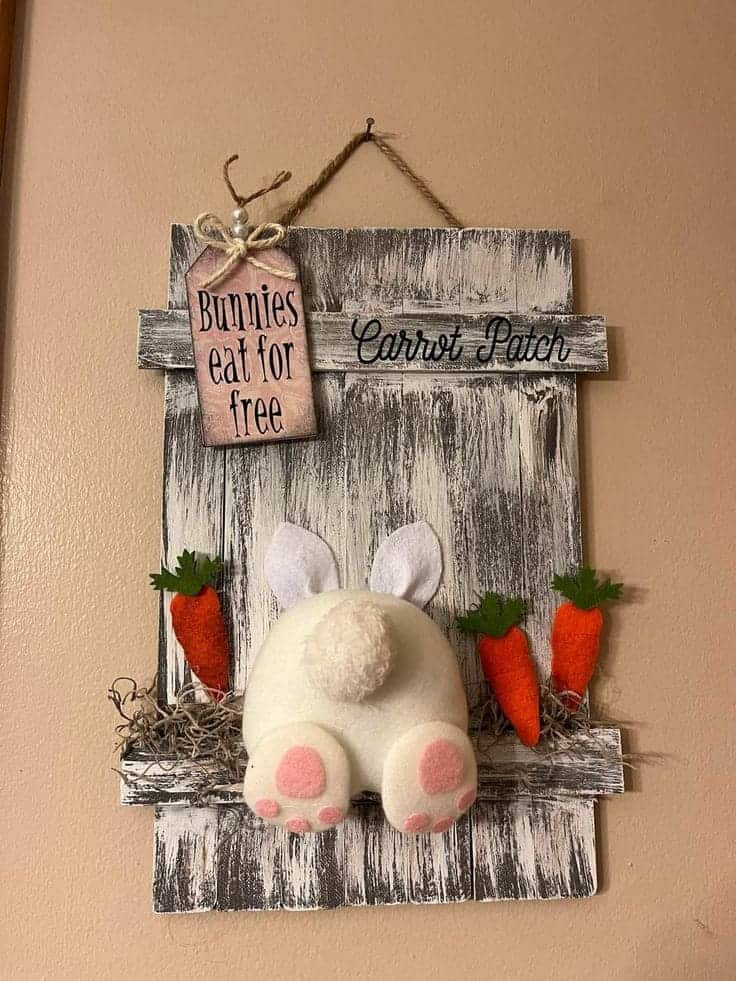
If you’re looking for a fun and quirky way to add Easter charm to your home, this bunny butt wall hanging is just what you need!
Complete with soft bunny feet, a fluffy tail, and playful carrots, it brings a whimsical touch to any room.
Materials Needed:
- Wooden plaque or rustic board
- White felt
- Pink felt
- Pom-pom
- Faux carrots (or carrot-shaped foam)
- Twine or string
- Hot glue gun
- Scissors
- Moss
- Paint
Instructions:
- Start by painting your wooden plaque with a whitewashed finish, using a dry brushing technique for a rustic look. Let it dry completely.
- Cut out a round bunny body shape from white felt, and attach a large pom-pom for the tail using hot glue.
- Cut small oval shapes from pink felt for the bunny’s paws and glue them to the bottom of the body.
- Cut out bunny ears from white felt, adding pink accents to the inner ear. Attach the ears to the top of the body.
- Attach faux carrots around the bunny using hot glue. You can glue them directly to the plaque or let them sit in a nest of moss for a more rustic look.
- Add a small sign that says “Carrot Patch” or “Bunnies Eat for Free” to complete the look, using twine to attach it above the bunny.
- Finally, add a twine loop at the top of the plaque for easy hanging.
#28. Lovely Bunny Butt Decoration with Carrots
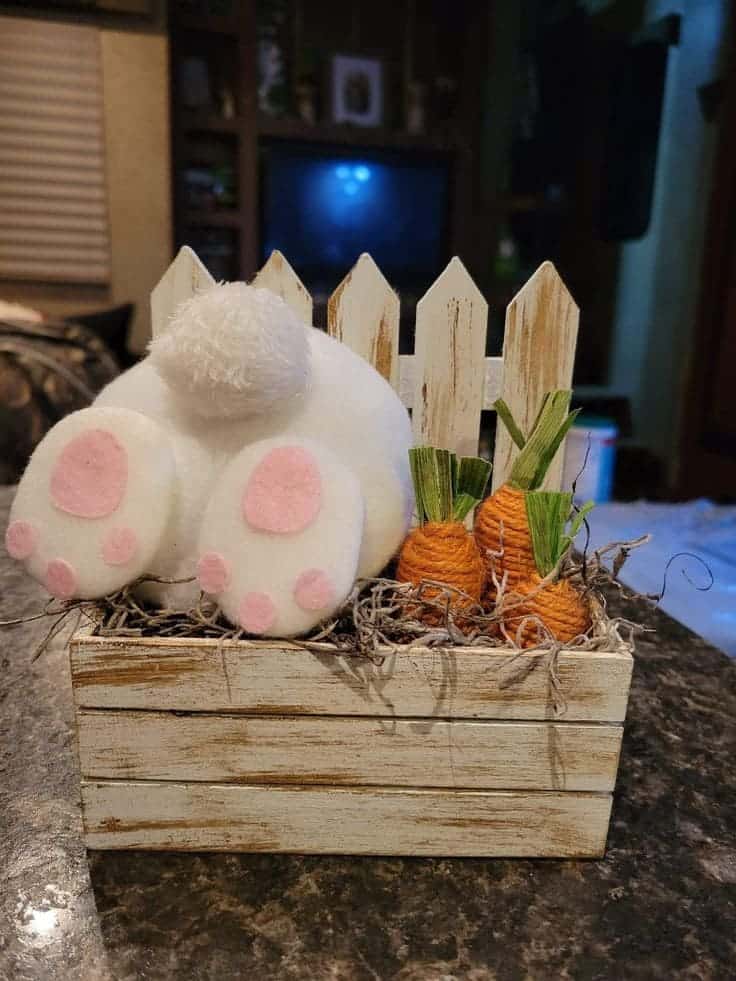
Rather than the typical Easter décor, this charming bunny butt arrangement brings a whimsical touch to your home.
With its fluffy tail, sweet pink feet, and fresh-looking carrots, this easy-to-make craft is sure to delight your guests.
Materials Needed:
- Wooden crate or small box
- Faux grass or moss
- Felt (white, pink)
- Pom-pom (for the tail)
- Wooden fence pieces (or craft sticks)
- Twine or orange yarn (for carrots)
- Green felt (for carrot tops)
- Scissors
- Hot glue gun
Instructions:
- Start by painting the small crate or box in a rustic or whitewashed finish, using a dry brush technique for a weathered look.
- Fill the box with faux grass or moss to create a soft base for the bunny.
- Cut out bunny feet shapes from white felt, and use pink felt to add the paw pads. Glue the feet to the back of the box.
- Attach a large white pom-pom to the back for the bunny’s tail.
- For the carrots, wrap orange yarn around a small wooden stick or foam piece, securing the end with glue. Cut green felt into small strips and glue them to the top of each carrot to mimic leaves.
- Position the carrots in front of the bunny, arranging them to look natural.
