Have you ever wished you could bring your favorite Christmas characters to life right in your living room? With these 20+ creative Christmas character crafts, you can do exactly that.
From jolly Santas and playful reindeer to cheerful snowmen and mischievous elves, each project adds a sprinkle of magic to your holiday season.
These crafts aren’t just decorations, they’re tiny stories of joy made by your own hands.
#1. Painted Wood Slice Christmas Characters
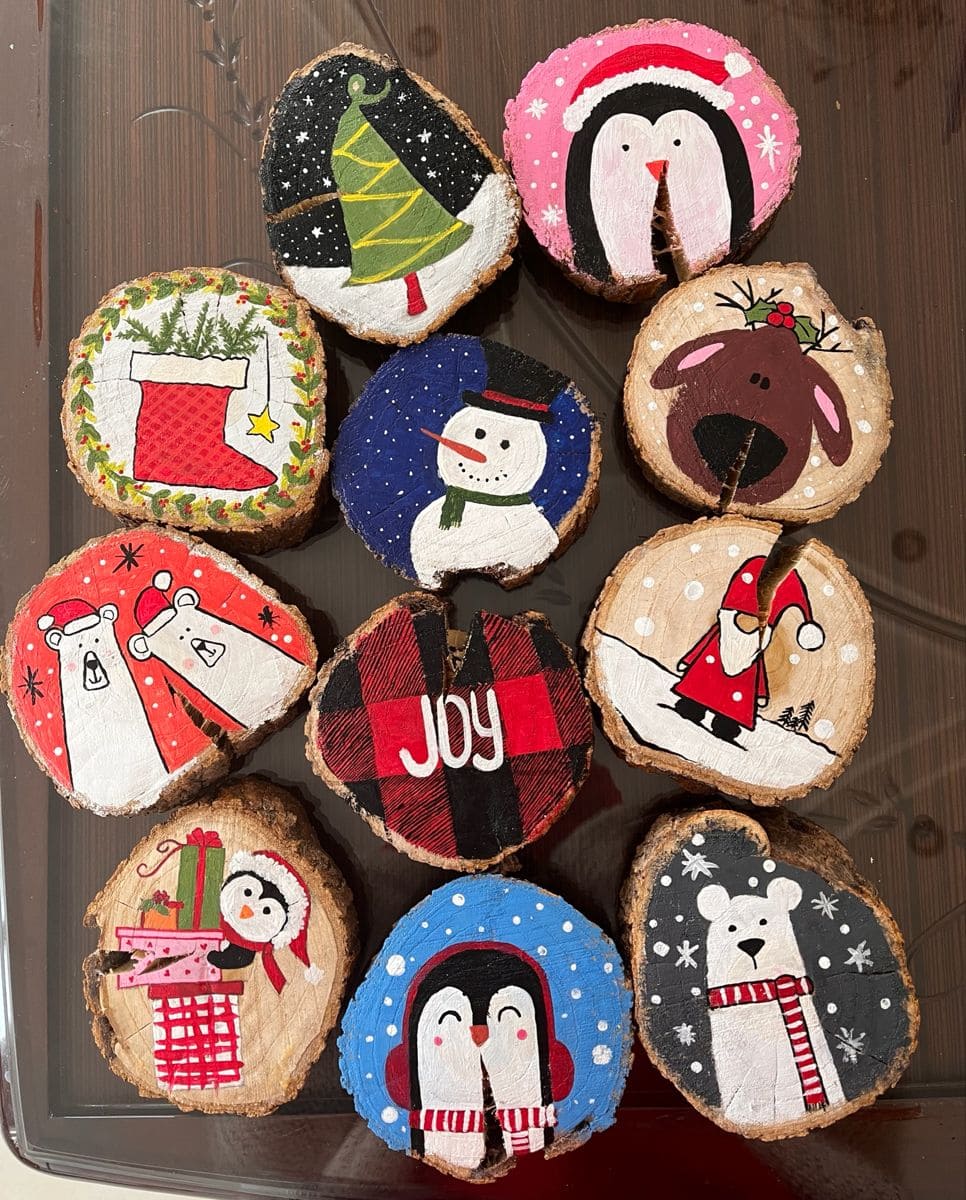
There’s something magical about these little painted wood slices, each one feels like a tiny winter story captured in color.
With just a few strokes of paint, you can turn ordinary tree slices into joyful Christmas keepsakes.
From penguins in scarves to cheerful snowmen and reindeer, every piece becomes a character full of warmth and whimsy.

- 10 natural wood slices ((3-4” diameter, about ½” thick))
- Acrylic paints ((red, white, black, green, blue, brown, yellow, pink))
- Small paintbrush set ((fine detail and medium flat brushes))
- Pencil
- White gel pen or paint marker
- Twine or jute string ((2-3 ft, optional for hanging))
- Drill ((for holes if making ornaments))
- Matte or glossy sealant spray ((1 can))
-
Lightly sand each wood slice to smooth the surface, then sketch simple Christmas shapes like penguins, trees, or snowmen using a pencil.
-
Paint your background colors first such as navy for night skies, red for warmth, or soft gray for snow scenes. Let dry before adding details.
-
Fill in your main characters, layering lighter shades over dark backgrounds for contrast. Use a fine brush to define faces, hats, scarves, and outlines.
-
Add fun accents like dots for snow, stars, or plaid textures. A white paint marker helps bring everything to life with small highlights.
-
Once the paint dries completely, seal each slice with matte or glossy spray for protection and shine.
You can drill a small hole at the top, loop twine through, and tie a knot to hang them.
#2. Toilet Paper Roll Christmas Characters
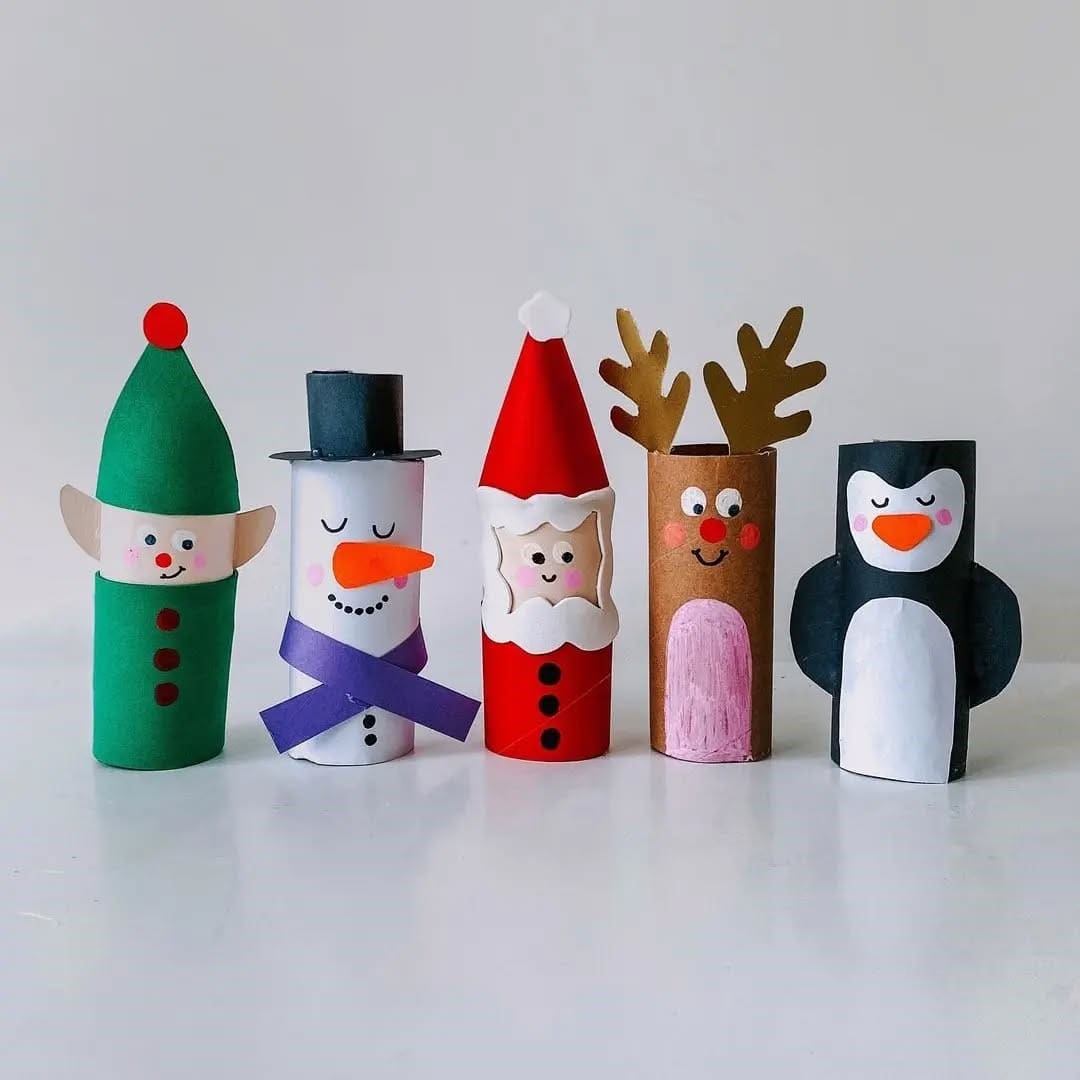
These charming Christmas characters made from toilet paper rolls are the perfect mix of creativity and cuteness.
You can turn simple recyclables into an adorable lineup like Santa, a snowman, an elf, a reindeer, and even a penguin.
Each one has its own personality, and together they bring a festive story to your holiday decor.

- 5 empty toilet paper rolls ((4” height))
- Colored craft paper ((green, red, brown, black, white, orange, purple, pink))
- Glue stick and craft glue
- Scissors
- Black marker or fine paint pen
- 3 Small red pom-poms
- Mini cotton balls ((3 pieces for Santa’s hat and beard))
- Googly eyes ((optional, 10 pieces))
- Double-sided tape
- Double-sided tape
-
Wrap each toilet paper roll with colored craft paper like green for the elf, white for the snowman, red for Santa, brown for the reindeer, and black for the penguin. Secure the paper using glue or double-sided tape.
-
Cut and glue small paper shapes to build faces and outfits such as triangles for hats, circles for buttons, and ovals for bellies. For Santa, use cotton for his beard and hat trim; for the reindeer, cut antlers from brown paper.
-
Add a small orange triangle for the snowman’s nose and a red pom-pom for Rudolph’s. Draw eyes and smiles with a black marker.
-
Make accessories like scarves, belts, and collars from leftover colored paper. A purple scarf for the snowman or a gold belt for Santa adds extra charm.
-
Line up your finished characters together. Their playful expressions and bright colors will make any shelf or windowsill look merry and alive.
#3. Christmas Paper Chain Characters
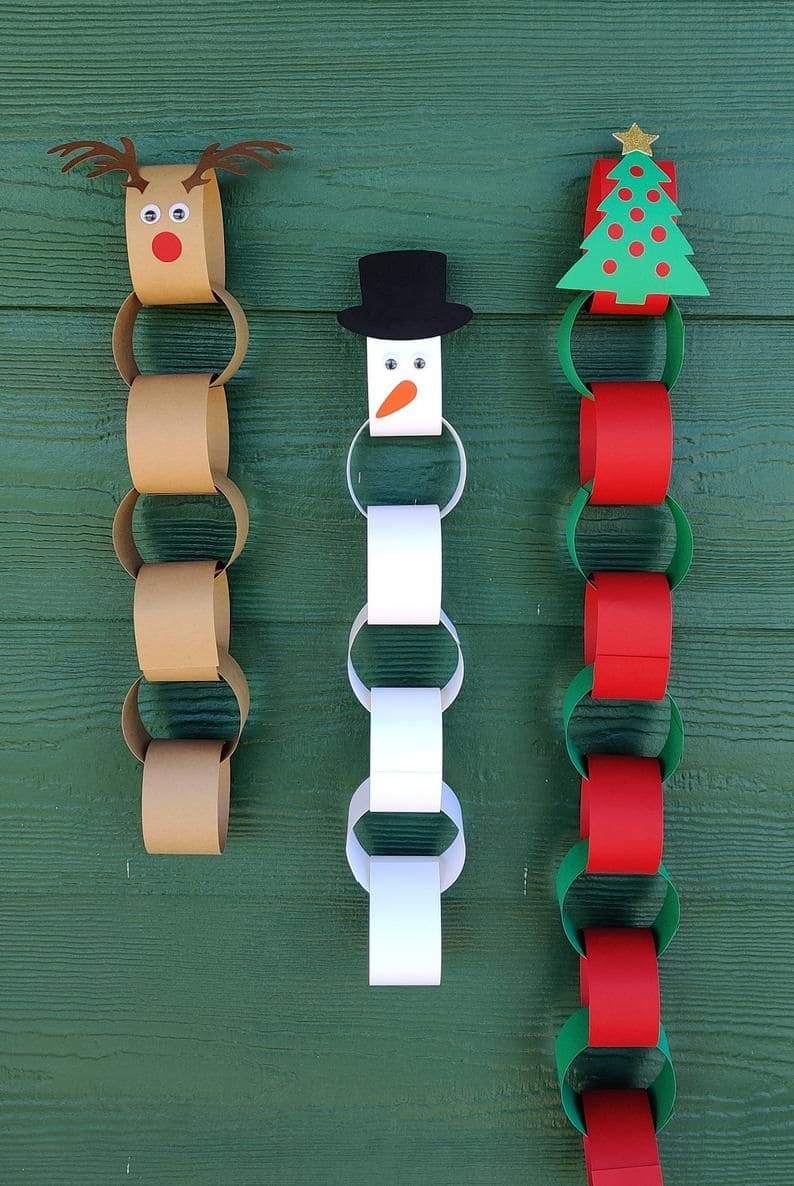
Simple yet full of spirit, these Christmas paper chain characters bring old-fashioned charm to your holiday decor.
With just colored paper and imagination, you can turn each link into part of a story such as a reindeer, a snowman, and a Christmas tree standing proudly side by side.
Each one feels playful, nostalgic, and cheerful, perfect for decorating a classroom, a kid’s room, or even your mantel.

- Colored paper ((brown, white, red, green, black, orange, and gold))
- Scissors or paper cutter
- Glue stick or tape
- Googly eyes ((6-8 small pairs))
- Red pom-poms or circle stickers
- Black marker
- Gold star stickers or cutouts
- Ruler and pencil for measuring strips
-
Cut colored paper into strips about 1 inch wide and 8 inches long. You’ll need several strips for each chain including brown for the reindeer, white for the snowman, and alternating red and green for the Christmas tree.
-
Form the first paper strip into a loop and secure it with glue or tape. Then thread the next strip through it and repeat until your chain reaches the desired length.
-
For the reindeer, glue googly eyes and a red pom-pom nose on the top link, then add hand-cut brown antlers.
-
For the snowman, attach eyes, a small orange triangle for the carrot nose, and a black paper top hat.
-
For the Christmas tree, add green paper “branches,” red ornaments, and a gold star on top.
-
Hang your festive chains across doorways, stair rails, or windows. They bring a sweet, homemade feel to any space and making them together feels like counting down to Christmas with laughter and gluey fingers.
#4. Christmas Crochet Characters
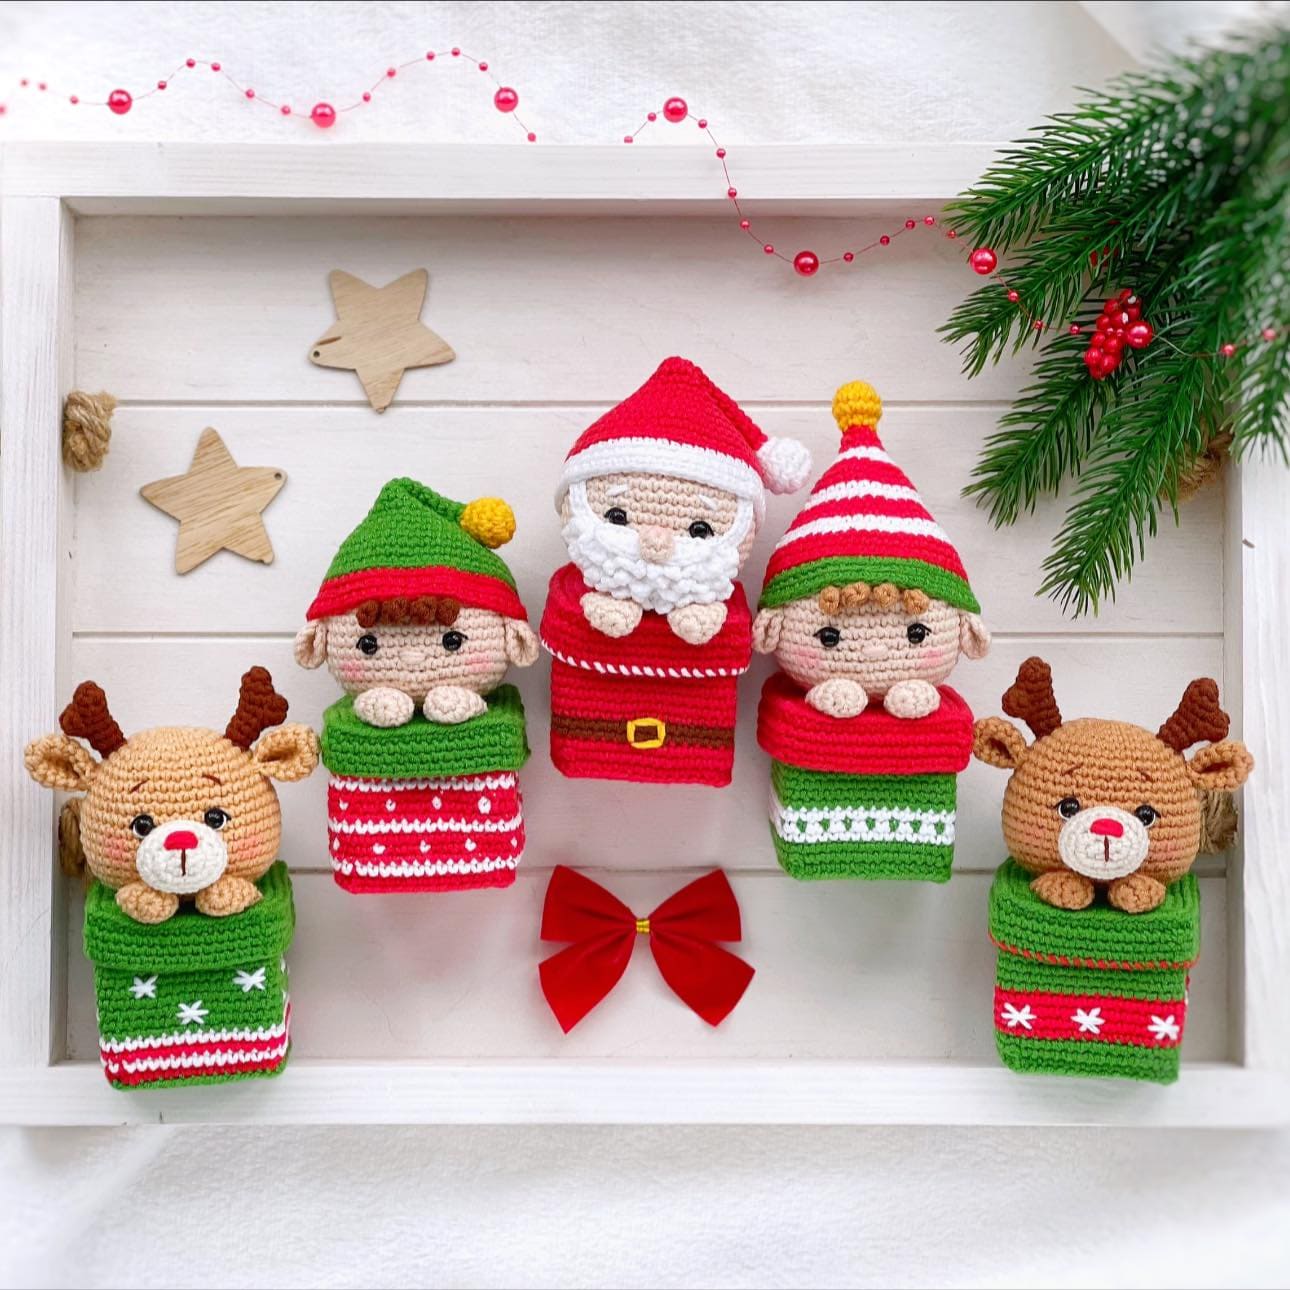
There’s a cozy kind of magic in these handmade crochet Christmas characters, Santa, his smiling elves, and two adorable reindeer all bursting with color and charm.
Making them is more than a craft; it’s like stitching joy into every loop.
When you finish, they bring warmth to any corner of your home, whether perched on a shelf, nestled in stockings, or gifted to someone special.

- Assorted yarn in red, green, white, brown, and beige ((50g each))
- Crochet hook ((2.5mm-3.5mm))
- Polyester fiberfill for stuffing ((approx. 100g))
- Black embroidery thread for facial details
- Safety eyes or small black beads ((8mm))
- Tapestry needle and scissors
- Small pom-poms or felt accents ((optional))
-
Crochet the base of each figure in festive colors, alternating stripes to create that Christmas sweater look.
-
Shape the heads using beige yarn and stuff lightly for a soft, rounded form.
-
Add signature details like Santa’s beard, elf hats, and reindeer antlers using coordinating yarn or felt.
-
Stitch the heads securely onto the bodies and check that each sits upright.
-
Finish with embroidered smiles and eyes. Then add pom-poms, scarves, or tiny buttons for personality.
#5. Baluster Santa and Snowman Duo
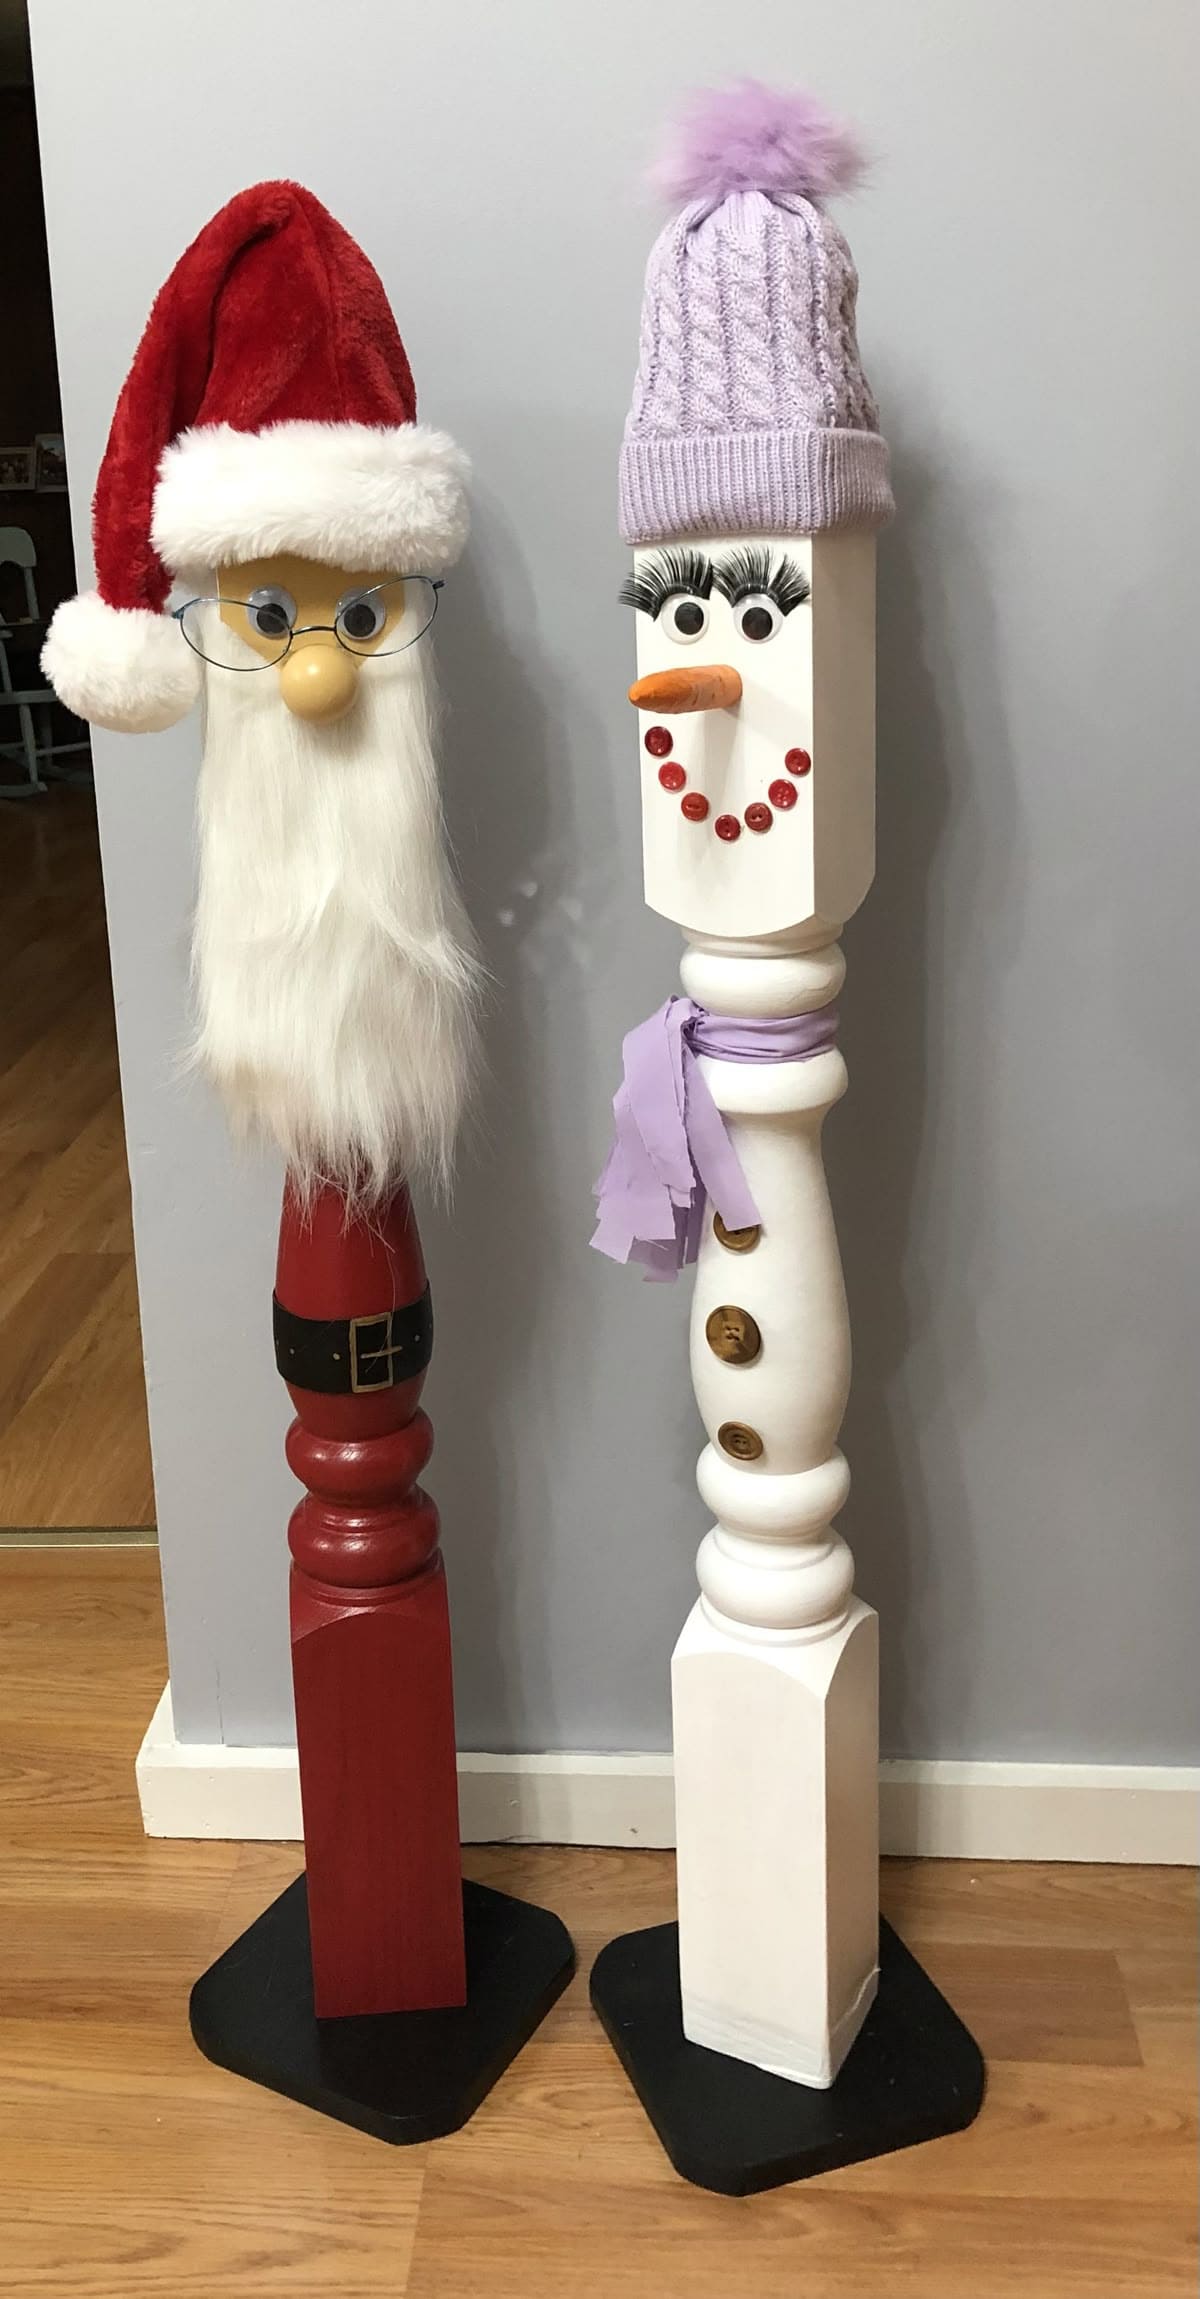
Wow, these tall Santa and Snowman figures made from old stair balusters are the kind of DIY project that makes people stop and smile.
Standing proudly in a hallway or porch corner, they bring an instant festive charm, one with a jolly beard and the other with rosy cheeks and a carrot nose.
Their playful details, from Santa’s glasses to the snowman’s pom-pom hat, make them both elegant and fun.

- 2 old wood balusters ((around 36-40” tall))
- Acrylic paint ((red, white, black, beige, orange))
- Paintbrushes ((1 large flat, 1 fine detail))
- Santa hat and winter beanie with pom-pom
- White faux fur ((8” strip for beard))
- Plastic glasses frame ((optional for Santa))
- (optional for Santa)
- 2 Small round wooden knobs or balls
- 6-8 Buttons
- Scarf or fabric strip ((12”-14” long))
- Hot glue gun and glue sticks
- Black wooden or MDF bases ((2 pieces, approx. 8”×8”))
-
Sand and clean the balusters thoroughly. Paint one red for Santa and the other white for the snowman. Then apply two coats for a smooth, even finish.
-
For Santa, glue a small wooden ball for the nose and attach the faux fur beard just below it. Once dry, place a Santa hat on top and add a belt detail using black paint and a gold buckle.
-
For the snowman, glue on the carrot-shaped wooden nose, paint eyes and a smiling mouth with black paint, and use red buttons for a cheerful touch.
-
For the snowman, glue on the carrot-shaped wooden nose, paint eyes and a smiling mouth with black paint, and use red buttons for a cheerful touch.
-
Finally, mount both figures onto the black wooden bases for stability.
#6. Rustic Santa Stick Craft
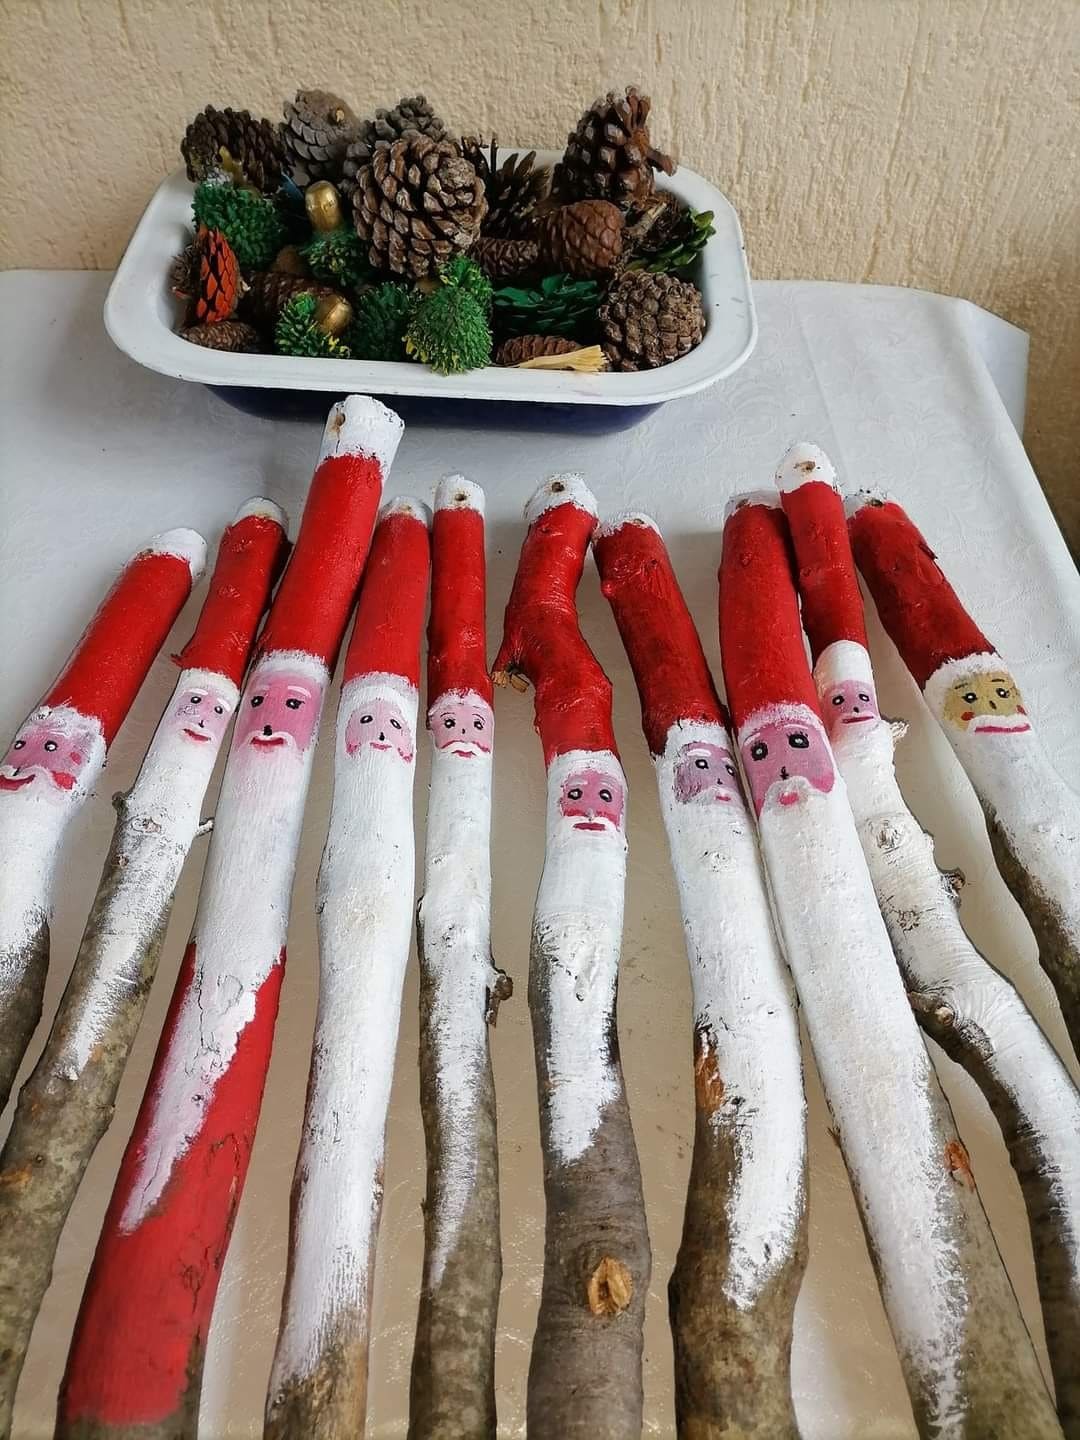
There’s a certain charm in these hand-painted Santa sticks, they capture the simplicity and warmth of old-fashioned Christmas crafts.
Made from gathered branches, each Santa has a personality of his own, with rosy cheeks, kind eyes, and that classic red-and-white suit.
It’s the perfect project for cozy afternoons, especially if you enjoy creating something from nature.

- 10-12 tree branches ((length 10-12”, diameter 1-1.5”))
- Acrylic paints ((red, white, pink, black))
- Small paintbrush set ((flat and fine tip))
- Sandpaper
- Clear matte sealant spray ((1 can))
- Optional: twine or ribbon ((for hanging or tying together))
-
Choose sturdy, straight sticks with interesting bark texture. Then cut them to similar lengths and sand one side slightly to create a smooth painting surface.
-
Paint the top third of each stick red for Santa’s hat, leaving a small tip white for the pom-pom.
-
Paint the middle portion pink to form Santa’s face, blending softly into the red. Below the face, add a thick white section for his beard and coat trim.
-
Once dry, use a fine brush to paint eyes, a small mouth, and rosy cheeks. Don’t worry about perfection, uneven strokes add character!
-
Spray each stick with matte sealant for durability and a gentle sheen.
-
Bundle a few together with twine for a rustic display or stand them upright in a vase filled with pinecones.
#7. Pinecone Christmas Characters
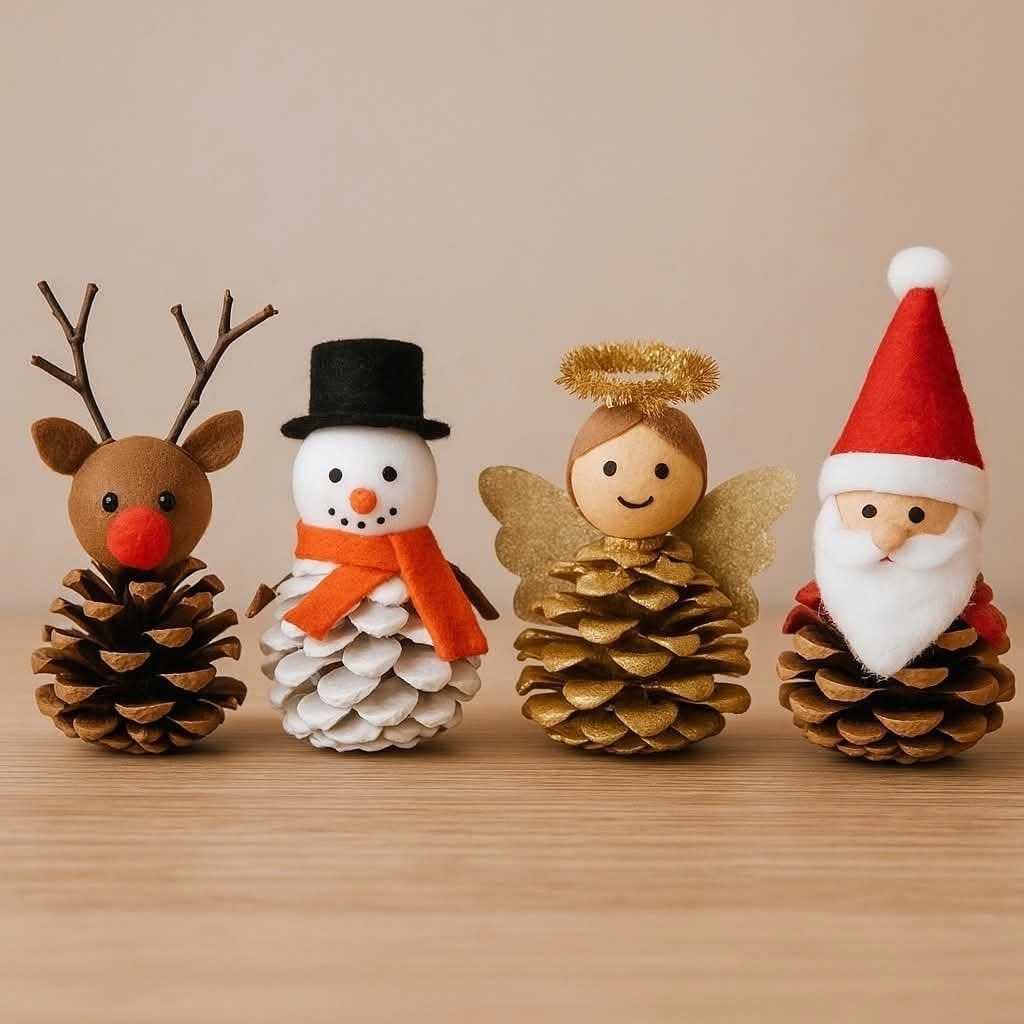
Look! These little pinecone Christmas characters bring a woodland kind of joy.
You can see a reindeer, snowman, angel, and Santa come to life using nothing more than pinecones, felt, and imagination.
Each one seems to tell its own story, and once they’re lined up together, they create a heartwarming winter scene.

- 4 medium pinecones, cleaned and dried
- Wooden craft balls (1-1.5 inch) for heads
- Acrylic paint ((white, red, brown, gold, black, orange))
- Small felt sheets in red, white, black, orange, and gold
- Mini pom-poms, pipe cleaners, and twigs
- Hot glue gun and glue sticks
- Small paintbrushes
- Scissors
-
Start by cleaning your pinecones and making sure they can stand flat on a surface. If needed, trim the bottom slightly.
-
Paint the pinecones according to each character, you should l leave natural for the reindeer and Santa, paint white for the snowman, and gold for the angel. Allow to dry completely.
-
Paint the wooden heads. Add facial details with a fine brush such as cheerful eyes, rosy cheeks, and sweet smiles.
-
Attach each head to the top of a pinecone using hot glue.
-
Now add felt antlers and a red pom-pom nose for the reindeer, a black hat and orange felt scarf for the snowman, a gold halo and wings for the angel, and Santa’s red hat and beard made of felt and cotton.
-
Arrange them together on your table or mantel. They look charming in groups and make wonderful handmade gifts or ornaments that carry the warmth of homemade Christmas joy.
#8. Popsicle Stick Christmas Crafts
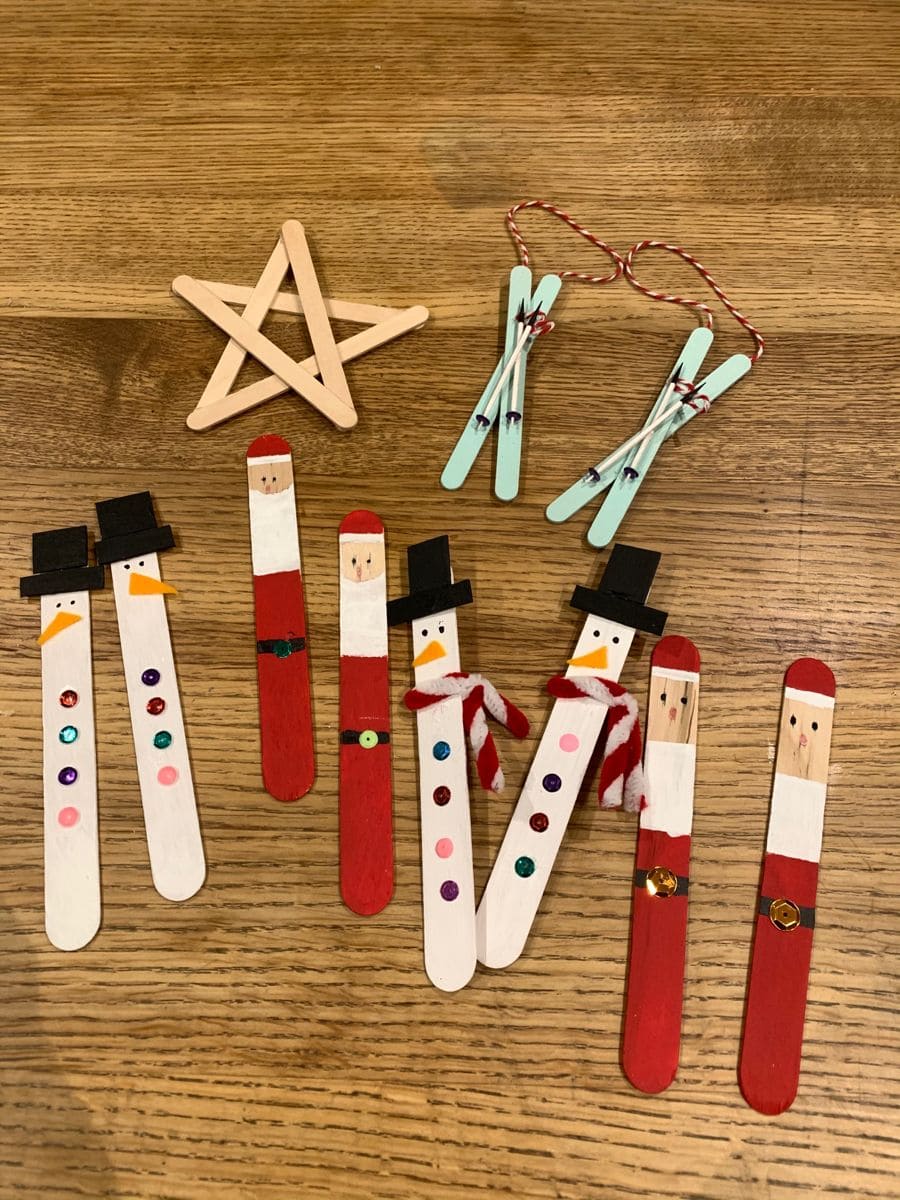
These adorable popsicle stick crafts capture the cheerful, homemade magic of the holidays.
Each tiny snowman, Santa, and star feels like a piece of childhood joy with simple, bright, and full of character.
Plus, they’re easy enough for kids yet charming enough to hang proudly on any Christmas tree or wall.

- 20 popsicle sticks ((regular size, 4.5” long))
- Acrylic paint ((red, white, black, orange, light blue))
- Small paintbrush set ((1 fine, 1 flat))
- 10-12 Mini sequins or rhinestones
- Red and white twine ((12 inches for hanging loops))
- Mini pom poms or small buttons ((optional))
- Hot glue gun or craft glue
- Scissors
- Permanent black marker for faces and details
-
Paint several sticks white for snowmen, red for Santa, and light blue for ski ornaments. You leave a few natural for the star. Let them dry fully.
-
For the Santas, paint the top part of each stick beige for the face, add a red hat tip, and draw small eyes and a pink nose. Use a gold sequin as the belt buckle for detail.
-
For the Santas, paint the top part of each stick beige for the face, add a red hat tip, and draw small eyes and a pink nose. You can use a gold sequin as the belt buckle for detail.
-
To make the star, glue five sticks in a crisscross pattern, forming a perfect five-point shape. Hold each connection for a few seconds until secure.
-
For ski ornaments, cross two light-blue sticks, glue them in an X, and tie red-and-white twine through the top for hanging. Then add a small bow for cuteness.
-
Once dry, arrange them together, you’ll have a cozy little collection of handmade Christmas decorations that radiate rustic charm and holiday spirit.
#9. Painted Clothespin Christmas Characters
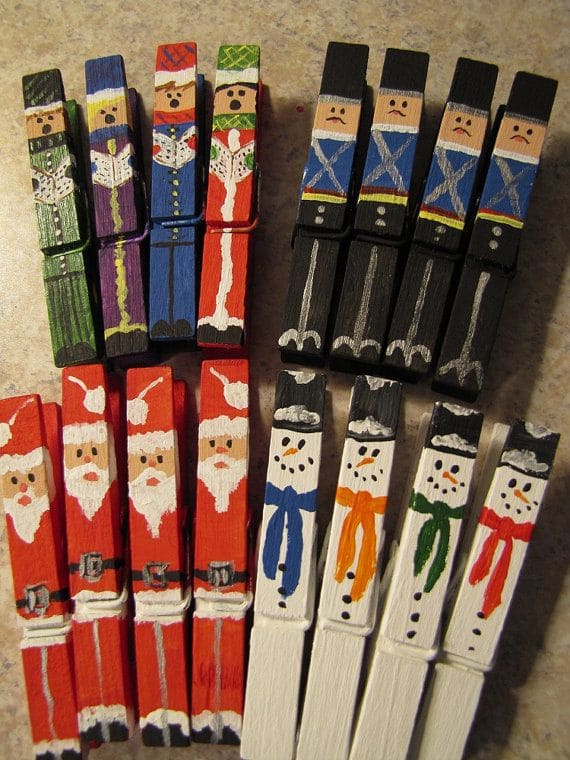
Tiny but full of personality, these hand-painted clothespin characters bring a sprinkle of Christmas cheer to your home.
Each little Santa, nutcracker, and snowman looks ready to march straight into your holiday display.
What makes this craft so delightful is how easy it is to customize, a few colors, a steady hand, and suddenly your clothespins are full of life.

- 12 wooden clothespins ((standard size, 3.25” long))
- Acrylic paints ((red, white, black, blue, green, orange, gold, silver))
- Fine-tipped paintbrushes ((1-2 sizes for detail work))
- Pencil ((for sketching simple outlines))
- Black fine-tip marker ((optional for faces))
- Clear matte or gloss sealant spray
-
Start by lightly sketching the designs such aas Santas, snowmen, and nutcrackers onto each clothespin. Divide the sections for hats, faces, and clothing.
-
Paint the base colors first. Use red for Santa’s suit, black for nutcrackers, and white for snowmen. Let them dry before layering details.
-
Add belts, buttons, scarves, and facial features using a fine brush. Tiny details like rosy cheeks or a glittery buckle make a big difference.
-
Once the paint is fully dry, spray a thin coat of sealant to protect your designs and give them a smooth finish.
-
Finally, use your festive clothespins as tree ornaments, card holders, or to clip small gift bags shut.
#10. Wooden Spoon Christmas Characters
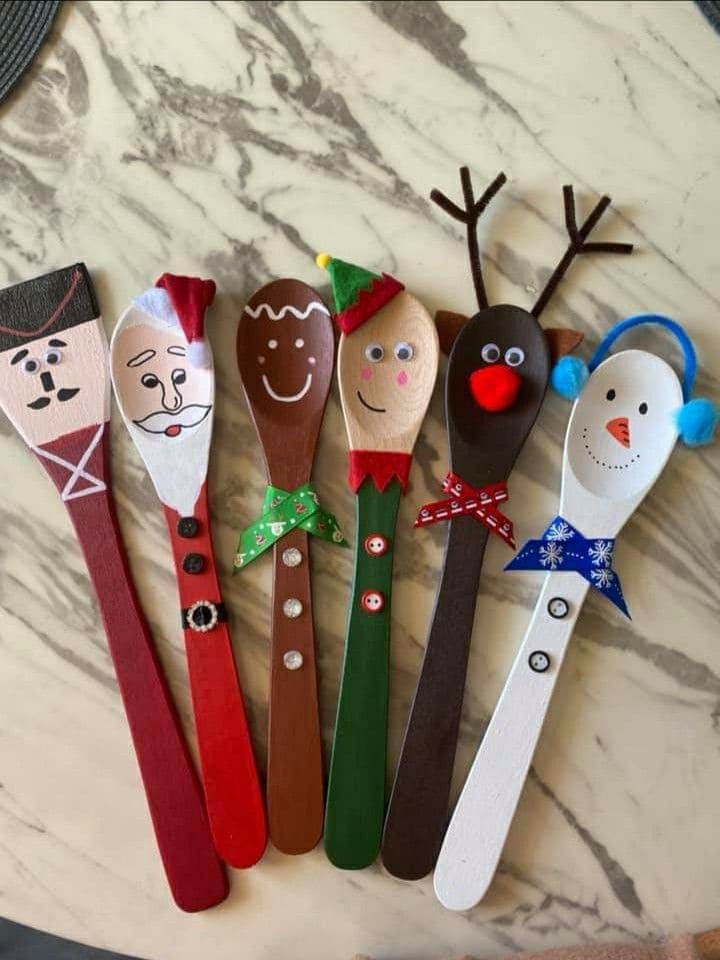
These cheerful wooden spoon Christmas characters turn simple kitchen tools into adorable festive figures full of personality.
Each one tells a story like Santa’s friendly grin, Rudolph’s shiny red nose, and the snowman’s cozy earmuffs all bring your holiday spirit to life.
Painting them feels like crafting joy itself, and when they’re finished, they’ll brighten up any corner of your home or make perfect handmade gifts.

- 6 wooden spoons (8-10 inches long)
- Acrylic paints in red, white, green, brown, black, orange, and tan
- Small paintbrush set ((fine tip and medium flat brushes))
- Googly eyes ((optional))
- Red pom-poms for Rudolph’s nose
- Mini blue pom-poms for earmuffs
- Small felt pieces in red, green, black, and white for hats and scarves
- Ribbon strips ((about 6-8 inches each))
- Hot glue gun or craft glue
- Scissors
-
Paint each spoon handle and head to match your chosen characters such as white for the snowman, red for Santa, brown for the reindeer, and so on. Let them dry completely.
-
Use smaller brushes to add details like eyes, mouths, and buttons. A fine-tipped brush works best for outlining features.
-
Cut felt into hats, scarves, or collars, then glue them carefully onto the spoons. Add pom-poms, ribbons, or tiny embellishments for extra charm.
-
Attach googly eyes or paint your own expressions to give each character personality.
-
Once dry, display them in a jar, stick them into potted plants, or tie a loop of ribbon around the handles to hang them on your Christmas tree.
#11. Paintbrush Santa and Gnome Ornaments
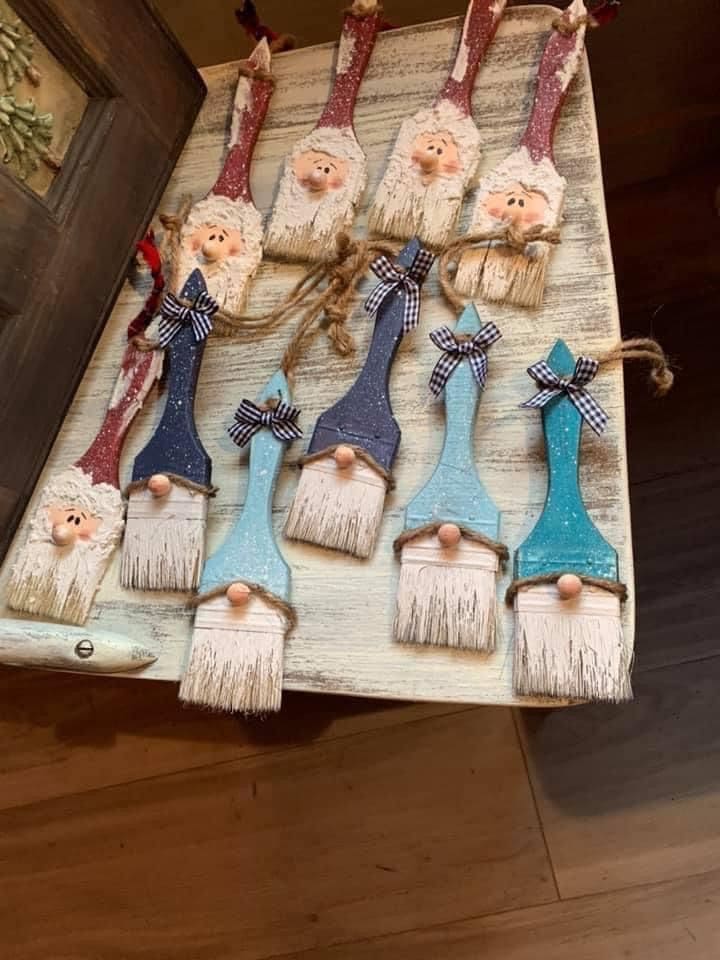
Who would’ve thought an old paintbrush could become Santa himself?
These paintbrush Santas are a clever upcycling craft that turns something ordinary into a heartwarming Christmas decoration.
With a little paint and creativity, you can transform worn-out brushes into charming, rustic ornaments that look delightful hanging from your tree or adorning your gift packages.

- 6 old paintbrushes ((2”-3” wide))
- Acrylic paint ((red, white, blue, light blue, navy, and beige))
- Small wooden beads or round buttons ((6 pieces for noses))
- Twine or jute rope ((2 feet total))
- Small gingham ribbon ((12 inches, cut into bows))
- Hot glue gun and glue sticks
- Small paintbrushes for detail work
- White glitter or faux snow spray ((optional for shimmer))
-
Clean and dry your old paintbrushes thoroughly. Then trim any stray bristles to shape the beard.
-
Paint the handle in your chosen color like red for classic Santa, or try icy blues for a Nordic winter look. Let them dry completely.
-
Paint the metal ferrule (the part above the bristles) with white paint to resemble Santa’s beard. Then add a small beige oval or circle above it for the face.
-
Glue a small wooden bead in the center for the nose, just where the handle meets the ferrule.
-
Add tiny painted eyes or leave them simple for a minimalist look. Once dry, lightly brush on white paint or sprinkle glitter for a snowy finish.
-
Tie a small gingham ribbon bow under the nose and attach a piece of twine to the top for hanging.
#12. Christmas Clay Character Magnets
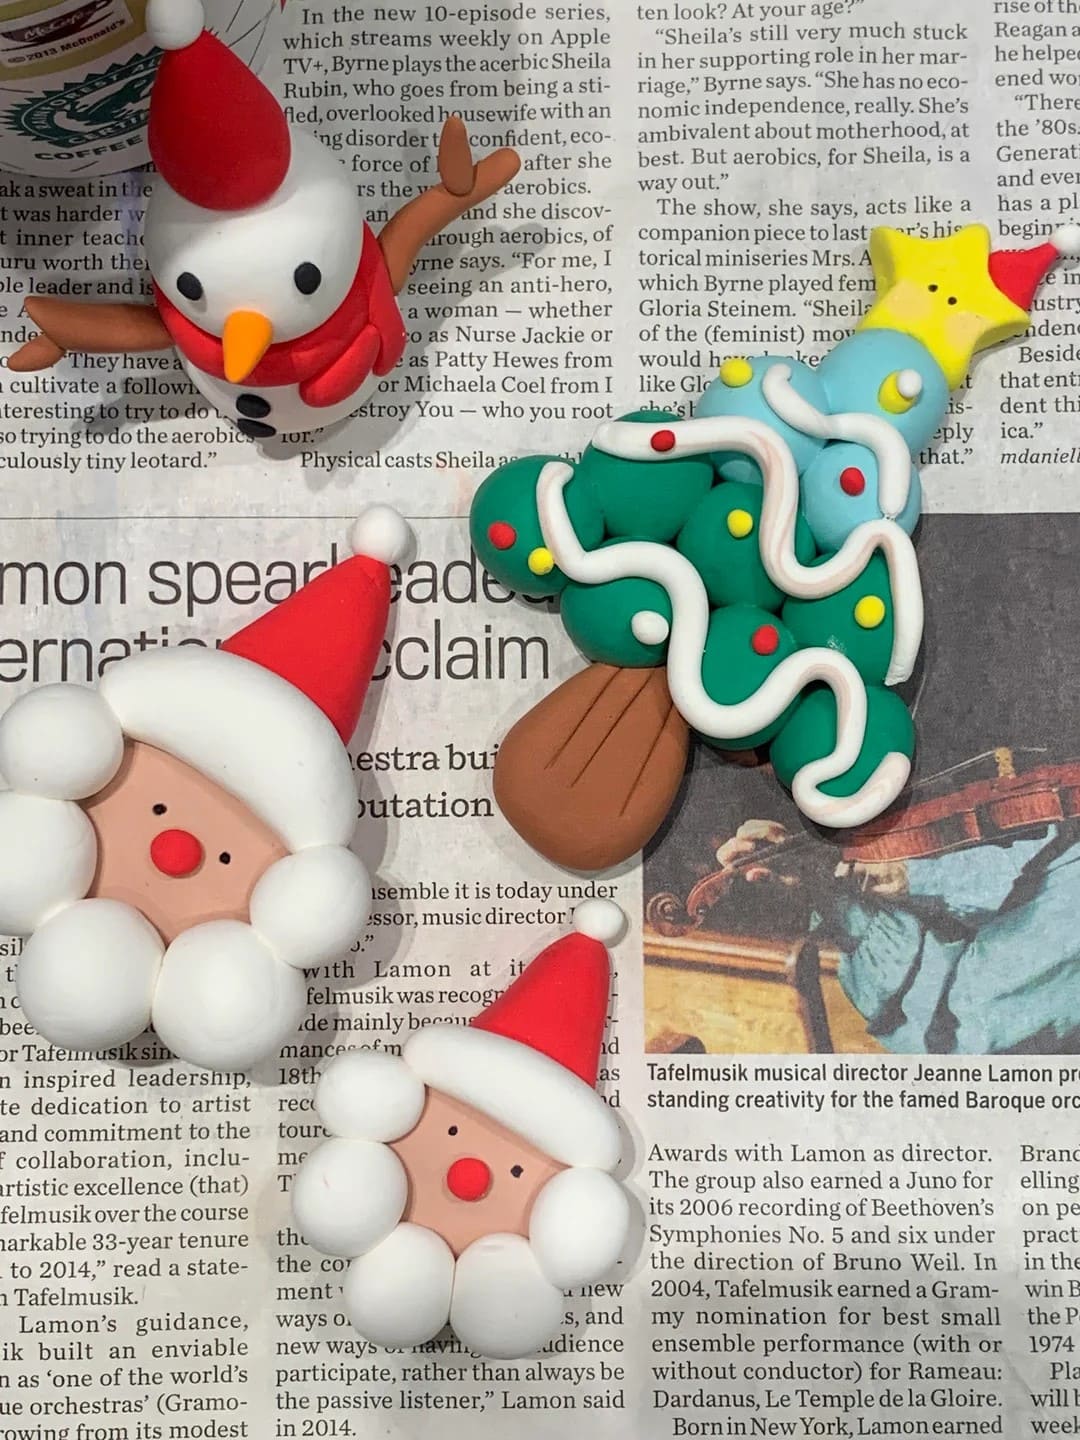
Amazingly, these adorable clay Christmas characters look like they’ve popped straight out of a storybook!
The soft curves and bright colors of Santa, the snowman, and the Christmas tree make them irresistible, perfect for fridge magnets or playful ornaments.
You’ll love shaping each one, giving them cheerful expressions and little details that make them come alive.

- Polymer clay in red, white, green, brown, yellow, orange, black, blue, and pink ((about 50g each color))
- Clay sculpting tools ((small knife, shaping stick, and dotting tool))
- Small round magnets ((0.5" diameter, 6-8 pieces))
- Rolling pin or smooth bottle for flattening clay
- Baking tray lined with parchment paper
- Super glue or strong craft adhesive
- Oven ((for baking clay, per package directions))
-
Knead and soften the clay. Roll small balls and cylinders for each part such as Santa’s hat, beard, face, and snowman’s round body.
-
Shape your characters one by one. For Santa, form a triangle red hat, round face, and white beard curls. For the snowman, stack two white spheres and add a scarf and carrot nose. The Christmas tree can be made from layered green cones with tiny colorful ornaments.
-
Use the dotting tool to mark eyes and smiles, and gently press the pieces together before baking.
-
Bake according to your clay’s instructions (usually around 265°F / 130°C for 15–20 minutes). Allow to cool completely.
-
Once cool, glue magnets to the back of each piece and let them set.
#13. Christmas Character Wood Blocks
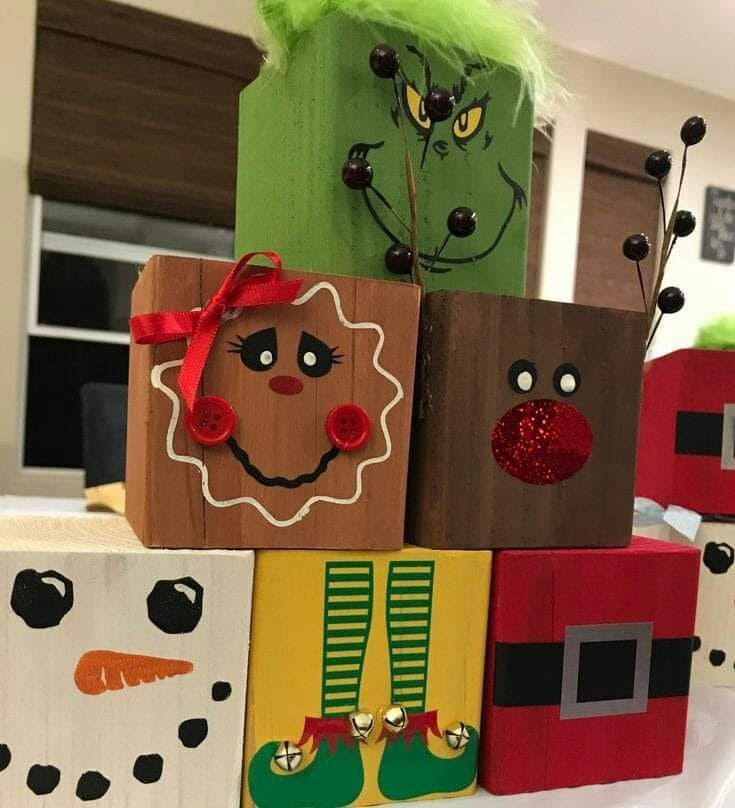
These Christmas character wood blocks are bursting with personality from the mischievous Grinch to the sweet gingerbread girl and cheerful reindeer.
Each block tells its own story, and when stacked together, they create a charming holiday display that feels both handmade and heartfelt.
You can make them for a cozy mantel decoration or as a craft project with kids.

- 6 wooden blocks ((each 3”×3”×3”))
- Acrylic paint set ((red, green, brown, yellow, white, black, orange))
- Fine paintbrushes and sponge brushes ((1 small, 1 medium))
- 4 Red buttons ((1-inch size))
- 2 Black buttons ((0.5-inch size))
- Green faux fur or feather trim ((6-inch strip))
- Ribbon ((12-inch red piece))
- 4 Small jingle bells
- Small jingle bells
- Small jingle bells
- Glitter ((red and white, optional))
-
Sand your wooden blocks lightly to remove any rough edges. Then wipe them clean before painting.
-
Paint each block according to your chosen character such as green for the Grinch, brown for the reindeer, red for Santa, yellow for an elf, white for a snowman, and tan for the gingerbread face. Let them dry completely.
-
Use a fine brush or paint pen to draw faces and details. For example, add Santa’s belt buckle, the Grinch’s smirk, and the snowman’s carrot nose.
-
Attach buttons, ribbons, and glitter accents using a glue gun. Use green faux fur on the Grinch’s head, jingle bells on the elf’s shoes, and buttons as the gingerbread’s cheeks.
-
Stack or line them up on your table or shelf. Each block captures a little piece of Christmas fun.
#14. Paper Plate Christmas Faces
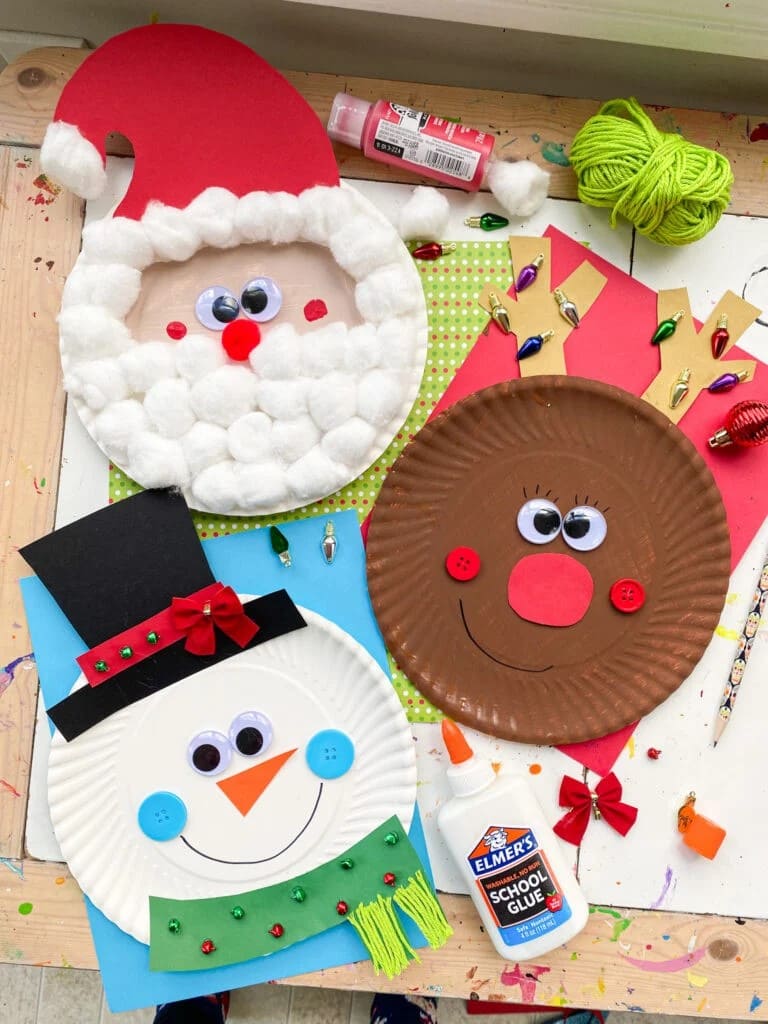
These cheerful paper plate Christmas characters bring instant joy to any craft table!
With a little glue, color, and imagination, you can turn simple plates into Santa, Rudolph, and Frosty the Snowman.
Moreover, each face seems to come alive with personality, making them great for wall decor or classroom displays.

- 3 paper plates ((9" diameter each))
- Red, brown, black, orange, and green craft paper ((A4 sheets))
- Cotton balls ((1 bag, about 50 pieces))
- 6 Googly eyes ((1" size))
- 4-6 Small red pom-poms
- Red and green buttons ((10-12 total))
- Elmer’s school glue ((1 bottle))
- Safety scissors
- Paint ((brown and red, 2 oz each))
- Yarn ((green, 2 ft for scarf))
- Pencil and paintbrush
-
Paint one plate brown for Rudolph, one white for Frosty, and leave one plain for Santa. Let them dry completely.
-
For Santa, cut a red hat shape from paper and glue it to the top of the plate. Then add cotton balls along the hat edge and beard area, pressing them gently to create texture.
-
For Rudolph, cut antlers from brown paper and a red nose circle. Glue on the antlers, googly eyes, and pom-pom nose, then finish with a big smile.
-
For Frosty, cut out a black top hat and orange triangle nose. Glue them on and use yarn to create a cozy scarf under his chin. You can also add buttons and a drawn-on smile.
-
Once everything dries, display them on a wall, classroom board, or window to spread Christmas cheer.
#15. Christmas Character Keys
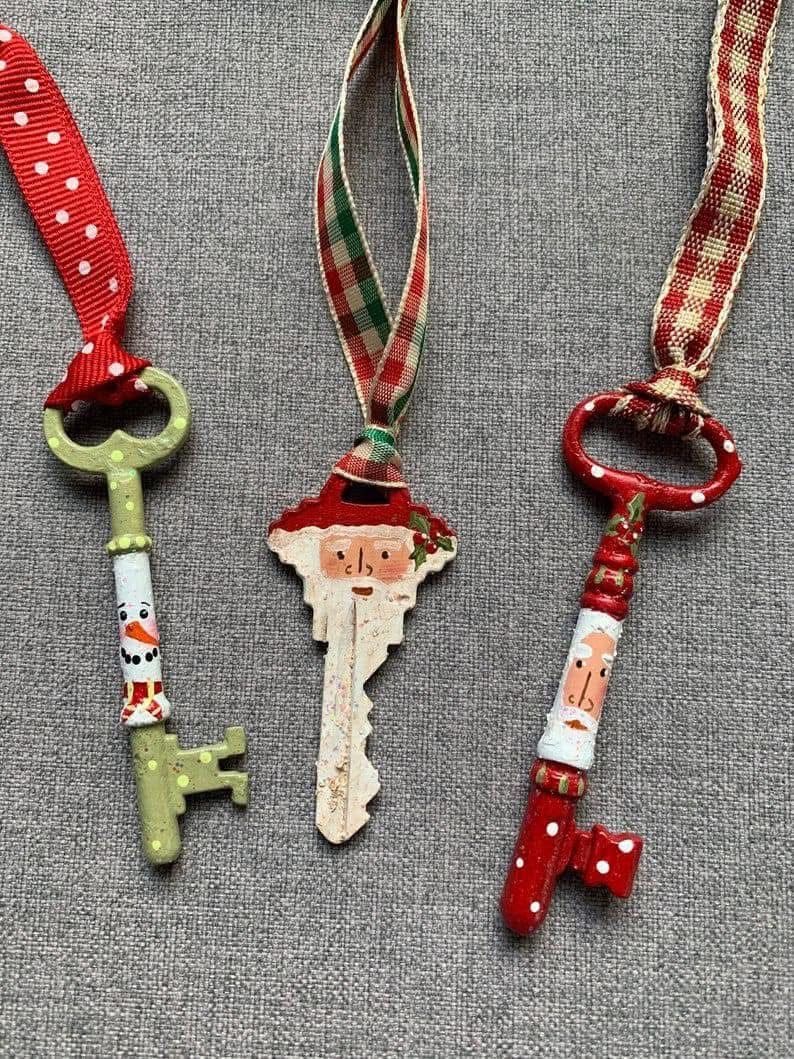
These charming Christmas character keys are the kind of craft that turns something ordinary into a keepsake full of magic.
Imagine a snowman, Santa, and even an elf brought to life on an old key, suddenly, it’s not just metal anymore but a tiny piece of Christmas wonder.
They’re delightful to hang on the tree, tie onto gifts, or even present to little ones as Santa’s magic key.

- 3-5 Old or vintage keys ((various shapes and sizes))
- Acrylic paints in red, white, green, orange, black, and peach tones
- Small paintbrushes ((fine-tipped and medium))
- Painter’s tape or masking tape ((optional, for neat color sections))
- Clear varnish or sealant ((for durability and shine))
- Ribbons in festive colors or patterns ((8-10 inches each))
- Palette or small dish for mixing colors
- Paper towels and water cup for rinsing brushes
-
Clean and dry your keys thoroughly to remove any dust or rust. If the metal is dark, apply a thin base coat of white paint to help the colors pop. Let it dry completely.
-
Decide which Christmas characters you want to paint including Santa, a snowman, or an elf. Start with the base color of each key (red for Santa, green for the snowman, cream for the elf). Apply two coats if needed for solid coverage.
-
Once the base layer is dry, use a fine brush to paint small details like faces, hats, scarves, and buttons. Add tiny white dots or holly designs for extra holiday flair. You can even use the teeth of the key to mimic a beard or scarf edge.
-
After all paint has dried, brush a thin coat of clear varnish to protect your artwork and give it a polished finish.
-
Thread a ribbon through the key’s loop or handle and tie it securely in a bow or loop. Choose ribbons that complement each character such as red and white for Santa, green plaid for the elf, and dotted red for the snowman.
-
Hang them on your Christmas tree, attach them to gift tags, or display them on a holiday wreath.
#16. Fingerprint Christmas Frame Art
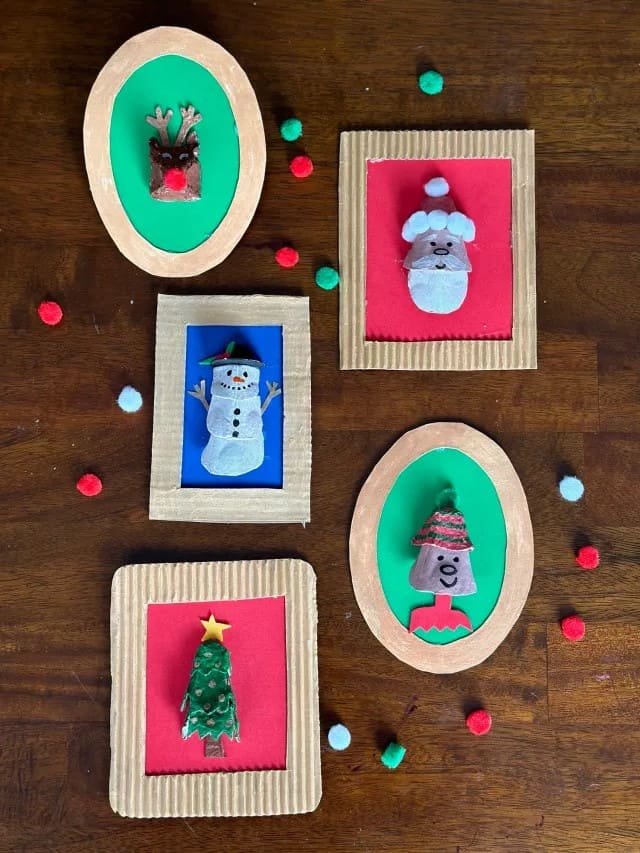
These fingerprint Christmas frames are tiny masterpieces that capture the magic of the season and a little piece of you, too.
Each print turns into something festive: a reindeer, Santa, a Christmas tree, or even a smiling snowman.
They’re heartwarming, personal, and a joy to make, especially with kids.
Also, the frames add a handcrafted touch, making every piece feel like a cherished holiday keepsake.

- Cardboard sheets ((cut into 5 pieces, about 4"x6" each))
- Corrugated cardboard for frame borders
- Red, green, and blue cardstock (A4 size)
- Washable paints ((white, brown, red, green, black, and yellow, 1 oz each))
- Paintbrush and fine-tip marker
- Googly eyes ((10 pieces, 0.5"))
- Small craft pom-poms ((12 pieces, assorted colors))
- Glue stick and craft scissors
- Optional: small star stickers or sequins for decoration
-
Cut out cardboard bases for your frames and glue colored cardstock onto each one to serve as the background.
-
Dip your fingertip into paint to create characters such as brown for reindeer, white for snowmen, green for trees, and pink for Santa faces. Let each print dry for about 10 minutes.
-
Once dry, add details with a fine marker and small brush: antlers, buttons, scarves, hats, and smiles. Then attach googly eyes or pom-poms for extra charm.
-
Cut and glue corrugated cardboard around each artwork to create a frame. You can choose square or oval shapes for variety.
-
Cut and glue corrugated cardboard around each artwork to create a frame. You can choose square or oval shapes for variety.
#17. Glitter Character Christmas Ornaments
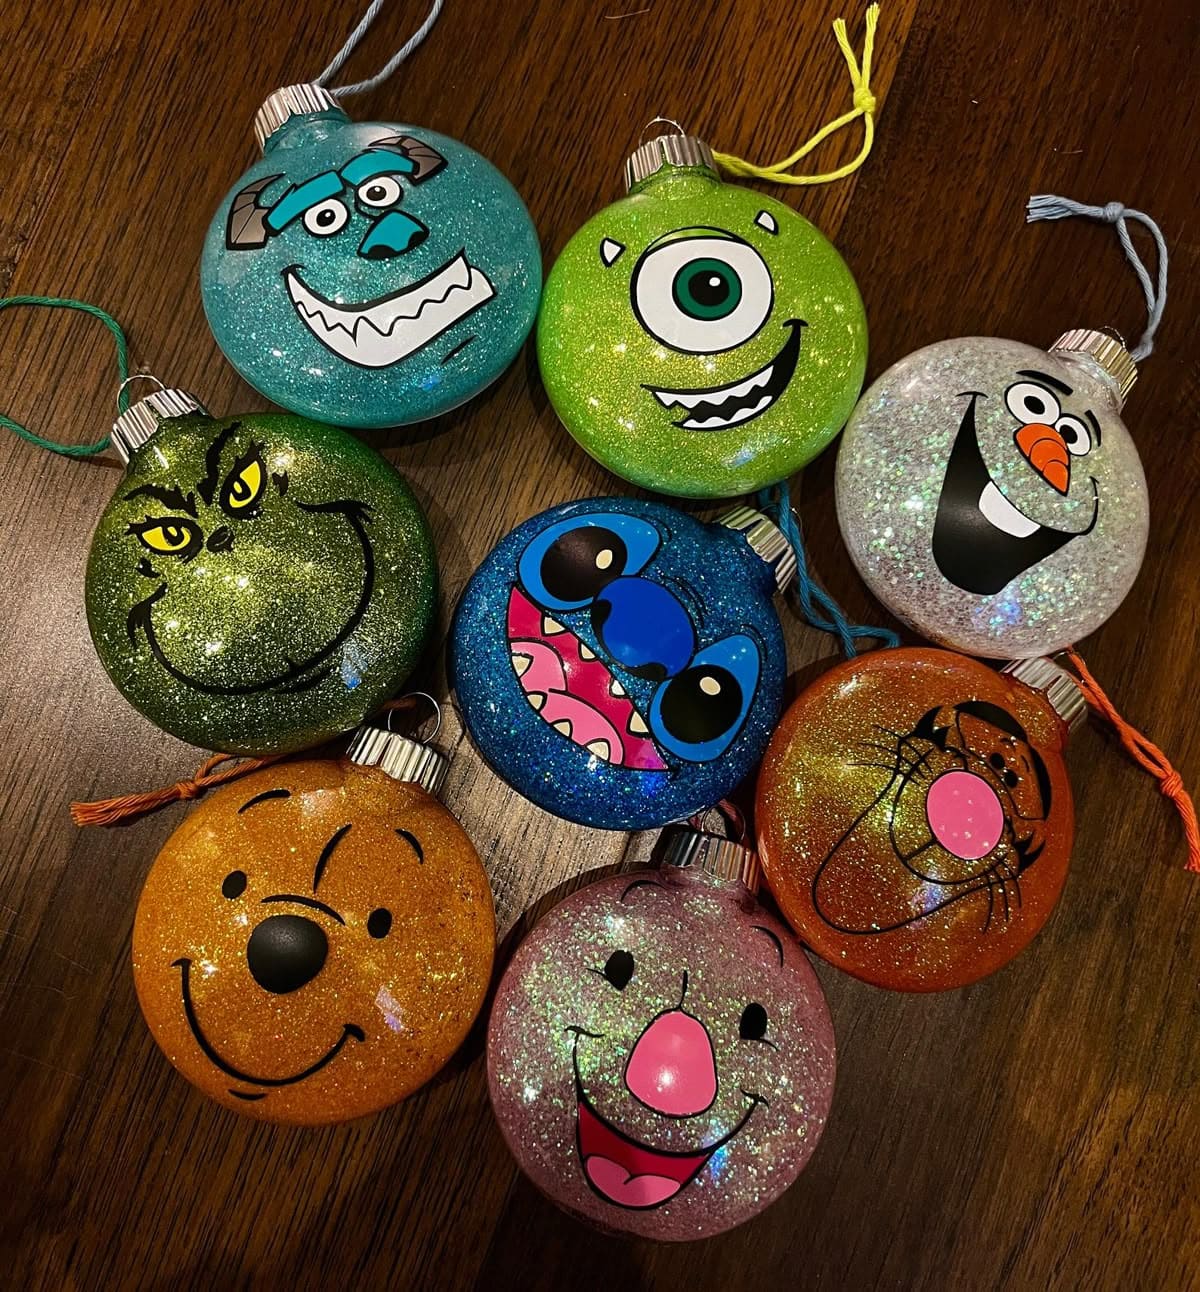
These glitter character ornaments are pure joy in a circle, sparkling, goofy, and full of holiday mischief.
Each one brings a favorite movie face to life, from the Grinch’s sly grin to Olaf’s cheery smile and Stitch’s wild laugh.
I think they shimmer beautifully under Christmas lights and make even the simplest tree look magical.

- Clear plastic or glass ornaments ((3-4 inches in diameter))
- Fine glitter in assorted colors ((green, blue, orange, pink, white, etc.))
- Polycrylic or clear glue for inside coating
- Vinyl character face stickers or printed templates ((Grinch, Olaf, Stitch, etc.))
- Small funnel
- Ribbon or string for hanging
- Paintbrush and paper towels
-
Remove the ornament tops and pour a small amount of Polycrylic inside each ornament. Then swirl it around to coat the entire interior evenly, then pour out the excess.
-
Using a funnel, add glitter inside the ornament. Rotate until it covers all sides, then tap gently to remove any loose glitter. Let dry completely.
-
Once dry, apply your character’s face using vinyl cutouts or stickers. You can also hand-draw the details with a permanent marker for a personalized touch.
-
Reattach the ornament tops and tie a matching ribbon or string for hanging.
#18. Christmas Tin Can Characters
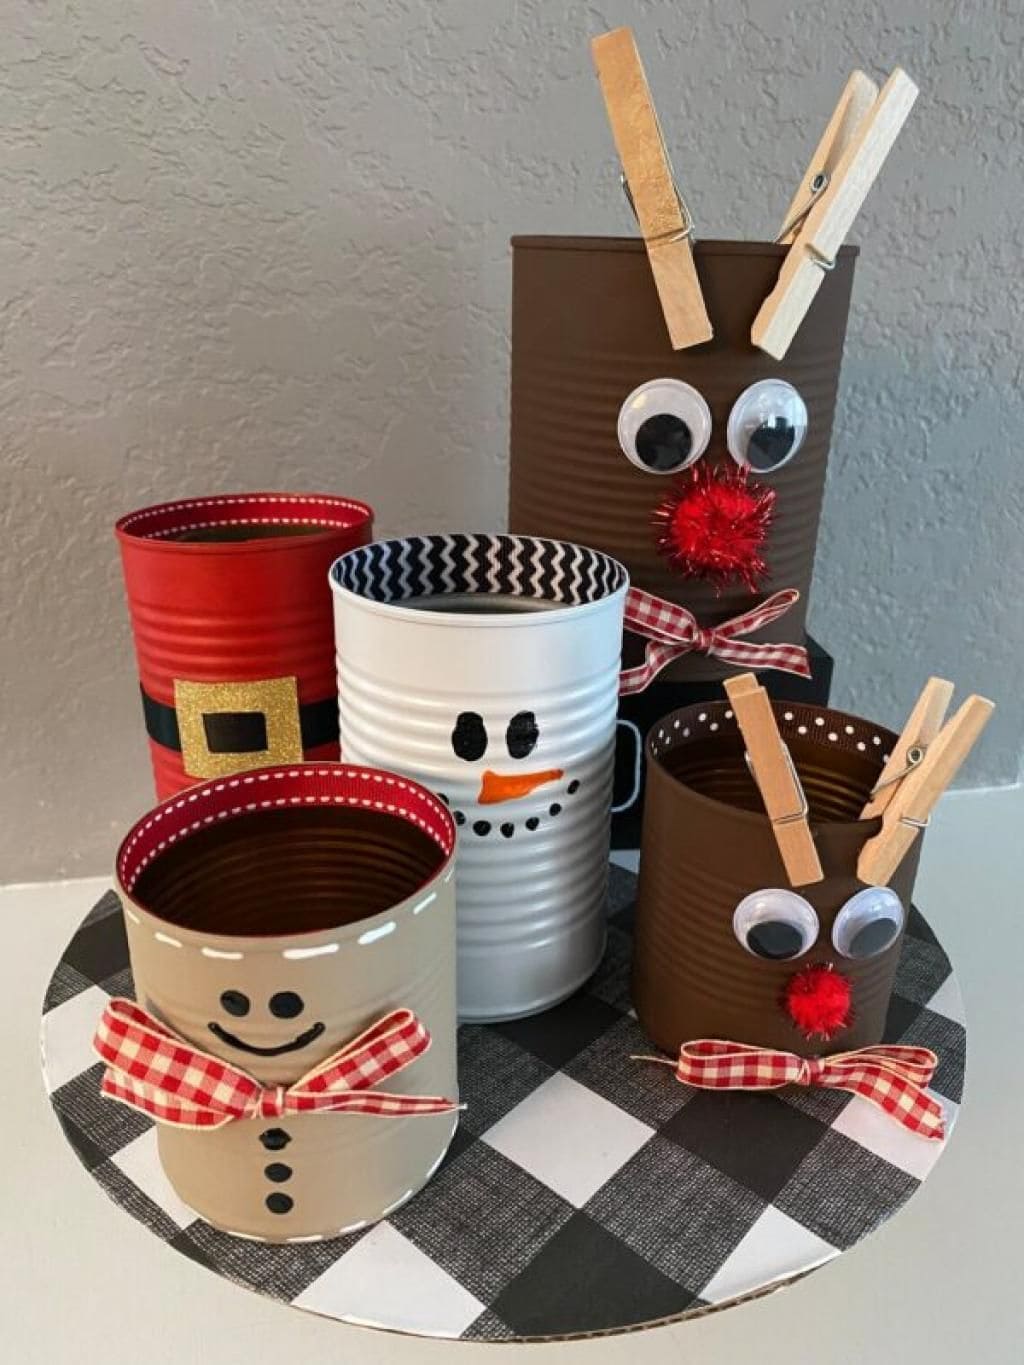
These upcycled tin cans are proof that festive magic can bloom from the simplest materials.
With just a bit of paint, ribbon, and imagination, you can turn plain cans into adorable Christmas friends , a snowman, Santa, reindeer, and even a gingerbread man.
They make perfect tabletop decorations, pencil holders, or treat containers.

- 4-5 empty tin cans ((cleaned and labels removed, various sizes: 3”-6” tall))
- Acrylic paint ((red, white, brown, beige, black, orange))
- Paintbrushes ((1” flat and fine tip))
- Googly eyes ((10 pieces, 1”-1.5” size))
- 2 Red pom-poms
- Wooden clothespins ((4 pieces for reindeer antlers))
- Red and white gingham ribbon ((2 ft total, for bows))
- Black permanent marker or paint pen
- Hot glue gun and glue sticks
- Gold paper or glitter foam
-
Paint each can with your chosen base color such as red for Santa, white for the snowman, brown for the reindeer, and beige for the gingerbread man. Then apply two coats for a solid finish and let them dry.
-
For the snowman, use a fine brush or marker to paint black dots for eyes and buttons, and an orange carrot-shaped nose. For Santa, add a black belt with a gold buckle in the center.
-
Create reindeer by gluing on large googly eyes and red pom-pom noses. Clip clothespins on top for playful antlers.
-
Give your gingerbread man a friendly smile and dot details along the rim. Finish each character with a tied gingham bow under the face.
-
Once dry, arrange your tin can crew together on a tray or shelf. Their quirky expressions and rustic style will fill your space with cozy Christmas cheer.
#19. Christmas Character Wood Planks
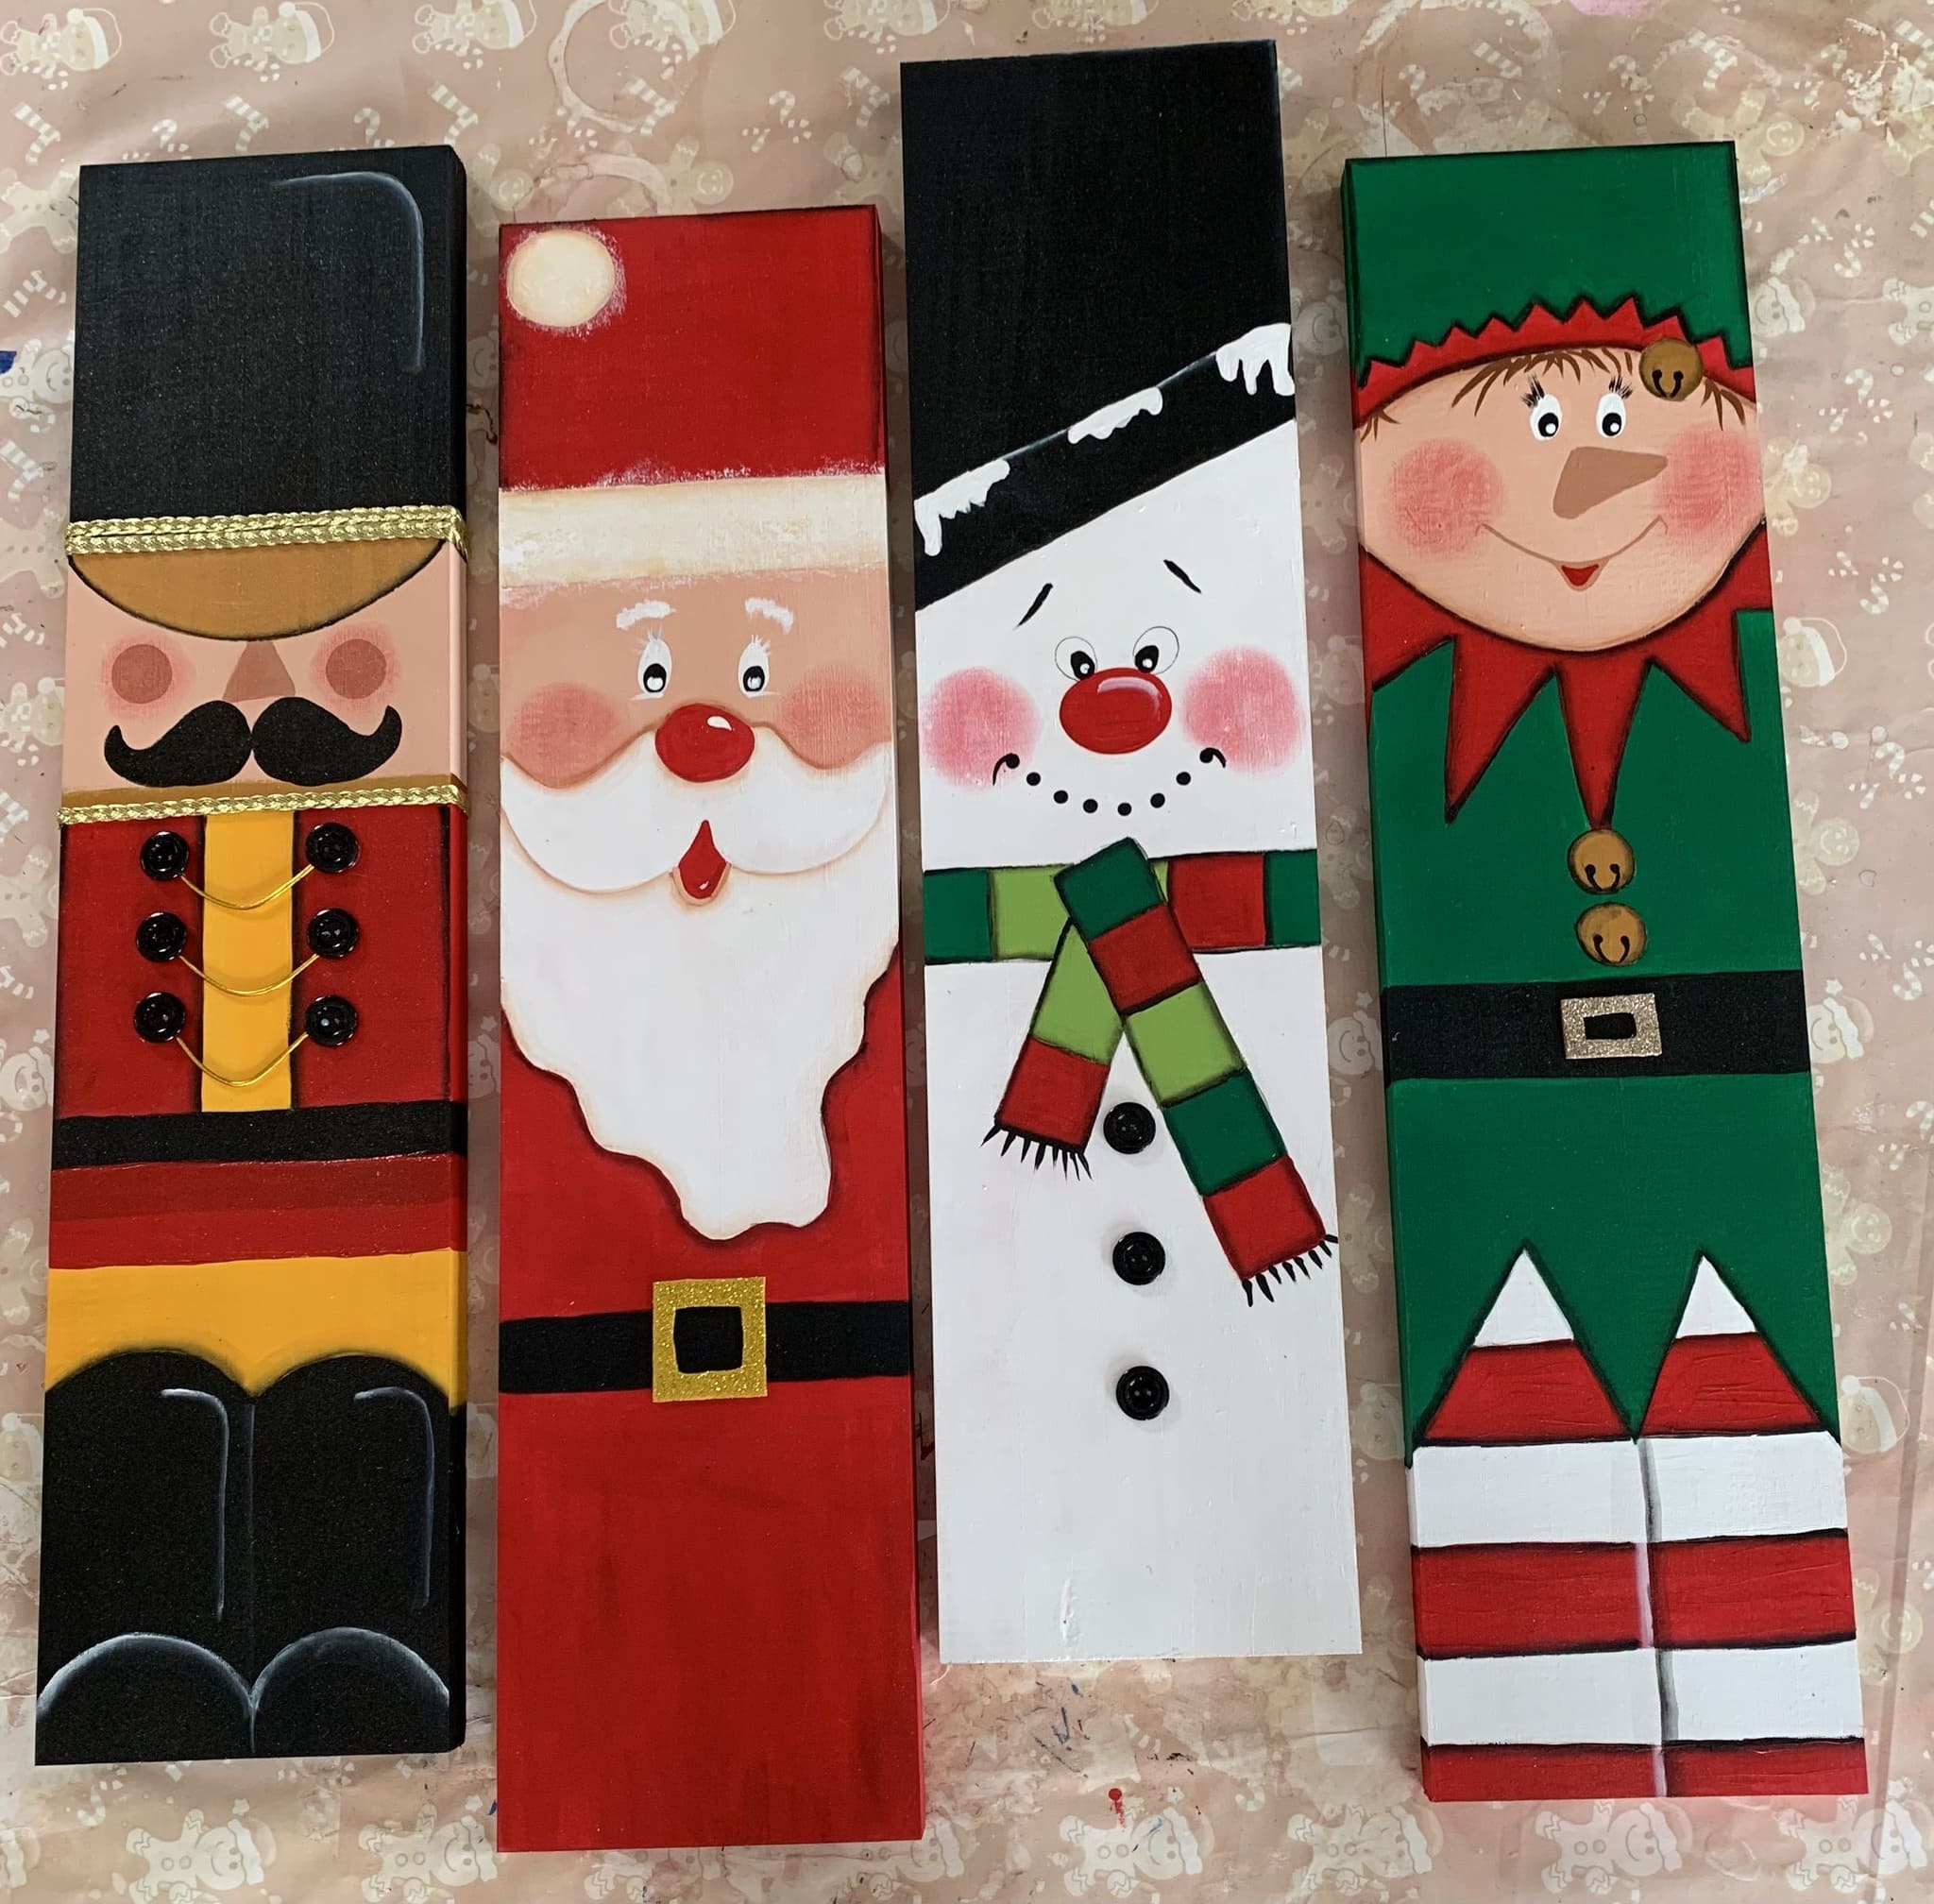
These cheerful painted wood planks turn ordinary scraps of lumber into a line-up of your favorite Christmas characters.
Each face has its own charm, glowing with personality and warmth.
You’ll love how these rustic friends brighten your porch, mantel, or entryway, greeting everyone with a handmade holiday smile.

- 4 wooden planks (approx. 4” × 16” each, sanded smooth)
- Acrylic paint in red, white, green, black, pink, yellow, and brown
- Fine paintbrushes and foam brushes
- Pencil for sketching faces
- Buttons, jingle bells, or gold cord for embellishments
- Painter’s tape for straight edges
- Clear acrylic sealant ((optional, for outdoor protection))
- Palette, paper towels, and water cup for cleanup
-
Sand and clean your planks to remove any rough edges or dust. If you plan to display them outside, apply a base coat of primer and let it dry.
-
Lightly sketch each character’s outline, Santa with his fluffy beard, the nutcracker’s bold uniform, the snowman’s scarf, and the elf’s pointed collar and shoes.
-
Begin painting large color blocks first (red suit, green outfit, white snow). Once dry, use smaller brushes for facial features and fine details like eyes, cheeks, and buttons.
-
Add decorative touches such as glue real buttons on the snowman, gold cord on the nutcracker’s chest, or tiny jingle bells on the elf’s collar for texture and sparkle.
-
Once everything is dry, apply a coat of sealant to protect your artwork, especially if displaying outdoors.
-
Arrange your characters together. They look lovely as a porch welcome display or grouped by the fireplace, each plank bringing its own piece of Christmas cheer.
#20. Life-Size DIY Nutcracker Soldiers
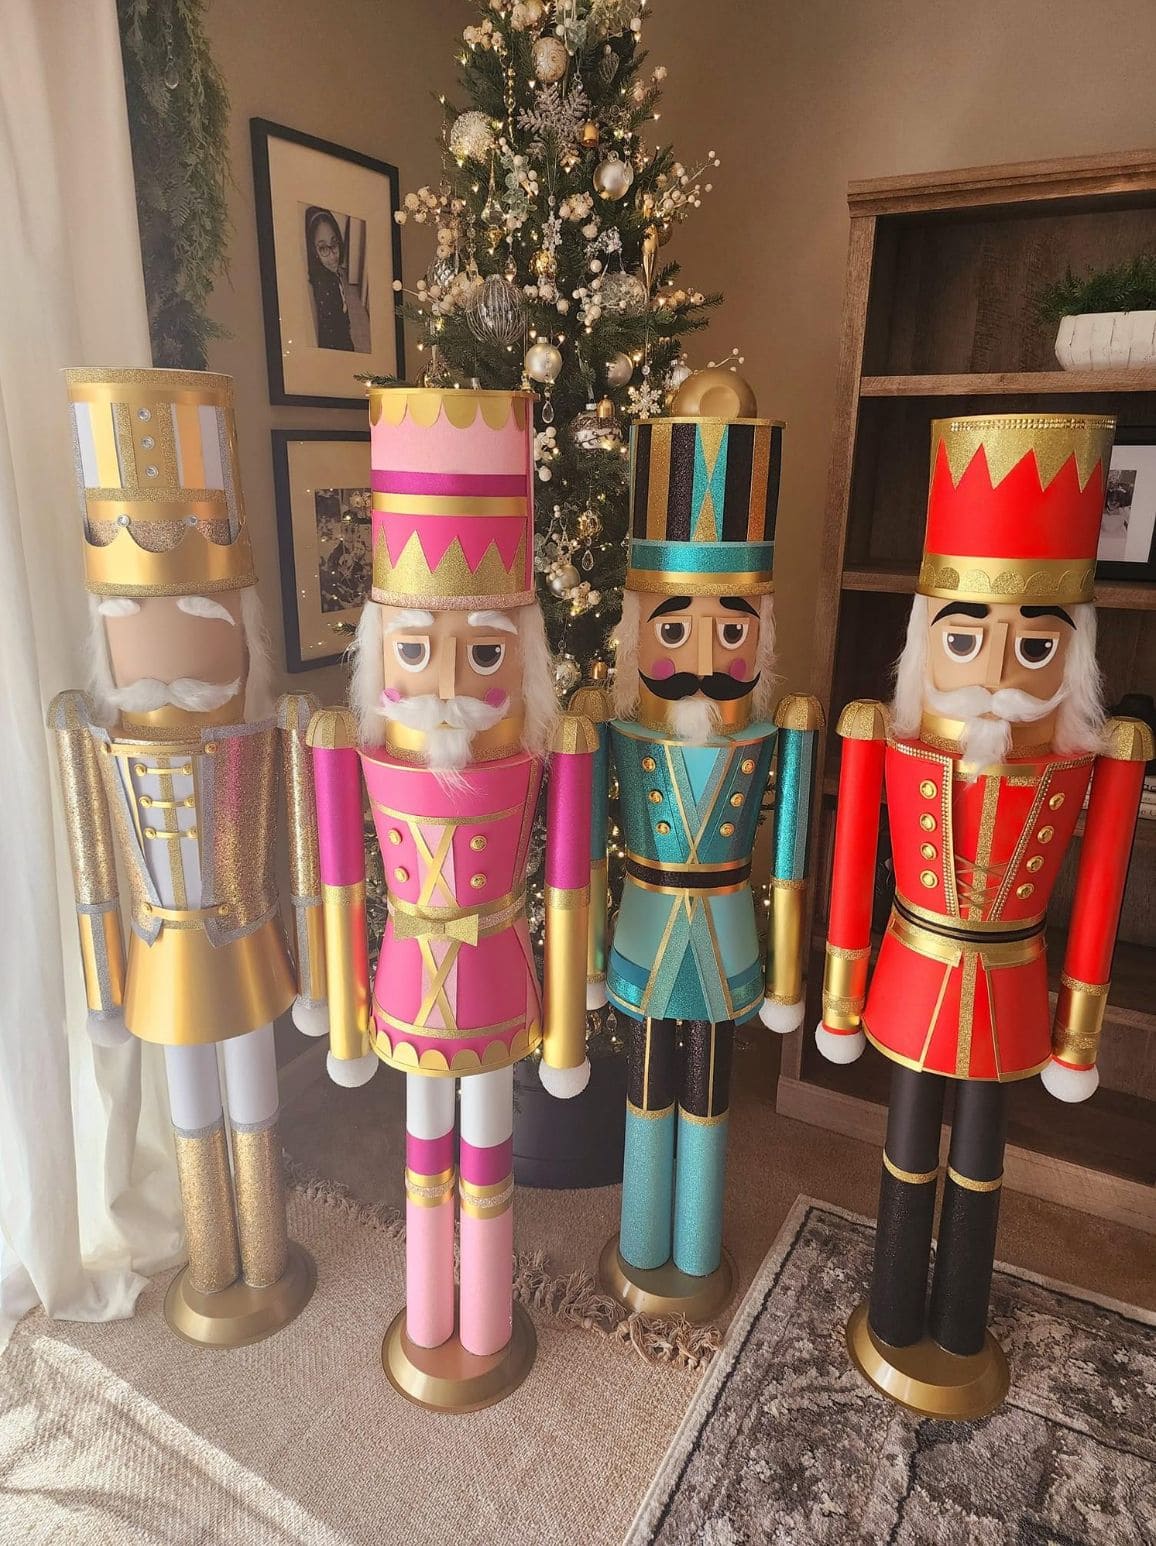
These majestic nutcracker soldiers look straight out of a storybook, bold, glittering, and ready to guard your Christmas tree.
Standing tall in dazzling colors of red, gold, pink, and teal, they bring a touch of magic and nostalgia to your holiday decor.
Crafting them feels like stepping into a Christmas ballet.

- Large cardboard mailing tubes or wrapping paper rolls
- Round styrofoam balls for heads
- Cardboard sheets for hats and bases
- Gold, red, pink, blue, and white craft paint
- Glitter paper or adhesive vinyl ((gold, silver, and colored))
- Hot glue gun and glue sticks
- White faux fur or cotton for beards and hair
- Black marker for facial details
- Decorative trim, buttons, and ribbon
-
Paint the tubes in your chosen colors to form the nutcracker’s body and legs. Next, use vibrant combinations like red and gold, or teal and black for a royal touch. Let them dry completely.
-
Attach the styrofoam balls as heads using hot glue. Then, create tall cylindrical hats from cardboard and wrap them in glitter paper. Glue them securely on top.
-
Add details such as belts, buttons, and cuffs made from gold paper or ribbon. Draw facial features with a marker, and glue on faux fur for the beard and hair.
-
For arms, use smaller tubes or rolled cardstock and attach them to the sides. Finish with small foam balls as hands.
-
Mount each figure onto a sturdy circular cardboard base painted gold.
-
Once assembled, place them by your tree or doorway. Their commanding presence instantly elevates the holiday mood.
#21. Cozy Snowman with Pine Hat Decor
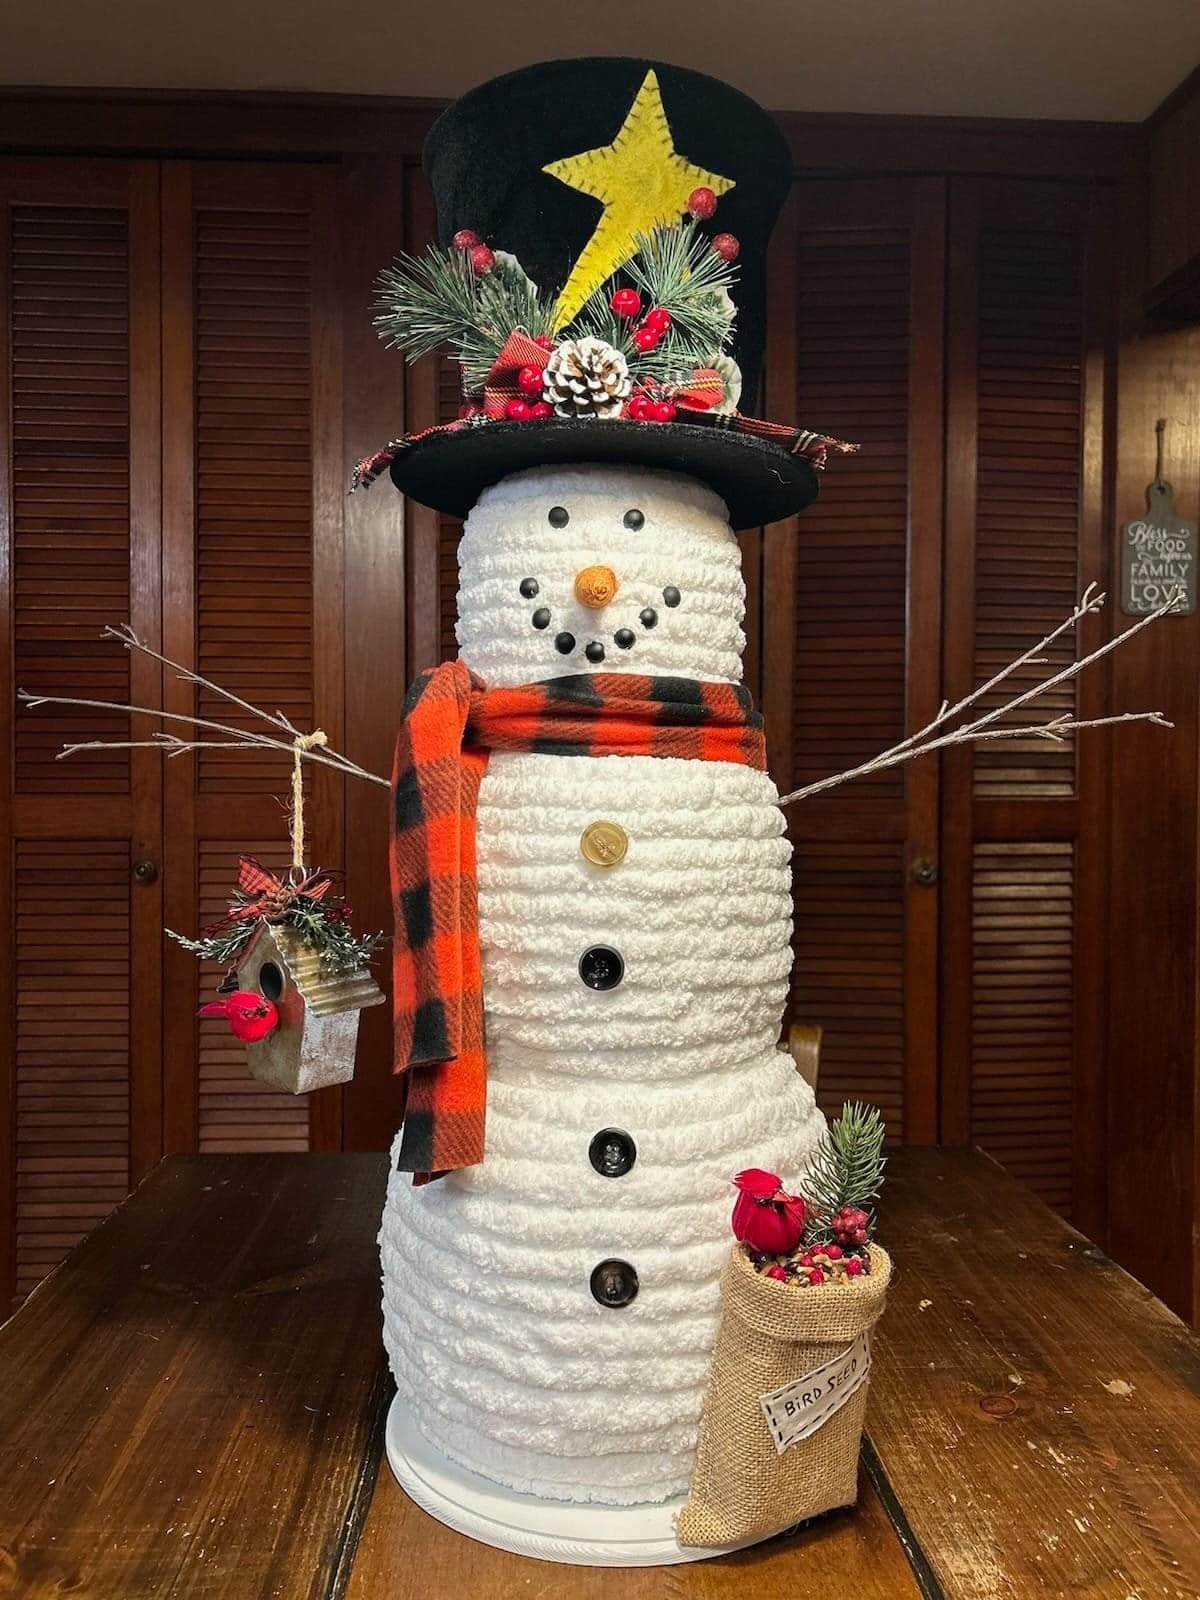
This cheerful snowman looks like he’s just stepped out of a winter cabin story with warm, rustic, and full of Christmas spirit.
His textured body, plaid scarf, and charming hat make him a perfect centerpiece for your holiday decor.
You can almost imagine him guarding the porch on a snowy evening or greeting guests by the fireplace.

- 3 foam or lightweight plastic round containers ((sizes: 12", 10", and 8" diameter))
- 1 large black felt top hat ((about 10" tall))
- 1 orange foam cone (2”) for nose
- 10-12 black buttons ((various sizes))
- 1 plaid scarf ((40" long))
- 2 small twigs ((for arms, about 10-12”))
- Hot glue gun with glue sticks
- 1 yellow felt star ((6”))
- Artificial pine branches, red berries, and pinecones
- 1 small piece of burlap (6"x8") + faux bird or mini house
-
Stack and glue the three foam containers from largest to smallest to form the snowman’s body. Let the glue dry completely for stability.
-
Wrap the scarf snugly around the neck section and secure it with a small dab of glue if needed.
-
Use the buttons to create a smiling face and a vertical row down the body. Then attach with hot glue.
-
Insert twigs into each side of the middle section forarms, you can glue them in place for added support.
-
Decorate the hat by gluing pine sprigs, berries, and pinecones around the brim, and attach the yellow felt star at the front.
-
Finish the scene by placing a small burlap sack labeled bird seed and adding a faux bird or two for a heartwarming touch.
