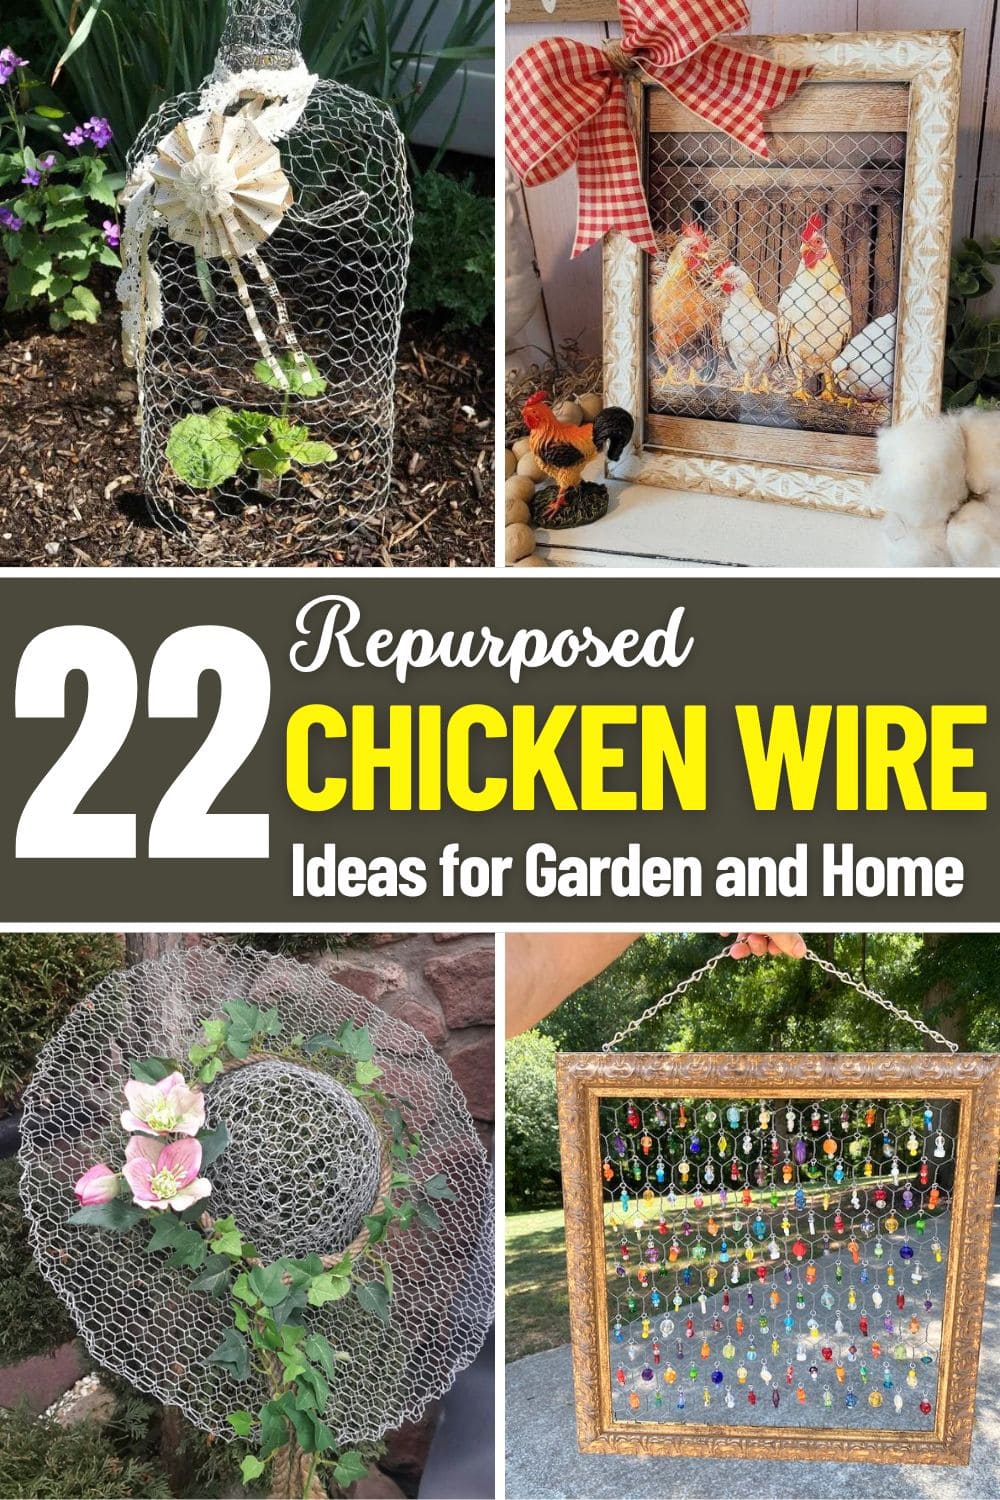
Have you ever thought about how chicken wire, commonly used for fences or plant supports can be turned into something truly unique for your home and garden? This simple, yet versatile material can be transformed into stunning decor pieces that add charm and personality to any space.
Whether you’re looking to enhance your garden with a whimsical sculpture or bring a rustic touch to your indoor design, chicken wire opens up endless creative possibilities.
In this article, we’ve rounded up 22 creative chicken wire projects that will inspire you to craft one-of-a-kind, budget-friendly pieces for your home and garden.
#1. Chicken Wire Plant Protector
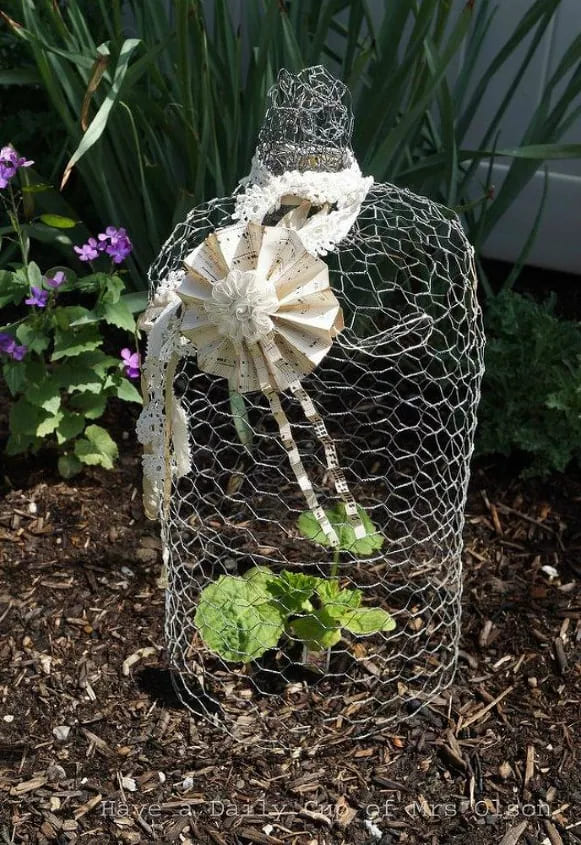
Many gardeners apply this method to keep pests at bay while let their plants grow strong and healthy under its watch.
If you also want to safeguard your precious seedlings, try this with a chicken wire plant protector, adorned with a touch of lace that feels like a gentle hug from nature.
Materials Needed
- Chicken wire (1-inch mesh), 2 feet by 2 feet
- Wire cutters
- Heavy-duty gloves
- Pliers
- Lace ribbon (1-2 inches wide), 2-3 feet
- 1-2 paper or fabric flowers
- Twine or wire (3 feet)
- Small plant or seedling
- Optional: hot glue gun
Step-by-Step Guide
Step 1: Put on your gloves and use wire cutters to shape the chicken wire into a cylinder, about 12 inches tall and 8 inches wide, securing with pliers.
Step 2: Wrap the lace ribbon around the top, gluing or tying it in place, and add flowers for a sweet touch.
Step 3: Place the cylinder over your plant, pressing it into the soil to stand firm like a protective shield.
#2. Chicken Wire Photo Display
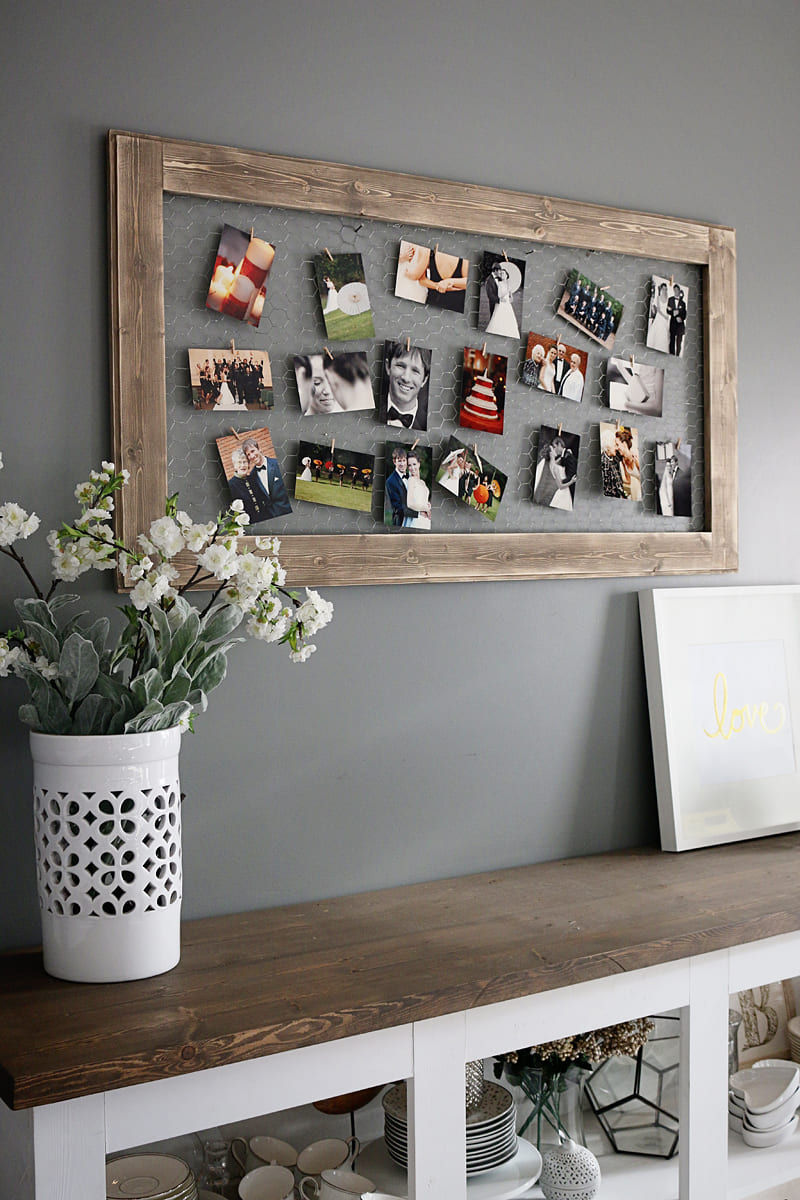
By this way, your favorite memories shine on your wall, framed by a rustic chicken wire photo display that feels like a warm hug from the past.
Materials Needed
- Chicken wire (1-inch mesh), 2 feet by 3 feet
- Wire cutters
- Heavy-duty gloves
- Wooden frame (24×12 inches, rustic style)
- Pliers
- 15-20 small clothespins (1 inch)
- Staple gun with ¼-inch staples
- Optional: sandpaper (medium grit)
- Optional: 10-15 photos (4×6 inches)
Step-by-Step Guide
Step 1: Put on your gloves and use wire cutters to cut the chicken wire to fit the frame, then sand the wood lightly if it’s rough.
Step 2: Stretch the wire across the frame’s back and secure it with the staple gun, pulling it tight for a smooth surface.
Step 3: Clip your photos to the wire using clothespins, arranging them in a pattern that feels right to you.
Step 4: Finally, hang the display on your wall.
#3. Chicken Wire Suncatcher
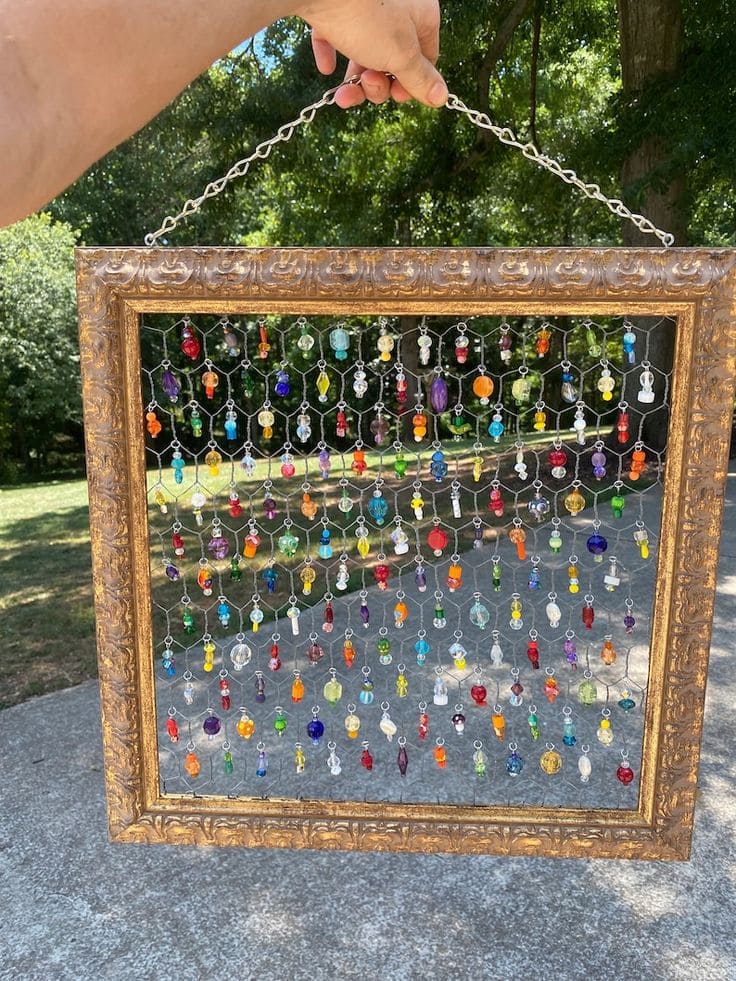
This charming project turns an old frame and some leftover beads into a piece of art that feels alive, swaying gently in the breeze and catching the sun’s rays in the most magical way.
Plus, it’s a great way to honor the outdoors, using materials that might otherwise gather dust, so why not give it a try and see your garden glow with personality?
Materials Needed
- Chicken wire (1-inch mesh), 2 feet by 2 feet
- Ornate wooden frame (12×12 inches)
- Wire cutters
- Heavy-duty gloves
- 50-70 assorted glass beads
- Thin jewelry wire (20 feet)
- Staple gun with ¼-inch staples
- Chain or rope (2 feet)
- Optional: small pliers
Step-by-Step Guide
Step 1: Slip on your gloves to keep your hands safe, then use the wire cutters to trim the chicken wire into a 12×12-inch square.
Step 2: Grab the staple gun and secure the wire to the frame, pulling it tight to create a smooth surface.
Step 3: Thread your beads onto short pieces of jewelry wire or fishing line, then tie each end to the chicken wire in a scattered, playful pattern.
Step 4: Attach the chain or rope to the top corners of the frame, then hang it where sunlight can dance through the beads.
#4. Chicken Wire Garden Hat
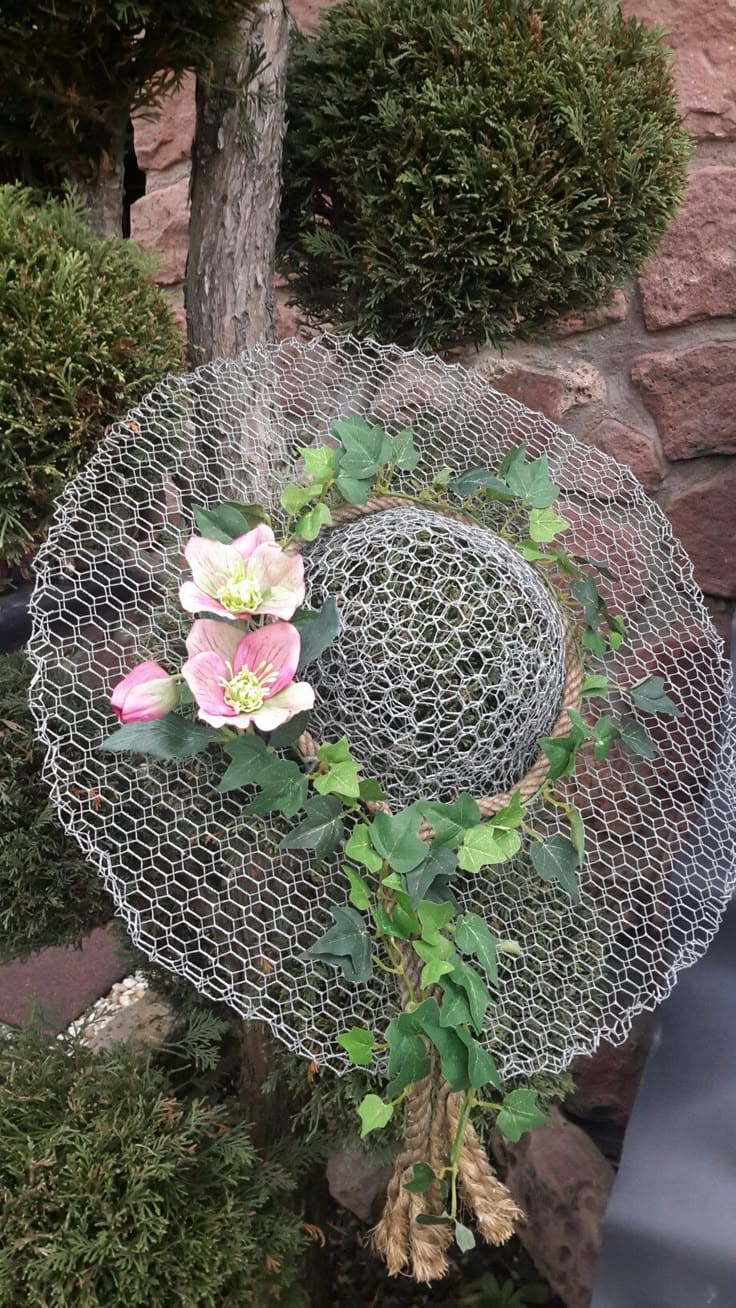
You’ll feel a thrill as you shape this unique piece, turning simple wire into a charming decoration that blends beautifully with nature.
Materials Needed
- Chicken wire (1-inch mesh), 2 feet by 2 feet
- Wire cutters
- Heavy-duty gloves
- Pliers
- 3-4 artificial flowers (e.g., pink hellebores, 2–3 inches)
- Artificial ivy vines (2–3 feet)
- Twine (3 feet)
- Wooden or metal stake (2–3 feet tall)
- Optional: spray paint (light color)
Step-by-Step Guide
Step 1: Put on your gloves and use wire cutters to shape the chicken wire into a wide hat brim and a rounded top, securing the edges with pliers.
Step 2: Weave the ivy vines around the hat, tucking them into the wire to create a natural look that flows like a garden path.
Step 3: Attach the flowers to the front with twine, arranging them to peek out like a cheerful smile.
Step 4: Mount the hat on the stake and place it in your garden.
#5. Chicken Wire Chicken Art Frame
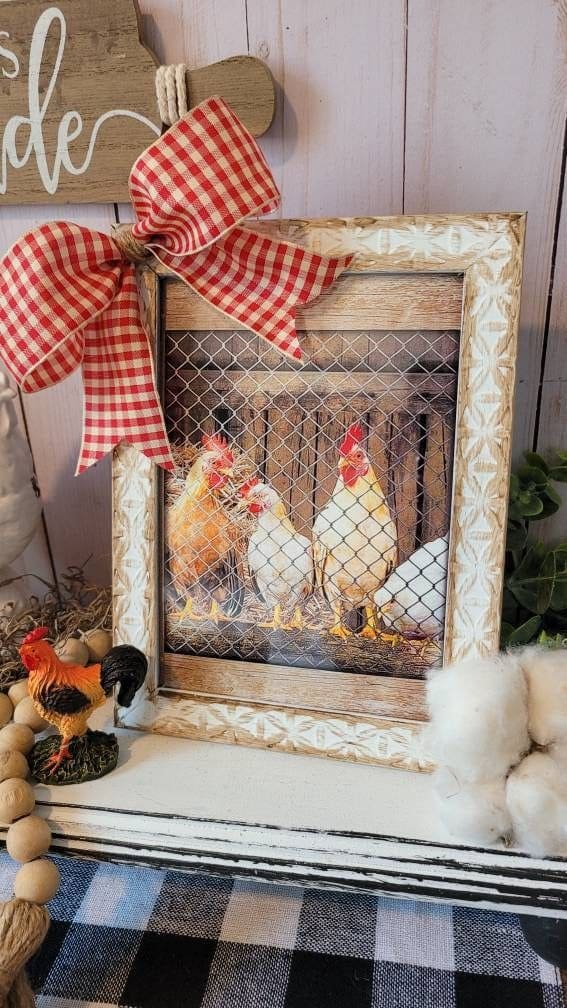
I believe you can’t resist crafting this eye-catching piece, blending a photo of your favorite hens with a red checkered bow for a cozy touch.
Specially, for about nearly $18, it’s a budget-friendly way to add personality to your space, honoring the natural beauty of your backyard flock.
Materials Needed
- Chicken wire (1-inch mesh), 2 feet by 2 feet
- Wire cutters
- Heavy-duty gloves
- Ornate wooden frame (12×10 inches)
- Pliers
- Red checkered ribbon (1-2 inches wide)
- Staple gun with ¼-inch staples
- Chicken photo or print (8×6 inches)
- Optional: sandpaper (medium grit)
Step-by-Step Guide
Step 1: Put on your gloves and use sandpaper to smooth the frame if needed, then cut the chicken wire to fit the frame’s opening with wire cutters.
Step 2: Secure the wire to the frame’s back with the staple gun, pulling it tight for a neat fit.
Step 3: Place the chicken photo behind the wire and tie the ribbon into a bow, attaching it to the top corner.
#6. Chicken Wire Storage Cabinet
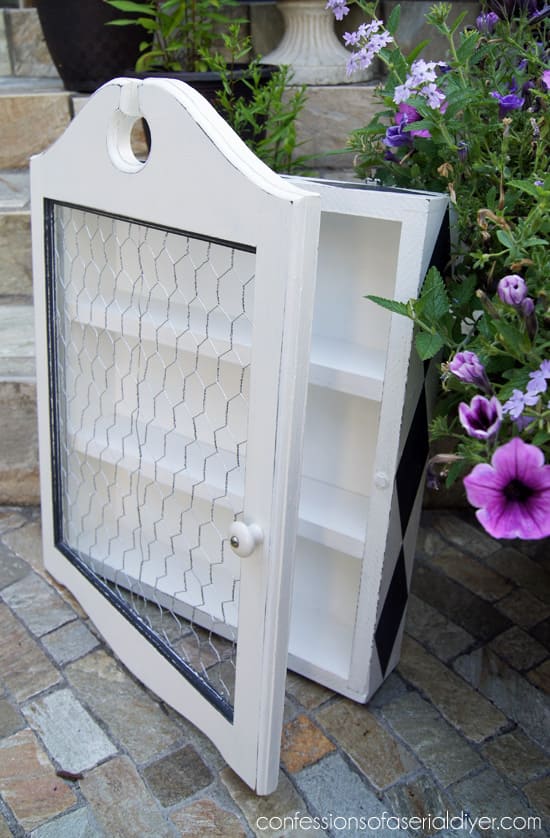
You can easily add a touch of rustic elegance to your porch with this chicken wire storage cabinet, perfect for stashing garden tools or treasures in style.
Bonus, you’ll feel a sense of accomplishment as you transform an old cabinet, letting the wire bring a breath of fresh air while keeping everything visible and organized.
Materials Needed
- Chicken wire (1-inch mesh), 2 feet by 3 feet
- Wire cutters
- Heavy-duty gloves
- Old wooden cabinet (12x6x18 inches)
- Pliers
- Staple gun with ¼-inch staples
- Paint (white or your choice)
- Optional: sandpaper (medium grit)
Step-by-Step Guide
Step 1: Put on your gloves and use sandpaper to smooth the cabinet, then paint it your desired color and let it dry.
Step 2: Cut the chicken wire to fit the cabinet door with wire cutters, trimming it to match the frame.
Step 3: Secure the wire to the inside of the door with the staple gun, pulling it tight for a neat look.
Step 4: Reattach the door, place the cabinet outside, and fill it with your items.
#7. Heart-shaped Wall Hanging
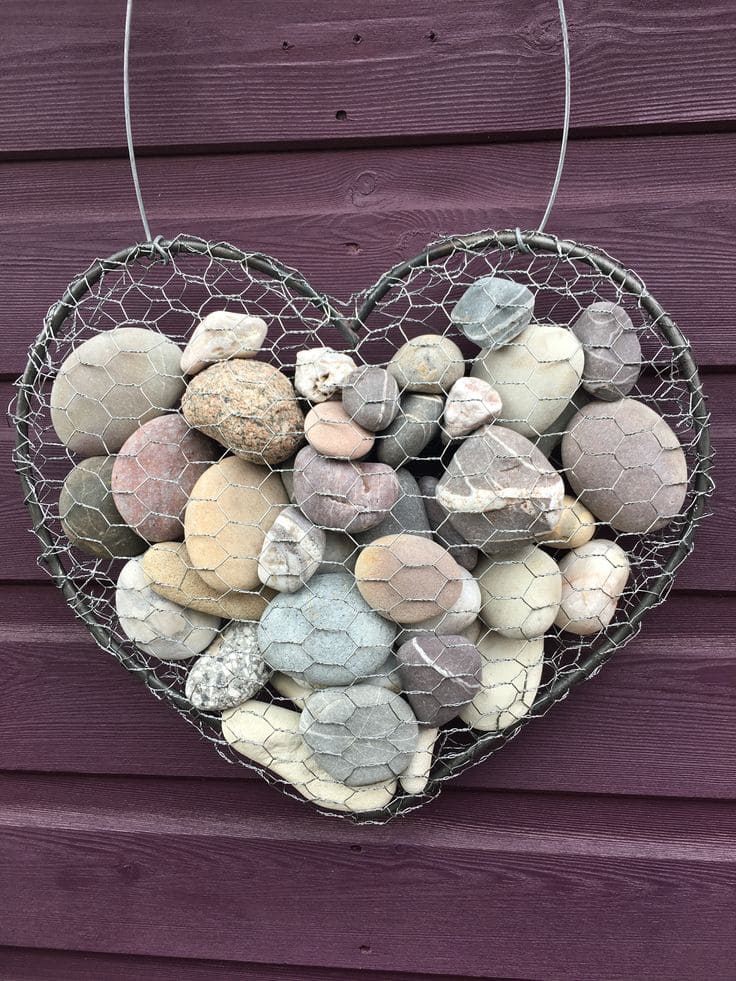
This charming heart-shaped wall hanging is made with chicken wire and smooth, colorful stones, making it a perfect addition to any outdoor or garden space.
In addition, the stones add texture and natural beauty to the piece, while the wire structure holds everything together in a neat, eye-catching design.
Materials Needed:
- Chicken wire (about 1 square yard)
- Various smooth stones
- Wire cutters
- Needle and wire
- Scissors
- Hanging wire (optional)
Step-by-Step Guide:
Step 1: Cut the chicken wire into a heart shape, ensuring it’s large enough to hold your stones. You should use a pair of scissors or wire cutters for a clean cut.
Step 2: Start placing stones inside the chicken wire frame, arranging them to fit snugly. Then layer the stones based on size, with larger ones at the bottom.
Step 3: Secure each stone in place by wrapping small pieces of wire around them, ensuring they stay in position as you work your way up the heart.
Step 4: Once your heart is filled with stones, attach a piece of wire at the top to hang it.
#8. Chicken Wire Lamp Shade
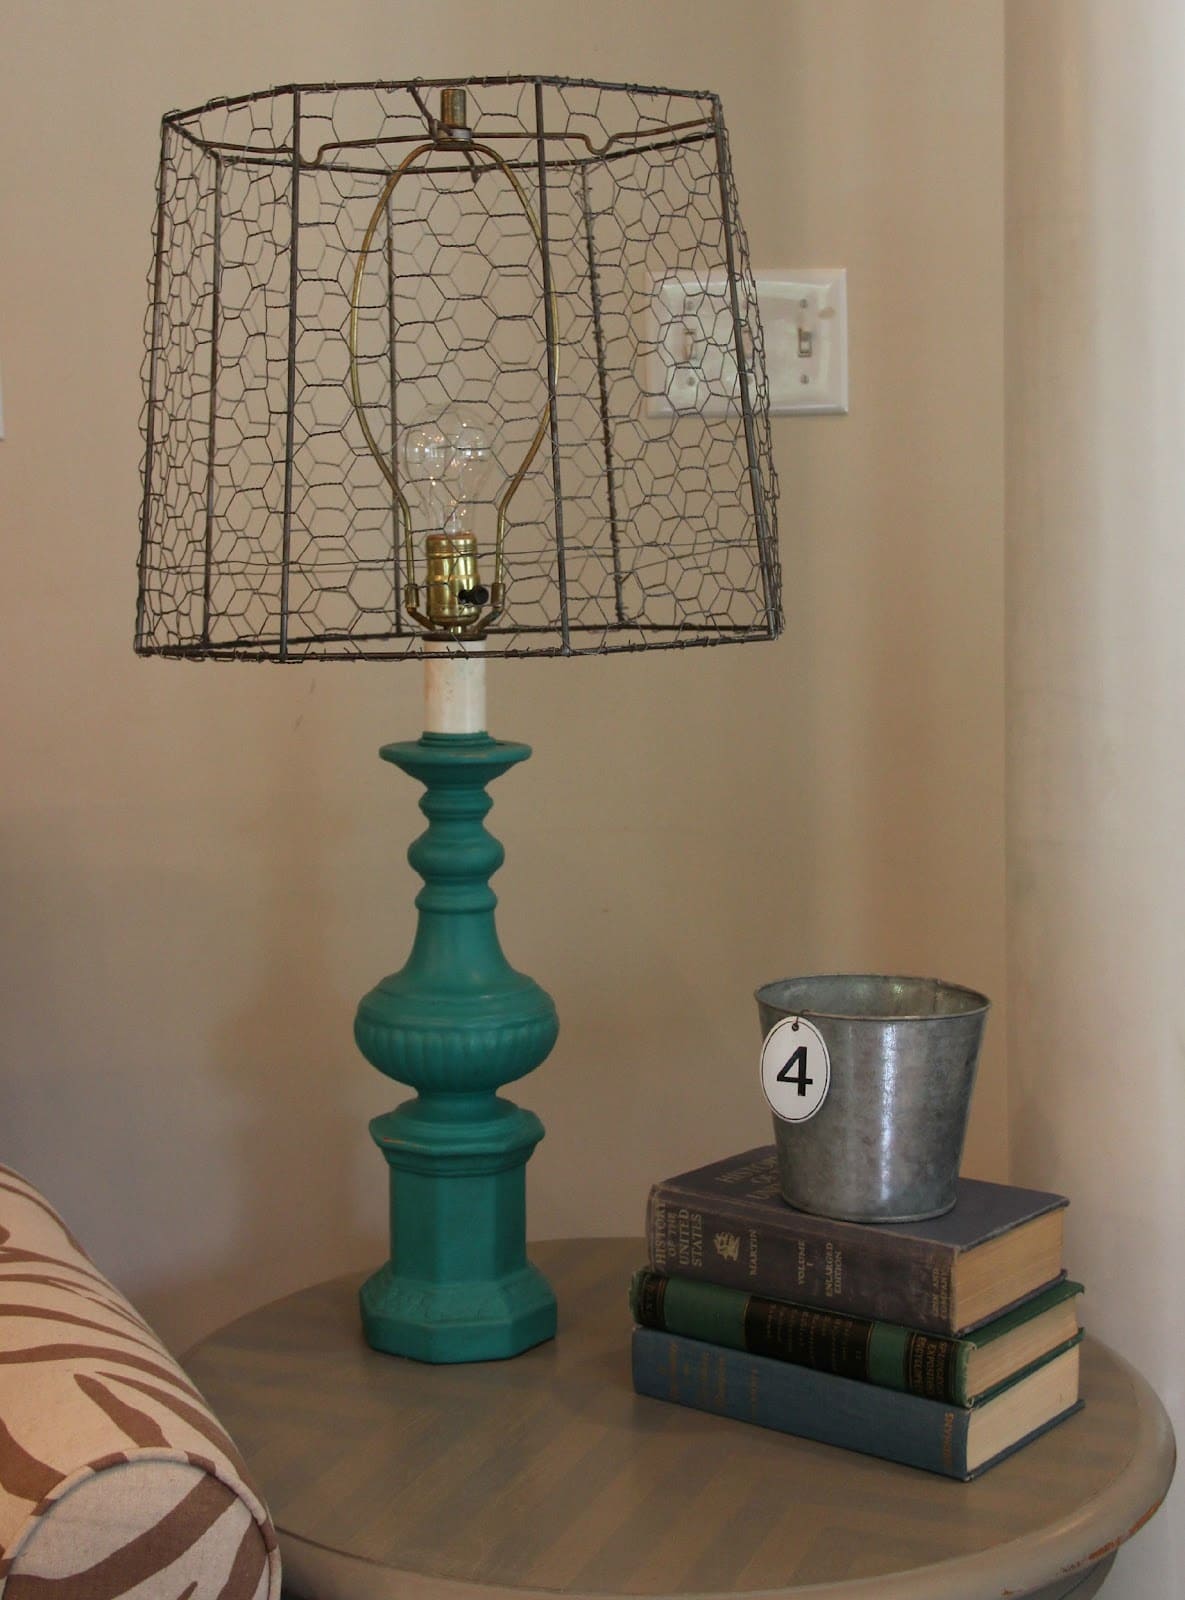
You’ll love the way this simple upgrade adds character to an old lamp, blending the wire’s texture with a pop of color for a unique touch. Plus, it’s an easy project that brings new life to your space, and it respects the natural vibe of your home.
Materials Needed
- Chicken wire (1-inch mesh), 2 feet by 2 feet
- Wire cutters
- Heavy-duty gloves
- Lamp base (with socket and bulb)
- Pliers
- Lamp harp or frame
- Spray paint (e.g., bronze or black)
- Optional: sandpaper (medium grit)
Step-by-Step Guide
Step 1: Put on your gloves and use wire cutters to shape the chicken wire into a cylinder, about 12 inches tall and 10 inches wide, securing with pliers.
Step 2: Sand the lamp base if needed, then attach the wire cylinder to the lamp harp, ensuring it sits snugly.
Step 3: Spray paint the wire shade and let it dry, choosing a color that warms up the room.
#9. Chicken Wire Magazine Holder
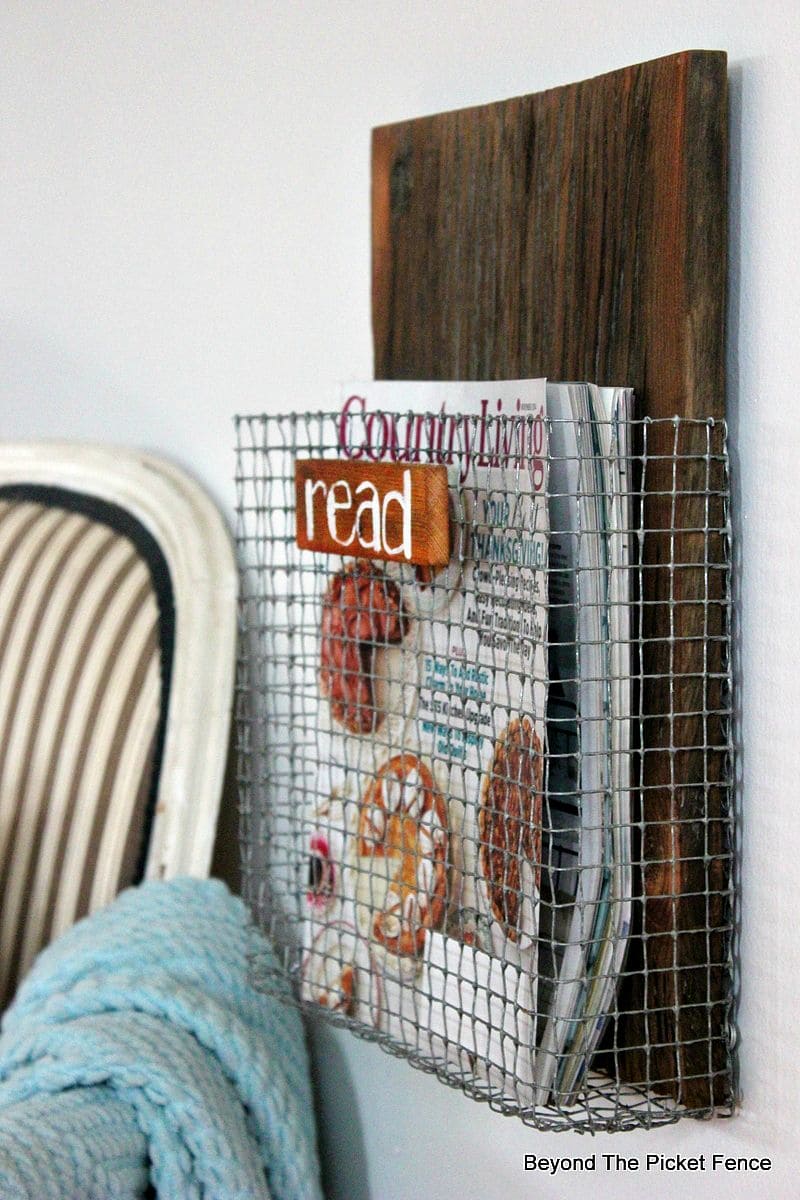
If you want your reading nook or living room corner to be organized, try this chicken wire magazine holder, blending rustic wood with a practical design that adds warmth to your space.
Materials Needed
- Chicken wire (1-inch mesh), 2 feet by 1.5 feet
- Wire cutters
- Heavy-duty gloves
- Wooden board (12×10 inches)
- Pliers
- Staple gun with ¼-inch staples
- Wood stain or paint
- Optional: sandpaper (medium grit)
Step-by-Step Guide
Step 1: Put on your gloves and sand the wooden board, then apply stain or paint and let it dry.
Step 2: Cut the chicken wire to fit the board’s width with wire cutters, shaping it into a pocket with pliers.
Step 3: Secure the wire to the board’s edges with the staple gun, creating a sturdy holder.
Step 4: Mount the holder on the wall and slide in your magazines.
#10. Chicken Wire Garden Orbs
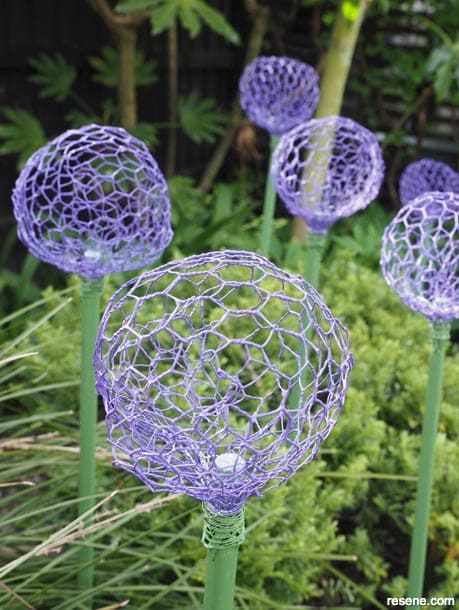
For about $15–$20, this project is a fun way to add a splash of color, and it respects nature by letting your garden shine through. So, let’s do the task that’ll make your outdoor space feel fresh and lively.
Materials Needed
- Chicken wire (1-inch mesh), 3 feet by 3 feet
- Wire cutters
- Heavy-duty gloves
- 5 green garden stakes (3 feet long)
- Purple spray paint (rust-resistant)
- Pliers
- 5 small round objects (e.g., balloons or bowls, 6–8 inches diameter)
- Optional: clear sealant spray
Step-by-Step Guide
Step 1: Put on your gloves and use wire cutters to cut the chicken wire into five 1×1-foot squares, then shape each over a round object with pliers.
Step 2: Secure the wire into spheres by twisting the edges together, then remove the round objects carefully.
Step 3: Spray the orbs with purple paint in a well-ventilated area, letting them dry completely. Add sealant if you want extra protection.
Step 4: Attach each orb to a garden stake and push them into the soil where they’ll catch the light.
#11. Chicken Wire Heart Trellis
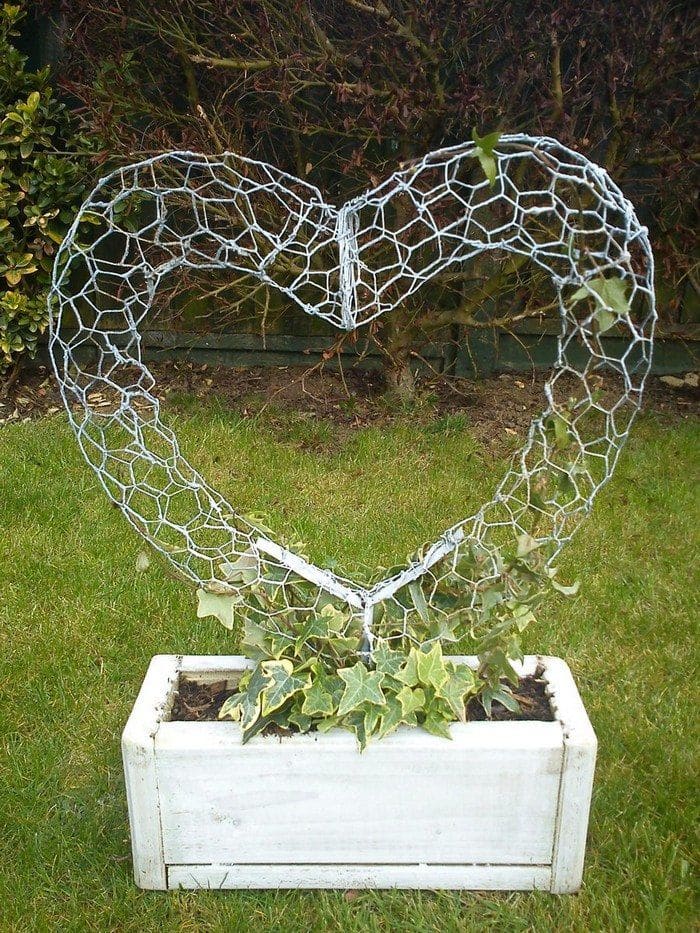
For someone who want something outstanding in their garden, you can own this chicken wire heart trellis, a sweet symbol of love that invites ivy to climb and flourish like a living embrace.
Materials Needed
- Chicken wire (1-inch mesh), 3 feet by 2 feet
- Wire cutters
- Heavy-duty gloves
- Wooden planter box (12x6x6 inches)
- Pliers
- Ivy plants or climbing vines
- 2 metal stakes (12 inches long)
- Optional: 1 small bag of soil and compost mix
Step-by-Step Guide
Step 1: Put on your gloves and use wire cutters to shape the chicken wire into a large heart, about 2 feet tall, bending it gently with pliers.
Step 2: Secure the heart to the metal stakes and place them into the planter box, making sure it stands firm like a proud sculpture.
Step 3: Plant the ivy or vines around the stakes, adding soil and compost to give them a good start.
Step 4: Position the trellis in a sunny spot, water the plants, and let nature take over, soon, you’ll see a green heart blooming.
#12. Chicken Wire Hanging Lantern
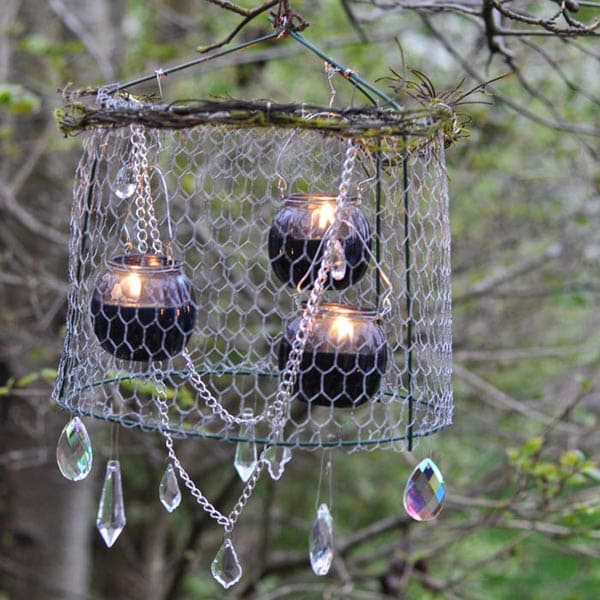
Wow, you can see a soft, magical glow lighting up your garden at dusk, with a chicken wire hanging lantern swaying gently in the breeze like a gift from the trees.
Furthermore, you’ll feel a sense of wonder as you craft this, blending rustic wire with the sparkle of candles and crystals, perfect for those warm summer evenings.
Materials Needed
- Chicken wire (1-inch mesh), 2 feet by 2 feet
- Wire cutters
- Heavy-duty gloves
- small glass candle holders (3 inches tall)
- 3 tea lights or votive candles
- 3-4 twigs (12–15 inches long)
- 4-6 crystal or glass beads (1–2 inches)
- Pliers
- Strong twine (5 feet)
- Optional: floral wire (3 feet)
Step-by-Step Guide
Step 1: Put on your gloves and use wire cutters to shape the chicken wire into a 12-inch wide cylinder, weaving twigs around the top for a natural frame.
Step 2: Place the candle holders inside, securing them with twine or floral wire so they hang evenly. Now, you can add the tea lights for a cozy glow.
Step 3: Attach the crystals to the bottom with twine, letting them dangle like little stars.
Step 4: Hang it from a tree or hook with the rope, light the candles, and enjoy the enchanting light it casts around you.
#13. Chicken Wire Garden Spirit

This enchanting figure, draped in vines and flowers feels like a guardian of the earth, standing tall among the trees with a gentle, welcoming presence.
Specially, you can create this magical piece for about $15–$20, using materials that blend seamlessly with nature, so it’s perfect if you love a project that grows with your garden.
Materials Needed
- Chicken wire (1-inch mesh), 4 feet by 3 feet
- Wire cutters
- Heavy-duty gloves
- Wooden base or stump (12–15 inches tall)
- Pliers
- 3-5 assorted small plants or vines (e.g., ivy, creeping thyme)
- 2-3 flowers (e.g., petunias or roses)
- Garden twine (10 feet)
- Optional: 1 bag of moss or soil to fill gaps
Step-by-Step Guide
Step 1: Put on your gloves and use wire cutters to shape the chicken wire into a rough human figure. Then attach it to the wooden base with pliers.
Step 2: Weave the plants and vines through the wire, letting them climb naturally. Now, secure them with garden twine, imagining you’re dressing your spirit in a green gown.
Step 3: Tuck the flowers into the chest or hands, adjusting them so they stand out like a bright smile. Then, add moss or soil if you want extra texture.
Step 4: Place your garden spirit in a shady spot, water the plants gently, and watch it come to life as nature takes over.
#14. Chicken Wire Earring Display
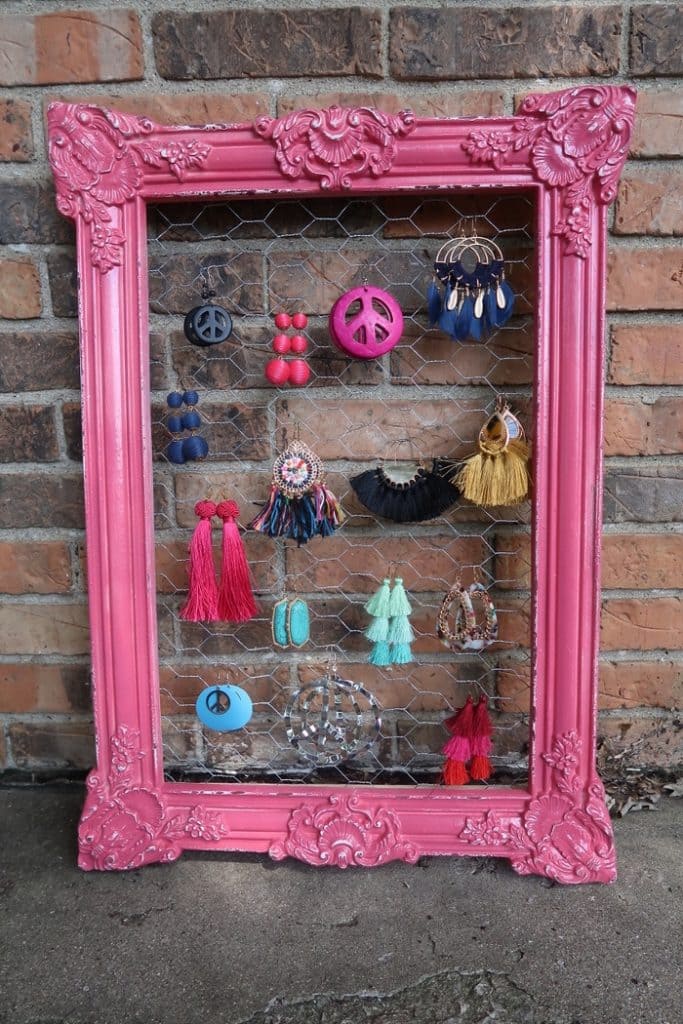
Great, now you have one more way to showcase your favorite earrings by displaying in a vibrant chicken wire display, framed in a bold pink that adds a pop of personality to your room.
Materials Needed
- Chicken wire (1-inch mesh), 2 feet by 2 feet
- Wire cutters
- Heavy-duty gloves
- Ornate wooden frame (16×12 inches)
- Pliers
- Pink spray paint (rust-resistant)
- Staple gun with ¼-inch staples
- Optional: sandpaper (medium grit)
Step-by-Step Guide
Step 1: Put on your gloves and use sandpaper to smooth the frame, then spray paint it pink and let it dry completely.
Step 2: Cut the chicken wire to fit the frame’s opening with wire cutters, trimming it neatly.
Step 3: Secure the wire to the frame’s back with the staple gun, pulling it tight for a clean look.
Step 4: Hang the display on the wall and hook your earrings onto the wire.
#15. Chicken Wire Candle Holder
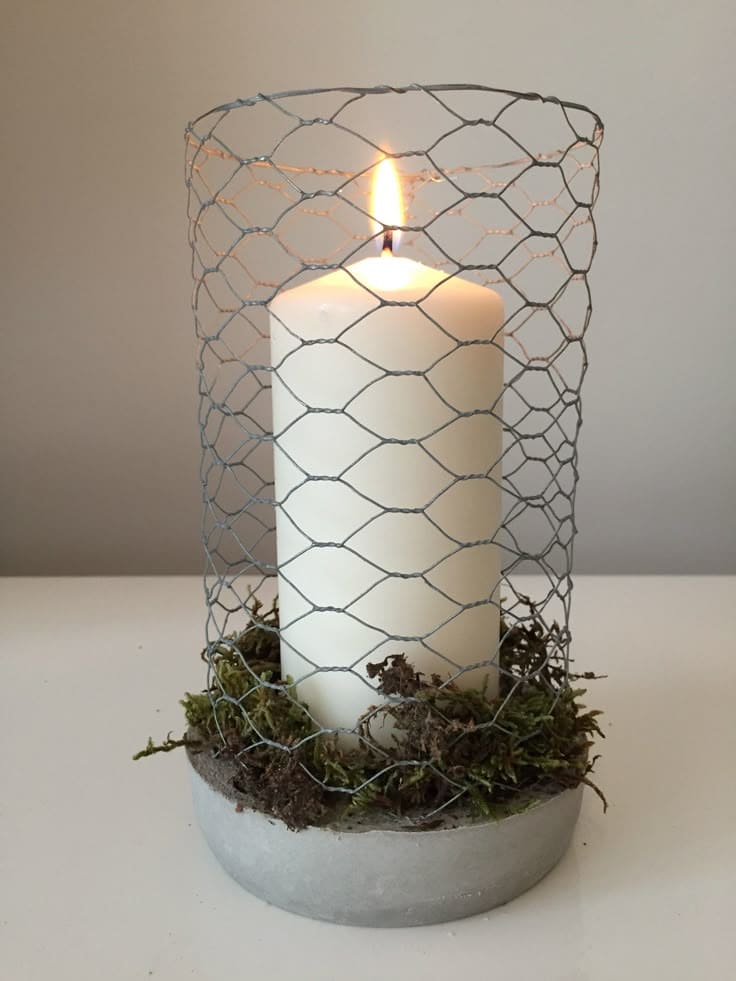
Oh my god, nothing better than a soft glow lighting up your evening, wrapped in a chicken wire candle holder that feels like a little piece of the forest brought indoors.
You’ll love how the wire’s rustic texture pairs with the warm flicker of a candle, creating a cozy vibe that’s perfect for quiet nights or special gatherings.
Materials Needed
- Chicken wire (1-inch mesh), 1.5 feet by 1.5 feet
- Wire cutters
- Heavy-duty gloves
- Pillar candle (3 inches diameter, 4 inches tall)
- Concrete or clay base (5 inches diameter)
- Dried moss
- Pliers
- Floral wire (3 feet)
- Optional: small pebbles, ½ cup
Step-by-Step Guide
Step 1: Put on your gloves and use wire cutters to shape the chicken wire into a cylinder around the candle, leaving a little space for the flame.
Step 2: Secure the cylinder with pliers and floral wire, ensuring it stands firm. Then place it over the candle, resting it on the base.
Step 3: Press the dried moss around the base, tucking it into the wire for a natural look. Add pebbles if you want extra weight and texture.
#16. Chicken Wire Egg Basket
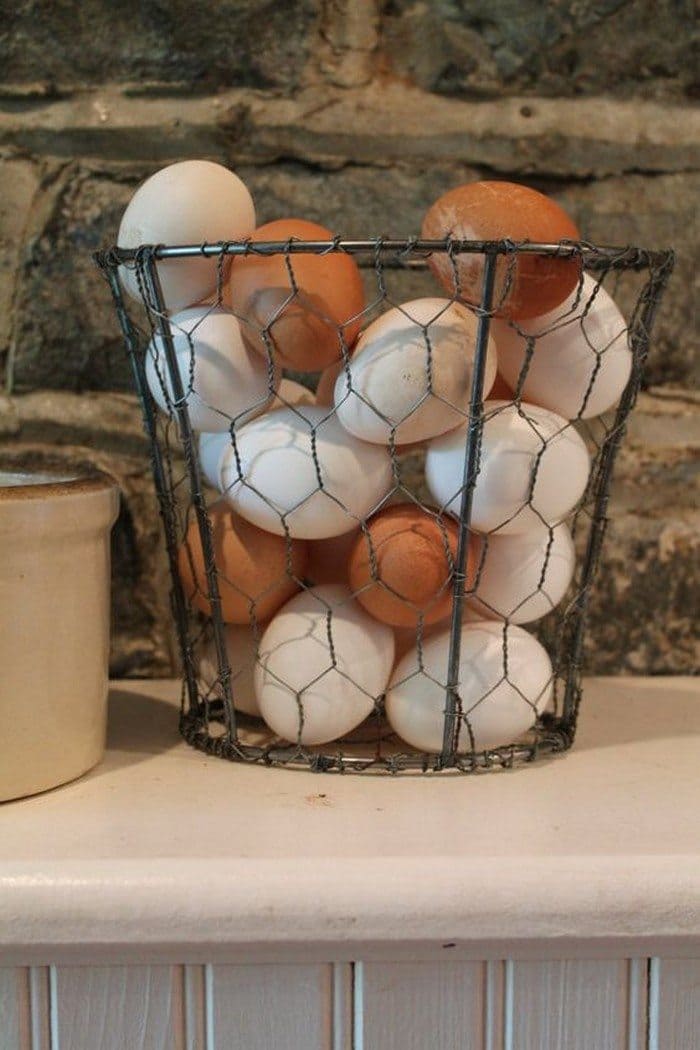
Instead of using traditional containers, you can replace by this wire basket to gather fresh eggs and its rustic design also adds a touch of farmhouse warmth to your kitchen.
Materials Needed
- Chicken wire (1-inch mesh), 1.5 feet by 1.5 feet
- Wire cutters
- Heavy-duty gloves
- Pliers
- Twine or wire (2 feet)
- Optional: spray paint (rust-resistant)
Step-by-Step Guide
Step 1: Put on your gloves and use wire cutters to cut the chicken wire into a 12×12-inch square, shaping it into a cylinder with pliers.
Step 2: Fold the bottom edges inward to create a base, securing them with twine or wire for stability.
Step 3: If desired, spray paint the basket and let it dry for a custom look.
Step 4: Place your eggs inside and set the basket on your counter.
#17. Chicken Wire Bird Sculpture
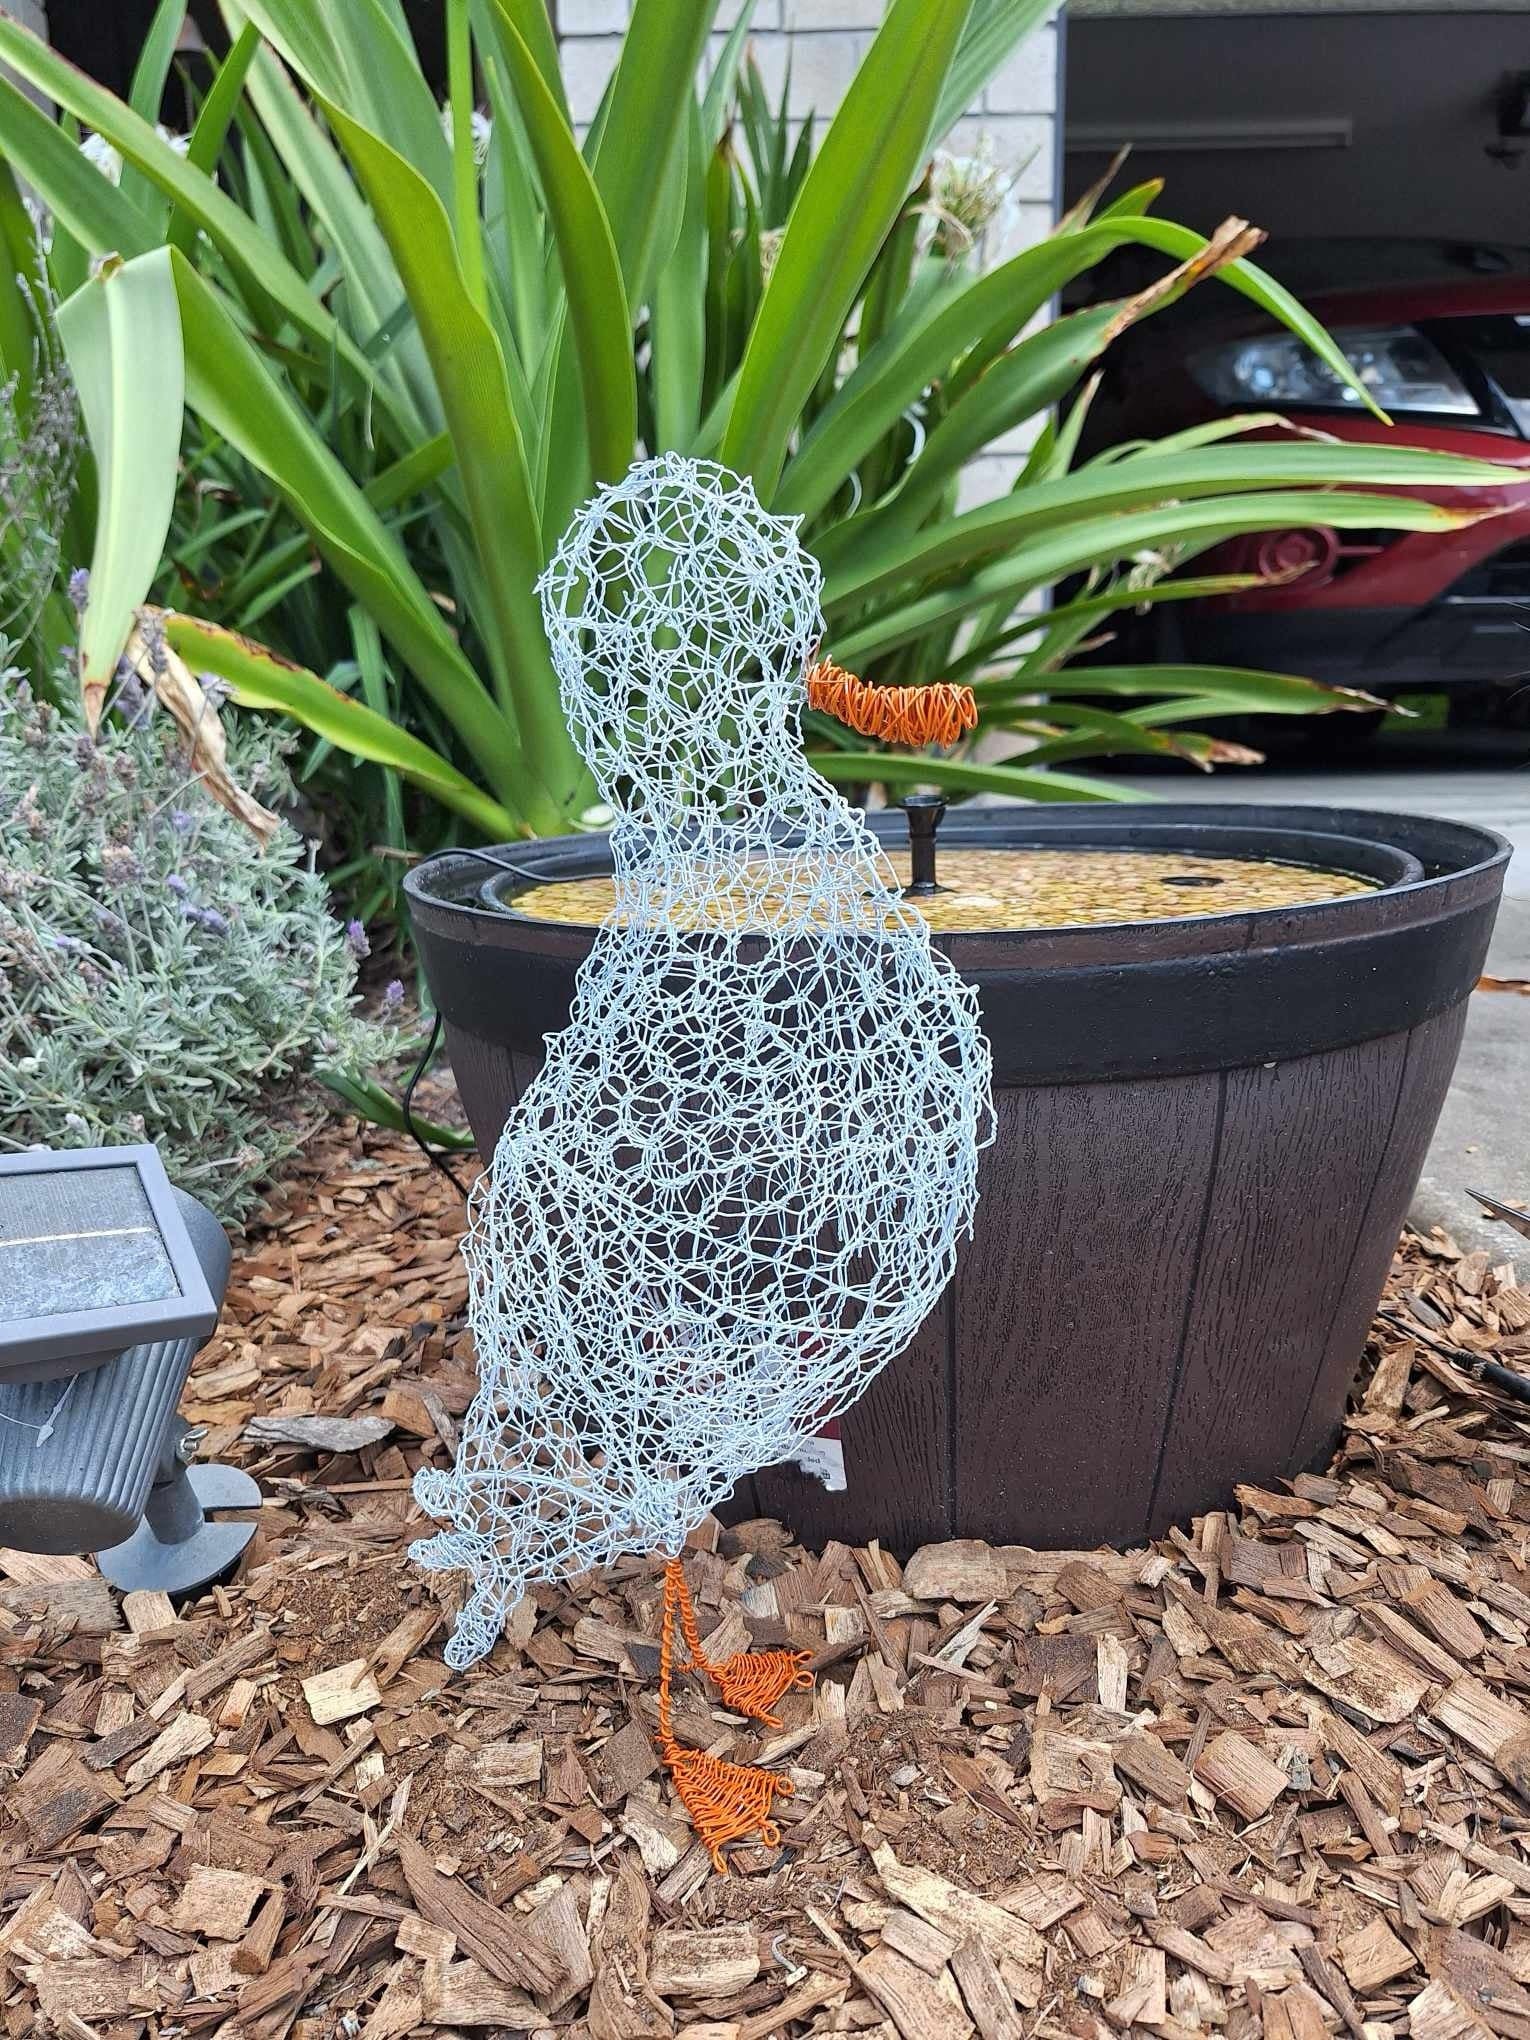
This unique chicken wire project brings your outdoor decor to life with a whimsical bird sculpture. It is both a creative and practical way to add a touch of nature-inspired art to your backyard or garden.
Materials Needed:
- Chicken wire (at least 2 feet by 2 feet)
- Orange wire (about 1-2 feet)
- Wire cutters
- Pliers
- Optional: Spray paint
Step-by-Step Guide:
Step 1: Begin by cutting your chicken wire to the desired size. For this bird sculpture, a 2-foot section should suffice.
Step 2: Shape the wire into the body of the bird. Start with a rounded base for the body and gradually form a small head. Use your pliers to twist the wire ends tightly.
Step 3: Once the body is shaped, use the orange wire to form the beak and feet. Then twist small sections into triangular shapes for the beak and long loops for the feet.
Step 4: Attach the feet to the base of the bird’s body by twisting them securely into place. You can also bend and adjust the body to create the perfect shape.
#18. Chicken Wire Autumn Wreath
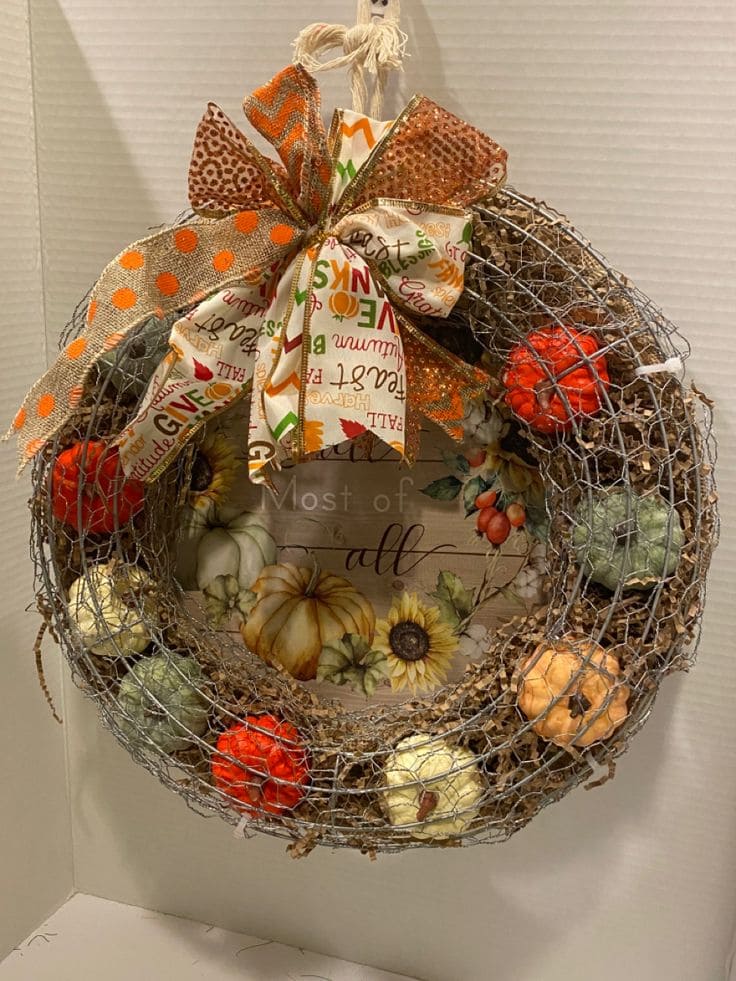
When fall comes, you can welcome guests with a cozy chicken wire autumn wreath hanging proudly on your door, its warm hues and rustic charm whispering tales of fall harvests.
Moreover, you’ll feel a burst of seasonal joy as you craft this beauty, layering it with mini pumpkins and a festive bow that ties the look together like a hug from nature.
Materials Needed
- Chicken wire (1-inch mesh), 2 feet by 2 feet
- Wire cutters
- Heavy-duty gloves
- 6-8 mini artificial pumpkins (3-4 inches)
- Decorative ribbon (2 inches wide, 2-3 yards)
- Raffia or burlap strips (2 feet)
- Pliers
- Floral wire (5 feet)
- Optional: autumn-themed sign or print (8×8 inches)
Step-by-Step Guide
Step 1: Put on your gloves and use wire cutters to shape the chicken wire into a 12-inch circle, bending the edges gently to form a wreath base.
Step 2: Weave raffia or burlap through the wire for a rustic touch, then secure the mini pumpkins with floral wire, spacing them evenly like little treasures.
Step 3: Tie the ribbon into a big bow and attach it to the top with floral wire. If you have a sign, nestle it in the center and secure it too.
Step 4: Hang your wreath with a loop of raffia, step back, and let the fall vibes wash over you as it brightens your space.
#19. Chicken Wire Ornament Decorations
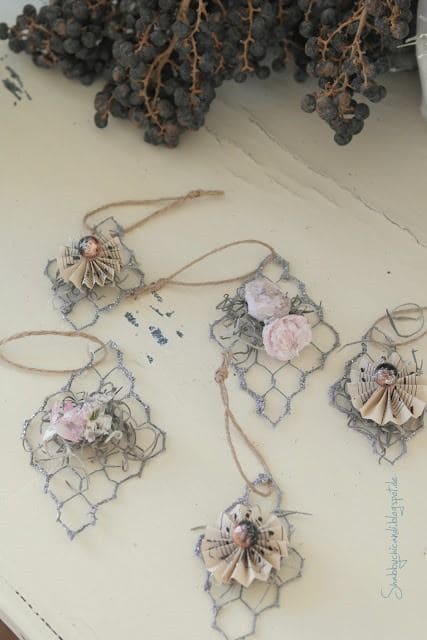
Imagine hanging delicate chicken wire ornaments on your tree or porch, each one a tiny work of art that feels like a whisper of nature’s elegance.
It will be great for you and your kids to enjoy crafting these sweet decorations, blending soft flowers and paper with the wire’s rustic texture for a touch of holiday magic.
Materials Needed
- Chicken wire (1-inch mesh), 2 feet by 2 feet
- Wire cutters
- Heavy-duty gloves
- 5-6 small artificial flowers (e.g., roses, 1-2 inches)
- Old book pages (5-6 sheets)
- Twine (10 feet)
- Pliers
- Spray paint (light purple or silver)
- Optional: hot glue gun
Step-by-Step Guide
Step 1: Put on your gloves and use wire cutters to cut the chicken wire into five 6×6-inch squares, shaping each into a small circle with pliers.
Step 2: Spray paint the wire circles and let them dry, adding a soft shimmer that catches the light.
Step 3: Fold the paper into fan shapes or rosettes, then glue or tie the flowers onto the center of each wire circle.
Step 4: Attach a loop of twine to hang them, and place your ornaments where they’ll sparkle.
#20. Chicken Wire Wall Shelves
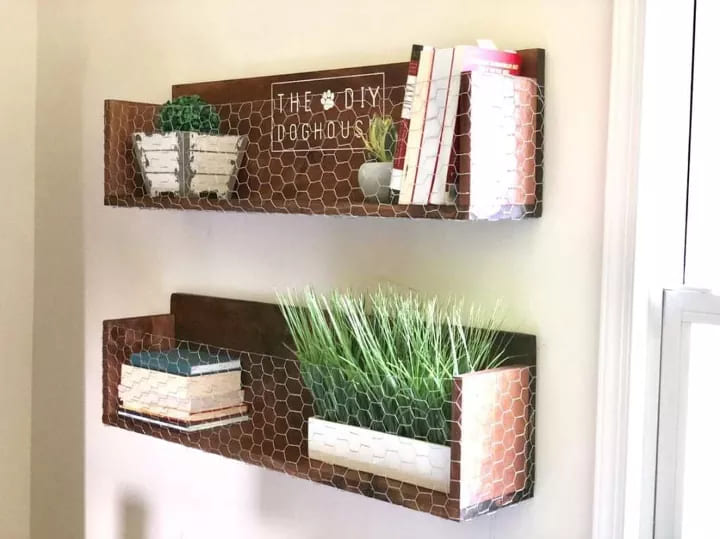
I am sure you’ll love building these sturdy shelves, where the wire adds a unique texture while keeping your items in sight.
For about $15–$20, it’s an affordable project that brings warmth and style to your space, blending naturally with your decor. So, grab your tools and get started.
Materials Needed
- Chicken wire (1-inch mesh), 3 feet by 2 feet
- Wire cutters
- Heavy-duty gloves
- 2 wooden planks (12×6 inches)
- Pliers
- Staple gun with ¼-inch staples
- Wood stain or paint
- 4 shelf brackets
- Optional: sandpaper (medium grit)
Step-by-Step Guide
Step 1: Put on your gloves and sand the wooden planks, then stain or paint them and let them dry.
Step 2: Cut the chicken wire to fit the front of each plank with wire cutters, securing it with the staple gun.
Step 3: Attach the shelf brackets to the wall and place the planks on top, ensuring they’re level. Now you can add your favorite books and plants.
#21. Garden Dragonfly Chicken Wire
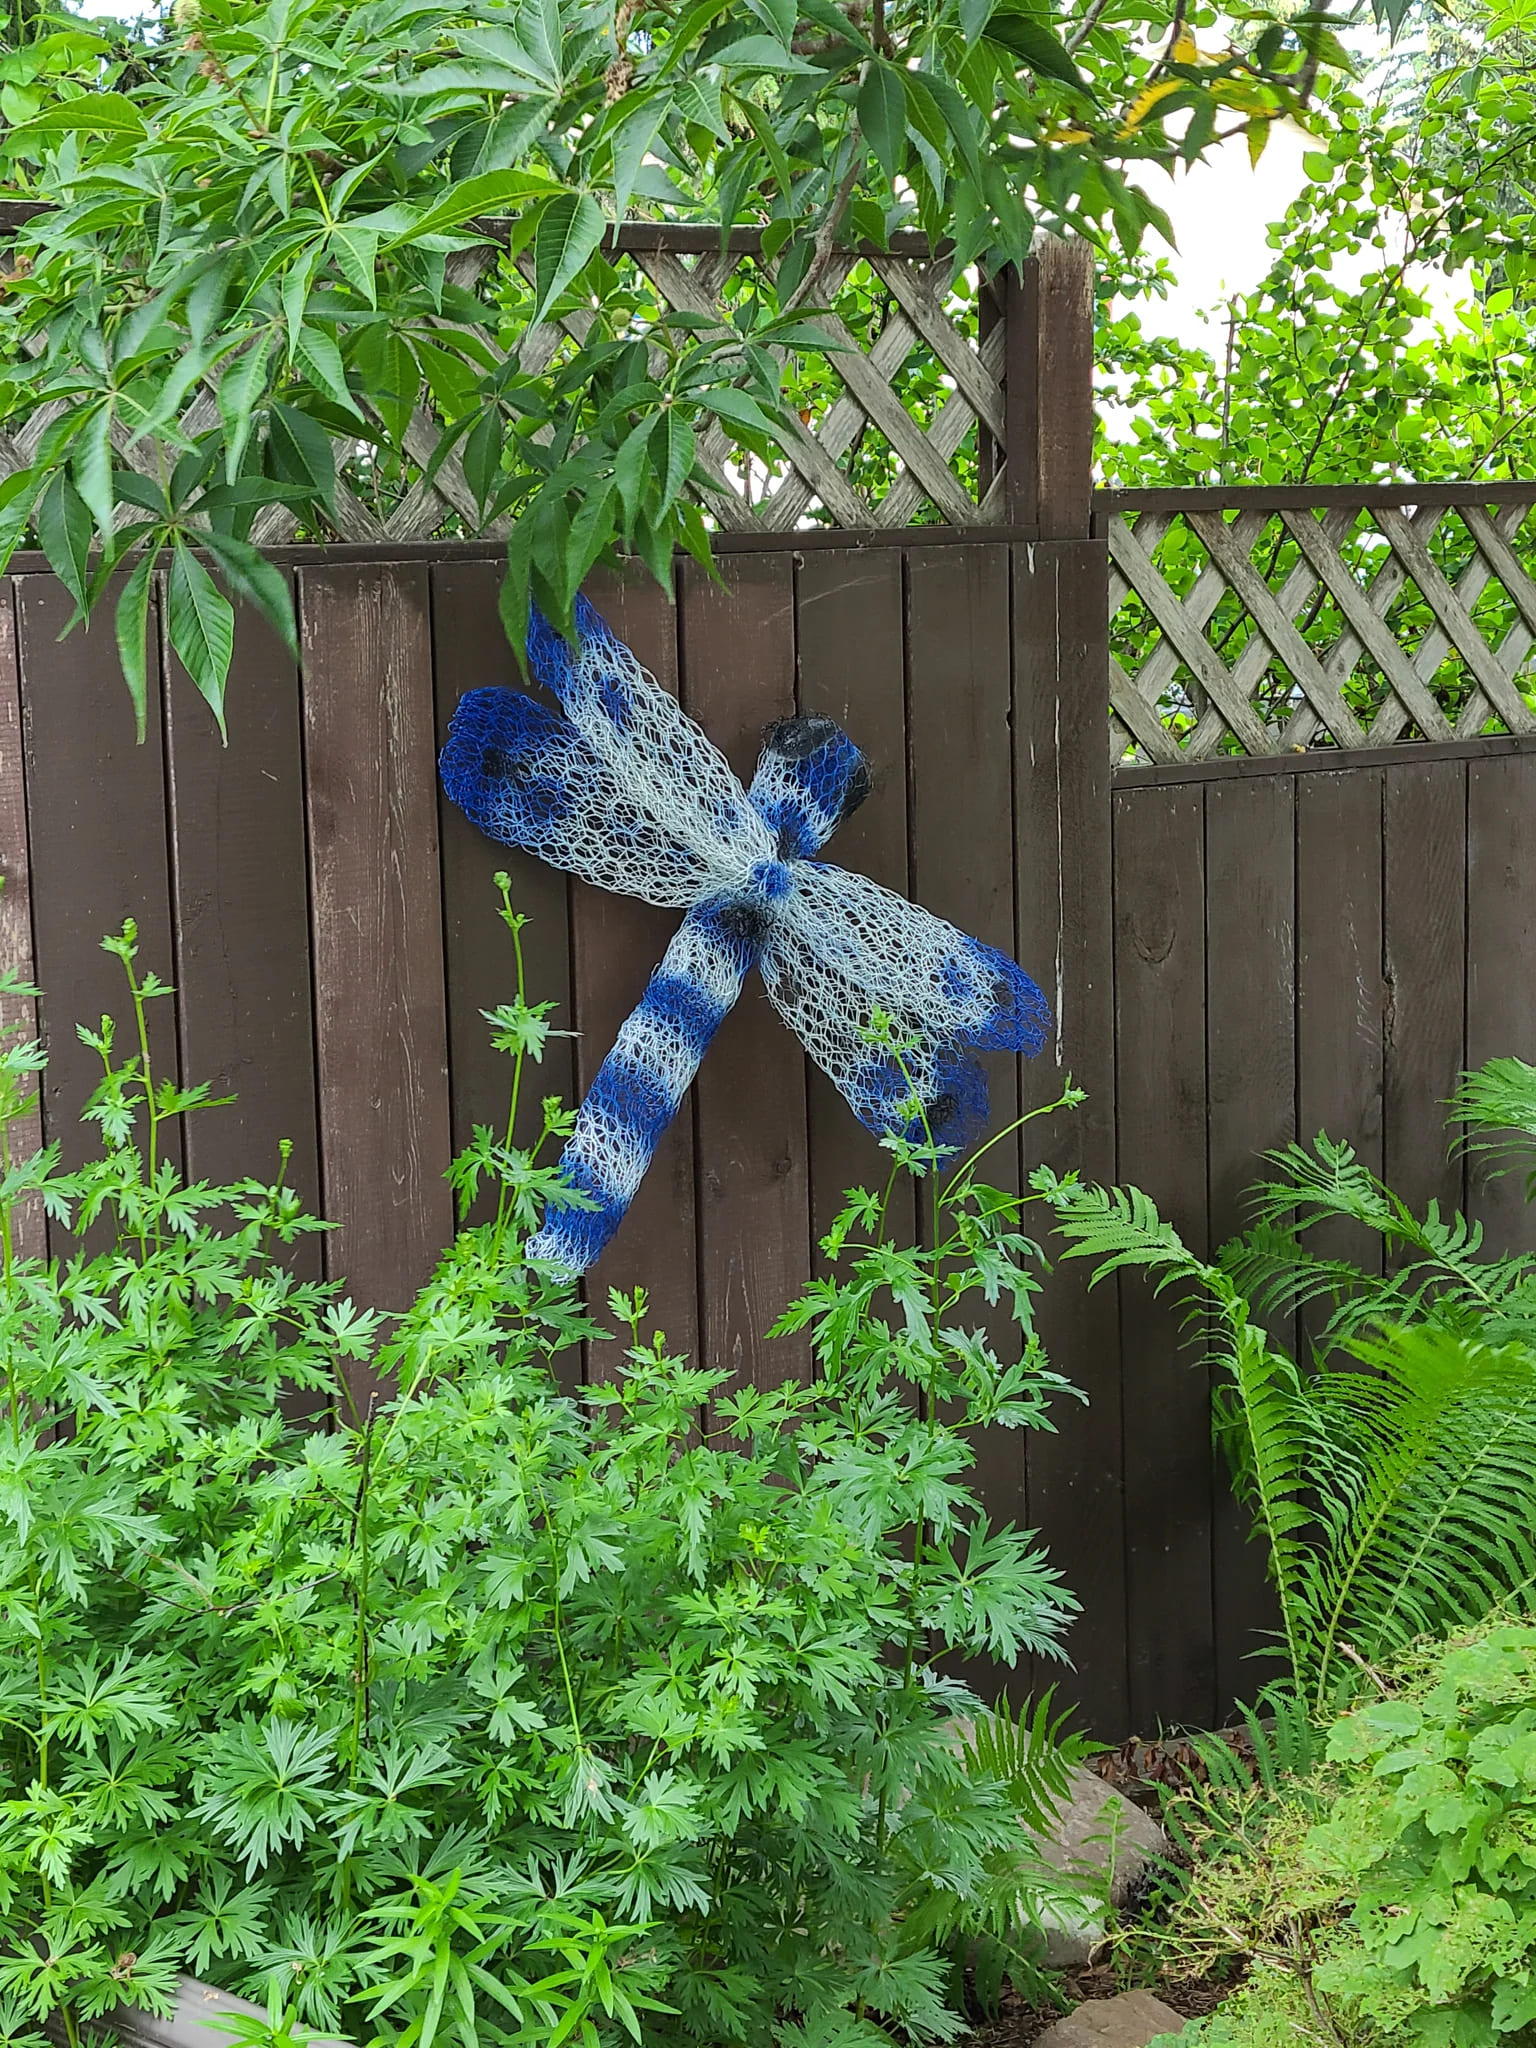
You can see the delicate, intricate structure mimics the wings of a dragonfly and the two-tone blue coloring adds a pop of brightness to the fence or garden wall.
By using chicken wire, you’re able to create a lightweight and durable piece of art that blends seamlessly with the greenery around it. Plus, it’s a perfect project to try if you’re looking for an eye-catching DIY decoration with a personal touch.
Materials Needed:
- Chicken wire (approximately 2-3 feet)
- Blue and white spray paint
- Pliers and wire cutters
- Optional: Twine
- Scissors
Step-by-Step Guide:
Step 1: Start by cutting the chicken wire into two large sections for the wings and one smaller section for the body of the dragonfly. The wings should be roughly the same size, each about 18 inches wide.
Step 2: Shape the wire into the body of the dragonfly, bending it into a long cylindrical shape, then attach the wings by twisting the wire into place.
Step 3: Spray paint the wings in a gradient of blue and white, starting from the outer edges for a smooth transition.
Step 4: Once the paint dries, hang the dragonfly sculpture on a fence or wall, securing it with twine or fishing line.
#22 Shovel Covered Chicken Wire
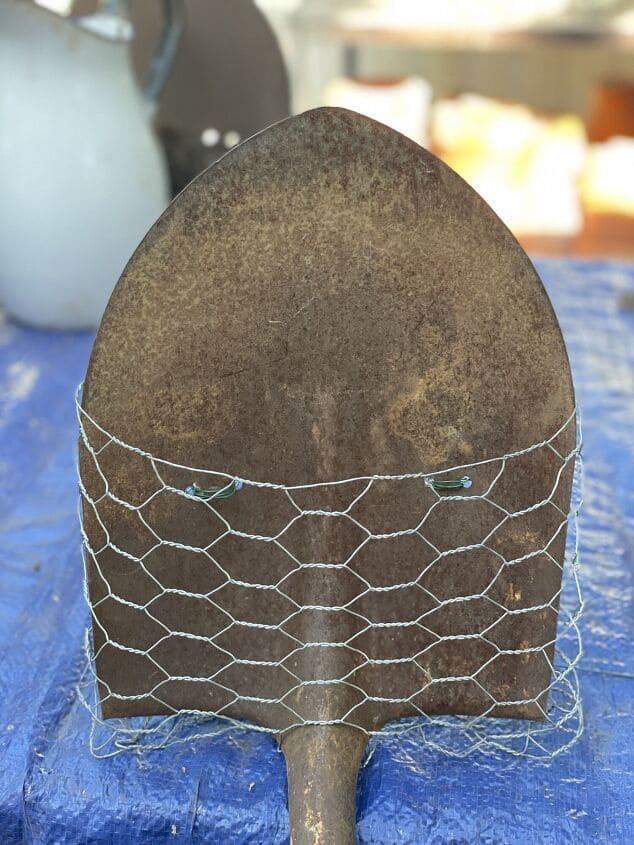
The wire attached to the shovel can serve multiple purposes, such as creating a whimsical wall decoration, a plant holder, or even a hanging storage space for small items.
By repurposing a seemingly outdated tool, you not only give it new life but also add a charming and creative touch to your garden or home.
Materials Needed:
- Shovel
- Chicken wire
- Wire cutters
- Small wire hooks (optional)
- Pliers
- Scissors
Step-by-Step Guide:
Step 1: Begin by securing your chicken wire to the blade of the shovel, cutting it to the appropriate size to cover the flat surface of the shovel.
Step 2: Use wire cutters to trim any excess wire, ensuring the wire fits snugly around the edges of the shovel. Now, you secure the chicken wire at the top with small wire hooks.
Step 3: If you want to hang the shovel on a wall, attach the wire hooks at the top of the shovel handle, then use pliers to secure them tightly.
