Air plants have quietly become a favorite in many homes, and it’s easy to see why.
They don’t need soil, they thrive with minimal care, and their sculptural shapes bring an effortlessly modern touch to any room.
But let’s be honest, most air plant displays look the same. A few pebbles in a glass bowl, maybe a seashell or two, and that’s it.
If your current setup feels more basic shelf filler than design statement, it might be time for a fresh take.
#1. Seashell Tower Air Plant Holder
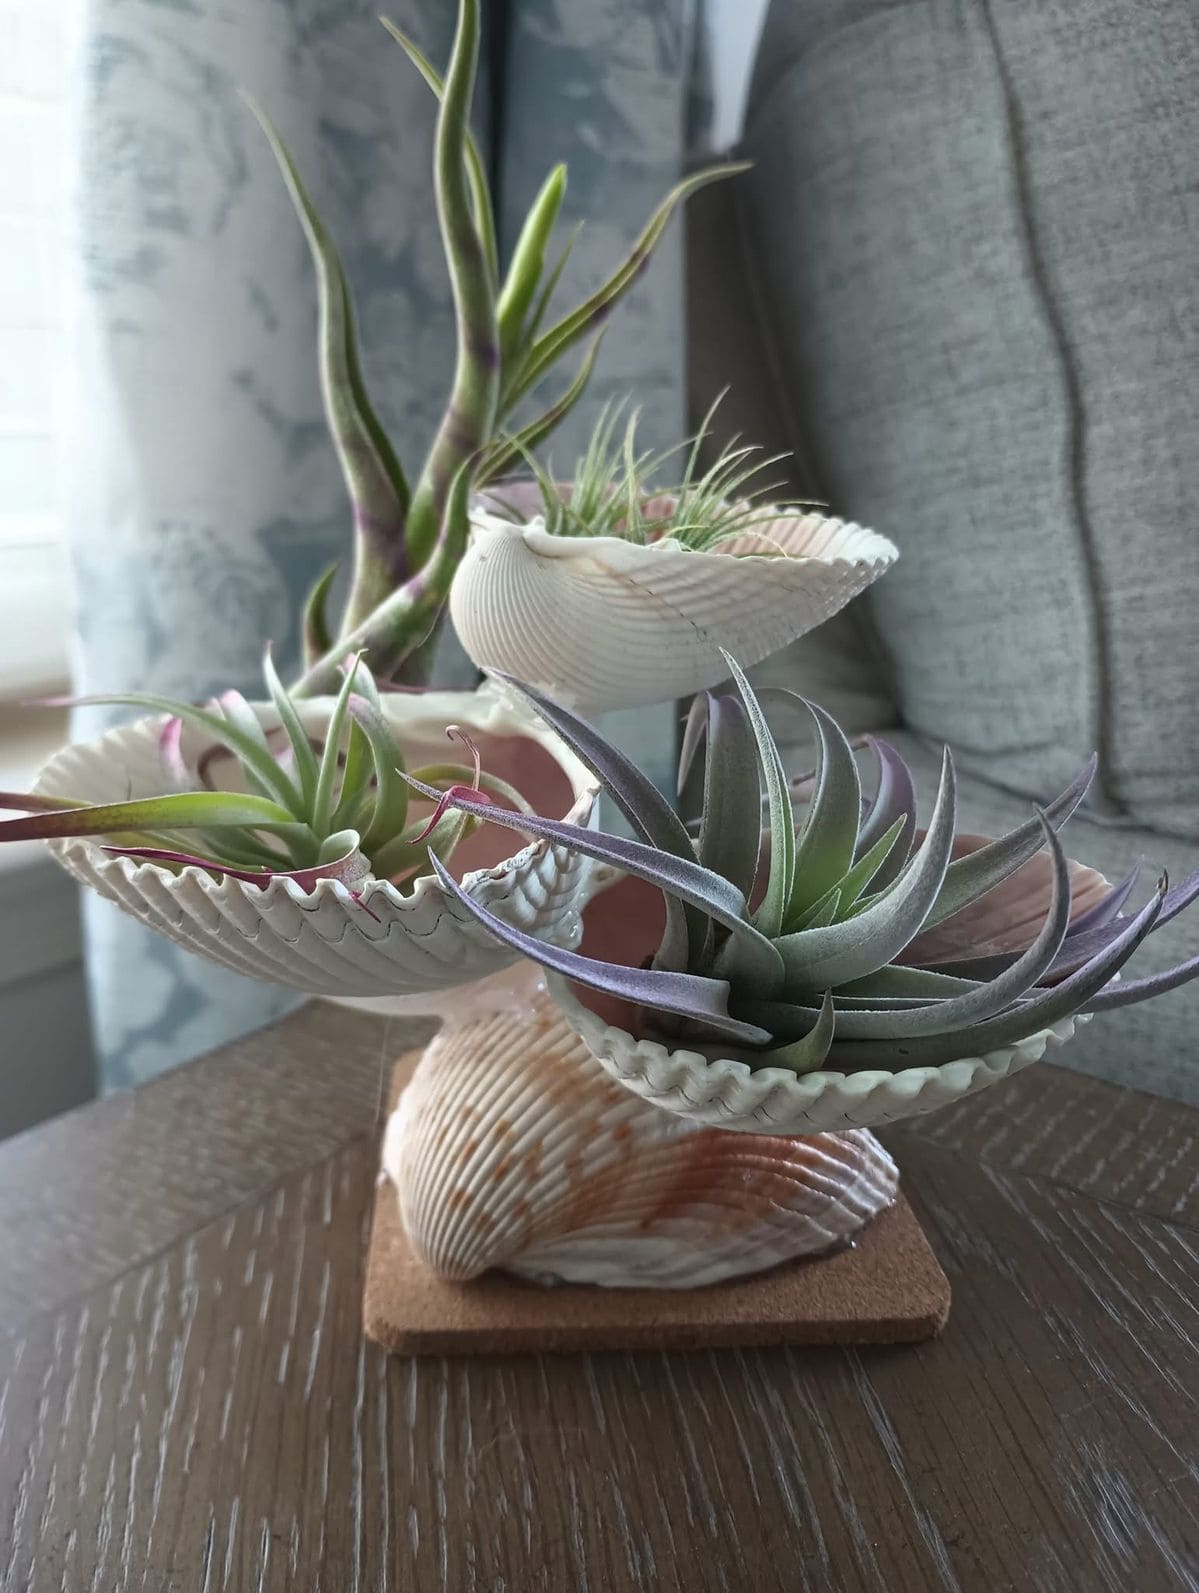
What about bringing the ocean breeze into your home with this enchanting seashell tower?
Stacked with care and imagination, the tower feels like a sculpture washed ashore from a coastal daydream.
This idea is perfect if you collect shells from beach vacations and don’t know what to do with them.
Materials Needed
- 3-5 medium to large scallop or cockle seashells (approx. 3″-5″ wide)
- 1 large conch or fan shell for the base (around 4″-6″)
- 4-6 assorted air plants (Tillandsia)
- Strong clear craft adhesive (like E6000)
- Small cork tile or wood slice (4″×4″)
Step-by-step Guide
Step 1: Clean your shells gently with warm water and dry thoroughly. Make sure no sand remains to affect the adhesive.
Step 2: Glue the largest shell to the center of your cork tile or wood base. Let it sit until firmly bonded.
Step 3: Begin stacking and gluing the smaller shells on top, tilting and layering them so they balance visually and allow for open spaces to tuck in air plants.
Step 4: Once the glue is dry, place air plants inside each shell bowl. They should rest comfortably without needing to be secured.
Step 5: Position your display where it can get bright, indirect light, ideal for Tillandsia care.
#2. Floating Jellyfish Air Plant Mobile
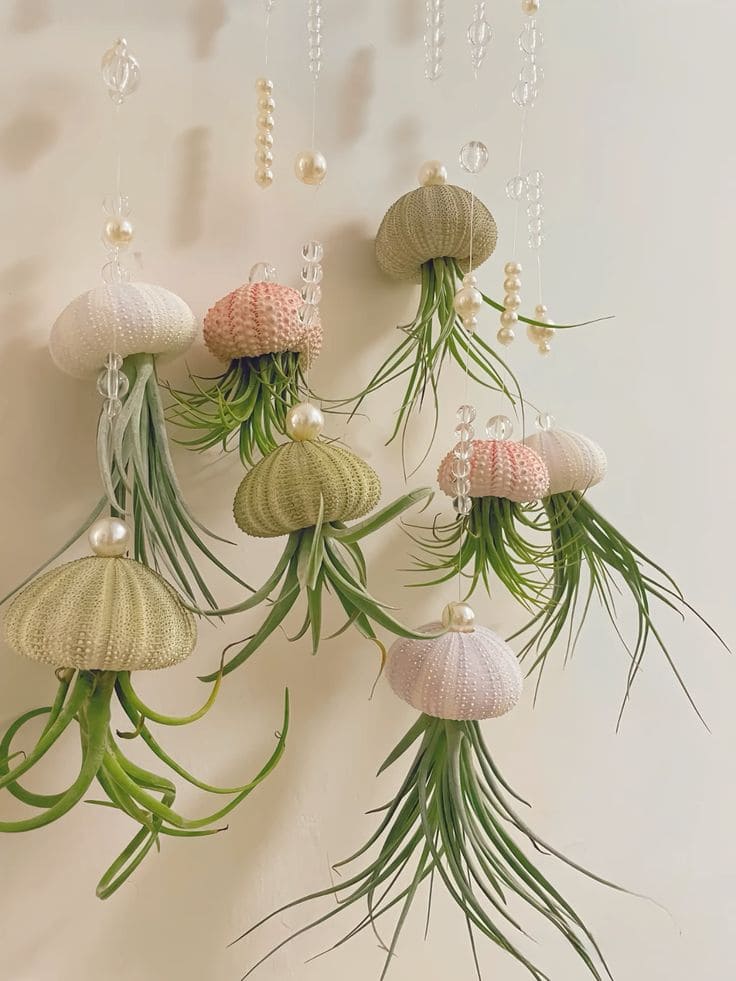
This enchanting jellyfish mobile transforms your space into a dreamy undersea realm.
With sea urchin shells acting as delicate jellyfish domes and air plants trailing below like floating tentacles, each piece seems to dance gently in the air.
Beads and faux pearls strung along clear thread add sparkle and whimsy, creating a magical illusion of marine life suspended in time.
Materials Needed
- 6-8 sea urchin shells (varied pastel colors)
- 6-8 air plants (Tillandsia varieties)
- Clear fishing line or transparent thread
- Assorted beads, pearls, or acrylic droplets
- Glue gun or floral adhesive
- Small ceiling hook or wooden ring for hanging
Step-by-step Guide
Step 1: Insert the base of each air plant gently into the underside of a sea urchin shell.
Next, you secure with a tiny dab of glue if necessary, avoid covering too much of the plant’s surface.
Step 2: Tie clear thread around the base of each plant or through the top hole of the urchin. Adjust length as needed to create a varied floating effect.
Step 3: String beads and pearls onto each thread above the urchin, spacing them out for an ethereal, drifting look.
Step 4: Tie each thread to a wooden ring or support and hang the entire mobile from a ceiling hook or bracket.
Tips: For best results, place this mobile in a spot with bright indirect light.
#3. Boho Ring Kokedama Wall Display
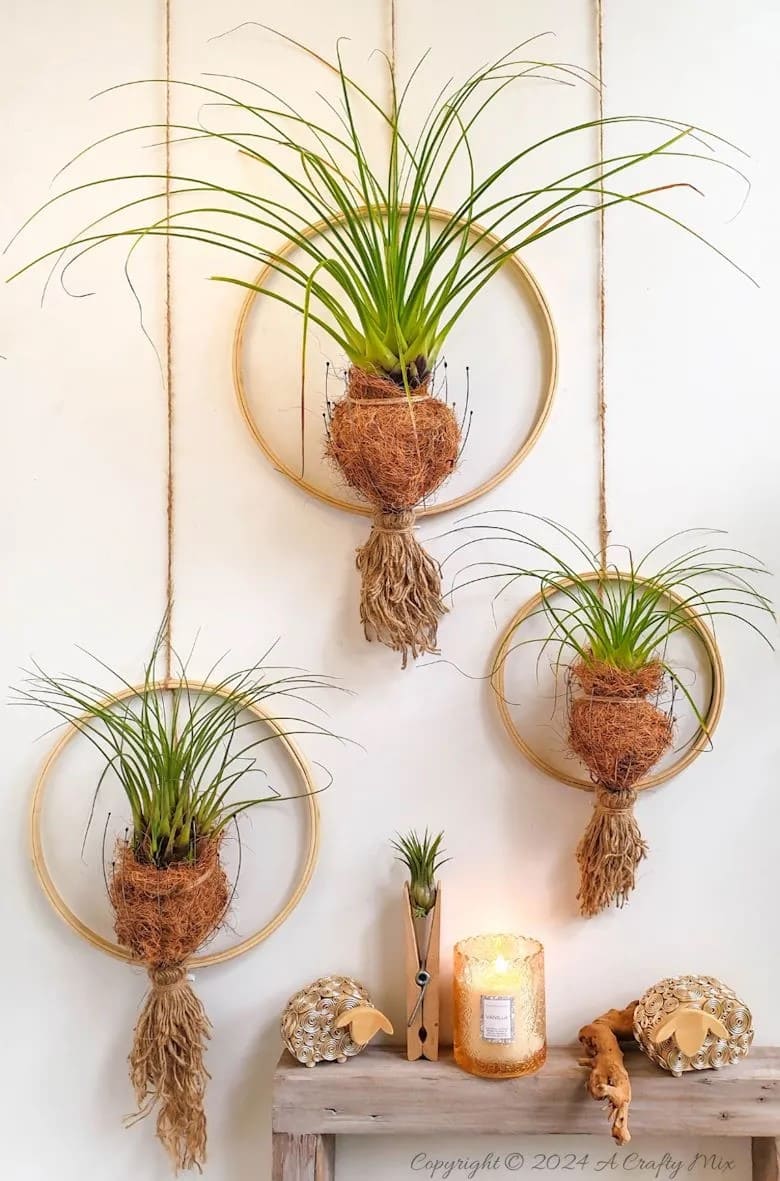
This hanging air plant arrangement merges the rustic charm of kokedama with a boho-inspired twist.
Three embroidery hoops frame lush, moss-wrapped air plants, giving each one the look of floating art.
Besides, twine-wrapped roots cascade like macramé tassels, adding texture and natural movement to your wall.
Materials Needed
- 3 wooden embroidery hoops (10″, 12″, 14″)
- 3 air plants (larger varieties like Xerographica or Caput-Medusae)
- Coconut coir liner or moss (enough to wrap 3 root balls)
- Natural jute twine (approx. 3 ft per piece)
- Hot glue gun or floral wire
- Wall hooks or nails for hanging
Step-by-step Guide
Step 1: Wrap a handful of coir or moss around the base of each air plant to form a round kokedama shape.
Step 2: Use twine to secure the moss ball tightly and form a decorative hanging tail beneath it.
Step 3: Center each kokedama inside a hoop and secure it using floral wire or glue at the top back side of the moss ball.
Step 4: Hang each hoop from the wall using jute rope, staggering them at various heights for visual interest.
#4. Rustic Wood Slice Air Plant Wall Art
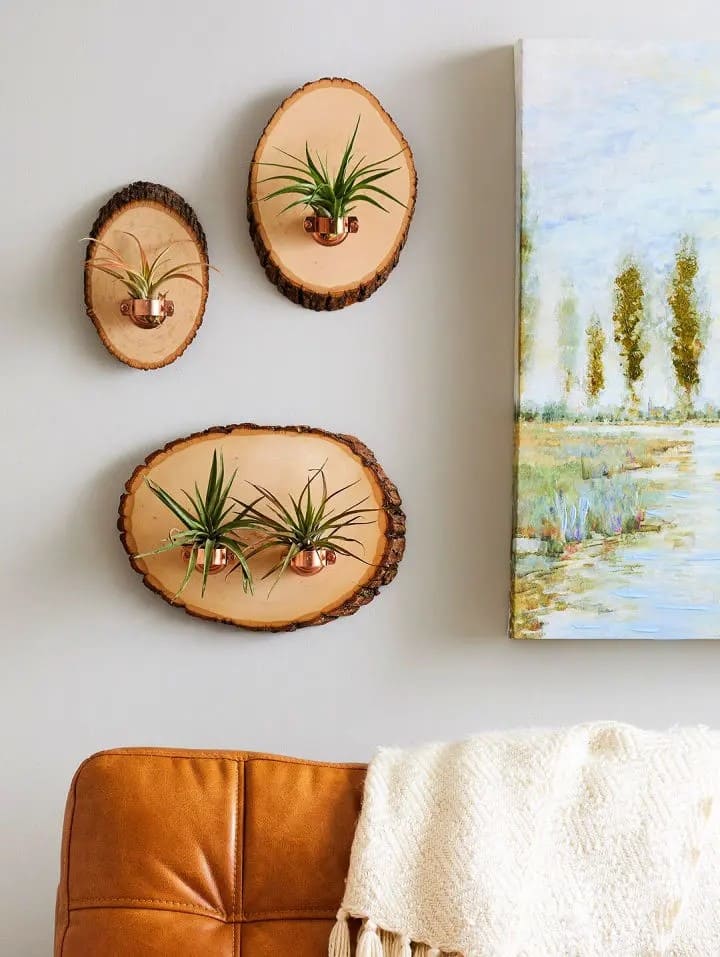
Mounted on natural wood slices with bark edges, each air plant sits snugly inside a tiny copper holder, creating a perfect balance between raw nature and modern polish.
It feels warm, grounded, and quietly stylish, just like a walk through the woods with a hint of shine.
Grouped as a trio or displayed individually, these pieces give off that artisan-crafted charm that feels both fresh and timeless.
Materials Needed
- Wood slices (sizes ranging from 5″ to 12″ in diameter)
- Mini copper fittings or shot glasses (1.5″-2″ diameter)
- Air plants
- Strong glue (E6000 recommended)
- Picture hangers or sawtooth hangers
- Drill (optional, for adding hangers)
Step-by-step Guide
Step 1: Attach your picture hanger or sawtooth hook to the back of each wood slice.
Step 2: Glue the copper holder near the center or base of each wood slice. Let it cure completely (usually 24 hours).
Step 3: Tuck your air plant into the copper cup. You can remove it easily for misting or soaking.
Step 4: Hang your pieces in a cluster or spread them across a wall for a gallery effect.
#5. Colorful Yarn Orb Air Plant Holders
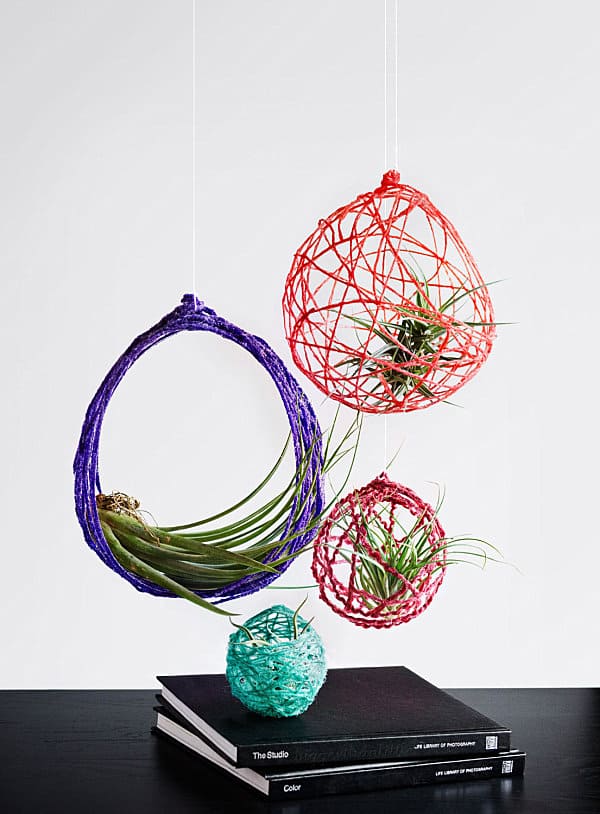
Make your air plants float like playful art pieces with these bold, yarn-wrapped orbs.
The colors pop brilliantly against any neutral wall, and the open structure gives your greenery a light, almost magical appearance.
These hanging sculptures are perfect for brightening up a corner, bringing in texture and whimsy without overwhelming the space.
Materials Needed
- Colored yarn (any texture you like)
- White glue or Mod Podge
- Small balloons (water balloon size)
- Scissors
- Air plants
- Fishing line or clear thread for hanging
Step-by-step Guide
Step 1: Blow up your balloons to the size you want your orbs to be, then tie them off.
Step 2: Dip yarn pieces into glue until fully coated, then wrap them randomly around the balloon. Let dry overnight.
Step 3: Pop the balloon and carefully remove it, leaving just the hardened yarn orb.
Step 4: Tuck an air plant into the opening and suspend the orb using fishing line from a ceiling hook or branch.
#6. Wine Cork Wall Mount Air Plant Holder
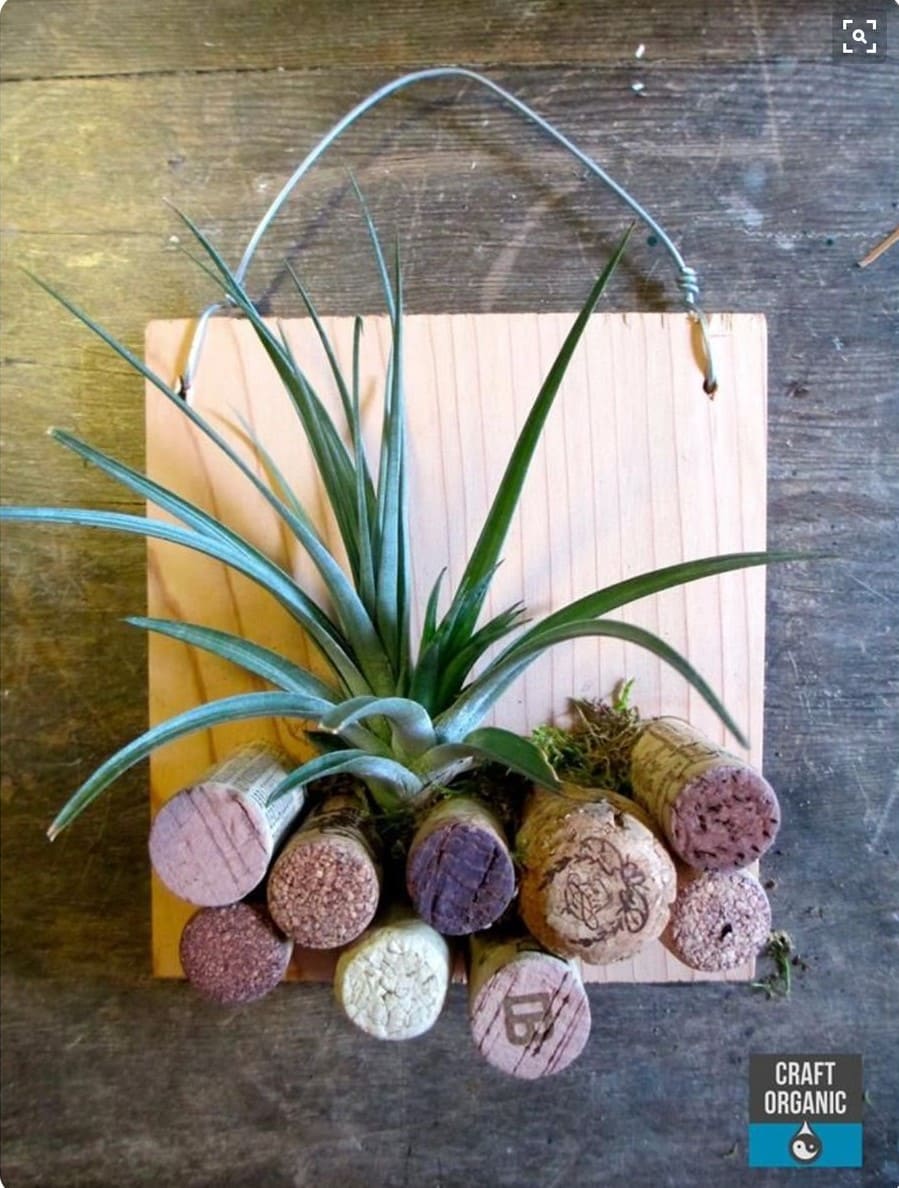
Look! This upcycled wall mount breathes new life into wine corks and creates a natural, earthy perch for your air plant.
Mounted on a lightweight wood board, the corks are lined up horizontally at the base, adding both texture and charm.
The corks provide a breathable surface for air plant roots to rest on without holding moisture, which is perfect for tillandsias.
Materials Needed
- Wood plaque (approx. 6×6 inches or any small board)
- 12 wine corks (standard size, 0.75–1 inch diameter)
- Strong craft glue or hot glue gun
- Air plant (medium-sized)
- Optional: twine or wire for hanging, moss for decor
Step-by-step Guide
Step 1: Arrange your corks in a row or pyramid shape on one side of the board to find a balanced look.
Step 2: Secure each cork with glue and let it dry completely before moving to the next step.
Step 3: Nestle your air plant between the corks, optionally adding moss to cushion and enhance appearance.
Step 4: Attach a loop of wire or twine to the top corners of the board for hanging.
#7. Copper Swirl Shell Holder
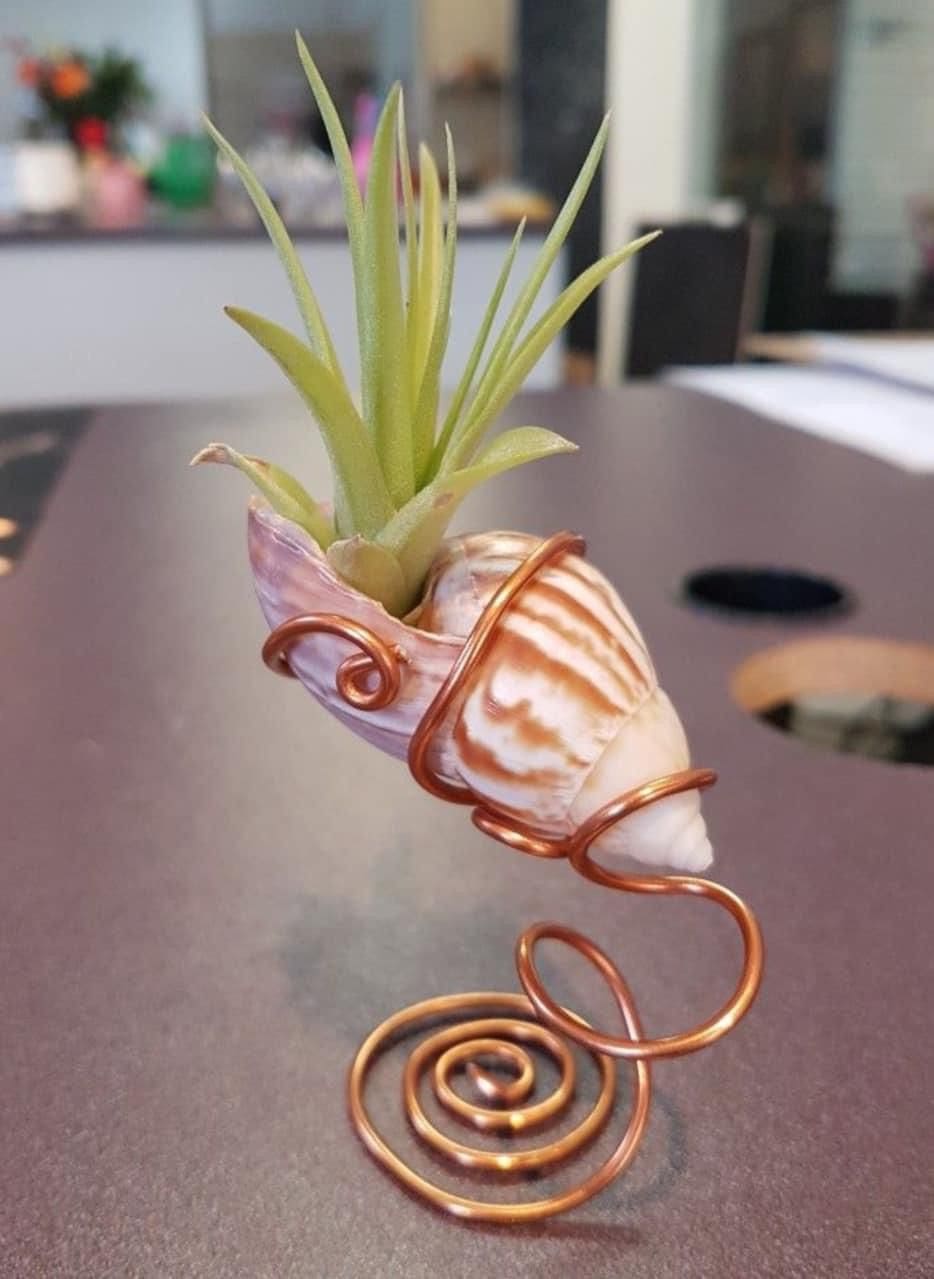
This stunning tabletop air plant display brings together oceanic charm and sculptural finesse.
A natural seashell becomes a cozy cradle for your air plant, while the copper wire spirals underneath like an elegant flourish of handwritten script.
The warm metal contrasts beautifully with the plant’s soft green leaves, making it a standout piece for any shelf or desk.
Materials Needed
- 1 medium spiral seashell (about 3-4″)
- 1 air plant (such as Ionantha or Brachycaulos)
- 18-20 gauge copper wire (approx. 2 ft per piece)
- Wire cutters and needle-nose pliers
Step-by-step Guide
Step 1: Start by forming the base of your holder with a tight spiral, shaping the wire flat to ensure it stands stable.
Step 2: Continue wrapping upward to create a coil that rises vertically. Form a “cradle” by curving the wire to match the contour of the shell.
Step 3: Insert the shell into the holder, adjusting the wire to secure it snugly without damaging the shell.
Step 4: Gently place the air plant inside the shell, ensuring it’s upright and can breathe freely.
#8. Hanging Light Bulb Air Plant Terrarium
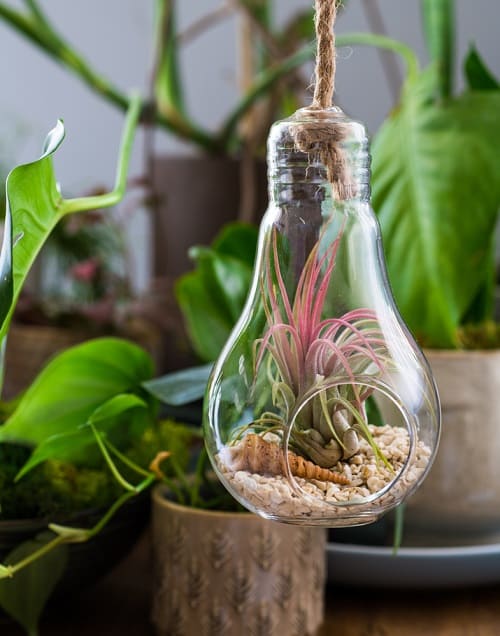
Wow, this upcycled hanging terrarium feels like a tiny world suspended in time.
The clear light bulb shape brings a charming industrial feel, while the air plant nestled inside offers a soft, organic contrast.
Also, a sprinkle of gravel and a curled shell complete the miniature desert scene, making it captivating yet delicate.
Materials Needed
- Clear hanging glass bulb terrarium (approx. 4-6″ tall)
- Air plant (small variety like Ionantha)
- Fine gravel or decorative sand (2-3 tablespoons)
- Mini seashell or decorative accent
- Twine or jute string (12-18″)
Step-by-step Guide
Step 1: Add a shallow layer of gravel or sand to the base of the glass bulb.
Step 2: Carefully position the air plant inside, adjusting it with tweezers if needed.
Step 3: Add a small shell or other tiny decoration for a personalized touch.
Step 4: Tie twine securely around the metal loop and hang from a hook, curtain rod, or ceiling mount.
#9. Driftwood Wall Art With Air Plants
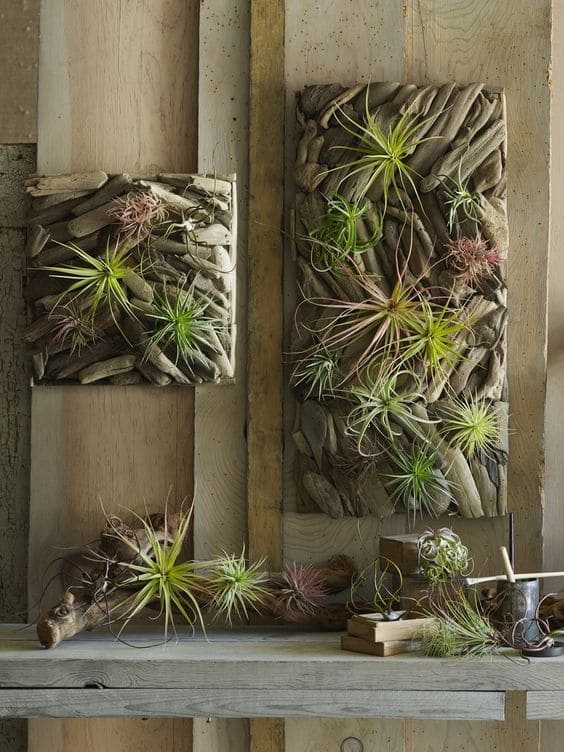
This rustic wall display blurs the line between natural sculpture and living artwork.
Mounted pieces of driftwood form a rugged mosaic backdrop, while clusters of vibrant air plants breathe life into every crevice.
Specially, the texture is wild and free, with an organic rhythm that feels as if it were sculpted by tide and time itself.
Materials Needed
- Assorted pieces of driftwood (approx. 15-30, depending on frame size)
- Wooden board or canvas frame (12”x18” or larger)
- Air plants in different colors and sizes (minimum 8)
- Strong craft adhesive or hot glue
- Optional: floral wire or mesh backing
- Wall hooks or hanging hardware
Step-by-step Guide
Step 1: Arrange driftwood pieces on the wooden base until you achieve a textured, overlapping pattern. Leave small gaps where air plants will nest.
Step 2: Glue each driftwood piece firmly in place, creating depth and structure.
Step 3: Gently nestle air plants into the open pockets or secure them lightly with floral wire so they can be removed for watering.
Step 4: Attach hanging hardware to the back and display it in a spot with bright, indirect light.
#10. Mini Cone on Wood Slice Air Plant Holder
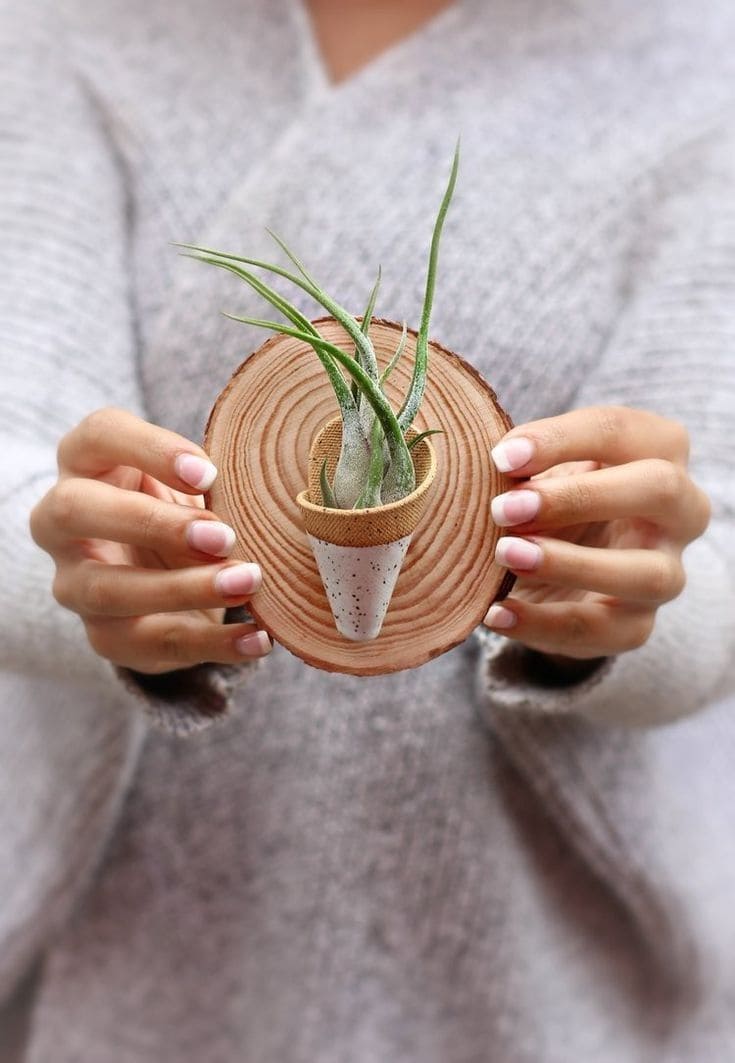
Look at this minimalist air plant holder1 It captures the magic of nature with striking simplicity.
A tiny speckled cone cradles a soft green air plant, all mounted on a cross-section wood slice that highlights natural tree rings.
You can display it flat like a tiny table sculpture or add a hanger to mount it on the wall as natural artwork.
Materials Needed
- 1 wood slice (approx. 3.5″-4.5″ diameter)
- Miniature ceramic or clay cone (2″-3″ tall)
- 1 small air plant (Tillandsia ionantha or similar)
- Strong adhesive or hot glue
- Optional: wall hook or adhesive picture hanger
Step-by-step Guide
Step 1: Choose a wood slice with visible rings for added visual interest. Then sand any rough edges if necessary.
Step 2: Use a strong adhesive to attach the cone upright to the center of the wood slice. Let it dry fully before moving on.
Step 3: Gently place the air plant inside the cone, adjusting until it stands snugly and looks balanced.
Step 4: If you want to hang it, attach a hook or adhesive hanger to the back of the wood slice.
#11. Framed Wire Grid Air Plant Wall Art
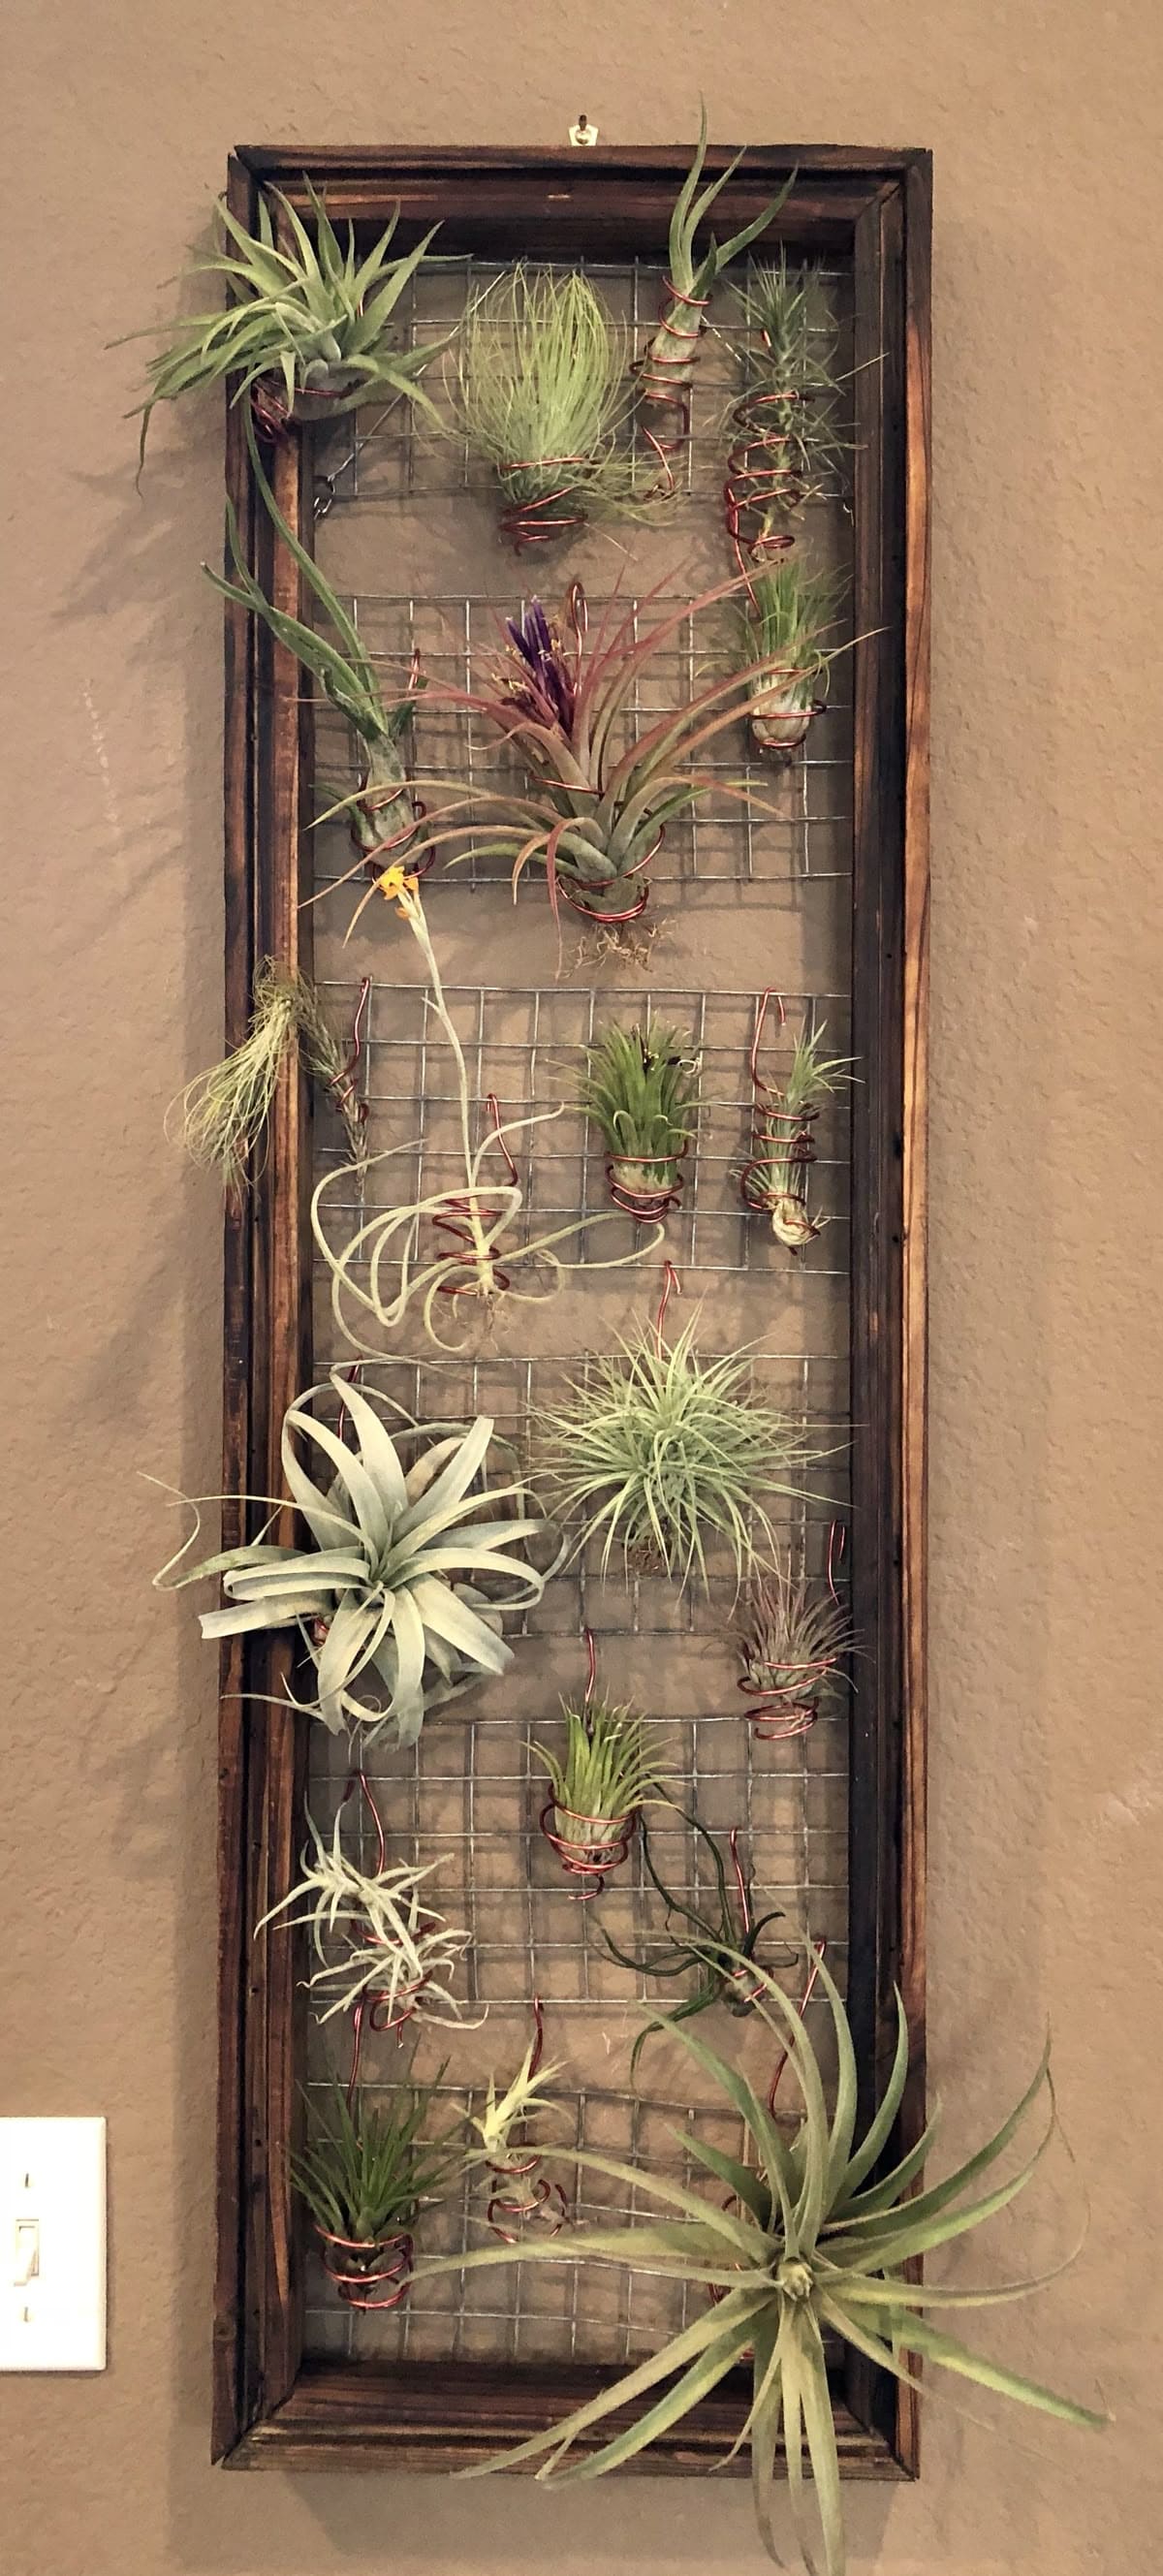
This vertical wall grid is a creative way to showcase your air plant collection as living art.
A rustic wooden frame surrounds metal mesh, giving each plant its own pocket of space while creating a cohesive, gallery-like feel.
Plus, the copper wire wraps delicately around each plant, securing them in place like sculptural accents.
Materials Needed
- Wooden picture frame (approx. 12×36 inches)
- Wire mesh or hardware cloth cut to size
- Copper craft wire (18-20 gauge)
- Assorted air plants
- Wire cutters and staple gun
Step-by-step Guide
Step 1: Secure the wire mesh to the back of the wooden frame using staples or strong adhesive.
Step 2: Cut small sections of copper wire and gently wrap each one around the base of an air plant.
Step 3: Twist the wire ends onto the mesh grid, adjusting the plant’s angle as needed for visual balance.
Step 4: Hang the entire frame on a wall using sturdy hooks or a picture hanger, and mist plants weekly.
#12. Wire-Wrapped Stone Air Plant Holder
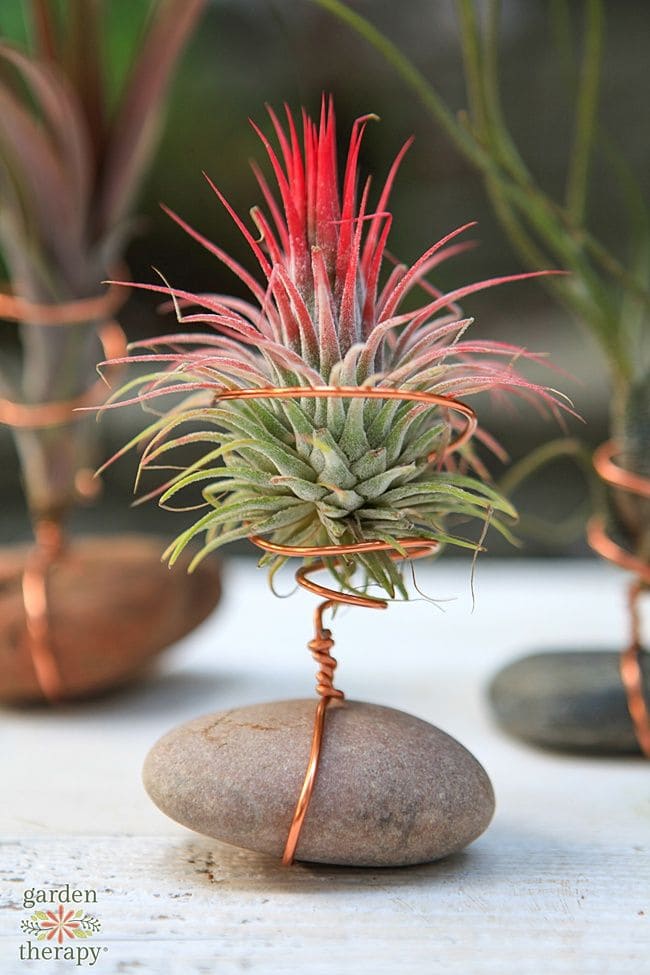
You can see a smooth river rock serves as the grounding base, while copper wire dances upward in swirls to cradle the vibrant plant like a sculpture.
The red-tipped Tillandsia steals the spotlight, turning the whole piece into a mini celebration of color, balance, and movement.
If you’re drawn to tactile, elemental decor, this one’s for you.
Materials Needed
- River rock or flat stone (3-4″ in diameter)
- Flexible copper wire (18-20 gauge, about 24” long)
- Air plant (Tillandsia Ionantha or similar)
- Wire cutter and round-nose pliers
Step-by-step Guide
Step 1: Wrap the copper wire tightly around the stone base for stability, leaving a long tail to spiral upward.
Step 2: Use pliers to twist the wire into a coiled stem with a top loop or cradle that gently holds the air plant.
Step 3: Adjust the top loop to fit the shape of your plant securely without pinching any leaves.
Step 4: Place your air plant into the cradle and display the holder on a flat surface in bright, indirect light.
Tip: You should use stones with slight flatness to prevent wobbling, and match copper tones with other accents in your space for harmony.
#13. Boho Macrame Air Plant Hangers
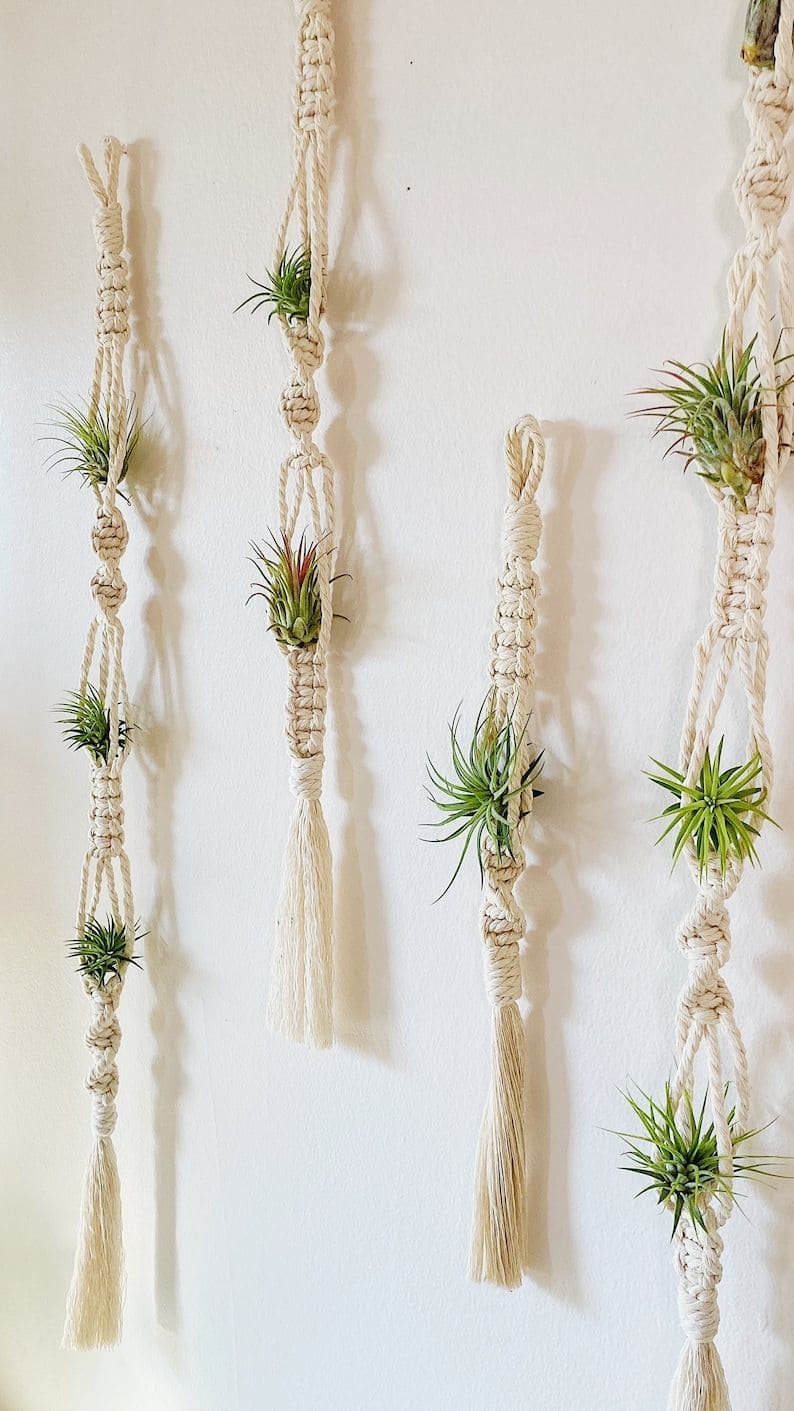
These macramé air plant holders bring a relaxed bohemian feel to your walls.
The natural texture of the cotton rope complements the spiky greenery, creating a soft-meets-wild aesthetic that feels grounded yet playful.
Perfect for filling narrow wall spaces or adding dimension to a corner, this vertical design blends art, texture, and life into one breezy arrangement.
Materials Needed
- Natural cotton macramé cord (approx. 3-5 mm thickness)
- Air plants (assorted sizes)
- Scissors and tape measure
- Wooden dowel or branch for hanging (optional)
- Wall hooks or adhesive hangers
Step-by-step Guide
Step 1: Cut lengths of macramé cord and fold in half. Attach to a dowel or branch using a lark’s head knot.
Step 2: Begin tying square knots and spiral knots, leaving pockets where plants will nestle naturally.
Step 3: Once your pattern is complete, tuck air plants gently into the knots.
Step 4: Hang your finished pieces on the wall and mist plants weekly to keep them healthy.
#14. Minimalist Zen Wire Garden
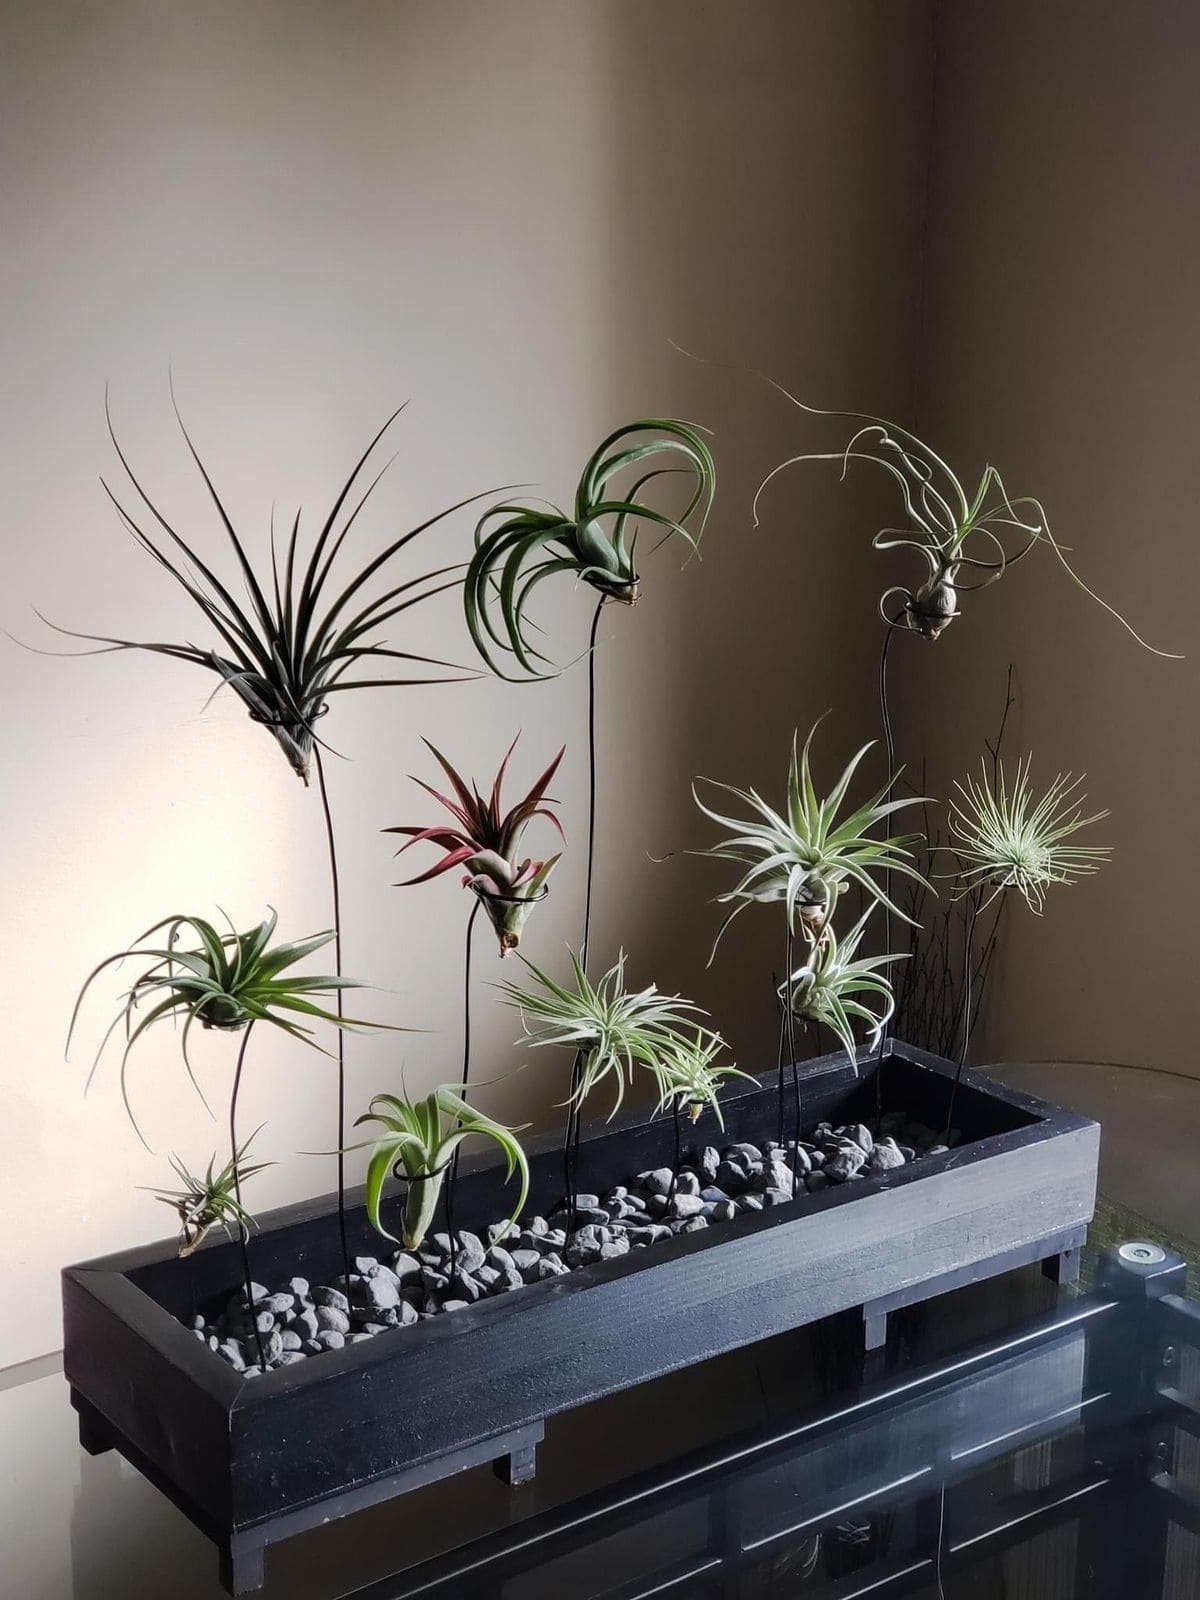
There’s something mesmerizing about this display, it’s like a dance of delicate forms frozen mid-air.
Each air plant is perched on slender black wire rising from a bed of dark gravel, evoking the tranquility of a bonsai garden but with a futuristic edge.
If you’re drawn to minimalism or love balance in design, this living sculpture speaks your language.
Materials Needed
- Shallow rectangular planter box (16″-20″ length)
- Small river stones or black aquarium gravel
- Flexible black floral wire or bonsai wire (18-22 gauge)
- Air plants (various sizes and shapes)
- Wire cutters and pliers
Step-by-step Guide
Step 1: Fill the planter box with stones, spreading them evenly to create a clean surface base.
Step 2: Cut and shape wire pieces at different lengths, curling one end into a nest or loop for each air plant.
Step 3: Insert the straight ends of the wires deep into the stone bed until they stand firm and upright.
Step 4: Carefully place the plants into their wire cradles, adjusting angles so they appear to hover naturally.
#15. Elegant Beach-Inspired Air Plant Terrarium
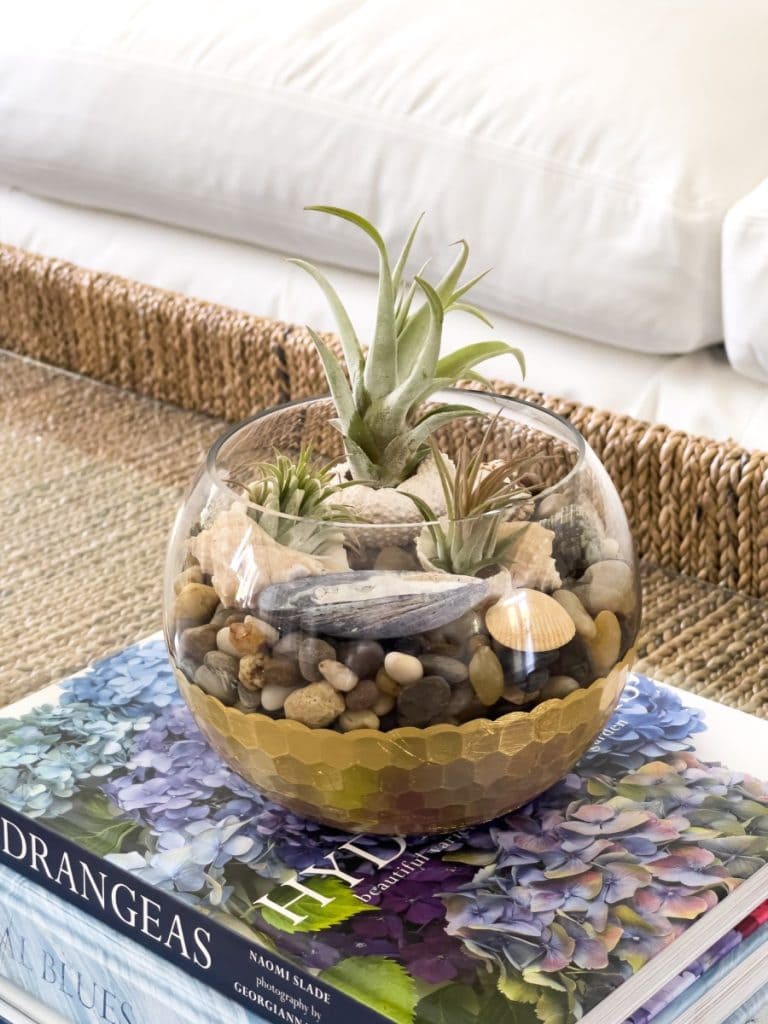
You can also bring a coastal breeze into your home with this serene glass terrarium filled with smooth pebbles, tiny seashells, and air plants.
The gold-dipped base adds a luxurious touch, blending casual beach elements with a refined aesthetic that’s perfect for a coffee table or reading nook.
Best of all, there’s no soil mess or watering schedule to fuss over, just a lovely, low-maintenance centerpiece .
Materials Needed
- Medium-sized glass bowl or fishbowl (6″-8″ diameter)
- Air plants (3-5, small to medium)
- Decorative pebbles or river stones (enough to fill halfway)
- Small seashells, driftwood, and beach finds
- Gold adhesive foil or metallic paint (optional for accent)
Step-by-step Guide
Step 1: Apply gold foil or paint to the bottom third of the glass bowl and let it dry fully before proceeding.
Step 2: Fill the bowl halfway with polished pebbles or river stones to anchor the design visually.
Step 3: Nestle in your air plants, spacing them naturally and gently tucking shells or driftwood around them for balance.
Step 4: Place your terrarium where it receives filtered sunlight, and mist plants weekly to keep them hydrated and vibrant.
Tip: Rotate your terrarium occasionally to ensure even light for all plants and to keep the look fresh from every angle.
#16. Wire Basket Air Plant Chandelier
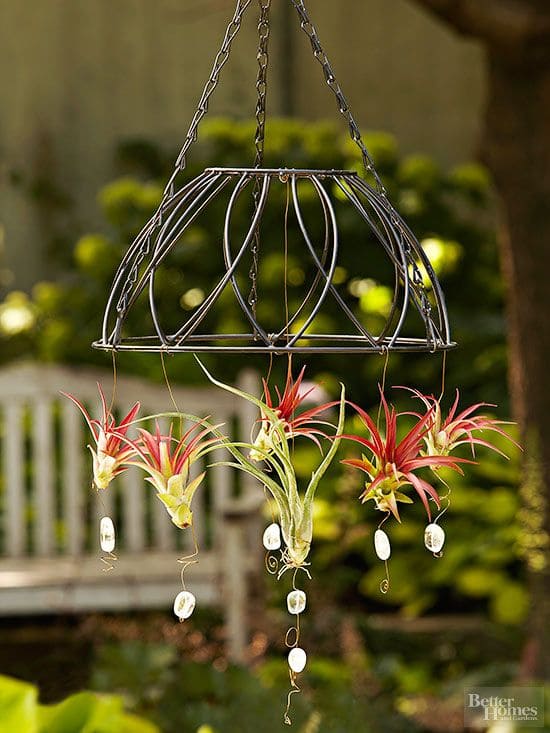
This hanging chandelier brings a poetic, botanical twist to traditional garden décor.
A repurposed wire lampshade frame becomes the structure for a delicate display of air plants, suspended like stars with soft dangling accents.
The natural curves of the plants create a breezy, almost whimsical look that dances in the breeze.
Materials Needed
- Metal wire basket or lampshade frame (approx. 12-15″ diameter)
- 6-8 air plants (varieties with red/pink hues)
- Fishing line or thin craft wire
- Beads or shells for embellishments (optional)
- Chain or twine for hanging (18-24″)
Step-by-step Guide
Step 1: Clean and prep your wire frame, ensuring all surfaces are safe for handling.
Step 2: Use fishing line or wire to suspend each air plant at varying heights around the frame.
Step 3: Add decorative beads or shells between the plants for visual interest and extra texture.
Step 4: Attach a sturdy chain or twine to the top of the frame and hang it from a hook or garden arbor.
#17. Wine Cork Refrigerator Magnets
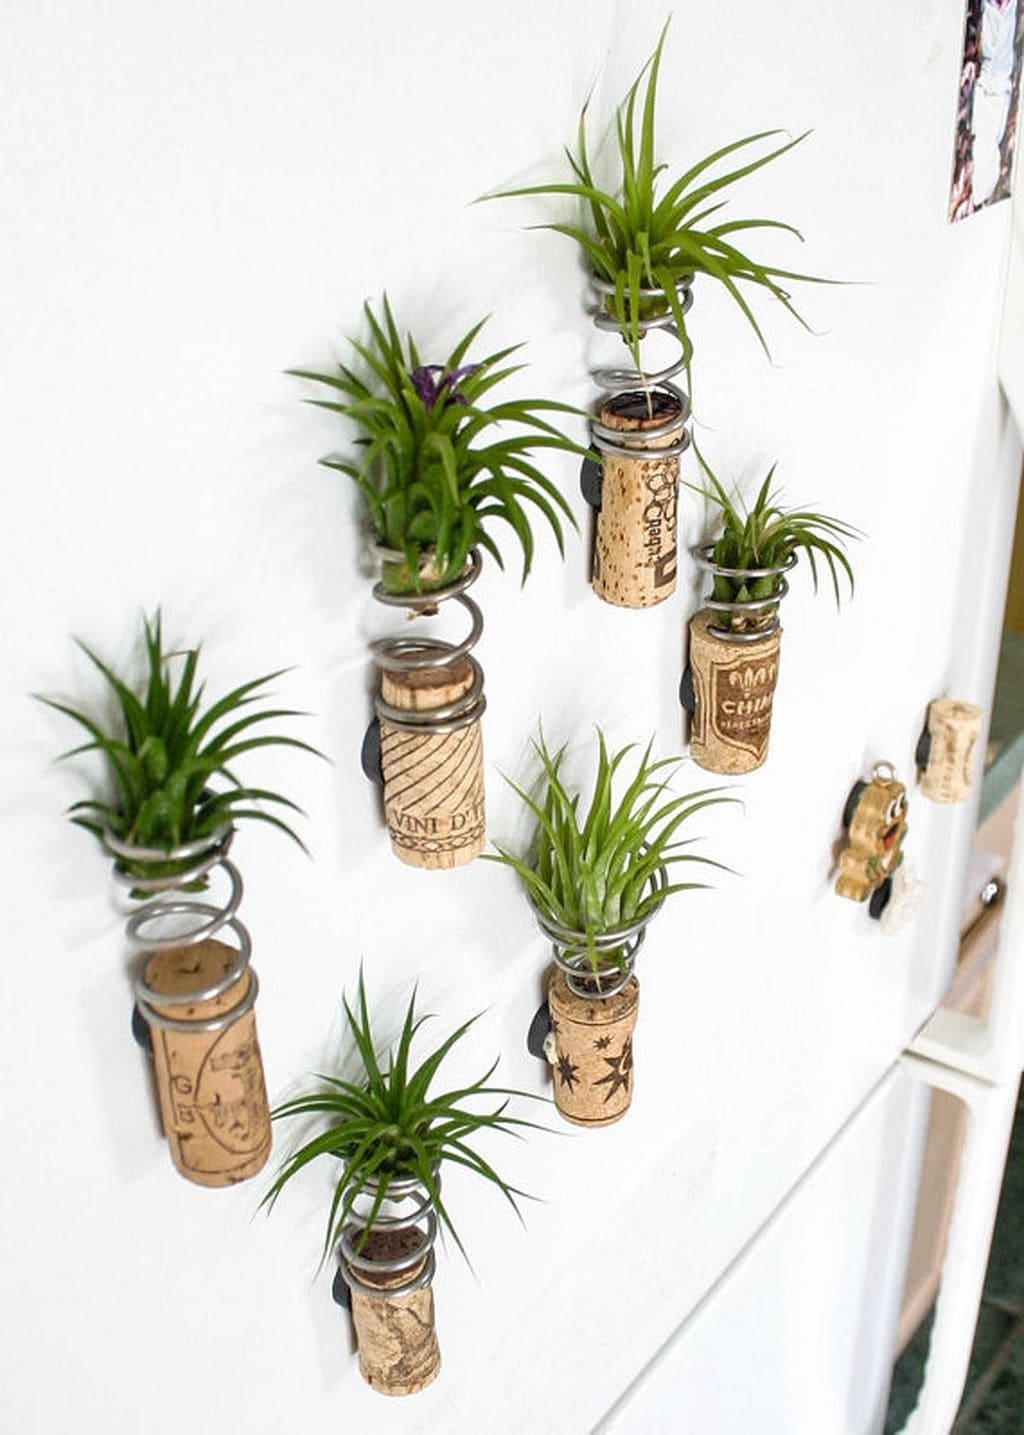
Why not turn your old wine corks into a mini vertical jungle right on your fridge?
These charming little air plant holders use simple magnets and repurposed corks to make functional, space-saving décor.
Moreover, the tiny springs give each piece a fun, sculptural edge, while the plants bring life to your kitchen.
Materials Needed
- 6-10 wine corks (1.75″ length)
- Small neodymium magnets (0.5″ diameter)
- Air plants (small Tillandsia varieties)
- Metal springs or wire coils (1″-1.5″ in diameter)
- Hot glue gun
Step-by-step Guide
Step 1: Glue one magnet to the back of each wine cork. Let it set for a few minutes to ensure strong hold.
Step 2: Attach a small spring or metal coil to the top of each cork, forming a snug nest for the plant base.
Step 3: Gently insert an air plant into the coil, adjusting it for balance and symmetry.
Step 4: Stick your finished planters to your fridge or any magnetic surface, and rotate weekly to keep things visually fresh.
#18. Vintage Cubby Wall Garden
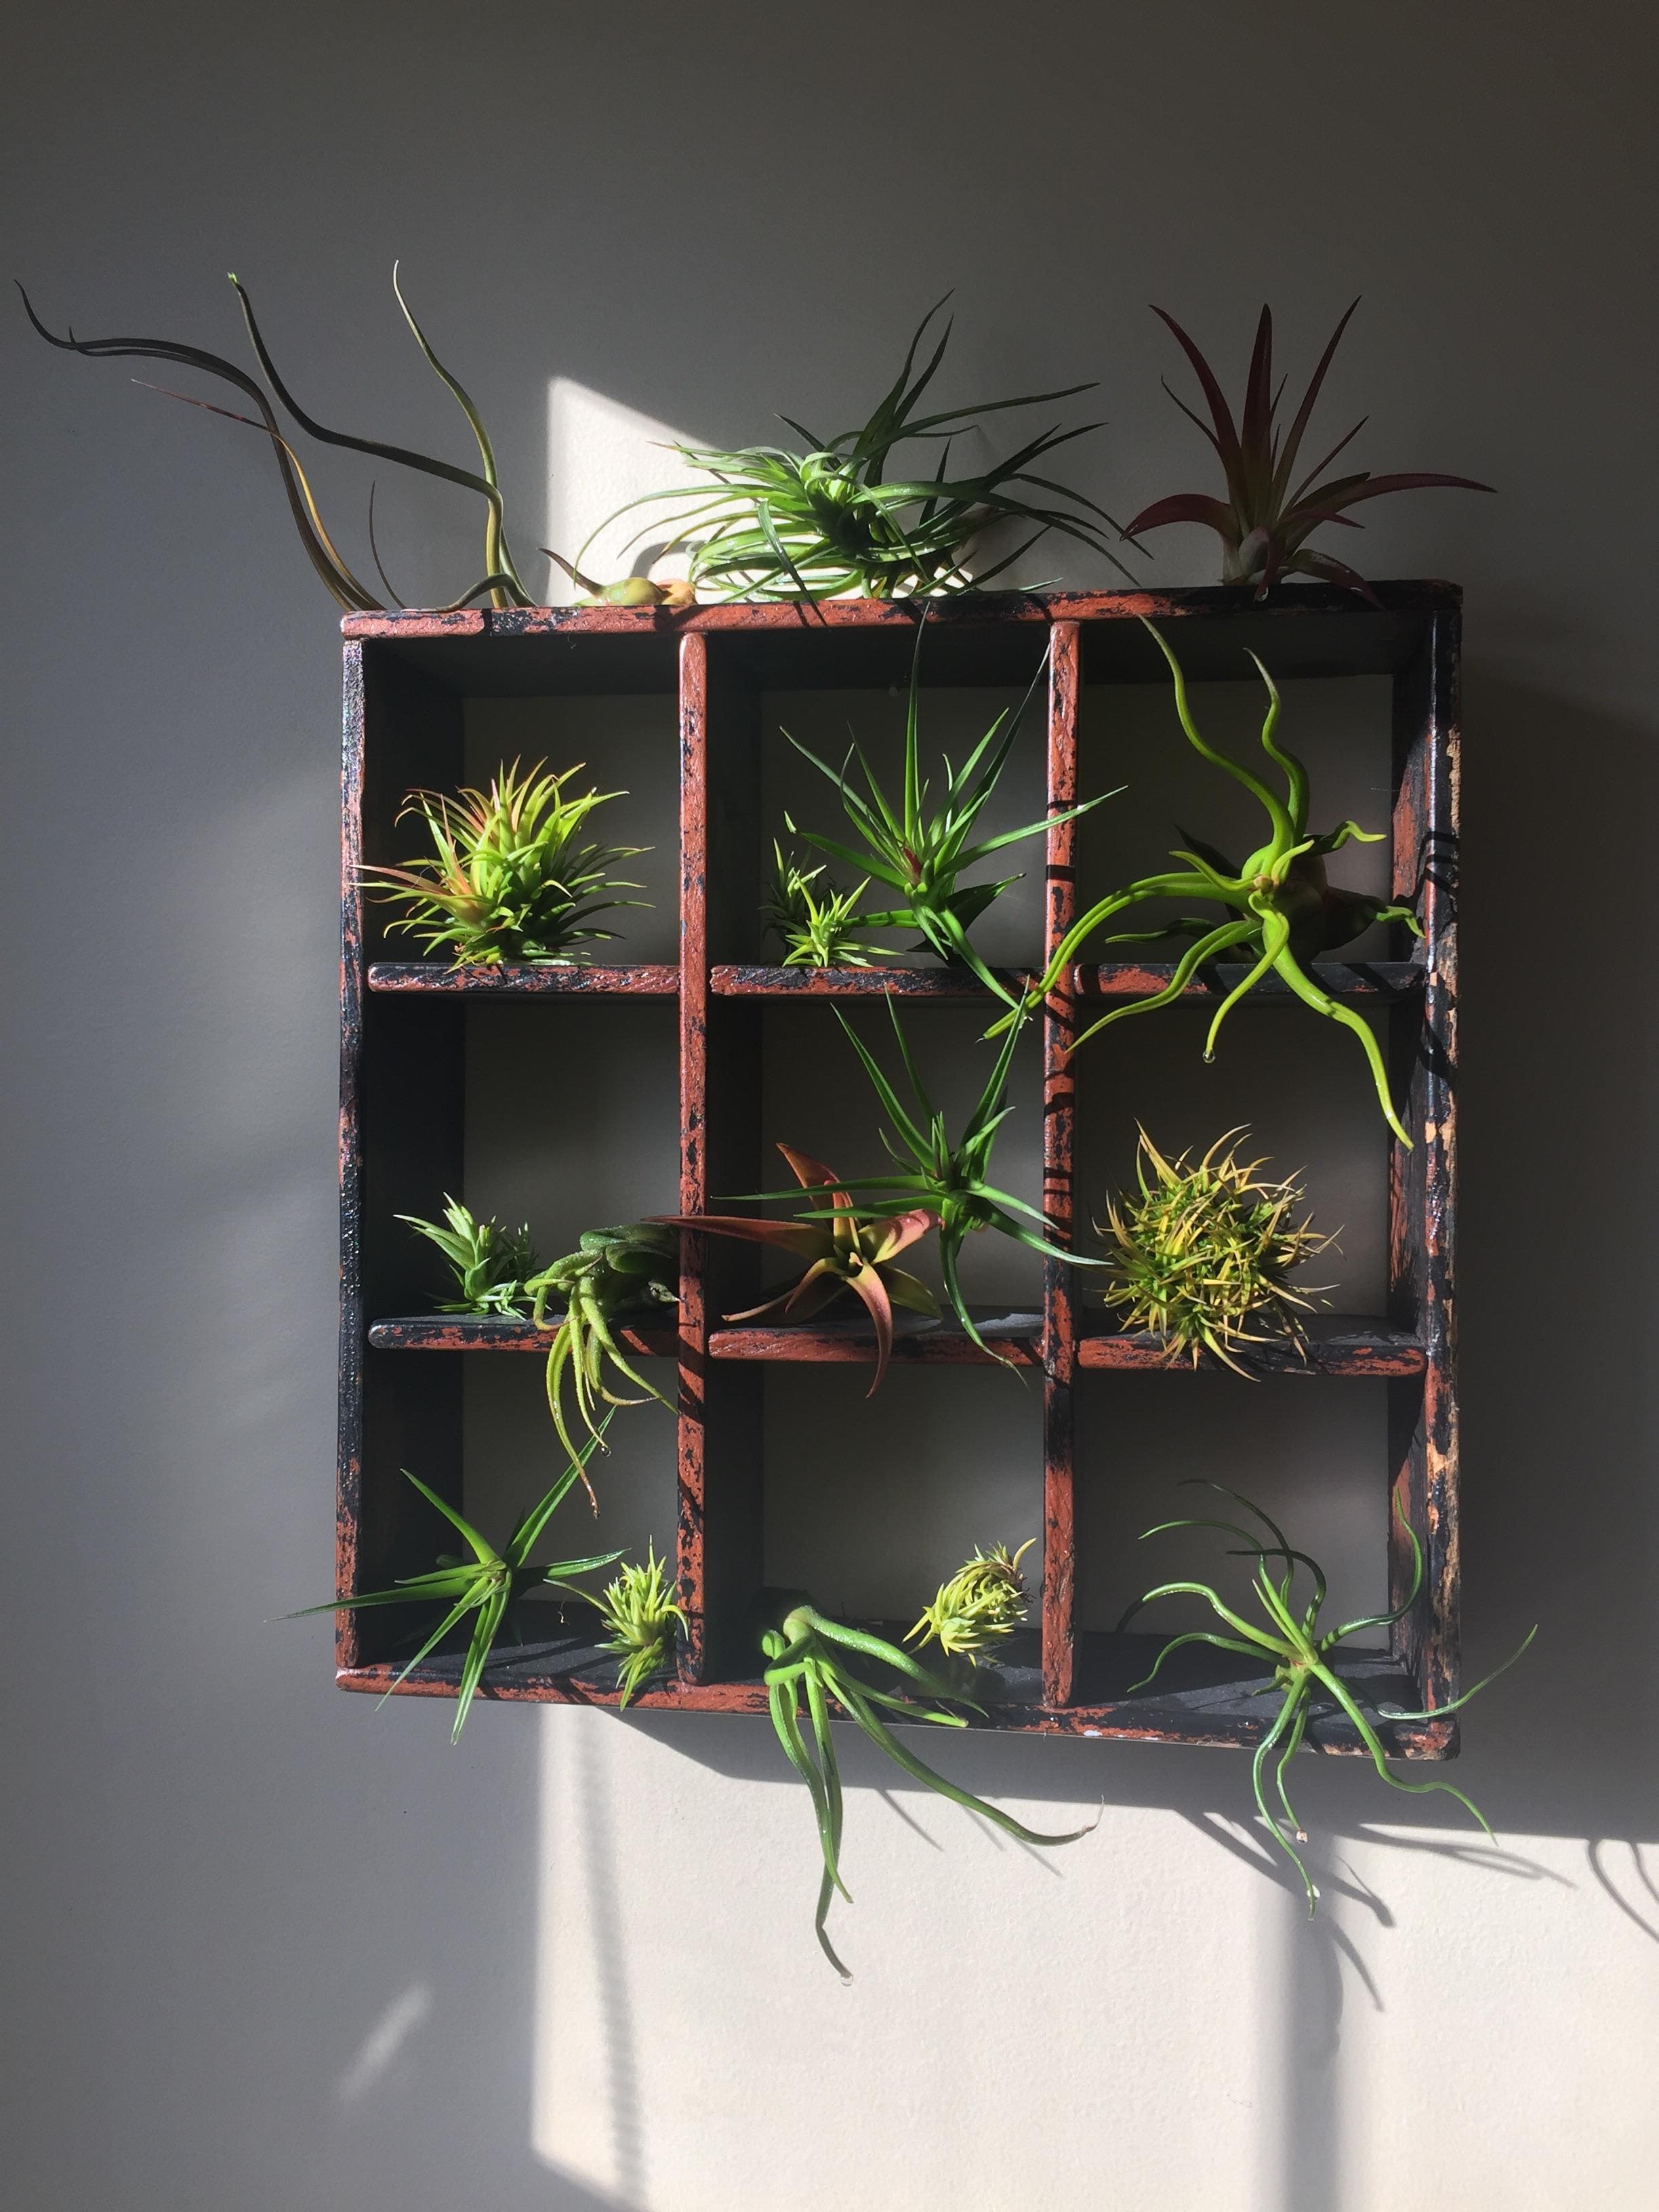
This rustic cubby display brings structure to the wild charm of air plants.
Each compartment becomes a miniature habitat, allowing you to spotlight every curl, twist, and spike of your Tillandsia collection.
Also, the cubby’s aged patina adds a nostalgic depth, pairing beautifully with the modern minimalism of air plants.
Materials Needed
- Wooden cubby shelf (approximately 16″×16″, with 9-12 compartments)
- Air plants in varying shapes and sizes (10-14 pieces)
- Mounting hardware for wall display
- Optional: black chalkboard paint for backdrop
Step-by-step Guide
Step 1: Clean and paint the back of each cubby (optional) for contrast that makes your plants pop.
Step 2: Attach secure wall mounting brackets and hang your cubby at eye level in a bright room with indirect light.
Step 3: Gently place an air plant in each section, positioning them to spill or curl naturally over edges for movement.
Step 4: Rotate plant placement every few weeks to ensure even light exposure and prevent fading on one side.
Tip: Choose differently colored air plants for visual rhythm like silvery Ionantha, curly Caput Medusae, and spiky Bulbosa to keep the composition alive.
#19. Jellyfish Terrarium with Sea Urchin Shells
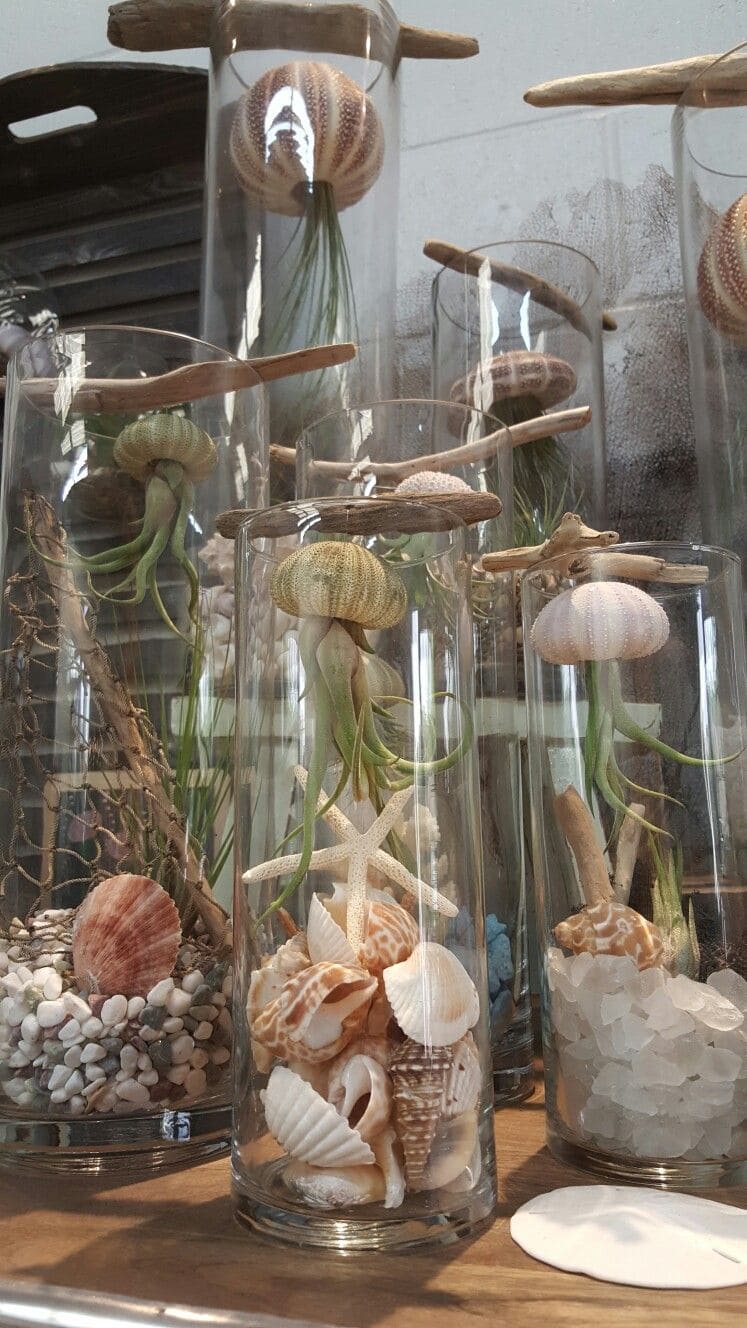
These elegant jellyfish terrariums are a mesmerizing blend of sea life and air plants, giving the illusion of floating marine creatures.
By suspending Tillandsia from inside sea urchin shells and dangling them within tall glass cylinders, you create a display that’s part sculpture, part miniature ecosystem.
The soft curves of the shells mimic jellyfish bells, while the plants’ tendrils sway like delicate tentacles beneath.
Materials Needed
- 3-5 clear glass vases (8″-12″ tall)
- 3-5 sea urchin shells (2″-3″ diameter)
- 3-5 air plants (like Tillandsia caput-medusae or bulbosa)
- Driftwood sticks (7″-10″ length, to span vase tops)
- Fishing line or thin clear thread
- Assorted seashells, pebbles, or crushed glass (for vase filler)
- Glue gun or strong clear adhesive
Step-by-step Guide
Step 1: Gently feed the tip of the air plant through the base of the urchin shell so it resembles a jellyfish body. Then secure lightly with glue if needed, but avoid covering the plant base.
Step 2: Cut a piece of fishing line and tie one end around the air plant stem or through the top of the sea urchin shell.
Next, tie the other end to a piece of driftwood that can rest across the top of your vase.
Step 3: Place the driftwood across the vase opening so the jellyfish plant hangs mid-air inside the glass.
Step 4: Fill the bottom of the vase with pebbles, seashells, or glass to create a grounded oceanic base.
Tips: You can use different vase heights to create visual rhythm.
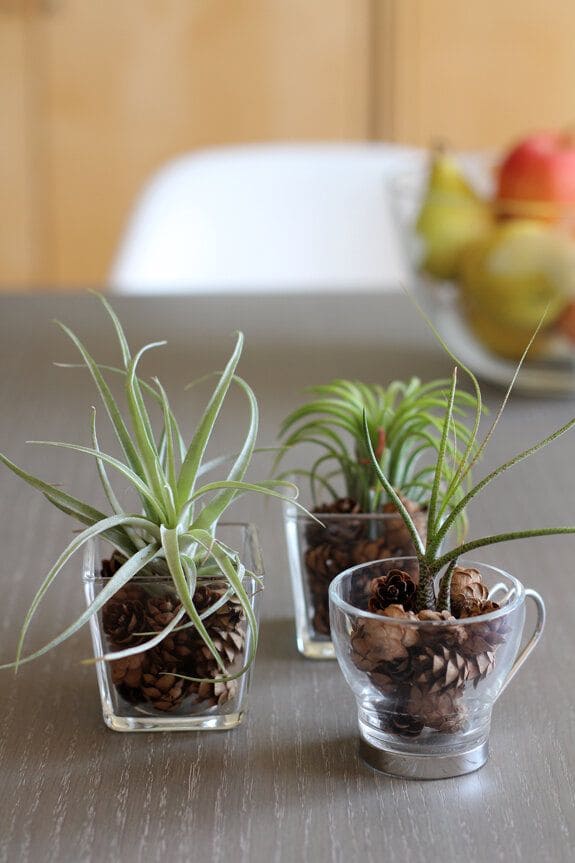
#20. Pinecone-Filled Glass Cup Planters
This vintage colander takes on a warm holiday charm when transformed into a glowing candle centerpiece.
The candlelight filters through the holes of the colander, casting a soft, flickering glow that instantly feels like home.
Tucked with faux greenery and sparkly red baubles, this centerpiece is easy to assemble and endlessly customizable depending on your theme or decor palette.
Materials Needed
- 1 medium metal colander (approx. 9″-10″ diameter)
- 1 wide-mouth mason jar (16 oz or quart size)
- 1 tealight or votive candle (or LED alternative)
- 1 small wreath ring or handful of faux pine garland
- 6-8 mini Christmas ornaments (1″-2″ diameter)
Step-by-step Guide
Step 1: Place the colander on a sturdy, flat surface and position your mason jar in the center.
Step 2: Wrap faux greenery around the inside edge of the colander to form a mini wreath base.
Step 3: Nestle the ornaments into the greenery, evenly spacing them for balance and color.
Step 4: Insert a tealight or votive candle into the mason jar and light it carefully.
