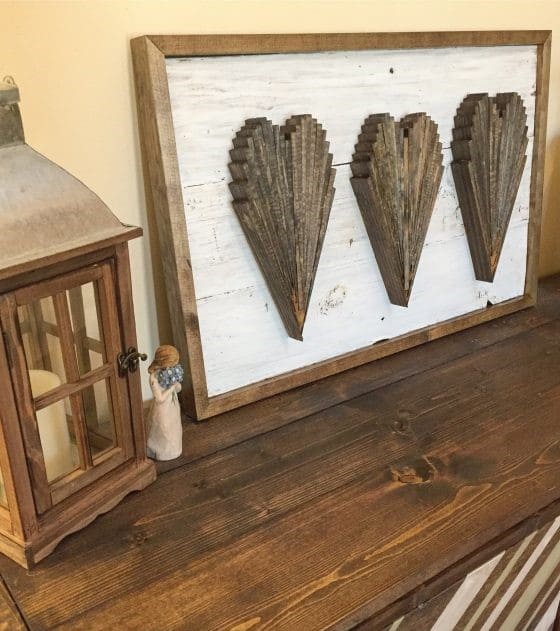
 This project transforms leftover shims into a work of art that feels like it belongs in a boutique.
Instead of flat décor, you create depth, layer upon layer of thin wooden slivers that build into bold, fan-like shapes.
Also, the repetition of three gives balance and symmetry, while the rustic wood tones bring warmth to any room.
Materials Needed
- 60-70 wood shims (6″-8″ long, straight and uniform)
- 1 wooden backing board (approx. 18″×24″)
- Wood frame trim pieces (cut to fit board)
- White paint
- Wood stain (dark walnut, espresso, or weathered gray)
- Wood glue
- Finishing nails or brad nails (optional)
- Sandpaper (medium and fine grit)
- Picture hangers
Step-by-step Guide
Step 1: Paint your backing board with a light coat of white paint, then distress lightly with sandpaper for a weathered look.
Step 2: Stain your shims in your chosen wood tone and let dry completely. The contrast between stained shims and white background will add visual depth.
Step 3: Begin arranging the first fan shape by laying down shims in a “V” pattern.
You should layer more shims on top, each one offset slightly to create a stepped, dimensional effect. Continue stacking until you’ve built up the desired thickness.
Step 4: Repeat the process two more times, evenly spacing the fans across the board. Then use wood glue generously but carefully to keep layers secure.
Step 5: Once all three fans are dry, attach the outer trim pieces to frame your board. Next, secure with glue or nails.
Step 6: Add hanging hardware to the back, then display your art where it will catch natural light and cast shadows.
Tips: You can vary the stain slightly between shims as it creates subtle highlights that make the fans look even more textured.
