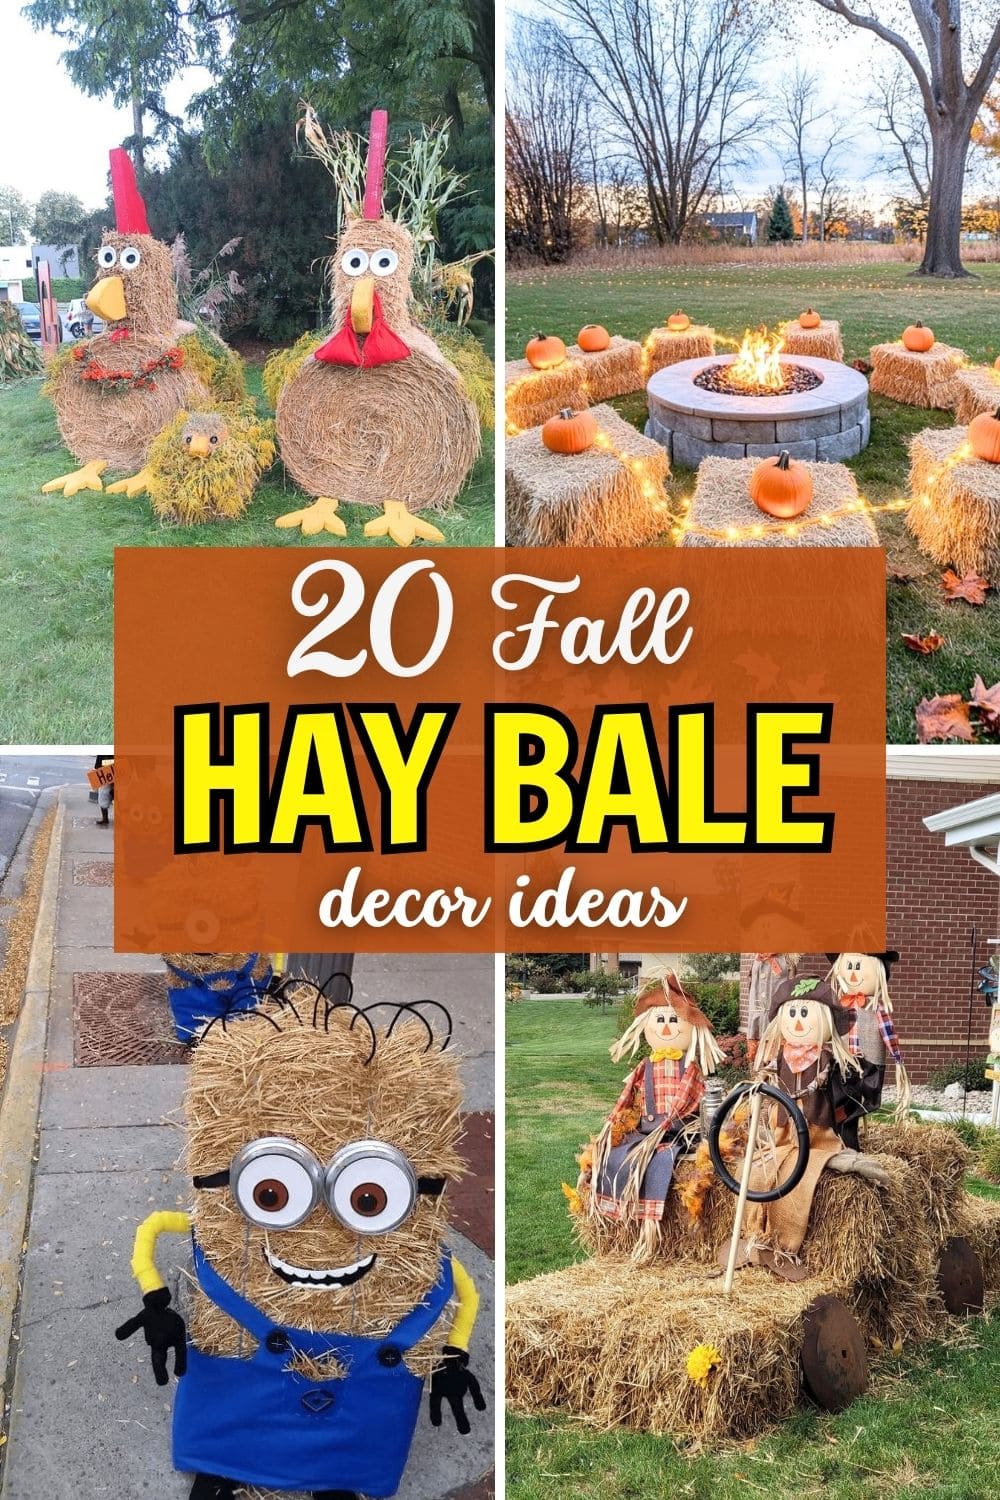
Projects in fall have a special kind of charm, especially when they blend rustic textures with seasonal warmth.
Hay bales are one of those timeless elements that can instantly turn a plain space into an autumn retreat. Their golden tones and sturdy form make them perfect for creating cozy vignettes.
You can stack them, wrap them in ribbons, or pair them with pumpkins, lanterns, and flowers for a picture-worthy setup.
These humble bundles of straw offer endless creative possibilities, bringing a natural and inviting touch to any outdoor or indoor scene. Here are 20 inspiring ideas to spark your next fall project.
#1. Minion Hay Bale Crew
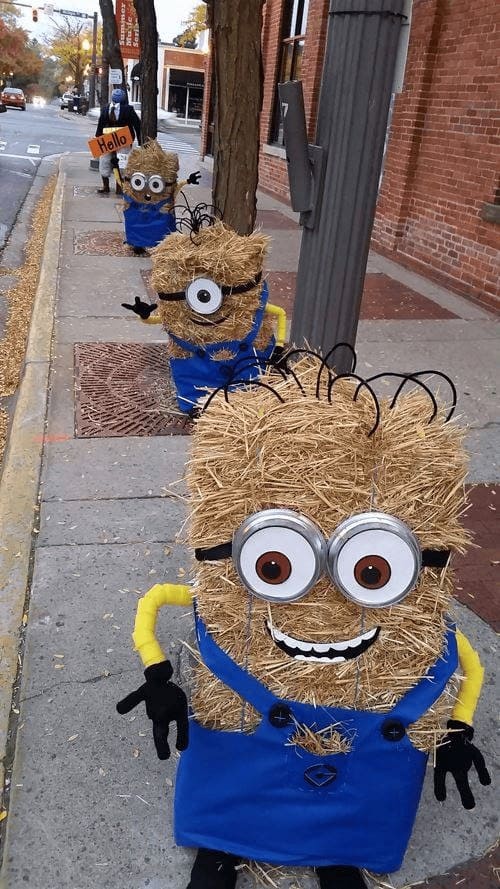
These cheerful hay bale Minions are impossible to walk past without smiling. Lined up along the sidewalk, their big googly eyes, toothy grins, and denim overalls make them look ready for mischief.
This idea is perfect if you want your Halloween or fall décor to feel playful instead of spooky.
You can even create a whole crew to greet neighbors, with each Minion holding a fun sign or striking a silly pose.
Materials Needed
- 3-5 rectangular hay bales (36″ L × 18″ W × 14″ H)
- 3-5 pairs of blue overalls or blue fabric (1 yd each)
- 3-5 sets of large round goggles (6-8″ diameter)
- Black pipe cleaners or wire (12″ each)
- Yellow paint or fabric (2 yd total)
- Black gloves (1 pair per Minion)
- White and black poster board
- Zip ties, hot glue, and scissors
Step-by-step Guide
Step 1: Place your hay bales upright so they stand tall.
Step 2: Wrap each bale with blue overalls or blue fabric to form the signature dungarees. Then tie or pin in the back so it stays snug.
Step 3: Cut out large circles from white poster board for the eyes, adding smaller black and brown circles for pupils. Next, attach goggles over them for the perfect cartoon look.
Step 4: Use yellow fabric to create arms, stuffing them lightly for shape, and attach black gloves at the ends.
Step 5: Finally, add black pipe cleaners or wire at the top for quirky Minion hair, then glue a big smiling mouth below the goggles.
#2. Hay Bale Chicken Family Display
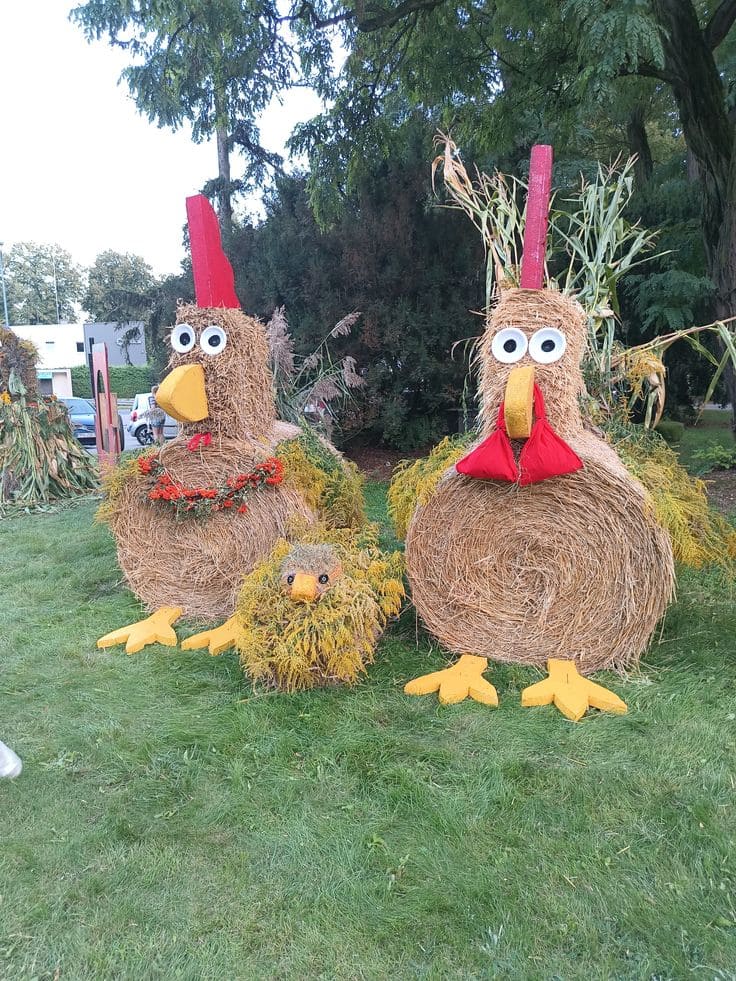
Using large round hay bales as the bodies, you can create quirky barnyard birds with oversized eyes, bright beaks, and feather-like foliage.
The playful design includes two proud parent chickens and their fluffy chick, making it a perfect photo spot for autumn events or harvest festivals.
Adding simple accents like wooden feet, painted combs, and fresh greenery gives them personality and texture. This is one of those projects that makes neighbors stop, smile, and maybe even ask for a tutorial.
Materials Needed
- 2 large round hay bales (approx. 4 ft diameter each)
- 1 small round hay bale (approx. 2 ft diameter)
- 3 wooden beaks (8-10 in long, painted yellow)
- 6 large round craft eyes (6-8 in diameter)
- 3 red wooden comb shapes (12-18 in tall)
- 3 red wattle cutouts (optional)
- 6 wooden chicken feet cutouts (approx. 12 in long, painted yellow)
- Greenery or straw
- Strong outdoor adhesive or screws
Step-by-step Guide
Step 1: Place the large hay bales side by side for the parent chickens and position the smaller bale in front for the chick.
Step 2: Attach the wooden combs and wattles to the top/front of each bale using screws or heavy-duty outdoor adhesive.
Step 3: Secure the painted beaks at the center front of each bale.
Step 4: Fix the large craft eyes above the beaks for a comical, wide-eyed look.
Step 5: Attach greenery or straw bundles to the sides as wings for the parents; give the chick a fluffier moss-like covering for texture.
Step 6: Position and secure the painted wooden feet at the base of each bale for stability and charm.
#3. Hay Bale Scarecrow Car Display
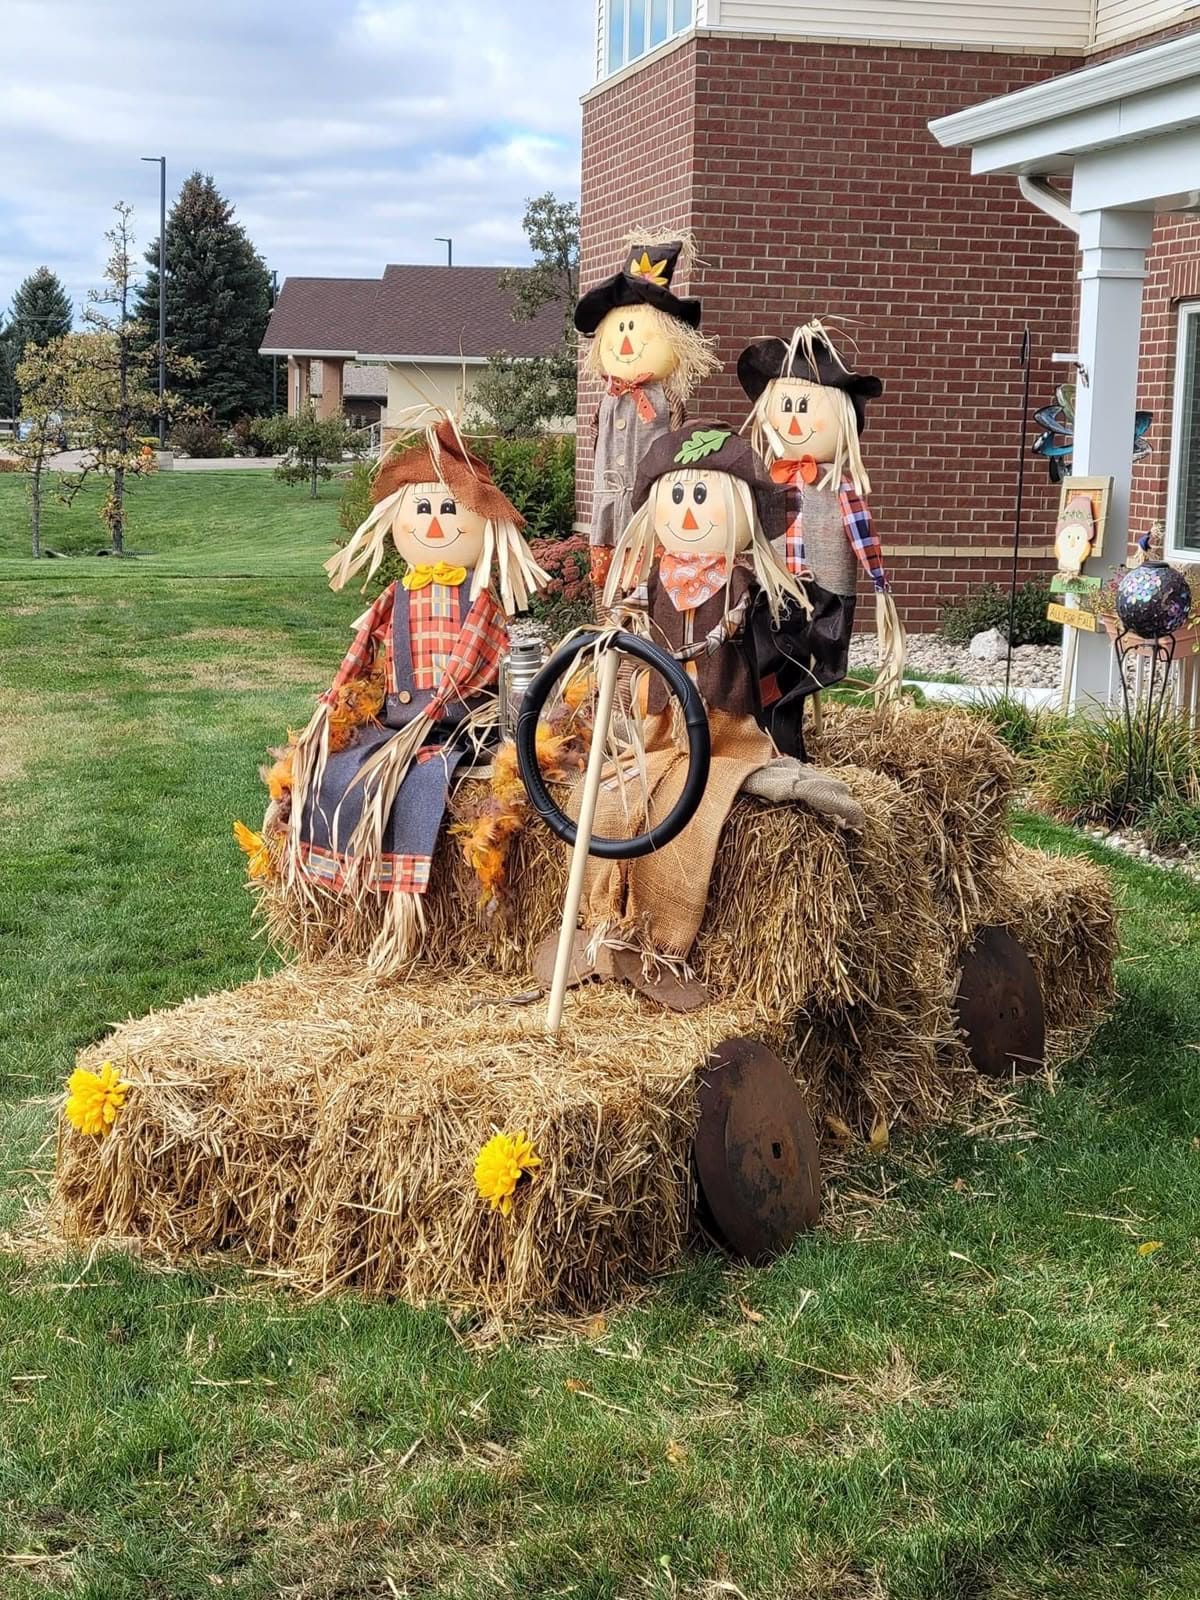
This playful fall display turns an ordinary lawn into a country road scene straight out of a harvest festival.
The car is built from hay bales stacked and shaped to mimic a vintage ride, complete with a rustic steering wheel and old metal discs as wheels.
Bonus, four cheerful scarecrows dressed in flannel shirts, burlap hats, and bandanas ride together, bringing a sense of humor and charm to the yard.
Materials Needed
- 8 rectangular hay bales (approx. 36″ × 18″)
- 4 scarecrow figures (life-size, assorted outfits)
- 1 old steering wheel or round wooden frame
- 4 large metal discs or old wheels (18-20″ diameter)
- Fresh or faux yellow flowers (8-10 stems)
- Burlap fabric (2-3 yards)
- Zip ties or twine
Step-by-step Guide
Step 1: Arrange two hay bales in front for the car hood, securing them tightly with twine.
Step 2: Stack additional bales to create the main body of the car, leaving room for seating.
Step 3: Attach the metal discs to each side as wheels, pressing them slightly into the hay for stability.
Step 4: Secure the steering wheel to a vertical stick or dowel and insert it in front of the driver’s seat.
Step 5: Position the scarecrows including one in the driver’s spot and the others as passengers.
Step 6: Add yellow flowers around the car for a pop of color and to tie the look together.
#4. Grumpy Pumpkin Hay Bales
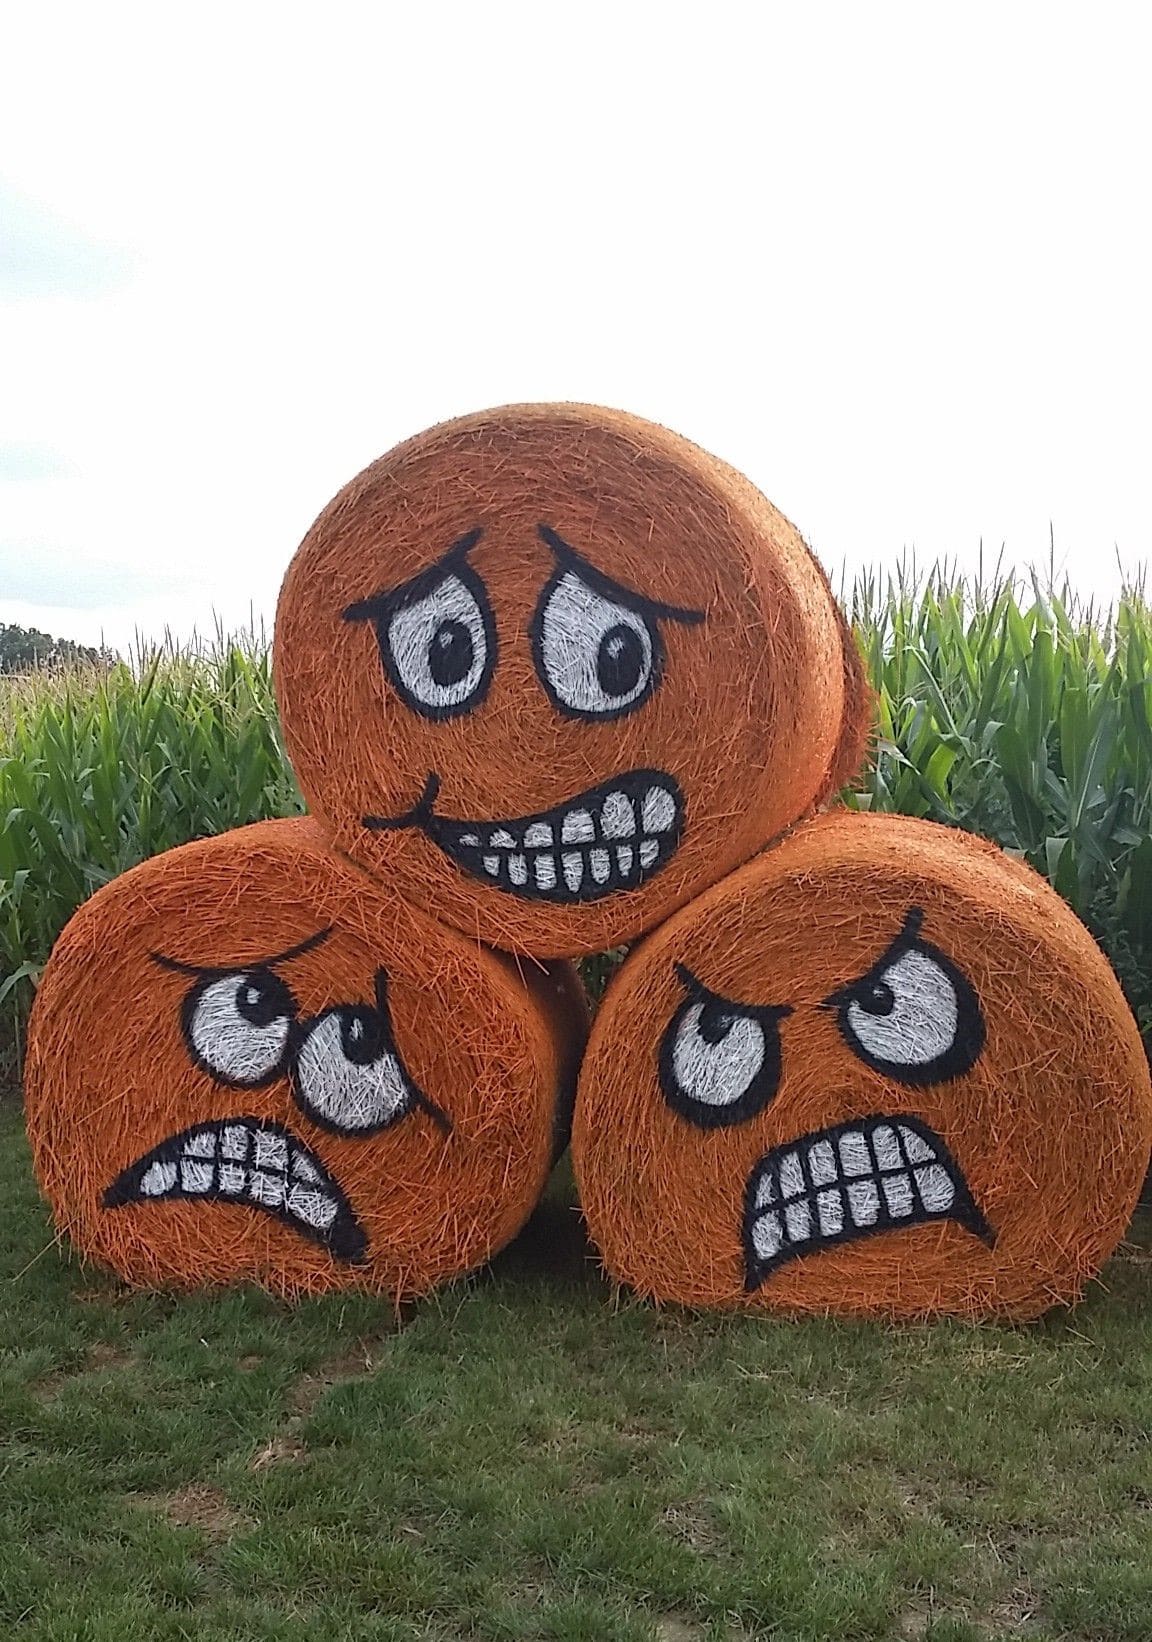
This playful Halloween display turns ordinary hay bales into oversized pumpkin faces full of personality. Each bale is painted a bright pumpkin orange, with bold black-and-white facial expressions.
Stacked in a pyramid shape, they instantly grab attention and add a touch of humor to your autumn décor.
Perfect for a farm entrance, front yard, or even a school fall festival, these expressive pumpkins make a statement without needing carving or messy cleanup.
Materials Needed
- 3 round hay bales (about 4-5 ft diameter)
- 1 gallon outdoor orange paint
- Black and white outdoor paint (1 quart each)
- Paint rollers and brushes
- Drop cloths or tarps
Step-by-step Guide
Step 1: Place the hay bales in your desired arrangement, stacking them securely if needed.
Step 2: Lay drop cloths around the base to avoid paint mess on the grass.
Step 3: Use a roller to coat each bale evenly with orange paint, letting it dry fully.
Step 4: Sketch facial features lightly with chalk, then fill in with black and white paint for bold expressions.
#5. Hay Bale Skeleton
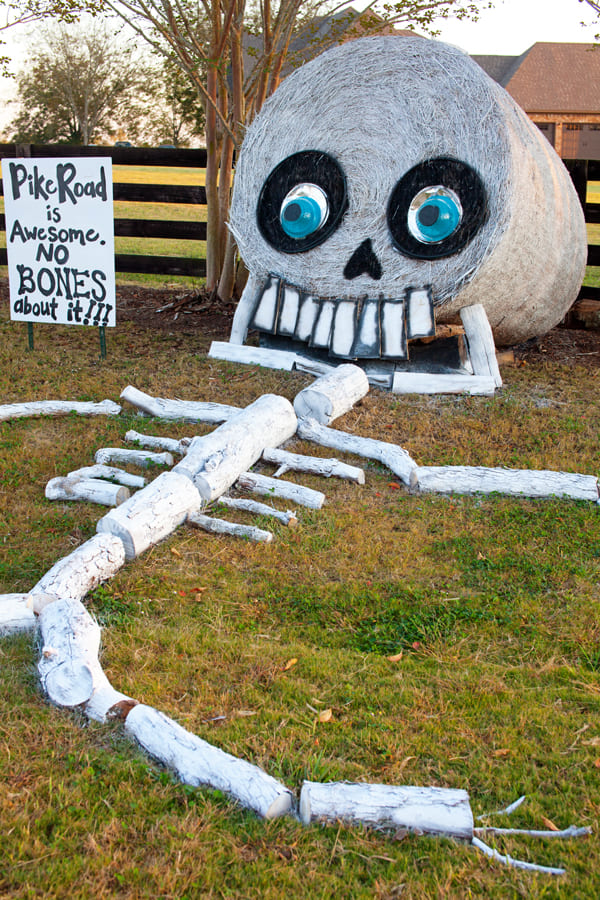
You can see this oversized skeleton is ready to greet trick-or-treaters with a goofy grin and a big message.
The giant skull is crafted from a round hay bale painted ghostly white, with huge blue eyes and a cartoonish toothy smile. White-painted logs stretch across the yard to form the ribcage, spine, and limbs.
Perfect for a neighborhood that loves Halloween fun with a lighthearted twist, this idea blends creativity, rural charm, and a playful sense of community spirit.
Materials Needed
- 1 large round hay bale (about 5 ft in diameter)
- 12-15 logs or large branches (2-4 ft each)
- White outdoor paint (1 gallon)
- Black outdoor paint (1 quart)
- Blue paint or round panels (2 pieces, about 12 in diameter)
- Wooden or cardboard teeth cutouts (8-10 pieces)
- Sign board and weatherproof markers/paint
Step-by-step Guide
Step 1: Place the large hay bale upright where you want the skeleton’s head to be.
Step 2: Paint the bale white, then add large black eye circles, a small triangle nose, and a wide, toothy grin.
Step 3: Create the eyes by painting blue circles on panels or large lids, then attach them inside the black eye outlines.
Step 4: Lay the logs on the ground to form the skeleton’s spine, ribs, arms, and legs. Then paint them white for a bone-like look.
Step 5: Arrange the wooden teeth cutouts in the mouth area and secure them with nails or heavy-duty glue.
Step 6: Paint and set up your sign nearby to add a fun Halloween message.
#6. Smiling Scarecrow Hay Bale
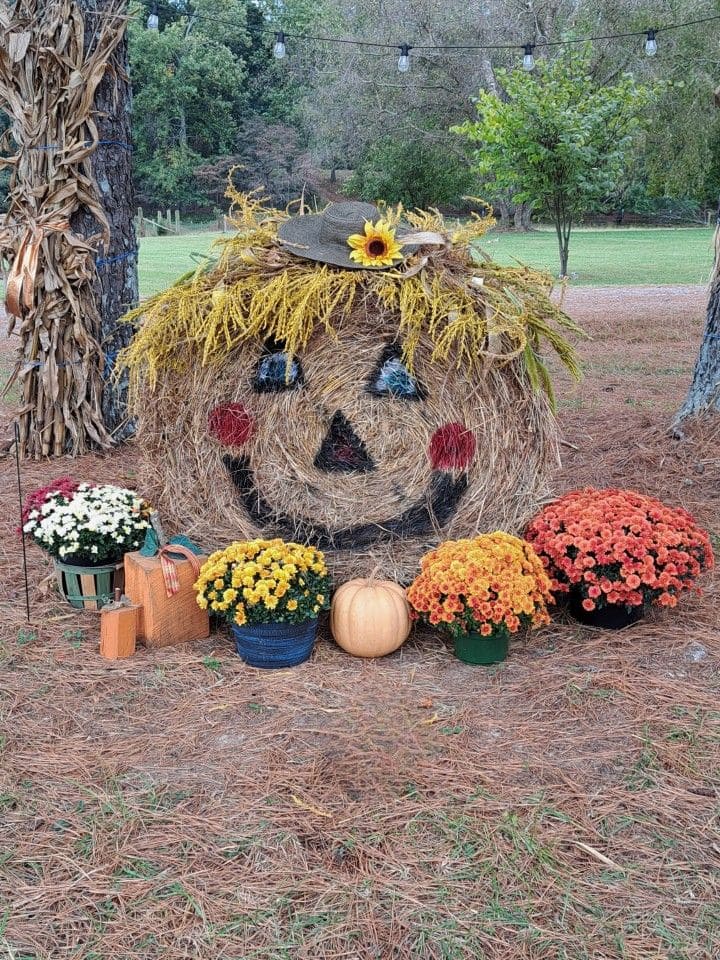
This cheerful hay bale scarecrow instantly brightens up any autumn setting with its warm, country charm. A wide, hand-painted smile, rosy cheeks, and a classic triangular nose give it an inviting, friendly look.
Plus, golden straw hair spills from under a floppy hat adorned with a sunny sunflower, adding an extra dose of seasonal flair.
Arranged with pots of colorful mums, a rustic pumpkin, and vintage props, this setup feels like stepping into a small-town harvest fair.
Materials Needed
- 1 round hay bale (4-5 ft diameter)
- Outdoor acrylic paint: black, red, blue (1 quart each)
- 1 bundle of dried yellow grass or wheat stems
- 1 floppy hat
- 1 artificial sunflower
- Assorted potted mums (3-4 pots, 8-10” diameter)
- 1 medium pumpkin
- Paintbrushes
Step-by-step Guide
Step 1: Position the hay bale upright in a visible spot. Then paint a friendly scarecrow face using black for outlines, red for cheeks, and blue for eyes. Let dry.
Step 2: Tuck dried grass into the top for hair, securing with twine if needed.
Step 3: Place the hat on top, attaching the sunflower with hot glue.
Step 4: Arrange potted mums, a pumpkin, and any decorative props around the base for a complete look.
See more: 24 Easy Fall Leaf Craft Projects for Preschoolers and Kids
#7. Cozy Halloween Hay Bale Fire Pit Gathering
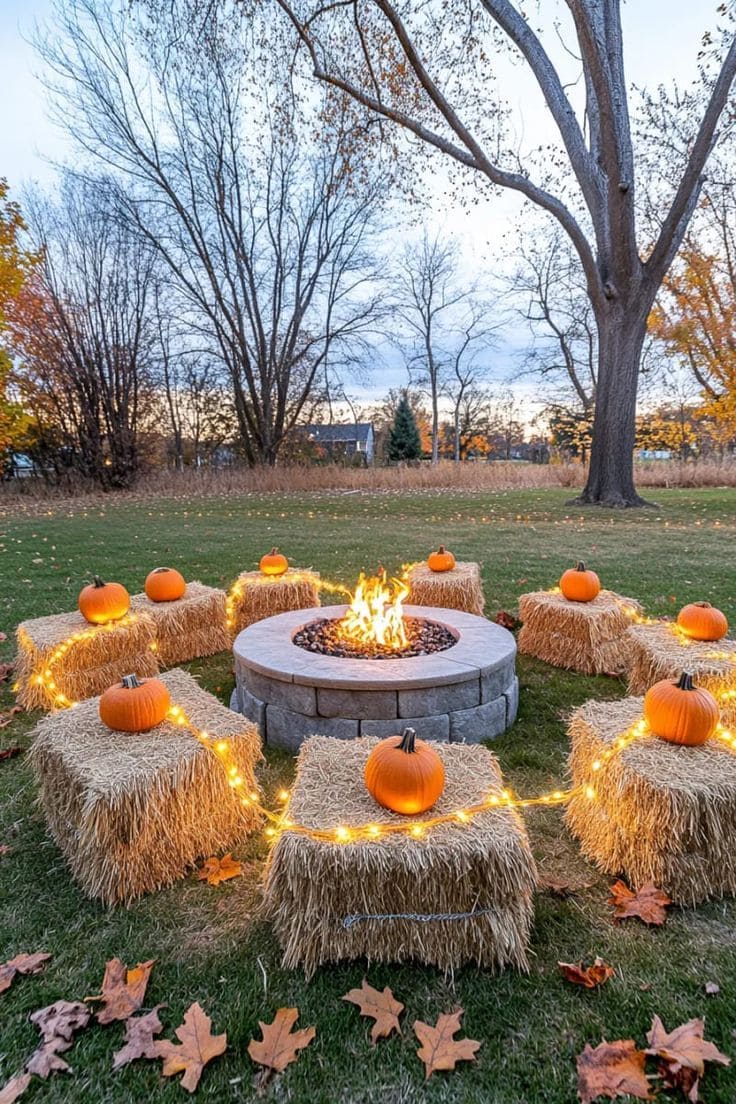
This inviting Halloween setup blends rustic charm with seasonal magic. A circle of hay bales surrounds a warm stone fire pit, each topped with a bright orange pumpkin for that perfect autumn touch.
Golden string lights drape across the hay, casting a soft, enchanting glow as the flames dance at the center.
Specially, the combination of natural textures, warm lighting, and Halloween accents creates an atmosphere that feels both festive and cozy.
Materials Needed
- 8-10 hay bales (standard size: approx. 36″ × 18″ × 14″)
- 8-10 medium pumpkins (8″-10″ diameter)
- 1 outdoor fire pit (stone or metal, 36″-40″ diameter)
- 1–2 strands of warm white outdoor string lights (25-50 ft each)
- Extension cord (if needed)
Step-by-step Guide
Step 1: Place your fire pit in the center of your yard or gathering space, ensuring it’s on a safe, flat surface away from low branches or structures.
Step 2: Arrange the hay bales evenly around the fire pit in a circle, leaving enough space for people to sit comfortably and move around.
Step 3: Set a pumpkin on top of each hay bale to add a festive autumn accent.
Step 4: Drape the string lights across the hay bales, weaving them between pumpkins for a magical glow.
Step 5: Plug in the lights, light the fire, and enjoy a warm, spooky fall night with friends and family.
#8. Festive Hay Bale Deer Display
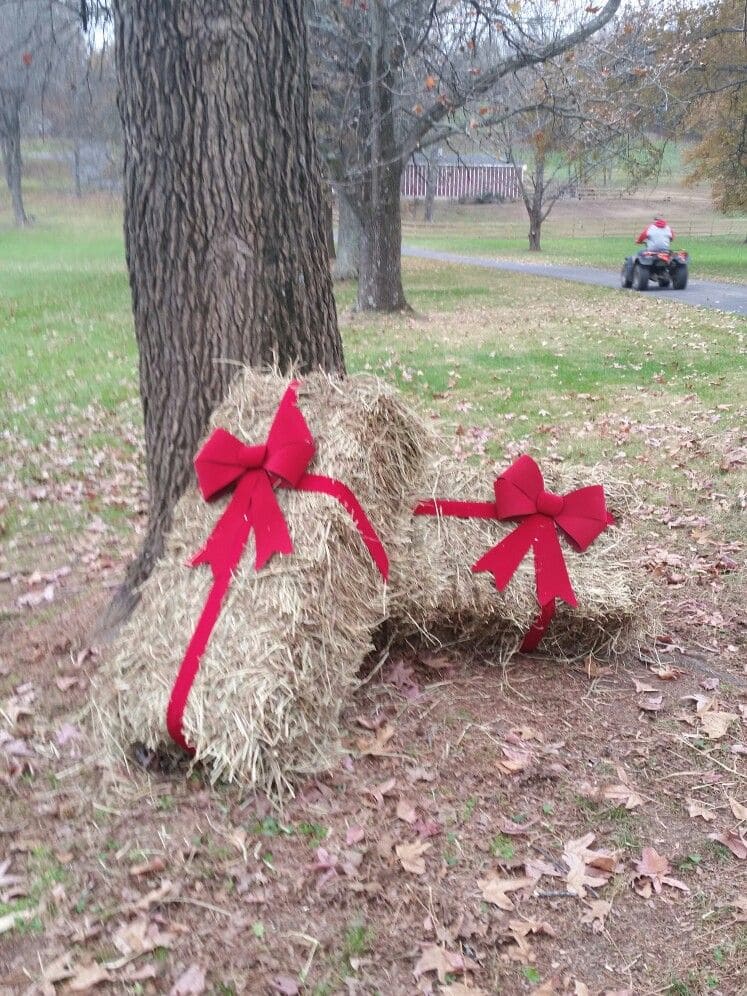
Crafted from two rectangular hay bales stacked and arranged to resemble a resting deer, this adorable hay bale deer is accented with bold red ribbons and oversized bows for a cheerful seasonal statement.
Placed under a tree or along a driveway, this display feels welcoming and playful, catching the eye of anyone passing by.
Materials Needed
- 2 rectangular hay bales (approx. 36″ × 18″)
- 2-3 yards of red ribbon (2″ width)
- 2 large red bows (approx. 10″ wide)
Step-by-step Guide
Step 1: Position one hay bale upright to serve as the deer’s body.
Step 2: Place the second hay bale at an angle on top to create the head and neck shape.
Step 3: Wrap red ribbon securely around each bale, finishing with large bows for a festive touch.
Step 4: Adjust placement near a tree or open yard space for maximum visibility.
#9. Adorable Hay Bale Bumblebee
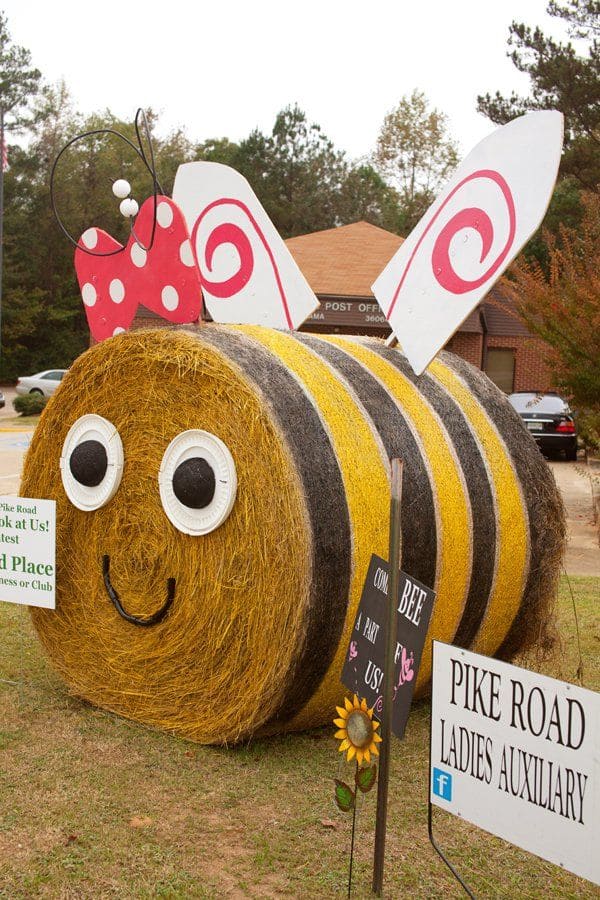
This giant bumblebee made from a round hay bale is a charming outdoor decoration that instantly brightens any fall or harvest festival.
With its cheerful smile, whimsical polka-dot bow, and oversized wings, it’s the kind of display that makes people stop for photos.
Moreover, the yellow and black stripes are painted directly on the hay, giving it that unmistakable bee pattern.
Materials Needed
- 1 large round hay bale (approx. 4-5 ft diameter)
- Exterior yellow and black paint (1 quart each)
- 2 large white paper plates
- 2 smaller black paper circles
- 1 sheet plywood
- White and red outdoor paint
- Metal rods or thick wire
- Hot glue gun or heavy-duty adhesive
- Paintbrushes and rollers
Step-by-step Guide
Step 1: Place the hay bale in your desired location, ensuring it’s stable and won’t roll.
Step 2: Paint alternating yellow and black stripes around the bale. Let dry completely.
Step 3: Attach paper plates for eyes, adding black circles as pupils with glue or paint.
Step 4: Cut wing shapes from plywood, paint them white with red swirls, and attach to the bale using stakes or screws.
Step 5: Make a bow from plywood or sturdy cardboard, paint it red with white dots, and secure it above the eyes.
Step 6: Form antennae from wire, add white beads at the tips, and insert them into the top of the bale.
Step 7: Finally, add a black painted smile to complete the bumblebee’s face.
#10. Hay Bale Fall Porch Display
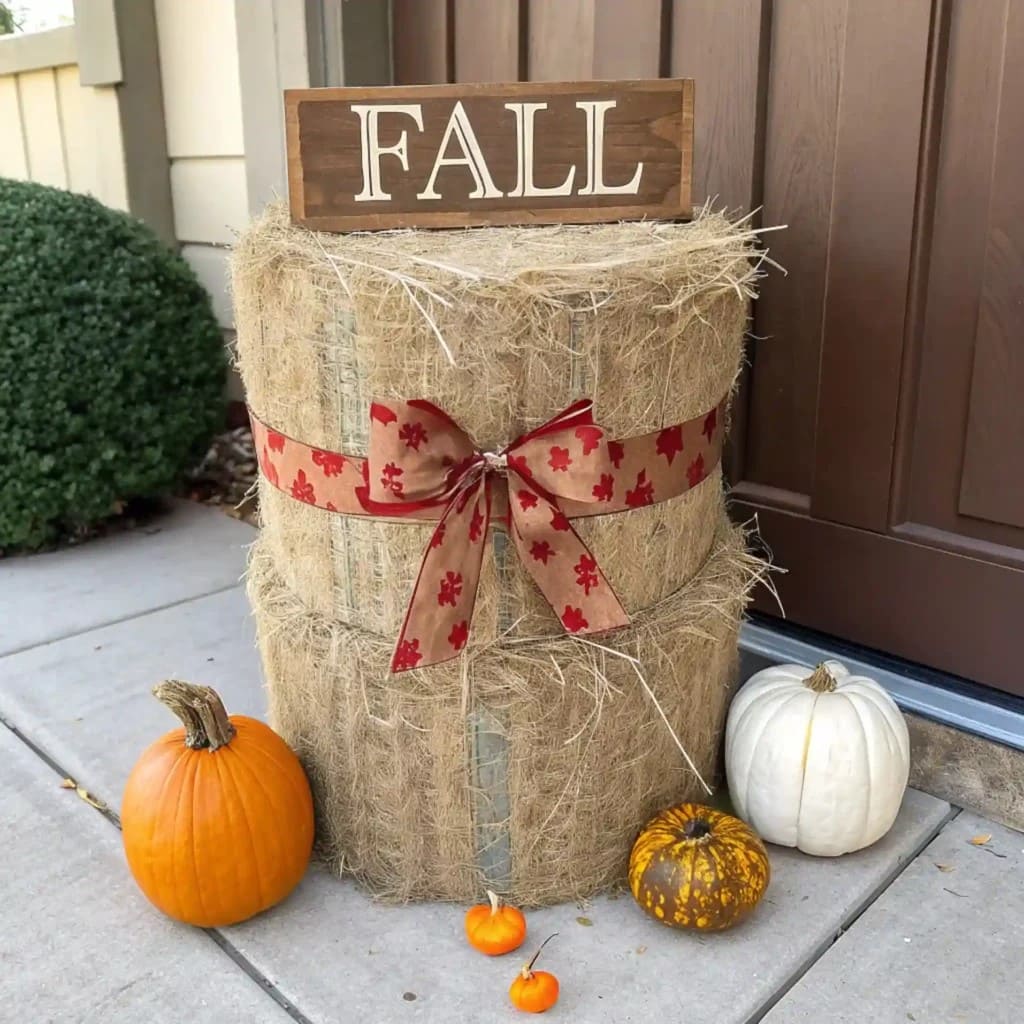
This charming hay bale setup instantly gives your porch a cozy autumn welcome. Two stacked hay bales create a rustic base, tied together with a ribbon featuring red maple leaves for that seasonal touch.
On top, a wooden sign proudly declares FALL, while pumpkins in varying colors and sizes sit at the base, adding warmth and texture.
Materials Needed
- 2 medium hay bales (approx. 20″ × 16″)
- 1 wooden “FALL” sign (12″ × 6″)
- 1.5 yards of ribbon with autumn patterns
- 4 assorted pumpkins (various colors and sizes)
Step-by-step Guide
Step 1: Stack the two hay bales vertically in a stable position near your porch entrance.
Step 2: Tie the ribbon around the middle, finishing with a neat bow at the front.
Step 3: Place the wooden FALL sign securely on top of the upper hay bale.
Step 4: Now you can arrange the pumpkins at the base for a balanced and inviting look.
#11. Cheeseburger Hay Bale Display
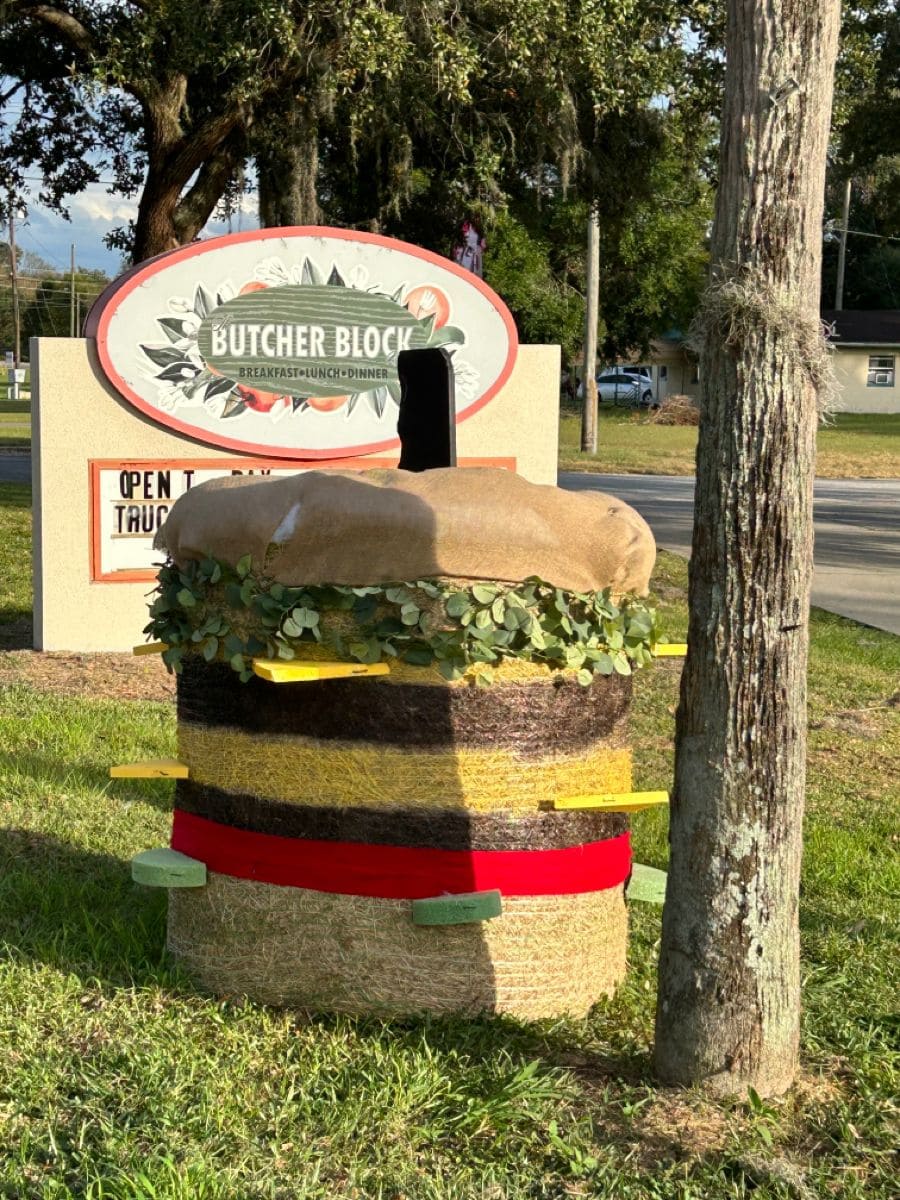
This giant cheeseburger hay bale is a roadside showstopper that’s perfect for grabbing attention. It’s stacked with lettuce, tomato, cheese, and a thick beef patty, all made from painted hay and creative accents.
The realistic look comes from layering colors and textures, topped off with a “toothpick” for extra fun.
Materials Needed
- 1 large round hay bale (about 4–5 ft in diameter)
- Tan fabric or tarp (enough to cover top bun)
- Green faux foliage garland (6-8 ft)
- Red fabric strip (6-8 in wide, 6 ft long)
- 8-10 yellow foam or painted wood strips (12-18 in long)
- Black foam or cardboard tube (12-18 in tall)
- Brown and yellow outdoor paint
- Staple gun and staples
- Scissors
Step-by-step Guide
Step 1: Place the hay bale upright in your desired location.
Step 2: Paint the middle section brown for the burger patty and a lighter yellow section above it for the cheese.
Step 3: Wrap green faux foliage around the top of the patty layer for lettuce. Then add yellow foam strips sticking out for extra cheese effect.
Step 4: Wrap a red fabric strip around the lower section for tomato.
Step 5: Cover the top portion with tan fabric to create the bun, securing it with staples.
Step 6: Finally, insert the black foam or tube at the top for the “toothpick.”
#12. Giant Hay Bale Flower Display
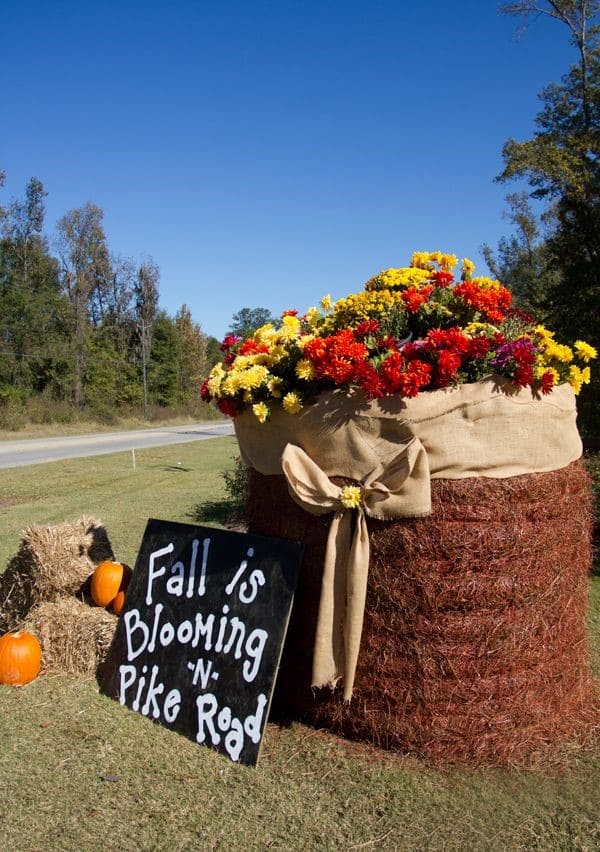
This oversized hay bale display bursts with autumn charm, making it a perfect roadside or front-yard statement piece.
Plus, a round bale is wrapped in rustic burlap and tied with a bow, creating the look of an enormous gift bag overflowing with fall flowers.
The rich reds, oranges, and yellows of the blooms bring a warm seasonal glow, while a hand-painted sign adds a personal, welcoming touch. You’ll love how quickly it transforms a simple space into a picture-perfect fall scene.
Materials Needed
- 1 large round hay bale (approx. 4′ diameter)
- 1 piece of burlap fabric (at least 8′ × 4′)
- 1 wide ribbon or extra burlap strip (6″ × 5′)
- Artificial or fresh fall flowers (enough to cover the top, about 20-30 stems)
- 1 sturdy signboard (18″ × 24″)
- White and black outdoor paint
- 2-3 small hay bales
- 3-4 medium pumpkins
- Staple gun or heavy-duty pins
Step-by-step Guide
Step 1: Position the large hay bale where you want the display, ensuring it’s on a flat, stable surface.
Step 2: Drape the burlap over the bale, pulling it snug and securing it at the back with staples or pins.
Step 3: Wrap the ribbon or burlap strip around the bale and tie a neat bow in front.
Step 4: Arrange your flowers on the top, covering the entire surface for a lush look. Use foam or chicken wire to help them stay in place if needed.
Step 5: Paint your fall message on the signboard, then add small hay bales and pumpkins around the base to complete the festive setup.
#13. Pink Pig Hay Bale Display
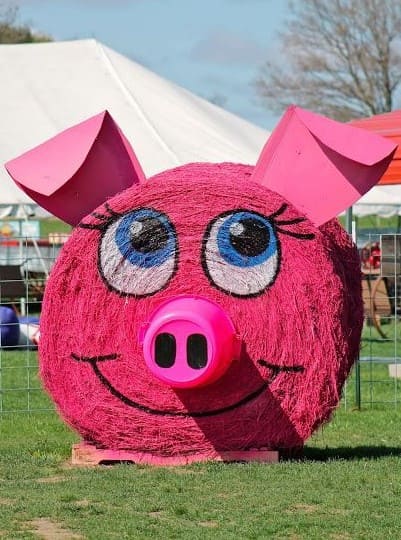
Crafted from a large round hay bale painted a vibrant bubblegum pink, this cheerful pink pig boasts oversized cartoon eyes with long lashes, a playful smile, and a bright snout made from an upcycled plastic bin lid.
The pig’s perky ears are fashioned from painted plywood, angled just right to give it an animated expression.
Perfect for a farm-themed fall festival or a whimsical Halloween twist, this design turns a simple hay bale into an adorable, larger-than-life barnyard character.
Materials Needed
- 1 large round hay bale (about 5 ft in diameter)
- Pink outdoor paint (1 gallon)
- White outdoor paint (1 quart)
- Black outdoor paint (1 quart)
- Blue paint for eyes (1 pint)
- 2 plywood sheets (2 ft × 2 ft each) for ears
- 1 large round plastic bin lid or container (12-14 in diameter) for snout
- Strong adhesive or screws
Step-by-step Guide
Step 1: Position the hay bale upright and paint it entirely in bright pink. Then allow it to dry fully.
Step 2: Paint large white circles for the eyes, then add blue irises and black pupils. Next, outline the eyes in black and add eyelashes for personality.
Step 3: Use black paint to create a friendly, curved smile beneath the eyes.
Step 4: Paint the plywood ears pink, cut them into triangles, and attach them to the top sides of the bale at a jaunty angle.
Step 5: Attach the plastic bin lid to the center of the face for the snout, and paint or mark two black nostrils.
#14. Broom Family Hay Bale Display
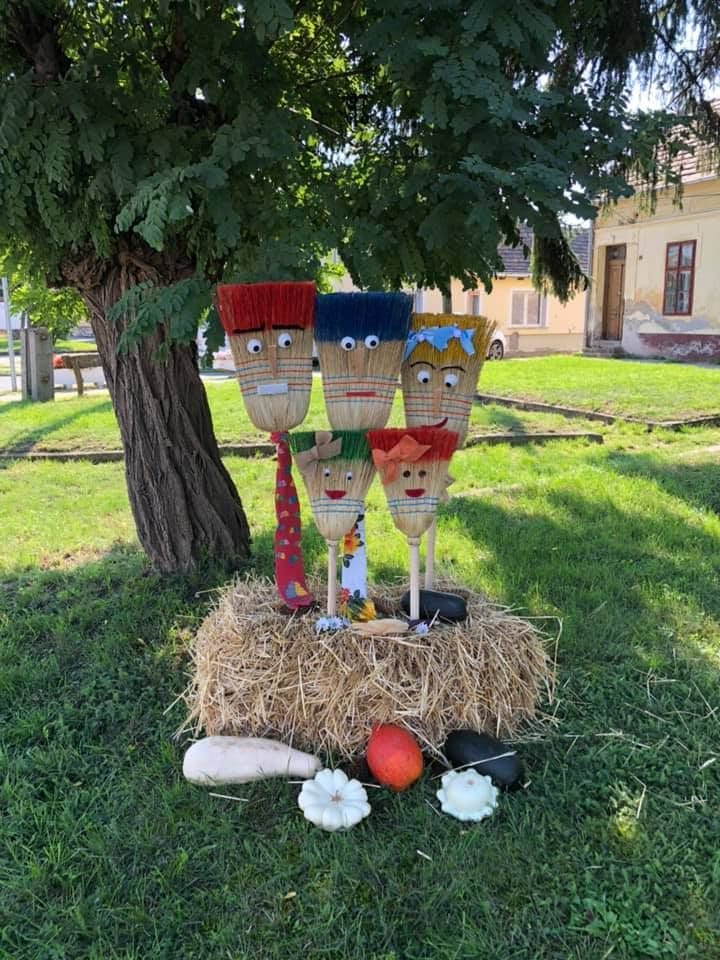
This cheerful hay bale scene turns ordinary brooms into a whimsical family that instantly makes your outdoor space feel more inviting.
With their painted faces, colorful hair, and playful accessories, each broom character brings its own personality to the display.
Also, this setup works beautifully for both fall harvest celebrations and Halloween, offering a touch of humor and rustic charm in one.
Materials Needed
- 1 hay bale (36″×18″×14″)
- 5 straw brooms (standard size, 54″)
- 5 sets of googly eyes (2″ diameter)
- Acrylic paints (assorted colors, 6-8 oz each)
- Paintbrushes (various sizes)
- 3-4 fabric scraps or ties (24″ each)
- 5-6 assorted decorative gourds and pumpkins
- Hot glue gun with glue sticks
Step-by-step Guide
Step 1: Place your hay bale in the desired outdoor spot, ensuring it’s stable and level.
Step 2: Paint each broom head with a unique hair color and face design, letting your creativity shine.
Step 3: Glue on googly eyes, and add painted or fabric mouths for expression.
Step 4: Dress your broom family with ties, scarves, or fabric strips to give them personality. Then arrange the brooms by pushing their handles into the hay bale for stability.
Step 5: Scatter gourds and pumpkins around the base to finish the harvest look.
#15. Hay Bale Festival Lady
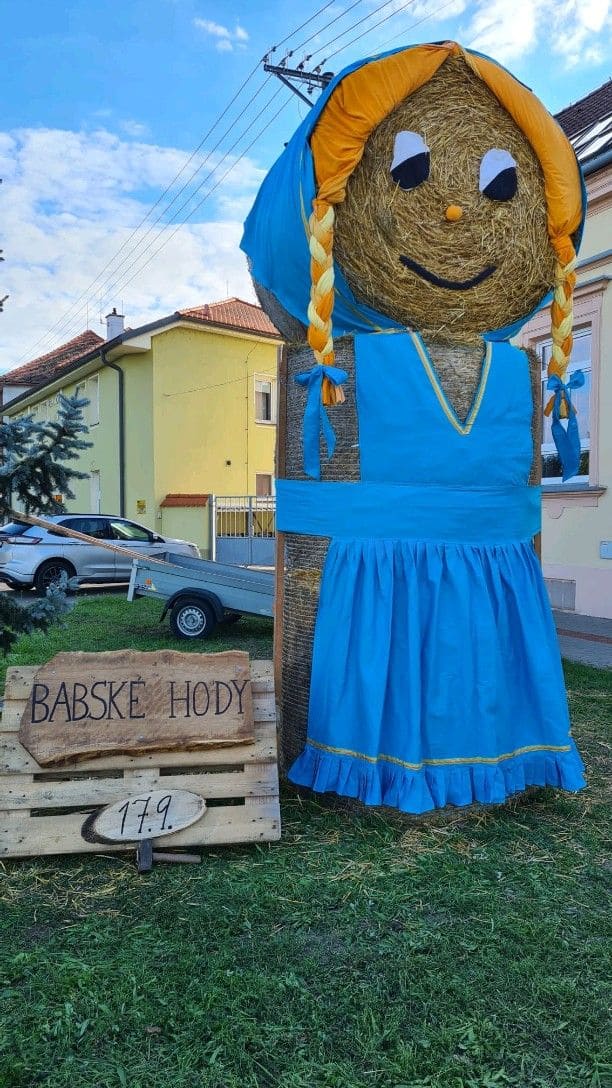
This cheerful hay bale lady instantly sets the mood for Babske Hody. Standing tall in her bright blue dress and matching headscarf, she greets passersby with a warm smile and golden braided hair tied with blue ribbons.
Her playful charm captures the spirit of the upcoming celebration, making the date 17.9 hard to forget.
Materials Needed
- 2 large round hay bales
- Blue fabric (approx. 3 m)
- Yellow fabric (approx. 1 m)
- Yarn for braids (2 m, golden yellow)
- Black and white fabric
- Orange fabric
- Wooden pallet and signboard
Step-by-step Guide
Step 1: Stack the two hay bales vertically to form the body and head.
Step 2: Wrap the top bale with yellow and blue fabric to create the headscarf.
Step 3: Sew or pin the blue dress around the bottom bale, adding a waistband for shape.
Step 4: Create braids from yarn and attach them on each side with bows.
Step 5: Cut eyes, nose, and mouth from fabric, then fix them onto the top bale. Then place the wooden pallet sign with the festival name and date nearby.
#16. Hay Bale Cookie Monster
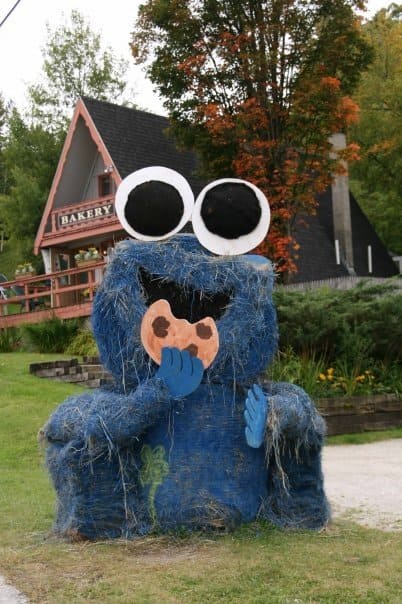
This adorable hay bale Cookie Monster is a delightful nod to the beloved Sesame Street character, perfect for bringing smiles to kids and adults alike.
Crafted from a large round hay bale painted a vibrant blue, it’s instantly recognizable thanks to its oversized googly eyes, wide black smile, and of course, a big cookie in hand.
Bonus, the playful pose, with one cookie half in its mouth and the other hand raised, makes it feel full of life.
Materials Needed
- 1 large round hay bale (approx. 4-5 ft diameter)
- Exterior blue paint (1-2 quarts)
- 2 large white foam boards or cardboard circles for eyes
- 2 large black felt or painted circles
- Black outdoor paint
- Plywood or cardboard
- Brown and black paint
- Heavy-duty adhesive or screws
- Paintbrushes and rollers
Step-by-step Guide
Step 1: Position the hay bale securely in the display area so it won’t shift.
Step 2: Paint the entire bale in bright blue, covering all visible sides. Let it dry fully.
Step 3: Cut two large circles from foam board or cardboard, paint them white, and attach black felt circles for pupils. You fix the eyes to the top front of the bale.
Step 4: Paint or cut out a wide black smile shape and attach it just below the eyes.
Step 5: Create two hands and a cookie from plywood or sturdy cardboard. Next, paint the cookie light brown and add black dots for chocolate chips.
Step 6: Attach one hand holding the cookie near the mouth and position the other to appear raised.
#17. Hay Bale Gumball Machine
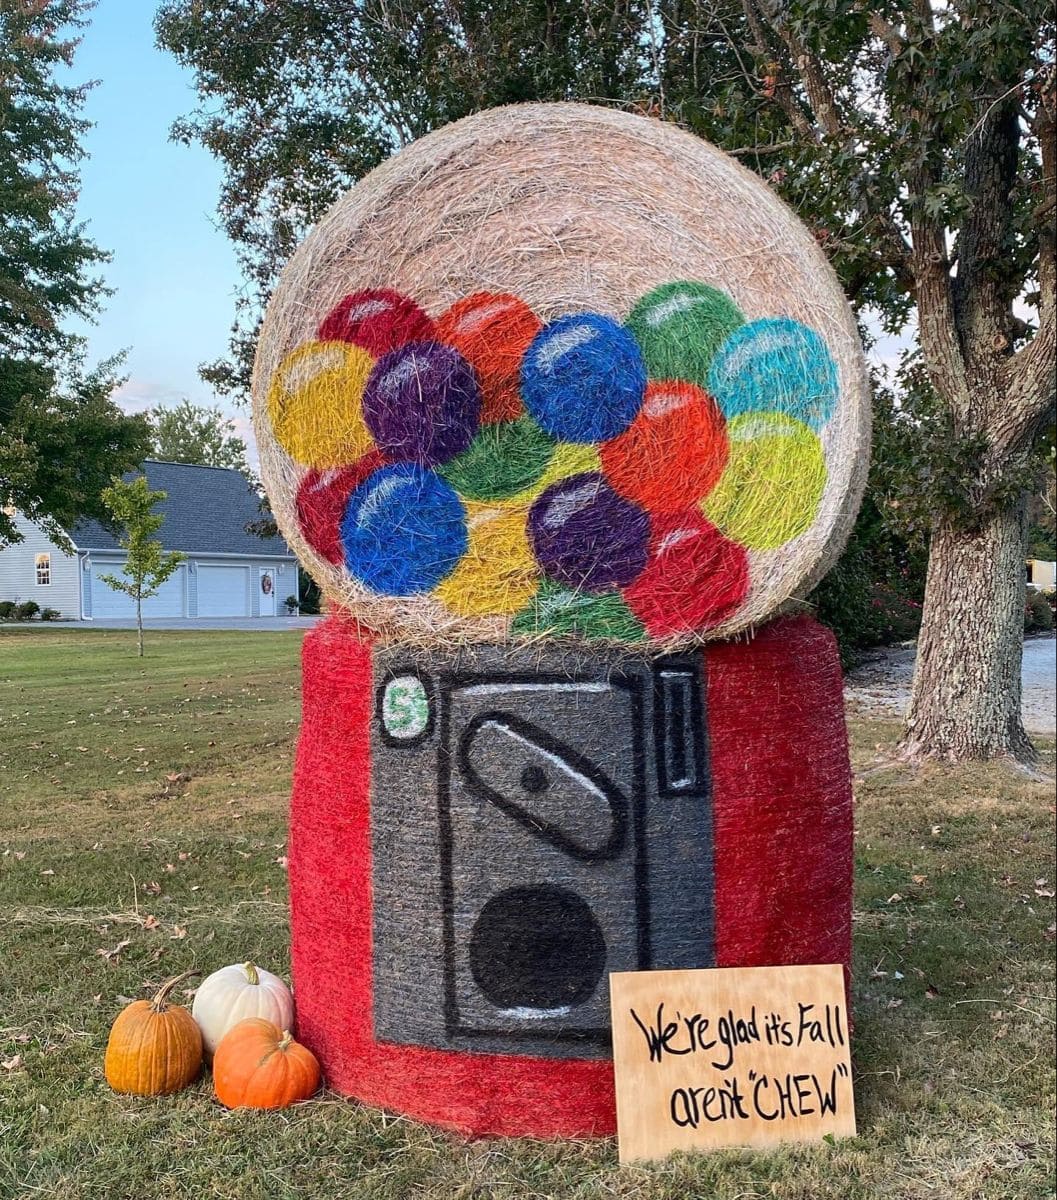
Crafted from large round hay bales, the design transforms farmyard charm into playful nostalgia.
The glass dome is filled with brightly painted gumballs in every color you can imagine like red, blue, yellow, green, and purple while the base is painted bold red to mimic the classic candy dispenser.
Plus, the little detail of the hand-painted coin slot and dispenser makes it feel delightfully authentic. A wooden sign with the pun adds a fun seasonal touch, and the pumpkins at the base tie the whole look into autumn.
Materials Needed
- 2 large round hay bales (approx. 4-5 ft diameter each)
- Spray paint in red, gray, black, white, and multiple bright colors (2-3 cans each)
- Wooden board (approx. 12″×18″)
- Black permanent marker or paint pen
- 3-4 small pumpkins (assorted sizes)
Step-by-step Guide
Step 1: Stack the hay bales securely, placing one vertically for the globe and one upright for the machine base.
Step 2: Spray paint the top bale’s background in a light natural tone, leaving most hay visible to mimic glass. Then paint large, colorful circles to represent gumballs.
Step 3: Cover the bottom bale with red spray paint for the base. You can add a gray rectangle, then paint the black dispenser details.
Step 4: On the wooden board, write your chosen fall pun with a black marker or paint pen.
Step 5: Arrange pumpkins around the base and position the sign for the finishing touch.
#18. Cozy Cabin-Style Hay Bale Coffee Table
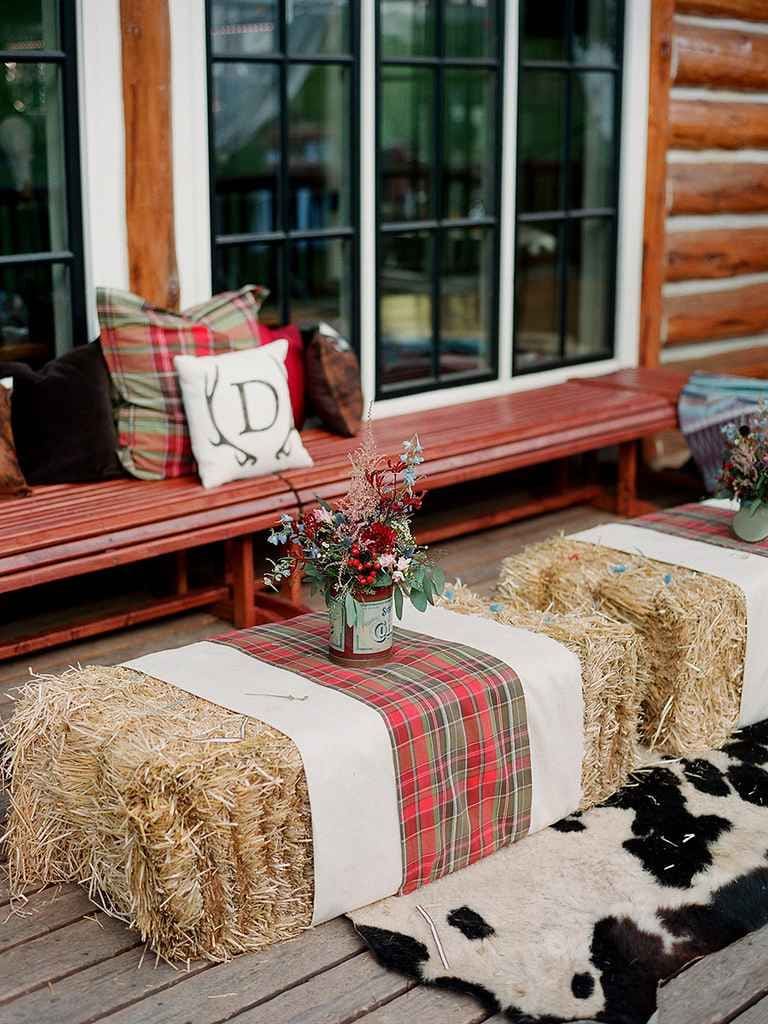
This setup instantly gives your porch or patio a warm, lodge-inspired vibe. The hay bales, dressed in a layer of cream fabric topped with a plaid runner, feel like they’ve been plucked straight from a rustic winter retreat.
Bonus, you add a few charming details like a bucket of dried flowers or wild berries and the whole look feels like it’s ready to welcome friends for hot cocoa or mulled cider.
Materials Needed
- 2 rectangular hay bales (36″ × 18″)
- 2 fabric runners in cream (18″ × 48″)
- 2 plaid fabric runners (18″ × 48″)
- 2 small metal buckets (8″ height)
- Dried flowers or faux floral arrangements (enough to fill buckets)
Step-by-step Guide
Step 1: Place your hay bales side by side in the desired spot, making sure they’re stable and level.
Step 2: Lay the cream runner directly over the center of each hay bale. Then smooth it out so it sits evenly.
Step 3: Layer the plaid fabric runner on top of the cream one, allowing both edges to show for a framed effect.
Step 4: Fill your buckets with dried or faux flowers and place them right in the center of the bales.
Step 5: Add nearby accents like cozy pillows, blankets, or rugs to complete the inviting cabin feel.
#19. Rustic Ranch Hay Bale Entrance
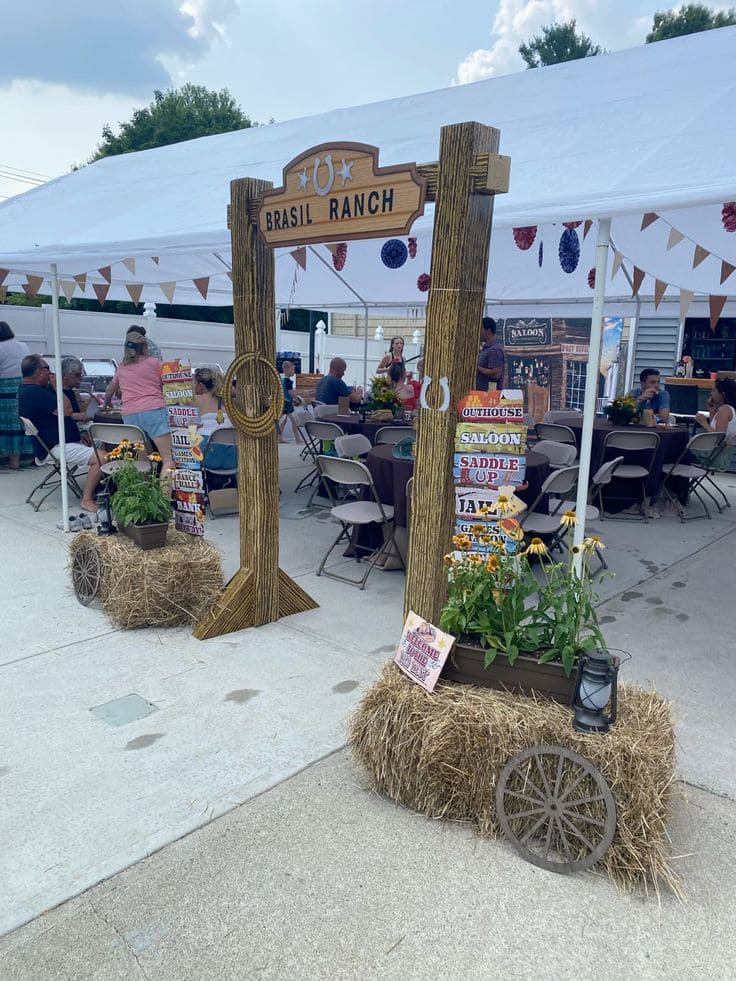
Walking into this Western-themed party feels like stepping straight into a ranch in the middle of summer.
The hay bales, paired with wagon wheels, overflowing flowers, and old-fashioned lanterns, set the tone for a laid-back, country celebration.
Plus, the weathered wooden archway with a sign welcomes guests with charm, while playful directional signs hint at fun stops like the saloon and games area.
Materials Needed
- 2 large hay bales (approx. 36″ × 18″ each)
- 1 wooden archway (7 ft tall × 5 ft wide)
- 2 wagon wheels (18″ diameter)
- 1–2 potted flowering plants (12″ pots)
- 1 vintage-style lantern
- Western-themed signboards (various sizes)
- Decorative rope (6-8 ft)
Step-by-step Guide
Step 1: Position the hay bales on each side of the entrance space, leaving enough walking room for guests.
Step 2: Secure the wooden archway between the bales, ensuring it’s stable for safety. Then attach wagon wheels to the sides of the hay bales for a ranch-style touch.
Step 3: Place the potted plants on top of the hay bales to add natural color.
Step 4: Hang the lantern and drape decorative rope for extra flair.
Step 5: Finish by placing Western signboards to guide guests toward different activities.
#20. Fall Hay Bale Welcome Sign
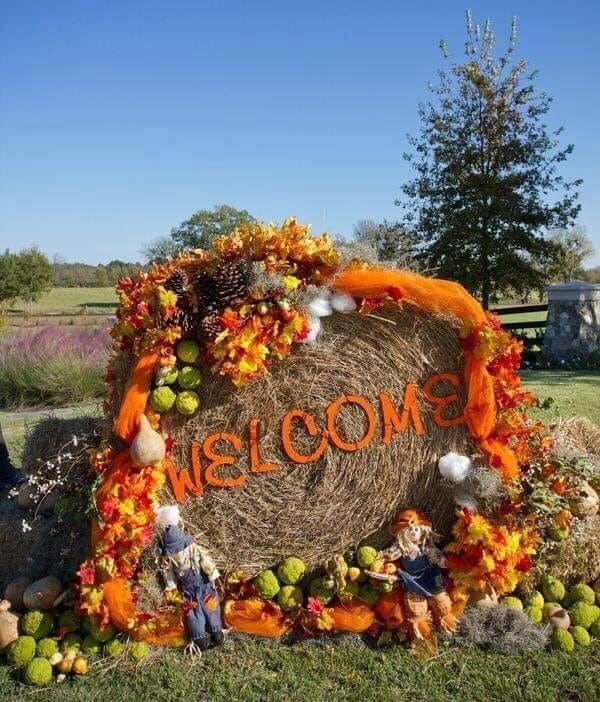
Wrapped in vibrant orange mesh and adorned with bright fall leaves, pinecones, gourds, and faux cotton stems, this hay bale is a cheerful statement piece for your front yard or farm entrance.
The warm colors pop beautifully against the golden hay, while small scarecrow figures at the base add a whimsical harvest touch.
Materials Needed
- 1 large round hay bale (approx. 4-5 ft. diameter)
- 3-4 yards of orange mesh fabric
- Artificial fall leaves and flowers (2-3 garlands)
- 12-15 pinecones
- 15-20 decorative gourds and Osage oranges
- 2 small scarecrow figures (12-18 inches tall)
- 4-6 faux cotton stems
- Orange wooden or foam “WELCOME” letters (6-8 inches tall)
- Hot glue gun and glue sticks
Step-by-step Guide
Step 1: Position the hay bale upright where it will be displayed, making sure it’s stable.
Step 2: Wrap orange mesh loosely around the edges, securing it with floral pins or glue.
Step 3: Arrange artificial leaves, flowers, and pinecones along the mesh, layering for fullness.
Step 4: Glue the “WELCOME” letters across the hay bale’s front, angling them slightly for a playful look.
Step 5: Add gourds, Osage oranges, and faux cotton stems for extra texture and color.
Step 6: Place scarecrow figures at the bottom corners to complete the harvest scene.
Refer to: These 20 Corn Husk Crafts Will Make You Fall in Love with Autumn
