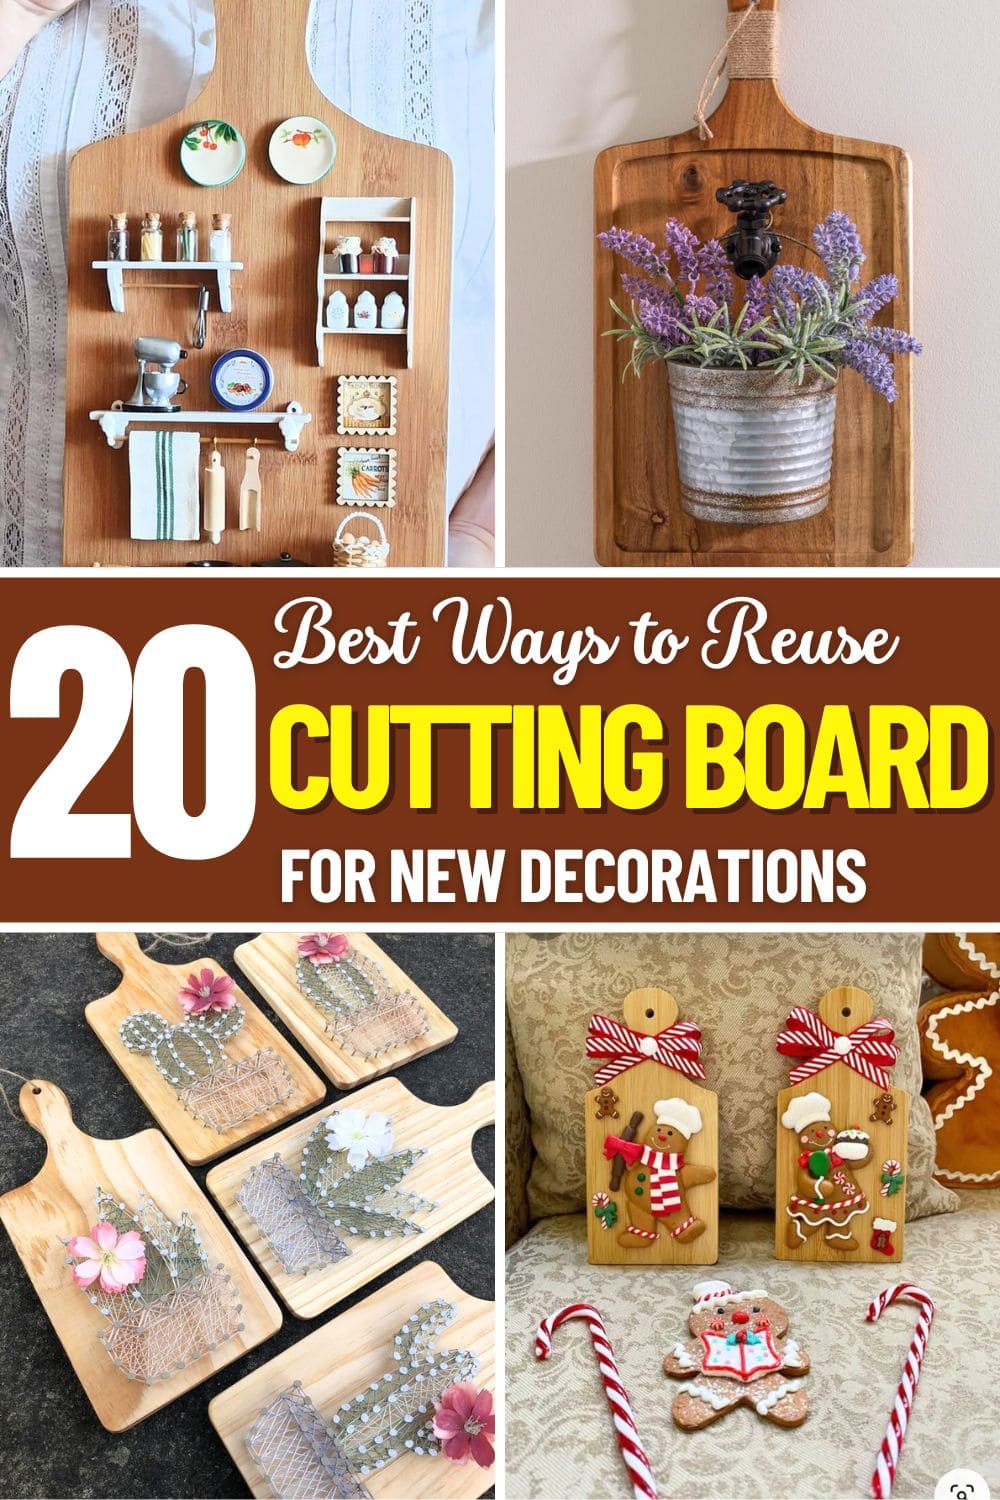
Is that stack of old cutting boards in your kitchen feeling more like clutter than potential? Don’t toss them just yet.
What might look like a scratched-up slab of wood can actually become a charming piece of home décor, a clever organizer, or even a personalized gift with just a little vision. Cutting boards are sturdy, versatile, and full of rustic character, perfect for creative reuse.
Whether you’ve got one board or ten, this list is your invitation to rethink what used up really means. From wall art to storage hacks, we’re diving into 20 clever ways to breathe new life into those forgotten kitchen staples.
#1. Miniature Kitchen Shelf Cutting Board Craft
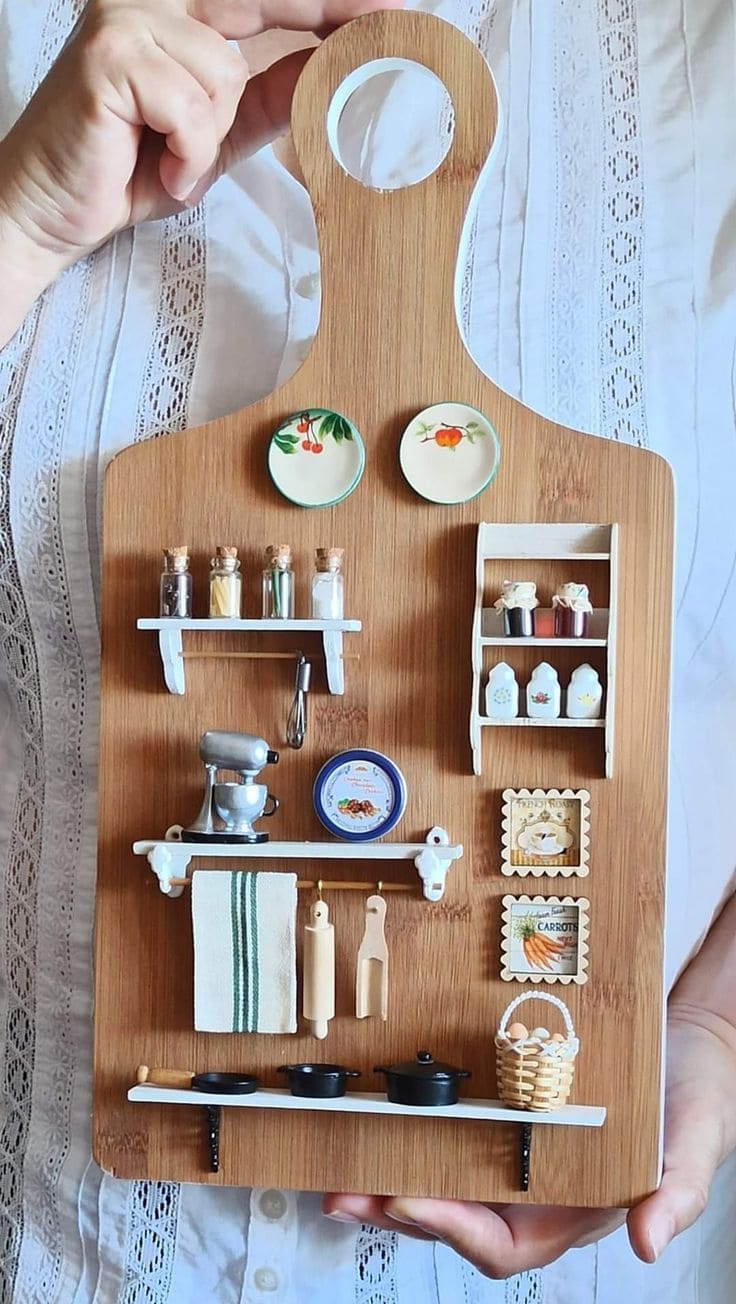
This delightful little scene transforms a plain cutting board into a miniature kitchen you can hold in your hands. It’s packed with tiny pots, spice jars, utensils, and even a teeny towel rack, each detail so carefully placed, it feels like a dollhouse chef might step in at any moment.
Perfect for anyone who loves cozy farmhouse touches or wants to craft something that feels like a storybook came to life.
Materials Needed
- 1 wooden cutting board (approx. 6″ x 12″)
- 2-3 miniature plates (1″ diameter)
- 4 mini glass spice jars (1″ tall)
- 2-3 mini wooden shelves
- Tiny pots, pans, and utensils (1:12 scale)
- Mini towel and hanging rack
- Hot glue gun + glue sticks
- Acrylic paint (optional)
- Mini printed signs
- Basket with faux eggs
Step-by-Step Guide
Step 1: Clean your board and lightly sand if needed. You can leave the wood natural or stain it for a warmer look.
Step 2: Start gluing your mini shelves in place. Then arrange them thoughtfully so you have space to hang and place each tiny object.
Step 3: Fill your shelves with the mini jars, spice bottles, and small dishware. You need to secure each with a dot of glue so nothing falls off.
Step 4: Hang the miniature towel, add the pots to the bottom shelf, and stick on any decorative signs or basket extras.
#2. Cactus String Art on Cutting Boards
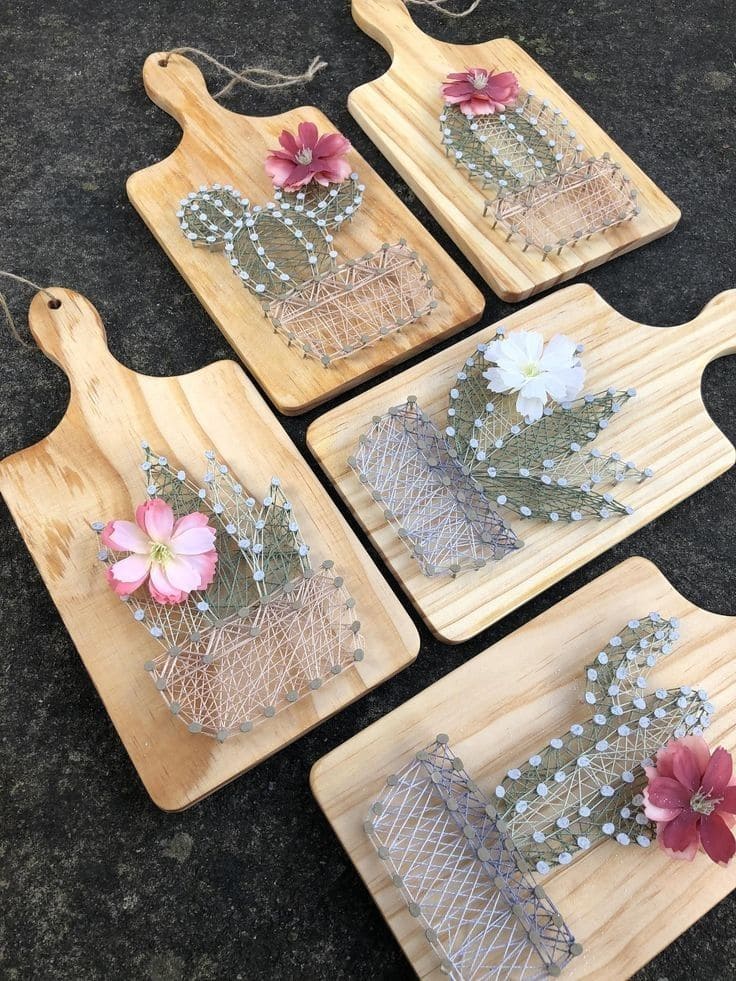
Who knew a humble cutting board could become such a charming little canvas? These cactus string art pieces bring a splash of desert warmth into any room without a single prickle.
By mixing rustic wood, soft floral accents, and intricate thread work, you get a craft that’s part decor, part conversation piece.
Materials Needed
- 1 wooden cutting board (approx. 6″ x 12″)
- 30-40 small nails per board
- Hammer
- Embroidery thread
- Paper printout of cactus designs
- Tape
- Artificial flowers (1-2 per board)
- Hot glue gun
- Pencil
Step-by-Step Guide
Step 1: Tape your printed cactus design onto the center of the cutting board. Then lightly hammer nails along the outline, spacing them evenly.
Step 2: Remove the paper and tie your thread to one nail. Begin wrapping the thread between nails to form the cactus shape and pot, layering colors if desired.
Step 3: Tie off the string securely and trim any excess. Now you gently press the threads flat with your fingers if needed.
Step 4: Finally, use hot glue to add an artificial flower to your cactus for a sweet pop of color and personality.
#3. Cutting Boards Turned Rustic Wall Hooks
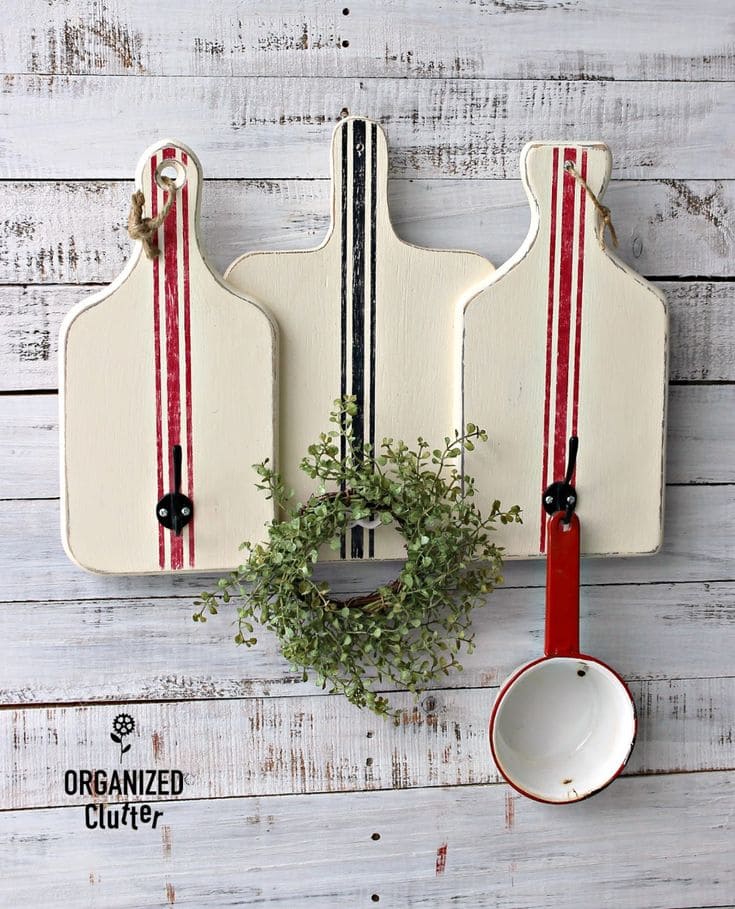
That old cutting board in the back of your kitchen drawer? It’s about to become your favorite rustic wall accent.
Specially, these painted cutting board hooks blend farmhouse charm with everyday functionality. A little paint, a little time, and suddenly you’ve got a stylish way to hang mugs, wreaths, or even herbs.
Materials Needed
- 3 wooden cutting boards (assorted sizes, approx. 12″-18″ tall)
- Chalk or acrylic paint (ivory/off-white base and red + black for stripes)
- Painter’s tape (¼ inch wide)
- Sandpaper
- 3 metal hooks (2 black, 1 white or mixed finish)
- Screws + screwdriver
- Twine (optional)
- Clear matte sealant (optional)
Step-by-Step Guide
Step 1: Sand each cutting board gently to smooth the surface and remove any finish. Then paint them with 2 coats of ivory or off-white paint.
Step 2: Tape off your stripe pattern down the center. Paint bold grain sack–inspired stripes using red and black. You now remove tape while the paint is still slightly wet for crisp edges.
Step 3: Lightly sand over edges and stripes for a weathered, vintage look. If desired, spray with a matte sealant to protect the finish.
Step 4: Attach hooks securely with screws near the bottom of each board. Then add twine to the top holes if you want to hang them freely.
#4. DIY Cutting Board Chalkboard
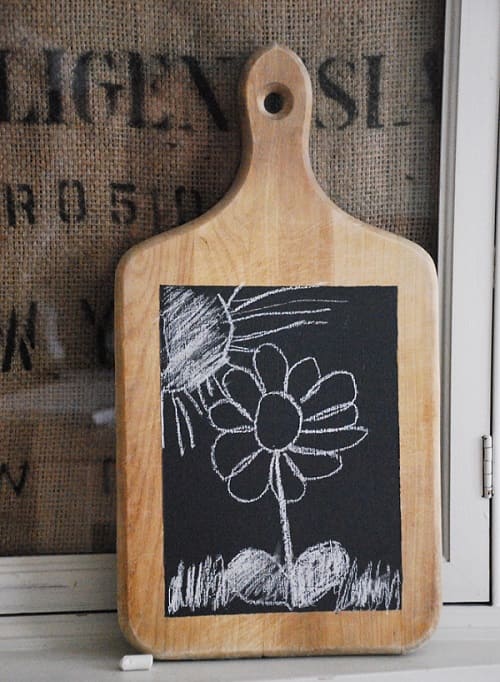
This adorable transformation turns a plain wooden cutting board into a reusable chalkboard, perfect for kitchen notes, doodles, or little daily smiles.
No matter how you want to jot down grocery lists or let your kids unleash their inner artist, this project adds both function and charm to any cozy corner of your home.
Materials Needed
- 1 wooden cutting board (any size)
- Chalkboard paint (black or dark green)
- Painter’s tape
- Small foam brush
- Chalk
Step-by-Step Guide
Step 1: Clean and dry your cutting board thoroughly. Then lightly sand the center area if the surface feels too glossy.
Step 2: Use painter’s tape to mask off a neat rectangle in the center or lower half of the board, this will be your chalkboard area.
Step 3: Apply 2-3 coats of chalkboard paint inside the taped-off area, allowing each coat to dry as directed on the label.
Step 4: Once fully dry, remove the tape and cure the surface by rubbing a piece of chalk all over the painted section and then wiping it clean.
#5. Upcycled Cutting Board Hanging Planter Box
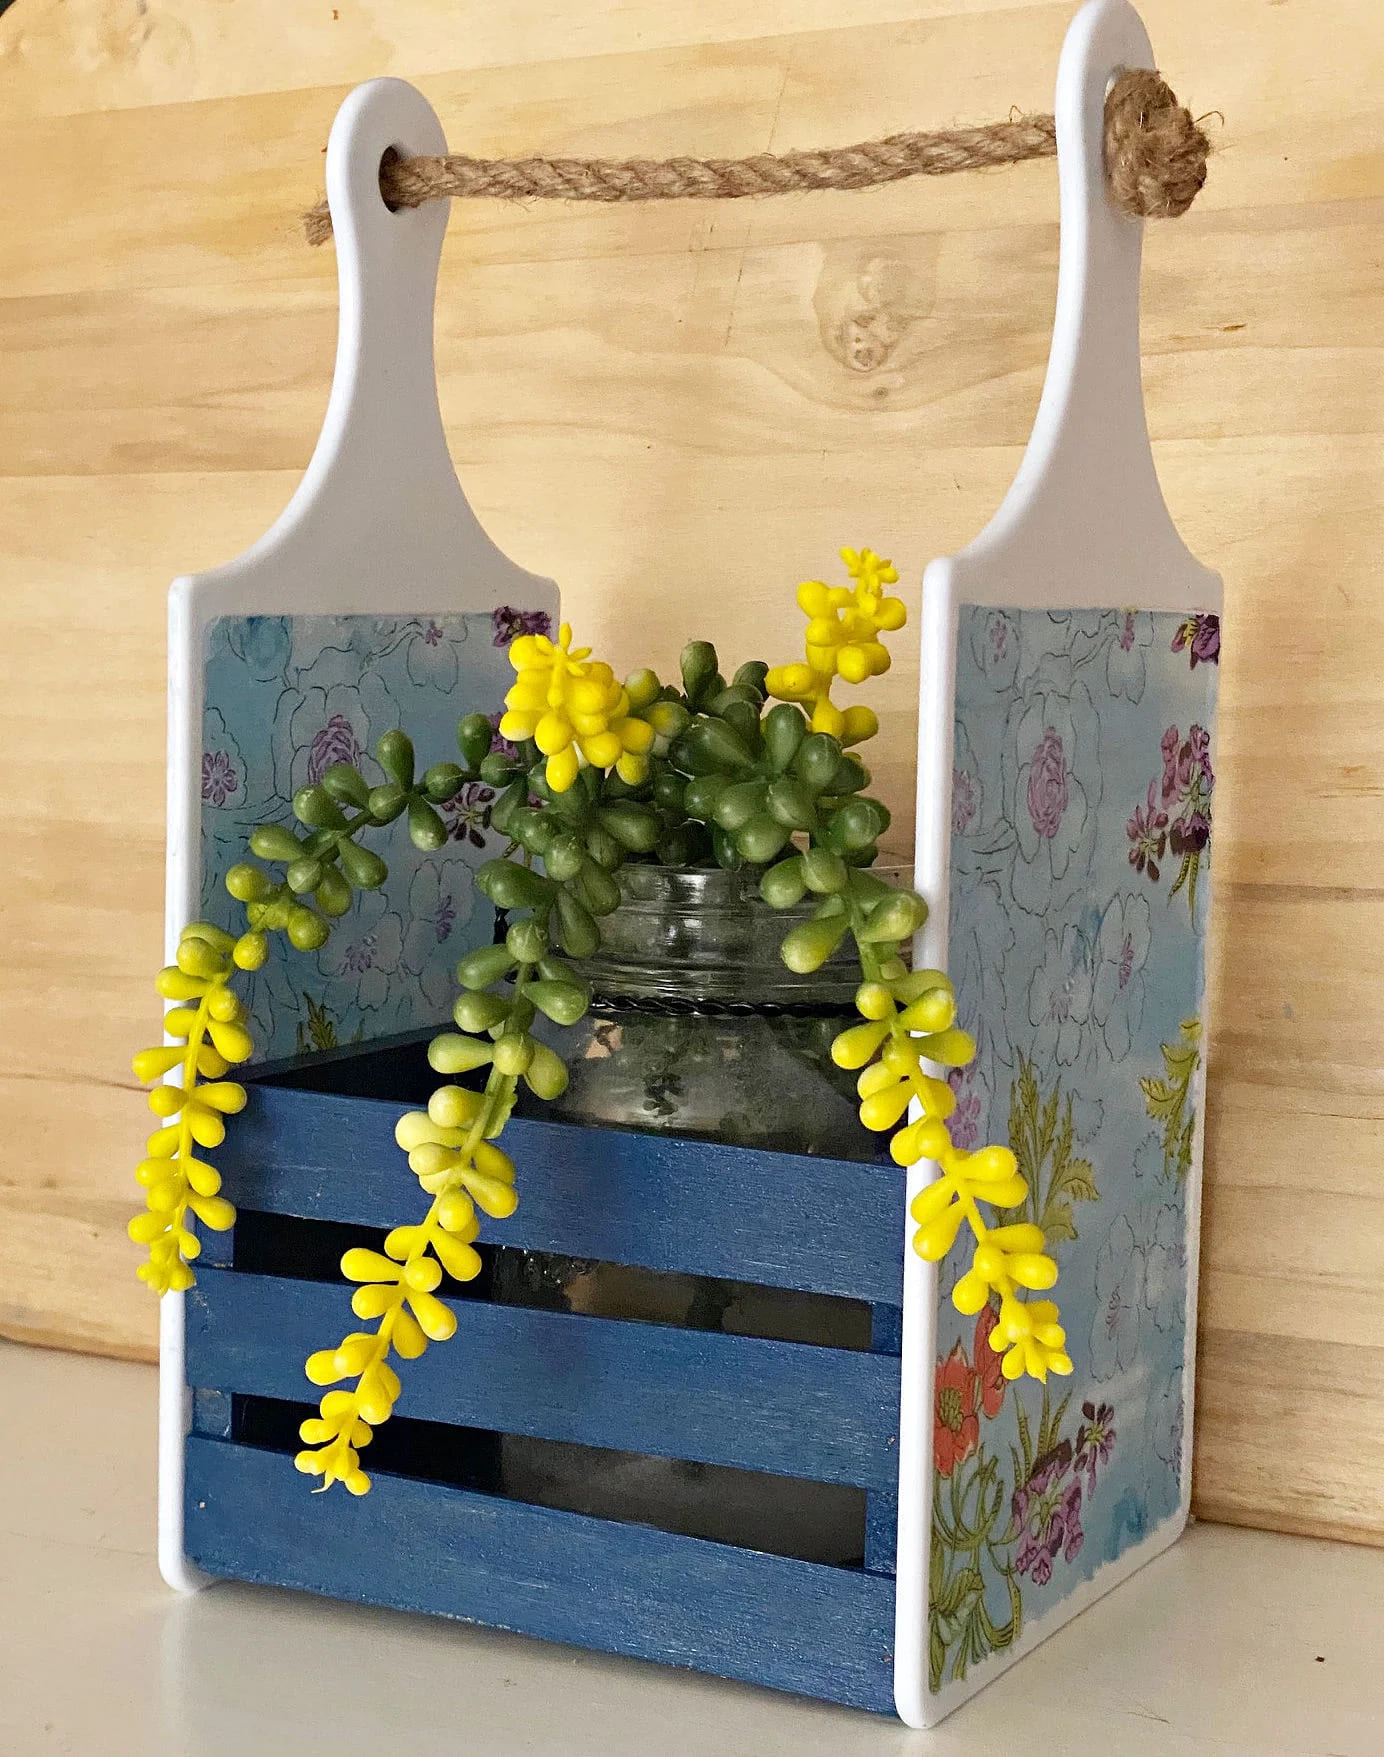
Wow, this whimsical DIY transforms two small cutting boards into the charming sides of a hanging planter box.
Moreover, the painted crate base, floral wallpaper panels, and soft rope handle add just the right amount of cheer to any room or porch.
Materials Needed
- 2 identical small cutting boards (with handles)
- 1 mini wood crate (approx. 6-8″ wide)
- Decorative paper
- Mod Podge
- Paint (white and navy or preferred colors)
- Twine
- Small jar and faux or real plant
Step-by-Step Guide
Step 1: Paint both cutting boards white. Let them dry completely. You can lightly sand the surface for a vintage feel.
Step 2: Apply your floral napkin or paper to the flat sides using Mod Podge. Then smooth out bubbles and allow to dry fully.
Step 3: Paint the crate in your chosen accent color, like navy blue. Let dry.
Step 4: Attach the crate between the two cutting boards using wood glue or nails, making sure the boards are upright and symmetrical.
Step 5: Thread twine through the handles and tie a knot at each end to create a sturdy hanger.
#6. Inspirational Quote Cutting Board Sign
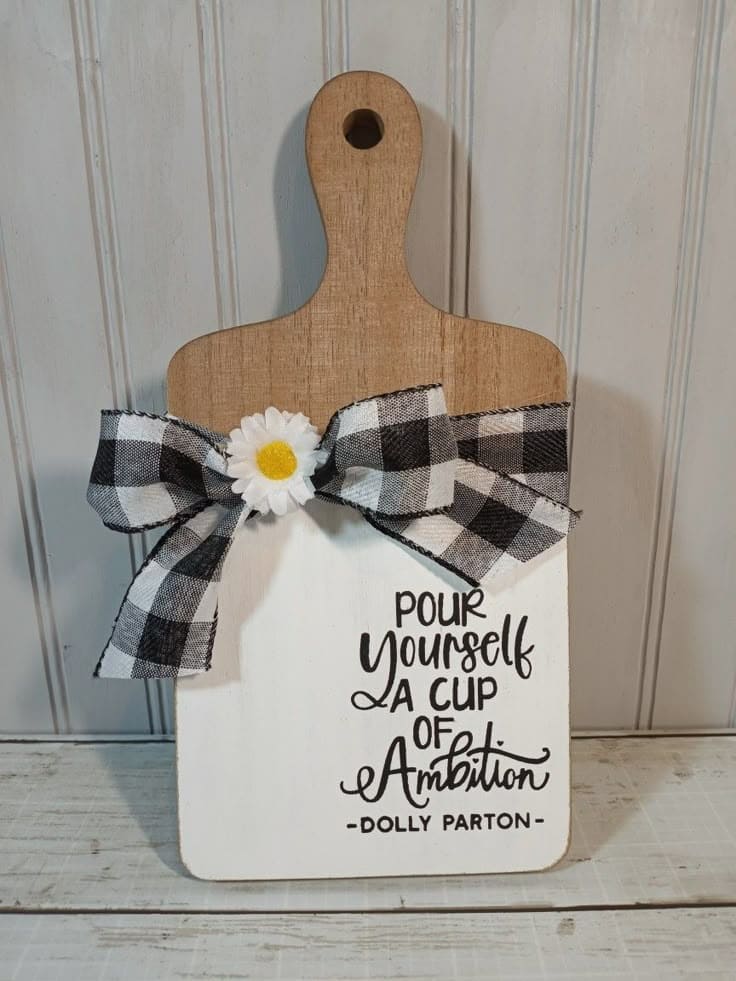
With Dolly Parton’s iconic words front and center, this cutting board is the kind of daily nudge you didn’t know your kitchen needed.
Plus, the rustic wood, clean white paint, and playful buffalo plaid bow topped with a daisy give it farmhouse flair that feels both cozy and uplifting. You can hang it by the coffee station, and let it set the tone for your morning.
Materials Needed
- 1 wooden cutting board (approx. 5″ x 10″)
- White acrylic paint
- Black permanent vinyl or paint
- 1 sheet buffalo plaid ribbon (2″ width, 18″ long)
- 1 faux daisy flower
- Hot glue gun + glue sticks
- Transfer paper
- Optional: Clear sealer spray
Step-by-Step Guide
Step 1: Paint the lower half of the cutting board with white acrylic paint.
Step 2: Add your quote using vinyl transfer or by carefully stenciling with paint. You need to make sure it’s centered and aligned.
Step 3: Tie a bow with the buffalo plaid ribbon and hot glue it near the handle. Then attach a faux daisy to the center of the bow.
Step 4 (Optional): Finish with a light coat of clear sealer to protect your design. Now it’s ready to brighten up your mornings with style and sass.
#7. DIY Fork Hook Board
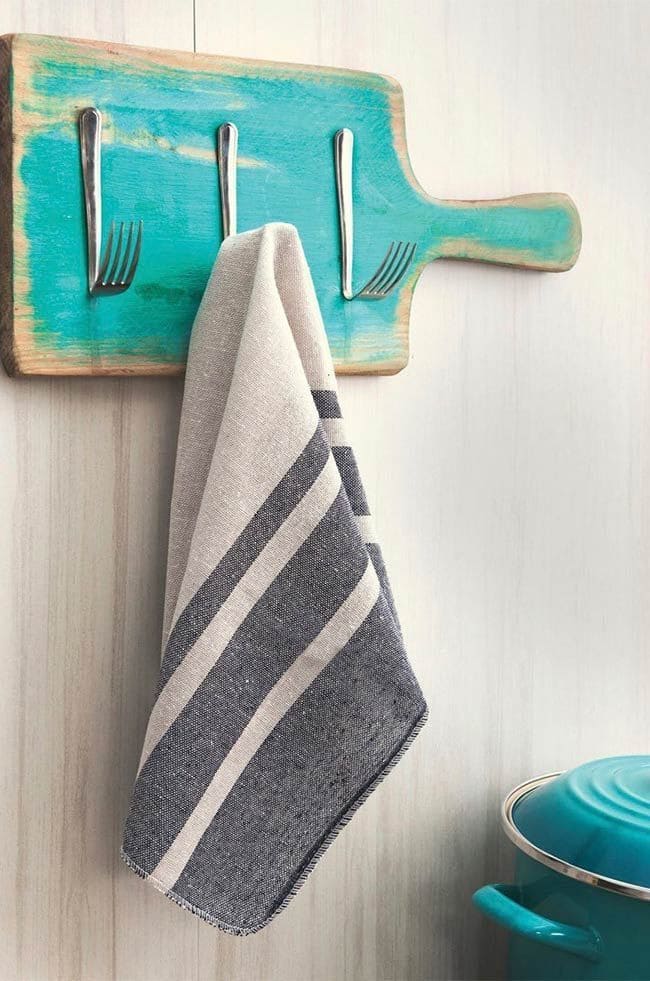
Old cutting boards have a story. And this one just found a new chapter as a rustic, upcycled towel rack that’s both functional and filled with soul.
Also, with a splash of cheerful paint and a few bent forks, you’ll turn a forgotten board into a charming hook station that belongs in the heart of any kitchen. It’s the kind of project that makes you smile every time you hang up your dish towel.
Materials Needed
- 1 wooden cutting board (approx. 14 x 6 inches, paddle-shaped)
- 3 metal forks
- Acrylic or chalk paint (blue, turquoise, or your favorite pop color – 2 oz)
- Sandpaper
- Drill + screws
- Strong adhesive (optional)
- Wall mounting hardware
Step-by-Step Guide
Step 1: Lightly sand your old cutting board to remove stains and rough spots. Then wipe clean, then paint with a bold color for a fresh look.
Step 2: Bend the forks into hook shapes using pliers. You want the handle to stay straight for attaching, while the tines curl forward just enough to hold towels or keys.
Step 3: Mark and drill pilot holes on the board where each fork will go. Now, you screw them in securely through the fork handles. If needed, add a dab of strong glue beneath each fork to prevent wiggling.
Step 4: Finally, attach a sawtooth hanger or wall hooks to the back.
#8. Rustic Faucet and Lavender Wall Hanging
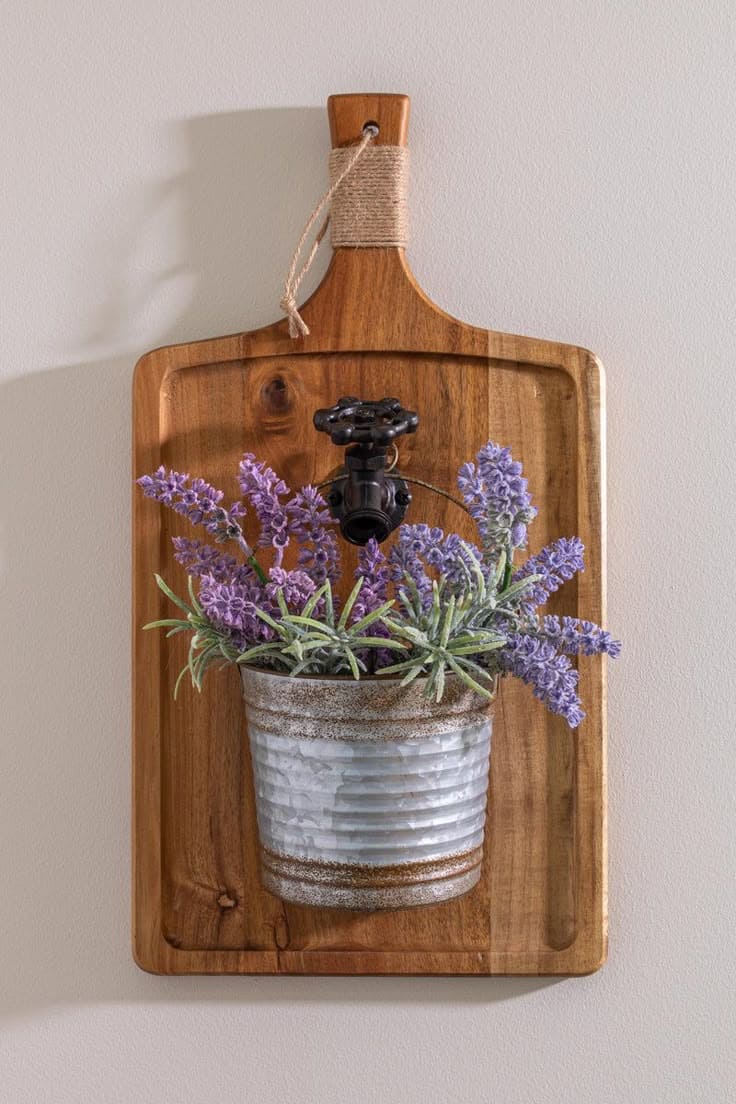
Some DIYs speak softly but leave a lasting charm. This lavender wall piece is one of those as it brings the calming presence of a farmhouse garden straight into your home.
In addition, a wooden cutting board, an old-style faucet handle, and a bucket of faux blooms come together to make something that feels warm, nostalgic, and surprisingly elegant.
Materials Needed
- 1 wooden cutting board (approx. 12″ x 18″)
- 1 small galvanized metal pot (about 4-5″ tall)
- Faux lavender bunches
- 1 decorative faucet knob
- Screws
- Twine
- Hot glue gun
- Screwdriver
Step-by-Step Guide
Step 1: Clean your cutting board and lightly sand the surface if you want a more rustic, worn-in look.
Step 2: Wrap twine tightly around the handle several times and secure it on the back with hot glue.
Step 3: Mark where you want the faucet knob to go (a few inches above the center). Then drill or screw it in securely and it should look like it’s ready to pour flowers.
Step 4: Position your metal pot just below the knob. Attach it using screws (if it has side holes) or a strong adhesive.
Step 5: Fill the pot with faux lavender, then thread a length of jute or rope through the handle or back, tie it off, and hang it proudly.
#9. Sweet Rustic Bird Trio on Reclaimed Board
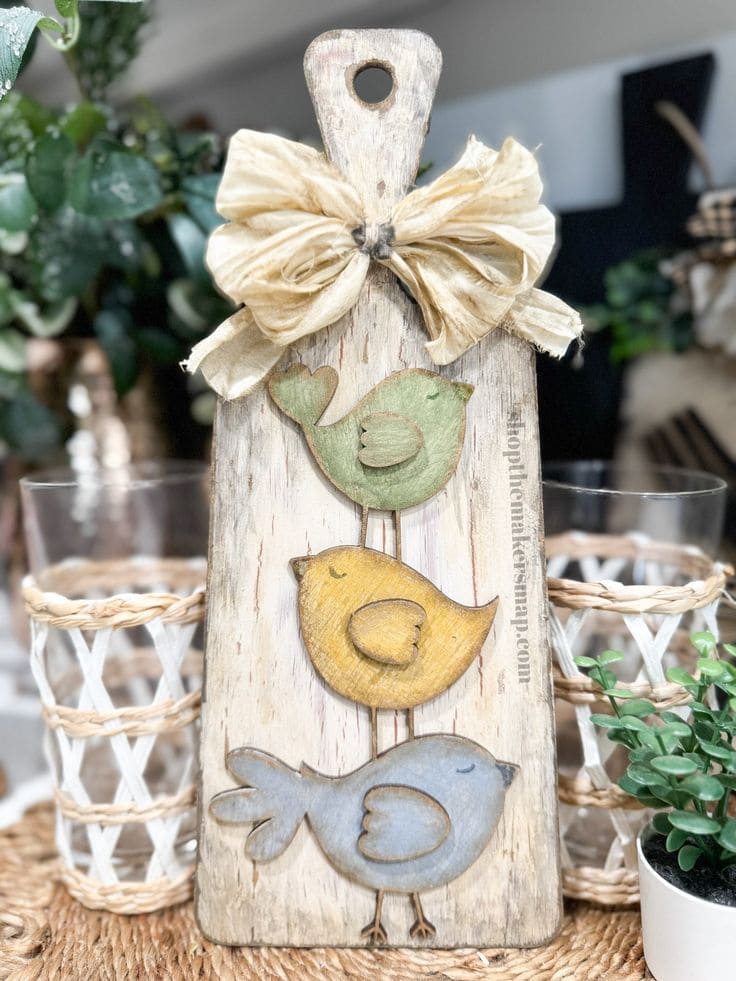
This cheerful trio of wooden birds adds such warmth to any corner, a perfect blend of cottagecore charm and nostalgic country style.
Whether perched by your kitchen window or brightening a hallway shelf, this piece captures the simple joy of spring mornings and feathered friends singing their hearts out.
Materials Needed
- 1 old or distressed cutting board (approx. 6″ x 12″)
- 3 small wooden bird cutouts (different shapes)
- Chalk paint in soft green, mustard yellow, and dusty blue
- Sandpaper
- Hot glue gun
- Jute string
- Brown paint (optional)
- Small paintbrushes
- Optional: black marker
Step-by-Step Guide
Step 1: Clean your cutting board, then lightly sand to give the surface a worn, farmhouse texture.
Step 2: Paint each bird a different color using your chalk paints.
Step 3: Arrange the birds vertically down the board. Now you use a ruler to space them evenly or let them stack playfully.
Step 4: Attach the birds with wood glue or a hot glue gun. Then add simple details like eyes or feathers using a fine brush or black marker.
Step 5: Tie a large, fluffy bow from raffia or jute and hot glue it at the top of the handle for a rustic finish.
#10. Frying Pan Wall Decor
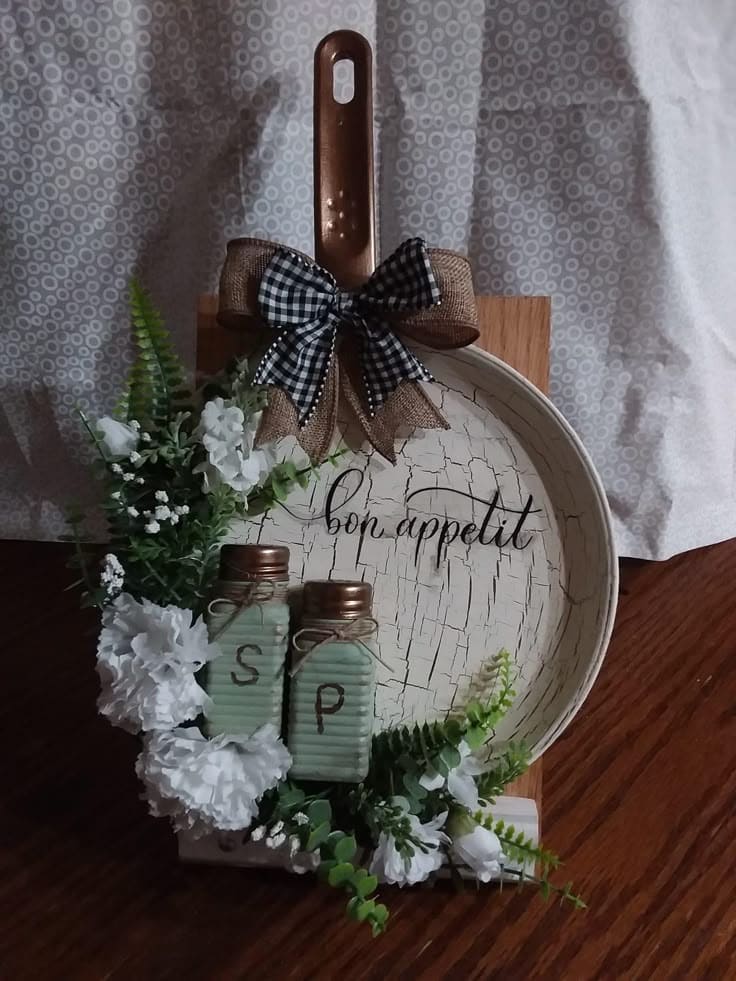
This piece transforms an old frying pan into a heartwarming slice of rustic kitchen art. The cracked cream surface, elegant script, and vintage salt-and-pepper shakers instantly bring out that cozy, farmhouse charm.
Additionally, layered with faux greenery, white florals, and a checkered burlap bow, it’s a gentle invitation to slow down and savor the joy of cooking.
Materials Needed
- 1 old or thrifted frying pan
- Wooden board
- Faux flowers (ferns, carnations, baby’s breath)
- Ribbon: buffalo check + burlap
- Mini salt & pepper shakers
- White crackle spray paint
- Vinyl quote decal
- Hot glue gun + glue sticks
- Twine
Step-by-Step Guide
Step 1: Paint the inner surface of the frying pan with crackle medium and cream acrylic paint for a distressed finish.
Step 2: Apply your vinyl decal or hand-letter the quote using a fine-tip permanent marker.
Step 3: Attach the pan securely onto the wood plaque using strong adhesive or hot glue.
Step 4: Decorate the base and left side of the pan with faux greenery and white florals. Then tuck in the salt and pepper shakers and tie small twine bows around their necks.
Step 5: Finish the top handle area with a large layered bow made from checkered ribbon and burlap for a farmhouse flair.
#11. Gingerbread Cutting Board Wall Decor
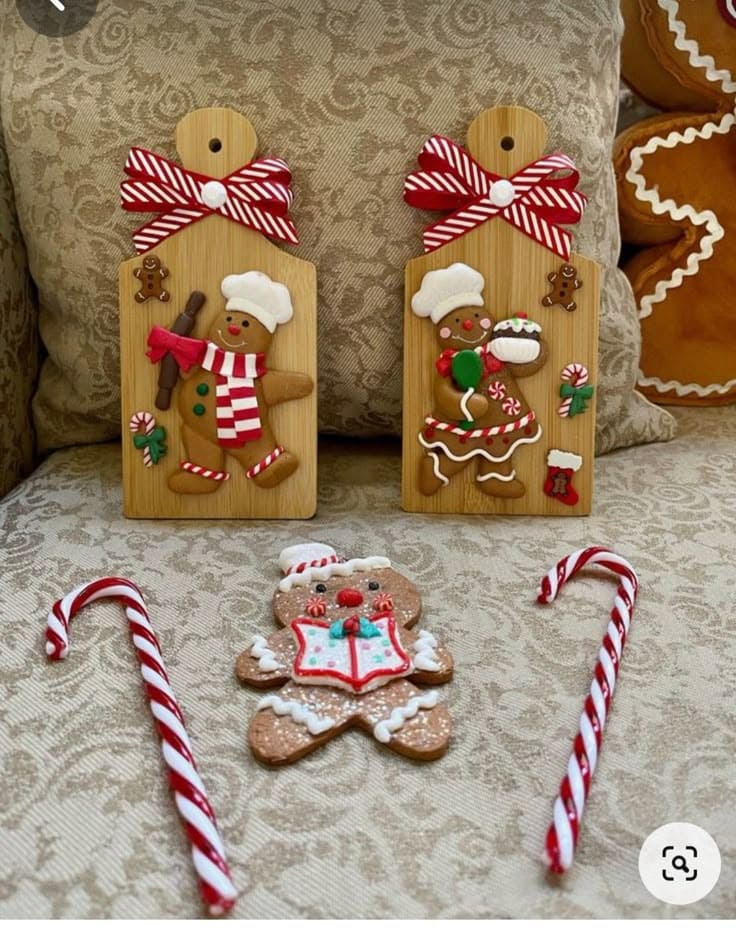
This might be the cutest thing you hang up all season. With a touch of whimsy and a sprinkle of nostalgia, these gingerbread chef boards instantly warm up your kitchen or entryway.
I believe if you’re dreaming of baking cookies or just want to make your guests smile, these decorations add joy without much effort.
Materials Needed
- 2 mini wooden cutting boards (approx. 5″x10″)
- Red-and-white striped ribbon (approx. 12″ per bow)
- Clay or resin gingerbread figures
- Hot glue gun + glue sticks
- Mini Christmas-themed embellishments (e.g., candy canes, stockings, holly)
- Small decorative buttons
- Scissors
Step-by-Step Guide
Step 1: Start by tying your red-and-white ribbon into two large bows. Now you glue one at the top of each cutting board, just under the hole.
Step 2: Arrange your gingerbread characters in the center of each board. Then add supporting characters (gumdrops, gifts, candy) around them until it looks playfully balanced.
Step 3: Secure everything in place using a hot glue gun. Then press down gently and allow to set fully.
Step 4: If desired, use a white paint pen or puff paint to add icing details or names to personalize each piece.
#12. Hand-Painted Cutting Board Sign
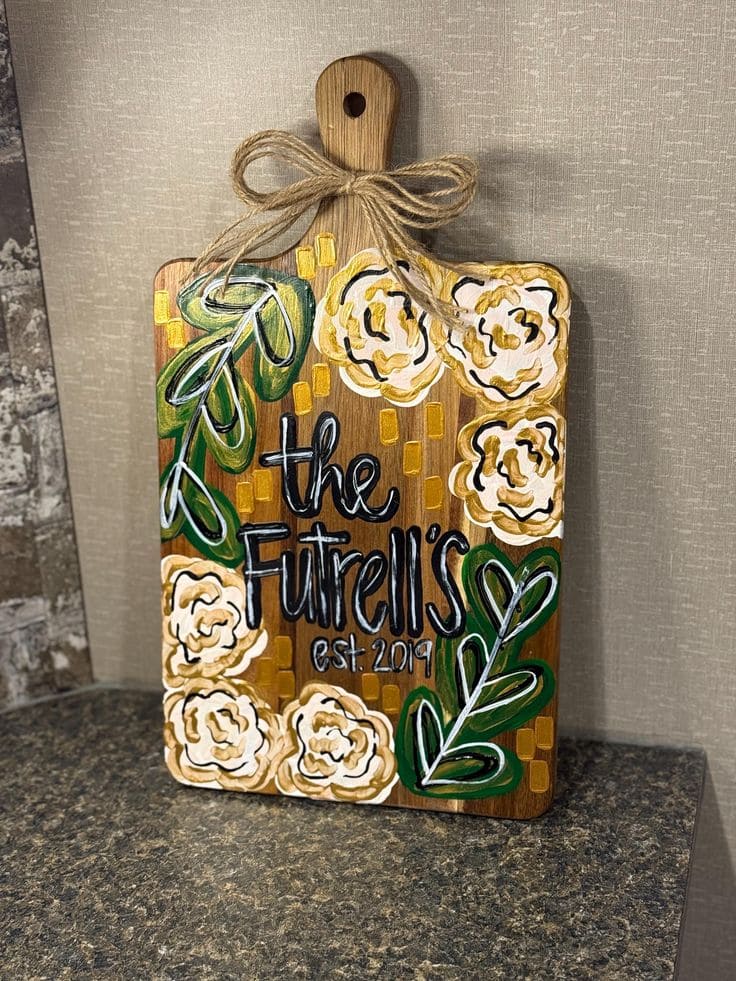
How about adding a personal touch to your home with a DIY that’s as meaningful as it is charming?
This cutting board-turned-keepsake blends warm rustic texture with modern floral design, making it perfect for entryways, kitchen walls, or housewarming gifts. You don’t need to be a skilled artist, just a little paint, love, and a name that means everything.
Materials Needed
- 1 wooden cutting board (8″ x 12″)
- Acrylic paints: white, black, green, mustard yellow, gold
- Small and medium round paintbrushes
- Chalk pencil
- Clear acrylic sealant spray
- Twine (about 18″)
- Paper towel and water cup
- Optional: fine-tip paint marker
Step-by-Step Guide
Step 1: Clean your cutting board thoroughly and let it dry. Then lightly sand the surface if it has a glossy finish so the paint adheres better.
Step 2: Sketch your family name and “Est.” date in the center using chalk or a pencil. You should play around with layout if you want to include florals around the edges.
Step 3: Start painting the floral designs. You use a mix of white and beige to create layered roses, and alternate greens for the leaves, then add mustard rectangles as playful accents.
Step 4: Paint your family name and date in bold black paint. You can use a fine brush or marker depending on your comfort. Let dry completely.
Step 5: Add highlights and outlines to your flowers and leaves with white or gold for more dimension.
Step 6: Once dry, spray the board with a clear acrylic sealant to protect your artwork. Finally, tie a cute twine bow around the handle for the final farmhouse flourish.
#13. Rustic Kitchen Board Planter Wall Decor
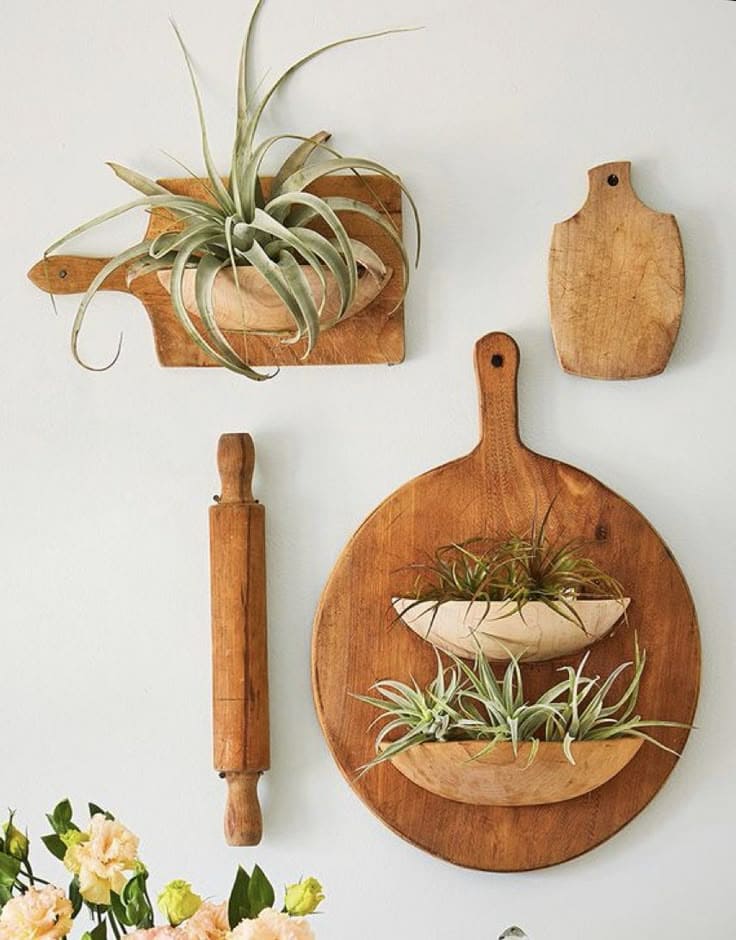
Interesting, this wall arrangement is the perfect example of how everyday kitchen tools can become earthy, eye-catching decor.
Specially, wooden cutting boards and a rolling pin find new life as vertical planters, showcasing a selection of air plants tucked into hand-carved bowls. It feels like nature is whispering through your kitchen wall.
Materials Needed
- 2-3 vintage cutting boards
- 1 wooden rolling pin (optional)
- Small hand-carved wooden bowls
- Air plants (Tillandsia)
- Wood glue or screws
- Hanging hardware
- Sandpaper (optional)
Step-by-Step Guide
Step 1: Choose your boards. Clean them up and, if needed, lightly sand to restore the wood’s natural glow or add a rustic distressed finish.
Step 2: Attach the small bowls to each board with strong wood glue or small screws.
Step 3: Arrange the air plants inside each bowl. These plants don’t need soil, just occasional misting or soaking, making them perfect for wall-mounted decor.
Step 4: Mount the boards on your wall in a visually pleasing layout. You can mix shapes for contrast and add a rolling pin for a whimsical farmhouse touch.
#14. DIY Cutting Board Shelf with Hooks
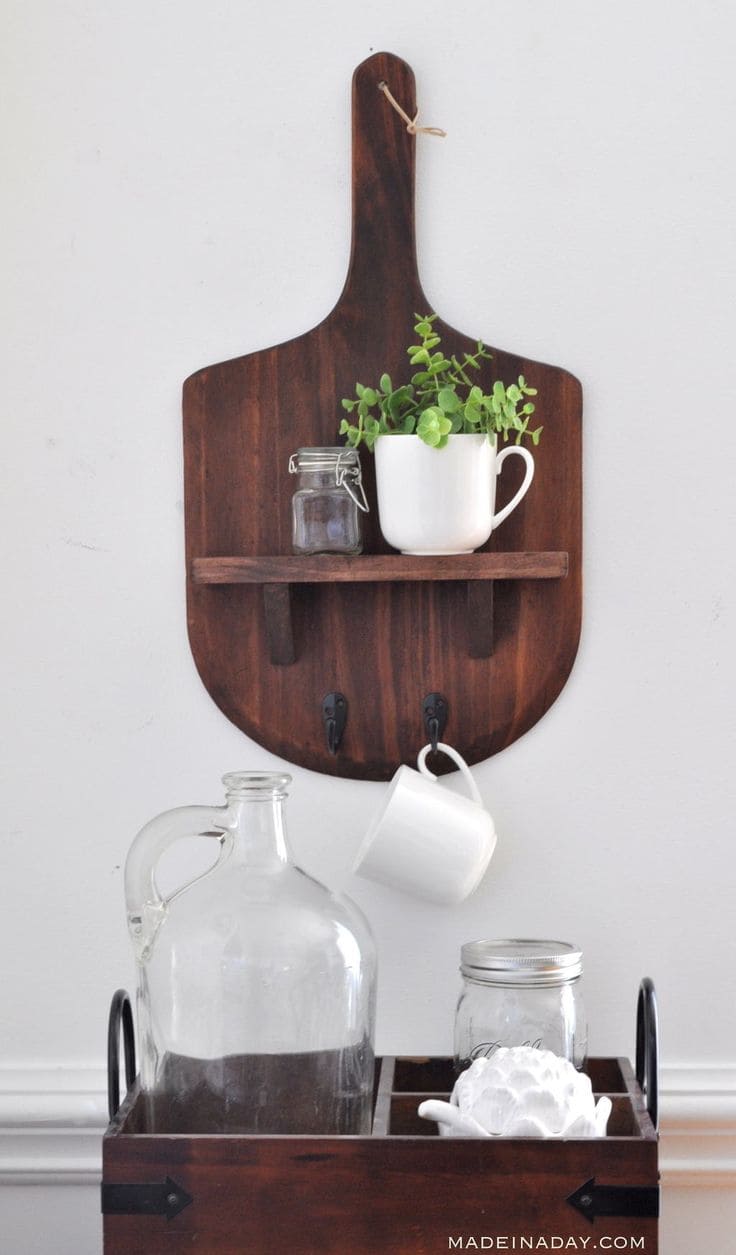
Who knew your old cutting board could turn into such a charming mini shelf? With just a little stain, a spare plank, and two hooks, you’ve got yourself a rustic, practical decor piece perfect for mugs, plants, or spices.
Moreover, this DIY is simple, functional, and full of farmhouse soul, great for kitchens, coffee corners, or anywhere that needs a cozy upgrade.
Materials Needed
- 1 wooden cutting board (approx. 10″x16″)
- 1 small wooden plank (approx. 10″ long x 2.5″ deep)
- 2 small L-brackets
- 2 metal wall hooks
- Wood stain
- Sandpaper
- Drill and screws
- Optional: rope, small potted plant, mug, or jar
Step-by-Step Guide
Step 1: Clean your cutting board with a damp cloth and lightly sand both the board and shelf plank for a smooth, grippy surface.
Step 2: Apply your chosen wood stain or paint to both pieces. Let them dry completely. Then you repeat a second coat for deeper color if desired.
Step 3: Attach the small shelf plank to the cutting board about 3-4 inches from the bottom using L-brackets or strong wood glue.
Step 4: Drill two small pilot holes beneath the shelf and screw in the wall hooks.
Step 5: If you want to hang the board with rope, drill a hole at the top and thread in a small loop of twine or jute. Otherwise, attach a wall hanger to the back.
Step 6: Now style your shelf with a small potted herb, a mason jar, or your favorite ceramic mug.
#15. DIY Vintage Lace Cutting Board Decor
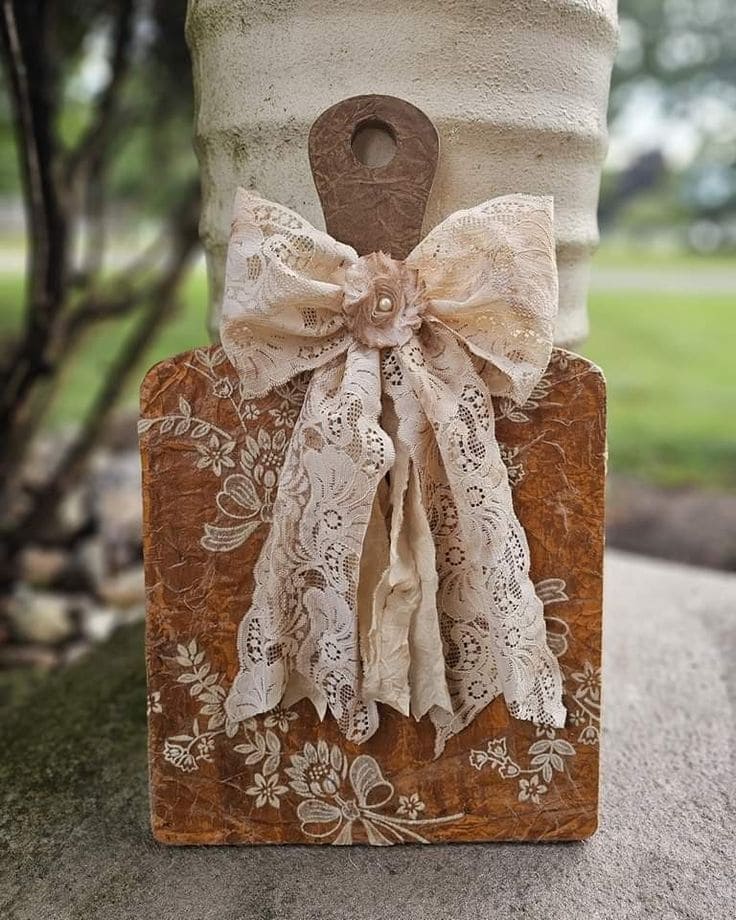
Why not turn an old cutting board into a piece of vintage-inspired beauty that looks like it stepped out of a fairytale garden?
This project is all about soft textures, delicate details, and creating something that feels nostalgic and heartwarming. Perfect for vintage-themed homes, bridal showers, or simply to add a feminine touch to your decor.
Materials Needed
- 1 wooden cutting board (preferably with a handle, approx. 8″x12″)
- Vintage lace fabric (approx. 12″x12″)
- Mod Podge
- Sponge brush
- Neutral-toned scrapbook
- Scissors
- Hot glue gun
- Embellishment (pearl, vintage button, or fabric flower)
- Decorative lace ribbon and fabric strips (approx. 2-3 ft total)
- Optional: Sandpaper, antique wax
Step-by-Step Guide
Step 1: Clean your cutting board thoroughly, removing any oils or residue. Then lightly sand the surface if needed to help the glue adhere better.
Step 2: Cut scrapbook or tissue paper to cover the front of the board. Now, you apply a layer of Mod Podge over the wood, lay the paper down, and smooth out any bubbles.
Step 3: Layer your lace fabric over the dried background. Apply a generous coat of Mod Podge beneath and gently press the lace into place. You also need to smooth it down with your fingers or a cloth, then seal the top with another thin coat of glue.
Step 4: Create a romantic bow using wide lace ribbon. Then add layers of soft fabric strips underneath for a cascading effect.
Step 5: Hot glue the bow at the neck of the board handle. You should also lightly brush edges with antique wax or brown paint to give a soft aged look.
#16. DIY Cutting Board Memo Holder
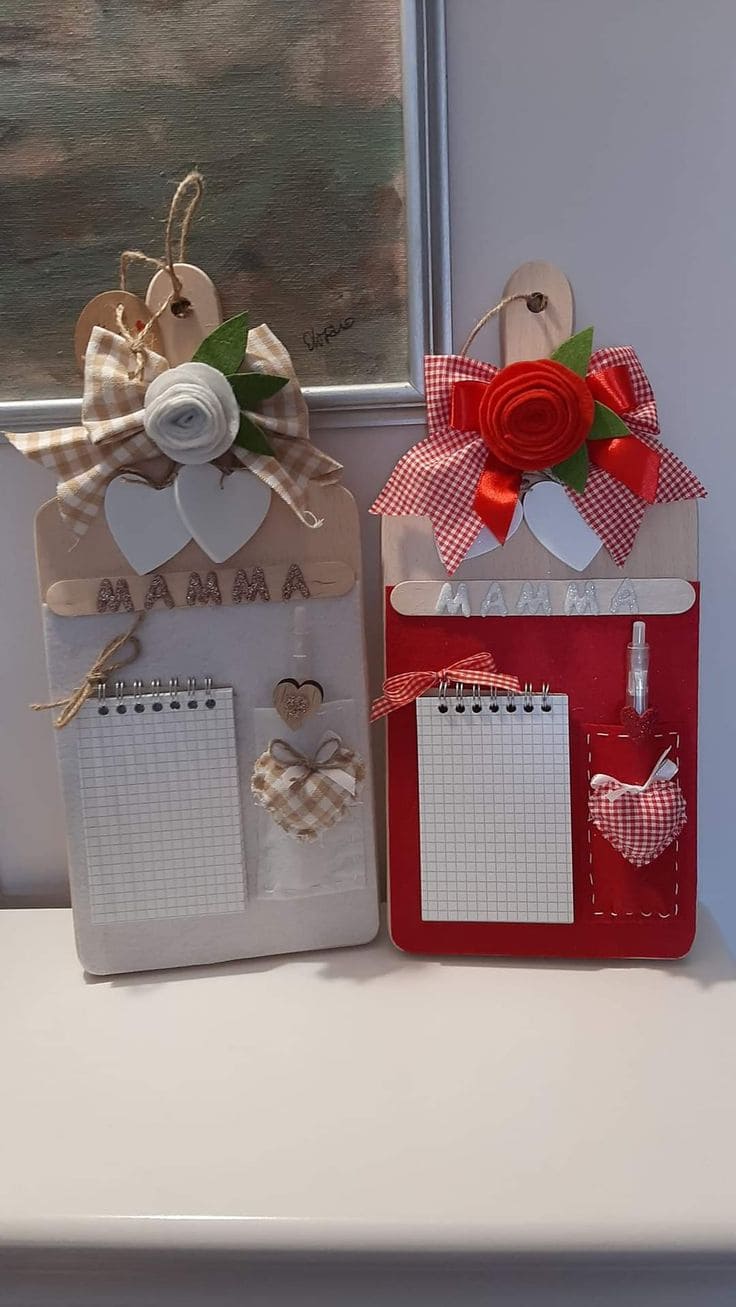
This is more than just a craft, it’s a daily hug in the form of a noteboard. By reusing an old wooden cutting board, you can create a lovely, personalized memo holder that’s both practical and heartwarming.
Plus, this charming project turns scraps and soft touches into something your mom will actually use and smile at every time. It’s the perfect mix of handmade and heartfelt.
Materials Needed
- 1 small wooden cutting board (approx. 12 x 5 inches)
- Acrylic paint
- Small notepad (A6 size or 4 x 6 inch)
- Ribbon (12-15 inches per bow)
- 2-3 felt hearts or wood embellishments
- Small clip
- Decorative letters
- Hot glue gun and glue sticks
- Twine
- Optional: mini pen and stitched pocket
Step-by-Step Guide
Step 1: Clean and lightly sand your old cutting board. Then paint it in your chosen color, you should go soft and neutral, or bright and bold.
Step 2: Glue the notepad near the bottom center. You then attach a clothespin or a small metal clip to hold the top edge.
Step 3: Add your decorative elements: a bow made of ribbon, a few felt or wooden hearts, and a sweet word like “MAMMA” across the top using craft letters.
Step 4: For extra function, attach a small stitched fabric pocket on the side for a pen or mini heart ornament.
#17. Vintage-Inspired Utensil Holder
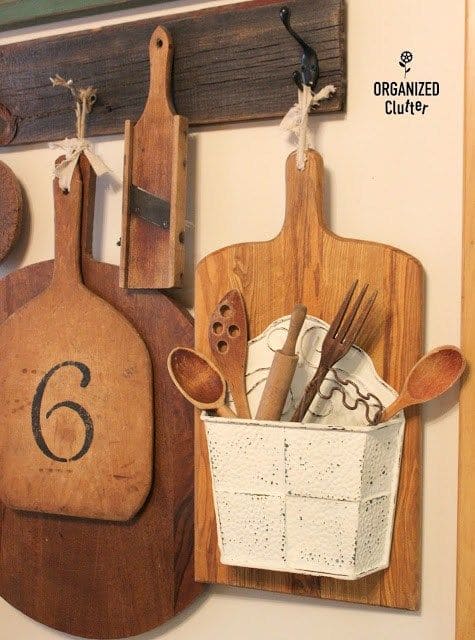
This charming wall piece breathes new life into a worn-out cutting board by transforming it into a rustic kitchen utensil holder.
Hung with rope and styled with a distressed white metal basket, it gives off cozy farmhouse vibes, the kind that makes you want to bake something from scratch.
Materials Needed
- 1 medium to large cutting board with a handle
- 1 small metal or tin wall bin (approx. 6-8 inches wide)
- Screws or strong adhesive (like E6000)
- Jute rope
- Assorted wooden utensils (optional)
- Hanging hook
Step-by-Step Guide
Step 1: Clean the cutting board thoroughly and decide whether to leave it natural or apply a light wood stain or oil to refresh its tone.
Step 2: Attach the metal bin securely to the lower half of the board using screws or industrial-strength adhesive.
Step 3: Loop a piece of jute rope through the board’s handle and tie a knot to create a rustic hanging look.
Step 4: Fill the bin with wooden kitchen utensils, faux greenery, or even seasonal décor accents.
#18. Snowman Cutting Board Ornament
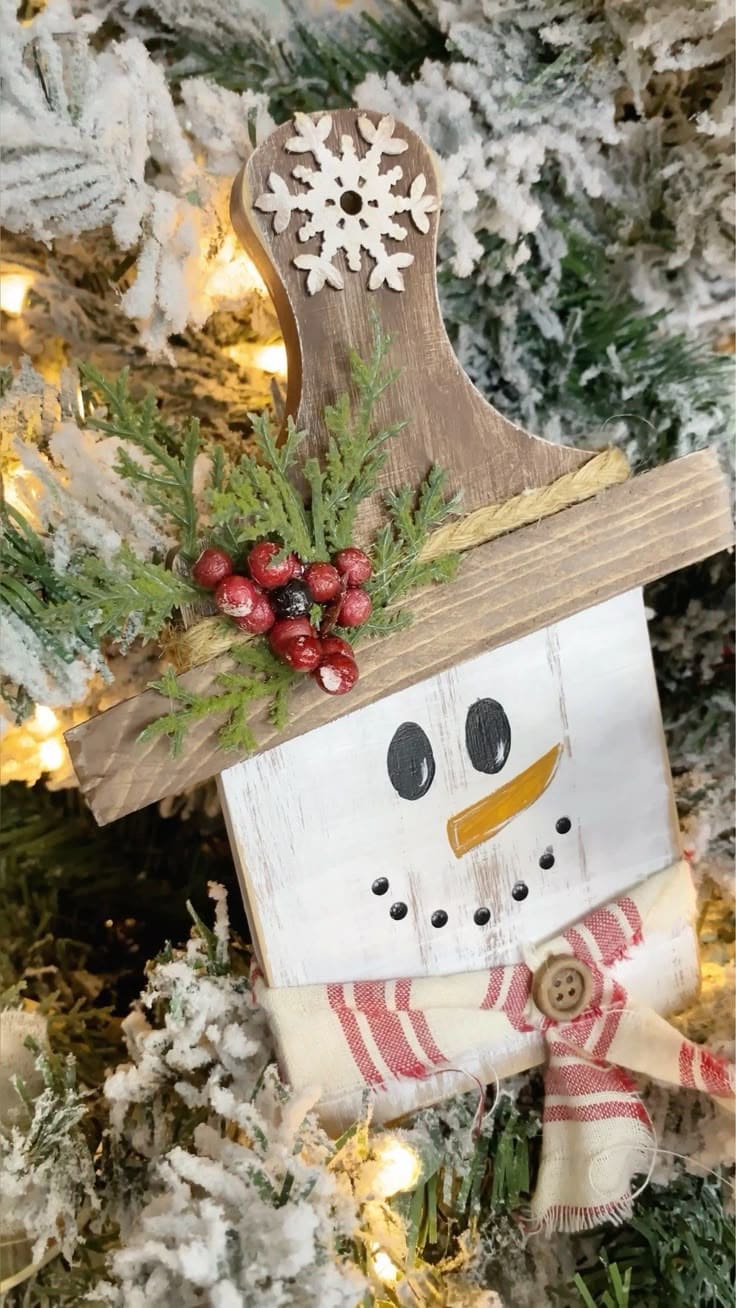
This little snowman brings such a burst of winter joy! What used to be a plain mini cutting board is now a heart-melting ornament perfect for your Christmas tree or rustic holiday display.
Moreover, the mix of painted details, greenery, and that adorable fabric scarf gives it such homemade charm like something you’d find at a cozy holiday market.
Materials Needed
- 1 mini wood cutting board (approx. 4″ x 8″)
- White and brown acrylic paint
- Small wooden snowflake embellishment
- Faux pine sprigs and red berry accents
- Twine
- Red-and-white striped fabric (8″ x 2″)
- 1 small wooden button
- Hot glue gun + glue sticks
- Black and orange paint
- Sandpaper (optional)
Step-by-Step Guide
Step 1: Paint the bottom half of the cutting board white for the snowman’s face and leave the top natural wood for the hat.
Step 2: Use black paint to dot on the eyes and smile, and orange for the carrot nose. You can lightly sand the edges for a distressed finish.
Step 3: Glue a small faux pine sprig and some berries to the corner of the hat. Then add a twine border where the two sections meet.
Step 4: Wrap your striped fabric like a scarf at the base and secure it with a button in the center. Finish by gluing the wooden snowflake to the top handle.
#19. DIY Farmhouse Animal Frame
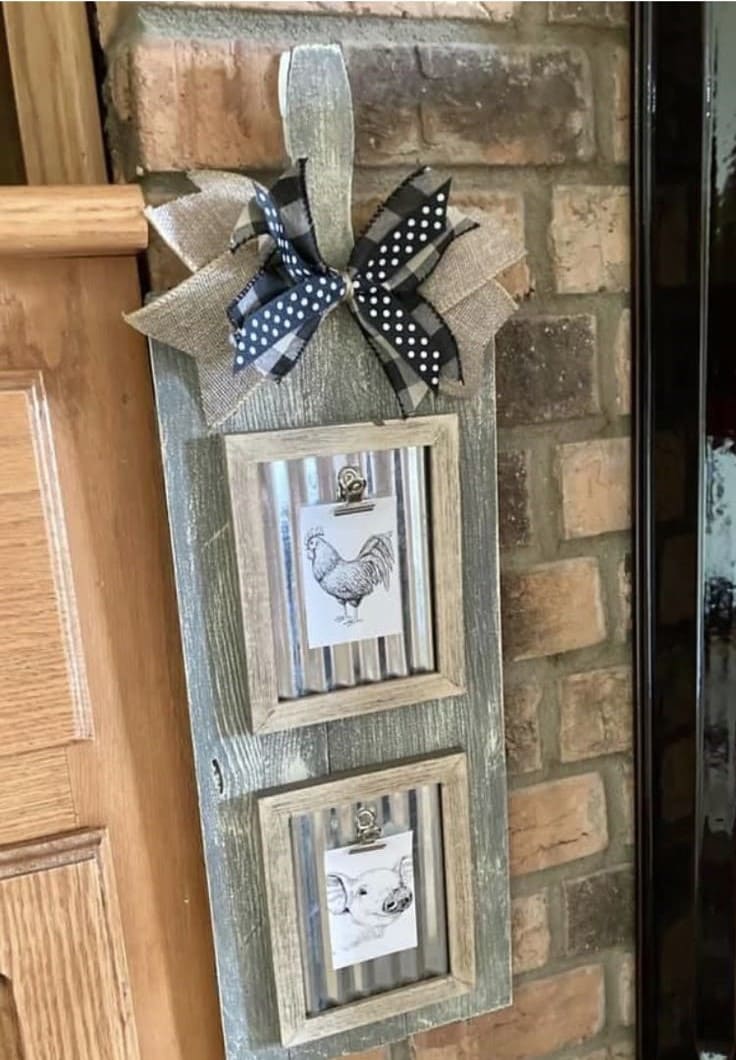
Look at this! This rustic double-frame piece blends charm and function, perfect for farmhouse-style kitchens or cozy living spaces. The use of corrugated metal as a backing adds texture, while the simple animal prints and bow tie it all together.
This project is all about layering materials for a handcrafted, vintage-inspired effect. Plus, you can switch the prints anytime for a fresh look.
Materials Needed
- 1 long wooden cutting board (approx. 6″-8″ wide x 18″-20″ long)
- 2 small corrugated metal sheets (each approx. 5″x5″)
- 2 small wooden picture frames (roughly 6″x6″)
- 2 mini bulldog clips (metal)
- Screws
- Sandpaper (medium grit)
- Wood stain
- Decorative ribbon
- Staple gun
- Twine
- Optional: Printable animal sketches, antiquing wax
Step-by-Step Guide
Step 1: Clean your cutting board and lightly sand the surface for a smooth, paint-ready finish. You also need to wipe away any dust with a cloth.
Step 2: If you’d like a weathered look, apply a coat of wood stain or chalk paint, then sand back lightly to create a distressed patina.
Step 3: Attach the two corrugated metal squares to the board vertically, spaced evenly apart. Then use glue for a strong hold.
Step 4: Center the wooden picture frames over each piece of metal. You need to secure them using a few small nails around the frame edges.
Step 5: Clip your printed images (farm animal drawings work great!) using bulldog clips and attach them to the center of each corrugated panel.
Step 6: Create or attach a farmhouse-style bow using a combination of burlap, buffalo plaid ribbon, and twine. Also, glue it at the top of the board for a decorative touch.
Step 7: Attach a loop of twine through the board handle and it’s ready to hang!
#20. Rustic Kitchen Cutting Board Decor
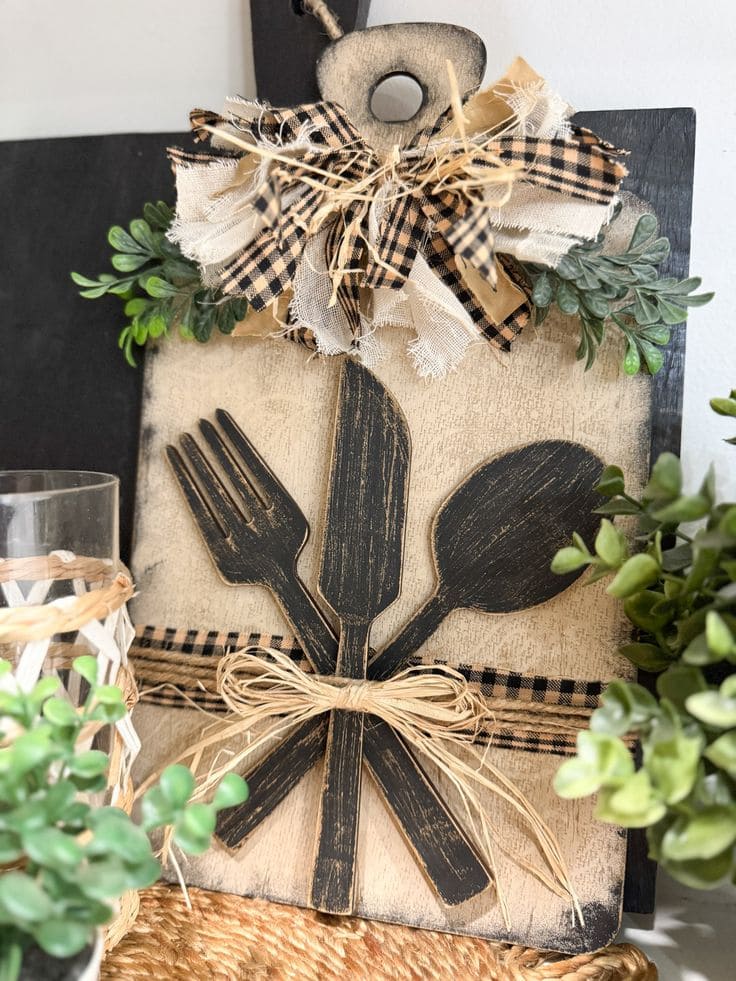
This reused cutting board was destined for the thrift pile until it became a charming kitchen wall piece that looks like it belongs in a cozy countryside cottage.
With layered bows, jute twine, a worn black utensil trio, and sprigs of faux greenery, it celebrates everything warm, handmade, and homey.
If you love neutral tones and a rustic vibe, this little beauty is calling your name. It’s also a lovely gift for someone who thinks kitchens should feel like hugs.
Materials Needed
- 1 old wooden cutting board (approx. 10″ x 14″)
- Wooden fork, knife, and spoon shapes (each approx. 6″ long)
- Black matte paint
- Sandpaper (medium grit)
- Hot glue gun + glue sticks
- Burlap ribbon (approx. 1 yard)
- Jute twine (2 feet)
- Faux greenery sprigs (2 small bunches)
- Scissors
Step-by-Step Guide
Step 1: Sand the surface of the cutting board lightly and paint it with an off-white or cream tone.
Step 2: Paint your wooden utensils in black and lightly sand the edges to give them a vintage look. Then arrange them in a fan shape and glue them in place near the center.
Step 3: Wrap a ribbon horizontally across the board and secure with glue. Now now add a rustic bow from raffia or ribbon just where the utensils cross.
Step 4: Attach faux greenery sprigs on the top sides, then layer on a big, scrappy bow using mixed ribbons and frayed fabric for extra texture.
