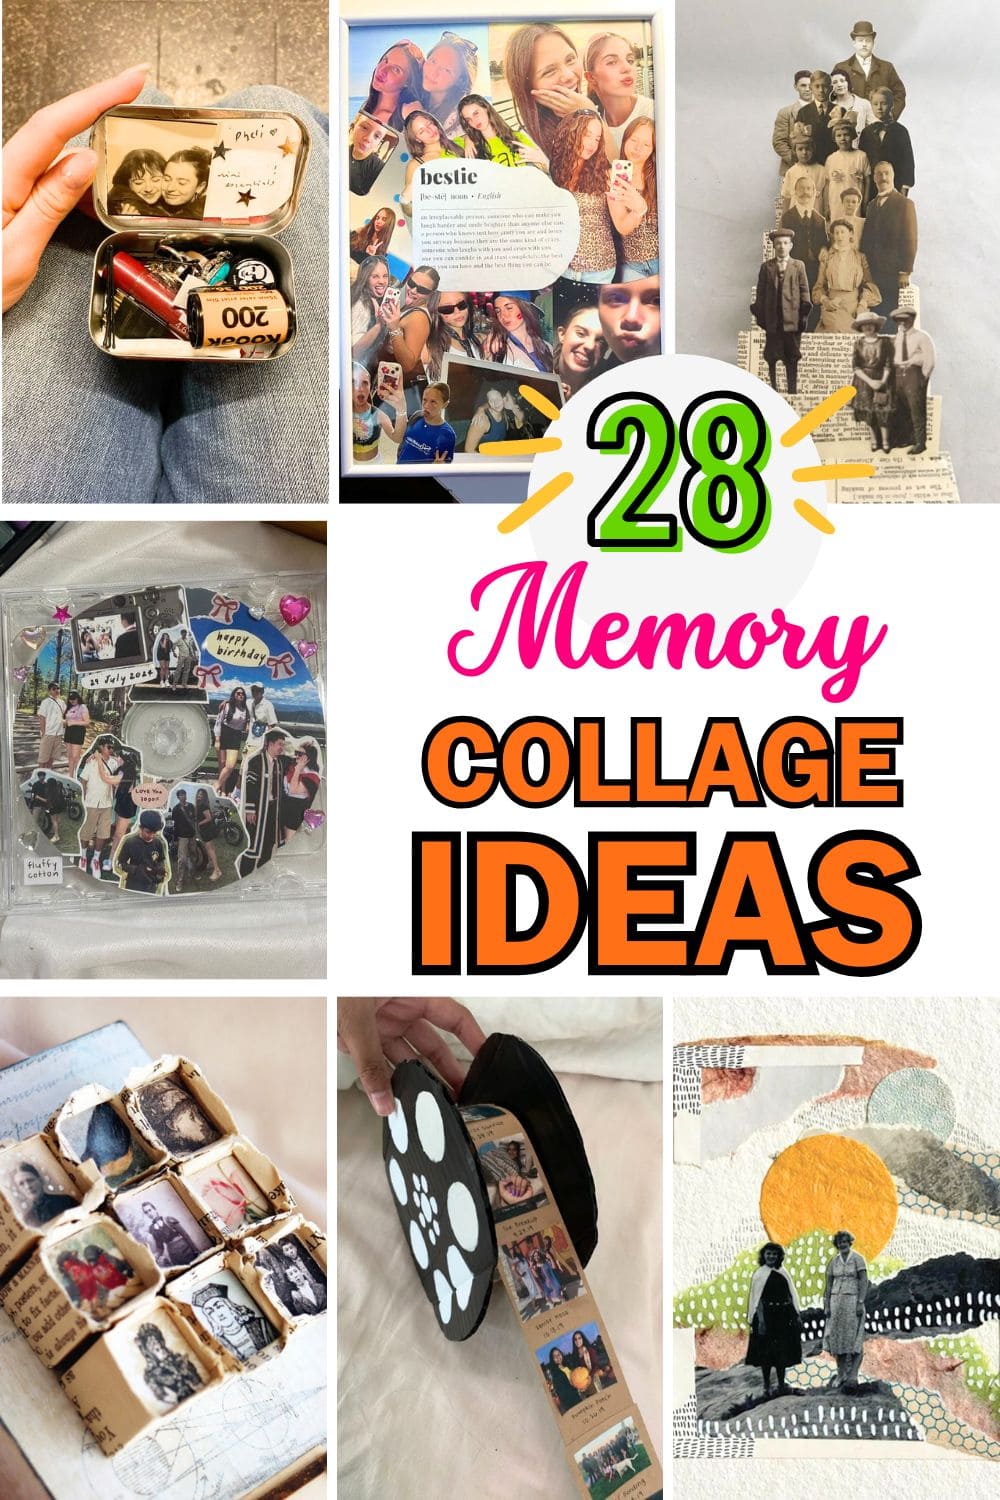
Old photos have a quiet way of holding on to us. A blurry smile, a sunlit afternoon, a moment frozen in time, these fragments of the past often carry more emotion than words ever could.
And yet, so many end up tucked away in drawers or forgotten folders. What if you could bring them back to life in a way that felt intentional, beautiful, and deeply personal? Memory collages do exactly that.
They aren’t just crafts, they’re tiny love letters to your past. In this article, you’ll discover 28 memory collage ideas designed to turn your cherished photos into meaningful keepsakes you’ll want to look at again and again.
#1. Silhouette Photo Collage
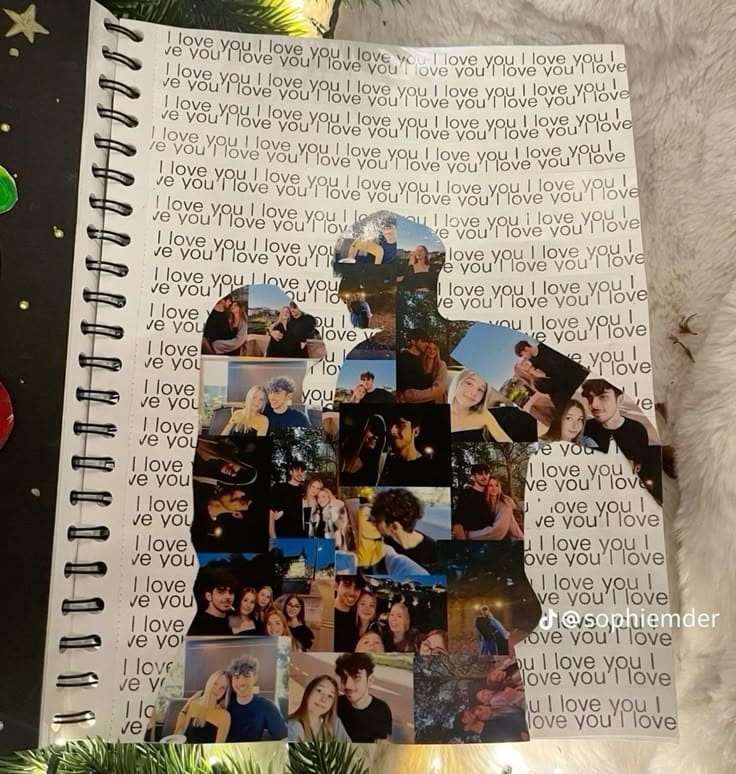
This striking scrapbook page features a powerful silhouette made up entirely of small candid snapshots, strategically cut and pieced together like a mosaic of memories.
Also, the final effect is deeply personal, eye-catching, and visually poetic. This design doesn’t just say I love you, it shows it, frame by frame.
Materials Needed
- A notebook, sketchpad, or cardstock base
- Printout or stencil of a couple’s silhouette
- Small printed photos
- Background printout of repeating text
- Scissors
- Glue stick
- Optional: decorative lighting
Step-by-step Guide
Step 1: Print or draw a simple outline like a couple hugging, a side profile, or even something symbolic like a heart or city skyline.
Step 2: Cut your printed mini-photos to fit within the silhouette. Then arrange them like a photo puzzle, trimming as needed for the curves and edges.
Step 3: Print or create a repetitive word/phrase background (“I love you,” “forever yours,” etc.). Now you place this page behind the silhouette.
Step 4: Carefully paste your filled photo shape on top of the background so the surrounding words peek through the gaps.
#2. Best Friend Collage Poster
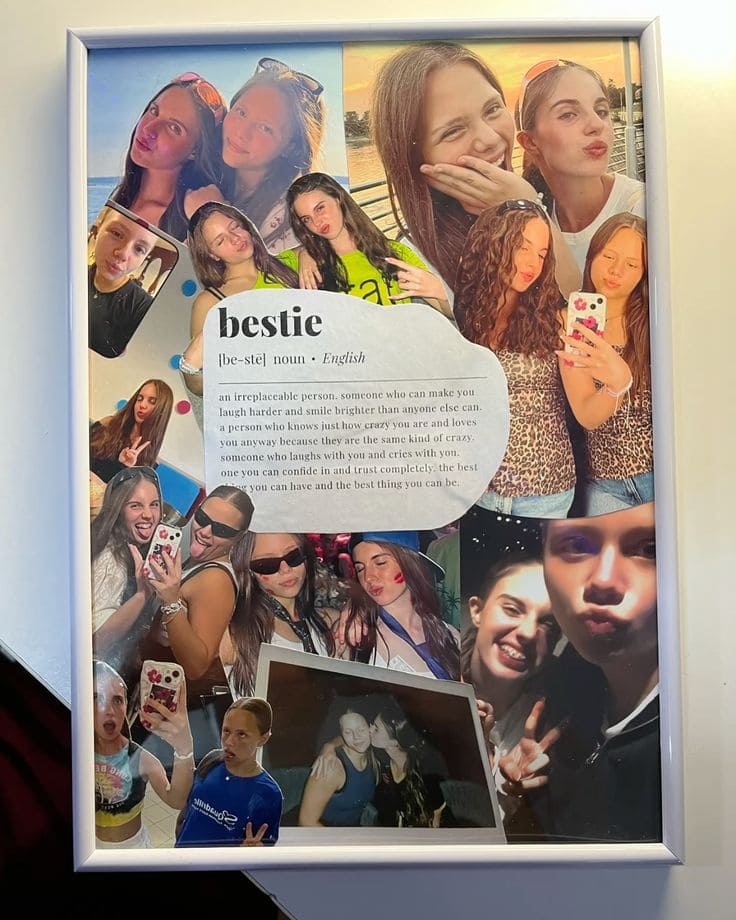
You take all those chaotic, sun-soaked, late-night, dance-floor, mirror selfie moments and turn them into one big love letter to your best friend.
Then you can add a printed definition that says exactly what they mean to you, and suddenly, this isn’t just a poster.
Materials Needed
- 1 poster frame (11×14)
- 10-15 printed bestie photos
- 1 printed definition or quote of your friendship (about 4×6 inches)
- Scissors
- Glue stick
- Optional extras: glitter paper, song lyrics, and colored markers
Step-by-step Guide
Step 1: Trim your photos and arrange them across the poster frame backing. You can use a mix of big bold pics and smaller fun ones.
Step 2: Print or write your definition piece. You can use the classic format or write a note in your own voice. Then place this near the center or top as the heart of the design.
Step 3: Fill the spaces in between with extras like glittery hearts, doodled bows, your inside joke.
Step 4: Pop it into the frame and wrap it up, or hand it over during a chill hangout. Trust me, it’ll make their day.
#3. Sun-Warmed Shadows Collage
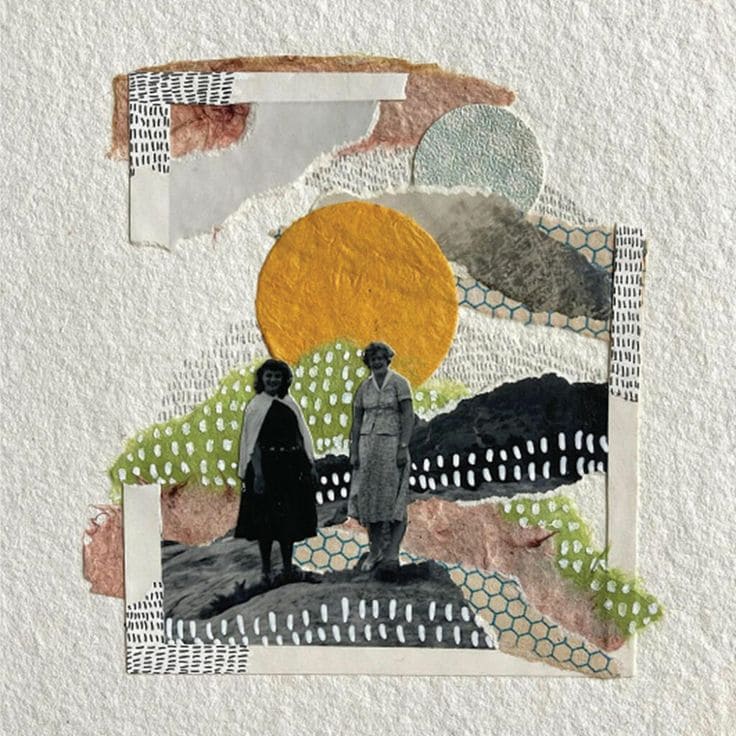
In this piece, you let the past walk gently across paper hills, dressed in black and white but surrounded by vibrant, abstract emotion.
The most important is that the materials are simple yet the result feels like a landscape plucked from your mind’s eye.
Materials Needed
- 1 or 2 black-and-white photo cutouts (about 3-4 inches tall)
- 1 sheet cold-press watercolor paper (8×8 inches)
- Yellow-orange tissue (~3-4 inch circle)
- Textured papers: green tissue (~4×6 inches), gray and brown torn paper (~3-4 strips, each 1-2 inches wide), honeycomb paper (~4×4 inches) and white paper
- Glue stick
- Scissors
- White gel pen
- Ruler (optional)
Step-by-step Guide
Step 1: You can trim your watercolor paper to a square format if you like the boxed feel. Then tear your background scraps into organic, sloping shapes.
Step 2: Glue your sky layers first, then the sun just off-center to anchor the scene. You should follow with horizontal bands of green, pink, and dark torn textures to build your hilly terrain.
Step 3: Add your vintage figures. You should let them stand on the darker papers as if perched on rocks.
Step 4: Use a white gel pen to draw short dotted lines or vertical strokes across the darker hills. Finally, add minimal white strips to create a frame if desired.
#4. Custom CD Case Collage
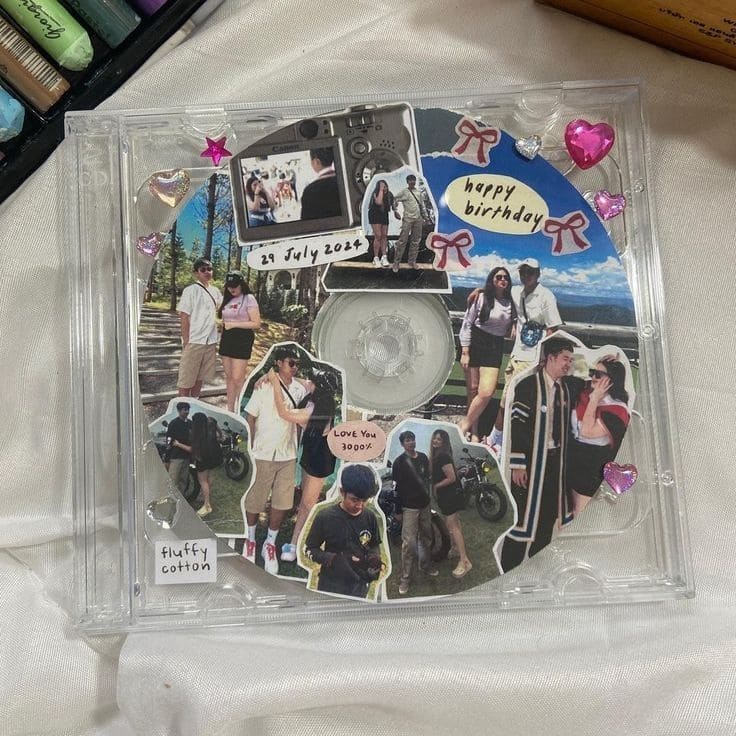
This one’s for the hopeless romantics, the best friends, the memory hoarders as the people who’d rather get a handmade CD full of silly photos and heartfelt notes than anything store-bought.
Materials Needed
- 1 empty clear CD case
- 1 CD or DVD
- 1 round piece of cardstock (4.75″ diameter)
- 8-10 small printed photos
- Clear tape
- Gel pens, markers, or label stickers
- Cute embellishments: puffy stickers, hearts, stars, tiny gems, washi tape and small printed phrases
Step-by-step Guide
Step 1: Trace and cut a circle from cardstock to fit snugly inside the CD tray. You can choose a soft color or simple patternlike sky blue, pastel pink, or gradient paper .
Step 2: Print and cut out photos of you and your person about 1–2 inches tall, then paste them around the CD surface like a visual story.
Step 3: Use label tape, gel pens, or small printed tags to write the date, a quote, or little notes. You continue to add stickers and shiny bits where your heart leads you.
Step 4: Snap it into the CD case. You can place a playlist or burned CD behind it, or leave it as a standalone scrapdisc.
#5. Scrapbook-Style Memory Collage
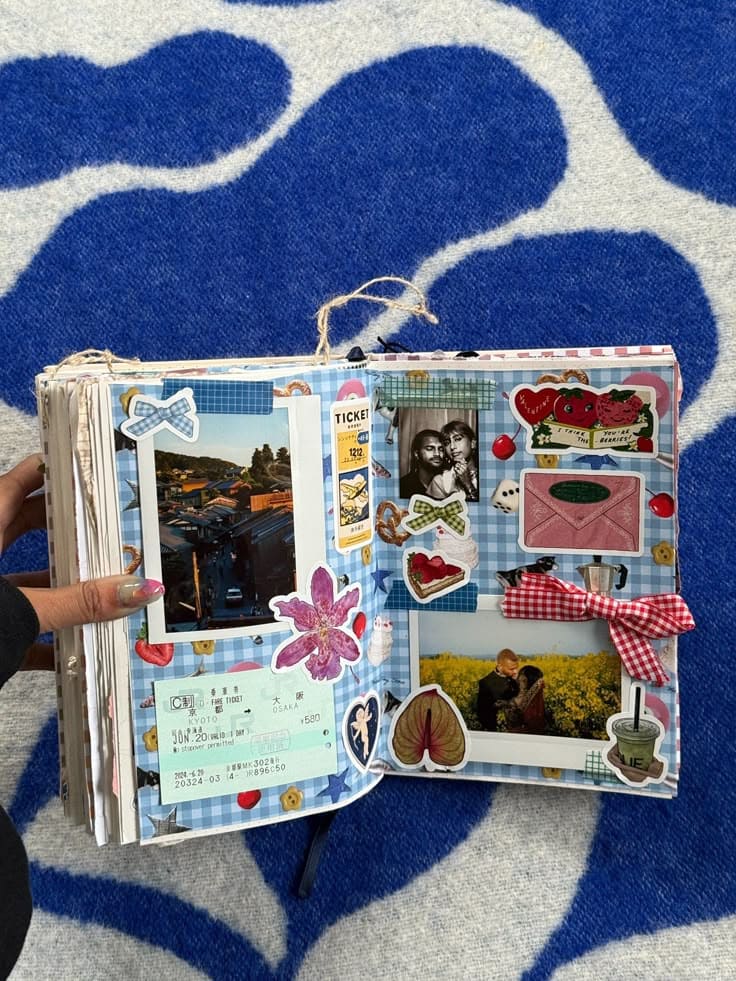
You flip open your journal, and suddenly you’re back in Osaka. Or lying in a field of yellow flowers with someone who makes you laugh. This kind of collage doesn’t follow rules — it follows feelings. Each sticker, each torn corner, each messy bow you tape in is part of the magic. It’s about documenting joy as it happens. The train tickets you almost lost. The photo booth print you folded into your wallet for weeks. This isn’t just a travel scrapbook. It’s a love letter to ordinary days made unforgettable by the people you shared them with.
Materials Needed
- 1 sturdy blank journal
- 2-4 printed photos (3×4 inches)
- Travel tickets, receipts, or ephemera
- Decorative washi tapes (1-3 rolls)
- Assorted stickers
- Ribbon (12-16 inches)
- Small glue dots, tape roller, or stick glue
- Scissors
- Optional: Gingham or patterned scrapbook paper
Step-by-step Guide
Step 1: Start with two pages side by side in your journal. You need to choose a patterned paper, then glue paper over the journal pages to create a soft, layered base.
Step 2: Arrange your main elements like photos and ticket stubs as focal points.
Step 3: Use stickers to create a sense of movement scattering them across the page like little reminders of joy. Then tape a ribbon down with a cute bow or let it frame a photo.
Step 4: Cut out hearts, press a small flower, or even tuck in a café napkin.
#6. Tiny Collage Box of Stories
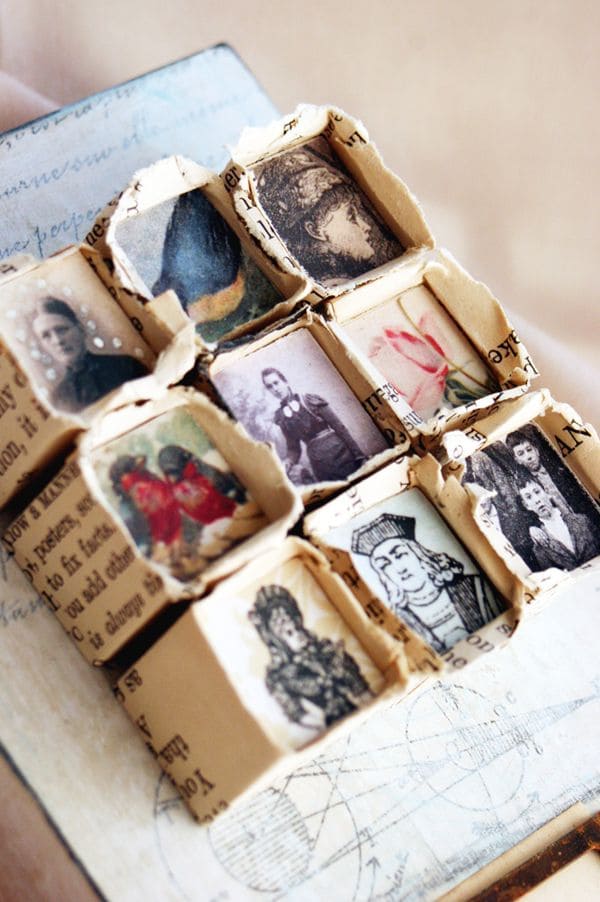
This collage feels like opening a timeworn cabinet full of secrets. Old portraits, illustrations, and clippings are carefully nested into little torn-paper cubbies.
Moreover, you don’t need much. Just a few scraps, a steady hand, and the urge to preserve something fleeting.
Materials Needed
- 1 small base (~4×4 inches)
- 1 vintage book page
- 9 tiny photo cutouts (approx. 1×1 inch each)
- Craft glue
- Scissors
- Bone folder (optional)
- Tweezers
Step-by-step Guide
Step 1: Cut your book page into 9 small squares (each about 2×2 inches). Then fold up the edges of each square to create shallow walls like tiny trays.
Step 2: Arrange the nine cubbies in a 3×3 grid on your base. You can test the layout first, then glue them down gently.
Step 3: Place your tiny images inside each compartment. You should choose a mix including a mysterious woman, a bird wing, a queen, a faded flower.
#7. Joy-Filled Memory Collage
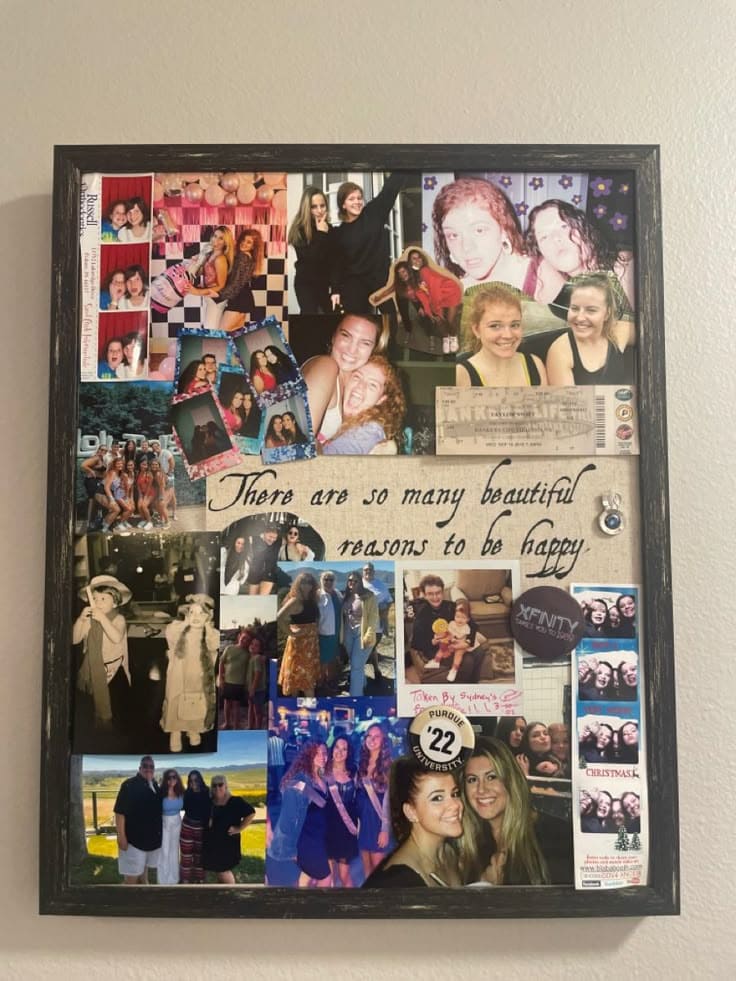
This collage isn’t polished or curated and that’s exactly why it feels so alive. It’s full of hugs, goofy faces, blurry snapshots from nights that mattered more than you realized at the time.
Also. it’s a reminder wall. Every time you glance at it, you’ll feel more grounded in gratitude for the people, the growth, and all the beautiful reasons to be happy.
Materials Needed
- 1 corkboard, pinboard, or large frame (size: 12×16 inches)
- 15 printed photos (4×6 inches)
- Small mementos: concert or event tickets, name tags, buttons, wristbands and notes
- 30 push pins
- Optional background: burlap, linen, scrapbook paper
- A quote centerpiece printed on cardstock (4×6)
- String lights
Step-by-step Guide
Step 1: Print your quote on a piece of cardstock and place it in the center.
Step 2: Begin arranging your photos around the quote, you can mix sizes and orientations to make it feel organic.
Step 3: Fill in the empty spaces with meaningful bits like ticket stubs, funny notes from friends, a pressed flower, pins from events.
Step 4: Secure everything with pins or clips. If you’re using a frame with a glass front, use a glue dot or washi tape for each element.
#8. Envelope Cityscape Collage
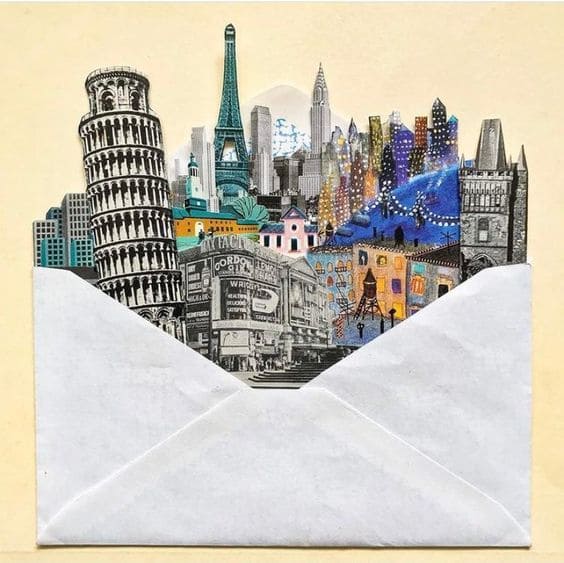
You open an envelope, and instead of letters, a skyline bursts out, wow Eiffel Tower, Leaning Tower, Times Square, all layered like a dream you once had.
Specially, this collage is a love letter to places you’ve been, want to go, or just imagine at 2 a.m. when the world feels too quiet.
Materials Needed
- 1 plain envelope (approx. 4×6 inches)
- Assorted images of landmarks and city skylines (2-4 inches tall)
- Ideas: Eiffel Tower, Big Ben, Tokyo skyline, NYC, Pisa, neon signs, bridges
- Scissors
- Glue stick
- Optional: glitter, washi tape
- Optional backing: small cardstock (4×6)
Step-by-step Guide
Step 1: Cut out your landmarks. You should vary the height, color, and style and choose 8-10 buildings or scenes to form your mini skyline.
Step 2: Arrange them overlapping each other so the tallest sit in the back and smaller pieces peek through the middle. Then glue or tape them together as one layered group.
Step 3: Gently tuck your collage into the open envelope, gluing only the bottom layer inside so the buildings pop out like a blooming city.
Step 4 (optional): Decorate the envelope with stars, passport stamps, or your favorite travel quote.
#9. The Family Tree
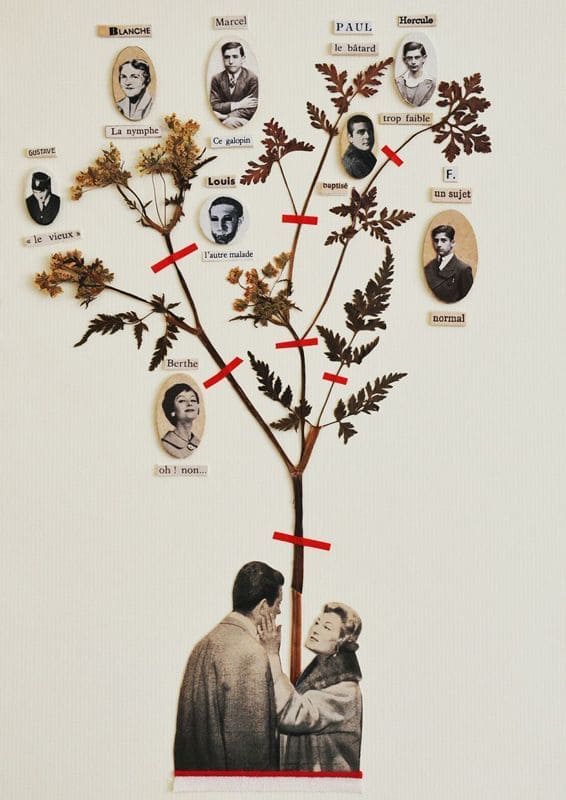
This collage is absurd and poetic at once, turning old photographs into characters, and a dried plant into the drama-drenched branches of heritage.
Plus, the beauty of this project lies in letting go of accuracy. It’s not about who came from whom, but what did they feel like?
Materials Needed
- 1 dried botanical stem (~6-10 inches long)
- 1 sturdy cardstock (~9×12 inches)
- 2 small vintage portrait cutouts (1×2 inch each)
- Printed labels
- Red or black paper strips (cut into ~1.5-inch segments)
- Glue stick and/or hot glue gun
- Scissors
- Optional: tea or coffee stain
Step-by-step Guide
Step 1: Start by arranging your dried plant on the center of your board, then secure the base and main branches with strong glue.
Step 2: Print or cut out small portraits. You can mix of actual family photos and found images from vintage books or the internet. then give them quirky roles with typed or handwritten labels.
Step 3: Attach the portraits along the branches, like they’re blooming from history. You should use small red strips to mark connections, relationships, or drama.
Step 4: Add one larger image at the bottom like a couple, a mysterious figure, or your central trunk.
#10. Poetic Page Collage
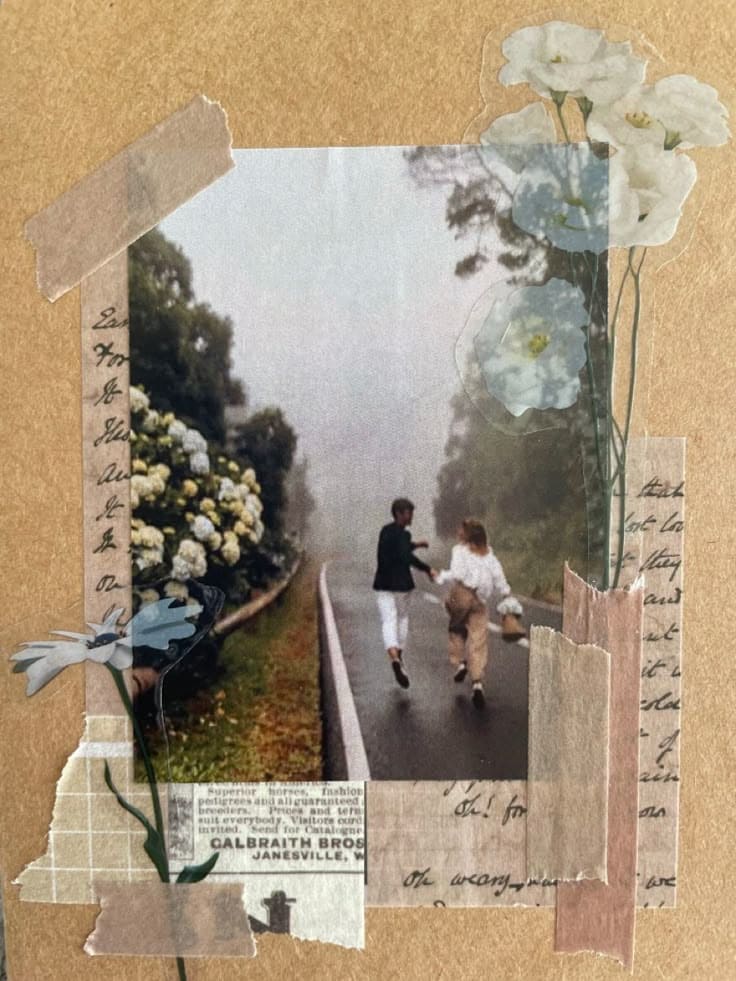
This collage captures the feeling of freedom with someone who makes the world feel softer. You can’t stand doing this project.
Also, it’s a gentle project, perfect for evenings when you need something grounding and sentimental.
Materials Needed
- 1 kraft paper journal page (5×7)
- 1 printed photo with motion (approx. 3×4 inches)
- Torn paper scraps: vintage book (1×2-2×4 inches), old magazine clipping, flower stickers
- Washi tape
- Glue stick
- Optional: tracing paper or vellum
Step-by-step Guide
Step 1: Position your photo slightly off-center. You can tear the edges if you want softness, or leave them clean for contrast. Then anchor it with a strip of washi tape at the top left and bottom right.
Step 2: Add texture around the photo using torn book pages. You then tuck one underneath, and layer another slightly over the corner.
Step 3: Place floral stickers or translucent pressed flowers gently around the photo. You can even layer a bit of vellum under one flower to create a misty effect.
Step 4: Finish with a faded label or printed name.
#11. Textured Heritage Collage
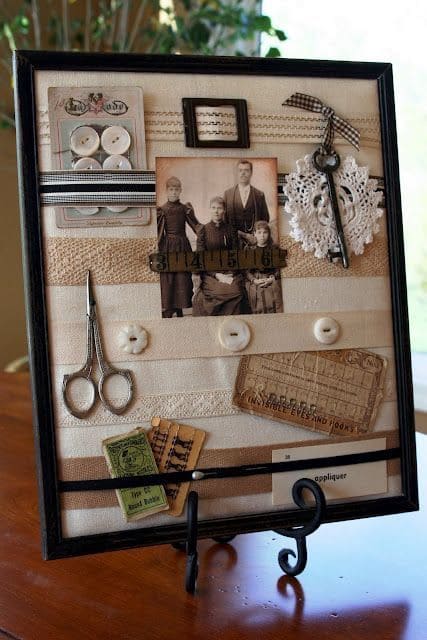
I bet that this is a tribute to ancestry through texture for those who honor their roots with fabric, thread, and found objects.
Whether you display it on a stand or hang it in a hallway, this collage turns family history into a living display.
Materials Needed
- 1 deep photo frame (8×10)
- 1 sturdy piece of fabric or canvas
- 1 vintage photo (2×3)
- Sewing items: buttons, small scissors, snippets of lace, doily, vintage cards
- Needle and thread
- Safety pins (optional)
Step-by-step Guide
Step 1: Stretch your base fabric across the frame’s backing board and secure it tight. You should choose a pattern with light texture.
Step 2: Arrange your central photo first. You let it anchor the middle of the board, layer a strip of lace behind it like a shelf and add a decorative pin to bring that old-school charm.
Step 3: Now, you sew or glue on buttons, press scissors diagonally, tuck tickets or a doily under the edge of a photo.
Step 4: Add a strip of dark ribbon across the bottom or near the top for visual grounding.
#12. Photo Film Reel Memory Gift
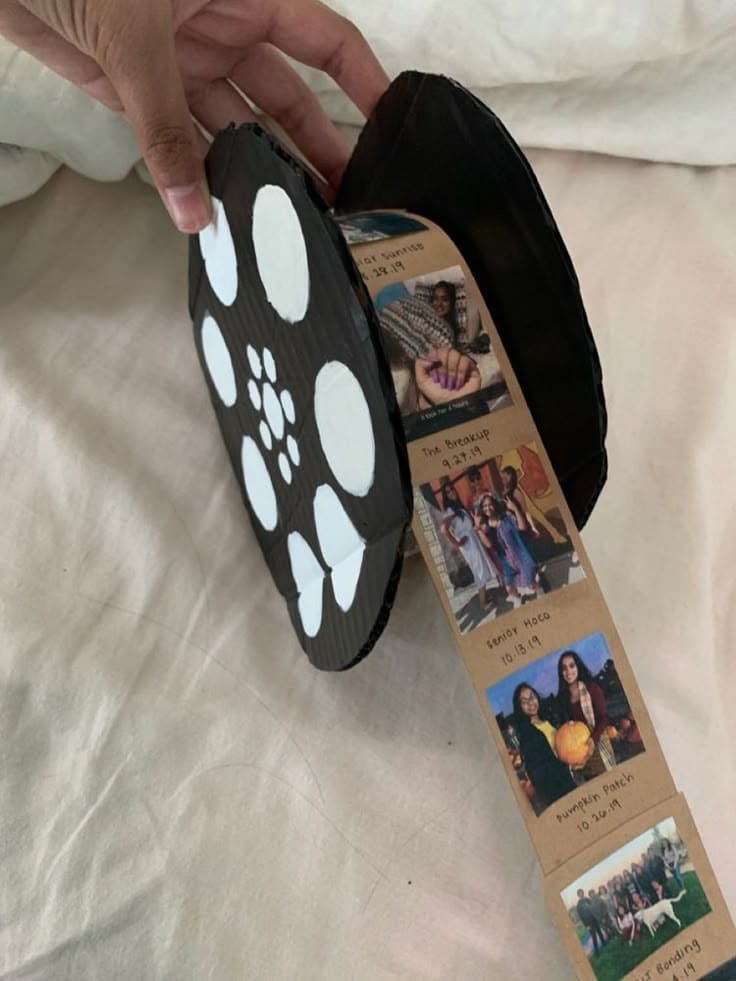
This one’s for the storytellers. It’s shaped like an old-school film reel, but instead of movie frames, each “scene” is one of your real-life memories — complete with dates, captions, and emotions that come rushing back like a favorite rewatch. Whether it’s a friendship timeline, a relationship recap, or a year-in-review, this collage project is all about showing how every little moment becomes part of your epic story.
Materials Needed
- 2 circular cardboard cutouts (approx. 6-8 inches wide)
- Black paint
- White paint
- Long strip of kraft paper (~3-4 feet)
- 8-15 small printed photos (2×2 inches)
- Glue stick
- Black fine-tip pen
- Scissors and ruler
- Optional: ribbon
Step-by-step Guide
Step 1: Cut two circles from sturdy cardboard. Now, you paint both sides black, then add six evenly spaced white reel holes on each to mimic a movie reel.
Step 2: Cut a long strip of kraft paper or tape multiple strips together, then leave enough space between sections to fit each photo.
Step 3: Stick your photos onto the strip in chronological order or themed scenes. You can also add handwritten captions, dates, or mini titles underneath.
Step 4: Glue the ends of the film strip to the inside edges of each cardboard circle, leaving a bit of slack so it can be rolled and unrolled.
#13. Book Page and Movie Wall Collage
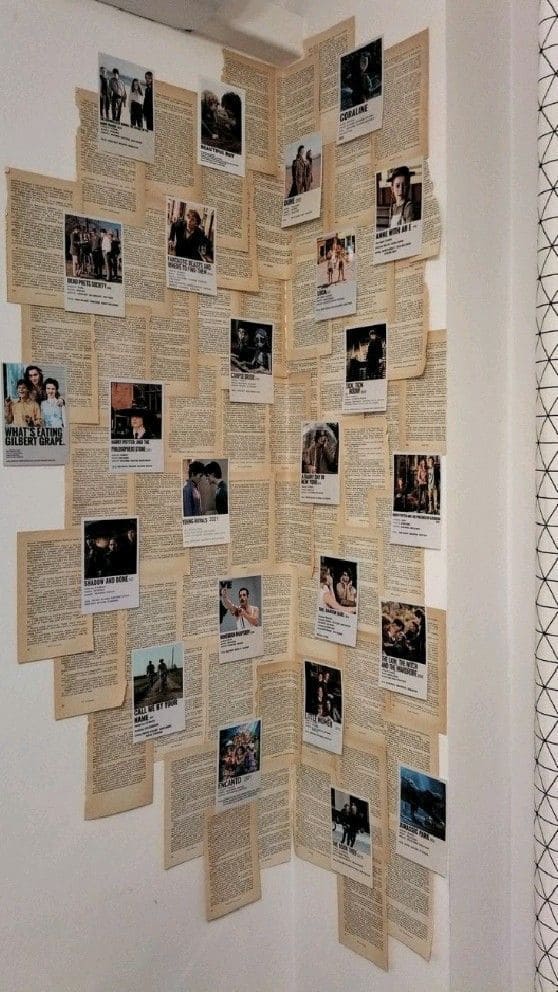
One step in and you’re surrounded by flickering memories, classic scripts, and cinematic emotion.
Bonus, this is the perfect DIY for movie buffs, scrapbookers, and anyone who wants to turn a quiet corner into a mood board you can literally walk into.
Materials Needed
- 40 vintage book pages (5×8 inches)
- 20 printed film stills (4×6 or 3×4 inches)
- Double-sided tape
- Scissors
- Optional: black paper
Step-by-step Guide
Step 1: Choose your wall and corners work best for this collage as they create an immersive effect, like being inside a book.
Step 2: Arrange the book pages so they overlap slightly, alternating horizontal and vertical if you want a patchwork feel.
Step 3: Select your movie stills, then print them with or without borders. You can also add title text, quotes, or ratings underneath if you want it to feel like a gallery wall.
#14. She Poured Words into the Mountains
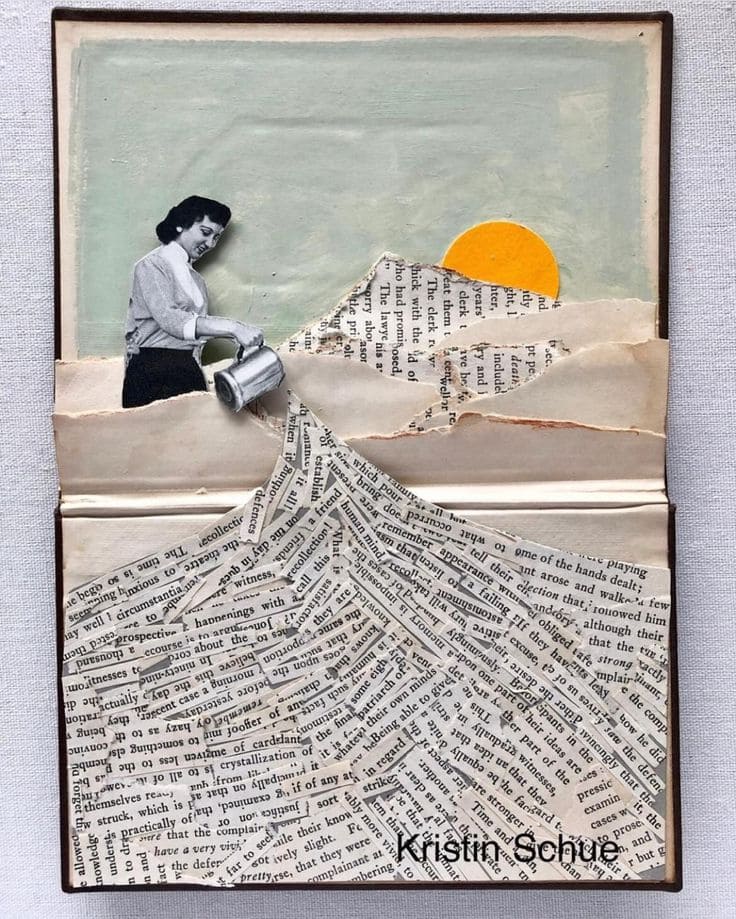
Wow, you can see a woman stands poised at the edge of a painted horizon, gently pouring words down a hill like water as well as the setting sun watches quietly.
This is also a perfect rainy afternoon project. If you’ve ever felt comfort in old books, or found healing in forgotten sentences, this collage will feel like home.
Materials Needed
- 1 vintage book
- 1 printed or cutout image of a person pouring (about 3-5 inches tall)
- Old book text (at least 2 full pages)
- Scrap watercolor
- Yellow/orange paper (cut into a 2-3 inch sun)
- Scissors
- Glue stick
- Optional: clear matte sealant spray
Step-by-step Guide
Step 1: Carefully remove 2-3 pages from your book, then trim one page to use as the painted backdrop.
Step 2: Cut your book text into strips. Begin layering them from the bottom up to form a slope, mimicking the shape of a pouring stream or mountain.
Step 3: Place the figure at the top left or edge of your slope. Then glue her so her hand is tilted and add a paper sun just peeking from the top corner.
Step 4: Add extra details if you’d like like dots of white paint, a faint shadow under the figure, or torn edges for a raw feel.
#15. Paper Thoughts Collage
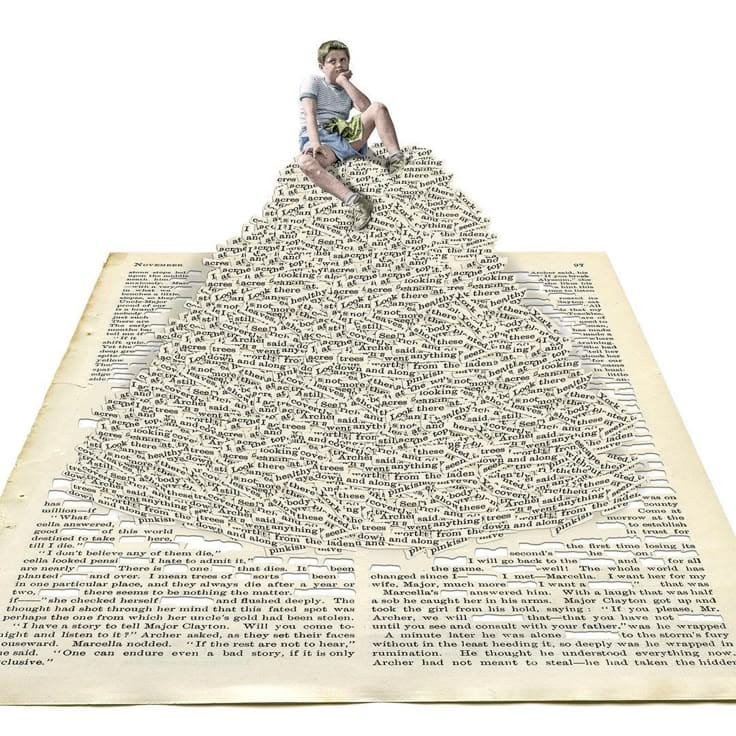
Have you ever felt like you were drowning in words like stories, ideas, old pages that won’t let you go?
This collage feels like a day spent inside your own head, in the best way. It’s a fantastic project if you love working with old books or thrifted paperbacks.
Materials Needed
- 1 large book page (at least 8×10 inches)
- 1 photo cutout of a seated figure (2-4 inches tall)
- Old book text (1-2 pages)
- Small scissors
- Glue stick
- Tweezers (optional)
- Bone folder
Step-by-step Guide
Step 1: Lay your base book page flat. You want a nice, aged look. If using magazine paper, you lightly sand the surface to help the glue stick better.
Step 2: Cut up your old book text into small chunks. You can go messy or neat, then begin gluing these pieces from the bottom up, forming a mountain or wave shape.
Step 3: Once your text-mountain is built, choose the perfect place to perch your figure. Now, cut them out carefully and glue them at the top or nestled into the middle, as if they’re deep in thought or watching the story unfold.
Step 4: Gently press everything flat using a ruler or bone folder. Optional: you can highlight certain words with a light wash of watercolor for added texture.
#16. Personalized Photo Bookmarks
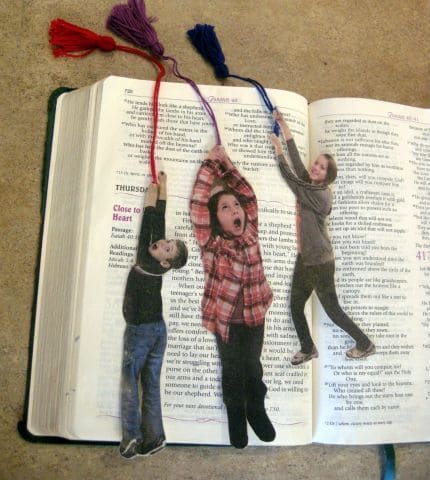
These bookmarks turn your loved ones into gravity-defying daredevils hanging by a tassel and dangling right over the pages of your favorite book. It’s creative, adorable, and unexpectedly hilarious.
Materials Needed
- Full-body printed photos of kids, family, or friends (about 4-6 inches tall)
- Stiff cardstock
- Scissors
- Glue stick
- Laminating sheets (optional)
- Tassels
- Hole punch
Step-by-step Guide
Step 1: Choose photos where the subject has their arms raised or looks like they’re reaching.
Step 2: Carefully cut out the figure and glue it onto cardstock to make it sturdy. You should trim neatly around the edges again.
Step 3: Cover with laminating paper, then punch a hole just above the hands and tie a tassel through it.
#17. Playing Card Photo Collage
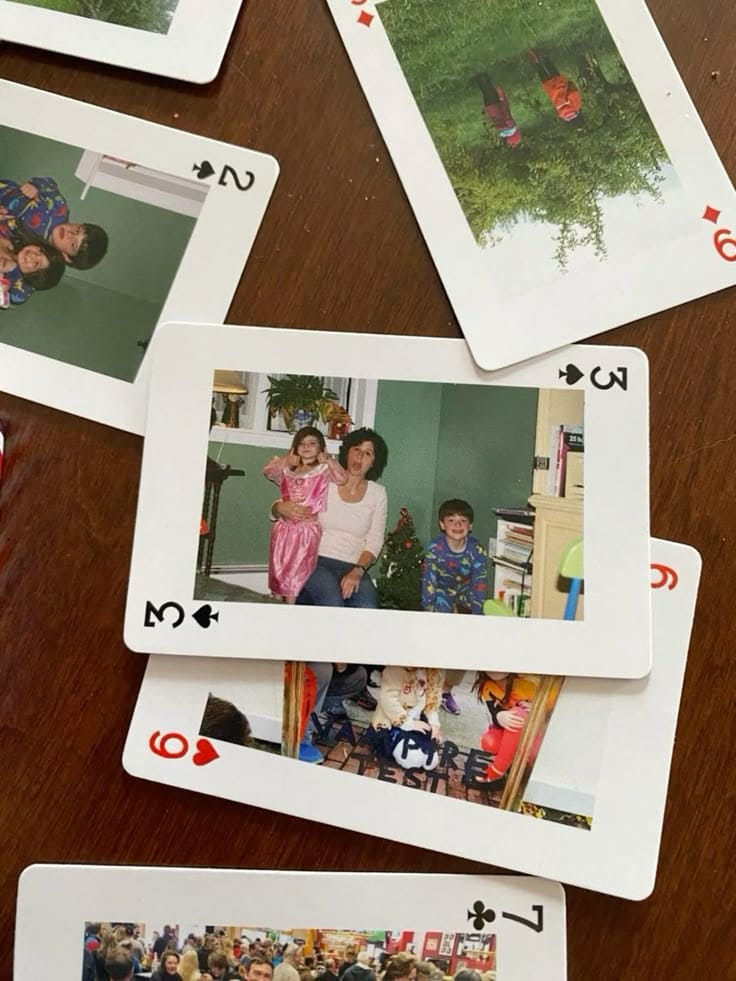
Forget poker night as this deck deals out nostalgia.
I believe whether you display them as a garland, gift them in a box, or leave them loose for shuffling through joy, this project turns an everyday object into a time capsule.
Materials Needed
- 1 full deck of standard playing cards
- 52 small printed photos (approx. 2.5 x 1.75 inches)
- Glue stick
- Scissors
- Optional extras: permanent marker, ribbon, or a clear storage box
Step-by-step Guide
Step 1: First, choose images that represent a wide range like birthdays, vacations, ordinary joys, even a silly moment you thought you’d forget.
Step 2: Trim your photos to fit the face of the cards, leaving the number and suit visible if you’d like to keep that classic card feel. You can also cover the entire front for a more unified photo set.
Step 3: Glue each photo down, smoothing the edges carefully to avoid bubbles.
Step 4 (optional): You can write a memory, date, or tiny message on the back of each card, then stack them into a box.
#18. Standing Ancestry Collage
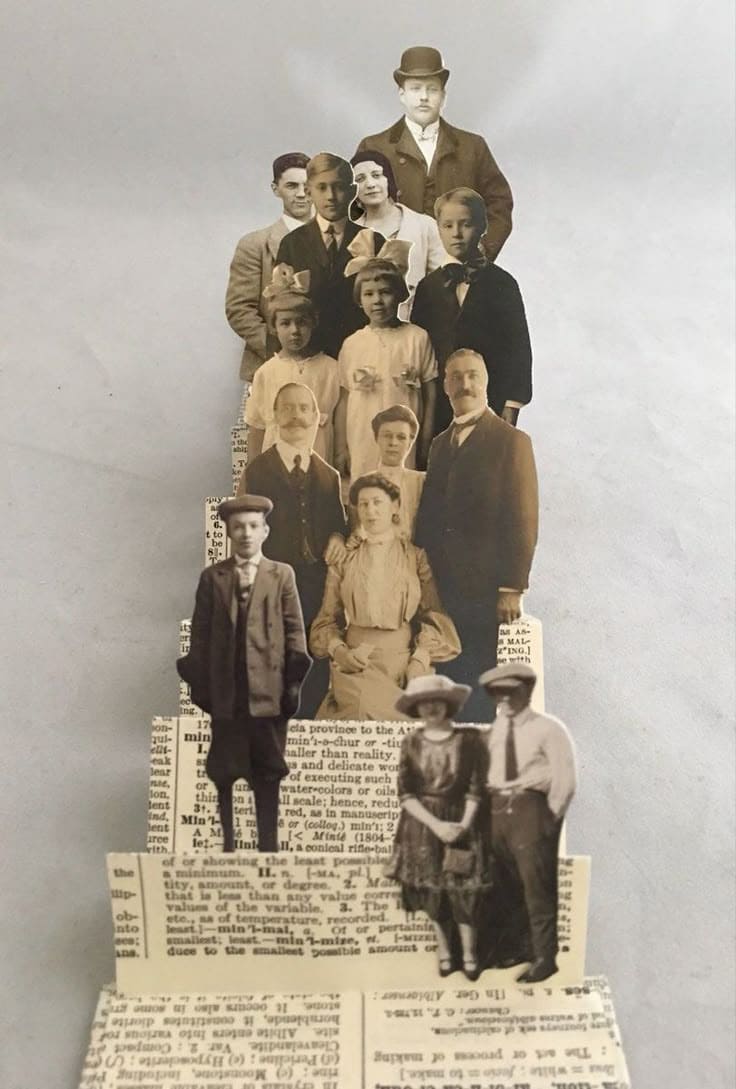
Created from vintage photos and dictionary pages, this piece becomes a physical metaphor including generations stacked, one story at a time.
Furthermore, this collage is part family tree, part shadowbox theater. A poetic, almost sculptural tribute to lineage, whether it’s your own or a fictional one you dream up.
Materials Needed
- 1 stiff sheet of cardstock (8×10 inches)
- 5-7 small black-and-white vintage photo cutouts (1.5-3 inches tall)
- 3-4 old book
- Thick paper scraps
- Scissors
- Tacky glue
- Optional: bone folder
- Optional: printed names, birth years, or made-up titles
Step-by-step Guide
Step 1: Accordion-fold or stack strips of cardstock and book paper to form steps leading up toward the back. Each step should be slightly taller than the one before it.
Step 2: Cover the visible faces of each step with torn pieces of book text.
Step 3: Carefully choose images with strong silhouettes. If you’re making a fictional family, mix clothing styles and poses for charm.
Step 4: Finally, you add names written in typewriter font, a date on the bottom edge, or a hidden message tucked beneath the front step.
#19. Threaded Memories Mini Collage
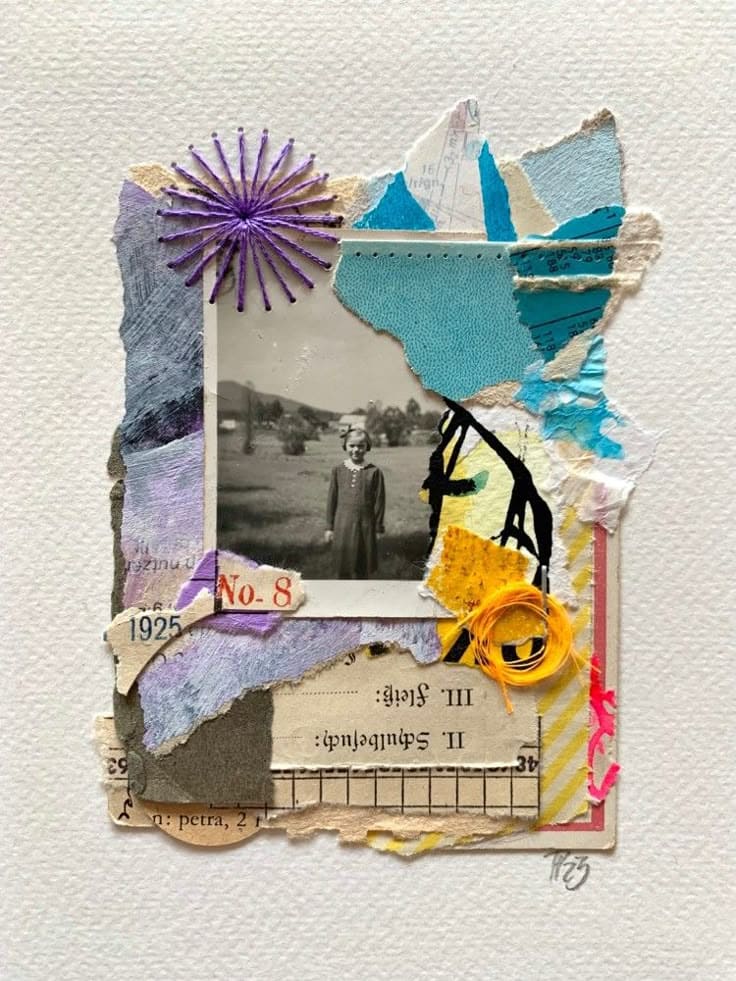
This collage is tiny but rich, like a memory caught mid-thought. You stitch a sunburst into the sky with purple thread and let a swirl of yellow fiber sit like a forgotten ribbon from childhood.
Materials Needed
- 1 small vintage photo (approx. 2×3 inches)
- 1 cold press paper (4×6 inches)
- Torn paper scraps: vintage ledger (about 2×2.5 inches), colored tissue (1×2 to 2×3 inches each) and blue scrap
- Threads: purple (at least 12 inches), yellow (about 10 inches) and needle
- Black paper silhouette (1 to 2 inches tall)
- Glue stick
- Small scissors
Step-by-step Guide
Step 1: Tear small sections of maps, printed textures, and handwritten notes. Then glue them down loosely, leaving a bit of room at the top and bottom.
Step 2: Tuck it into the layers like it’s always belonged there. You then add your silhouette shapes beside or over the image to suggest a secret narrative or shadow memory.
Step 3: Use a needle to poke holes in a rough sunburst shape near the top left. Thread the purple floss and carefully stitch through the points, radiating from the center.
Step 4: Wrap the yellow floss into a small coil, secure it with glue, and press it into place like a bright knot of memory.
#20. Custom Photo Soccer Ball Collage
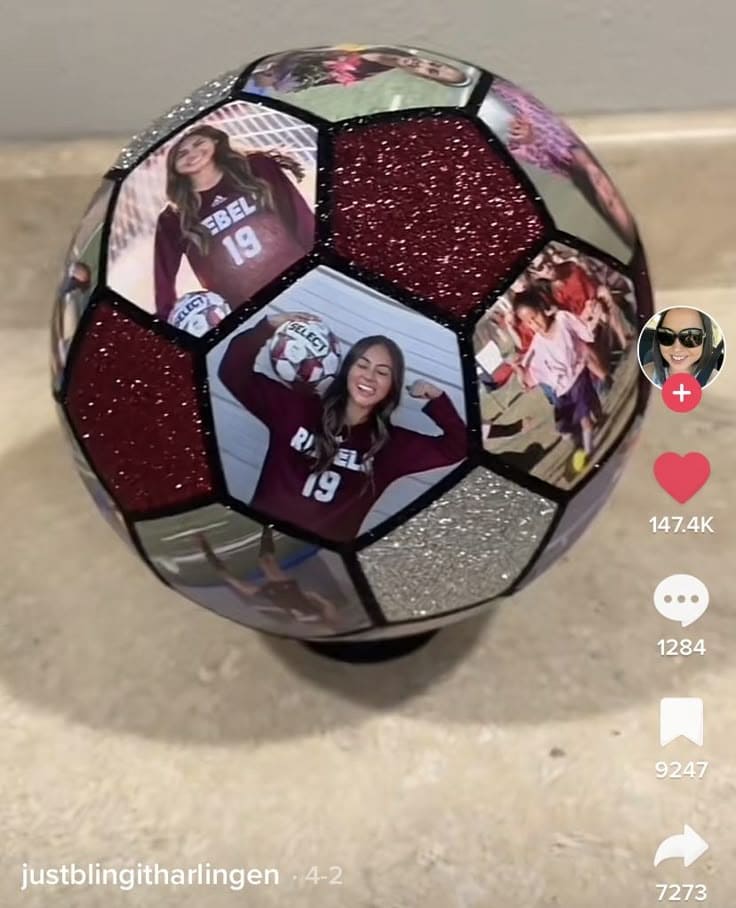
Wow, this is a highlight reel you can hold. Each panel becomes a mini tribute: game-day smiles, championship poses, fist bumps, team hugs, and glitter that screams MVP energy.
No matter how you’re gifting it to your star player or celebrating their final season, this collage ball becomes a keepsake no one will forget.
Materials Needed
- 1 clean, deflated soccer ball
- 15 small printed photos (about 2-3 inches wide)
- Glitter paper
- Strong adhesive
- Scissors and precision craft knife
- Black paint pen
- Optional: acrylic sealer spray
Step-by-step Guide
Step 1: Choose your best action shots, team selfies, and proud moments, you’ll want a mix of posed and candid photos. Then cut them into pentagon/hexagon shapes to match the ball’s panels.
Step 2: Cut glitter paper to fill alternating panels. Then carefully glue each image and glitter shape onto the ball, smoothing them into the curves.
Step 3: Use a black paint pen or thin tape to outline the edges if needed.
#21. Faith and Friendship Collage Frame
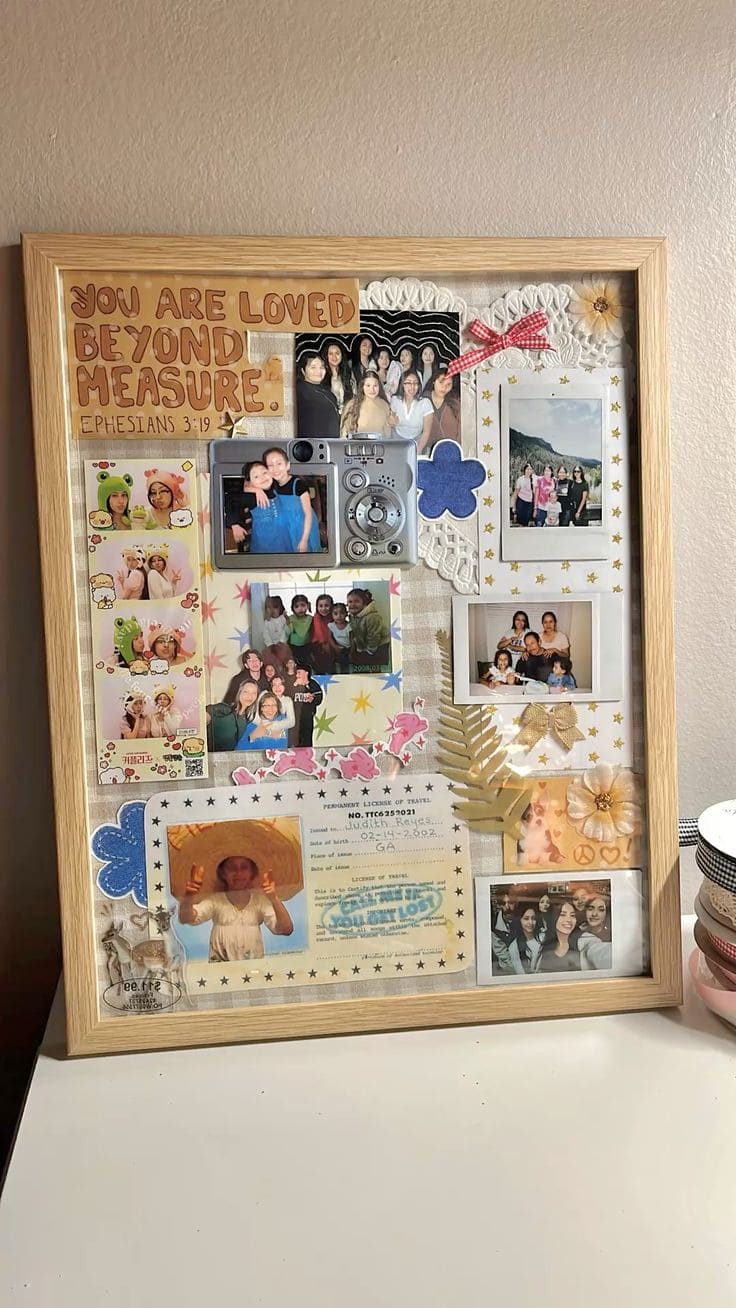
This collage speaks like a gentle hug as a reminder that you are held, known, and cherished. Surrounding it are joyful photos, stickered memories, travel licenses, even a real camera.
Besides, you can recreate this for yourself or gift it to someone who may need to be reminded that they matter.
Materials Needed
- 1 wooden or natural frame (12×16)
- 6-10 printed photos
- 1 handwritten or printed verse (5×7 inches)
- 1-2 novelty items (small toy camera, keychain, license replica, etc.)
- Flat embellishments: paper flowers, bows, doilies, background paper
- Double-sided tape
- Scissors
Step-by-step Guide
Step 1: Line the backing of your frame with neutral fabric or patterned paper. You need to secure it tightly so it lays smooth.
Step 2: Position your message near the top left. I recommend choosing a font or handwriting style that feels gentle, warm, and meaningful.
Step 3: Use a mix of candid group shots, Polaroid-style images, and posed memories.
Step 4: Use doilies, sticker cut-outs, travel stubs, and even a mini camera or memento glued in place. Let a bow peek out beside a photo.
#22. Framed Friendship Keepsake Collage
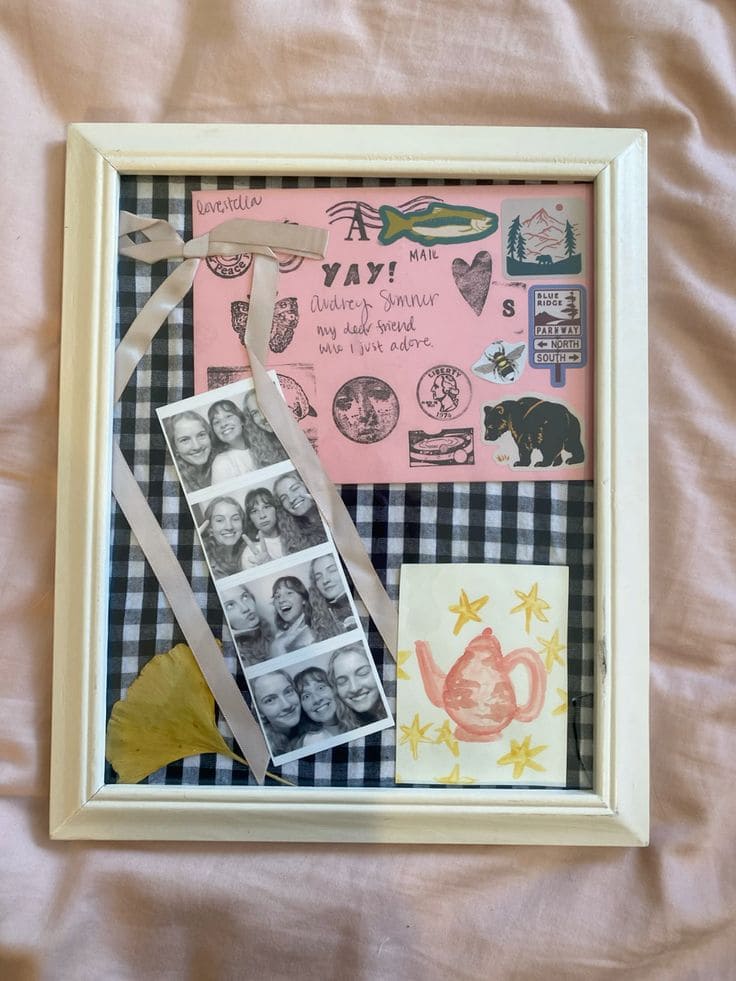
You know that feeling when a photo booth strip flutters out of a drawer, and suddenly you’re laughing at a moment from five summers ago? That’s the spirit of this collage.
Specially, the ribbon, the handwritten notes, the stickers from that road trip, a leaf from the sidewalk outside your favorite café, everything gets to belong.
Materials Needed
- 1 simple glass-front frame (size: 8×10 inches)
- 1 sheet of fabric or patterned paper
- 1 photo booth strip (2×6 inches)
- 1 small envelope (4×6 inches)
- Assorted embellishments: Stickers, pressed flower, ribbon (at least 12 inches long)
- Double-sided tape
- Scissors
Step-by-step Guide
Step 1: Remove the glass and backing from the frame. Now you trim your fabric or background paper to fit snugly inside.
Step 2: Arrange your key pieces first: the photo strip, note or card, and maybe a small artwork or doodle. Let the ribbon weave through them gently.
Step 3: Add small embellishments next. Think stickers that meant something from your trip, a dried leaf from a walk, or even a little scrap of handwriting from a friend. You can use glue dots or tape to hold everything lightly.
#23. Garden of Her Words Collage
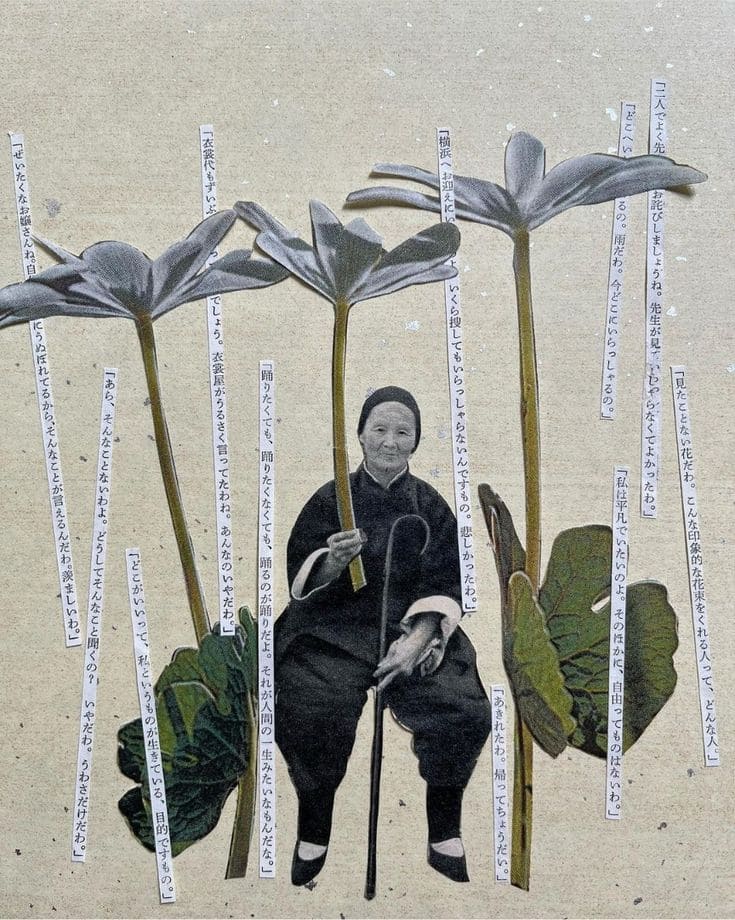
In this collage, you plant those stories as tall blossoms, letting their stems rise around a grandmother figure like leafy protectors.
Moreover, it’s a perfect project for when you want to slow down and remember someone. Maybe it’s your grandmother, or someone else who felt like shelter in human form.
Materials Needed
- 1 black-and-white portrait (approx. 4-6 inches tall)
- 1 piece of kraft (8×10 inches)
- 3 flower images
- Old book, newspaper, or printed text strips (3-5 inches long)
- Small scissors
- Glue stick
- Tweezers (optional)
- Bone folder
Step-by-step Guide
Step 1: Start by trimming your background to size. Then choose a photo with presence and cut it out cleanly and position it near the bottom center.
Step 2: Cut 3-5 leafy stems or flowers, then place them around and behind the seated figure, as if she’s sitting in a quiet field.
Step 3: Now, take your pre-cut text strips and begin placing them vertically beside or between the stems. You can let them drift like whispers more structured like stalks.
Step 4: Nestle her slightly in front of one or two plant stems so she feels rooted in the piece.
#24. 3D Valentine Photo Cards
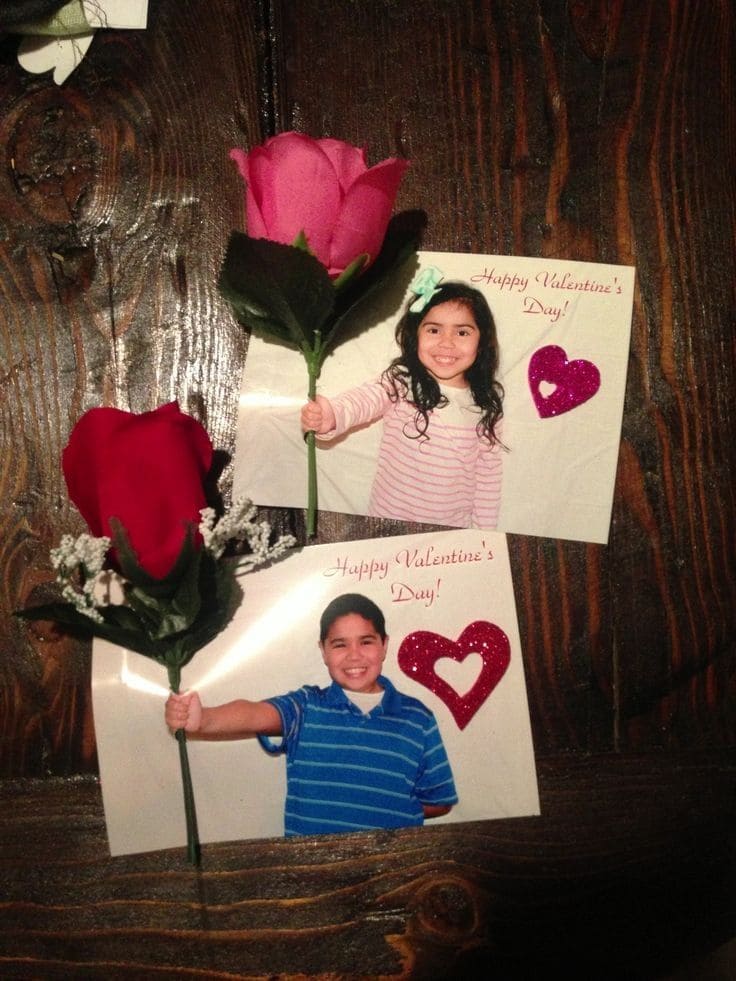
These Valentine’s Day cards are guaranteed to make hearts skip a beat. Each one features a cutout photo of a child reaching forward.
Additionally, with a real silk rose slipped through a small slit in the photo to look like they’re offering the flower to the recipient, it’s heartfelt, humorous, and surprisingly easy to make.
Materials Needed
- A printed photo of the child holding out their arm (4×6 inches)
- Faux flowers
- Craft knife
- Thick photo paper
- Decorative glitter hearts
- Markers
Step-by-step Guide
Step 1: Ask your child to pose with their arm outstretched, hand closed as if holding something. Then snap the photo with good lighting and a clean background.
Step 2: Print the photos on thick paper. Now, you can add Valentine’s messages and embellishments like glittery hearts or stickers for extra charm.
Step 3: Use a craft knife to cut a small slit at the top and bottom of their hand in the photo.
Step 4: Slide the flower stem through the slit, adjusting it so it looks like they’re holding it out.
#25. Vintage-Inspired Letter Collage
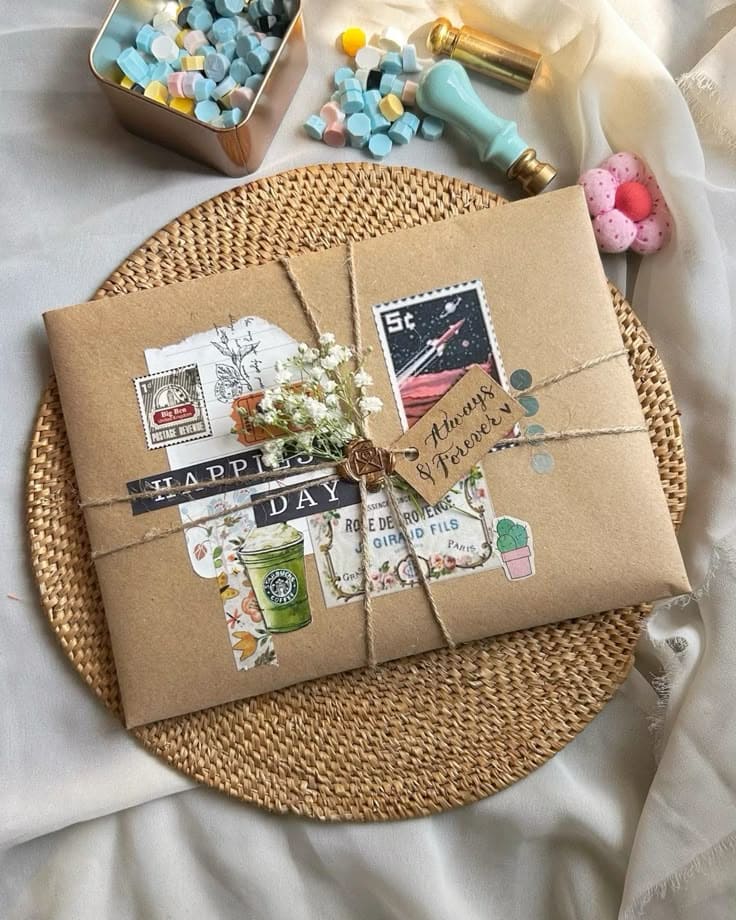
Wrapped in kraft paper and tied with twine, this envelope is a piece of art with layers of ephemera.
Whether you’re gifting letters, photos, or even a handmade zine, this collage transforms the outside of your envelope into a nostalgic journey before the contents are even revealed.
Materials Needed
- Kraft envelope
- Jute twine
- Faux vintage stamps and travel ephemera
- Floral washi tape and sticker accents (plants, tea cups, retro labels)
- Wax seal stamp + wax (optional)
- Dried baby’s breath
- Small tag
Step-by-step Guide
Step 1: Begin layering ephemera and stickers on kraft envelope, let them overlap slightly for that curated scrapbook effect.
Step 2: Tie your envelope gently with jute twine, tucking in a sprig of dried flowers or herbs like lavender for extra romance.
Step 3: Add a wax seal in the center of the knot or glue a faux seal for flair. You can even stamp initials or a heart.
Step 4: Finally, include a tag or something more personal.
#26. Photo Globe Collage
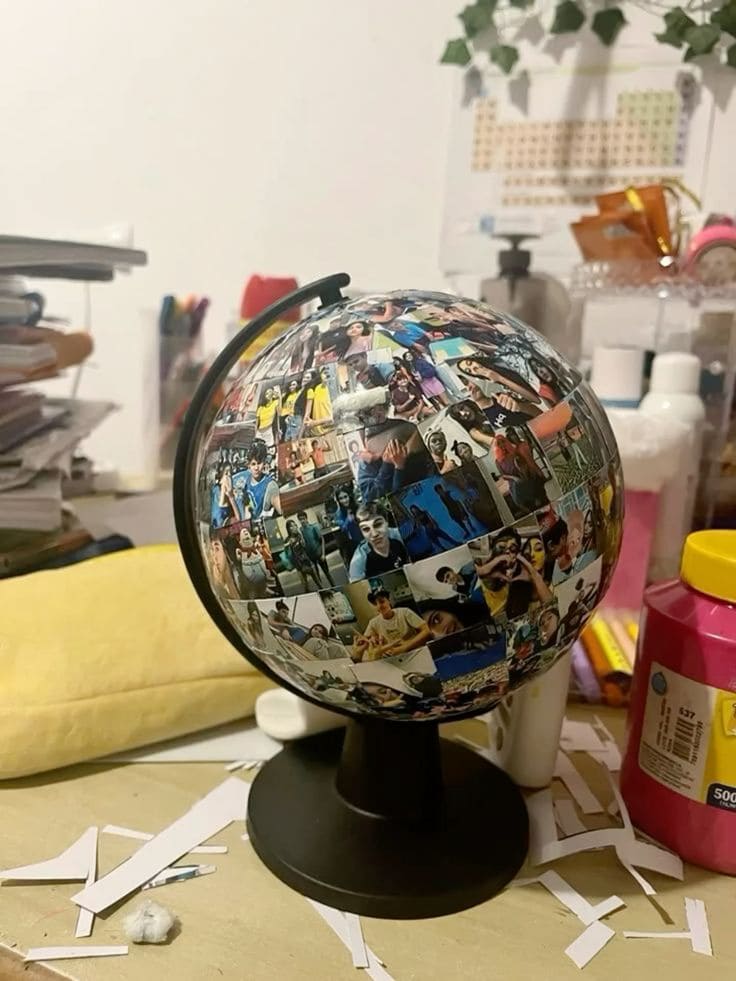
This stunning DIY turns an ordinary desk globe into a vibrant mosaic of memories. Instead of countries and oceans, each segment of the world is replaced with photos — tiny pieces of your shared story. Whether it’s for a best friend, a partner, or even yourself, this project makes an unforgettable gift that says: “Everywhere I look, I see you.”
Materials Needed
- Old or cheap globe (any size)
- Printed mini photos (1 to 2 inches wide)
- Mod Podge or craft glue
- Scissors
- Small paintbrush or sponge
- Optional: clear sealant spray for longevity
Step-by-step Guide
Step 1: Clean the surface and remove any stickers or peeling parts. If the design is too busy, give it a quick coat of neutral paint.
Step 2: Choose candid moments, trips, funny selfies, even screenshots of texts, you should resize them to fit the curve of the globe and cut each into small squares or curved patches.
Step 3: Begin at the equator and work your way around, carefully layering the photos like a puzzle. You can use Mod Podge both underneath and over the top to seal each one.
Step 4: Overlap slightly and trim edges for a cleaner finish.
#27. Celebrity Bouquet Collage
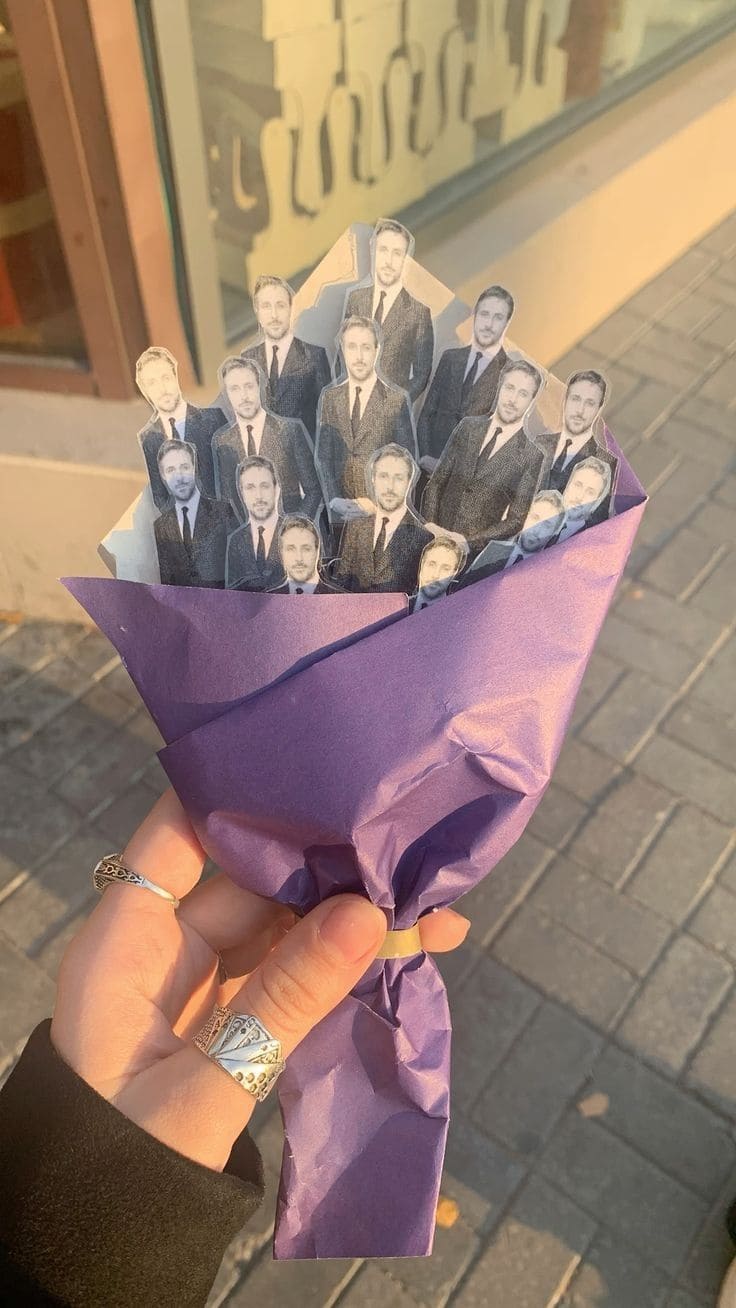
Why settle for flowers when you can give a bouquet full of charm, suits, and cinematic appeal? This hilarious twist on traditional gifting involves swapping blooms for multiple tiny cutouts of your favorite celebrity.
Materials Needed
- Small printouts of your chosen celebrity
- Cardstock or photo paper
- Scissors
- Wooden skewers
- Glue
- Tissue paper
- Ribbon
Step-by-step Guide
Step 1: Select 10-15 mini images of the celebrity, then use fun, iconic, or absurd red-carpet shots. You can print them out on thick paper and carefully cut them out.
Step 2: Attach each cutout to a wooden skewer using glue or tape. Also, angle some upright, some tilted, so the bouquet feels full and dimensional.
Step 3: Bundle the sticks together tightly, and wrap the bottom with tissue paper like a real floral bouquet. Now, secure it with ribbon.
#28. Mini Memory Tin
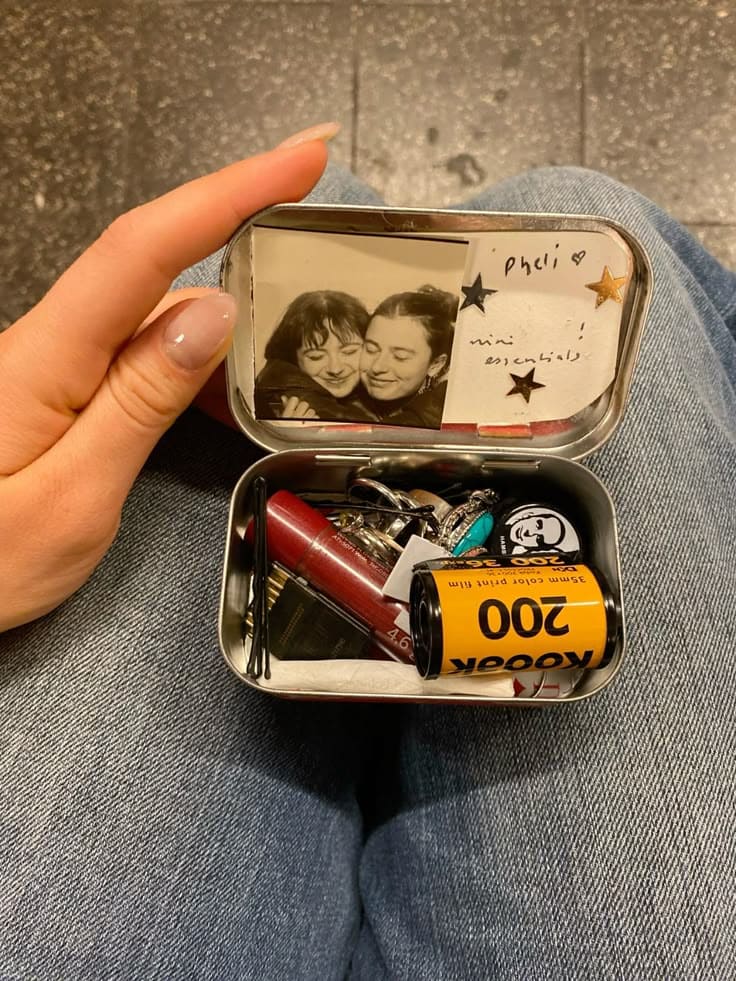
This nostalgic craft transforms a simple mint tin into a heartfelt time capsule. Labeled mini essentials, it’s part survival kit, part memory vault.
Moreover, it’s the kind of thing you gift someone you’ve laughed with, cried with, and grown up beside.
Materials Needed
- Empty mint or Altoids tin
- Small printed photos
- Washi tape
- Scrap paper
- Mini items: film rolls, favorite lip balm, a keychain, a note, rings, or other personal essentials
- Glue
Step-by-step Guide
Step 1: You glue a favorite photo and a small paper note to the inside of the lid. You can use stickers or washi tape for a fun, finished look.
Step 2: Choose tiny objects that feel meaningful, It could be mementos from adventures, everyday essentials your friend always carries, or bits that represent inside jokes.
Step 3: You can wrap it with ribbon, tuck it into a gift bag, or just press it into someone’s hand.
