When fall comes, everything feels a little cozier. The air gets cooler, the leaves turn golden, and it’s the perfect time to stay in and make something fun with your hands.
If you have a pile of fabric scraps lying around, don’t throw them out and turn them into something cute and creative instead! These fall crafts are easy, fun, and a great way to enjoy the season with your kids or on your own.
From tiny pumpkins to pretty leaf garlands, you’ll find simple ideas that bring warmth to your home. It’s amazing what a few small pieces of fabric can become with just a little time and love.
#1. Fabric Acorns of Autumn Whimsy
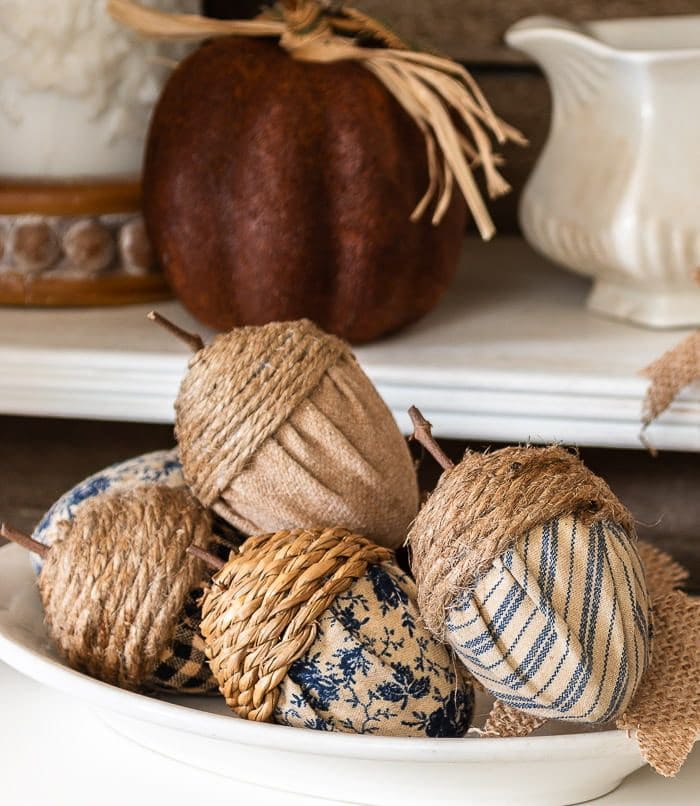
These oversized fabric acorns are like tiny heirlooms made from scraps you couldn’t throw away. Each one combines soft textures and rustic charm, all nestled into a bowl like they’ve just fallen from a fairytale oak.
Materials Needed:
- 5–7 plastic Easter eggs
- 5–7 fabric squares (5″x5″)
- Jute twine (approx. 3 ft per acorn)
- Small sticks (1–2″ long)
- Hot glue gun
Step-by-Step Guide:
Step 1: Wrap each egg half in fabric, then pull the fabric tight, pleating it toward the center opening and secure with hot glue.
Step 2: Wind twine around the top half of the egg, covering the raw fabric edge. Glue as you go.
Step 3: Add a small twig as a stem on top.
#2. Autumn Leaf Garland With Fabric Scraps
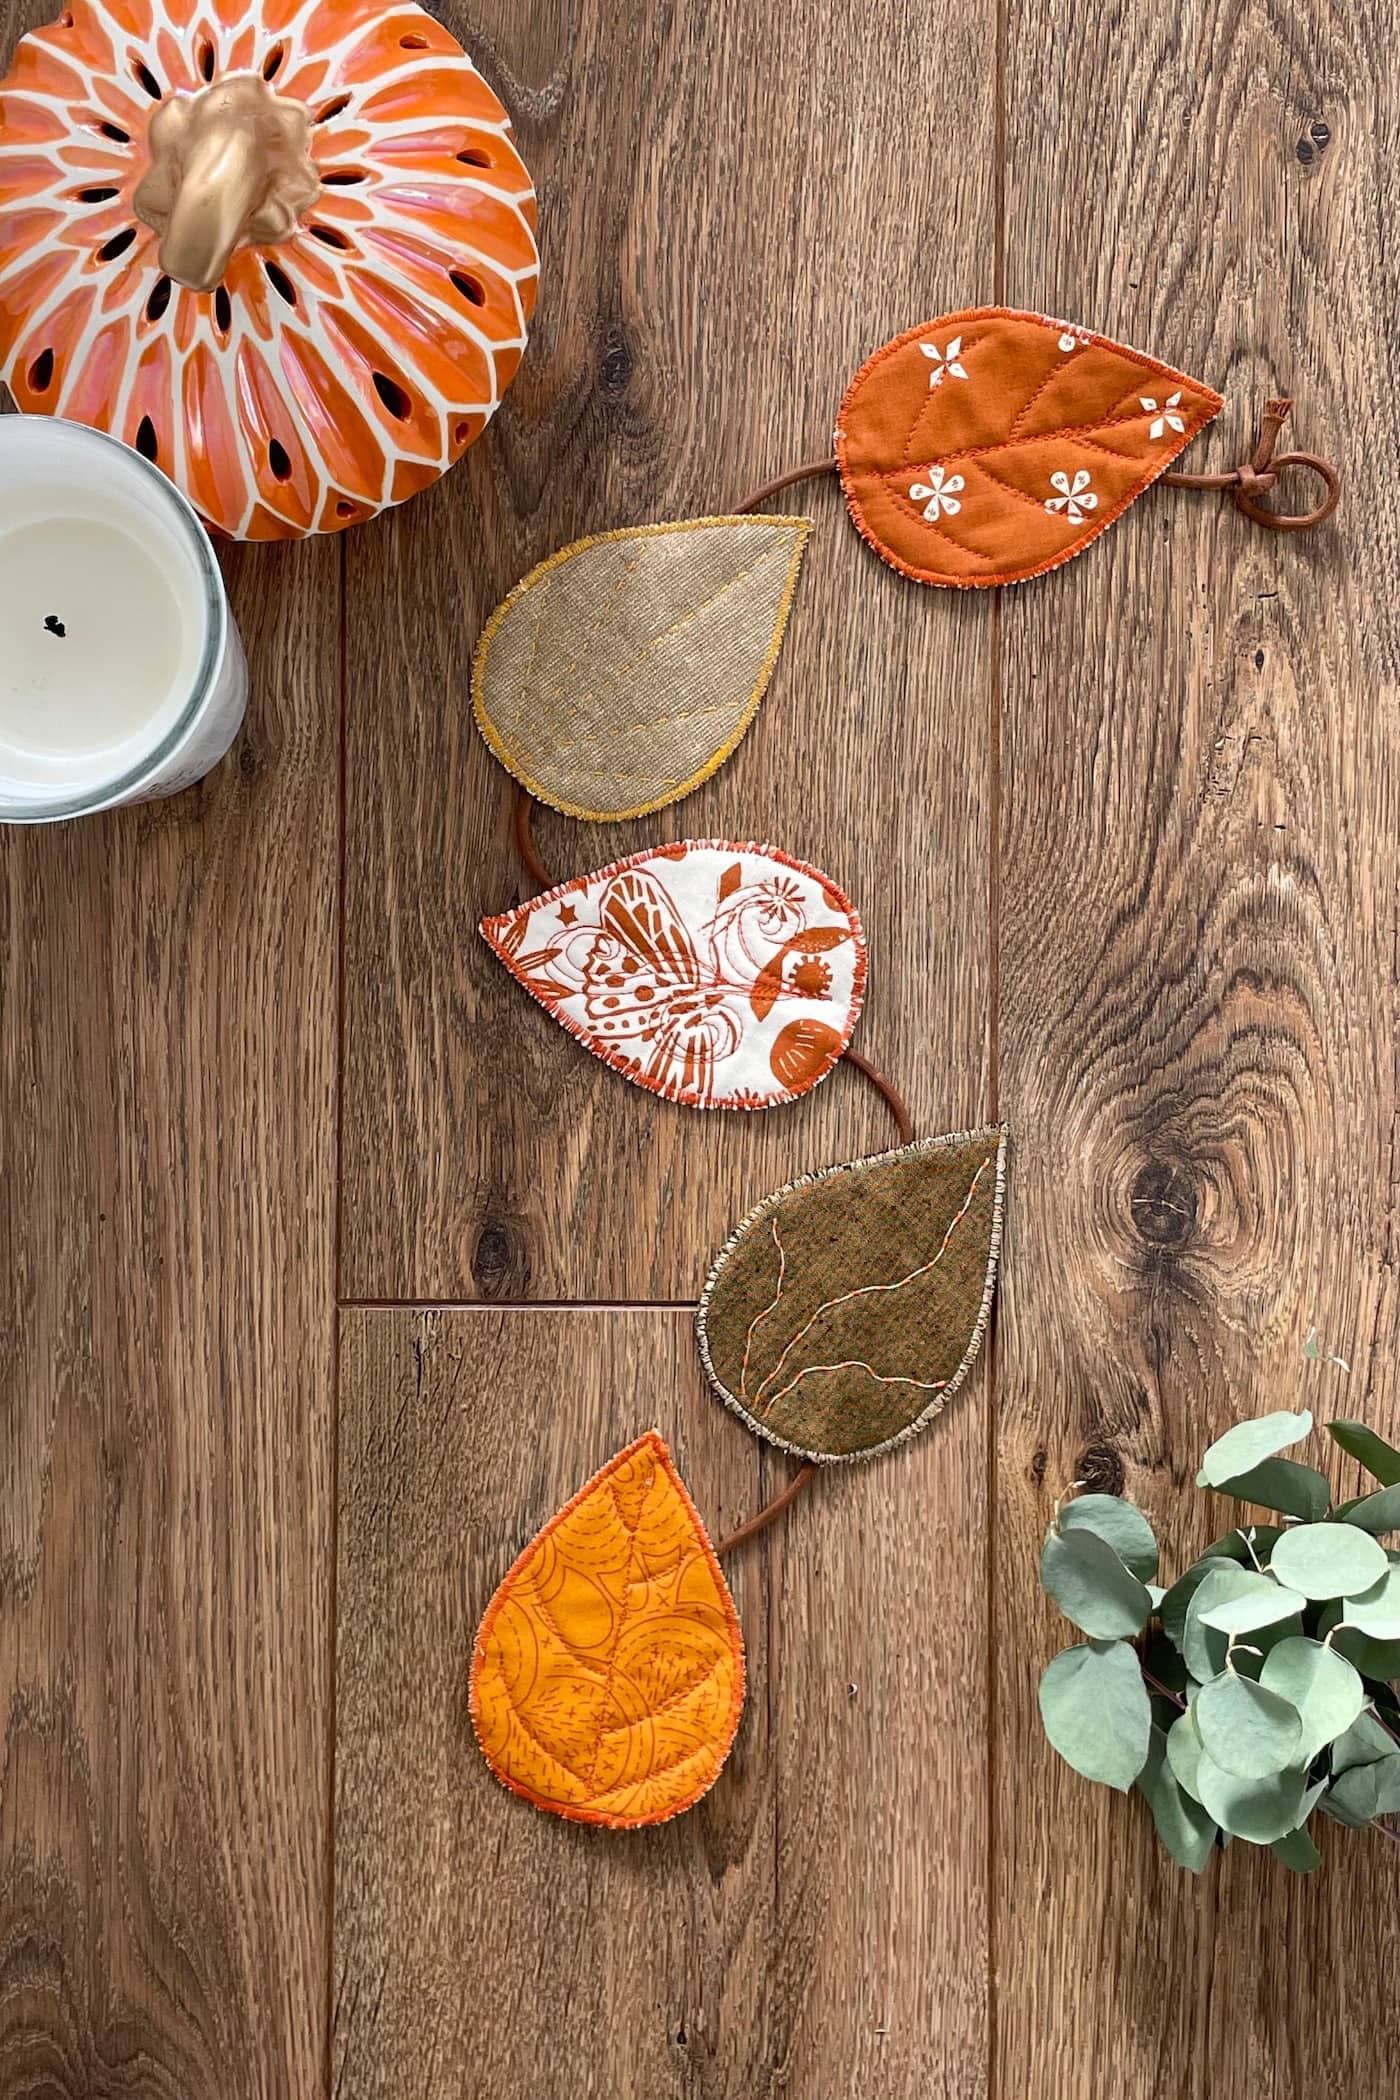
This fabric leaf garland captures that same soft flutter indoors stitched with cozy textures, harvest hues, and just enough whimsy to make your mantel or entryway feel magical.
You can hang it along the stairs, frame a window, or drape it across a console. Whether you’re a seasoned sewist or just getting started, this garland is a joyful reminder that beauty comes in little handmade details.
Materials Needed:
- Fabric scraps in fall colors (orange, brown, gold, cream)
- Lightweight fusible interfacing
- Brown ribbon (about 3 ft)
- Matching thread
- Leaf template (around 4–5 inches long)
- Scissors, pins, iron, sewing machine
Step-by-Step Guide:
Step 1: Trace and cut leaf shapes from both fabric and interfacing. You can fuse them together with an iron for sturdiness.
Step 2: Use a sewing machine or hand-stitch to add veins in the middle of each leaf, using contrasting thread for a touch of rustic charm.
Step 3: Attach the top of each leaf to your ribbon using either machine zigzag stitches or hot glue.
#3. Pumpkin Pie Slice Pillows
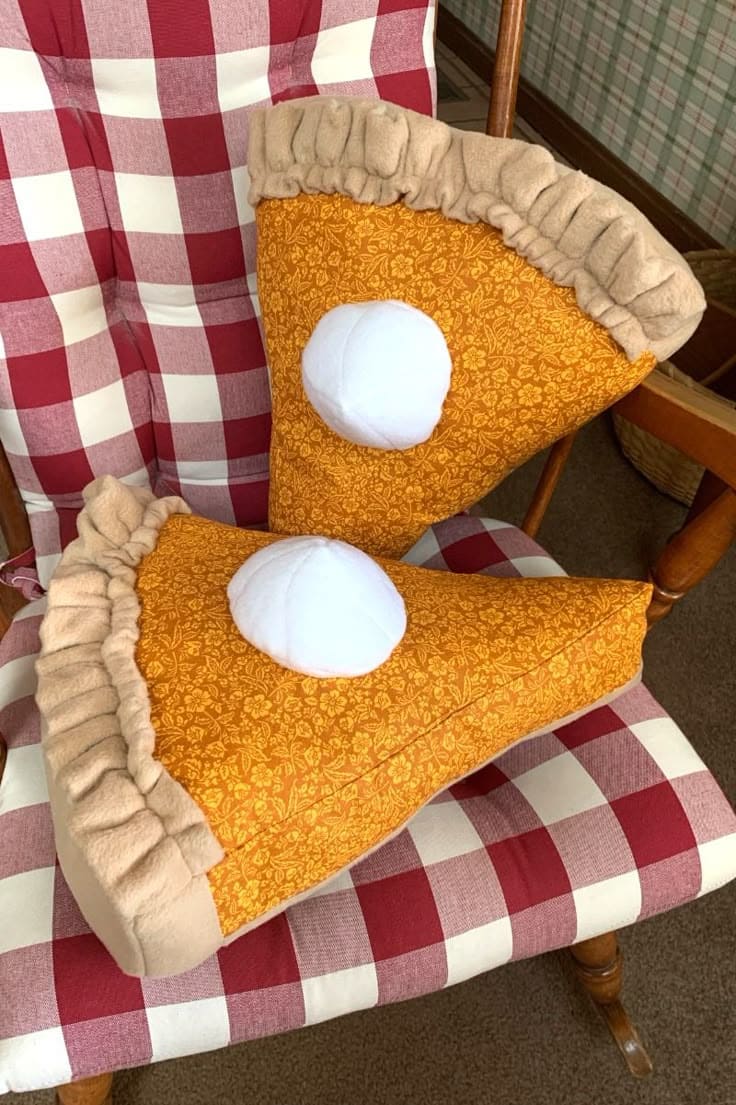
Whether you’re decorating for Thanksgiving or just want to add a whimsical touch to your fall decor, these plush treats hit all the right notes.
These are fantastic beginner sewing projects, especially if you’re looking for something seasonal that also makes an adorable gift or photo prop.
Materials Needed:
- Orange patterned cotton fabric (14″x10″ per slice)
- Beige fleece (8″x3″, ruffled)
- White fleece/felt circle
- Polyfill stuffing (approx. 1–2 cups per pillow)
- Sewing machine
- Optional: fabric glue
Step-by-Step Guide:
Step 1: Cut a triangle for the pie base and two rectangles for the sides, then sew together, leaving an opening.
Step 2: Add the crust piece by folding and ruffling beige fabric, then attach it to the top edge.
Step 3: Stuff with polyfill until fluffy and firm.
Step 4: Cut and sew a white fleece dome. Now, you attach it on top as the whipped cream garnish.
#4. Rustic Fabric Sunflowers
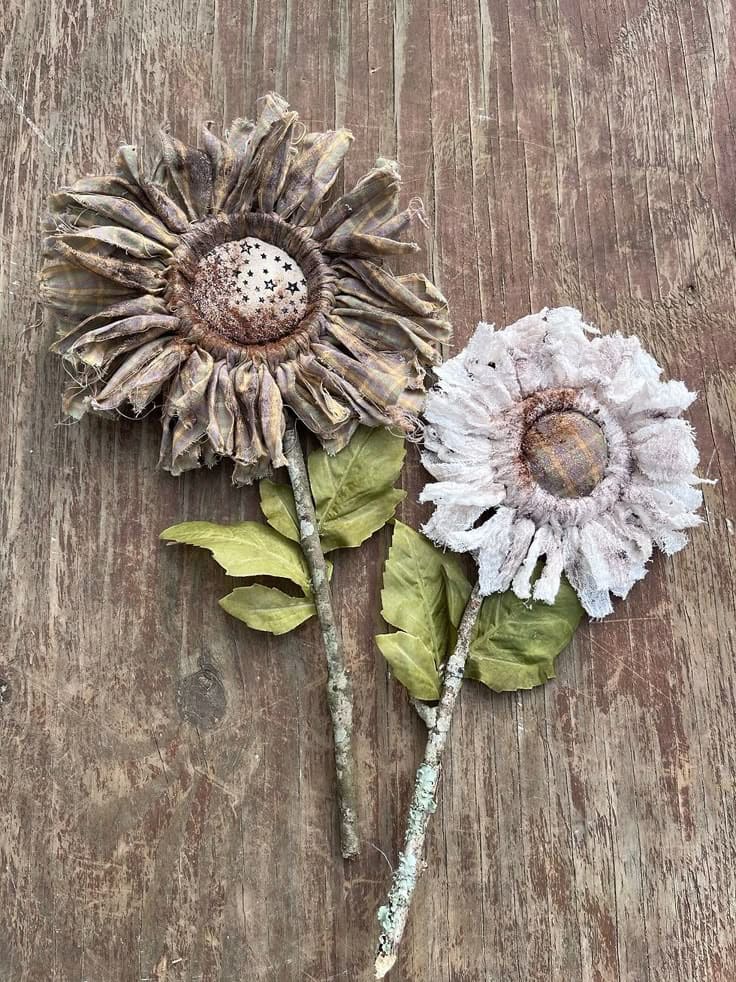
These charming fabric sunflowers carry the spirit of autumn in every petal.
I first tried making them after spotting a weathered bouquet in an old farmhouse photo and it felt like the kind of project your grandmother would’ve made from worn aprons and leftover quilt scraps.
Materials Needed:
- Cotton fabric scraps in fall tones (1/2 yard total, mixed)
- Small circle of felt (3″ diameter)
- Real twigs (8–10″ long, 1 per flower)
- Green faux leaves
- Hot glue gun
- Optional: glitter or coffee stain
Step-by-Step Guide:
Step 1: Cut fabric into strips about 1″ wide and 5″ long. Fray the edges gently for a rustic texture.
Step 2: Glue the strips in a circle around the felt center, overlapping slightly like sunflower petals.
Step 3: Attach the finished bloom to a twig using hot glue, pressing firmly until secure.
Step 4: Add faux leaves to the stem and embellish the center with a sprinkle of glitter or a dab of brown paint for extra detail.
#5. Candy Corn Fabric Plush
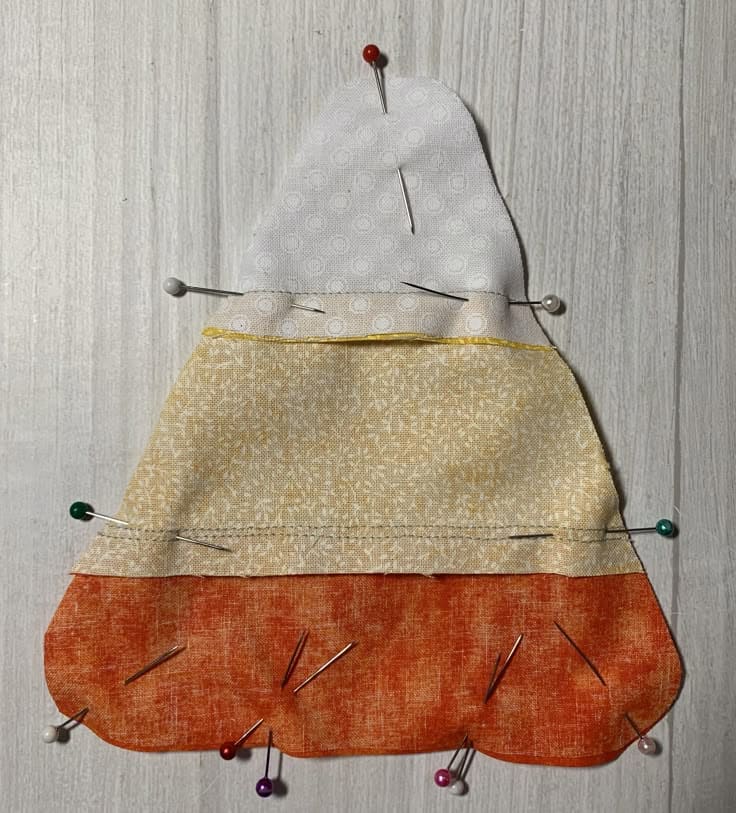
This little plush piece is shaped just like the classic Halloween treat, made of three cheerful bands of fabric.
Whether you’re crafting for a festive bowl filler, a whimsical garland, or a soft toy for kids, this project stitches together seasonal charm and easy weekend creativity.
Materials Needed:
- Orange, yellow, and white cotton fabric (each piece approx. 4” x 4”)
- Polyfill
- Thread
- Sewing pins, scissors, sewing machine or needle
Step-by-Step Guide:
Step 1: Cut each fabric into thirds (white tip, yellow middle, orange base) and stitch them together to form a candy corn shape.
Step 2: Place the front and back pieces right sides together, then oin securely and sew around, leaving a small gap at the bottom.
Step 3: Turn it right-side out and gently stuff with polyfill.
Step 4: Hand-stitch the opening closed, and you’re done!
#6. Pumpkin Fabric Coasters
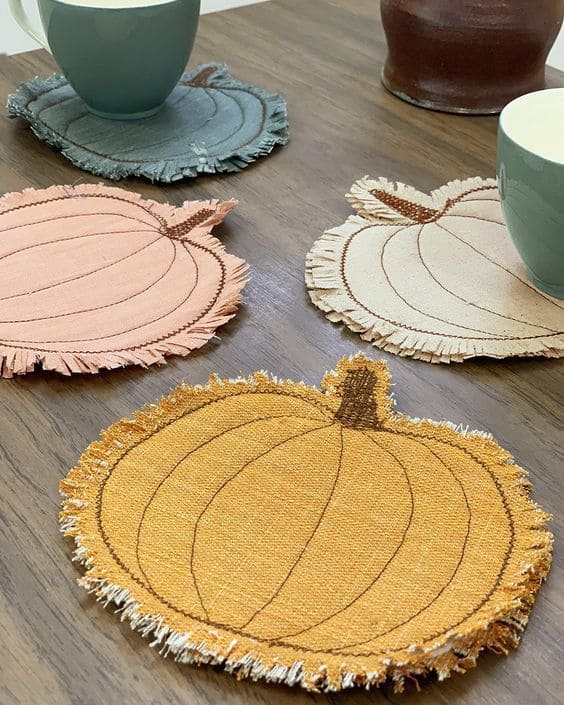
This project is easy on your budget and a clever way to repurpose fabric remnants. You can personalize the colors to match your fall décor palette from soft neutrals to harvest brights.
Materials Needed:
- Medium-weight fabric in fall colors (6” squares)
- Coordinating thread
- Fabric scissors
- Iron-on interfacing (optional)
Step-by-Step Guide:
Step 1: Draw and cut two identical pumpkin shapes from your chosen fabric.
Step 2: Layer them wrong sides together. If using interfacing, press it onto one layer before assembling.
Step 3: Stitch the outline of a pumpkin, including the stem and curved lines, with a sewing machine or hand needle.
Step 4: Use pinking shears or fringe the edges for that cozy, farmhouse finish.
#7. Cozy Pumpkin Fabric Wreath
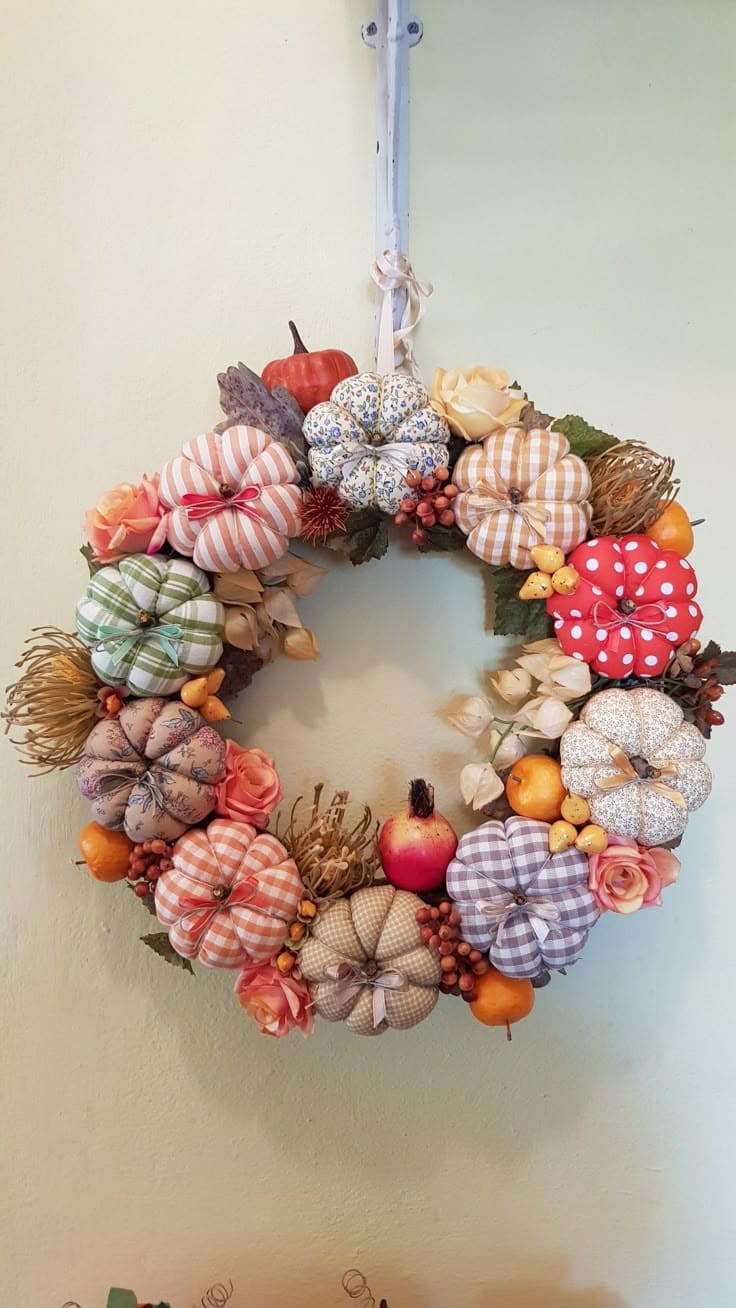
I wanted something soft and handmade to greet guests at the door during Thanksgiving and Halloween, and this did exactly that.
The squishy pumpkins are easy to sew and cost very little, especially if you’re upcycling. A few faux berries, dried florals, and mini apples from the dollar bin add texture and charm.
Materials Needed:
- 12 fabric scraps in fall tones (6″x6″ each)
- Polyester fiberfill
- Embroidery thread
- Cinnamon sticks
- 14–16″ grapevine
- Hot glue gun and glue sticks
- Faux berries, mini fruit, dried flowers, leaves, ribbon
Step-by-Step Guide:
Step 1: Cut fabric into circles and stitch around the edge with a simple running stitch. Pull the thread tight and stuff each fabric pouch to create a pumpkin shape.
Step 2: Use strong thread to divide the pumpkin into sections by wrapping it around and tying tightly, then glue a cinnamon stick or stem on top.
Step 3: Attach each pumpkin to your wreath base using hot glue. Space them evenly, or cluster in groups of three for a natural look.
Step 4: Fill in the gaps with dried florals, berries, and little accents to bring the whole wreath to life.
#8. Cozy Felt Mushroom Garland
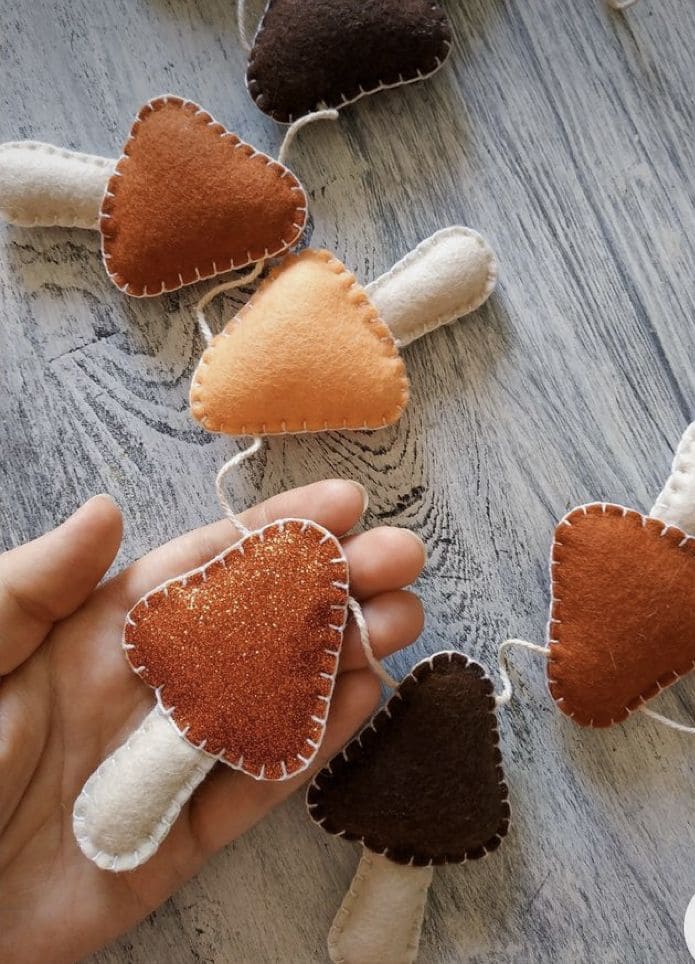
This felt mushroom garland is one of those crafts that just makes you smile with soft textures, earthy tones, and a little touch of forest magic.
The best part is that you don’t need to be a sewing pro to pull this off. Each mushroom is hand-stitched and lightly stuffed, then strung together with a simple white thread.
Materials Needed:
- Felt sheets (shades of brown, cream, rust; 1 sheet per 2–3 mushrooms)
- Embroidery floss
- Poly-fill stuffing
- Yarn or twine
- Needle, scissors, and optional glitter felt
Step-by-Step Guide:
Step 1: Cut out two identical mushroom tops and two stem pieces for each ornament.
Step 2: Sew the top and stem pieces together using a blanket stitch, leaving a small gap.
Step 3: Lightly stuff with poly-fill, then finish stitching closed.
Step 4: Use yarn to thread through the tops or backs of the mushrooms to create the garland.
#9. No-Sew Fall Fabric Wreath
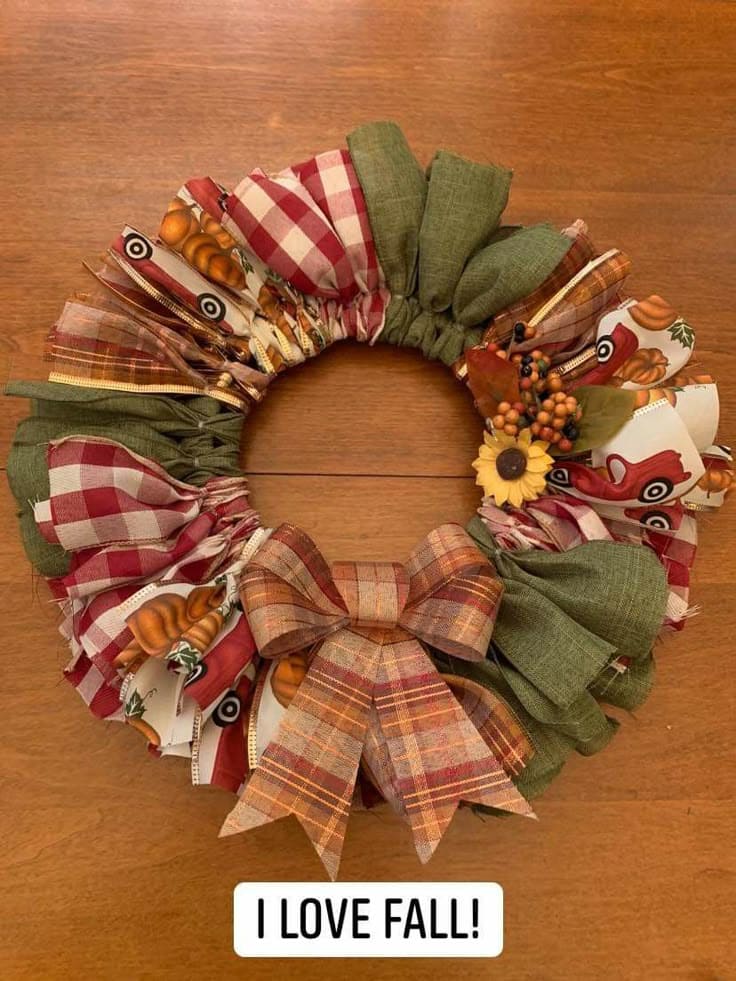
Made from scraps of flannel shirts, checkered tablecloths, and whimsical harvest prints (yes, those tiny red farm trucks are adorable), it’s a project that doesn’t ask for perfection, just warmth and heart.
Materials Needed:
- Wire wreath form (12–14”)
- Fabric strips in fall patterns (2″x10″, approx. 60–80 total)
- 1–2 faux flowers (optional)
- 1 wide plaid ribbon (at least 24″)
Step-by-Step Guide:
Step 1: Cut all your fabric strips. You should vary textures like gingham, burlap, plaid for a homespun look.
Step 2: Tie each strip around the wreath form using a simple knot, then pack them tightly for a full, fluffy finish.
Step 3: Once covered, hot glue or wire on faux florals, acorns, or mini pumpkins.
Step 4: Finish with a plaid bow at the bottom or side for that final farmhouse touch.
#10. Stuffed Fabric Fall Leaves
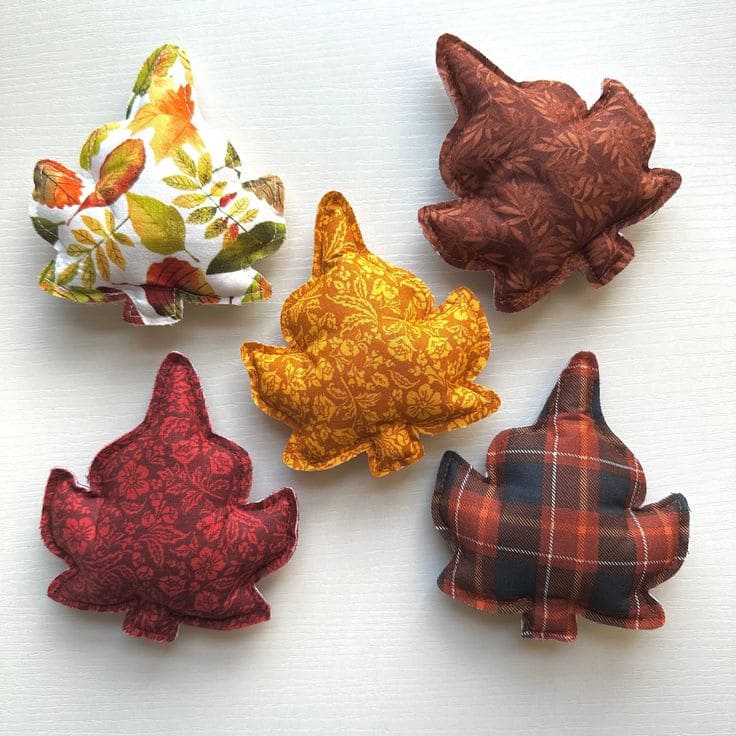
These soft, puffy fabric leaves feel like tiny pillows of autumn. Whether you want a bowl filler, a festive garland, or a little gift topper with character, these are so simple you’ll wonder why you haven’t made them before.
You can also use scrap fabric you already have (especially flannel, cotton, or old shirts) to keep the cost down.
Materials Needed:
- 2 pieces of autumn-themed fabric per leaf (each about 5″x5″)
- Polyester stuffing
- Sewing pins and needle
- Leaf template
- Matching thread
- Scissors
Step-by-Step Guide:
Step 1: Trace your leaf template onto the back side of the fabric and cut out two identical leaf shapes per design.
Step 2: Pin the fabric pieces right sides together, then sew around the edge with a ¼” seam allowance and leave a 1″ gap.
Step 3: Flip the leaf right-side out through the opening, then stuff it with polyester filling until it’s nice and plump.
Step 4: Hand-stitch the gap closed, and if you like, add decorative stitching along the leaf veins.
#11. Rag Strip Pumpkin
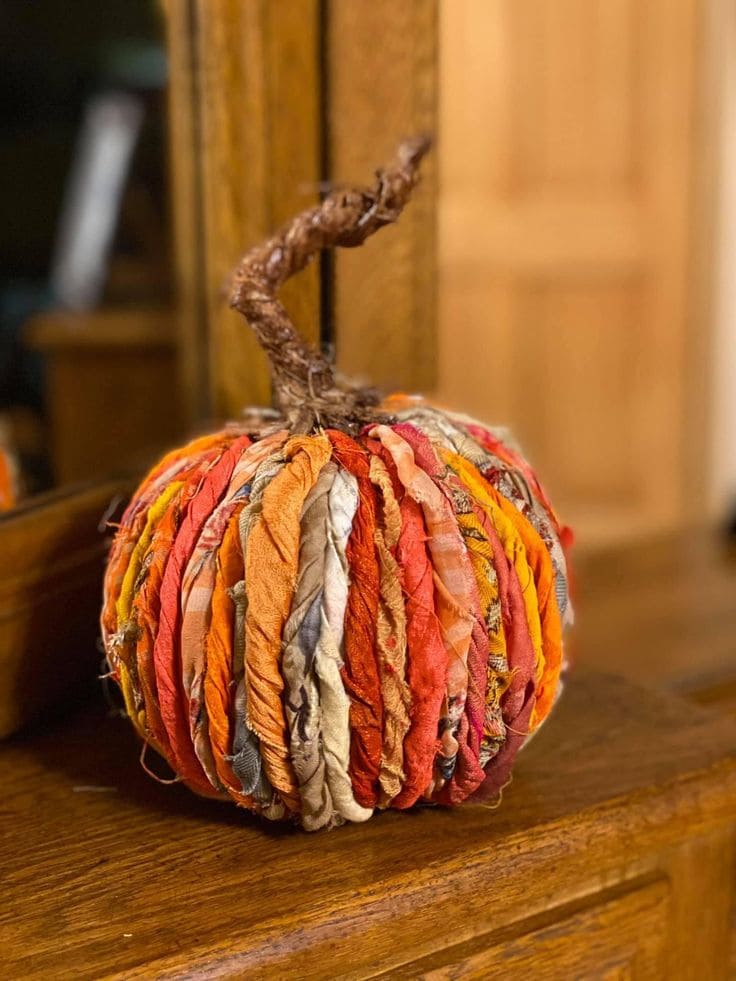
This charming pumpkin is wrapped. A swirl of warm-hued fabric strips transforms a humble base into a cozy fall treasure. It’s the kind of decor you’d find in your grandmother’s attic, layered with years of harvest stories.
Materials Needed:
- 1 foam pumpkin (6–8″ diameter)
- 20–25 fabric strips (1.5” wide x 18–24” long, mix of orange, red, brown, ivory)
- Hot glue gun
- 1 real or faux twig (4–6″ long)
- Optional: raffia, lace, cinnamon stick, or twine
Step-by-Step Guide:
Step 1: Tear or cut your fabric strips and lightly fray the edges for that rustic texture.
Step 2: Starting at the base, hot glue one end of each strip, then wrap it tightly over the pumpkin and glue the other end underneath. Repeat until the pumpkin is fully covered.
Step 3: Insert and glue your stick or twig into the top center as a stem. Twist it slightly if you want that whimsical curl.
Step 4 (Optional): Add embellishments like a tied raffia bow, dried leaves, or even a mini tag.
#12. Primitive Fabric Corn Husks
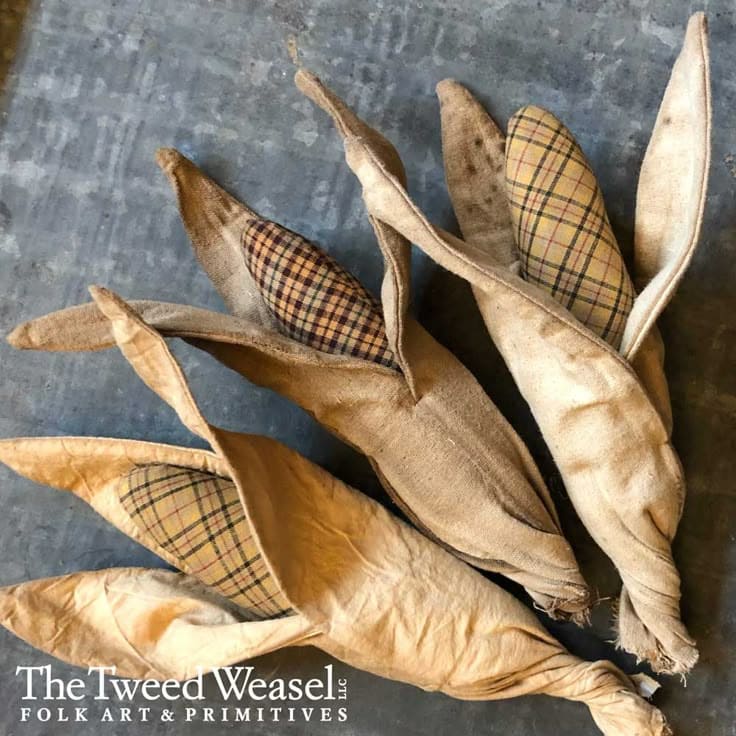
Inspired by antique folk art and the rustic charm of old farm kitchens, these stuffed ears of corn wrapped in weathered fabric husks evoke the quiet beauty of harvest time.
I remember making a bundle of these for our Thanksgiving table centerpiece, and guests couldn’t stop touching them, asking where they were from.
Materials Needed:
- 3 pieces plaid cotton fabric (8” x 4” each)
- 3 pieces tea-dyed or stained muslin (each 14” x 6”)
- Fiberfill for stuffing
- Thread and needle
- Optional: cinnamon or coffee grounds
Step-by-Step Guide:
Step 1: Sew the plaid fabric into corn shapes leaving a small opening. Then turn inside out and stuff with fiberfill and stitch closed.
Step 2: Take your aged muslin (dip in tea or instant coffee and let dry), fold and stitch or hot glue it around each corn cob to mimic husks.
Step 3: Tie the ends of the husks with twine to gather them and give a more realistic finish.
#13. Pumpkin Patch Pocket Pillow
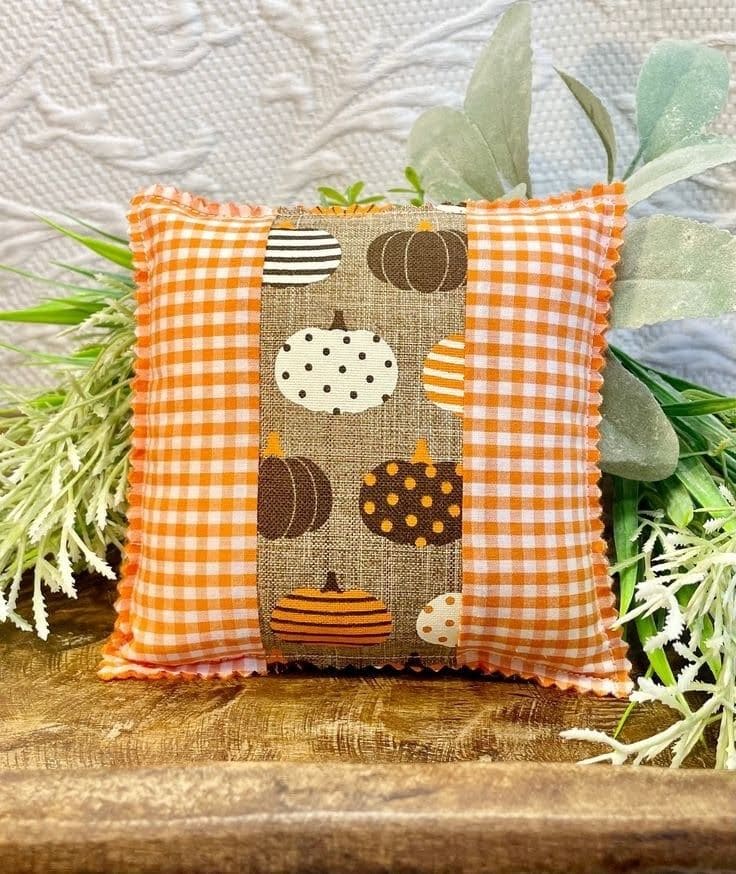
This pumpkin patch pocket pillow is small, sweet, and delightfully nostalgic, like something you’d find tucked into grandma’s kitchen windowsill in late October.
Moreover, the orange gingham background instantly brings a farmhouse feel, while the center patch showcases a parade of patterned pumpkins that say fall is here without ever speaking a word.
Materials Needed:
- Orange gingham cotton fabric (6″x6″ square)
- Burlap (2″x6″)
- Polyfill stuffing
- Matching thread, scissors, pinking shears (optional)
Step-by-Step Guide:
Step 1: Cut your square base fabric and center pumpkin strip, then stitch the strip down the middle of the front fabric square.
Step 2: Place the front and back pieces right sides together. Now, you sew around edges, leaving a small opening.
Step 3: Turn right side out, stuff with filling, then stitch the opening shut.
#14. Mini Fabric Scarecrow Heads
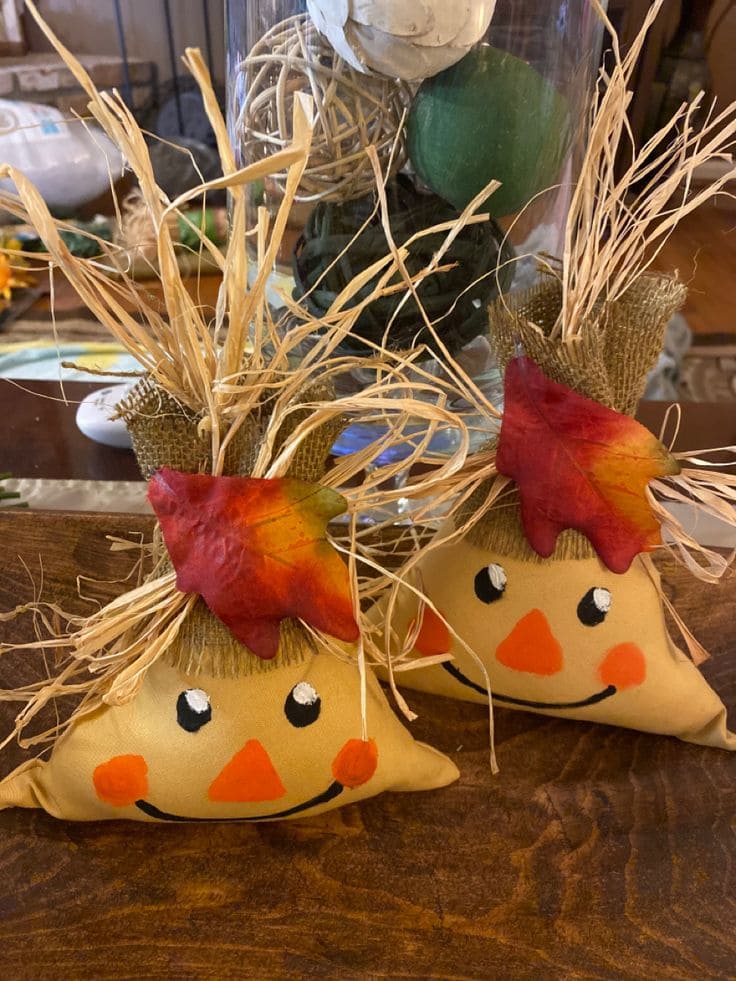
I made a handful of them last year to tuck into shelves and window sills, and they instantly brought warmth to every corner.
The idea came after visiting a small-town harvest festival where local kids had stuffed scarecrows lining the sidewalks, each one with its own funny, wonky smile.
Materials Needed:
- Tan or muslin fabric (10″ x 10″ squares, 1 per scarecrow)
- 20 raffia strands per head
- Small piece of burlap (3″ x 3″)
- Fiberfill stuffing
- Acrylic paints (black, white, orange)
- Faux autumn leaves
- Hot glue gun and scissors
Step-by-Step Guide:
Step 1: Cut the fabric into squares and sew around the edges, leaving a small opening, then turn inside out and stuff.
Step 2: Glue or stitch the opening closed, shaping it slightly into a dome for the head.
Step 3: Paint on cheerful scarecrow faces with acrylics and let dry.
Step 4: Tuck in raffia at the top for hair and glue a burlap square around it like a hat. Finally, you can add a faux leaf to give it that fall harvest vibe.
#15. Primitive Fabric Pears
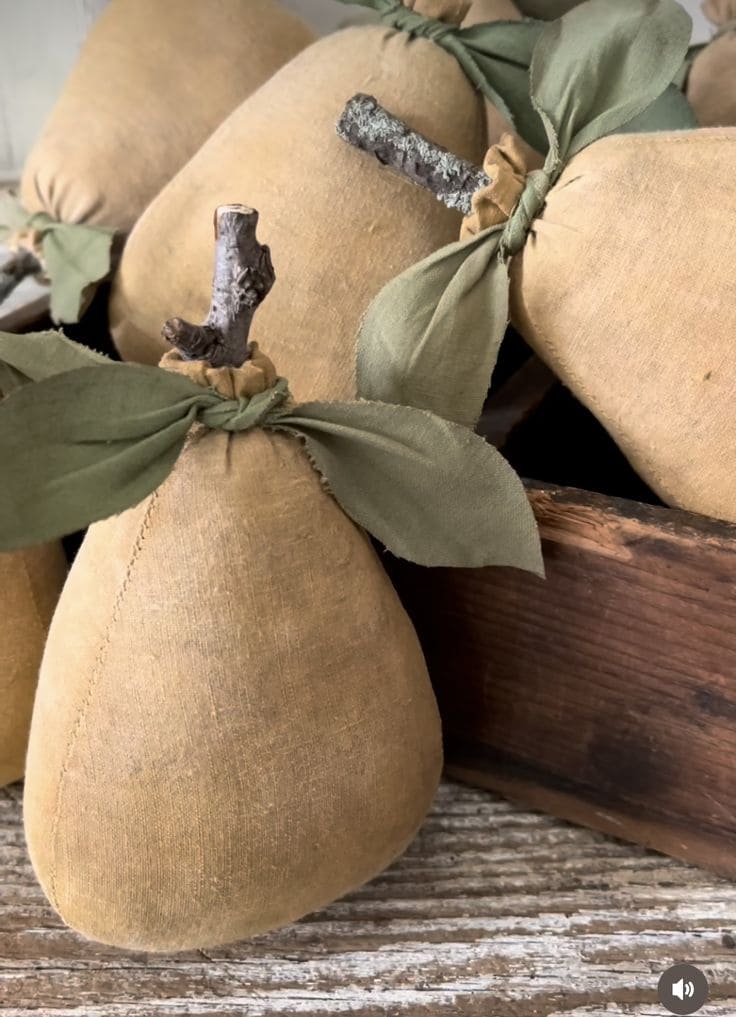
These handmade fabric pears capture that old-world, rustic charm that makes fall decorating feel warm and thoughtful.
If you’ve got some fabric scraps and a bit of stuffing, you can make a dozen of these in an afternoon with time to spare for cider.
Materials Needed:
- 1/4 yard muslin or linen
- Green fabric scraps
- Twigs, 3–4 inches each (1 per pear)
- Poly-fill or cotton stuffing
- Needle, thread, scissors
- Optional: tea bags and water
Step-by-Step Guide:
Step 1: Draw a simple pear shape on your fabric and cut out two identical pieces, then sew them together, leaving the top open.
Step 2: Turn the fabric right side out and fill with stuffing. You want them plump but not too firm.
Step 3: Insert a twig into the opening and tie a green scrap around it to look like leaves. Stitch or glue to secure.
Step 4 (optional): If using unstained fabric, soak in strong tea for 10–15 minutes, then air dry to give it a cozy aged finish.
#16. Cozy Fabric Pumpkins That Steal the Show
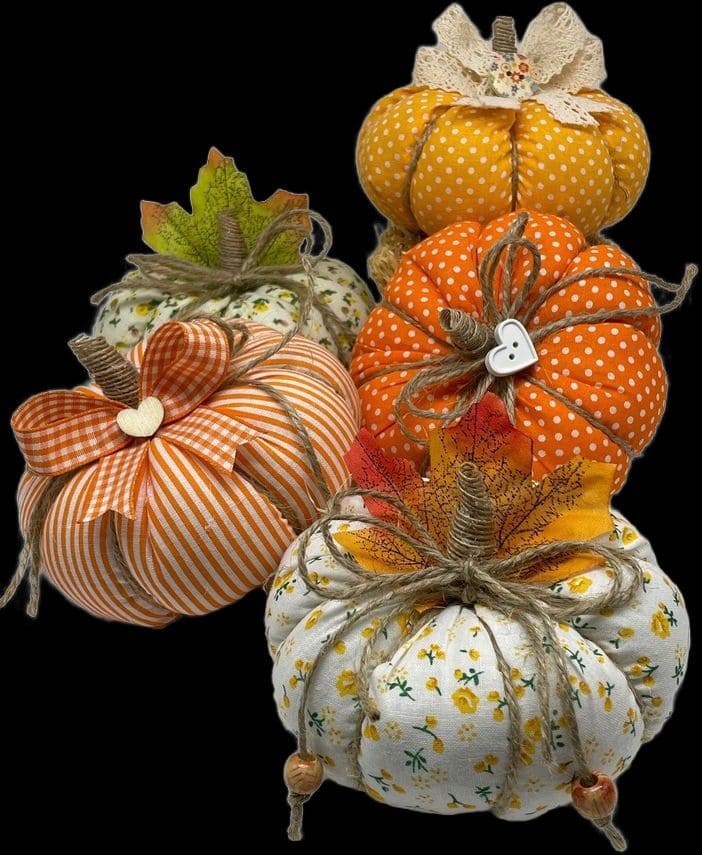
These plump little pumpkins might just be the coziest thing you’ll make this fall. They have a way of bringing warmth to any room from a farmhouse centerpiece to a simple shelf accent.
They’re simple, cost next to nothing, and instantly create a sense of homey comfort. Plus, they last for years, unlike real pumpkins that quietly collapse after Halloween.
Materials Needed:
- Fabric squares (10″x10″, 12″x12″)
- Polyfill (1–2 cups per pumpkin)
- Twine (1 ft per pumpkin)
- Cinnamon sticks (1 per pumpkin)
- Fall embellishments: faux leaves, lace, buttons, beads
- Needle and thread
Step-by-Step Guide:
Step 1: Cut a circle from fabric (roughly 10″–12″ diameter), then sew a loose running stitch around the edge.
Step 2: Pull the thread to gather the fabric, then stuff with polyfill. Pull tight and knot closed.
Step 3: Use twine to wrap around the pumpkin, dividing it into 6–8 sections. Now, you tie tightly and knot at the top.
Step 4: Add a twig or cinnamon stick stem. You can decorate with ribbon, lace, or leaves for extra charm.
#17. Rustic Scarecrow Pillow
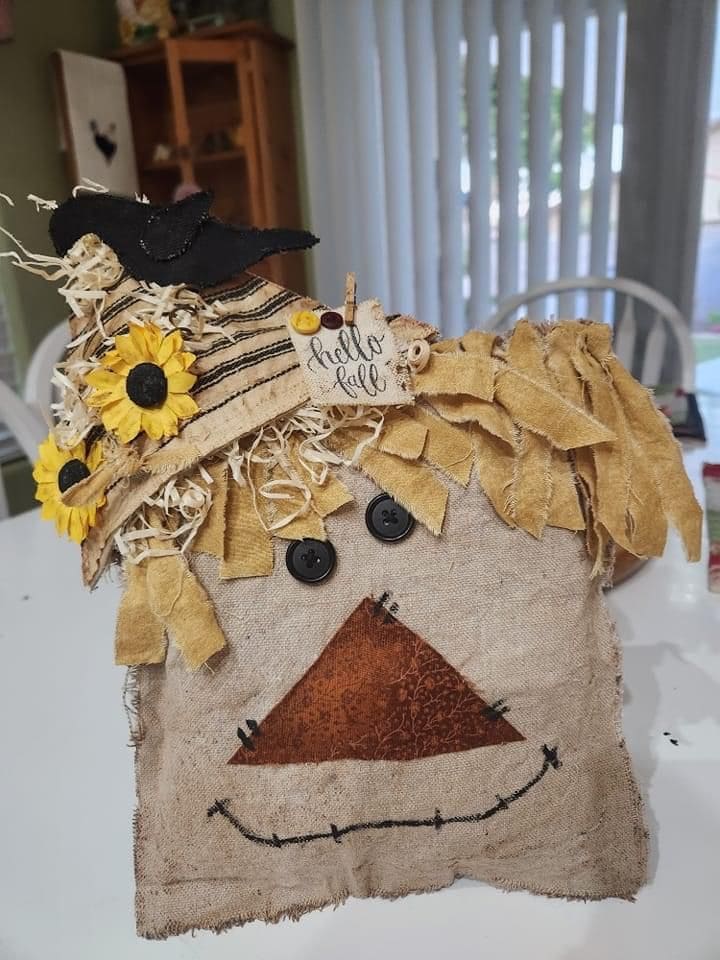
Made with scrappy burlap, fabric remnants, and a whole lot of personality, this DIY scarecrow pillow adds a delightful, homespun touch to any fall decor.
Furthermore, the hand-stitched smile, button eyes, and tousled fabric hair tell a story of old-fashioned charm. It’s a great beginner sewing project and a smart way to repurpose leftover materials.
Materials Needed:
- 2 pieces of burlap or canvas (approx. 10” x 10”)
- Assorted fabric scraps
- 3 black buttons
- Small twigs, raffia, mini flowers, or craft embellishments
- Fiberfill or pillow stuffing
Step-by-Step Guide:
Step 1: Cut two squares of fabric for the pillow base, then stitch around the edges, leaving a small opening, and turn inside out.
Step 2: Stuff with fiberfill and sew the opening closed.
Step 3: Attach strips of fabric for the hair and triangle fabric for the nose with fabric glue or stitches and sew on the buttons for eyes.
Step 4: Add the hat using fabric, lace, or ribbon. Now, you decorate with a crow, a mini sign or faux sunflowers for extra cuteness.
#18. Farmhouse Fabric Sunflowers
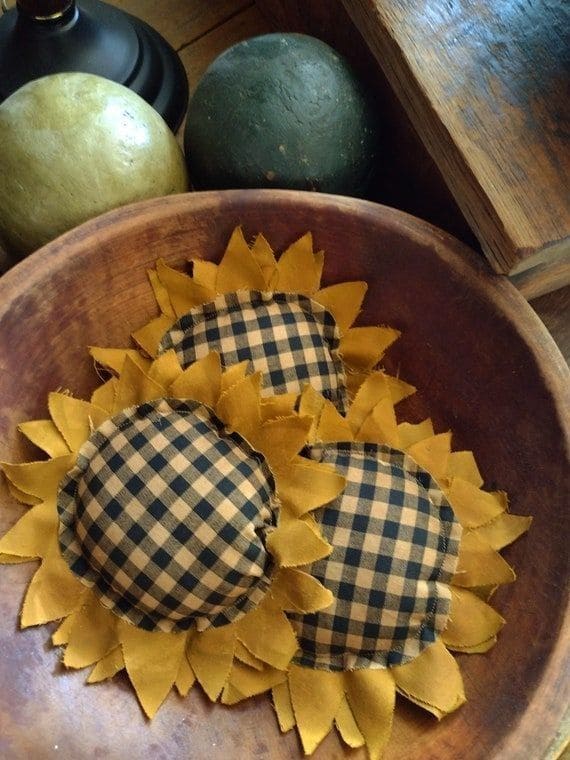
Whether you use them as bowl fillers, tuck them into wreaths, or line them on a windowsill, they instantly make your space feel like fall without ever having to sweep up petals.
Bonus, they’re ideal for beginner sewists, and you can repurpose thrifted shirts or leftover quilting cotton.
Materials Needed:
- 2 fabric scraps: gingham or plaid (4”x4”), golden solid (5”x10”)
- Polyfill
- Needle, thread, or hot glue gun
- Scissors
Step-by-Step Guide:
Step 1: Cut a circle from your patterned fabric (about 4″ diameter) and sew or glue a small seam around the edge. Stuff lightly.
Step 2: Cut petal shapes from the golden fabric, about 12–16 for each flower. Pinking shears help with the rustic look and fray prevention.
Step 3: Attach petals to the back of the stuffed circle with glue or a quick running stitch.
Step 4 (Optional): Lightly tea-stain or brush with cinnamon water for a vintage, primitive finish.
#19. Pumpkin Seeds Cat Doll
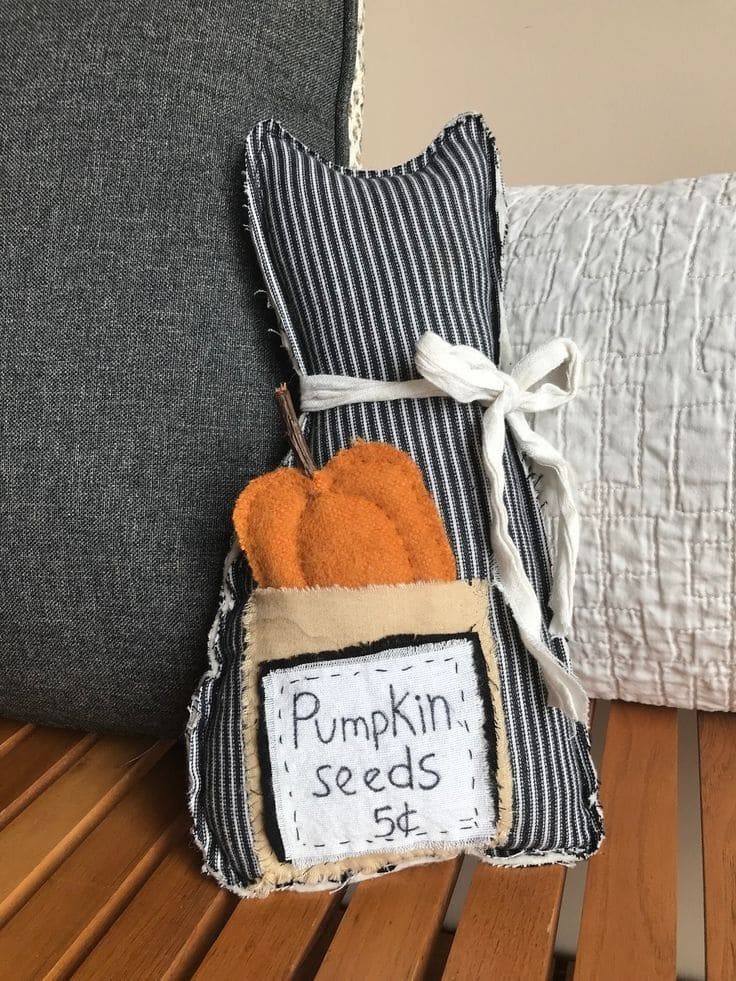
Whimsy meets primitive charm in this adorable stuffed cat holding a pocket of felt pumpkin seeds—priced at just 5¢, as lovingly stitched onto its little patch. With its striped homespun fabric and hand-cut pumpkin detail, this softie feels like something you’d find tucked into a cozy corner of an old country farmhouse or at a harvest fair booth run by a neighbor with the warmest smile. Whether you perch it on your entry bench or gift it to someone who loves rustic décor, it brings instant character. The uneven stitches, frayed edges, and handwritten label aren’t imperfections—they’re stories. They say, “I made this with care, not perfection.”
Materials Needed:
- 1 piece black & white striped cotton (approx. 9″x12″)
- White muslin (4″x4″)
- Beige scrap fabric
- Orange felt (3″x3″)
- Embroidery thread (black or brown)
- Fabric marker
- Stuffing/fiberfill
- Ribbon
- Small stick or cinnamon stick
- Needle, scissors, sewing pins, and optional sewing machine
Step-by-Step Guide:
Step 1: Cut out a cat-shaped silhouette from your striped fabric, then stitch and stuff it with fiberfill. You can leave the edge raw or use a blanket stitch for a folk look.
Step 2: Create a small rectangle pocket using beige and muslin fabric. Write your statement with fabric marker.
Step 3: Cut a simple pumpkin shape from orange felt and hot-glue or stitch a tiny stick at the top as a stem.
Step 4: Attach the pocket and pumpkin onto the front of your cat, then add a small bow around its waist for a soft finishing touch.
#20. Fall Owl Garland Made from Upcycled Fabric
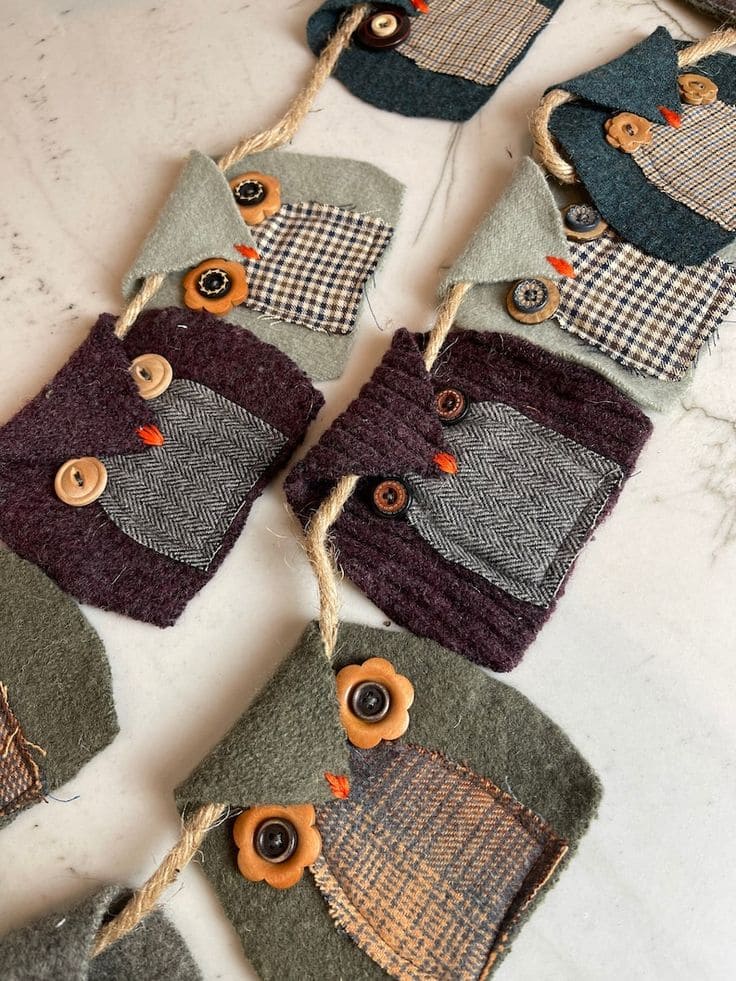
There’s something irresistibly nostalgic about these wise little owls, strung together with jute like a line of storybook characters watching over your mantel.
Each one is stitched from bits of old wool coats, flannel shirts, and tweed scraps. The mismatched buttons for eyes and tiny hand-stitched beaks give them personality, like they might blink when you’re not looking.
Materials Needed:
- Flannel fabric scraps (approx. 4″x4″ per owl)
- Tweed/plaid cotton scraps (3″x2″)
- 1 jute rope
- Assorted buttons (2 per owl)
- Embroidery thread (orange or brown)
- Needle, scissors, hot glue
- Felt or leather scraps
- Optional: batting
Step-by-Step Guide:
Step 1: Cut owl body shapes from felted wool or flannel, then add a layered chest piece in a contrasting fabric and stitch or glue in place.
Step 2: Sew or glue on button eyes. You can use smaller or mismatched buttons for personality and add a tiny felt triangle for a beak.
Step 3: Attach each owl to the jute rope using hot glue or by sewing them directly through the back of their heads.
Step 4: Hang your garland across a fireplace, stair rail, or shelf and enjoy the cheerful watch of your fabric flock.
